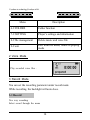
1
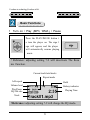
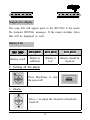
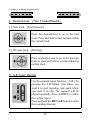
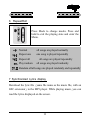
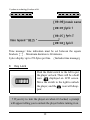
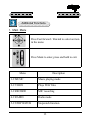
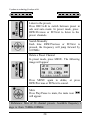
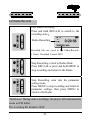
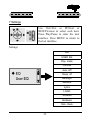
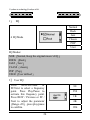
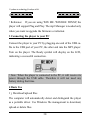
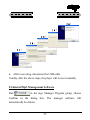
UM-F158 plus MP3 Player
USER MANUAL
Thank you for purchasing aigo’s UM158 plus MP3 Player! Pl
ease read all instructions carefully before use. Contents are su
bject to change without prior notice.
TABLE OF CONTENTS
1
Freedom in technology,Freedom in life
Summary
1.
Features................................................................................. 4
2.
Precautions............................................................................ 5
3.
Accessories ........................................................................... 6
4.
Player overview ................................................................... 7
Basic Functions
1.
Turning the player on......................................................... 8
2.
Turning the player off ........................................................ 9
3.
Volume.................................................................................. 9
fast forward / rewind
...................... 10
4.
Next/Previous
5.
A-B Loop / Recording ..................................................... 10
6.
Repeat Mode / Exit ...........................................................11
7.
Lyrics...................................................................................11
8.
Key Lock ........................................................................... 12
Additional Functions
1.
Main Manual ..................................................................... 13
2.
Voice Mode........................................................................ 14
3.
Recording Mode ................................................................ 14
2
4.
Radio .................................................................................. 19
5.
Stop Watch......................................................................... 22
6.
Folder ................................................................................. 22
7.
Setting................................................................................. 27
8.
File Management ............................................................... 21
Software
1.
Systems requirements ........................................................ 28
2.
Installing Mp3 Management Software ............................. 28
3.
Connecting the player to your PC .................................. 30
4.
Basis Use ........................................................................... 30
5.
Hardware Upgrade ........................................................... 33
6.
Format memory ................................................................. 33
7.
Resume ............................................................................... 34
8.
Uninstall Mp3 Management Software.............................. 35
Other
1.
Trouble Shouting ............................................................... 36
2.
FAQ .................................................................................... 37
3.
Specifications ..................................................................... 38
3
Freedom in technology,Freedom in life
Summary
1
Features
Portable and Stylish
Has a key lock function
HOLD
Stylish OLED screen with a two color backlight
Supports Chinese & Enghlish ID3 lyric files
Lyrics synchronous
Supports MP3
MPEG1 Layer 3
Built-in 128M/256M/512M FLASH
and WMA files
stores up to 30/60/1
20 songs
Support OS: WINME / WIN2000 /WINXP
Low battery consumption, up to 7 hours of playing time
with one
AAA
Alkaline battery
Multiple EQ modes: Pop, Classic, Jazz, Rock, Normal,
User defined
File and folder management system, up to 16 folders
available
Resume play & stop watch
4
One touch recording Multi recording modes section rec
ording, timed recording, 128MB gives up to 8 hours of
recording time.
Recorde optimize
FM Radio with 20 channel presets
2
Precautions
Avoid using or storing the player in hot or humid conditions.
Dropping the player may cause serious damage
The F158 Plus MP3 Player uses 1 Alkaline AAA battery
Please replace the battery under the following conditions.
1
2
Indicator appears.
Pushing buttons doesn’t illicit a response even after the
battery is taken out and reinstalled.
3
Auto shut down while power is on.
4
The player displays the
low Battery
signal.
*To avoid damaging the player, we strongly advise that you
use alkaline batteries with this player.
*If the player is not going to be used, please remove the
battery from the player.
5
Freedom in technology,Freedom in life
Please pay attention to the following to avoid static electricity
while playing:
* If possible, do not use the player in especially dry
environments.
* If the device suddenly stops playing, turn it off, then on
again. Also, you can try reinserting the battery.
Adjust the volume to a comfortable level.
3
Accessories
This player includes the
following accessories; please cont
act local venders if items are missing from the package.
1. MP3 Player
1pc
2. Earphones
1pc
3. USB Cable
1pc
4. Driver Disk
1pc
5. AAA Battery
1pc
6. Lanyard
1pc
7. User Manual
1pc
6
4
Player Overview
MIC
Handl
Battery
compartment
LCD
REC/A-B
Hold
MENU
REW/PR
Volume+
Play/Pause
FF/Next
USB Port
Volume -
Earph
7
Freedom in technology,Freedom in life
Basic Functions
1
Turn on / Play MP3, WMA / Pause
Press the PLAY/PAUSE button t
o turn the player on. The aigo l
ogo will appear, and the player
will automatically resume playing
music.
! Reference: adjusting setting 7-9 will deactivate The Resu
me Function.
Current track/total tracks
Repeat mode
A-B repeat
Hold
Volume level
Play/Pause
EQ/ Bit rate
Battery indicator
Playing Time
Track
! Reference: adjusting setting 7-9 will change the EQ mode.
8
Songs/Lyrics display
The song title will appear prior to the ID3/TAG if the music
file includes ID3/TAG messages. If the music includes lyrics,
that will be displayed as well.
Battery Life
Battery is full
2
Battery is
sufficient
Battery is
low
Battery should be
replaced
Turning off the player
Press Play/Pause to turn
the power off.
3 Volume
Press +/- to adjust the volume level between
0 and 24
9
Freedom in technology,Freedom in life
4
Next/previous
1
Next track
Fast Forward/Rewind
Fast Forward
Press fast forward/next to go to the next
track. Press and hold to fast forward within
the current track.
2
Previous track
Rewind
Press rewind/previous to go to the previous
track or press and hold to rewind within the
current track.
5
A-B Loop/ Record
Use the segment repeat function A-B by
pressing the A-B button, first where you
want it to start repeating, and again where
you want it to end. The segment will be
played repeatedly. Press A-B/REC to delete
the section repeat.
Press and hold the REC/A-B button to enter
the recording function
10
6
Repeat/Exit
Press Mode to change modes. Press and
hold to exit the playing state and enter the
Menu.
Normal
all songs are played normally
Repeat one
one song is played repeatedly
Repeat all
Play random
all songs are played repeatedly
all songs are played randomly
Random all all songs are played randomly and repeatedly
7 Synchronized Lyrics display
Download the lyric file same file name as the music file, with an
LRC extension to the MP3 player. While playing music, you can
read the lyrics displayed on the screen.
11
Freedom in technology,Freedom in life
Time message: time indication must be set between the square
. Maximum duration is 60 minutes.
brackets
Lyrics display: up to 256 bytes per line. Includes time message
8
Key Lock
Push the Hold switch to the left to put
the player on lock. There will be a hold
displayed on LCD screen.
icon
Move the switch to the right to unlock
icon will disapthe player, and the
pear.
! If you try to turn the player on when it’s locked, a prompt
will appear telling you to unlock the player before turning it on.
12
Additional Functions
1. Main Menu
Press Fast forward / Rewind to select an item
in the menu
Press Mode to enter, press and hold to exit.
Menu
Description
1-9 MUSIC
Music playing mode
2-9 VOICE
Plays WAV files
3-9 RECORD
MIC recording
4-9 RADIO
Radio mode
5-9 STOP WATCH
Stopwatch function
13
Freedom in technology,Freedom in life
Menu
Description
6-9 FOLDER
Folder function
7-9 SETTING
Player’s settings and information
8-9 file management
Delete music and voice file
9-9 exit
Exit from the menu, return to playing
mode
2 Voice Mode
Play recorded voice files .
3 Record Mode
You can set the recording parameter under record mode.
While recording, the backlight will auto close.
3-1 Record
Two way recording
Select record through the menu
14
Press REC/A-B to record, the following will
appear, and then press it again to return to t
he prepared condition.
MIC Recording
Current
recording
Recorded time
Recorded files are saved in VOICE Folder/Recorded Name/Recorded
Format WAV
! Reference: During the MIC recording, the player will auto
build a VOICE folder.
The MIC recorded music files are .WAV files
One Touch Recording
2
Start recording
In music mode, press and hold REC/A-B to
record.
Under Voice Mode/Main Menu/Folder, press
REC/A-B to record.
15
Freedom in technology,Freedom in life
Stop recording
*Press REC/A-B return to MIC recording.
* Press MENU return to the parameter sett
ing interface.
* Press and hold MENU to return to the m
ain menu.
3-2 Set Radio Recording Parameters
Press MENU to enter recording parameter settings.
MIC
Use Vol+/Vol– or FF/Next
or REW/Previous to select,
press Play/Pause to enter the
next parameter setting, or
confirm the choice and
return to the last setting.
Radio
Timing Record
Section Record
1
Set the MIC Recording Sample Rate & Recording Distance
16
There are 3 Sample rates available.
! Reference: Select the sample rate according to your surroundings.
Please select “Near” to record while it’s noisy.
2
Set radio recording sample rate
3 sample rates are available.
For details on Radio Recording, refer to the Radio section.
17
Freedom in technology,Freedom in life
3
Set the recording time
When the recording time begins, other functions will close. The
player will return to Recording mode and start the MIC recording.
! Reference: Timed recordings are only available to MIC recordings.
4
Section Recording
While recording, it will auto executer the setting time and save.
18
4-1 Radio
Please plug in your earphones before using the radio, they also
serve as an antenna.
When entering the radio interface, the player will display “initializing”
Received Frequency
Current Channe
Current Mode
Stereo /Single channel indiator
Frequency Bar
l/ Total preset
channel
Search manually in auto mode
Press and hold REW/Previous or FF/Next.
Press any button to stop searching
Save channel
Press MENU and the following picture will
appear.
Press MENU again to preset the channel. To
cancel, press REW/Previous or FF/Next and
select CANCEL, then press MENU to confirm.
19
Freedom in technology,Freedom in life
Listen to the presets
Press REC/A-B to switch between preset m
ode and auto mode. In preset mode, press
REW/Previous or FF/Next to listen to the
preset channels.
Search Manually
Each time REW/Previous or FF/Next is
pressed, the frequency will jump forward by
0.05MHz.
Delete a Preset Channel
In preset mode, press MENU. The following
image will appear:
Press MENU again to delete, or press
REW/Previous or FF/Next to cancel.
Mute
Press Play/Pause to mute, the mute icon
will appear.
! Reference: Max of 20 channel presets. Available frequency r
ange is from 76MHz-108MHz.
20
4-2 Radio Records
One button recording
Press and hold REC/A-B to switch to the
recording state
Radio Recording
Recorded files are saved in FM folder/Recorde
r Name/ Recorded Format MP3
Stop Recording, return to Radio Mode
Press REC/A-B or press and hold MENU to
stop recording and return to the Radio.
Stop Recording, enter into the parameter
setting menu
Press MENU to stop recording and return to
parameter settings, then press MENU to
return to the Radio.
! Reference: During radio recordings, the player will automatically
create an FM folder.
The recording file format is WAV.
21
Freedom in technology,Freedom in life
5 Stop Watch
Press FF/Next to start
time, press it again to
pause.
Press REW/Previous to
stop.
Press MENU to exit from
the Stop Watch function.
6 Folder
You can create or delete up to 16 folders.
Press VOL+ / Vol- or
FF/Next or REW/ Previous
to select a folder, press
Play/Pause to confirm. The
closed folder icon will turn
into an open folder icon
and all the music
files stored in the selected
directory will be played.
! Reference: If you select the root directory, all files will be played.
If you exit file management, the root directory will replace the
previously set folder.
22
7 Settings
Use Vol+/Vol- or FF/Next or
REW/Previous to select each item.
Press Play/Pause to enter the next
interface. Press MENU to return to
the last interface.
Settings:
EQ
USER EQ
Play mode
Contrast
Auto Off
Sleep off
Backlight
Resume
Lyrics
LOGO
Software
Hardware
Disk check
23
Freedom in technology,Freedom in life
1
EQ
Normal
Rock
Jazz
Classic
POP
User
6 EQ Mode
EQ Modes:
NOR Normal, Keep the original music’s EQ.
ROCK Rock
JAZZ Jazz
CLASS classic
POP Pop
USER User defined
2
User EQ
Press
REW/Previous
or
FF/Next to select a frequency
point. Press Play/Pause to
activate this frequency point.
Press REW / Previous or FF /
Next to adjust the parameter
Range ±28 , press play/pause
to confirm.
24
80
250
1K
4K
12K
3
Play Mode
Normal
Repeat one
You can choose from 5
modes.
Repeat All
Play All
Repeat All
4
Contrast
Adjust the contrast from 0
lightest
5
darkest
to 5
Auto Off
off
5 Modes
When the player is stopped
or paused and idle for the set
amount of time, it will
automatically shut off.
1Minute
2 Minutes
5 Minutes
10 Minutes
! Reference: There is no access to the auto shut down function in
the following modes: Radio, File Management, Stopwatch, and Record.
25
Freedom in technology,Freedom in life
6
Sleep Off
There are 5 times to
select.
While music is playing,
the player will automatically shut off after the
set time has elapsed.
off
30minutes
60minutes
90minutes
120minutes
! Reference: There is no access to sleep off while recording.
7
Backlight
0n
5seconds
10seconds
30seconds
1 minute
There are 5 backlight
choices.
8
Resume
Off The player will resume playing
the music file from the point that it was
shut off.
Off The first file from the current
subdirectory will be played.
! Note: If return from file manager turn into playing interface, then
setting of resume is not care, the first file of root will be played
first.
26
9
Lyrics
On
show lyrics
Off
show track title
10
LOGO
On
Power on with animation
Off Power on without animation
11
Software Version/ Hardware Version/Disk Check
Check Software Version, Hardware Version, and Max storage
capacity information.
8
File Management
Press Fast forward/next
or REW / previous to
select the Music or Voice
mode.
Press
the
Play/Pause button to
confirm, and then press
MENU to return to the
Main Menu.
27
Freedom in technology,Freedom in life
To delete files, enter the
delete interface. Press
Fast forward/next or
REW/previous to select
YES or NO, then press
Play/Pause to confirm. If
you select NO, press
Mode to go to the next
file.
Software
1
System Requirements
Microsoft ® Windows TM 98 SE/Me/2000/XP
Microsoft ® Internet Explorer 4.0 or higher
Pentium® 100MHz or faster
CD-ROM drive
USB port
20MB available hard disk space
2
Manager Software Installation
Before installing, please close the application programs on your
28
computer. You should click the “Next” button on the screens or
change the selection until it is finished. After installation, click
[Start]—[program] as illustrated:
[ 6 ]
[ 5 ]
[ 4 ]
[ 3 ]
[ 2 ]
[ 1 ]
After installing, click
appear.
start → program . The following should
29
Freedom in technology,Freedom in life
! Reference: If you are using WIN ME /WIN2000/ WINXP, the
player will support Plug and Play. The mp3 Manager is needed only
when you want to upgrade the firmware or reformat.
3 Connecting the player to your PC
Connect the player to your PC by plugging one end of the USB cable to the USB port of your PC, the other end into the MP3 player.
Turn on the player. The Ready symbol will display on the LCD,
indicating a successful connection.
! Note: When the player is connected to the PC, it will receive its
power through the USB cable. Therefore it will not need any
battery during that time.
4 Basis Use
1
Download/upload files
The computer will automatically detect and distinguish the player
as a portable driver. Use Windows file management to download,
upload or delete files.
30
! Reference: The player will automatically create a VOICE/FM
Folder when you record.
2 Pulling out the USB Cable
While files are being transmitted, the message “Writing” will be
displayed on the LCD. Avoiding disconnecting the player at this
time, or you will need to use Firmware Recover.
After the files are transmitted, close My Computer or Files
Management.
If you are using WIN98, you can operate as follows:
31
Freedom in technology,Freedom in life
It you are using WINME/WINME, you can operate as follows.
Click the green arrow on the bottom
right of the screen.
Click “Stop USB Disk-Driver”.
32
Pull out the USB cable after “Safe to remove hardware” appears.
5 Firmware Upgrade
Find upgrades at http://www.aigo.com
Copy the downloaded files to the folder C:\Program Files\aigo
F158plus Digital Player.
Run
in MP3
file management, and then
select START to upgrade.
After upgrading, restart the
Player.
6
Format
If you selected Format files, c
lick Start: The hardware will b
egin to upgrade, and the files
will be reformatted.
Please make a copy of all your important files before reforma
tting.
33
Freedom in technology,Freedom in life
7. Firmware Recover
Please do not use the Windows format program. If it is used by
mistake and results in an error in the player, please recover
Firmware.
Shut down the player.
Press
and
hold
Play
/Pause and connect the
USB cable to the PC.
. A
Then run
black screen should appear
please pull out the
USB if “ready” appears this moment, and carry out the above
steps again . If the correct picture appears, Firmware Recover
is running, please loose Play/Pause.
Execute the Format progress to Firmware recovers.
If you are using WIN XP, the system will detect the player as
new hardware. If you want to install the Player Recover Device
software, please do so according to the instructions in the
following pictures:
34
[ 5 ]
[ 4 ]
[ 3 ]
[ 2 ]
[ 1 ]
After recovering, disconnect the USB cable.
Usually, after the above steps, the player will recover normally.
8 Uninstall Mp3 Management Software
Run
in the aigo Manager Program group; choose
Confirm in the dialog box. The manager software will
automatically be deleted.
35
Freedom in technology,Freedom in life
Other
1 Troubleshooting
* The LCD display is blank after the player has been turned on.
Make sure the battery has been inserted.
Check if the battery needs to be replaced.
Try to reinsert the battery or replace it.
Take out the battery and insert it again 5 seconds later.
* There is no sound when MP3 files are being played.
Check to see whether the volume is too low and turn it up.
Check to see if there are any music files in the memory.
* You cannot download music files.
If you are using WIN98, make sure the Manager program has
been installed.
Check if the software is working properly.
Check if your Mother Board supports the USB devices or needs
upgrading.
* Disconnecting the player from your computer while it’s transferring files may cause problems on your PC.
Please do not
try to disconnect the player while files are being transferred.
36
Why is the indicated memory size not the standard size?
Because we put our firmware in the Flash and make the FAT
partition in the flash, this takes up some of the player’s memory.
* Some Mp3 files cannot be played normally on the player.
Strictly, Mp3 refers to an MPEG I Layer3 compressed music
file. When you come across some music that cannot be played,
there are two options: 1
Delete the track, 2
Use software to
compress the file in an MPEG I Layer 3 format.
* Lyrics aren’t displayed even though the LRC lyrics file has
been downloaded.
LRC and MP3 files are in different name directories.
The player does not support your LRC format.
2
FAQ
* Why can’t the files in the player be deleted by the manager?
Please check the file properties in “My Computer” on your
desktop to see if the file is read-only. If so, transfer it to the
Archive first and then delete it.
*
As a portable drive, is there a driver to be installed for
Windows2000 and Windows XP?
No, there isn’t.
37
Freedom in technology,Freedom in life
* Why can’t the manager format the player?
You may have opened the player in another file browser. If so,
please close it for formatting.
* How can a WMA file be compressed?
To assure that the compressed file can be played properly, we
suggest you use Windows Media Player 7.1 or higher, which
you can download for free from the Microsoft website.
3
Specifications
Model Name
Built-in Memory
Screen
Battery
aigo MP3 UM-F158 Plus
128M/256M/512M
Flash
Memory
96*39 OLED
1 size AAA battery, up to 7 hours
of playing time
Earphone Output
7Mw x 2/32 ohm
Output Range
20~20KHz
38
SNR
80dB
Supported Music Files
MP3
WMA
Supported Recording Files
WAV
Chinese & English Display
GB2312
MP3
WinZip Rate
MPEG 1.0 Layer 3
32K~320Kbps
WMA 64K~256Kbps
File System
FAT32
Temperature
-5
Connection
Mini USB connection
Dimensions
79
Weight
23g
~ 40
27
21 mm
Contents are subject to change without prior notice.
39