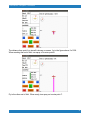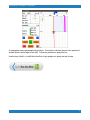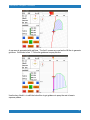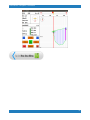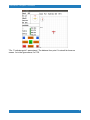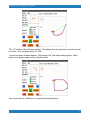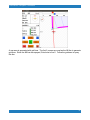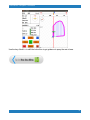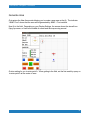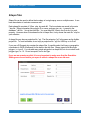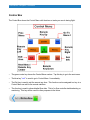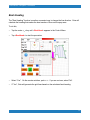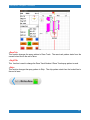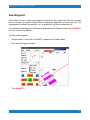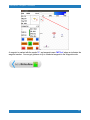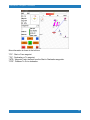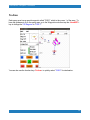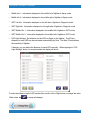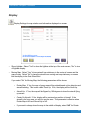
1
Guia Platinum - Navigation Version 1.0.0 User Manual Copyright © 2014 AG-NAV Inc. Guia Platinum - Navigation 1.0.0 Manual Table of Contents About .............................................................................................. 5 Support ........................................................................................... 6 Notes ............................................................................................... 7 Operations ...................................................................................... 9 Navigate/Training ......................................................................... 14 Application .................................................................................... 15 Application Info ............................................................................................. 5 Set Swath ........................................................................................................ 5 New Area ......................................................................................................... 5 Old Area .......................................................................................................... 5 Obstacles ........................................................................................................ 5 WayPoints ....................................................................................................... 5 Background Maps ........................................................................................ 5 New Area ....................................................................................... 26 New Area Settings ...................................................................................... 27 AB Line .......................................................................................................... 29 Generate Area ........................................................................................................................... 30 Split - Boundary .......................................................................................... 33 Generate Area ........................................................................................................................... 35 Split - Edge ................................................................................................... 38 Generate Area ........................................................................................................................... 40 Split - Center ................................................................................................ 43 Generate Area ........................................................................................................................... 45 Split - Pivot ................................................................................................... 48 Generate Area ........................................................................................................................... 50 Mark - Split ................................................................................................... 53 Generate Area ........................................................................................................................... 54 Mark - Squeeze ........................................................................................... 58 Generate Area ........................................................................................................................... 59 Mark - Skip ................................................................................................... 63 Generate Area ........................................................................................................................... 64 Mark - Manual .............................................................................................. 68 Generate Area ........................................................................................................................... 69 Generate XCL ........................................................................................................................... 73 Spray Boundary .......................................................................................... 77 Generate Area ........................................................................................................................... 78 AB&C - Squeeze .......................................................................................... 82 2 Guia Platinum - Navigation 1.0.0 Manual Generate Area ........................................................................................................................... 83 AB&C - Pivot ................................................................................................ 87 Generate Area ........................................................................................................................... 88 Old Area ........................................................................................ 92 Select Areas ................................................................................................. 93 Application Type ......................................................................................... 94 Shape Files .................................................................................................. 96 Project Files ................................................................................................. 98 Guidance ...................................................................................................... 99 Map Display ............................................................................................... 101 Navigation Info .......................................................................................... 102 Control Box ................................................................................................ 104 Spray Areas ............................................................................................... 105 Closest Line ............................................................................................... 108 Change Line Direction ............................................................................. 110 Best Heading ............................................................................................. 113 Next Heading ............................................................................................. 115 Reverse Heading ...................................................................................... 117 Spray Patterns .......................................................................................... 119 New Waypoint ............................................................................................ 123 Waypoint Mode ........................................................................... 125 To Home ..................................................................................................... To Area ....................................................................................................... To Work ...................................................................................................... Functions ................................................................................................... 127 128 129 132 Map Mode ................................................................................... 134 Fix Gaps ..................................................................................................... 135 Functions ................................................................................................... 136 Edit .............................................................................................. 137 Edit Area ......................................................................................................... 5 Edit Waypoint ................................................................................................. 5 Settings ....................................................................................... 140 Spraying ......................................................................................................... Geodetics ....................................................................................................... Colours ........................................................................................................... Guidance ........................................................................................................ Lightbars ........................................................................................................ Keys ................................................................................................................. Display ............................................................................................................ 5 5 5 5 5 5 5 3 Guia Platinum - Navigation 1.0.0 Manual Data Recording .............................................................................................. 5 Flow Controller .............................................................................................. 5 Manage Settings ........................................................................................... 5 Help ............................................................................................. 161 Navigation Help ............................................................................................. 5 Home ........................................................................................... 163 Index ........................................................................................... 164 4 Guia Platinum - Navigation 1.0.0 Manual About The Guia Platinum is a GPS navigation system designed by AG-NAV Inc. for aerial agricultural application. It is a state-of-the-art system developed with the combination of latest technologies in GPS, computers, wired and wireless data communications, and aerial applications. The Guía is a highly accurate, real-time navigation guidance system. It uses GPS signals received directly from a constellation of 24 satellites in orbit around the Earth. This system can operate in conjunction with differential correction signals. This help is for Guia Platinum software version 1.0.0, released on March 19, 2014. 5 Guia Platinum - Navigation 1.0.0 Manual Support For technical help, please contact AG-NAV: Phone: (800) 99 AGNAV (North America) (800) 992-4628 (705) 734-0909 (International) Fax: (705) 735-0880 Email: [email protected] Web: www.agnav.com 6 Guia Platinum - Navigation 1.0.0 Manual Notes The software and hardware described in this manual is furnished under the license and may only be used or copied in accordance with the terms of the license. Copyright © Ag-NAV Inc. 2014 Revision: 1.0 Release Date: March 2014 All rights reserved. No part of this publication or the components it describes may be reproduced, stored in a retrieval system or transmitted, in any form, or by any means, electronic, mechanical, photo-copying, recording, or otherwise, without prior written consent from AG-NAV Inc. AG-NAV Inc. provides this manual “as is”, without warranty of any kind and reserves the right to make improvements an/or changes to the product described in this manual at any time and without notice. AG-NAV Inc. equipment should not be used as a primary navigation device. CLASS A COMPUTING DEVICE. This equipment has been tested and found to comply with the limits for a Class A digital device, pursuant to Part 15 of the FCC rules. These limits are designed to provide reasonable protection against harmful interference when the equipment is operated in a commercial environment. The equipment generates, used, and can radiate radio frequency energy and, if not installed and used in accordance with the instruction manual, may cause harmful interference to radio communications. Operation of this equipment in a residential area is likely to cause harmful interference, in which case the use will be required to correct the interference at hi/her own expense. SOFTWARE IS PROVIDED AS IS. To the maximum extent permitted by law, the manufacturer, (Ag-NAV Inc.) and its suppliers disclaim all warranties, either express or implied, including, but not limited to implied warranties of merchantability and fitness for a particular purpose, with regard to the SOFTWARE, the accompanying written materials, and any accompanying hardware. You may have other rights which vary from state/jurisdiction to state/jurisdiction. NO LIABILITY FOR CONSEQUENTIAL DAMAGES. To the maximum extent permitted by applicable law, in no event shall the company or its suppliers be liable for any damages whatsoever (including without limitation, direct or indirect damages for personal injury, loss of business profits, business interruption, loss of business information, or any other pecuniary loss) arising out of the use of this product, even if the company has been advised of the possibility of such damages. In any case, the company’s and its suppliers’ entire liability shall be limited to the amount actually paid by the owner of the product for the product. Because some states/jurisdictions do not allow the exclusion or limitation of liability for consequential or incidental damages, the above limitation may not apply to the use. 7 Guia Platinum - Navigation 1.0.0 Manual TRADEMARKS o AG-NAV® or AG-NAV is a registered trademark of AG-NAV In. o Guia or Guia™ is a registered trademark of Ag-NAV Inc. o FlightMaster or FlightMaster™ is a registered trademark of AG-NAV Inc. o All other brand names are trademarks of their respective holders CONTACT INFORMATION For technical help, please contact AG-NAV: Phone: (800) 99 AGNAV (North America) (800) 992-4628 (705) 734-0909 (International) Fax: (705) 735-0880 Email: [email protected] Web: www.agnav.com In the Event of a problem that cannot be resolved using the information supplied, please contact AG-NAV. You can also gain assistance through the User's Area on our web page at www.agnav.com. For further assistance, contact the AG-NAV Technical Support Line by telephone, fax, or email. AG-NAV Customer Support personnel will discuss your situation, determine the cause of problem and provide the appropriate technical assistance. 8 Guia Platinum - Navigation 1.0.0 Manual Operations The Guia Platinum Operation in the Navigate or Training program has two modes: PreFlight and On-the-fly. 1) PreFlight includes all screens for settings, editing and item selections. To select an item, tap the item on the screen or use the remote switches to move the cursor to the desired item. If using the remote switches , the Left, Right, Up, Down keys are used to move the cursor. Push the Center key to select, open or execute the item. 9 Guia Platinum - Navigation 1.0.0 Manual On the page that has parameters, to edit a parameter Tap the item on the page, then tap the or to toggle through the available options. If you use the remote switches, the Up/Down keys will move the cursor and the Left/Right keys will change the option of parameter. 10 Guia Platinum - Navigation 1.0.0 Manual If a parameter has a numerical value, Tap the or to decrease or increase the value. If the difference between the current value and the desired value is big, tap to open a virtual keyboard for quick entry. If using the remote switches, the Up/Down keys will move the cursor, the Left/Right key will decrease/increase the value. 11 Guia Platinum - Navigation 1.0.0 Manual 2) On-the-fly operation starts when the Guia enters a fly mode: New Area, Spray, Map or Waypoint. The picture below shows a typical display in the Spray mode. The Control box shows the functions that you can do. As in the example, the functions are PrevLL, NextLL, ZoomIn, ZoomOut. The positions of the functions are associate with the keys on the remote switches. As in the example, Left key does "PrevLL", Right key "NextLL", Up key "ZoomIn" and Down key "ZoomOut". Tap the center green button to change the Control Menu. Or push the Center key on the remote switches. The number in the center of the center green button shows the set or Control Menu number. 12 Guia Platinum - Navigation 1.0.0 Manual Other buttons in the Control box: You can tap twice on the map window to expand the display. Left Right Up Down The Control box is shown at the bottom of screen. Just tap the button to do the desired task. If using the remote switches, the sequence of keys for the functions is Left, Right, Up, Down. 13 Guia Platinum - Navigation 1.0.0 Manual Navigate/Training By tapping the NAVIGATE with the following options: o o o o o or TRAINING icon, you will be taken to a new screen Application Edit Settings Help Home 14 Guia Platinum - Navigation 1.0.0 Manual Application By tapping the APPLICATION icon, you will be taken to a new screen with the functions of the Applications menu listed. 15 Guia Platinum - Navigation 1.0.0 Manual Application Info Application Info The Application Info has the information that you want to record for each application. The information will be saved to a text file for post flight review and mission report. 16 Guia Platinum - Navigation 1.0.0 Manual To edit the information, tap on the desired box then tap the keyboard icon to show the keyboard. Tap the "Clear" button to clear the current entry then enter the new entry. When done, tap this button to accept the entry. 17 Guia Platinum - Navigation 1.0.0 Manual For quick editing, you can save all entries to a list, for example frequent clients. Next time you can select the desired name from the list. To do this, tap this clipboard for you to add the items to the list. button. It opens the You can select a desired item from the list for Application Information. 18 Guia Platinum - Navigation 1.0.0 Manual Set Swath Set Swath The Guia Platinum offers up to 4 swath sections. If your aircraft has multiple swath sections, you can define the width of each section. Each swath must have a boom switch to turn on/off the spray of that section. To edit the swath width, o Tap the "Number of Swaths" box. o Use the "-" or "+" button to decrease/increase the value. If you have one swath section, enter "1". o Tap the "Swath Width ( )" box. o Use the "-" or "+" button to decrease/increase the swath width. You can tap the keyboard icon to enter the value by using the virtual keyboard. o When done, tap to accept the value and exit. 19 Guia Platinum - Navigation 1.0.0 Manual New Area New Area Generation Guía offers many methods to generate a new area for your application. From simply making an AB line to marking irregular boundary of a spray area, you will find it very easy to work with the Moving Map display. 20 Guia Platinum - Navigation 1.0.0 Manual Old Area Old Area, spraying an existing area. Guía offers a convenient way to prepare your application. If you have a map file, you can use AGNAV NavviewW or SprayView to digitize the map to make spray areas for the Guía system. With lots of space on the hard drive, you can load hundreds of areas to the system. They are ready for you to spray at any time. 21 Guia Platinum - Navigation 1.0.0 Manual Obstacles Obstacle Warning An obstacle means any object that might be encountered by pilots who fly very low to the ground. Obstacles can be trees, test poles, MET towers, wind turbines, power lines and any high objects that may pose a hazard for aerial spraying. Improving the Awareness of Obstacles is the goal that AG-NAV Inc. tries to achieve through the Obstacle Warning feature. Before flying, tap to show the list of obstacle files available in the Guia. The "agnav.pup" has the local obstacles entered on-the-fly. The *.dat files, for example "12Fl.Dat", are FAA obstacle files. You can download the FAA obstacle files from internet. 22 Guia Platinum - Navigation 1.0.0 Manual To select an obstacle file, tap the square at the beginning of desired file. If you want Guia to load this file automatically, tap the "Set Default" button. When done, tap to accept the selection and exit. 23 Guia Platinum - Navigation 1.0.0 Manual WayPoints Waypoint Flight Waypoint mode is used for guidance to fly from the aircraft to a destination waypoint, or from one waypoint to another. There are two Waypoints types: Area Waypoints and Cross Country Waypoints (XWaypoints). Area waypoints are normally local waypoints and saved in an area or project file. Xwaypoints are for cross country flights. They are saved in the file called “agnav.wpt”. For guidance to fly XWaypoints, tap this to open a list of XWaypoints. 24 Guia Platinum - Navigation 1.0.0 Manual Background Maps Background Maps help avoid spraying a wrong field. It can be used as reference for flying at night. You can make a background map by using SprayView to download the image from Google Earth. The image is saved in a jpeg file *.jpg with a georeference file *.pbm. Before flying, tap to load the background map files. To select a map file, tap the square at the beginning of desired file. If you want Guia to load this file automatically, tap the "Set Default" button. When done, tap to accept the selection and exit. 25 Guia Platinum - Navigation 1.0.0 Manual New Area Guía offers you many ways to make a new area, from simply entering the AB line to marking a complicated area with exclusion zones. To do this, tap to open the settings for new area generation. 26 Guia Platinum - Navigation 1.0.0 Manual New Area Settings The New Area Settings define how a new area will be generated and what spray pattern be used on the area. o File Type: Defines the format that the new area and spray data will be saved in. The options are "AG-NAV" for AgNav format and "Shape" for shapefile format. o Prefix: Enter the first letters for area names. Prefix is normally one or a few characters used to differentiate the areas made for different clients or applications. Do not use a space in Prefix. o Area Name: When the New Area Settings page is open, a default Area Name is shown. The convention is Prefix + last digit of year + 2 digits of month + 2 digits of day + 2 digits of number of new area generated during the day. The area file extension is automatically added, either ".no1", ".prj" or ".shp". o Make Area By: Defines how the new area is generated. See "New Area" section for all methods that can be used. o Option: Supplement how the area is generated or defines how grid lines are generated and spray pattern. o Number Of Lines: Defines how many swaths the new area will have when generating by 27 Guia Platinum - Navigation 1.0.0 Manual spraying the AB line. In another word, this defines the width of spray area. o Spray Pattern: Defines the default spray pattern when generating the new area by the AB Line, Mark Manually or Spray Boundary. o Line Offset: Defines how the first grid line is generated. Normally the first line is generated half swath inside the area. The entry should be "Yes". If for any reason you want the first line to be right on the edge of area, select "No". o Spray Material: Enter the name of spray material. You can make a list of spray materials for quick selection. o Application Rate: Enter the target Application Rate (L/Ha or GPA). If a flow controller is used, this target rate will be sent to the flow controller to regulate the material flow rate for even application on the new area. o Tank Volume: Enter how much material you have in the tank before flying this new area. The unit is Liter or Gallon depending on the Unit defined in Spraying Settings. 28 Guia Platinum - Navigation 1.0.0 Manual AB Line The first and simplest method to generate a new area is to spray an AB line. Guía will make a rectangular area on the left or right of the AB line. The “Number of Lines” and “Swath Width” parameters are used to calculate the width of the area. Select "Make Area By" "AB Line". If the area is on the left of the AB line, select "Option" "Left". If the area is on the right of the AB line, select "Option" "Right". Enter the "Number of Lines" you want to have on the area. You should enter more than enough so that the last sprayed line is remembered for the next flight. o Select the Spray Pattern. Options are "Back & Forth", "Race" Track, "Squeeze", "Skip" and "Expand". o Check other parameters and make sure they are correct for your application. o o o o When done, tap to continue. 29 Guia Platinum - Navigation 1.0.0 Manual Generate Area Guia enters the New Area mode allowing you to create a new area on-the-fly. The indicator “ABLINE LEFT“ shows that the area will be on the left of the AB line. Now fly to the field. Depending on your Display Settings, the screen shows the aircraft icon flying up screen, or fixed in the middle of screen and the map moving around. Guia is waiting for you to enter point A. When getting to the field, set the first swath by spray on to enter point A. 30 Guia Platinum - Navigation 1.0.0 Manual The distance from point A to aircraft is shown on screen. As in the figure above, it's 336ft. When reaching the end of field, turn spray off to enter point B. A rectangular area is generated with grid lines. Since the first line was sprayed, the locked line is shifted to line 2. Follow the guidance to spray line 2. 31 Guia Platinum - Navigation 1.0.0 Manual Use the key <NextLL> to shift the locked line to get guidance to spray the rest of area. 32 Guia Platinum - Navigation 1.0.0 Manual Split - Boundary The Split - Boundary method requires the operator to enter three points (A,B,C). The AB line is normally the longest side of the area where you may want to spray first. Point C is on the other side which defines the width of area. The spray pattern is Center Split field or Race Track. The Race Track number is half of total number of grid lines covering a whole area. 33 Guia Platinum - Navigation 1.0.0 Manual o Select "Make Area By" "Split". o Select "Option" "Boundary". o Check other parameters and make sure they are correct for your application. When done, tap to continue. 34 Guia Platinum - Navigation 1.0.0 Manual Generate Area Guia enters the New Area mode allowing you to create a new area on-the-fly. The indicator “Split Boundary“ shows that the area will be generated by Split - Boundary method. Now fly to the field. Depending on your Display Settings, the screen shows the aircraft icon flying up screen, or fixed in the middle of screen and the map moving around. Guia is waiting for you to enter point A. When getting to the field, set the first swath by spray on to enter point A. 35 Guia Platinum - Navigation 1.0.0 Manual The distance from point A to aircraft is shown on screen. As in the figure above, it's 125ft. When reaching the end of field, turn spray off to enter point B. Fly to the other end of field. When ready, turn spray on to enter point C. 36 Guia Platinum - Navigation 1.0.0 Manual A rectangular area is generated with grid lines. Guia locks to the line closest to the position of aircraft which is the last line on the field. Follow the guidance to spray this line. Use the key <NextLL> to shift the locked line to get guidance to spray the rest of area. The third spray swath is the line next to the AB line. 37 Guia Platinum - Navigation 1.0.0 Manual Split - Edge The Split - Edge method requires the operator to enter three points (A,B,C). The AB line is normally the longest side of the area where you may want to spray first. Point C sets the center line of the area. The spray pattern is Center Split field or Race Track. The Race Track number is the number of lines from the AB line to point C. 38 Guia Platinum - Navigation 1.0.0 Manual o Select "Make Area By" "Split". o Select "Option" "Edge". o Check other parameters and make sure they are correct for your application. When done, tap to continue. 39 Guia Platinum - Navigation 1.0.0 Manual Generate Area Guia enters the New Area mode allowing you to create a new area on-the-fly. The indicator “Split Edge“ shows that the area will be generated by Split - Edge method. Now fly to the field. Depending on your Display Settings, the screen shows the aircraft icon flying up screen, or fixed in the middle of screen and the map moving around. Guia is waiting for you to enter point A. When getting to the field, set the first swath by spray on to enter point A at the edge of area. 40 Guia Platinum - Navigation 1.0.0 Manual The distance from point A to aircraft is shown on screen. As in the figure above, it's 128ft. When reaching the end of field, turn spray off to enter point B. Fly to the center line of field. When ready, turn spray on to enter point C. 41 Guia Platinum - Navigation 1.0.0 Manual A rectangular area is generated with grid lines. Guia locks to the line closest to the position of aircraft which is at the center of the field. Follow the guidance to spray this line. Use the key <NextLL> to shift the locked line to get guidance to spray the rest of area. 42 Guia Platinum - Navigation 1.0.0 Manual Split - Center The Split - Center method requires the operator to enter three points (A,B,C). The AB line defines the length of the center of area. Point C sets one edge of the area. The spray pattern is Center Split field or Race Track. The Race Track number is the number of lines from the AB line to point C. 43 Guia Platinum - Navigation 1.0.0 Manual o Select "Make Area By" "Split". o Select "Option" "Center". o Check other parameters and make sure they are correct for your application. When done, tap to continue. 44 Guia Platinum - Navigation 1.0.0 Manual Generate Area Guia enters the New Area mode allowing you to create a new area on-the-fly. The indicator “Split Center“ shows that the area will be generated by Split - Center method. Now fly to the field. Depending on your Display Settings, the screen shows the aircraft icon flying up screen, or fixed in the middle of screen and the map moving around. Guia is waiting for you to enter point A. When getting to the field, set the first swath by spray on to enter point A at the center of area. 45 Guia Platinum - Navigation 1.0.0 Manual The distance from point A to aircraft is shown on screen. As in the figure above, it's 135ft. When reaching the end of field, turn spray off to enter point B. Fly to the edge of field. When ready, turn spray on to enter point C. 46 Guia Platinum - Navigation 1.0.0 Manual A rectangular area is generated with grid lines. Guia locks to the line closest to the position of aircraft which is at the edge of the field. Follow the guidance to spray this line. Use the key <NextLL> to shift the locked line to get guidance to spray the rest of area. 47 Guia Platinum - Navigation 1.0.0 Manual Split - Pivot The Split - Pivot method generates a circular area. The AB line is at the center of area defining the diameter of area. Once the area is formed, the operator sprays the area in a left hand turn Race Track pattern until a whole field has been sprayed. 48 Guia Platinum - Navigation 1.0.0 Manual o Select "Make Area By" "Split". o Select "Option" "Pivot". o Check other parameters and make sure they are correct for your application. When done, tap to continue. 49 Guia Platinum - Navigation 1.0.0 Manual Generate Area Guia enters the New Area mode allowing you to create a new area on-the-fly. The indicator “Split Pivot“ shows that the area will be generated by Split - Pivot method. Now fly to the field. Depending on your Display Settings, the screen shows the aircraft icon flying up screen, or fixed in the middle of screen and the map moving around. Guia is waiting for you to enter point A. When getting to the field, set the first swath by spray on to enter point A at the center of area. 50 Guia Platinum - Navigation 1.0.0 Manual The distance from point A to aircraft is shown on screen. As in the figure above, it's 141ft. When reaching the end of field, turn spray off to enter point B. A circular area is generated with grid lines. Guia locks to line 1 which is at the left edge of the area. Follow the guidance to spray this line. Use the key <NextLL> to shift the locked line to get guidance to spray the rest of area. 51 Guia Platinum - Navigation 1.0.0 Manual 52 Guia Platinum - Navigation 1.0.0 Manual Mark - Split The Mark method allows you to enter thousands of points to define a spray area. o Select "Make Area By" "Mark". o Select "Option" "Split". o Check other parameters and make sure they are correct for your application. When done, tap to continue. 53 Guia Platinum - Navigation 1.0.0 Manual Generate Area Guia enters the New Area mode allowing you to create a new area on-the-fly. The indicator “Mark Split“ shows that the area will be generated by Mark - Split method. "$Zone" means Spray Zone or Spray Area. "Pts: " indicates the number of points you have entered for this spray zone. Now fly to the field. Depending on your Display Settings, the screen shows the aircraft icon flying up screen, or fixed in the middle of screen and the map moving around. Guia is waiting for you to enter the corners of spray zone. When you are over a corner cross of the spray zone, tap the <NextPnt> button. On the remote switches, press the key to do <NextPnt>. 54 Guia Platinum - Navigation 1.0.0 Manual "Pts: 1" indicates point 1 was entered. The distance from point 1 to aircraft is shown on screen. As in the figure above, it's 143ft. Fly to the next corner of spray zone. Use <NextPnt> to mark the corner. Repeat this until you finish marking the boundary of spray zone. When you finish marking the area, use the key <EndArea> to complete the area generation. 55 Guia Platinum - Navigation 1.0.0 Manual A new area is generated with grid lines. The first 2 corners are used as the AB line to generate grid lines. Guia locks to line 1. Follow the guidance to spray this line. Use the key <NextLL> to shift the locked line to get guidance to spray the rest of area in split pattern. 56 Guia Platinum - Navigation 1.0.0 Manual 57 Guia Platinum - Navigation 1.0.0 Manual Mark - Squeeze The Mark method allows you to enter thousands of points to define a spray area. o Select "Make Area By" "Mark". o Select "Option" "Squeeze". o Check other parameters and make sure they are correct for your application. When done, tap to continue. 58 Guia Platinum - Navigation 1.0.0 Manual Generate Area Guia enters the New Area mode allowing you to create a new area on-the-fly. The indicator “Mark SQZ“ shows that the area will be generated by Mark - Squeeze method. "$Zone" means Spray Zone or Spray Area. "Pts: " indicates the number of points you have entered for this spray zone. Now fly to the field. Depending on your Display Settings, the screen shows the aircraft icon flying up screen, or fixed in the middle of screen and the map moving around. Guia is waiting for you to enter the corners of spray zone. When you are over a corner cross of the spray zone, tap the <NextPnt> button. On the remote switches, press the key to do <NextPnt>. 59 Guia Platinum - Navigation 1.0.0 Manual "Pts: 1" indicates point 1 was entered. The distance from point 1 to aircraft is shown on screen. As in the figure above, it's 119ft. Fly to the next corner of spray zone. Use <NextPnt> to mark the corner. Repeat this until you finish marking the boundary of spray zone. When you finish marking the area, use the key <EndArea> to complete the area generation. 60 Guia Platinum - Navigation 1.0.0 Manual A new area is generated with grid lines. The first 2 corners are used as the AB line to generate grid lines. Guia locks to line 1. Follow the guidance to spray this line. Use the key <NextLL> to shift the locked line to get guidance to spray the rest of area in squeeze pattern. 61 Guia Platinum - Navigation 1.0.0 Manual 62 Guia Platinum - Navigation 1.0.0 Manual Mark - Skip The Mark method allows you to enter thousands of points to define a spray area. o Select "Make Area By" "Mark". o Select "Option" "Skip". o Enter the desired value for "Skip Tracks". This is the number of swaths to skip when you shift the locked line. o Check other parameters and make sure they are correct for your application. When done, tap to continue. 63 Guia Platinum - Navigation 1.0.0 Manual Generate Area Guia enters the New Area mode allowing you to create a new area on-the-fly. The indicator “Mark Skip“ shows that the area will be generated by Mark - Skip method. "$Zone" means Spray Zone or Spray Area. "Pts: " indicates the number of points you have entered for this spray zone. Now fly to the field. Depending on your Display Settings, the screen shows the aircraft icon flying up screen, or fixed in the middle of screen and the map moving around. Guia is waiting for you to enter the corners of spray zone. When you are over a corner cross of the spray zone, tap the <NextPnt> button. On the remote switches, press the key to do <NextPnt>. 64 Guia Platinum - Navigation 1.0.0 Manual "Pts: 1" indicates point 1 was entered. The distance from point 1 to aircraft is shown on screen. As in the figure above, it's 216ft. Fly to the next corner of spray zone. Use <NextPnt> to mark the corner. Repeat this until you finish marking the boundary of spray zone. When you finish marking the area, use the key <EndArea> to complete the area generation. 65 Guia Platinum - Navigation 1.0.0 Manual A new area is generated with grid lines. The first 2 corners are used as the AB line to generate grid lines. Guia locks to line 1. Follow the guidance to spray this line. 66 Guia Platinum - Navigation 1.0.0 Manual Use the key <NextLL> to shift the locked line to get guidance to spray the rest of area in skip pattern. 67 Guia Platinum - Navigation 1.0.0 Manual Mark - Manual This Mark method allows you to enter thousands of points to define a spray area. Multiple areas and exclusion zones can be generated as well. o o o o Select "Make Area By" "Mark". Select "Option" "Manual". Select "Spray Pattern". As an example "Back & Forth" is used. Check other parameters and make sure they are correct for your application. When done, tap to continue. 68 Guia Platinum - Navigation 1.0.0 Manual Generate Area Guia enters the New Area mode allowing you to create a new area on-the-fly. The indicator “Mark Man“ shows that the area will be generated by Mark - Manual method. "B&F" is the spray pattern selected for the new area. "$Zone" means Spray Zone or Spray Area. "Pts: " indicates the number of points you have entered for this spray zone. Now fly to the field. Depending on your Display Settings, the screen shows the aircraft icon flying up screen, or fixed in the middle of screen and the map moving around. Guia is waiting for you to enter the corners of spray zone. When you are over a corner cross of the spray zone, tap the <NextPnt> button. On the remote switches, press the key to do <NextPnt>. 69 Guia Platinum - Navigation 1.0.0 Manual "Pts: 1" indicates point 1 was entered. The distance from point 1 to aircraft is shown on screen. As in the figure above, it's 175ft. 70 Guia Platinum - Navigation 1.0.0 Manual Fly to the next corner of spray zone. Use <NextPnt> to mark the corner. Repeat this until you finish marking the boundary of spray zone. When you finish marking the area, use the key <EndArea> to complete the area generation. A new area is generated with grid lines. The first 2 corners are used as the AB line to generate grid lines. Guia locks to line 1. Follow the guidance to spray this line. 71 Guia Platinum - Navigation 1.0.0 Manual Use the key <NextLL> to shift the locked line to get guidance to spray the rest of area in back & forth pattern. 72 Guia Platinum - Navigation 1.0.0 Manual Generate XCL If there are no spray or exclusion zones, you can use the Mark - Manual method to generate a spray zone with exclusion zones. To do this, first generate a spray zone. "$Zone" means Spray Zone or Spray Area. "Pts: " indicates the number of points you have entered for this spray zone. When done, DO NOT TAP or PRESS <EndArea>. Fly to where the exclusion zone (XCL) is. When over the first corner of XCL, tap the key <NewXZone> to enter the first corner of the exclusion zone. 73 Guia Platinum - Navigation 1.0.0 Manual The indicator "XCLZone" means Exclusion Zone is being entered. "Pts: " indicates the number of points you have entered for this XCL. When you are over the next corner of XCL, tap the <NextPnt> button. On the remote switches, press the key to do <NextPnt>. Repeat for the remaining of XCL corners. When you finish the first XCL, if you have another XCL to enter, fly to the second XCL then tap <NewXZone> to enter the first corner of the second XCL. Use <NextPnt> to enter all other corners. 74 Guia Platinum - Navigation 1.0.0 Manual When you finish all XCLs, use the key <EndArea> to complete the area generation. A new area is generated with the XCL(s) and grid lines. The first 2 corners of the spray zone are used as the AB line to generate grid lines. Guia locks to line 1. Follow the guidance to spray this line. 75 Guia Platinum - Navigation 1.0.0 Manual Use the key <NextLL> to shift the locked line to get guidance to spray the rest of area. 76 Guia Platinum - Navigation 1.0.0 Manual Spray Boundary The Spray Boundary method requires no key presses. To generate a new area, just fly and spray the boundary of spray zone. o Select "Make Area By" "Spray Boundary". o Select "Spray Pattern". As an example "Back & Forth" is used. o Check other parameters and make sure they are correct for your application. When done, tap to continue. 77 Guia Platinum - Navigation 1.0.0 Manual Generate Area Guia enters the New Area mode allowing you to create a new area on-the-fly. The indicator “Spray Boundary“ shows that the area will be generated by Spraying the Boundary of area. "B&F" is the spray pattern selected for the new area. "Pts: " indicates the number of points Guia entered for this area. Now fly to the field. Depending on your Display Settings, the screen shows the aircraft icon flying up screen, or fixed in the middle of screen and the map moving around. Fly along the boundary of area. Turn spray on to mark the boundary. Guia will enter a point when the heading of aircraft changes. 78 Guia Platinum - Navigation 1.0.0 Manual "Pts: 18" indicates 18 points were entered. The distance from the last point to aircraft is shown on screen. As in the figure above, it's 148ft. You can turn spray off where desired. When spray is off, Guia stops entering points. When desired, turn spray on again until you finish the area. Tap or press the key <EndArea> to complete the area generation. 79 Guia Platinum - Navigation 1.0.0 Manual A new area is generated with grid lines. The first 2 corners are used as the AB line to generate grid lines. Since the AB line was sprayed, Guia locks to line 2. Follow the guidance to spray this line. 80 Guia Platinum - Navigation 1.0.0 Manual Use the key <NextLL> to shift the locked line to get guidance to spray the rest of area. 81 Guia Platinum - Navigation 1.0.0 Manual AB&C - Squeeze The ABC - Squeeze method requires the operator to enter three points (A,B,C). The AB line is normally the longest side of the area where you may want to spray first. Point C is on the other side which defines the width of area. The spray pattern is Squeeze. o Select "Make Area By" "AB & C". o Select "Option" "Squeeze". o Check other parameters and make sure they are correct for your application. When done, tap to continue. 82 Guia Platinum - Navigation 1.0.0 Manual Generate Area Guia enters the New Area mode allowing you to create a new area on-the-fly. The indicator “AB & C Squeeze“ shows that the area will be generated by AB & C - Squeeze method. Now fly to the field. Depending on your Display Settings, the screen shows the aircraft icon flying up screen, or fixed in the middle of screen and the map moving around. Guia is waiting for you to enter point A. When getting to the field, set the first swath by spray on to enter point A. 83 Guia Platinum - Navigation 1.0.0 Manual The distance from point A to aircraft is shown on screen. As in the figure above, it's 174ft. When reaching the end of field, turn spray off to enter point B. Fly to the other end of field. When ready, turn spray on to enter point C. 84 Guia Platinum - Navigation 1.0.0 Manual A rectangular area is generated with grid lines. Guia locks to the line closest to the position of aircraft which is the last line on the field. Follow the guidance to spray this line. 85 Guia Platinum - Navigation 1.0.0 Manual Use the key <NextLL> to shift the locked line to get guidance to spray the rest of area. The third spray swath is the line next to the AB line. 86 Guia Platinum - Navigation 1.0.0 Manual AB&C - Pivot The ABC - Pivot method requires the operator to enter three points (A,B,C) to generate a circular area. The AB line is at the center of area defining the diameter of area. Point C determines what side of the AB line the next swath will be. The spray pattern is Expand or spiral which starts from the center of area towards the sides. o Select "Make Area By" "AB & C". o Select "Option" "Pivot". o Check other parameters and make sure they are correct for your application. When done, tap to continue. 87 Guia Platinum - Navigation 1.0.0 Manual Generate Area Guia enters the New Area mode allowing you to create a new area on-the-fly. The indicator “AB&C Pivot“ shows that the area will be generated by AB&C - Pivot method. Now fly to the field. Depending on your Display Settings, the screen shows the aircraft icon flying up screen, or fixed in the middle of screen and the map moving around. Guia is waiting for you to enter point A. When getting to the field, set the first swath by spray on to enter point A at the center of area. 88 Guia Platinum - Navigation 1.0.0 Manual The distance from point A to aircraft is shown on screen. As in the figure above, it's 153ft. When reaching the end of field, turn spray off to enter point B. For point C, turn the aircraft to the side you want to spray then tap the <NextPnt> key. With this way, you get the guidance to spray the next line. 89 Guia Platinum - Navigation 1.0.0 Manual A circular area is generated with grid lines. Guia locks to the line next to the AB line. Follow the guidance to spray this line. 90 Guia Platinum - Navigation 1.0.0 Manual Use the key <NextLL> to shift the locked line to get guidance to spray the rest of area. 91 Guia Platinum - Navigation 1.0.0 Manual Old Area Guía offers a convenient way to prepare your application. If you have a map file, you can use AgNav's NavviewW or SprayView to digitize the map to make spray areas for the Guía system. Then copy the area and project files to the Guia by using File Manager. The area and project files stored in the Guia are called Old Areas. To fly the old areas, tap to open the list of areas for your selection. 92 Guia Platinum - Navigation 1.0.0 Manual Select Areas An Old Area file can be *.no1, *.prj or *.shp file. *.no1 is an AgNav file which has boundary for a single spray area. *.prj is an AgNav file which has boundaries of multiple spray zones. The combination of multiple spray zones is called a project. *.shp is a vector map file in shapefile format which may have boundaries of a single or multiple spray zones. A shp file can have boundaries of exclusion zones as well. After tapping , a list of old areas is shown. Tap the desired item to select it. For the remote switches, use the Up/Down keys to move the red box up/down. When in the list of areas, use the Left/Right keys to move the highlight bar to select a desired item. Before flying the area, check other parameters and data settings. 93 Guia Platinum - Navigation 1.0.0 Manual Application Type To check parameters or data, tap the parameter or data box and use the toggle through the available options. or to If using the remote switches, the Up/Down keys move the red box to another parameter or data box, the Left/Right keys change the value or option. Application Type: Depending on selection, data from previous flights may be shown. o o o New: Area is blank for a new application. Old: Spray data from the last flight will be shown for continuing the application. All: Spray data from all previous applications will be shown. 94 Guia Platinum - Navigation 1.0.0 Manual Spray Material: Enter the material used for the application. Application Rate: Enter the target application rate (Gals/acre) or (L/Ha). If you have a flow controller, this application rate will be used to regulate the flow of material. Tank Volume: Enter the current volume of material in the tank. When everything is correct, tap to continue. 95 Guia Platinum - Navigation 1.0.0 Manual Shape Files Shape file can be used to define the boundary of a single spray zone or multiple zones. It can have boundaries of exclusion zones as well. Each shape file consists of 3 files: shp, shx and dbf. The boundaries are saved in the main *.shp file. Other information like polygon ID or name, polygon size, etc... is saved in the database *.dbf file. *.shx is the index file. You must have all 3 files in the Guia for it to work properly. However when Guia shows the list of shape files, it only shows the main file *.shp for your selection. A shape file may have a projection file *.prj. The file extension "prj" is the same as the AgNav project file. To avoid mistakes, do not copy a projection file *.prj to a USB key or to Guia. If you are a GIS expert who creates the shape files, if possible select Lat/Long or geographic coordinates in WGS-84 ellipsoid for the data in the shp files. Shape type should be single polygon, i.e. type 5. You can add many single polygons to a shape file, but do not select multipolygon type, i.e. 15. Do not use point, line or arc type. If you are an operator or pilot, it is very important to make sure that the Geodetics Settings are correct before you open or select a shape file as an old area. 96 Guia Platinum - Navigation 1.0.0 Manual The Central Meridian must be correct for your spray zones. Do not set it to "0". You can change the value and check the brief description at the bottom of screen. The Longitudes of spray zones must be within the range in square bracket [ ]. For example, if Central Meridian is 279, the Longitudes of spray zones must be within 84 to 78 degrees West. When you select a shape file for spray area, the flight and spray data will be saved to shape files. Spray data will be save to "spron" files. Spray off or flight path data will be saved to "sproff" files. 97 Guia Platinum - Navigation 1.0.0 Manual Project Files When you have spray blocks located in close proximity, it would be more effective to combine them to spray them all together. You do this by creating a project file. You can use NavviewW or SprayView to create a project in office then copy them to the Guia. Each project file consists of a *.prj file and a *.dsp file. The *.prj file has the coordinates of the bounding box of all spray blocks. The *.dsp file has the boundaries of spray blocks. If the project has exclusion zones, their boundaries will be saved to a *.xcl file. 98 Guia Platinum - Navigation 1.0.0 Manual Guidance After selecting an old area to fly, Guia enters the Spray mode. Pilot gets the guidance to fly and spray the area; one swath at a time in the pattern selected by pilot. A typical display in Guia is below: The Guidance is displayed at the top of screen. This is called the Internal Lightbar. The external lightbar will show the same information. The Guidance starts with 2 bars: Cross Track (XTrack) at the top and Angle of Intercept (AOI) at the bottom. 99 Guia Platinum - Navigation 1.0.0 Manual n The XTrack shows the error or cross distance from aircraft to guide line. n The logic of bar movement is defined in the Lightbar Settings. If "Bar Dir" is selected, when the bar moves to the left (red), steer the aircraft left. If the bar moves to the right (blue), steer the aircraft right. n By default, the bottom bar indicates the Angle Of Intercept. The AOI shows the angle difference between the line heading and aircraft heading. If the aircraft moves parallel to the locked line, AOI is zero. The AOI in degrees is shown on the other side of the bar. n The goal is to bring both XT and AOI bars to the center to get the aircraft flying on the right track. n The spray indicator is shown as the 4 lights. When the spray is on, the lights are on. Spray off, lights off. n There are four more fields of information shown below the guidance bars. n By defaults from left to right, they are: Guide or Locked Line Number, Distance To Go, Sprayed Acreage, and XTrack Error. 100 Guia Platinum - Navigation 1.0.0 Manual Map Display Map Display plots all items for a safe application. Depending on Display Settings, the aircraft may be fixed at the center of map window and the map is moving around; or the map is fixed and aircraft is moving. On the Compass, the red hand is pointing to true North. 101 Guia Platinum - Navigation 1.0.0 Manual Navigation Info o Nav. Mode: Current navigation or fly mode. There are 4 modes: Spray mode "SPR" for guidance and spraying, New Area "NewA" for new area generation, Map mode "MAP" for viewing map and spray coverage, and Waypoint mode "WPT" for guidance to fly to a selected destination. o Spr Pattern: Spray pattern used for spraying area. The options are Back & Forth "B&F" or Back to Back, Split field "SPLIT", Race Track "RACE", Squeeze "SQZ", Expand "EXPD", Skip "SKIP". o Lck Line Shift: Locked Line or Guide Line Shift shows the direction and number of lines the guide line will shift next in the spray pattern. 102 Guia Platinum - Navigation 1.0.0 Manual o MET Data: For your record, remember to enter the correct meteorological data before you fly in the Application Info. The MET data shows wind speed "Kts", wind direction "Hdg", outside temperature "Tmp" and relative humidity "RH". Note that the wind direction is the direction where wind coming from. o Line Dir Indicator: This indicator shows the line direction relative to nose of aircraft. If the aircraft is flying in the same direction as the AB line, the red indicator will be at 0 deg or 12:00 o'clock. If the aircraft is flying the opposite direction, the red indicator will be at 180 deg or 6:00 o'clock. o Area Name: Area file name. o Number of Lines: Total number of grid lines or swaths on the spray area. o Flow Data Comm.: If a flow controller is used, this circle will become a solid red disk. This indicates the communications between the Guia and flow controller is good. The empty circle indicates no data communications with the flow controller. o Target App Rate: Target application rate in Gals/acre or Liters/ha depending on the unit setting. o Applied App Rate: Applied or actual application rate in Gals/acre or Liters/ha. If no flow controller is used, this applied rate is calculated from the flow rate (Gals/min or Liters/min) entered in the Flow Controller settings, ground speed and swath width. o Tank Gauge: Shows how much material left in tank. When spraying, Guia calculates how much material has been sprayed based on the actual flow rate, then subtract this value from the Tank Volume. o Info 1,2,3,4: Shows the information selected in the Display Settings. 103 Guia Platinum - Navigation 1.0.0 Manual Control Box The Control Box shows the Control Menu with functions or tasks you can do during flight. o The green center key shows the Control Menu number. Tap this key to go to the next menu. o The blue key ">>1" is used to go to Control Menu 1 immediately. o The Exit key is used to exit the area at any time. This function can be assigned to a key in a Control Menu as well for the remote switches. o The Aux key is used to show detailed flow data. This is for flow controller troubleshooting or monitoring. This key will be used for other purposes in the future. 104 Guia Platinum - Navigation 1.0.0 Manual Spray Areas After selecting an area, the Guia enters the Spray mode. The Guia guides you to spray one swath at a time. Based on the selected spray pattern, a grid line is locked to calculate guidance. Follow the guidance to stay on the right track. Turn spray on when desired. Note the Line Direction Indicator at the top left corner, the red indicator shows that the aircraft is flying in the same direction as the AB line which is line 1. When finish line 1, tap <NextLL> to shift the locked line to line 2. 105 Guia Platinum - Navigation 1.0.0 Manual Turn aircraft and spray line 2. 106 Guia Platinum - Navigation 1.0.0 Manual The Line Dir Indicator shows the aircraft flying in the direction opposite to the AB line. When finish line 2, tap <NextLL> again to shift the locked line. Repeat the same sequence to spray a whole area. If you want to go back to some line, tap <PrevLL>. 107 Guia Platinum - Navigation 1.0.0 Manual Closest Line If desired, you can shift the locked line to the line closest to the aircraft for guidance to spray. To do this, o Tap the center <> key until <ClstLine> appears in the Control Menu. o Fly to the desired place where you want to spray. o Tap <ClstLine> to shift the locked line. 108 Guia Platinum - Navigation 1.0.0 Manual o Follow the guidance to spray the locked line. 109 Guia Platinum - Navigation 1.0.0 Manual Change Line Direction When you load an area, if the line direction is not suitable for spraying, Guia offers many ways to change line direction. You can spray the AB line in the desired direction. Other lines will be generated based on the AB line. To do this, o Tap the center <> key until <NewGrid> appears in the Control Menu. o Tap <NewGrid> to start the procedure. o Select "Yes". On the remote switches, push <>. If you are not sure, select "No". o If "Yes", Guia will turn off the grid line and wait for you to spray the AB line. 110 Guia Platinum - Navigation 1.0.0 Manual o Fly to the desired location and turn spray on to enter point A. o When reaching the end of area, turn spray off to enter point B. 111 Guia Platinum - Navigation 1.0.0 Manual o Tap <NextLL> to shift the locked line to spray the next swath. 112 Guia Platinum - Navigation 1.0.0 Manual Best Heading The "Best Heading" function is another convenient way to change the line direction. Guia will calculate the heading that makes the least number of lines on the spray area. To do this, o Tap the center <> key until <BestHead> appears in the Control Menu. o Tap <BestHead> to start the procedure. o Select "Yes". On the remote switches, push <>. If you are not sure, select "No". o If "Yes", Guia will generate the grid lines based on the calculated best heading. 113 Guia Platinum - Navigation 1.0.0 Manual o Select the desired line and follow guidance to spray the area. 114 Guia Platinum - Navigation 1.0.0 Manual Next Heading If you want grid lines to be parallel to a side of spray area, use <NextHead>. To do this, o Tap the <MapMode> key to go to the Map mode. o Tap the center <> key until <NextHead> appears in the Control Menu. o Tap <NextHead>. Guía will start with the first heading from corner1 to corner2. 115 Guia Platinum - Navigation 1.0.0 Manual o Tap <NextHead> again, the heading will change from corner2 to corner3. o Keep tapping <NextHead> until you see grid lines parallel to the desired side. 116 Guia Platinum - Navigation 1.0.0 Manual Reverse Heading The "Reverse Heading" function changes the current line direction by 180 degrees. This is normally used to reverse the line numbers. For example an area has grid lines with direction South to North, i.e. 0 deg. The line numbering sequence will start from West (line 1) to East (last line). 117 Guia Platinum - Navigation 1.0.0 Manual Now you want to spray the same lines but starting from East to West. You just tap <RevrHead> to reverse the line direction. This will change the line numbering starting from the East to West side. 118 Guia Platinum - Navigation 1.0.0 Manual Spray Patterns Guia offers many patterns for your application. Spray pattern can be changed on-the-fly. The following keys are used to change spray pattern: <BnF> This function changes the spray pattern to Back & Forth. <Split> This function changes the spray pattern to area Split. The spray area starting from the current locked line to the end will be splitted into 2 parts. Guía provides guidance to spray from the locked line to the end of area in the Split pattern. 119 Guia Platinum - Navigation 1.0.0 Manual <Squeeze> This function changes the spray pattern to Squeeze. The squeeze pattern starts from the current locked line to the end of area. 120 Guia Platinum - Navigation 1.0.0 Manual <Expand> This function changes the spray pattern to Expand. The Expand pattern starts from the center to the ends of area. 121 Guia Platinum - Navigation 1.0.0 Manual <RaceTrk> This function changes the spray pattern to Race Track. The race track pattern starts from the current locked line to the end of area. <ChgRTK> This function is used to change the Race Track Number if Race Track spray pattern is used. <Skip> This function changes the spray pattern to Skip. The skip pattern starts from the locked line to the end of area. 122 Guia Platinum - Navigation 1.0.0 Manual New Waypoint This function is used to enter a new waypoint on-the-fly for the current area. The new waypoint can be a location you want to fly back later to continue the application or start a new job. The new waypoint is saved in the area file *.no1 or project file *.prj that you selected to fly. You can enter a new waypoint in the Spray or Waypoint mode. Make sure the key <NewWPT> is in one of the Control Menus. To make a new waypoint, o Tap the center <> key until <NewWPT> appears in the Control Menu. o Fly to the new waypoint location. o Tap <NewWPT>. 123 Guia Platinum - Navigation 1.0.0 Manual A waypoint is marked with the symbol "+" and waypoint name "WPTnn" where nn indicates the waypoint number. You can get guidance to fly to a selected waypoint in the Waypoint mode. 124 Guia Platinum - Navigation 1.0.0 Manual Waypoint Mode Waypoint Mode is used for guidance to fly from aircraft to a destination waypoint such as COR1 for corner 1 of area, HOME for home, WORK for a new work area, or local airport. To go to the Waypoint mode, tap the key <WPTMode>. o Tap the center <> key until <WPTMode> appears in the Control Menu. o Tap <WPTMode>. By default, the guidance in Waypoint mode is directly from aircraft to the destination waypoint. The destination waypoint is also called "To Waypoint". The XTrack error is always zero. So the guidance is shown by the difference between the aircraft ground track and the track from aircraft to the destination. The information shown on the lightbar is defined in the Lightbar Settings for Waypoint mode. 125 Guia Platinum - Navigation 1.0.0 Manual More information is shown in the Info box: "FR:": Start or From waypoint "TO:": Destination or To waypoint. "WTR: Waypoint Track, the track from the Start to Destination waypoints. "DTG": Distance To Go to destination. 126 Guia Platinum - Navigation 1.0.0 Manual To Home When you first go to the Waypoint mode, the guidance will be from aircraft to the HOME waypoint. HOME waypoint is the location when you first entered the New Area or Spray mode. The aircraft is supposed to remain on the ground. So the HOME waypoint is supposed to be where you want to come back when finishing the job. You can change the HOME waypoint by using the function key <Home>. When you do this, the speed of aircraft must be 0.0. To get the guidance to fly to HOME, go to the Waypoint mode then use the function key <ToHome>. 127 Guia Platinum - Navigation 1.0.0 Manual To Area Each spray area has a special waypoint called "COR1" which is the corner 1 of the area. To have the guidance to fly to the spray area, go to the Waypoint mode then tap the <NextWPT> key to change the TO Waypoint to "COR1". You can also use the function key <ToArea> to quickly select "COR1" for destination. 128 Guia Platinum - Navigation 1.0.0 Manual To Work To change the work location, you can enter the coordinates of the new location and get guidance to fly there to spray a new area. The new location is called a "WORK" waypoint. To do this, o Go to the Waypoint mode. o Tap the center <> key until <Work> appears in the Control Menu. o Tap <Work> to open the coordinate editor. o The editor starts with the Latitude and Longitude of the aircraft when pressing <Work>. o Use the virtual keyboard to enter the Latitude of the Work waypoint. The format is "dd mm.mm". Note there must be a space to separate the degrees and minutes. Do not enter a negative number. Use "N" for North and "S" for South. 129 Guia Platinum - Navigation 1.0.0 Manual o Tap the Longitude box to edit it. Use the same format for Longitude "ddd mm.mm". Do not enter a negative number. Use "W" for West and "E" for East. o When done, tap screen. to accept the coordinates. The "WORK" waypoint will be shown on o Tap <ToWork> to get guidance to fly to the "WORK" waypoint. 130 Guia Platinum - Navigation 1.0.0 Manual Note that if you have to fly to another work location, use the same procedure to enter the new "WORK" waypoint. The previous "WORK" will be "WORK1". 131 Guia Platinum - Navigation 1.0.0 Manual Functions The functions related to Waypoints and Waypoint Mode are: <WPTMode> This function is used to enter the Waypoint mode for guidance to fly from aircraft to a destination; or fly from one waypoint to another. <XWayPnt> This function is used to enter a cross-country waypoint on-the-fly. Cross-country waypoint (XWaypoint) can be the location of airport or new job. <NewWPT> This function is used to enter a new waypoint on-the-fly for the current area. This waypoint is saved in the area file *.no1 or project file *.prj that you selected to fly. <HOME> This function allows you to change your home waypoint. <WORK> This function allows you to enter the coordinates of a waypoint on-the-fly. <PrevWPT> <NextWPT> When you select an area to fly, Guia reads all the waypoints defined in the area or project file and makes a list of waypoints for your selection. Guia adds the “HOME” waypoint which is the location before the airplane takes off assuming that you select an area to fly while on ground. Guia also adds the “COR1” waypoint to the list which is the corner 1 of spray area. “HOME” is always the first waypoint in the list. When you enter the Waypoint mode, “HOME” will be the default destination waypoint. You can use <PrevWPT> or <NextWPT> to select the previous or next waypoint in the list as the destination waypoint. <SprMode> When you are in the Waypoint mode, press <SprMode> to go to the Spray mode. <ToArea> This function selects the corner 1 of spray area as the destination waypoint. This is useful when you have a long list of waypoints and want the guidance to fly to the spray area immediately. If you fly multiple areas, the active area is selected as the destination. <ToHome> 132 Guia Platinum - Navigation 1.0.0 Manual This function selects the “HOME” waypoint as the destination for guidance. <ToWork> This function selects the “WORK” waypoint as the destination for guidance. <PntGuide> This function selects guidance to fly from aircraft to a destination waypoint. <SegGuide> This function selects guidance to fly from one waypoint to another. A flight leg or segment is formed by 2 consecutive waypoints in the list. When you finish one leg, use <NextWPT> to move to the next leg. A correct sequence of waypoints defined in the area or project file is important. <ChooseWP> If you fly from one waypoint to another, i.e. flight leg or segment guidance, use this function to select any 2 waypoints in the list to fly. 133 Guia Platinum - Navigation 1.0.0 Manual Map Mode Map Mode is used to view the spray area, exclusion zones, grid lines and spray coverage. The display is centered on the map so you can view the spray area and all data while on ground or being far from the spray area. There is no flight guidance in the Map mode. However it provides many ways to change grid lines and select the locked line for the Spray mode. 134 Guia Platinum - Navigation 1.0.0 Manual Fix Gaps At the end of flight, you may view the spray coverage while on the ground. If the spray coverage has gaps or some lines were missed spraying, use the function keys <PrevLL> and <NextLL> to move the locked line to the gap. Then tap <SprMode> to get the guidance to spray that line. 135 Guia Platinum - Navigation 1.0.0 Manual Functions Special functions in the Map Mode include: <SprMode> When you are in the Map mode, press <SprMode> to go back to the Spray mode. <BestHead> This function calculates the best heading for grid lines and generates grid lines in this direction. Best Heading is the heading which produces the least number of grid lines. <NextHead> Guia can generate grid lines parallel to one side of the spray area. This function toggles through the sides of area starting from side 1 (corners 1 and 2); and generates lines parallel to the selected side. <ChgHead> If you know what the line heading or direction is, you can enter the heading value by using <ChgHead>. Once the heading is entered, Guia will generate grid lines in this direction. <RevrHead> This functions reverses the line heading. Line numbers will be reversed as well, i.e. first line will be last and last line will be first. <Left> <Right> <Up> <Down> These functions are used to pan or move the map left, right, up or down respectively. <PrevLL> <NextLL > <ClosestLn> <GuideLine> These functions are used to select the locked line in Map mode, make it ready for guidance when you go to the Spray mode. 136 Guia Platinum - Navigation 1.0.0 Manual Edit By tapping the EDIT icon, you will be taken to a new screen with options to edit a spray area or waypoints. 137 Guia Platinum - Navigation 1.0.0 Manual Edit Area Edit Area Edit Area is used to view and edit a spray area. 138 Guia Platinum - Navigation 1.0.0 Manual Edit Waypoint Edit Waypoint Edit Waypoint is used to view and edit cross-country waypoints (XWaypoints). 139 Guia Platinum - Navigation 1.0.0 Manual Settings By tapping the SETTINGS icon, you will be taken to a new screen with options to control the settings of the Guia Platinum. 140 Guia Platinum - Navigation 1.0.0 Manual Spraying Spraying Settings include the parameters for spraying an area. o Unit: Select your preference measurement system, Metric or U.S./Imperial. o Common Swath: Select “Yes” if you want to use the same swath width for all areas. Select “No” if you want to Guia to read the swath width in area file. Note that the swath width defined in area file may be different from the common swath width. o Spray Mult. Areas: For flying multiple areas or project, select “Separate” if you want to spray each zone separately. Select “Together” if you want to spray all zones together. o Boom Switch: “Closed” means boom switch contacts are closed when spray on. “Open” means booms switch contacts are open when spray on. o Auto Advance: Automatic advance or shift the target line after finish spraying it. If the selection is "Yes", the Auto Advance Time parameter will be shown. o Auto Advance Time: Enter the time in seconds when the target line should be shifted after finish spraying a line. 141 Guia Platinum - Navigation 1.0.0 Manual o Auto Spray On: For automatic booms. Select “GuideLine” for spray on when aircraft flying along the guide line. Select “Inside” for spray on when aircraft flying anywhere inside spray area. o Spray On Lag: Used for automatic booms. The micro relay in Guia will close contacts by this time before crossing boundary to turn spray on. o Spray Off Lag: Used for automatic booms. The micro relay in Guia will open contacts by this time before crossing boundary to turn spray off. o Pattern: Spray pattern when making a new area by AB line or manually marking boundary; or when spray pattern is not defined in area or project files. o Race Tracks: Number of lines to shift when using Race Track pattern. o Skip Tracks: Number of lines to shift when using Skip pattern. 142 Guia Platinum - Navigation 1.0.0 Manual Geodetics Geodetics Settings include parameters for area boundary and position. n Note that these parameters are used as defaults for new area generation only. The old areas have their own settings in the area or project files. n If you use a shape file, Guia will read geodetic settings from the agn file. If required information is not found, the default geodetic settings will be used. o Coordinates: Type of coordinates used for corners and waypoints. The options are Lat/Lon or UTM X/Y. o Ellipsoid Name: Type of ellipsoid or datum used for coordinates. “WGS-84” is the most common. This is very close to NAD-83. o Central Meridian (CM): Central meridian of geographical zone. Make sure the CM is correct by changing the value then check the help at the bottom of screen to see if the range of longitude values cover the longitudes of spray area. For example CM=279 covers all longitudes from 84.0 to 78.0 West. If CM = 0, it will be calculated by Guia when GPS data is available. The calculated CM will be saved to the Geodetics Settings. 143 Guia Platinum - Navigation 1.0.0 Manual n If you use shape file, you must enter the correct CM for areas defined in the shp file. o Hemisphere: Hemisphere where spray areas are. North or South, must be defined properly. o Delta X/Y/Z: Datum shifts. They must be 0 if “WGS 84” used. o Magnetic Variation: Enter negative value for East, positive value for West. 144 Guia Platinum - Navigation 1.0.0 Manual Colours Colours Settings define colors for items displayed on screen. Depending on your preference, you can select different colors for spray area, grid lines, exclusion zones, spray on data and text. 145 Guia Platinum - Navigation 1.0.0 Manual 146 Guia Platinum - Navigation 1.0.0 Manual Guidance Guidance Settings are for guidance calculations and display. o Look Ahead: This is for smooth guidance. If the value is 1.0, Guia will look ahead and provide guidance 1 second ahead of time. o Max Xtrack: Full scale for XTrack bar. Small value makes XTrack bar more sensitive. The default is 200 ft or 60m. o Obstacle Alert: This is for Guia to show warning on lightbar when aircraft is approaching an obstacle like high tower or power line. 147 Guia Platinum - Navigation 1.0.0 Manual o Sprayed Message: Select “Yes” if you want a warning on lightbar and screen when you select to fly a line already sprayed. o Spr. Outside Warning: Select “Yes” if you want a warning when you spray outside the designated area. Use this when the spray boundary is precise and spraying outside area is restricted. o Approach Flash Time: Enter time in seconds for flashing lights on lightbar when approaching area boundary. Note that you must be on the locked line to have the proper warning. o Altitude Guidance: This is a vertical bar used to guide pilot to fly and spray at a target height above ground or canopy. The target spray height and altitude scale for vertical bar must be entered. 148 Guia Platinum - Navigation 1.0.0 Manual Lightbars Lightbars Settings are for guidance and information displayed on lightbar. o Lightbar Type: Type of lightbar used with Guia. Choices are Bright Bar, Nav Bar and Pilot Indicator. o Lightbar Brightness: Default percentage of brightness of lightbar. If you always fly at night, you can enter 10% or 20%. o Set First Bar To: XTrack or Angle of Intercept. o First Bar Logic: Guidance logic for the first or top bar of lightbar. The logic can be “Bar Dir” to follow the bar direction. When bar extends to the left, steer airplane left. When bar extends to the right, steer right. “Opposite Bar Dir” means steering in the opposite direction of bar. o Set Second Bar To: XTrack or Angle of Intercept. If both bars are set to the same data, the logic of first bar will be used. o Second Bar Logic: Set guidance logic for second bar. o Left Info: Information displayed on the left side of lightbar in Spray mode. o Right Info: Information displayed on the right side of lightbar in Spray mode. 149 Guia Platinum - Navigation 1.0.0 Manual o Middle Info 1: Information displayed in the middle left of lightbar in Spray mode. o Middle Info 2: Information displayed in the middle right of lightbar in Spray mode. o WPT Left Info: Information displayed on the left side of lightbar in Waypoint mode. o WPT Right Info: Information displayed on the right side of lightbar in Waypoint mode. o WPT Middle Info 1: Information displayed in the middle left of lightbar in WPT mode. o WPT Middle Info 2: Information displayed in the middle left of lightbar in WPT mode. o LED Light Settings: Set distance for the LEDs or lights on the lightbar. The XTrack distance for each LED can be calculated automatically by Guia. The Max XTrack defines the sensitivity of lightbar. If desired, you can define the distance for each LED manually. When tapping the "LED Light Settings" button, for manual entries the display will show: To enter the distance, tap the LED number then use the Left or Right button to change the value. When done, tap to accept all changes. 150 Guia Platinum - Navigation 1.0.0 Manual Keys Keys Settings are for Control Menus used during flight. o The first column of functions is for key <I> or the Left key of the remote switches, second column for key <II> or the Right key, third column for key <III> or the Up key, and fourth column for key <IIII> or the Down key. o Each set of functions is called a Control Menu. o Depending on application mode, there are different Control Menus for each mode. The modes are displayed at the top of screen. "Old Area" for the Spray mode used when an area already exists. "New Area" for use when generating a new area. "Map Mode" for use in the Map mode. "Waypoint Mode" for use in the Waypoint mode. You should arrange the keys in the most convenient way for your application. The first set should have the functions that you use the most. Note: You don't have to select functions or keys for all sets. If you need only 10 functions in the Spray mode, you can set them all in 3 Control Menus. The fourth set can be all blank. When the 151 Guia Platinum - Navigation 1.0.0 Manual Guia finds a blank Control Menu, it will skip the rest and return to set 1. 152 Guia Platinum - Navigation 1.0.0 Manual 153 Guia Platinum - Navigation 1.0.0 Manual Display Display Settings for map rotation and information displayed on screen. o Show Lightbar: Select "Yes" to show the lightbar at the top of the main screen, "No" to turn off lightbar display. o Moving Map: Select "Yes" to have aircraft icon stationary in the center of screen and the map moving. Select "No" to have the aircraft icon moving and map stationary on screen like the display in the Guia Silver/Gold. If you select "No" for Moving Map, the following parameters will be shown: o Rotate Map: If Yes, the map of spray area will be rotated based on line direction and aircraft heading. This is also called Track Up. If No, the display will be North Up. o Aircraft Up: If Yes, the map will be flipped by 180 degrees to show the aircraft flying up screen. o Center On Aircraft: If Yes, display will be centered on position of aircraft. If the aircraft is far from area, you will not see the area. This parameter is effective when Rotate Map is NO and Aircraft Up is NO. o If you want to always show the map in the middle of display, select “NO” for Rotate 154 Guia Platinum - Navigation 1.0.0 Manual Map, Aircraft Up and Center on Aircraft. In this case, you may not see the aircraft icon if it is flying off screen. o Default Scale: Set default scale of display when first entering the Spray mode. If default scale is 0, Guia will calculate screen scale based on the size of area. o Swath Overlap: Percentage of overlap used to plot spray data. Note that this is for spray display only, not for calculating spray coverage, application rate or spray volume. o Info 1/2/3/4: The 4 fields of information displayed in the info box above the Control Menu on the screen. 155 Guia Platinum - Navigation 1.0.0 Manual Data Recording Data Recording Settings are for recording spray data. o Minimum Speed: This sets the minimum speed for data recording. Guia will record flight path and spray data when speed of aircraft is higher than or equal to the minimum speed. The unit of speed can be Km/h or MPH depending on the Unit defined in Spraying settings. o Spray ON Interval: This sets the recording period for SPRAY ON data. The default is 0.2 seconds. That means when spray is ON, the data will be recorded every 0.2 seconds or 5 times per second. o Spray OFF Interval: This sets the recording period for SPRAY OFF data. The default is 0.5 seconds. That means when spray is OFF, data will be recorded every 0.5 seconds. 156 Guia Platinum - Navigation 1.0.0 Manual Flow Controller Flow Controller Settings are for flow controller. Flow Control Type: Select the type of flow controller used with the Guia. If you have no flow controller, select "None". Flow Rate: If you have no flow controller, the Guia does not know the actual flow rate. For flow data calculations, enter the target flow rate in Liters/min or Gals/min that you will spray. The Sprayed Volume and Tank Gauge will be calculated based on your entered flow rate. If you have a flow controller, the actual flow rate is known. All flow data will be calculated based on the actual flow rate. 157 Guia Platinum - Navigation 1.0.0 Manual Manage Settings Manage Settings show a menu for managing settings. o Save settings to a file: After setting all parameters correctly, you should save the settings to a file for backup. Tap to open the Save dialog. 158 Guia Platinum - Navigation 1.0.0 Manual You can select to save the current settings to an existing file shown in the list; or make a new setting file. For new file, tap the "New File Name" box, then tap the keyboard icon. Tap the "Clear" button to clear the current name then enter a new name. 159 Guia Platinum - Navigation 1.0.0 Manual o Load settings from a file: After updating the Guia software or when desired, you can load back the settings you saved before by tapping shown for you to select the desired one. . The list of existing setting files is o Restore factory settings: If for any reason your settings do not work, you can start with the factory default settings. Then change the parameters to suite your application. Note that every time you load settings from a file or restore factory settings, you should return to the Main Menu. Then run Navigate again for the new settings to be updated before you fly. 160 Guia Platinum - Navigation 1.0.0 Manual Help By tapping the HELP icon, you will be taken to the onboard help for the Navigate and Training modules. 161 Guia Platinum - Navigation 1.0.0 Manual Navigation Help You are viewing the Navigation help now. 162 Guia Platinum - Navigation 1.0.0 Manual Home By tapping the HOME icon, you will exit the Navigation/Training menus and be taken to the Main Menu. 163 Guia Platinum - Navigation 1.0.0 Manual Index A AB Line 2, 20, 26, 28, 29, 30, 33, 37, 38, 43, 48, 56, 61, 66, 71, 75, 80, 82, 86, 87, 90, 103, 105, 107, 110, 142 AB&C - Pivot 3, 87, 88 AB&C - Squeeze 2, 82 About 2, 5 application 2, 3, 5, 14, 15, 16, 18, 20, 21, 27, 28, 29, 34, 39, 44, 49, 53, 58, 63, 68, 77, 82, 87, 92, 94, 95, 101, 103, 119, 123, 151, 155, 160 Application Info 2, 16, 18, 103 Application Type 3, 94 B Background Maps 2, 25 Best Heading 3, 113, 136 C Change Line Direction 3, 110 Closest Line 3, 108 Colours 3, 145 Control Box 3, 12, 13, 104 COR1 125, 128, 132 D Data Recording 4, 156 Display 3, 12, 13, 20, 30, 35, 40, 45, 50, 54, 59, 64, 69, 78, 83, 88, 99, 101, 103, 134, 145, 147, 149, 150, 151, 154, 155 E Edit 3, 9, 10, 14, 17, 18, 19, 129, 130, 137, 138, 139 Edit Area 3, 138 Edit Waypoint 3, 139 F fix gap 3, 135 Flow Controller 4, 28, 95, 103, 104, 157 functions 3, 12, 13, 15, 104, 132, 136, 151 G Geodetics 3, 96, 143 Guidance 3, 5, 24, 31, 32, 37, 42, 47, 51, 56, 61, 66, 67, 71, 72, 75, 76, 80, 81, 85, 86, 89, 90, 91, 99, 100, 102, 105, 108, 109, 114, 119, 124, 125, 127, 128, 129, 130, 132, 133, 134, 135, 136, 147, 148, 149 H Help 4, 5, 6, 8, 14, 25, 143, 161, 162 Home 3, 4, 14, 125, 127, 132, 133, 163 Home waypoint 127, 132 K 164 Guia Platinum - Navigation 1.0.0 Manual Keys 3, 9, 10, 11, 12, 13, 93, 94, 119, 135, 151 L Lightbars 3, 149 M Manage Settings 4, 158 Map Display 3, 20, 101 Map Mode 3, 102, 115, 134, 136, 151 mapmode 115 Mark - Manual 2, 68, 69, 73 Mark - Skip 2, 63, 64 Mark - Split 2, 53, 54 Mark - Squeeze 2, 58, 59 N Navigate/Training 2, 14 Navigation Help 4, 162 Navigation Info 3, 102 New Area 2, 12, 20, 26, 27, 28, 29, 30, 35, 40, 45, 50, 54, 56, 59, 61, 64, 66, 69, 71, 75, 77, 78, 80, 83, 88, 102, 127, 129, 142, 143, 151 New Area Settings 2, 27 New Waypoint 3, 123, 132 Next Heading 3, 115 O Obstacles 2, 22 Old Area 2, 3, 21, 92, 93, 96, 99, 143, 151 Operations 2, 9 P Project Files 3, 92, 98, 142, 143 R Reverse Heading 3, 117 S Select Areas 3, 93 Set Swath 2, 19 Settings 2, 3, 4, 9, 14, 26, 27, 28, 30, 35, 40, 45, 50, 54, 59, 64, 69, 78, 83, 88, 93, 96, 100, 101, 103, 125, 140, 141, 143, 145, 147, 149, 150, 151, 154, 156, 157, 158, 159, 160 Shape Files 3, 96, 97 Split - Boundary 2, 33, 35 Split - Center 2, 43, 45 Split - Edge 2, 38, 40 Split - Pivot 2, 48, 50 Spray Areas 3, 21, 92, 105, 144 Spray Boundary 2, 28, 77, 78, 148 Spray Patterns 3, 119 Spraying 3, 21, 22, 25, 28, 78, 102, 103, 110, 135, 141, 148, 156 Support 2, 6, 8 165 Guia Platinum - Navigation 1.0.0 Manual T to area 3, 119, 128 to home 3, 127 ToArea 128, 132 tohome 127, 132 W waypoint 2, 3, 12, 24, 102, 123, 124, 125, 126, 127, 128, 129, 130, 131, 132, 133, 137, 139, 143, 150, 151 waypoint mode 3, 24, 102, 123, 124, 125, 127, 128, 129, 132, 150, 151 WayPoints 2, 24, 126, 132, 133, 137, 139, 143 wptmode 125, 132 166