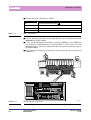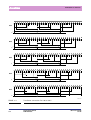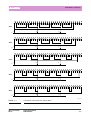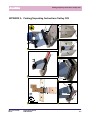
1
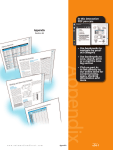
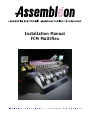
Installation Manual
FCM Multiflex
DOCUMENT DATA
MANUAL TITLE
Installation Manual FCM Multiflex
MANUAL NUMBER
4022 591 96102
PA NUMBER
(02.02) PA 1110/02
HISTORY
ISSUE
Pre-release
Second Issue
DATE
July 2002
Sept. 2002
ORDER NUMBER
4022 591 96101
4022 591 96102
REVISION CODE
02.01
02.02
Assembléon Customer Services maintains a
customer site on the internet This site provides
the latest information such as bulletins, surveys
about spare parts, manuals and software
updates. The status of this document can also
be checked.
© A s s e m b l é o n
STATUS
Replaced
Current
RELEASE DOCUMENT
N.A.
DI-FCM-183
Subscribe first to acces this information. So
complete the Support Request Form on the
Assembléon website in its entirety.
The Assembléon website:
www.assembleon.com
N e t h e r l a n d s
B . V .
All rights reserved. No part of this book may be reproduced in any form, by print, photoprint, microfilm or any other
means without the written permission from Assembléon.
HOW TO REPORT DOCUMENT IRREGULARITIES
We have endeavoured to ensure that the information in this document was correct when published. If, when
using this document, errors, omissions or anomalies are discovered, please inform us using the reply-form
attached. We thank you for this service, in advance, as it will help us to ensure that you, the customer,
receive the highest possible quality of information and service.
Manual Title:
Installation Manual FCM Multiflex
Please, don’t forget to fill-in this!
Manual Number: 4022 591 96102
PA Number:
PA 1110/02
Update Code Manual:
.
✍
FROM:
Name . . . . . . . . . . . . . . . . . . . . . . . . . . . . . . . . . . . . . . . . . . . . . . . . . . . . . . . . . . . . . . . . . . . . . .
Company . . . . . . . . . . . . . . . . . . . . . . . . . . . . . . . . . . . . . . . . . . . . . . . . . . . . . . . . . . . . . . . . . . . .
Address. . . . . . . . . . . . . . . . . . . . . . . . . . . . . . . . . . . . . . . . . . . . . . . . . . . . . . . . . . . . . . . . . . . . .
Date . . . . . . . . . . . . . . . . . . . . . . . . . . . . . . . . . . . . . . . . . . . . . . . . . . . . . . . . . . . . . . . . . . . . . . .
DOCUMENT IRREGULARITIES:
Page/Paragraph Number . . . . . . . . . . . . . . . . . . . . . . . . . . . . . . . . . . . . . . . . . . . . . . . . . . . . . . . . .
Erroneous Entry . . . . . . . . . . . . . . . . . . . . . . . . . . . . . . . . . . . . . . . . . . . . . . . . . . . . . . . . . . . . . . .
..........................................................................
..........................................................................
..........................................................................
Consequence . . . . . . . . . . . . . . . . . . . . . . . . . . . . . . . . . . . . . . . . . . . . . . . . . . . . . . . . . . . . . . . . .
..........................................................................
..........................................................................
..........................................................................
Suggestion . . . . . . . . . . . . . . . . . . . . . . . . . . . . . . . . . . . . . . . . . . . . . . . . . . . . . . . . . . . . . . . . . .
..........................................................................
..........................................................................
..........................................................................
TO:
Assembléon
Supply Centre Customer Support
P.O. Box 218
Building BAF 2
5600 MD Eindhoven
The Netherlands
Fax: +31 40 27 246 10
Document irregularities can also be
reported via the Assembléon website:
www.assembleon.com
Subscribed persons only.
Installation Manual
FCM Multiflex
Table of Contents
4022 591 96102
02.02
CHAPTER 1
Introduction . . . . . . . . . . . . . . . . . . . . . . . . . . . . . . . . 1-1
CHAPTER 2
Safety. . . . . . . . . . . . . . . . . . . . . . . . . . . . . . . . . . . . . 2-1
2.1 General . . . . . . . . . . . . . . . . . . . . . . . . . . . . . . . . 2-1
2.2 Personnel Qualification . . . . . . . . . . . . . . . . . . . . . 2-1
2.3 Caution and Warning Statements . . . . . . . . . . . . . . . 2-1
2.4 Safety Standards . . . . . . . . . . . . . . . . . . . . . . . . . . 2-2
2.5 Caution and Warning Stickers on the FCM Multiflex . . . 2-3
2.6 Electrical Safety . . . . . . . . . . . . . . . . . . . . . . . . . . 2-4
2.6.1 Main Switch Locking . . . . . . . . . . . . . . . . . 2-4
2.6.2 FCM Wiring Colours . . . . . . . . . . . . . . . . . . 2-4
2.6.3 FCM Multiflex Safety Switches . . . . . . . . . . . 2-5
2.7 ESD Precautionary Measures . . . . . . . . . . . . . . . . . . 2-6
2.8 Noise Level . . . . . . . . . . . . . . . . . . . . . . . . . . . . . 2-6
2.9 Liability. . . . . . . . . . . . . . . . . . . . . . . . . . . . . . . . 2-6
CHAPTER 3
Installation. . . . . . . . . . . . . . . . . . . . . . . . . . . . . . . . . 3-1
3.1 Machine Area . . . . . . . . . . . . . . . . . . . . . . . . . . . . 3-1
3.2 Machine Height Dimensions . . . . . . . . . . . . . . . . . . 3-2
3.3 Machine Feet Positions . . . . . . . . . . . . . . . . . . . . . 3-3
3.4 Site Installation . . . . . . . . . . . . . . . . . . . . . . . . . . 3-3
3.4.1 Contents of the Crates . . . . . . . . . . . . . . . . 3-3
Installation Manual
FCM Multiflex
C-1
3.4.2
3.5
Unpacking . . . . . . . . . . . . . . . . . . . . . . . . 3-4
3.4.2.1
Unpacking the FCM Multiflex Crate 3-4
3.4.2.2
Unpacking FCM Multiflex Feeder
Trolley Crate . . . . . . . . . . . . . . . 3-4
3.4.2.3
Unpacking Other Crates . . . . . . . 3-4
3.4.3 Transport to the Site . . . . . . . . . . . . . . . . . 3-5
3.4.4 Positioning of the FCM Multiflex . . . . . . . . . 3-5
3.4.5 Removing the Transport Securities . . . . . . . . 3-6
3.4.6 Leveling of the FCM Multiflex . . . . . . . . . . . 3-8
3.4.7 Trolley Height Adjustment . . . . . . . . . . . . 3-10
3.4.7.1
Conveyor Height . . . . . . . . . . . 3-11
3.4.7.2
Adjustment of the Trolley . . . . . 3-12
Mounting Accessories and Options . . . . . . . . . . . . . 3-13
CHAPTER 4
Connections to Services . . . . . . . . . . . . . . . . . . . . . . . . 4-1
4.1 Electrical . . . . . . . . . . . . . . . . . . . . . . . . . . . . . . . 4-1
4.1.1 Safety Instructions before Connecting the
Machine to the Mains . . . . . . . . . . . . . . . . 4-2
4.1.2 Mains Voltage Connection and Adaption . . . . 4-3
4.1.3 Switching On and Checking the Mains. . . . . . 4-8
4.1.4 External Emergency Circuit . . . . . . . . . . . . . 4-8
4.2 Compressed Air . . . . . . . . . . . . . . . . . . . . . . . . . . . 4-9
CHAPTER 5
Communication . . . . . . . . . . . . . . . . . . . . . . . . . . . . . . 5-1
5.1 SMEMA Interface Connections . . . . . . . . . . . . . . . . . 5-1
5.2 Network Connections . . . . . . . . . . . . . . . . . . . . . . . 5-2
CHAPTER 6
Software Installation . . . . . . . . . . . . . . . . . . . . . . . . . . 6-1
CHAPTER 7
Final Testing . . . . . . . . . . . . . . . . . . . . . . . . . . . . . . . . 7-1
7.1 Putting into Operation . . . . . . . . . . . . . . . . . . . . . . 7-1
7.2 Performing the Dry Run Test . . . . . . . . . . . . . . . . . . 7-1
7.3 Running the Acceptance Test . . . . . . . . . . . . . . . . . 7-1
CHAPTER 8
Moving/Transporting of the System. . . . . . . . . . . . . . . . 8-1
8.1 Introduction. . . . . . . . . . . . . . . . . . . . . . . . . . . . . 8-1
8.2 Preparation . . . . . . . . . . . . . . . . . . . . . . . . . . . . . 8-1
8.3 Movement . . . . . . . . . . . . . . . . . . . . . . . . . . . . . . 8-1
8.4 Installation . . . . . . . . . . . . . . . . . . . . . . . . . . . . . 8-1
8.5 Transport Material . . . . . . . . . . . . . . . . . . . . . . . . . 8-2
APPENDIX A Packing/Unpacking Instructions Trolley FCM . . . . . . . . . A-1
C-2
Installation Manual
FCM Multiflex
4022 591 96102
02.02
Introduction
CHAPTER 1 Introduction
Before installing the FCM Multiflex system, make sure that the customer has
prepared the site in accordance with the pre-installation instructions (see PreInstallation manual).
The information in this manual is intended to be a guide for the installation of a
basic FCM Multiflex system, possibly with built-in options.
The described (re-)installation may only be carried out by a trained service/ maintenance engineer.
4022 591 96102
02.02
Installation Manual
FCM Multiflex
1-1
Introduction
1-2
Installation Manual
FCM Multiflex
4022 591 96102
02.02
Safety
CHAPTER 2 Safety
2.1 General
For the correct and safe use of the FCM Multiflex system, both the operating and
service personnel should follow generally accepted safety procedures. In addition,
they must comply with the safety precautions as specified in this manual.
Where necessary, special warning and caution statements are used throughout this
manual. These statements will be explained in this chapter.
Moreover, all warning and caution statements present on any sticker on the
FCM Multiflex system are explained in this chapter.
2.2 Personnel Qualification
Operation, adjustment, maintenance and repair of the FCM Multiflex system may
only be carried out by trained and qualified personnel who are aware of the
hazards involved.
The following training levels are defined:
TABLE 2-1
Level
Qualifications
Operator
Official Assembléon training course or training received from a
qualified maintenance engineer.
User or Supervisor
Official Assembléon training course at one of the official
Assembléon Training Centers.
Maintenance level 1 or Maintenance
level 2
Official Assembléon training course at one of the official
Assembléon Training Centers.
Personnel qualification
2.3 Caution and Warning Statements
!
WARNING:
To urge attention in order to prevent personal injuries or dangerous situations.
CAUTION
CAUTION:
4022 591 96102
02.02
To urge attention in order to prevent damage to equipment.
Installation Manual
FCM Multiflex
2-1
Safety
2.4 Safety Standards
The safety of the FCM Multiflex system is in accordance with following CE directives:
■ Machine directive 89/392/EEC including amendments.
■ Low Voltage directive 73/23/EEC including amendments.
■ EMC directive 89/336/EEC including amendments.
To be handled by the FCM Multiflex system, products are to be inserted at the FCM’s
run-in section opening, and they will leave via its run-out section opening.
Moreover, components to be placed by the FCM Multiflex system are picked up from
the attached component feeders via the component pick-up area opening. Because
of this, the run-in and run-out section openings as well as the component pick-up
area openings are to be considered as functional items of the FCM Multiflex.
!
WARNING:
It is not allowed to touch any part in the run-in section, the run-out section
or the component pick-up area opening whenever the FCM machine is
running.
!
WARNING:
2-2
Always disconnect the FCM from the mains supply before cleaning the
housing. Never use excessive water to avoid electrical short-circuits caused
by water dripped into switches.
Installation Manual
FCM Multiflex
4022 591 96102
02.02
Safety
2.5 Caution and Warning Stickers on the FCM Multiflex
Pictogram
Category
Meaning
WARNING
Danger.
High voltage!
WARNING
Danger.
Moving parts, crushing risk!
WARNING
Danger.
Rotating parts, risk of being drawn in!
WARNING
Danger.
Class 1 laser product. Risk of laser
radiation!
Do not enter the laser source area with
reflective material, as this may expose
you to reflected laser radiation.
CAUTION
Very sensitive part. Handle with care.
CAUTION
Wiring colors in accordance with
IEC 60204-1.
(see FIGURE 2-1)
82 Vdc
190 - 480 Vac
L1
45 Vdc
L2
24 Vdc
L3
230/400 Vac
RAIL 1
PE
RAIL 2
ESD terminal
IEC 60204-1
TABLE 2-2
Caution and warning stickers on the FCM Multiflex
4022 591 96102
02.02
Installation Manual
FCM Multiflex
2-3
Safety
2.6 Electrical Safety
2.6.1
Main Switch Locking
When the FCM Multiflex system is switched off by the FCM Multiflex main switch,
this main switch must always be locked by a padlock!
2.6.2
FCM Wiring Colours
When working on the FCM’s electrical system, always first switch off the main
switch and lock by a padlock.
The wiring colours are in accordance with IEC 60204-1, see FIGURE 2-1. The cable
which includes L1, L2 and L3 between connection and main switch, is marked
Yellow.
82 Vdc
190 - 480 Vac
L1
45 Vdc
L2
24 Vdc
L3
230/400 Vac
RAIL 1
PE
RAIL 2
ESD terminal
IEC 60204-1
FCM0581a.eps
FIGURE 2-1
FCM Multiflex wiring colours, in accordance with IEC 60204-1
2-4
Installation Manual
FCM Multiflex
4022 591 96102
02.02
Safety
2.6.3
FCM Multiflex Safety Switches
Interlocked
safety switch
Interlocked
safety switch
Emergency
stop
ESD
Earth Facility
Main
Switch
ESD
Earth Facility
Servo Power On
Emergency stop
FCM5301a cz.fm
FIGURE 2-2
Location of FCM Multiflex Safety Switches
Switch
Consequence
Emergency stop
Switch off servo power.
Interlocked safety switch
Switch off servo power.
Main switch
Switch off main power.
TABLE 2-3
4022 591 96102
02.02
Installation Manual
FCM Multiflex
2-5
Safety
2.7 ESD Precautionary Measures
■ All printed circuit boards that are part of the FCM Multiflex must be transported
and stored in ESD-protected bags.
■ Any person handling an FCM Multiflex printed circuit board must adequately be
earthed - e.g. by means of a bracelet with earth cable - to prevent destructive
electrostatic discharge through the printed circuit board.
■ In areas that are not ESD protected, the removable protective covers must be
mounted on all placement modules.
■ Handling of FCM Multiflex printed circuit boards should be restricted as much as
possible.
■ Repairs to various printed circuit boards must be carried out in an ESD-protected
area.
2.8 Noise Level
Average sound-pressure level measured at 3 operator positions at height =
1.5m and distance = 1m.
≤ 79 dB(A)
Sound pressure at operator’s position.
≤ 78 dB (A)
Average environmental noise level during measurement
53 dB(A)
TABLE 2-4
2.9 Liability
Assembléon shall not be liable for any costs, damages or personal injuries if the FCM
Multiflex system is not used according to the safety rules given in this chapter.
2-6
Installation Manual
FCM Multiflex
4022 591 96102
02.02
Installation
CHAPTER 3 Installation
3.1 Machine Area
Check whether the machine area is according to FIGURE 3-1.
All dimensions are in mm.
1000
Check that there is enough space to manoeuvre the fork-lift truck with the machine
on its forks or to use air-ball rollers.
Fixed Transport Rail
Operator area
(front)
1000
960
2060
FCM machine
top view
4060
*
Service & maintenance area
(rear)
3120
Sizes in mm
* With four feeder-trolleys included
FCM5048a cz.eps
FIGURE 3-1
Machine area
4022 591 96102
02.02
Installation Manual
FCM Multiflex
3-1
Installation
3.2 Machine Height Dimensions
The FCM Multiflex has the following height dimensions, see FIGURE 3-2.
1770 mm
1290 mm
940 mm
110_037e2-Multiflex cz.fm
FIGURE 3-2
Machine height dimensions
3-2
Installation Manual
FCM Multiflex
4022 591 96102
02.02
Installation
3.3 Machine Feet Positions
Measure and mark the feet positions on the floor and check if the feet are resting
directly on a concrete floor, see FIGURE 3-3.
3120
1920
570
310
1820
50
50
630
1020
Placement Modules
910
790
Centre of Mass: 3000 kg
Height (relative to ground) = 500
2060
280
Feeder Trolley
Fixed Transport Rail
960
Run-out
200
30
333
Run-in
FCM5054a cz.eps
FIGURE 3-3
Machine feet positions
3.4 Site Installation
NOTE:
Verify the lift capacity of the pallet truck (3000 kg).
3.4.1
Contents of the Crates
Item
FCM Multiflex
Feeder trolleys
4/crate
1/crate
Feeders
Accessories
Crated item
Weight (kg)
2600
400
100
330
270
TABLE 3-1
Contents of the Crates
4022 591 96102
02.02
Installation Manual
FCM Multiflex
Dimensions (mm)
3250 x 1830 x 1630
2360 x 1150 x 1200
720 x 1150 x 1200
1410 x 850 x 1280
1270 x 1020 x 1220
Uncrated item
Weight (kg)
2300
70
300
240
Dimensions (mm)
3120 x 1615 x 1290
475 x 950 x 950
1400 x 840 x 1160
1260 x 1010 x 1100
3-3
Installation
3.4.2
3.4.2.1
Unpacking
Unpacking the FCM Multiflex Crate
■ Remove the cover and sides of the FCM Multiflex system crate and inspect the
machine for transport damages.
■ Remove the four nuts underneath the pallet. Use an M24 open-ended spanner
(width 36 mm) see FIGURE 3-4.
■ Lift the system with a fork-lift truck from the pallet and unscrew the four thread
ends see FIGURE 3-4.
■ Mount the four feet, the two ESD-feet at the front of the machine and the two
black feet at the rear, see FIGURE 3-4.
FCM5059a cz.eps & FCM5060a cz.eps
FIGURE 3-4
3.4.2.2
Unpacking FCM Multiflex Feeder Trolley Crate
■ Refer to Appendix A, Packing / Unpacking Instructions Trolley FCM.
NOTE:
3.4.2.3
Preserve the crate for future movings.
Unpacking Other Crates
■ Remove the cover and sides of the crates and inspect the accessories for
transport damages.
3-4
Installation Manual
FCM Multiflex
4022 591 96102
02.02
Installation
3.4.3
Transport to the Site
The unpacked system can be transported to the site in two ways, depending on the
width of doors and corridors:
■ If the width is greater than 3116 mm, one fork-lift truck on the rear (where the
red-coloured transport bracket is mounted) can be used, see FIGURE 3-5.
■ If the width is less than 3116 mm, two fork-lift trucks must be used on the short
sides of the system.
For dimensions and weights of the uncrated system, see section 3.4.1.
Rear side of the FCM Machine
Rear side of the FCM Machine
FIGURE 3-5
Transport to the site
3.4.4
Positioning of the FCM Multiflex
Determine where the machine has to be placed and mark the positions of the feet.
Move the machine onto the marked positions and lower the machine gently.
4022 591 96102
02.02
Installation Manual
FCM Multiflex
3-5
Installation
3.4.5
Removing the Transport Securities
■ Remove the transport “beams” at the rear side of the machine by removing the
bolts holding the beams, refer to FIGURE 3-6.
4x
Rear side of the FCM Machine
FCM5027a.fm
FIGURE 3-6
Red-coloured transport brackets on the rear of the FCM Multiflex
3-6
Installation Manual
FCM Multiflex
4022 591 96102
02.02
Installation
■ Remove the transport brackets securing the placement modules to the base of
the FCM Multiflex, refer to FIGURE 3-7.
4x
FCM5203a.fm
FIGURE 3-7
Red-coloured transport brackets that secure the placement modules
■ Remove the two red-coloured transport brackets on the left and right side of the
transport beam inside the FCM Multiflex, see FIGURE 3-8.
4022 591 96102
02.02
Installation Manual
FCM Multiflex
3-7
Installation
X-transport
Note: Also for right-end of the X-transport
FIGURE 3-8
The red-coloured transport brackets on the left and the right side of the transport beam
NOTE:
Preserve the removed transport brackets and material for future movings
of the machine.
NOTE:
Adjust the conveyors of all FCMs in the factory to the same height, if possible.
3.4.6
Leveling of the FCM Multiflex
■ Loosen the nuts which tighten the feet, refer to FIGURE 3-10.
■ Turn the right-hand rear side foot up so the foot does not affect the leveling of
the machine.
3-8
Installation Manual
FCM Multiflex
4022 591 96102
02.02
Installation
■ Adjust the front feet so the conveyer height of the FCM Multiflex is equal to the
height of the other flowline equipment. According SMEMA standards the
conveyer height must be between 940 mm and 965 mm (37” and 38” ).
■ Open the covers and placement modules of the machine.
■ Place a spirit level on the transport of the FCM Multiflex in both the length and
depth direction of the machine, refer to FIGURE 3-8.
■ The level of the machine must be within 0.1 mm/meter.
■ Repeat the level adjustment until the machine is leveled.
■ When the machine is leveled, the three feet must be locked.
■ Turn the right-hand rear side foot down until it touches the floor.
■ To ensure the load of the feet is equal to each other, the right-hand rear side
foot must be tightened clockwise two facets of the nut.
■ After all the locking nuts have been tightened check the level of the machine
again, correct if necessary.
■ Attach the machine to the floor using the clamps, refer to FIGURE 3-10.
Spirit level
View according arrows
(without Placement Modules)
FIGURE 3-9
Positions for the spirit-level
4022 591 96102
02.02
Installation Manual
FCM Multiflex
3-9
Installation
Nut
Retaining clamp
Machine Foot
FIGURE 3-10
3.4.7
Detail of machine foot
Trolley Height Adjustment
Exchangeability of trolleys between FCMs is improved when it is taken into account
that the floor condition is according to the floor specifications as is described in
the Pre-Installation Manual FCM Multiflex and the trolleys have been adjusted
according to the procedures.
The Feeder Trolley FCM Multiflex is designed in such a way that a one-time
adjustment of a trolley guarantees exchangeability between all trolley positions on
an FCM Multiflex. This is if the FCM Multiflex is adjusted within SMEMA range (940
mm - 965 mm or 37” – 38” ). If a trolley is used on other FCMs in a factory they
might have to be readjusted if the difference in height between the highest FCM
Multiflex and the lowest FCM Multiflex is more than 13 mm.
If an FCM Multiflex is adjusted on the lower end of the SMEMA range then the
trolley interface can collide with the castings on the FCM Multiflex (FIGURE 3-11).
If an FCM Multiflex is adjusted at the upper end of the SMEMA range then the inlet
of the trolley can collide with the base arm of the FCM Multiflex (FIGURE 3-11).
!
WARNING:
3-10
Do not tilt the trolley with the trolley arms over the base arm of the FCM
because this can cause breaking of the trolley arms.
Installation Manual
FCM Multiflex
4022 591 96102
02.02
Installation
Trolley interface casting base
FIGURE 3-11
3.4.7.1
Trolley inlet/base arm
Trolley interface casting base & Trolley inlet/base arm
Conveyor Height
Adjust the conveyor height of all the FCMs in the factory, if possible, to the same
height within SMEMA range or at least within 13 mm of each other (FIGURE 3-12).
It is best to do so during initial installation of FCMs. This improves exchangeability
of trolleys between several FCMs and prevents re-adjustment of trolleys.
< 13
13 mm
mm
A
A
FCM5087a cz.eps
FIGURE 3-12
Adjustment of conveyor height
4022 591 96102
02.02
Installation Manual
FCM Multiflex
3-11
Installation
3.4.7.2
Adjustment of the Trolley
■ Define the highest height (A) between the floor and the top of the base arms
(positioning block) of all FCMs in the factory (FIGURE 3-12).
■ Turn the trolley over and loosen screws 1 and 2 a bit, which lock screws 3 and 4
(FIGURE 3-13).
Adjustment screws and step
Bottom of trolley
FIGURE 3-13
Bottom of trolley & Adjustment screws and step
■ Place the trolley upright.
■ Adjust the height of the trolley to the highest A+4 mm (FIGURE 3-14) by turning
screw 3 (raise trolley: turn screw 3 clockwise, lower trolley: turn screw 3 counter
clockwise) with the trolley removed from the FCM.
■ Move the trolley towards the machine so that the ball (FIGURE 3-14) of the
trolley inlet touches the base arm. Do NOT lift the trolley.
Trolley inlet
Trolley interface plate / transport
FIGURE 3-14
Trolley inlet & Trolley interface plate / transport
3-12
Installation Manual
FCM Multiflex
4022 591 96102
02.02
Installation
■ Level the trolley by adjusting screw 4 (FIGURE 3-13) (move trolley towards frontrail by turning screw 4 clockwise). The trolley is leveled when the distance
between trolley interface plate and front-rail is 5 mm (FIGURE 3-14).
NOTE:
Adjusting the distance between interface plate and front rail to 5 mm does
NOT affect the pick position. The pick position is fixed when the trolley is
lifted.
■ Turn the trolley over again and retighten screws 1 and 2 (FIGURE 3-13).
■ Always check if the wheels closest to the FCM Multiflex are free from the ground
and if the step (FIGURE 3-13) can be lifted when the trolley is in the upper
position. If not, readjust the FCM Multiflex and trolley according to the
procedures.
3.5 Mounting Accessories and Options
■ Unpack the lamp pole, mount it on top of the run-out section with four screws
and connect the cable.
■ Unpack the computer, and shift it into the frame underneath the run-out
section.
CAUTION
CAUTION:
Verify if the computer voltage is set to 220 Volt.
■ Plug the mains cable into the computer.
■ Unpack the keyboard, and place it on the keyboard support, mounted in front of
the run-out section.
■ Connect the keyboard/mouse cable with the Y-intermidiate cable to the
computer.
■ Adjust the keyboard table height by partly loosening the 2 wing nuts situated
below the keyboard table. Shift the table to the desired height and tighten the 2
wing nuts.
■ Unpack the monitor, and shift it inside the monitor support.
■ Connect the mains cable to the monitor.
■ Route the monitor video cable via the monitor arm, and the hole at the rear, into
the video extension cable.
■ Plug the bitbus cable into the computer.
■ Plug the video cable of the WVM (if used) into the computer.
■ Plug the RVS/BI cables (if used) into the computer.
4022 591 96102
02.02
Installation Manual
FCM Multiflex
3-13
Installation
FCM5062a cz.eps
FIGURE 3-15
Mounting Accessories and Options
3-14
Installation Manual
FCM Multiflex
4022 591 96102
02.02
Connections to Services
CHAPTER 4 Connections to Services
4.1 Electrical
NOTE:
To prevent compensating currents occurring in the communication between
machine and connected hardware, it is compulsory to supply the connected
hardware and the machine from the same wall socket. If such a supply
socket is not available, connect the hardware to the service socket at the
left side (seen from the front of the machine) of the machine. NEVER use
an “external” socket, as it is very likely that the bit bus connection will be
damaged!
SMEMA interface connector
Rear side of the FCM Machine
SMEMA ground stud
Thin wire Ethernet
connector (optional)
Gland for mains cable
SMEMA ground stud
Feed-through hole
for mains ducting pipe
Bulk head coupling for compressed air
FCM5055a.eps
FIGURE 4-1
Connections to services
4022 591 96102
02.02
Installation Manual
FCM Multiflex
4-1
Connections to Services
4.1.1
Safety Instructions before Connecting the Machine to the Mains
■ Set the system main switch to OFF (on the main switch panel in front of the
run-out section, see FIGURE 4-2).
■ Ensure that the mains supply to the system is inactive by removing the relevant
factory fuses.
■ Remove fuses F1 to F3 (25 A), F4 to F6 (50 A) and F7 to F9 (10 A) in the power
supply/transport controller cabinet, switch off S1 and press the handle of circuit
breaker F12 downwards (tripped position, see FIGURE 4-3).
Emergency
stop
ON
OFF
ESD
Earth Facility
Main
Switch
Phase indicator
Servo Power On
Emergency stop
FCM5301b cz.fm
FIGURE 4-2
Main control panel
4-2
Installation Manual
FCM Multiflex
4022 591 96102
02.02
Connections to Services
Fuses (F4 to F9)
Transformer Connections (T1)
CONTR
V1
P1
External Safety
Connection (X7.1 & 7.2)
Trafo T1
F4
V2
F5
F6
F7
F8
F9
A1
K2
K4
24
2
K6
F10
C1
C2
1
X7
Rail 2
Rail 1
ON
F1
F2
F3
PE
S1
1
X2
X3
X5
V3
3
5
X6
ON
K5
OFF
F12
X1
OFF
Earth Rail
2
4
6
Vacuum Pump Switch
Fuses (F1 to F3)
Primary side F12
(to measured 220V ± 10%)
PE
50
60
L1
L2
L3
Mains cable
60Hz connection
FCM5063a.fm
FIGURE 4-3
Front view of the power supply/transport controller cabinet
4.1.2
Mains Voltage Connection and Adaption
If the cable is routed through a ducting pipe, the pipe can be fed through the hole
in the right-hand side of the FCM Multiflex base (seen from the rear, see FIGURE 41). This side is provided with four holes to mount the ducting pipe to the side.
■ Feed the mains cable (4 x 2.5 mm2 max., diameter max. 16 mm) through the
mains gland.
4022 591 96102
02.02
Installation Manual
FCM Multiflex
4-3
Connections to Services
■ Connect the mains cable wires as follows:
TABLE 4-1
Mains Cable
Power supply/transport controller cabinet
Earth
PE earth stud marked with sticker
Phase 1
X1.L1
Phase 2
X1.L2
Phase 3
X1.L3
Mains connections
■ Check if the interconnections on terminal block T1 are in accordance with the
nominal local supply voltage.
■ If not, choose the appropriate settings according to FIGURE 4-6 and FIGURE 4-7
and change the interconnections on terminal block T1. This ensures that the
tolerance range of the mains voltage matches the specified operating range of
the FCM Multiflex.
■ If a 60 Hz mains frequency is used than connect points X1.50 and X1.60 (see
FIGURE 4-3).
0025109 h
9
F4
F1
F2
F5
F6
F7
F8
F9
F3
FCM5065a cz.eps
FIGURE 4-4
Location of the T1 connector
4-4
Installation Manual
FCM Multiflex
4022 591 96102
02.02
Connections to Services
CAUTION
CAUTION:
Do not select the setting of the interconnections based on the instantenously measured value of the mains voltage because the voltage
varies in time.
Actual connector
1
6
1
12
7
18
13
18
PE
T1 connector
T1 connector
1 2
3
4 5
6
1
2
3
4 5
6
7 8
9 10 11 12
7 8
9 10 11 12 13 14 15 16 17 18 13 14 15 16 17 18
Diagram
FCM5083a.eps
FIGURE 4-5
T1 connector
4022 591 96102
02.02
Installation Manual
FCM Multiflex
4-5
Connections to Services
1
2
3
4
5
6
1
2
3
4
5
6
7
8
9 10 11 12
7
9 10 11 12 13 14 15 16 17 18 13 14 15 16 17 18
8
190 V
X1
9
1
10
2
3
4
5
6
1
2
3
4
5
6
7
11
8
9 10 11 12
7
9 10 11 12 13 14 15 16 17 18 13 14 15 16 17 18
8
200 V
X1
9
1
10
2
3
4
5
6
1
2
3
4
5
6
7
11
8
9 10 11 12
7
8
9 10 11 12 13 14 15 16 17 18 13 14 15 16 17 18
208 V
9
10
11
X1
1
2
3
4
5
6
1
2
3
4
5
6
7
8
9 10 11 12
7
8
9 10 11 12 13 14 15 16 17 18 13 14 15 16 17 18
230 V
9
10
11
X1
1
2
3
4
5
6
1
2
3
4
5
6
7
8
9 10 11 12
7
8
9 10 11 12 13 14 15 16 17 18 13 14 15 16 17 18
240 V
9
X1
10
11
FCM5064a.fm
FIGURE 4-6
Transformer connections for 190 to 240 V
4-6
Installation Manual
FCM Multiflex
4022 591 96102
02.02
Connections to Services
1
2
3
4
5
6
1
2
3
4
5
6
7
8
9 10 11 12
7
8
9 10 11 12 13 14 15 16 17 18 13 14 15 16 17 18
380 V
9
10
11
X1
1
2
3
4
5
6
1
2
3
4
5
7
6
8
9 10 11 12
7
8
9 10 11 12 13 14 15 16 17 18 13 14 15 16 17 18
400 V
9
10
11
X1
1
2
3
4
5
6
1
2
3
4
5
6
7
8
9 10 11 12
7
8
9 10 11 12 13 14 15 16 17 18 13 14 15 16 17 18
416 V
X1
9
1
10
2
3
4
5
6
1
2
3
4
5
6
7
11
8
9 10 11 12
7
8
9 10 11 12 13 14 15 16 17 18 13 14 15 16 17 18
460 V
9
10
11
X1
1
2
3
4
5
6
1
2
3
4
5
6
7
8
9 10 11 12
7
8
9 10 11 12 13 14 15 16 17 18 13 14 15 16 17 18
480 V
9
10
11
X1
FCM5066a.fm
FIGURE 4-7
Transformer connections for 380 to 480 V
4022 591 96102
02.02
Installation Manual
FCM Multiflex
4-7
Connections to Services
4.1.3
Switching On and Checking the Mains
CAUTION
CAUTION:
Follow this procedure to prevent machine damage.
1. Replace the factory fuses of the mains supply, and switch on the mains supply.
2. Set the system main switch to ON.
3. Check the voltage on the primary side of F12 with respect to the earth rail. It
should read 220 V ± 10%. If not, refer to section 4.1.2.
4. Switch on F12. If the phase detector lamp on the main switch panel lights then
continue with the following steps. If the lamp does not light interchange two
phases on the connectors L1 to L3 according previously described steps.
5. Switch on S1. The vacuum pump should start running, see FIGURE 4-3.
6. Set the main switch to off.
7. Re-install fuses F1 to F3 (25A), fuses F4 to F6 (50A) and fuses F7 to F9 (10A),
see FIGURE 4-3.
8. Set the main switch to on. The phase-detector lamp on the main switch panel
should light, indicating that the three phases are present.
4.1.4
External Emergency Circuit
An external emergency circuit can be connected to points X7.1 and X7.2 of the
power supply/transport controller cabinet, see FIGURE 4-3. This is done by
removing the interconnection between X7.1 and X7.2. The circuit must consist of
one or more mechanical interrupt contacts.
!
WARNING:
4-8
Due to safety regulations it is prohibited to bypass the safety interlock
circuit.
Installation Manual
FCM Multiflex
4022 591 96102
02.02
Connections to Services
4.2 Compressed Air
The compressed air supply can be connected by metal pipes or hoses. To prevent
electrical earth loops and transfer of vibration, it is recommended to connect a
piece of flexible hose between the fixed pipe and the system.
Subject
Requirements
COMPRESSED AIR SUPPLY
TABLE 4-2
- pressure
6 x 10⁵ - 8 x 10⁵ Pa
- flow
65 NI/minute
- oil content
≤ 0.1 mg/m3
- dew point
< 2 °C at 7 x 10⁵ Pa
< 4 °C at 7.2 x 10⁵ Pa
- dust particle size
< 10 µ m
Conditions Checklist Compressed Air
■ Fit a hose pillar or coupling to the G1/4 coupling, located at the left of the air
supply panel in the power supply controller cabinet, see FIGURE 4-8.
■ Connect the hose to the hose pillar or coupling.
■ Turn the compressed air supply on.
■ Set the 3-position slide valve (see FIGURE 4-8) in the “open” position (handle to
the right).
■ Check the pressures on the gauges mounted on the filter regulator (see FIGURE 4-8).
■ Adjust the pressures by means of the adjustment knobs, one to 5.7 bar and the
other to 2.6 bar.
4022 591 96102
02.02
Installation Manual
FCM Multiflex
4-9
Connections to Services
FCM5035a cz.eps
FIGURE 4-8
Vacuum and compressed air connections
4-10
Installation Manual
FCM Multiflex
4022 591 96102
02.02
Communication
CHAPTER 5 Communication
5.1 SMEMA Interface Connections
All interface connections are according to the SMEMA standard. For interfacing the
system to the foregoing and following equipment, the SMEMA cable delivered with
the system must be used.
For the location of the SMEMA interface connectors, see FIGURE 4-1.
For a specification of the SMEMA interface cable, see FIGURE 5-1, see FIGURE 5-2
and see TABLE 5-1.
Direction of the boards
FCM Multiflex
Upstream module
24V
1
1
2
2
Downstream module
24V
Not busy
1
1
2
2
BUSY
3
3
24V
Not busy
Board
Available
3
3
BUSY
Board
Available
24V
Board
Available
Board Available
4
4
4
4
SD 2282
FIGURE 5-1
SMEMA interface
1
2
3
4
5
6
7
8
9
10
11
12
13
14
103_084
FIGURE 5-2
SMEMA Inlet Connector (front view).
PIN
FUNCTION
1
2
2
24V from previous module
1 - 2 Closed (connected) = FCM Multiflex Not Busy
1 - 2 Open (not connected) = FCM Multiflex Busy
3
4
24V from FCM Multiflex
3 - 4 Closed (connected) = ‘Board Available’ from previous module
TABLE 5-1
SMEMA Inlet
4022 591 96102
02.02
Installation Manual
FCM Multiflex
5-1
Communication
5.2 Network Connections
If the system has to communicate with a Production Preparation System (PPS),
Production Control System (PCS) or another computer system, a thin wire LAN
ethernet cable (software protocol TCP/IP) can be connected to the optional
etherlink III card at the rear of the computer.
The location of the thin wire connector on the computer depends on the used
etherlink III card.
5-2
Installation Manual
FCM Multiflex
4022 591 96102
02.02
Software Installation
CHAPTER 6 Software Installation
NOTE:
An FCM Multiflex system is factory installed with the latest version of
the FC.
■ Set the main switch to ON
■ Switch on the computer and the monitor
■ First the operating system (NT) will start up, after a while the FCM Multiflex
machine software will automatically start up
OPER
FIGURE 6-1
OK
FCM Multiflex system controller screen
■ If the system displays the FCM Multiflex system controller screen, no installation
is needed, otherwise the software must be installed as described in the FCM
Multiflex Controller Manual.
4022 591 96102
02.02
Installation Manual
FCM Multiflex
6-1
Software Installation
6-2
Installation Manual
FCM Multiflex
4022 591 96102
02.02
Final Testing
CHAPTER 7 Final Testing
7.1 Putting into Operation
■ Set the main switch to ON. The phase-detector lamp should light.
■ Switch on the computer and the monitor (these should normally be in the
switched-on state).
■ Make sure that the PCB width and thickness of the transport are according to
the Action Spec. If not, proceed as described in the User Manual.
■ Operate push button S5, SERVO POWER ON. The SERVO POWER ON lamp should
light.
■ Check the nozzles according to the Action Spec. Proceed as described in the User
Manual.
■ Make sure that the feeder positions are according to the Action Spec. If not,
proceed as described in the User Manual and the Feeder Manual.
■ Perform the calibration procedure as described in the Service Manual.
7.2 Performing the Dry Run Test
■ Load the Action spec. from disc with the Action Spec > Copy function from the
dialogue function.
■ Enter the order with the Order > Entry function.
■ Set the system to simulation mode with the Configuration > FCM System
parameters dialogue function.
■ The boards may possibly be loaded, although the system can operate in simulation mode without boards.
■ Start the system with the Production > Start dialogue function.
■ Let the system run for a couple of minutes.
7.3 Running the Acceptance Test
The final phase of the installation procedure is the completion of the “Customer
Acceptance Test” or the “Standard Acceptance Test” as agreed in the sales contract.
4022 591 96102
02.02
Installation Manual
FCM Multiflex
7-1
Final Testing
7-2
Installation Manual
FCM Multiflex
4022 591 96102
02.02
Moving/Transporting of the System
CHAPTER 8 Moving/Transporting of the System
8.1 Introduction
This chapter is meant to inform the customer how an installed FCM Multiflex system
in a flowline can be removed out of the flowline for maintenance or re-installation
to another location, without damaging the FCM Multiflex system.
Directives will be given for a smooth re-installation such as cautions and warnings
to take note of if an FCM Multiflex system is already installed.
In case of doubt, your Assembléon Customer Support representative will be
available for professional advice.
8.2 Preparation
CAUTION
CAUTION:
Never use a fork-lift truck without first reading these preparation steps!!
■
■
■
■
Remove the installed trolleys.
Disconnect the power supply to the FCM Multiflex system.
Disconnect the air connection to the FCM Multiflex system.
Look if the FCM Multiflex system is connected with the preceding and/or
succeeding system(s). If this is the case, remove this/these connection(s).
■ Secure the system by means of the relevant red-coloured transport brackets.
If the transport brackets are no longer on site, they can be ordered from
Assembléon. See section 8.5.
8.3 Movement
To move the FCM Multiflex system, correctly use the information described in
CHAPTERS 3 to 7 of this manual.
8.4 Installation
To (re-)install the FCM Multiflex system correctly, use the information described in
CHAPTERS 3 to 7 of this manual, being an installation guide for a basic FCM
Multiflex system, possibly with built-in options.
4022 591 96102
02.02
Installation Manual
FCM Multiflex
8-1
Moving/Transporting of the System
8.5 Transport Material
A Transport Material Kit FCM can be ordered with Service Ordering code 4022 591 87740.
The kit consists of the following material:
Qty
Description
Function
Ordering Code
1
Transport bracket
To lift the FCM with a fork truck
4022 510 32780
1
X-transport bracket
To secure the X-beam (left side)
4022 510 33320
2
Washer 6.4 x 18
To mount X-transport bracket
2522 600 27209
2
Socket head screw M6 x 50
To mount X-transport bracket
2522 006 04062
1
X-transport bracket 1
To secure the X-beam (right side)
4022 510 34910
2
Washer 6.4 x 18
To mount X-transport bracket 1
2522 600 27209
2
Socket head screw M6 x 50
To mount X-transport bracket 1
2522 006 04062
1
PM cap support
To support the PMs on the rear side
4022 510 35950
4
Socket head screw M10 x 30
To mount the PM cap support
2522 006 04095
4
Curved spring washer 10.2
To mount the PM cap support
2522 728 04009
4
Hex nut M10
To mount the PM cap support
2522 401 09016
8
Strip
To mount on front side casting for PM
securing
4022 512 25840
16
Socket head screw M6 x 20
To mount the strip on front side casting
2522 006 04054
16
Washer 6.4 x 18
To mount the strip on front side casting
2522 600 27209
4
Strip
To secure PMs
4022 512 25900
8
Pull rods
To connect strip on casting with strip
on PM
4022 512 25890
16
Hex nuts M6
To mount the rods to the strips
2522 401 09013
16
Washer 6.4 x 18
To mount the rods to the strips
2522 600 27209
TABLE 8-1
If the FCM Multiflex should be moved externally, the following sets with packaging
material can be ordered:
Description
Ordering Code
Set of packaging material for FCM Mutliflex
4022 496 .......
Set of packaging material for 4 feeder trolleys
4022 496 .......
TABLE 8-2
8-2
Installation Manual
FCM Multiflex
4022 591 96102
02.02
Packing/Unpacking Instructions Trolley FCM
H
F
K
(2×)
(2×)
E
J (4×)
I
D
F
C
G
M10× 30 mm
L
36× 4×
M
N
4×
C
A
H
B
C
H
G
5
2
J (2×)
A
E
J (4×)
I
6
G
3
H
L
(3×)
B
7
B
L (9×)
G
A
I
}
L(12×)
M
(4×)
N
APPENDIX A Packing/Unpacking Instructions Trolley FCM
J
10×
K
2×
40 mm
50 mm
Installation Manual
FCM Multiflex
4
1
100 mm
4022 591 96102
02.02
A-1
Packing/Unpacking Instructions Trolley FCM
A-2
Installation Manual
FCM Multiflex
4022 591 96102
02.02