1
chapter
Chapter 9
9
Page Layout
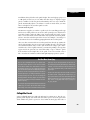
For much of the Web’s short life, designers have used the HTML <table> tag to
control the positioning of elements on a page—to create columns, sidebars, banners, and so on. Unfortunately, since the <table> tag was intended to display
information in a spreadsheet-like format, bending it to a Web designer’s will often
resulted in complex HTML that downloaded slowly, displayed sluggishly, and was
very difficult to modify.
But now that CSS-friendly Web browsers like Internet Explorer 6 and 7, Firefox,
Safari, and Opera rule the Web, designers can safely rely on a much better (though
often frustrating) method: Cascading Style Sheets. That’s right; not only is CSS
great for formatting text, navigation bars, images, and other bits of a Web page, it
also has all the tools needed to create sophisticated designs, like the ones shown in
Figure 9-1.
CSS provides two methods for laying out a Web page—absolute positioning and
floats. Absolute positioning lets you position an element anywhere on the page
with pixel level accuracy—or so the theory goes. This kind of total control is exciting, but actually very difficult to achieve. That’s why the vast majority of Web
pages use float-based layouts.
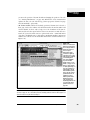
Dreamweaver can produce both types of layouts and includes a starter set of 32
CSS Layouts (only two use Absolute Positioning). These CSS Layouts are new in
Dreamweaver CS3 and provide Web designers with the files for building the most
commonly used page layouts. Theses layout files aren’t complete Web page designs
as much as a basic scaffolding that you can modify to match your own design sensibility. Best of all, the complex part of getting the designs to work in all current
Web browsers has been done for you.
309
Page Layout
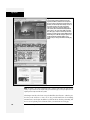
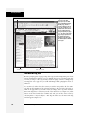
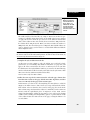
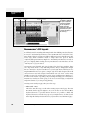
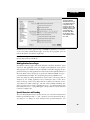
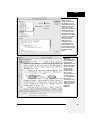
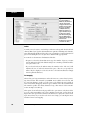
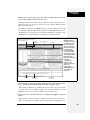
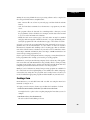
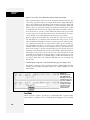
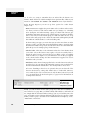
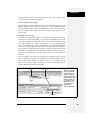
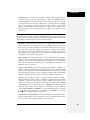
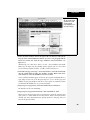
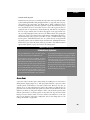
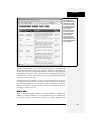
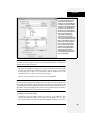
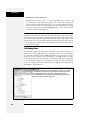
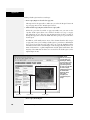
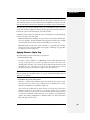
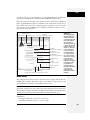
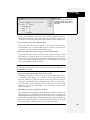
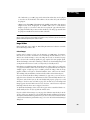
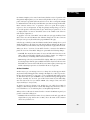
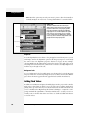
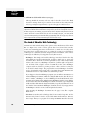
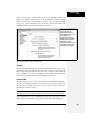
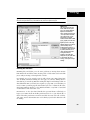
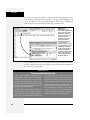
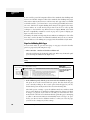
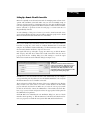
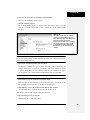
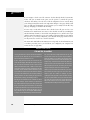
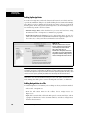
Figure 9-1:
CSS Zen Garden (www.csszengarden.com) is the
original (and still best) showcase for CSS layout. It
has caused many a Web designer to bow down and
proclaim, “I’m not worthy. I’m not worthy.” The site is
interesting not only for the great design work it
showcases, but because each page includes the
same content, but is formatted in radically different
ways using CSS. The exact same HTML is shared by
these three pages—only the external style sheet and
graphics used in the style sheet differ. Making drastic
visual changes to a table-based layout requires a lot
of tinkering with the underlying HTML. CSS, by
contrast, lets you redesign sites without rewriting any
HTML.
Note: CSS Layout is one of those complex topics that is sometimes better learned by doing instead of
reading. To get a taste of how CSS Layout works, try the tutorial on page 351 first, then flip back to the
beginning of this chapter for all the messy details.
This chapter introduces the basic concepts behind float-based layouts—what they are,
how they work, and how to create one; it also provides instructions for modifying
Dreamweaver’s CSS designs. In addition, you’ll learn about absolute positioning, and
how to use it for placing selected elements where you want them on a Web page.
310
Dreamweaver CS3: The Missing Manual
Types of Web Page
Layouts
Types of Web Page Layouts
Being a Web designer means dealing with the unknown. What kind of browsers do
your visitors use? Do they have the latest Flash Player plug-in installed? But perhaps the biggest issue designers face is creating attractive designs for different display sizes. Monitors vary in size and resolution: from petite 15-inch 640 × 480 pixel
displays to 30-inch monstrosities displaying, oh, about 5,000,000 × 4,300,000 pixels.
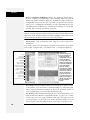
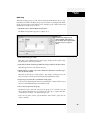
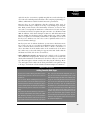
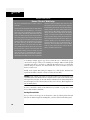
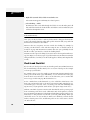
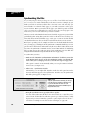
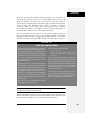
Float-based layouts offer three basic approaches to this problem, two of which
power most of the best-looking sites you see today: fixed width or liquid (also
called fluid layouts). A fixed width gives you the most control over how your
design looks, but can inconvenience some of your visitors. Folks with really small
monitors have to scroll to the right to see everything, and those with large monitors have wasted space that could be showing more of your excellent content. Liquid designs make controlling the design of the page more challenging for you, but
make the most effective use of the browser window. There’s also a third type, elastic
design, which combines some advantages of both.
• Fixed Width. Many designers prefer the consistency of a set width, like the page
shown in Figure 9-2, top. Regardless of the browser window’s width, the page
content’s width remains the same. In some cases, the design clings to the left
edge of the browser window, or, more often, it’s centered in the middle. With
the fixed-width approach, you don’t have to worry about what happens to your
design on a very wide (or small) monitor.
Many fixed-width designs are about 760 pixels wide—a good size for 800 × 600
screens (since you need to leave a little room for scroll bars and other parts of
the browser’s “chrome”). For the past few years, the prevailing wisdom has been
that you can count on most visitors having a minimum screen resolution of 800
× 600. However, more and more sites (especially ones aimed at a more techsavvy crowd) are about 950 pixels wide, on the assumption that visitors have at
least 1024 × 768 monitors.
Note: For examples of fixed-width designs aimed at larger monitors, visit www.alistapart.com, www.espn.com,
or www.nytimes.com.
• Liquid. Sometimes it’s easier to roll with the tide instead of fighting it. A liquid
design adjusts to fit the browser’s width—whatever it may be. Your page gets
wider or narrower as your visitor resizes the window (Figure 9-2, middle). While
this type of design makes the best use of the available browser window real estate,
it’s more work to make sure your design looks good at different window sizes. On
very large monitors, these types of designs can look ridiculously wide.
• Elastic. An elastic design is really just a fixed-width design with a twist—type
size flexibility. With this kind of design, you define the page’s width using em
values. An em changes size when the browser’s font size changes, so the design’s
width is ultimately based on the browser’s base font size (see page 107). If a visitor increases the size of the browser’s display font (by pressing Ctrl-+ in Firefox, for example), the page’s width grows as well.
Chapter 9: Page Layout
311
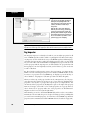
Float Layout Basics
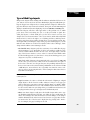
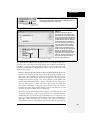
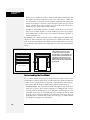
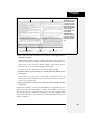
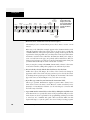
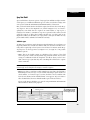
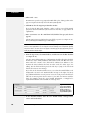
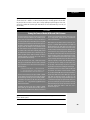
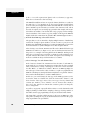
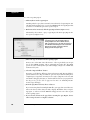
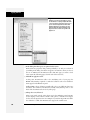
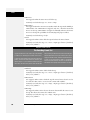
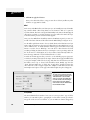
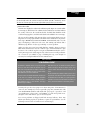
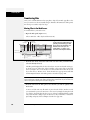
Fixed
Liquid
Figure 9-2:
CSS gives you several
ways to deal with the
uncertain widths of Web
browser windows and
browser font sizes. You
could simply ignore the
fact that your site’s visitors
have different resolution
monitors and force a
single, unchanging width
for your page (top). Or
you could create a liquid
design that flows to fill
whatever width window
the page encounters
(middle). An elastic design
(bottom) changes width
only when the font size—
not the window width—
changes.
Elastic
Figure 9-2, bottom, shows an elastic page with the browser’s normal font size
(left) and several font sizes larger (right). Increasing the font size widens all
page elements as well. Elastic designs keep everything on your page in the same
relative proportions, and make sure that when someone with poor vision has to
pump up the text size, the columns holding the text grow as well.
Float Layout Basics
Float-based layouts take advantage of the CSS float property to position elements side
by side, and create columns on a Web page. As you read on page 213, you can float an
image to make text wrap around a photograph. But it’s also a powerful layout tool to
move a bunch of related page elements (like a list of links that should appear in a lefthand column) into position horizontally on a page. In essence, the float property
moves a page element to the left or the right. Any HTML that appears below the floated
element moves up on the page, and wraps around the side of the float.
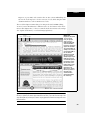
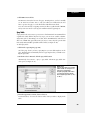
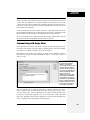
Float is a CSS property, available when you create a CSS style (see page 117 for
instructions on creating a style). It’s listed in the CSS Rule Definition window’s
Box category (see Figure 9-3). Choose the “left” option, and the styled element
floats to the left, choose the “right” option and the element moves to the right. If
you want to position a sidebar on the left side of a page, then you float it to the left.
312
Dreamweaver CS3: The Missing Manual
Float Layout Basics
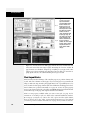
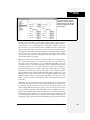
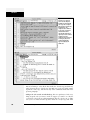
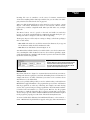
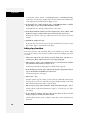
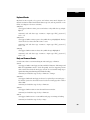
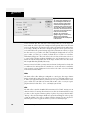
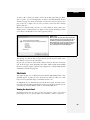
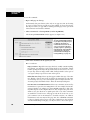
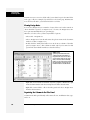
Figure 9-3:
There are just three options when you want to float an element: left, right, and none.
You might never need the “none” option—it simply positions an element like a normal,
unfloated element. Since this is the regular behavior of any element, you’d need this
option only if you wanted to turn off a float applied by another style (see page 296 for
more on how multiple styles can affect the same element).
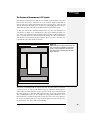
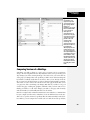
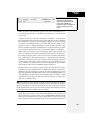
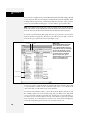
The Mighty <div> Tag
Whether you’re using tables or CSS, Web page layout involves putting chunks of
content into different regions of the page. With CSS, the most common element
for organizing content is the <div> tag. The <div> tag is an HTML element that
has no inherent formatting properties (besides the fact that browsers treat the tag
as a block with a line break before and after it); you use it to mark a logical grouping of elements, or a division, on the page.
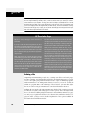
You’ll typically wrap a <div> tag around a chunk of HTML that belongs together.
For example, the elements comprising the logo and navigation bar in Figure 9-4
occupy the top of the page, so it makes sense to wrap a <div> tag around them. At
the very least, you would include <div> tags for all the major regions of your page,
such as the banner, main content area, sidebar, footer, and so on. But it’s also possible to wrap a <div> tag around one or more other divs. People often wrap the HTML
inside the <body> tag in a <div>. This tag, then, wraps around all the other divs on
the page: You can set some basic page properties by applying CSS to this wrapper
<div>. You can set an overall width for the page’s content, for example, set left and
right margins, or center all of the page’s content in the middle of the screen.
Note: If you’re a long time <table> tag jockey, you need to develop a new mindset when you begin to
use CSS for layout. First, forget about rows and columns (a notion that’s important when working with
tables). With CSS, there are no column spans or row spans, and the grid-like structure of a table is
nowhere to be found. You can, however, think of a <div> tag as a table cell. As with table cells, a <div> tag
is the logical place to put content that you want to position in one area of the page. In addition, as you’ll
see, CSS designs often nest a div inside another div, much like you’d nest tables within tables to get certain effects—but, fortunately, the CSS method uses a lot less HTML code.
Once you’ve got your <div> tags in place, you add either a class or ID style to each
one, which becomes your handle for styling each <div> separately. For parts of the
page that appear only once and form the basic building blocks of the page, designers usually use an ID (see page 284). For example, the <div> tag for a page’s banner area might look like this: <div id="banner">. Recall that you can use an ID
only once per page, so if you have an element that appears multiple times, use a
class instead. If you have several divs that position photos and their captions, you
can create a style like this: <div class="photoBox">.
Tip: If you select a <div> tag in the document window, the Property inspector provides two menus: one
to apply an ID to the div, and another to apply a class style to the div.
Chapter 9: Page Layout
313
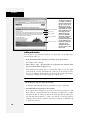
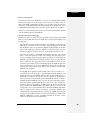
Float Layout Basics
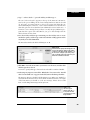
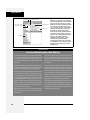
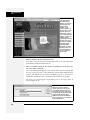
Figure 9-4:
You can use the float
property to lay out a Web
page with multiple columns.
On this page, a block of
content is floated to the left
edge. The sidebar has a set
width, but the main content
doesn’t, which makes this
design a liquid layout (page
311). The main section of the
page simply expands to fill
the width of the browser
window. In the upper right,
the bathtub photo is floated
to the right.
banner div
sidebar div
main content div
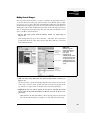
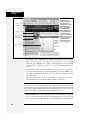
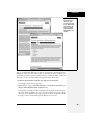
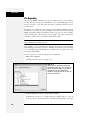
The Insert Div Tag Tool
Because grouping parts of a page using <div> tags is such an important part of CSS
layout, Dreamweaver includes a tool to simplify the process. The Insert Div Tag
tool lets you wrap a <div> tag around a selection of page content, or simply drop
an empty div onto a page for you to fill with images, links, paragraphs of text, or
whatever.
To use this tool, either select the content you wish to wrap with a div (for example, click at the beginning of the selection and drag to the end of the selection) or
click on the page where you wish to insert an empty <div> tag. Then click the
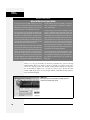
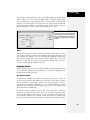
Insert Div Tag button on the Layout tab of the Insert bar (see Figure 9-5). That
button is also listed under the Common tab, and you can also insert a div by
choosing Insert ➝ Layout Objects ➝ Div Tag. In either case, the Insert Div Tag
window appears (Figure 9-6).
314
Dreamweaver CS3: The Missing Manual
Float Layout Basics
Figure 9-5:
The Layout tab of the Insert bar contains buttons for adding both <div> tags
and absolutely positioned divs (see page 337).
Insert div tag Draw absolutely
positioned div
New tag position
List of tags with IDs applied
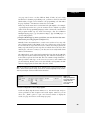
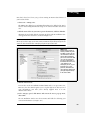
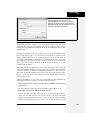
Figure 9-6:
The Insert Div Tag tool can help you
precisely place the div in relation to other
tags on the page (see your choices listed in
the Insert’s left-hand menu). The right-hand
Insert menu lets you choose the tag the new
div will be placed in relation to. That menu
lists only tags that have an ID applied to
them, or the <body> tag for the “after start
of tag” and “before end of tag” options.
Suppose you want to insert a <div> tag to
display a footer at the bottom of a page.
Because you know the footer will go last on
the page, you click the Insert Div Tag
button, select “Before end of tag” from the
Insert’s left menu, and <body> from the
right menu. The <div> tag then appears at
the very end of the page’s content, just
before the closing </body> tag.
If you click OK, Dreamweaver either wraps the selected content in a <div> tag, or
just drops a new <div> tag onto the page with the text “Content for New Div Tag
Goes Here” (of course, you’ll replace that text with your own content). But usually
you’ll take an additional step: applying either a class or ID to the div. You can do
this in a couple of ways:
• Choose a class from the Class menu or choose an ID from the ID menu. The
Class menu on the Insert Div Tag window lists all the class styles available to the
current page. You’d usually select a class if you’re inserting a div tag that’s formatted the same as other divs on the page. You might use a div tag to position
an image and a caption on a page, or to create a pull-quote in the middle of an
article; if you had multiple instances of photos with captions, you could create a
class style (like .figure) to format each photo-caption pair. You could then
select a photo and caption on the page, use the Insert Div Tag tool, and then
select the class name (.figure in this example) from the class menu. You could
repeat this procedure multiple times on a single page.
The ID menu on the Insert Div Tag window behaves a bit differently. Since you
can only use an ID once per page (see page 284 for the reason) the ID menu lists
only IDs that exist in your style sheet, but which haven’t yet been applied to any
tags. Say you created an ID style named #banner that you plan on applying to a
<div> tag to define the banner area of your page. You could select the banner
content (like the site logo and navigation bar), and then click the Insert Div Tag
Chapter 9: Page Layout
315
Float Layout Basics
button. At this point, you’d select #banner from the ID menu. If you then
inserted a second div on the page using the Insert Div Tag tool, #banner would
no longer appear in the ID menu.
• Create a class or ID. If you haven’t yet created a style to apply to the new div
tag, you can click the New CSS Style button (see Figure 9-6). This button opens
the familiar New Style Rule window, so you can create a new style. The process
is the same as creating any style, as described on page 117. Once you’ve completed the style, you’ll return to the Insert Div Tag window, and the name of the
style you just created appears in the appropriate box. (In other words, if you
created a class style, the name of the new class appears in the Class box; similarly, a new ID name appears in the ID box.)
After you apply a class or ID, and then click the OK button, Dreamweaver inserts
the new <div> tag complete with the appropriate HTML to apply the style: for
example, <div id="banner">. In addition, Dreamweaver takes any styling you created for the class or ID and applies it to the div. In the case of CSS layout, that
could mean sizing the div and positioning it on the page, as well as adding a background color, changing the size of text, or any of the other effects possible with
CSS. You can add new content inside the div, edit what’s there, or completely
delete the contents of the div.
Note: CSS-based layout is a big topic, worthy of a book or two by itself. For more in-depth coverage of
CSS layout, including solutions to common float problems, pick up a copy of CSS: The Missing Manual.
A Simple Example
To get a better idea of how using a div to help with page layout actually works, look at
the basic process for creating the layout shown in Figure 9-4. This design has a banner
(logo and navigation bar), a left-hand sidebar (list of story titles and links), and the
main story. Figure 9-7 shows the order in which the HTML appears in the page: The
banner elements come first, the sidebar links second, and the main story (headlines,
paragraphs, photo and so on) appear last. (Remember, what you’re seeing in Figure 9-7
demonstrates the power and the beauty of the HTML/CSS tango: Your HTML file contains your structured chunks of content, while your CSS controls how that content gets
displayed.) Viewed in a Web browser, without any CSS styling, these different HTML
sections would all appear stacked one on top of the other.
Note: You don’t have to use this particular technique to get started with CSS layout. Dreamweaver CS3
ships with 32 premade layout designs called “CSS Layouts.” You can read about these starting on page 324.
To create a two-column design, you could follow these easy steps:
1. Select the contents of the banner, and click the Insert bar’s Insert Div Tag button (Figure 9-5).
For example, click before the logo image and drag to select the navigation bar.
With this HTML selected, you can then wrap it in a <div> tag.
316
Dreamweaver CS3: The Missing Manual
Float Layout Basics
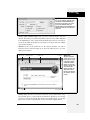
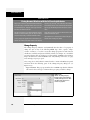
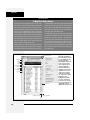
HTML Source Order
CSS Layout
1
banner
1
2
sidebar
2
Figure 9-7:
Creating a two-column layout is a simple
matter of floating a <div> tag to the left
(top). To make a sidebar move from the
left to right side of the page (middle), just
change the sidebar’s CSS float property to
right. You don’t need to make any other
changes to your CSS or HTML. Converting
it into a fixed-width layout is a snap.
Simply wrap all the tags within the page’s
body inside another <div> (<div
id="wrapper">, for example). Then,
create a style for that new container
element that has a set width, such as 760
pixels (bottom). That width setting
constrains everything inside the container
box.
3
3
L
main content
1
banner
1
2
sidebar
3
2
3
R
main content
3
1
wrapper
1
2
banner
2
3
sidebar
3
4
4
L
main content
width: 760px
2. In the ID box, add an ID name.
You can add the name in several ways, depending upon whether you want to
create an ID style immediately, have already created an ID, or want to create the
style later on.
Chapter 9: Page Layout
317
Float Layout Basics
• To create an ID style, click the New CSS Style button. The process at this point
is the same as creating any new style, as described on page 117. You could create a class style, but for the main sections of a page, Web designers usually create an ID. In this case, the name of the style might be #banner. You can set any
CSS properties you’d like for the banner: You can add a border around all four
sides, color the background of the banner, or even set a width for it.
Note: When you create an ID style using the New CSS Rule box, the ID’s name must begin with a #
symbol, like this: #banner. However, when identifying the ID in the Insert Div Tag window, you omit the
# symbol. In the ID box, you’d just type banner. The same applies to class styles.
• Select an ID name from the ID menu. The Web page may already have an
external style sheet attached, which contains all of the necessary styles for the
layout. Just select the ID name for the div you’re inserting (for example, banner).
• Type a name in the ID box. If you don’t want to create a style, you could just
type banner in the ID box, and create the style later.
While providing an ID isn’t absolutely necessary, it’s generally considered good
form to identify each area of a page with an ID.
3. Click OK to close the Insert Div Tag window.
Dreamweaver wraps the selected HTML with a <div> tag, and (if you created a
new style) formats the banner region.
4. Select the contents of the sidebar, and then, in the Insert bar, click the Insert
Div Tag button. Click the New CSS Style button, and create a new ID style
named #storyLinks (or whatever you’d like to name the ID).
This style formats and positions the left sidebar. We’re finally getting to the
“float” part of this design.
5. In the Style Definition window, click the Box category, and then, from the float
menu, select Left (see Figure 9-8).
When you work with floats, the source order (the order in which you add
HTML to a file) is important. The HTML for the floated element must appear
before the HTML for the element that wraps around it.
Figure 9-7 shows three two-column layouts. The diagrams on the left show the
page’s HTML source order: a <div> for the banner, followed by a <div> for the
sidebar and, lastly, a <div> for the main content. On the right, you see the
actual page layout. The sidebar comes before the main content in the HTML, so
it can float either left (top, bottom) or right (middle). The main text area then
moves up the page and wraps around the floated element.
6. Type a value in the Width box (circled in Figure 9-8).
Unless you’re floating an image with a predefined width, you should always give
your floats a width. In this way, you create a set size for the floated element, letting the browser make room for other content to wrap into position.
318
Dreamweaver CS3: The Missing Manual
Float Layout Basics
Figure 9-8:
Whenever you float an
element (other than an
image), always set a
width as well. The width
constrains the floated
element so that other
content has room to move
next to it.
The width could be a fixed size like, say, 170px or 10em. You can also use percentages for a flexible design that’s based on the width of the browser window
(see page 107 for more about the pros and cons of the different measurement
units). If the sidebar is 20% wide and the browser window is 700 pixels wide,
the sidebar will be 140 pixels wide. But if your visitor stretches the window to
1000 pixels wide, then the sidebar grows to 200 pixels. Fixed-width sidebars are
easier to design for, since you don’t have to consider all the different widths the
sidebar might stretch to.
Note: If the overall page design is a fixed width (as described on page 314), percentage width values for
the sidebar are based on the fixed width containing element. The width isn’t based on the window size,
and doesn’t change when the browser window changes size.
7. Complete the style, and then insert the div.
At this point you can continue to style the sidebar: You could add a background color, set a font family, that, thanks to inheritance (see page 294), will
apply to all of the text inside the div, and so on. When you’re done, just click
the OK button in the Style Definition window; you return to the Insert Div Tag
window with the ID box filled out with your freshly created style’s name. Click
OK to insert the div, and then watch the sidebar float.
Now it’s time to style the main column.
8. Follow the same steps for the main content div: Select the page elements that
form that main content on the page, click the Insert Div Tag button, and then
create a new ID style for the page’s main content region.
In this instance, you don’t need to float anything. You merely have to add a left
margin to the main content so that it won’t try to wrap underneath the sidebar.
If the sidebar is shorter than the other content on the page, the text from the
main column wraps underneath the sidebar. It’s much like how the main text
interacts with the right-floated photo in Figure 9-4. If the main content
wrapped underneath the sidebar, the appearance of two side-by-side columns
would be ruined. Adding a left margin that’s equal to or greater than the width
of the sidebar indents the main content of the page, creating the illusion of a
second column.
Chapter 9: Page Layout
319
Understanding the
Box Model
By the way, it’s usually a good idea to make the left margin a little bigger than
the width of the sidebar: This action creates some empty space—a white gutter—between the two elements. So if the sidebar is 170 pixels wide, adding a left
margin of 185 pixels for the main content div adds 15 pixels of space between
the two columns. If you use percentages to set the width of the sidebar, use a
slightly larger percentage value for the left margin.
In addition, avoid setting a width for the main content div. It’s not necessary,
since browsers simply expand it to fit the available space. Even if you want a
fixed-width design, you don’t need to set a width for the main content div, as
described in Figure 9-7.
Expanding the two-column design into a three-column design isn’t difficult either
(Figure 9-9). First, add another <div> between the two columns, and float it to the
right. Then add a right margin to the middle column, so that if the text in the middle column runs longer than the new right sidebar, it won’t wrap underneath the
sidebar.
HTML Source Order
CSS Layout
1
banner
1
2
left sidebar
2
3
right sidebar
L
banner
4
3
R
Figure 9-9:
A three-column design uses the same
concepts used to create a two-column
design. In this case, you float both the left
and right sidebars, and add both left and
right margins to the center column. The
left-hand diagram shows the order of the
HTML, the right side shows what the Web
page looks like.
4
main content
Understanding the Box Model
It’s no coincide that the float property is located under the “Box” category of the
Style Definition window (Figure 9-10). To fully understand CSS layouts and how
to make the most of using floats, you also need to understand the other CSS properties located within this category: width, height, padding, margin, and clear.
• Width and height. You can specify the width and height for any styled object
using these properties. If you want a paragraph to be 100 pixels wide, create a
class style with the Width property set to 100 pixels, and then apply it to the
paragraph. You’ll often use the Width property in conjunction with the Float
property (see the following paragraph) to do things like create a box with a set
width that floats to either the left or right side of the page—a common format
for pull-quotes, message boxes, and sidebars.
320
Dreamweaver CS3: The Missing Manual
Understanding the
Box Model
Figure 9-10:
Use the Box category to define the
dimensions of a style, to position an
object on the page, and to add space
between the styled object and other
objects around it.
Be careful with the height property. Many designers turn to this property to
provide precise control over page elements. Unfortunately, height is tricky to
control. If you’ve set a specific height for a sidebar that contains text, and you
later add more text, you can end up with text spilling outside the sidebar—this
can also happen if a visitor increases the text size in his browser. Because Internet Explorer 6 (and earlier versions) handles these instructions differently than
other browsers, you can end up with inconsistent and strange results in different browsers. In other words, set the height of an object only if you’re sure the
content inside will never get taller.
• Float. If you want to move an object to the left or right side of a page and have
other content wrap around it, use the Float property. Of course, that’s been
most of the point of this chapter, so you probably understand this property by
now. However, there’s one important point to keep in mind: Floating an object
doesn’t necessarily move it to the side of the page or the browser window. A
floated object merely goes to the left or right edge of what’s called its “containing block.” If you float a div to the left of the page to create a sidebar, and then
insert an image into the sidebar and float that image right, the image goes to the
right edge of the sidebar, not the right edge of the page. In addition, if you float
multiple elements, they can often end up sitting beside each other—this technique is used to create four-column layouts, where each column is floated next
to the other.
• Clear. Clear prevents an element from wrapping around any object with a right
or left Float property. This property can come in handy when you want to force
an element to appear below a floated object instead of wrapping around it. The
classic example with float layouts is a page’s footer (the area at the bottom of
the page usually containing contact information and a copyright notice). If a
page has a particularly long left-floated sidebar, the footer can move up the page
and wrap around the sidebar. In this case, the bottom of the sidebar is at the
bottom of the page, and the footer is somewhere in the middle. To fix this problem, simply create a style for the footer that includes a value of both for the clear
Chapter 9: Page Layout
321
Understanding the
Box Model
property. This style forces the footer to drop below both left-floated and rightfloated elements. (If you merely want something to drop below a left-floated
element, but still wrap around anything floated right, choose the left option; to
clear a right-floated element, choose right.) In other words, if you ever see page
content appear next to a floated element instead of underneath it, use the clear
property on that content to make it go beneath the float.
• Padding. Padding is the gap that separates the content of the styled tag—such as
a paragraph of text or an image—and its border (see page 215). If you put a 1pixel border around an image and want to add 10 pixels of space between the
image and the border, type 10 into the top padding box, and then choose “pixels”
from the pop-up menu. Turn off the “Same for all” box if you wish to set the padding around each edge separately; then, type values into each of the four boxes.
Warning: Unfortunately, Internet Explorer 5 for Windows doesn’t handle the “Box” model correctly. If
you set the padding or borders of a style, Internet Explorer displays the element smaller than other browsers, ruining your Web page’s layout. Although IE 5 isn’t that popular anymore (thank goodness), you can
find more information on this problem and a clever workaround. Visit http://css-discuss.incutio.com/
?page=BoxModelHack.
• Margin. The margin is the outermost space surrounding an element
(Figure 9-11). It surrounds the border and padding properties of the style, and
lets you add space between elements. Use any of the values—pixels, percentages,
and so on—that CSS supports.
Padding, margins, borders, and the content inside the styled tag make up what’s
called the CSS Box Model, as described in Figure 9-11. Margins and padding are
invisible. They also have similar effects: 5 pixels of left padding adds 5 pixels of
space to the left edge of a style; the same happens when you add a 5-pixel left margin.
Most people use margins to put space between elements (for example, between the
right edge of one column and left edge of an adjacent column), and padding to put
space between an element’s border and its content (like moving text within a column away from a borderline surrounding the column). Because you can’t see padding or margins (just the empty space they make), it’s often difficult to know if the
gap between, say, the banner at the top of your page and the main area of content
is caused by the style applied to the banner or the main area. You also can’t always
tell if any extra space is caused by a padding or a margin setting. Dreamweaver
includes a helpful diagnostic tool (see Figure 9-12) that lets you clearly see these
invisible properties.
When you select a <div> tag that has margin or padding properties set, Dreamweaver draws a box around that div, and adds slanting lines to indicate the space
occupied by margins and padding (Figure 9-12 shows this box and lines in action).
322
Dreamweaver CS3: The Missing Manual
Understanding the
Box Model
Figure 9-11:
In the CSS Box Model, every style is composed
of multiple boxes, one inside the other. Each
box controls certain display properties of the
style. The outermost box of a style is called
the margin. It controls the space between the
border of the style and any other objects
around the styled object, such as images,
paragraphs, or tables; padding is the space
between the border and the content itself (the
innermost box). The area within the border,
which includes the content and padding, may
also have a background color. Actually, the
background color is drawn underneath the
border, so if you assign a dashed or dotted
border, the background color appears in the
gaps between the dots or dashes.
top margin
top border
top padding
left
margin
left
border
left
padding
content
right
padding
right
border
right
margin
bottom padding
bottom border
bottom margin
border
content
padding
margin
Margins appear outside padding, and are represented by lines that slant downward
from left to right; padding appears inside the margin, and is represented by lines
that go upward from left to right. In Figure 9-12, the area that contains the main
story is enclosed in a <div> tag with an ID style named mainContent applied to it.
When that div is selected (the tag selector in the lower-left corner of the document
window is great for this), Dreamweaver highlights the margins and padding values
that are defined in that ID style. As you can see, there’s a considerable amount of
margin on both the left and rights edges, and a smaller amount of padding (20 pixels) applied to both the left and right edges.
If you find these visual aids confusing, you can turn them off via the Visual Aids
menu in the document window (see Figure 9-12), or by choosing View ➝ Visual
Aids ➝ Layout Box Model. These same steps turn the margin and padding visual
aids back on.
Chapter 9: Page Layout
323
Dreamweaver’s CSS
Layouts
Margin
Padding
Visual aids menu
Figure 9-12:
In addition to displaying
the space occupied by
margins and padding,
the CSS Layout Box
Model’s visual aids
indicate the vertical and
horizontal center point
(circled in this figure) of
the <div> tag.
Dreamweaver’s CSS Layouts
You’ll find yourself contending with many details when building CSS-based layouts.
You need to understand the intricacies of the CSS Box Model, as well as the sometimes bizarre behavior of floats. In addition, different browsers handle CSS in different ways, which sometimes means a design that looks great in Firefox
completely falls apart in Internet Explorer 6. Fortunately, Dreamweaver is ready to
give you a helping hand. Leading the way, Dreamweaver CS3 introduces 32 new
“CSS Layouts” to get you started.
CSS Layouts aren’t finished Web page designs. They don’t have graphics, fancy
text, drop-down menus or any whiz bang features. They’re simply basic designs
that are intended to lay the foundation for your design talents. Each layout is a
simple HTML file and a (not quite so simple) style sheet. Each design works in all
current browsers and each design’s hand-crafted CSS code irons out the many
wrinkles presented by troublesome browsers (most notably Internet Explorer 6).
In other words, instead of spending a day stretching and sizing your own canvas, a
Dreamweaver CSS layout is like going to the art store and buying a ready-made
and primed canvas so you can get busy painting.
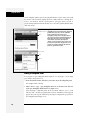
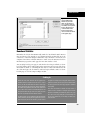
Creating a new CSS layout page takes just a few steps:
1. Choose File ➝ New.
This is the same first step you take when creating any new Web page. The New
Document window appears (Figure 9-13). You can also use the Ctrl+N (c-N)
keyboard shortcut to open this window (however, it’s possible to disable this
keyboard shortcut as described on page 37; you might want to do that if you’d
rather skip this clunky window whenever you just want a new, blank Web page).
324
Dreamweaver CS3: The Missing Manual
Dreamweaver’s CSS
Layouts
2. Choose Blank Page from the left column, and the type of page you wish to create in the Page Type column.
Usually, you’ll select HTML from the page type category, since most of the time
you’ll be creating regular Web pages. However, if you’re creating one of the
database-driven pages described in Part 6 of this book, choose one of the page
types listed in the bottom half of this column (PHP, ColdFusion, and so on).
Note: The documents listed in the Page From Sample category in the left column of the New Document
window (see Figure 9-13) are holdovers from previous versions of Dreamweaver. In most cases, these
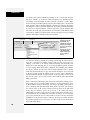
examples use old Web design techniques (such as tables for layout, or frames) and are best avoided.
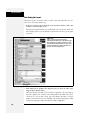
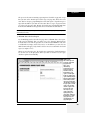
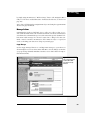
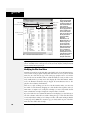
CSS layouts
Selected layout
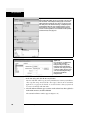
Preview
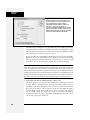
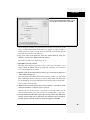
Figure 9-13:
This dialog box lists
Dreamweaver’s different
types of ready-made CSS
Layouts. For example, “2
column fixed, right
sidebar” indicates a
design with 2 columns:
the main content column
on the left, and a thinner
sidebar (for
supplementary info like
links) on the right. The
design also sports a fixed
width and has no header
or footer. A preview of
the selected layout
appears in the top right
of the window; a short
description below the
preview provides more
detail on how the layout
works.
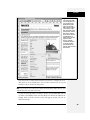
3. From the Layout column, select a page layout.
This is where the fun begins. As you’ve read before, choose <none> here to create an empty Web page. The other options, however, let you choose one of 32
different CSS-based layouts. Basically, you decide how many columns you want
(1, 2 or 3), whether there should be a header and footer on the page (like a banner at the top or a copyright notice at the bottom), and the type of Web page
layout (fixed width, liquid, or elastic).
This last choice relates to the kinds of Web page layouts discussed on page 324.
For example, a fixed width design maintains a constant overall width no matter
what the width of the visitor’s browser window. Dreamweaver refers to some
layouts as “hybrid”—meaning that the different columns use different width
Chapter 9: Page Layout
325
Dreamweaver’s CSS
Layouts
types. For the layouts Dreamweaver supplies, this means the main column is
“liquid” (it resizes as the browser window resizes), while any sidebars are “elastic” (meaning the sidebars change width only when a visitor changes the font
size of her browser). A preview in the top right of the New Document window
contains a set of visual codes to help you understand how the different layouts
behave, as explained in Figure 9-14.
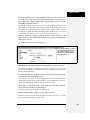
Fixed
Liquid
Figure 9-14:
The layout preview displayed in the New Document window visually identifies
the type of CSS layout you’ve selected. A small lock icon indicates a design that’s
“fixed” (top): The width of each column is set using pixel values, and doesn’t
change when the browser window is resized. The % symbol indicates a liquid
design (second from top): Column widths are defined using percentage values
that change based on the width of the browser; a wider browser window means
wider columns. These designs fill the entire width of the browser. The word em
in the preview window identifies an elastic layout, where column widths are
defined with ems (second from bottom). Elastic designs are very much like fixed
width designs: Their widths don’t change when you resize the browser window.
However, if a visitor changes the size of his browser’s font size, the width of each
column changes (columns get wider if the font size is increased, thinner if the
font size is decreased). With a hybrid design (bottom), the center column is
liquid, but the sidebars remain a set width, defined in ems.
Elastic
Hybrid
4. Choose a DocType from the DocType menu.
Here’s where you decide which type of HTML/XHTML you wish to use for the
page. It’s the same option you faced when creating a new, blank Web page, as
described on page 35. You’re safe going with the default option of XHTML 1.0
Transitional.
326
Dreamweaver CS3: The Missing Manual
Dreamweaver’s CSS
Layouts
5. From the Layout CSS menu, select where to store the layout’s CSS code.
Each Dreamweaver CSS Layout requires its own style sheet containing all of the
styles you need to make the layout work. When creating a new page from a CSS
layout, you have several options for where to store that style sheet. The “Add to
Head” option creates an internal style sheet in the HTML file that Dreamweaver’s about to create. Most of the time, you don’t want this option, since
external style sheets are more efficient (see page 115 for an explanation).
You can also store the CSS layout styles in a new, external style sheet. Choose
Create New File to let Dreamweaver create a new external CSS file and store the
necessary CSS rules there.
The “Link to Existing File” option sidesteps the entire process of creating new
CSS styles. This option assumes you already have the appropriate styles defined
in another external style sheet. Choose this option if you’ve previously created a
Web page using the same type of CSS layout. Say you’ve earlier created a twocolumn fixed layout using a Dreamweaver CSS Layout. At that time, you saved
the necessary styles into an external style sheet, and saved that style sheet to
your site. Now, you want to create a new two-column fixed layout page, so you
follow steps 1-4 above. At this point, an external style sheet with the styles you
need already exists, so you can choose “Link to Existing File”, and then proceed
to step 6 to link the external style sheet already on your site.
Keep in mind, however, that each CSS Layout has its own style sheet. So if you
create a two-column fixed layout page, and then you want to create a three-column
liquid layout page, you can’t just link to the style sheet Dreamweaver created for
the two-column layout. In other words, whenever you create a new type of CSS
layout (two-column fixed, three-column liquid, and so on), choose the Create
New File option, so Dreamweaver can create the appropriate styles in a new
external style sheet.
Tip: You don’t need to go through these steps each time you want to create a new page using a CSS layout
you’ve used before. Suppose you want to build a site that’s got 40 Web pages and each Web page has a
two-column fixed layout. Instead of going through the New Document dialog box (and the steps listed
here) for each of those pages, just use the New Document dialog box once to create the initial page, and
then choose File ➝ Save As, to save a copy of that design for the next two-column page you wish to create.
Better yet, use Dreamweaver’s Template tool described in Chapter 19 to manage pages with the same layout.
6. Click the “Attach Style Sheet” button to attach any external style sheets to the
page (see Figure 9-15).
This is an optional step, but if you’ve already got an external style sheet that
you’re using to format the pages of your site, now’s the time to link to it. In
addition, if you chose “Link to Existing File” in the previous step, you have to
link to the external style sheet containing the styles to create the particular layout type. The process of linking to the external style sheet is the same as with
any Web page, as described on page 120.
Chapter 9: Page Layout
327
Dreamweaver’s CSS
Layouts
Remove selected stylesheet
Attach stylesheet
Figure 9-15:
You can attach more than one external style
sheet when creating a CSS based layout page:
You might have one that defines the basic look
of headlines, text, images, and other elements
on your site, another that controls the layout of
columns, and a third “printer” style sheet to
dictate how the page will look when printed (see
page 301).
7. Click the Create button to bring your new Web page to life.
If you selected the Create New File option in step 5, Dreamweaver now asks you
to name the new style sheet, and select where in the site you wish to save it (this
is just like when you create a new external style sheet, as described on page 117).
Dreamweaver suggests names for the CSS files for each of its layouts—such as
twoColFixRtHdr.css for a two column, fixed design with a right sidebar and a
header and footer. You can change the name if you like, but the name Dreamweaver suggests is descriptive.
After all of that, you end up with a page with basic structure, and some
“dummy” text to fill in the different areas of the page (see Figure 9-16). Don’t
forget to save and then title the page (see page 38 if that’s news to you).
<body.thrColFixHdr> <div#container> <div#header> <h1>
328
Dreamweaver CS3: The Missing Manual
Figure 9-16:
It doesn’t look like much, but a CSS
Layout page has the basic
scaffolding in place: the necessary
<div> tags to organize the page, and
CSS styles to position those divs on
the page. Click inside any area of
the page, and the tag selector
(circled) shows you the structure of
the HTML at that point. In this case,
after clicking inside the heading at
the top of the page, the tag selector
shows which tags wrap around the
current selection. You read this info
from right (the tag where the
insertion point is) to left (the <body>
tag that contains everything you see
inside the Document window). For
this three-column design, the <h1>
tag is inside a div with an ID of
header (that’s what the
<div#header> means), which is
itself inside a div with an ID of
container. Finally, the body tag has
a class named thrColFixHdr applied
to it: <body.thrColFixHdr>.
Dreamweaver’s CSS
Layouts
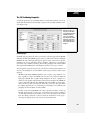
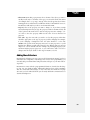
The Structure of Dreamweaver’s CSS Layouts
Dreamweaver’s CSS Layouts are made up of a handful of page elements: Some pages
have a header and a footer, some have one or two sidebars, and all of them have an
area for your page’s main content. Each section is represented by a <div> tag, and
each div has its own ID applied to it. A layout’s accompanying style sheet has predefined ID styles that control where the different divs are placed on the page.
To keep the CSS layouts consistent, Dreamweaver uses the same ID names for
every layout (see Figure 9-17). The ID for the <div> tag containing the main content on the page is #mainContent; if the layout has a sidebar, its ID is #sidebar1; if
there’s a second sidebar, it’s called #sidebar2. The header div is ID’ed with #header,
while the div at the bottom of the page is #footer. There’s one more <div> that surrounds all the other divs: Its ID is #container.
Figure 9-17:
Each Dreamweaver CSS Layout’s basic structure is the
same. Several <div> tags identify the various layout
regions of a page. Each div has its own unique ID
name, which is then controlled by an ID style in the
design’s style sheet.
#container
#header
#sidebar1
#mainContent
#sidebar2
#footer
<body class=”thrColFixHdr”>
You may be wondering: If all the CSS layouts share the same names for their layout divs, how do we end up with different types of designs like fixed, liquid, or
elastic? That’s determined by the <body> tag. The <body> tag of each CSS layout
has a class applied to it: This class defines the basic type of page (two-column fixed,
three-column liquid, and so on). For example, the page pictured in Figure 9-16 is a
fixed-width, three-column design with a header and footer. The class applied to
the <body> tag defines that page’s style: In this example (just look at the tag selector in the image), the class is named .thrColFixHdr.
Chapter 9: Page Layout
329
Modifying
Dreamweaver’s CSS
Layouts
The first sidebar in Figure 9-16 “knows” it’s 150 pixels fixed width and floated to
the left because a descendent selector in the layout’s style sheet tells it so. You’ll
recall from page 285 that a descendent selector lets you format a particular tag
based on the tags it’s nested inside. In this case, the descendent selector .thrColFixHdr #sidebar1 applies to the tag that has the #sidebar1 ID applied to it, but only
when that tag is inside another tag with the class .thrColFixHdr. In other words,
this style applies only to a sidebar for a three column, fixed-width layout with a
header and footer. How’s that for precision?
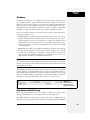
FREQUENTLY ASKED QUESTION
Paying Attention to Conditionals
I’ve noticed that when I create a page using a Dreamweaver CSS Layout, the page has some weird-looking code
just above the beginning <body> tag. What’s that about?
If you go into Code view of a CSS Layout page, you’ll notice
some grayed-out HTML that begins with <!--[if IE]> and
ends with <![endif]-->. It’s grayed out because Dreamweaver treats this code like an HTML comment. HTML comments are mostly used by those who code their pages by
hand. Their purpose is to let a Web designer leave notes
about the page—like an explanation for why a chunk of
HTML was added, or a note to identify which div a particular
closing </div> tag belongs to. Dreamweaver and other
browsers ignore HTML comments.
However, this particular HTML comment, while ignored by
every other browser, has special significance for Internet
Explorer. HTML comments that begin like this <!--[if IE]> are
actually secret messages, called conditional comments,
intended just for Internet Explorer. Conditional comments
are a way of sending HTML, CSS, and JavaScript to Internet
Explorer only; you can even send special HTML to particular
versions of Internet Explorer (for example, <!--[if IE 5]>
sends HTML to just version 5 of Internet Explorer). In the
case of Dreamweaver CSS Layouts, these conditional comments provide additional CSS styles that make sure Internet
Explorer correctly displays the layout (in other words,
Dreamweaver is saving you the hair-pulling experience of
creating a design that looks great in Firefox, but breaks in
Internet Explorer).
The upshot of this: Don’t remove these comments! They
ensure that the layout works in IE. In addition, if you use
Dreamweaver CSS Layouts, avoid the “Remove NonDreamweaver HTML Comments” option for the Clean Up
HTML/XHTML command discussed on page 597. Doing so
also removes the conditional comments, and wrecks your
layouts.
For a short tutorial on conditional comments, visit: www.
javascriptkit.com/howto/cc2.shtml.
Modifying Dreamweaver’s CSS Layouts
The basic look of a freshly minted Dreamweaver CSS Layout doesn’t have much to
recommend it: grey sidebars, header, footer, a dark grey page background, and
overly large text. One of the first things you want to do with a new layout is
remove some of the Dreamweaver formatting. In addition, you might want to
tweak some of the basic layout properties, like the width of a fixed-width design, or
the width of sidebars and main columns.
330
Dreamweaver CS3: The Missing Manual
Modifying
Dreamweaver’s CSS
Layouts
Making General Changes
One of your first tasks should be to remove (or change) the gray background colors for the sidebar and other page elements (unless you really like gray, in which
case your job is a lot easier). This task generally means editing the style defined in
the Dreamweaver-supplied style sheet. You’ve already learned several methods for
editing styles—like double-clicking the style’s name in the CSS Styles panel (page
124), or using the Properties Pane (page 289). The real trick is locating the correct
style to edit. Here’s the fast method:
1. On the CSS Styles panel, click the Current button (see right image in
Figure 9-18).
If the Styles panel isn’t open, choose Window ➝ CSS Styles. The Current view
in this panel shows the styles and properties that affect whatever’s selected in
the Document window.
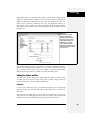
Show CSS
properties for
currently
selected tag
Show cascade
Figure 9-18:
Finding the style that
formats a particular tag
can be tricky…unless
you’re using
Dreamweaver. By
combining the tag selector
and the Current view of the
CSS Styles panel, you can
quickly identify and edit a
style applied to any tag on
a page.
Show CSS
properties for
currently
selected style
2. Make sure that, in the Rules Pane, the Show Cascade button is selected (see
Figure 9-18).
The Show Cascade option lists all styles that affect the current selection in the
order of the “cascade”—most specific style at the bottom, least specific at the
top of the list (see page 296 for a refresher on the cascade and specificity).
3. Highlight the div you want to format. If you want to reformat the header
region, select the div with the headline text Header. You can do this in a couple of ways:
• Click inside the div, and then click the <div> in the Tag Selector at the bottom
left of the Document window (see Figure 9-18, left). This selects the div tag.
Chapter 9: Page Layout
331
Modifying
Dreamweaver’s CSS
Layouts
• Click inside the div, and then press Ctrl+A (c-A), or choose Edit ➝ Select
All. This selects the contents of the div, and highlights the div in the tag
selector. (Pressing Ctrl+A twice selects the <div> tag itself). To highlight a
<div> tag that wraps around the div you clicked into, press Ctrl+A (c-A)
more than once. To highlight the #container div that surrounds the header,
sidebars, main content, and footer, you can click the header region, press
Ctrl+A twice to select the header, and then press Ctrl+A once more to highlight the #container div.
After you highlight the div, its style appears in the CSS Styles panel’s Rules pane.
In Figure 9-18, selecting the sidebar div from the tag selector (left) selects that
div’s style—.thrColLiq #sidebar1 in this instance—in the Rules pane (right). At
this point you can use the Properties pane (directly below the Rules pane) to
edit the style as described on page 289, or simply double-click the style name in
the Rules pane to open the user-friendly Style Definition window.
Tip: The styles for Dreamweaver CSS Layouts use what’s called CSS “shorthand properties.” These combine several CSS properties under a single property name. For example, the values for background-color
and background-image can be combined into a single property named background, while all four margins
(top, right, bottom, and left) can be specified with just one property: margin. This makes for more compact
styles, but it also means that in order to edit a shorthand property in the Properties pane, you need to know
how to write the values yourself: Dreamweaver doesn’t provide a color box, link button, or any of the other
helpful tools used to set the values of a “longhand” property like background color. In other words, unless
you know CSS well, if you want to really make changes to a style, you’re better off double-clicking the style’s
name in the Rules pane to access the much more user-friendly Rule Definition window.
Once you’ve selected a layout region on the page (header, sidebar, and so on),
there are a few common changes you’ll probably make:
• Background colors. To completely remove the gray background of a div, just
delete the value next to the Background property in the Properties pane. You
can also double-click the style’s name in the CSS Styles panel to open it for editing, and then select the Background category of the Rule Definition window, as
described on page 217, to edit the color.
• Padding. The header, sidebars, and footer of a Dreamweaver CSS Layout
include padding to add space from the edges of the layout region and the content inside. In many cases, this is a good thing: Designs can look cramped if text
runs from edge to edge in a box. But if you want to completely fill the div, you
must remove the padding. You might want to insert an image that fills the
entire header region—say, a banner graphic that spans from side to side. Padding adds space between the graphic and the edge. Use the Properties pane to
remove the padding (just delete the values that are listed), or double-click the
style in the Rules pane to use the Rule Definition window. (Note that you may
encounter some differences in the space given for the top padding in Internet
Explorer vs. Firefox. See the box on page 333 for the explanation.)
332
Dreamweaver CS3: The Missing Manual
Modifying
Dreamweaver’s CSS
Layouts
• Text formatting. You can modify the text and other content of the page to your
heart’s content. The earlier chapters in this book cover the techniques for formatting headlines, paragraphs, images, and links. However, when creating styles for
these elements, use an external style sheet other than the one Dreamweaver uses
for the layout styles. You can store these types of styles in a generic style sheet like
global.css, instead of the layout-specific style sheet such as twoColFixLtHdr.css. See
step 5 on page 327 for the reason.
FREQUENTLY ASKED QUESTION
Spacing Differences with IE
I’ve created a two-column layout. Why is the space
between the top of the sidebar and the first paragraph of
text different in Internet Explorer and Firefox?
Yes, Firefox and most other browsers can insert space
above the first paragraph of text inside a div. That same
space, however, doesn’t appear in Internet Explorer. The
fault lies with the paragraph’s top margin (the same applies
to headlines or any tag with a top margin). If the paragraph
is at the top of the div, IE ignores its top margin. It figures
you don’t want the space there. Firefox, however, says,
“Hey, there’s a top margin. I’d better insert some extra
space.” The upshot is you get inconsistent spacing.
The easiest way to deal with this problem is to simply
remove the top margin for headings and paragraphs. You
could do this by creating a tag style for the <p> and headline tags that sets their top margin to 0 (see page 322 for
more on setting margins). You can adjust the style’s bottom
margin to provide space between paragraphs or between a
paragraph and whatever tag follows it.
Another approach is to create a class style that has 0 top
margin and apply it to the first tag in the div. This style
removes the top margin for just that tag, and eliminates the
difference between the browsers. (For this trick to work,
you need to make sure the class is more specific than any
other style affecting the tag. See page 296 for more on the
gory details of specificity.)
Some of Dreamweaver’s CSS Layouts introduce another
wrinkle. In some cases, Dreamweaver inserts CSS code
using an IE Conditional Comment which adds extra padding
to the top of sidebars (see the box on page 330 for information on conditional comments).
For example, if you look into the HTML that Dreamweaver
creates for a two column fixed design, you’ll see this:
<!--[if IE]>
<style type="text/css">
/* place css fixes for all versions of IE
in this conditional comment */
.twoColFixLtHdr #sidebar1 { padding-top:
30px; }
.twoColFixLtHdr #mainContent { zoom: 1; }
/* the above proprietary zoom property
gives IE the hasLayout it needs to avoid
several bugs */
</style>
<![endif]-->
The highlighted code above (the line with .twoColFixLtHdr
#sidebar1) includes an instruction to add 30 pixels of space
between the top of the first sidebar and the top of the first
tag inside the sidebar. If you adjust the sidebar’s padding in
the main style sheet (as recommended on the opposite
page), you’ll probably find that the space at the top of the
sidebar is different in IE and Firefox. You can either delete
this line entirely and use one of the methods suggested
above (like removing the top margin from the first element
in the sidebar) or edit the code inside this conditional comment until the design looks good. For example, if you see
more space in IE than Firefox, change padding-top: 30px to
something smaller like padding-top: 20px until the display
matches up between the browsers.
You’ll encounter this IE problem (and a solution) in the
tutorial at Step 15 on page 365.
Chapter 9: Page Layout
333
Modifying
Dreamweaver’s CSS
Layouts
Fixed Layouts
The width of any Dreamweaver fixed layout is 780 pixels. That width may be too
wide or too narrow for your tastes. If you’re designing for the cinema-screen audience,
you might want a page that takes advantage of the wider screen, so you might bump
the width to 900 pixels or more. In addition, you may want to change the widths of
columns on the page. Here are a few key layout changes you may wish to make:
• Page width. The area of the page that includes the header, sidebars, and main
content is fixed at 780 pixels. This setting is defined in the #container div. Just
select the div, and then change 780 to the desired width.
• Column width. The sidebar columns have a fixed width setting. Depending on
the number of columns in the design, sidebars range in width from 150 to 200
pixels. Select the sidebar you wish to make wider or narrower, and then adjust
its width property. The main content column doesn’t have a set width; rather,
its width is determined by its left and right margin values. A left value is used to
indent the main content div from a left sidebar, while a right margin value
indents the div from a right sidebar. Don’t set a width value for this div—it can
lead to some weird cross-browser display problems. Instead, adjust the left and
right margins until the main content area is the width you wish.
Tip: If you often use Dreamweaver CSS layouts, you may frequently make the same adjustments. For
example, you might always remove the padding and background color and adjust the column widths of
your designs. Instead of doing that over and over, you can edit the default HTML and CSS files Dreamweaver uses when creating a new blank CSS layout page. You’ll find them on Windows in the C:\Program
Files\Adobe\Adobe Dreamweaver CS3\configuration\BuiltIn\Layouts folder, and on the Mac in the Applications ➝ Adobe Dreamweaver CS3 ➝ configuration ➝ BuiltIn ➝ Layouts folder. You can also clean up
this folder by deleting designs you don’t use. Just make sure you back up the folder before you do anything to the files inside. And then, back up your new designs so that if you ever have to reinstall Dreamweaver, you have a backup of your modified templates.
Liquid Layouts
Liquid layouts adjust to the width of the browser window. Columns grow wider as
visitors widen the browser window, and shrink when the browser window shrinks.
However, you can still control the relative widths of the page:
• Page width. Although the page content adjusts its width with a liquid layout,
Dreamweaver’s default styles make the page content 80 percent of the window
width. In other words, there’s always some empty space on either side of the
container div (10 percent on each side). If you want to remove this space to
make the page fill the entire width of the browser window, edit the #container
style: Just delete the width entirely, don’t set its width to 100 percent. (Doing so
can cause the page to appear a little wider than the browser window, forcing visitors to scroll right to see all of the page’s content. See the box on page 336 for
an explanation.)
334
Dreamweaver CS3: The Missing Manual
Absolute
Positioning
• Column width. As with fixed layouts, the sidebar widths are set using the width
property, and the main content area is controlled by the left and right margin
properties of the #mainContent style. The only difference is that the width and
margin values are set using percentages. So to make the left sidebar wider,
change its style’s width from 24% to 28%, for instance.
Elastic Layouts
Elastic layouts are put together very much like fixed width layouts, but instead of
using pixels to define the width of the page content and columns, they use ems (see
page 107 for a discussion of ems). Use the same instructions on page 334 for
adjusting the widths on elastic layouts.
You need to keep one thing in mind when working with elastic layouts, however.
The actual onscreen width of an em depends not only on the visitor’s browser settings, but also on the font size defined for the <body> tag on the page. The normal
style sheet Dreamweaver spits out for elastic designs sets the font to 100 percent. If
you make this smaller, the page width and columns get thinner. Make the <body>
tag’s font size larger, and the page and columns get wider.
In addition, the width of a column also changes if you set a font size for the column’s style. Suppose you want all the text inside the left sidebar to be 80 percent
the size of other text on the page: One technique would be to define the font size
for the #sidebar1 style to 80 percent; then the tags inside this div will inherit that
size (see page 294 for how this works). Unfortunately, that action also defines the size
of the em for that div, so its width gets smaller. To get around this, set font sizes for
the styles formatting the tags inside the <div>.
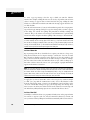
Absolute Positioning
CSS’s other technique for placing elements on a page, absolute positioning, lets
you specify an exact position on a page for any element. But before you start thinking you’ve found page layout heaven, keep in mind that the Web is a fluid environment that’s difficult to control with pixel level precision. If a visitor increases the
font size in her browser, the enlarged text may spill out of your carefully crafted
layout. In addition, it’s nearly impossible to force a footer to the bottom of a page
that’s laid out using absolute positioning (a trivial task with float-based layouts).
That’s why most CSS layouts use floats and the techniques discussed at the beginning of this chapter.
Note: In previous versions of Dreamweaver, absolutely positioned elements were called layers; Dreamweaver now refers to them as either AP Divs or AP Elements: AP meaning absolutely positioned. Any tag
can take advantage of CSS positioning, but most often you’ll apply positioning to a <div> tag that contains
text, images, or other content. In this book, the term AP Div refers to any absolutely positioned div. However, because any tag (a link, unordered list, or just a simple paragraph) can be absolutely positioned,
you’ll see the term AP Element used to describe any tag that’s absolutely positioned.
Chapter 9: Page Layout
335
Absolute
Positioning
FREQUENTLY ASKED QUESTION
When Width Doesn’t Equal Width
In my style sheet, the CSS Width property of one of my
styles is set to 150 pixels. But when I preview the page in a
Web browser, the <div> tag I applied the style to is much
wider than 150 pixels. Is this a bug with my browser?
No, you’re browser’s fine. The problem lies with the difference between the CSS width property and the final calculated width of an element onscreen. The width you see
onscreen is the sum total of several separate CSS properties, not just the width property. The width property merely
defines the width of the content area of the style—the place
where the text, images, or other nested tags sit.
The actual width—that is, the amount of screen real estate
given by the Web browser—is the total of the widths of the
left and right margins, left and right padding, left and right
borders, and the width property. So say you’ve created a
style that has a width of 100 pixels, 10 pixels of padding on
all four sides, a 2 pixel border, and 20 pixels space on the
left margin. While the space dedicated to the content inside
the style is 100 pixels, any tag with this style will have an
onscreen width of 144 pixels: 100 (width) + 10 (left padding) + 10 (right padding) + 2 (left border) + 2 (right border) + 20 (left margin).
To make matters just a bit more confusing, Internet
Explorer 5 on Windows gets the whole thing wrong. That
browser includes left and right padding and borders as part
of the width property. In other words, page elements can
appear a lot thinner in that browser than in others. Fortunately, Internet Explorer 5 is on the way out, and you may
find that none of your site’s visitors even use that browser
any more. But if you’re one of the unlucky ones who still
has to build Web pages to support IE 5, you can find out
how to solve this dilemma here: www.communitymx.com/
content/article.cfm?cid=E0989953B6F20B41.
The CSS height property and the final height of a style
behave the same way. The onscreen height of an element
is a combination of the height, plus top and bottom margins, padding, and borders (and yes, IE 5 gets this one
wrong, too).
That’s not to say you shouldn’t use absolute positioning. It’s great for moving
small elements, like a logo, image, or short set of links to a position on the page;
and it’s the only way to have one element overlap another element on a page (see
the circled image in Figure 9-19). As long as you don’t try to dictate the exact
width, height, and position of every design element, you’ll find absolute positioning powerful and helpful.
Figure 9-19:
One unique aspect of CSS positioning is its ability to place an
element on top of other page content.
336
Dreamweaver CS3: The Missing Manual
Absolute
Positioning
The CSS Positioning Properties
Several CSS properties are specifically meant for positioning elements on a screen.
You’ll find them under the Positioning category of the CSS Rule Definition window (Figure 9-20).
Figure 9-20:
Dreamweaver gives you
easy access to the many
CSS Positioning properties
available. You’ll never
need to set all of them
and a few, like the settings
found in the Clip section
of this dialog box, aren’t
often used by most Web
designers.
Positioning type
Normally, tags are positioned on the screen in the order they appear in the HTML:
What appears first in the HTML appears at the top of the browser window. Similarly,
HTML at the end of Web page files appears at the bottom of the browser window.
In Figure 9-21, the top left image shows a headline, followed by a paragraph of
text, followed by a headline, an image, and another paragraph. The order in which
they appear in the HTML is the order displayed by the browser: top to bottom.
The CSS position property, however, lets you alter how a styled element appears on
the screen by assigning one of four available position types: absolute, relative, static,
and fixed.
• Absolute is the most common option. It lets you place a tag anywhere on a
page, regardless of where the HTML code for the tag is positioned within the
Web page’s HTML. The top-right image in Figure 9-21 shows a graphic of a
sticky note. The graphic is absolutely positioned. Even though in the HTML the
code for that image falls after the “Malorum Gipsum” headline, its visual placement is at the top (and even a little bit off the top) of the page. The space where
the graphic appeared prior to positioning (top-left image) is now filled by the
paragraph of text beneath the second headline.
In other words, the actual HTML code can go anywhere inside the <body> tag
and still appear anywhere on the page—its location in the code has nothing to
do with the positioning of the element on the screen. In addition, any element
that’s absolutely positioned is removed from the normal flow of the page—
other tags on the page aren’t even “aware” the AP element exists.
Chapter 9: Page Layout
337
Absolute
Positioning
After you select this option, use the Placement properties (see page 341) to
specify a specific position.
• The relative option lets you position a tag relative to its position in the HTML.
When you choose this option and then assign, say, a left and top placement, the
positioned element appears relative to where it appeared prior to any positioning. The bottom left image in Figure 9-21 shows the same sticky note graphic
positioned using the relative property. The top and left placement values (page
341) are the same as for the top-right image; in this case, however, the graphic is
placed relative to its old position below the second headline. Another side effect
is that the space formerly taken up by the image remains: Notice that the last
paragraph doesn’t try to fill up the space where the graphic was. There’s still a
big empty area.
No positioning
Relative positioning
Absolute positioning
Relative
Absolute
Figure 9-21:
Whenever you use
absolute positioning to
place an element on the
page, its exact position
depends upon the
positioning of any other
tags inside which the
styled element is nested.
In the top-right image,
the sticky note graphic is
positioned relative to the
browser window
because it’s been styled
with an absolute
position, and it’s not
inside any other tag with
either absolute, relative,
or fixed positioning. In
the bottom-right image,
the graphic is absolutely
positioned as well, but
its placement is relative
to the edges of the
second headline
because the HTML for
the image is inside the
headline, and the
headline has a relative
position applied to it.
At first glance, the relative option might seem less than useful. After all, what’s
the point of positioning something on the page, just to leave a big empty (“I was
here”) space? In most cases, you don’t actually apply relative positioning to the
element you want to position. You apply it to a tag that wraps around the element you wish to position, in order to create a new set of coordinates for an
absolutely positioned element to use.
338
Dreamweaver CS3: The Missing Manual
Absolute
Positioning
Say you placed an image inside a headline, and you want the image to appear on
the left edge of that headline. If you simply position the image in an exact spot
in the browser window on the left edge of the headline tag, you’re taking your
chances. If the headline moves (say you add some new body text), the absolutely positioned image stays glued to its assigned spot. Instead, what you want
to do is position the image relative to the headline tag, so that when the headline moves, the image moves with it. Look at the bottom right image of
Figure 9-21. In this case, the headline (Malorum Gipsum) has a relative position applied to it, and the sticky note graphic has an absolute position. Even
when, later on, you add a little more text to the top of the page (thereby forcing
the headline to move down), the sticky note travels along for the ride.
• Static positioning is the normal behavior of HTML. Static simply means the
content follows the normal top-down flow of HTML. Why would you want to
assign an element static positioning? The short answer: You probably never will.
• Fixed is similar to the “fixed” value of the CSS “attachment” property used to
lock a background image in place (see page 218). This option “fixes” the AP div
in place in the browser window. When you scroll down the page, the AP div
doesn’t move, but remains in an exact position in the browser window. It’s a
cool option with exciting possibilities...and absolutely no support in Internet
Explorer 6 and earlier versions. You may want to experiment with the “fixed”
option in Internet Explorer 7 or Firefox, but when building a Web site you
actually want the whole world to see, skip it.
Width and height
These properties, logically enough, set the width and height of the element. You
can use any of the available CSS measurement systems like pixels, ems, and percentages. In most cases, when you want precise control over the dimensions of
your tags—that is, a page element that’s exactly 200 pixels wide and won’t change
even if the visitor changes the size of her browser window—use pixels. However, if
you want the element to resize as the visitor resizes her browser window, use percentages. In this way, you can make a styles that’s 50 percent the width of the
browser window, no matter the size of the window.
Note: The Width and Height properties available under the Positioning category of the CSS Rule Definition window are identical to the options with the same name under the Box category (see Figure 9-10).
Also note that CSS calculates the total width of a style as the Width value plus any borders, margins, or
padding (see the box on page 336 for more).
Visibility
If left to its own devices, Dreamweaver makes the contents of all tags visible on the
page, so you’ll usually leave this property blank. After all, if you put something on
your page, it’s usually because you want people to see it. But there are situations in
which you may want to make a certain tag (and its contents) invisible in your visitors’ Web browsers.
Chapter 9: Page Layout
339
Absolute
Positioning
The power of the Visibility property becomes clear when you start using Dreamweaver behaviors or your own JavaScript programming; in these instances, you can
make previously hidden tags visible again, on cue. Imagine a Web page where
you’ve superimposed many hidden divs on a diagram of a car engine. Moving the
mouse over a part of the image makes the div visible, revealing text that describes
the corresponding engine part. (Page 535 shows you how to create this effect.)
Tip: The CSS display property also has an option to hide an element: none (see page 137). The benefit
of using the display property over the visibility property is that an element whose display is set to none literally disappears from the page; whereas an element with visibility of hidden can still take up space on the
page—it just leaves a hole where it normally would appear. After hiding an element by setting its display
property to none, you can make it visible again by changing the display property to block (for example,
using the Change Property behavior discussed on page 536). That property makes the element visible again.
The options for this property let you make the AP div “visible” (which is how all
tags start out anyway); make it “hidden,” so it doesn’t appear until you make it visible; or make it “inherit” the visibility of another AP div. (The inheritance option
can be useful with nested AP divs, as discussed on page 350.)
Z-index
Welcome to the third dimension. Absolutely positioned tags are unique in the
world of Web elements, because they “float” above (or even behind) a Web page,
and can overlap each other, completely or partially.
If you were awake in high school algebra, you may remember the graphing system
in which the X axis specified where a point was in space from left to right and the Y
axis specified where the point was vertically from top to bottom. And if you were
awake and paying attention, you may remember that the Z axis denoted a point’s
position in front-to-back space. When you draw a three-dimensional object on this
type of graph, you need to use all three axes: X, Y, and Z.
The Z-index of an absolutely positioned element doesn’t make your Web page
appear three-dimensional; it simply specifies the “front-to-backness” of overlapping AP elements. In other words, the Z-index, represented by a number in the Zindex field, controls the stacking order of AP elements on a page.
Note: The Z-index setting doesn’t always work when you try to overlap certain kinds of content, like pulldown menus, radio buttons, or other form elements. It also may not work with plug-in content like Flash
or Java applets. This is because Web browsers let other programs control the display of these items.
The page itself lies behind all AP elements, and the AP elements stack up from
there. In other words, the higher the Z-index number, the higher the AP elements,
so that an AP element with a Z-index of 4 appears behind an overlapping AP div
with a Z-index of, say, 7.
340
Dreamweaver CS3: The Missing Manual
Absolute
Positioning
Z-index numbers have no relation to the actual number of absolutely positioned
items on a page. You can have three AP elements with Z-indexes of 2, 499, and
2000, if you choose. You’d still just have three AP elements, one on top of the
other in ascending order. Spacing your Z-index numbers in this manner is helpful, since it lets you insert divs between already positioned divs as you develop your
page without having to renumber the Z-indexes of all your AP divs.
Overflow
Suppose you create a square AP div that’s 100 × 100 pixels. Then you fill it with a
graphic that’s 150 × 162 pixels—that is, larger than the AP div itself.
You’ve already seen how a table cell reacts to this situation: It simply grows to fit
the content inside it. AP divs, however, are more (or less) flexible, depending on
your choice of Overflow option in the Property inspector. The following choices
let you decide how browsers handle the excess part of the image:
• Visible makes the AP div grow to accommodate its contents. If you don’t
choose another setting, then AP divs grow to fit automatically.
• Hidden chops off the excess. In the example above, only the top-left 100 × 100
pixels of the image would be visible.
• Scroll adds scroll bars to the AP div, so that a visitor can scroll to see all of the AP
div’s contents. It’s like having a miniature browser window embedded in the
page. This feature offers an interesting way to add a small, scrollable window
within a Web page: Imagine a small “Latest Company News” box, which visitors
can scroll to read the text inside without disturbing anything else on the page.
• Auto adds scroll bars to an AP element only if necessary to accommodate its
oversize contents.
In Design view, if you’ve selected any option besides “Visible”, you see the AP div’s
set dimensions—for example, 100 pixels by 100 pixels. Any content outside that
area—the overflow—isn’t displayed.
You may have content you’d like to edit that’s part of the overflow—like the “Latest Company News” box example above. Dreamweaver does give you an easy way
to edit any of that hidden content—just double-click the AP div. Doing so expands
the AP div (just as if you’d selected the visible option) so you can edit it. To reset
the AP div back to its original dimensions, right-click (Control-click) the AP div
and, from the shortcut menu that appears, select Element View ➝ Hidden.
Placement
These properties let you specify an absolutely positioned element’s position, which
is, after all, the whole point of AP divs. The four properties control where each of
the four edges of the AP div begin. Setting the Top box to 200 pixels places the top
of the AP div 200 pixels down the screen, whereas the Bottom option identifies
where the bottom of the AP div starts. Similarly, the Left and Right properties set
where the left edge and right edge of the AP div should appear.
Chapter 9: Page Layout
341
Absolute
Positioning
Frequently, you’ll use a combination of the Width property (page 339) with the Top
and Left or Right properties. To place a 150-pixel-wide sidebar 200 pixels from the
top of the page and 15 pixels in from the left side of the page, you’d set the Width
property to 150 pixels, the Top property to 200, and the Left property to 15 pixels.
The Right property is also handy. Say you want to put a 200-pixel-wide sidebar at
the right side of the page. Since you don’t know the exact width of a visitor’s
browser window—580 pixels, 1200 pixels?—you can’t know ahead of time how far
the AP div needs to be from the left edge of the window. Instead, you can set the
Right property to 0—if you want the sidebar to touch the right edge of the page. If
you want to indent the AP div 20 pixels from the right edge of the window, type 20.
While it’s technically possible to use Left and Right positioning simultaneously—
say, placing an AP div 50 pixels from the left edge and 20 from the right—Internet
Explorer doesn’t support this combination. Instead, use absolute positioning with
one edge of the AP div and a margin setting (see page 322) for the other edge.
Positioning isn’t quite as straightforward as it may seem. The exact position of a
positioned div is a combination of not only these position values, but also what
type of placement you choose for the AP div—absolute or relative. As noted earlier, with relative positioning, the numbers you type for Top or Left, for instance,
are calculated based on where the AP div already appears in the HTML code and
on the screen. So setting the Top property to 100 pixels doesn’t place the AP div
100 pixels from the top of the browser window; it places it 100 pixels from where it
would appear on the screen based on the HTML code.
Absolute positioning, however, lets you place an AP div at an exact spot on a page.
So setting the Top and Left properties for an absolutely positioned AP div to 100
and 150 pixels will place that AP div 100 pixels from the top of the browser window and 150 pixels from the left edge.
Note: There’s one additional wrinkle to absolute positioning. For a div that’s nested inside another div
that has either a “relative” or “absolute” position setting, position values are calculated based on the position of the parent div. If you have one AP div that’s located 300 pixels from the top of the page, an absolutely positioned AP div nested inside that AP div with a Top position setting of 20 doesn’t appear 20
pixels from the top of the page. Instead, it appears 20 pixels from the top of the parent AP div, or, here,
320 pixels from the top of the page.
Clip
The Clip property can hide all but a rectangular piece of an AP div. In most cases,
you should avoid this property, since it’s rarely useful, and it’s also a waste of precious bandwidth.
Suppose you put a large graphic into an AP div, but you want to display only one
small area. You could use the Clip property, but the Web browser still has to download the entire graphic, not just the clipped area. You’re much better off just preparing the smaller graphic at the right size to begin with (see Chapter 6). The
kilobytes you save may be your own.
342
Dreamweaver CS3: The Missing Manual
Adding an AP Div to
Your Page
You can use JavaScript to move the clipping area, creating an effect like a spotlight
traveling across the AP div. Although that may be a more useful purpose for the
Clip property, Dreamweaver unfortunately offers no tools for performing this
maneuver.
The four clipping settings—top, right, bottom, and left—specify the positions of
the clipping box’s four edges. In other words, these indicate the borders of the visible area of the AP div.
Adding an AP Div to Your Page
In most cases, you’ll position a <div> tag that contains a variety of HTML elements—images, paragraphs, headlines, and so on. To place a series of links on top
of the banner at the top of the page, you could wrap those links in a div tag and
position that div. Dreamweaver gives you a couple of ways to insert an absolutely
positioned div:
• Use the Insert Div Tag tool discussed on page 314. You can start out by selecting already existing content on the page, or just click where you wish to add a
new absolutely positioned div. Either way, you either need to create an ID style
first (with the positioning properties discussed above), and then select that style
from the ID menu of the Insert Div Tag window (Figure 9-6); or, alternatively,
create the ID style by clicking the New CSS Style button on the Insert Div Tag
window (Figure 9-6).
• Use the Draw AP Div tool. Dreamweaver provides a tool to draw a div tag
directly onto the document window. Page 346 shows you how this tool works.
Unless you add a background color or border to your AP div, it’s difficult to identify
its boundaries. To make working with AP divs easier, Dreamweaver provides visual
cues in Design view, as shown in Figure 9-22, and explained in the following list:
• AP element marker. The gold shield with the letter C (huh?) represents the
position in the underlying HTML where the code for the AP div actually
appears.
These markers aren’t normally visible. To see them, you must turn them on in
the Preferences window: Press Ctrl+U (c-U) to open the window, click the
Invisible Elements category, and make sure the “Anchor points for AP elements” option is turned on.
While HTML objects generally appear in the document window in a top-tobottom sequence that mirrors their order in the HTML source code, the position of AP divs doesn’t depend on where the AP div-creating code appears in the
page’s HTML. In other words, it’s possible to have an AP div appear near the
bottom of the final Web page, whereas the actual code may be the first line in
the body of the HTML page (see Figure 9-22 for more detail).
Chapter 9: Page Layout
343
Adding an AP Div to
Your Page
Figure 9-22:
Unlike other page
elements, AP elements
don’t appear in the
same place on the page
as their HTML code.
Here, a div containing
the 6th Anniversary
button, appears on top
of the navigation bar.
The HTML for the div,
however, is the first bit of
HTML on the page (and
is therefore represented
by the AP element
marker in the top-left
corner of the page).
HTML position
for AP div
Selection handle
Display position
for AP div
Resizing handle
Layer positioning
info
If you want to move the HTML of the AP div, drag the shield icon. This element
appears in the same place on the page, but its code moves to a new location
within the page’s HTML. Note, however, that dragging the selection handle
(described next) visually moves the div, but leaves the HTML in the same
location.
That distinction often confuses Dreamweaver users. For instance, be careful not
to drag an AP div marker (the gold shield which represents the HTML code)
into a table. Putting an AP div inside a table can cause major display problems
in some browsers.
That said, an AP div can visually overlap a table, or even appear to be inside a
cell; just make sure the gold AP div marker itself isn’t inside a cell.
Tip: The AP div marker (shield icon) takes up room on the screen and can push text, graphics, and other
items out of the way. In fact, even the thin borders that Dreamweaver adds to divs take up space in the
document window, and the space they occupy may make it difficult to place AP divs precisely. The keyboard shortcut Ctrl+Shift+I (c-Shift-I) hides or shows invisible items like AP div markers. The Hide All
Visual Aids option from the Document toolbar does the same thing (see Figure 9-23).
• Selection handle. The selection handle provides a convenient way to grab and
move an AP div around the page. The handle appears when you select the AP
div, or when you click inside the AP div to add material to it. The handle lets
344
Dreamweaver CS3: The Missing Manual
Adding an AP Div to
Your Page
you move the position of the AP div without changing the position of its code
(see “Moving AP Elements” on page 349). Behind the scenes, Dreamweaver
updates the CSS code (the left and top position properties described on page
341) automatically…pretty nifty.
• AP element outline. When an absolutely positioned element isn’t selected, a
thin, gray, 3-D border outlines each AP element. Like the AP div marker and
selection handle, it’s there only to help you see the boundaries of the AP element, and doesn’t show up in Web browsers. You can turn it on and off, but to
turn it off, you need to make sure two options in the View ➝ Visual Aids menu
don’t have checkmarks next to their names: AP Element Outlines and Layout
Outlines. You can also use the Visual Aids menu in the document window (see
Figure 9-23).
Figure 9-23:
Choices 2–5 in the Visual
Aids menu provide visual
cues to help you with CSS
layouts in Design view.
The CSS Layout
Backgrounds option—
selected here—lights up
each <div> tag on a page
with a hideous, randomly
selected background
color. It also highlights
any element whose
display property is set to
“block,” (see page 137) or
that uses either absolute
or relative positioning (see
page 337). Both the CSS
Layout Outlines and AP
Element Outlines options
draw a gray line around
positioned elements. In
addition, the Layout
Outlines option draws a
black border around
<div> tags that aren’t
absolutely positioned. The
CSS Layout Box model
option is discussed on
page 324.
Note: If one AP element overlaps another, the top AP element—the one with the higher Z-index, as
described on page 340—has a solid outline; the lower absolutely positioned element’s outline appears as a
dashed line where the top AP element overlaps it.
Chapter 9: Page Layout
345
Drawing AP Divs
• AP div positioning summary. If you select an AP div and hover your mouse over
that div, Dreamweaver pops up a yellow box with information about how that AP
div is positioned (see Figure 9-22), including the name of the ID style or class style,
what type of positioning is used, the dimensions of the AP div, and so on. This box
provides a quick summary of relevant positioning information, and gives you a
bird’s-eye view of the CSS properties defining the AP div’s placement on the page.
Drawing AP Divs
Dreamweaver wouldn’t be Dreamweaver if it didn’t give you several ways to perform a certain task, like creating an absolutely positioned div. You can create an
AP div as described above, or turn to two methods designed specifically for adding
AP divs to a page: You can drag to create an AP div freehand, or use a menu command to insert a full-blown, complete AP div. Your choices are:
• Use the Draw AP div tool. The Draw AP div tool is in the Insert bar, on the Layout tab (see Figure 9-5). Click the AP div button, and then drag the + cursor diagonally in the document window to create a box—the outline of the AP div.
Tip: For accurate drawing, you should hide Dreamweaver’s visual aids (like the AP div border and selection handles), which take up space and move AP divs slightly out of position in Design view. Ctrl+Shift+I
(c-Shift-I) does the trick.
• Use a menu command. To insert an AP div at the insertion point, choose Insert
➝ Layout Objects ➝ AP Div.
If you don’t like the looks of the default AP div that Dreamweaver inserts, choose
Edit ➝ Preferences (Dreamweaver ➝ Preferences), select the AP Elements category, and then adjust the default properties there. Add a background color, for
example, or increase the AP div’s size. From then on, you can instantly create
your favorite kind of AP div using the Insert ➝ AP div command.
However, Dreamweaver’s AP div tools have one drawback: They create internal ID
styles with generic names like apDiv1, apDiv2, and so on. So you don’t get to take
advantage of the byte-saving virtues of an external style sheet until you move the styles
to an external style sheet. Fortunately, Dreamweaver CS3’s new CSS management
options make this maneuver simple, as described on page 291. In addition, you have to
take a second to rename these AP divs to something a little more understandable—like
changing apDiv1 to button. (Your new friend, the AP Elements panel, makes this easy
to do, as shown in Figure 9-24, and explained in the next section.)
The AP Elements Panel
The AP Elements panel (Figure 9-24) helps you manage absolutely positioned elements in a document. To open it, choose Window ➝ AP Elements, or press F2. It’s
called the AP Elements panel instead of the AP Divs panel because any tag that has
346
Dreamweaver CS3: The Missing Manual
The AP Elements
Panel
an ID style and which has its position property set to absolute (see page 337)
appears here. So if you absolutely position a single paragraph, its ID appears in this
panel. The panel’s three columns provide information on each element:
Figure 9-24:
The AP Elements panel lets you name, reorder, and change the visibility of AP
elements. Turning on the “Prevent overlaps” checkbox ensures you can’t position
or drag an AP div on top of another. This feature is intended to make it easy to
convert an AP div layout to a table-based layout using the Modify ➝ Convert ➝
“AP divs to Table”. Don’t do it! This creates horribly bloated HTML that easily falls
apart as you add, edit, and adjust content on the page.
• Visibility. To change an absolutely positioned element’s visibility property
(page 339), click in the column with the eye icon next to the element’s name.
An open eye indicates that the property is set to visible; a closed eye, hidden. No
eye icon at all represents the factory setting: The element is still visible on the
page, it’s just that the CSS visibility property isn’t set.
• AP element ID. If you use Dreamweaver’s Draw AP div tool, Dreamweaver
gives the AP div a generic ID name—like apDiv1. If you created the div yourself, you probably already came up with a pretty good ID like siteTools or
navBar. But if you want to change that name (or provide a more descriptive
name for a Dreamweaver-created AP div), double-click the AP element ID
name, and then type a new name. (AP element names are just ID names, so they
must start with a letter, and can contain only letters and numbers. As Dreamweaver is quick to remind you, spaces and other punctuation aren’t allowed.)
Clicking an item in the AP Elements panel, by the way, is another way to select
that element in the document window.
Note: Don’t rename an AP element’s ID if you’ve already used it in a Dreamweaver behavior like the
Show/Hide Elements action (see page 533). JavaScript uses those names to “talk to” the absolutely positioned elements. If you change its ID in the AP Elements panel, Dreamweaver doesn’t automatically
update the name in the JavaScript code in your page. The behavior, therefore, no longer works. In that
case, you need to edit the behavior using the new ID name.
• Z-index. The Z-index provides a third dimension to absolutely positioned elements, letting them overlap one another (see page 340). To change the Z-index
of an element, click the number in the Z column, and then type another number. Software veterans will find that Dreamweaver’s AP Elements panel works
just as it does in Photoshop or Fireworks: You can drag the name up or down
the list to the desired position. The AP element at the top of the list (highest
number) is in front of all other AP elements, while the AP element at the bottom of the list (lowest number) appears behind all other AP elements.
Chapter 9: Page Layout
347
Modifying AP
Element Properties
Modifying AP Element Properties
Once you’ve added an AP div, you don’t need to go back to the CSS Rule Definition window to edit most of the AP div’s positioning properties. Using the Property inspector, you can rename it, resize it, move it, align it with other AP divs, and
set many other properties.
But first, you have to select the AP div using one of these methods:
• Click the AP div’s name in the AP Elements panel (Figure 9-24).
• Click the AP div’s selection handle (Figure 9-22).
• Click the AP div’s border. The border turns red when you’ve moved your
mouse into the proper position.
• Click the AP element marker that indicates the HTML code for the absolutely
positioned item (Figure 9-22). (Out of the box Dreamweaver hides these markers,
since they can get in the way of your design work; to show them, see page 344.)
And if those aren’t enough ways to select an AP div—Adobe’s programmers never
sleep—you can also Shift-click an absolutely positioned element. This technique
also lets you select multiple AP divs, so that you can set the properties of (or align)
many AP divs at once. If you’re working in an AP div or have an AP div selected,
Shift-clicking another AP div selects them both. You can continue to Shift-click to
select additional AP divs. (Shift-click a second time to deselect a selected absolutely positioned element.)
Resizing Absolutely Positioned Elements
When you select an AP element, eight handles appear around the edges of the AP
div (see Figure 9-22). You can drag any of these handles to change the AP div’s
dimensions. The corner handles resize both the width and height simultaneously.
You can also use the keyboard to resize an absolutely positioned element. First,
select the AP element, and then do one of the following:
• Press the Ctrl (c) key, and then press the arrow keys to change the AP element’s size by one pixel. The up and down arrow keys adjust the AP div’s
height; the left and right arrows affect its width.
• To change the size 10 pixels at a time, press Ctrl+Shift (c-Shift), and then press
the arrow keys.
For better precision, use the Property inspector to set an exact width and height for
the AP element (see Figure 9-25). Type values in the W and H boxes to change the
width and height of the AP element, respectively. You can specify any unit of measurement that CSS understands: px (pixels), pc (picas), pt (points), in (inches),
mm (millimeters), cm (centimeters), em (height of the current font), ex (height of
the current font’s x character), or % (percentage)—see page 107 for more on CSS
measurement units. To pick your measurement unit, type a number immediately
348
Dreamweaver CS3: The Missing Manual
Modifying AP
Element Properties
followed by the abbreviation for the unit. For example, type 100px into the W box
to make the AP div 100 pixels wide. Don’t leave out the measurement unit—px,
em, or %, for example—or browsers won’t display the correct dimensions of the
AP element.
Figure 9-25:
The Property inspector
controls many AP
element properties
(although some require
editing CSS styles).
Another benefit of using the Property inspector is that Dreamweaver lets you resize
multiple AP divs at once. Shift-click two or more AP divs to select them, and then
type new widths and heights. Dreamweaver sets all selected AP divs to these same
dimensions.
Moving AP Elements
Moving an absolutely positioned element is just as simple as resizing it. Drag any border of the element, or the AP element’s selection handle (shown in Figure 9-22).
(Avoid the eight resize handles, which change the size of the AP div when dragged.)
For less speed but greater precision, you can move an AP element using the keyboard. First select the element and then do one of the following:
• To move an AP element one pixel at a time, press the corresponding keyboard
arrow key.
• Press Shift while using an arrow key to move the element 10 pixels at a time.
As you’d guess, you can also control an AP element’s placement by using the Property inspector (see Figure 9-25). Dreamweaver measures an AP div’s position relative to the left and top edges of the page (or, for nested AP divs, from the left and
top edges of a parent div with a position property set to either absolute or relative).
The Property inspector provides two boxes for these values: L specifies the distance
from the left edge of the page to the left edge of the selected AP div; T specifies the
distance from the top edge of the page to the top of the selected AP div.
Note: You can’t edit an AP div’s Right or Bottom positioning properties from the Property inspector. For
these properties, edit the style using one of the methods discussed on page 124.
To position an AP div using the Property inspector, select the div (for example, by
clicking the div’s border or selecting its name in the AP Elements panel), and then
type distances in the L and T boxes. You can use any of the units of measurement
mentioned previously. You can even use negative values to move part or all of an AP
div off the page entirely (offstage, you might say), which is something you’d do if you
intended a subsequent animation to bring it onstage, into the document window.
Chapter 9: Page Layout
349
Nesting AP Divs
If you draw a 100-pixel-tall and 50-pixel-wide AP div, you can move it to the very
top-left corner of the page by selecting it, and then typing 0 in both the L and T
boxes. To position that same AP div so that it’s just off the left edge of the page,
type -50px in the L box.
Aligning AP Elements
At times, you may want to align several AP elements so that their left, top, bottom,
or right edges line up with each other. Dreamweaver’s Align command does just
that; it can even make the width and height of selected AP elements the same.
To use this feature, select two or more AP divs (by Shift-clicking them), choose
Modify ➝ Arrange, and then select one of the following options from the submenu:
• Align Left aligns the left edges of all selected AP divs. In other words, it gives
each AP div the same L property.
• Align Right aligns the right edges.
• Align Top aligns the top edges, so that the T properties are all set the same.
• Align Bottom aligns the bottom edges of the AP divs.
• Make Same Width sets the same width for all selected AP divs (in the W box in
the Property inspector). Make Same Height does the same for the height of the
AP divs.
The AP div you select last dictates how Dreamweaver aligns the AP divs. Say you
have three AP divs—A, B, and C—and select them in order from A to C. You then
align them to Left. Dreamweaver uses the left edge of AP div C (the last one you
selected) as the value for the other AP divs.
Background Image and Color
To add a background image to the AP div, click the folder icon next to the Bg
Image field, and then select an image from your site folder. As usual, Dreamweaver tiles the image, if necessary, until the entire AP div’s filled with repeating
copies of the graphic. (To adjust how or whether the image tiles, you’ll need to edit
the style using the normal CSS-style editing techniques; see page 218.)
Setting a background color is even easier. Just use the Bg Color box to select a
color or sample a color off the screen.
Nesting AP Divs
Nesting doesn’t necessarily mean that one AP div appears inside another AP div;
rather, it means that the HTML for one AP div is written inside the code for
another. The nested AP div itself can appear anywhere on the page. The main benefit of nested AP divs is that the parent AP div—the AP div containing the HTML
of one or more other AP divs—can control the behavior of its child AP divs.
350
Dreamweaver CS3: The Missing Manual
CSS Layout Tutorial
Suppose you create one AP div, and nest two AP divs inside it. If you move the
parent AP div on the screen, the two child AP divs follow it, which gives you an
easy way to move several AP divs in unison. Furthermore, the parent AP div can
control its children’s visibility. When you hide the parent AP div (see page 339),
the nested AP divs also disappear (unless you’ve specifically set the nested AP divs’
visibility property to visible).
Tip: Dreamweaver’s factory settings hide a useful visual cue—“AP element markers (see Figure 9-22).
These markers identify where in the code the HTML for the AP div appears. Since a nested absolutely positioned element is a tag whose code appears inside another absolutely positioned element—like inside the
parent’s <div> tag—an AP element marker appears inside the parent AP div for each nested AP div. To turn
on the AP element marker feature, press Ctrl+U (c-U) to open the Preferences window, click the Invisible Elements category, and then turn on the “Anchor Points for AP Elements” checkbox. You also need to
make sure visual aids are turned on (as explained in Figure 9-23).
Here’s how to create a nested AP div:
• While pressing the Ctrl (c) key, drag one AP div in the AP divs panel (see
Figure 9-24) onto another AP div. The dragged AP div becomes the child of the
AP div you drop it on, and its name appears indented in the AP divs panel, also
shown in Figure 9-24.
To un-nest an AP div, drag it above or below the parent AP div in the AP divs
panel. (Doing so places the code for the nested AP div directly before the opening <div> tag of the parent AP div.)
Tip: You can also un-nest an AP div, and gain more control over where the HTML for that AP div is written in the document, by dragging the AP element marker to a new spot in the document window. (This
AP element marker isn’t always immediately visible, however; see the Tip above)
• Use the Insert Div Tag button on either the Common or Layout tab of the
Insert bar, or choose Insert ➝ Layout Objects ➝ Div Tag. In either case, the
Insert Div Tag window appears (Figure 9-6). Select the name of the AP div you
wish to nest inside another AP div; choose either “After start of tag” or “Before
end of tag” from the first Insert menu; then choose the name of the parent AP
div from the second menu.
• Click inside an AP div, and then choose Insert ➝ Layout Objects ➝ AP div. You
get a new, nested AP div inside it.
• Drag the Draw AP Div button (see Figure 9-5) from the Insert bar’s Layout tab,
and drop it inside an AP div on the page.
CSS Layout Tutorial
In this tutorial, you’ll create a page using one of Dreamweaver CS3’s new CSS Layouts. You’ll add content to the page, apply styles, and modify the design to meet
the exacting standards of Cosmofarmer.com (see Figure 9-36).
Chapter 9: Page Layout
351
CSS Layout Tutorial
Note: You need to download the tutorial files from www.sawmac.com/dwcs3/ to complete this tutorial.
See the Note on page 39 for more details.
Once you’ve downloaded the tutorial files and opened Dreamweaver, define a new
site as described on page 28: Name the site CSS Layout, and select the Chapter09
folder (inside the MM_DWCS3 folder). (In a nutshell: choose Site ➝ New Site. In
the Site Definition window, click the Advanced tab, type CSS Layout into the Site
Name field, click the folder icon next to the Local Root Folder field, navigate to
and select the Chapter09 folder, and then click Choose or Select. Finally, click OK.)
1. Choose File ➝ New.
The New Document Window opens (see Figure 9-26).
Figure 9-26:
Dreamweaver provides
32 CSS layouts organized
by the number of
columns each layout has.
2. Select the “Blank Page” category in the left column; select HTML from the
Page Type column, and select “2 column fixed, left sidebar, header and footer”
from the Layout column.
You’ve selected a design that has two columns, a left-hand sidebar and a main
content area on the right, with areas at the top and bottom of the page to hold a
banner and copyright notice.
Next you need to tell Dreamweaver where to store the CSS required to make
this design work.
3. From the Layout CSS menu, select Create New File.
This option tells Dreamweaver to create a new external style sheet with the
required styles, and to link it to the new page Dreamweaver is about to create.
352
Dreamweaver CS3: The Missing Manual
CSS Layout Tutorial
4. Click the Create button.
The Save Style Sheet File As window appears. Before Dreamweaver creates a
new Web page, you first have to save the external style sheet. Dreamweaver recommends a file name—twoColFixLtHdr.css in this instance. You can rename
this file to anything you’d like, but the name Dreamweaver suggests is descriptive, if not particularly elegant.
5. Click the Site Root button to navigate to this site’s main folder, and then select
the css folder. Click Save.
Dreamweaver saves the file, and creates a new document. It’s not much to look
at yet, but you’ll add your own design touches to this page in the steps ahead.
6. Choose File ➝ Save; click the Site Root button to move to the main folder for
the site, and then save the file as hydroponics.html.
Every page needs a title and the one Dreamweaver supplies—“Untitled Document”—isn’t very helpful.
7. Click the Title box at the top of the Document window, and then type Bathtub
Hydroponics.
The first step after creating a page based on a Dreamweaver CSS Layout is to
remove some of the formatting that Dreamweaver supplies. For example, to
help you easily identify the header, sidebar, and footer, Dreamweaver adds a
gray background to each of these elements. Unless you’re designing a battleship
tribute site, you should remove these colors (or at least change them to colors
you like).
8. Make sure the CSS Styles panel is open (Window ➝ CSS Styles), and the Current
button is selected at the top of the panel (see Figure 9-27).
Dreamweaver’s CSS Panel provides a quick and easy way to identify and edit a
style applied to a part of the page. The panel’s Current view displays the styles
affecting the current selection. Also make sure the Cascade button (labelled in
Figure 9-27) is pressed.
9. In the document window, click inside the word Header at the top of the page,
and then choose Edit ➝ Select All (Ctrl+A or c-A for Macs works just as well).
Clicking inside the headline places the insertion point inside the <h1> tag, and
inside the <div> tag used to define the header portion of the page. The Select
All command works slightly differently when the cursor’s inside a <div>.
Instead of selecting everything on the page (probably what you’d think Select All
would do), it selects all of the div’s contents—it also highlights the <div> tag in
the Tag selector at the bottom of the page. Now, if you look at the CSS Styles
panel, you see a style .twoColFixLtHdr #header listed in the Rules pane (see
Figure 9-27).
Chapter 9: Page Layout
353
CSS Layout Tutorial
Show CSS
properties for
currently
selected tag
Figure 9-27:
The Current View of the CSS Styles Panel is one of
Dreamweaver’s greatest CSS productivity tools. It
shows properties and styles that apply to any
element you select in the Document window. It’s
most useful when you click the Show Cascade
button (labelled), which displays every style that
might affect the current selection, and displays those
style names in the order of their importance, with
the style that has the greatest impact on the selected
page element listed at the bottom. Turn to page 298
to learn more about using the CSS Styles panel.
Show cascade
Selected style
Show CSS
properties for
currently
selected style
Attach external stylesheet
10. Make sure .twoColFixLtHdr #header is selected in the Rules pane (see
Figure 9-27). In the Properties pane, click the Background color value—
#DDDDDD—press Delete, and then hit the Enter (Return) key.
This removes the background color and, at the same time, deletes the background color property from the style sheet. You could also have changed the
color to something more appropriate for the site.
Next, you’ll remove the space that surrounds the headline inside the header area.
11. In the Properties pane, click the padding values—“0 10px 0 20px”—to select
them. Type 0, and then Enter (or Return).
This action removes any padding inside the header div—in other words, it
removes the space between the div’s edge in the content inside. In some cases,
you may want to keep or adjust the padding if you want to keep text inside the
div from running to the very edge of the div. In this tutorial, you’ll be inserting
a banner graphic that needs to fill the entire header region.
12. Repeat steps 9–11 to remove the background color, and set the padding to 0
for the sidebar and footer.
For example, click inside the text “Sidebar1 Content,” press Ctrl+A (c-A), and
edit the .twoColFixLtHdr #sidebar1 style. The name of the style controlling the
footer is .twoColFixLtHdr #footer.
354
Dreamweaver CS3: The Missing Manual
CSS Layout Tutorial
If you preview the page now, you’ll notice a black border framing the header,
sidebar, main content, and footer areas. This border is applied to a <div> tag
that wraps all of the other tags. You’ll remove that border now.
13. In the Tag Selector at the bottom left of the document window, click <div#
container> to select the div. In the Properties Pane of the CSS Style panel,
delete the value “1px solid #000000” from the border property.
In other words, click “1px solid #000000,” and then press Delete. (If you don’t
see <div#container> in the Tag Selector, click inside any of the areas with text
on the page.)
Finally, you’ll remove the background color for the page.
14. In the Tag Selector click <body.twoColFixLtHdr> to select the page’s <body>
tag. In the Properties Pane of the CSS Style panel, remove the gray background color.
This is the same as step 10 above. At this point, you’ve removed some of the visual
formatting to start with a clean slate. In the next section you’ll add actual content.
Adding Content
Now it’s time to add the real content to this page…OK, it’s not “real” content,
since CosmoFarmer.com doesn’t really exist, but you get the idea.
1. Select and delete the text “Header” at the top of the page; choose “None” from
the Property inspector’s Format menu.
You’ll replace that text with a banner image.
2. Choose Insert ➝ Image; navigate to the images folder, and then select the file
banner.png. Click the OK or Choose button to insert the image.
If the Image Tag Accessibility window appears, type CosmoFarmer.com in the
Alternate text box, and then click OK.
The sidebar lists links to other pages related to this one. The content for that
sidebar is located in another HTML file in this tutorial.
3. In the files panel, locate the file sidebar_content.html in the content folder, and
double-click it to open it.
You could also choose File ➝ Open, navigate to the content folder in the site,
and then double-click the sidebar_content.html file to open it. Either way, a Web
page opens with a headline, bulleted list, and paragraph. You’ll copy it from this
page and paste it into the new layout.
4. Choose Edit ➝ Select All, then Edit ➝ Copy; in the document toolbar, click the
tab for hydroponics.html to switch to that page. Click anywhere inside the sidebar, and then choose Edit ➝ Select All and Edit ➝ Paste.
The sidebar’s dummy text supplied with the layout page is replaced with not much
smarter text from CosmoFarmer.com. You’ll do the same for the main content area.
Chapter 9: Page Layout
355
CSS Layout Tutorial
5. Repeat steps 3 and 4 with the main_content.html file and the main content
region of the page.
In other words, open main_content.html, and then paste its contents into the
div with the big headline “Main Content.” You’ll just type the copyright notice
into the footer.
6. Scroll to the bottom of the page, double-click the word “footer”, and then type
Copyright 2007, CosmoFarmer.com.
There’s just one last piece of content missing—a photo to liven up the page.
7. Scroll to the top of the page; click into the main content area in the empty
paragraph just above the paragraph that begins “Bathtub hydroponics offers
rich rewards…” Choose Insert ➝ Image and insert the file tomato_bath.jpg.
If the Image Tag Accessibility window appears, then type Tomato Bath for the
alternate text, and then click OK. At this point, the page should look like
Figure 9-28. The basic structure is together and the contents in place. Now it’s
time to add some style.
Figure 9-28:
The dotted lines that run
around the different
layout regions on the
page represent the <div>
tags that are positioned
to create this two-column
layout. The left-hand
sidebar is a left floated
div with a set width.
356
Dreamweaver CS3: The Missing Manual
CSS Layout Tutorial
Applying Some Style
At this point, you could create new styles to format this page using the techniques
you’ve read about earlier in this book—change the fonts and font sizes, add underlines to headlines, change the look of links, and so on. For the sake of keeping this
book from rivaling the length of War and Peace, this book assumes you’ve already
got those skills under your belt, and you’ll attach a style sheet with some already
created styles.
1. In the CSS Style panel, click the Attach External Style Sheet button (see
Figure 9-27).
The Attach External Style Sheet window opens. It’s a good idea to place any
styles that don’t directly affect the layout of one of Dreamweaver’s CSS Layout
pages in a separate CSS file, like the one you’re about to attach. That way you
can have one CSS file that controls style elements that apply to every type of
page on your site—the background color of the body, the look of headings and
text, and so on. Then you can attach this global style sheet so that it shares these
same styles with other pages using different types of CSS layouts—1 column, 3
column, liquid, and so on.
2. Click the Browse button, and then navigate to the css folder; double-click the
file global.css. Click OK in the Attach External Style Sheet window.
Dreamweaver links the style sheet to the page, and styles the page content.
There’s still some work to be done with the layout, but first you’ll style the
background of the page.
3. In the Tag selector, click <body.twoColFixLtHdr> to select the <body> tag.
The CSS Styles panel should look like Figure 9-29. Notice that there are two
body styles listed in the Rules pane. One is defined in the layout style sheet
(twoColFixLtHdr.css), and the other is in the global style sheet you just attached.
You want to edit the style in the global.css file.
4. In the Rule pane, double-click the body style that appears at the bottom of the list.
The CSS Rule Definition window opens.
5. Click the Background category; in the Background color box, type #D6D9E1;
click the Browse button, navigate to the images folder, and then select the file
leaf_bg.gif.
The CSS Rule Definition window should look like Figure 9-30.
6. Click OK to finish editing the style.
A simple leaf illustration fills the background of the page. However, there’s not
a strong enough separation between the background and page content; a border on the left and right sides of the container div will fix that.
Chapter 9: Page Layout
357
CSS Layout Tutorial
Figure 9-29:
When working with multiple style sheets, you might see the same style
name listed twice—in this example, the body tag style. To determine
which style belongs to which style sheet, mouse over the style’s name
in the Rules pane (in the middle of this image). A tooltip box provides
useful information about the style’s specificity and where its code is
located. In this case, the CSS for the second body style listed here is
stored in a file named global.css. For the lowdown on what specificity
is and how it works, turn to page 296.
Figure 9-30:
It’s a good idea to set a background
color even when assigning a
background image to a page. The
background color should match the
general tone of the image. That way, if
a visitor has graphics turned off, or for
some reason the background image
fails to load, you’ll still have
background color.
7. In the CSS Style panel, click the New Style button.
The New CSS Rule window opens. Every Dreamweaver CSS Layout includes a
<div> tag that wraps around all the other tags; it has an ID of #container
applied to it (see page 329 for details). So to add a border to that, you just need
to create a new ID style with that name.
8. Select the Advanced button, type #container in the Selector box, choose global.css
in the Define In menu, and then click OK.
The CSS Rule Definition window appears (Figure 9-31).
358
Dreamweaver CS3: The Missing Manual
CSS Layout Tutorial
9. Click the Border category, and then turn off the three “Same for all” checkboxes. For the left and right borders, choose a solid, 2-pixel, black border.
Make the bottom border a solid, 20-pixel, black border.
The Rule Definition window should look like Figure 9-31.
Figure 9-31:
You don’t need to add
borderlines to all four
sides of a style, and you
don’t even need to make a
border that looks like a
border. Instead, by making
a very thick border, you
can create the appearance
of a large block on the
page—in this case, a thick,
black, block adds a solid
visual end to the bottom of
the page.
10. Click OK to complete the style.
If you preview the page in a Web browser, it should look like Figure 9-32. A few
problems still need fixing.
Figure 9-32:
The layout’s a bit off. The
banner doesn’t fit the
entire width of the
container, and the gutter
between the sidebar and
the main content is way
too wide. You’ll fix those
problems in the next part
of the tutorial.
Chapter 9: Page Layout
359
CSS Layout Tutorial
Fine-Tuning the Layout
This layout needs a few minor tweaks to make it look just right. First, the container is too wide for the banner logo.
1. In the Tag selector at the bottom left of the document window, click <div#
container> (circled in Figure 9-33).
The CSS Styles panel should now look like Figure 9-33 (if it doesn’t, make sure
the CSS Styles panel is open and that the Current button at the top of the panel
is selected).
Figure 9-33:
If the CSS Styles panel isn’t tall enough, the
information for the Rules pane or the Properties pane
kind of disappears. To quickly expand the CSS Styles
Panel, double-click the tab labeled CSS Styles on the
panel. This maximizes the height of the panel, and
shows the contents of all three panes.
2. Click 780px next to Width in the Properties pane to select the value. Type
760px and press Return (Enter).
This action changes the width of the container to 760 pixels—the exact width of
the banner graphic. The container style actually defines the width of the entire
content area, so if you want a wider page, then change this value to a larger
number. Some Web sites are now designing to fit monitors that display at 1024
× 768 pixels, using page widths that range from 900 to 1000 pixels.
360
Dreamweaver CS3: The Missing Manual
CSS Layout Tutorial
The sidebar is also a bit wide.
3. Click inside the sidebar, and then click <div#sidebar1> in the Tag selector.
Repeat step 2, but set the width to 170px.
The sidebar width changes to 170 pixels. Now it’s time to remove the large gap
between the sidebar and the main part of the page.
4. Click anywhere inside the main story text, and then click <div#mainContent>
in the Tag selector.
This selects the main content div. Its properties now appear in the Properties
pane’s Styles panel. The #mainContent style doesn’t have a set width. Instead, a
left margin is used to indent the content from the left edge of the page and away
from the sidebar. On the Properties pane, you should see the margin property
listed and a value of “0 0 0 250px.” Margin is a CSS shorthand property, and the
four numbers represent the four margins around the div. From left to right,
they are the top, right, bottom and left margins. In this case there’s no margin
for the top, right and bottom, but the left margin is 250 pixels. To close the gap
between this div and the sidebar, you just need to make the left margin smaller.
Tip: Here’s a short mnemonic to help you remember the order of values (top, right, bottom, and left) for
the margin and padding properties: TRBL. If you don’t get the order right, you’ll be in TRouBLe.
5. In the Properties Pane, click the “0 0 0 250px” value, and then change it to:
“15px 0 0 175px”.
This new setting adds 15 pixels of space above the main content (pushing it
down a bit from the banner), and 175 pixels of space on the left (there’s also 20
pixels of left padding applied to the main content div, so the text in that div is
actually farther than 170 pixels from the left edge of the container—it’s 190 pixels,
to be precise). Now this div is positioned well. Finally, the copyright notice
needs some help.
6. Scroll to the bottom of the page, click anywhere inside the copyright notice,
and then, in the Tag selector, click <div#footer>. In the Rules pane, doubleclick the .twoColFixLtHdr #footer style.
The CSS Rule Definition window appears.
7. In the Font Size box, type 12.
This action makes the copyright notice a little less prominent. Next, you’ll move
the footer to the left and add a border to the top.
8. Click the Box category, and then turn off the “Same for all” checkboxes for
both the padding and margin. Type 20 in the left padding box, and choose pixels
from the menu to the right. Type 175 in the left margin box, and choose pixels
from its menu.
Finally, add a top border to finish the footer.
Chapter 9: Page Layout
361
CSS Layout Tutorial
9. Click the Border category, and then turn off all three “Same for all” checkboxes. For the top border, choose “dashed” from the style menu, type 1 in the
width box, and then choose a gray color (#666666 is good). Click OK to complete the style.
The last layout-related change you’ll make is creating a right-floated box to contain the photo and its caption.
10. In the document window, scroll to the top of the page. Click at the end of the
sentence after the photo of the bathtub (the paragraph with the gray background), and then drag to the left and up until that paragraph and the photo
are selected.
You’ll wrap these two elements with a div using Dreamweaver’s Insert Div Tag tool.
11. Choose Insert ➝ Layout Objects ➝ Div Tag.
The Insert Div Tag window appears. You need to create a style to format the div
you’re about to insert.
12. Click the New CSS Style button, and then, in the New CSS Rule box, click the
class button; select and delete the stuff in the Name box, and then type .photoBox;
choose global.css from the Define In menu. Click OK.
Just a few settings will size and position the photo and caption.
13. Click the Block category. Choose center from the Text align menu. Click the
Box category. Choose right from the Float menu, and then type 220 in the
Width box. Click OK to complete the style.
The center option aligns the photo and text in the middle of the box. The other
properties set a width of 220 pixels, and move the box to the right edge of the
main content area.
At this point, you’ve returned to the Insert Div Tag window, and the class box is
filled out with the name of the class style you just created.
14. Click OK.
The photo and caption move to the right edge of the story content. Preview the
page to check your progress.
Finishing Touches
Currently the page doesn’t have any navigation bar, and the sidebar looks a little
uninspiring. You’ll complete this tutorial by adding just a couple more enhancements.
First, the sidebar links have a gray and green background that’s only as tall as the
link area. It looks a little wimpy: A better design would be a colored background
that spans the entire height of the sidebar. But even if you added a background
color to the sidebar div, you still wouldn’t have a strip that extended the entire
height of the page. That’s because the content div is much taller and takes up more
vertical space than the sidebar. The solution is to add a background image to the
container div, and tile it up and down to fill the left sidebar.
362
Dreamweaver CS3: The Missing Manual
CSS Layout Tutorial
1. Return to Dreamweaver; and click anywhere inside the sidebar or main content of the page. In the Tag selector, click <div#container>. In the CSS Styles
panel’s Rules Pane, double-click the style .twoColFixLtHdr #container to open
the CSS Rule Definition window.
Because the container encloses all of the other tags, it always stretches to the
same height as the divs inside it. By tiling an image in the background of this
div, you can be assured that no matter which div (the sidebar or main content)
is taller, it’ll look like the sidebar extends the entire height of the content area
(and if that doesn’t make any sense, you’ll see the results after step 3).
2. Click the Background category. Click the Browse button, navigate to the
images folder, and then double-click the file wrapper_bg.png. From the Repeat
menu, choose repeat-y.
The window should now look like Figure 9-34.
Figure 9-34:
Using a background image to simulate
a much taller sidebar is known as the
“faux columns” technique. You can
read about it at http://alistapart.com/
articles/fauxcolumns/.
3. Click OK to finish the style, and then press F12 (Option-F12) to preview the page.
The sidebar is much more solid looking. Scroll to the bottom of the page, and
you see that the background extends well past the actual sidebar content. Now,
time for the navigation bar.
4. Return to Dreamweaver. In the files panel, locate the file menubar.html in the
content folder, and double-click to open it.
You could also choose File ➝ Open, navigate to the content folder in the site,
and then double-click the menubar.html file to open it. Either way, a Web page
opens with a bulleted list of links. You’ll copy it from this page.
5. Choose Edit ➝ Select All, then Edit ➝ Copy; in the document toolbar, click the
tab for hydroponics.html to switch to that page.
You’ll paste the navigation bar after the banner image.
6. Click the banner graphic, and then press the right arrow key.
This little move deselects the image and places the cursor just next to it, ready
for you to paste the navigation bar into place.
Chapter 9: Page Layout
363
CSS Layout Tutorial
7. Choose Edit ➝ Paste.
You could also press Ctrl+V (c-V). Either way, your precious layout blows up!
The sidebar travels to the far right and the main content drops to the bottom of
the page. Ahh, the joys of Web design. You’ve actually encountered a problem
with floated elements, and if you use the Spry Navigation bar (see page 175)
you’ll probably encounter this same problem frequently.
Here’s what happened: When you pasted the unordered list into the page, it was
formatted using styles from the global.css style sheet. These styles are the same ones
you created in the tutorial for the links chapter. They’re the styles used to create a
horizontal Spry navigation bar, and they use a left float to position the buttons next
to each other. Unfortunately, because they’re floated, the sidebar attempts to obey
the rules of CSS by wrapping around the floated element (just like text wraps
around a floated image.) This positions the sidebar to the right of the navigation
bar. The main content, with no place to go (there’s no room to wrap around the
right side of the sidebar anymore), just drops to the bottom of the page.
Fortunately, the solution isn’t too painful…but it does require a brief trip into
Code view.
8. Double-click the word Horoscopes in the navigation bar, and then, at the top
left of the document window, click the Code button.
This action drops you into a scary forest of HTML. Here’s the lowdown: You’re
about to insert a linebreak (<br>) tag, right after the closing </ul> tag of the
navigation bar. You’ll also apply a class named “clearfloat” to the tag. Clearfloat
is a style that’s in the twoColFixLtHdr.css file that was created as part of the
Dreamweaver CSS Layout. Its purpose is to prevent an element from wrapping
around a floated element—in other words, it uses the CSS clear property,
described on page 321. In this case, it’ll keep the sidebar from trying to wrap
around the navigation bar, and restore your beautiful layout to its pristine glory.
9. Click after the closing </ul> tag that appears just before the HTML comment
<!--end #header -->, and then type <br class="clearfloat" /> (see Figure 9-35).
Believe it or not, this fixes the problem.
Figure 9-35:
At times you’ll find that
floats can sometimes
bump into other floats,
ruining the layout of a
page. By adding a tag
that “clears” the float,
you can often prevent
problems.
10. Click the Design view button to return to the wonderful world of visual Web
design. (HTML’s a wonderful place to visit, but who would want to live there?)
364
Dreamweaver CS3: The Missing Manual
CSS Layout Tutorial
The layout returns to order, but there’s a white space next to the navigation bar.
You can make that go away by adding a background color to the header div.
11. Click the banner image, and then press Ctrl+A (c-A) to highlight the header div.
Double-click the style .twoColFixLtHdr #header in CSS Styles panel’s Rules pane.
The CSS Rule Definition window appears…honestly, this tutorial’s almost over.
12. Click the Background category, and then set the Background color to
#EEEEEE. Click the Border category, and then create a bottom border that’s
solid, 1 pixel tall, and dark gray.
Make sure you turn off all three “Same for all” checkboxes under the Border category, so you add a border only to the bottom of the header, below the navigation bar.
13. Click OK to finish editing the style. Press F12 (Option-F12) to preview your
creation.
It should look like Figure 9-36. If it doesn’t, you’re probably using Internet
Explorer. That browser has a few problems that need your attention. First, the
gray background of the header doesn’t fill the space to the right of the navigation bar. Second, the content in the sidebar is pushed further down from the
top than in other browsers. Both of these problems can be tackled in…egads,
not again…Code view.
14. At the top of the document window, click the Code button, and then scroll to
the top of the file.
You should see a chunk of grayed-out HTML. Those are Internet Explorer conditional comments, and they provide special CSS rules just for the sake of IE
(see the box on page 330 for the explanation). In this case, one of those rules is
inserting the extra padding at the top of the sidebar. You just need to delete it.
15. Locate this line of code: .twoColFixLtHdr #sidebar1 { padding-top: 30px; }
(it should be located at line 15). Select that line, and then delete it.
Next, you need to add a new line of CSS code for IE only.
16. Add a new blank line to the code (either above or below the .twoColFixLtHdr
#mainContent style), and then type .twoColFixLtHdr #header { zoom: 1; }
This property’s a special one that, in the case of many weird display bugs,
knocks some sense into Internet Explorer.
You have to deal with one last Internet Explorer problem. If you preview the
page now, you see there’s a little extra space between the banner image and the
navigation bar. Curse you, IE! One style can fix that.
Note: Internet Explorer has always posed some problems for Web designers. IE 6, which is over
half a decade old but still widely used, is full of bugs that wreak havoc on CSS layouts. IE 7 has
fixed many of those problems, but still has a few of its own. For help dealing with IE and CSS, visit
www.positioniseverything.net/ie-primer.html and www.communitymx.com/content/article.cfm?cid=7A8DF.
For in-depth help, pick up a copy of CSS: The Missing Manual.
Chapter 9: Page Layout
365
CSS Layout Tutorial
17. In the CSS Style panel, click the New Style button. Create a new advanced style
named #banner img, and store it in the global.css style sheet.
The extra space is created by the fact that the image is an inline element (see
page 137). In other words, it acts just like a letter in a line of text. Because of
this, IE makes space for any descenders (the bottom half of letters like y, p, q, g
that fall below the bottom of other letters on a line) on the line containing the
graphic. However, an image isn’t a letter, and they don’t have descenders; alas,
IE makes room for them anyway. It’s an easy task to remove that space, however.
18. In the CSS Rule Definitions window, choose the Block category, and then select
“block” from the Display property menu. Click OK to complete the style.
Honestly, you’re finished. That’s it. The page really does work now.
19. Save the file, and then preview the page in Internet Explorer.
Now, even in IE, the page should look like Figure 9-36. If it doesn’t, repeat this
saying four times: “Practice makes perfect,” and then try the tutorial again.
You’ll find the completed tutorial in the Chapter09_Finished folder.
Figure 9-36:
Using Dreamweaver
CS3’s CSS Layouts as a
starting point, you can
quickly build a
multicolumn Web page.
366
Dreamweaver CS3: The Missing Manual
chapter
Chapter 10
10
Under the Hood: HTML
While Dreamweaver started life primarily as a visual Web page editor, it also hosts
powerful code-editing tools that let you work on your pages’ HTML, CSS, and
JavaScript code directly. In fact, in recognition of the ever-multiplying types of files
used to create Web sites, Dreamweaver lets you edit all text-based files, including
XML, Java, ActionScript, and just plain text files. The code editor includes professional features like customizable syntax highlighting, auto indenting, line numbering, and code hints; code collapse, so you can concentrate on just the code you
want; and the Code view toolbar, which provides one-click access to frequent
hand-coding tasks. Dreamweaver may be the only Web page creation program
even hard-core code junkies ever need.
Roundtrip HTML
Unlike many other visual HTML editors, Dreamweaver has always graciously
accepted HTML written by hand (and even by other programs). In fact, Dreamweaver has always made it easy to jump between itself and text-editing programs
like the much loved, but retired, HomeSite (for Windows) and BBEdit (for the Mac).
This ability, which Adobe calls Roundtrip HTML, lets Web developers write code
the way they want, without worrying that Dreamweaver will change it. For example, suppose you have a particular way of formatting your handwritten code.
Maybe you insert an extra carriage return for spacing after every <td> (table cell)
tag, or you like to use multiple tabs to indent nested tags. In such cases, Dreamweaver doesn’t try to rewrite that to fit its own style—unless you ask it to.
367
Roundtrip HTML
Auto-Fixing Your Code
That’s not to say that Dreamweaver doesn’t ever change your code. In fact, the program can automatically fix errors when you open a page that was created in
another program, including:
• Overlapping tags. Take a look at this example:
<p><strong>Fix your tags!</p></strong>
This HTML is invalid, because the opening and closing <strong> tags should
appear inside the <p> tag. Dreamweaver rewrites this snippet correctly:
<p><strong>Fix your tags!</strong></p>
• Unclosed tags. Tags usually come in pairs, like this:
<em>This text is in italics</em>
But if a page is missing the ending tag (<em>This text is in italics), Dreamweaver adds the closing tag.
• Extra closing tags. If a page has an extra closing tag (<strong>bold text</strong>
</strong>), Dreamweaver helpfully removes it.
This feature comes turned off in Dreamweaver CS3. If you’re working on a site
that was hand coded or created by another, less capable Web-editing program,
it’s wise to turn this feature on, since all of those errors are improper HTML
that can cause problems for browsers. (Once upon a time, some Web developers, for example, deliberately omitted closing tags just to save a few kilobytes in
file size. While most browsers can still interpret this kind of sloppy code, it’s
poor practice.)
You can turn auto-fixing on in the Preferences window (see Figure 10-1); just turn
on “Fix invalidly nested and unclosed tags” and “Remove extra closing tags.” If
you don’t have these preference options turned on, Dreamweaver doesn’t fix the
HTML, and there’s no command you can run to fix these kinds of problems.
Instead, Dreamweaver highlights these mistakes in Document view and Code view
(see Figure 10-5).
Tip: The “Warn when fixing or removing tags” option isn’t really a warning as much as it is a report. By
the time you see the “Warning” message, Dreamweaver’s already rewritten the code in your page. You
can’t undo these changes, but you can close the file without saving the changes, to retain the old (improperly formatted) HTML.
Dreamweaver can also change the capitalization (case) of HTML tags and properties, if you want. For example, if you prefer lowercase letters for tags and properties, like this:
<a href="nextpage.html">Click here</a>
368
Dreamweaver CS3: The Missing Manual
Roundtrip HTML
Figure 10-1:
To specify a file name
extension whose code you
never want Dreamweaver
to touch, choose Edit ➝
Preferences. Then, in the
Category list, choose Code
Rewriting, and then type a
new extension in the
extensions field. (Make
sure the “Never rewrite
code” checkbox is turned
on, as well.)
Dreamweaver can convert uppercase tags (<A HREF="next.html">) to lowercase,
or vice versa, when it finds them in pages created by other programs. (You can
turn on this feature, as described on page 383.)
Note: If you’re creating XHTML pages (see page 9), you don’t get the option to choose between cases—
tags must always be lowercase in XHTML files.
Web Application Server Pages
Dreamweaver can leave pages with certain file name extensions untouched—pages
created for Web application servers, for example. Web application servers process
Web pages that access databases and other dynamic services like shopping cart programs and form-processing applications. You’ll read about this capability in Part 6 of
this book. Many of these systems rely on special code within the HTML of a page—
code that Dreamweaver might “fix,” interpreting the portions as HTML errors.
Unless you change its settings, Dreamweaver doesn’t rewrite code in pages that are
designed for the leading application-server technologies—that is, files whose
names end in .asp (Active Server Pages that run on Microsoft’s IIS Web Server),
.aspx (Microsoft’s .NET technology), .cfm and .cfml (ColdFusion Markup Language pages that run on Adobe’s ColdFusion Server), .jsp (JavaServer Pages that
run on any Java Server), or .php (PHP pages), among others. To add an extension
to this list, see Figure 10-1.
Special Characters and Encoding
The Code Rewriting Preferences window also lets you control how Dreamweaver
handles special characters like <, >, and ", whenever you enter them into the Property inspector or a dialog box. Some characters have special meaning; the “less
Chapter 10: Under the Hood: HTML
369
Code View
than” symbol (<), for example, indicates the beginning of an HTML tag, so you
can’t just link to a page named bob<zero.html. If you did, a Web browser would
think a new HTML tag (called zero) was starting after the < symbol.
There are several ways to avoid this problem. The simplest and wisest method:
Avoid strange characters when you name pages, graphics, CSS styles, or any other
object in your site. Sticking to letters, numbers, hyphens, and underscores (_)
makes your life much easier.
Another option is to let Dreamweaver encode those special characters. Encoding a
character simply means using a code to represent it. For example, you can represent a space as %20, or a < symbol as %3C. Thus, the infamous bob<zero.html file
becomes bob%3C.html, and your link will work just fine. To set up encoding,
choose Edit ➝ Preferences (Dreamweaver ➝ Preferences on the Mac) and select the
Code Rewriting category. Your options are as follows:
• Special characters. Turning on this checkbox means that Dreamweaver converts any special character you might type in the Property inspector, or another
dialog box, into the % notation described above. (This feature has no effect on
code you type in Code view.)
Dreamweaver comes with this option turned off, since it can sometimes interfere with server-side code (see Part 6 of this book). If you stick to the simple
rule, “Don’t use strange characters in your file names,” you’ll probably never
notice the difference.
• Do not encode special characters. Selecting this option, the first of three under
“URL encoding,” tells Dreamweaver not to touch any Web addresses you enter
(in the Property inspector’s Link box, say). (Again, selecting this option has no
effect on any links you type in Code view.)
• Encode special characters in URLs using &# is the safest choice. It’s especially
helpful if you use a language that has a non-Latin alphabet. If you name your
files using Japanese characters, for example, choosing this option can translate
them into code that successfully transmits over the Internet.
• Encode special characters in URLs using % is intended for use with older
browsers (and we’re talking old, as in pre-Internet Explorer 4).
Code View
Dreamweaver provides several different ways to view a page’s HTML code:
• Code view. In Code view, Dreamweaver displays your page’s raw code.
• Split view. This shows the HTML code and the “regular” Design view simultaneously (Figure 10-2).
• Code inspector. The Code inspector is a floating code window that lets you use
Design view in its full glory (not cut in half as in Split view), while still providing access to the code. (To open the Code inspector, choose Window ➝ Code
370
Dreamweaver CS3: The Missing Manual
Code View
Inspector, or press F10.) Code warriors who are into serious multitasking can
also use the Code inspector to look at one area of code, while using the main
document window to work on another area of code.
The rest of this chapter assumes that you’re using Code view for HTML editing.
To move between Dreamweaver’s different views, use the buttons in the Document toolbar (Figure 10-2) or choose a name from the View menu: Code, Design
(the “regular” visual mode), or Code and Design (Split view).
Code/
Code design Design
Figure 10-2:
In Split view (also called
“Code and Design
view”), the top half
shows your page’s
HTML; the bottom half
shows the WYSIWYG
Design view. Selecting an
object in the visual half
(the circled headline, for
example) also selects the
corresponding HTML in
the code half (the
highlighted paragraph
tag)—a great way to
identify an object in your
HTML. As you work in
one half of the Split view,
Dreamweaver updates
the other half. Use the
buttons (labeled) in the
Document toolbar to
jump between the
different views. (Notice
that the Tag selector at
the bottom of the
document window
[circled] also identifies
the selected tag.)
Tip: You can quickly jump between Code and Design view by pressing Control+' (on both Windows and
the Mac). In Split view, this shortcut jumps between the two views, so you could insert an image in the
design half of Split view, and then press Control+' to jump right into the HTML for that image in the Code
half of the window.
Chapter 10: Under the Hood: HTML
371
Code View
Code view functions just like a text editor. You can click anywhere inside the window, and then start typing HTML, JavaScript, Cascading Style Sheet, or any other
programming code (such as ASP, ColdFusion, or PHP).
You don’t have to type out everything by hand; the Insert bar, Insert menu, and
Property inspector also function in Code view. Using these sources of canned
HTML blobs, you can combine hands-on HTML work with the easy-to-use, rapid
action of Dreamweaver’s objects. This trick can be a real time-saver when you need
to add a table, which would otherwise be a multiline exercise in typing accuracy.
You can also select a tag (like an image’s <img> tag) in Code view, and use the
Property inspector to modify it.
Note: When you add HTML to Code view, Dreamweaver doesn’t automatically update Design view,
which can be disconcerting when you’re working in Split view. (After all, how would Dreamweaver display
a half-finished tag like this: <table border="?) Click the Refresh button in the Property inspector (see
Figure 10-3), or press F5, to update the visual display.
Figure 10-3:
After changing code in Split
view, click Refresh on the
Property inspector to update
Dreamweaver’s visual display.
To help you navigate your code, Code view provides several visual cues. They include:
• Syntax coloring. Dreamweaver displays different elements in different colors.
Comments, for example, are gray. Text is black, HTML tags appear in dark
blue, and HTML properties show up in bright blue. You can change any of
these colors, and even specify unique colors for different types of tags, using the
Preferences window (see Figure 10-4).
To really make a tag stand out, you can underline it, make it bold, italicize it,
and even give it a background color. Dreamweaver has separate color schemes
for 24 different types of documents, such as ASP, CSS, and XML files. (But do
you really need different colors for HTML forms in ASP pages, HTML pages,
and PHP pages? You be the judge.)
• Bad code highlighting. When you type incorrect code (an opening tag without
a closing tag, say), it’s highlighted in yellow (see Figure 10-5). However, you’ll
see this highlighting only if you turn on the Highlight Invalid Code option from
the Document toolbar’s View Options menu (see Figure 10-6). That setting is
turned off when you first install Dreamweaver.
• Templates. Uneditable regions in pages built from templates appear in light
gray. You can’t actually change this code in Code view. This coloring scheme is
a little confusing since HTML comments (see page 376) are also displayed in
gray, and you can edit those. (For more on templates, see Chapter 19.)
372
Dreamweaver CS3: The Missing Manual
Code View
Figure 10-4:
From the Preferences
window, you can control the
color Dreamweaver uses to
display HTML and script code
while in Code view. To do so,
select the Code Coloring
Category. Then select the type
of document—HTML, ASP,
CSS, or whatever—and click
Edit Coloring Scheme. In the
Edit Coloring Scheme window
(shown here), select an item
whose color you wish to
change—Library Item or
HTML Form Tags, for
example—and set a text
and/or background color
using the color boxes. You
can also make the code bold,
italic, or underlined using the
appropriate formatting
buttons.
Figure 10-5:
Dreamweaver highlights
incorrect HTML code
with bright yellow
highlighting in Code view
(like the <strong> tags in
this figure). If you click
the yellow area, the
Property inspector
reveals the mistake. In
this case, a tag is
improperly nested—part
of it is outside the <p>
tag. (In Design view, on
the other hand,
Dreamweaver indicates
mistakes by showing the
HTML tag—</strong> for
example—in front of a
bright yellow
background.)
Chapter 10: Under the Hood: HTML
373
Code View
• Browser compatibility highlighting. Much to the anguish of Web designers,
browsers sometimes react differently to CSS formatting. What looks great in
Firefox may crumble in Internet Explorer 6. Dreamweaver CS3’s new Browser
Compatibility Checker can alert you to possible cross-browser CSS problems.
When you see a squiggly line underneath code—like underneath the tag <div
id="MainContent"> in Figure 10-5—Dreamweaver’s alerting you to a potential
problem. This cool feature is described on page 129.
Note to Dreamweaver 8 Users: In versions of Dreamweaver prior to CS3, the squiggly line indicates
HTML that isn’t understood by some browsers; this feature is part of the Check Browser Support tool. That
(really useless) tool has been replaced with the new Browser Compatibility tool, which deals only with
potential cross-browser CSS problems (see page 129 for more on this great feature).
• Library Items. Code from Library items (Chapter 18) has a light yellow
background.
You can also control Code view display by using the View Options pop-up menu
in the toolbar (see Figure 10-6), or by using the View ➝ Code Options submenu:
Figure 10-6:
Code view provides easy
access to common codewriting tasks with the
Coding toolbar (left edge)
and the View Options
menu (top right), both of
which let you modify how
Dreamweaver displays the
code. The Word Wrap
option, for example,
forces all code to fit inside
the width of the window. If
a line of code extends off
the page, Dreamweaver
wraps it to the next line.
Your only clue that you’re
looking at one long line is
that the entire glob of text
has only a single line
number.
Open
documents
Collapse tag
Collapse selection
Expand all
Select parent tag
Balance braces
Show line numbers
Show invalid code
Apply comment
Remove comment
Wrap tag
Recent snippets
Move CSS rules
Indent code
Outdent code
Format source code
• Word Wrap. This option makes long lines of code wrap (at the window’s edge)
to the next line, so you don’t have to scroll horizontally to see it all. This option
affects only how Dreamweaver displays the line in the document window; it
doesn’t actually change your code by introducing line breaks.
• Line Numbers. This automatic line numbering can come in handy when you’re
using Dreamweaver’s Browser Compatibility Checker (see page 129), or when
you encounter an error in a page containing server-side code (such as the code
you create in Part 6 of this book). You can also click a line number in Code
view to select the entire line, which is a great way to delete or cut a line of code.
374
Dreamweaver CS3: The Missing Manual
Code View
• Hidden Characters. Some characters you can type on the keyboard aren’t visible on the screen: the end of a line, created by hitting the Enter or Return key,
for example. Sometimes, these hidden characters can cause big trouble. When
working with dynamic, server-side Web pages (described in Part 6), you might
find some cool code on the Web, and copy it to your own page. Sometimes
copying and pasting code from a Web page introduces hidden characters that
prevent the code from working. Turning on the Hidden Characters option can
help you ferret out these problem characters and eliminate them. Spaces appear
as dots, tabs as a strange, lowercase a character, and paragraphs as a paragraph
symbol (see Figure 10-6).
• Highlight Invalid Code. This is the on/off switch for Dreamweaver’s friendly
tendency to highlight bad HTML in Code view (see Figure 10-5).
• Syntax Coloring. This option turns tags, comments, and text into colorful (and
informative) text (see Figure 10-4).
• Auto Indent. When you’re working with nested HTML tags, it’s often helpful to
press Tab to indent each level of nested tags, making it easier to identify large
blocks of HTML (like a table and all its contents). The Auto Indent option carries the same size indent onto the next line when you hit the Return or Enter
key. Suppose you hit the Tab key twice, type a line of code, and then hit Return.
Dreamweaver would place the insertion point on the next line, indented using
two tabs. To un-indent, just press Backspace.
Coding Toolbar
Dreamweaver includes a handy toolbar that makes many basic hand coding tasks
go much more quickly. While working in Code view, the Coding toolbar appears
on the left edge of the document window (see Figure 10-6). If you don’t see it, you
can turn it on by choosing View ➝ Toolbars ➝ Coding, or by right-clicking (Controlclicking) on another toolbar such as the Insert or Document toolbar, and turning
on the Coding option in the pop-up menu. Use the same technique to close the
toolbar, if you don’t use it.
The toolbar contains buttons that duplicate tasks and preference settings you can
control from other parts of Dreamweaver. Here’s a quick rundown of the buttons
listed in Figure 10-6, with a brief explanation of what they do and, when applicable, a cross-reference to a more detailed description of the tool or action:
• Open Documents. This is just a pull-down menu, displaying all open documents. It lets you switch among the different documents you’re currently working on, but it’s actually more work than just clicking a document’s tab at the top
of the document window (see page 20), so you’ll probably want to skip it.
• Collapse Full Tag/Collapse Selection/Expand All. These three buttons work
with Dreamweaver’s Code Collapse feature described on page 379. They let you
collapse (and expand) multiple lines of code, essentially keeping it out of the
way, letting you concentrate on the code you’re currently working on.
Chapter 10: Under the Hood: HTML
375
Code View
• Select Parent Tag. This handy feature lets you quickly select the tag that surrounds your current selection. Say you’ve selected the text inside a link (<a>)
tag, or just clicked inside that tag, and your cursor’s blinking happily. Click this
button, and the entire <a> tag is selected. Click it again, and that link’s parent
tag is selected. This button provides a quick way to select the tag you’re currently working on. If you really want to be productive, the keyboard shortcut
Ctrl+[ (c-[) is quicker.
• Balance Braces. If you do a lot of programming using JavaScript or one of the
server languages like PHP, ColdFusion, or ASP, this button can help you find
the matching brace ({ or }) character in a chunk of programming code. Just
click to the right of an opening brace ({) and then click this button to find the
closing brace. To find a closing brace’s mate, click to the left of the brace, and
then click this button. The button also finds matching parentheses characters.
The keyboard shortcut—Ctrl+' (c-')—is even faster.
• Apply/Remove Comments. Comments are a way of including helpful notes in
your code, which don’t appear on the page when it’s displayed in a browser.
You may want to leave some explanatory notes in your HTML page to help
future generations of Web developers understand what you were doing. You
might put a comment before a <div> tag (see page 313) that explains what
should go inside it—“Put corporate logo and navigation bar here.” People also
frequently use comments to mark the end of a page section—“End of navigation bar.” These buttons let you add or remove comments to HTML, CSS, JavaScript, PHP, and VBScript code, as demonstrated in Figure 10-7.
Note: Comments are very useful with Cascading Style Sheets. You can open a CSS file, select a property
inside a style, and stick a pair of comment tags around this property. When you preview a page that uses
the style, you’ll see the style minus the property you’ve commented (or commented out, as some programmers say). This maneuver lets you preview a style, temporarily hiding the effect of one or more styling properties without permanently deleting the property. It’s a great help in debugging problematic styles.
• Wrap tag. Works the same as the Quick Tag editor described on page 385.
• Recent Snippets. This pop-up menu lists all the snippets (see page 647) you’ve
recently used. Selecting an item from the menu inserts that snippet’s code into
your Web page.
• Move CSS Rule. This pop-up menu lets you move an inline CSS style to either
an internal or external style sheet, or lets you move a rule from an internal to an
external style sheet. You’ll find more details on page 291.
• Indent/Outdent. These buttons indent or outdent lines of selected code, using
the settings you’ve defined in the Code Formatting preferences (see page 382).
• Apply Source formatting. This button lets you apply specific formatting to an
entire Web page, or just a selection of code, using the code-formatting options
you’ve set up in the Code Formatting preferences window (see page 381) and
the rules defined in the type-A-uber-geek-what-a-lot-of-work Tag Library
described in the box on page 384.
376
Dreamweaver CS3: The Missing Manual
Code View
Figure 10-7:
The Coding toolbar lets you
wrap HTML, CSS, JavaScript,
or other programming code
within comment characters.
Just select the code you wish
to turn into comments, click
the Add comment button,
and then select the type of
comment you wish to add.
Use the HTML comment
option to hide HTML code;
the /* */ option to hide
multiple lines of CSS,
JavaScript, or PHP code; the
// option to hide each line of
CSS, JavaScript, or PHP
code; the ’ option to hide
VBScript code; and, if you’re
working on a server-side
page as described in Part 6,
use the last option to hide
code in those pages. To
remove a comment, select
all of the code (including the
comment) and click the
Remove comment button
(hidden in this figure; it’s
just below the Apply
Comment button).
Code Hints
Typing code can be a chore, which is why even longtime hand coders take advantage of anything that helps speed up the process. A perfect example is Dreamweaver’s Code Hints feature (shown in Figure 10-8). It lets you select tags,
attributes, and even Cascading Style Sheet styles from a pop-up menu as you type.
Note: Code Hints work with other tags as well as scripting languages like ASP.NET, ColdFusion, and PHP.
In addition, Dreamweaver includes CSS Code Hints, so if you write your style sheets by hand, you can take
advantage of the auto-completion features of Code Hints to quickly type out CSS style properties.
Here’s how it works. After you begin a new tag by typing an opening bracket (<), a
menu pops up, listing all available HTML tags. Use your mouse or arrow keys to
select a tag, or type the first few letters of the tag and let Dreamweaver select the
closest matching item. When you press Enter (Return), Dreamweaver automatically fills in the tag name. Even better, a second menu now pops up, listing all the
properties of that tag.
Chapter 10: Under the Hood: HTML
377
Code View
Figure 10-8:
The Code Hints feature saves your tired fingers from
typing tags and tag properties. Just select the
appropriate item from a pop-up list, and let
Dreamweaver type it for you. Dreamweaver’s even
thoughtful enough to show you all available CSS
styles when you insert a class attribute in a tag.
Note: You can also open the Code Hints menu by pressing Ctrl+Space bar (in both Mac and Windows).
This shortcut’s very useful when you’re editing code and want to add a property or edit a property of a tag
you’ve already created. For example, you could click inside the name of a class style applied to a tag—click
inside the word “copyright” in this code class="copyright”, for instance—and then press Ctrl+Space bar. This
not only selects the name so you can change it, but also opens a menu listing all of the classes available to
the page. Then you can use the up and down arrow keys (or even your mouse) to select a different CSS style.
If the feature annoys you, you can get it out of your way. You can turn off Code
Hints completely, rein it in by setting a delay (so that pop-up lists don’t appear
immediately), or turn off Code Hints only for selected types of elements (such as
tag properties). To make any of these adjustments, open the Preferences window
by pressing Ctrl+U (c-U), and then select the Code Hints category. Make your
desired changes to the Code Hints Preferences, and then click OK.
Dreamweaver also simplifies the writing of the closing tag: As soon as you type </
(the first two characters for any closing tag), Dreamweaver automatically finishes
off your thought by closing the tag for you. For example, after you’ve typed an
opening <p> tag, followed by the content in this new paragraph, Dreamweaver
finishes the closing tag—</p>—the moment you type </. For a longer tag like the
<address> tag, this feature saves your fingers a lot of work. (Previous versions of
Dreamweaver would automatically insert the closing tag immediately after you finished typing the opening tag. This was a pain if you were going to follow your
opening tag with a whole bunch of HTML, since the opening and closing tags in
378
Dreamweaver CS3: The Missing Manual
Code View
this case were not next to each other, but separated by many lines of code. If you
like the old way better, or just can’t stand the feature at all, you can make your
wishes felt in the Code Hints category of the Preferences window mentioned in the
previous paragraph.)
Note: If you like Code Hints, you’ll love the Snippets panel, which makes reusing code a snap. See Chapter
18 for details.
Code Collapse
One problem with raw HTML is, well, it’s raw—a bunch of letters, numbers, and
symbols that tend to blend together into a mind-numbing sea of code. This can
make locating a particular bit of code needle-in-a-haystack tough. On large pages,
with lots of code, it’s easy to get lost as you scroll up and down to make a change.
In many cases, you don’t need to see all of the code, because you’re not likely to
change it—for example, the top portion of a page containing the DOCTYPE and
html declarations (see page 37)—or because you can’t change it—like the HTML
embedded in template-based pages (Chapter 19), or containing Dreamweaver
Library items (Chapter 18).
Fortunately, Dreamweaver lets you get that in-your-way code out of your face. The
Code Collapse feature condenses multiple lines of code into a single highlighted
box of 10 characters (Figure 10-9). The basic process is simple: Select the code you
want to collapse—like all the code above the <body> tag—and click the icon
(Figure 10-9, top) that appears just to the left of both the first and last line you
wish to collapse. On Windows, this icon is a small box with a minus sign (–); on
Mac, it’s a down-pointing arrow (at the beginning of the selection) and an uppointing arrow (at the end). The code collapses into a gray outlined box. To
expand the code, just select it, and then click the icon (a plus sign [+] in Windows,
a right-pointing arrow on the Mac).
Tip: To quickly select multiple lines of HTML, click in the blue, line-number area to the left of the code,
indicating where you wish to begin the selection, and then drag to the line where you want to end the
selection.
Dreamweaver includes a few more nuanced methods of collapsing code. You can:
• Collapse an individual tag. Say you want to hide a long paragraph of text.
Instead of selecting it, just click anywhere inside the paragraph (<p>) tag, and
then either click the Collapse Tag button on the Coding toolbar (Figure 10-6),
choose Edit ➝ Code Collapse ➝ Collapse Full Tag, or press Ctrl+Shift+J (c-Shift-J).
This feature works on the tag the cursor is nearest. Say you have a paragraph of
text, and, inside it, a link. If you click inside the <a> tag and use this feature, the
<a> tag collapses. But if you click anywhere else inside the paragraph, the paragraph or <p> tag collapses. This behavior is a little confusing, but it can be
really useful. Say you want to hide everything inside a page’s <head> tags.
Chapter 10: Under the Hood: HTML
379
Code View
Figure 10-9:
Now you see it, now you
don’t. You can collapse a
multiline selection of HTML
code (top) into a compact
little gray box (circled in the
bottom image). The
collapsed code is still there
in your page—you haven’t
deleted it—but now it’s
conveniently tucked out of
sight. If you need a reminder
of what code you’ve
collapsed, move your mouse
over the gray box, and a
yellow tooltip window
appears displaying the
HTML code.
Instead of having to select all the lines inside the <head> tag, just click anywhere between the two <head> tags (but make sure you’re not inside another
tag like the <title> tag), and then use any of the commands mentioned in the
previous paragraph.
• Collapse the code outside an individual tag. This is a quick way to hide everything except the code you want to work on. Suppose you want to see only the
code inside of the body tag. Click immediately after the <body> tag (to make
sure you’re not inside another tag that’s inside the <body> tag), and either
380
Dreamweaver CS3: The Missing Manual
Code View
press the Alt (Option) key and click the Collapse Tag button on the Coding
toolbar (Figure 10-6), choose Edit ➝ Code Collapse ➝ Collapse Outside Full
Tag, or press Ctrl+Alt+J (c-Option-J).
• Collapse the code outside the current selection. This is another way to view
only the code you wish to work on. Select the code, and then either press the Alt
(Option) key and click the Collapse Selection button on the Coding toolbar
(Figure 10-6), choose Edit ➝ Code Collapse ➝ Collapse Outside Selection, or
press Ctrl+Alt+C (c-Option-C).
• Expand All. If you miss all that hidden code, you can quickly restore it to its
full glory by clicking the Expand All button in the Coding toolbar
(Figure 10-6), choosing Edit ➝ Code Collapse ➝ Expand All, or pressing
Ctrl+Alt+E (c-Option-E).
You can hide any number of regions in a page—for example, the top portion of a
page, a navigation sidebar that never gets edited, and the copyright notice at the
bottom of the page—so you can easily identify the code that you’re really interested in working on. Dreamweaver even remembers the state of these sections,
which means that if you close a document and then reopen it, the collapsed sections are still collapsed, so you don’t have to continually hide code in that page
each time you open it for editing.
Setting Code Formatting
Whenever you use the Insert bar, Dreamweaver adds a chunk of HTML that’s preformatted for easier reading. The code for table rows, for instance, comes indented
using two spaces; the code for table cells, meanwhile, is indented four spaces. If
you’re particular about how your HTML is written, Dreamweaver gives you plenty
of control over these settings.
Note: If you don’t work in Code view frequently, you may not care a whit how your HTML is formatted
in the file—and that’s fine. As long as the underlying HTML is valid (and Dreamweaver writes valid HTML),
Web browsers can display HTML that’s been formatted in many different ways. In fact, Web browsers simply ignore multiple spaces, empty lines, and other “white space” characters used to make HTML code
more readable.
Dreamweaver provides several ways to control the formatting of the code it produces. Basic settings are available in the Preferences window; advanced settings for
obsessive coders even let you control the formatting of individual tags (see the box
on page 384). For basic formatting settings, open the Preferences window (Edit
➝ Preferences or Ctrl+U [c-U]) and click the Code Format category (see
Figure 10-10). While Dreamweaver’s standard settings work fine, you can still configure a number of options.
Chapter 10: Under the Hood: HTML
381
Code View
Figure 10-10:
For general control of
HTML code, Dreamweaver
offers the Code Format
category in the Preferences
window. For most people,
this degree of control is
overkill, but if the way
HTML code appears in a
page’s file matters to you,
go wild. (These settings
don’t affect how the page
looks in a Web browser—
only how the code appears
when viewed in
Dreamweaver’s Code view
or another text editor.)
Indents
To make your code easier to read, it helps to indent nested tags and other block-level
elements. But if you’d prefer that Dreamweaver quit auto-indenting such elements,
turn off the Indent checkbox. This is also your opportunity to request tabs instead of
spaces for indenting lines of code; just choose Tabs from the pop-up menu.
You can also set the amount of indentation, like this:
• If Spaces is selected in the Indent menu, type the number of spaces you want
into the Indent size field. The default setting is two, meaning each indent will be
two spaces in the code.
• If you selected Tabs in the Indent menu, the number in the “Tab size” field
indicates the size of each tab, measured in spaces. (The size you specify here
affects only the display in Code view. In the code itself, Dreamweaver simply
inserts a plain tab character.)
Text wrapping
When a line gets long, Dreamweaver can break it into two or more lines by inserting a hard return. This can make your HTML more readable in Code view, and
free you from having to scroll to see all of your code. If that’s the way you like it,
turn on Automatic Wrapping, and then type a number in the After Column field.
The number specifies how many characters long a line must be before Dreamweaver attempts to break it up.
This option doesn’t affect how the page will look to your visitors, only how it looks
in a text editor. But unlike Code view’s simulated word-wrap option shown in
Figure 10-6, this option adds real line-break characters to split your code into multiple, shorter lines. If you use the Code view’s word wrap, you can skip this more
intrusive form of text wrapping.
382
Dreamweaver CS3: The Missing Manual
Code View
Note: Although Dreamweaver can shorten lines by inserting returns after a specified number of characters, it never does so if the final effect will change the appearance of the Web page. The program is smart
enough not to sacrifice the quality of a page just to make the code look better in Code view. That’s why
some lines of HTML may be considerably longer than the limit you specify here.
Line breaks
Windows, Mac OS, and Unix each look for a different invisible character at the
end of each line of code. This expectation can cause problems when you use one
kind of computer to create a page, while another OS runs the remote server that
dishes out the page. Fortunately, Dreamweaver fixes the problem when it transfers
a file to a Web server.
If you plan to use another text editor to edit your Dreamweaver pages, you should
select your operating system from the “Line break type” pop-up menu. Doing so
assures that the program on the receiving end will properly read the line breaks in
Dreamweaver-produced pages.
Case for tags and attributes
You can write tag and property names using either uppercase letters (<B>bold</B>)
or lowercase (<b>bold</b>); Web browsers don’t care. However, you may care
how they appear in your HTML display. If so, choose your preference from the
two Case pop-up menus. Select either the lowercase or uppercase option from the
two menus.
Note: HTML may treat capital and lowercase letters in its tags identically, but XML does not. Both it and
the hybrid language XHTML require all-lowercase tag and property names.
That’s why many Web developers now strictly use lowercase characters, even in their HTML. And that’s why,
if you select the XHTML option when creating a new page (see page 37), Dreamweaver ignores an uppercase setting in the Preferences panel—even if you turn on either of the “Override case of” checkboxes.
If you also turn on the “Override case of” checkboxes, you can make Dreamweaver scan tags and properties when opening a page created by someone else (or
some other program). If the case doesn’t match your preferences, Dreamweaver
rewrites the code to fit the wishes of you, its master.
TD tag
Adding a line break after an opening <td> (table cell) tag may look good in Code
view, but in some browsers it adds an unwanted extra space character in the table
cell. Because the extra space can wreak havoc on your design, make sure this box is
always turned on.
Chapter 10: Under the Hood: HTML
383
Code View
POWER USERS’ CLINIC
Take Control of Code Formatting
For ultimate control over tag formatting, Dreamweaver
includes the Tag Library Editor. Not only does it let you control
exactly how Dreamweaver formats every HTML tag it inserts
into a page, it also lets you dictate the formatting for nine other
Tag Libraries, such as ASP, PHP, JSP, and Cold-Fusion tags.
Even if you’re using some new bleeding-edge tag language
unfamiliar to Dreamweaver, you’re not out of luck. You can
create additional Tag Libraries, and even import custom
ASP.NET and JSP tags, as well as DTD Schemas for XML.
You can also add additional tags to any Library; so if the
HTML standard suddenly changes, you can add new or
remove obsolete tags.
To control the formatting of tags in a Library, choose Edit ➝
Tag Libraries to open the Tag Library Editor window. A list
of all Tag Libraries appears. Click the + symbol to the left of
a Tag Library name to see a list of tags for that Library.
Select a tag, and then select formatting options from the
Tag Format area in the bottom half of the window. A shortcut for quickly reformatting a particular tag already present
on a page is to select the tag in the Tag selector first, and
then choose Edit ➝ Tag Libraries; that tag will then be preselected for you.
You can control where a line breaks in relation to the tag,
choosing: no line breaks after the tag; no breaks before and
after the tag; or no breaks before, inside, and after the tag.
In addition, you can choose whether any formatting rules
are applied to the contents of a tag and choose the case—
upper, lower, mixed—to be used when Dreamweaver adds
the tags to the code.
Advanced formatting options
For real sticklers, two advanced formatting buttons let you instruct Dreamweaver
how to format every aspect of your CSS and HTML code. The Tag Libraries button opens the Tag Library, discussed in the box above. The CSS button opens the
CSS Source Format Options window, which lets you dictate how the CSS code
Dreamweaver creates should be written: whether properties get indented; whether
CSS properties should appear one per line; the placement of the opening brace
used in the CSS rule; and whether there should be a blank line between rules to
make the CSS more readable. All these options are matters of personal preference,
and don’t affect the performance of your Web pages or CSS.
If you find yourself wading through lots of HTML and CSS code, you might want to
experiment with these settings to see if you can make the code Dreamweaver produces more readable. Both the Tag Library Editor and Source Format Options windows provide previews of what the formatted HTML and CSS code will look like
with the settings you select. Keep in mind that these settings aren’t going to affect
how you write your code. But if you do find that your own HTML or CSS hand coding doesn’t look as elegant as Dreamweaver’s, you can turn to the Apply Source Formatting command (Commands ➝ Apply Source Formatting to make Dreamweaver
clean up your code. That command changes a page’s code—adds indents, line
breaks, and so on—based on the instructions defined by these two options.
Note: There are another set of preference settings that affect how Dreamweaver creates its CSS code.
The Preferences window’s CSS Styles category tells Dreamweaver whether or not to use CSS shorthand
properties. See page 332 for more on CSS shorthand properties.
384
Dreamweaver CS3: The Missing Manual
Quick Tag Editor
Quick Tag Editor
Code view is great when you really need (or want) to dig into the trenches and finetune your HTML. But if a text editor is all you wanted, you wouldn’t have bought
Dreamweaver in the first place. Most of the time, you’ll be working in Dreamweaver’s Design view, enjoying the pleasures of its visual authoring environment.
Occasionally, however, you’ll want to dip momentarily into the HTML pond,
especially when you need to use some HTML that’s not available from the Insert
bar. You might wish you could type out a quick HTML tag on the spot, right there
in Design view, without having to make the mental and visual shift required for a
switch into Code view.
That’s what the Quick Tag Editor is all about. To access the Quick Tag Editor,
press Ctrl+T (c-T)—or, if you’re feeling especially mouse-driven, click the Quick
Tag Editor button in the Property inspector (see Figure 10-11). Depending on
what you’ve selected in the document window, the Quick Tag Editor opens in one
of the following three modes (see Figure 10-11):
• Insert new tag. Inserts a new tag in the page. You get this mode if nothing is
currently selected in your document window.
• Edit tag. Lets you edit the tag for whatever is selected in the document window
(a graphic, for example), and all its properties.
• Wrap tag. If you’ve selected a swath of text or other objects (like two images),
the editor opens in this mode, which makes it easy to wrap a new tag around
the current selection.
Tip: You can cycle through the modes by repeatedly pressing Ctrl+T (c-T).
Using the Quick Tag Editor
You can type tag names, properties, and property values directly into the Quick
Tag Editor window. If you’re editing a selected tag, you can change any of the
properties listed, and even add new ones. When you’re done, press Enter (Return).
The Quick Tag Editor closes, and the changes take effect.
To make all of this even easier, the Quick Tag Editor sports a helpful list—called Tag
Hints—of HTML tags and properties, for your selection pleasure. It’s much like
Code view’s Code Hints feature (in fact, the Code Hints category in the Preferences
window also controls Tag Hints). When you insert a tag, for example, a menu of
available tags appears (top right in Figure 10-11). Use the up and down arrow keys or
the scroll bar to move through the list. And when you type the first few letters of a
tag or property, Dreamweaver jumps to the nearest match in the list.
To choose the highlighted name, press Enter or Return. Dreamweaver adds that tag or
property name to the Quick Tag Editor window. If you’ve selected a tag property,
Dreamweaver adds the proper punctuation (href=" ", for example). The insertion point
appears between the quotation marks, waiting for you to type the property’s value.
Chapter 10: Under the Hood: HTML
385
Tag Inspector
Figure 10-11:
Left: You can open the Quick Tag Editor by
clicking the corresponding button in the
upper-right corner of the Property inspector
(circled). (This button is visible only in
Design view.)
Right: The three modes of the Quick Tag
Editor let you insert new tags, edit old tags,
or wrap a new tag around a selection. The
Quick Tag Editor is mobile: Drag the window
by its handle (the mode name) anywhere on
the screen—ideal when you want to see the
part of the page you’re modifying.
Tip: When editing an existing tag in the Quick Tag Editor, press Tab to select the next property or property value. You can then type a new property or value. Shift+Tab selects the previous property or value.
Tag Inspector
The Property inspector is a handy tool. With it, you can adjust properties for all
sorts of HTML tags, like a table’s width or a paragraph’s font. But even the Property inspector doesn’t tell the whole story: Some HTML tags have additional properties that don’t appear there, such as the tabindex property of the <a> tag, which
lets you control the order in which links are highlighted as you press Tab. You can
set this property with the Tag inspector. As with tabindex, the properties listed in
the Tag inspector are less frequently used, but you don’t have to go into Code view
to add or edit them.
For these hard-to-reach properties, turn to the Tag inspector (see Figure 10-12).
Think of it as the uber–Property inspector. For hard-core HTML fanatics, it’s the
best way to set properties for every HTML tag. To display it, press the F9 key, or
choose Window ➝ Tag inspector (the same procedure also hides this panel).
When you select a tag on the page (in either Code or Design view), all of its properties appear in the panel. You can choose one of two views for displaying these
properties: one long list, or grouped into tidy categories (see Figure 10-12). You
can edit any of these properties by clicking in the space to the right of the property
name. You can type a new value or, for certain properties, use a pop-up menu to
choose from a list of property values. For color properties, use Dreamweaver’s
ubiquitous color box to select just the right shade.
Unfortunately, you need to understand HTML fairly well to set the correct values;
Dreamweaver doesn’t make the process foolproof, leaving open the possibility that
you could enter an invalid property. (To learn more about HTML tags and their
properties, turn to Dreamweaver’s built-in HTML reference, described on page 394.)
386
Dreamweaver CS3: The Missing Manual
Comparing Versions
of a Web Page
Figure 10-12:
Dreamweaver’s Tag
inspector lets you edit
every property of every
tag on a page. What it
lacks in userfriendliness—you need to
know a lot about HTML
to use it correctly—it
makes up for in
comprehensiveness. It
has two faces: Category
view (left) and List view
(right.) The List view is
just that: a list of all
properties for the
selected tag. The
Category view imposes a
bit of order on this mess,
by organizing the
different properties into
related categories. You
can even set a property
value dynamically, based
on information retrieved
from a database, using
the lightning bolt button
(circled). (Of course, you
must first learn how to
build dynamic Web sites
by reading Part 6 of this
book.)
Comparing Versions of a Web Page
Sometimes you make a change to a page, save it, preview it, close it, and move
along to the next assignment for the day. Only later, when you’re previewing your
day’s changes, just before moving them up to the Web server, you notice that one
of the pages you changed has some problem you didn’t notice at first: Perhaps the
left sidebar is suddenly wider than it was before. Since you’ve already closed the
file, you can’t use the Undo feature to remove whatever wacky mistake you made.
You could, of course, retrieve the current version of the page from the Web server
(see page 624), thus overwriting your changes. But what if you did a lot of good
work on the page—adding text, graphics, and links—that you don’t want to lose?
Ideally, you’d like to see all of the changes you made to the page, and selectively
undo the mistake you accidentally introduced to the sidebar.
Enter the Compare File command. Dreamweaver CS3 includes a command that
lets you compare two files and see what lines of code are different between the two.
This tool is a perfect solution for problems like the unintentionally botched sidebar. With it, you can compare the local file (the one with the messed-up sidebar)
Chapter 10: Under the Hood: HTML
387
Comparing Versions
of a Web Page
with the remote file (the live version of the Web site that works, but is missing the
fine new pictures and words you added). You can then identify any changes you
made, and undo your mistake.
Dreamweaver doesn’t actually have this tool built into it. Instead, Dreamweaver
just passes the files you wish to compare to a separate file-comparison utility (often
called a “diff” tool, since it identifies differences between files). You’ll need to
download this utility, and there are a lot of different ones to choose from. Fortunately, there are several free utilities for both Windows and Mac that you can
download (see the following boxes).
WINDOWS ONLY
Getting Your Hands on the Goodies
There are lots of file-comparison tools for Windows.
Beyond Compare from Scooter Software (www.
scootersoftware.com) is a commercial product ($30) that
offers a wide range of comparison options. For a free alternative, check out WinMerge (www.winmerge.org). This
open source software provides all the basic options you’ll
need. Here’s how you get it. Go to www.winmerge.org.
Click the WinMerge link in left sidebar’s Downloads section.
On the downloads page, you have several options: Click the
Installer link, which takes you to a different site—Source
Forge.net, a kind of warehouse for open source software. At
this point you’re asked to save the file to your computer.
Once you’ve downloaded the program, the process for
installing the program is like most other Windows programs. Just double-click the file to launch an installer, and
follow the step-by-step installation instructions. Once it’s
installed, you’re ready to proceed as described below.
After downloading and installing the file-comparison utility, you need to tell
Dreamweaver where to find your new helper:
1. Open the Preferences panel, by choosing Edit ➝ Preferences (Dreamweaver ➝
Preferences on the Mac), or pressing Ctrl+U (c-U), and then click the File
Compare category.
There’s not much to this Preferences category, just a single box and a Browse
button.
2. Click the Browse button, and then navigate to and select the file-comparison
utility.
For example, on Windows you might find your utility here: C:\Program Files\
WinMerge\WinMerge.exe.
On the Mac, it’s slightly different. Instead of selecting the text-editing program
Text Wrangler or BBEdit, you need to specify the proper “diff” tool, which is
stored in a special location on your computer. Navigate to the /usr/bin folder—
something like this: Macintosh HD:usr:bin—and select the correct file. For Text
Wrangler, it’s twdiff; for BBEdit, it’s bbdiff; and for FileMerge, it’s opendiff.
3. Click OK to close the Preferences window.
Dreamweaver’s been notified of the location of the utility, so you’re ready to
begin comparing files.
388
Dreamweaver CS3: The Missing Manual
Comparing Versions
of a Web Page
MACS ONLY
What Difference Does It Make?
The Mac version of Dreamweaver supports only three file
comparison tools: File Merge (which is a Mac developer
program that comes with the XCode tools on your Mac OS
X installation disc), BBEdit (the powerful, $125 commercial
text editor), and Text Wrangler (the free little brother of
BBEdit). Bare Bones Software (www.barebones.com) produces both BBEdit and Text Wrangler, but since Text Wrangler’s free, it’s the best place to begin.
Point your Web browser to www.barebones.com/products/
textwrangler/download.shtml, and click any of the download links to download the program to your computer. As
with many Mac programs, this download opens a disk
image—just like a folder—with the application inside it. Just
drag it to your Applications folder to install it. Once
installed, you’re ready to proceed as described on the
opposite page.
The Compare File command works with a local file and a remote file, so you need
to have already defined a site with both local and remote root folders (see
Chapter 17 for details on how to do this). In addition, since you’re comparing two
files, you need to make sure you’ve got two versions of the same file on your local
computer and your remote site—for example, your home page, or one of the other
pages in your site. To compare the files, follow these steps:
1. In the Files panel, locate the file you wish to compare.
This file can be listed either in the Local View or Remote View of the Files panel
(see page 567).
2. Right-click (Control-click) the file, and then, from the pop-up menu that
appears, select “Compare with Remote.”
This menu will say, “Compare with Local” if you’re in the Remote view of the
files panel.
Dreamweaver does a little behind-the-scenes trickery before passing the files off to
the file comparison program. It first creates a folder (if it’s not already created)
named _compareTemp in the local root folder of your site. Dreamweaver then
creates a temporary file with all of the code from the remote-site file, and stores
that in the new folder. In other words, you don’t actually compare the file on the
live Web server with the local file on your computer; you compare a copy of the
remote file with the local file. This distinction is important to keep in mind if you
want to incorporate changes between the files, as described in step 3.
At any rate, your selected file-comparison program—for example, WinMerge
or Text Wrangler—starts and compares the two files. If there are no differences—they’re exactly the same files—then you’ll most likely get a message saying something to the effect of “The Selected Files are Identical.” So if no
differences are found between the files, your work is done. If there is a difference,
the file-comparison program displays the two files and identifies the code that
differs between the two files (see Figures 10-13 and 10-14).
Chapter 10: Under the Hood: HTML
389
Comparing Versions
of a Web Page
3. Evaluate the differences and incorporate any changes into your local file.
File-comparison programs work generally the same way. When comparing two
files, you see the code for the two files side by side. In addition, the program has
some way of notifying you of any differences. You can then review the differences in the code, and merge the changes into one file or the other. For example, say you accidentally deleted a table from your local file; a comparison of
this file with the remote file shows the table intact in the remote file, and indicates that it’s missing in the local file. You can then copy the table code from the
remote file into the local file. If, however, you deleted the table purposefully,
then do nothing, and move on to evaluate the next difference.
Here’s where Dreamweaver’s little bait-and-switch mentioned in step 2
becomes important. You’re not actually comparing the remote file with the
local file; you’re comparing a copy of the remote file saved locally in the _compare
Temp folder. As a result, you want to move changes only in one direction—
from the temporary file to your local file. Changes in the temporary file have no
effect on the actual live file on your Web server. So how do you update the
remote file? Move any changes you want made from the temporary file to your
local file. Once you’re satisfied with the changes, you can save them, return to
Dreamweaver, and then upload them to your remote site folder. Then pour
yourself a cup of tea and be thankful you don’t have to do that very often.
4. Save any changes, return to Dreamweaver, and then move your newly updated
local file to your Web server.
The exact process varies from program to program, but see the next two sections for examples using WinMerge and Text Wrangler.
Tip: Dreamweaver lets you compare two files on your local hard drive (the home page of the site you’re
working on vs. a backup of that page you made last week, for example). To do this, go to the Files panel,
and select your hard drive (instead of a defined site) from the site list. In this mode, the Files panel acts
just like Windows Explorer or the Mac Finder. You just need to wade through all of the folders until you
can see both files at once. Ctrl-click (c-click) each file to select them both, right-click (ctrl-click) one of the
files, and then choose Compare Local Files from the pop-up menu. The process from that point on is the
same as comparing a local and remote file.
Using WinMerge to Compare Files
If you’ve got a Windows PC and you’re interested in taking Dreamweaver’s Compare Files command for a test drive, see the box on page 388 for instructions on
how to download WinMerge, and then follow these steps:
1. Once you’ve downloaded and installed WinMerge, follow the steps on page
388 to set up Dreamweaver’s preferences for working with WinMerge.
First you need to make sure Dreamweaver knows to use WinMerge for file
comparison.
390
Dreamweaver CS3: The Missing Manual
Comparing Versions
of a Web Page
2. Follow steps 1 and 2 on page 389 to select a file and tell Dreamweaver to compare it with its sibling on the remote Web server.
WinMerge launches, and if there are any differences between the files, the program shows the code for the two files side by side, with all differences highlighted (see Figure 10-13).
In WinMerge, differences are highlighted by one or more yellow bars in the left
Location pane (circled in Figure 10-13), and the code is highlighted either in yellow
(meaning there’s content present in one file that’s missing in the other file) or gray
(meaning there’s content missing in one file that’s present in the other file).
Select next, previous, first, current,
and last differences
Copy right
Copy left
Diff pane
Code from
local file
Remote (temp)
file
Local file
Figure 10-13:
WinMerge includes a
kind of bird’s-eye view of
code differences in the
far-left Location pane.
Click near any yellow
bands (circled) to jump
to code that differs
between the two files.
You can also tell which
file is the temp (remote)
file, by looking at the file
path just above the
page’s code and locating
the file with
_compareTemp in
the name. In this
example, the left page’s
path is Y:\11\_
compareTemp\
TMPdbt72jj6k7.htm; it’s
the code from the
remote file.
Code from
remote file
3. Click anywhere in the page, and then click any of the “diff” navigation buttons—next diff, previous diff, first diff, or last diff (see Figure 10-13).
“Diff” stands for difference, so clicking these buttons takes you to the locations
in the files where the code differs. Doing so also selects the differing code and
highlights it in red. You can now see which code you wish to keep.
4. If the code in the remote file looks correct, click the Copy Right or Copy Left
button.
Which button you click depends on whether the remote file is on the left or
right side of the window (see Figure 10-13 for instructions on figuring this out).
Chapter 10: Under the Hood: HTML
391
Comparing Versions
of a Web Page
If the remote code is on the left, click the Copy Right button. This button
moves the code over to the page on the right—your local file.
You don’t need to do anything if the code in the local file looks OK.
Tip: The “diff” pane gives a clear picture of how the code differs between the files. To view it, choose
View ➝ Diff Pane.
5. Continue with steps 3 and 4 until you’ve evaluated all the differing code in the
two pages.
At this point, the “perfect” copy is your local file. It has all the correct code
from the remote file, and all the correct code from the local file. You just need
to move it to your Web server.
6. Move your local file to your Web server, using one of the techniques described
on page 620.
Using Text Wrangler to Compare Files
Mac owners can download the free Text Wrangler if they want to compare files
(see the box on page 389). And since BBEdit is a more powerful version of Text
Wrangler, these steps will work for that program as well:
1. Once you’ve installed Text Wrangler, follow the steps on page 388 to set up
Dreamweaver’s preferences.
First you need to make sure Dreamweaver knows to use Text Wrangler for file
comparison.
2. Follow steps 1 and 2 at the bottom of page 389 to select a file and tell Dreamweaver to compare it with its sibling on the remote Web server.
Text Wrangler launches, and if there are any differences between the files, it
shows the code for the two files side by side (see Figure 10-14). Where lines of
code differ, Text Wrangler identifies them in the Differences panel below the
two pages. The program also gives some indication of how the lines differ: for
example, “Nonmatching lines” means the lines are similar (some of the code is
the same) but not identical, while “Extra lines before line xx” means that completely different lines of code are in one file but not the other.
If the files are identical, Dreamweaver pops up a “No difference found between
these files” message (although sometimes, if there’s no difference, you don’t see
any message at all).
3. In the Differences panel, double-click the difference you wish to inspect.
It’s a good strategy to just start at the top of the list and work your way down.
392
Dreamweaver CS3: The Missing Manual
Comparing Versions
of a Web Page
Remote file
Differences between files
Local file
Apply buttons
Figure 10-14:
Text Wrangler in action.
Where the remote file’s
code appears (left side
or right side) determines
which of the two Apply
buttons you should click.
You can identify the
remote file by its name.
In this example,
TMPojosfkj9ur.html
indicates the temporary
copy of the remote file
Dreamweaver created,
as described on page
390.
Differences panel
4. If the code in the remote file looks correct, click one of the Apply buttons in
the Differences panel.
Which button you click depends on whether the remote file is on the left or
right side of the window (see Figure 10-14 for instructions on figuring this out).
If the remote code is on the left, click the “Apply to Old” button. Doing so
moves the code over to the page on the right, your local file.
You don’t need to do anything if the code in the local file looks OK.
5. Continue with steps 3 and 4 until you’ve evaluated all of the differing code in
the two pages.
At this point, the “perfect” copy is your local file. It has all the correct code
from the remote file, and all the correct code from the local file. You just need
to move it to your Web server.
6. Move your local file to your Web server, using one of the techniques described
on page 620.
Comparing a local file to a remote file with Dreamweaver is quick and easy. You
can also access the file-compare feature to compare two local files, or two remote
files, but the steps are so convoluted that it’s a lot easier just to bypass Dreamweaver and go directly to WinMerge, Text Wrangler, or the file-comparison utility
of your choice. In the case of two remote files, download them first, and then conduct the comparison.
Chapter 10: Under the Hood: HTML
393
Reference Panel
Reference Panel
When it comes to building Web sites, there’s a lot to know. After all, Cascading
Style Sheets, HTML, and JavaScript are filled with cryptic terms and subtle
nuances. Fortunately, Dreamweaver’s Reference panel makes your search for
knowledge a little bit easier. It gives you quick access to reference excerpts on 13
Web topics from a variety of authoritative sources, including:
• O’Reilly CSS Reference. In-depth information on Cascading Style Sheets.
• O’Reilly HTML Reference. Complete guide to HTML tags and properties.
• O’Reilly JavaScript Reference. A not-so-well-organized reference to JavaScript
topics, concepts, and commands.
• O’Reilly PHP Pocket Reference. A less-than-user-friendly reference to PHP. For
seasoned programmers.
• O’Reilly SQL Language Reference. If you plan to go deeper into database-driven
Web development, this great reference can help you figure out how to write the
perfect database query.
• O’Reilly ASP Reference. Look up commands for Active Server Pages, one of
Microsoft’s server-side programming technologies.
• O’Reilly ASP.NET Reference. More server-side commands, but this time for
ASP’s more powerful successor, .NET.
• UsableNet Accessibility Reference. Guidelines for making Web pages more accessible to the disabled.
• Adobe CFML Reference. Complete reference to tags used in the Cold-Fusion
Markup Language (used with Adobe’s ColdFusion application server).
• Adobe CF Function Reference. A reference of different functions (commands)
built into ColdFusion functions. Includes helpful examples of how to use each
function.
• O’Reilly JSP Reference. Java got you down? Quickly look up Java Server Page
commands here.
• O’Reilly XML Reference. Dreamweaver offers some interesting XML features
(see Chapter 26), but this general dictionary of XML terms and properties isn’t
the place to start your education.
• O’Reilly XSLT Reference. To turn XML into readable XHTML, you’ll turn to
XSLT (and Chapter 26, where you’ll learn how to use it). This reference
describes the various XSLT functions.
To open the Reference panel, choose Window ➝ Reference, or press Shift+F1. The
Reference panel appears at the bottom of the screen, docked with the Results panel
group (see Figure 10-15). The first menu at the top of the panel lets you choose the
“book” you want. Once you’ve selected a reference, choose a particular HTML tag,
394
Dreamweaver CS3: The Missing Manual
Inserting JavaScript
CSS style, JavaScript object, or appropriate reference topic from the menu to the
right of the Book menu. A description of that item appears in the main window.
Depending on the reference, there may be sample usage and browser-support
details. A secondary menu to the right lets you access additional information about
a particular property or details of the selected tag, style, object, or topic. For example, in Figure 10-15, to display information about the <a> tag’s tabindex property,
you’d choose “a” from the Tag menu, and “tabindex” from the Attribute menu.
Figure 10-15:
If the print in the
Reference panel is too
small or too large, use
the panel’s shortcut
menu (click the arrow in
the upper-right corner of
the panel), as shown
here, and select a
different size. When
perusing the reference
panel, Dreamweaver lets
you copy examples of
tags and code, so you
can paste them into a
page, but it doesn’t let
you copy the reference
information that explains
the tag or code. Oh well.
You’ll just have to type
your “Plagiarist’s Guide
to Web Design.”
Tip: You can quickly see reference information for a tag by either clicking or selecting a tag, and then
pressing Shift+F1. The Reference panel opens, and information for that particular tag appears.
While you won’t spend every waking minute in the Reference panel, it’s a good
way to keep your HTML, CSS, and JavaScript chops sharp.
Inserting JavaScript
Dreamweaver CS3 includes many fun and useful interactive effects—Spry Menus,
Spry Form Validation, Spry Effects, Dreamweaver behaviors, and so on. All of
these effects are achieved with JavaScript programming. Of course, there are a lot
of other cool things you can do with JavaScript that Dreamweaver isn’t programmed for. In these cases, you’ll need to wade into the depths of JavaScript
programming yourself.
The most straightforward approach, especially if you’re already familiar with JavaScript, is to simply switch into Code view (Ctrl+` [Option-`]) and type away. Or, if
you prefer, you can use Dreamweaver’s Script window to add your JavaScript code
(see Figure 10-16).
Chapter 10: Under the Hood: HTML
395
Inserting JavaScript
Figure 10-16:
Unlike Code view, the Script window
doesn’t respond to the Tab key; if you’re
accustomed to indenting your code, you
need to use spaces. You can also insert a
message in the “No script” box; the note
will appear if the Web browser doesn’t
understand JavaScript.
To add your JavaScript code, click in either the head or body section of the page,
and then choose Insert ➝ HTML ➝ Script Objects ➝ Script. In the Script window
that appears (Figure 10-16), choose “text/javascript” from the Type menu (there
are a bewildering selection of options, but for straightforward JavaScript choose
“text/javascript”).
Tip: You can use the Insert Script command in Design view also, but to add a script to the <head> of the
page, first chose View ➝ Head Content, which opens a small bar below the Document toolbar that lists all
of the different tags like <title>, <script>, and <meta> that appear in the head of a page. Click here, and
then follow the above recipe for inserting a script.
Just type your script into the Content section (no need to include <script> tags, as
Dreamweaver handles that part), and then click OK. If you inserted the script in
the body of the document, you see a small gold icon (indicating an invisible element on the page) to mark its location.
You can edit your script in Code view, of course. In Design view, select the script
icon, and then, in the Property inspector, click Edit.
If you use external JavaScript files, you can link to them directly in the Script window (see Figure 10-16). Instead of typing any code, click the familiar Browse for
File icon (to the right of the Source box), locate the external JavaScript file, and
then click OK. Dreamweaver adds the appropriate code to link the script file to the
Web page.
Dreamweaver also lets you open and work on external JavaScript files (.js files) right in
Code view. The program doesn’t try to interpret the file as an HTML page; it doesn’t
attempt to make any of the changes described on page 368. But you can just use the
built-in text-editing capabilities of Code view to write your JavaScript programs.
Note: JavaScript programming is no walk in the park. While it’s certainly easier to learn than full-featured
languages like Java or C++, it can still be challenging. If you want to get your feet wet, here’s a great
resource for basic tutorials and information on JavaScript: www.w3school.com/js/.
396
Dreamweaver CS3: The Missing Manual
Part Three:
Bringing Your Pages to
Life
III.
Chapter 11: Forms
Chapter 12: Spry
Chapter 13: Dreamweaver Behaviors
Chapter 14: Flash and Other Multimedia
3
chapter
Chapter 11
11
Forms
A Web site is a great way for you to broadcast a message, announce a new product, post late-breaking news, or just rant about the state of the world. But that’s all
one-way communication, which you may find a bit limiting. You may be curious
to get some feedback from your audience. Or you may want to build your business by selling your product online, and you need a way to gather vital stats from
your customers. If you want to receive information as well as deliver it, it’s time to
add forms to your Web design repertoire (see Figure 11-1 for a simple example).
Whatever type of information you need to collect on your site, Dreamweaver’s
form objects make the task easy.
Form Basics
A form begins and ends with the HTML <form> tag. The opening <form> tag
indicates the beginning of the form and sets its properties; the closing </form> tag,
of course, marks the form’s end.
In between these tags, different objects provide the basic user-interface elements of
the form. Radio buttons, text fields, and pull-down menus are just a few of the
ways you can gather input. It’s perfectly OK to include other HTML elements
inside a form, too. In fact, your site’s visitors would be lost if you couldn’t also add
(and format) text that explains each form object’s purpose. And if you don’t use a
table or Cascading Style Sheets to lay out a form in an organized way, it can
quickly become an unreadable mess (see the box on page 416).
399
Form Basics
Figure 11-1:
A form can be as simple
as a single empty text
box (a field) and a
button, or as complex as
a 100-question survey
composed of
fill-in-the-blank and
multiple-choice
questions.
Every form element, whether it’s a text field or a checkbox, has a name and a value.
The name indicates what information the element is intended to collect. If you
want your visitors to type their email addresses into a text field, the name of that
field might be email. The value, on the other hand, is the visitors’ input—what
they type into the text field, for example, or the selections they make from a pulldown menu.
After your visitors fill out the form and click the Submit button to transmit their
responses, each form element is transmitted as a name/value pair like this:
[email protected]. Submitting both pieces of information helps the program that processes the form figure out what the input means. After all, without a
name, a value of 39 doesn’t mean much (39 what? Potatoes, steps, days until
Christmas?). The name/value pair (age=39) provides context for a visitor’s input.
The Code Backstage
Creating a form is just the first step in collecting information from your Web site’s
visitors. You also need to connect the form to a computer program that actually
does something with the information. The program may simply take the data from
the form and email it to you. However, it could do something as complex as contacting a bank, processing a credit card payment, creating an invoice item, or notifying a shipping department to deliver the latest Stephen King novel to someone in
Nova Scotia. A form is pretty useless without a form-processing program running
on the Web server. These information-crunching programs come in a variety of
languages—Perl, C, C#, Visual Basic, VBScript, JavaScript, Java, ColdFusion
Markup Language, PHP—and may be part of a dedicated application server like
Macromedia’s ColdFusion Server or Microsoft’s .NET technology.
400
Dreamweaver CS3: The Missing Manual
Creating a Form
Writing the necessary behind-the-scenes processing software can be complex, but
the concepts behind forms are straightforward:
• First, someone fills out a form on your Web page, and then clicks the Submit
button.
• Next, the form data is transmitted over the Internet to a program on your Web
server.
• The program collects the data and does something with it—whatever you and
the programmer decide it should do: For example, send the data off as an email
to you or store the information in a database.
• Finally, the Web server returns a page to the Web visitor. It may be a standard
Web page with a message like “Thanks for the info,” or a page dynamically generated by the program itself—like a detailed invoice page, or the results of a search.
So how do you create the processing half of the forms equation if you’re not a programmer? You can use Dreamweaver, of course. Part 6 of this book describes
Dreamweaver’s dynamic Web building tools for creating pages that use information collected from forms in a database. If your Web server accommodates Active
Server Pages, ASP.NET, ColdFusion, Java Server Pages, or PHP, Dreamweaver can
create form-processing programs for you.
If you’re part of a Web development team in a company, you may already have inhouse programmers who can help you create the processing program.
Furthermore, even if your Web hosting company doesn’t tolerate any of the application servers that work with Dreamweaver, they probably offer free form-processing
programs as part of their services. Contact your Web host and ask about this; most
companies provide basic instructions on how to use these programs.
Finally, if you feel adventurous, many form-processing programs are available for
free on the Web. For a thorough sampling, see the CGI Resource Index at http://cgi.
resourceindex.com. Using these free programs can be tricky, however, because you
need to download the appropriate program, and then install it on your Web server.
Creating a Form
In Dreamweaver, you can build forms with one-click ease using the Insert bar’s
Forms tab (see Figure 11-2).
To begin, you need to insert a <form> tag to indicate the boundaries of a form:
1. In the document window, click where you wish to insert the form.
You might decide to place it after a regular paragraph of introductory text, for
example.
2. On the Insert bar, select the Forms tab.
The tab reveals 18 form-building tool icons.
Chapter 11: Forms
401
Creating a Form
Spry
validation
checkbox
Form
Hidden
Radio
field Checkbox group
Text
field
Text
area
Radio
button
Jump
menu
List
menu
File
field
Image
field
Label
Button
Spry
validation
Text field
Fieldset
Figure 11-2:
The Insert bar’s Forms
tab gives you one-click
access to all the different
form elements—buttons,
text fields, checkboxes,
and more.
Spry
validation
Textarea
Spry
validation
select
3. On the Insert bar, click the Form icon (the far-left square).
Alternatively, if you’re a menu-driven person, choose Insert
instead.
➝
Form
➝
Form
Either way, a red, dashed-line rectangle appears in the document window, indicating the boundaries of the form. (If you don’t see it, choose View ➝ Visual Aids
➝ Invisible Elements.) The top line represents the opening <form> tag; the bottom
represents the closing tag. Make sure you always insert form objects, like buttons
and menus, inside these lines. Otherwise, Dreamweaver thinks you’re trying to
create a second form on the page. (It’s perfectly valid to include more than one
form per page [as long as you don’t try to insert a form inside another form], but
your visitor can submit only one form—and its data—at a time.)
Since you can place so many other HTML elements inside a form, it’s often easier
to insert the form first, adding tables, graphics, text, and form objects later.
4. If it isn’t already selected, click the dotted red line to select the form.
Unlike other objects, like images, the red line of the form doesn’t change its
appearance when selected. The only way you know you’ve selected the form is
by checking the Property inspector. If it displays the “Form name” label at the
upper-left corner, as shown in Figure 11-3, you’ve done it correctly.
5. If you like, type a name for your form into the “Form name” field.
This step is optional. Dreamweaver supplies a generic name—form1, but a
form doesn’t even need a name to work. However, a name is useful if you use
JavaScript or a Dreamweaver behavior (see the next chapter) to interact with
the form or any of its fields.
6. Type a URL into the Action field, or select a file by clicking the tiny folder icon.
Your mission here is to specify the location of the program that will process the
form. If someone else is responsible for the programming, ask that person what
to enter here. It’s a standard Web path—either an absolute URL (one that
begins with http://) or just the path to the server’s form-processing program.
402
Dreamweaver CS3: The Missing Manual
Creating a Form
(See page 153 for more on these different kinds of links.) If you’re using
Dreamweaver’s dynamic page-building tools, you’ll most often leave this field
blank. When you apply a server behavior—the programming code that makes
the page “dynamic”—Dreamweaver inserts the correct URL.
Either way, the file name doesn’t end in .html. The path might be, for example,
../cgi-bin/forms.pl. In this case, .pl is the extension used to indicate a program
written in the Perl programming language. Other common file extensions for
Web programs include .asp (for Active Server Pages), .cfm (for ColdFusion
Markup Language pages), .jsp (for JavaServer Pages), .php (for PHP pages), or
.cgi (for CGI programs).
7. Using the Method pop-up menu, specify how you want the form data transmitted to the processing program (see Figure 11-3).
Basically, forms can transmit data to a Web server in either of two ways. The
more common method, called POST, is the one you’ll use most often. It sends
the form data in two steps: First, the browser contacts the form program at the
URL you specified in the previous step; then, it sends the data to the server. This
method gives a bit more security to your data, and it can easily handle forms
with lots of information.
The GET method, on the other hand, transmits the form data in the URL, like
this: http://search.yahoo.com/bin/search?p=dogs. The characters following the ?
in the address represent the form data. This code submits a single form field—
named p, with the value dogs—to the server. As you can see, such a URL could
get extremely long. Because some servers can’t handle very long URLs, the GET
method is inappropriate for forms that collect a lot of data.
Tip: The GET method has one big benefit: You can bookmark it. This is great if you want to save and
reuse a common search request for Google, or want to send someone Google Maps driving directions.
That’s why search engines use the GET method for form submissions.
Figure 11-3:
You’ll generally want to
use the POST method of
sending data to the
server. See step 7 for
more details.
8. If you’re using frames, select a Target option.
You’ll most likely skip this menu. Frames are so 1998 Web design, and pose
serious problems for Web designers and search engines. However, you can
choose the “_blank” option to open a new browser window to display the
results. (See page 161 for more on the Target property.)
Chapter 11: Forms
403
Adding Form
Elements
9. Select an encoding type, if you like.
You usually don’t have to select anything from the Enctype menu. The default
value—empty—is almost always correct, and is the same as selecting the much
more long-winded “application/x-www-form-urlencoded” option.
But if you’re using the File Field button (see page 416) to let visitors upload files
to your site, you should use the “multipart/form-data” option. In fact, Dreamweaver automatically selects this option when you add a File Field to a form.
You’ve laid the foundation for your form. Now you’re ready to add the input
controls—menus, checkboxes, and so on— to it, as described in the next section.
Note: In some cases, you may find that the server generates errors or doesn’t process your forms correctly.
One cause may be the form’s encoding method. If you add a File Field button to a form (page 416),
Dreamweaver automatically sets the form’s encoding method to “multipart/form-data.” For this method to
work, the Web server must be set up to receive files, and many Web servers have this option turned off
for security reasons. So when your visitors attempt to submit a form—even one without a file attachment—
and you’ve used this encoding method, the Web server spits back a nasty error.
So the first thing you may be tempted to do is delete this File Field button from your form. So far, so good.
But you’re not done yet. Dreamweaver doesn’t reset the encoding method to the original setting of “application/x-www-form-urlencoded.” You must remedy the situation manually by selecting the form, and then
using the Property inspector to change the encoding method back to “application/x-www-form-urlencoded.”
Adding Form Elements
Unless you’ve never used a computer before, the different user interface elements
available for HTML forms should look familiar (Figure 11-4): text fields where
people can type in information (their names, addresses, phone numbers, and so
on); checkboxes for making multiple-choice selections; and menus for picking
items from a list. The Insert bar’s Forms tab lets you create all of these elements
and more (see Figure 11-2).
Dreamweaver CS3 introduces several new form elements, called Spry Validation
widgets. These are like the regular form elements discussed below, but have the
added ability to verify the contents of a form field, and prevent a form from being
submitted if it’s not filled out correctly. The Spry Validation widgets are discussed
starting on page 422.
What All Form Elements Have in Common
Adding form elements to your document always follows the same pattern:
1. In the document window, insert a form (see page 401).
Or, if the page already has a form, click inside its red border.
404
Dreamweaver CS3: The Missing Manual
Adding Form
Elements
Text field (Single-line)
Text field (Password)
Figure 11-4:
Forms collect
information using a
variety of different
interface elements like
text boxes, password
fields, and pull-down
menus. You can even
add a File Field to let
visitors select and upload
a file to your site.
Text area (Multi-line)
Radio buttons
Checkboxes
File field
Pull-down menu
Buttons
Tip: You can also have Dreamweaver add the form element when you first add a form field to a page.
When you insert a field (step 2) and there isn’t yet a form, Dreamweaver asks if you’d like to add the
proper form tag. Click the Yes button, and Dreamweaver automatically creates the red, dotted-line form
boundaries (and, behind the scenes, the corresponding <form> tags). You should always click the Yes
button. A form field that isn’t surrounded by the proper form tag won’t work.
2. Click the appropriate button on the Insert bar (see Figure 11-2).
Alternatively, use the Insert ➝ Form submenu. You’ll soon discover that every
form object on the Insert bar is also represented by a command on the Insert
menu (for example, Insert ➝ Form Objects ➝ Text Field).
Tip: Instead of just clicking a form-element button on the Insert bar, you may prefer to drag it off the tab
and into a specific position on your Web page. This trick works with any of the user controls on the Insert
bar, not just text fields.
3. In the Input Tag Accessibility Attributes window, type an ID (see Figure 11-5).
This window serves a couple of functions. It lets you assign an ID (this step),
and set a few accessibility options. These options add information and tools for
the benefit of those who surf using “assistive technologies”—like screen readers—
or those who don’t use mice to jump from form field to form field.
The ID you type in this field also determines the name of the field. Remember,
each field has a name so that the form processing program can identify what the
Chapter 11: Forms
405
Adding Form
Elements
Figure 11-5:
This window appears when you’re inserting a form
element. If you don’t see it, you or someone else has
turned off Dreamweaver’s factory setting to
automatically launch this window. To summon it,
choose Edit ➝ Preferences (Dreamweaver ➝
Preferences), click the Accessibility category, and then
turn on the Form Objects checkbox. You can also turn
off this option by clicking the “Change the Accessibility
preferences” link at the bottom of this window.
information it’s receiving is for (see page 400). Say you’re adding a text field to
a page that’ll collect a visitor’s town name. If you type town in the ID box, then
when Dreamweaver inserts the text field onto the page, the HTML looks like
this: <input type="text" name="town" id="town">.
Be sure to follow the same naming conventions you’d use for CSS ID names:
Begin with a letter, use only numbers, letters, hyphens, or underscores, and skip
spaces, punctuation, and other characters. You don’t have to create a CSS ID
style, either, but you can if you want to format the look of the form field.
Note: The ID value you type in step 3 has a slightly different effect when adding radio buttons. Radio
buttons that are part of the same group (like answers to a multiple-choice question) must have the same
name: This characteristic lets only one button in the group be selected at one time (see page 411).
Because all radio buttons in a group share the same name, and because you can apply each ID only once
per page (see page 284), each radio button must have its own unique ID. So Dreamweaver takes the ID
you enter and adds it to the radio tag, but then sets that radio button’s name to the generic “radio.” Therefore, make sure you rename your radio button using the Property inspector as described on page 412.
4. Type a label, and then select label options (see Figure 11-5).
The label option lets you add text that identifies the form element’s purpose
(see page 420 for a description of the Label tag). The label is visible to the person filling out the form, and appears either to the left or right of the form field.
If you add a text field to collect someone’s name, the label might be Name:.
Someone filling out the form would then see the text “Name:” followed by a
box for typing a name. It’s always a good idea to add a label. In addition,
Dreamweaver wraps the text you type inside an HTML tag created just to indicate a form’s purpose: the <label> tag.
406
Dreamweaver CS3: The Missing Manual
Adding Form
Elements
Tip: Sometimes you don’t need or want a label. For example, buttons already have a label—like Submit
or Reset—so you don’t need to add another. In this case, either click the Cancel button, which just adds the
form field without any of these accessibility properties, or leave the label box empty, and select the “No
label tag” radio button.
You have two ways to attach a label to a form element. The first method, indicated by the radio button labeled “Wrap with label tag” (as shown in
Figure 11-5), wraps the <label> tag around both the text you type and the form
element itself. This method keeps the two together and easily identifies which
label goes with each form field.
The second method, “Attach label tag using ‘for’ attribute,” also wraps the text
you type inside a <label> tag. However, it places the form field outside the label
tag. This method is useful if the label and form field don’t appear directly next
to each other in the HTML code. People often use a table to visually organize
forms (see the box on page 416). By placing text labels in one table column and
form fields in an adjacent column, you can neatly align the labels and their corresponding fields. However, organizing your page like this puts the labels and
form fields into separate table cells, and “breaks” the connection between the
label and the field. Those visitors who use a screen reader, to read your form
may not understand which label applies to which form field. Fortunately,
Dreamweaver can add a for property to the label tag, which tells a Web browser
which form element the label is “for.”
Note: Using the “Attach label tag using the ‘for’ attribute” option was essentially broken in Dreamweaver
8. In order for it to work properly, you always had to go into Code view and adjust the HTML. Thankfully,
Dreamweaver CS3 correctly tracks the name of the field and its label. Even if you later change the field’s
name in the Property inspector, Dreamweaver updates the label tag’s for property to make sure the connection between the label and field isn’t broken.
Say you add a text field that lets someone enter their email address to register
for your site’s email newsletter. If, when you inserted the field, you used the ID
email, the label “Your email address:,” and the “Attach label tag using the ‘for’
attribute” option, you’d end up with this HTML code:
<label for="email">Your email address: </label>
<input type="text" name="email" id="email" />
At this point, you could move the <label> tag to any other location on your
Web page, and the label would still remain related to the field. Of course, if you
place the label at the top of the page and the field at the bottom, your visitors
won’t know they’re related, so keep the two tags in close visual proximity. One
common method, however, is putting the <label> tag in one table cell of a row,
and the field in a table cell to the right (this technique is one way of visually
organizing a form, as described in the box on page 416).
Chapter 11: Forms
407
Adding Form
Elements
5. Type an “Access key” and a Tab Index number, and then press OK.
These optional steps let visitors access the form field using the keyboard. The
“Access key” option lets visitors use a keyboard shortcut to jump immediately
into or select a field. If you enter M for a form element’s access key, visitors can
jump to that element using Alt+M (Windows) or Control-M (Mac). While this
feature seems to be a great way to make your forms more usable, it has a couple
of drawbacks. First, not all browsers support this feature. In addition, since it’s
not at all obvious to your site’s visitors what keyboard shortcuts you’ve added
to your form, you need to list the shortcut next to the form element, or create a
“user’s manual” of sorts that explains the shortcuts used in your forms.
Browsers support the Tab Index more often than the “Access key” property.
The Tab Index lets you number each form field and, in the process, set the
order in which the fields will be selected as a visitor presses the Tab key. Number 1 indicates the first field to be selected when a visitor presses the Tab key,
and each number after that—2, 3, 4, and so on—dictates the order of selection
when the Tab key is pressed. You don’t usually need to go to this extreme, since
most browsers jump to the next form field when you press the Tab key, but it
sometimes comes in handy when you have a particularly complex form, and use
either tables or CSS to lay it out. In some cases, the order the fields are selected
by default doesn’t match the visual presentation of the form (in other words,
when you press the Tab key, you actually jump to a different field than the one
you expect). If this is the case, setting the Tab Index lets you correctly specify
the tab order.
6. In the Properties inspector, set the form element’s properties (Figure 11-6).
For instance, you may be able to specify the element’s width, height, and other
variables. The following descriptions indicate the options available for each
form element.
Figure 11-6:
The Property inspector
looks slightly different
depending on the type of
text field you choose. The
Class menu (available to
all form elements) lets
you apply a Cascading
Style Sheet class style
(see page 114) to the
selected form field.
Text Fields
When you need to collect a specific piece of information like a person’s name,
phone number, or address, you use a text field (shown in Figure 11-4). Text fields
408
Dreamweaver CS3: The Missing Manual
Adding Form
Elements
accept typed responses and are great for open-ended questions. They come in
three different flavors: single-line fields for short responses, password fields to hide
people’s input from snooping eyes, and multiline fields for longer typed replies.
Once you’ve inserted the text field, you can adjust the following settings in the
Property inspector (see Figure 11-6):
• Char Width. The width of a text field is measured in characters; so if you type
20 for the Char Width (character width), the text field will be as wide as necessary to hold 20 typed letters. Be aware that the exact size can vary from browser
to browser. (You can use Cascading Style Sheets to set an exact width.)
• Type. You can choose from three different types of text fields.
— A single-line text field, of course, holds just one line of text. This kind of text
field is the most common; use it for collecting small pieces of information,
like a last name, Social Security number, or credit card number.
— Multiline fields provide a larger area for adding multiple lines of text. You need
to use this kind of text field when offering a place to type longer comments,
such as in a “Let us know what you think!” or “Nature of problem:” field.
Note: Dreamweaver includes a separate button for adding a multiline text field—called Textarea in HTML
(see Figure 11-2).
— Password fields hide a password being typed from the prying eyes of passing
spies. Whatever your Web visitor types appears as asterisks *** (Windows)
or bullets ••••; (Mac) on the screen. (Of course, the information in the password field is still transmitted as plain text, just like any other form field. The
masking action takes place only in your visitor’s browser.)
• Max Chars/Num Lines. Max Chars (maximum characters) is a text field that
lets you limit the number of characters the field accepts. It’s a good way to help
ensure that guests type the right information in the right place. For instance, if
you use a field to collect the visitor’s age, odds are you don’t need more than
three characters to do it; very few 1,000-year-olds surf the Web these days (and
those who do don’t like to reveal their ages).
When you’ve specified a multiline text field, the Max Chars box morphs into
the Num Lines box. In this case, you can’t limit the amount of text someone
types into the field. Instead, this field lets you specify the height of the text field
on the screen.
Note: The limit you specify here affects only how tall the field is onscreen. Your visitors can type as many
lines of information as they want. (A scroll bar appears if the typing exceeds the size of the box you’ve
specified with the Num Lines option.)
Chapter 11: Forms
409
Adding Form
Elements
• Wrap. The Wrap property is meant to specify what happens when your visitor
types right to the edge of the text box. Although most browsers recognize this
property, it isn’t officially part of the HTML or XHTML standard. In general, the
“Default” option is your best bet. It leaves this nonstandard property out of your
HTML, and lets the text box behave as most people would expect: When the typing reaches the edge of the box, it automatically wraps to the next line. The Off
setting completely prevents sentences from wrapping inside the text field. When
the typed text exceeds the width of the field, a horizontal scroll bar appears at the
bottom of the field, and the text scrolls to the left. The text remains on a single
line until the visitor hits Enter or Return. You’ll almost never want to use this
option, because it forces your visitor to scroll not only up and down, but left and
right, too, to see everything she’s typed. And the last two options—Virtual and
Physical—have no effect in most browsers, but add invalid HTML to your page
(see page 593 to learn more about HTML validation).
• Init val. Here, you can specify the Initial Value of the field—starter text that
automatically appears in the field, so that it isn’t empty when the visitor begins
completing the form. You can use this feature to include explanatory text inside
the field itself, such as “Type your name in this box” or “Example: (212) 5551212.” Another common use for the “Init val” box: You’ve created an update
form—a form for editing previously entered information. If you wanted to
update your MySpace profile, you’d go to a page that presents a form containing all the information you’ve previously entered. You could then change the
information and submit the form to update your profile. An update form
requires a database and some server-side programming—you’ll learn how to
build this type of form in Chapter 24.
Note: If your form page is one of the dynamic file types with which Dreamweaver works—ASP, ASP.NET,
PHP, ColdFusion, or JSP—you also see a small lightning bolt to the right of the “Init val” box. This button
lets you add dynamic data—information drawn from a database—to the text field. (In-depth coverage of
this feature starts on page 857.)
FREQUENTLY ASKED QUESTION
Using the Password Field for Credit Card Numbers
Can I use the Password field type for credit card numbers
and other sensitive information?
Yes, but it doesn’t give the information any extra security.
The Password field does one thing: It hides people’s input
on the screen. Someone looking over your visitor’s shoulder can’t read what’s being typed—it’ll look like a bunch of
dots—but once that information is submitted over the Internet, it’s just as visible as a regular text field.
410
To provide real security for form information, you need an
encrypted connection between the Web server and the visitor’s computer. Most Web site creators use SSL (Secure
Socket Layer) technology for this purpose.
Most Web browsers understand this technology, but your
Web server must be specially configured to work in this
mode. Contact your Web host to see if you can use SSL on
your server (the answer is usually yes). If so, they’ll be able
to tell you how to set it up.
Dreamweaver CS3: The Missing Manual
Adding Form
Elements
Checkboxes
Checkboxes (see Figure 11-4) are simple and to the point; they’re either turned on
or not. They’re great for questions in which your visitor is allowed to select more
than one item in a group. Suppose you produce three different email newsletters
that you send out each month. In your form, you might include some text—
“Check the boxes for the newsletters you’d like to receive”—and three corresponding
checkboxes, so that each visitor can sign up for only the newsletters he wants.
Once you’ve added a checkbox to a form, you can set up these options in the Property inspector (Figure 11-7):
• Checked value. If your visitor turns on the checkbox, here’s where you’re specifying the information that’s submitted when the form data is sent to your processing program. It doesn’t necessarily have to match the checkbox’s label
(which you’ll create in a subsequent step); it could, instead, transmit some special coded response to your processing application. Your visitors never actually
see this information.
• Initial state. If you like, your checkbox can already be on when your Web page
first appears. You may have seen this setup on sites that require you to sign up
for some service. Usually there’s a checkbox—already checked—down near the
bottom of the form, with fine print like this: “Check here if you want to get
daily, unsolicited email from our marketing department.”
Note: As with many form elements, your checkbox can respond to information it retrieves from a database. The Property inspector’s Dynamic button—available only when you’re working on a dynamic page
(ASP, PHP, and so on)—lets you set the checkbox state (Checked or Unchecked) based on data in a database. (See page 858 for details.)
After adjusting the Property inspector, if you don’t use Dreamweaver’s accessibility
options discussed on page 405, make sure you return to the document window to
add a text label next to the field. Let people know what the checkbox is for: “Yes, sign
me up!” for example. Finally, you may want to insert another checkbox. Checkboxes
don’t have to come in groups, but they often do, as in “yes” and “no” boxes.
Figure 11-7:
The “Checked value”
property defines the
checkbox’s actual value .
Radio Buttons and Radio Groups
Radio buttons, like checkboxes, are very simple (see Figure 11-4); they’re either
selected (represented on screen as a solid circle) or not (an empty circle).
But unlike checkboxes, radio buttons restrict your visitor to making only one
choice from a group, just like the radio buttons on an old-style automobile dashboard
Chapter 11: Forms
411
Adding Form
Elements
(or, if you’re too young to remember those car radios, like the buttons on a
blender). Radio buttons are ideal for multiple-choice questions like, “What is your
income: A. $10–35,000, B. $35–70,000, C. $70–100,000, D. None of your business.”
In the Property inspector, you can set up these options for a radio button
(Figure 11-8):
• Name. Dreamweaver supplies the generic name radio (or radio2, radio3, and so
on) when you insert a radio button. Make sure you change it to something
more descriptive, and when inserting a group of related radio buttons, give
them all the same name. Given a group of radio buttons, your visitors should be
able to select only one button in the group. To make sure that’s the case, every
button in the same group needs to share the same name (although they should
have different “Checked values”; see the next bullet point).
If, when testing your page, you notice that you can select more than one radio
button at a time, you must have given them different names. (Consider using
Dreamweaver’s Radio Group object, described next. It acts as a wizard that simplifies the process of creating a group of radio buttons.)
• Checked value. This value is the information that the form submits when
your visitor selects this button. Once again, it doesn’t necessarily have to
match the radio button’s onscreen label. If you filled out the accessibility
window’s ID box (see Figure 11-5), Dreamweaver uses the ID you supplied
as the checked value. Change the value Dreamweaver supplies if it doesn’t
match the value you want.
• Initial state. Often, when a form page first loads, one radio button in each set is
preselected. To do your visitors this timesaving courtesy, turn on Checked for
the button that holds the default value—the one they’ll choose most often.
Of course, if making a choice here is optional, then you can leave all of the
buttons unselected by setting their initial states to Unchecked. However,
once somebody does select a radio button, only the Reset button (if you add
one) can make them all unselected again (see page 418 for information on
creating a Reset button).
Figure 11-8:
Radio buttons offer
answers to a single
multiple-choice question.
Finally, you add text labels for the entire group. If you have the accessibility features turned on (see page 405), you’ll have already added labels to each button. If
not, simply click the document window and type, just as you’d add any text to the
page. Your whole-group-of-buttons label may take the form of a question (“How
would you like to pay?”); the labels for the individual buttons might say, “Visa,”
“MasterCard,” and “I.O.U.”
412
Dreamweaver CS3: The Missing Manual
Adding Form
Elements
Radio Group
Although creating a group of radio buttons using the Radio Button object is easy,
Dreamweaver includes the Radio Group object to make it even simpler. The Radio
Group object provides a single dialog box for creating a group of radio buttons and
their labels in one fell swoop. To use it:
1. On the Insert bar, click the Radio Group button.
The Radio Group window appears (see Figure 11-9).
Figure 11-9:
The Radio Group dialog box lets you
quickly add multiple radio buttons to a
page. The buttons form a single group that
lets visitors select one of a group of
options.
2. In the Name field, type a name.
This name covers all radio buttons in the group, saving you the trouble of typing the name for each button yourself.
3. In the Label column, click the top Radio label. Type a label for the first button.
This label appears next to the button onscreen.
4. Hit the Tab key to jump to the Value column for that button, and then type a
value for the first button.
This value is the button’s “checked value.” Type what you want passed to the
Web server when somebody selects this button and submits the form.
5. Repeat steps 3 and 4 for the second button in the group.
You can create additional radio buttons by clicking the + button. Follow steps 3
and 4 for each additional button you add in this way.
6. Select a layout option for the group.
Dreamweaver puts each radio button in the group on its own line. You can
choose whether Dreamweaver uses a line break (<br> tag) to separate each line,
or whether it uses a table—one radio button per row.
Don’t care for either of these options? Pick the “Line breaks” option. It’s the
easiest to modify.
Chapter 11: Forms
413
Adding Form
Elements
Tip: If you want a group of radio buttons to appear side by side instead of stacked one on top of the
other, then, in the Radio Group dialog box, choose the “Line breaks” option. Then make sure Dreamweaver is set to display the invisible line break character (see page 68). Click the line break’s gold shield,
and then hit backspace or Delete to move the lower radio button onto the same line as another button.
7. Click OK to add the radio group to your page.
The radio buttons and their labels are essentially text and buttons on the screen.
You can move the buttons around, change their labels, and alter each button’s
properties in the Property inspector.
Pull-Down Menus and Lists
While checkboxes and radio buttons both provide ways to offer multiple choices,
you should consider them only when there are relatively few choices. A form can
quickly become overcrowded with buttons and boxes if there are too many options
to choose from. The beauty of lists and pull-down menus (usually called pop-up
menus on the Macintosh) is that they offer many choices without taking up a lot of
screen space. (Figure 11-10, top, shows an example.)
Menu
List
Figure 11-10:
A menu is a single
compact line; a list can
take up any number of
lines on the page. Use
the first menu or list item
to instruct visitors what
to do. For example,
“Select the state you live
in” or “--Select One--.”
Once you’ve inserted a menu or list object into your document window, here’s
how to adjust the Property inspector settings:
• Type. Menus and lists differ both in appearance (see Figure 11-10) and function, as described in a moment. Click the one you want (Menu or List).
• Height. The number you type into the Height box (available only for lists)
should reflect the amount of space you wish the list to take up on the page. A
list can be a single line tall (in which case you might as well use a menu) or
many lines (letting your visitors see a number of choices at once). A vertical
scroll bar appears automatically if the height you specify here is smaller than the
number of items in the list.
• Allow multiple. Here’s a key difference between menus and lists: If you turn on
this option, a visitor can select more than one item from a list, just by pressing
the Ctrl (c) key while clicking different options in the list.
414
Dreamweaver CS3: The Missing Manual
Adding Form
Elements
• List Values. This button opens the List Values dialog box (see Figure 11-11),
where you build the list of options in your list or menu. Each item is composed
of two parts: a label (the text that actually appears in the menu or list on the
Web page) and the value (the information that gets submitted with the form,
which isn’t necessarily the same thing as the label).
To use this dialog box, type an item label. Press Tab (or click in the Value column), and then type the value, if you like. (See Figure 11-11 for details.)
Including a value is optional; if you don’t specify one, your form submits the
item’s label as the value. Still, setting up a separate value is often useful. Imagine that you’ve designed a pull-down menu on an e-commerce site so that your
visitors can select their credit card’s expiration month. Figure 11-11 shows what
the items for such a pull-down menu might look like: The names of the months
appear on the menu, but when a visitor selects, say, April, the form would actually transmit the number 4 to your form-processing program.
Add/remove items
Change item order
Figure 11-11:
Using the + button, you can add an item to
the end of a list; when you click in the Value
column of the list’s last item, pressing Tab
creates a new list item. To delete an item,
select it, and then click the minus sign (–)
button. You can move an item higher or
lower in the list of options by selecting the
option, and then clicking the up or down
arrow buttons. Like radio buttons, pop-up
menu and list items always flock together—
nobody ever creates just one.
Since computer programs are often more comfortable with numbers than
names—and humans are often the exact opposite—it makes more sense to use
numbers for list values in this case.
When offering your visitors a pop-up menu of products from which to choose,
the label might be the human-friendly name of the product, like “Blue Wool
Cap.” The value would be the model number that your form-processing program can understand, like XSD1278.
• Dynamic values. Dreamweaver can also create a dynamic menu, where the
menu’s labels and values come from a database. This option—available only
when you insert a menu into one of the dynamic page types, as described in
Part 6 of this book—is great when the menu items change frequently, as they
would in a list of employee names. This feature is described on page 860.
Click OK when you’re finished building your menu or list. You can always return
to this screen and edit the list of options. To do so, in the document window, click
the menu or list, and then, in the Property inspector, click the List Values button.
You return to the dialog box shown in Figure 11-11.
Chapter 11: Forms
415
Adding Form
Elements
As with other form elements, you can, and probably should, add some explanatory text alongside the list or menu in the document window. One easy method:
You can automatically add a label to a menu or list using Dreamweaver’s accessibility features as described on page 405.
POWER USERS’ CLINIC
Giving Order to Your Forms
If you’re not careful, creating forms can quickly lead to
visual chaos. The different shapes and sizes of text boxes,
radio buttons, and other form objects don’t naturally align
well with text. One solution: Use tables to control your
forms’ appearance.
In the picture on the right, a table made of two columns and
13 rows (one row for each question) organizes the text and
form elements into two columns. Notice that the text next to
each form element aligns to the right, creating a clean edge
that effectively mirrors the edge created by the form fields.
In the picture on the left, form elements were added next
to the label text on each line, forcing your eye to follow an
ungainly zigzag pattern created by the form’s text boxes.
The result is not only ugly, but also hard to read.
To make this table-based solution work most effectively, set
each text field to the same width using the Char Width
property or Cascading Style Sheets.
When using this technique, add the <form> tag first, insert
the table inside the form’s dotted red boundaries, and then
add form elements inside the table. If you make a table first
and then try to insert a form, Dreamweaver lets you add it
to only a single cell of the table. See Chapter 7 for more on
creating tables.
You can also use CSS to lay out a form. This technique is a
bit more complex, but if you’re interested, you can find a
good demonstration of CSS-based form layout at: http://
jeffhowden.com/code/css/forms/.
File Field
Receiving responses to checkboxes, radio buttons, and pull-down menus is all well
and good, but what if you’d like your visitors to submit something a little meatier—
like an entire file? Imagine a bulletin board system that lets guests post JPEG
images of themselves, or upload word processing documents to share with others.
They can do just that, thanks to File Field (see Figure 11-4)—and a little magic
from your Web server.
Before you get carried away with the possibilities the File Field offers, you need to
do a little research to see whether you can use it on your Web site. Although
Dreamweaver makes it easy to add a field for uploading image files, text files, and
other documents, you need to check your Web server administrator to see if anonymous file uploads are permitted (some servers don’t allow this kind of activity for
fear of receiving viruses or overly large files). Then, of course, you’ll have to ensure
that the program that processes the form is programmed to do something with the
416
Dreamweaver CS3: The Missing Manual
Adding Form
Elements
incoming file—store it somewhere on the server, for instance. Dreamweaver
doesn’t have anything built in that helps with this, but you can enlist some thirdparty solutions as described in the box on page 418.
When you click the File Field button on the Insert bar (or choose Insert ➝ Form
Objects ➝ File Field), Dreamweaver inserts a text field and a Browse button;
together, they constitute a single File Field. When you click either one, you highlight both.
The Browse button, once it’s posted on the Web and visible in somebody’s
browser, opens up the standard Windows or Macintosh Open File dialog box, permitting your visitor to navigate to and select a file for uploading.
The Property inspector offers only two settings to change (other than specifying a
more creative name):
• Char width. The width of a text field is measured in characters; if you type 20
for the character width, the field is 20 characters wide.
• Max chars. Leave this blank, as shown in Figure 11-12.
Your File Field isn’t finished until you’ve added a label to it in the document window, something like “Click the Browse button to select a file for uploading” (again,
a task that Dreamweaver simplifies with the Label option in the forms Accessibility window described on page 406).
Figure 11-12:
Avoid the “Max chars” field. It’s intended to limit the number
of characters that the field accepts, but doesn’t have any
effect on the File Field, which selects the full path to the file
regardless of how many characters long it is.
Hidden Field
Most form elements are designed to accommodate interaction from your visitors:
clicking radio buttons, typing into text fields, and making choices from menus, for
example. But there’s one kind of field that your visitors won’t even know about
and will never see: the hidden field.
Why, you’re probably asking, would you need to submit a value you already know?
Hidden fields supply information to the programs that process forms—information
that the program has no other way of knowing. For example, most Web hosting
services offer a generic form-processing program that collects information submitted with a form, and emails it to a selected person. But how does the program
know where to email the data? After all, it’s a generic program that’s used by hundreds of other people. The solution: A hidden field that stores the information required
for the program to properly process the form—like [email protected].
To insert a hidden field, click Insert bar’s Hidden Field button, or choose Insert ➝
Form ➝ Hidden Field. A gold shield icon appears on the page (this is Dreamweaver’s
Chapter 11: Forms
417
Adding Form
Elements
EXTENSION ALERT
Adding File Upload Ability to Your Site
Imagine adding a “Job Application” page to your site,
where applicants could upload their resumes for review. Or
a Web-based way for clients to submit their graphic files
and word processing documents.
Dreamweaver lets you add a File Field to a form, but
doesn’t provide the tools to make this useful feature function on your Web site. To compensate for that glaring omission, you can turn to extensions that add this missing power
to Dreamweaver when building a dynamic Web site (as
described in Part 6 of this book). But before you shell out
any hard-earned cash on the extensions listed next, make
sure your Web hosting company allows anonymous file
uploads from a Web form—some don’t.
Adobe sells an extension for database-driven Web sites that
lets you do this: The Adobe Dreamweaver Developer Toolbox (www.adobe.com/products/dreamweaver/addt/) lets
your site visitors upload images and files to a Web server. It
works with PHP, ColdFusion, and ASP server technologies,
and includes other useful tools for working with databasedriven sites. DMXZone (www.dmxzone.com/index.asp?
TypeId=3&CatId=862) offers three fee-based extensions
for ASP, ASP.NET, and PHP. The Pure Upload extension
offers many different settings to manage the process of
uploading files to a Web site, including the ability to rename
duplicate files, and add file information to databases.
Finally, WebAssist (one of the big players in the Dreamweaver Extensions market) offers a commercial product,
Digital File Pro, for uploading and downloading files from a
server (www.webassist.com/professional/products/Product
Details.asp?PID=112). This extension works for ASP, PHP,
and ColdFusion.
symbol for HTML, that you can’t see in Web browsers). Use the Property inspector to
give the field a name and a value—that is, the value that will get submitted to your
form-processing program (in the example above, your email address).
Note: The gold shield indicating a hidden field appears only if the Hidden Form Fields box is turned on
in the Preferences window’s Invisible Elements category (see page 68), and, in the View menu, Invisible
Elements is turned on (View ➝ Visual Aids ➝ Invisible Elements).
Buttons
No form is complete without a Submit button for your Web visitors to click as a
final step (see Figure 11-4). Only then do their responses set out on their way to
your form-processing application. People sometimes add a Reset button, which
visitors can click when they’ve filled out a form and realize they’ve made an error.
The Reset button clears all the form entries, and resets all of the form fields to their
original values.
Use the Insert bar’s Forms tabs (see Figure 11-2), or choose Insert ➝ Form ➝ Button.
If the Accessibility window appears (see page 405), you don’t need to add a label,
since the button itself has “Submit,” “Reset,” or whatever text you wish emblazoned across its face.
The Property inspector controls (Figure 11-13) for a freshly inserted button are:
• Button name. The button’s name provides the first half of the “name/value”
pair that’s sent when the form is submitted (see page 400).
418
Dreamweaver CS3: The Missing Manual
Adding Form
Elements
Figure 11-13:
Buttons have just three properties:
Name, Value, and Action. Like other
form elements and HTML tags,
Dreamweaver also lets you apply a CSS
class style to improve your forms’
design.
• Value. The value is the label that appears on the button. Dreamweaver proposes Submit, but you’re free to substitute Do It, Make It So, or Send my data on
its merry way.
So what your visitors see printed on the button—“Click Me”—is also the value
that’s transmitted along with the button’s name when the form is submitted.
This characteristic opens up some interesting possibilities. You could, for example, include several Submit buttons, each with a different label. Maybe you’re
creating a form for a database application; one button might say Delete, while
another says Edit. Depending on which button your visitor clicks, the program
processing the form either deletes the record from the database or modifies it.
• Action. These three buttons govern what happens when somebody clicks your
button. A “Submit form” button transmits the form data over the Internet to
the form-processing program. A “Reset form” button sets all the fields back to
their original values. (The fields, checkboxes, or menu items aren’t left blank,
unchecked, or unselected. Instead, they return to their initial values, which you
specified when creating these various controls. If you set the Initial State property of a checkbox to Checked, and your visitor unchecks the box, and then
clicks the Reset button, then a checkmark reappears in the box.)
The Reset button used to appear on nearly every form on the Web; these days it
is much less frequent, mainly because it’s unlikely that anyone would want to
completely erase everything they’ve typed into the form. In addition, its presence
offers the unfortunate possibility that a visitor, after painstakingly filling out a
form, will mistake the Reset button for the Submit button, and click it—erasing
everything she’s typed. If you do add a Reset button, make sure you don’t put it
right next to a Submit button.
Note: A Reset button can come in handy on a page intended to update information. An update form
contains previously recorded information (like your shipping address for your Amazon.com account). In
this case, a Reset button lets the visitor erase any mistakes he made when updating his account information. Clicking a Reset button, in this case, sets the form back to display the original information. You’ll learn
how to create an update form for a database-driven site in Chapter 24.
Setting the button’s action to None means that clicking on the button has no
effect on the form. “Gee that’s useful,” you’re probably thinking. But although the
button doesn’t submit the data or reset the form’s fields, you need to choose the
None option if you want to add interactivity to the button using Dreamweaver’s
Chapter 11: Forms
419
Adding Form
Elements
built-in behaviors (see the chapter 13). In this way, you can use a common user
interface element—the 3-D beveled look of a form button—to trigger any of
many different actions, like opening a new browser window, starting or stopping a Flash movie, or popping up a message on the screen. If you’re a JavaScript programmer, you can use the button to activate your own programs.
Tip: You can also use a graphic as a Submit button, thanks to something called an Image Field, thus freeing you to be more creative with the look of the button itself. Click the Image Field button on the Insert
bar, or choose Insert ➝ Form Objects ➝ Image Field, to select a graphic you want to use as a button.
When a Web visitor clicks the image, it submits the form and all its data. (Unfortunately, Image Fields only
do one thing: submit form data. You can’t use them as form Reset buttons.)
Label Tag
The Label tag lets you associate a label with a particular form element, like a checkbox or text field. Of course, you can always place plain text next to a form element
on the page. But because a Label tag is “attached” to a particular form element, it’s
more helpful in explaining the function and layout of your form to people who use
assistive technologies like screen-reading software for the blind.
The Label tag button on the Insert bar’s Forms tab (see Figure 11-2) doesn’t do
much more than switch you into Code view, and drop the <label> tag into your
HTML. You’re much better off inserting labels with Dreamweaver’s form accessibility option, as described on page 405. However, there are some cases where you
don’t want to put the label directly next to the form field; for example, when using
tables to lay out a form, you usually put the label in one table cell, and the form
element in another. In this case, you need to jump into Code view to add a label
anyway, and this button can save you a little typing.
Fieldset Tag
The Fieldset tag is a form organization tool, intended to let you group related form
fields. For example, if you’re creating an online ordering form, you can organize all
of the “ship to” information—address, city, state, Zip code, and so on—into a single
set. Again, this arrangement can help those using assistive technology to understand the organization and intent of a form.
In most of the latest browsers, the Fieldset tag also has a visual benefit. Internet
Explorer 4 and above, Firefox, Safari, Opera, and other newer browsers display an
attractive border around fieldsets, and add a useful label to identify the fields.
To use this tag, select the related form fields. The form fields must be next to each
other onscreen, and can be organized within other HTML elements like a table.
Then, on the Insert bar, click the Fieldset button (see Figure 11-2). In the Label
window that appears, type a label (called, somewhat dramatically, a “Legend”) for
the fieldset, and then click OK.
420
Dreamweaver CS3: The Missing Manual
Validating Forms
FREQUENTLY ASKED QUESTION
Emailing the Results of a Form
I don’t want to store form submissions in a database or
anything fancy like that. I just want to receive an email with
the information from each form submitted on my site. How
do I do that?
This common function—available on countless Web sites—
may seem like an easy task, but Dreamweaver doesn’t supply a tool for automating the process. Basically, you need a
program to collect the data, and then send it off in an email.
Most Web hosting companies provide just such programs.
They generally work like this: You build a form, set the
form’s Action property (see page 402) to point to the URL
of the form-emailing program, and then add one or more
hidden fields. The hidden fields contain information for the
program to use—such as the email address the results
should go to and the page the visitor should end up at after
she submits the form. Since this form-emailing program
varies from server to server, you need to contact your Web
hosting company for details.
There are many commercial extensions. For basic form mailing, the Mail Form extension for ASP and PHP is available
from Felix One (www.felixone.it/extensions/dwextensionsen.
asp). Two other extensions offer much more advanced
emailing features, including the ability to mass-email newsletters to email addresses stored in a database: WA Universal
Email from WebAssist (www.webassist.com/professional/
products/ProductDetails.asp?PID=13) works for ASP, PHP,
and ColdFusion pages, and DMXZone (www.dmxzone.com)
sells both an ASP and a PHP version of its Smart Mailer
extension.
Dreamweaver, in addition to displaying the label you type, displays a simple border around all the fields you select. Because different browsers display this border
differently, make sure to preview the page (F12, or Option-F12 on a Mac) in a
recent version of Internet Explorer, Mozilla, Opera, or Safari to see both the label
and the border surrounding the form elements in the set.
Validating Forms
You might get frustrated when you look over feedback that’s been submitted via a
form on your Web page, only to notice that your visitor failed to provide a name,
email address, or some other piece of critical information. That’s why, depending on
the type of form you create, you might want to make certain information mandatory.
For instance, a form used for subscribing to an email newsletter isn’t much use if
the would-be reader doesn’t type in an email address for receiving it. Likewise, if
you need a shipping address to deliver a brochure or product, you want to be sure
that the visitor included his address on the form.
Luckily, Dreamweaver CS3 introduces a new set of validation options that accomplish this exact task: Spry Form validation “widgets.” (The term widget refers to
any of the Web page elements Spry helps you create, such as the Spry menu bar,
Spry validation text field, and Spry tabbed panels). With a Spry validation widget
you can display a friendly “Hey, please fill this box out” message when someone
tries to submit a form that’s missing important information. You can specify that a
particular field can’t be left blank, or that it must contain information in a specific
format, such as a phone number, email address or credit card number. If someone
attempts to submit the form without the correct information or with the incorrect
Chapter 11: Forms
421
Validating Forms
type of information, she’ll be notified. And instead of popping up an annoying and
amateurish JavaScript error window, Spry form validation displays error messages
directly in the Web page, directly next to the faulty form field. You can even
change the way the field looks (add a red background to the field, for example) to
further highlight the problem.
Note: Spry validation widgets are much more useful than Dreamweaver’s old Form Validation behavior.
The new validation tools provide professional-looking error messages and a wider range of validation
options. If you’ve used the Form Validation behavior in the past, switch to the Spry validation widgets, and
prepare to be pleased.
Spry Validation Basics
The Spry validation widgets let you validate input received via a text field, a text
area, a pull-down menu, or a checkbox. You can make sure a field is filled out, a
checkbox turned on, or a selection’s been made from a pull-down menu. You can
require a specific type of information such as a date or a phone number, and even
limit the number of letters someone can type into a text box.
Note: Unfortunately, Dreamweaver doesn’t provide a way to validate radio buttons. But you can fake it
using checkboxes; see the Tip on page 439.
The basic process for all form validation widgets is the same:
1. Insert the widget.
Buttons for inserting the four types of Spry validation form fields are on the
Insert bar’s Forms (see Figure 11-2) and Spry tabs (Figure 12-2). You can also
insert a Spry form field from the Insert ➝ Form submenu. The initial steps are
just like inserting any form field. The Input Tag Accessibility window appears
(Figure 11-5) and you follow steps 3, 4, and 5 on page 405.
If you’ve already inserted a text field, multiline text box, checkbox, or pulldown menu, you can add Spry validation to it by selecting the form element on
the page, and then, on the Insert bar, clicking the appropriate Spry form button. If you want to add validation to a text field, select the text field, and then
click the Spry Validation Text Field button.
When you insert one of these widgets, Dreamweaver adds more than just the
HTML needed for the form field: It also inserts a <span> tag that surrounds the
form field, a label, and additional HTML for displaying one or more error messages. A Spry validation widget also adds JavaScript programming (to make sure
the form field receives valid information), and CSS (to style the appearance of
the field and the validation error messages).
Note: When you save a Web page after inserting a Spry widget, Dreamweaver pops up a window letting
you know that it’s added JavaScript and CSS files to a SpryAssets folder in the site’s root folder (see the Tip
on page 180).
422
Dreamweaver CS3: The Missing Manual
Validating Forms
2. Rename the Spry widget (optional).
Once inserted, you can customize the form widget using the Property inspector
(see Figure 11-14). Every Spry widget is assigned a generic ID like sprytextfield1,
sprytextfield2, and so on. You can change this, if you wish, to something more
descriptive, but for clarity’s sake leave “spry” in the ID name. If you inserted a
Spry text field for collecting a person’s email address, you might name the widget spryEmail. Dreamweaver applies this ID to a <span> tag that wraps around
the actual form field, form label, and error messages that Spry creates. Don’t get
this ID confused with the ID you assigned to the form field—that’s a different
tag that requires its own ID. That’s why it’s a good idea to include “spry” in the
new ID you assign to the widget. If this all sounds confusing, then do yourself a
favor and don’t bother renaming the widget. Dreamweaver can track the IDs
just fine, and since the generic name assigned by Dreamweaver is never visible
on the form, no one visiting your site will know the difference.
3. Assign a validation requirement.
Use the Property inspector to assign the type of validation you’d like to apply to
the field. The most basic form of validation is simply requiring input from the
form field. That is, ensuring that something’s been typed in the text box or text
area, a selection has been made from a pull-down menu, or a checkbox has
been turned on. But each type of form field has additional validation options.
For example, you can make sure a text field is filled with numbers in the correct format for a credit card. The specific options for each type of form field are
discussed below.
Note: Properties for a Spry widget appear in the Property inspector only when you’ve selected the widget (as opposed to selecting the form field itself). To select the widget, mouse anywhere over the form
field until a blue Spry tab appears (see Figure 11-15); then click the tab to select the Spry widget.
4. Select when validation occurs.
A browser validates form fields as soon as the visitor submits the form. In other
words, when someone clicks the Submit button on the form, the JavaScript
code in the Web page checks to make sure everything was filled out correctly. If
it’s not, the form does not pass Go and one or more error messages appear, letting the visitor know what went wrong.
However, to provide more responsive feedback, you can also check to make sure
the form has the right info immediately after the visitor interacts with it. Say
you’ve added a text field to collect a visitor’s email address and some wisenheimer
types, “I’m not telling” instead of his email address. You could present an error
message—like “This is not a valid email address”—when the form is submitted. Or
you could display an error message the moment he moves onto the next form
field. This kind of instant feedback can make it easier for your site visitors: They
can immediately see and fix their mistake, and they don’t have to wait until the
form is submitted to see (and fix) all the errors they may have made.
Chapter 11: Forms
423
Validating Forms
You dictate when a field is validated by turning on one or both of the Property
inspector’s “Validate on” checkboxes (circled in Figure 11-14). Dreamweaver lets
you validate a form field when the field is “blurred,” “changed,” or both. “Blur”
doesn’t mean the form field suddenly gets fuzzy; blur simply refers to the moment
when the visitor clicks on another form field or another part of the page. If you type
something into a text box, and then click the Tab key to jump to another form field,
the text box is considered “blurred.” Or if you type into a text box, and then click
somewhere else on the page, that text box also becomes blurred. This blurred state is
a great time to validate a text field, because you know the visitor is done providing
input into that field the moment he tabs to the next field.
Widget ID
Format type
Figure 11-14:
Depending on the type
of form field, Spry
validation can check for
different types of input.
In the case of a text field,
pictured here,
Dreamweaver lets you
verify that the visitor
input text conforms to
one of 14 different
formats.
You can also validate a field when it’s changed. This happens when someone
types into a text field, for example. In fact, each letter the person types is a
“change” to the field, so the field is validated following each keystroke. This
quality can be a bit annoying, since an error message might appear the moment
you start typing. With email address validation, the JavaScript that validates
user input is looking for text in the form of [email protected]. So say Bob
clicks into the field and starts to type. The moment he hits the ‘b’ key, the field
is changed, and its contents are validated. Since ‘b’ isn’t a proper email address
format, an “Invalid Format” message appears on the page. That’s a bit rude. In
this case, the “blur” option is better, since it waits until the visitor has finished
filling out the field.
On the other hand, validating a pull-down menu field when it changes can be
quite useful. Say you’ve added a pull-down field to a form, and the first option
is “Please make a selection.” Obviously, you want people filling out the form to
select something other than that initial “Please make a selection” option. Imagine someone starts to fill out the form and selects an item on the pull-down
menu; then, for whatever reason, she goes back to the menu and chooses
“Please make a selection.” This option isn’t valid, and the visitor should be notified immediately. If you validate the form when it changes, an error message
pops up the moment she chooses “Please make a selection.” On the other hand,
if validation occurs when the menu is “blurred,” the visitor is notified only after
she’s clicked somewhere else on the page—in other words, a few moments later,
rather than immediately.
424
Dreamweaver CS3: The Missing Manual
Validating Forms
In general, “blur” works best for text fields and text areas, while “change” is better for checkboxes and pull-down menus.
5. Set other options for the widget.
Some widgets have other settings that can come in handy. For instance, you can
limit the number of letters someone can type into a text area validation widget;
and in text field widgets, you can add a helpful “hint” (like “Type your name in
this box,” which would appear inside the text field). These options are discussed below.
6. Modify the error messages.
Preventing incomplete visitor input solves only part of the problem. When a
visitor leaves a required field blank, or types incorrect information into a field,
you need to let him know what went wrong, so he can fix it. Every form validation widget includes one or more error messages. An error message appears
next to a form field if the contents of the field aren’t successfully validated: Different error messages appear under different circumstances. For example, a
Spry validation text field displays the message “A value is required” if the field is
left blank, or “Invalid format” if the field isn’t empty but has the wrong type of
response—a word instead of a year in a “What year were you born?” field, for
instance.
You can customize each of these error messages by selecting the proper “preview
state” from the Property inspector (see Figure 11-15). After selecting a preview
state, Dreamweaver changes the display of the page in Design view. In
Figure 11-15, selecting “required” displays the error message that appears if the
form is submitted but this field is left blank.
Spry tab
Figure 11-15:
Click the blue Spry tab to
select a Spry validation
widget. This way is the
only way to display the
widget’s properties in the
Property inspector. If you
click the form field (text
box, checkbox, or pulldown menu), you see
just the regular form
field properties,
discussed on page 408.
Error message
Preview state
Chapter 11: Forms
425
Validating Forms
To change the message, select the text in Design view, and then type a new error
message. It’s generally a good idea to come up with a friendly and descriptive
message. If a text field is programmed to accept a date in a particular format,
you might change the “invalid format” error message to something like “Please
enter a date in this format: 02/27/2007.”
Warning: Validation error messages are wrapped in <span> tags. It’s easy to select the error message
and the <span> tag at the same time. If this happens and you type a new error message, the <span> tag
is deleted, and the error message you add always appears, even before the visitor has touched the form!
To prevent this message, select everything but the error message text’s final period, and then type the new
error message. This precaution makes sure you insert the new message inside of the <span>—right where
it belongs.
Most validation widgets have more than one error message, so make sure you preview each of the different “states.” Some preview states have no error message, so
you’re just previewing how the page will look in the selected state. For example,
there’s no error message when the form first loads, so the “Initial” option in the preview state menu just shows what the form field looks like when the form page is first
visited. Every other widget except for the checkbox widget also includes a “valid”
preview state. This is how the form field looks when input is received. There’s no
error message in this instance, but the form field’s background changes to green. You
create this green formatting with CSS, which you’ll learn to modify next.
Formatting Spry Error Messages and Fields
Spry’s error messages are red with a red outline. Fortunately, you’re not stuck with
this factory setting. CSS controls the display of Spry widgets; a single style, for
example, controls the “invalid” error message’s formatting. Each Spry validation
widget (text boxes, text areas, menus, and checkboxes) has its own external style
sheet. The style sheet is named after the type of widget: The style sheet for a Spry
validation text field is named SpryValidationTextField.css. When you insert a Spry
validation widget, Dreamweaver adds the style sheet to the SpryAssets folder in
your site’s root folder (see page 180).
Fortunately, you don’t have to hunt and peck through the .css file to modify an
error message’s style. By using Dreamweaver’s CSS Styles panel’s Current view,
you can easily identify the proper style and edit it. Here’s how:
1. Open the CSS Styles panel (see Figure 11-16).
For example, choose Window ➝ CSS Styles, or Shift-F11 on Windows.
2. At the top of the panel, click the Current button.
The Current view shows the styles and properties that apply to a given selection
in the document window.
3. Make sure the Cascade button is pressed (Figure 11-16).
426
Dreamweaver CS3: The Missing Manual
Validating Forms
The Cascade button activates the Rules pane in the middle of the CSS Styles
panel. It displays all CSS styles that apply to the selection in the order of their
specificity—least specific on top, most specific on bottom. The style that most
directly applies to the given selection is listed last.
4. Select the Spry validation widget.
To select the widget, mouse anywhere over the form field until a blue Spry tab
appears (see Figure 11-15); click the tab to select the Spry widget.
5. Select the preview state you wish to format from the Property inspector’s “Preview
states” menu.
The error message for the selected state appears. In addition, the preview state
may also include formatting for the form field itself; for example, a text field in
its “valid” state has a green background. You can adjust the formatting of that
field as well.
6. In the document window, click inside the error message or select the form field
you wish to format.
The style appears in the CSS Styles panel’s Rules pane (see Figure 11-16). The
style’s name is a rather long-winded descendent selector (like .textfieldRequiredState .textfieldRequiredMsg). In addition, several descendent selectors are usually lumped together in a group style (see page 288 for details on group styles).
You don’t really need to pay attention to the name, however, since you’ve
already identified the style you’re going to edit.
Error message
Figure 11-16:
Adjusting the formatting
of a Spry validation error
message is as easy as
clicking inside the error
message, identifying the
style in the Rules pane,
and, in the Properties
pane, editing the style
properties.
Error style
Error style properties
Chapter 11: Forms
427
Validating Forms
Note: When formatting an error message, just click inside the text. Don’t try to select the entire message—if
you do, you might select more than the error message, and the CSS Styles panel won’t reflect the correct style.
7. Edit the style’s properties.
You can do this most easily by double-clicking the style’s name in the Rules pane;
this action opens the CSS Rule Definition window, where you can edit CSS properties as with any other style (see page 124). You can also use the Properties pane
for a more rapid edit: To quickly change the text color, for instance (see page 289
for more on how to use the Properties pane to edit and set CSS properties).
Tip: Spry error messages are presented inside <span> tags, which are displayed inline (meaning on the
same line as the form field). If you want to put the error message on its own line, change the display
property from inline to block (the chapter-ending tutorial includes an example of this trick on page 444).
In addition, you can move the <span> tags containing the error messages, and even change them from a
<span> to a <div> or <p> tag. The exact tag type doesn’t matter—but if you do change the tag type (from
span to p, for instance), make sure the class name remains the same. Spry depends on the proper class
name to identify the error message. If you move the error message, it must remain inside the outer
<span> tag that forms the Spry validation widget. You’ll see an example of this in the tutorial on page 453.
A few other styles affect the appearance of Spry form fields, but you can’t preview or
adjust them using the method just described. For example, when you click into a
Spry-enabled text field, its background color changes to yellow; when you click a
Spry menu, its background also changes to yellow (in all browsers except Safari).
These different colors are applied to what’s called the field’s “focus state”—the
moment a visitor interacts with the field. The styles to control these focus states are:
• Text field focus style: .textfieldFocusState input, input.textfieldFocusState. This
style is located in the SpryValidationTextField.css file.
• Text area focus style: .textareaFocusState textarea, textarea.textareaFocusState.
This style is located in the SpryValidationTextarea.css file.
• Menu focus style: .selectFocusState select, select.selectFocusState. This style is
located in the SpryValidationSelect.css file. While Internet Explorer and Firefox
let you use nearly any CSS style to format a menu, Safari lets you change only
the font family, color, and size of pull-down menus.
In addition, another special style formats text fields and text area boxes when a visitor
presses an invalid key on the keyboard (see the Tip on page 433).
Note: Styling form fields can be frustrating. Not all browsers format form fields in the same way, and
some browsers limit what kind of styling you can apply to a form field. For a good introduction to styling
form fields, visit www.456bereastreet.com/archive/200701/styling_form_controls_with_css_revisited.
428
Dreamweaver CS3: The Missing Manual
Validating Forms
Spry Text Field
Spry text fields have the most options of any Spry form validation widget. Dreamweaver gives you 14 different validation types as well as several other settings, such
as an option to limit the minimum and maximum number of characters.
First you should decide whether the field is required, and if it is, then, in the Property inspector, turn on the Required box (circled in Figure 11-17). A form frequently has some fields that are required (an email address to sign up for a
newsletter, for instance). Sometimes a response is optional, such as when you add
a field for someone to add a phone number. In this case, you don’t turn on the
Required box. But you still want to use a Spry field, so that you can make sure any
phone number that is submitted is formatted accurately.
Validation types
To make sure your visitors supply the appropriate information for your forms, you
frequently validate the contents of a field to make sure the data is formatted correctly: that a required zip code isn’t just a series of letters, for instance. In the Property inspector, use the Type menu (see Figure 11-17) to assign one of 14 possible
validation options:
• None. This is the default setting: no validation. The contents of the field
aren’t inspected to make sure they match any particular format. You use this
setting, in combination with the “Required” checkbox, when you don’t care
what someone types, just that they enter something: like a field used to capture
visitor comments.
Note: When you assign any validation option other than “None,” Dreamweaver adds an “Invalid Format”
error to the page. You can change this error message, as described on page 426.
• Integer. Use this to verify that a whole number was typed into the field, like a
field asking for someone’s age or a year of birth. The integer option checks for a
whole number, so if someone types 1.25 into the field, it doesn’t validate: The
form doesn’t submit, and an “Invalid format” error appears. (If you do want to
allow decimal values, then use the Real Number option discussed below.)
If you specify integer validation, you can also assign minimum and maximum
allowed values as discussed on page 434.
Validation type
Validation format
Figure 11-17:
Spry validation text fields
provide multiple options
for managing user input.
Chapter 11: Forms
429
Validating Forms
• Email. This option looks for a validly formatted email address (like missing@
sawmac.com). It can’t actually make sure that the email address itself is real,
however. Someone could still enter a fake email address [email protected];
but this option at least makes sure an honest visitor doesn’t make a typo.
• Date. When you require a specific date, use this option. If you created a form
for scheduling the use of a meeting room at the office, you could add a “Date
needed” field to the form. A date is composed of the month, day of the month,
and the year, which can be formatted in many different ways: 12-02-2007,
12/02/07, 02.12.07, and so on. To specify the format you want, use the Property
Inspector’s Format menu (see Figure 11-17).
Note: With data validation, the option yyyy means the field must have the full year (2007) to be valid.
However, mm and dd both allow single digit values—for example, 1 for January, or 2 for the second day of
the month. An initial zero (01 or 02) isn’t required.
A month is indicated by mm, the day by dd and the year by yy (for just the last
two digits of the year: 07) or yyyy (for a complete year: 2007). Separators like /
and the hyphen (–) are also used to separate the month, day, and year values.
So, for example, the option mm/dd/yyyy means that 1/2/2007 and 12/15/2007
would both be valid inputs, but 1-2-2007 or 12/15/07 would not.
Tip: If data from a date form field will eventually be stored in a MySQL database in a MySQL DATE field,
then choose yyyy-mm-dd as the format option. That matches the date format for MySQL.
• Time. This option validates a time in one of several different formats such
as 12:15 PM or 23:15. You could use it along with a date field to capture the
exact time of an event: A meeting room scheduling form might include a
“What time does the meeting begin?” field, and another field to specify an
ending time. As with the Date format, Time validation requires that you
specify a particular time format using the Property inspector’s Format
menu. HH indicates the hour specified using 24-hour time: 13 for 1 p.m.,
for example; hh is the hour; mm is minutes; ss indicates seconds; tt is
before-noon and afternoon notation (that is, a.m. or p.m.); t indicates time
of day using just a single letter, A or P.
For example, the HH:MM option would validate 13:35, but not 01:35 PM (a
zero is required for single digit hours, minutes, and seconds). The hh:mm:ss tt
option requires a time to be formatted like this: 01:35:48 PM.
Tip: Whenever you require a visitor to type information in a specific format—12:45 PM, for instance—be
sure to include clear instructions on how to fill out the form. Something like, “Please enter the time you’d
like to reserve, using this format: 12:45 PM.” You can also take advantage of a Spry text field’s Hint setting,
as described on page 433.
430
Dreamweaver CS3: The Missing Manual
Validating Forms
• Credit Card. An e-commerce site wouldn’t be much good if you didn’t provide
a way for someone to pay for your products. To make sure a validly formatted
credit card number is entered into a field, choose this option. If you accept only
one type of credit card—like Visa or Mastercard—you can specify the acceptable
type of card using the Property inspector’s Format menu. As with email
addresses, this validation format checks only to make sure the number is formatted correctly—it can’t actually check to see if this is a real (and not stolen!)
credit card.
Note: Be careful accepting credit card numbers online. An awful lot of responsibility goes along with taking someone’s credit card number, as well as potential liability if the card was stolen, or someone manages to steal credit card numbers you collect. For an introduction to online payment processing, check out
http://particletree.com/notebook/processing-online-credit-card-transactions/.
• Zip Code. To mail a brochure, T-shirt, book, or any product your site distributes, you’ll need a zip code. Use the Zip Code validation format to make sure
the Zip code you receive is formatted correctly. The Format menu lets you specify a type and country. For example, US-5 means a 5 digit US Zip code like
97213, whereas US-9 is the 9 digit format composed of 5 digits, a hypen, and 4
more numbers: 97213-1234. You can even create your own Zip code format by
specifying a custom pattern (see page 432).
• Phone Number. Use the Format menu to choose a US/Canada phone number
format, or select Custom Pattern, which you then define in the Pattern field as
described on page 432. The US/Canada phone format has to be entered like
this: (555) 555-1234. The parentheses, space, and hyphen are required. For an
alternative style, see page 433.
• Social Security Number. This option requires three numbers, a hyphen, two
numbers, a hyphen, and three more numbers, like this: 555-12-4888. You might
want to avoid requesting Social Security numbers: For reasons of privacy and
fear of identity theft, many people are reluctant to disclose their Social Security
numbers, and by law, they don’t have to share these numbers with anyone.
• Currency. If you require someone to specify a monetary amount in a field—
“How much money would you like to contribute to the home for wayward Web
designers?”—then choose the currency option to validate their responses. You
can choose between US and European formatting. US format is like 1,000.00,
while in Europe the same value is expressed as 1.000,00. The comma (period for
European value) that’s used to indicate a thousands position—1,000—is
optional. Both 1000.00 and 1,000.00 are considered valid. However, an opening
$ or
sign won’t be accepted; so if a visitor enters $1,000.00 into a currency
field, he gets an “Invalid format” error message.
• Real number/Scientific Notation. To allow decimal points in a field intended to
capture numeric values, use this option. For a serious, scientific audience, numbers can even be entered using scientific notation: 1.231e10.
Chapter 11: Forms
431
Validating Forms
• IP Address. Because we all like having people type the unique set of numbers
that identify a computer on the Internet, you can make sure only properly formatted IP addresses (like 192.168.1.1) are accepted. The Format menu lets you
choose between the current IPv4 and (the newer, not yet adopted) IPv6, or
both—oh, please…
• URL. Make sure visitors enter proper Web addresses using this option. For
example, use this option for a form field requesting the address of a favorite
Web site. The address has to include the protocol (http://) as well. So http://
www.sawmac.com/ is valid, but www.sawmac.com isn’t.
• Custom. If you’re unhappy with the validation options Dreamweaver offers,
you can create your own as described next.
Custom validation
If you need to make sure information is entered in a very precise way, and one of
Dreamweaver’s predefined validation types don’t fit the bill, you can create your
own custom validation format. Say your company has an internal ID system for
employees. Each employee is assigned an ID composed of three numbers, a
hyphen, followed by the first three letters (in uppercase) of the person’s last name:
like 348-MCF. You can create your own custom validation “pattern” to enforce
this format. If a visitor’s input matches the pattern, the data is considered valid and
the form can be submitted. If the input doesn’t match the pattern, then an error
message appears.
A pattern is just a series of symbols that indicate acceptable input; each letter in the
pattern has a special meaning that defines the valid character type. AAA means
“Accept three uppercase letters in a row as valid.” To create your own custom validation, select a Spry text field widget, choose Custom from the Property inspector’s Type menu, and then type the pattern into the Pattern field (see
Figure 11-18). Here’s a key to the symbols you use to create a pattern:
• 0 means a whole number between 0 and 9. If you want to make sure that someone enters five digits, type 00000 in the Property inspector’s Pattern field. This
pattern is the same as a five-digit Zip code.
• Type A to indicate a single uppercase alphabetic character. The pattern, A0A,
for instance, is good for an uppercase letter, followed by a number, followed by
another uppercase letter, like U5U.
• A lowercase a identifies a lowercase alphabetic character. The pattern aaa, then,
matches abc, but not ABC.
• To accept either an uppercase or lowercase letter, use B. The pattern BBB
matches both abc and ABC.
• To include numbers along with uppercase letters, use X; the letter x matches both
numbers and lowercase alphabetical characters. Use Y for a case-insensitive match
for numbers and letters. XXX matches B2B, BBB and 123, but not b2b or bbb.
432
Dreamweaver CS3: The Missing Manual
Validating Forms
Figure 11-18:
Are Spry’s validation types not enough
for you? Create your own by creating a
pattern that a form field’s input must
match in order to validate.
Validation pattern
• Finally, use ? as a kind of wild card. It stands in for any character whatsoever,
and you should use it when a character other than a letter or number (like a
period, !, or $ symbol) is also valid.
You can include any required symbol, like a period, comma, or hyphen, as part of
the pattern. In the employee ID example discussed at the beginning of this section,
the pattern to match that format would be 000-AAA. In other words, three numbers, a hyphen, and three uppercase letters. The pattern to match a phone number
entered in this format (503-555-1234) is 000-000-0000. And the pattern to match
the MySQL DATETIME format is 0000-00-00 00:00:00.
Enforcing a pattern
You can make sure incorrect characters aren’t even allowed into a form field by
turning on, in the Property inspector, the “Enforce pattern” checkbox (circled in
Figure 11-18). When this option is selected, the form field doesn’t let anyone enter
invalid characters.
Suppose you added a Spry text field, and then set its validation type to Zip code using
the US-Zip5 format. That box can accept only digits, and only five digits at that. If
the “Enforce pattern” option were turned on for this field, then a visitor could type
only five numbers into the field. If a visitor clicks into the field, and types the letter A,
nothing happens. If the visitor types five numbers, and then any other character (like
another number or even a letter), that sixth character never appears.
You can choose the “Enforce pattern” option for any validation type except None.
It even works with custom patterns that you create.
Tip: When someone types invalid characters into a form field that has the “Enforce pattern” option set,
any text inside the box flashes bright red to indicate a problem. If you want to change that color, you can
edit the styles responsible. For text fields, the style is a group selector named “.textfieldFlashText input,
input.textfieldFlashText” in the SpryValidateTextField.css file. A similar style named “.textareaFlashState textarea,
textarea.textareaFlashState” in the SpryValidationTextarea.css file applies to text area fields.
Supplying a hint
As mentioned in the Tip on page 430, when you require a very specific format for a
form field, you should provide clear instructions on how visitors should fill out the
field. These instructions might appear next to the label or below the form field.
Chapter 11: Forms
433
Validating Forms
Dreamweaver also lets you add a short “hint” inside a Spry text field. This hint
appears when the form first loads, but the moment a visitor clicks into the field,
the hint disappears; visitors are then free to type a response.
To add a hint, select the Spry widget, and then enter what you want to appear in
the Property inspector’s Hint field (see Figure 11-17).
Since text fields are relatively short, the hint shouldn’t really be instructions on
what to type. Instead, hints work best if they’re examples of the format the field
requires. If the form field is intended to collect an email address, the hint might be
your_email@your_site.com. If you’re looking for a phone number and use the
phone number validation type (page 431), you should add a sample phone number like this: (555) 555-1234. This lets visitors know that they should include the
parentheses and hyphen.
Limiting characters and enforcing a range of values
At times you may want to control how much or how little text someone types into
a form field. If you’ve created a form to sign up new members to your “membersonly” Web site, you might want to make sure any passwords they sign up for have
at least 10 characters, but no more than 15. As you’ve read, you can control the
maximum number of characters entered into a text field with a text field’s “Max
chars” property (see page 409). However, HTML provides no way to require at
least a certain number of characters; setting the “Max chars” property doesn’t alert
a visitor when she’s typed the maximum number of allowable characters.
With Spry text fields, you can set both, using the Property inspector’s “Min chars”
and “Max chars” fields (see Figure 11-19). Select the Spry widget by clicking the
blue Spry tab that appears when you mouse over a Spry text field; then type the
minimum number of allowable characters in the “Min chars” field, and the maximum number of allowable characters in the “Max chars” field. You can fill in
either field, both, or neither. In the password example from the previous paragraph, you’d type 10 in the “Min chars” box and 15 in the “Max chars” box.
Each setting has its own error message that you can view and edit by choosing the
appropriate state from the Preview States menu (see page 425). The error message
for the minimum number of characters is “Minimum number of characters not
met.” You should change the error message to something more descriptive like
“Your password must be at least 10 characters long.”
Figure 11-19:
Go ahead, be a dictator. The Spry text field validation widget even lets
you control how many characters someone can type into a field.
Some types of validation also let you enforce a range of values. If you select the
Integer validation type (see page 429), the “Min value” and “Max value” boxes in
the Property inspector (see Figure 11-19) become active. Say you include a question
434
Dreamweaver CS3: The Missing Manual
Validating Forms
on a form that reads, “Please rate our service quality from 1 to 10,” and supplies a
text box for a response. In this case, set the “Min value” to 1 and the “Max value”
to 10; that way answers like 100, or -10 aren’t allowed.
You can also set Min and Max values for other numeric validation types like currency
(page 431) and real numbers (page 431). These two settings even work with the date
and time validation types (page 430). Say you’re offering rebates to anyone who
bought your product before a certain date—08/05/2007, for instance; the online
rebate form includes a “Date purchased” field. In this instance, you can choose the
Date validation type, select mm/dd/yyyy from the Format menu (see page 429), and
then type 08/05/2007 into the “Max value” field. If someone who bought the product
on 09/15/2007 tries to claim the rebate, they get an error when they fill out the form.
Note: Setting a Min and Max value for a text field that uses Time validation works reliably only if you use
24-hour time (like 18:00 for 6:00 PM). If you use one of the formats that requires a.m. or p.m., you can
end up with inaccurate results. Spry treats 12:00 PM (noon) as later than 5:00 PM, and 8:00 AM as earlier
than 12:00 AM (midnight).
Spry Text Area
A Spry text area has far fewer validation options than a normal text field. You can’t
select a type of validation or enforce a pattern on the text box’s contents. However, the Property inspector for a Spry text area widget does let you specify whether
content is required; dictate the minimum and maximum number of characters
allowed; and supply a “hint” that appears inside the text area box when the form
page first loads (see Figure 11-20). (These options works just like those for a text
field, as described on page 434.)
Figure 11-20:
If you turn on the “Block
extra characters”
checkbox after you set a
value in the “Max chars”
field, anything someone
types beyond the
maximum character limit
doesn’t appear. HTML
provides no way to limit
the amount someone can
type into a multiline text
box, so this Spry feature
offers a nice workaround.
(Also note that the error
message that normally
appears when someone
exceeds the maximum
number of characters
doesn’t appear if the
“Block extra characters”
option is turned on.)
Chapter 11: Forms
435
Validating Forms
In addition, you can include a counter alongside the text area that indicates the
total number of characters that have been typed into the box. Maybe you want to
limit the amount of feedback a visitor can type into a multiline text box, so you
add a message like “Please limit your feedback to under 300 letters.” If you select
the “Chars count” radio button, when the Web form is viewed in a Web browser, a
counter appears next to the text area. As letters are typed into the box, the counter
value increases to show the number of letters typed (Figure 11-21, top text box).
If you specify a maximum number of allowable characters in the “Max chars” field,
you can instead select the “Chars remaining” button (see Figure 11-20). Instead of
displaying the number of characters inside the text area, it displays how many
characters are still allowed (see Figure 11-21, bottom text box).
Total number of characters typed
Figure 11-21:
A Spry text area can include
feedback regarding how many
letters have been typed into a
multiline text box (top). It’s also
possible to display a countdown
that shows how many letters are
still allowed before the limit is
reached (bottom).
Total number of characters remaining
Both of these counters are helpful, but unfortunately, there’s no context provided
for the numbers: 128? 128 what? Letters remaining, or letters already typed into the
box? To add a message that appears next to the number, you have to go into Code
view. The best method is to select the text area field in Design view; click the Code
view button; then look for a <span> tag that looks something like: <span
id="countsprytextarea2"> </span>. In this example, “sprytextarea2” is the
name of the Spry widget. You must add your message either before or after the
span tag, but not inside the span. The code above could be changed to “<span
id="countsprytextarea2"> </span> characters remaining” for a text area
with the “Chars remaining” option turned on. In this way, a visitor would see
something like “128 characters remaining.”
436
Dreamweaver CS3: The Missing Manual
Validating Forms
Spry Checkbox
The Spry validation checkbox lets you make sure a particular checkbox has been
selected. This checkbox is useful for those ubiquitous “I agree to your rules and
conditions” checkboxes. In addition, you can add several checkboxes as a group
and require that the person filling out the form selects a minimum number
(“Please make at least two choices”) or a maximum number (“Please choose no
more than two”) of options.
To add a single Spry checkbox, choose Insert ➝ Form ➝ Spry Validation Checkbox,
or click the Spry Validation Checkbox button on the Insert bar’s Forms tab
(Figure 11-2). The Spry checkbox that appears on the page already has the
“Required” option selected in the Property inspector (see Figure 11-22). If you
want just a single checkbox that visitors must check in order to submit the form,
you’re done. But beyond the kind of “You must turn on this checkbox to free us
from all legal responsibility” scenario, a single, required checkbox isn’t so useful.
After all, checkboxes more commonly come in groups as part of a multiple-choice
question.
Figure 11-22:
Use the Spry validation
checkbox widget to make
sure your site visitors turn
on a checkbox (in cases
where you want this to
happen, of course).
Unfortunately, Dreamweaver doesn’t include a simple “Add a group of checkboxes”
tool. If you insert several Spry checkboxes in a row, they’re each inside their own
Spry widget, and each is separately validated. Nor can you insert a bunch of regular
checkboxes, select them, and then apply the Spry validation checkbox to them.
To create a group of related Spry checkboxes, you need to either go into Code view
or do a delicate keyboard dance to insert all of the necessary code just right. The
tutorial starting on page 440 presents the method that requires going into Code
view. If you want to stay in Design view, here’s a method for inserting a group of
checkboxes that are validated together.
1. Insert a Spry checkbox.
Use either the Insert ➝ Form menu or the Insert bar. Dreamweaver inserts a
checkbox, and the familiar blue Spry tab appears. Let’s assume you added a
label to the right of the checkbox, and you want to add another checkbox to the
right of the one you just inserted.
2. Click the label text (see top image in Figure 11-23).
Assuming you added a label (see page 405), your goal is to move the cursor outside the <label> tag for the current checkbox. If you simply click to the right of
Chapter 11: Forms
437
Validating Forms
the label to insert the next checkbox, one of two (bad) things can happen.
Either you insert another checkbox inside the first checkbox’s <label> tag—
when this happens Dreamweaver gets really confused and omits a <label> tag
for the new checkbox. Or, you insert the checkbox outside the Spry widget,
meaning the new checkbox isn’t validated along with the first checkbox.
3. Press the right arrow key until the <label> tag disappears from the Tag selector,
but you still want to see something like <span#sprycheckbox1> (Figure 11-23,
bottom image).
Once again, the Tag selector comes to the rescue. When you no longer see
<label> in the Tag selector, the cursor is outside the label, and you can now
insert another checkbox. The <span#sprycheckbox1> identifies the tag responsible for the Spry checkbox widget. As long as you still see that in the Tag selector,
the next checkbox you insert receives Spry validation.
Cursor inside <label> tag
Figure 11-23:
If you want to include multiple checkboxes in a single Spry checkbox
validation widget, you need to first insert a Spry checkbox, then
insert additional regular (non-Spry) checkboxes. The trick is making
sure you don’t insert the new checkbox inside the <label> tag of
another checkbox (top), but still insert the new checkbox inside the
Spry validation widget’s code (bottom).
Still inside Spry Checkbox widget
4. Insert a regular (non-Spry) checkbox as described on page 411.
The cursor is already inside a Spry checkbox widget, so don’t insert a Spry
checkbox.
5. Repeat steps 2–4 to insert as many additional checkboxes as needed.
You can add as many checkboxes as you want. As long as they’re inserted inside
the Spry widget, they’ll be part of the validation process.
438
Dreamweaver CS3: The Missing Manual
Validating Forms
Note: If you want to place each checkbox in its own paragraph, you must change the <span> tag used
for the Spry checkbox validation widget to a <div> tag. According to the rules of HTML, a <span> tag can’t
be wrapped around block level elements such as paragraphs. Just go into Code view, locate the <span>
(which should look something like <span id="sprycheckbox1">), and then change span to div. Then
locate the closing </span> tag, and change it to </div>.
6. Click the blue Spry tab to select the widget; in the Property inspector, select the
“Enforce range” button, and then type numbers in the “Min # of selections”
and the “Max # of selections” fields (see Figure 11-22).
You don’t have to fill out both the Min and Max fields. If you have a question
like “What type of food do you like (select as many as apply),” you might
choose 1 for “Min # of selections” but leave the Max field blank. This way, you
require at least one choice, but the visitor is free to choose as many other
options as she wants.
Or, you might have a question like “Select your four favorite foods.” In this
case, you’d type 4 in the Max field, since you don’t want more than four
answers. (You could also type 4 in the Min field if you want to make sure you
get no more or less than four choices.)
Tip: There’s no Spry validation available for a group of radio buttons, but you can get the same effect
using a group of checkboxes inside a Spry validation widget: Choose the “Enforce range” button, and then
type 1 in both the Min # and Max # of selections boxes.
Spry Select
The Spry validation select widget validates the selection of pull-down menus and
has two options to determine if a selection in the menu is valid or not (see
Figure 11-24). Remember that a pull-down menu (created with the <select> tag)
consists of a label and a value (see page 414). The label is what someone sees when
he makes a selection from the menu, and the value is what’s sent over the Internet
when the form is submitted.
With a Spry menu, you can prevent a form from submitting, and instead display
an error message if the current menu selection has no value set or has a particular
“invalid” value set. Say you have a menu listing all the months of the year. The
label is the month’s name and its value is a number (see Figure 11-24). Suppose
you added “Please select a month” as the first item on the menu. This is a common technique to let visitors know what’s listed on the menu and what they
should select from the menu. Of course, when the form is submitted, you want to
make sure a month and not “Please select a month” is selected.
Note: Although Dreamweaver inserts a pull-down menu when you insert a Spry validation select widget,
you can convert the menu to a list, as described on page 414. The same validation options apply.
Chapter 11: Forms
439
Forms Tutorial
To prevent a visitor from submitting the form without selecting a month in this
scenario, just leave the value for the “Please select a month” label blank, and turn
on the “Blank value” checkbox for the Property inspector’s “Do not allow” option
(see Figure 11-24). With this setting, if the visitor selects a month (say February),
there is a set value (2, for instance) and the menu validates. However, if she doesn’t
make a selection, the “Please select a month” choice (which has no value) invalidates the menu, and prevents the form from submitting.
Figure 11-24:
Remember: You see validation options only when
the Spry widget (represented by a blue tab in the
document window) is selected. Clicking on the
actual form field (clicking a form menu in Design
view, for instance) just selects the field, not the
widget.
Sometimes the label and the value are the same. On a menu with a list of years
(“What year were you born?”), for example, the label (“1967”) is the same as the
value (“1967”) and it would be a bit redundant to set both the label and value for
each menu item. Fortunately, you don’t have to double your effort in this case. As
you read on page 415, a label doesn’t require a value. If no value is specified, the
label is submitted as the value.
When there are no assigned labels, the “Blank value” validation option doesn’t
work. After all, even valid selections don’t have a value explicitly set—just a label.
In this case, use the “Invalid value” option. To use this option, just assign an arbitrary value to an illegitimate menu selection, and specify that value in the text box
to the right of the Property Inspector’s “Invalid value” text (Figure 11-24). For
example, the first menu option on the list of years might be “Please select a year.”
Just assign a value (like -1) to that menu option in the List Values window (page
415). Then select the Spry widget, and specify the same value in the Property
inspector’s “Invalid value” field. (See page 414 for more on assigning labels and
values to form menus.)
Tip: If your form menu has a long list of options, you might add a separator (like a row of hyphens, ----------)
as a label, in order to divide groups of options. You could either forego assigning a value to that separator
and use the “Blank value” validation option, or assign it an invalid value (like -1) and use the “Invalid
value” setting. In this way, if someone accidentally selects the separator, she can’t submit the form.
Forms Tutorial
In this tutorial, you’ll build a simple newsletter sign-up form for The CosmoFarmer
Web site (see Figure 11-36). To make sure the folks at CosmoFarmer receive the
right information, you’ll also use the Spry form validation tools.
440
Dreamweaver CS3: The Missing Manual
Forms Tutorial
Note: You’ll need to download the tutorial files from www.sawmac.com/dwcs3/ to complete this tutorial.
See the note on page 39 for more details.
Once you’ve downloaded the tutorial files and opened Dreamweaver, define a new
site as described on page 28: Name the site Forms, and then select the Chapter11
folder (inside the MM_DWCS3 folder). (In a nutshell: Choose Site ➝ New Site. In
the Site Definition window, click the Advanced tab, type Forms into the Site Name
field, click the folder icon next to the Local Root Folder field, navigate to and select
the Chapter11 folder, and then click Choose or Select. Finally, click OK.)
Inserting a Form and Adding a Form Field
The first step to building a form is inserting a <form> tag. This tag encloses all the
different fields in the form, and indicates where the form begins and ends. As
noted earlier in this chapter, you can also insert other HTML elements, like text
and <div> tags within the form.
1. Choose File ➝ Open; click the Site Root button (at the bottom left of the open
file window). Select the file signup.html, and then open it.
(If you have the Files panel open [Window ➝ Files], you can also just doubleclick the signup.html file in the panel to open it.) The page is partly designed
already with a banner, sidebar, and footer.
2. Click the empty white space directly below the headline and paragraph that
begins “Signup today.” On the Insert bar, select the Forms option (see
Figure 11-2).
The Insert bar now shows you the Forms icons you’ll need.
3. Click the Insert bar’s Form button (see Figure 11-2), or choose Insert ➝ Form
➝ Form.
A red, dashed rectangle appears in the document window, indicating the
boundaries of the form.
4. In the Property inspector, in the “Form name” field, type signup
(Figure 11-25).
You’ve just named your form.
5. In the Action field, type http://www.cosmofarmer.com/signup.php.
(Leave off the final period, as shown in Figure 11-25.)
Figure 11-25:
The Action property of a form is simply
the URL for the program that processes
the form.
Chapter 11: Forms
441
Forms Tutorial
A form’s Action property identifies the address of the program that processes
the form’s submitted data. In this case, you’ve been spared the effort of writing
(or hiring a programmer to write) the required form-processing software. Such
a program already exists on the Web site whose address you’ve just specified,
and it’s waiting to process the form you’re about to design.
You may be creating your own form-processing programs if you’re using
Dreamweaver’s dynamic Web-building tools described in Part 6. See the tutorial on page 821 for an example.
6. In the Method menu, make sure POST is selected. Leave the Target and Enctype
fields blank.
The Method indicates how the form sends information to the form-processing
program (see page 403).
Now you’re ready to insert a text field.
7. In the document window, click the form—anywhere inside the red, dashed
lines. Next, hit Enter (Return) to create a new paragraph, and then press the
backspace key to delete that new paragraph.
No, this isn’t an experiment, and you’re not being led around like a lab rat. This
strange little two-step overcomes a Dreamweaver bug you would otherwise
encounter in a few moments. In a nutshell: When you insert a form and click it,
there’s no paragraph formatting yet—in other words, no paragraph tag exists to
hold the first form field. If you simply insert a text field with a label (like you’re
about to do), and then press Enter to create a new paragraph for a new form
field, Dreamweaver does a weird thing: The first form field is wrapped inside a
paragraph tag, but its label isn’t. The result? The label and the field are split
apart from each other. By pressing Enter first, and then pressing the backspace
key, you’re actually creating a paragraph tag in which you’ll now insert the label
and text field.
8. On the Insert bar, click the Text Field button (see Figure 11-2) or choose Insert
➝ Form ➝ Text Field.
The Input Tag Accessibility window appears (see Figure 11-26). If you don’t see
this window, choose Edit ➝ Undo to remove the Text Field you just entered;
use the Preferences window to turn on the accessibility options for form objects
as described in Figure 11-5.
9. In the ID box, type subscriber.
The name you type into the ID box is added as both the name and ID property
of the field’s HTML. The form processing program that receives the form input
uses the name property: It’s how that program knows what the visitor feedback
means. In this case, visitors type their name into this form field, so the form
processing program receives information (subscriber=Bob, for instance) in
what’s called a name/value pair (see page 400).
442
Dreamweaver CS3: The Missing Manual
Forms Tutorial
Figure 11-26:
The Input Tag Accessibility Attributes window is a great
way to quickly insert a bunch of form-related HTML.
The ID uniquely identifies the form element. If you want, you can create an ID
style to format this particular form field—for example, to assign a width or
background color to this one field. Next you’ll add the text label that appears
along with the text field on the Web page.
10. Type Your name in the label box; select the “Attach label tag using ‘for’
attribute”; and select the “Before form item” button.
The window should now look like Figure 11-26.
11. Click OK to insert the text field.
The label and text field appear side by side on the page. The label’s text is
wrapped inside the HTML <label> tag (page 420). Your first order of business
is to set the width of the form field.
12. Click the newly inserted field (the box on the page); in the Property Inspector’s
“Char width” field, type 25.
This action defines the number of characters wide the box will be. In other words,
the box will display 25 letters (this step sets only the visible width of the field; a visitor can actually type more letters than this into the field, as described on page 409).
Now it’s time to add some style.
13. Make sure the CSS Styles panel is open (choose Window ➝ CSS Styles); on the
Styles panel, click the + button to create a new style.
Alternatively, you can choose Text ➝ CSS Styles ➝ New Style. Either way, the
New CSS Style window opens. (For a refresher on creating styles, see page 117.)
14. Select the Advanced radio button; replace the text in the Selector box with #mainContent .question (make sure to include the space character between #mainContent and .question); from the “Define in” menu, select global.css; click OK.
Chapter 11: Forms
443
Forms Tutorial
The CSS Rule Definition window opens. You’ve just created a descendent
selector—actually, a new class style named .question. But the formatting you’re
about to assign applies only to an element with the question class applied to it
that also happens to be inside another tag with an ID of mainContent. In this
case, you’ve inserted your form inside a <div> tag with the mainContent ID
assigned to it. You’ll use this style to make each form field’s label stand out and
visually separate different questions on the form.
15. In the Rule Definition window’s Type category, choose bold from the Weight
menu; select the Block category, and, from the Display menu near the bottom
of the window, choose block.
The block option for the CSS Display property formats a tag like a block-level
element—in other words, there’s a line break above and below the element. You
use this option to change the display of a tag that would normally appear
“inline” (side-by-side) with other elements. For example, the <label> tag is an
inline element and, in the form you’re working on, the label “Your Name”
appears directly to the left of the text field. By applying this style with its block
display to that label, you force the label to appear above the field. Positioning
the label in this manner isn’t any kind of requirement for forms; it’s just a
design choice to make the form more readable.
Next you’ll add a border above the label to visually separate it from an element
above it.
16. Select the Border category, and turn off the three “Same for all” checkboxes.
From the Top Style menu, choose dashed; type 1 in the top Width box; and
type #C9F173 in the top Color box.
Finally, you’ll just add a bit of padding to separate the border and the label. You’ll
also add some top margin to create a bit more space between form elements.
17. In the CSS Rule Definition window, select the Box category. Turn off the two
“Same for all” checkboxes and, in the Padding’s Top box, type 5; type 15 in the
Top Margin box; type 0 in the Bottom Margin box. Click OK to complete the style.
Because this is a class style, you must apply it manually.
18. In the document window, click anywhere inside the label text “Your name.” In
the Tag selector, click <label> (circled in Figure 11-27) to select the label tag;
in the Properties inspector’s style menu, choose question (see Figure 11-27).
The form field drops below the label. Next you’ll add a Spry form field to make
sure the form submits the information you’re looking for.
Adding a Spry Validation Text Field
Next up for this form: an email address field. Because the whole point of the form
is to get a visitor’s email address, you need to make sure that the visitor fills out the
email address field with the proper data (namely, a well-formed email address). A
Spry validation text field is the perfect solution.
444
Dreamweaver CS3: The Missing Manual
Forms Tutorial
Figure 11-27:
The Tag selector and the
style menu are a great
one-two punch for
precisely applying a CSS
class style to any tag.
1. In the document window, click to the right of the text field you added in the
last part of this tutorial. Hit Enter (Return) to create a new paragraph. On the
Insert bar’s Forms tab, click the Spry Validation Text Field button (see
Figure 11-2).
Alternatively, you could choose Insert ➝ Form ➝ Spry Validation Text Field.
Either way, the Input Tag Accessibility window appears just as it does when
you’re inserting a regular text field…you fill it out the same way, too.
2. In the ID field, type email; type “Your email address” in the label field; make
sure the “Attach label tag using ‘for’ attribute” and the “Before form item”
radio buttons are selected; click OK to insert the text field.
A new text field and label appear. A blue tab also appears, identifying this as a
Spry widget. If you look at the Property inspector, you see all the properties
available for Spry Text Fields. You’ll choose a few options in a minute, but first
you’ll format this field like the one you inserted earlier.
3. Repeat step 12 on page 443 to set the Char width of the new field to 25.
The label also needs some formatting.
4. Repeat step 18 on page 444 to format the “Your email address” label.
When you use the Property inspector’s style menu to apply the .question class
style, you’ll see a whole bunch of new classes listed. Those come from another
external style sheet that Dreamweaver quietly attached to this page after you
inserted the Spry form field.
Chapter 11: Forms
445
Forms Tutorial
5. Choose File ➝ Save.
Dreamweaver opens the Copy Dependent Files dialog box, letting you know the
page now requires both a style sheet file and a JavaScript file.
6. Click OK to close the Copy Dependent Files window.
If you look at the Files panel (Window ➝ Files), you’ll see a new folder named
SpryAssets where Dreamweaver just saved the two new files (see page 180 for an
explanation).
7. Move your mouse over the email form field; click the blue Spry tab when it
appears.
The Properties inspector displays the Spry field’s properties (see Figure 11-28).
First you’ll assign a validation type to this widget.
Note: Dreamweaver automatically creates a name for the Spry widget. The Spry text field you just
inserted is named sprytextfield1. You can change the name to something more descriptive like spryEmail,
but you don’t have to. The name doesn’t ever appear on the Web page; the Spry programming uses it to
identify the particular validation widget.
8. From the Type menu, select Email Address, and then turn on the Blur checkbox
(see Figure 11-28).
The Type menu defines what type of information should be allowed in the field.
In this case, only a validly formatted email address works. The Blur box determines when the contents of the field will be validated (in addition to the
moment the visitor submits the form). In other words, if a visitor types “not
telling” into the field and then presses the Tab key to jump to the next form
field, he’ll receive an error message.
If you look at the document window now, you see that the email field has a red
background color and a red “Invalid format” message to the right of it. Every
Spry validation field has several “preview” states. You can preview the field as it
will look at various points when a visitor to your Web site interacts with the
field—for example, when she’s typed invalid information, or simply left a
required field blank. You’ll tweak this error message now.
Figure 11-28:
Select a Spry validation
widget in the document
window, and then use
the Property inspector to
assign validation options.
9. In the document window, delete the text “Invalid format,” and type Please
enter a valid email address.
446
Dreamweaver CS3: The Missing Manual
Forms Tutorial
Now when some wise guy types “not telling,” he’ll get an error message informing him to enter a validly formatted email address. There’s also an error message
that appears if this field is just left blank. You can adjust this message as well,
but first you must switch to a different “preview state.”
Warning: The “Invalid format” error message is contained inside a <span> tag. You can easily accidentally select and delete this entire span. If that happens, the error message no longer works. If, when you
replace the error message in step 11, the new message you add appears in black instead of red, you’ve
accidentally deleted the span. If this mistake happens, choose Edit ➝ Undo until you see the old error
message in red. Try selecting “Invalid format” but not the trailing period. Then type the new message.
10. Click the blue Spry tab again; from the Property inspector’s “Preview states”
menu, select Required.
A new error message appears: “A value is required.” This message appears when
nothing is entered into a required answer field and the visitor tries to submit
the form.
11. Repeat step 11, replacing the “A value is required” with “We need your email
address to sign you up.”
The red outline surrounding the error message doesn’t fit the look of CosmoFarmer.com. Fortunately, it’s easy to update the look of a Spry widget.
12. Click anywhere inside the error message text you added in the last step; make
sure the CSS Styles panel is open (Window ➝ CSS Styles). At the top of the
panel, select the Current button, and make sure the Cascade button is selected
(circled in Figure 11-29).
Figure 11-29:
When formatting Spry widgets, it’s easiest to use the CSS Styles
panel’s Current view. If the Cascade button is selected (circled), you
merely need to click the element whose style you want to change. In
this case, selecting the error message for a Spry Validation Text
field highlights the appropriate style’s name. Double-click the name
to open the CSS Rule Definition window, and style away!
Chapter 11: Forms
447
Forms Tutorial
A descendent selector named “.textfieldRequiredState .textfieldRequiredMsg”
controls the error message’s styling. This is the last style listed in the Rules pane
of the Styles panel (the middle pane in Figure 11-29).
13. In the Rules pane, double-click the style “.textfieldRequiredState .textfieldRequiredMsg” to open the CSS Rule Definition window.
You’ll make the error message bold and remove the border.
14. In the Rule Definition window, from the Weight menu, choose “Bold.” Click
the Border category, and then delete the contents of the top row of boxes.
Deleting the contents of the type, width, and color boxes removes the border
entirely.
15. Click OK to complete the style.
Notice that the error message next to the Spry form field is bold, but no longer
has a border. Time to insert another form field.
Adding a Spry Form Menu
Text boxes aren’t the only form fields that you can validate. You can also make
sure someone’s made a selection from a pull-down menu, by adding a Spry menu
to a form.
1. Click to the right of the error message you just added (after “sign you up.”),
and then press Enter or Return to insert a new empty paragraph.
2. Choose Insert ➝ Form ➝ Spry Validation Select, or, on the Insert bar, click the
Spry Validation Select button (see Figure 11-2).
As with any form field, the Input Tag Accessibility window appears.
3. In the ID field, type decade; type “What decade did you begin apartment farming?” in the label box; click OK to insert the menu.
A form menu appears on the page.
4. Choose File ➝ Save.
Another window appears, letting you know that an additional JavaScript file
and CSS file are needed to make this new Spry validation widget work. Click
OK to dismiss that window. Time to style the label.
5. Repeat step 18 on page 444 to format the “What decade did you begin…” label.
At this point, the pull-down form menu is empty, so your next step is to add a
few options.
6. In the document window, click the newly inserted menu to select it. In the
Property inspector, click the List Values button.
The List Values window opens (see Figure 11-30). Here you can add options for
the menu.
448
Dreamweaver CS3: The Missing Manual
Forms Tutorial
7. Type “-- Select a decade --”; press the Tab key, and then type -1.
The text (“Select a decade”) appears at the top of the menu. It’s an instruction for the person filling out the form, letting him know what he should
do. Of course, you want someone to choose an option other than this one
when submitting the form. The -1 is the value transmitted over the Internet
when this option is selected and the form submitted; however, in this case, -1
is kind of a secret message that you’ll use to notify the Spry validation program that this option isn’t valid. Before you get to that though, add the
valid selections for this form.
8. Press the Tab key and then type 1960-1970; press the Tab key twice to create
another list option, and then type 1970-1980. Continue adding options in this
way until you’ve added 2000-2010.
The List Values window should look like Figure 11-30.
Figure 11-30:
The label column displays what will appear in the
menu on the Web page, while the value column
contains the value that’s actually submitted (-1 in
the first row, for example). If you don’t specify a
value (as with all of the decade ranges here), the
label’s text is submitted as the value.
9. Click OK to insert the menu. Move your mouse over the menu, and then click
the blue Spry tab to select it.
You need to specify what type of menu selection should be considered invalid.
10. In the Property inspector, turn off the “Blank value” box; turn on the “Invalid
value” box and make sure -1 appears in the field; turn on the Change checkbox.
The Property inspector should look like Figure 11-31. Make sure “Invalid” is
selected from the “Preview states” menu. In the document window, to the right
of the form menu, you should see a red error message, “Please select a valid
item.” You’ll change this message and its style next.
Figure 11-31:
You can assign an
arbitrary value (like -1)
to any menu item that
you want to prevent from
being submitted.
Chapter 11: Forms
449
Forms Tutorial
11. Replace the text “Please select a valid item” with “Please select a decade.”
Repeat steps 13-15 on page 448 to make the error message bold and remove
the borderline.
Each type of Spry validation widget (text field, menu, checkbox, text area) has
its own CSS styles to format error messages. In the case of a pull-down menu
error message, the style is named “.selectRequiredState .selectRequiredMsg,”
and is in an external style sheet named SpryValidationSelect.css.
Add Spry Checkboxes
Just a couple more form fields and you’ll be done. Now it’s time to ask a multiplechoice question that requires two responses.
1. Click to the right of the error message you just formatted (after “select a
decade.”), and then press Enter (Return) to insert a new empty paragraph.
Type Please select your two favorite urban farming techniques.
Time to format the question.
2. From the Property inspector’s Style menu, select “question”.
This formats the paragraph so that it looks like the labels for other questions on
the form. Next you’ll add a few checkboxes.
3. Press the Enter (Return) key to create a blank paragraph.
The new paragraph also has the question class applied to it. You need to remove
that style.
4. From the Property inspector’s Style menu, choose None. Choose Insert
Form ➝ Checkbox.
➝
You can also click the Checkbox button under the Insert bar’s Forms tab (see
Figure 11-2). Either way, the Input Tag Accessibility window appears. You
should know the drill by now.
5. Type raisedbed in the ID box; type Raised beds in the Label box; the rest of the
window should look like Figure 11-32. Click OK to insert the checkbox.
Because you can’t type information inside a checkbox—you can only turn it on
or off—you need to supply a value that’s submitted when the checkbox is
turned on. You’ll do that next.
6. In the document window, click the checkbox to select it. In the Property
inspector’s “Checked value” field, type Y.
If someone filling out this form turns on this checkbox and then submits the
form, the name/value pair (see page 400) raisedbed=Y is submitted. In other
words, the Y is just a way to indicate that “yes” someone selected this answer.
7. In the document window, click after the label “Raised beds,” and then press
Shift-Enter (Shift-Return).
450
Dreamweaver CS3: The Missing Manual
Forms Tutorial
Figure 11-32:
When you insert a Spry form validation widget, you
encounter the same Input Tag Accessibility Options
window that appears when you insert regular form
fields.
As you’ll recall (or not) from page 67, pressing Shift-Enter is a fast way to insert
a line break (the HTML <br> tag). It simply drops the cursor to the next line
without creating a new paragraph. You’ll add a checkbox here.
8. Choose Insert ➝ Form ➝ Checkbox; in the Accessibility Options window, type
waterbed in the ID box; type “Waterbed hydroponics” in the Label box; click
OK to insert the checkbox.
Now add a value for the new checkbox.
9. In the document window, click the checkbox to select it. In the Property
inspector’s “Checked value” field, type Y.
You’ll insert one more checkbox this way, and then you’ll insert a Spry checkbox.
10. Repeat steps 7-9 to insert one more checkbox: For one box, use the ID name
bathtub and the label “Bathtub hydroponics”.
Now it’s time to add a validation checkbox.
11. Click to the right of the label for the newly inserted checkbox, and then press
Shift-Enter to add a line break. Choose Insert ➝ Form ➝ Spry Validation
Checkbox.
You can also click the Spry Validation Checkbox button from the Insert bar’s Forms
tab (see Figure 11-2). Either way, the Input Tag Accessibility window appears.
12. In the ID box, type fallow, and for the label type “Fire fallow cultivation.”
Click OK to insert the checkbox.
In addition to the checkbox and its label, a blue Spry tab appears indicating a
validation field. Even though you can use Spry to validate a group of checkboxes (for example, to make sure at least two boxes have been turned on),
Chapter 11: Forms
451
Forms Tutorial
there’s no straightforward way to create a single group of Spry checkboxes. You
need to insert a single Spry checkbox (like you just did), and then go into Code
view to readjust the code. But before that happens, you need to make sure
you’ve added a value for this field.
13. Choose File ➝ Save.
Another window appears, letting you know that you need an additional JavaScript file and a CSS file to make this new Spry validation widget work (click
OK to close that window).
14. Repeat step 9 to add a “Y” value for this new checkbox field.
To set the validation options for the checkbox, you must select the blue Spry
tab, not the checkbox itself.
15. Mouse over the last checkbox or “Fire Fallow Cultivation” label, until the Blue
Spry tab appears; click the tab to select it.
The Property inspector now shows the properties for the checkbox validation.
16. Select the “Enforce range” button; type 2 in the “Min # of selections” field;
type 2 in the “Max # of selections” field; and turn on the Change checkbox.
The Property inspector should look like Figure 11-33. This configuration makes
sure that at least (but no more than) two checkboxes are turned on. Since the
question asks for a visitor’s “two favorite techniques,” it makes sense that you
should require two boxes to be turned on. In addition, the “Change” option
makes sure that the Spry programming inspects what’s happening each time a
box is changed (from checked to unchecked or vice versa). In this way, the person filling out the form gets immediate feedback: If he clicks a third box, he’s
notified that he’s selected too many options; if he selects only one, he’s told that
he needs to make an additional selection.
Now you can customize the error messages.
Figure 11-33:
You can make selecting a
checkbox mandatory, or
you can require that a
minimum and/or
maximum number of
checkboxes are turned on.
17. In the Property inspector’s “Preview states” menu, make sure “Max. No. of
Selections Exceeded” is selected.
On the page, you should see the error message “Maximum number of selections exceeded.”
18. Change the error message on the page to read “Only two choices please.”
There’s also an error message if too few choices are made; you’ll change that next.
452
Dreamweaver CS3: The Missing Manual
Forms Tutorial
19. Click the blue Spry tab to select the Spry checkbox widget. From the “Preview
states” menu, choose “Min. No. of Selections Not Met.” Change the error message on the page to read “Two choices please.”
These error messages should match the look of the ones you formatted earlier.
20.Repeat steps 13–15 on page 448 to make the error messages for the checkbox
bold and without a border line. In addition, in the CSS Style Definition window, select the Block category, and then change the Display property from
inline to block.
The style you need to edit is named “.checkboxRequiredState .checkboxRequiredMsg.” At this point, there are four checkboxes, but only the last
checkbox is part of the Spry validation. To make sure all four checkboxes are
included in the validation process, you need to go into Code view.
21. Mouse over the bottom checkbox on the page, and then click the blue Spry tab
to select it. In the top left of the document window, click the Code button.
The code should look like what you see in Figure 11-34. The opening tag—
<span id="sprycheckbox1">—indicates the beginning of the Spry checkbox
validation. If you move this opening tag before the code for the other three
checkboxes, they’ll all be included as part of the validation process.
Figure 11-34:
Spry validation fields are
created by wrapping a
regular form field inside
a <span> tag. The error
messages for the
validation also appear
inside <span> tags that
are enclosed by the
<span> tag for the
validation field.
Begin Spry checkbox validation
Error messages
End Spry checkbox validation
22.Select the code <span id="sprycheckbox1">, and then choose Edit ➝ Cut.
This step removes the code from the page. You’ll paste it back in above the first
checkbox.
Warning: Don’t try to save the page between steps 22 and 23. If you do, Dreamweaver sees that the
special Spry code you cut out in step 22 is missing, and suggests that you let it remove the widget entirely.
Chapter 11: Forms
453
Forms Tutorial
23. Scroll up a few lines, and locate the tag <input name="raisedbed"
type="checkbox" id="raisedbed" value="Y" />. Click before this tag (in other
words, between the <p> tag and the <input> tag), and then choose Edit ➝
Paste.
The code should look like Figure 11-35. Now all four checkboxes are part of the
validation. The form is nearly complete.
Figure 11-35:
Simply by moving the
opening <span> tag, you can
change the range of
checkboxes that are included
in a Spry validation.
Completing and Testing the Form
At this point there’s no way to submit the form after it’s filled out. You need to add
a submit button.
1. At the top of the document window, on the toolbar, click the Design button to
return to Design view. Click to the right of the label for the last checkbox, and
then hit Enter to insert a new paragraph. From the Property inspector’s style
menu, choose question.
A green line and a little extra space appear above the paragraph. This matches
the look of the other parts of the form.
2. Choose Insert
(Figure 11-2).
➝
Form
➝
Button or, on the Insert bar, click the Button icon
Your old friend the Input Tag Accessibility window appears again. This time,
however, you don’t need an ID or label. Buttons already have a message (like
Submit) printed on them, so you don’t need to add a label.
3. Leave the ID and Label fields empty; select the No Label Tag radio button, and
then click OK.
A submit button appears on the page. You can change the generic “Submit”
message to something more reflective of the form’s purpose.
4. Click the button on the page; in the Property inspector’s Value field, type
“Sign up.”
The form is done. Now take it for a test drive.
5. Choose File ➝ Save All, and press the F12 (Option-F12) key.
A Web browser opens with the new form.
454
Dreamweaver CS3: The Missing Manual
Forms Tutorial
Note: If you preview this in Internet Explorer for Windows, you may see a security warning. This problem and a solution are discussed on page 231.
6. Click the submit button.
The form doesn’t submit (see Figure 11-36). Instead, several error messages
appear. Fill out the form correctly and try to submit it again.
Figure 11-36:
Dreamweaver CS3’s new
Spry validation form
widgets can help ensure
that your forms collect
the information you
want. Professionallooking error messages,
placed next to the
offending responses,
provide clear feedback to
visitors.
Chapter 11: Forms
455
chapter
Chapter 12
12
Spry
As a Web designer, you can count on one thing: The Web is always changing. Yesterday’s technology is yesterday’s news—remember Java applets, frames, and messages that scroll in your browser’s status bar? You can see the most recent Web
design innovations on Web sites like Google Maps, Flickr, and Meebo, all of which
offer a high degree of interactivity without resorting to multimedia plug-ins like
Flash. Google Maps lets you zoom in, zoom out, and scroll across a map of the
world without loading a new Web page. Many of the most cutting-edge Web sites
almost feel like the kinds of complex software you run right on your computer.
JavaScript, which has grown from a simple little language that helped create popup windows and image rollovers, to a full-blown programming tool that can
change the content of a Web page as you look at it, is the key to this interactivity.
JavaScript can even update a page with new data that gets downloaded behind the
scenes (that’s what’s happening when you scroll to new sections of that Google
Map). Dreamweaver, which has always tried to provide tools to meet Web designers’ current needs, adds a new set of JavaScript tools to Dreamweaver CS3. Based
on what Adobe calls its “Spry framework for Ajax,” Dreamweaver’s new Spry
toolset lets you add interactive page elements like drop-down navigation menus,
tabbed panels, and XML-driven, sortable data tables.
What is Spry?
You’ve already seen Spry in action in Chapters 5 and 11, where you learned about
the Spry menu bar and Spry validation widgets. But what exactly is Spry? Spry isn’t
just a Dreamweaver tool; it’s a technology developed by Adobe, and distributed
freely and independently on the Adobe Labs Web site (http://labs.adobe.com/
technologies/spry/).
457
Tabbed Panels
It’s officially called the “Spry framework of Ajax” and it’s a collection of JavaScript
programs that let you, the Web designer, offer sophisticated control of a Web page
to your visitors through widgets, effects, and data sets. A widget is an interface element like a menu bar, form validation message, or set of tabbed panels that generally
makes a page easier for site visitors. For example, the Spry menu bar adds a lot of
links to a compact navigation bar, so you can easily navigate a Web site.
An effect is a visual treat that doesn’t necessarily improve how a Web page works,
but adds cool looking eye candy. You can use a Spry effect to fade page elements in
and out of view (effects are discussed in the next chapter). Finally, a Spry data set is
a data presentation format that’s more interactive than a standard HTML table.
Imagine you have a table listing products your company sells. Each product is presented in its own row with columns for product name, price, and availability. A
visitor can sort a Spry data table by any of those columns, simply by clicking the
name of a column. And it all happens without the browser ever having to reload a
Web page.
In addition, a Spry data set can suck down the contents of an XML file, and then
update a Web page with the file’s content; see page 477 for the full scoop on XML, an
increasingly popular and extremely flexible data format. This Spry data set/XML
tango is the “Ajax” part of the “Spry framework for Ajax.” Ajax is a term coined in
2005 to describe a timesaving system for transferring information from a Web
server to a Web page (and vice versa). The revolutionary advantage of Ajax, as
highlighted in the Google Maps example, is that it lets a page’s contents change
quickly without having to reload a new page from the server.
Note: Ajax originally stood for “Asynchronous JavaScript and XML,” since most original Ajax examples
used XML. Nowadays the term more commonly describes the use of JavaScript to send and receive data
to and from a Web server, and update the contents of a page based on that data.
Tabbed Panels
Some Web site visitors are loath to scroll; if they don’t see what they want when a
page first loads, they move on. Because of this attitude, some Web designers divide
long passages of information into multiple pages so that each page presents small,
easy-to-digest chunks. Of course that means building several pages instead of just
one, and forces the visitor to click through (and wait for) a series of pages. Fortunately, Spry Tabbed Panels provides another alternative (see Figure 12-1). Instead
of creating one long page, or several smaller pages, you can organize information
into separate tabbed panels. That way your content is always front and center, and
your visitors can easily access different sections by clicking a tab above each panel.
Adding a Tabbed Panel
You can place Spry tabbed panels anywhere on a Web page. But since the tabs
form a single row at the top of the group of panels, you’ll need enough horizontal
458
Dreamweaver CS3: The Missing Manual
Tabbed Panels
Figure 12-1:
Organize your page’s
content into easily
accessible panels with
the Spry Tabbed Panels
widget. Clicking a tab
opens a new panel’s
worth of information
without loading a new
Web page.
space to accommodate all the tabs (see the box on page 465 for an exception to this
limitation). Unless you have only a couple of tabs with one-word text labels, you
should place the tabbed panels in a fairly wide space, such as the main column of a
Web page, or across the entire width of the page. Just follow these steps:
1. In the document window, click where you wish to insert the panels.
For example, inside a div tag (page 313).
2. Choose Insert ➝ Spry ➝ Spry Tabbed Panels, or, on the Insert bar, click one of
the Spry Tabbed Panels buttons (see Figure 12-2).
You can find several Spry widgets (including tabbed panels) under the Layout
tab of the Insert bar (Figure 12-2, top); other Spry buttons are grouped under
other tabs (form validation Spry widgets appear under the forms tab); and all
the Spry goodies are found on the Spry tab (Figure 12-2, bottom).
Chapter 12: Spry
459
Tabbed Panels
Spry menu bar
Spry collapsible panel
Spry tabbed panels Spry accordion
Figure 12-2:
It’s easy to identify a Spry icon in the Insert bar, even
when Spry buttons are mixed in with regular HTML
objects (top). The bright orange starburst that appears
in a button’s lower-right corner identifies it as a Spry
object.
Spry
validation
Spry
Spry checkbox Spry
Spry repeat validation
menu Spry
region list text field
bar accordian
XML
data
set
Spry Spry
Spry
Spry
Spry
repeat table validation
tabbed collapsible
select
panels
panel
menu Spry
validation
text area
After inserting a tabbed panel, you see two tabs and two panels on the page
(Figure 12-3); in addition, a blue tab appears above the panels indicating
the Spry widget. The blue tab appears only in Dreamweaver’s Design view,
not when the page is viewed in a Web browser. The blue Spry tab provides
an easy way to select the Spry widget and access its properties in the Property inspector.
Note: When you save a page after inserting a Spry Tabbed Panel, Dreamweaver notifies you that it has
added two files to the site: a CSS file (SpryTabbedPanels.css) for formatting the panel group, and a JavaScript file (SpryTabbedPanels.js) to make the panels appear and disappear when the tabs are clicked.
Dreamweaver saves both files in the SpryAssets folder in your site’s root folder (see page 180). Make sure
you upload this folder when moving your site onto your Web server.
3. In the Property inspector, name the panel group (Figure 12-3).
This step is optional. Dreamweaver provides a generic name, TabbedPanels1,
for the group of panels. You don’t really have to name the Spry panel group; the
name never appears in a browser window. However, if you take the plunge into
manually modifying your Spry widgets in Code view (see the box on page 471),
you may wish to change the Spry panel group’s name to something more
descriptive. If you created a group of tabbed panels to house information about
a product, you might name the panel group, productPanels. A descriptive name
helps you identify code related to this particular panel group if you ever want to
dive into Code view, and enhance or change the functionality of the panels (see
the box on page 471).
460
Dreamweaver CS3: The Missing Manual
Tabbed Panels
Figure 12-3:
Normally, when a Web
browser downloads a
page containing Spry
panels, the first tab and
panel are highlighted.
However, if you’d rather
open another panel
when the page loads,
then, in the Property
inspector’s “Default
panel” menu, select the
tab’s name.
4. Add additional panels.
If two panels aren’t enough for your needs, use the Property inspector to add
more. Click the + button above the list of tab names (see Figure 12-3) to add a
new panel. To remove a panel, click the name of a tab in this list and click the
minus (–) button. (You can also reorder the panels by selecting a tab from the
list, and then clicking the up or down arrow button. The up arrow moves a
panel to the left, while the down arrow moves a panel to the right.)
Note: A Spry widget’s properties appear in the Property inspector only when you’ve selected the widget.
To select the widget, click the blue tab that appears above the elements inside the widget (see
Figure 12-3).
Adding and Editing Panel Content
Each tabbed panel has two parts: a labeled tab, and a panel containing content
associated with the tab. In Figure 12-1, “Introduction,” “Materials,” “Step-byStep,” and “Dealing with Irate Neighbors” are each tabs, while the area of the page
beginning with the “Shopping List” headline is the panel for the “Materials” tab.
To change the label on a tab, just select and replace the tab’s text in Design view.
The label is normal HTML text, so you can just triple-click to select it as you would
any block of text.
Text for the panel itself is contained inside a <div> tag, so you can select it by
clicking anywhere inside the panel, and then choosing Edit ➝ Select All (or Ctrl+A
[c-A]). You can place any combination of HTML inside a panel: headlines, paragraphs, bulleted lists, forms, images, and Flash movies (you can even insert another
Spry Tabbed Panel if you like that kind of Circus-Sideshow-hall-of-mirrors effect).
Chapter 12: Spry
461
Tabbed Panels
If you want to edit a panel’s contents, you do need to make the panel visible first.
Since the entire point of the Spry Tabbed Panels is to present a lot of information
within overlapping panels, you see only one panel at a time. Fortunately, Dreamweaver offers a simple way to close the current panel and open another panel for
editing: Move your mouse over the tab for a hidden panel, and an eye icon appears at
the tab’s right edge (see Figure 12-4). Click the eye to open the tab’s panel for editing.
Figure 12-4:
Dreamweaver displays an eye icon for all Spry widgets that include tabs and
panels. Clicking the eye makes a currently hidden panel visible and ready to edit.
Formatting Tabbed Panels
Spry Tabbed Panels are actually just basic HTML with a good dose of CSS. The tab
buttons are a simple bulleted list, while each panel is a separate div; all the panels
are wrapped together in another div. All the fancy formatting—tab buttons sitting
side by side, borders, and background colors—is controlled by an external style
sheet named SpryTabbedPanels.css, which is located in the SpryAssets folder in the
site root.
Tip: You can change the folder in which Dreamweaver inserts Spry support files (the external CSS and
JavaScript files that make Spry so spry), as described on page 180.
Dreamweaver supplies different CSS styles to format the panels, the currently
selected tab, and the tabs whose panels aren’t currently visible. The general process of modifying the look of any element in a panel group is simple: Identify the
element you want to modify (like the panel or a selected tab), locate the style that
controls that element, and then edit that style. If you want to change the text color
of the currently selected tab, you need to open the .TabbedPanelsTabSelected class
style in the SpryTabbedPanels.css file. The basic steps are as follows:
1. Open the CSS Styles panel (Window ➝ CSS Styles).
At the top of the Styles panel, make sure the All button is selected.
2. Expand the list of styles for the SpryTabbedPanels.css style sheet.
Just click the + (arrow on a Mac) symbol next to the file’s name to reveal all the
styles for tabbed panels.
3. In the Styles panel, double-click the style’s name.
The Style Definition window for that style opens.
462
Dreamweaver CS3: The Missing Manual
Tabbed Panels
4. Make the changes, and then, in the Style Definition window, click OK to finish
editing the style.
You can use the CSS Properties pane (page 289) to edit the styles as well. For a
recap on editing CSS styles, see page 126.
To help guide you in the process of modifying Spry panels, here’s a list of panel
elements and the styles that control them:
• Spry Tabbed Panel group: .TabbedPanels
Normally, the width of a collection of panels and tabs stretches to fit the available space. So if you place a panel group on an empty page, it stretches to fit the
entire width of the browser window. Placed inside a div with a set width, the
group of panels stretches to match the div’s width. If you wish to make the
group of panels thinner, change the width property of the .TabbedPanels style.
Normally it’s set to 100 percent, but you could change this to 50 percent or a set
pixel amount. The entire group of panels and tabs is floated to the left, so any
content that appears after the panel group wraps around the right side of the
panels (see page 312 for more on floats). (To adjust the height of a group of
panels, see the “Panels” bullet point, below.)
• All tabs: .TabbedPanelsTab
There are two types of tabs: the one for the currently displayed panel, and the
tabs that aren’t active. The .TabbedPanelsTab style controls both types of tabs. If
you want to change the font used on all tabs, edit the .TabbedPanelTab style,
and choose a new font family. In addition, if you wish to change the borders
that appear around the tabs, edit this style. To adjust the amount of space
between the edge of the tab and the text label inside, edit the style’s padding
property (page 322); to change the space between tabs, edit the style’s margin
property (page 322).
• Not selected tab: .TabbedPanelsTab and .TabbedPanelsTabHover
The .TabbedPanelsTab also dictates the basic look of an unselected tab, things
like its background color. In addition, a non-selected tab has a hover style—
.TabbedPanelsTabHover—so that when the mouse moves over the tab, it highlights to indicate that you can click it. The basic style sheet supplied with
Dreamweaver merely changes the tab’s background color when the mouse
moves over it, but you’re free to change other settings, such as the font color.
• Currently selected tab: .TabbedPanelsTabSelected
The .TabbedPanelsTabSelected style applies to the tab associated with the currently displayed panel. This style essentially overwrites style properties inherited from the .TabbedPanelsTab style that all tabs share. The background color
and text color differ from the other tab style, but, again, you’re free to modify
this style (by picking a new font, for instance).
Chapter 12: Spry
463
Tabbed Panels
With this style, be aware of a couple of things. First, the style has a set bottom
border. You shouldn’t eliminate it, unless you eliminate bottom borders on the
.TabbedPanelsTab as well. Otherwise, you’ll see a noticeable line separating the
tab from its panel. In addition, if you change the background color of the tab
and the panel (they’re usually set to the same color to make it appear that they
form one unified element), set the color of the bottom border for this style to
match. If you don’t, you’ll end up with a line separating the tab from the panel.
Tip: If you make the text size for one type of tab larger or smaller than the other tab type, you end up
with different heights for the different tabs. What’s worse, the shorter tab no longer touches the top of the
panel group. To fix this, add a line-height property (page 134) to the .TabbedPanelsTab style that’s large
enough to force the two tabs to occupy the same height—use a pixel value so that you can guarantee the
different tabs will be the same height. You’ll probably need to conduct some trial and error testing to get
this right.
• Panels: .TabbedPanelsContentGroup or .TabbedPanelsContent
Two styles affect the panels. The first, .TabbedPanelsContentGroup, is applied to
a <div> tag that wraps around the HTML of all of the panels. Second, the content of each panel is itself wrapped in a <div> tag with the .TabbedPanelsContent
class applied to it. You can edit either style to adjust basic properties like font
color, size, and so on. However, the borders and background color for the panels is
controlled by the .TabbedPanelsContentGroup; edit that style if you wish to change
the panels’ borders or backgrounds. Out of the box, the .TabbedPanelsContent style
sheet just has padding set on it—the padding property (page 322) adds space inside
each panel so its contents don’t butt right up against the borders of the panel.
Each panel is only as tall as the content inside it. If one panel has a lot of
information and another just a little, the panels grow wildly as you switch
among the different tabs and panels. If you’re a stickler for consistency, you
can set a height for all panels: Edit the .TabbedPanelsContent style, and add
a height property (see page 320). Be careful with height, however; before
building a Web page, it’s difficult to judge how much content a panel will
have (and thus how tall it needs to be). If the content inside a panel grows
taller than the panel’s height setting, you get some weird display problems,
as explained on page 321.
Tip: In Firefox, when you click a tab, it gains a fuzzy, dotted outline around it. This outline is applied by a
“focus” state (see page 174). To remove it, you need to create an advanced style named .TabbedPanelsTab:focus. Then you need to set the CSS outline property to none. Unfortunately, you can’t do this setting with Dreamweaver’s Rule Definition Window. To add this property, first create the .TabbedPanelsTab:
focus style; when the CSS Rule Definition window appears, just click OK. This action creates a style with no
properties. Next, find the style in the CSS Styles panel, and then select it; then, in the Properties Pane (see
page 289), click the Add Property link, type outline, hit Tab, and then type none. You’re done.
464
Dreamweaver CS3: The Missing Manual
Accordions
• Content inside the panel
Dreamweaver doesn’t start you off with any styles that control specific tags inside
a panel. Although headlines and paragraphs inherit (see page 294) any text properties added to the panel styles, you might want to define a different look for
headlines, paragraphs, lists, and other tags inside a panel. This situation is perfect
for a descendent selector. A descendent selector, as you read on page 285, lets you
specify the look of a tag when it’s inside another tag, and thus lets you pinpoint
the look of page elements based on where they appear on the page. In this case,
say you want paragraphs inside a panel to look different from other paragraphs
on the page: Create a descendent selector style named “.TabbedPanelsContent p,”
and then add any CSS properties you’d like. A style to format heading 2 tags
inside a panel: “.TabbedPanelsContent h2”. To control the look of any particular
tag inside a panel, create an advanced style, and then tack .TabbedPanelsContent,
followed by a space before the name of any tag you want to look different when it
appears inside a panel (see page 117 for more on creating styles).
FREQUENTLY ASKED QUESTION
.VTabbedPanels Explained
In the SpryTabbedPanels.css style sheet, what do all the
styles whose names begin with .VTabbedPanels do?
The short answer: They don’t do anything. The longer
answer: Unless you want to have vertical tabbed panels. A
vertical tabbed panel displays the tabs one on top of the
other along the left edge of the groups of panels. In other
words, the panels appear to the right instead of the tabs.
They don’t look particularly good, and if that weren’t reason
enough to avoid them, they’re difficult to manage. To see
one in action, visit: http://labs.adobe.com/technologies/
spry/samples/tabbedpanels/tabbed_panel_sample.htm.
If you feel like experimenting, you can turn a regular tabbed
group of panels into vertical tabs by applying a .VTabbedPanels class to the <div> tag that surrounds the entire Spry
Tabbed Panel group. (This div tag looks something like
<div.TabbedPanels#TabbedPanels1> in the Tag selector).
The exact ID—#TabbedPanels1 in this example—depends
on the ID you set on step 3 on page 460. You can most easily change this div’s ID with the Tag selector method
described in Figure 8-2 on page 285.
Accordions
A Spry Accordion is another space-saving widget for stuffing lots of content into a
multi-paneled display (Figure 12-5). Like Spry Tabbed Panels, a Spry Accordion
contains panels of information, each with a labeled tab. However, the tabs are
stacked on top of each other instead of side by side. When you click the tab of a
panel that’s not currently visible, that panel rises with a smooth animated effect. In
addition, you must set each panel’s height, so if the content inside a panel is taller
than the panel itself, a scroll bar appears on the panel’s left edge: It’s kind of like
having a browser window inside a browser window. Dreamweaver’s stock style
sheet sets the height of each panel to 200 pixels, but you can change that (see the
bullet point “Panels” on page 470).
Chapter 12: Spry
465
Accordions
Tab for open panel
Open panel
Panel scrollbar
Browser scrollbar
Tab for closed panel
Figure 12-5:
Accordion panels must have
a set height, so you always
know how much room they
take up on a page. Panels
that have lots of content
automatically get scroll bars
added to them. The content
in the “Introduction” panel
in this image doesn’t fit
within the height of the
panel, so to read all the
information, a visitor must
use the small scroll bar.
Depending on how you look
at it, the additional scroll
bar provides a great spacesaving device or an
annoying inconvenience
that forces visitors to scroll
unnecessarily.
Adding an Accordion
You can place a Spry accordion anywhere on a Web page—on an empty page,
inside a div tag, and so on.
1. In the document window, click where you wish to insert the accordion.
For example, inside a div tag.
2. Choose Insert ➝ Spry ➝ Spry Accordion, or, on the Insert bar, click one of the
Spry Accordion buttons (see Figure 12-2).
After inserting an accordion, you see a tab (labeled “Label 1”), an open panel
(with “Content 1” inside) and another tab (“Label 2”) at the bottom (see Figure 12-6); in addition, a blue Spry tab appears above the top tab, and the Property inspector displays the accordion’s properties (Figure 12-6).
Tip: You can insert any Spry widget by dragging its icon from the Insert bar to anywhere on a Web page.
3. In the Property inspector, name the accordion.
As with Spry Tabbed Panels, this step is optional (see step 3 on page 460).
4. Add additional tabs and panels to the accordion.
If two panels aren’t enough for your needs, use the Property inspector to add
more. Click the + button above the list of tab names (see Figure 12-6) to add a
new tab and panel. To remove a panel, in the panels list, click the name of the
tab, and then click the minus (–) button. (You can also reorder the panels by
selecting a tab from the list, and then, in the Property inspector, clicking the up
or down arrow button.)
466
Dreamweaver CS3: The Missing Manual
Accordions
Spry selection tab
Figure 12-6:
To edit a Spry Widget’s
properties, select it: in
Design view, on top of
the widget, click the blue
Spry tab. The blue tab is
an internal
Dreamweaver control,
and doesn’t appear in a
Web browser.
Adding and Editing Accordion Content
An accordion is divided into sections, composed of a labeled tab and a content
panel associated with the tab. Each tab is embedded in its own <div> tag; content
for a panel appears inside another <div> tag. Each tab-panel pair is enclosed by yet
another div (and the entire accordion [all tab-panel groups] is wrapped in one
final div).
To edit a tab’s label, in Design view, just select its text, and then type a new label.
(Since the label is enclosed in a <div> tag, you can also just click the tab, and then
press Ctrl+A (c-A) to select all the label’s text.) Since accordion widget tabs span
the entire width of the accordion, you can put a lot more words on an accordion
tab than on tabs on the tabbed panels.
As with Spry Tabbed Panels, you have to make a panel visible to edit it: Mouse
over the tab whose panel is hidden, and then, at the right edge of the tab, click the
eye icon to open the panel for editing. It’s the same procedure (and same eye icon)
as with tabbed panels (see Figure 12-4). To select all the text inside a panel, click
the panel, and then choose Edit ➝ Select All (or Ctrl+A [c-A]). You can place any
combination of HTML inside a panel: headlines, paragraphs, bulleted lists, forms,
images, and Flash movies.
You’ll run into one big problem if you add more content than you can fit inside an
accordion panel’s height: You can’t see all the content in Dreamweaver! Remember, accordion panels occupy a fixed height: When the accordion is viewed in a
Chapter 12: Spry
467
Accordions
browser, you can just scroll inside the panel to see any content that doesn’t fit (see
Figure 12-5). But you don’t get any scroll bars in Dreamweaver’s Design view, so
when you add more content than you can fit into the height of the panel, you can’t
edit it. You can work around this problem in two ways:
• Double-click the panel.
• Right-click (control-click on a Mac) the panel, and then, from the contextual
menu, choose Element View ➝ Full (see Figure 12-7).
Either way, the panel fully expands so you can now see and edit all the content
inside. In fact, all the panels in the accordion expand when you do either of these
things. This “full” view is visible in Dreamweaver only in order to make it easier to
edit content in the accordion panels: When someone views the page in a Web
browser, he sees only the top panel, and he must click another tab to view another
panel’s content.
Formatting a Spry Accordion
When you add a Spry Accordion to a Web page, Dreamweaver links an external style
sheet named SpryAccordion.css to the page. This CSS file contains all the styles that
control the look of the accordion’s tabs and panels. The process for modifying the
appearance of those tabs follows the same general sequence described on page 462
for Spry Tabbed Panels: Identify the element you wish to format, and then open and
edit that element’s style to match your page’s overall design.
To help guide you in the process of modifying Spry accordions, here’s a list of
accordion elements and the styles that control them:
• The Accordion (all tabs and panels): .Accordion
The .Accordion class style controls the overall settings for the accordion. This
class is applied to the <div> that surrounds the tabs and panels. If you add basic
font formatting to this style, such as font color, size, and font family, the other
tabs and panels inherit (see page 294) these same settings.
In addition, the left, right, and bottom borders that appear around the accordion are set in this style.
• All tabs: .AccordionPanelTab
Tabs inside a Spry Accordion are displayed in four possible ways (some designinspired Adobe engineer got a little wild): As with a Spry tabbed panel, you see
both a selected tab (the tab for the currently displayed panel) and a nonselected tab (the tab eagerly waiting to be clicked to reveal the hidden contents
of its panel).
In addition, both the selected and non-selected tab have “focus” states that kick
into action to format all tabs when you click any one tab. In other words, click a
single tab, and all tabs change appearance—“Yes sir, my tabs-in-arms and I are
ready for your command!” Overall, the focus tabs are visually distracting (especially since the background colors are two shades of electric blue). They aim to
468
Dreamweaver CS3: The Missing Manual
Accordions
Figure 12-7:
“Full” view shows all the
content in all panels for a
Spry accordion widget.
Double-click any panel
whose content is taller
than the panel’s height to
enter Full view, or right
click (control-click) on the
panel, and then, from the
Element View submenu,
choose Full. To return the
accordion back to its
collapsed state (the way it
appears in a Web
browser), right-click
(Control-click) anywhere
on the page, and then,
from the Element View
submenu, choose Reset All
Element Views.
aid someone who is using a keyboard instead of a mouse to navigate the accordion panels (you can actually tab to the accordion, and then use the up and
down arrow keys to hide and reveal panels).
Note: You see only the “focus” state for tabs in Firefox and Internet Explorer. Neither Safari nor Opera
display the effects of the focus styles discussed here.
To alter the basic appearance of all tabs, edit the .AccordionPanelTab style. If
you define a font family for this style, then all tabs use that font. In addition, the
padding inside each tab, and the borders that appear around each tab are
defined in this style.
Chapter 12: Spry
469
Accordions
• Not selected tab: .AccordionPanelTab, .AccordionPanelTabHover, and “.AccordionFocused .AccordionPanelTab”
The .AccordionPanelTab style also dictates the background color for a nonselected tab. In addition, a non-selected tab has a hover style—.AccordionPanelTabHover—so that when a visitor’s mouse moves over the tab, the tab highlights to indicate that you can click it. The basic style sheet supplied with
Dreamweaver merely changes the tab’s text color when the mouse moves over
it, but you’re free to change other settings as well.
When any tab is clicked, all non-selected tags also change appearance, thanks to
the “.AccordionFocused .AccordionPanelTab.” Tabs also use this style when a visitor presses his keyboard’s Tab key to access the accordion panels. The stock
style sheet changes the background color to a bright blue. You can delete the
style completely if you don’t want the tabs to change when clicked. (At the very
least, for the sake of all who care about beauty in this world, change the electric
blue color to something less obnoxious.)
Tip: The same Tip on page 464 regarding the fuzzy line that Firefox places around focused tabs applies
to the Spry accordion. In this case, the fuzzy line appears around the entire accordion. To remove this outline, create an advanced style called .Accordion:focus, and then follow the steps in the Tip on page 464 to
set that style’s outline property to none.
• Currently selected tab: “.AccordionPanelOpen .AccordionPanelTab”, “.AccordionPanelOpen .AccordionPanelTabHover”, and “.AccordionFocused .AccordionPanelTab”
The “.AccordionPanelOpen .AccordionPanelTab” style applies to the tab associated with the currently opened panel. This style essentially overwrites style
properties inherited from the .AccordionPanelTab style that all tabs share. In the
stock style sheet, only the background color differs from the other tab style, but,
again, you’re free to modify this style. In addition, the text on a selected tab also
changes color when a visitor’s mouse moves over it, thanks to the “.AccordionPanelOpen .AccordionPanelTabHover” style. This subtle “you can click me” cue
is useful for a non-selected tab (since clicking one of those tabs actually does
something). But since clicking an already opened tab doesn’t do anything, this
hover style is actually a needless distraction.
A selected tab also changes color when you click its tab, or press the keyboard’s
Tab key to access the accordion (again, you see that hideous electric blue). The
“.AccordionFocused .AccordionPanelTab” style is the culprit.
• Panels: .AccordionPanelContent
The .AccordionPanelContent class is applied to the <div> tag that surrounds the
HTML contained in an accordion panel. You can adjust font settings for this
style to affect only the text inside the panel.
470
Dreamweaver CS3: The Missing Manual
Collapsible Panels
In addition, this style defines each panel’s height. The CSS height property is set
to 200 pixels at first, but you can make this value larger to display a bigger
panel, or smaller for a shorter panel. Unfortunately, there’s no way to make the
panels automatically adjust to fit whatever content is inside them; you must
have a set height for the accordion panels to work.
• Content inside the panel
Dreamweaver supplies you with no specific styles for controlling specific tags
inside an accordion panel. You can use the same general process described for
Spry tabbed panels (under the bullet point “Content inside the panel” on page
475) to create descendent selectors that affect only tags inside accordion panels.
Just use .Accordion as the first part of the selector. For example, “.Accordion p” is
a descendent selector for formatting paragraphs inside an accordion panel.
Also note that content inside an accordion panel butts directly up against the
panel’s left and right edges. You can’t apply padding directly to the panel (the
.AccordionPanelContent style) because you would create empty space underneath the tabs of closed panels. Instead, you must add padding to the tags that
appear inside the panel. If you want all heading 2 tags to indent 5 pixels
from both the left and right sides of the panel, create a descendent selector
like “.Accordion h2”, and then set the left and right margin properties to 5 pixels.
POWER USERS’ CLINIC
Get the Most from Spry
Spry isn’t just a Dreamweaver tool; it’s a separate JavaScript-based toolset that has a lot of bells and whistles
beyond what’s available from Dreamweaver’s Insert bar
and Property inspector. You can do things like change the
speed of most effects (like how fast collapsible panels open
and close). You can even program other ways to make an
accordion panel open—by clicking another link on a page,
or simply mousing over a tab. You can even change the
underlying HTML for most Spry widgets. You could change
the <span> tags usually used for Spry Validation error messages to a <p> tag.
made Spry easy for non-programmers to learn and use.
The complex programming that makes Spry work its magic
is hidden; you need to learn only a few basic concepts, and
have a handy guidebook nearby, to take control of your
Spry widgets.
To learn more about Spry and how to modify it, check out
the online manual at http://livedocs.adobe.com/en_US/
Spry/1.4/index.html. If you’re more the bookish type who
likes to relax by the fire, you can also download and print a
PDF version at http://help.adobe.com/en_US/Spry/1.4/
dw_spry_help.pdf.
To modify the Spry widgets that Dreamweaver inserts into
a Web page, you need to dip into Code view and make
some changes. This sounds scarier than it actually is. Adobe
Collapsible Panels
A Spry Collapsible Panel is a single tab and panel (see Figure 12-8). The tab toggles the panels’ display; each click of the tab either opens or closes the panel. You
decide whether the panel is opened or closed when the Web page first loads. A
Chapter 12: Spry
471
Collapsible Panels
closed collapsible panel is great for keeping information out of a visitor’s face until
she wants it—like a form for signing up for an e-mail newsletter, or driving directions to your business. Add an opened panel to your page when you want to
present an important announcement that, once read, can be quickly hidden with a
click of the mouse.
Collapsed panel
Tab
Figure 12-8:
Collapsible panels work especially well as absolutely
positioned divs (page 335). Here, the collapsible
panel is positioned at the top of the page
overlapping an empty area on the page’s banner
(top). Because the panel is absolutely positioned, it
floats above other content on the page. When a
visitor clicks the tab, and the panel expands
(bottom), it doesn’t push other page content out of
the way; it merely sits above the page, like a sheet
of paper on a desktop. Clicking the tab above the
panel once again hides the panel.
Open panel
Tab
Panel
Adding a Collapsible Panel
You can place a Spry Collapsible Panel anywhere on a Web page—on an empty
page, inside a div tag, and so on.
1. In the document window, click where you wish to insert the collapsible panel.
For example, inside a div tag.
2. Choose Insert ➝ Spry ➝ Spry Collapsible Panel, or, on the Insert bar, click one
of the Spry Collapsible Panel buttons (see Figure 12-2).
After inserting a collapsible panel, in the document window, you see a tab
(labeled “Tab”), and an open panel with “Content”; in addition, a blue Spry tab
appears above the top tab, and the Property inspector displays the properties for
the collapsible panel (Figure 12-9).
472
Dreamweaver CS3: The Missing Manual
Collapsible Panels
3. In the Property inspector, name the collapsible panel.
As with Spry Tabbed Panels, this step is optional (see step 3 on page 460).
Unlike tabbed panels and accordions, a collapsible panel is just a single tab/panel
pair. You can’t add additional tabs or panels. You can, however, place multiple
collapsible panels on a page, stacked one on top of the next. This method has
two distinct advantages over an accordion. First, you don’t have to have a panel
open when the page loads. You can have three collapsible panels on a page with
all three closed. A visitor clicks the tab of one panel, and it opens, leaving the
other collapsible panels unaffected.
In addition, because each collapsible panel is independent, a visitor can have all
of the panels open at once.
4. From the Property inspector’s Display menu, choose either Open or Closed
(see Figure 12-9).
The Display menu controls only whether the panel is opened or closed in
Design view. In other words, this setting is just to help you while working within
Dreamweaver; it doesn’t affect how the panel appears when the page is viewed
in a Web browser.
Figure 12-9:
You can skip the Display menu in the Property
Inspector, and open and close the panel by clicking
the eye icon—to open a closed panel—or the shut-eye
icon (circled)—to hide an open panel. Like the
Display menu options, this action controls only
whether the panel is opened or closed in
Dreamweaver’s Design view as you work on the
page.
5. From the Property inspector’s “Default state” menu, choose either Open or
Closed (see Figure 12-9).
This menu controls how the panel appears—open or closed—when a Web
browser first loads the page. In other words, a visitor sees the panel this way
when he visits the page: Either the panel is open and visible, or closed and hidden. Of course, a visitor can change that view simply by clicking the tab when
he views the page.
6. Enable or disable animation.
Turn on the Property inspector’s “Enable animation” checkbox (see
Figure 12-9), if you want the panel to move in and out of view in a smooth
Chapter 12: Spry
473
Collapsible Panels
“window-blind” effect. Uncheck this box if you simply want the panel to
instantly appear and disappear from view each time the tab is clicked. The
choice is purely aesthetic, so choose according to your design preferences.
Adding Content to a Collapsible Panel
A collapsible panel consists of a simple combination of div tags: one div tag (marking the beginning and end of the widget) that wraps around two other div tags
(one tag for the tab, followed by another div for the panel).
To edit a tab’s label, in Design view, just select its text, and then type a new label.
Since the label is enclosed in a <div> tag, you can also just click inside the tab, and
then press Ctrl+A (c-A) to select all of the label’s text.
To edit the contents of the panel, the panel must be visible, and you control it
either with the Property inspector’s Display menu (step 4 on page 473) or by clicking the eye icon on the panel’s tab (Figure 12-9). To select all the text inside a
panel, click anywhere inside the panel, and then choose Edit ➝ Select All (or
Ctrl+A [c-A]). You can place any combination of HTML inside a panel: headlines, paragraphs, bulleted lists, forms, images, and Flash movies.
Formatting a Collapsible Panel
When you add a Spry Collapsible Panel to a Web page, Dreamweaver links the
page to an external style sheet file named SpryCollapsiblePanel.css, which contains
all the styles that control the look of the tab and the panel. The process for modifying the appearance of those elements follows the same general sequence described
on page 462 for Spry Tabbed Panels: namely, identify the element you wish to format, and then open and edit that element’s style to match your page’s overall
design.
To help guide you in the process of modifying Spry Collapsible Panel styles, here’s
a list of the panel elements and the styles that control them:
• The Collapsible Panel: .CollapsiblePanel
This style controls the border that appears around a collapsible panel. Alter the
color or style of the border, or completely remove it.
• All tabs: .CollapsiblePanelTab
Four styles control how a collapsible panel’s tab is displayed. Each style applies
to the tab under different circumstances: When the panel is open, when the
panel is closed, when the mouse moves over the tab, and when the tab is clicked
(this last action gives the tab “focus”).
To alter the basic appearance of all tabs, edit the .CollapsiblePanelTab style. For
example, define a font family for this style, and all tabs use that font. In addition, this style dictates the padding inside each tab, and the border that separates the tab and the panel beneath it.
474
Dreamweaver CS3: The Missing Manual
Collapsible Panels
• Tab when panel is closed: .CollapsiblePanelTab
The .CollapsiblePanelTab style also dictates the properties, such as the background color, for the tab when the panel is closed.
Tip: The same Tip on page 464 regarding the fuzzy line that Firefox places around focused tabs applies
to the Spry Collapsible Panel. To remove this outline, create an advanced style called .CollapsiblePanel:
focus, and then follow the steps in the Tip on page 464 to set that style’s outline property to none.
• Tab when moused over: “.CollapsiblePanelTabHover, .CollapsiblePanelOpen
.CollapsiblePanelTabHover”
This long group selector applies to the hover state for tabs—both when the
panel is open and when it’s closed. If you want to define a different hover
appearance for a tab when the panel is open, create two styles: .CollapsiblePanelTabHover for a tab when the panel is closed, and “.CollapsiblePanelOpen .CollapsiblePanelTabHover” for a tab that’s moused over when the panel is closed.
(If you go this route, you should either delete the supplied group selector
style—“.CollapsiblePanelTabHover, .CollapsiblePanelOpen .CollapsiblePanelTabHover”—or change its name as described on page 127 so that it only applies to
one of the tab states.)
• Tab when panel is opened: “.CollapsiblePanelOpen .CollapsiblePanelTab,”
“.CollapsiblePanelFocused .CollapsiblePanelTab”
The “.CollapsiblePanelOpen .CollapsiblePanelTab” descendent selector style
applies to the tab when the panel is opened. This style overwrites style properties inherited from the .CollapsiblePanelTab style. In the stock style sheet, only
the background color differs from the other tab style, but, again, you’re free to
modify this style.
A tab also changes color when you click it, or press the Tab key is pressed to
access it (but only in Internet Explorer and Firefox, as described in the Note on
page 469). The “.CollapsiblePanelFocused .CollapsiblePanelTab” style is the culprit here, so you want to edit this style if you don’t want this color change.
• Panel: .CollapsiblePanelContent
The .CollapsiblePanelContent class is applied to the <div> tag that surrounds the
HTML contained in an accordion panel. You can adjust font settings for this
style to affect only the text inside the panel, or add a background color to make
the panel stand out from other page content.
• Content inside the panel
As with the panels for Spry Tabbed Panels and Spry Accordions, Dreamweaver
doesn’t start you out with any styles that control specific tags inside a collapsible panel. You can use the same general process described for Spry Tabbed
Panels (under the bullet point “Content inside the panels” on page 465) to create descendent selectors that affect only tags inside a collapsible panel. Just
Chapter 12: Spry
475
Spry Data Sets
use .CollapsiblePanel, followed by a space as the first part of the selector: for
example, “.CollapsiblePanel p” is a descendent selector for formatting paragraphs inside an accordion panel.
Also note that content inside a collapsible panel butts directly up against the
panel’s left and right edges. You can’t apply padding directly to the panel (the
.CollapsiblePanelContent style) because this adds extra space inside a closed
panel, making it look not so closed. Instead, you must add padding to the tags
inside the panel. If you want all heading 2 tags to indent 5 pixels from both the
left and right sides of the panel, create a descendent selector (like “.CollapsiblePanelContent h2”), and then set the left and right margin properties to 5 pixels.
Spry Data Sets
Dreamweaver also includes a way to display data more dynamically than the plainvanilla HTML table. Spry Data Sets let you create interactive data tables that visitors can sort just by clicking the top of a table column (Figure 12-10). Say a page
has a table that lists all the employees in a company. Each employee’s name, the
region of the country in which she works, the phone number, and other important data is included. Say you sometimes want to see the list of employees alphabetized by last name, and other times you want to sort the list of employees by the
region in which they work (Northeast, Southeast, and so on). Normally, this
requires creating two pages: one with a table of employees listed by last name, and
another with employees listed by their region.
With a Spry data set you need only one page and one table, no matter how many
columns you wish to sort by. That’s because a Spry table is interactive, just like a
regular old Excel spreadsheet. Want to see employees organized by last name?
Click the “Name” column. To group employees by region, just click the “Region”
column. A Spry table is interactive, instantaneous, and doesn’t require loading
another Web page.
In addition, Spry data sets let you display detailed data on a single item contained
within the table. Suppose you have a simple table that just lists employees’ names
and the regions in which they work. With Spry you can add an “Up Close and Personal” section to the page, so that when an employee name is clicked in a table
row, detailed information such as the employee’s phone number, photo, and email
address appear in another part of the page. Once again, this little trick doesn’t
require that the visitor download a different Web page. All this information
appears on the same Web page with a simple mouse click.
If you often add data tables to your site, or simply have large amounts of related
data that you want to display in an interactive format, the Spry data set may be the
tool for you. You need to do a little extra work, however. The data for a Spry data
set isn’t just plunked into an HTML table, as described in Chapter 7; instead, the
data must be formatted in an XML file. That means you’re actually dealing with
476
Dreamweaver CS3: The Missing Manual
Spry Data Sets
Figure 12-10:
A Spry data table lets
visitors interact with your
data. Clicking a column
header sorts the column
in ascending order; click
the column again, and
data is sorted in
descending order. Here,
if you wish to view the
plants in alphabetical
order by their Latin
names, click the Latin
Name column header.
The table’s data is sorted
instantly, without loading
a new Web page.
two files: a Web page that you’ve added the Spry data magic too, and an XML file
that contains data. When the Web page loads, the JavaScript programming provided by the Spry data set downloads the XML file, extracts the required data, and
then displays it on the page. When a visitor interacts with that data (by clicking a
column header to sort the data, for instance), the Spry programming dynamically
reorders the content on the page.
You’ll learn more about XML in a moment, but keep in mind that Spry data sets
are primarily intended for when you want to display repeating rows of information. Although an XML file can really hold any type of information, the kind of
XML file you should use with Spry should contain lists of information, like product catalogs or employee records.
What Is XML?
XML, or Extensible Markup Language, has many similarities to HTML. Like
HTML, it’s a tag-based language used to identify different pieces of information,
and structure data into a meaningful document. For example, HTML has the
Chapter 12: Spry
477
Spry Data Sets
<h1> tag to identify the most important headline, or the <ul> tag to denote a
bulleted list. But HTML has only a handful of tags, and, in many cases, they don’t
always meaningfully identify the information you’re presenting. You can format a
news title like “Bigfoot to Wed Super Model” with an <h1> tag, but you could also
use the <h1> tag to format the name of a product you’re selling, the title of a book,
or an event on a calendar. In these cases, you’re using the same tag to identify different types of information. Technically speaking, there’s nothing wrong with using
h1 tags in that way. But you can introduce some awfully messy organizational
problems into your document, as you’ll learn in a moment. Instead, it would be
much more informative to use a tag that accurately identifies the type of information, like <product>, <title>, or <event>.
That’s where the “X” in XML comes in. XML is not really a markup language
like HTML, as much as it’s a set of guidelines for creating your own markup
languages. The X, or extensible, part of XML lets you define your own types of
tags—or “extend” the language to fit your needs. In this way, you can create
very specific tags to describe different types of information like invoices,
books, personnel, and so on.
Tip: To learn more about XML, check out www.w3schools.com/xml, grab a copy of Learning XML
(O’Reilly) by Erik T. Ray, or visit the XMLTopic Center on the Adobe Web site: www.adobe.com/devnet/
topics/xml.html.
Suppose CosmoFarmer wants to use Dreamweaver’s new-fangled XML data set
tools, and so decides to come up with an XML format for storing their list of favorite indoor plants. That list consists of a plant’s regular and Latin names, a short
description of the plant, the path to an image file on the site, and a number representing the recommended square footage you need to grow the plant. In HTML,
this information might look like this:
<h2>Kudzu <em>(Pueraria lobata)</em></h2>
<p><img src="images/kudzu.jpg">Kudzu is a climbing, woody or semi-woody,
perennial vine capable of reaching heights of 66-98 ft, but also scrambles
extensively over lower vegetation. <strong>1200</strong></p>
This code is all well and good for display in a Web browser, but it doesn’t give any
sense of what kind of information is being presented. This quality is particularly
important when you keep in mind that XML was invented as a way of exchanging
data between computers. So if another computer encountered this HTML, it
wouldn’t understand the purpose of the text inside the <h2> tag. In fact, even a
human viewing this code might not easily discern what the “1200” means; it’s a
number, but without some descriptive label, you can’t tell that this number refers
to square footage. XML provides a much clearer way of defining the structure and
meaning of content.
478
Dreamweaver CS3: The Missing Manual
Spry Data Sets
CosmoFarmer’s IT staff could decide to come up with their own XML format to store
this data. In this case, the same information might be written in XML like this:
<plants>
<plant>
<name latin="Pueraria lobata">Kudzu</name>
<description>Kudzu is a climbing, woody or semi-woody, perennial vine capable
of reaching heights of 66-98 ft, but also scrambles extensively over lower
vegetation.</description>
<area>1200</area>
<image>images/kudzu.jpg</image>
</plant>
</plants>
Kind of like HTML, right? But with a completely different set of tags. This new
markup makes the meaning of each chunk of information clearer. You can easily
tell that this data describes a plant (the <plant> tag) with a regular name, a Latin
name, and so on. In a nutshell, that’s what XML offers: tags that meaningfully
identify the information inside them.
Rules of the Road
Because XML is intended to be an easy way to exchange data between different
computers, operating systems, programs, institutions, and people, it has some
fairly strict requirements to ensure that everyone’s playing by the same rules. If
you’ve done your fair share of writing raw HTML code, much of this will be familiar to you (see page 6). In fact, if you’ve written XHTML code (see page 9), you’ve
already been writing XML. XHTML is an XML version of HTML that just has a
few more rules than plain old HTML.
• Every XML document must have a single “root” element. A root element is a
tag that surrounds all other tags in a document, and appears only once in a document. In an XHTML (and an HTML) document, this tag is the <html> tag. In
the CosmoFarmer XML format introduced above, this tag is <plants>. If you’re
creating your own XML-formatted file, you can make this root element whatever you want: <events>, <employees>, and so on. It makes sense for this tag to
describe whatever content you’re storing inside the file.
• All tags must be nested properly, with no overlapping tags. This rule works just
as it does in HTML. You can’t have code like this: <b><i>Bold and italics</b> </
i>. Since the opening <i> tag appears after the opening <b> tag, its closing
tag—</i>—must appear before (or inside of) the closing <b> tag, like this:
<b><i>Bold and italics</i></b>.
• All tags must have both an opening and closing tag, or be self-closing. In
HTML, a paragraph of text is indicated by both an opening <p> and a closing
</p>. Some HTML tags, however, don’t hold content, like the <img> tag or the
line break (<br>) tag. The XML version of these tags include a forward slash at
the end of the tag, like this: <br />. This type of tag is called an empty element.
Chapter 12: Spry
479
Spry Data Sets
• The property values of all tags must be quoted. In regular old HTML, you
could get away with this line as a way to add a link to a page: <a href=index.
html>Home</a>. In XML, this doesn’t fly. You need to quote the href property’s value like this: <a href="index.html">Home</a>. You’re probably used
to doing this already, and if you’ve been using Dreamweaver, the program
always does it for you. But when writing your own XML files, make sure to
include quotes around a tag’s property values.
If your XML file meets these conditions, it’s known as (to use the official XML designation) “well-formed.” In other words, your XML code is written properly. If
you write more complex XML documents, you’ll need to follow additional rules,
but these requirements are basic.
In many cases, you’ll also include what’s called a prolog—an introduction of sorts
that appears at the very top of the document and announces what kind of document it is. In its most basic form, the prolog looks like this:
<?xml version="1.0"?>
The prolog can also include the type of encoding (useful for indicating different
characters for different languages) used in the document.
Here, then, is a basic, complete, and well-formed XML document:
<?xml version="1.0" encoding="utf-8"?>
<plants>
<plant>
<name latin="Pueraria lobata">Kudzu</name>
<description>Kudzu is a climbing, woody or semi-woody, perennial vine
capable of reaching heights of 66-98 ft, but also scrambles extensively over
lower vegetation.
<area>1200</area>
<image>images/kudzu.jpg</image>
</plant>
<plant>
<name latin="E. globulus">Blue Gum Eucalyptus</name>
<description>One type of the large family of Eucalypts native to
Australia. The grow best in multi-story loft apartments or on balconies with
sturdy steel reinforcing.
<area>20</area>
<image>images/eucalyptus.jpg</image>
</plant>
</plants>
480
Dreamweaver CS3: The Missing Manual
Spry Data Sets
Tip: Dreamweaver can verify whether or not an XML file is well formed. Open the file in Dreamweaver,
and then choose File ➝ Validate ➝ As XML. The Results panel opens. If nothing appears inside the Validation panel, the file is OK. If there’s an error, then a message explaining the problem appears. Fix the error,
and then try to validate the document again. Dreamweaver can even validate XML using a DTD file (see
the box below).
UP TO SPEED
Taming the Tower of Babel: DTDs and XML Schemas
You may be wondering: If anyone can make up her own tags
to create her own types of XML files, how can XML help computers, people, and organizations exchange data? After all, if
you come up with one way of formatting invoices using XML,
and your buddy in accounting uses his own set of tags to create invoices, you’ll end up with two different and incompatible types of files for tracking the same information. It’s like
the Tower of Babel—everyone speaking their own language
and unable to talk to each other. Fortunately, XML provides
two solutions to this problem: DTDs (or Document Type Definitions) and XML Schemas. Both are methods of creating a
common vocabulary, so everyone can use the same language to talk about the same things.
In fact, you’ve already been using a DTD when building
Web pages in Dreamweaver. When you create a new Web
page, Dreamweaver adds a line of code at the beginning of
the page, like this:
<!DOCTYPE html PUBLIC "-//W3C//DTD XHTML
1.0 Transitional//EN" "http://www.w3.org/
TR/xhtml1/DTD/xhtml1-transitional.dtd">
This line varies depending on the type of HTML or XHTML
you use. But the concept is the same. The entire line defines
the document type for the page—in this example, XHTML 1.
0 Transitional—and points to a URL where the DTD can be
found—here, it’s http://www.w3.org/TR/xhtml1/DTD/
xhtml1-transitional.dtd.
Essentially, the DTD for each type of HTML or XHTML
defines what tags are allowed and how they should be
written. If you don’t follow the rules, the page is considered
invalid. In fact, Dreamweaver’s validator, discussed on page
593, is doing just that—making sure your code follows the
rules of a particular DTD.
XML Schemas are just another method of enforcing a language for a particular XML format, with a few bells and
whistles that DTDs lack. DTDs have been around a long
time and are more common; schemas are a newer concept,
but will probably eventually replace DTDs. Both XML Schemas and DTDs are very confusing beasts—difficult to read,
and difficult to create. Many DTDs and Schemas are available for describing a wide range of different types of information. A consortium of businesses that agree to a single
way of describing information often create these DTDs and
Schemas, so that they can easily share data with each other.
You probably won’t be creating your own anytime soon,
but just keep in mind that they exist, and are a common
way to make sure everyone’s speaking the same tongue.
Dreamweaver includes a nice feature related to both DTDs
and Schemas: If you include a DTD or Schema in an XML
file, and then edit that XML file in Code view, Dreamweaver
displays Code Hints for the various XML tags as you type.
Code Hints are shortcuts for typing an entire tag or tag
property; as you begin to type a tag, Dreamweaver pops up
a small window displaying any tags that match what you’ve
typed so far. At that point, you can just select the correct tag,
instead of having to type it all out. This feature is also available when working with HTML in Code view, and is
described on page 377.
Tip: Dreamweaver includes built-in reference material covering XML. See page 394 for more on Dreamweaver’s Reference panel.
Chapter 12: Spry
481
Spry Data Sets
Inserting a Spry Data Set
To begin using a Spry data set, you must first tell Dreamweaver which XML file you
wish to use, and what data in the XML file you want to access. Start by clicking the Spry
XML Data Set button on the Insert bar’s Data tab (Figure 12-11) or on the Insert bar’s
Spry tab (Figure 12-2, bottom). You can also choose Insert ➝ Spry ➝ Spry XML Data
Set. Either way, the Spry XML Data Set window opens (Figure 12-12).
Spry region
Spry repeat list
Figure 12-11:
You can find buttons for inserting Spry data set objects under the Insert
bar’s Data tab.
Spry XML Spry Spry
data set repeat table
The number of choices makes this window a little intimidating, but filling out the
options correctly is a simple process:
1. Type a name in the “Data Set name” field.
Dreamweaver supplies a generic name—like ds1—but change the name to
something that’s more descriptive. If you add multiple data sets to a page, distinguishing among ds1, ds2, ds3 isn’t as easy as among dsEvents, dsEmployees,
and dsProducts.
However, do leave ‘ds’ as a prefix to the name—dsEvents, for example. If you
ever go into Code view, this small step makes it easy for you to identify a reference to a Spry data set.
2. Click the Browse button, and then locate and select an XML file.
You can also type an absolute URL that points to an XML file—like http://www.
cosmofarmer.com/plants.xml. Keep in mind a couple of caveats for working with
absolute URLs, however. First, in order for the Spry data set to work, the Web
site the file is located on must be the same site the Web page is on. In other
words, if you add a Spry data set that specifies an XML file on www.
cosmofarmer.com, to a Web page that will ultimately reside on www.
nationalexasperator.com, the Spry data set doesn’t work. In fact, a browser trying to view that Spry-enabled page will display a nasty error message.
That error is part of a Web browser’s built-in security system. When a Web
page on one site tries to use JavaScript to access and display data from another
site, the Web browser smells something fishy—“Is this Web page trying to pretend it’s on another site?”—and spits out an error.
There’s yet another problem you’ll face when using an absolute URL to specify
an XML file. Even if the Web page and the XML file will eventually sit on the
same Web site, that isn’t the case as you’re building your page: While you build
and test the Spry Web page, that Web page is on your computer, but the XML
file is stored wherever you’re absolute URL is pointing.
482
Dreamweaver CS3: The Missing Manual
Spry Data Sets
Figure 12-12:
Unless you’re an XML pro, don’t fill
out the XPath field. Dreamweaver
does that for you automatically when
you identify a repeating row. XPath is
a language used to identify particular
elements or tags in an XML file. You
use XPath to create what’s called an
“XPath expression,” which is kind of
like a trail of cookie crumbs that leads
from one part of the document
(frequently the beginning tag, or
“root element”) to the particular
“node”—tag or tag property—you wish
to select. In its most basic form, XPath
works very much like the document
window’s Tag selector: it pinpoints a
tag nested in any number of other
tags. For instance, in this example,
the XPath expression plants/plant
means: Start at the plants element
(that’s the root element of this
particular XML file), and then find a
nested tag named plant. Chapter 26
has more about XPaths.
Note: You can still work with a remote XML file in Dreamweaver’s Design view. You can add XML data,
and format it as described on page 488. You just can’t preview the page with real data on it until you put it
up on the Web server where the XML file is.
The same rules apply here that you just read about with the first absolute URL
problem: The Web browser thinks the local Web page is trying to get the XML
from another place (a Web site on the Internet), and doesn’t allow it. You end
up with another error, and you can’t preview your page.
Because of these problems, it’s best to work with a local XML file.
Note: Internet Explorer 7 doesn’t display Spry data set pages if you preview them locally—even if both the XML
file and the Web page are together on your computer. IE 7 spits out a nasty error message. The only way around
this is to put the page and XML file up on your Web server, or create a local testing server that includes a Web
server running right on your desktop computer (you’ll learn how to do this in Part 6 of this book). You have one
other solution: Test your pages locally using Firefox, and then move the completed Web page and XML file to
your Web server. Finally, preview the finished product using Internet Explorer 7.
3. Click the “Get Schema” button.
Dreamweaver loads the XML schema—the structure of the XML file. This
structure is pictured in the large “Row element” box. In Figure 12-12, a nested
list of names indicates the different tags in the XML file. Each tag is represented
Chapter 12: Spry
483
Spry Data Sets
by the < > icon. The topmost item (plants) is the root element (see page 479).
Inside the root element are other nested tags.
The XML file usually has at least one repeated element, which has a + symbol to
the right of its < > icon. In Figure 12-12, the repeated element is named plant.
(You can tell by the straightforward names that this XML file contains a list of
plants.) Within a repeated element, you can have other elements as well, such as
the name, description, area, and image tags pictured in this example. The @ symbol indicates an attribute of an element (like a tag’s property). In this example,
latin is an attribute of the <name> tag. (One example of this tag in the XML file
might look like this: <name latin="E. globulus">Blue Gum Eucalyptus</name>.)
4. From the list of XML tags, select a Row element.
The Spry data set tools are intended to display multiple instances of similar data,
such as a list of employee phone numbers, or a list of events. So your job is to tell
Dreamweaver which XML tag indicates a repeating item. Basically, you just select
the element that has a + symbol. In Figure 12-12, that’s the plant element.
After selecting a row element, Dreamweaver fills out the XPath field in the Spry
XML Data Set window (see Figure 12-12). You can click the Preview button at
this point to see a sample of the data pulled from the XML file. Each tag nested
inside the row element tag is treated like a column in a table. In Figure 12-12,
the plant element is like a table row; the name, description, area, and image elements are each like the data you’d find in that row’s columns.
5. Select a “Data type” for each column of data.
In the “Data Set columns” list, Dreamweaver lists the name of each XML element inside the row element. Dreamweaver assumes that the data contained
inside each element is a string—meaning just a collection of letters and numbers like “Hello,” or “100 Years of Solitude.” However, an XML tag might contain other types of data such as a date, a number, or a path to a graphics file. An
XML file containing accounting information might have a tag named “balance”
that contains a financial balance: <balance>1000</balance>.
In this case, you would change the data type in the XML Spry Data set window: In the “Data Set columns” list, click the element (like “balance”), and
then, from the “Data type” menu, select a new type. For any element that
contains just numbers, select “number.” For an element that contains a
date, select date. And for an element that contains a path to an image file,
choose “image link.”
As you’ll see on page 493, a Spry table allows a visitor to sort the data inside a table
simply by clicking a column header. Assigning a data type of string, number, or
date makes sure the Spry programming correctly sorts the data for that column.
The “image link” option has a different purpose: If you use an XML tag to identify a path to an image file on your site, then Dreamweaver can insert the proper
image tag and link to the specified file.
484
Dreamweaver CS3: The Missing Manual
Spry Data Sets
6. Choose sorting options.
If you want the data in the XML file to be sorted (for example, alphabetically)
when it first appears on the Web page, then, from the Sort menu, select the
name of the XML column that you wish to sort by. Then, select the direction
you wish to sort that information from the Direction menu. Ascending sorts A–Z or
1–100, while the Descending option sorts in the opposite direction: Z–A or 100–1.
If you choose none, Dreamweaver doesn’t sort the data, and simply lists it in the
order in which it appears in the XML file.
7. Select the other options that apply.
Dreamweaver gives you a few other options when you’re inserting a Spry XML
Data Set, all of which affect how the XML data is requested and displayed on
the Web page:
• The “Distinct on load” checkbox eliminates any duplicate records inside an
XML file. If, for whatever reason, the same content is duplicated in an XML
file, turning this option on prevents the duplicate from appearing on the Web
page. If your XML file doesn’t have duplicate records, this won’t be an issue;
but since turning this checkbox on doesn’t do any harm, you might as well.
• The other two settings—“Turn XML Data Caching Off” and “Auto refresh
data”—ensure that your site’s visitors are looking at the data’s most recent
version. Normally, when a Web page with a Spry data set is downloaded, the
XML file is downloaded and stored in the browser’s cache (see page 607). If a
visitor revisits the Web page, the version of the XML file stored on their
computer is used. However, if you frequently update the XML file with new
data, you might turn on the “Turn XML Data caching off” box: This way,
each time the visitor visits the Spry data set page, he will also download the
XML file’s latest version.
If your XML file is updated really frequently—like every few seconds or so—
you can also force the Web page to automatically reload the XML file, and
update the Web page dynamically with new data (great for displaying up-tothe-minute stock prices). To use this option, a database or program on a
Web server needs to automatically generate the XML file (unless you want to
manually update an XML file every 5 seconds). If you do have time-sensitive
data, and a quickly updated XML file, then turn on the “Auto refresh data”
checkbox, and type the number of milliseconds the browser should wait
before asking for the XML file again. Type 5000 to wait for 5 seconds. Set the
refresh time to be no sooner than the time in which the XML file will realistically be updated. If the data in the database used in the XML file isn’t
updated any more frequently than once a minute, type 60000 (60 seconds). If
you type 1 in the milliseconds box, the Web browser will try to download the
XML file 1000 times a second, potentially affecting the browser’s performance (and your Web server’s performance).
Chapter 12: Spry
485
Spry Data Sets
Finally, think twice before enabling either of these options. If you update the
XML file only every month or so, there’s no reason to waste your visitor’s
time (and your Web server bandwidth) downloading the same XML file over
and over again.
Note: Dreamweaver doesn’t have a built-in method to dynamically produce XML files—like pulling information from a database, and then turning it into an XML file to use with a Spry data set. However, that feature is
built into Adobe’s Dreamweaver Developer Toolkit—and, at the time of this writing, Adobe was offering a
free extension from that Toolkit that lets you turn database records into XML. Register your copy of
Dreamweaver, and Adobe will send you an email with details.
8. Click OK to finish the Data set.
Dreamweaver adds the code needed for the Web page to download and process
the XML file. In addition, Dreamweaver attaches two JavaScript files—xpath.js
and SpryData.js—to the Web page. (These files are stored in the SpryAssets
folder in your site’s root folder, as described on page 180.)
Creating a Spry Region
Adding a Spry data set to a Web page merely tells Dreamweaver which XML file to
use and how to process it; none of the information from the XML file actually
appears on the Web page until you add it. Usually you’ll display multiple items
from an XML file using one of the Spry tools dedicated to this task: a Spry Table, a
Spry Repeat List, or a Spry Repeat region. Each of these tools provides a different
way to display multiple records from an XML file. If you want to display a list of
employee names, you can present them in an orderly HTML table, as a simple bulleted list, or in a bunch of repeating <div> tags.
But before you use one of these tools, you must first insert a Spry Region. A Spry
Region is simply a tag that marks the beginning and end of a portion of a Web
page dedicated to displaying Spry data. A Spry Region tells the Spry programming,
“Hey, all the action’s over here; you can ignore all that other boring HTML on the
page.” You then add dynamic XML data inside the region.
To insert a Spry region:
1. Click the Web page where you wish to insert the Spry region.
This area might be inside a <div> used for laying out the Web page, such as
inside a sidebar or on the main content region of a page. In addition, you can
select any HTML that’s already on the page, and either replace it with a Spry
region, or wrap the Spry Region around it as described in step 6.
2. On the Insert Bar’s Data tab or Spry tab, click the Spry Region button.
You can also choose Insert ➝ Spry ➝ Spry Region. Either way, the Insert Spry
Region window opens (Figure 12-13).
486
Dreamweaver CS3: The Missing Manual
Spry Data Sets
Figure 12-13:
A detail region lets you display more detailed
information about individual records from the XML file. It
works in conjunction with a Spry table as described on
page 493.
3. Choose a type of container—div or span.
A Spry region uses either a <div> tag or a <span> tag to hold Spry data content. Div is the most common selection, since a <div> tag can hold block level
elements like tables, bulleted lists, and other divs. In other words, a <div> tag
provides plenty of room to insert content.
4. Choose the type of region.
To display multiple records from an XML file (like a list of employee names, or
a catalog of all of your company’s products), choose the Region option. People
often choose this.
The “Detail region” button is useful when you want to display extra information about one particular record in the XML file (like a photo and extra statistics about a particular plant). This information appears when the person
viewing the Web page clicks a row in a Spry table; the detail region is then
updated with whatever extra data you want to grab from the XML file. This
advanced tool is discussed on page 495.
5. From the Spry Data Set menu, choose a data set.
If you’ve added multiple data sets to a page, use this menu to specify the data set
whose data you wish to insert into the region. Dreamweaver lets you insert data
from more than one data set into the same Spry Region: from the Bindings panel,
simply drag an XML element from the different data sets into the Spry region.
6. If you selected content on the page before inserting the Spry Region, choose
either “Wrap selection” or “Replace selection.”
Choose “Wrap selection” if you want to include elements that are already on the
page within a Spry region. Say you want to add a bunch of information from an
XML file to various locations in the main content area of a page (like inside a div),
but you already had some content in that div. Just click the div, click Ctrl+A (c-A)
to select everything inside the div, insert a Spry Region, and then choose the
“Wrap selection” button. Dreamweaver then “spry-ifies” that div.
Be careful of the “Replace selection” option: It deletes anything that you’ve
selected, and replaces it with an empty Spry Region.
Chapter 12: Spry
487
Spry Data Sets
7. Click OK to insert the Spry Region.
Dreamweaver inserts the <div> (or <span> depending upon your choice in
step 2) in the page, and then adds the proper code to mark it as a Spry Region.
You can insert anything inside this region, even non-Spry stuff such as tables,
other divs, images, and so on. In addition, you’ve now enabled that area so that
it’s ready to accept Spry data using the Bindings panel—or one of the Spry data
tools discussed in the following pages.
Warning: Spry data sets add invalid HTML to a Web page. To make all the Spry XML magic happen,
Dreamweaver inserts invalid HTML attributes like spry:repeat and spry:region to <div> and <span> tags.
The Web page no longer passes muster as proper HTML. The page still works in Web browsers, but it’s
harder for you to locate any invalid HTML that might actually affect how your page displays in a Web
browser (see page 593 for more on validation). Note that the other Spry widgets discussed in this chapter, as well as Spry Effects, Spry Menu Bars, and Spry Validation widgets, do not insert invalid HTML. The
Spry data set is the only culprit.
The Bindings Panel
The bindings panel lists the Spry data sets attached to the current Web page (see
Figure 12-14). All the XML elements for a particular data set are also listed there.
You can drag an element from the Bindings panel into any Spry Region on a page.
In Design view, the element is just a placeholder for the XML element—its name
surrounded by braces like this: {employee}. Dreamweaver adds a blue background
to the placeholder to make it easy to identify as a special Spry element. When the
page is viewed in a Web browser, that placeholder is replaced with actual data from
the XML file—like Frank Jones.
Figure 12-14:
The Bindings panel adds three elements to the bottom of each data set: ds_RowID,
ds_CurrentRowID, and ds_RowCount. ds_RowCount is the number of items in the
data set. Each item in the data set has its own ds_RowID number, and the
ds_CurrentRowID indicates the currently active row, which comes into play when
adding a detail region as described on page 495.
488
Dreamweaver CS3: The Missing Manual
Spry Data Sets
You can select an XML data set element on a Web page, style it with CSS, include it
inside other HTML (such as a paragraph or heading 1), and even move it around
the page (as long as it remains inside a Spry region). To delete the element, just
select it, and then press Delete.
However, if you insert a Spry region, and then immediately drag an element from
the Bindings panel, you see only the first item from the XML Data Set—for example,
the first employee listed, not a list of all employees. To see all the records in a data
set, you must use one of Spry’s repeating region tools, discussed next.
Spry Repeating Region
Dreamweaver provides three methods for inserting multiple rows of information
from a data set. The most flexible is the Spry Repeating Region. A Spry Repeating
Region is a <div> or <span> tag in which you insert any combination of HTML
and Spry Data (using the Bindings panel as described above). The tag and its contents are repeated once per row in the XML file (see Figure 12-15).
One record
Figure 12-15:
A Spry repeating region
provides a flexible method for
displaying data from an XML
file. This page includes four
records from an XML file. The
repeating region is a <div> tag
(outlined), containing three
pieces of information from one
XML record.
XML data
Chapter 12: Spry
489
Spry Data Sets
To create a repeating region:
1. Click anywhere inside a Spry Region.
Anything related to Spry data sets must be inserted inside of a Spry Region. You
can click inside an empty area, or even select HTML inside the Spry Region that
you want to be included as part of the repeated region.
2. On the Insert bar’s Data tab, click the Spry Repeat button (Figure 12-11).
Alternatively, choose Insert ➝ Spry ➝ Spry Repeat. The Insert Spry Repeat window opens (see Figure 12-16).
Figure 12-16:
A Spry Repeat region is the most flexible method of
inserting multiple records from an XML file. However,
unlike a Spry Repeat List or a Spry Table, this tool doesn’t
insert XML data automatically; you need to decide which
XML elements to include, and drag them from the
Bindings panel into the Repeat region.
3. Choose the type of container for the repeating region.
In most cases, select DIV, since this inserts a <div> tag in which you can put
lots of other HTML elements, such as paragraphs and other divs. The SPAN
option can come in handy when you wish to display a single row of XML data
elements side by side.
4. Select the “Repeat children” button.
In practice, you’ll find no difference between the Repeat and “Repeat children”
options. However, the “Repeat children” option is very useful for adding more
complex logic to Spry data. (You may not be ready to jump into Code view and
start hand-coding Spry data just yet, but this will at least leave you prepared for
the day you do [see the box on page 471 for more on enhancing Dreamweaver’s Spry offerings].)
5. From the Spry Data Set menu, choose a data set.
If you’re inserting data from multiple XML files, your page has several data sets.
Choose the data set whose data you wish to display. Remember, this is a repeating region, so each record in the XML file will appear in its own <div> as part
of the repeating region.
6. If you selected content on the page before inserting the Spry Region, choose
either “Wrap selection” or “Replace selection.”
490
Dreamweaver CS3: The Missing Manual
Spry Data Sets
Choose “Wrap selection” if you want to include elements that are already
on the page within a Spry region. Be careful of the “Replace selection”
option: It deletes anything that you’ve selected, and replaces it with an
empty Spry Region.
7. Click OK to insert the Spry Region.
Dreamweaver inserts the <div> (or <span>, depending upon your choice in step
3) in the page, and then adds the proper code to mark it as a Spry Repeat region.
At this point, you can add any HTML to the repeat region. In addition, to include
XML data (which is, after all, the whole point) drag elements from the Bindings
panel (page 488) from the data set into this region. Everything inside the region is
repeated once for each row in the XML file.
Note: If you completely remove a Spry data set from a Web page, Dreamweaver still leaves a couple of
code remnants behind, which you should remove. Go into Code view (page 370), and then locate and
delete these two lines:
<script src="SpryAssets/xpath.js" type="text/javascript"></script>
<script src="SpryAssets/SpryData.js" type="text/javascript"></script>
If you don’t remove these lines, the Web browser tries to download these files and run the JavaScript programming in them; since these two files weigh in at a whopping 173K total, you should spare visitors the
unnecessary download.
Spry Repeat Lists
If you simply want to list a bunch of repeating elements from an XML file, the Spry
Repeat list provides the simplest method. It inserts either a bulleted list, a numbered list, a form menu, or a definition list full of XML data (see Figure 12-17).
Here’s how:
1. Click inside a Spry Region where you wish to insert a list of repeating elements.
2. On the Insert bar’s Data tab, click the Spry Repeat List button.
Alternatively, choose Insert ➝ Spry ➝ Spry Repeat List. The Insert Spry Repeat
List window opens (see Figure 12-18).
3. From the “Container tag” menu, choose the type of container you want for the
repeating region.
Pick from any of the four list types: bulleted lists (page 92), numbered lists
(page 92), form menus (page 414), or definition lists (page 98).
4. Choose the data set whose XML data you wish to repeat.
Make your choice from the Spry Data Set menu.
Chapter 12: Spry
491
Spry Data Sets
Figure 12-17:
A Spry Repeat List
provides four ways of
displaying repeating XML
data.
UL
(bulleted list)
OL
(numbered list)
SELECT
(form menu)
DL
(definition list)
5. Choose the column or columns to display.
If you’re going with a bulleted or numbered list, you get to pick only one column (Figure 12-18, top). If you’re using a form menu or a definition list, you
can pick two XML elements (Figure 12-18, bottom). For a menu, you can select
one element for the label—what the visitor sees when they view the menu—and
another for the value—the information submitted to the Web server when the
form is processed. Definition lists include one term (like a word in a glossary)
represented by the DT tag, and one definition represented by the DD tag.
Figure 12-18:
Dreamweaver provides different options for a Spry
Repeat List, depending on the type of list you insert. For a
numbered or bulleted list, you choose just one XML
element to display from the “Display column” menu
(top); form menus and definition lists require two XML
elements (bottom). Once the list is inserted, you can use
the Bindings panel to add more XML elements to the list.
If you want a bulleted list of employee names, but also
want to include the employee’s phone extension as part
of the list item—Bob Jones (x456)—insert the Spry list
using the employee name, and then, from the Bindings
panel, drag the phone extension number.
492
Dreamweaver CS3: The Missing Manual
Spry Data Sets
6. Click OK to insert the list.
Dreamweaver inserts the list onto the page. In Design view, you don’t actually
see an entire list of items. You see only one bulleted or numbered item. You
have to preview the page to see the final effect with all the items listed.
You can select and style a Spry Repeat List just like a regular chunk of HTML,
and you can even move it (as long as it remains inside the Spry Region).
Spry Table
A Spry table is the easiest way to present rows of information from an XML file in
a quick and orderly fashion. In just a few steps, you can create sortable columns,
assign CSS styles to alternating rows of data, insert an HTML table, and add row
after row of XML data. Spry tables aren’t just easy to create, they also present data
in an easily understandable spreadsheet-like format (see Figure 12-10).
To add a Spry table:
1. Click inside a Spry Region (page 486).
Or, if the page doesn’t yet have a Spry Region, you can click anywhere on the
page. Dreamweaver automatically inserts a Spry Region after you finish creating the Spry table.
2. On the Insert bar’s Data tab, click the Spry Table button.
Alternatively, choose Insert ➝ Spry
dow opens (see Figure 12-19).
➝
Spry Table. The Insert Spry Table win-
Figure 12-19:
It doesn’t always make sense to make a
column sortable. For example, it’s not
useful to sort a column full of
descriptive paragraphs (who wants to
see a list of items based on whether
their description begins with “A,” “The,”
or “This"?).
3. From the Spry Data Set menu, choose a data set.
You should select, of course, the data set whose data you wish to display in the
table.
Chapter 12: Spry
493
Spry Data Sets
4. Remove and rearrange columns.
Dreamweaver lists all XML elements from the data set. Each XML element
appears inside a single table cell. If you don’t want one of the elements to appear
in the table, click its name in the Columns list, and then press the minus (-) button
to remove it. (If you want to bring back a column you’ve deleted, press the + button and then, in the window that appears, select a column name).
Removing an element from the column list only means that Dreamweaver
won’t add a column to the table it’s about to create. You’re free to use the Bindings panel after the table is inserted, to drag missing elements into the table.
You can also rearrange the columns, so that they appear in a different order in
the table. The name at the top of the list is the table’s left-most column; the
name at the bottom is the table column on the far right. To rearrange a column, click its name, and then press the up arrow button (to move its column of
data to the left in the final table) or the down arrow button (to move the column to the right).
5. Assign sortable columns.
One of Spry tables’ coolest features is the ability to dynamically resort table data
simply by clicking a column’s header. If someone visiting your Web page wishes
to sort the information in a Spry table differently from the way you presented it,
he only needs to click a different header to change the data’s order.
Columns aren’t normally sortable—the Insert Spry Table window defaults to
listing all columns as non-sortable. To make a column sortable, select its name
in the Column list, and then turn on the “Sort column when header is clicked”
checkbox (see Figure 12-19).
6. Assign CSS classes to table rows.
A Spry table provides helpful visual feedback that makes a table of data easier to
read and interact with. It’s easier to scan all of the columns in a single, wide row
of data if every other row has a distinct background color (see the Spry table in
Figure 12-20). Dreamweaver lets you assign a class style to a table’s odd rows
and another class style to even rows. A simple approach is to create two classes,
.odd and .even, each with different background colors. Then, in the Insert Spry
Table window, select the appropriate class from the “Odd row class” menu and
the “Even row class” menu.
Similarly, you can assign classes to rows based on how someone interacts with a
row. You can make a row change color when someone mouses over any column in the row. This trait is useful if you add a detail region (opposite page).
That’s because, with a detail region, clicking a table row changes data in another
part of the page. So a hover class for a table row provides the same helpful feedback as a hover style for a link: In other words, a hover style screams, “Hey, you
can click me and something’s going to happen.”
494
Dreamweaver CS3: The Missing Manual
Spry Data Sets
In addition, since a detail region displays data from a row that’s been clicked, a
select class provides a way to highlight the row that’s just been clicked. As with
the odd and even classes, a simple strategy for hover and select modes is to simply
create a .hover and .select class styles, and then, in the Insert Spry Table window,
choose them from the “Hover class” and “Select class” menus.
If you haven’t yet created any class styles for these rows, just type in a class
name (without the period). Even if you’re not sure whether you want to
change the look of the table’s rows, assign classes to all four (odd, even,
hover, and select) anyway. Dreamweaver provides no way to return to the
Insert Spry Table window, so if you later decide to add styles to the rows,
then you have to go into Code view and add them by hand using specific
Spry syntax (see page 471). Save yourself this hardship by assigning the
classes while you’ve got an easy dialog box.
7. If you plan on including a detail region (discussed next), turn on the “Update
detail regions when row is clicked” checkbox.
This option makes sure that the Spry programming changes a detail region
when a visitor clicks a row in the Spry table.
8. Click OK.
Dreamweaver inserts a table onto the page. It’s just an HTML table with a
little extra Spry code. You can resize the table and adjust it just as you
would a regular HTML table (see Chapter 7). The top row of the table contains a series of table headers (<th> tags) containing each XML element’s
name. The names are regular text and you can change them to a more
understandable label if you’d like.
The second row of cells represents the XML data. Only one row is represented
in Dreamweaver, but when you preview the page in a Web browser, a table row
appears for each row of data in the XML file. In Design view, each cell in this
row has an XML data placeholder (the element’s name on a blue background)
just as if you had dragged the element from the Bindings panel into the table
cell. You can select a format for the XML element placeholder as if it were regular HTML (for example, apply a CSS style to it or make it bold).
Adding a Detail Region
A Spry table is even more useful when you add a Spry Detail Region to a page. As
with a normal Spry Region, a detail region is an area of the page that you fill with
XML data: it’s usually a <div> that you fill with HTML and XML data from the
Bindings panel (page 488). However, unlike a repeating region, which displays
information from every row in an XML file, a detail region shows information
from a single row. The fun part is that the person viewing the Web page controls
the information in the detail region by selecting a row from a Spry table
(Figure 12-20).
Chapter 12: Spry
495
Spry Data Sets
Adding a detail region involves several steps:
1. Insert a Spry Region as described on page 486.
This region is for the Spry table, so make sure you select the “Region” button in
step 4 on page 487 (not the “Detail region” button).
2. Click inside the Spry Region, and then insert a Spry table.
Follow the procedure described on page 493. Make sure you turn on the
“Update detail regions when row is clicked” checkbox (see step 7 on page
495 and Figure 12-19). This step lets Dreamweaver know that you plan on
having this Spry table control the XML data that’s going to be presented in a
detail region.
In addition, you’ll usually remove most of the columns from the table (step 4
on page 494). Since you’re adding a detail region to provide more information
for a selected row from the Spry table, there’s no point in displaying all the
information in the table as well. In Figure 12-20, the Spry table has just two columns of information—a plant’s English name and the plant’s Latin name. The
majority of the XML data for that row is reserved for the detail region (on the
right in Figure 12-20).
Figure 12-20:
Add real interactivity to
your data with a Spry
Detail Region. Clicking
one of the rows in a Spry
table (left) updates the
Spry Detail region from
the same row of the XML
file. In this example,
clicking the Kudzu row in
the left hand table
displays the plant’s
name, photo,
description, and
recommended square
footage.
Spry table
Selected row
Detail region
3. Insert a Spry Detail Region.
496
Dreamweaver CS3: The Missing Manual
Spry Data Sets
The process is the same as inserting a Spry Region as described on page 486, except
that you turn on the “Detail region” button (step 4 on page 487). This is the secret
sauce that lets the Spry programming know that this region is dependent upon a
Spry table. In addition, you must select the same data set (step 5 on page 487) that
you selected for the Spry table. Because the detail region is displaying XML data
from the same XML file as the Spry table, the two must share the same data set.
Note: You can’t place a Spry Detail region inside a Spry table, or another Spry region. (If you try, Dreamweaver tells you as much.)
4. Add XML data to the detail region.
Use the Bindings panel as described on page 488 to add XML data to the region.
If the page has multiple data sets, make sure you’re dragging XML elements
from the data set used in the Spry table. You can add other HTML as well, such
as additional text, images, tables, divs, and so on. In addition, you can select an
XML element and apply a style, make it bold or move it around inside the detail
region (see Figure 12-21).
When you view the Spry page, the detail region contains the detail information
for the first row of the Spry table. When you click on another row, the Spry
details are updated automatically.
Figure 12-21:
Here’s the Design view
perspective of the Web
page pictured in
Figure 12-20.
Unfortunately,
Dreamweaver doesn’t
provide any obvious
visual clues to let you
know whether a Spry
region is a detail region.
In this case, both the Spry
region containing the Spry
table (the left box with the
dotted outline) looks the
same as the detail region
(the right box). To find out
if a Spry region is a detail
region or not, you must
select the region’s <div>
tag and go into Code
view. If you see spry:
region as part of the
opening div tag (<div
spry:region= "dsPlants">)
then that div is a regular
Spry region. If you see
spry:detailregion, it’s a
Spry detail region.
Chapter 12: Spry
497
chapter
Chapter 13
13
Dreamweaver
Behaviors
Chapter 6 makes clear how easy it is to add mouse rollover effects using Dreamweaver’s Rollover Image object. That and other interactive features rely on scripts
(small programs) written in the JavaScript programming language. You’ve
already seen some of the JavaScript-powered tools new to Dreamweaver CS3 like
the Spry menu, Spry form validation, and all of the cool Spry tricks discussed in
the previous chapter.
You could create the same effects without Dreamweaver, but you’d need to take a
few extra steps: buy a book on JavaScript; read it from cover to cover; learn about
concepts like arrays, functions, and the Document Object Model; and spend weeks
discovering the eccentric rules governing how different browsers interpret JavaScript code differently.
Like the new Spry tools, Dreamweaver’s Behaviors let you add dynamic JavaScript
programs to your Web pages without doing a lick of programming. Most Dreamweaver Behaviors have been around for a while, but Dreamweaver CS3 adds a new
set of behaviors called Spry Effects that let you add dazzling visual touches like fading a photo in or out, highlighting a portion of a page with a flash of color, and
shaking a <div> tag to catch a visitor’s attention.
Understanding Behaviors
Dreamweaver behaviors are prepackaged JavaScript programs that let you add interactivity to your Web pages with ease, even if you don’t know the first thing about
JavaScript. By adding behaviors, you can make your Web pages do things like:
• Make portions of a page appear and disappear.
499
Understanding
Behaviors
• Open a new browser window to a specified size, with or without scroll bars, status bar, location bar, and other Web browser “chrome.”
• Change the background color of any element on a page.
• Pop open an alert box with an important message for your site’s visitors.
Note: Try it yourself. See examples of all of Dreamweaver’s behaviors on this book’s companion Web
site, www.sawmac.com/dwcs3/.
Behavior Elements
To use a behavior, you bring together three elements: an action, an event, and an
HTML tag:
• The action is whatever the behavior is supposed to do—such as open a new
browser window or hide an absolutely positioned div.
• The event is the trigger that causes the action to happen. It’s usually something
your visitor does, like clicking a Submit button on a form, moving the mouse
over a link, or even simply loading a Web page into the browser.
• Finally, you apply the event and the action to an HTML tag to bring interactivity to your Web page.
Let’s say you want to let visitors access different Web pages on your site by offering
them a pop-up menu (also known, ironically, as a drop-down menu)—a common
form element. This menu lists the different pages of your site—About This Company,
Contact Us, See Our Products, and so on.
When someone selects one of the options from the menu, his browser opens the
Web page for that section of the site. In this case, the HTML tag is the pop-up menu
itself—a <select> tag; the action is opening another Web page in the site; and the
event brings the two together so that, when your visitor makes a selection from the
pop-up menu, his browser goes to the selected Web page. Voilà—interactivity!
More about Events
When people visit a Web page, they do more than just read it—they interact with
it. You already know that when someone clicks a link, the browser reacts by loading a new Web page or jumping to a named anchor (page 167).
But visitors can also interact with a Web page in a variety of other ways. They may
resize the browser window, move the mouse around the screen, make a selection
from a pop-up menu, click an image, type inside a form field, or click a form’s Reset
button. Web browsers “listen to” and react to these triggering events with actions.
In JavaScript and Dreamweaver, the names of events always begin with the word
“on,” which essentially means “when.” For example, the onLoad event refers to the
moment when an object fully loads into the browser—like when a Web page, its
500
Dreamweaver CS3: The Missing Manual
Applying Behaviors
FREQUENTLY ASKED QUESTION
Behaviors and Added Code
I hear the JavaScript that Dreamweaver produces adds
excessive lines of code, unnecessarily adding to a page’s
file size. Is this a reason not to use behaviors?
In some cases, it’s true that a seasoned JavaScript programmer could write a program that does what a Dreamweaver
behavior does using less code.
However, Dreamweaver behaviors were created to work in
as many browsers as possible without producing errors in
older browsers. The hitch is that JavaScript doesn’t work the
same in all browsers or even in all versions of browsers.
Indeed, many browsers have, until recently, understood
JavaScript so differently that programmers have resorted to
elaborate workarounds, requiring a lot of experience, practice, and patience.
Accordingly, the engineers at Adobe used their vast understanding of JavaScript, HTML, and Web browsers to ensure
that Dreamweaver behaviors work in as many browsers as
possible. At times, this compatibility may lead to larger files
with more lines of code, but it also assures that your Web
pages will work for the broadest possible audience.
In addition, while the programming code for most behaviors is stored directly within the Web page itself, in the case
of Spry Effects and the other Spry tools in Dreamweaver,
the majority of the programming magic is stored in an
external JavaScript file—that’s a good thing too, because the
file for Spry Effects alone is a whopping 67k in size. Fortunately, visitors to your site need only download the file
once, thanks to their browsers’ caches (see page 607).
images, and other linked files have downloaded. Events also include the various
ways someone can interact with a particular HTML tag (element). For instance,
when someone moves the mouse over a link or clicks a link, the corresponding
events are called onMouseOver and onClick.
Note: Traditionally, JavaScript programmers have capitalized the second word in a JavaScript event—
onMouseOver, for instance. Trouble is, XHTML doesn’t allow uppercase letters for tags or their properties.
So if you’re creating XHTML pages, events should always be lowercased, like this: onmouseover. (Dreamweaver converts such terms to lowercase automatically as you create XHTML pages.)
Applying Behaviors
Dreamweaver makes adding behaviors as easy as selecting a tag and choosing an
action from a drop-down menu in the Behaviors panel.
The Behaviors Panel
The Behaviors panel is your control center for Dreamweaver’s behaviors
(Figure 13-1). On it, you can see any behaviors that are applied to a tag, add more
behaviors, and edit behaviors that are already applied.
You can open the Behaviors panel in any of three ways:
• Choose Window ➝ Behaviors.
• Press Shift+F4.
• If the Tag inspector is open, click the Behaviors tab.
Chapter 13: Dreamweaver Behaviors
501
Applying Behaviors
Selected tag Add/delete actions
Show set events
Show all events
Change order
Actions list
Events list
Figure 13-1:
Behaviors are grouped by event and listed in
the order in which they occur on the Behaviors
panel. You can change the type of event by
clicking the event name and selecting another
event. For actions with different events, the
order is irrelevant, since the event determines
when the action takes place, not the order.
One HTML element can trigger multiple
actions. In this example, five different actions
are applied to a single link (the <a> tag); in
fact, one event even triggers multiple actions.
In this case, the onClick event makes
something on the page appear, opens a
browser window, and calls a custom
JavaScript program. When one event triggers
several behaviors, you can change the order
in which they occur with the up- and downpointing arrows
GEM IN THE ROUGH
Link Events Without Loading a New Web Page
As you start to use behaviors, you’ll quickly notice that there
are an awful lot of useful events associated with links. Links
can respond to interactions of all sorts, like moving the
mouse over the link, moving it away from the link, or clicking the link.
The secret is, instead of using a real URL or path for the link,
you use a “dummy” link—a link that goes nowhere. This
way, you can still take advantage of all of the great events
links have to offer without adding links that take you away
from the page.
Clicking a link usually opens a different Web page. But there
are times when you may want to use the onClick event to
trigger an action without leaving the current Web page.
There are two types of dummy (also called null) links. The
first uses the pound symbol (#). Select the text or graphic
you want to add the behavior to, and then, in the Property
inspector, instead of adding a URL in the Link field, type in
#. You can also create a dummy link by typing javascript:;
into the Link field. Be sure to include both the colon and
semicolon. This dummy link doesn’t load a new Web page,
but provides a link to which you can apply behaviors.
For instance, you may have a Web page with lots of unusual
or technical words. It would be great to program the page
so that when someone clicks an unfamiliar word, a dialog
box displaying its definition pops up on the screen (using
the Popup Message action, described on page 529). Unfortunately, a Web browser doesn’t know when you click a
word, since there’s no event associated with regular text.
However, browsers do know when you click a link and can
respond to this action accordingly.
But in this case, you don’t want to use a real link; that would
force a new page to load. You just want to use a link’s
onClick event.
502
The advantage of the second method is that some browsers
(including Internet Explorer for Windows) scroll to the top
of the page when a visitor clicks a link that uses the # symbol, which could be disconcerting if you attached a behavior that appears far down a page.
Dreamweaver CS3: The Missing Manual
Applying Behaviors
Note: Dreamweaver includes two different types of behaviors, and it’s important not to get them confused. This chapter describes JavaScript programs that run in your audience’s Web browsers—these are
called “client-side” programs. The server behaviors listed in the Application panel group, on the other
hand, run on the Web server to let you access information from a database. These are described in Part 6.
The currently selected tag is indicated at the top of the Behaviors panel, and a list
of all of the behaviors applied to that tag, if any, appears below. Each behavior is
listed in two parts: Events and Actions, as described earlier.
The Behaviors panel offers two different views. You switch between them using the
buttons at the upper left of the panel:
• Show set events (pictured in Figure 13-1) gets down to the specifics: which behaviors you’ve applied to the tag and which events trigger them. When you’re working
on a Web page, this view moves extraneous information out of your way.
• Show all events lists all of the events available to a particular tag. Someday,
should you decide to memorize which events apply to which tags (see page 506),
you may no longer need this view.
Applying Behaviors, Step by Step
Open the Behaviors panel, and then proceed as follows:
1. Select the object or tag.
You have to attach a behavior to an HTML tag, such as a link (indicated by the
<a> tag) or the page’s body (<body> tag). Take care, however: It’s easy to accidentally apply a behavior to the wrong tag. Form elements, like checkboxes and
text fields, are easy—just click one to select it. For other kinds of tags, consider
using the Tag selector, as described on page 22, for more precision.
Tip: You can be sure which tag the behavior is applied to by looking at the Tag inspector’s header
(above the Behaviors tab). For example in Figure 13-1, “Tag <a>” indicates that the behaviors listed are
applied to an <a>, or link, tag.
2. In the Behaviors panel, add an action.
Click the + button in the Behaviors panel and, from the Add Action menu,
select the action you wish to add (see Figure 13-2). You’ll find a list of these
behaviors and what they do beginning on page 511.
Some actions are dimmed in the menu because your Web page doesn’t have
elements necessary for the behavior to work. For instance, if you haven’t
included a form in your Web page, then the Validate Form behavior is grayed
out. Others are dimmed because they have to be applied to a particular page
element. For example, Jump Menu is off limits until you’ve added a list/menu
field to the page and selected it.
Chapter 13: Dreamweaver Behaviors
503
Applying Behaviors
Figure 13-2:
Behaviors you can’t currently apply are grayed
out. Dreamweaver is trying to tell you that either
a necessary object is missing from your page, or
you’ve selected an object that can’t have that
behavior applied to it. For example, you can’t
apply the Show-Hide Elements behavior if the
page doesn’t have at least one tag with an ID
applied to it.
3. In the dialog box that opens, set options for the action.
Each action has properties that pertain specifically to it, and you set them to
your liking in the dialog box that now appears. For instance, when you choose
the Go To URL action, Dreamweaver asks what Web page you want to load.
(Once again, the following pages describe each of these actions.)
4. Click OK to apply the action.
At this point, Dreamweaver adds, to the underlying code of your page, the
HTML and JavaScript required to make the behavior work. Your behavior’s
name appears in the Behaviors panel.
Unlike HTML objects, behaviors usually add code to two different places in a
document. For behaviors, Dreamweaver usually adds JavaScript code to the
head of the document and to the body of the page.
5. Change the event, if desired.
When your newly created action shows up in the Behaviors panel, Dreamweaver displays—in the Events column of the panel—a default event (trigger)
for the selected tag and action. For example, if you add an Open Browser Window behavior to a link, then Dreamweaver suggests the onClick event.
504
Dreamweaver CS3: The Missing Manual
Applying Behaviors
However, this default event may not be the only event available. Links, for
instance, can handle many different events. An action could begin when your
visitor’s cursor moves over the link (the onMouseOver event), clicks the link
(the onClick event), and so on.
To change the event for a particular behavior, click the event’s name, and the
Events pop-up menu appears (see Figure 13-1). Select the event you want from
the list of available events for that particular tag. (See page 506 for a list of all
available events in current versions of the most popular browsers.)
When you’re done, you can leave the Behaviors panel open to add more behaviors
to the tag, or to other tags. Select another tag, using the document window or Tag
selector, and repeat steps 2 through 5.
Adding Multiple Behaviors
You’re not limited to a single behavior per HTML tag. You can, and often will,
apply several behaviors to the same tag. For instance, when a page loads—the
onLoad event of the <body> tag—it can preload images to be used in rollover
effects, open a small browser window displaying a pop-up advertisement, and
highlight a message on a page with a flash of color.
Nor are you limited to a single event per tag—you can add to a link any number of
actions that are triggered by different events, such as onMouseOver, onMouseOut, and onClick. For example, if you set things up for a link as shown in
Figure 13-1, when you click the selected link in the browser window, some element on the page fades into view, and then a new browser window opens, and
finally a custom JavaScript program runs. The link also responds to other events,
like moving the mouse over it—in this example, making an invisible element
appear on the page.
Editing Behaviors
Once you’ve applied a behavior, you can edit it anytime. Double-click the behavior
in the Behaviors panel to reopen the Settings dialog box, as described in step 3 of
the previous instructions. Make any changes you like, and then click OK.
To remove a behavior from your Web page, select it in the Behaviors panel and
click the minus sign (–) button or press Delete. (If you accidentally delete a behavior, just choose Edit ➝ Undo Remove Behavior.)
A Quick Example
This brief example is designed to give you a clear overview of the behavior-creation
process. In it, you’ll use a behavior that makes an important message appear automatically when the Web page opens.
1. Choose File ➝ New to create a new untitled document.
You’ll start with a new page.
Chapter 13: Dreamweaver Behaviors
505
Events
2. Choose File ➝ Save and save the file to your computer.
It doesn’t matter where you save the page, since you won’t be including any
graphics or linking to any pages.
You start the process of adding a behavior by selecting a specific tag—in this
case, the page’s <body> tag.
3. In the Tag selector in the lower-left corner of the document window, click
<body>.
Once the tag is selected, you can apply one or more behaviors to it. But first,
make sure the Behaviors panel is open. If you don’t see it, choose Window ➝
Behaviors or press Shift+F4.
4. Click the + button on the Behaviors panel. From the Add Action menu, choose
Popup Message (see Figure 13-2).
The Popup Message dialog box appears.
5. In the message box, type Visit our store for great gifts! Then click OK.
Dreamweaver adds the required JavaScript code to the page. Notice that the
Behaviors panel lists the action called Popup Message next to the event called
onLoad. The onLoad event triggers an action after a page and everything on it—
graphics and so on—have loaded.
To see the page in action, just preview it in a Web browser by pressing the F12
(Option-F12) key.
Note: Dreamweaver behaviors rely on little JavaScript programs running inside the Web browser. If
you’ve got Windows XP and have Service Pack 2 installed or if you’re running Windows Vista, whenever
you preview a behavior-using page in Internet Explorer, you’ll run into the same problems you encountered with rollover images in Chapter 6. For a solution, turn to the Tip on page 231.
Events
Events are at the heart of interactive Web pages. They trigger behaviors based on
how site visitors interact with a Web page: clicking a link, mousing over an image,
or simply loading a Web page. But not all events work with all tags. For example,
the onLoad event only works with Web pages and images, not paragraphs, divs, or
any other page element. The Event menu in the Behaviors panel can help: It only
lists events available for the tag you’re applying the behavior to.
Current browsers—Firefox, Safari, and Internet Explorer 6 and 7—support a wide
range of events for many HTML tags. In most cases, you’ll find that many of the
events in the following list work with all of the tags pictured in Figure 13-3. Many
events work with other tags as well, such as headline, paragraph, or div tags. However, don’t go crazy. Making an alert message appear when someone double-clicks
a paragraph is more likely to win your site the Hard-to-use Web Site of the Month
award than a loyal group of visitors.
506
Dreamweaver CS3: The Missing Manual
Events
To help you select a good combination of event and HTML tags, the following
pages list and explain the most common and useful HTML tags and events.
Each entry shows you the name of the event as you’ll see it listed in the Behaviors
panel; a plain-English description of what that event really means; and the list of
tags to which this event is most commonly applied. See Figure 13-3 for the visual
representations of those HTML tags. For example, you’ll find out that the <select>
tag represents a pop-up menu.
Headline <h1>
Image <img>
Paragraph <p>
Text field:
Link <a> <input type=”text”>
Checkbox:
<input type=”checkbox”>
Radio button:
<input type=”radio”>
Password field:
<input type=”password”>
Pull-down menu:
<select>
File field:
<input type=”file”>
Multiline text field:
<textarea>
Submit button:
Rest button:
<input type=”submit”> <input type=”reset”>
Figure 13-3:
This sample Web page
illustrates HTML tags to
which you can attach
events. Not shown is the
body of the Web page
(the whole thing, in
other words), whose tag
is <body>, and the form
portion of this page (see
Chapter 11), whose tag
is <form>. Whenever
you set up a behavior,
you should attach it to
one of the tags shown
here. Today’s browsers
add events to every tag,
so you could add a
behavior to a level 1
heading or a paragraph
of text, but since those
tags usually aren’t
associated with user
interactions (like clicking
or mousing over),
visitors to your site
probably won’t interact
with them.
Mouse Events
Web designers most often use mouse movement events to trigger actions (like the
familiar rollover image). But mouse clicks—on checkboxes, radio buttons, and
other clickable form elements—also qualify as mouse events.
Note: In the following list, the many different types of input form elements are listed like this: <input
type="button | checkbox | radio | reset | submit">. This notation simply means that any of these form
elements—buttons, checkboxes, radio buttons, reset buttons, or submit buttons—react to the listed event.
Also, when you see an <area> tag, it refers to the hotspots on an image map (see page 226).
onMouseOver
Gets triggered: When the cursor moves over the tag.
Commonly used with these tags: <a>, <area>, <img>
Chapter 13: Dreamweaver Behaviors
507
Events
onMouseout
Gets triggered: When the cursor moves off of the tag.
Commonly used with these tags: <a>, <area>, <img>
onMouseMove
Gets triggered: When the cursor moves anywhere inside the tag. Works similarly to
onMouseOver, but onMouseOver is triggered only once—when the mouse first
moves over the tag. onMouseMove is triggered continually, whenever the mouse
moves over the tag. The possibilities for an annoying Web page are endless.
Commonly used with this tag: <body>
onClick
Gets triggered: When a visitor clicks the tag and releases the mouse button.
Commonly used with these tags: <a>, <area>, <input type="button | checkbox |
radio | reset | submit">
FREQUENTLY ASKED QUESTION
The Vanishing Events List
I applied a behavior to a link, but the only event available
is onMouseOver. What happened to all the other events?
To make sure your behavior works in as many browsers as
possible, check out the Show Events For submenu (also
shown in Figure 13-2). The earlier the browser version you
choose here, the fewer events you’ll see listed. On the other
hand, choosing an earlier browser version ensures that your
behavior will work for more of your visitors. If you’re developing your site with modern, standards-compliant browsers
in mind, you can safely pick the HTML 4.01 specification
listed on the Show Events For submenu. Your site will then
work with the vast majority of Web browsers in use today.
onDblClick
Gets triggered: When a visitor double-clicks the tag.
Commonly used with these tags: <a>, <area>, <input type="button | checkbox |
radio | reset | submit">
onMouseDown
Gets triggered: When a visitor clicks the tag. The mouse button doesn’t need to
be released for this event to occur (note the contrast with onClick).
Commonly used with these tags: <a>, <img>, <input type="button | checkbox |
radio | reset | submit">
onMouseUp
Gets triggered: When a visitor releases the mouse button while the cursor is over
the tag. The effect is the same as the onClick event.
Commonly used with these tags: <a>, <img>, <input type="button | checkbox |
radio | reset | submit">
508
Dreamweaver CS3: The Missing Manual
Events
Keyboard Events
Keyboard events respond to key presses and releases. Most Web designers use
them in association with form elements that accept text, such as password or text
fields. (See Chapter 11 for more on forms.)
onKeyPress
Gets triggered: When a visitor presses and releases a key while the tag is highlighted.
Commonly used with these tags: <textarea>, <input type="file | password |
text">, <a>
onKeyDown
Gets triggered: When a visitor presses a key while the tag is highlighted. The key
doesn’t need to be released for this event to occur.
Commonly used with these tags: <textarea>, <input type="file | password |
text">, <a>
onKeyUp
Gets triggered: When a visitor releases a key while the tag is highlighted.
Commonly used with these tags: <textarea>, <input type="file | password |
text">, <a>
Body and Frameset Events
Several events relate to actions involving an entire Web page or frameset.
onLoad
Gets triggered: When a Web page and any embedded elements—like images and
Flash and QuickTime movies—load. Frequently used for triggering actions
when a visitor first loads the Web page; can also be used with an image tag to
signal when that particular image has finished loading.
Commonly used with these tags: <body>, <frameset>, <image>
onUnload
Gets triggered: When the Web page is about to be replaced by a new Web page—
for instance, just before the Web browser loads a new Web page after a visitor
clicks a link.
Commonly used with these tags: <body>, <frameset>
onResize
Gets triggered: When a visitor resizes the Web browser window.
Commonly used with these tags: <body>, <frameset>
onError
Gets triggered: When an error occurs while a Web page or an image is loading.
Commonly used with these tags: <body>, <img>
Chapter 13: Dreamweaver Behaviors
509
Events
Note: The onFocus and onBlur events described in the following section also apply to the <body> and
<frameset> tags.
Selection and Highlighting Events
Some events occur when the visitor focuses on different parts of a Web page,
selects text, or chooses from a menu.
onSelect
Gets triggered: When a visitor selects text in a form field.
Commonly used with these tags: <textarea>, <input type="text">
onChange
Gets triggered: When a visitor changes the text in a form field.
Commonly used with these tags: <textarea>, <input type="file | password |
text">, <select>
onFocus
Gets triggered: When an element becomes the focus of the visitor’s attention. For
instance, clicking in a form text field or tabbing to it gives the text field focus.
Commonly used with these tags: <body>, <frameset>, <textarea>, <input
type="button | checkbox | file | password | radio | reset | submit | text">, <select>
onBlur
Gets triggered: When an element loses the focus. For instance, if the visitor is
typing into a form text field and then clicks outside of that field, the onBlur
event occurs. The onBlur event is also triggered when the visitor sends a window to the background. Suppose your visitor is reading your Web site in one
window and has another open in the background. If he clicks the background
window, the current page loses focus and an onBlur event occurs.
Commonly used with these tags: <body>, <frameset>, <textarea>, <input
type="button | checkbox | file | password | radio | reset | submit | text">, <select>
Form Events
While each element of a form (radio button, text field, checkbox) can respond to a
variety of events, the whole form—the entire collection of elements—can respond
to only two events:
onSubmit
Gets triggered: When a visitor clicks the Submit button on a form.
Commonly used with this tag: <form>
onReset
Gets triggered: When a visitor clicks the Reset button on a form.
Commonly used with this tag: <form>
510
Dreamweaver CS3: The Missing Manual
The Actions, One by
One
The Actions, One by One
While events get the ball rolling, actions are, yes, where the action is. Whether it’s
opening a 200 × 200 pixel browser window or slowly fading in a photograph, you’ll
find an action for almost every interactivity need.
In some cases, alas, the actions aren’t very good. Dreamweaver CS3 is still saddled
with behaviors that were created for (and haven’t been updated since) Dreamweaver 4. Although the new Spry Effects offer a fresh set of behaviors to play with,
Adobe has only weeded out a few behaviors that aren’t very useful or that don’t
work well. This book makes clear which are the rotten eggs to steer clear of.
Note: You’ll find a menu named “~Deprecated” in the behaviors list on the Behaviors panel (see
Figure 13-2). This menu includes five behaviors that have been “deprecated”—meaning AVOID AT ALL
COSTS. Those behaviors don’t work well (or at all, in some cases). They still appear in the menu to help out
the poor Web designers who added these behaviors to their sites using a previous version of Dreamweaver.
After you complete the steps required to set up an action as described on page 503,
the new action appears in the Behaviors panel, and your Web page is ready to test.
At that point, you can click the behavior’s name in the Behaviors panel, where—by
clicking the Events pop-up menu, as shown in Figure 13-1—you can change the
event that triggers it.
Spry Effects
Spry Effects are the only addition to Dreamweaver CS3’s arsenal of behaviors.
They’re sophisticated visual effects that can do things like highlight elements on a
page, make a photo fade in, or shake an entire sidebar of information like an earthquake. They’re mostly eye candy and work well when you want to draw attention
to an element on the page, or create a dramatic introduction. It’s easy to abuse
these fun effects, however: If every part of your page blinks, shrinks, shakes, and
flashes, then most visitors will quickly grow tired of your page’s nonstop action.
Spry Effects are part of Adobe’s Spry Framework, which you read about in-depth
in the previous chapter and have encountered when learning about the Spry menu
bar and Spry validation widgets. To use a Spry Effect, you first have to apply an ID
to the “target” element—the part of the page you wish to affect. Every effect,
except Slide, can target any element (an <img> tag, for instance, for an image).
(The Slide effect can target only a <div> tag).
You’re probably thinking of IDs as something you’d use when creating the kinds of
CSS layouts discussed in Chapter 9. True, IDs are often associated with Cascading
Style Sheets as a way of formatting a unique element on a page. However, IDs are
also handy when you want to use JavaScript to add interactivity to a page. In fact,
you can add IDs to HTML without ever creating any associated ID styles using CSS.
Recall that the HTML ID attribute marks a tag with a unique name. You can apply
CSS to that tag using an ID style, but you can also control that tag using JavaScript.
Chapter 13: Dreamweaver Behaviors
511
The Actions, One by
One
How you apply an ID to a tag differs depending on the tag, but here are the most
common techniques:
• Div tags. Assign an ID to a div using the Property inspector. Just select the div
tag, and then use the ID field in the Property inspector to give it a unique name.
In addition, you can wrap any collection of HTML tags (or even a single element like an image) inside a <div> tag and apply an ID at the same time using
the Insert Div Tag tool (see page 314).
• Images. When you select an image in the document window, you can type an
ID for that image in the Property inspector’s Name box (see Figure 6-6).
• Forms. Select the form and type an ID in the Name field on the left edge of the
Property inspector (see Figure 11-3).
• Form fields. When you insert a form field, you can set the field’s ID in the Input
Tag Accessibility Options window (see Figure 11-5). You can later set or change
a field’s ID by selecting it and then using the Name field on the left edge of the
Property inspector.
• Other elements. It’s not as straightforward to add an ID to paragraphs, headlines, bulleted lists, and other tags. However, it’s not that difficult if you use the
Tag selector’s contextual menu, as described in Figure 8-2.
After you’ve applied an ID to the target, you then add a Spry Effect behavior to a
tag (usually some tag other than the target) which then triggers the effect. For
example, you might want the site’s banner image to fade into view after the Web
page loads. The target is the banner image, but you apply the Spry Effect behavior
to the <body> tag using the onLoad event (page 509). Any of the tag/event combinations discussed on page 506 will work.
Appear/Fade
To make an element fade in or out, use the Appear/Fade effect. To add a dramatic
introduction to your site, you can fade in a large photograph on your site’s home
page after the page loads. Or you can have an “Important Announcement” box
disappear when it’s clicked.
To use this effect:
1. Select the tag that you want to trigger the fade in or out.
For example, you could pick a link that triggers the effect, or you could use the
<body> tag coupled with the onLoad event (page 509).
2. From the Actions list on the Behavior panel, choose Effects ➝ Appear/Fade.
The Appear/Fade window appears (see Figure 13-4).
3. Select a target element from the first menu.
Here’s where you specify which element on the page should appear or fade
away. This menu lists every tag on the page that has an ID applied to it. In addition, you may see <current selection> listed, which refers to the tag you selected
512
Dreamweaver CS3: The Missing Manual
The Actions, One by
One
Figure 13-4:
Use the Appear/Fade effect to make an
element fade from the page, or have a
photograph fade into view on your site’s
home page.
in step 1. You would choose this option if you wanted to apply the behavior to
an absolutely positioned <div> tag that contains some kind of message—like
“Welcome to our Web site!” When a site visitor clicks this <div>, it fades away.
4. Type an amount in the “Effect duration” field.
This setting controls how long the fade in or out lasts. The duration is measured in milliseconds, so entering 1000 gets you 1 second. If you want the target element to appear or disappear immediately, enter 0.
5. Choose the type of effect—Fade or Appear—from the Effect menu.
If you want the target element to fade into view, it must be hidden to begin
with. Otherwise the fade in effect looks really weird: first you see the photo,
then you don’t, and then it fades in. To make the element invisible, add (or edit)
a style for the target element, and then use the CSS visibility property (page
339). Set the visibility property to “hidden.”
Note: Don’t use the CSS display property setting “none” for an element you wish to fade in. This setting
does indeed hide the element from view, but the fade in effect won’t work in the Safari Web browser: The
target element will remain invisible.
6. Type a percentage amount in the “from” and “to” fields.
Depending on which type of effect you selected, you’ll see either “Appear from”
or “Fade from” and “Appear to” or “Fade to” in the Appear/Fade window.
These two fields let you define the opacity of the target element. You’ll commonly type 100 in the “Fade from” field and 0 in the “Fade to” field. Doing so
causes an image to fade completely out of view. However, if you like ghostly
apparitions, you can fade from 100% to 25%—this makes a solid element
become transparent.
7. Optionally, turn on the “Toggle effect” checkbox.
This option turns the trigger tag into a kind of light switch that lets you fade the element in and out. Say you added an absolutely positioned div to a page that contained helpful hints on getting the most out of your Web site. You could then add a
link that said “Show/hide hints.” Add the Appear/Fade effect, target the AP div, and
turn on the Toggle effect checkbox. Now, when that link is clicked, the div would
fade into view (if it were hidden) or fade out of view (if it were visible).
Chapter 13: Dreamweaver Behaviors
513
The Actions, One by
One
8. Click OK to apply the behavior.
Once you’ve added the effect to a tag, you can edit or delete it just like any other
behavior; see page 505 for details.
Blind
Don’t worry: The Blind effect won’t hurt your eyes. It’s actually just a way of simulating a window blind—either being drawn over an element to hide it or opened to
reveal an element. The basic concept and functionality is the same as the Fade/Appear
effect: It lets you hide or reveal an element on a page. Follow the same basic steps
as described in the previous section for Fade/Appear.
Once you select Blind from the Effects menu in the Behaviors panel, you can control all of the basic elements of this effect from the Blind dialog box (Figure 13-5).
Use the Effect pull-down menu to choose which direction the blind moves. If you
want to hide an element on the page as if a blind where being pulled down over it,
choose “Blind down.” To make a hidden element appear as if a blind were being
drawn to reveal it, choose “Blind up.” You can choose either direction for both
revealing or hiding an element; the key is entering the correct percentage values in
the “from” and “to” fields (Figure 13-5). If you wish to hide an already visible element, then type 100 in the “from” field and 0 in the “to” field.
To make an element appear, first you need to set its visibility property (page 339)
to hidden by creating a CSS style for the target element. Next, apply the Blind effect
to a tag (for example, a link or the body tag), and then select the direction you wish
the blind to move (up or down) from the Effect menu. Finally, type 0 in the
“from” field and 100 in the “to” field. The “Toggle effect” checkbox reverses the
effect when the event is triggered again. For example, a link clicked for the first
time might reveal a photo on the page; when clicked again, the photo disappears.
Figure 13-5:
The “from” and “to” fields can also hide
or reveal just a portion of a div. If you set
“Blind down from” to 0% and “Blind
down to” to 50%, the effect will begin to
reveal the contents of the div starting at
the top and then stop at the halfway
mark—in other words, the bottom half of
the div will still be invisible.
Grow/Shrink
The Grow/Shrink effect is another “now you see it, now you don’t” type of effect.
With it, you can make a photo, a paragraph, or a div full of content grow from a
tiny speck on the screen to its full size, or you can make an element disappear by
514
Dreamweaver CS3: The Missing Manual
The Actions, One by
One
shrinking into nothingness. The basic setup is the same as with the Appear/Fade
effect described on page 512. The Grow/Shrink window (Figure 13-6) lets you target any element with an ID; set a duration for the effect; and then select whether to
make the element appear (grow) or disappear (shrink). You can also have an element grow or shrink to a percentage of its full size. However, unless you’re targeting an image, displaying an element at less than its full size is usually unattractive
and unreadable.
Figure 13-6:
The “Grow from” menu (“Shrink from” if the
Shrink effect is selected) determines the point
on the page from which the element begins
its growth on its way to achieving its full size.
You can either make the element grow from
its center or from its top-left corner. The
“center” option makes the element appear to
come straight at you (or recede straight from
you when Shrink is selected).
Tip: You can combine multiple types of effects for a single target element. For example, you could make
a photo fade into view when the page loads, shake when the mouse is moved over it, and even slide out
of view when a link is clicked. However, be careful assigning multiple effects to the same event on the
same element. If you add a Grow/Shrink effect and a Shake effect, both targeting the same element and
using the same event, you won’t see the element grow and then shake—you’ll see it shake as it grows. In
other words, the effects happen simultaneously (and usually bizarrely) instead of one after the other.
Highlight
Adding a background color to a paragraph, headline, or div is one way to create
visual contrast and make an important piece of information stand out. A red box
with white type will draw the eye quicker than a sea of black type on a white page.
But if you really want to draw someone’s attention, use the Highlight effect. Highlightling an element lets you add a flash of bright background color to it. For
instance, on a form, you may have an important instruction for a particular form
field (“Your password must be 10 characters long and not have !, # , or $ in it”).
You could add the Highlight effect to the form field so that when a visitor clicks in
the field, the instruction’s background color quickly flashes, ensuring that the visitor sees the important information.
As with other Spry Effects, you use the Behaviors panel to apply the Highlight effect
to some triggering element (like a form field you click in, or a link you mouse over).
Then you set options in the Highlight window (see Figure 13-7): a target element
(any tag with an ID), the duration of the effect, and background colors.
Chapter 13: Dreamweaver Behaviors
515
The Actions, One by
One
Figure 13-7:
The “Toggle effect” checkbox lets you
fade in a background color with one
action (for example, a click of a link)
and then fade the background color
out when the same event occurs again
(the same link is clicked a second time,
for instance). But in order for it to look
good, make sure the Color After Effect
is the same as the End Color.
Otherwise, the second time the
highlight is triggered (in other words,
when the effect is toggled) the
background won’t fade smoothly back
to the start color.
Colors work like this: The Start Color is the background color of the target element when the effect begins. The background subsequently fades from the Start
Color to the End Color (the duration of the fade is determined by the Effect duration setting). Finally, the End Color abruptly disappears and is replaced by the
Color After Effect. The general settings suggested by Dreamweaver when you apply
the effect aren’t so good: white, red, white. Assuming the background color of your
page is white, you don’t get so much of a flash effect as a “fade-to-a-color-thatimmediately-disappears” effect. The effect looks a lot better if the Start Color is set
to some bright, attention grabbing, highlight color, and the End Color is set to
match the current background color of the target element. Then the effect looks
like a bright flash that gradually fades away.
However, instead of a flash, you may want an element’s background to slowly fade
to a different color and stay that color. In that case, set the Start Color to match the
target element’s current background color, and use the same color for both End
Color and Color After Effect.
Shake
The Shake effect is like adding an earthquake to a Web page. The target element
shakes violently left to right on the page for a second or so. And that’s all there is to
it. When you apply this behavior, you have just one option: which element on the
page to shake. You can shake any element with an ID—a div or even just a paragraph. It’s kind of a fun effect…once…and maybe just for kids.
Slide
The Slide effect is just like the Blind effect. But instead of a “blind” moving over an
element to hide it, or moving off an element to reveal it, the element itself moves. Say
you have a <div> tag that contains a gallery of photos. If you target that div with a
“slide up” effect, then the images will all move upwards and disappear at the top edge
of that div. Think of the <div> as a kind of window looking out onto the photos.
When the photos move up past the window, you can’t see them any longer.
516
Dreamweaver CS3: The Missing Manual
The Actions, One by
One
You can make an element slide up or slide down using the Effect menu in the Slide
window (Figure 13-8). And, as with the Blind effect, to make an element disappear, type 100 in the “from” field and 0 in the “to” field. To make an element slide
either up or down and appear on the page, first create a style for the element’s ID;
then apply the Slide behavior to some other element (a link or the body tag, for
instance). Finally, type 0 in the “from” field and 100 in the “to” field.
Figure 13-8:
The Slide effect works just like the Blind effect
described on page 514. The one difference is
that the element itself moves and disappears
(as opposed to a blind being drawn over the
element).
Squish
The Squish effect offers no options other than selecting a target element. The effect
only works to first hide an element (by shrinking it down until it disappears) and
then revealing it by making it grow. It’s exactly like the Shrink/Grow effect (page
514) with the “Toggle effect” box turned on and the Shrink effect selected (see
Figure 13-6). Since it doesn’t provide any controls for timing the effect, you’re better off just sticking with the Shrink/Grow effect.
Navigation Actions
Many of Dreamweaver’s actions are useful for adding creative navigational choices
to your Web sites, giving you the opportunity to go beyond the simple click-andload approach of a basic Web page.
Open Browser Window
No matter how carefully you design your Web page, chances are it won’t look
good in every size window. Depending on the resolution of your visitor’s monitor
and the dimensions of his browser window, your Web page may be forced to
squeeze into a window that’s 400 pixels wide, or it could be dwarfed by one that’s
1200 pixels wide. Designing your Web pages so they look good at a variety of different window sizes is challenging.
It’s the Open Browser Window action to the rescue (Figure 13-9). Using this
behavior, you can instruct your visitor’s browser to open a new window to whatever height and width you desire. In fact, you can even dictate what elements the
browser window includes. Don’t want the toolbar, location bar, or status bar visible? No problem; this action lets you include or exclude any such window chrome.
Chapter 13: Dreamweaver Behaviors
517
The Actions, One by
One
Figure 13-9:
You, too, can annoy your
friends, neighbors, and Web
site customers with these
unruly pop-up windows. Just
add the Open Browser
Window action to the <body>
tag of your document. Now,
when that page loads, a new
browser window opens with
the ad, announcement, or
picture you specify. To be
even more annoying, use the
onUnload event of the
<body> tag to open a new
browser window—with the
same Web page—when your
visitors try to exit the page.
They won’t be able to get to a
different page, and may even
encounter system crashes.
Now that’s annoying! Most
current Web browsers,
however, prevent these kinds
of automatic window-opening
tricks.
To open a new browser window, you start, as always, by selecting the tag to which
you wish to attach the behavior. You can attach it to any of the tags discussed on
page 511, but you’ll usually want to add this action to a link with an onClick event,
or to the <body> tag with the onLoad event.
Tip: Most browsers have pop-up blockers. This nifty feature prevents the browser from opening a new
browser window unless the visitor initiates the request. In other words, browser windows that are meant
to open when a new page is loaded won’t, but browser windows that open based on a visitor’s action—
like clicking a link—will.
Once you’ve selected this action’s name from the + menu in the Behaviors
panel, you’ll see the dialog box shown in Figure 13-10. You have the following
choices to make:
• URL to display. In this box, type the URL or path of the Web page, or click
Browse and find the Web page on your computer (the latter option is a more
foolproof method of ensuring functional links). If you’re loading a Web page
on somebody else’s site, don’t forget to type an absolute URL, beginning with
http:// (see page 154).
518
Dreamweaver CS3: The Missing Manual
The Actions, One by
One
Figure 13-10:
Here, you can define the properties of the
new window, including what Web page
loads into it, its dimensions, and so on. If
you leave the “Window width” and
“Window height” properties blank, the new
window is the same size as the window it
opens from.
• Window width, Window height. Next, type in the width and height of the new
window. These values are measured in pixels; in most browsers, 100 x 100 pixels
is the minimum size. Also, strange visual anomalies may result on your visitors’
screens if the width and height you specify here are larger than the available
space on their monitors.
• Attributes. Turn on the checkboxes for the window elements you want to
include in the new window. Figure 13-11 shows the different pieces of a standard browser window.
Menu bar
Navigation bar
Status bar
Location bar
Scroll bar
Figure 13-11:
The parts of a browser
window. Note: The menu
bar only appears as part
of the browser window
on Windows machines.
On Macs, the menu bar
appears at the top of the
screen and can’t be
hidden; in addition, the
Safari browser won’t
hide the resize handle or
the scroll bars (if they’re
needed).
Resize handle
• Window name. Give the new window a name here (letters and numbers only).
If you include spaces or other symbols, Dreamweaver displays an error message
and lets you correct the mistake. This name won’t actually appear on your Web
page, but it’s useful for targeting links or actions from the original window.
Chapter 13: Dreamweaver Behaviors
519
The Actions, One by
One
Once a new window is open, you can load other Web pages into it from the original page that opened the window; simply use the name of the new window as the
link’s target. For example, you could add this behavior to an “Open photo gallery”
link that, when clicked, opens a small new window showcasing a photo. You could
add links to the main page that then load additional photos into the small window.
If you use more than one Open Browser Window behavior on a single page, make
sure to give each new window a unique name. If you don’t, you may not get a new
window for each Open Browser Window action.
When you click OK, your newly created behavior appears in the Actions list in the
Behaviors panel.
Go to URL
The “Go to URL” action works just like a link, in that it loads a new Web page.
However, while links work only when you click them, this action can load a page
based on an event other than clicking. For instance, you may want to load a Web
page when your visitor’s cursor merely moves over an image, or when she turns on
a particular radio button.
Once you’ve selected a tag and chosen this action’s name from the + menu in the
Behaviors panel, you can make these settings in the resulting dialog box:
• Open in. If you aren’t using frames, only Main Window is listed here. But if
you’re working in a frameset file and have named each of your frames, they’re
listed in the “Open in” list box. Click the name of the frame where you want the
new page to appear.
• URL. Fill in the URL of the page you wish to load. You can use any of the linkspecifying tricks described on page 159: type in a path or an absolute URL starting with http://, or click the Browse button and then select a page from your site.
Jump Menu and Jump Menu Go
Conserving precious visual space on a Web page is a constant challenge for Web
designers. Putting too many buttons, icons, and navigation controls on a page can
clutter your presentation and muddle a page’s meaning. As sites get larger, so do
navigation bars, which can engulf a page in a long column of buttons.
The Spry menu bar is one solution to this problem, but you may not want to go
through the lengthy process of creating and styling a Spry menu as described on
page 175. A simpler way to add detailed navigation to a site without wasting pixels
is to use Dreamweaver’s Jump Menu behavior. A jump menu is a form pop-up
menu that lets visitors navigate by choosing from a list of links.
The Jump Menu behavior is listed in the Behaviors panel, but for a simpler, happier life, don’t insert it onto your page that way. Instead, use the Insert bar or
Insert menu, like this:
1. Click where you want the jump menu to appear on your Web page.
It could be in a table cell at the top of the page, or along the left edge, for example.
520
Dreamweaver CS3: The Missing Manual
The Actions, One by
One
2. Under the Forms tab on the Insert bar, click the Jump Menu icon (see
Figure 11-2 on page 402). Or choose Insert ➝ Form ➝ Jump Menu.
If you use the Behaviors panel instead, you first have to add a form and insert a
menu into it. The Insert Jump Menu object saves you those steps.
Tip: Even though the jump menu uses a pop-up menu, which is a component of a form, you don’t have
to create a form first, as described in Chapter 11. Dreamweaver creates one automatically when you insert
a jump menu.
The Insert Jump Menu dialog box opens, as shown in Figure 13-12.
3. Type an instructive label, like Select a Destination, in the Text box.
What you enter in the Text box sets the menu’s default choice—the first item
listed in the menu when the page loads. Dreamweaver provides two methods
for triggering the jump-menu behavior: when the visitor makes a selection from
the list—which is an onChange event, since the visitor changes the menu by
selecting a new option—or when the visitor clicks an added Go menu button
after making his selection. The second method requires extra effort from the
visitor—making a selection and clicking a button. The first method, therefore,
offers a better visitor experience. But it means that you can’t include an actual
link in the first item in the menu; after all, the behavior is triggered only when a
visitor selects an item other than the one currently listed.
If you intend to add a Go button, you can skip this step and jump down to step 6.
4. Leave the “When selected, go to URL” box empty.
Since the first item in the list is just an instruction, you don’t link it to any page.
5. To add a link, click the + button.
This adds another item to the menu.
6. Type the name of the link in the text field.
You’re specifying the first link in your pop-up menu. The name doesn’t have to
match the page’s title or anchor’s name; it’s whatever you want your menu to
say to represent it. For instance, you can call a menu choice Home even if the
title of your home page is “Welcome to XYZ Corp.”
7. Enter a URL for this link in the “When selected, go to URL” field.
Use any of the usual methods for specifying a link (see page 159).
8. To add the next link in your pop-up menu, click the + button and repeat steps
6 and 7. Continue until you’ve added all of the links for this menu.
If you want to remove one of the links, select it from the “Menu items” list and
then click the minus sign (–) button. You can also reorder the list by clicking
one of the link names and then clicking the up and down arrow buttons.
Chapter 13: Dreamweaver Behaviors
521
The Actions, One by
One
Figure 13-12:
Top: The Insert Jump Menu dialog
box is set up so that the onChange
event of the <select> tag triggers
the Jump Menu action. That is, the
Jump Menu behavior works when
your visitor selects an item other
than the one currently listed.
Bottom: Unless you turn on the
“Insert go button after menu”
checkbox, the first item of a jump
menu should never be used as a
link. Instead, use some descriptive
text—such as “Select a Sign”—to let
visitors know what the menu does.
Then leave the URL blank in the
Insert Jump Menu dialog box.
When placed on a page, the
resulting menu is very compact,
but it can offer a long list of pages.
9. If you’re using frames, use the “Open URLs in” pop-up menu to specify a
frame in which the indicated Web page should appear.
Otherwise, the “Main window” option loads links into the entire browser window.
10. In the “Menu name” box, give the menu a name.
This step is optional; you can also just accept the name Dreamweaver proposes.
Since Dreamweaver uses this name only for the internal purposes of the JavaScript that drives this behavior, it doesn’t appear anywhere on the page.
522
Dreamweaver CS3: The Missing Manual
The Actions, One by
One
11. If you want a Go button to appear beside your jump menu, turn on the “Insert
go button after menu” checkbox.
You need to use this option only when the jump menu is in one frame and is
loading pages into another, or when you want to make the first item in your
jump menu a link instead of an instruction.
When you include a Go button, Dreamweaver adds a small form button next to
the menu, which your visitor can click to jump to whatever link is listed in the
menu. But most of the time, your visitors won’t get a chance to use this Go button.
Whenever they make a selection from the menu, their browsers automatically
jump to the new page without waiting for a click on the Go button.
The Go button’s handy, however, when there’s no selection to make. For example, if the first item in the menu is a link, your visitors won’t be able to select it;
it’s already selected when the page with the menu loads. In this case, a Go button is the only way to trigger the “jump.”
12. If you want to reset the menu after each jump (so that it once again shows the
first menu command), turn on “Select first item after URL change.”
Here’s another option that’s useful only when the jump menu is in one frame,
loading pages into another frame. Resetting the menu so that it shows its
default command makes it easy for your visitors to make another selection
when ready.
13. Click OK to apply the action and close the Jump Menu dialog box.
Your new pop-up menu appears on your Web page, and the new behavior
appears in the Actions list in the Behaviors panel.
Tip: To edit a jump menu, click the menu in your document and then, in the Behaviors panel, doubleclick the Jump Menu action in the Actions list. The settings dialog box reappears. At this point, you can
change any of the options described in the previous steps, except you can’t add a Go button to a jump
menu that didn’t have one to begin with. Click OK when you’re finished.
The Jump Menu Go action (available on the Behaviors panel) is useful only if you
didn’t add a Go button in step 11. In this case, if there’s a jump menu on the page
and you wish to add a Go button to it, click next to the menu, add a form button,
and then attach this behavior to it. (For more on working with forms, see
Chapter 11.)
Check Plugin
The Check Plugin behavior isn’t a navigation tool per se, but it helps you guide visitors to the right page if their Web browser is missing software it needs to view
your latest Shockwave game, Flash animation, or QuickTime movie. All these multimedia goodies can add a lot of excitement to any Web site. Unfortunately, they
don’t work unless your visitors have downloaded and installed the corresponding
browser plug-ins (see page 539 for more on this topic).
Chapter 13: Dreamweaver Behaviors
523
The Actions, One by
One
The Check Plugin behavior can detect whether your visitor’s browser has the
required plug-in installed (Flash, Shockwave, LiveAudio, Netscape Media Player,
or QuickTime)—and if not, it can redirect your visitor to a special page for such
less-fortunate Web surfers. Again, this behavior works in theory. In reality, it
doesn’t work with Internet Explorer—the most popular Web browser—except in
the case of Flash and Shockwave. That’s because Internet Explorer doesn’t have an
easy way to determine which plug-ins are installed. With Flash and Shockwave,
however, Dreamweaver adds some additional code in VBScript, a language understood by Internet Explorer.
Because of this limitation, it’s really best to use this behavior just for determining if the
plug-ins for these Adobe technologies are installed, and skip the other plug-in options.
You can attach this behavior to the <body> tag and trigger it with the onLoad event.
You may want to include this behavior on your home page to detect if the Flash
plug-in is installed in your visitor’s browser; if it is, you can either send visitors off to
your crazy Flash page or keep them on the home page. Alternatively, you could add
this behavior to a link with an onClick event. That way, when your visitors click the
link, they see one page if they have the plug-in, and another if they don’t.
When you choose Check Plugin from the + menu in the Behaviors panel, the
Check Plugin dialog box (Figure 13-13) lets you adjust the following settings:
• Plugin. From the pop-up menu, choose the plug-in’s name, or type its name in
the Enter field.
The plug-in options in the menu are Flash, Shockwave, LiveAudio, Netscape
Media Player, and QuickTime. Only the Flash and Shockwave options work
with Internet Explorer, and some don’t work with other browsers. In Safari, for
example, this behavior doesn’t work for detecting Apple’s QuickTime player.
Figure 13-13:
If you leave the “If found,
go to URL” field empty,
the visitor who has the
correct plug-in installed
stays right there on the
same page. Use this
arrangement when you
apply the action to a
<body> tag with an
onLoad event and the
page contains the plug-in
object.
• If found, go to URL/Otherwise, go to URL. Using these text fields, specify the
Web pages to which your visitor is directed if the plug-in is—or isn’t—installed.
You can indicate these pages just as you would any link (see page 159). If the
Web page is part of the site you’re working on, click Browse to locate and open
the Web page document.
524
Dreamweaver CS3: The Missing Manual
The Actions, One by
One
The “Otherwise, go to URL” page can let visitors know that they need a plug-in
to view the site. It should also offer a link to the site where they can download
the plug-in.
• Always go to first URL if detection isn’t possible. Remember that Internet
Explorer can’t detect all plug-ins. It wouldn’t make sense to send Internet
Explorer people to a “You don’t have the correct plug-in” page when they have
the plug-in installed. If you turn on this checkbox, your Web page assumes that
the plug-in is installed if it can’t determine otherwise.
Note: However you plan to use this action, always make sure that you give visitors who don’t have the
plug-in a way to quickly and easily download and install it, so they can return to your site to bask in the
glorious multimedia experience you’ve created for them.
Image Actions
Images make Web pages stand out. But adding Dreamweaver behaviors can make
those same images come to life.
Preload Images
It takes time for images to load over the Internet. A 16 KB image, for instance,
takes about 4 seconds to download over a 56k dial-up modem. However, once a
Web browser loads an image, it stores the image in its cache, as described on page
607, so that it loads extremely quickly if a page requires the same graphic again.
The Preload Images action takes advantage of this fact by downloading images and
storing them in the browser’s cache, even before they’re actually needed.
Preloading is especially important when using mouse rollover effects on a Web page
(see page 229). When a visitor moves the mouse over a particular button, it may, for
example, appear to light up. If you couldn’t preload the image, then the lit-up
graphic wouldn’t even begin to download until the cursor rolled over the button.
The resulting delay would make your button feel less like a rollover than a layover.
If you use the Insert Rollover Image command (see page 229), you won’t need to
apply this action by hand, since Dreamweaver adds it automatically. But there are
exceptions, such as when you use the CSS background property (page 217) to add
an image to the hover state of a link (see page 172). In this case, a new background
image appears when the link is moused over; however, a Web browser only loads
that image when the hover state is triggered, not before.
To add the Preload Images action, select the tag you want to attach the behavior to.
You’ll usually use the <body> tag with an onLoad event.
If you’ve added rollover images to your page, this behavior may already be in the
<body> of the page. In this case, just double-click the Preload Images action that’s
already listed in the Behaviors panel. If not, just choose this action’s name from the
+ menu in the Behaviors panel. Either way, you’re now offered the Preload Images
dialog box.
Chapter 13: Dreamweaver Behaviors
525
The Actions, One by
One
Click the Browse button and navigate to the graphics file that you wish to preload,
or type in the path or (if the graphic is on the Web already) the absolute URL of
the graphic. Dreamweaver adds the image to the Preload Images list. If you want to
preload another image, click the + button and repeat the previous step. Continue
until you’ve added all the images you want to preload.
You can remove an image from the list by selecting it and then clicking the
minus sign (–) button. (Be careful not to delete any of the images that are
required for a rollover effect you’ve already created—the Undo command
doesn’t work here.)
When you click OK, you return to your document and your new action appears in
the Behaviors panel. Here you can edit it, if you like, by changing the event that
triggers it. But unless you’re trying to achieve some special effect, you’ll usually use
the onLoad event of the <body> tag.
That’s all there is to it. When your page loads in somebody’s browser, the browser
continues to load and store those graphics quietly in the background. They’ll
appear almost instantly when they’re required by a rollover or even a shift to
another Web page on your site that incorporates the graphics you specified.
Swap Image
The Swap Image action exchanges one image on your page for another. (See
the end of this section for detail on Swap Image’s sibling behavior, Swap Image
Restore.)
Simple as that process may sound, swapping images is one of the most visually
exciting things you can do on a Web page. Swapping images works something like
rollover images, except that a mouse click or mouse pass isn’t required to trigger
them. In fact, you can use any tag and event combination to trigger the Swap
Image action. For instance, you can create a mini slideshow by listing the names of
pictures down the left side of a Web page and inserting an image in the middle of
the page. Add a Swap Image action to each slide name, so that the appropriate picture swaps in when your visitor clicks any one of the names.
To make this behavior work, your Web page must already contain a starter image,
and the images you want swapped in must be the same width and height as the
original graphic. If they aren’t, the browser resizes and distorts the subsequent pictures to fit the “frame” dictated by the original.
To add the Swap Image behavior, start by choosing the starter image file that you
want to include on the page. (Choose Insert ➝ Image, or use any of the other techniques described in Chapter 6.) Give your image a name in the Property inspector,
so that JavaScript knows which image to swap out. (JavaScript doesn’t really care
about the original graphic image itself, but rather about the space that it occupies
on the page.)
526
Dreamweaver CS3: The Missing Manual
The Actions, One by
One
Note: You can swap more than one image using a single Swap Image behavior (Figure 13-14). Using
this trick, not only can a button change to another graphic when you mouse over it, but any number of
other graphics on the page can also change at the same time. An asterisk (*) next to the name of an
image in the Swap Image dialog box (see Figure 13-15) indicates that the behavior will swap in a new
image for that particular graphic. In the example in Figure 13-15, you can see that two images—horoscope
and ad, both marked by asterisks—swap with a single action.
Figure 13-14:
You can use the Swap
Image behavior to make
multiple graphics change
with a single mouseover.
A humble Web page
(top) comes to life when
the mouse is moved over
the Horoscopes button
(bottom). Not only does
the graphic for the
Horoscopes button
change, but the ad on the
left sidebar is also
replaced with a
tantalizing look at the
“Sign of the Month.” This
type of effect, sometimes
called a disjoint rollover,
is easy with the Swap
Image action.
Chapter 13: Dreamweaver Behaviors
527
The Actions, One by
One
Now select the tag you want to attach the Swap Image behavior to. When you
choose this action’s name from the Behaviors panel, the Swap Image dialog box
appears, as shown in Figure 13-15.
• Images. From the list, click the name of the starter image.
• Set source to. Here’s where you specify the image file that you want to swap in.
If it’s a graphics file in your site folder, click Browse to find and open it. You
can also specify a path or an absolute URL to another Web site, as described on
page 163.
• Preload images. Preloading ensures that the swap action isn’t slowed down
while the graphic downloads from the Internet.
• Restore images onMouseOut. You get this option only when you’ve applied
this behavior to a link. When you turn this checkbox on, moving the mouse off
the link makes the previous image reappear.
Swap Image Restore
The Swap Image Restore action returns the last set of swapped images to its original
state. Most designers use it in conjunction with a rollover button so that the button
returns to its original appearance when the visitor rolls the cursor off the button.
You’ll probably never find a need to add this behavior yourself. Dreamweaver
automatically adds it when you insert a rollover image and when you choose the
“Restore images onMouseOut” option when setting up a regular Swap Image
behavior (see Figure 13-15). But, if you prefer, you can add the Swap Restore
Image behavior to other tag and event combinations, using the general routine
described on page 503. (The Swap Image Restore dialog box offers no options to set.)
Figure 13-15:
Some actions, like the Swap Image
action, can automatically add
behaviors to a Web page. In this
case, the “Preload images” and
“Restore images onMouseOut”
options actually add a Swap Image
Restore action to the onMouseOut
event of the currently selected tag,
and a Preload Images action to the
onLoad event of the <body> tag.
Set Navigation Bar Image
The Navigation Bar object’s enticing name tricks many people into thinking that
they can quickly and easily build a useful navigation bar for their sites. They can,
sort of, but the object adds lots of additional JavaScript code that’s easily avoided
528
Dreamweaver CS3: The Missing Manual
The Actions, One by
One
by simply using Dreamweaver’s “Rollover image” feature. The Navigation Bar is
really a tool for those outdated dinosaurs—frames-based Web sites (see the box on
page 163).
You’re better off skipping the Navigation Bar object and using the Spry Menu Bar
discussed on page 175 instead.
Message Actions
Communication is why we build Web sites: to tell a story, sell a product, or provide useful information that can entertain and inform our visitors. Dreamweaver
can enhance this communication process with actions that provide dynamic feedback. From subtle messages in a browser’s status bar to dialog boxes that command a visitor’s attention, Dreamweaver offers numerous ways to respond, in
words, to the things your visitors are doing on your Web pages.
Popup Message
Use the Popup Message behavior to send important messages to your visitors, as
shown in Figure 13-16. Your visitor must click OK to close the dialog box. Because
a pop-up message demands immediate attention, reserve this behavior for important announcements.
Figure 13-16:
Here, a pop-up message
indicates that a Web
form wasn’t correctly
filled out.
Chapter 13: Dreamweaver Behaviors
529
The Actions, One by
One
To create a pop-up message, select the tag to which you want the behavior
attached. For example, adding this action to the <body> tag with an onLoad event
causes a message to appear when a visitor first loads the page; adding the same
behavior to a link with an onClick event makes the message appear when the visitor clicks the link.
From the Add Action menu (+ button) in the Behaviors panel, choose Popup Message. In the Popup Message dialog box, type the message that you want to appear
in the dialog box. (Check the spelling and punctuation carefully; nothing says
“amateur” like poorly written error messages, and Dreamweaver’s spell-checking
feature isn’t smart enough to check the spelling of these messages.) Then click OK.
Note to JavaScript Programmers: Your message can also include any valid JavaScript expression.
To embed JavaScript code in a message, place it inside braces ({ }). If you want to include the current
time and date in a message, for example, add this: {new Date( )}. If you just want to display a brace in the
message, add a backslash, like this: \{. The backslash lets Dreamweaver know that you really do want a {
character—and not just a bunch of JavaScript—to appear in the dialog box.
Set Text of Status Bar
Pop-up messages, like those described above, require your visitors to drop everything and read them. For less urgent messages, consider the “Set Text of Status
Bar” behavior. It displays a message in the status bar of a browser window—the
strip at the bottom of the window. You can add a message to a link, for example,
that lets visitors know where the link takes them. Or you could set things up so
that when a visitor moves the cursor over a photograph, copyright information
appears in the window’s status bar.
Note: The “Set Text of Status Bar” effect was common in the early days of the Web, but its popularity has
waned for several reasons: People don’t always notice their status bars. The bar is down at the bottom of
the browser window and doesn’t change dramatically—flash, blink, or sing, for example—when text
appears. What’s worse, visitors can hide the status bar and never see your message. And finally, the
behavior doesn’t work in many newer browsers like Opera, Safari, and Firefox.
To apply the “Set Text of Status Bar” action, select a tag (a very common example
is a link [<a>] tag with the onMouseOver event); choose this behavior’s name
from the Add Action menu (+ button) in the Behaviors panel; and then, in the
“Set Text of Status Bar” dialog box, type your message. Keep the message short,
since browsers cut off any words that don’t fit in the status bar. Your message can
also include any valid JavaScript expression, as described in the Note above.
Set Text of Text Field
Normally, a text field in a form (see page 408) is blank. It sits on the page and waits
for someone to type in it. The “Set Text of Text Field” behavior, by contrast, can
save your visitors time by filling in form fields automatically with obvious answers.
530
Dreamweaver CS3: The Missing Manual
The Actions, One by
One
For instance, imagine you’ve created a Web survey that has a series of questions. The
first question might require a yes or no answer, along the lines of “Do you own a computer?” And you’ve provided radio buttons for Yes or No. The second question might
be “What brand is it?” followed by a text field where your visitors can type in the brand.
But if someone answers “No” to question 1, there’s no point in her typing a
response to the second question. To help keep things moving along, you can set
the second question’s text field so that it says, “Please skip to Question 3.” To do
so, simply add the “Set Text of Text Field” action to the onClick event of the No
radio button of Question 1.
To apply the “Set Text of Text Field” action, make sure your page includes a form
and at least one text field. Because this behavior changes the text in a form text
field, you won’t get very far without the proper HTML on the page.
Select the tag to which you want the behavior attached. In the example above, you’d
attach the behavior to the form’s No radio button with an onClick event. However,
you aren’t limited to form elements. Any of the tags discussed on pages 506–510 work.
When you choose “Set Text of Text Field” from the + menu in the Behaviors
panel, the “Set Text of Text Field” dialog box opens. Make the following changes:
• Text field. The menu lists the names of every text field in the form; choose the
name of the text field whose default text you want to change. (See Chapter 11
for the full story on building online forms in Dreamweaver.)
• New text. Type the text you want that field to display. Make sure you don’t make
the message longer than the space available in the field. If you leave the New Text
field blank, the contents of the field will be erased. Once again, your message can
include a JavaScript expression, as described in the Note on page 530.
Set Text of Container
Another way to get your message across is to change the text that appears inside
any element with an ID applied. For example, this might be a <div> tag, an absolutely positioned element (see page 335), or just a paragraph with its ID property
set. This action also lets you use HTML code to format the message that appears in
the layer. (Actually, the “Set Text” part of this action’s name is a bit misleading,
since this action also lets you include HTML code, images, forms, and other
objects in the layer—not just text.)
As always, you start by selecting a tag. In this case, you could select a link, for
example, so that moving the mouse over the link changes the text inside a <div> to
read, “Click here to see our exclusive photos of unexplained phenomena.”
When you choose this action’s name from the + menu in the Behaviors panel, you
get these controls in a dialog box:
• Container. The menu lists the names of every element on the Web page with an
assigned ID (see page 284 for more on IDs); choose the name of the container
whose text you want to set.
Chapter 13: Dreamweaver Behaviors
531
The Actions, One by
One
• New HTML. In this field, type the text you wish to add to the layer. You can
type in a plain-text message or use HTML source code to control the content’s
formatting.
For instance, if you want a word to appear bold in the layer, place the word
inside a pair of strong tags like this: <strong>important</strong>. Or if you’d
rather not mess around with HTML code, you can design the content using
Dreamweaver’s Design view—that is, right out there in your document window. Copy the HTML source from the Code view (Chapter 10), and then paste
it into this action’s New HTML field.
Text of Frame
Like the “Set Text of Layer” action, the “Set Text of Frame” action replaces the
content of a specified frame with HTML you specify. It’s like loading a new Web
page into a frame, only faster. Since the HTML is already part of the page that contains this action, your visitors don’t have to wait for the code to arrive from the
Internet.
To apply the “Set Text of Frame” action, create frameset and frame pages. (For more
about frames, see the online chapter about frames, which you can find at www.
sawmac.com/missing/dw8/chapters.php.) When you select a tag in any of the frames—
even the one whose content you intend to replace—and then choose this action from
the + menu in the Behaviors panel, the “Set Text of Frame” dialog box opens:
• Frame. The menu lists the names of every available frame. Choose the frame
where you want the text to appear.
• New HTML. Type the text you want the frame to display. You can type in a
plain-text message, or use HTML source code to control the content’s formatting: <strong> like this </strong> for bold, for example.
You can also copy the HTML currently in the frame by clicking the Get Current
HTML button, which copies the HTML source into the New HTML Field.
Once it’s there, you can modify it as you see fit. Use this technique if, for example, you want to keep much of the formatting and HTML of the original page.
Be careful, however: This action can only update the body of the frame; any
code in the <head> of the frame is lost. You can’t add behaviors, meta tags, or
other <head> content to the frame.
• Preserve Background Color. This option ensures that the background color of
the frame won’t change when the new text appears.
Element Actions
Dreamweaver includes several tools that let you manipulate the appearance and
placement of any element on a page.
532
Dreamweaver CS3: The Missing Manual
The Actions, One by
One
Show-Hide Elements
Do you ever stare in awe when a magician makes a handkerchief disappear into
thin air? Now you, too, can perform sleight of hand on your own Web pages, making HTML disappear and reappear with ease. Dreamweaver’s Show-Hide Elements
behavior is a piece of JavaScript programming that lets you make your own magic.
Show-Hide Elements takes advantage of the Visibility property. You can use it for
things like adding pop-up tooltips to your Web page, so that when a visitor’s
mouse moves over a link, a paragraph appears offering a detailed explanation of
where the link goes (see Figure 13-17).
The following steps show how to create this effect:
1. Add absolutely positioned divs to your Web page using the techniques
described on page 343. Use the Visibility setting (page 339) to specify how you
want each div to look when the page loads.
If you want a layer to be visible at first and then disappear when your visitor
performs a specific action, set the layer to Visible. If you want it to appear only
after some specific event, set it to Hidden.
Note: You don’t have to use an absolutely positioned div to take advantage of this behavior; any element
with an ID applied to it can be hidden or shown. (See page 284 for more on IDs and page 335 for more
on absolute positioning.)
2. In the Tag selector, click the tag to which you want the behavior attached.
Web designers often attach behaviors to link (<a>) tags. But you can also attach
them to images or, as in Figure 13-17, to an image map, which defines hotspots
on a single graphic.
To create this effect, attach two behaviors to each hotspot in the document
window (that is, to each <area> tag in HTML): one to show the div, using
the onMouseOver event, and one to hide the div, using the onMouseOut
event.
Note: If this is all Greek to you, see page 226 for more on image maps and hotspots.
3. If it isn’t already open, choose Window
panel.
➝
Behaviors to open the Behaviors
The Behaviors panel (as pictured in Figure 13-1) appears. It lets you add,
remove, and modify behaviors.
4. Click the + button on the panel. Select Show-Hide Elements from the menu.
The Show-Hide Elements window appears (see Figure 13-18). You’ll use this
window to tell Dreamweaver what div you intend to work with first.
Chapter 13: Dreamweaver Behaviors
533
The Actions, One by
One
Figure 13-17:
Using Dreamweaver’s
Show-Hide Elements
behavior, you can make
elements appear and
disappear. In this
example, several
elements lay hidden on
the page. When a visitor
moves the mouse over
different parts of the tree
cross-section, informative
graphics (each placed in
a hidden element)
suddenly appear. Moving
the mouse away returns
the element to its hidden
state. Notice how the
information bubble
overlaps the tree image
and the text above it—a
dead giveaway that this
page uses absolutely
positioned divs.
5. Click an element in the list of named elements.
It’s useful to give your elements descriptive ID names so you can easily distinguish which is which in a list like this one.
6. Choose a Visibility setting for the elements by clicking one of the three buttons: Show, Hide, or Default.
You’re determining what happens to the element when someone interacts with
the tag you selected in step 2. Show makes the element visible, Hide hides the
element, and Default sets the element’s Visibility property to the browser’s
default value (usually the same as the Inherit value described on page 340).
The choice you selected appears in parentheses next to the layer’s name, as
shown in Figure 13-18.
Figure 13-18:
This box lets you hide or show any
element on the page. In fact, you can
control multiple elements at once. Here,
the “toolTip1” div appears, while the div
“toolTip2” disappears, when the behavior
is triggered. Other elements—like an
HTML form and a form field (both have
IDs so they appear here)—are unaffected
by this particular action.
534
Dreamweaver CS3: The Missing Manual
Advanced Behaviors
7. If you like, select another element and then apply another visibility option.
A single Show-Hide Elements action can affect several elements at once. A single
action can even make some visible and others invisible. (If you apply an action to an
element by mistake, select the same option again to remove it from that element.)
8. Click OK to apply the behavior.
The Show-Hide Elements action is now listed in the Behaviors panel, as is the
event that triggers it.
Once you’ve added Show-Hide Elements, you can preview the behavior in a Web
browser (Dreamweaver can’t display behaviors by itself). Like other Dreamweaver
behaviors, you can edit or delete this action; see page 505.
Draggable and Animated Divs
Dreamweaver includes a few other behaviors for working with absolutely positioned divs. The Drag AP Div behavior lets you create pages with AP divs that you
can freely position anywhere on the Web page (think interactive jigsaw puzzle).
The Timeline behavior lets you create animations, allowing your divs to travel
freely around a page. Both of these were cool behaviors in their day, but they
haven’t been updated for years. Not only do they add lots and lots of JavaScript
code that really weighs down your Web page, but they’re also based on really old
code that isn’t guaranteed to work in any new browser. In fact, Adobe even recognized that the code was so old; when they first released Dreamweaver MX 2004,
they temporarily removed the animation features. (The few, die-hard fans of the
animation tools raised such a ruckus that Adobe put them back in.)
At any rate, the tools still sort of work. If you’re interested in them, you’ll find instructions on how to use them online at www.sawmac.com/missing/dw8/chapters.php.
Advanced Behaviors
Dreamweaver has two advanced behaviors that let you call custom JavaScript functions and change the properties of various HTML elements. Both of these actions
require familiarity with JavaScript and HTML (Chapter 10). Unlike the other Dreamweaver behaviors, these two can easily generate browser errors if used incorrectly.
Call JavaScript
You can use the Call JavaScript behavior to execute a single line of JavaScript code
or to call a JavaScript function that you’ve added to the <head> section of your
Web page.
When you select a tag and choose this behavior’s name from the Behaviors panel,
the Call JavaScript dialog box opens. If you want to execute a single line of JavaScript
code, simply type it in. For instance, if you want to make the browser window
close, type window.close( ). If you want to call a JavaScript function, type the function name, like this: myFunction( ).
Chapter 13: Dreamweaver Behaviors
535
Advanced Behaviors
POWER USERS’ CLINIC
Closing Browser Windows with the Call JavaScript Behavior
Suppose you’ve added an Open Browser Window behavior
to your home page, so that when visitors come to your site,
a small window opens, displaying a Web page that advertises some new feature of your site.
inspector, type javascript:; in the Link field). Next, add the
Call JavaScript behavior; in the Call JavaScript window that
appears, type the following line of JavaScript code: window.
close( ).
After they’ve read the ad, your visitors will want to close the
window and continue visiting your site. Why not make it
easy for them by adding a “Close this Window” button?
Finally, after you click OK, make sure that the event is set to
onClick in the Behaviors panel.
To do so, simply add a graphic button—text works fine, too—
and then add a dummy (null) link to it (that is, in the Property
That’s all there is to it. The link you’ve added to the pop-up
window offers a working close button.
Change Property
The Change Property behavior can dynamically alter the value of a property or
change the style of any of the following HTML tags: <div>, <span>, <img>,
<form>, <textarea>, or <select>. It can also change properties for radio buttons,
checkboxes, text fields, and password fields on forms (see Chapter 11). As with the
previous behavior, this one requires a good knowledge of HTML, CSS, and JavaScript. Dreamweaver’s built-in HTML, CSS, and JavaScript references (see page
394) can help you get up to speed.
Select a tag, choose this behavior’s name from the + menu in the Behaviors panel,
and then fill in the following parts of the Change Property dialog box (see
Figure 13-19):
• Type of element. This pop-up menu lists the 13 HTML tags that this behavior
can control. Choose the type of element whose property you wish to change.
Figure 13-19:
Caution: The Change Property
behavior requires some knowledge
of HTML, JavaScript, and CSS. All of
the options in the menu refer to
various CSS properties.
536
Dreamweaver CS3: The Missing Manual
Adding More
Behaviors
• Element ID. From this pop-up menu, choose the ID of the object you want to
modify. You’ll only see elements of the type you selected from the first menu
(for example <div> or <p> tags). Any tag of the selected type that doesn’t have
an ID applied to it will be listed, but will have the label “unidentified” next to it.
Dreamweaver will only let you choose an element with an ID.
• Property. Choose the property you want to change (or, if you know enough
about JavaScript and CSS, just type the property’s name in the Enter field). All
of the options in the menu refer to various CSS properties. For example, “colors” refers to the color property, which sets the color of text as discussed on
page 134.
• New value. Type the new value you wish to set for this property. This value
should be appropriate to the type of property you’ll be changing. For example,
if you’re changing a background color, the value should be a color, like
#FF0066. The options in the Property menu refer to CSS properties, so you’ll
find that the different possible values listed for the different CSS properties in
Chapters 4, 5, and 6 should work. For example, the fontWeight property is the
CSS Font Weight property (page 133), so you could enter a value of “bold” to
change text in an object (inside a <div> tag, for instance) to bold.
Adding More Behaviors
Dreamweaver’s behaviors can open a new world of interactivity. Even if you don’t
understand the complexities of JavaScript and cross-browser programming, you
can easily add powerful and interesting effects that add spice to your Web visitors’
experience.
Dreamweaver comes with the preprogrammed behaviors described in this chapter, but you can download many additional behaviors from Adobe’s Exchange
Web site (www.adobe.com/exchange) or any of the Web sites mentioned on page
741. Once you’ve downloaded them, you can easily add them to Dreamweaver, as
described in Chapter 21.
Chapter 13: Dreamweaver Behaviors
537
chapter
Chapter 14
14
Flash and Other
Multimedia
With Cascading Style Sheets (Chapter 4), Spry widgets (Chapter 12), Dreamweaver Effects and Behaviors (Chapter 13), and images (Chapter 6), you can bring
your Web pages to life with interactivity and animation. But as you may have
noticed, more and more Web pages these days blink, sing, and dance with sound,
video, and advanced animation.
You can create these effects too, but you’ll need outside help from programs like
Flash (see Figure 14-1) or Director, or the Java programming language, all of
which are designed to create complex multimedia presentations. Dreamweaver
provides powerful tools for adding these external media files and embedding them
into your Web pages.
Four warnings, however. First, while all of the technologies discussed in this chapter let you expand your Web pages into new and exciting territory, they also
require that your site visitors have external applications (not just a Web browser).
These programs, usually called plug-ins, are a bit controversial in the Web development community, mainly because they can limit your audience. Not all Web site
visitors have the necessary plug-ins installed on their computers. Those guests
must choose from three equally unpalatable options: go to a different Web site to
download the plug-in, skip the multimedia show (if you’ve built a second, plug-in–
free version of your site), or skip your Web site entirely. All media types in this
chapter require a plug-in of some kind; see each section for more detail.
Second, it’s worth noting that these effects can bulk up your Web site considerably, making it slower to load and making it still more likely that some of your visitors (especially those using dial-up modems) won’t bother sticking around.
539
Flash: An
Introduction
Figure 14-1:
Some Web pages, like
the Disney.com home
page, are created almost
entirely with Flash. The
interactivity, animation,
and video playback
abilities of Flash make it
a great technology for
entertainment Web sites.
Ultimately, however, you
still need an HTML file to
display the Flash movie.
Third, these flashy multimedia effects are easy to overuse. Blink and flash too
much, and you’ll find your audience beating a hasty retreat for the cyber-exits.
Finally, creating external movies, animations, or applications is an art (and a book
or two) unto itself. This chapter is a guide to inserting such add-on goodies into
your Web page and assumes that a cheerful programmer near you has already
created them.
Note: For the full scoop on Flash, pick up a copy of Flash CS3: The Missing Manual.
Flash: An Introduction
Flash is the standard for Web animation, complex visual interaction, and what has
become known as “Rich Internet Applications” (which is just a fancy way of saying
you can make a Web page work a lot like a desktop program). Adobe’s Flash technology produces high-quality animated images—known as Flash movies—at a relatively small file size. Its drawings and animations are vector graphics, which means
that they use mathematical formulas to describe objects on the screen. By contrast,
bitmap technology like GIF and JPEG include data for every pixel of an image, gobbling up precious bytes and adding download time. Flash’s vector graphics, on the
other hand, save file size with their compact mathematical expressions.
540
Dreamweaver CS3: The Missing Manual
Flash: An
Introduction
Flash can also handle MP3 audio, video playback, and advanced programming features, providing an added dimension of sound, video, and interactivity that can
make a plain HTML page look dull by comparison. For example, sophisticated
Flash gurus can build automatic score tracking into an online game or add a cannonfiring animation each time the player clicks the mouse. While Dynamic HTML
(see Chapter 13) can do some of these things, Flash movies are easier to create. An
intriguing advantage of Flash movies is that they look and work exactly the same in
every browser, whether on Windows, Mac, or even Linux.
Of course, all of this power comes at a price. Although Dreamweaver has some limited Flash-creation abilities (such as the Flash buttons feature, discussed on page 231)
you need another program, such as Adobe Flash or Swish (www.swishzone.com) to
produce full-fledged movies. These programs aren’t difficult to learn, but they’re
more programs to buy and more technologies to get under your belt.
Furthermore, your visitors can’t play Flash movies without the Flash Player plug-in
(see page 229). If they don’t have it, they’ll need to download and install it—a sure
spontaneity killer. Fortunately, chances are your visitors already have Flash Player,
since all major browsers (even Opera) now come with the Flash plug-in installed.
In fact, Adobe says that (insert grain of salt here) over 98 percent of Web browsers
in use now have some version of the Flash Player (a much smaller percentage has
the latest version of the player).
Inserting a Flash Movie
To insert a Flash movie into a Web page, click where you want to insert the movie,
and then choose Insert ➝ Media ➝ Flash (or, on the Common tab of the Insert bar,
choose Flash from the Media menu [circled in Figure 14-2]). Either way, a Select File
dialog box appears. Navigate to the Flash movie file (look for an .swf extension) and
double-click it. Dreamweaver automatically determines the width and height of the
movie and generates the appropriate HTML to embed it into the page.
Figure 14-2:
The Media menu on the Insert Bar’s Common tab is
where old Web technologies go to die. Only Flash and
Flash video are commonly used on Web sites these
days.
Chapter 14: Flash and Other Multimedia
541
Flash: An
Introduction
Note: In addition to the HTML required to add a Flash movie to a page, Dreamweaver CS3 also links to a
JavaScript file that’s used when the Web page is viewed. The purpose of this Javascript code is to overcome security settings in some versions of Internet Explorer that force a visitor to click on the Flash movie
before it can play. You’ll have to upload this Javascript file—it’s contained in the Scripts folder and is
named AC_RunActiveContent.js—to your Web server, along with the Flash movie and the Web page. (See
page 620 for more on uploading files to a Web site.)
The movie appears as a gray rectangle with the Flash logo in the center; you can
adjust its settings as described in the next section.
Tip: You can also drag a Flash movie file from the Files panel (see page 567) into the document window. Dreamweaver automatically adds the correct code.
POWER USERS’ CLINIC
The <object> and <embed> Tags
If you choose View ➝ Code after inserting a Flash movie,
you may be surprised by the amount of HTML Dreamweaver deposits in your page. You may also encounter
some HTML tags you’ve never heard of, including
<object>, <embed>, and <param>. These tags provide
browsers with the information they need to launch Flash
Player and play a Flash movie. Other embedded media
(Shockwave, for example) make use of these tags, too.
The <object> and <embed> tags do the same thing in different browsers. Some browsers (including Netscape, Opera,
Internet Explorer for Mac, and Mozilla) use <embed> to
insert movies and other plug-in media, while Internet
Explorer for Windows uses the <object> tag to insert ActiveX
controls (Microsoft’s own kind of plug-in technology). For
maximum browser compatibility, Dreamweaver adds both
tags. Browsers ignore HTML tags that they don’t understand,
so this method doesn’t cause problems.
To preview Flash files directly in Dreamweaver, just select the movie and then click
the Play button on the Property inspector (see Figure 14-3). To stop the movie,
click the same button, which has now become a Stop button.
Figure 14-3:
When you insert a Flash
movie into a page,
Dreamweaver tracks the
original Flash file. When
you click the Edit button
here, the file opens in
Flash for you to edit.
Note: When inserting a Flash movie, an “Object Tag Accessibility Options” window appears. This window lets
you set options that are intended to make accessing the Flash content easier, but they don’t really work in most
browsers. If you don’t want to set these options, just click Cancel, and Dreamweaver still inserts the Flash movie.
To permanently turn off this window, open the Preferences window—Edit ➝ Preferences (Dreamweaver ➝ Preferences on Mac)—click the Accessibility category, and then turn off the Media checkbox.
542
Dreamweaver CS3: The Missing Manual
Flash: An
Introduction
If your page has lots of Flash movies—numerous animated buttons, say—you can
play all of them at once by pressing Ctrl+Shift+Alt+P (c-Shift-Option-P). Then
sit back and watch the show. To stop all running movies, press Ctrl+Shift+Alt+X
(c-Shift-Option-X). You can also preview Shockwave movies in Dreamweaver.
(And no wonder: Adobe makes Shockwave, too.)
EXTENSION ALERT
Who’s Got Flash?
One tricky thing about using Flash movies is that you never
know whether the people visiting your site even have the
correct version of Flash Player. For example, say you create
a snappy new Flash-based program for translating text into
different languages using Flash CS3. This cool Flash movie
will have people across the globe communicating in each
other’s language—but, unfortunately, only if they have the
latest version of Flash Player. Earlier versions don’t understand some of Flash CS3’s complex features.
Instead of making your visitors scratch their heads and
curse your name when they can’t get this cool movie to
work, you can advise them they need a newer version of
the player. Adobe offers a Flash Detection kit that includes
an extension for Dreamweaver. This kit (a collection of
instructions and sample files) lets you build pages that can
tell whether visitors have Flash Player and, if so, which version they have. For information and downloads, visit www.
adobe.com/products/flashplayer/download/detection_kit/.
Flash Movie Properties
You’ll rarely have to change the default properties Dreamweaver assigns to Flash
movies. But if you ever want to change the margin of space around a movie,
restore it to its original size after resizing it, or swap in a different movie, the Property inspector is the place to do it.
Naming a Flash movie
As with images and navigation buttons, you can use JavaScript to control Flash
movies. If you plan to use JavaScript with your Flash movie, you need to give the
Flash element a name. To do so, type the name you wish to use in the Name field
(the box directly below Flash in the Property inspector). JavaScript uses this name
to identify the movie in its code.
The movie file
The File field specifies the path to the Flash movie file on your hard drive. To select
a different file, type a new path into the File field, or click the folder icon to access
your site folder’s contents.
Src property
As with Fireworks files (see page 225), Dreamweaver can keep track of the original
Flash file you used when creating a Flash movie. That’s fortunate because, once
again, Flash movies start off in the program’s native format (as .fla files) and then
must be exported as .swf (Flash movie) files, which are viewable on the Web.
Chapter 14: Flash and Other Multimedia
543
Flash: An
Introduction
The Src property field indicates where the original Flash file is stored. Clicking the
Property inspector’s Edit button launches Flash and opens the original Flash file. You
can then make any changes you wish to the movie and, in Flash, click Done. Flash
exports the updated .swf file into your site, replacing the previous version of the file.
Movie size
Although dragging to enlarge a GIF or JPEG image can turn it into a pixellated
mess, you can usually resize Flash movies without problems, since their vectorbased images are based on mathematical formulas that scale nicely. (The exception is when you’ve included bitmap images—such as GIFs, PNGs, or JPEGs—in
your Flash movie. Then, as when resizing an image in a Web page, you’ll see distortion and pixellation in the movie.)
To resize a movie, do one of the following:
• Select the movie in the document window; drag one of the three resizing handles
that appear at the edges of the movie. To avoid changing the movie’s proportions in the process, press Shift as you drag the lower-right corner handle.
• Select the movie in the document window; type new width and height values
into the W and H boxes in the Property inspector. You can also use percentage
values, in which case Web browsers scale your movie to fit the window.
If you make a complete mess of your page by resizing the movie beyond recognition, just click Reset Size in the Property inspector.
Play options
The Loop and Autoplay checkboxes control how the Flash movie plays back. When
you turn on Loop, the Flash movie plays over and over again in an endless loop, an
approach advertisers often use in animated banner ads.
The Autoplay checkbox instructs the Flash movie to start playing when the page loads.
Note that neither of these options overrides specific programming instructions in the
Flash movie. For instance, if you’ve added a Stop action to the final frame of a movie—
an action that stops the movie at that frame—then the Loop option has no effect.
Margins
Flash movie margins are especially useful if you’ve wrapped text around the movie
on the page; they determine how much buffer space falls between the movie and
the text.
To add space above and below a selected movie, type a number of pixels into the V
space field in the Property inspector (note that you need to type only a number; don’t
add px to specify pixels). Press Enter to see the results of your change. To add space to
the left and right, type a pixel measurement in the H space field; 10 or 20 pixels usually
provides an attractive amount of space. Unfortunately, you can’t specify independent
values for each of the four margins—only top/bottom and side/side. (You can, however, accomplish this setting using Cascading Style Sheets; see page 322.)
544
Dreamweaver CS3: The Missing Manual
Flash: An
Introduction
Quality settings
If your Flash movie’s heavy data requirements overwhelm a visitor’s computer, it may
run slowly and appear choppy, especially if the animation is action-packed and complex. Not every computer on earth has at least a three-gigahertz processor and two
gigabytes of RAM. Until then, you may need to adjust the quality settings of your Flash
movies to help them look better on all computers, from the sluggish to the speedy.
By default, Dreamweaver sets the quality to High, but you can choose any of the
following four settings from the Quality menu in the Property inspector:
• High provides the best quality, but the movie may run slowly on older computers.
• Low looks terrible. This setting sacrifices quality by eliminating all antialiasing
(edge smoothing) in the movie, leaving harsh, jaggy lines on the edges of every
image. Movies set to Low quality look bad on all computers; to accommodate
both the fast and the slow, use Auto High or Auto Low.
• Auto Low forces the movie to start in Low quality mode, but to switch automatically to High if the visitor’s computer is fast enough.
• Auto High makes the movie switch to Low quality mode only if the visitor’s
computer requires it. In this way, you can deliver a high-quality image to most
visitors, while still letting those with slow computers view the movie. This mode
is the best choice if you want to provide a high-quality image but still make
your movie accessible to those with older computers.
Scaling
When you resize a Flash movie (see the opposite page), changing its original proportions, your visitors’ Web browsers scale or distort the movie to fit the newly specified
dimensions. Scaling becomes an issue particularly when, for example, you give a Flash
movie relative dimensions (setting it to, say, 90 percent of the browser window’s
width), so that it grows or shrinks as your visitor’s browser window grows or shrinks.
The Scale property lets you determine how the Flash Player plug-in scales your
movie. For example, in Figure 14-4, the top movie’s original size is 200 × 50 pixels.
But if you resize the movie so that it’s 300 × 50 pixels, one of three things may happen, depending on your choice of Scale setting:
• Show All. This setting, the default, maintains the original aspect ratio (proportions) of the movie (second from top in Figure 14-4). In other words, although
the overall size of the movie may change, the movie’s width-to-height proportion remains the same. This setting keeps the movie from distorting, but it may
also cause borders to appear on the top, bottom, or either side of the movie. (To
hide the borders, match the movie’s background color to the color on the page.)
• No Border. This setting resizes the movie according to your specifications and
maintains its aspect ratio, but may also crop the sides of the movie. Notice how
the top and bottom of “Cosmopolitan Farmer” are chopped off (third from top
in Figure 14-4).
Chapter 14: Flash and Other Multimedia
545
Adding Flash Videos
• Exact Fit. This option may stretch your movie’s picture either horizontally or
vertically. In Figure 14-4 (bottom), “Cosmopolitan Farmer” is stretched wider.
Figure 14-4:
This browser window shows the results of your
different choices in the Scale menu on the Property
inspector. A Flash movie’s Scale property specifies
how a movie should be scaled when its width and
height properties are set differently than the original
movie. If you’ve resized a movie, press F12 (optionF12) to see how it looks in a Web browser, and then,
if necessary, choose a different setting from the Scale
pop-up menu in the Property inspector.
Show all
No border
Exact fit
Alignment
You can align Flash movies relative to the paragraphs around them, just as you do
with images. In fact, the alignment options in the Property inspector work exactly
the same as the text alignment properties discussed on page 90. For example,
choosing Right from the Align menu positions the movie at the right of the screen
and wraps text around its left side. (If the movie is inside a cell, Align Right moves
it all the way to the right of the cell.)
Background color
To set a background color for a Flash movie, use the Bg Color box in the Property
inspector. This color overrides any background color set in the movie itself; it fills the
space where the movie appears when the page first loads (and the movie hasn’t).
Adding Flash Videos
In addition to animations and games, the Flash player can also project videos. In fact,
Flash video, as this feature is called, is now one of the most common methods for
putting video up on the Web. If you’ve visited a little Web site named YouTube.com,
you’ve seen Flash video. High among this format’s advantages—compared to competing standards like QuickTime or Windows Media Video—is that you can reasonably count on the fact that visitors won’t have to download additional software
to view the videos.
546
Dreamweaver CS3: The Missing Manual
Adding Flash Videos
Dreamweaver makes it a snap to add these videos to a Web page. Unfortunately,
you can’t use Dreamweaver to transform existing videos into the appropriate format (called Flash Video; format extension: .flv). Nor can you use just any old video
format, like MPEG or AVI. Instead, you need to create the Flash Video file using
one of several Adobe products. If you bought the Creative Suite 3, you’re in business; it includes the Flash Video Encoder for creating these types of files. Otherwise, you need Flash CS3 Pro or Flash 8 Pro.
Note: For a quick intro to creating Flash videos, visit www.adobe.com/designcenter/dialogbox/encode_video.
html. Adobe also dedicates an entire section of their site to Flash video: www.adobe.com/devnet/flash/video.
Fortunately, creating the .flv file is the hardest part. In just a few simple steps,
Dreamweaver can insert Flash video directly into a Web page, complete with VCRlike controls (or maybe that’s now DVD-like controls) for start, stop, pause, and
volume control.
1. Click the page where you’d like to insert the Flash video.
Like other Flash movies, you’ll want an open area of your page to place the
video.
2. Choose Insert ➝ Media ➝ Flash Video.
Or, from the Common tab of the Insert bar, select Flash Video from the Media
menu (see Figure 14-2). The Insert Flash Video window appears (see
Figure 14-5).
Figure 14-5:
The Insert Flash Video command is
probably the easiest way to add video
to your Web site. All your visitors need
is the Flash Player, which in most cases
comes preinstalled in their browser.
Chapter 14: Flash and Other Multimedia
547
Adding Flash Videos
3. Select Progressive Download from the “Video type” menu.
Dreamweaver provides two options, but the second one—Streaming Video—
requires some expensive software (the Flash Server) or a Flash video streaming
service which can run you anywhere from $10 a month to a couple hundred
dollars a month. Streaming Video is best used for live events or to handle very
large numbers of viewers. That’s why Web sites for TV networks like ABC.com
use streaming servers—it’s a more efficient method when thousands of people
are watching the same video at the same time.
Choosing Progressive Download means that the video doesn’t have to download completely before it begins playing. That way viewers don’t have to wait,
say, 30 minutes while your 40 MB movie downloads. Instead, the video starts as
soon as the first section of the file arrives on their machine; playback proceeds
while the rest of the movie downloads.
4. Click the Browse button and select the Flash Video (.flv) file you wish to add to
the page.
Due to some differences in how operating systems work, you’re better off putting your Flash Video file in the same folder as the Web page you’re adding it
to. If you want to put your Flash video files elsewhere (for instance in one dedicated Flash Video folder, or even on a different Web server) use absolute links
(see page 154) to make sure your video appears.
5. Select a skin.
The skin is the visible set of controls that you add to your video: buttons for
starting, pausing, and stopping the video; a progress bar; and various volumeadjustment controls (see Figure 14-6).
Figure 14-6:
The “Clear” skin controls lie directly over the movie
(“Clear Skin 3” is shown here). They disappear if the
mouse isn’t anywhere inside the movie, but they reappear
the moment you mouse back over the video. Try each skin
to see which fits your taste.
Movie
Skin
Play/Stop/Pause
Progress bar
Volume controls
Dreamweaver adds these controls to your video, and they’re offered in nine different styles—actually, three different types of controllers, each with three different
548
Dreamweaver CS3: The Missing Manual
Adding Flash Videos
graphical styles. Each skin includes controls for starting the video and controlling
the sounds. You also get some additional buttons for stopping and pausing the
video, and a progress bar that lets you see how far the video has progressed.
6. Click the Detect Size button.
Flash Videos contain meta-data—additional information embedded inside the
video file that describes features like dimensions, size, and so on. The Flash
video encoder adds this meta-data when you create a Flash video file. Clicking
the Detect Size button extracts the movie’s width and height; adds the width
and height of the various elements of the selected skin; and then automatically
fills in the width and height boxes in the Insert Flash Video window (see
Figure 14-5).
If for any reason your file doesn’t include meta-data, you’ll have to enter the
width and height values yourself—these settings specify how much space the
Flash video occupies on the page. Note that entering these dimensions won’t
actually distort your video—making it really, really thin, or really, really wide,
for example. No matter what size you enter, the original aspect ratio (proportions) of the movie is preserved, and extra, empty space is added to fill any area
not filled by the movie. For example, say your movie is 352 pixels wide and 288
pixels tall. If you entered width and height dimensions of 100 × 288, respectively, the movie won’t stretch like you’re watching it in fun-house mirror.
Instead, the movie appears 100 pixels wide and 82 pixels tall, with 53 pixels of
blank space above and below it.
7. If you want, turn on the “Auto play” checkbox.
Doing so makes the movie play as soon as enough video data has downloaded
from the Web. Otherwise, your site’s visitors need to press the play button to
begin the video.
8. If you want, turn on the “Auto rewind” checkbox.
If you want the movie to automatically rewind to the beginning after it’s done playing, turn on this checkbox. Your movie will then return to the first frame of the
video after it’s played through. But you may not always want to abide by the videostore credo “Be Kind, Rewind.” If your movie ends with a dramatic message—“Stay
tuned for the next exciting installment of Blind Mole Rats from Mars!”—you
might prefer to leave the movie on its last frame when it’s complete.
9. Turn on the “Prompt users to download Flash player if necessary” checkbox.
Flash Video is a relatively new and advanced technology. It requires your visitors
to have at least version 7 of the Flash Player. Turning on this checkbox presents
the few people who have an older version of the Flash plug-in with a helpful
message—and a link to the Adobe site where they can download and install the
latest Flash Player. If you want to customize the message those viewers see, type
a new message in the Message box.
Chapter 14: Flash and Other Multimedia
549
The Land of
Obsolete Web
Technology
10. Click OK to add the Flash Video to your page.
This step installs the necessary code not only for the video, but for the “Flash
detection” message from step 9 as well. You can check out the newly inserted
video by pressing F12 (Option-F12) to preview the page in a Web browser.
Note: When you upload your Web page and Flash Video to your site (see Chapter 17), you also need to
upload three additional files that Dreamweaver secretly added to your site: the JavaScript file discussed in
the Note on page 542, the FLVPlayer_progressive.swf file, and the .swf (Flash movie) file for the skin you
selected. That last file is named after the skin you chose—for example, Clear_Skin_1.swf. Save yourself
some work: When uploading your Flash-filled Web page (uploading details are on page 620) choose to
include “dependent files”; that way Dreamweaver grabs these three files for you.
The Land of Obsolete Web Technology
Dreamweaver CS3 includes many other options on the Media menu of the Insert
Bar (see Figure 14-2). Some of these options have been around since Dreamweaver was in training pants. Most of them don’t see much use on today’s Web;
they either don’t work for many users, or creating the content to work with these
technologies is so hard that few Web designers bother. In addition, some of these
technologies look like they’re being phased out by their creators.
• FlashPaper. This simple and useful technology, introduced back in the days
when Flash was owned by Macromedia, provides a simple way to export any
document (like a Word file or an Excel spreadsheet) into a Web-ready format.
Visitors can zoom in on a FlashPaper document, scroll through it, and print it
out. It’s kind of like a “light” version of a PDF file; in fact, since FlashPaper
competes with one of Adobe’s premier products—Adobe Acrobat—it may not
be around for much longer. The program that creates FlashPaper documents
used to be included in the Studio suite of programs along with Dreamweaver
and Flash, but now it’s only available as a stand-alone product.
If you happen to have the FlashPaper program, you can still use Dreamweaver to
insert a FlashPaper document (which are really just Flash movies, after all): choose
Insert ➝ Media ➝ FlashPaper, or choose FlashPaper from the Media menu on the
Common tab of the Insert bar. When the Insert FlashPaper window opens, click the
browse button and select the FlashPaper document (an .swf file), type a height and
width, and then click OK. The height and width you specify determine the size of
the “window” that contains the FlashPaper document. Viewers of your page can use
the FlashPaper controls to zoom, scroll, and print the document.
After inserting the FlashPaper document into the page, it acts like a regular
Flash movie.
• Shockwave is another Web technology that’s been around a long time. It’s the
Internet-ready form for movies created with Macromedia Director. Director
has a longer history as a program for creating CD-ROMs. But when the Web
550
Dreamweaver CS3: The Missing Manual
The Land of
Obsolete Web
Technology
exploded onto the scene, Director quickly morphed into a Web authoring tool.
As a result of its CD background, Shockwave offers complex programming possibilities, which makes it ideal for detailed, interactive presentations.
However, there are some indications that this technology either won’t be
around for much longer or will just be used by a very small group of designers.
First, Flash provides much of the functionality of Director (at least for Web
sites) and is, consequently, the much more common choice for Web designers.
Second, Director hasn’t been updated in quite some time—it’s still Director MX
2004. In addition, Adobe hasn’t changed its name: It’s still called Macromedia
Director. Finally, the Shockwave plug-in (which weighs in at a hefty 2.5 MB)
hasn’t been updated to run natively on Intel Macs. (You might not care about
this if you’re a Windows user, but it does seem to signal that Adobe isn’t too
interested in this technology.)
But if you just can’t do without Shockwave, you can insert a Shockwave movie
into a Web page just as you would any multimedia format. Click where you
want to insert the movie, and then choose Insert ➝ Media ➝ Shockwave (or
choose Shockwave from the Media menu on the Common tab of the Insert
bar). Either way, a Select File dialog box appears. Find and double-click the
Shockwave movie file (look for the .dcr extension).
• Other Multimedia Controls. Dreamweaver also includes tools for inserting
other multimedia and plug-in files. In fact, these tools have been around since
much earlier incarnations of Dreamweaver, when there really were other media
types like Java applets, ActiveX controls, and other plug-in technology. However, Java applets never really took off (their performance never quite lived up
to the hype), and ActiveX controls are limited to Internet Explorer for Windows.
FREQUENTLY ASKED QUESTION
Adding Sound to Web Pages
Hey man, I’m a rock-star in training, and I want to surprise
the world with my cool tunes. How do I put my music on
my Web site?
There are lots of different technologies that let you add
music and sound to your Web site. Most require plug-ins
that severely limit your audience (few people are going to
rush off to another Web site and download and install more
software just to enjoy your site—unless you’re U2 or William
Hung).
Flash provides the best and fastest way to add sound to a
site. Flash can import different audio formats such as MP3,
WAV (Windows), AIFF (Mac), and if you have QuickTime
installed, even more formats. You’ll have to dip into the
Flash Help files to learn how to import audio, but it’s not too
hard. If you just want ambient background music on a
page, you can even create a very small (like 1 pixel x 1 pixel)
Flash movie that simply plays back music. Follow the steps
on page 541 for inserting the Flash movie into a Web page.
There are also a few Dreamweaver extensions that let you
add sound and music to your site: Speaker from HotDreamweaver.com (www.hotdreamweaver.com/speaker)
is a $19.99 extension that lets you insert an MP3 file onto
your page that’s played back by clicking a small icon. Trio
Solutions (http://components.developers4web.com/) sells
over a dozen different MP3 player extensions; each lets
you insert CD-player-like controls (play, pause, stop, fastforward) to control playback of audio and some let you create a playlist of multiple songs.
Chapter 14: Flash and Other Multimedia
551
Part Four:
Building a Web Site
IV.
Chapter 15: Introducing Site Management
Chapter 16: Testing Your Site
Chapter 17: Moving Your Site to the Internet
4
chapter
Chapter 15
15
Introducing Site
Management
As the dull-sounding name site management implies, organizing and tracking your
Web site’s files is one of the least glamorous, most time-consuming, and errorprone aspects of being a Web designer. On the Web, your site may look beautiful,
run smoothly, and appear to be a gloriously unified whole, but behind the scenes,
it’s nothing more than a collection of varied files—HTML, images, Cascading Style
Sheets, JavaScript, Flash movies, and so on—that must all work together. The
more files you have to keep track of, the more apt you are to misplace one. A single
broken link or missing graphic can interfere with the operation of your entire site,
causing personal—even professional—embarrassment.
Fortunately, computers excel at tedious organizational tasks. Dreamweaver’s site
management features take care of the complexities of dealing with a Web site’s
many files, freeing you to concentrate on the creative aspects of design. In fact,
even if you’re a hand-coding HTML junkie and you turn your nose up at all visual
Web page editors, you may find Dreamweaver worth its weight in gold just for the
features described in this chapter and the next two.
Where the first three parts of this book describe how to create, lay out, and embellish a Web site, this part offers a bird’s-eye view of the Web production process as
you see your site through to completion and, ultimately, upload it to the Internet.
To get the most out of Dreamweaver’s site management features, you need to be
familiar with some basic principles for organizing Web files, as discussed in the
next section.
555
Structuring a Web
Site
Structuring a Web Site
When you build a Web site, you probably spend hours providing your visitors
with carefully planned links, helpful labels, and clear, informative navigation
tools. You want your site architecture—the organizational structure of your site’s
various sections—to make it easy for visitors to understand where they are, where
they can go, and how to return to where they came from (see Figure 15-1). Behind
the scenes, it’s equally important to organize your site’s files with just as much
clarity and care, so that you can find your way around when updating or modifying the site later. And, as on your home computer, a Web site’s main organizational tool is the humble folder.
Figure 15-1:
A good site has an easyto-understand structure.
Content is divided into
logical sections, and a
prominent navigation
bar—the row of buttons
below the
CosmoFarmer logo in
this image—gives visitors
quick access to the site’s
information. When
building a site, this “site
architecture” provides a
useful model for
naming and creating
the folders that hold the
site’s files.
You organize files on your computer every day, creating, say, a folder called Personal, within which are folders called Financial Planning and Vacation Pictures.
Inside the Vacation Pictures folder, you have separate folders for your memories of
Maui, Yosemite, and the Mall of America.
The same principle applies to the folders that make up a Web site: All Web sites
have one primary folder—the root folder—that holds all of the site’s Web pages,
graphics, and other files used in the site. The root folder usually contains additional folders for further subdividing and organizing the site’s files.
A good structure (see Figure 15-2) speeds up the production and maintenance of
your site by providing quick access to whatever graphic, style sheet, or Flash movie
you’re looking for. But don’t fall into the trap of becoming so obsessed that you
put every graphic or Web page you create in its own separate folder; creating a
structure for the files in a site should make your job easier, not harder.
556
Dreamweaver CS3: The Missing Manual
Structuring a Web
Site
Root folder
Home page
Graphics
Navigation graphics
Graphics used on home page
Graphics used throughout site
Figure 15-2:
Here’s a sample structure for a Web site. The root
(main) folder, htdocs, holds all of the pages in the
site. The home page, index.html, is in the root folder,
while other pages are in subfolders—one folder for
each section. The home page uses lots of graphics
that don’t appear anywhere else on the site; a folder
named home inside the img (short for images) folder
helps keep those in order. In addition, since many
pages share the same logos and other graphics,
there’s a folder called global. Finally, to keep all the
graphics used in the site’s navigation bar orderly,
there’s a nav folder. Also notice that the experts
folder (like the folder for each section of the site) has
its own default page, here called index.html, and can
contain additional subfolders (see the box on page
560).
One section of the site
CSS file
Tip: If you already have a Web site that suffers from lack of organization, it’s not too late. Dreamweaver
can help you reorganize your files quickly and accurately. Take the following rules to heart and then turn
to “Organizing Site Files” on page 567 to learn how Dreamweaver can whip your current site into shape.
Here, then, are some guidelines for effective site organization:
• Plan for future growth. Like ever-spreading grapevines, Web sites grow. Today
you may have only enough words and pictures for 10 Web pages, but tomorrow you’ll put the finishing touches on your new 1,000-page online catalog. It
may seem like overkill to create a lot of folders for a small site, but better to start
with a solid structure today than find yourself knee-deep in files tomorrow.
For instance, it’s useful to create additional folders for graphics files that appear
within each section of the site. If a section of your site is dedicated to promoting your company’s products, create a folder called products for storing product
Web pages. Create an additional folder called images to store the pictures of
those products. Then, when you add more products or images, you know right
where to put them.
Chapter 15: Introducing Site Management
557
Structuring a Web
Site
Note: While you can start with no organization plan and later use Dreamweaver to bring it all into shape
(see page 567), you may run into unforeseen problems if your site is already on the Internet. If your site’s
been up and running for a while, search engines may have indexed your site, and other Web sites may have
linked to your pages. If you suddenly rearrange the pages of your site, those cherished links from the outside
world may no longer work, and people who try to access your site from a search engine may be foiled.
• Follow the site’s architecture. Take advantage of the work you’ve already done
in organizing the content on your site. For instance, the CosmoFarmer site content is divided into five main sections: Features, Ask the Experts, Cosmo Shop,
Projects, and Horoscopes, as shown in Figure 15-1. Following this architecture,
it makes sense to create folders—features, experts, horoscopes, and so on—in the
site’s root folder for each section’s respective Web pages. If one section is particularly large, add subfolders.
• Organize files by type. After you create folders for each section of your site,
you’ll probably need to add folders for storing other types of files like graphics,
Cascading Style Sheets, external JavaScript files, and PDF files. Most sites, for
instance, make extensive use of graphics, with several graphics on each page. If
that’s the case for you, then you need to file those images neatly and efficiently.
One way to organize your graphics is to create a folder for images that appear
on your home page and another for images that appear elsewhere in the site.
Often, the home page is visually distinct from other pages on the site and contains graphics that are unique to it. You can create a folder—such as images_
home—in the root folder for images that appear only on the home page. Create
another folder—images_global, for example—to store graphics that all or most
of the pages use, such as the company logo, navigation buttons, and other frequently used icons. When you add these images to other pages of your site,
you’ll know to look for them in this folder. Alternatively, you could create an
images folder in the root of your site and add subfolders such as home, global,
and nav (see Figure 15-2). The choice of an organizational system is yours; just
make sure you have one.
• Use understandable names. While file names like 1a.gif, zDS.html, and f.css are
compact, they aren’t very explanatory. Make sure file names mean something.
Clear, descriptive names like site_logo.gif or directions.html make it a lot easier
for you to locate files and update pages.
This principle is especially important if you work as part of a team. If you’re
constantly explaining to your coworkers that 345g.gif is the banner for the home
page, changing the file name to home_banner.gif could save you some aggravation. There’s a tradeoff here, however, as long file names can waste precious
bytes. For instance, a name like this_is_the_image_that_goes_in_the_upper_
right_corner_of_the_home_page.gif is probably not a good idea.
558
Dreamweaver CS3: The Missing Manual
Structuring a Web
Site
Note: Dreamweaver employs the industry-standard .html extension for Web pages—as in index.html.
Another common extension is .htm (a holdover from the days when Windows could only use three-letter
extensions). It doesn’t really matter which you use, and if you’re used to .htm, you can easily change the
extension Dreamweaver uses. Just choose Edit ➝ Preferences (Dreamweaver ➝ Preferences on Mac) to
open the Preferences window, select the New Document category, and then type .htm in the default
extension box.
It’s also helpful to add a prefix to related files. For example, use nav_ at the
beginning of a graphic name to indicate that it’s a navigation button. In this
way, you can quickly identify nav_projects.png, nav_quiz.png, and nav_horoscopes.
png as graphics used in a page’s navigation bar, or bg_body.png and bg_column.
png for graphics used as backgrounds. As a bonus, when you view the files on
your computer or in Dreamweaver’s Files panel (see Figure 15-6), they’ll appear
neatly sorted by name; in other words, all the nav_ files cluster together in the
file list. Likewise, if you have rollover versions of your navigation graphics (see
page 229), give them names like nav_projects_over.gif or nav_ horoscopes_high.
gif to indicate that they’re the highlighted (or over) state of the navigation button. (If you use Fireworks, its button-creation tools automatically use names
like nav_projects_f1.gif and nav_projects_f2.gif to indicate two different versions
of the same button.)
• Be consistent. Once you’ve come up with a system that works for you, follow it.
Always. If you name one folder images, for instance, don’t name another graphics
and a third pretty_pictures. And certainly don’t put Web pages in a folder
named images or Flash movies in a folder named style_sheets.
In fact, if you work on more than one Web site, you may want to use a single
naming convention and folder structure for all of your sites, so that switching
among them goes more smoothly. If you name all your graphics folders images,
then no matter what site you’re working on, you already know where to look
for GIFs and JPEGs.
UP TO SPEED
Naming Your Files and Folders
The rules for naming files and folders in Windows and Macintosh are fairly flexible. You can use letters, numbers,
spaces, and even symbols like $, #, and ! when naming
folders and files on these operating systems.
Web servers, on the other hand, are far less accommodating. Because many symbols—such as &, @, and ?—have
special significance on the Web, using them in file names
can confuse Web servers and cause errors.
The precise list of no-no’s varies from Web server to Web
server, but you’ll be safe if you stick to letters, numbers, the
hyphen (-), and the underscore (_) character when naming
files and folders. Stay away from spaces. File names like
company logo.gif or This company’s president.html probably won’t work on most Web servers. Replace spaces with
underscores or inner caps—company_logo.gif or companyLogo.gif—and remove all punctuation marks.
Sure, some operating systems and Web servers permit
strange naming conventions, but why take the chance?
Someday you may need to move your site to another, less
forgiving Web server. Play it safe: keep your file names simple.
Chapter 15: Introducing Site Management
559
Structuring a Web
Site
Note: Put only files that go on your Web site in the root folder and its subfolders. Keep your source
files—the original Photoshop, Fireworks, Flash, or Word documents where you created your content—
stored elsewhere on your computer. This way, you’re much less likely to accidentally transfer a 14.5 MB
Photoshop file to your Web server (a move that would not gain you friends in the IT department). But if
you insist on keeping all those files together with your Web site files, check out Dreamweaver’s cloaking
feature (described on page 626). Using it, you can prevent certain file types from being transferred to your
Web server when using Dreamweaver’s FTP feature.
FREQUENTLY ASKED QUESTION
All Those Index Pages
Why are so many Web pages named index.html (or
index.htm)?
If you type a URL like www.missingmanuals.com into a
Web browser, the Missing Manuals home page opens on
your screen. But how did the Web server know which page
from the site to send to your browser? After all, you didn’t
ask for a particular Web page, like www.missingmanuals.
com/index.html.
When a Web server gets a request that doesn’t specify a
particular Web page, it looks for a default Web page—often
named index.html or index.htm. It does the same thing
even when the URL you’ve typed specifies (with a slash) a
folder inside the site root, like this: www.missingmanuals.
com/cds/. In this case, the Web server looks for a file called
index.html inside the cds folder and—if it finds the file—
sends it to your Web browser.
If the Web server doesn’t find an index.html file, two things
can happen, both undesirable: the Web browser may display either an ugly error message or a listing of all the files
inside the folder. Neither result is helpful to your visitors.
While your site still functions without this step, it’s good
form to give the main Web page inside each folder in your
site the proper default page name. Web servers use different names for these default pages—index.html or default.
html, for example—so check with your Web server’s administrator or help desk. In fact, you can name any page as a
default page, as long as you set up your Web server to look
for the correct default name. So if you’re creating a dynamic
site like those discussed in Part 6, you can set up a server to
look for a dynamic page like index.asp or index.php as the
default page. On many Web servers, multiple default page
names are specified, so if it doesn’t find a file named index.
html, it may then look for a file called index.php.
Defining a Site
Organizing and maintaining a Web site—creating new folders and Web pages;
moving, renaming, and deleting files and folders; and transferring pages to a Web
server—can require going back and forth between a couple of different programs.
With Dreamweaver’s site management features, however, you can do it all from
within one program. But to take advantage of these features, you must first define
the site; in other words, give Dreamweaver some basic information about it.
Defining the site involves showing Dreamweaver which folder contains your Web
site files (the root folder) and setting up a few other options. You’ve already learned
how to do this site-building using Dreamweaver’s Site Definition Wizard (see page
29) and you got a quick introduction to the advanced Site Definition window (see
page 34). Here, you’ll get a more detailed explanation of the options available in
the advanced Site Definition window.
560
Dreamweaver CS3: The Missing Manual
Structuring a Web
Site
Start by choosing Site ➝ New Site. This opens the Site Definition window (see
Figure 15-3). Click the Advanced tab to access Dreamweaver’s advanced settings.
There are ten categories of information for your site, but to get up and running,
you need to provide information only for the first category: Local Info. (The
remaining categories are discussed in Chapters 16 and 17.)
Figure 15-3:
The Basic tab of the Site
Definition window provides a
simple method for new users to
set up a Web site. But
Dreamweaver pros can take
advantage of the greater options
available under the Advanced
tab shown here. The ten
categories listed on the left side
of the window are discussed in
this and the next two chapters.
Here are the options on the Local Info tab:
Site name
Into the Site Name field, type a name that briefly identifies the site for you—and
Dreamweaver. This is the name that appears, among other places, on the Site pop-up
menu on the Files panel (Figures 15-6 and 15-8), so that you can tell what site
you’re working on. It’s just for identifying your site while working in Dreamweaver and doesn’t have any effect on the actual pages of your site.
Local root folder
Identify your site’s local root folder—the folder that contains all files belonging to
your site—by clicking the folder icon to the right of the “Local root folder” box.
The procedure is described on page 31. (Also see the box on page 33 for more
information on local root folders.)
Tip: If you’re confused about which folder should be the local root folder, just ask yourself this question:
“Which folder on my computer contains (or will contain) my site’s home page?” That’s the local root folder.
All of Dreamweaver’s tools for managing your sites’ files rely on the local root
folder. Once you’ve defined a site, you see all of its files listed in the Files panel.
Chapter 15: Introducing Site Management
561
Structuring a Web
Site
Default images folder
For a graphic image to work properly on the Web, you can’t just add it to a Web
page (Chapter 6); you also have to store a copy of the graphics file in the local root
folder or one of its subfolders. In other words, if you link to a graphic that’s sitting
on your computer’s hard drive outside of the root folder, the Web browser will
never find it.
Dreamweaver offers a feature that puts images in the right place even if you forget.
When you add a stray graphics file to a page in your site, the program automatically copies the file into your default images folder. In fact, even if you drag a
graphic from your desktop onto a Web page in progress, Dreamweaver copies the
file to the default images folder without missing a beat.
The process of choosing the default images folder is the same as selecting a
local root folder. Click the folder icon and select the proper folder, which can
be an existing folder in your local root or a new one you create on the spot.
(For example, this could be a folder named images or images_global in your
local root folder.)
Links relative to
As discussed on page 153, there are a variety of ways to link to a Web page. When
linking to another page in your site, Dreamweaver lets you create document-relative
or root-relative links. Document-relative is often the easiest way to go (see page
155), but Dreamweaver offers you the flexibility to choose. Click either the Document or “Site root” radio button. Dreamweaver then uses that method when adding links between pages of your site.
Tip: You can override this setting and use whichever type of link you wish—site root-relative or documentrelative—when actually creating the link, as described on page 161.
FREQUENTLY ASKED QUESTION
Bringing Your Own Web Site
I already have a Web site. Will Dreamweaver work with it?
Yes. In fact, Dreamweaver’s site management features are
an invaluable aid in organizing the files of an existing site.
As you can read in “Organizing Site Files” on page 567, you
can use Dreamweaver to rearrange, rename, and reorganize
files—tasks that are extremely difficult and time-consuming
to do by hand.
562
Furthermore, Dreamweaver lets you clean up and reorganize a site without breaking links. So Dreamweaver is just
as useful for working with a completed site as it is for creating one from scratch.
To work on an existing site, first save a copy of all site files
on your computer, all in one folder. When defining the site
(see page 560), choose this folder for the local root folder.
Dreamweaver CS3: The Missing Manual
Structuring a Web
Site
HTTP address
This option serves two functions: first, if you use absolute URLs to link to pages
within your site (see page 154), you must fill out the “HTTP address” field for
Dreamweaver’s link-management features to work properly. Type your site’s full
URL beginning with http://. Dreamweaver uses this address to check for broken
links within your site and to correctly rewrite links if you move pages around. For
example, maybe your Webmaster has told you to link a form to http://www.yourdomain.com/cgi/formscript.php instead of using a document-relative link. In this
case, you’d type http://www.yourdomain.com/ in the “HTTP address” box. Now, if
you move or rename the formscript.php page from within Dreamweaver, the program is smart enough to update the link on the page with the form.
This setting is also incredibly valuable for one particular situation: if you’re using
site root–relative links, but the site you’re working on isn’t actually located in the
site root on the Web server. For example, maybe you’re running the marketing
department at International ToolCo. You manage just the Web pages for the marketing department, and they’re located in a folder called marketing on the Web
server. In essence you manage a sub-site, which acts as an independent site within
the larger International ToolCo site. Maybe your Webmaster demands that you
use site root–relative links—man is that guy bossy.
This is potentially a tricky situation. Here’s why: site root–relative links always begin
with a /, indicating the root folder on the Web server (for a refresher on this concept,
see page 155). Normally, if you add a root-relative link, say to the main page in a folder
named personnel located inside the local root folder, Dreamweaver would write the link
like this: /personnel/index.html. But in this case, that wouldn’t work. The personnel
folder is actually located (on the Web server) inside the marketing folder. So the link
should be /marketing/personnel/index.html. In other words, Dreamweaver normally
thinks that the local root folder maps exactly to the Web server’s root folder.
You can solve this dilemma by adding a URL that points to the “sub-site” in the
Site Definition window’s “HTTP address” box. In this example, you’d type http://
www.intltoolco.com/marketing/ in the box. Then, whenever you add a site root–
relative link, Dreamweaver begins with /marketing/ and then adds the rest of the
path to the URL. In summary, if you use site root–relative links and you’re working solely on pages located inside a subdirectory on the actual Web server, then fill
out the absolute URL to that subdirectory. Finally, add this whole rigmarole to the
list of reasons why document-relative links are easier to manage in Dreamweaver.
Case-sensitive links
Some Web servers (namely, those of the Unix and Linux variety) are sensitive to the
case used in a file name. For example, INDEX.html is a different file than index.html.
In this case, you can turn on the “Use case-sensitive link checking” box to make
sure Dreamweaver doesn’t mistake one file for another when checking links. For
example, say you link to a file named INDEX.html, but change the name of
another file named index.html to contact.html. Without this option turned on,
Dreamweaver may mistakenly update any links to INDEX.html.
Chapter 15: Introducing Site Management
563
Structuring a Web
Site
In real-world use, you probably won’t need this option. First, it’s not possible to
have two files with the same name but using different combinations of upper- and
lowercase letters in the same folder on a Mac or Windows machine. So if your local
root folder is located on your Mac or Windows computer, you’ll never be able to
get into this situation. In addition, it’s confusing (and just plain weird) to use the
same name but different cases to name your files. Revisit the rules of file naming
(see page 38) if you find yourself tempted to do this.
Cache
The cache is a small database of information about the files in your site. It helps
Dreamweaver’s site management features work more efficiently; leave this checkbox turned on.
Once you’ve provided the local information for your site, click OK to close the Site
Definition window and begin working.
Editing or Removing Defined Sites
Sometimes you need to edit the information associated with a site. Perhaps you want to
rename the site, or you’ve reorganized your hard drive and moved the local root folder
to a different location, and you need to let Dreamweaver know what you’ve done.
UP TO SPEED
Local vs. Remote Root Folders
A root folder is the main, hold-everything folder for your
site. It contains every piece of the site: all Web page documents, graphic images, CSS style sheets, flash movies, and
so on.
The word “root” implies that this is the master, outer, main
folder, in which there may be plenty of subfolders. Remember that, in most cases, your Web site exists in two locations: on your computer as you work on it, and on the
Internet where people can enjoy the fruits of your labor. In
fact, most Web sites in the universe live in two places at
once—one copy on the Internet and the original copy on
some Web designer’s hard drive.
The copy on your own computer is called the local site or
the development site. Think of the local site as a sort of
staging ground, where you build your site, test it, and modify
it. Because the local site isn’t on a Web server, and the public can’t see it, you can freely edit and add to a local site
without affecting the pages your visitors are viewing, meanwhile, on the remote site. The root folder for the version of
the site on your computer, therefore, is called the local root
folder.
When you’ve added or updated a file, you move it from the
local site to the remote site. The remote, or live, site mirrors
the local site. Because you create it by uploading your local
site, it has the same organizational folder structure as the
local site and contains the same polished, fully functional
Web pages. However, you leave the half-finished, typo-ridden drafts on your local site until you’ve perfected them.
Chapter 17 explains how to use Dreamweaver’s FTP features to define and work with a remote site.
To edit a site, open the Manage Sites dialog box (choose Site ➝ Manage Sites or, in
the Files panel, choose Manage Sites from the Site pop-up menu) and double-click
the name of the site you want to edit. The Site Definition window opens
564
Dreamweaver CS3: The Missing Manual
Structuring a Web
Site
(Figure 15-3). Now you can type a new name in the Site Name box, choose a new
local root folder, or make any other changes. Click OK to close the dialog box
when you’re done.
Tip: If you want to edit the current site’s information, there’s a shortcut. In the Files panel (Figure 15-6),
just double-click the name of the site in the Sites menu. (Mac owners need to click once to select the
name in the menu, and then click again to open the Site Definition window.)
Once you’ve finished a site and are no longer working on it, you may wish to
remove it from Dreamweaver’s list of sites. To delete a site from the list, open the
Manage Sites dialog box as described above, click to select the site you wish to
delete, and then click Remove.
A warning appears telling you that this action can’t be undone. Don’t worry; deleting the site here doesn’t actually delete the site’s images, Web pages, and other files
from your computer. It merely removes the site from Dreamweaver’s list of
defined sites. (You can always go back and define the site again, if you need to, by
following the steps on page 564.) Click Done to close the Manage Sites window.
Note: If you do, in fact, want to delete the actual Web pages, graphics, and other site components, you
can either switch to the desktop (Windows Explorer or the Finder, for example) and delete them manually, or delete them from within Dreamweaver’s Files panel, described on page 567.
Exporting and Importing Sites
When you define a site, Dreamweaver stores that site’s information in its own private files. If you want to work on your site using a different computer, therefore,
you must define the site again for that copy of Dreamweaver. In a design firm
where several people are working together on many different sites, that’s a lot of
extra setup. In fact, even if there’s just one of you working on two computers,
duplicating your efforts is a pain.
So that you can put your time to better use, Dreamweaver lets you import and
export site definitions. For example, you can back up your site definition files—in
case you have to reinstall Dreamweaver—or export a site definition for others to use.
To export a site definition:
1. Choose Site ➝ Manage Sites.
The Manage Sites window appears, listing all the sites you’ve defined
(Figure 15-4).
2. Select a site from the list, and then click Export.
If the site definition includes remote site information (see page 609), you’ll see a
dialog box called “Exporting site” (Figure 15-5). If you’re simply making a
backup of your site definition because you need to reinstall Dreamweaver, select
the “Back up my settings” radio button. (The other option, “Share settings,” is
Chapter 15: Introducing Site Management
565
Structuring a Web
Site
Figure 15-4:
The Manage Sites window is the control center for managing your sites. Add
new sites, edit old sites, duplicate a site definition, and even export site
definitions for use on another computer, or as a precautionary backup.
useful when, for example, your local root folder is on the C: drive, but the root
folder is on the E: drive on someone else’s computer, so your setup information doesn’t apply to them. It’s also handy when you don’t want to give someone else your user name and password to the Web server.)
Figure 15-5:
This dialog box lets you
back up your settings or
share them (minus your
login information) with
other people.
3. Click OK.
The Export Site panel appears.
Tip: You can export multiple sites in one step. Just select all of the sites you wish to export (Ctrl-click
[c-click] the names of the sites you wish to export), and then click the Export button.
4. In the Export Site panel, specify where you want to save the file and give it a name.
If you’re making a backup, save the file outside the local root folder (for example, with the Photoshop, Fireworks, and Word source files). Because the export
file can potentially contain the username and password you use to move files to
your site, you don’t want to keep the file anywhere in your local root folder—it
might mistakenly be uploaded to the Web server where someone might find the
file and discover your username and password.
Dreamweaver ends site definition files with the file extension .ste.
Once you have a site definition file, you can import it into any version of Dreamweaver as follows:
1. Choose Site ➝ Manage Sites.
The Manage Sites panel appears.
566
Dreamweaver CS3: The Missing Manual
Structuring a Web
Site
2. Click Import.
The Import Site panel appears. Navigate to a site definition file—look for a file
ending in .ste. Select it, and then click OK.
If you’re importing the site definition to a computer other than the one you used
to export the site, you may need to perform a few more steps. If Dreamweaver
can’t locate the local root folder in the site definition file, it asks you to select a local
root folder on the new computer, as well as a new default images folder.
Organizing Site Files
Once you’ve defined your local site, Dreamweaver helps you organize your files, create folders, and add new Web pages to your site, using the Files panel as your command center. To open the Files panel, choose Window ➝ Files, or just press F8.
In its most basic incarnation, the Files panel displays the files in the current site’s
local root folder (see Figure 15-6). This list looks and acts just like Windows
Explorer or the Macintosh Finder; you see names, file sizes, and folders. You can
view the files inside a folder by clicking the + (triangle on Mac) symbol next to the
folder (or simply by double-clicking the folder). Double-click a Web page to open
it in Dreamweaver.
Dreamweaver CS3 has added more file information to this panel: now you can see
the size of a file, the type of file, and the last time the file was modified. In previous
versions all of this information was only available when you expanded the Files
panel as described in the Figure on page 570. (If you find this new view a little too
crammed with information, you can hide any columns you don’t like—see page 568.)
Note: You can open certain types of files in an outside program of your choice by defining an external
editor for that file type. For example, you can tell Dreamweaver to open GIF files in Fireworks, Photoshop,
or another image editor. (See page 222 for more on this feature.)
You can view your site’s files in four different ways using the View pop-up menu
(shown in Figure 15-6):
• Local view shows the files in your local root folder. Folders in this view are green.
• Map view shows a map of your site (see the box on page 576).
• Remote view shows files on the Web server in the remote root folder (see page
564). Of course, before you’ve posted your site on the Web, this list is empty.
Information appears here only after you’ve set up a connection to a remote root
folder (see page 609) and connected to a Web server. Folders in this view are
yellow on Windows and blue on Macs.
• Testing Server view is useful when you’re creating the dynamic, databasedriven sites discussed in Part 6 of this book. No files appear in this view until
you’ve set up a testing server (see page 754) and connected to it. Folders in this
view are red.
Chapter 15: Introducing Site Management
567
Structuring a Web
Site
Sites menu
File-transfer tools
View menu
Expand/
Collapse
Column
dividers
Site files in local
root folder
Figure 15-6:
The Files panel, logically
enough, lists files in the
currently active Web site.
A list of all the Web sites
you’ve defined in
Dreamweaver appears in
the Sites pop-up menu; to
work on a different site,
select its name (but be
aware you can also select
files on your local file
system, potentially
tripping up
Dreamweaver’s Site
Management tools—see
the box on page 574).
You can use the Files
panel to transfer files
back and forth between
your local and remote
sites, as described on
page 620. You can also
use the panel to access a
contextual menu (circled)
that lets you perform
many file-related tasks.
Tip: If you’ve got a small monitor, the Files panel (and other panel groups) might take up too much
space to comfortably work on a Web page. You can hide (and show) all panels, including the Property
inspector and the Insert bar, by pressing F4.
Modifying the Files Panel View
Dreamweaver CS3 has stocked the Files panel with loads of new information. Previous versions of the program only listed the files in the site; now you’ll see the file
name, the size of the file, the type of file (Web page, graphic, and so on), and the
date the file was last modified. This is useful information, but if you have a relatively small monitor, you may not be able display all of that information. What’s
worse, the filenames themselves can get clipped off as Dreamweaver tries to display the other columns of information.
There are a couple of things you can do to fix this situation. First, you can resize
the width of each column by dragging one of the dividers that separates each column name (see Figure 15-6). Using this technique you can at least make the file
name column wide enough to display the complete name of each file.
If you don’t like the new columns Dreamweaver CS3 displays, you can hide any or
all of the columns. After all, how useful is listing the type of each file? The folder
icon clearly indicates when you’re looking at a folder; a file name ending in .html is
a Web page; and a JPEG file’s extension, .jpg, is clearly visible as part of the file’s
name. For most folks, that’s enough.
568
Dreamweaver CS3: The Missing Manual
Structuring a Web
Site
Unfortunately, there’s no program-wide setting to control which columns appear.
You have to define the visible columns on a site-by-site basis. Start by editing the Site
definition, following the instructions on page 564. Next, click the File View Columns category (under the Advanced tab of the Site Definition window; see
Figure 15-7). Select a column you wish to hide and turn off the Show checkbox.
The column’s status under the Show column changes from Show to Hide as shown
in Figure 15-7.
Figure 15-7:
Use the File View Columns
category to show or hide
columns of information in the
Files panel. It’s also useful for
working with Dreamweaver’s
collaborative note sharing
feature called Design Notes.
Information on Design Notes and
instructions for how to use them
start on page 637.
You can also change the order of the columns—perhaps the Modified date information is more important than the file size to you. Select a column and click the
up or down arrow. The up arrow moves the column to the left in the Files Panel,
while the down arrow demotes a column to the right in the Files panel.
Adding New Folders and Files
The Files panel provides a fast way of adding blank Web pages to your site. With
one click, you can create a new page in any folder you like, saving several steps
you’d otherwise have to perform using the File menu.
Adding files
To create a new, blank Web page, open the Files panel using one of the methods
described on page 567, and then right-click (Control-click) a file or folder in the
Files panel.
In the shortcut menu that appears, choose New File. Dreamweaver creates a new,
empty Web page. (Actually, the page doesn’t have to be empty; you can edit the file
Dreamweaver uses as its default new page, as described in the box below.)
Chapter 15: Introducing Site Management
569
Structuring a Web
Site
FOR WINDOWS PCS
The Windows Files Panel
If you’d like to expand the Files panel, so you can see a sideby-side view of both the remote site files and local site files,
click the Expand/Collapse button (labeled in Figure 15-6).
The Files panel fills the screen as shown in Figure 15-8. The
obvious drawback is that you can’t work on a Web page
while the Site window is maximized, because you can’t
even see it. Click the Expand/Collapse button again to minimize the Files panel and gain access to your document
window.
To get around this limitation, you can undock the Files panel
before clicking the Expand button: Grab the Files panel group
by its grip—the tiny column of dots to the left of the word
Files—and drag it toward the middle of the screen. (Stay away
from the edges of the screen when performing this maneuver;
touching there may simply redock the panel group.) The
panel group then becomes a floating panel. Now press the
Expand button to get the side-by-side files view. You’re now
free to resize the Files panel even after expanding it.
Testing server
Remote site
Remote site
Site map
Collapse
Local site
Figure 15-8:
Clicking the Expand/
Collapse button
maximizes the Files
panel and lets you
display two views
simultaneously. This
way, you can view both
the remote and local
sites at the same time.
Local files always appear
on the right (unless you
change the preference
setting located in the Site
category of the
Preferences window—
Ctrl+U [c-U]). The view
that appears on the left
side—Remote, Testing, or
Site Map—depends on
which view you selected
before clicking the
Expand button. To
change views, click a
different view button—
Remote, Testing, or Site
Map.
Note: The type of file Dreamweaver creates depends on the type of site you’re creating. For a plain
HTML site, Dreamweaver creates a blank HTML page. However, if you’re building a dynamic, databasedriven site like those described in Part 6, Dreamweaver creates a blank page based on the type of server
model you’ve selected. For example, if you’re building a site using PHP and MySQL, the page is a blank
PHP page (named untitled.php).
570
Dreamweaver CS3: The Missing Manual
Structuring a Web
Site
The new file appears in the Files panel with a highlighted naming rectangle next to
it; type a name for the page here. Don’t forget to add the appropriate extension
(.htm or .html) to the end of its name.
Tip: If, immediately after creating a new file in the Files panel, you rename that file and add a new extension, the contents of the file update to reflect the new file type. For example, changing untitled.html to
global.css erases all of the HTML code in the file and turns it into an empty CSS file.
POWER USERS’ CLINIC
Changing the Default New Page
Whenever you create a new Web page—for example, by
choosing File ➝ New or by right-clicking (Control-clicking)
an existing file in the Files panel—Dreamweaver gives you a
blank, white document window. But what if you always
want your pages to have gray backgrounds, or you always
want to include a link to the same external style sheet?
Every new Web page you create is actually an untitled copy
of a default template document called Default.html. You
can find this file in the Dreamweaver configuration folder.
On Windows it’s in C:\Program Files\Adobe\Adobe Dreamweaver CS3\configuration\DocumentTypes\NewDocuments.
On a Mac, you can find it in Applications ➝ Adobe Dreamweaver CS3 ➝ configuration ➝ DocumentTypes ➝ NewDocuments folder. You can open this file within
Dreamweaver and edit it however you like: change its background color, margins, text color, or whatever, so that all
subsequent new pages you create inherit its settings. Consider making a backup of this file before editing it, however,
so that you can return to the factory settings if you accidentally make a mess of it. (Also, make sure you don’t touch an
HTML fragment that probably appears to you to be incorrect: namely, the charset=” snippet, which appears at the
end of the <meta> tag. This fragment of HTML is indeed
incomplete, but when you create a new page, Dreamweaver correctly completes this code according to the
alphabet—Chinese, Korean, or Western European, for
example—that your page uses.)
You’ll also notice lots of other files in this folder. Since
Dreamweaver can create lots of different file types—Cascading
Style Sheets, Active Server Pages, and so on—you’ll find a
default blank file for each. You can edit any of these—but
don’t, unless you’re sure of what you’re doing. You can easily damage some of the more complex file types, especially
those that involve dynamic Web sites.
Adding folders
You can add folders to your site directly in Dreamweaver using the Files panel. Just
right-click (Control-click) a file or folder in the local files list. From the shortcut
menu, choose New Folder. If you clicked a file, Dreamweaver creates the new
folder in the same folder as that file; if you clicked a folder, you get a new folder
inside it.
If you crave variety, you can add a folder another way. Select a file or folder in the
Files panel and then click the contextual menu button (circled in Figure 15-6) and
select File ➝ New Folder.
Finally, in the naming rectangle that appears in the Files panel, type a name for the
new folder.
Chapter 15: Introducing Site Management
571
Structuring a Web
Site
Moving files and folders
Because the Dreamweaver Files panel looks and acts so much like the Windows
Explorer and the Macintosh Finder, you may think it does nothing more than let you
move and rename files and folders on your computer. You may even be tempted to
work with your site files directly on the Mac or Windows desktop, thinking that
you’re saving time. However, when it comes to moving the files and folders in your
site, Dreamweaver does more than your computer’s desktop ever could.
In your Web travels, you’ve probably encountered the dreaded “404: File Not
Found” error. This “broken link” message doesn’t necessarily mean that the page
doesn’t exist, just that your Web browser didn’t find the page at the location
(URL) specified by the link you just clicked. In short, someone working on that
Web site probably moved or renamed a file without updating the link. Because
Web site files are interrelated in such complex ways—pages link to other pages,
which include paths to graphics, which in turn appear on other pages—an action
as simple as moving one file can wreak havoc on an entire Web site. That’s why
you shouldn’t drag Web site files around on your desktop or rename them in Windows Explorer or the Macintosh Finder.
In fact, moving and reorganizing Web site files is so headache-ridden and errorprone that some Web designers avoid it altogether, leaving their sites straining
under the weight of thousands of poorly organized files. But you don’t have to be
one of them: Dreamweaver makes reorganizing a site easy and error-free. When
you use the Files panel to move files, Dreamweaver looks for actions that could
break your site’s links and automatically rewrites paths of links, images, and other
media (see the cautionary box on page 574).
Note to JavaScript Programmers: If your custom JavaScript programs include paths to images,
Web pages, or other files in your site, Dreamweaver can’t help you. When you reorganize your site with
the Files panel, the program updates links it created, but not paths you’ve included in your JavaScript programs.
Just be sure to do your moving from within Dreamweaver, like this: In the Files
panel, drag the folder or file into its new folder (see Figure 15-9). To move multiple files, Ctrl-click (c-click) each of the ones you want to move, and then drag
them as a group; to deselect a selected file, Ctrl-click or c-click it again. You can
also select one folder or file and Shift-click another to select all files and folders in
the list between the two.
Note: Close all of your Web documents before reorganizing your files in this way. Dreamweaver has
been known to not always correctly update links in open files. But if you do end up with malfunctioning
links, you can always use Dreamweaver’s Find Broken Links tool (see page 586) to ferret out and fix any
broken links.
When you release the mouse button, the Update Files dialog box appears
(Figure 15-9); just click Update. Dreamweaver updates all the links for you.
572
Dreamweaver CS3: The Missing Manual
Structuring a Web
Site
Tip: If you accidentally dragged the file or folder to the wrong location, click Don’t Update. Then drag the
file back to its original location and, if Dreamweaver asks, click Don’t Update once again.
Figure 15-9:
Left: You can move files and
folders within the Files panel
just as you would in Windows
Explorer or the Macintosh
Finder. Simply drag the file into
(or out of) a folder. But unlike
your computer’s file system,
Dreamweaver constantly
monitors the links between Web
pages, graphics, and other files.
Right: If you move a file using
Windows Explorer or the Finder,
you’ll most likely end up
breaking links to that file or, if
it’s a Web page, links in that file.
By contrast, Dreamweaver is
smart enough to know when
moving files will cause
problems. The Update Files
dialog box lets you update links
to and from the file you’re
moving, so that your site keeps
working.
Renaming files and folders
Renaming files and folders poses the same problems as moving them. Because
links include file and folder names, altering a file or folder name can break a link
just as easily as moving or deleting the file or folder.
For example, say you’ve created a new site with a home page named home.html.
You cheerfully continued building the other pages of your site, linking them to
home.html as you went along. But after reading this chapter and checking to find out
what default file name your Web server requires (see page 560), you found that you
need to rename your home page file index.html. If you were to rename the file index.
html using Windows Explorer or the Macintosh Finder, every link to home.html
would result in a “File not found” error.
Dreamweaver, on the other hand, handles this potential disaster effortlessly, as
long as you rename the file in the Files panel instead. To do so, just click the file or
folder in the Files panel. Pause a moment, and click the name of the file or folder.
(The pause ensures that Dreamweaver won’t think you just double-clicked the file
for editing.)
Chapter 15: Introducing Site Management
573
Structuring a Web
Site
FREQUENTLY ASKED QUESTION
Beware “Site-less” Web Design
Why doesn’t Dreamweaver warn me when I delete or
move a file?
Dreamweaver’s site management tools are always watching
your back—unless you’re not working in a site. Dreamweaver tries to be a flexible tool for use in all situations.
Some developers don’t like the whole notion of sites and
prefer to just work on their pages in the old (unmonitored)
way of most programs. And in cases where you just want to
edit a single page, but don’t want to go through the whole
business of defining a site, Dreamweaver’s Files panel lets
you browse your files, just like the regular Windows
Explorer or Mac Finder. If you click the Sites menu (where
you’d normally switch between defined sites) and scroll to
the top of the menu, you’ll see a list of hard drives and
other networked storage devices. For example, you could
select your main drive (C: or Macintosh HD, for example).
The Files panel then displays all of the files on that drive.
Unfortunately, this flexibility can also cause a lot of trouble.
Sometimes people accidentally select their hard drive
instead of their site in the Sites menu, and then navigate to
the folder holding their site’s files. They then begin working,
blissfully unaware that they’re working without Dreamweaver’s safety net. When looking at your files in this way,
changes you make to your existing site files—like moving,
deleting, or renaming—aren’t monitored by Dreamweaver
(it figures you know better). Similarly, all of Dreamweaver’s
other site management features like Libraries (Chapter 18),
templates (Chapter 18), and file transfers (Chapter 17)
don’t work when you’re off in un-site-managed-land. In
other words, it’s best to always define a site, and always
make sure you’ve selected the site’s name in the Files
panel, as you work on your Web site.
A renaming rectangle appears; type the new name. Be sure to include the proper
extension for the type of file you’re renaming. For example, GIFs end with .gif and
Cascading Style Sheets end with .css. Although Dreamweaver lets you name files
without using an extension, the extensionless files won’t work when you move
them to a Web server.
Finally, in the Update Files dialog box (Figure 15-9), click Update. Dreamweaver
updates all the links to this file or folder to reflect the new name.
Warning: It bears repeating: never rename or move files and folders outside of Dreamweaver. If you
use Windows Explorer or the Macintosh Finder to reorganize the files in your site, links will break, images
will disappear from your pages, and the earth will open underneath your feet. (Well, actually, that last
thing won’t happen, but it can feel that way when your boss comes in and says, “What’s happened to our
Web site? Nothing works!”)
If you’ve edited files outside of Dreamweaver by accident, see page 586 to learn
how to find and fix broken links.
Deleting files and folders
It’s a good idea to clean up your site from time to time by deleting old and unused
files. Just as with moving and renaming files, you delete files from the Files panel.
574
Dreamweaver CS3: The Missing Manual
Site Assets
To delete a file or folder, just click to select it in the Files panel and press Backspace or Delete. (To select multiple files or folders, Ctrl-click [c-click] them as
described on page 572.) If the doomed file or folder isn’t referenced by any other
page on the site, a simple “Are you sure you want to delete this file?” warning
appears; click Yes.
However, if other files link to the file—or to files within the folder—that you’re
deleting, then a warning dialog box (Figure 15-10) appears informing you that
you’re about to break links on one or more pages in your site.
Figure 15-10:
When you delete files in the Files panel, Dreamweaver
warns you if other pages reference (link to) the file. If
you click Yes, you’ll need to go back and repair the
links. Dreamweaver gives you a convenient way to do
so—the Change Links Sitewide command (see page
592)—and reminds you of it in this dialog box.
The message even lists the first few pages that use the file. If you’ve made a mistake, click No to leave your site untouched.
If you’re sure you wish to delete the file, click Yes. And yes, this move does break
links in all the pages listed. Repairing those links, which usually means linking
them to a new page, requires a separate step: using the Site ➝ Change Links Sitewide
command, as described on page 592.
Site Assets
Web pages integrate lots of different elements: PNGs, GIFs, JPEGs, links, colors,
and Flash movies, to name just a few. In a large site with lots of files, it’s a challenge to locate a particular image or remember an exact color.
To simplify the process, Dreamweaver provides the Assets panel. For want of a better generic term, Dreamweaver defines the term asset to mean any element you use
on a Web page, such as a GIF file, a link, or even an individual color.
Viewing the Assets Panel
Dreamweaver lists your site’s assets on the nine category “pages” of the Assets
panel (Figure 15-11). To open the panel, choose Window ➝ Assets, or press F11.
Chapter 15: Introducing Site Management
575
Site Assets
GEM IN THE ROUGH
A Map That’s Better Buried
Dreamweaver includes yet another view of your site’s files:
Site Map view. To see a map of your site choose Map View
from the Files panel’s View menu (see Figure 15-6), or,
when the Files panel is expanded, click the Site Map button
(see Figure 15-8). Unfortunately, the kind of map Dreamweaver displays isn’t the kind of nicely organized hierarchical
drawings favored by Web designers. Instead of showing the
logical organization of a site—the main sections of the site
and which page fits into which section—a Dreamweaver Site
Map is a sprawling diagram of links. In fact Site Map view
shows every link on every page of your site.
However, there is one useful feature buried in the site map—
the ability to quickly re-title Web pages (that is, change the
title that appears at the top of the browser). Perhaps you’ve
Preview
inherited a Web site from a Web designer who didn’t know
much about how to title a page (see page 38). Now it’s your
job to re-title every page with a snappy and descriptive title.
One quick way to re-title pages on a site (without opening
every single page) is with Site Map view.
To re-title pages quickly, go to Site Map view (for example,
select Map View from the View menu in the Files panel).
Choose View ➝ Site Map ➝ Options ➝ Show Page Titles
from the Files panel’s contextual menu (see Figure 15-6).
Now, each page, instead of displaying its file name—index.
html, for example—will show the page title. To change a
page’s title, select it in the Site Map and then click the title
name—this will take you into an editing mode in which you
can re-title the page.
Context menu
Images
Colors
Links
Flash
Shockwave
Movies
Scripts
Templates
Library
Asset list
Refresh the list
Add to favorites
Edit
576
Dreamweaver CS3: The Missing Manual
Figure 15-11:
Most of the commands in
the contextual menu shown
here are duplicated in the
panel itself, but three
options appear only on this
menu. Recreate Site List
comes in handy if you’ve
added or deleted files
outside Dreamweaver. It
rebuilds the site cache and
updates the list of assets.
“Copy to Site” copies the
selected asset to another
site. “Locate in Site” opens
the Files panel and
highlights the file of the
asset you selected in the
Assets panel. You can also
open a contextual menu by
right-clicking (Controlclicking) any asset in the list.
Site Assets
You select an asset in the list by clicking its name; a miniature preview appears
above the Assets list. To preview a movie, click the green arrow that appears in the
preview window.
The Assets panel highlights nine different categories of site elements. To view the
assets in a particular category, click its icon at the left of the Assets panel:
• The Images category lists all of the GIF, JPEG, and PNG files in your site.
Dreamweaver lists the dimensions of each image next to its name, so you can
quickly identify whether logo1.gif, or logo2.gif is your 728 × 90 pixel banner logo.
You can also see the images’ sizes, types, and where they’re located in the site
(you may need to scroll to the right to see all of this information).
• The Colors category shows all of the colors specified in the Web pages and style
sheets of your site. These include link colors, background colors, and text colors.
• The Links category lists all external links—not just standard http:// links, but
also email links, FTP addresses, and JavaScript links. (For an example of a JavaScript link, see the box on page 502.)
• The multimedia categories—Flash, Shockwave, and Movies—are roughly equivalent. They each display movie files with their corresponding extensions: .swf (Flash),
.dcr (Shockwave), .flv (Flash video), and .mov or .mpg (QuickTime and MPEG).
• The Scripts category lists JavaScript files. This category only includes external
script files that Web pages link to; for example, the JavaScript files that are part
of the Spry Framwork and which are attached to a Web page whenever you use
a Spry widget or effect. Scripts that are embedded into a Web page—like those
created using Dreamweaver behaviors—aren’t listed.
• The last two categories—Templates and Library—are advanced assets that
streamline Web site production. They’re discussed in Chapters 18 and 19.
You can switch between two different views for each asset category—Site and Favorites—by clicking the radio buttons near the top of the Assets panel. The Site option lists
all the assets that appear in the Site for the chosen category. Favorites lets you create a
select list of your most important and frequently used assets (see page 579).
Note: Dreamweaver’s cloaking feature lets you hide files from many sitewide tasks, including the Assets
panel. So, if you have a folder with thousands of image files that you’d rather not display on the Assets
panel, you can hide that folder and its files. See page 626 for more on this feature.
If, as you’re working on a site, you add additional assets—for example, you create a
new GIF image in Fireworks and import it to the site—you’ll need to update the Assets
panel. Click the Refresh Site List button (see Figure 15-11) to update the list of assets.
Inserting Assets
The Assets panel’s prime mission is to make using assets easier. From the Assets
list, you can add graphics, colors, and links to your pages with a click of the mouse.
Most of the categories on the panel refer to external files that you can include on a
Web page: images, Flash, Shockwave, movies, and scripts.
Chapter 15: Introducing Site Management
577
Site Assets
The easiest way to insert an asset file is to drag it from the Assets panel into the document window. You can drag the asset anywhere on the page you’d normally insert an
object—in a table cell, a <div> tag, at the beginning or end of a page, or within a paragraph. Script assets can go in the head of a Web page (see Figure 15-12).
Figure 15-12:
While you’ll insert most
assets into the body of a Web
page, you can (and usually
should) place script files in
the head of the page. To do
this, first choose View ➝
Show Head Content. Then
drag the script from the
Assets panel into the head
pane, as shown here.
(Adding a script asset doesn’t
copy the JavaScript code into
the Web page. Instead, just
as with external style sheets,
Dreamweaver links to the
script file so that when a Web
browser loads the page, it
looks for and then loads the
file from the Web site.)
(If you’re billing by the hour, you may prefer the long way: click in the document
window to plant the insertion point, click the asset’s name, and then click Insert at
the bottom of the Assets panel.)
POWER USERS’ CLINIC
The Return of Root-Relative Paths
Chapter 5 explains the different types of link paths—absolute,
document-relative, and root-relative—that Dreamweaver
understands (see page 153). While it’s best to use document-relative paths for linking to pages within your own
site, or for adding images and other media to a page, you
may notice that Dreamweaver frequently displays root-relative paths in its site management tools.
For instance, the list in the Assets panel includes the full
root-relative path of each asset—/images_home/banner.
png, for example. The initial “/” indicates the root folder of
the site, and the information that follows indicates the rest
578
of the path to that asset. In this example, the graphic asset
banner.png is in a folder called images_home, which is
itself in the site’s root folder. Dreamweaver needs to look
no further than the root folder to find the asset in question.
Root-relative paths indicate a precise location within a site
and let Dreamweaver know where to find a file. This
doesn’t mean, however, that when you use the Assets
panel to insert an image or other file, that Dreamweaver
uses site-root-relative links. Dreamweaver uses the type of
link you specified for the site as described on page 562.
Dreamweaver CS3: The Missing Manual
Site Assets
Adding color and link assets
Color and link assets work a bit differently than other asset files. Instead of standing on their own, they add color or a link to images or text you’ve selected in the
document window. (You can add colors to any text selection, or add links to
images and text.) In this way, you can quickly add a frequently used link—the URL
to download the Flash player or Adobe Reader, for example.
To do so, start by highlighting the text (to change its color or turn it into a link) or
image (to turn it into a link). In the Assets panel, click the appropriate category
button—Colors or Links. Click the color or link you want, and then click Apply.
Alternatively, you can drag the color or link asset from the panel to the selection.
Note: Applying color to text using the Assets panel either creates a new CSS style or wraps the selected
text in a <font> tag. The actual result depends on the Preferences setting described on page 38.
Favorite Assets
On a large site, you may have thousands of image files, movie files, colors, and
external links. Because scrolling through long lists of assets is a chore, Dreamweaver lets you create a compact list of your favorite, frequently used assets.
For example, you might come up with five main colors that define your site’s color
scheme, which you’ll use much more often than the other miscellaneous colors on
the Assets list. Add them to your list of favorite colors. Likewise, adding graphics
files you use over and over—logos, for example—to a list of favorites makes it easy
to locate and insert those files into your pages. (Don’t forget that you can also use
Dreamweaver’s Library and template features for this function. They’re similar,
but more powerful tools for keeping frequently used items at the ready. Turn to
Chapter 18 for the details.)
Identifying your Favorites
If the color, graphic, or other element to be added to your Favorites list already
appears on your Assets panel, highlight it in the list and then click the “Add to
Favorites” button (see Figure 15-11).
Even quicker, you can add Favorites as you go, snagging them right from your
Web page in progress. If you’re working on your site’s home page and you insert a
company logo, for example, that’s a perfect time to make the logo a favorite asset.
Simply right-click (Control-click) the image. From the shortcut menu, choose
“Add Image to Favorites;” Dreamweaver instantly adds the graphic to your list of
favorites. You can do the same with Flash, Shockwave, and QuickTime files, as well
as with links. (Unfortunately, this shortcut doesn’t work for colors and script files.)
When it comes to colors and links, there’s another way to turn them into Favorites. In the Assets panel, select the Color or URLs category, click the Favorites radio
button, and then click the New Asset button (see Figure 15-13). Then:
• If you’re adding a favorite color, the Dreamweaver color box appears. Select a
color using the eyedropper (see page 47).
Chapter 15: Introducing Site Management
579
Site Assets
Figure 15-13:
In addition to using folders to organize your
favorites, you can give a Favorite asset an easily
identifiable nickname. Instead of listing a favorite
image using its file name—148593.gif—use an easily
understood name like New Product. Naming favorite
colors is particularly helpful; a nickname like Page
Background is more descriptive than #FF6633. To
name a Favorite asset, click to select it; pause a
moment, and then click again to edit its name.
(These nicknames apply only in the Assets panel;
they don’t rename or retitle your files.)
New favorites folder
Remove from favorites
New asset Edit
• If you’re adding a favorite link, the Add URL window opens. Type an absolute
URL in the first field, either a Web address starting with http:// or an email link
(for instance, mailto:[email protected]). Next, type a name
for the link—such as Acrobat Download or Subscription Email—in the Nickname
field and then click OK.
Your new color or link appears in the Favorites list.
GEM IN THE ROUGH
Better Use of Color Assets
Although color assets are meant only for coloring text, you
can use them any time Dreamweaver’s eyedropper tool
appears, such as when you’re creating a CSS style and wish
to add text color, background color, or border color. In
other words, any time you need a frequently used color,
you can hop right to the Assets panel rather than pecking
around on the color palette or trying to find another occurrence of the color on your screen.
Whenever you click a color box—in the Page Properties window, Property inspector, or Style Definition window, for
example—a color palette appears and the cursor changes to
an eyedropper. You could, of course, use this eyedropper
to pick a color from the palette or to sample a color from
the screen. But if you’ve already used the color in your site—
or saved it in the Favorites list—just grab it from the Assets
panel. To do so, make sure you have the Assets panel open,
and the color category selected; next, click the color box (for
example, next to the Color CSS Property when creating a
new style using the CSS Rule Definition window). Finally,
move the eyedropper to the colored swatch in the Assets
list and click.
Using your Favorites
You insert assets from the Favorites list into your Web pages just as you would any
other assets; see page 577.
580
Dreamweaver CS3: The Missing Manual
Site Assets
Removing Favorites
Removing assets from the Favorites list is just as straightforward as adding them:
just select one in the Favorites list of your Assets panel and then press Delete. The
“Remove from Favorites” button (see Figure 15-13) on the Assets panel does the
same thing. Yet another approach is to use the contextual menu (Figure 15-11).
Don’t worry; removing an asset from the Favorites list doesn’t delete that asset
from the Assets panel (or your site)—only from the Favorites list. You can still find
it listed if you click the Site radio button.
Organizing Favorite assets
On a large site with lots of important assets, even a Favorites list can get unwieldy.
That’s why you can set up folders within the Assets panel to organize your assets.
For example, if you use lots of ads on a site, create a folder in the Image assets
Favorites called Ads or, for even greater precision, create multiple folders for different types of ads: Banner Ads, Half Banner Ads, and so on.
You can then drag assets into the appropriate folders, and you can expand or contract the folder to show or hide the assets inside (see Figure 15-13). These folders
simply help you organize your Assets panel; they don’t actually appear anywhere
within the structure of your site. Moving a Favorite asset into a folder in the Assets
panel doesn’t change the location of files within your site.
To create a Favorites folder, click the appropriate category button at the left edge
of the Assets panel (any except the bottom two, since, alas, you can’t create folders
for templates and Library items). Click Favorites at the top of the Assets panel (you
can’t create folders in Site view). Finally, click the New Favorites Folder button (see
Figure 15-13) at the bottom of the Assets panel. When the new folder appears with
its naming rectangle highlighted, type a new name for the folder and then press
Enter. (Don’t use the same name for more than one folder.)
To put an asset into a folder, just drag it there from the list. And if you’re really
obsessive, you can even create subfolders by dragging one folder onto another.
EXTENSION ALERT
Importing and Saving Color Palettes
The Color Palette Extension for Dreamweaver is a simple,
but useful tool created by Brian Newtz. It can capture all of
the colors in the current Web page or CSS Style Sheet and
display them on a floating color palette. You can then sample colors from the palette when defining colors for styles
(see the box on page 47).
Even better, if you specify a link to another Web site (either
a page or a CSS file), the Color Palette panel grabs all of the
colors specified on that page—a quick way to “borrow”
some color inspiration from another site.
You can also export the captured color palette as a simple
HTML page that you could then distribute to others: for
example, other designers, co-workers, and even off to a
client for their review and approval. You can find this
extension at http://bnewtz.cannet.com/wp/2006/06/colorpalette-for-dreamweaver/. (To learn how to install extensions turn to page 742.)
Chapter 15: Introducing Site Management
581
chapter
Chapter 16
16
Testing Your Site
As you’ve no doubt realized by now, there are quite a few steps involved in building a Web site. At any point in the process, it’s easy to introduce errors that affect
the performance of your pages. Both small mistakes, like typos, and site-shattering
errors, like broken links, occur frequently in the Web development cycle.
Unfortunately, Web designers often don’t develop a good procedure for testing
their sites. This chapter offers some helpful techniques for testing your site, including using Dreamweaver’s wide array of site-testing tools.
Site Launch Checklist
Don’t wait until you’ve finished your site before embarking on a thorough strategy of testing. By that time, serious design errors may have so completely infested
your site’s pages that you may have to start over, or at least spend many hours fixing problems that could have been prevented early on.
• Preview early and often. The single best way to make sure a page looks and
functions the way you want is to preview it in as many Web browsers as possible. Use Dreamweaver’s Preview command (see page 55) to preview your page
in every browser you can get your hands on. Make sure the graphics look right,
that your layout remains the same, and that Cascading Style Sheets, Dreamweaver behaviors, and complex layout methods work as you intended.
583
Site Launch
Checklist
Note: If you don’t have every browser ever created installed on your Mac, Windows, and Linux machines
(you do have all three, don’t you?), consider the commercial Web site www.browsercam.com. This service lets you view screenshots of your site using a wide variety of browsers and operating systems to make
sure your site is working. The downside: $40 a month (ouch).
Free alternatives include iCapture (www.danvine.com/icapture) for getting screen captures of your Web
pages using Apple’s Safari browser, and Browsershots (www.browsershots.org), which provides a widerange of Linux screenshots plus IE 6 (no IE 7 as of this writing) on Windows, and Safari 2 on the Mac.
Alternatively, you can download and install the real thing from http://browsers.evolt.org/. This site has
archived versions of nearly every Web browser created.
If you’re a Mac person with an Intel Mac you can install Windows on your machine using Apple’s Bootcamp technology (www.apple.com/bootcamp) or third-party “virtualization” software which lets you run
Mac and Windows simultaneously on the same computer (and believe it or not the universe does not
implode). Parallels Desktop for Mac (www.parallels.com/en/products/desktop/), for example, lets you run
multiple versions of Windows (XP and Vista) as well as Mac OS X.
For a thorough evaluation, however, you should preview your pages using every
combination of browser and operating system you think your site’s visitors may
use. Enroll co-workers, family members, and household pets, if necessary, in
this effort. At the very least, test your pages using Internet Explorer 6 and 7 on
Windows, Firefox on Windows or Mac, and Safari on the Mac. According to
several sources, including TheCounter.com (www.thecounter.com/stats/) and
BrowserNews (www.upsdell.com/BrowserNews/stat.htm), Internet Explorer 6 for
Windows is installed on over 50 percent of all computers surfing the Web, followed by Internet Explorer 7, Firefox, Safari, and others. And as the population
of Opera browsers grows, you might want to add this browser to your test
schedule, too.
Tip: If you already have a site up and running, you can find useful browser information in your
site’s log files. These files track information about visits to your site, including which browsers and
platforms your visitors are using. Most Web hosting companies provide access to these files, as well
as software to analyze the confusing code inside them. You can use this information, for example, to
see whether anyone who visits your site still uses Internet Explorer 5. If no one does, that’s one less
browser you have to design for.
Unfortunately, you’ll discover that what works on one browser/operating system combination may not work on another. That’s why you should preview
your designs early in the process of constructing your site. If you design a page
that doesn’t work well in Internet Explorer 6 on Windows, for example, it’s better to catch and fix that problem immediately than discover it after you’ve built
100 pages based on that design.
584
Dreamweaver CS3: The Missing Manual
Site Launch
Checklist
Note: Internet Explorer 6 is usually where most Web pages fall apart. This old and crotchety browser is
full of bugs that often cause head-scratching bouts of hysteria among Web designers. Most of these problems are related to using CSS for layout (see Chapter 9). One approach recommended by professional
Web designers is to preview your page in Firefox, Safari, or Internet Explorer 7 first. Get the page working
in those browsers and then preview the page in IE 6 to fix the bugs. If you design just with IE 6 in mind,
you’ll find that the site won’t work in Firefox, Safari, and, in many cases, the ever growing population of IE
7 browsers. Dreamweaver CS3’s new Check Browser Compatibility tool is one way to track down nasty
CSS bugs (see page 129).
• Validate your pages. Dreamweaver includes a tool that lets you compare your
Web pages against agreed-upon standards for HTML and other Web languages. It
checks to make sure your pages are valid (that they conform to these standards).
Valid pages are more likely to work in a predictable way on all Web browsers.
And if you envision your site on mobile devices such as cellphones and palmtops,
valid pages are again a better bet. In fact, you can even validate your Web pages to
see if they conform to Wireless Markup Language (WML)—a tag-based language
like HTML used for creating content for mobile phone Web browsers.
• Check for accessibility. Not everyone experiences the Web in the same way. People with poor vision, for example, will miss out on the beautiful, full-color banner and navigation buttons you’ve created. To help you build Web sites that don’t
shut out people with disabilities, Dreamweaver can check your Web site to make
sure it conforms to Section 508 (a Federal regulation mandating that Web sites
built by or for the Federal Government are accessible to those with disabilities).
Some troubleshooting steps should come at the end of the process, when a page
(or entire site) is ready to be moved to a Web server:
• Check spelling on your pages. Amazingly, this simple step is often overlooked.
As a result, it’s easy to find otherwise professional-looking Web pages on the
Internet that are undermined by sloppy spelling. To learn how to use Dreamweaver’s built-in spell checker, see page 79.
• Check your links. As the name indicates, a Web site can be a complex and
twisted collection of interconnected files. Web pages, graphics, Flash movies,
and other types of files all work together. Unfortunately, if one file is moved or
deleted, problems can ripple through the entire site. Use Dreamweaver’s Check
Links command to identify and fix broken links (see page 586).
• Run site reports. It’s always the little things. When building a Web site, small
errors inevitably creep into your pages. While not necessarily life-threatening,
forgetting to title a Web page or to add an Alt property to an image does diminish the quality and professionalism of a site. Use Dreamweaver’s site-reporting
feature to quickly identify these problems (see page 600).
Chapter 16: Testing Your Site
585
Find and Fix Broken
Links
Note to Dreamweaver 8 Users: The Check Browser Support command was removed in Dreamweaver CS3. It wasn’t a very useful tool since it concentrated on incompatibilities in different browsers’
understanding of HTML. Most browsers now recognize the same HTML tags and tag properties. The real
problem is differences in how browsers understand CSS. That’s why Dreamweaver CS3 added a new
Check Browser Compatibility tool—the name sounds like the tool it’s replacing, but it only worries about
CSS. Learn about this new tool on page 129.
Find and Fix Broken Links
Broken links are inevitable. If you delete a file from your site, move a page or
graphic outside of Dreamweaver, or simply type an incorrect path to a file, broken
links and missing graphics may result. In the B.D. era (Before Dreamweaver), the
only way to fix such problems was to methodically examine every link on every
page in your site. Fortunately, Dreamweaver’s link-checking features can automate the process of tracking down broken-link problems.
Note: In this context, a link doesn’t only mean a hyperlink connecting one page to another. Dreamweaver also uses the term to include the paths that identify external files incorporated in your Web page,
such as PNGs, GIFs, JPEGs, external CSS style sheets, and Flash movies. For example, if a graphic is missing or isn’t in the place specified by the Web page, Dreamweaver reports a broken link.
Finding Broken Links
The Check Links Sitewide command scans an entire site’s worth of files and
reports all links and paths that don’t lead to a file. (It’s one of Dreamweaver’s site
management features, meaning that you have to define a local site before using this
command; see page 28 for instructions on defining a site.) Note that Dreamweaver
checks only links and paths within the local site folder; it doesn’t check links that
lead to other people’s Web sites (see the note on page 587 for a tool that can help
with that annoying chore).
Note: If your local site contains a lot of pages, you may not want to check links in one or more folders
whose pages you know have no broken links. You can exclude files from the Check Links Sitewide operation
using the Cloaking feature described on page 626. Doing so also makes the link-checking operation go faster.
Checking just one page
To check links on an open page, save it in your local site folder. Then choose File ➝
Check Page ➝ Links (or press Shift+F8). Dreamweaver scans the page and opens
the Link Checker window, which lists files containing broken links (see Figure 16-1).
If Dreamweaver doesn’t find any broken links—you HTML god, you—the window
comes up empty.
586
Dreamweaver CS3: The Missing Manual
Find and Fix Broken
Links
Note: Although Dreamweaver can’t check links to the outside world, a free tool from the W3C can. You
can find its link checker at http://validator.w3.org/checklink. This tool checks both internal links (between
pages on the same site) and external links (to other sites). The only possible downside: the pages you
wish to check must already be up on the Web. Windows users will find Xenu’s Link Sleuth, a free, automated link checker, can help speed up the process of checking external links (http://home.snafu.de/
tilman/xenulink.html).
Checking specific pages
You can also check links just on specific pages of your site from the Link Checker
panel:
1. Choose Window
Checker tab.
➝
Results to open the Results panel and click the Link
The Link Checker panel opens.
2. Use the Files panel to select the site you wish to check (see Figure 15-6).
If you’re already working on the site you want to check, you can skip this step.
3. In the Files panel, select the files you’d like to check.
For techniques on selecting files and folders in the Files panel, see the box on
page 588.
Tip: Selecting a folder makes Dreamweaver scan all files in that folder.
4. Click the green-arrow icon in the Link Checker panel. From the menu that
appears, choose “Check Links for Selected Files/Folders in Site”.
Alternatively, you can right-click (Control-click) the selected files, and then
choose Check Links ➝ Selected Files from the shortcut menu.
Either way, Dreamweaver scans the pages and opens the Link Checker panel
(Figure 16-1).
Checking the entire Web site
You can check all the links on all pages of your Web site in any of three ways:
• Open the Web site you want to check (press F8 to open the Files panel and use
the panel’s menu to select the site), and then choose Site ➝ Check Links Sitewide.
Or use the keyboard shortcut, Ctrl+F8 (c-F8).
• Open the Files panel and right-click (Control-click) any file. Choose Check
Links ➝ Entire Local Site from the shortcut menu.
• Open the Link Checker panel (Window ➝ Results to open the Results panel,
and then click the Link Checker tab), click the green-arrow icon, and, from its
menu, choose “Check Links for Entire Current Local Site”.
Chapter 16: Testing Your Site
587
Find and Fix Broken
Links
Once again, Dreamweaver scans your site and opens the Link Checker panel,
which lists files containing broken links (Figure 16-1).
Figure 16-1:
The Check Links Sitewide command
generates a list of all external links
and orphaned files (files with no
links to them). If you wish, click the
Save (floppy disk) button to save all
of this information into a tabdelimited text file. You can also fix a
broken link directly inside this panel
using the “Browse for File” button
(circled) as described on page 589.
UP TO SPEED
Selection Shortcuts for the Files Panel
You’ll often want to use the tools in the Results panel on
more than one page in your Web site. Fortunately, most of
these tools can work on multiple pages in the Files panel.
You probably can figure out that you should click a file to
select it. But you can also select several files that are listed
consecutively: click the first one, scroll if necessary, and
then Shift-click the last one. Dreamweaver highlights all the
files between your first and final clicks.
If you want to select several files that aren’t consecutive in
the list, the trick is to click each one while pressing the Ctrl
(c) key.
Once you’ve selected one or more files, you can deselect
one by Ctrl-clicking (c-clicking) it once again.
want to select all the files you created or changed today (to
see if the links work or to upload them to your Web server,
as described on page 620). To use this command, you need
to click the Files panel’s contextual-menu button in the
upper-right corner of the panel. From the menu that
appears, select Edit ➝ Select Recently Modified.
The Select Recently Modified window appears. You can
either specify a range of dates (for example, files you created or changed between December 1, 2007, and December 7, 2007) or a number of days (to specify all modified
files in, say, the last 30 days). (The last option—Modified
By—works only with Adobe’s Contribute program.) Set the
options, click OK, and Dreamweaver selects the appropriate
files in the Files panel.
Dreamweaver also includes a snazzy command for selecting recently modified files in the Files panel. Suppose you
Fixing Broken Links
Of course, simply finding broken links is only half the battle. You also need to fix
them. The Link Checker panel provides a quick and easy way to do this:
1. In the Link Checker panel, click a path in the Broken Links column.
The path is highlighted, and a tiny folder icon appears to the right (circled in
Figure 16-1).
588
Dreamweaver CS3: The Missing Manual
Find and Fix Broken
Links
Note: The Link Checker panel shows you which pages contain broken links, but doesn’t show you the
text or images of the broken links themselves, which can make it difficult to figure out how you’re supposed to fix them (“Was that a button that links to the home page?”). In such a case, double-click the file
name in the left column in the Link Checker panel. Dreamweaver opens the Web page and, even better,
highlights the link on the page.
Once you’ve determined where the link should lead (“Oh yeah. That’s the button to the haggis buffet
menu”), you can fix the link on the page (see page 171) or go back to the Link Checker panel and make
the change as described in the next step.
2. Click the tiny folder icon.
The Select File dialog box opens. From here, you can navigate to and (in the next
step) select the correct page—the one that should have been opened by that link.
If you prefer, you can type a path directly in the Link Checker panel. Doing so
usually isn’t a good idea, however, since it’s difficult to understand the path
from one page to another by just looking at the Link Checker panel. Searching
for the proper page using the Select File dialog box is a much more accurate and
trouble-free method.
3. Double-click a Web page in the Select File dialog box.
The dialog box disappears, and Dreamweaver fixes the link.
If your Web site contains other links pointing to the same missing file, Dreamweaver asks if you’d like to fix the same broken link on those pages, too—an
amazing time-saver that can quickly repair broken links on dozens of pages.
Note: Dreamweaver’s behavior is a bit odd in this regard, however. Once you fix one link, it remains
selected in the Link Checker panel. You must click another broken link, or one of the buttons in the window, before Dreamweaver asks if you’d like to fix that same broken link on other pages.
4. Continue to fix broken links, following steps 1–3.
When you’ve repaired all the broken links, click the close button.
Listing External Links
Although Dreamweaver doesn’t verify links to other Web sites on your pages, it does
show you a list of such external links when you run the link checker. To see this list,
choose External Links from the Show menu of the Link Checker panel (see
Figure 16-2). The list includes absolute URLs leading to other sites (like http://www.
yahoo.com) as well as email links (like mailto:[email protected]).
This window is especially useful if you’ve created a link to a certain external Web
site several times throughout your Web site and you’ve decided to change the link.
For example, you discovered through testing (or through the W3C Link Checker
Chapter 16: Testing Your Site
589
Find and Fix Broken
Links
Figure 16-2:
Although Dreamweaver can’t
check external links, you can use
this window to change the URL of
an external link.
mentioned in the Note on page 587) that an external link that you’ve peppered
throughout your site no longer works:
1. Choose Site ➝ Check Links Sitewide (or press Ctrl+F8 [c-F8]).
Dreamweaver scans your site and opens the Link Checker panel.
2. From the Show pop-up menu, choose External Links.
The window lists links you’ve created to sites outside your own.
3. Click the external link you want to change.
Dreamweaver highlights the link, indicating that you can now edit it.
4. Type the new URL and then press Enter (Return).
If other pages contain the old URL, Dreamweaver asks if you would like to fix
them as well. If so, click Yes; the deed is done.
Orphaned Files
The Link Checker panel also provides a list of files that aren’t used by any Web
page in the site—orphaned files, as they’re called. You wind up with an orphaned
graphic file when, for example, you save a GIF into your site folder but then never
use it on a Web page. Or suppose you eliminate the only link to an old page that
you don’t need anymore, making it an orphaned file. Unless you think you may
link to it in the future, you can delete it to clean up unnecessary clutter in your site.
In fact, that’s the primary purpose of this feature: to locate old and unused files
and delete them. Here’s how it works:
1. Choose Site ➝ Check Links Sitewide, or press Ctrl+F8 (c-F8).
Dreamweaver opens the Link Checker panel.
2. From the Show menu, choose Orphaned Files.
The list of orphaned files appears (see Figure 16-3).
3. Select the files you want to delete.
For example, by Ctrl-clicking (c-clicking) the files.
590
Dreamweaver CS3: The Missing Manual
Find and Fix Broken
Links
Figure 16-3:
Identify (and delete) unused files
with Dreamweaver’s Link Checker
panel. This panel lists external
links and orphaned files as well
as broken links; use the Show
menu to isolate the different
types of link.
4. Press Delete.
Dreamweaver asks if you really want to delete the files. Click OK if you do, Cancel
if you suddenly get cold feet.
5. Click the Close button when you’re finished.
Before you get spring-cleaning fever and delete all orphaned files in your site, however, keep a few pointers in mind:
• Just because a file isn’t currently in use doesn’t mean you won’t need it again
later. For example, say you have an employee-of-the-month page. In March,
you included a photo of Robin Albert, your best salesperson. In April, someone
else got the award, so you removed Robin’s photo from the page. The actual
graphic file of the photos is still on your computer, it’s just that no Web page is
currently using it—that makes it an orphaned file—but next month you may
need the photo again, when Robin develops a spurt of motivation. Make sure a
file is really useless before deleting it.
• More important, Dreamweaver may flag files your site actually needs as
orphaned. For example, some sites include what’s called a splash page: an introductory page that first appears when someone comes to the site. It can be a page
with a bold graphic and the text “Click here to enter the site.” Or it may be a
fancy Flash movie intended to make a big impact on your visitors. Usually, this
page is nothing more than a welcome mat that leads to the real home page.
Since it’s simply an introductory page, no other page in the site links to it.
Unfortunately, that’s precisely what Dreamweaver considers an orphaned file.
• If you write your own JavaScript code, you may reference graphic files and Web
pages. Dreamweaver doesn’t keep track of these references, and identifies those
files as orphans (unless they’re inserted or linked to elsewhere in the page or site).
On the other hand, Dreamweaver is somewhat smarter when it comes to Spry
widgets and Dreamweaver Behaviors. It can track files referenced as part of its
own JavaScript programs—for example, graphic files you use in a rollover
effect—and doesn’t list them as orphaned files.
The bottom line is that while this report is useful, use it cautiously when deleting files.
Chapter 16: Testing Your Site
591
Find and Fix Broken
Links
Changing a Link Throughout a Site
Suppose you’ve created a page on your site to teach your visitors about the basics
of the HTML language. You think this page would be really, really helpful to your
visitors, so you create links to it from every page on your site. After a while, you
realize you just don’t have the time to keep this page up to date, but you still want
to help your visitors get this information. Why not change the link so it points to a
more current and informative source? Using Dreamweaver’s Change Link Sitewide
command, you can do just that:
1. Choose Site ➝ Change Link Sitewide.
The Change Link Sitewide dialog box opens (see Figure 16-4).
Figure 16-4:
Dreamweaver uses a root-relative link to specify the
page, as indicated by the slash (/). Don’t worry: this
doesn’t mean Dreamweaver makes the link rootrelative. It’s just how Dreamweaver identifies the
location of the page in the site. See page 155 for more
on root-relative links.
This dialog box offers two different fields: Change All Links To and Into Links
To. Understanding what you’re supposed to do at this point is easier if you
imagine that the first label is actually Change All Links That Currently Point To.
In other words, first you’ll indicate where those links point now; then you’ll
indicate where you’d like them to go instead.
At this point, you can type the old Web address into the Change All Links To field.
For example, if your aim is to round up every link that now points to Yahoo and
redirect them to Google, you could start by typing http://www.yahoo.com here.
If the links you’re trying to change refer to a page in your own site, however,
proceed to step 2.
2. Click the folder icon to the right of the Change All Links To field.
The “Select Link to Change” dialog box opens. You’re about to specify the file
that the links point to now.
3. Select a file in the local site folder; click OK (Windows) or Choose (Mac).
In the following steps, Dreamweaver will change every link that leads to this file,
whether it’s a graphic, Cascading Style Sheet file, or any other external file that
can be part of a Web page.
Tip: As a shortcut to following steps 1, 2, and 3, you can select a file in the Files panel, and then choose
Site ➝ Change Link Sitewide. Dreamweaver automatically adds the selected file’s path to the Change All
Links To field.
592
Dreamweaver CS3: The Missing Manual
Validating Web
Pages
Now it’s time to substitute the new URL or file—the one to which all of those
links will be redirected. If you’re reassigning them to a different Web site, you
can type its URL directly into the Change All Links To field. For example, in the
previous example, you can type http://www.google.com.
Note: For another way to change one external link into another, see Figure 16-2.
If you’d like the changed links to point to a file on your own Web site instead,
proceed to step 4.
4. Click the folder icon to the right of the Into Links To field.
The “Select Link to Change” dialog box opens.
5. Select a file in the local site, and then click OK (Windows) or Choose (Mac).
You’ve just selected the new file you wish to link to. In other words, every link
that once led to the file you selected in step 3 now links to this file. You can
select graphics, Cascading Style Sheet files, and any other external files you can
include in a Web page.
You’ll get unpredictable results, however, if you change a link that points to a
graphic file into, say, a link that points to a Web page, or vice versa. Make sure the
“before” and “after” links share the same file type: Web page, style sheet, or graphic.
6. Click OK to make the change.
The same Update Files dialog box you encountered in the last chapter appears,
listing every page that will be affected.
7. Click Update to update the pages.
Dreamweaver scans your site and updates the pages.
Validating Web Pages
The Web is a far-flung collection of technologies, scripting and programming languages, and people all working together. When you think about it, it’s pretty amazing that an 11-year-old in Fargo, North Dakota, can create a Web site viewable by
millions of people around the world, or even that hundreds of different browsers,
from Internet Explorer to cellphones, can browse the same Web site. This kind
of global communication owes its success in large part to the World Wide Web
Consortium (the W3C), an organization composed of representatives from universities, research institutions, corporations, and government agencies dedicated to
creating standards for different Internet-related technologies.
The W3C developed standards for HTML, XHTML, CSS, XML, and other Web languages, and continues to create new standards as technologies evolve. Thanks to
these standards, companies have a guide to follow when creating new Web browsers.
Chapter 16: Testing Your Site
593
Validating Web
Pages
It sure would be great if all companies followed the standards when building Web
browsers, and all Web designers followed the standards when building Web pages.
Then anyone with any Web browser could view any Web page. What a wonderful
world that would be—you’d never have to test your Web pages in different browsers.
Of course, this kind of utopian thinking hasn’t always been applied by the major
browser makers. As a result, Web developers have been forced to come up with
techniques to deal with the way different browsers display HTML. (The Check
Browser Compatibility command, covered on page 129, is great for helping you
figure out where browsers fail.)
Fortunately, the situation is improving; browser makers are making more of an effort
these days to stick to the W3C’s recommended standards. And you can, too: Dreamweaver includes a tool for making sure your pages meet the standards set by the W3C.
Steps for Validating Web Pages
You can check either an open and saved page or any pages selected in the Files
panel (see page 588) by following these steps:
1. Choose Window ➝ Results and click the Validation tab.
The keyboard shortcut for the Results panel is F7. Either way, the Results panel
opens, showing the Validation tab (Figure 16-5).
Note: If you want to validate just the page you’re working on, choose File ➝ Check Page ➝ Validate
Markup.
Select files/validator settings
Stop checking
More
information
Save results
View results
as web page
Figure 16-5:
The Validation panel lets
you check your Web pages
against various W3C
standards.
2. In the Validation panel, click the green arrow and select which files to inspect.
The green arrow reveals a menu with four options. The first checks the page
you’re currently working on. The second option checks all pages in your site,
and the third option checks just those files selected in the Files panel.
The fourth option—Settings—opens the Validator Preferences window, which
lets you select which type of standard to validate against if no doctype is specified.
A doctype (see page 37) is just a line of code that goes in the head of a document and tells a Web browser which standard the particular page is attempting
to adhere to. Because Dreamweaver automatically inserts a doctype (as specified by you either in the site definition window or when you create the page)
you won’t need to change any of these settings.
594
Dreamweaver CS3: The Missing Manual
Validating Web
Pages
Note: You can also validate the file as an XML file by choosing File ➝ Check Page ➝ “Validate as XML.”
(To the technically inclined: this command not only checks whether your XML is “well-formed,” but can
also check the document against the Document Type Definition [DTD] specified in your document.)
3. Review the results.
Dreamweaver displays the results in the Validation panel (Figure 16-5). Each validation message is divided into four columns: the first includes an icon that indicates
the severity of the error, the second lists the file, the thirds lists which line in the
code the message applies to, and the fourth describes the validation error or message.
The icon at the beginning of the message helps you determine which errors are
important. A red stop sign identifies a violation of the standards for the particular doctype (HTML 4.01 Transitional, XTHML 1.0 Transitional, and so on) the
page is attempting to follow. In some cases, this warning can indicate that a
mandatory tag (like the <body> tag) is missing—a serious problem.
Other stop-sign errors aren’t necessarily fatal. For example, when you insert a
Flash movie, Dreamweaver uses the <embed> tag to insert information to play
the movie—the <embed> tag isn’t even part of the HTML standards; it was created by Netscape but is widely supported by other browsers. You’ll get all manner of errors if you validate a page containing this tag, even though it’s
necessary for viewing the Flash movie in non-IE browsers.
GEM IN THE ROUGH
Is the Validator Valid?
Dreamweaver’s validation feature is a big help in seeing
where your code fails to match the standards set by the
W3C, but it’s an imperfect tool. For example, it doesn’t provide very good explanations for errors, it doesn’t always
catch invalid code, and it can’t validate CSS.
For the best source of validation information and tools, turn
to the W3C’s free validation services and information
resources. You can find the HTML (or XHTML) validator at
http://validator.w3.org/. For CSS validation, visit http://
jigsaw.w3.org/css-validator/.
With these tools, you can validate files already online or
upload a Web page or CSS file for analysis. It’s free, and it
provides detailed information about the meaning of any
errors.
Because Dreamweaver’s validator is faster (you don’t need
to upload files to the Internet or wait for the W3C validator
to download files over the Web), it’s a good approach to
start with it. Find and fix errors Dreamweaver identifies, and
then try out the W3C validator for the finishing touches.
You may also get the red stop-sign error when using some of Dreamweaver’s
own tools. For example, if you use a Spry Table (page 495), Dreamweaver adds
some invalid HTML attributes with names like “spry:repeat”, “spry:select”, and
“spry:detailregion”. These aren’t “real” HTML, so you’ll end up with errors.
Just ignore errors that include “spry” in the description.
Less serious problems are flagged with little message balloons. These may
inform you that the page has no problems, or point out optional fixes. (See the
following section for a list of common errors and messages.)
Chapter 16: Testing Your Site
595
Validating Web
Pages
You may also encounter an icon that looks like two pieces of paper placed one
on top of the other (who comes up with these things?). These usually occur
when you validate against any of the HTML standards and have incorrectly
written code—an unclosed <p> tag, for example.
4. Fix the errors.
Alas, Dreamweaver can’t fix all of these validation errors. For errors related to
improperly written code (see the last paragraph of step 3), you can let Dreamweaver automatically fix them as described on page 368.
For the other errors, it’s up to you and your knowledge of HTML to go into the
code and fix any problems. For assistance, check out the online HTML reference (see page 394).
To get started, double-click an error in the Validation results panel. The Web
page opens in Split view, with the invalid HTML code selected. You can then
delete or modify the offending code. Keep in mind, though, that the code
Dreamweaver produces is the result of many thousands of hours of engineering
and testing. Unless you’re sure you know how to fix a problem, you may just
want to trust the code Dreamweaver produces.
Common Validation Errors
Although a complete reference for creating valid Web sites would fill a book of its own,
here are some errors you’ll encounter frequently when using Dreamweaver’s validator:
• In HTML 4.0, FONT is deprecated. You encounter this message in pages you’ve
built with earlier versions of Dreamweaver, or if you set your preferences to work
with the old style <font> tag. Since version MX 2004, Dreamweaver has used Cascading Style Sheets when formatting text with the Property inspector, so you probably won’t encounter this error on any pages you build using Dreamweaver CS3
(unless you’ve changed Dreamweaver’s factory presets as described on page 40).
• The tag name: “embed” not found in currently active versions. This error
appears when you insert Flash movies (including Flash buttons and Flash text),
as described on page 231. Other errors related to the <embed> tag may also
appear, including “The tag: ‘embed’ doesn’t have an attribute: ‘quality’ in currently active versions.” Ignore them.
• In tag: ‘script’ the following required attributes are missing: ‘type’. This message indicates that the <script> tag used to insert JavaScript programs is missing the following Type property. Dreamweaver now inserts this property
correctly, but it didn’t always. If you used Dreamweaver 4 to build your site, for
example, you’ll get this error message for any page that uses a Dreamweaver
behavior. To fix it, add type="text/JavaScript" to the <script> tag.
• The tag: ‘body’ doesn’t have an attribute: ‘marginwidth’ in currently active versions. (Similar messages for marginheight may also appear.) If you set the left and
top margin of a page in the <body> tag (in a previous version of Dreamweaver,
for example), you’ll encounter this message. Dreamweaver’s Page Properties window (see page 45) uses CSS to set margins instead. Marginwidth is a Netscape596
Dreamweaver CS3: The Missing Manual
Cleaning Up HTML
(and XHTML)
specific property and not part of any HTML standard. Internet Explorer’s leftmargin and topmargin properties are similarly browser-specific. Although using these
properties poses no real problems—other browsers ignore them—you’re bettter
off using Cascading Style Sheets to set the margins of a page.
Cleaning Up HTML (and XHTML)
You’ve been reading about what great HTML code Dreamweaver writes, and how
all you hand coders need to get on the WYSIWYG bandwagon. But there are
exceptions to every rule. In the process of formatting text, deleting elements,
and—in general—building a Web page, it’s quite possible to end up with lessthan-optimal HTML coding. While Dreamweaver usually catches potentially
sloppy HTML, you may nonetheless run across instances of empty tags, redundant tags, and nested tags in your Dreamweaver pages.
For example, in the normal course of adding, editing, and deleting content on a
page (either by hand or even in Dreamweaver’s Design view), you can occasionally
end up with code like this:
<div align="center"> </div>
This empty tag doesn’t serve any purpose and only adds unnecessary code to your
page. Remember, the less code your page uses, the faster it loads. Eliminating
redundant tags can improve the download speed of your site.
Another possible source of errors is you. When you type HTML in Code view or
open pages created by another program, you may introduce errors that you’ll need
to clean up later.
Note: The Clean Up HTML command doesn’t fix really bad errors like missing closing tags, or improperly nested tags. You can have Dreamweaver automatically fix these types of problems when opening a
file (see page 368).
Aware of its own limitations (and yours), Dreamweaver comes with a command
that’s designed to streamline the code in your pages: Clean Up HTML (if you’re
using Dreamweaver’s XHTML mode, the command is called Clean Up XHTML).
This command not only improves the HTML in your page, it can also strip out
other nonessential code such as comments and special Dreamweaver markup code,
and it can eliminate a specific tag or tags.
Note: The Clean Up HTML command is extremely useful. Once you’ve tried it a few times, you’ll probably want to use it on all your pages. Unfortunately, it doesn’t come with a keyboard shortcut. This is a classic case when Dreamweaver’s keyboard-shortcut editor is just the white knight you need; using it, you can
add a key combination to trigger this command from the keyboard. See page 733 for details.
Chapter 16: Testing Your Site
597
Cleaning Up HTML
(and XHTML)
To use this command:
1. Open a Web page to clean up.
Unfortunately, this great feature works only on one page at a time. No cleaning
up a site’s worth of pages in one fell swoop! Accordingly, it’s best to first use the
Site Reports feature (see page 600) to identify problem pages. Then open them
in Dreamweaver and run this command.
2. Choose Commands ➝ Clean Up HTML (or Clean Up XHTML).
The Clean Up HTML/XHTML window appears (see Figure 16-6).
Figure 16-6:
The Clean Up HTML/XHTML command
lets you improve the quality and speed
of a Web page by stripping out
redundant and useless code. You can
even use it to strip out useful tags by
specifying a tag in the “Specific tag(s)”
field (although the “Find and Replace”
command provides a much more
powerful method of identifying and
removing HTML tags; see page 718).
3. Turn on the checkboxes for the options you want.
Here’s a rundown:
• Empty Container Tags deletes any tags that don’t actually contain anything.
For example, you may delete some text that had been set in boldface, leaving
behind opening and closing bold tags without any text in between: <b></b>.
Or you may delete an image within a link, leaving behind a useless pair of
<a> tags. It’s always a good idea to turn on this option.
• Redundant Nested Tags deletes tags that appear within other tags of the same
type, like this: <b>You can’t get any <b>bolder</b> than bold</b>. The inner
set of bold tags does no good, so choosing this option would produce this: <b>
You can’t get any bolder than bold</b>. This is an extremely useful option.
• Non-Dreamweaver HTML Comments deletes any comments not inserted by
Dreamweaver as part of its site management tools. For example, the Dreamweaver Template tool (Chapter 19) inserts HTML comments to help identify different parts of the template. However, Web designers also place notes
within code to give directions or explain parts of the code. (These comments
are invisible in a Web browser. They appear only in the Code view, or as a
gold comment icon in Dreamweaver’s document window.) In addition,
Dreamweaver CS3’s CSS Layout files (page 324) also add HTML comments
to help you learn how those pages work. Since comments are often added as
an aid for maintaining a Web page, you may not want to choose this option.
598
Dreamweaver CS3: The Missing Manual
Cleaning Up HTML
(and XHTML)
However, if the page is finished, and you doubt you’ll need the information the
comments contain, you can decrease the file size of a page by using this option.
Tip: Dreamweaver’s Clean Up HTML command won’t strip out CSS comments. If you use
Dreameweaver’s CSS Layouts you’ll find the style sheets loaded with CSS comments. If you want a quick
way to remove those types of comments visit www.foundationphp.com/tools/css_comments.php. On this
Web page, you can download a “stored query” (a reusable search) to use with Dreamweaver’s “Find and
Replace” tool (page 718).
• Dreamweaver Special Markup deletes any special code Dreamweaver inserts.
Dreamweaver relies on certain code in some of its features, including tracing
images, templates (Chapter 19), and Libraries (Chapter 18). Choosing this
option also eliminates the special code that makes those features work, so use
this option with care. (Since the template feature adds a great deal of this
specialized code, Dreamweaver includes a Template Export command that
lets you export an entire site with all template code removed. See page 700.)
• Specific Tag(s) deletes HTML tags you specify. Type the name of the tag
(without brackets) in the field like this: font. To remove multiple tags at
once, separate each tag name by a comma like this: font, blink.
Be careful with this option. Since it lets you remove any tag from a page, it’s
easy to delete an important and necessary tag (like the <body> tag) from
your page by accident. Furthermore, Dreamweaver’s “Find and Replace”
command provides much more powerful tools for performing this kind of
surgery (see page 718).
• Combine Nested <font> Tags when Possible combines multiple font properties into a single tag. Hopefully, you’ve moved to CSS for all of your text formatting needs, so you don’t use the <font> tag and don’t need this option.
• If you want to see a report of all the changes Dreamweaver makes to a page,
turn on Show Log on Completion.
4. Click OK to clean up the page.
If you selected “Show Log on Completion,” a dialog box then appears, listing the
types of changes and the number of changes that Dreamweaver made to the page.
Note: When running this command on an XHTML page, Dreamweaver also checks to make sure the syntax of the page matches the requirements of an XHTML document (see page 9). Among other concerns,
in XHTML, all tags must be lowercase, and any empty tags must be terminated correctly—<br /> for the
line break tag, for example. Dreamweaver fixes such problems.
As long as you keep the page open, you can undo changes Dreamweaver made.
Suppose you asked Dreamweaver to remove any comments, and suddenly realized
you really did need them. Ctrl+Z (c-Z) does the trick. You can also use the History
panel (page 81), which lists this step as Clean Up HTML/XHTML.
Chapter 16: Testing Your Site
599
Site Reporting
Site Reporting
The Clean Up HTML command is a great way to make sure your code is well written. But what if you forget about it until after you’ve built all 500 pages of your
site? Do you have to open each page and run the command—whether there’s a
problem or not?
Fortunately, no. Dreamweaver’s Site Reports feature makes identifying problems
throughout a site a snap. As well as locating the problems fixed by the Clean Up
HTML command, it makes Dreamweaver check your pages for other problems,
such as missing titles, empty Alt properties for images, and other problems that
can make your Web site less accessible to disabled Web surfers.
Tip: To save time when running a report, you can exclude select folders from a Site Report operation
using the cloaking feature described on page 626.
After running a report, Dreamweaver displays a list of pages with problems.
Unfortunately, the Site Reports feature only finds problems; it doesn’t fix them.
(To see the full lifecycle of an HTML error, see Figure 16-9.) You have to open and
fix each page individually.
To run a report on one or more Web pages, proceed like this:
1. Choose Site ➝ Reports.
The Reports window opens (see Figure 16-7).
Figure 16-7:
Dreamweaver’s Site Reports feature makes quick
work of finding common page errors. You won’t use
all of these options, but making sure you check for
missing Alt text (page 209) and any untitled
documents is a very good idea before you put a new
Web site up on the Internet.
2. From the “Report on” menu, select the files to analyze.
Dreamweaver can report on a single Web page, multiple pages, or even an
entire site. Choose Current Document to check the Web page that’s open at the
600
Dreamweaver CS3: The Missing Manual
Site Reporting
moment. Entire Current Local Site checks every Web page in the local site folder,
including folders inside it. This option is great when you want to check your
entire site prior to uploading it to a Web server and making it “live” (more on
that in Chapter 17).
Selected Files in Site checks only the files you choose in the Files panel. You need
to open the Files panel and select files in the local file list for this option to
work. See the box on page 588 for methods on selecting files in the Files panel.
Choose this option when you’ve modified or added pages to a site, and are
ready to move them to the Web server.
Folder checks all Web pages in a selected folder. After you choose this option, an
empty field and a folder icon appear. Click the folder icon; a dialog box gives
you the opportunity to locate and select the folder you wish to check, including
any folders inside it. You can also use this option when you wish to check pages
that aren’t actually part of the current site.
3. Select the types of reports you want Dreamweaver to generate.
The Reports window is divided into two types of reports. The first set, Workflow
reports, mostly deals with features that facilitate working with others as part of a
production team (see the following chapter). The last option in this group—
Recently Modified—generates a list of files that have either been created or modified within a certain number of days or within a range of dates (February 1 of last
year to the present, say). When you run this type of report, Dreamweaver lists the
files in the Site Reports panel and opens a Web page listing the files in your browser.
Note: The Recently Modified site report looks for files created or changed in the last seven days, but you
can adjust that time frame. Select Recently Modified in the Reports window and click the Report Settings
button (Figure 16-7). A window appears where you can change the range of dates to check.
In fact, you’ll find the technique described on page 588 more useful. It not only identifies recently modified files, but also selects them in the Files panel, giving you a lot more options for acting on this information. For example, with those files selected, you can upload them to your Web server, run Find and
Replace operations on just those files, or access many other tools.
The second type, HTML Reports, are useful for locating common errors, such as
forgetting to title a Web page or forgetting to add an Alt property to an image.
Three of the HTML Report options—Combinable Nested Font Tags, Redundant
Nested Tags, and Removable Empty Tags—search for pages with common code
mistakes. These are the same problems fixed by the Clean Up HTML command
(see page 597).
The Accessibility report lets you see how usable your site is to people with disabilities. This sophisticated command checks to see how well your pages conform to
Web accessibility guidelines mandated by the U.S. Government and recommended by the W3C (see page 604). This option produces detailed reports, so
it’s usually best to run it separately.
Chapter 16: Testing Your Site
601
Site Reporting
Turn on Missing Alt Text to search for pages with images that are missing an
alternate text description (see page 209). If you turn on the Accessibility option,
you can leave this option turned off; the Accessibility analyzer already includes
missing Alt text.
Finally, turn on Untitled Documents to identify pages that are either missing a
title or still have Dreamweaver’s default title (page 38).
Note: The Site Report command won’t identify XHTML syntax errors like those fixed by the Clean Up
XHTML command (see page 597).
4. Click Run.
Dreamweaver analyzes the pages you specified. It then produces a report that
lists pages that match your report settings (see Figure 16-8). Each line in the
Results window displays the name of the file, the line number where the error
occurs, and a description of the error.
Figure 16-8:
If you decide that the report is
taking too long, you can always
stop it by clicking the icon in the
left-hand toolbar of the Results
panel. It looks like a red stop sign
with an X through it.
5. In the Results panel, double-click the file to open it.
Dreamweaver opens the file and automatically highlights the offending code.
6. Fix the problem according to its type.
For a page containing Combinable Nested Font Tags, Redundant Nested Tags, or
Removable Empty Tags errors, use the Clean Up HTML command as described
on page 597.
For pages missing a title, add one using the technique described on page 45.
For Accessibility problems, read the detailed discussion starting on page 604.
You can add missing Alt properties using the Property inspector, as described
on page 209, but you may find it faster to use Dreamweaver’s powerful “Find
and Replace” command (see page 718).
7. Continue opening files from the Results window and fixing them until you’ve
corrected each mistake.
Unfortunately, Dreamweaver doesn’t provide a quick, one-step method to fix
any of these problems. Except when using the “Find and Replace” tip for adding missing Alt text, you must open and fix each page individually.
602
Dreamweaver CS3: The Missing Manual
Site Reporting
Figure 16-9:
The life cycle of a typical
HTML error.
Top: After running a
report, you may find a
common HTML error, like
an empty div tag.
Double-click the page in
the Results window to
open it.
Second from top: The
page opens with the
offending code selected
in Split Code view.
(Dreamweaver often
highlights the problem
HTML code so that you
can identify the problem.)
Since you can fix this
particular error—and
more—with the Clean Up
HTML/XHTML command,
choose Commands ➝
Clean Up HTML/XHTML.
Third: The Clean Up
HTML/XHTML window
opens. Even though you
can just clean up the
error you identified
earlier, it won’t hurt to
clean up other problems
that may appear in your
code (and somewhere
else in the Site Report
Results window). Click
OK to clean up the HTML.
Bottom: Dreamweaver
reports back to you. In
this case, Dreamweaver
fixed a few other XHTML
problems that the Site
Report didn’t catch and
reported what it couldn’t
automatically fix: the
type attribute for a script
tag and the Alt property
for an image, both of
which require human
intervention to fix (see
page 209).
If you want to save the results of your report, click the Save Report button. Dreamweaver opens a Save As dialog box and lets you save the report as an XML file (so
you can file it in the “Files I don’t really need” folder on your desktop).
Chapter 16: Testing Your Site
603
Accessibility
Accessibility
Even the clearest, most well-planned Web sites can pose a real challenge to people
with vision problems. Likewise, people with motor skill problems may be unable to
use a mouse and have to rely on keyboard shortcuts to navigate a Web page.
To make Web sites more accessible to those with a variety of disabilities, the Web
Accessibility Initiative (WAI)—a part of the World Wide Web Consortium—has
proposed guidelines for the design of Web sites. In fact, the U.S. government has
mandated its own set of guidelines (Section 508 of the U.S. Rehabilitation Act) for
all Web sites built by and for the government. Some states have even more stringent guidelines, and countries throughout the world are either in the process of
developing accessibility standards or already have such standards in place. Following the WAI guidelines improves your site by making it accessible to a larger audience.
Dreamweaver provides several tools for meeting these guidelines and helping Web
designers build more accessible sites (see page 211). But for comprehensive analysis of
your site, use the Accessibility site report. With it, you can evaluate your Web pages to
make sure they comply with W3C guidelines and the requirements of Section 508.
Checking your site against accessibility standards is similar to running any other
report. Follow steps 1–4 on page 600, taking care to turn on the Accessibility
checkbox. (You can also check accessibility for just the page you’re working on:
choose File ➝ Check Page ➝ Accessibility.)
Once the report is complete—which may take awhile for an entire site—the process
of identifying and fixing the errors is a little different than with other reports:
1. Select an error in the Results panel (see Figure 16-10).
Accessibility errors come with one of two designations: Failed and Manual. A
failure (marked by a red X in the Results panel) indicates that some item on the
page fails to meet one of the prescribed guidelines. The most common failure is
missing Alt text for graphics.
“Manual” errors are those that Dreamweaver is not sure about. Check them
manually and make corrections, if you deem them necessary.
In both cases, fixing the problems is up to you; Dreamweaver doesn’t do any
auto-fixing here.
Tip: The Insert Image command should be set to remind you to add alt text; if you’re not prompted to
supply alt text when inserting an image, turn to page 211 to learn how to turn on this feature.
2. Click the More Information (i) button in the Results panel.
The Reference panel shows a description of the problem and techniques for fixing
it (see Figure 16-10). In addition, you’ll find some guidance in the accessibility
guide built into the Reference panel (see page 394).
604
Dreamweaver CS3: The Missing Manual
Accessibility
Figure 16-10:
The UsableNet Accessibility
Reference provides
diagnosis and
recommendations for all
accessibility problems
encountered by
Dreamweaver’s Accessibility
reporting command. You
will probably have to stretch
the panel to a taller height
to read this information:
Windows users just drag the
dark bar (circled in the
middle of the figure) upward
to make the Reference panel
taller.
3. Double-click the name of the file in the Results panel.
As with other reports, Dreamweaver opens the file and automatically highlights the
offending code. You can then make the recommended changes and save the page.
Accessibility Priorities
As you’ll quickly learn, there are a lot of different guidelines for creating accessible
sites. The whole issue can be confusing (some helpful resources are listed in the
box on page 606).
To get you started, here are a few of the priority items recommended by the WAI:
• Images, animations. Use the Alt property to describe the function of each visual
element on a page (see page 209).
• Image maps. Provide Alt descriptions for each link in an image map (see page 226).
• Hypertext links. Use understandable text for all links. Try reading it aloud to
make sure the text clearly indicates where the link goes. Avoid “click here” links.
• Organizing page content. Use headings, lists, and consistent structure. Avoid
the <font> tag and the <table> tag for organizing page content; instead, use
Cascading Style Sheets for text styling and page layout.
Chapter 16: Testing Your Site
605
Accessibility
• Graphs, charts. Summarize information contained in informational graphics.
• Scripts, applets, plug-ins. Provide alternative content, in case active features are
inaccessible or unsupported.
• Frames. Use the noframes element and title each frame page (though you’re better off skipping this quickly dying Web design technique).
POWER USERS’ CLINIC
Making Accessible Web Sites
Building Web sites that meet everyone’s requirements is a
daunting task. Unless you have screen-reader software to
simulate the experience of a visually impaired visitor, or a
crew of people with a variety of impairments (from colorblindness to repetitive stress injury) to test your site, how
do you know what it takes to build a fully accessible Web
site?
Fortunately, there are plenty of resources to get you started.
The best place to start is at the Web Accessibility Initiative’s
Web site, especially their accessibility resources page: www.
w3.org/WAI/Resources. Here you’ll find lots of information,
including examples of different disabilities some Web surfers
face, plus tips, checklists, and techniques for making sites
accessible. You should also check out Dive Into Accessibility
(http://diveintoaccessibility.org), a Web site dedicated to
teaching Web designers the whys and hows of accessibility.
And if you do want to see how screen readers work with
your site, you can download a demo of JAWS, one of the
most popular screen readers, at www.freedomscientific.
com/fs_downloads/jaws.asp. A free alternative is a Firefox
extension named Fangs, which displays (in text) what a
screen reader like JAWS reads aloud. You can download it
from http://sourceforge.net/projects/fangs/.
Finally, Adobe dedicates an entire section of its site to
accessibility issues: www.adobe.com/accessibility/. Here,
you’ll find explanations of the issues, tips for using Adobe
products, and a showcase of accessible Web sites.
Accessibility Options
Dreamweaver’s accessibility report covers the Section 508 requirements as well
as version 1 of the WAI’s “Web Content Accessibility Guidelines” (more commonly referred to as WCAG 1.0). This thoroughness is commendable, but it
may be more than you need. By all means, pare down the report to include just
the guidelines that apply to your site. To do so, choose Site ➝ Reports and turn
on the Accessibility box. Click the Report Options button to open the window
shown in Figure 16-11.
You can disable any rules Dreamweaver uses to evaluate your pages. To turn
off an entire category—forms, frames, or tables, for example—click the name
and then click Disable. If you’d like to get more specific, click the + button
next to a category name to expand a list of individual rules for that category.
You can select and disable one or more rules. For example, if your site doesn’t
use frames, you’ll save time and Dreamweaver’s energy by turning off the
frames category.
606
Dreamweaver CS3: The Missing Manual
Download Statistics
Figure 16-11:
The Accessibility options
window lets you control
which rules Dreamweaver
uses to evaluate a Web site’s
accessibility. You may want to
fine-tune this list based on
recommendations in this
book or from the online
sources mentioned in the box
on the opposite page.
Download Statistics
Remember the old joke that WWW really stands for “World Wide Wait"? Even as
more and more people upgrade to speedy DSL and cable modems, file size is the
constant foe of the Web designer. What takes only a moment to load from your
computer’s hard drive could take minutes to travel across the Internet. The more
information you put into a Web page, the more time it takes to load.
You can judge how big your page is, and therefore how long it will take to download, by looking at the download stats in the status bar at the bottom of the document window. You’ll see something like this: 9k/2 sec. This term indicates the file
size of the Web page (9k, for instance) and how long it will take a visitor to download the page (2 seconds) using a 56 Kbps modem.
GEM IN THE ROUGH
Caching In
Behind the scenes, Web browsers store the graphics they
download onto the computer’s hard drive. This is a speed
trick. If you click your Back button to return to a Web page
whose graphics files the browser has already downloaded,
the browser simply pulls them out of the cache—off the hard
drive, in other words—instead of re-downloading them. This
arrangement makes the page load more quickly, since the
hard drive is generally much faster than the modem.
As a Web designer, you can capitalize on this standard Web
browser feature by reusing the same graphics files on more
than one page of your site. For instance, you can create a
navigation bar composed of small graphic buttons (Home,
Contact Us, Products, and so on). If you reuse those buttons
on other pages of the site, those pages appear to download
more quickly.
This same trick works for external CSS style sheets. A
browser needs to download a complete style sheet with
hundreds of formatting commands only once for any page
on a site to reuse it. By putting all of your formatting into
one or more external files, you can keep your Web pages
mean and lean.
Chapter 16: Testing Your Site
607
Download Statistics
The file size and download time takes into account linked files like images, external
CSS style sheets, and Flash movies. This information provides a realistic picture of
download speed, since not only does a page have to download, but any files that
page uses (like a photo) also need to travel across the Internet to a visitor’s
browser. The file size and download time can be misleading, however. If you use
the same external files on other pages in the site (for example a common external
style sheet or a logo graphic that appears on each page) your site’s visitors may
have already “cached” those files and won’t need to spend the time downloading
them again (see the box on page 607).
Note: People hate to wait. You may think that the graphic design of your Web site is so compelling that
even if it takes a full minute to download that zippy new Flash home page, people will stick around.
Think again. Research shows that 10 seconds is the maximum amount of time that someone stays focused
on a task while waiting. That means if you’re designing a Web site for people with 56 Kbps modems, keep
your pages below about 45 KB.
608
Dreamweaver CS3: The Missing Manual
chapter
Chapter 17
17
Moving Your Site to the
Internet
Building Web pages on your computer is a big accomplishment, but it’s not the
whole job. Your beautifully designed and informative Web site will simply languish
in obscurity on your hard drive unless you move it to a Web server.
Fortunately, once your Web site is ready for prime time, you can put it on a server
without ever leaving the comfort of Dreamweaver. The program includes simple commands for transferring files back and forth between the Web server and your desktop.
Depending on how you operate, choose one of these two methods for transferring
your files:
• If you’re the sole Web developer for a site, Dreamweaver’s Get and Put commands
are the easiest way to go.
• If, on the other hand, there’s a group of people working on your site, Dreamweaver’s Check Out and Check In tools let you move files at will without wiping out others’ hard work. In addition, this group feature integrates seamlessly
with two other industrial-strength Web collaboration tools: Microsoft’s Visual
SourceSafe and WebDAV, an open source file management tool.
Either way, you begin by defining a remote site.
Defining a Remote Site
As you create your Web site on your computer, you keep it in a local root folder
(see page 33), often called a local site for short. You can think of a local site as a
work-in-progress. As your site is under construction—whether you’re building it
from scratch or adding and modifying pages—you’ll routinely have partially finished
documents sitting on your computer.
609
Defining a Remote
Site
Then, when you’ve perfected and tested your pages using the techniques described
in Chapter 16, you’re ready to transfer them to a Web server that’s connected to
the Internet. Dreamweaver calls the Web server copy of your files the remote site,
and the program provides five methods for transferring files between it and your
local site:
• FTP. By far, the most common method is FTP, or File Transfer Protocol. Just as
HTTP is the process by which Web pages are transferred from servers to Web
browsers, FTP is the traditional method of transferring files over the Internet,
and it’s the one to use if a Web hosting company or Internet Service Provider
(ISP) provides the home for your Web pages.
• Over the local area network. If you’re working on an intranet, or if your company’s Web server is connected to the company network, you may also be able
to transfer files just as you would any files on your office network (using the
Network Neighborhood, My Network Places, or “Connect to Server” command,
depending on your operating system), without even connecting to the Internet.
• The last three options—RDS, SourceSafe, and WebDAV—are advanced file
management systems used for collaborative Web development. They’re discussed on page 616.
Setting Up a Remote Site with FTP
You can set up a remote site only if you’ve first set up a local site on your computer. Even if you’re just putting up a temporary site while working on your real
Web site, you must at least have the temporary site constructed and defined in
Dreamweaver (see page 28).
FREQUENTLY ASKED QUESTION
Beyond Dreamweaver
Do I have to use Dreamweaver to move my files to the
Web server?
No. If you’re used to using another program for this purpose, such as CuteFTP (Windows) or RBrowser (Mac), you
can continue to use it and ignore Dreamweaver’s Remote
Site feature.
However, if you’ve never before used Dreamweaver to
move files to a server, you may want to at least try it; you’ll
find that Dreamweaver simplifies much of the process. For
example, when you want to move a file from your computer to the Web server using a regular FTP program, you
must first locate the file on your local machine and then
navigate to the proper folder on the Web server. Dreamweaver saves you both steps; when you select the file in the
Files panel and click the Put button, Dreamweaver automatically locates the file on your computer and transfers it to
the correct folder on the Web server.
Note: Dreamweaver lets you edit directly on pages located on a Web server, using an FTP connection
(or if you’re working with ColdFusion files, an RDS connection). This feature isn’t always the best way to
go: It’s slow and leaves your works-in-progress open for the world to see on the Internet.
610
Dreamweaver CS3: The Missing Manual
Defining a Remote
Site
Once that’s done, here’s how you go about creating an Internet-based mirror of
your local site folder:
1. Choose Site ➝ Manage Sites.
The Manage Sites dialog box opens, listing all sites that you’ve defined so far. You’re
about to create a living, Internet-based copy of one of these hard drive–based local
sites.
2. Click the name of the site you want to post on the Internet, and then click Edit.
Alternatively, just double-click the site name in the list. The Site Definition window appears for the selected site, as shown in Figure 17-1.
Note: You can also define the remote site and the local site simultaneously, when you first begin creating a
Web site (as described on page 34). Even then, however, Dreamweaver requires that you first give the site
a name and choose a local root folder. At that point, you rejoin the steps described here.
Figure 17-1:
If a Web hosting company or
ISP hosts your Web site, you’ll
most likely use FTP to put your
site on the Web. To make sure
you have all the information
you need to connect to the Web
server, ask your ISP for these
four pieces of information: (1)
the FTP host name of the server,
(2) the path to the root
directory for your site, (3) your
login name, and (4) your
password. (If the Web server
comes with your email account,
your login and password may
be the same for both.)
3. Click the Advanced tab.
You can also use the Site Definition Wizard (Basic tab) to set up a remote site.
However, since the wizard requires you to step through screen after screen of
setup information—even after you’ve already supplied most of it—the
Advanced tab is faster.
4. In the Category panel, click Remote Info. From the Access pop-up menu,
choose FTP.
The Site Definition window now shows menus and fields for collecting your
connection information (see Figure 17-1).
Chapter 17: Moving Your Site to the Internet
611
Defining a Remote
Site
5. Fill in the “FTP host” field.
Your FTP host name may be a name like www.cosmofarmer.com. It never
includes directories, folders, or slashes (like www.cosmofarmer.com/home);
never includes codes for the FTP protocol (ftp://ftp.cosmofarmer.com); and is
usually not just a domain name, such as cosmofarmer.com. It can also be an IP
address, like 64.226.43.116. In most cases, it’s the address you would enter into a
Web browser (minus the http://) to get to your site’s home page.
If you don’t know the host name, there’s only one way to find out: call or email
your Web hosting company or ISP, or check its Web site.
6. In the “Host directory” field, type the path to the root directory.
You’re specifying which folder within your Web hosting account will contain
your Web page files and serve as the root folder for your site.
Just as on your own hard drive, all your Web site’s files on the Web server are
completely contained inside a master folder referred to as the root folder. But
when you connect to your Web server using FTP, you’re rarely connected to the
root folder itself. Instead, you usually connect to a folder that isn’t accessible
over the Web—some administrative folder for your Web account, often filled
with folders for log reports of your site’s Web traffic, and other files not visible
over the Web.
Your hosting account’s root directory folder (or even a folder within it) is where
you place your site’s root folder; that’s why you’re typing its name here. Common names for the root folder at ISPs or Web hosting companies are docs,
www, htdocs, public_html, or virtual_html. (Call or email your Web hosting
company or ISP to find out.)
The information you give Dreamweaver here represents the path from the FTP
folder to the root folder. It may look like this: www/htdocs/ (if you leave the
trailing forward slash off, Dreameaver adds it when you close the Site Definition window). In effect, you’re telling Dreamweaver: “After connecting to the
Web server, you’ll find a folder named www. Inside this folder is another folder,
htdocs. Put my site files in there.” In other words, htdocs is the Web site’s root
folder on this particular remote hosting account.
7. In the Login field, type your user name, and then type your password in the
Password field.
Dreamweaver uses bullets (•••) to display your password so that passing evildoers in your office can’t see what you’re typing.
If you want Dreamweaver to remember your password each time you use the
program, turn on the Save checkbox. This way, you won’t have to type your
password each time you connect to the Web server.
612
Dreamweaver CS3: The Missing Manual
Defining a Remote
Site
Warning: For security reasons, don’t turn on the Save box if you access the Web using computers at, say,
your local library, or anywhere else where people you don’t trust may use the machine. Otherwise, you might
just awaken one morning to find the following splattered across your home page: “Hi there! Welcome to
Jack’s house of illegally acquired and unlawfully distributed music, featuring Metallica’s greatest hits.“
8. Turn on the “Use passive FTP” or “Use firewall” boxes, if necessary.
If you’re building sites from your home, home office, or small company, you
may never need to use these options.
Many corporations, however, use firewalls: hardware- or software-based gateways
that control incoming and outgoing traffic through a network. Firewalls protect the company network from outside hackers; unfortunately, they also limit
how computers inside the network—behind the firewall—can connect to the
outside world.
Tip: When Dreamweaver can’t connect to a Web server, one of the first things you should try is turning
on the “Use passive FTP” checkbox. Your first chance to see whether this maneuver is necessary comes
below, in step 13.
If your company’s system administrator confirms that you have a firewall,
you’ll need to also get the name of the firewall host computer and its port number. Click the Firewall Settings button, which opens the Site Preferences dialog
box). Your firewall configuration may also require passive FTP—a method of
connecting using your local software, rather than the firewall server. Check with
your administrator to see if this is the case, and, if so, turn on the “Use passive
FTP” checkbox.
Note: You probably won’t need to turn on the “Use IPv6 transfer mode” checkbox for several years to
come. It’s intended for the day when we run out of IP addresses, and Web servers switch from IP addresses
that look like 192.168.1.1 to ones that look like this: 1A23:120B:0000:0000:0000:7634:AD01:004D. Egads.
9. If your Web server uses SFTP (a secure, encrypted form of FTP), turn on the
Use Secure FTP (SFTP) box.
Secure FTP encrypts all of your data, not just your user name and password, so
information transferred in this way is unintelligible to Internet snoops. It’s the
ideal method of connecting to a Web server, since normal FTP connections
send your username and password unencrypted, susceptible to Internet creeps;
in many cases, Secure FTP is also faster. Unfortunately, not all Web hosting
companies offer this advanced option.
By the way, leave “Automatically upload files to server on save” turned off.
Because it makes Dreamweaver upload the file each time you save, it slows you
down and runs the risk of putting half-finished Web pages on your server for all
the world to see. It’s better to just upload the page after you’re completely finished with it.
Chapter 17: Moving Your Site to the Internet
613
Defining a Remote
Site
10. Leave the Server Compatibility options alone.
That big Server Compatibility button is useful when you’re having trouble connecting to the server or moving files on the server. Dreamweaver, out of the
box, is tuned to make FTP run as fast as possible, so leave these options alone,
unless you’re having trouble. If you are having trouble connecting to your
server, start with the Tip on page 613. If that doesn’t work click the Server Compatibility button and turn off the “Use FTP performance optimization” box.
If everything’s okay when you’re connecting to your server, but you’re getting
errors when moving files on the server, you should turn on the “Use alternative
FTP move method” box. This method is slower but more reliable. It’s also
handy if you use Adobe’s Contribute program and are taking advantage of the
“rollback” feature (to learn more about Contribute, visit www.adobe.com/
contribute/).
11. If you don’t want to synchronize files, turn off the “Maintain synchronization
information” box.
Dreamweaver’s synchronization was greatly improved in Dreamweaver 8 and is
a useful tool for keeping a site up to date. It helps you maintain the most recent
versions of a file on the remote server, by keeping track of when you’ve changed
a file on your computer. When you synchronize a site, Dreamweaver can move
the more recent files onto the Web server. This feature is described in detail on
page 634. If you don’t use synchronization, definitely turn off this checkbox.
When this feature is on, Dreamweaver inserts little files named dwsync.xml
throughout your site in folders named _notes. These items keep track of synchronization information about each file in your site, but there’s no need to
clutter things up with these files if you don’t use synchronization.
12. Turn on “Enable file check in and check out,” if you like.
Turn it on if, for example, you and your team of Web developers all use Dreamweaver. Then fill in the corresponding options as explained in Figure 17-2.
If you do wind up using the “checking out” feature (see page 628), you can save
yourself some clicks by turning on “Check out files when opening.” (Fill in your
name and email address, too, as shown in Figure 17-2.) Now you can “check
out” a file from the remote server just by double-clicking its name in the Site
Files list.
Figure 17-2:
If you’re using Dreamweaver’s Check In/Check Out feature and you work
on your site in several different locations (for example, from home and
your office), use a different name for each location (BobAtHome and
BobAtWork, for example). In this way, you can identify which files you’ve
checked out to your home computer and which to your computer at work.
614
Dreamweaver CS3: The Missing Manual
Defining a Remote
Site
13. Click the Test button to see if Dreamweaver can connect to the Web server.
If everything goes according to plan, you’ll see a “Dreamweaver connected to
your Web server successfully” message. If not, you’ll get an “FTP error” message
with some additional information that can help you determine the problem (see
the box below).
14. Click OK to return to the Manage Sites dialog box, and then click Done.
The Manage Sites dialog box closes, and the Files panel opens.
At this point, you’re ready to connect to the Web server and transfer files. If you’re
the only person working on the site, Dreamweaver’s Get and Put commands will
do the trick (page 620). If, however, you’re part of a development team, use
Dreamweaver’s Check In and Check Out feature, described on page 628.
FREQUENTLY ASKED QUESTION
When Your Remote Site Is Too Remote
Help! I can’t connect to my Web server. What should I do?
Things don’t always go smoothly. That’s doubly true when trying to connect to a Web server, since you depend on a variety
of things—your Internet connection, the networks connecting
you to your Web server, the Web server itself, and the FTP software—working together in harmony. Dreamweaver presents
an error message if you can’t successfully establish an FTP connection with your Web server. The error box frequently contains useful information that can help you determine the
problem. Here are some of the most common:
• Remote host cannot be found usually means
you typed an incorrect FTP Host address (step 5 on
page 612).
• Your login or password is incorrect means just
that—you’ve typed the wrong user name or password (step 7 on page 612).
Unfortunately, there are lots of reasons Dreamweaver may
not be able to connect, so sometimes the error message
isn’t particularly helpful. Here are a few other suggestions
for troubleshooting: make sure you’re connected to the
Internet (open a Web browser and see if you can visit a site
on the Web); return to the Remote Info category of the Site
Definition window, and turn on the “Use passive FTP”
option (sometimes this just makes things work); click the
Server Compatibility button, and then turn off the “Use FTP
performance optimization” box; and if you have another
FTP program like CuteFTP or RBrowser, see if you can connect to your Web server using the same settings you gave
Dreamweaver. If all these steps fail, you can visit this page
on the Adobe Web site for additional troubleshooting tips:
www.adobe.com/cfusion/knowledgebase/index.cfm?id=tn_
14834.
• Cannot open remote folder usually means you
mistyped or input the wrong Host directory (step 6
on page 612).
Setting Up a Remote Site over a Local Network
If you’re working on an intranet, or if your company’s Web server is connected to
the company network, you may also be able to transfer your Web files just as you’d
move any files from machine to machine. Dreamweaver provides the same filetransfer functions as with FTP, but setup is simpler.
Chapter 17: Moving Your Site to the Internet
615
Defining a Remote
Site
Follow steps 1 and 2 of the previous instructions, but in step 4, click the Remote
Info category and then choose Local/Network from the Access pop-up menu.
Menus and fields for collecting your connection information appear in the Site
Definition box (see Figure 17-3).
Figure 17-3:
If your company’s Web server is
hosted in your office, the
“remote site” might not be that
remote: In this case, choose a
folder on your local network as
the remote site.
Now click the folder icon next to the “Remote folder” field. In the resulting dialog
box, navigate to and select your site’s remote root folder. On a local network, this
folder functions as the root folder on your company’s Web server, even though it’s
actually still within the walls of your building. (For differences on selecting root
folders on Windows and Macs, see page 32.)
Wrap up with steps 10, 11, 12, and 14 of the previous instructions. At this point,
you’re ready to connect to the Web server and transfer files.
Setting Up a Remote Site with RDS
RDS (Remote Development Services) is a feature of Adobe’s ColdFusion Server. It
lets designers work on Web files and databases in conjunction with a ColdFusion
application server. If you aren’t using ColdFusion, then this option isn’t for you.
To create a remote site in Dreamweaver that works with RDS, follow steps 1
through 3 on page 611. In step 4, click the Remote Info category, and then choose
RDS from the Access pop-up menu.
The Site Definition window displays a version number, a short description, and a
Settings button. Click Settings to open the Configure RDS Server window, shown
in Figure 17-4. Fill in the dialog box as directed by your server administrator or
help desk.
Setting Up a Remote Site with WebDAV
Dreamweaver also allows access to a remote site using WebDAV, short for Webbased Distributed Authoring and Versioning. Like FTP, it’s a method, or protocol,
for transferring files. Like SFTP, it lets you use a secure connection (SSL or Secure
Socket Layer) so that all of your data is encrypted as it passes back and forth
between your computer and the Web server. But unlike both of those technologies,
WebDAV also addresses the kinds of problems you encounter when collaborating
on a Web site with other people.
616
Dreamweaver CS3: The Missing Manual
Defining a Remote
Site
Figure 17-4:
Remote Development Services is a feature of the
ColdFusion application server. However, even if you use
ColdFusion, you may not be able to use RDS, since most
Web hosting companies that offer ColdFusion servers turn
off RDS due to potential security problems.
Note: WebDAV isn’t a very common option at most Web hosting companies, where FTP is still the norm.
So you may not be able to take advantage of this exciting technology. However, if you’re a Mac fan and
have an Apple .Mac account, your iDisk actually works using WebDAV, so you can connect to your .Mac
Homepage files using Dreamweaver. (Even Windows owners can use Dreamweaver to work on a WebDAV .Mac Web site.)
For instance, all kinds of havoc can result if two people edit a page simultaneously;
whoever uploads the page to the Web server second winds up wiping out the
changes made by the first person. WebDAV supports a check-in and check-out
system that works similarly to Dreamweaver’s Check In/Check Out tool (see page
xx) to make sure only one person works on a file at a time and no one tramples on
anyone else’s files. In fact, Dreamweaver’s Check In and Check Out tools work
seamlessly with WebDAV.
Both Microsoft Internet Information Server (IIS) and Apache Web Server can
work with WebDAV. WebDAV is commonly found at colleges and universities,
but it’s less common at traditional Web hosting companies. To find out if your
Web server can handle WebDAV (and to find out the necessary connection information), consult your Web server’s administrator (for example, call or email your
Web hosting company).
Setting up WebDAV access to a remote site is very similar to setting up FTP access.
Follow steps 1 through 3 on page 611, and then follow these steps:
1. Click the Remote Info category, and then choose WebDAV from the Access
pop-up menu.
The Site Definition window displays the WebDAV settings (Figure 17-5).
2. In the URL box, type in the URL of the WebDAV server.
In most cases, this is the URL of the Web site, so it begins with either http:// or
https://. The s in https means you’ll connect securely to the Web server using
SSL. The normal http:// method doesn’t use any encryption, which means that,
just like with regular FTP, your user name, password, and all data are sent “in
Chapter 17: Moving Your Site to the Internet
617
Defining a Remote
Site
Figure 17-5:
WebDAV, short for Web-based
Distributed Authoring and Versioning, is
a powerful tool for working on a site
with other people. It’s built into several
Web server packages but, unfortunately,
isn’t a very common option at most Web
hosting companies.
the open” across the Internet. Note that just adding an s won’t suddenly make
your file transfers secure; the Web server needs to be set up to accept https connections (a technically challenging task).
Note: .Mac account holders who want to connect to their Homepage Web site should type https://idisk.
mac.com/UserName/Sites where “UserName” is your .Mac account name.
3. In the Login field, type your user name, and then type your password in the
Password field.
Turn on the Save checkbox if you want to save yourself the hassle of having to
type in your password each time you move files to your Web server (but heed
the Warning on page 613).
4. Click the Test button to see if your connection works.
If Dreamweaver succeeds, it proudly tells you. Unfortunately, if it fails, you’ll
get an error message that isn’t exactly helpful. WebDAV isn’t nearly as finicky as
FTP, so if there’s an error, you most likely just typed the URL, password, or
login incorrectly, or WebDAV just isn’t available for the server.
Note: However, due to the different possible server configurations for WebDAV, Dreamweaver may not be
able to connect at all. If this is the case, you’ll need to use FTP or another method to connect to your server.
5. Leave the “Automatically upload files to server on save” box turned off.
This option makes Dreamweaver upload the file each time you save; it slows
you down and runs the risk of putting half-finished Web pages on your server
for all the world to see. It’s better to just upload the page after you’re completely finished with it.
The rest of the process is identical to the FTP setup process, so follow steps 11, 12,
and 14, starting on page 614. You’re ready to connect to the Web server and transfer files, as described on page 620.
618
Dreamweaver CS3: The Missing Manual
Defining a Remote
Site
Setting Up a Remote Site with SourceSafe
Microsoft originally created Visual SourceSafe for managing team software development. Like WebDAV, SourceSafe makes sure you don’t accidentally stomp on
someone else’s hard work by overwriting a Web page they just modified. In addition, this sophisticated program tracks different versions of files and lets an administrator “roll back” to previous versions of a Web page, or even an entire site; it’s
the granddaddy of Undos.
To take advantage of this power, however, you need a Visual SourceSafe (VSS)
server and VSS database already setup. In addition, Windows people need to install
Microsoft Visual SourceSafe Client version 6 on their PCs.
Note: The Visual SourceSafe option isn’t available in the Mac version of Dreamweaver.
Once you’ve installed the VSS Client software, and you’ve created and defined a
local site (see page 28), you’re ready to configure Dreamweaver for SourceSafe
using the Site Definition window. Basically, you tell Dreamweaver where to find
the SourceSafe database and how to sign on to the server.
Once again, follow steps 1 though 3 on page 611. But in step 4, click the Remote
Info category, and then choose Microsoft® Visual SourceSafe® from the Access
pop-up menu. In the resulting dialog box, click Settings to reveal the Open
Microsoft® Visual SourceSafe® Database dialog box (Figure 17-6).
Figure 17-6:
This window, sometimes called the “Microsoft’s®
Lawyers Are Everywhere®” dialog box, lets you set
up Dreamweaver for use with Microsoft’s Visual
SourceSafe system. Many corporations use this
powerful file-control system to control access to files
in large projects involving many people.
Click Browse to select the Visual SourceSafe (VSS) database file on your computer
(or type in the file path, if you know it, into the Database Path field)—the srcsafe.ini
file that Dreamweaver uses to initialize SourceSafe.
Then, in the Project field, fill in the name of the project within the VSS database
that you wish to use as the remote root folder. (A VSS database can have many
projects and Web sites listed in it. Make sure you enter the correct project name
for this site. If in doubt, contact the administrator of the Visual SourceSafe database.) Type your user name and password into the appropriate fields; again, ask
the administrator for guidance.
Click OK. But before dismissing the Site Definition dialog box, turn on “Check
Out Files when Opening,” so that Dreamweaver’s Check In and Check Out features (see page 628) work with the VSS system. Click OK, and then click Done.
Chapter 17: Moving Your Site to the Internet
619
Transferring Files
Transferring Files
Once you’ve told Dreamweaver how you plan to ship off your Web page files to the
Net, you can now set about actually doing it. Thanks to Dreamweaver’s Files panel,
the whole process takes only a few steps.
Moving Files to the Web Server
To transfer files to your Web server:
1. Open the Files panel (Figure 17-7).
Choose Window ➝ Files (keyboard shortcut: F8).
Put files
Get files
Refresh list
Check out
Check in
Synchronize
File view
Connect/
Disconnect
Figure 17-7:
The Files panel offers toolbar buttons for
uploading and downloading your Web
files to and from the actual Web server
that dishes them out to your site’s
adoring public. (See Chapter 15 for
much more on this important window.)
Expand/Collapse
2. From the Site menu, choose the name of the site whose files you wish to move
(if it isn’t already selected).
The Files panel displays files for the selected site. You can use the File View popup menu to access either a list of the local files or the remote files on the Web
server (see Figure 17-7). You can also see both local and remote files side by side
if you first choose “Remote view” from the File View pop-up menu and then
click the Expand button on the Files panel, as described on page 570.
Note: The color of the folders in the Site panel lets you know which view you’re currently in: green folders
mean Local view (your computer), beige (blue on the Mac) folders mean Remote view, and red folders indicate the Testing view for a testing server as described on page 762.
3. From the file list in the Files panel, select the files you wish to upload to the
Web server.
To move a folder and every file inside it, just select the folder. (In other words,
you can transfer your entire Web site to the server by simply selecting the local
root folder—the folder listed at the very top of the Local Folder file list.) When
only a few files have changed, you can also select only certain files or folders for
uploading, using any of the techniques described on page 588.
620
Dreamweaver CS3: The Missing Manual
Transferring Files
Note: If you don’t see the files you wish to upload in the Site Files list, you may have Remote view
selected. Select Local view to see only those site files on your computer and click the Refresh button on
the Files panel (Figure 17-7).
When you use do-it-yourself FTP programs like WS_FTP or Fetch, you have to
specify a folder location for every file you transfer to the Web server. But here’s
one of the great advantages of letting Dreamweaver do your file shuffling; it
already knows where the files should go on the remote site. The local and
remote sites are, after all, mirror images, so Dreamweaver simply puts files in
the corresponding folders on the remote site.
For example, suppose you select the file mayo.html, which is in a folder called Condiments, which is itself stored in the local root folder. When you transfer the file,
Dreamweaver knows to put this file in the Condiments folder in the root folder on
the remote site. In fact, if the folder Condiments doesn’t exist on the remote site,
Dreamweaver creates it and then puts the file into it. Now that’s service.
A hush falls over the audience; you’re ready to go live with your Web page.
4. Click the “Put files” button—the up-arrow icon identified in Figure 17-7—on
the Files panel.
Alternatively, you can use the keyboard shortcut Ctrl+Shift+U (c-Shift-U).
Several things happen when you do this: First, if you’re using an FTP connection,
Dreamweaver attempts to connect to your Web server, dialing your modem if
necessary. As you can see in the status window that opens, it may take a minute
or so to establish a connection; the Connect button (see Figure 17-7) displays a
bright green light when Dreamweaver is connected.
Next, if any of the files you’re transferring are currently open and have unsaved
changes, Dreamweaver asks if you want to save the files before transferring
them to the server. Click Yes to save the file, or, if there are multiple unsaved
files, click the Yes To All button to save all of them before posting them online.
In addition, Dreamweaver asks if you wish to transfer any dependent files (see
Figure 17-8). Dependent files are graphics, external CSS files, or Flash movies
that you’ve placed onto a page and are needed for the page to display properly.
Figure 17-8:
The Dependent Files feature of Dreamweaver’s
File Transfer command makes sure all
necessary files—graphics, Flash movies, and so
on—are copied to the Web server along with
your Web pages. There’s also a countdown—a
“will dismiss in xx seconds” message. If you
don’t click a button within 30 seconds,
Dreamweaver assumes you mean “No” and
just uploads the selected files.
Chapter 17: Moving Your Site to the Internet
621
Transferring Files
This feature can save you considerable time and hassle; no need to hunt for and
upload each graphic file or external style sheet yourself. On the other hand, if all
the dependent files are already on the server, having Dreamweaver transfer the
same files again is a waste of time. Fortunately, Dreamweaver helps stop this
wasted effort as described in the next step.
Note: If you turn on the “Don’t show me this message again” box and then click Yes, Dreamweaver copies
dependent files without asking. On the other hand, if you turn on the “Don’t show me this message
again” box and click No, Dreamweaver never copies dependent files.
If you want the Dependent Files dialog box to appear again after you’ve turned it off, hold down the Alt
(Option) key when you transfer a file (using any method except a keyboard shortcut). Or choose Edit ➝
Preferences ➝ Site Category (Dreamweaver ➝ Preferences ➝ Site Category) to turn this feature on or off.
5. Click Yes to transfer dependent files, or No to transfer only the files you
selected.
Dreamweaver copies the files to the Web server. If you’re copying a file that’s
inside a folder that isn’t already on the remote site, Dreamweaver creates the
folder as well. In fact, Dreamweaver creates as many subfolders as necessary to
make sure every file is transferred to the same folder location on the remote site
as it is in the local site. (Try doing that with a regular FTP program.)
If you’ve chosen to transfer dependent files as well, Dreamweaver may or may
not put the dependent file on the Web server. If you’ve turned on the “Maintain
Synchronization Information” checkbox when defining your remote site (see
step 11 on page 614), Dreamweaver determines if the dependent file is already
on the Web server and, if it is, whether your local copy of the file is a newer version. If the dependent file doesn’t exist on the server or your local copy is newer
(meaning you’ve made some changes to it locally but haven’t yet moved it onto
the Web), Dreamweaver puts it on the remote site when you tell it to transfer
dependent files.
However, if Dreamweaver thinks that it’s the same file, or that the copy of the
file on the Web server is newer, it won’t transfer the dependent file. This behavior is a huge time-saver, since you won’t have to repeatedly upload the same 50
navigation buttons each time you say “Yes” to transferring dependent files; but,
best of all, Dreamweaver still transfers those dependent files that really are new.
Note: Dreamweaver’s ability to correctly determine whether a dependent file on your computer is the
same as the file on the remote site depends on its Site Synchronization feature, described on page 634.
While Dreamweaver’s accuracy with this tool is good, Dremweaver has been known to get it wrong. If
Dreamweaver isn’t moving a dependent file that you want moved to the remote server, you can just select
that file and upload it manually (for example, select it in the Files panel and click the Put button). Dreamweaver always obeys a direct order to move a selected file to the remote site.
622
Dreamweaver CS3: The Missing Manual
Transferring Files
6. Continue using the Put button to transfer all files in your Web site to the
remote site.
Depending on the number of files transferred, this operation can take some
time. Transferring files over the Internet using FTP isn’t nearly as fast as copying files from one hard drive to another (see the box below).
POWER USERS’ CLINIC
A Little More Background on File Transfers
Dreamweaver lets you keep working as it dutifully moves files
in the background. You can edit a Web page, create a new
style sheet, and so on, while the program busily transfers files
over the Internet. However, there are some things you can’t
do while Dreamweaver is transferring files. These are mostly
logical restrictions: you can’t edit the site definition (since this
could affect how you connect to the remote server); you can’t
put or get other files (since Dreamweaver’s already busy
doing that); you can’t delete a file on the local or remote
server (since you may be transferring that file). Dreamweaver
lets you know if you try to do one of these forbidden actions
while it’s working with the server.
If you find the background activity window a nuisance, click
the Hide button and it temporarily disappears. In addition,
if you accidentally start uploading a 10,000 page Web site,
you probably won’t want to wait until Dreamweaver is finished. Click the Cancel button to stop the process.
Once Dreamweaver’s finished moving files around, you
can see a record of Dreamweaver’s actions by clicking the
Log button that appears at the bottom-right corner of the
Files panel. This log is a different record than the raw FTP
log discussed in the box on page 626. This plain-language
window lets you know what Dreamweaver did—“Put successful,” “Get successful,” and so on. If you see a “not transferred” message, this means that you tried to Get or Put a
file, but both the local and remote copies were identical, so
Dreamweaver didn’t do anything. See the above Note for
more information.
Other ways to move files to the Web server
In the Files panel, you can also drag a file from the Local Folder list into the
Remote Site list. (You first must expand the Files panel, as described on page 570.)
But don’t do it: it’s too easy to drag a file into the wrong place. If you drag a file to
the wrong folder on the remote site, for example, you’ll probably break all the links
on the page. It’s much better to let Dreamweaver keep track of where files should
go in the organization of your site. (However, if you’re already in this mess, see
“Find and Fix Broken Links” on page 586.)
You can also copy your current document to the Web server without using the
Files panel at all. You can go directly to the Put command when, say, you finish
building or modifying a Web page and want to immediately move it to the Web
server. Just choose Site ➝ Put or press Ctrl+Shift+U (c-Shift-U); Dreamweaver
automatically copies the fresh page to the proper folder online.
The toolbar also provides a quick menu shortcut for this operation, as shown in
Figure 17-9.
Chapter 17: Moving Your Site to the Internet
623
Transferring Files
Figure 17-9:
Click the File Status button (circled) and choose Put to quickly
move a file to your Web server. You can also use this menu
to retrieve a copy of this file from the server (Get), use Check
In and Out features (page 628), or review Design Notes
(page 637) for the page. To select this file in the Files panel,
choose “Locate in Site”.
Getting Files from the Web Server
So far, this chapter has described getting your hard drive–based Web pages to the
Internet. Sometimes, however, you’ll want to download one or more files from the
Web server. Perhaps you’ve made a horrible (and irreversible) mistake on the local
copy of a file, and you want to retrieve the last version from the Web server, using
the remote site as a last-ditch backup system. Or perhaps someone else uploaded
some files to the site, and you want to download a copy to your own computer
(although the Synchronize feature described on page 634 would also work).
To get files from the remote site, open the Files panel (press F8) and proceed as follows:
1. From the Site pop-up menu, choose the site whose files you wish to retrieve.
From the Files panel’s View menu (see Figure 17-7), choose “Remote view.”
Dreamweaver tells you that it’s attempting to connect to the Web server. Once
the connection has been made, a list of files and folders appears in the Remote
Site list, and the Connect button displays a bright green dot. (Dreamweaver
automatically disconnects you after 30 minutes of inactivity, at which point the
green dot turns black.)
Tip: If you’d like to change the disconnect-after-30-minutes-of-inactivity setting, press Ctrl+U (c-U) to
open the Preferences window. Click the Site category and change the number listed in the Minutes Idle
box. Be aware, however, that some Web servers have their own settings and may disconnect you sooner
than you’ve specified.
2. From the Remote Site file list, select the files you wish to download from the
Web server.
For techniques on selecting files in the Files panel, see page 588. To download a
folder and every file inside it, just click the folder. This technique also lets you
get your entire Web site from the server; just click the remote root folder, which
appears at the very top of the Remote Site file list.
624
Dreamweaver CS3: The Missing Manual
Transferring Files
TROUBLESHOOTING MOMENT
Don’t Replace the Wrong File
One strange feature of the Files panel’s Get and Put commands may get you in trouble. Suppose, having just added
new information to the home page (index.html), you want to
transfer it to the Web server. You select it in the Local Folder
list—but then you accidentally click Get instead of Put.
Not knowing your true intention, Dreamweaver dutifully
retrieves the file from the Web server and prepares to
replace (wipe out) the newly updated home page on your
computer.
Fortunately, Dreamweaver also opens a warning message
asking if you really want to overwrite the local file. Click No
or Cancel to save your hard work.
There may be times when you do want to wipe out your
local copy—for example, if your cat walks across your keyboard, types illegible code, presses Ctrl+S to save the ruined
page, and Ctrl+Q to quit Dreamweaver (keeping you from
using Undo to fix the mistakes). In this common situation,
you’ll want to replace your local copy with the remote copy.
To do so, press the Yes key to wipe out your cat’s errors. Oh
yeah, this is also a useful trick if you ever make a mistake
on a page you can’t fix and want to return to the working
copy on your Web server.
Dreamweaver also includes a useful Compare button to
help you sort out the differences between the local and
remote file. Clicking this button lets you compare the local
and remote copies of the page, so you can identify which
changes you made. In this way, you can salvage changes
you made to the local copy and discard errors you (or your
cat) may have introduced to the page. This feature is
described on page 387.
3. Click the Get files button—the down arrow.
Alternatively, you can use the keyboard shortcut Ctrl+Shift+D (c-Shift-D).
If the local version of any file you’re getting from the remote site is currently
opened and has unsaved changes, Dreamweaver warns you that you’ll lose those
changes. (No surprise there; copying a file from the remote site automatically
replaces the same file in the local site, whether it’s open or not.) Dreamweaver also
warns you if you’re about to replace a local file that’s newer than the remote one.
In addition, Dreamweaver offers to transfer any dependent files, as described in
Figure 17-8.
4. Click Yes to transfer dependent files, or No to transfer only the files you
selected.
Dreamweaver copies the files to the local site folder, creating any folders necessary to replicate the structure of the remote site.
Chapter 17: Moving Your Site to the Internet
625
Transferring Files
POWER USERS’ CLINIC
Troubleshoot with the FTP Log
If you’re having problems moving files using Dreamweaver’s FTP command, you may be able to find some
clues in the records Dreamweaver keeps when transferring
files. If you’ve used other FTP programs, you may have seen
little messages that are sent back and forth between the
Web server and the FTP program like this:
200 PORT command successful. LIST 150
Opening ASCII mode data connection for
/bin/ls.
Dreamweaver also sends and receives this information,
but it keeps it hidden. In order to see the FTP log, choose
Window ➝ Results, and then click the FTP Log tab. Any
errors appear in this log.
For example, if you encounter a “cannot put file” error, it
may mean that you’re out of space on your Web server.
Contact your ISP or the administrator of your Web server
for help. WebDAV connections also produce a log of filetransfer activity, but it’s not very easy to decipher.
And Secure FTP (SFTP) produces no log in Dreamweaver—
hush, hush, it’s a secret.
Cloaking Files
You may not want all files transferred to and from the Remote site. For example, as
part of its Library and Template tools, Dreamweaver creates folders inside your
local root folder. The Library and templates folders don’t do you any good on the
Web server; their sole purpose is to help you build the site on your computer.
Likewise, you may have Photoshop (.psd), Flash (.fla), or Illustrator (.ai) files in
your local root folder. They’re inaccessible from a Web browser and can take up a
lot of disk space, so they shouldn’t be transferred to the Web server when you
move your site online.
Note: If you work on a Web site with other people, you probably will want to have the Library and templates folders on the server. This way, others who work on the site can access them as well.
To meet such challenges, Dreamweaver includes a feature called cloaking. It lets
you hide folders and specific file types from many file-transfer operations, including
Get/Put files, the Check In/Check Out feature (page 628), and site synchronization (page 634). In fact, you can even hide files from many sitewide Dreamweaver
actions, including reports (see page 600), search and replace (page 718), check and
change links sitewide (page 586), and the Assets panel (page 575). There’s one
exception: files that are linked to Library items (see Chapter 18) or templates
(Chapter 19) can still “see” items in cloaked Library and template folders.
Dreamweaver lets you cloak specific folders in your site or particular file types
(those that end with a specific extension such as .fla or .psd). Each type of cloak
requires a different technique.
To hide specific types of files:
1. Choose Site ➝ Manage Sites.
The Manage Sites window opens, listing all sites you’ve defined in Dreamweaver.
626
Dreamweaver CS3: The Missing Manual
Transferring Files
2. Select the site you wish to use cloaking on and click Edit.
That site’s Site Definition window opens.
3. Click the Cloaking category.
The cloaking settings appear (see Figure 17-10). The factory setting is On for
every site you define. (If you want to turn it off, just turn off the “Enable cloaking” box.)
Figure 17-10:
The Cloaking category of the Site Definition
window lets you turn cloaking on and off—a
feature that lets you hide specific file types and
folders from sitewide operations like
transferring files to a Web server or searching
and replacing text. In this window, you can
specify which types of files to hide by listing
their extensions (.psd for Photoshop files, for
example).
Tip: You can quickly turn cloaking on and off by right-clicking (Control-clicking) any file or folder in the
Files panel and selecting Cloaking ➝ Enable Cloaking from the context menu. A checkmark next to Enable
Cloaking means cloaking is turned on.
4. Turn on the “Cloak files ending with” checkbox.
Dreamweaver identifies file types by their extensions—.fla for Flash files, for
example. Make sure you remove the .png listed in this box by default. It’s meant
to refer to Adobe Fireworks files, which end with the .png extension, but .png is
also used by the very common and useful PNG file format (see page 200).
Note: Mac programs don’t always add these file name suffixes, but without them, Dreamweaver can’t cloak.
5. In the text box, type the extensions you wish to cloak.
Each extension should start with a period followed by three or four letters. To
type multiple extensions in the box, separate them with a space.
6. Click OK twice to close this window and the Manage Sites window.
All cloaked files have a red slash through them in the Files panel.
You can also cloak a folder using the Files panel like this:
1. Open the Files panel by pressing F8.
Alternatively, choose Window ➝ Files.
Chapter 17: Moving Your Site to the Internet
627
Check In and Check
Out
2. Right-click (Control-click) a folder in Local Files view.
A shortcut menu appears with many site-related options.
3. Select Cloaking ➝ Cloak.
Dreamweaver adds a red slash through the folder’s icon in the Files panel. All
files and folders inside the cloaked folder are hidden as well, as indicated by the
red slashes through their icons.
Note: You can’t hide individual files in the Files panel—only folders. (You can only hide file types using
the Site Definition window.)
Once you’ve cloaked a folder, it and any folders inside it disappear from Dreamweaver’s file-transfer functions. Files with specific extensions that you specified in
the Preferences window are also hidden.
However, there are exceptions. You can override the cloaking, for example, by
selecting a cloaked folder or file and then using the Get or Put file buttons as
described on page 620. Dreamweaver assumes that since you specifically selected
that file or folder, you intend to override the cloaking feature.
Dreamweaver also ignores cloaking if you answer Yes in the Dependent Files message box (Figure 17-8) when you put or get files. In that case, Dreamweaver transfers
all dependent files, even if they’re cloaked (this applies to Library and template files
as well).
Check In and Check Out
If you’re the sole developer for a Web site, the Files panel’s Get and Put buttons are
fine for transferring your files. But if you’re on a team of developers, these simple
tools can get you in trouble.
For example, suppose your boss emails you an important announcement that she
wants posted on the home page immediately. So you download the home page
from the Web server and start to edit it. At the same time, your co-worker Bob
notices a typo on the home page. He downloads it, too.
You’re a much faster worker than Bob, so you’ve added the critical news to the
home page and moved it back to the Web server. But now Bob transfers his corrected home page to the Web server, overwriting your edits and eliminating that
urgent notice you just uploaded. (An hour later, your phone rings. It’s the boss.)
Without some kind of system to monitor who has what file, and to prevent people
from overwriting each other’s work, collaborative Web development is a chaotic
mess. Fortunately, Dreamweaver’s Check In and Check Out system provides a civilized answer to this problem. It works like your local public library: When you
check a file out, no one else can have it. When you’re finished, you check the file
back in, releasing control of it, and allowing someone else on the team to check it
out and work on it.
628
Dreamweaver CS3: The Missing Manual
Check In and Check
Out
To use the Check In/Check Out feature effectively, it helps to keep a few things
in mind:
• When you’re developing a Web site solo, your local site usually contains the
most recent versions of your files. You make any modifications or additions
to the pages on your computer first and then transfer them to the Web
server.
But in a collaborative environment where many people are working on the site at
once, the files on your hard drive may not be the latest ones. After all, your coworkers, like you, have been updating pages and transferring them to the Web
server. The home page file sitting in the local site folder on your computer may be
several days older than the file on the remote site, which is why checking out a file
from the remote site, rather than editing from the copy on your computer, is so
important. It guarantees that you have the latest version of the file.
• In a collaborative environment, nobody should post files to the Web server
using any method except Dreamweaver’s Check In and Check Out system.
The reason is technical, but worth slogging through: When Dreamweaver
checks out a file, it doesn’t actually lock the file. Instead, it places a small, invisible text file (with the three-letter suffix .lck) on both the remote server and in
your local site folder. This text file indicates who has checked out the file. When
Dreamweaver connects to a remote site, it uses these files to know which Web
files are in use by others.
But only Dreamweaver understands these .lck files. Other FTP programs, like
WSFTP (Windows) or Fetch (Mac), gladly ignore them and can easily overwrite any checked-out files. This risk also applies when you simply copy files
back and forth over the office network.
Note: Adobe’s word processor–like Web page editing program, Contribute, also takes advantage of this
Check In/Check Out feature, so you can use the two programs on the same site.
• All Dreamweaver people must configure their remote site to use Check In
and Check Out (see page 628). If just one person doesn’t do it, you risk
overwritten files.
Note: Visual SourceSafe and WebDAV people are free of these last two constraints. As long as everyone
working on the site uses programs that support the Visual SourceSafe client or the WebDAV protocol, they
can work seamlessly with Dreamweaver people, and vice versa.
Checking Out Files
When you want to work on a file in a collaborative site, you check it out from the
Web server. Doing so makes sure that you have the latest version of the file, and
that nobody else can make changes to the file.
Chapter 17: Moving Your Site to the Internet
629
Check In and Check
Out
If you’re used to creating sites by yourself, this business may feel a little strange; after all,
your local site (the files on your computer) contains the latest versions of all files. When
working with a group, however, you should consider the remote site—where everyone
can access, edit, and add new Web pages—to be the master copy of your site’s files.
Note: There’s nothing to check out when you’re creating a new page for the site. Since the only version of
the file in the universe is on your computer, there’s no fear that someone else may work on it at the same
time as you. In this case, you only need to check the file into the site when you’re done (see page 633).
You check out a file using the Files panel; if it’s not open, press F8 or use any of the
methods described on page 567. Then choose the remote site you wish to work on
from the Site pop-up menu (shown at top in Figure 17-11).
Check out
Check in
Figure 17-11:
The Check In/Out buttons transfer files
between the local site and the Web
server. A padlock identifies files that are
checked into the remote site. Confusingly,
the lock means that the file is open for
anyone to check out and edit. If a file is
currently checked out, a checkmark
appears next to its name. A green
checkmark indicates you’ve checked out
the file; a red checkmark means
someone else has checked it out.
Checked in
Checked out
Now you’re ready to begin. From the Local Folder file list in the Files panel, click
to select the files you wish to check out from the Web server—or, to check out an
entire folder and every file inside it, just select the folder.
You may in some instances want to select a file from the Remote Site list as well.
For example, maybe you need to modify a page that you didn’t create, and which
you’ve never before checked out. In this case, the file isn’t in your local folder, so
you must select it from the Remote Site list. Select Remote view from the Files
panel (see Figure 17-7); Dreamweaver connects to the server and then displays the
remote files in the Files panel. Select the ones you wish to check out.
630
Dreamweaver CS3: The Missing Manual
Check In and Check
Out
Tip: If, when you define the remote site (see page 609), you select the Check Out File when Opening
option, you can also check out (and open) a file by double-clicking it in the Files panel. This is a quick way
to open a page for editing while still using Dreamweaver’s Check Out feature.
In any case, now just click the Check Out files button on the Files panel (see
Figure 17-11), or use the keyboard shortcut Ctrl+Alt+Shift+D (c-Option-Shift-D).
(Not enough fingers? See page 733 to learn how to change Dreamweaver’s shortcuts.)
Dreamweaver asks if you wish to also check out any dependent files. Click Yes if you
think the page you’re checking out uses files you haven’t yet downloaded.
Dreameaver then copies the dependent files to your computer, so the page you’ve
checked out and are working on displays the current images, CSS style sheets, and
other linked files correctly. It doesn’t check out those files, so if you do want to edit a
dependent file—for example, you need to also edit styles on a linked external style
sheet that’s used by the page you checked out—you must also check out that file.
Note: If you try to edit a file that you haven’t checked out, Dreamweaver lets you know and then ask if
you’d like to check out the file.
When you check out files, Dreamweaver copies them to your computer and marks
them as checked out so others can’t change them. As when uploading and downloading files, checking out files can take time, depending upon the speed of your
Internet connection.
After you’ve checked out a file, a green “checked-out” checkmark appears next to
its name in the Files panel (see Figure 17-11). You can now open and edit it, and
(when you’re done) check the file back in.
WORKAROUND WORKSHOP
Manual Checkout Override
Occasionally, you may wish to erase the checked-out status
of a file. Suppose, for example, someone who’s checked
out a lot of files suddenly catches the plague and can’t continue working on the site. To free those files so others can
work on them, you should undo his checkout (and quarantine his cubicle).
To do this, make sure the Files panel is in Remote view (this
trick won’t work when looking at the Local Files). Then, rightclick (Control-click) the checked-out file in the Files panel and
select Undo Checkout from the menu that appears.
person can still check in the file, overwriting whatever’s on
the Web server. So you can see why you should override
the check-out only when the person who checked it out is
very unlikely to check it back in—stranded on a deserted
island, perhaps.)
When complete, a padlock icon appears next to the file.
You can also use this technique on a file you’ve checked
out. For example, if, after checking out a file, you’ve made
a horrible mistake on the page and wish to revert to the
copy on the Web server.
Dreamweaver warns you that whoever checked out the file
won’t be able to check it back in. (This is, in fact, false. That
Chapter 17: Moving Your Site to the Internet
631
Check In and Check
Out
If you attempt to check out a file someone else has already checked out, Dreamweaver tells you as much. It also gives you the option to override the person’s
checkout—but unless you’re the boss, resist the temptation, for two reasons. First,
your colleagues may have made some important changes to the page, which you’ll
wipe out with your shenanigans. Second, because you so rudely stole the file, they
may stop bringing you donuts in the morning.
A better way to work with someone who’s checked out a file you need is to use
Dreamweaver’s email feature. You can see who checked out a file by consulting the
Checked Out By column (see the circled entry in Figure 17-11). Even better, if you
click the name, Dreamweaver opens your email program and addresses an email to
that person, so you can say: “Hey Bob, you’ve had the home page checked out for
two days! I need to work on it, so check it back in!”
The name and email address Dreamweaver uses depends on the information your
co-workers provided, just as you did when you configured your computer for
remote site use (see page 609).
FREQUENTLY ASKED QUESTION
Get and Put, In and Out
I’m using Dreamweaver’s Check In and Check Out buttons
to transfer my files. What do the Get and Put buttons do
when the Check In/Out feature is in use?
If you’re using Check In and Out, the Get and Put commands function slightly differently than described on page
620. Get copies the selected file or files to your local site.
However, Dreamweaver draws a small lock icon next to
each of these “gotten” files in your Local Folder list. The files
are locked, and you shouldn’t edit them. Remember, checking out a file is the only way to prevent others from working
on it. If you edit a locked file on your computer, nothing is
stopping someone else from checking the page out from
the Remote site, editing it, and checking it back in.
But using the Get command in such a situation can still be
useful. For example, suppose someone just updated the
site’s external style sheet. Pages you’re editing use this style
sheet, so you’d like to get the latest version. You don’t want
to edit the style sheet itself, so you don’t need to check it out.
If you use Get instead of checking out the pages, you can
keep a reference copy on your computer without locking it
for anyone else and without having to check it back in later.
632
Put, on the other hand, simply transfers the file on your
local site to the remote site. If you’re using the Check In/
Check Out feature and you haven’t also checked out the
file, using Put is a bad idea. The remote site should be your
reference copy; several rounds of revisions may have been
made to a file since you last checked it out. Your local copy
will be hopelessly out of date, and moving it to the server
using Put destroys the most recent version of the file.
However, if you do have the file checked out, you can use
Put to transfer your local copy to the server so it can be
viewed by your site’s visitors. For example, say you’re
updating the home page with 20 new news items. To keep
your site “up-to-the-minute” fresh, you can Put the home
page after you add each news item. Then the whole world
will see each news item as soon as possible. When you’re
completely finished editing the home page, check it in.
Dreamweaver CS3: The Missing Manual
Check In and Check
Out
Checking In Files
When you’re ready to move a page you’ve edited back onto the server, you check it
in. (You also check in new files you’ve created.)
To check in files, open the Files panel (press F8), choose the site you’re checking
into from the Site pop-up menu, and (using the Local Folder file list in the Files
panel) select the files you wish to check in to the Web server. As always, you can
click a folder to check it in, along with every file inside it.
The files you select should be files you’ve checked out, or brand-new files that have
never been on the Web server. If you attempt to check in a file that someone else
has checked out, Dreamweaver warns you with a message box. Click Cancel to stop
the check-in procedure, so that you won’t overwrite the checked-out file on the
server. Dreamweaver also warns you if you try to check in a file that’s older than
the server copy. Again, unless you’re sure this is what you want to do, click Cancel.
Tip: If you want to check the page you’re currently working on into the remote site, use the toolbar in
the document window (see Figure 17-9).
You can check in the selected files in any of the usual ways:
• Click the Check In files button on the Files panel (see Figure 17-11).
• Use the keyboard shortcut Ctrl+Alt+Shift+U (c-Option-Shift-U). (See page 733 to
learn how to change the Dreamweaver shortcut to something less cumbersome.)
Note: The Site ➝ Check In menu option checks in only the document you’re currently working on, not
any files you’ve selected in the Files panel.
Dreamweaver asks if you wish to also check in any dependent files (see
Figure 17-8). You should transfer dependent files only if you first checked them
out, or if the dependent files are new and have never been uploaded to the server.
If you attempt to check in a dependent file that someone else has checked out,
Dreamweaver warns you with a message box.
After you’ve clicked through all message boxes, Dreamweaver copies the files to the
remote site. Once you’ve checked in a file, a padlock icon appears next to its name
in the Files panel (see Figure 17-11); checking in locks the file so that you don’t
accidentally change the local copy. If you wish to modify the file in some way,
check it out again (see page 629).
Note: Dreameaver’s Site Report feature (page 600) lets you run a report to see which files are checked
out and by whom. Skip it. On a large site, the report can take a long time to run, it isn’t always accurate,
and the operations you’re most likely to perform on checked out files (like checking them back in) can’t
be accomplished from the Reports panel.
Chapter 17: Moving Your Site to the Internet
633
Synchronizing Site
Files
Synchronizing Site Files
As you may suspect, when you keep two sets of files—local folder and remote
site—it’s easy to lose track of which files are the most recent. For example, say you
finish your Web site and move all the files to the Web server. The next day, you
notice mistakes on a bunch of Web pages, so you make corrections on the copies
in your local site. But in your rush to fix the pages, you didn’t keep track of which
ones you corrected. So although you’re ready to move the corrected pages to the
Web server, you’re not sure which ones you need to transfer.
When you use the Check In/Check Out feature described on page 628, you avoid this
problem altogether. Using that system, the version on the Web server is always considered the latest and most definitive copy—unless you or someone else has checked
out that file. In that case, whoever checked out the file has the most recent version.
But if you’re operating solo, for example, and don’t use the Check In/Check Out feature, you may get good mileage from the Synchronize command, which lets you compare the remote and local sites and transfer only the newer files in either direction. (In
fact, since the Synchronize command uses the Get and Put methods of transferring
files, you may not get the results you expect if you synchronize your site while also
using Check In and Check Out [as described in the box on page 632].)
To synchronize your sites:
1. Make sure the “Maintain synchronization information” checkbox is turned on
in the Remote Info category of the Site Definition window (you’ll make this
choice when you’re setting up a new site, as described in step 11 on page 614).
This option is turned on automatically when you set up the Remote information for a site (see Figure 17-1).
2. Choose Site ➝ Synchronize Sitewide.
Alternatively, you can right-click anywhere inside the Files panel. From the
shortcut menu that appears, select Synchronize. In either case, the Synchronize
Files dialog box appears (see Figure 17-12).
Figure 17-12:
Using the Synchronization command, you can copy
newer files from your computer to the Web server,
or get newer files from the remote site. (The
Synchronization command isn’t available if you’re
using Visual SourceSafe.)
3. Using the Synchronize menu, specify the files to update.
You can either synchronize all files in the current Web site, or just files you’ve
selected in the Local Folder list. This last option is good when you have a really
big site and you want to limit this operation to just a single section of the site—
one folder, for example. For site file-selection techniques, see page 588.
634
Dreamweaver CS3: The Missing Manual
Synchronizing Site
Files
4. Using the Direction pop-up menu, choose where you’d like to copy newer files.
You have three choices. Put newer files to remote updates the Web server with any
newer files from your local site folder. It also copies any new files on the local site
to the remote site. Use this option when you’ve done heavy editing to the local
site and you want to move all new or modified pages to the Web server.
Get newer files from remote does just the reverse: it updates your local site folder
with any newer (or new) files from the remote site. Here’s one instance where
the synchronize feature comes in handy in team-design situations. If you’ve
been out of the office for a while, click this option to download copies of the latest site files. (Note that this doesn’t check any files out; it merely makes sure you
have the latest files for your own reference. This is one example where synchronization works well with Check In/Check Out, since it refreshes your local copy
of the site with the latest files, including graphics and external CSS style sheets
that your checked-out pages may depend on.)
Get and put newer files is a two-way synchronization. Any new files on the local
site are transferred to the remote site and vice versa. The result is that both
“sides” contain the latest files.
5. Turn on the Delete checkbox, if desired.
The wording of this option reflects the option you selected in the previous step. If
you’re moving newer files to the remote site, it says “Delete remote files not on local
drive.” It’s a useful option when, for example, you’ve spent the afternoon cleaning
up the local copy of your site, deleting old, orphaned graphics files and Web pages,
for example, and you want Dreamweaver to update the Web server to match.
If you chose to transfer newer files from the remote site, Dreamweaver lets you
“Delete local files not on remote server.” Use this feature when your local site is
hopelessly out of date with the remote site. Perhaps you’re working on the site
with a team, but you’ve been on vacation for two months (this is, of course, a
hypothetical example). The site may have changed so significantly that you
want to get your local copy in line with the Web site.
Warning: Of course, you should proceed with caution when using any command that automatically
deletes files. There’s no Undo for these delete operations, and you don’t want to accidentally delete the
only copy of a particular page, graphic, or external Cascading Style Sheet.
If you chose the “Get and put new files” option in step 4, the Delete checkbox is
dimmed and unavailable. This option truly synchronizes the two; Dreamweaver
copies newer files on the remote site (including files that exist on the Web server
but not on your computer) to your local site, and vice versa.
6. Click Preview to begin the synchronization process.
Dreamweaver connects to the remote site and compares the two sets of files—if
your site is large, this comparison is a time-consuming process. When it finishes,
Chapter 17: Moving Your Site to the Internet
635
Synchronizing Site
Files
the Synchronize preview window appears (Figure 17-13), listing which files
Dreamweaver will delete and which it will transfer, and providing an additional
set of options for working with the listed files.
Figure 17-13:
The Synchronize window lets you preview
any actions Dreamweaver intends to take
to synchronize the files on your local and
remote sites. You can change this action
on a file-by-file basis. Turning on the
“Show all files” checkbox lists all files,
including ones Dreamweaver believes are
identical on both the remote and local
copies of the site: these files are marked
Synchronized in the Action column.
Get
Delete
Put
Compare local and remote versions
Mark as synchronized
Ignore file
7. Change the action Dreamweaver takes on the listed files.
The preview box tells you what Dreamweaver plans to do with a file—get it, put it,
or delete it. You can override these actions by selecting a file from the list and clicking one of the action buttons at the bottom of the window. For example, if you realize that Dreamweaver is going to delete a file that you know you need, select the file
in the list and click the “Ignore file” button (the red circle with a line through it).
Most of these options are useful only if you know Dreamweaver made a mistake: for example, when the program says you should get a file, but you know
your local copy is identical to the server’s copy. In that case, you could select the
file and click the “Mark as synchronized” button, to tell Dreamweaver that
they’re identical. However, if you knew exactly which files were identical and
which ones needed updating, you wouldn’t need to use the synchronize feature
in the first place, right?
One option can come in quite handy. The “Compare local and remote versions”
button lets you compare the code in the local file to the code in the remote file
so you can identify exactly what differs between the two. You can use this, for
example, to see exactly what changes someone else may have made to the
remote copy of the file. This feature is described in detail on page 387.
8. Click OK to proceed, or Cancel to stop the synchronization.
If you click OK, Dreamweaver commences copying and deleting the chosen
files. If you want to stop this process after clicking OK, click the Cancel button
in the Background File Activity window (see the box on page 623).
9. Click Close.
636
Dreamweaver CS3: The Missing Manual
Communicating
with Design Notes
Tip: If you just want to identify newer files on the local site without synchronizing them (to run a report
on them, for example), click the contextual menu in the top-right corner of the Files panel and choose Edit
➝ Select Newer Local, (Windows users can right-click anywhere in the Files panel and choose Select
➝ Newer Local from the pop-up contextual menu). Dreamweaver connects to the remote site and compares the files, and then, in the Files panel’s Local Folder list, highlights files on the Local site that are
newer than their remote counterparts.
You can also identify newer files on the remote site: Choose Edit ➝ Select Newer Remote from the Files
panel’s contextual menu (Windows users can right-click and then choose Select ➝ New Remote). As with
the Synchronization command, these options are unavailable if you’re using Visual SourceSafe.
You can also identify files on your computer that you’ve either created or modified within a given date
range, using the new Select Recently Modified command described on page 588.
Communicating with Design Notes
Lots of questions arise when a team works on a Web site: Has this page been proofread? Who is the author of the page? Where did this graphic come from? Usually,
you must rely on a flurry of emails to ferret out the answers.
But Dreamweaver’s Design Notes dialog box (Figure 17-14) eliminates much of
that hassle by letting you attach information, such as a Web page’s status or
author, to a file.
Figure 17-14:
If you want the Design Notes
window to open whenever
someone opens the page, turn on
the “Show when file is opened”
checkbox. This option makes sure
no one misses an important note
attached to a Web page. When
the page is opened in
Dreamweaver, the Design Notes
window appears automatically.
(This option has no effect when
adding notes to GIFs, JPEGs, Flash
movies, or anything other than a
file that Dreamweaver can open
and edit, such as a Web page or
an external CSS style sheet.)
You can open these notes (from the Files panel or from a currently open document), edit them, and even share them with others. In this way, it’s easy to leave
notes for other people—such as, “Hey Bob, can you make sure that this is the most
recent photo of Brad and Angelina?” You can even add notes to files other than
Web pages, including folders, images, Flash movies, and external Cascading Style
Sheets—anything, in fact, that appears in the Files panel.
Chapter 17: Moving Your Site to the Internet
637
Communicating
with Design Notes
Setting Up Design Notes
You can’t use Design Notes unless the feature itself is turned on. To find out if it is,
open the Site Definition dialog box by double-clicking the site’s name in the Manage
Sites dialog box (choose Manage Sites from the Site menu or the pop-up menu in
the Files panel). In the Category list, click Design Notes; as shown in Figure 17-15,
two checkboxes pertain to the notes feature:
• Maintain Design Notes. This checkbox lets you create and read notes using
Dreamweaver’s File ➝ Design Notes command (see page 640).
• Upload Design Notes for sharing. If you’re using Design Notes as part of a
team, turn on this checkbox, which makes Dreamweaver upload design notes to
the remote site, so that your fellow team members can read them.
Figure 17-15:
The Clean Up button deletes any notes
that were attached to now-deleted files.
(To avoid stray notes files in the first
place, always delete pages in
Dreamweaver’s Files panel, instead of on
your desktop.) If you turn off the Maintain
Design Notes checkbox, clicking Clean Up
removes all Design Notes files for the site.
Note: Design Notes are especially useful for keeping track of pages that are built and maintained by a team
of developers. But if you’re a solo operator and still want to use them—maybe you’re the type with a hundred Post-it notes taped to the edges of your monitor—then turn off “Upload Design Notes for sharing.” You’ll
save time and server space by preventing Dreamweaver from transferring note files to the Web server.
Click OK to close the Site Definition dialog box. You can double-click another site
in the Manage Sites dialog box to turn on its Design Notes feature, or click Done.
Adding Design Notes to a File
To add a Design Note to a document you’re working on, choose your favorite method:
• Choose File ➝ Design Notes.
• From the File Status menu in the toolbar, choose Design Notes (see
Figure 17-9).
• Right-click (Control-click) a file in the Files panel (or an external object, such as
a graphic or Flash movie, in the document window), and choose Design Notes
from the shortcut menu.
638
Dreamweaver CS3: The Missing Manual
Communicating
with Design Notes
In any case, the Design Notes window now opens (Figure 17-14). If you like, you
can use the Status pop-up menu to let your team members know where the file
stands. For example, is it ready to move to the Web server? Is it just a draft version? Or is there something wrong with it that requires specific attention? Dreamweaver provides eight different options: “draft,” “revision1,” “revision2,”
“revision3,” “alpha,” “beta,” “final,” and “needs attention.” If these categories
don’t match your workflow—for example, you want a “needs proofing” flag—you
can change them; see the box “Create Your Own Status Menu.”
The note itself, which you type into the Note box, could be a simple question you
have for the author of the page (“Are you sure ‘Coldplay: Defining a New Musical
Language for the Modern Age’ is an appropriate title for this article?”) or more information about the status of the page (“Still need studio shot of latest indoor mowers”).
POWER USERS’ CLINIC
Create Your Own Status Menu
The Status pop-up menu in Design Notes is a great feature.
With a flick of the mouse, you can assign a status to a page
or file, letting others know if a page is finished or just a
rough draft. But the preset status options may not exactly fit
your process. Your team may not use the terms “alpha” or
“beta.” Instead, you may have other stages you’d like to
add, such as “copy edit,” to signify that a page is ready to
be proofread and tested.
With a little sly hacking, you can change the status categories to suit your needs. The file Design Notes.htm holds the
key to the puzzle. On Windows the file is located in C:\Program Files\Adobe Dreamweaver CS3\configuration\Commands\Design Notes.htm. On a Mac the file is in
Applications ➝ Adobe Dreamweaver CS3 ➝ Configuration
➝ Commands ➝ Design Notes.htm. Start by making a
backup copy of the file; you can always return to it if something goes wrong.
Find line 29 in the file, which looks like this:
STATUS_ITEMS = new
Array("","draft","revision1","revision2",
"revision3", "alpha","beta","final","needs
attention");
The words between the double-quotes are the choices that
appear in the Status menu. You can change or delete them
as you see fit (if you delete one, be sure to delete the word,
both sets of quotation marks, and the following comma).
Then, after saving changes to the file, quit and restart
Dreamweaver, where you’ll see your new, improved Status
pop-up menu ready for action.
To make sure you and your co-workers see the same
choices, give each of them the modified Design Notes.htm
file, and advise them to put it in their own Adobe Dreamweaver CS3 ➝ configuration ➝ Commands folders.
Then open this file in a text editor like NotePad or TextEdit,
or even within Dreamweaver’s Code view.
Tip: Click the calendar icon (circled in Figure 17-14) to pop the date into your note—a great way to keep
a running tally of notes and the dates they were made.
When you click OK, Dreamweaver creates a file with all the note information in it.
This file ends with the extension .mno and begins with the name of the file; for the
file index.html, for example, the note would be called index.html.mno.
Chapter 17: Moving Your Site to the Internet
639
Communicating
with Design Notes
Dreamweaver stores notes in a folder called _notes that it keeps in the same folder
as the page or file. For example, if you add notes to the home page, Dreamweaver
stores the notes file in the _notes folder inside the root folder.
Viewing Design Notes
You can view Design Notes in a number of ways. If the note’s author turned on
“Show when file is opened” (see Figure 17-14), of course, the Design Notes window opens automatically when you open that page.
Otherwise, to look at a note, you have any number of options:
• Choose File ➝ Design Notes.
• Choose Design Notes from the File Status drop-down menu in the document
window’s toolbar (see Figure 17-9).
• Double-click the small yellow balloon icon in the Notes column of the Files
panel (see Figure 17-16). (This column is visible only if you’ve turned on this
option in the Site Definition window, as described below.)
Figure 17-16:
A yellow speech bubble in the Notes
column of the Files panel indicates a
Design Notes file. You can even add a
note to a folder (in this case, the styles
folder). The notes column is normally
hidden: you can make it appear from the
File View Columns category of the Site
Definition window as described below.
• Right-click (Control-click) an embedded object, like a graphic or Flash movie, right
in the document window, and choose Design Notes from the shortcut menu.
• Right-click (Control-click) a file in the Files panel and choose Design Notes
from the shortcut menu.
Organizing the Columns in the Files Panel
Columns in the Files panel identify a file’s name, file size, modification date, type,
and so on.
640
Dreamweaver CS3: The Missing Manual
Communicating
with Design Notes
This may be more information than you’re interested in—or it may not be
enough. So remember that Dreamweaver lets you show or hide these various columns, change their order, or even create new columns with information retrieved
from a file’s Design Notes.
Tip: You can adjust the relative widths of these columns by dragging the dividing line between the column names. You can also sort all the pages listed in this window by clicking the relevant column’s name.
Clicking Modified, for example, sorts the files so that the newest appear first. Click a second time to reverse
the sort, placing oldest files first.
When you’re setting up a Web site in the Site Definition window, you can view the
column setup by clicking the File View Columns category (Figure 17-17).
Figure 17-17:
If you’re working with others, you
might want to share columns you
add. Turn on the “Enable column
sharing” checkbox; then, you’ll be
able to see columns that others
on your team have added, and
they’ll be able to see columns
you’ve added (if you’ve turned on
“Share with all users of this site”
for each column, of course).
Once you’re looking at the display shown in Figure 17-17, you can perform any of
these stunts:
• Reorder columns. Click a column name in the Site Definition window to select
it. Then click the up and down arrow buttons to move the column one spot to
the left or right, respectively, in the Files panel.
• Hide columns. You may not care what date a file was last modified or whether
it’s a folder or Web page. If that’s the case, hide the column by clicking its name
in the Site Definition window and then turning off the Show checkbox (see
Figure 17-17). (You can always return to the Site Definition window and turn
the column back on.)
Chapter 17: Moving Your Site to the Internet
641
Communicating
with Design Notes
• Share a column. If you work with a team of designers, you may want to make
newly added columns visible to them, too. (See Figure 17-17 for details.)
• Adding Columns. You can add informational columns of your own, as
described next.
• Deleting columns. Click the column name, and then click the minus (–) button
to delete the column. (Dreamweaver doesn’t let you delete the built-in columns:
Name, Notes, Type, Modified, and so on.)
“All Info” Design Notes in Column Views
Your Files panel offers columns for all the usual information bits: Name, Checked
Out, and so on. But you may someday wish there were a column that showed each
page’s status, so that your Files panel could show you which files need proofreading,
or who wrote each article, or which pages are being held until a certain blackout date.
You can indeed add columns of your own design, although the process isn’t
streamlined by any means. It involves two broad efforts: First, using an offshoot of
the Design Notes feature described earlier, you set up the new columns you want
displayed. Then, using the column-manipulation dialog box shown in
Figure 17-17, you make the new columns visible in the Files panel.
Phase 1: Defining the new information types
You create new kinds of informational flags—primarily for use as new columns in
the Files panel—using the Design Notes dialog box, described on page 637. Here’s
the rundown:
1. Choose File ➝ Design Notes.
The Design Notes window appears. (You can summon it in various other ways,
too, as described on page 640.)
2. Click the “All info” tab.
This peculiar window shows the programmery underbelly of the Dreamweaver
Notes feature (see Figure 17-18). It turns out that it stores every kind of note as
a name/value pair. If you used the main Notes screen (Figure 17-14) to choose
Beta from the Status pop-up menu, for example, you’ll see a notation here that
says “status=beta.” (Status is the name of the info nugget; beta is the value.) If
you turned on the option called “Show when file is opened,” you’ll see “showOnOpen=true.” And if you typed Badly needs updating as the note itself, you’ll
see “notes=Badly needs updating” on this screen.
But those are just the built-in info types; you’re free to create your own.
3. Click the + button.
You may wonder why you’d do this; after all, you can type a lot of information
in the Notes box under the Basic Info tab. The primary benefit of creating new
types of notes is that you can display that information in the Files panel.
642
Dreamweaver CS3: The Missing Manual
Communicating
with Design Notes
Figure 17-18:
Dreamweaver lets you create your
own types of notes in the “All info”
tab of the Design Notes window.
This lets you add more
information to a page, such as its
author or designer. If you want to
delete a note you’ve added, it’s a
simple matter of clicking on the
note in the Info box and then
clicking the minus (–) button.
4. Type the name of the new note in the Name field.
It may be Author, for example, so that you can note who wrote the text of each
page. Or it could be Artist, if you wish to add a note to each image specifying
who created it. Maybe you need a column called Hold Until, which lets you
know when certain information is OK to publish online.
5. Press Tab (to jump to the Value field); type the contents of the note.
You can enter the actual name of the author or artist—Jennifer Jones, for
example—or the actual “Hold Until” date.
Repeat steps 3–5 if you want to add more notes to the page or file.
Tip: Keep the value short—one or two words. Otherwise, the narrow Files panel column chops off the latter part of it. If you’ve got enough screen real estate, you can resize the columns by dragging the divider
bars between column names.
6. Click OK.
The dialog box closes.
Phase 2: Adding the column
Just creating a new note type gets you only halfway home; now you have to tell
Dreamweaver that you want to see that information in the Files panel.
To add a column:
1. Open the Site Definition window for the particular site and select the File
Views category.
See page 564 for a reminder of how to edit a site definition. The File Views dialog box appears.
Chapter 17: Moving Your Site to the Internet
643
Communicating
with Design Notes
2. Click the + button (Figure 17-17).
A new, untitled column is added to the list, complete with three fields that need
filling in (they now say “untitled”).
3. In the Column Name box, type the column-heading name you want to appear
in the Files panel.
Make it short and descriptive. If possible, it should match the note type (Author,
Artist, Hold Until, or whatever).
4. Press Tab. Type the name of the Design Note you wish to use for this column.
This is the name part of the name/value pair described in step 4 of the previous
instructions. For example, if you added a note named Author to a file, you
would type Author here. Capitalization matters; so if you named the Design
Note Author, type it with a capital A.
There’s a pop-up menu here, too, but it always lists the same four options: Status,
Assigned, Due, and Priority. If you choose Status, you’ll get a column that
reflects your choice from the Status pop-up menu. The other three options do
nothing unless you created a matching note type in step 4 of the previous
instructions. (It would be nice if this pop-up menu listed all of the note names
you’ve created, so that you didn’t have to remember them.)
Before you wrap up the column-adding procedure, you can, if you wish, choose
an alignment option for the text in the column (left, right, or center). Check to
make sure that the Show checkbox is turned on (otherwise, your new column
won’t appear, and you’ve just defeated the purpose of this whole exercise).
Finally, turn on “Share with all users of this site,” if you like.
The Share feature works like this. The next time you connect to the remote site,
Dreamweaver uploads a file containing your newly defined column information. The next time another member of the team connects to the remote site, his
copy of Dreamweaver downloads this file, so that his Files panel shows the same
columns yours does.
Note: The column-sharing feature is very handy; it lets everyone working on a site share the same note
information. But it works properly only if everyone on the team has the “Enable column sharing” checkbox turned on (see Figure 17-17).
5. Click OK.
You should now see the new information column in your Files panel (You may
need to widen the panel to see all of the columns. You can also click the Expand
Files Panel button [Figure 17-1] to expand the Panel.)
644
Dreamweaver CS3: The Missing Manual