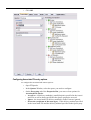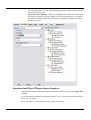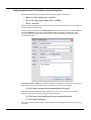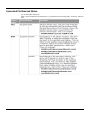
1
SBE V7.5
MANUAL
User Guide
July 2011
Version 7.5.01
Copyright © 1996-2011 TCG Information Systems Pty. Ltd.
Disclaimer
The information contained in this document is subject to change without notice and should not be construed as a
commitment by TCG Information Systems Pty. Ltd., who assumes no responsibility for any errors or omissions. TCG
Information Systems Pty. Ltd. reserves the right to revise this document and to make changes to the products described
herein for the purpose of product improvement at any time, without obligation by TCG Information Systems Pty. Ltd. to
notify any person of such revisions or changes.
The information contained in this document is the exclusive property of TCG Information Systems Pty. Ltd. This work
is protected under Australian Copyright Law and other international copyright treaties and conventions. No part of this
work may be reproduced or transmitted in any form or by any means, electronic or mechanical, including photocopying
and recording, or by any information storage retrieval system, except as expressly permitted in writing by TCG
Information Systems Pty. Ltd., Level 3, 53 Balfour Street, Chippendale NSW 2008, Australia.
Software Version
This manual supports FTSpooler Enterprise Edition version 7.5. (Last update November 2010)
Trademarks
FormTrap is a trademark of TCG Information Systems Pty. Ltd. All trademarks and registered trademarks are the
property of their respective owners.
Copyright
Copyright© 1995 - 2011 TCG Information Systems Pty. Ltd. All rights reserved.
CONTENTS
Getting Started
1
Introduction to FTSpooler SBE Edition
1
Getting Started. . . . . . . . . . . . . . . . . . . . . . . . . . . . . . . . . . . . . . . . . . . . . . . . 1
Immediately after Installation . . . . . . . . . . . . . . . . . . . . . . . . . . . . . . . . . . . . . 2
Queues
3
What is a Queue
3
Confirmation about Queue Parameters Change . . . . . . . . . . . . . . . . . . . . . . 4
Create a Queue
4
Empty queue . . . . . . . . . . . . . . . . . . . . . . . . . . . . . . . . . . . . . . . . . . . . . . . . .
Clone (copy) a queue . . . . . . . . . . . . . . . . . . . . . . . . . . . . . . . . . . . . . . . . . .
New print queue. . . . . . . . . . . . . . . . . . . . . . . . . . . . . . . . . . . . . . . . . . . . . . .
New email queue . . . . . . . . . . . . . . . . . . . . . . . . . . . . . . . . . . . . . . . . . . . . . .
New identification queue . . . . . . . . . . . . . . . . . . . . . . . . . . . . . . . . . . . . . . . .
Create a template Queue . . . . . . . . . . . . . . . . . . . . . . . . . . . . . . . . . . . . . . .
Delete a Queue
5
6
6
7
8
9
9
Delete a queue . . . . . . . . . . . . . . . . . . . . . . . . . . . . . . . . . . . . . . . . . . . . . . . 9
Queue Properties
10
General . . . . . . . . . . . . . . . . . . . . . . . . . . . . . . . . . . . . . . . . . . . . . . . . . . . .
Processing . . . . . . . . . . . . . . . . . . . . . . . . . . . . . . . . . . . . . . . . . . . . . . . . . .
Filters . . . . . . . . . . . . . . . . . . . . . . . . . . . . . . . . . . . . . . . . . . . . . . . . . . . . . .
Define Filters . . . . . . . . . . . . . . . . . . . . . . . . . . . . . . . . . . . . . . . . . . . . . . . .
Print . . . . . . . . . . . . . . . . . . . . . . . . . . . . . . . . . . . . . . . . . . . . . . . . . . . . . . .
Email . . . . . . . . . . . . . . . . . . . . . . . . . . . . . . . . . . . . . . . . . . . . . . . . . . . . . .
How Email is handled by the Spooler . . . . . . . . . . . . . . . . . . . . . . . . . . . . .
Fax. . . . . . . . . . . . . . . . . . . . . . . . . . . . . . . . . . . . . . . . . . . . . . . . . . . . . . . .
File . . . . . . . . . . . . . . . . . . . . . . . . . . . . . . . . . . . . . . . . . . . . . . . . . . . . . . . .
Applications . . . . . . . . . . . . . . . . . . . . . . . . . . . . . . . . . . . . . . . . . . . . . . . . .
Print to ANY Windows Printer
10
14
20
21
22
23
25
26
29
31
31
Overview . . . . . . . . . . . . . . . . . . . . . . . . . . . . . . . . . . . . . . . . . . . . . . . . . . .
Setup . . . . . . . . . . . . . . . . . . . . . . . . . . . . . . . . . . . . . . . . . . . . . . . . . . . . . .
To Define a new Filter . . . . . . . . . . . . . . . . . . . . . . . . . . . . . . . . . . . . . . . . .
To print to any Windows Printer. . . . . . . . . . . . . . . . . . . . . . . . . . . . . . . . . .
Queue Tools
31
32
33
35
36
Overview . . . . . . . . . . . . . . . . . . . . . . . . . . . . . . . . . . . . . . . . . . . . . . . . . . . 36
Batch Update . . . . . . . . . . . . . . . . . . . . . . . . . . . . . . . . . . . . . . . . . . . . . . . . 36
Changing ownership of queues . . . . . . . . . . . . . . . . . . . . . . . . . . . . . . . . . . 37
Data Folders
38
Manage Data Folders
Create a Data Folder . . . . . . . . . . . . . . . . . . . . . . . . . . . . . . . . . . . . . . . . . .
Reload the Forms of the Data Folder . . . . . . . . . . . . . . . . . . . . . . . . . . . . .
Update the Properties of a Data Folder . . . . . . . . . . . . . . . . . . . . . . . . . . . .
Delete a Data Folder . . . . . . . . . . . . . . . . . . . . . . . . . . . . . . . . . . . . . . . . . .
Manage Subtitution Files
38
38
39
40
41
41
Add a Substitution File to the Data Folder . . . . . . . . . . . . . . . . . . . . . . . . . . 41
Delete a Substitution File from the Data Folder . . . . . . . . . . . . . . . . . . . . . . 42
1
Manage Split Rule Files
43
Add a Split Rule File . . . . . . . . . . . . . . . . . . . . . . . . . . . . . . . . . . . . . . . . . . 43
Delete a Split Rule File . . . . . . . . . . . . . . . . . . . . . . . . . . . . . . . . . . . . . . . . 43
Archive
45
View All Records
45
View Delivered Records
46
View Errors
47
View Data Records
49
View Replication Records
51
View Formatting Records
52
View Working Records
53
View Logs
55
Managing Records
55
View the Archive Record . . . . . . . . . . . . . . . . . . . . . . . . . . . . . . . . . . . . . . .
Delete an Archive Records . . . . . . . . . . . . . . . . . . . . . . . . . . . . . . . . . . . . .
Resubmit a Job . . . . . . . . . . . . . . . . . . . . . . . . . . . . . . . . . . . . . . . . . . . . . .
Exporting . . . . . . . . . . . . . . . . . . . . . . . . . . . . . . . . . . . . . . . . . . . . . . . . . . .
Apply Selection to Searching and Filtering Panel . . . . . . . . . . . . . . . . . . . .
Refresh Records . . . . . . . . . . . . . . . . . . . . . . . . . . . . . . . . . . . . . . . . . . . . .
Finding and Filtering Archive Records
57
Finding and Filtering Records in the Record View. . . . . . . . . . . . . . . . . . . .
Finding and Filtering Records in the Data View. . . . . . . . . . . . . . . . . . . . . .
Finding and Filtering Records in the Replication View . . . . . . . . . . . . . . . .
Finding and Filtering Records in the Formatting View . . . . . . . . . . . . . . . . .
Error Messages from FormTrap Spooler
57
58
59
60
61
Self Explanatory Errors . . . . . . . . . . . . . . . . . . . . . . . . . . . . . . . . . . . . . . . .
Printer Errors, E0xxxxxxx . . . . . . . . . . . . . . . . . . . . . . . . . . . . . . . . . . . . . .
Vague or Meaningless Errors . . . . . . . . . . . . . . . . . . . . . . . . . . . . . . . . . . .
If You are Still Stuck . . . . . . . . . . . . . . . . . . . . . . . . . . . . . . . . . . . . . . . . . .
Not a current customer: . . . . . . . . . . . . . . . . . . . . . . . . . . . . . . . . . . . . . . . .
Setup
55
56
56
56
57
57
62
62
62
63
64
65
Core Components
65
Archive
66
Managing your DB . . . . . . . . . . . . . . . . . . . . . . . . . . . . . . . . . . . . . . . . . . . . 67
Settings
68
Filters
69
Run
71
Data Input
72
File System . . . . . . . . . . . . . . . . . . . . . . . . . . . . . . . . . . . . . . . . . . . . . . . . . 72
LP (Line Printer). . . . . . . . . . . . . . . . . . . . . . . . . . . . . . . . . . . . . . . . . . . . . . 73
Named Pipes
74
Delivery
75
Print Servers . . . . . . . . . . . . . . . . . . . . . . . . . . . . . . . . . . . . . . . . . . . . . . . . 75
Printer Licensing . . . . . . . . . . . . . . . . . . . . . . . . . . . . . . . . . . . . . . . . . . . . . 76
2
Email
77
Application
79
Delivery Monitor
81
Submit
83
Submit Input Data for Job Processing
83
Activity Monitor . . . . . . . . . . . . . . . . . . . . . . . . . . . . . . . . . . . . . . . . . . . . . . 83
Submit Queue via Network
84
Submit Queue via Named Pipe
84
Submit Queue via LPR Printer
85
Printing from Windows Applications . . . . . . . . . . . . . . . . . . . . . . . . . . . . . .
Printing from UNIX applications . . . . . . . . . . . . . . . . . . . . . . . . . . . . . . . . . .
Configuring Printers in your Application. . . . . . . . . . . . . . . . . . . . . . . . . . . .
Instructions on how to set up the LPR port in your PC . . . . . . . . . . . . . . . .
Associated Files
85
88
90
90
93
What are Associated Files
93
How Associated Files Work
93
Using Associated Files 3 Steps
93
Step 1 - Create Associated File fields in FTDesign
94
Example 1: Emailing the Document using Email Address from Input Data . 94
Example 2: Using Substitution . . . . . . . . . . . . . . . . . . . . . . . . . . . . . . . . . . . 96
Example 3: Using Multiple Associated Fields . . . . . . . . . . . . . . . . . . . . . . . 99
Example 3: Using Multiple Associated Fields . . . . . . . . . . . . . . . . . . . . . . 100
Step 2 - Define appropriate identification and split rules in FTSplitDef 102
Create a New Entry . . . . . . . . . . . . . . . . . . . . . . . . . . . . . . . . . . . . . . . . . .
Load Sample Data . . . . . . . . . . . . . . . . . . . . . . . . . . . . . . . . . . . . . . . . . . .
Create an Identification Rule . . . . . . . . . . . . . . . . . . . . . . . . . . . . . . . . . . .
Create a Split Rule. . . . . . . . . . . . . . . . . . . . . . . . . . . . . . . . . . . . . . . . . . .
102
103
105
106
Create an Unwanted Page Rule
107
Configure the Rule Evaluation
108
Save the rule file . . . . . . . . . . . . . . . . . . . . . . . . . . . . . . . . . . . . . . . . . . . . 109
Configure Rule Evaluation . . . . . . . . . . . . . . . . . . . . . . . . . . . . . . . . . . . . . 109
Step 3 - Configure your FTSpooler queues with the correct Associated File handling options
109
Configuring FTSpooler settings to apply rule files . . . . . . . . . . . . . . . . . . .
Configuring Associated File entry options . . . . . . . . . . . . . . . . . . . . . . . . .
Using Associated Files in FTSpooler Queues Properties . . . . . . . . . . . . .
Configuring Associated File Variables in Queues Properties . . . . . . . . . .
109
112
113
114
Reserved Names
115
Associated File Reserved Names
117
Related Batch Processes
Version Upgrade
124
124
Locate Components. . . . . . . . . . . . . . . . . . . . . . . . . . . . . . . . . . . . . . . . . . 124
Forms Components . . . . . . . . . . . . . . . . . . . . . . . . . . . . . . . . . . . . . . . . . . 127
Convert Components. . . . . . . . . . . . . . . . . . . . . . . . . . . . . . . . . . . . . . . . . 128
3
Home Locator
129
Settings Merger
131
Registry Update to FormTrap Spooler
132
Installing .reg files under a 64-bit operating system . . . . . . . . . . . . . . . . . 132
Other Add-Ons
133
Prodocom Fax
133
Using Prodocom Fax with FTSpooler Version 7 . . . . . . . . . . . . . . . . . . . .
Form changes (upgrade) . . . . . . . . . . . . . . . . . . . . . . . . . . . . . . . . . . . . . .
New forms . . . . . . . . . . . . . . . . . . . . . . . . . . . . . . . . . . . . . . . . . . . . . . . . .
Installation . . . . . . . . . . . . . . . . . . . . . . . . . . . . . . . . . . . . . . . . . . . . . . . . .
Track fax jobs . . . . . . . . . . . . . . . . . . . . . . . . . . . . . . . . . . . . . . . . . . . . . .
Replace Filter
134
Components . . . . . . . . . . . . . . . . . . . . . . . . . . . . . . . . . . . . . . . . . . . . . . .
Format of replace.ini . . . . . . . . . . . . . . . . . . . . . . . . . . . . . . . . . . . . . . . . .
Usage - Command Line. . . . . . . . . . . . . . . . . . . . . . . . . . . . . . . . . . . . . . .
Installation within Spooler V7 via Setup. . . . . . . . . . . . . . . . . . . . . . . . . . .
Special Forms
133
133
133
133
134
134
134
135
135
137
CSV Output File
137
QAD Forms in Chinese
139
Preparatory Work. . . . . . . . . . . . . . . . . . . . . . . . . . . . . . . . . . . . . . . . . . . . 139
Repagination . . . . . . . . . . . . . . . . . . . . . . . . . . . . . . . . . . . . . . . . . . . . . . . 141
Form Constants . . . . . . . . . . . . . . . . . . . . . . . . . . . . . . . . . . . . . . . . . . . . . 142
Multi-Page Forms
145
Using Sub-Forms as Pages . . . . . . . . . . . . . . . . . . . . . . . . . . . . . . . . . . . . 145
Using Detail Lines as Pages . . . . . . . . . . . . . . . . . . . . . . . . . . . . . . . . . . . 147
Personal Emails
147
Poster Printing
150
Contracts and Other Documents
150
Repaginator . . . . . . . . . . . . . . . . . . . . . . . . . . . . . . . . . . . . . . . . . . . . . . . . 150
Terms Form . . . . . . . . . . . . . . . . . . . . . . . . . . . . . . . . . . . . . . . . . . . . . . . . 151
Quantity Masking - Whole or Decimal
152
Salutation Masking
154
Widow/Orphan Size
155
Writing Letters
155
Data Extract from your DB . . . . . . . . . . . . . . . . . . . . . . . . . . . . . . . . . . . . . 155
Form Design . . . . . . . . . . . . . . . . . . . . . . . . . . . . . . . . . . . . . . . . . . . . . . . 156
Letter Texts:. . . . . . . . . . . . . . . . . . . . . . . . . . . . . . . . . . . . . . . . . . . . . . . . 158
Fax from your ERP System
162
New Fax Cover Sheet Form . . . . . . . . . . . . . . . . . . . . . . . . . . . . . . . . . . . 163
Repagination for the Fax Form . . . . . . . . . . . . . . . . . . . . . . . . . . . . . . . . . 163
Testing the Fax Form
166
Production System Changes . . . . . . . . . . . . . . . . . . . . . . . . . . . . . . . . . . . 166
4
Getting Started
Introduction to FTSpooler SBE Edition
FTSpooler integrates into a FormTrap production environment to provide identification,
batch job splitting into individual documents, formatting and automated delivery of finished
documents. Delivery methods include printing, email, faxing, outputting as a file to a
nominated location on the disk or initiating other tasks to accomplish additional delivery
methods. The document processing, formatting and delivery history can be viewed in archives
using searching capabilities. FTSpooler checks for the arrival of data, identifies and splits it if
necessary, formats it to produce a deliverable document (PCL and PostScript for printing,
PDF for email, tiff for faxing), determines the method of delivery and delivers the document
to your customer.
Getting Started
This is the FTSpooler Window for the SBE Edition.
The top navigation bar shows Connection, Queues, Data folders, Archive, and Setup.
•
Connection connect clients to FTSpooler Server on the same machine, or remotely
over the Windows network or the Internet.
1
•
Queues window is used to manage queues. The concept of the queue is central to
FTSpooler, and queues are normally allocated to specific delivery points (printers).
Each queue allows document identification, splitting, re-direction, formatting and
delivery. Before starting design of queues please first use the Setup window to configure FTSpooler settings and the Data Folders window to reload resource files.
•
Data folders is used to manage resource files sucj as forms (designed in FTDesign),
rule files which identify and split incoming files and substitution files. Use this after
configuring FTSpooler via Setup. Use this window to update forms or rule files or to
add new substitution files.
•
Archive stores job processing and delivery information, and allows searching for
information. Query searches for specific attributes of a document or job. Troubleshooting shows errors and expkanations of the errors.
•
Setup window configures FTSpooler settings. This is the first screen to visit after
installation. Configure printer licenses, email server parameters, define input methods
and set locations for resource files. Once FTSpooler has been set, you will rarely neet to
access this screen.
To access the online user manual, press the F1 button from any screen in FTSpooler, or click
the blue question mark icon and select User Manual from the popup menu. F1 is context
sensitive.
To access the online Knowledge Base from FTSpooler, click the blue question mark icon and
select Knowledge Base from the popup menu.
To view FTSPooler product information, click the blue question mark icon and select About
from the popup menu.
Immediately after Installation
We recommend allocating a special Windows "FormTrap User account" for the Spooler.
Reasons for this are here Notes on writing to network drives.
Update to number of printers or other features:
We send you a .zip file that contains an update to your settings. Stop the "FormTrap Service".
Use Settings Merger (FormTrap group of programs) to add the new feature(s) and restart
the service. Check the addition(s) you ordered is installed.
Move existing Version 7 to a new Server:
Install software, move the entire %fthome% folder to the same location on the new server.
Upgrade from Version 6.4:
Install software, do not start the FormTrap Server, see Version Upgrade on page 124. Data
folders need not be rebuilt. Printers will need to be re-allocated.
Upgrade from Version 6.3 or earlier:
Install software, do not start the FormTrap Server, see Version Upgrade on page 124. You will
need to rebuild the form set in FTDesign. Printers will need to be re-allocated.
2
Queues
What is a Queue
The queue is central to FTSpooler.
Each queue holds a set of rules for processing and delivery of documents and may include any
of these elements:
•
Split rules allow document identification and optional splitting into individual documents.
•
Identified documents or files may be formatted using a particular form within a
Data folder. Identified documents or files may also be redirected to other queues
for further processing, with no prectical limit on the number of redirections.
•
Delivery processes may output your formatted document by fax or email to a
printer, with the address of the output being formed dynamically, or as an attribute of
the queue.
The common delivery processes normally do not overlap, so "short cut" queue definitions are
provided for print and email as well as identification queues.
3
Confirmation about Queue Parameters Change
Making changes on any Queue Properties without clicking on the Apply button will receive
the pop up confirmation window. You also need to decide on the Future behavior: Keep
displaying this window, Do not display this window, instead save changes, or Do
not display this window, and do not save changes.
Alternatively, the Save changes option can be configured in the User Interface under
Setup - Settings tab.
More information on Configuration on Save changes Interface see page 68.
Create a Queue
Once a data folder is created and loaded, queues are created to accept, identify and route
and/or process incoming data. A "template" queue is available (grey and at the bottom of the
Queue list) and can be modified or new ones added to be models used by the New TYPE
queue options on the menu. We would normally recommend a template queue for each of
the three shortcuts.
To create a new queue or modify an existing queue, configure queue properties in each tab in
the Properties Bar, located in the right side of the FTSpooler Window. General,
Processing, and Filters specify how to identify and build FormTrap document whereas
Print, Email, Fax, and Applications deal with delivery options. General and/or
Processing or Filters tabs are the minimum requirements for new queues.
Shortcuts condense queue properties for the common queues into a single window,
•
Create a blank queue
•
Clone (copy) a queue
•
Create a simple print queue
•
Create a simple email queue
•
Create a simple identification queue
4
•
Create a template queue
Empty queue
To create a new queue:
•
Select Empty queue button from the top menu.
•
Properties Bar presents the General settings:
• Enter unique Queue name and set Data Input options.
• Notify (optional) sets an email address for successful and/or failure notification
emails.
• Archive (optional) sets successful archive duration (failures are always archived).
• Click Apply to save the settings.
More information on Queue Properties - General see page 10.
•
The Processing tab provides logic control over each data type identified by the
(optional) Rules file, which then appear in the Formatting and Replication list. Without
a Rules file, just the one entry appears in Formatting and Replication.
• Set the split rules, form(s), queue redirections, formatting options and processing
options for this queue.
• Click Apply to save the settings.
More information on Queue Properties - Processing see page 14.
5
•
Filters tab is used to add "Filter Programs" at various points. Filters generally modify
their input data. Standardly, an Input Filter is used to convert data from the locale (e.g.
US English) to UTF-8 code as a precursor to Unicode conversion. User-written filters
are very occasionally used to address very difficult data representation problems, and
output filter may be used to action device-specific operations, such as stapling.
• Add customized input filters, pre-identification filters, post-formatting filters or
associated file filters for this queue.
• Click Apply to save the settings.
More information on Queue Properties - Filters see page 20.
•
Print tab nominates which printer(s) to associated with this queue as well as printer
filters for delivery. Click Apply to save the settings.
More information on Queue Properties - Print see page 22.
•
Email tab configures email delivery settings using either SMTP service or Outlook
(MAPI). Click Apply to save the settings.
More information on Queue Properties - Email see page 23.
•
Fax tab defines options for delivery via the Windows fax service (Windows 2000,
2003, and XP). Click Apply to save the settings.
More information on Queue Properties - Fax see page 26.
•
File tab defines write-to-file options, including setting up structures for PDF archival.
Click Apply to save the settings.
More information on Queue Properties - File see page 29.
•
Applications tab defines options for customized delivery processes, such as Esker, Net
Fax, and OsFax. Click Apply to save the settings.
More information on Queue Properties - Applications see page 31.
Clone (copy) a queue
If the queue being created is similar to an existing queue, select Clone. This creates a new
queue using the highlighted queue's settings. The new queue's name and properties can then
be modified. This is most useful where queues with extensive rule files are required across a
number of printers.
To copy an existing queue:
•
Select the queue to be copied.
•
Select Clone button from the top menu.
•
General tab presents, with Queue name shown as copy of Highlighted Queue,
change this (at minimum), plus any other tabs, notably Print.
New print queue
This is a short cut to create a simple print queue from a template queue:
•
Select New print queue button from the top menu.
•
The Simple print queue dialog box pops up.
•
Enter the Name of the queue.
•
Choose the Template to copy.
•
Choose the Form to be used in the queue. The available forms from the dropdown
menu display in the format of form name (datafolder name), for instance, statement
6
(formtrap), where statement is the form name and formtrap is the datafolder
name.
•
Select a Printer from the dropdown menu.
•
Click OK.
New email queue
Use this option if you have an email template queue to copy.
To create a simple email queue from an existing template:
•
Select New e-mail queue button from the top menu.
•
The Simple email queue dialog box pops up.
•
Enter the Name of the queue.
•
Choose the Template to copy.
•
Choose the Form to be used in the queue. The available forms in the dropdown menu
display in the format of form name (datafolder name), for instance, statement
(formtrap), where statement is the form name and formtrap is the datafolder
name.
•
Select either SMTP or Outlook (MAPI) for the Engine option.
•
Fill in the Title, Subject, and Body of the email. Use an associated file variable by
quoting the associated file name in square brackets "[" and "]" (for example [Invoice
No]) or leave “as is” to use specific Associated File fields (for example SMTPTo, Subj
and SMTPBody).
7
More information on Using Associated Files in FTSpooler Queues Properties see page 113.
•
Click OK.
New identification queue
If the queue being created receives input that needs to be identified and routed, and is similar
to one of the templates, use this to create it. The new queue's properties can be modified as
necessary.
To create a simple identification queue from an existing queue:
•
Select New identification queue button from the top menu.
•
The Simple identification queue dialog box pops up.
•
Enter the Name of the queue.
•
Choose the Template to copy.
•
Choose the Rule file to be used in the queue.
8
•
Choose the queue to be replicated to the selected queue, and click the Apply and move
to the next rule button to continue. One queue per rule must be entered.
•
Click OK.
Create a template Queue
A template queue can be created as the “to copy” queue for other queues that share it’s
standards.
To create a template queue:
•
Right click and select New template from the list.
•
Update the queue properties in the Properties Bar (at minimum Queue name on
the General tab).
•
Save the queue as a named template.
•
Describe the queue in the name (for example Print Queue - PCL) and set all of the
standard tabs to match your most common queue type.
Delete a Queue
Deleting a queue also removes link(s) to other queues, requiring manual reconfiguration if the
deleted queue is referenced.
Delete a queue
To delete a queue:
9
Select the queue(s) to be removed.
•
Click the Delete button, or right click the queue(s) and select the Delete option.
•
A dialog box pops up to confirm the deletion process. Click Yes to finish (or No to fix
the listed queue(s) first).
•
If the queue is in used in any other queue(s), reconfigure those queues manually.
Write down the queue names indicated and fix them immediately.
Queue Properties
Select the queue to change by highlighting it. Update the queue settings in the Properties Bar
on the right side of the FTSpooler Window.
General
This tab defines the queue and its Data Input Method, Notification and Archive properties.
10
Queue name must be supplied and unique.
Three Input Services of Data Input to FTSpooler are available: Line Printer(LP), File
System, and Named Pipe.
•
Line printer allows users to treat the queue as a printer. You may:
• use lp/lpr from Unix
• define and write to an LPR printer from Windows
• use a "Work Station Customization Object" from a AS/400 to "print" files directly to
the queue
More information on Unix LPR Printers see page 88.
More information on Windows LPR Printers see page 85.
•
File system allows the user's application or a copy statement to write a file directly to
the queue folder. Queue folders are by default located under the SpoolRoot folder, normally located below the FTSpooler folder. This is the normal path and file name to the
queue folder Sample Queue shown in the screen shot, file name can be a constant:
C:\Program Files\TCGIS\FTSpooler\SpoolRoot\Sample Queue\filename.txt
More information on File system see page 84.
•
Named pipe allows the user to pipe data from their application to a queue, provided
the application is able to directly use a pipe. FTSpooler generates a pipe called \\ServerName\pipe\QueueName (where ServerName is replaced with "." (dot) if writing
from an application on the FormTrap server to the queue on the same machine).
More information on Named pipe see page 84.
11
Notify notifies users about completion of a job via e-mail. Choose to notify on success,
notify on error, or always notify, from the Notification Type dropdown menu. Enter a
valid email in the E-mail address line.
Archive enables you to specify the Number of days to keep the records for this queue.
No recipient to the queue is reported as an error if the option Treat absence of recipients
as an error is checked. This reports an error when no direct output (such as an email
recipient) is activated for a document.
Keep replication order processes split documents from the one input file in arrival order,
effectively single-threading the queue. This is the default and can be unticked. Unticking
allows multiple threads (to the limit in Setup, Settings, Maximum ... threads) meaning
the job will process faster with unpredictable output order.
Click the Apply button to save the changes.
Security for File system and Named pipe
This setting determines which users or groups have write permission to this queue, meaning
you have tight security control over who is allowed to send data to FTSpooler. Default is the
common selection and provides the same inherited security setting as the folder above the
queue folder. Unrestricted provides full write permissions to all users while Access
control list allows addition/removal of specific users or groups allowed to write to this
queue.
To add the Users or Groups for Access control option, click Add button and enter Name and
System name for the user.
12
The Line printer selection (unlike File system and Named pipe) uses IP Addresses to
secure jobs. The Add locals button automatically adds all local IP Addresses to the list. Flip
permission allows the selected IP Address permissions to be set to the reverse of what is
currently shown (i.e. locked or unlocked).
File system: Folder options
In this dialogue box define whether this queue folder is shared across the network:
•
Unchanged - FTSpooler does share or remove share for the folder. The system
administrator takes responsibility for sharing this folder on the network.
•
Share makes the queue folder available as a network shared object.
•
Do not share hides this folder from the network.
13
Named pipe options
This allows the pipe type to be defined as either Asynchronous (returns control
immediately meaning the transfer takes place as a background task) or Synchronous
(meaning the pipe maintains the current thread until data has been transferred). For
synchronous pipes, enter the Number of instances (concurrent instances), keeping this
number as low as possible.
•
Asynchronous: number of users is not limited.
•
Synchronous: number of instances controls how many users can use the pipe simultaneously.
Processing
Select a rule file for the queue under the Resolve list, if multiple document types are
processed by this queue or the input file needs to be split into individual document files. Leave
as No rules (resolved) if this queue processes without rules.
Then select the data file from Data folder list.
For No rules (resolved):
• To select a form, click on the Select forms button (right) to open the dropdown list
and select one or more forms to be used to format the input file. Click OK to finish.
• To select a queue, click on the Select queues button (right) next to the panel to
select one or more queues to replicate (copy) the input file to. Be careful to not create circular dependencies i.e. Queue "A" replicates to Queue "B" that replicates to
14
Queue "C" that passes it back to Queue "A". This will result in a loop and eventually
an error.
With Resolve (rule file) selected:
• Once the rule file is selected it's document entries are displayed in the Formatting
and replication panel as top-level elements. The special ID FAILURE entry is
used when files cannot be identified.
15
•
For each entry in the list, you can use the Select forms, Select queues, and
Remove button to both process and replicate these entries.
To add a form or queue, tick the items from Available items list, and then you will see them
as Selected items appearing on the right panel. Click OK.
16
Ticking the option Form name is embedded into the input data expects a form
selection within the input data (##F#formname#) and ignores any selected form name.
To remove a form or queue, select on the item(s) from the Formatting and replication
panel, either press the Delete key, or the Remove button.
Formatting options
Formatting Options allow users to specify general formatting preferences for the forms being
processed by the queue. This is typically used to overwrite the color default - xcolor or
xnocolor.
Option
Description
All options must be in the format -x[option]. Multiple options should be separated by a comma. For example, -xnocolor,nopjl
-xcolor/ -xcolour
Use color commands.
-xnocolor/ -xnocolour
Do NOT use color commands (default).
17
Option
Description
-xfastimage
(default) / -xbestimage
Image Scaling is the most intensive task performed by FormTrap. Image scaling is required only for substitution images
where FormTrap offers two modes for processing:
FastImage is the default setting and scales at the same
resolution as the original image, producing the output file
quickly with a smaller image. This option is UNSUITABLE for low resolution images (typically 72 dpi images).
Please review your substitution library for low dpi images
and replace them with images of 300 dpi or above for
preference. Consistency of images will produce consistency of output quality.
BestImage scales to 300 dpi, regardless of the original
image dpi. This produces good quality images slowly.
This is required if you have low resolution images in your
substitution library.
-xres
Use high-resolution user-defined PCL fill patterns (default).
-xnores
Do NOT use high-resolution user-defined PCL fill patterns.
-xpjl
Use HP Printer Job Language before and after print job to
setup printer and reset it (default).
-xnopjl
Do NOT use HP Printer Job Language before and after print
job to setup printer and reset it.
-xgl2
Use HP GL/2 for advanced PCL drawing (default).
-xnogl2
Do NOT use HP GL/2 for advanced PCL drawing.
-xbigfont
Turns on support for sending True Type font headers to PCL
printers that are larger than 32767 bytes (default).
-xnobigfont
Type 2 font headers (under 32Kb) are used when sending
downloaded fonts. REQUIRED for Lexmark T63x, T64x and
T65x printers and all others that do not support Type 3 font
headers.
Note: Default is nobigfont for version 6.3 and lower, bigfont
for version 6.4 and later.
Asian Fonts – Special Setting for Version 7.3.0.1 and lower version of
18
FormTrap:
See Setup, Core components, Formatting, Version:
For Asian and any other double-byte fonts, please set all Queues, Processing tab,
Options: to –s. This speeds up FormTrap by a factor of 10 or more. For additional details see
Asian Fonts in the www.formtrap.com Knowledge Base. –s is another parameter in this list
and should be space separated from the –x parameter.
Associated file entries
An Associated file is produced by the Print Logic when the document is created. The
associated file may contain information on the delivery requirements of a document, or may
contain user-specified data. Entries in the file are represented using a name=value syntax,
where "name" refers to the field name identifies the data contained in the "value". e.g.
emailto=user@domain_name.com the user@domain_name.com is identified as
the value of an emailto field.
More information on Associated files see page 93.
The advantage of the facility is that each document in any given batch can be handled
according to its specific delivery requirements, without having to initially separate the jobs in
the originating application.
When either value is blank or the name=value entry does not appear, the document will be
handled according to the Associated file options as set in FTSpooler.
19
There are four options for Associated file entries:
•
As well as - All the delivery method(s) i.e. email/ fax/ print, specified in the Associated file and those specified in the queue properties are used.
•
Ignore - The delivery method(s) specified in the queue properties are used; Associated
file delivery method(s) are ignored.
•
Overwrite (recipients of the same type) - If the delivery method specified in the
Associated file and the delivery method specified in the queue properties are the same
(e.g. both print) then the delivery option specified in the Associated file is used.
•
Overwrite (all recipients) - Delivery method(s) specified in the Associated file
delivery options are used. If there is no delivery method (i.e. recipient) specified in the
Associated file, the delivery method specified in the queue properties will be used.
Click the Apply button to save the changes.
Filters
Filters modify the input and output files, and the modified file MUST be returned to the
Spooler. You may use either standard filters supplied with your Spooler or programs written
in most computer languages, including Visual Basic. Most input files are passed through a
local language to UTF-8 filter (commonly Western filter) and filters may be used on output to
invoke special commands such as stapling on printers supporting those features. You may
include your own programs as filters.
Note: FTLabelPrint should be invoked as an Application, NOT as a filter as it does
not return a modified file to the Spooler.
External input filters deal with data that enters FTSpooler system from external sources.
The primary objective of these filters is character set normalisation – conversion of input data
to UTF-8 encoding. It is strongly recommended that every queue has a relevant filter. For
users of English speaking (and other Roman language) countries it would be the “Western”
filter. Other filters such as "Simplified Chinese" are also available for the customers using
different languages. Among the other standard filters are: PCL5 escape filter, AS400 filter,
filter to convert single carriage returns to line feeds.
Pre identification filters are invoked on all data before the identification step. The
primary objective of these filters is to normalise the data itself so it can be identified and
formatted. There are no common types of these filters – they are usually developed on
per-customer basis to solve specific problems and tailor the system for your requirements.
More information on the Replace filter see page 134.
Post formatting filters provide access to FormTrap output (for example to add documents
such as product data sheets to the FormTrap document, or insertion of stapling commands
for printers). The output file (PCL or PCLXL (PCL6) or PostScript) is still to be delivered, so
now incorporates any modified information.
Associated file (data elements) filters access the associated data file. The reasons to
have associated file filters include lookup of e-mail addresses for SMTP, adding properties
using external database, etc. There are a few associated filters provided by default:
•
Assoc_add – adds name=value pair to the end of associated file
•
Assoc_name_replace – replaces existing name with another name
•
Assoc_order – suppresses values of multiple identical names leaving only the first of
the identical names
Use Setup (top level menu) and Filters to see detailed descriptions of the filters.
20
There are a number of pre-defined filters available in FTSpooler, or you can use your own
customized program. Left click Add/Remove Filter to pop up a list of pre-built input
Filters.
Click the Apply button to save the changes.
Define Filters
In the Filters window, select the input document type from Show filters by input type
dropdown menu, this returns a list of available filters. Select a filter to view its description
below, click Add > to add it to the Active Filters list. Order of execution of the filters can be
changed using the four buttons to the side.
•
First - the selected active filter is moved to the top.
•
Up one - the selected active filter is moved one position up.
•
Down one - the selected active filter is moved one position down.
21
•
Last - the selected active filter is moved to the bottom.
•
To remove a filter, select an Active Filters and click Remove.
•
Click the OK button.
Print
To print FormTrap documents, FTSpooler needs a PCL5 or PCLXL (PCL6) or PostScript
compatible printer installed on the system.FormTrap uses only the printer's physical location
and needs only one printer defined to print in any of that printer's available languages. You
can print in (say) PostScript by selecting a PCL printer and vice versa. Selecting multiple
printers prints one copy on each selected printer.
22
Select printer(s) from the available list for the queue.
Click the Define filters button to choose the filter(s) for the printer.
More information on Print to ANY Windows Printer see page 31.
Click the Apply button to save the changes.
Email
Email tab allows you to send email via either SMTP or Outlook (MAPI).
SMTP (Simple Messaging Transfer Protocol) is an alternative delivery mechanism to
Microsoft® Outlook/Exchange (MAPI) and is a reliable and stable method for emails. Email
addresses must be in standard [email protected] form as address books are not
available. You must configure your SMTP settings before using this option.
Our recommendation is SMTP as the Email delivery mechanism.
Note: Several factors impact SMTP, particularly:
23
•
Windows inconsistencies between operating system and software versions.
•
Impact of anti-spam software, some of which does not work under load.
•
SMTP protocol itself which is fragile to user errors (for example, leaving out the @ in
an email address)
Please look at Archive, Errors and Archive, Log for additional error messages when you have
issues with SMTP.
Known items are summarized in this article from the Knowledge Base which we maintain as
new items present. You should read this before proceeding further.
•
www.formtrap.com and enter your User Id and Password
•
Select Knowledge Base
•
Use keyword anti and look at the single article that presents
How SMTP is handled by the Spooler see page 25.
More information on SMTP and Associated Files see Reserved Names see page 117.
Microsoft Outlook uses Microsoft Messaging Interface (MAPI) to deliver jobs to e-mail, fax or
other types of recipients supported by MAPI. MAPI is installed as a part of Microsoft Outlook
with only e-mail enabled by default. Use of this delivery mechanism requires prior setup of
the profile used to access MAPI. You must configure your Mail Profile before using the Mail
option.
Email is normally activated using Associated File entries with or without any default option
overridden by the Associated File. Like any of the "special delivery" methods, the Properties
tab, Associated file entries prompt must be set correctly.
More information on Outlook (MAPI) and Associated Files see Reserved Names see page 117.
To set the properties of emailing:
•
Select the email option to be either SMTP or Outlook (MAPI).
•
Enter the email attachment title in the Title field. You may use an associated file variable by quoting the associated file name in square brackets "[" and "]". For Example,
quoting Your Order [PO Num] would deliver “PO22344” from the associated file
line PO Num=PO22344 to give Your Order PO22344. Take care that your data
fields do NOT contain characters that are illegal for Windows file names (*\.: and so
on). These may cause the email to abort with an error message.
•
Click the Define attachments button to specify the attachment filter(s).
More information on Define Attachmentssee page 21.
•
Enter the Subject line (normally overridden by the Associated File name Subj) and
Body (from the standard file quoted in the Associated File name EmailBody or the
text entered in Body below).
More information on Using Associated Files in FTSpooler Queues Properties see page 113.
•
If you are constructing the title yourself, you may use square bracketed (“[“ and “]”)
associated file fields, as for Title.
•
Enter valid email address(es) in the To, Cc, Bcc, and From fields.
24
•
Click the Apply button to save the changes.
How Email is handled by the Spooler
The Associated File is produced during document formatting by the Spooler. If the form
contains an Associated File entry for SMTP Email ([email protected]) or the
Email tab within Queues contains a direct email to address, an email could be sent.
These additional conditions are required to send the email:
Queues, Process tab, Associated file entries: is NOT set to ignore
Email Address is properly formed in the SMTPTo Associated file entry:
25
SMTOTo entries with blank email addresses are ignored (effectively do not exist.)
Email addresses without an @ will cause SMTP to fail - they look like web sites - (see
KB).
Email addresses with multiple @ or . (full stop) symbols will fail but SMTP will be
recovered after that transaction (from Version 7.4.004). See KB.
Fax
This option sends FormTrap documents as faxes using Windows Fax Service.
Windows Fax Service requires the fax configuration in Microsoft® Fax Console. Instead
of a fax machine, you can use a modem and scanner to send or receive faxes from your
computer. The modem and scanner have no specific requirements. FormTrap does not use
the scanner and deals with outgoing faxes only.
More Information on Configuring Windows Faxes in Windows XP or, alternately you can go
to Start menu - Help and Support - search for fax to see relevant articles.
Note: You must change Windows Fax and untick Include banner, this is the screen
for XP-Pro and is similar for later operating systems. Please see the
Knowledge Base if you have problems with your initial fax tests.
26
Windows Fax Service is normally activated using Associated File entries with any default
option overridden by the Associated File. Like any of the "special delivery" methods, the
Properties tab, Associated file entries prompt must be set correctly.
More information on Windows Fax Service and Associated Files see Reserved Names see
page 117.
To set the properties of faxing:
•
Click Define document type to specify the document type. Fax requires TIFF for faxing so select the filter that converts from your document type (as indicated in Processing tab, Data Folder) to Tiff; i.e. one of :
PCL to Tiff where Data Folder is marked as PCL
PCLXL to Tiff where Data folder is marked as PCLXL
PostScript to Tiff where Data folder is marked as PostScript
More information on Define Document Type see page 21.
•
The usage of Cover page is OPTIONAL. The Cover page must be first created using
Windows Fax Cover Page Editor. You can launch it from Start - All Programs Accessories - Communications - Fax - Fax Cover Page Editor, create, edit and
save your cover page. In FTSpooler fill in the Cover page name i.e. the full path of the
cover page, Subject line, and Body. You can use associated file variables for Subject
line and Body.
•
Use an associated file variable by quoting the associated file name in square brackets
"[" and "]". For Example, quoting Your Order [PO Num] would deliver “PO22344”
from the associated file line PO Num=PO22344 to give Your Order PO22344.
More information on Using Associated Files in FTSpooler Queues Properties see page 113.
•
Select one of the three Schedule options: Immediately, Off peak and At specified
time (Time required).
•
Select one of the three Notify options:
• Do not notify
• Email to sender - requires a special email SMTP notification process (mailnfy.exe
to run in the background).
• Email to inbox - only works with Microsoft® Exchange.
•
Click the Sender, Recipients button to manage the details of the fax sender and
recipients. This is the default and is normally overwritten by the Associated File field
W2KFax from the document.
27
Click the Apply button to save the changes.
Manage the sender and recipients information
To manage the sender and recipients information:
28
•
Enter sender information sender's Name, Department and Company.
•
Click the Add new, Edit or Delete button to change the recipient lists.
File
This option delivers FormTrap standard output files to a specified directory, as well as the
opportunity to run processes over the FormTrap output.
To set the properties of output to file:
•
Enter the full Destination folder path of where to save the file to. Environment variables are accepted. See notes following the image below if you are attempting to write
to a network drive.
•
Enter the File title. Use an associated file variable by quoting the associated file name
in square brackets "[" and "]". For example quoting [PO Num] would deliver
“PO22344” from the associated file line PO Num=PO22344. Make sure that your
data fields do NOT contain characters that are illegal for Windows file names, (*\.: and
so on). These may cause the file save to abort, with an error message.
Note: See details in the Knowledge Base for a filter that is available (at a charge) that
removes illegal characters in potential folder and file names.
29
More information on Using Associated Files in FTSpooler Queues Properties see page 113.
•
Select any standard files you wish to add to output. There are three types of standard
files: Output file (PostScript (.ps) or PCLXL (PCL6) or PCL5 (.pcl)), Associated file
(.af) and Input file (.txt).
•
Click Add/Remove to edit which (if any) output conversion filters should be used to
add additional files (commonly .pdf files).
More information on Define Output Filters see page 21.
•
Click the Apply button to save the changes.
Notes on writing to network drives:
When the output folder is located on a network, both a UNC path (\\server\folder) or a
mapped drive (Z:\Folder) may be used.
Mapped drive(s) must exist for the user account that runs the FormTrap service (drive
mappings are maintained per user account). Please check by interactively logging in as the
user that runs the FormTrap service. The drive(s) should be mapped permanently. If you are
running the FormTrap service using a LocalSystem account you will not be able to log in as
the user account running the FormTrap service and will not be able to output to the mapped
drive.
30
In both cases you need to ensure the user account that runs the Formtrap service has
sufficient privileges to read and write to the required folder.
Drive errors as above show up in the Archive, Errors list as (for example) "Z:\Folder is not
a directory. " when that folder exists.
Applications
This option allows the use of customized third party application(s), including user-written
programs. The programs do not produce a modified file for continued spooler activity, instead
they are used for discrete user-specified purposes unrelated to FormTrap processing.
Note: FTLabelPrint is invoked as an Application.
More information on Application Setup see page 79.
To add a customized application:
•
Click the Add button to add a new application.
•
Select the required application from the Name list.
•
Enter Recipient for the application if required, otherwise key the hyphen (-) meaning
no recipient.
•
Click the Add/Delete button to edit the filters.
•
Click the Apply button to save the changes.
Print to ANY Windows Printer
Overview
This facility is only available for PCLXL (PCL6) files where the "Print to ANY Windows
Printer" chargeable option is included in their FormTrap system. Files must be generated
through a queue with a Data File showing the PCLXL (PCL6) symbol.
To print to other Windows printers, use a filter for each different printer you want to print to.
31
The table shows relative file sizes from which the demands of the process, especially for
PostScript, is shown. Converted files are larger by a factor of 20 - 30 over the equivalent direct
outputs, although the PDF file produced from PostScript is still small and efficient.
A four page “Accounts Report” formatted with FormTrap in Arial True Type font, compressed
down from a seven page original was used as the text file. The form file and data files may be
downloaded from here:
Download PCLXL-to-Any-Windows.zip
Printer used is an HP Color LaserJet 4600 printed in B&W with no logos:
Print Language
File size - Bytes
Original Text File
34,025
PCL5
172,761
PCLXL (PCL6)
305,708
PostScript
351,542
PDF from PostScript
74,128
Converted via printer drivers from the original PCLXL (PCL6) file via filter:
Original PCLXL (PCL6)
05,708
to Canon iP100 ink jet
3,620,241
to PCL
5,599,651
to PostScript
to PDF from PostScript from
PCLXL
to PCLXL
10,074,461
142,213
632,033
Setup
Filters are required to print to other windows printers from PCLXL (PCL6). Please set up
individual filters for each printer you wish to use. PostScript output can also be set up this way
(at around 30 times the size, with corresponding processing time).
32
To Define a new Filter
1. Open the Filters tab and use the PCLXL to Printer filter as a model.
2. Go to Start, Printers and Faxes, select the required printer and go to Properties.
33
Select the printer name as shown and copy the name.
3. Set up a new Filter. Paste the copied name in place of the printer name in Description and Arguments. If the printer is via a Print Server (on Plato in the example),
34
include that into the printer name, as \\server\ (\\ plato \ below).
4. Replace Printer in the Name with a modified version with no slashes (and short
enough to be able to see all the description). This is the final Filter:
5. Replace Input type with pclxl and Output type with prn.
6. Check these under Output type:
Check status
Require output
Use standard input/output
Hide console
Hide GUI should be Unticked
7. Save to record this as a new filter.
To print to any Windows Printer
Your queue must have a PCLXL (PCL6) Data Folder selected, PCLXL is represented as this
symbol:
In the Print tab:
Select the printer from the list and select the corresponding Filter from the list. Apply to
finish.
35
Queue Tools
Overview
The Check Integrity tool verifies completion of queue setups, such as replication,
formatting, and data validity and is useful in troubleshooting.
Warnings are shown in blue with errors in red.
Batch Update
The Batch Update tool allows the same action to be taken on selected or all queues. There
are three types of actions to be taken:
•
Add - append another value to a present value list where more than one value may
exist, for example, a new delivery filter.
•
Replace - find an old value and substitute a replacement value, for example, replace a
form with a new form.
•
Set - update a value that is unique to the queue, for example, days to keep the records,
or notification address.
To process a batch update:
•
Select Batch Update from the Tools button in Queues section. The list of actions
are displayed in the Batch Update window. Select the Action to be taken.
•
Enter the Old value if applicable, and New value.
•
Select the Scope of the action.
36
•
Click the Update button to finish.
Changing ownership of queues
•
To allow a normal user (not Admin) to view archives for queues, the user must be the
owner of those queues.
•
The owner of a queue will be able to see archives for the queue and may also be able to
edit the queue unless restricted, see Setup - Users.
•
Highlight the queues that the new owner should be able to view.
•
Select Batch Update from the Tools button in Queues section. The list of actions
are displayed in the Batch Update window. Select Set queue owner.
•
Enter the user's name in New value:
•
Set Scope to Selection.
•
Click the Update button to finish
37
Data Folders
Manage Data Folders
Data folders store the expanded contents of your FormTrap load (.ASC) file, created in
FTDesign as well as rule files and substitution files. The contents include the form(s)
definitions and data related to front and printer handling used by the formatting processes.
Create a Data Folder
To create a new data folder:
• Select Data folders from the top Navigation Bar.
• Click the New Folder button. The Data Folder dialog box pops up.
• Enter a Folder Name, for example, formtrap.
• The Use private substitution files for this data folder option permits the data
folder to have its own substitution files instead of the common substitution files.
More information on Add a Substitution File see page 41.
• Click OK.
38
• The dialog box pops up to allow you to locate the load (.ASC) file.
• Choose the load (.ASC) file to add and click Open to finish the reloading process. Forms within the load (.ASC) file are added to the data folder.
Reload the Forms of the Data Folder
To reload the data (.ASC) file to the data folder:
39
• Select either the data folder name i.e. formtrap in our example or Forms
underneath.
• Click the Reload forms button.
• The dialog box pops up to locate your load (.ASC) file.
• Select the load (.ASC) file to reload and click Open to finish the reloading
process. All previous forms are removed and new forms added.
Update the Properties of a Data Folder
To change the properties of a data folder:
• Select the data folder to update.
• Click the Folder properties button.
• Data folder dialog box pops up.
40
• Change the Folder Name or the option Use private substitution files for this
data folder. Click Ok to finish.
Delete a Data Folder
Unused data folders can be deleted from the system. Select a data folder to view its details in a
tree structure. Expanding the tree will show all queues that use data folder. When a data
folder is deleted these queues become invalid (since they still refer to the deleted data folder).
Edit the settings of these queues to re-assign a valid data folder before deleting. To delete a
data folder:
• Select the data folder to delete.
• Click the Delete button.
• A dialog box pops up to confirm the deletion process. Click Yes to finish.
Manage Subtitution Files
FTSpooler allows public and private substitution files to be applied to data folders. A data
folder may use either its own private substitution folder or a single public substitution folder.
Add a Substitution File to the Data Folder
To add a substitution file to the data folder:
• Select Substitutions in the tree structure, either at root level (public) or within a
specific data folder (private). To see a private substitutions folder, the option
Use private substitution files for this data folder must be checked in Data
folder properties.
More information on Update the Properties of a Data Folder see page 40.
• Click the Add Substitution Files button.
41
• The dialog box pops up to allow you to add the substitution file(s).
• Select the substitution file(s) to be added and click Open to finish the process.
Note: Text files must be stored in Unicode, in Notepad select Save as, Encoding and
UTF-8 from the drop down list.
Delete a Substitution File from the Data Folder
To delete a substitution file from the data folder:
• Select the substitution file(s) to delete.
• Click the Delete button.
• The dialog box pops up to confirm the deletion process. Click Yes to finish.
42
Manage Split Rule Files
The single Split Rules folder is at root level.
Add a Split Rule File
To add a Split Rule File:
• Select Split Rules in the tree structure.
• Click the Add Split Rules button.
• A dialog box pops up to allow you to add split rule file(s). Select the rule file(s)
you wish to add and click Open to finish.
Delete a Split Rule File
To delete a Split Rule File:
• Select the split rule file(s) you wish to delete under Split Rules in the tree structure.
• Click the Delete button.
43
• The dialog box pops up to confirm the deletion process. Click Yes to finish.
44
Archive
This section details how to use the Archive features of FormTrap.
More information on Archive Database see page 66.
More information on archive viewing for deafault (not Admin) users see page 36.
FTSpooler keeps all the job processing and delivery information in one job archive and
provides different views, i.e. All, Delivered, Errors, Data, Replication, Formatting,
Working and Logs.
Archive shows three panels: searching and filtering, main panel and detail panel.
View All Records
Select the All button under Archive from the top navigation bar. In the searching and
filtering panel, specify searching criteria to retrieve data records.
More information on Search and Filter Archive Records see page 57.
In the main panel, FTSpooler shows the following for each job:
• Status - job status
• Date/ Time - of submission
• Queue - the queue the data was processed in
• To - form(s) used in the processing the document
Between submission and delivery of the formatted document may be several steps such as
input filtering, identification and routing an/or splitting, repagination and print formatting.
Each step is shown in the detail panel located at the right side effectively showing the
history of each job in most recent (top) to oldest (bottom) order.
You can select multiple records and save their documents. You can view a document in the
appropriate viewer.
• Process Name - shows the name of the process used to modify or format the
document. Some processes show additional information after a colon sign ":".
For instance, the print-formatting process "formtrap" is followed with the name
of the form; delivery engine "smtp", is followed with the document filter name.
• Document Type - the file type that is produced by the process. "txt" is raw data,
"pcl" or"pclxl" or "ps" are formatted and print ready documents.
45
More information on Exporting Files see page 56.
View Delivered Records
Select the Delivered button under Archive from the top navigation bar. In the searching
and filtering panel, specify searching criteria to retrieve data records.
More information on Search and Filter Archive Records see page 57.
In the main panel, FTSpooler shows the following for each job:
• Status - job status
• Date / Time - of submission
• Queue - the queue the data was processed in
• To - form(s) used in the processing the document
Between submission and delivery of the formatted document may be several steps such as
input filtering, identification and routing an/or splitting, repagination and print formatting.
Each step is shown in the detail panel located at the right side effectively showing the
history of each job in most recent (top) to oldest (bottom) order.
46
You can select multiple records and save their documents. You can view a document in the
appropriate viewer.
• Process Name - shows the name of the process used to modify or format the
document. Some processes show additional information after a colon sign ":".
For instance, the print-formatting process "formtrap" is followed with the name
of the form; delivery engine "smtp", is followed with the document filter name.
• Document Type - the file type that is produced by the process. "txt" is raw data,
"pcl" or "pclxl" or "ps" are formatted and print ready documents.
More information on Exporting Files see page 56.
View Errors
Select the Delivered button under Archive from the top navigation bar. In the searching
and filtering panel, specify searching criteria to retrieve data records.
More information on Search and Filter Archive Records see page 57.
In the main panel, FTSpooler shows the following for each job:
• Status - job status
47
• Date / Time - of submission
• Queue - the queue the data was processed in
• To - form(s) used in the processing the document
Between submission and delivery of the formatted document may be several steps such as
input filtering, identification and routing an/or splitting, repagination and print formatting.
Each step is shown in the detail panel located at the right side effectively showing the
history of each job in most recent (top) to oldest (bottom) order.
You can select multiple records and save their documents. You can view a document in the
appropriate viewer.
• Process Name - shows the name of the process used to modify or format the
document. Some processes show additional information after a colon sign ":".
For instance, the print-formatting process "formtrap" is followed with the name
of the form; delivery engine "smtp", is followed with the document filter name.
• Document Type - the file type that is produced by the process. "txt" is raw data,
"pcl" or "pclxl" or "ps" are formatted and print ready documents.
An additional error description panel displays extra information for troubleshooting:
• Process Error Description - a brief description of the process-generated error
• FTSpooler Error Description - a full description of the error in FTSpooler
Process errors show the best information available. The information may not be meaningful
or very relevant. There is no additional information available from log files.
More information on Error Messages from FormTrap Spooler see page 61.
48
More information on Exporting Files see page 56.
View Data Records
Select the Delivered button under Archive from the top navigation bar. In the searching
and filtering panel, specify searching criteria to retrieve data records.
More information on Search and Filter Archive Records see page 57.
In the main panel, FTSpooler shows the following for each job:
• Status - job status
• Date / Time - of submission
• Queue - the queue the data was processed in
• Document type - the document type of the selected data record
• Name - the associated file entry name
• Value - the value of the associated file entry
Name and Value repeat for different jobs, showing all of the Associated File names in that
file (last to first down the page, including duplicates).
49
Between submission and delivery of the formatted document may be several steps such as
input filtering, identification and routing an/or splitting, repagination and print formatting.
Each step is shown in the detail panel located at the right side effectively showing the
history of each job in most recent (top) to oldest (bottom) order.
• Process Name - shows the name of the process used to modify or format the
document. Some processes show additional information after a colon sign ":".
For instance, the print-formatting process "formtrap" is followed with the name
of the form; delivery engine "smtp", is followed with the document filter name.
• Document Type - the file type that is produced by the process. "txt" is raw data,
"pcl" or "pclxl" or "ps" are formatted and print ready documents.
• Status - job status
• To - form(s) used in the processing the document
• Error Description - errors in the formatting process
More information on Exporting Files see page 56.
50
View Replication Records
Select the Replication button under Archive from the top navigation bar. The Formatting
view's detail panels have the replication structure and delivery status panels at the
bottom which provide additional information. In the searching and filtering panel,
specify searching criteria to retrieve data records.
More information on Search and Filter Archive Records see page 57.
In the main panel, FTSpooler shows each of the formatting process for each job:
• Date / Time - of submission
• Queue - the queue the data was processed in
• To - the recipient of the completed document
• Type - the replication type. There are two types: Root and Child.
• Root - a topmost queue that has no parents.
• Child - a queue that has parent-queue(s) and may have child-queue(s).
In the replication structure panel, view the tree structure below the selected queue (if
any).
In the delivery status panel, FTSpooler shows:
• Status - job status
• To - queues to which the document is replicated
• Error Description - errors in the replication process
51
More information on Exporting Files see page 56.
View Formatting Records
Select the Formatting button under Archive from the top navigation bar. The Formatting
view's detail panels has the document processing and delivery status panels at the
bottom which provide additional information. In the searching and filtering panel,
specify searching criteria to retrieve data records.
More information on Search and Filter Archive Records see page 57.
In the main panel, FTSpooler shows each of the formatting process for each job:
• Date / Time - of submission
• Queue - the queue the data was processed in
• Process Name - shows the name of the process used to modify or format the
document. Some processes show additional information after a colon sign ":".
For instance, the print-formatting process "formtrap" is followed with the name
of the form; delivery engine "smtp", is followed with the document filter name.
• Document Type - the file type that is produced by the process. "txt" is raw data,
"pcl" or "pclxl" or "ps" are formatted and print ready documents.
52
In the document processing panel, you can see delivery history of each document.
In the delivery status panel, FTSpooler shows:
• Status - job status
• To - form(s) used in the processing the document
• Error Description - errors in the formatting process
More information on Exporting Files see page 56.
View Working Records
Select the Working button under Archive from the top navigation bar. This view does not
have the searching and filtering panel.
This view is used for problem diagnosis, specifically “stuck” jobs as most jobs are transient
and disappear very quickly.
In the main panel, FTSpooler shows the following for each job:
• Status - job status
• Date / Time - of submission
53
• Queue - the queue the data was processed in
• To - form(s) used in the processing the document
Between submission and delivery of the formatted document may be several steps such as
input filtering, identification and routing an/or splitting, repagination and print formatting.
Each step is shown in the detail panel located at the right side effectively showing the
history of each job in most recent (top) to oldest (bottom) order.
You can select multiple records and save their documents. You can view a document in the
appropriate viewer.
• Process Name - shows the name of the process used to modify or format the
document. Some processes show additional information after a colon sign ":".
For instance, the print-formatting process "formtrap" is followed with the name
of the form; delivery engine "smtp", is followed with the document filter name.
• Document Type - the file type that is produced by the process. "txt" is raw data,
"pcl" or "pclxl" or "ps" are formatted and print ready documents.
More information on Exporting Files see page 56.
54
View Logs
Select the Logs button under Archive from the top navigation bar. In the searching and
filtering panel, specify searching criteria to retrieve data records.
More information on Search and Filter Archive Records see page 57.
In the main panel, FTSpooler shows the general dialog, but not information about a
particular job. It provides additional information for troubleshooting processes.
A full description of the selected activity is shown in the detail panel located at the bottom
of the window.
Managing Records
View the Archive Record
FTSpooler shows 1,000 records per page. When number of retrieved records exceeds page
size use these navigation buttons to move between pages:
•
- first page (the most recent jobs)
•
- previous page
55
•
- next page
Records are NOT refreshed automatically by FTSpooler.
Delete an Archive Records
To delete a record and its associated files:
• Select the record to be deleted.
• Right click the mouse and select Delete selected job option, or click the Delete
button
on the toolbar and choose the desired option. Four options are provided to delete:
• Selected recipients - delete the information about recipients of the selected
records. The files and associated data will remain in the archive.
• All recipients in the query - delete the information about recipients in the
query. The files and associated data will remain in the archive. The result of
this operation is the same as selecting all records on all pages and "Delete
Selected recipients".
• Selected jobs - all information for the job is deleted.
• All jobs in the query - all information for all jobs in the query is deleted.
The result of this operation is the same as selecting all records on all pages
and "Delete Selected jobs".
• Click the Yes button to confirm.
Resubmit a Job
To resubmit a successful or failed job:
• Select the record to be restarted.
• Right click the mouse and select the Restart option, or click the Restart button
on the toolbar.
Exporting
This option is often used to capture data files for testing or for troubleshooting purposes.
To capture a sample data file:
• To view the document, select a "ps" or "pclxl" or "pcl" file (i.e. formatted document).
• To view the document, double click on the process name, or select the process name and click the
icon.
• Select the input txt file.
• To save the document, select the process name and click the
icon.
• Click the ... button to browse a Destination folder where the file should be
saved.
56
• Select an option from the File naming dropdown menu. There are five options
available:
• ID - name the exporting file using record ID, e.g. 32.txt.
• ID-process - name the exporting file using record ID and process name, e.g.
32-split_Statement_Print.txt
• ID-queue - name the exporting file using both record ID and name, e.g.
32-Statement.txt
• queue-ID - name the exporting file using queue name and ID, e.g. Statement-32.txt.
• Click the OK button.
Apply Selection to Searching and Filtering Panel
This option short cuts the searching and filtering process. To apply the current selection to the
searching and filtering panel:
• Right click on the selected record. the option Apply to search toolbar appears.
• Choose one from the available selections list. The criteria in the searching and
filtering panel are updated.
Refresh Records
At any time you may click the Refresh button
to update the records displayed in archive.
Records are NOT refreshed automatically by FTSpooler.
Finding and Filtering Archive Records
FTSpooler has a fully searchable database. The finding and filtering archive records
feature is on the left hand side of the archive window. Search results replace the contents of
the archive window, with the Clear All button returning to the full archive.
Finding and Filtering Records in the Record View
This feature allows finding records that match the settings chosen in the search box.
57
• Click the Archive button on the top menu bar, and click the All button.
• Select the required Status from Success, Error or leave as Do not filter to see
both successful and failed jobs.
• Select a queue and/or recipient name from the Queue and To drop down menu,
or type required values in these fields.
Both fields are case sensitive and can be part completed. For instance, key inv in the
Queue text field to see invoice-email and invoice-print, but not Invoice-Email.
• Date range is the time frame of the search and can substantially improve performance by being a narrow selection of dates. By default, the Date range is
the default time frame specified in Settings Setup. Changes to the default
time frame affect the initial state of all queries.
More information on Changing Default Time Frame see page 68.
• Click the Apply filter button to match records to the selection criteria. The
Apply filter first Refreshes the main archive panel so all records are searched.
• Click the Clear All button to set selection criteria back to the default values.
Job Status is not needed if you are in either Delivered or Errors View.
Finding and Filtering Records in the Data View
This option finds data that matches the settings in the search box.
58
• Click the Archive button on the top menu bar, and click the Data button.
• Select an associated file name, value, and/or queue name from the Name,
Value, and Queue drop down menus, or type required values in these fields.
These three fields are case sensitive and can be part completed. For instance, key inv in
the Queue text field to see invoice-email and invoice-print, but not Invoice-Email.
• Date range is the time frame of the search and can substantially improve performance by being a narrow selection of dates. By default, the Date range is
the default time frame specified in Settings Setup. Changes to the default
time frame affect the initial state of all queries.
More information on Changing Default Time Frame see page 68.
• Click the Apply filter button to match records to the selection criteria. The
Apply filter first Refreshes the main archive panel so all records are searched.
• Click the Clear All button to set selection criteria back to the default values.
Finding and Filtering Records in the Replication View
This option finds replications that match the settings in the search box.
59
• Click the Archive button on the top menu bar, and click the Replication button.
• Select a queue and/or recipient name from the Queue and To drop down menu,
or type required values in these fields.
Both fields are case sensitive and can be part completed. For instance, key inv in the
Queue text field to see invoice-email and invoice-print, but not Invoice-Email.
• Date range is the time frame of the search and can substantially improve performance by being a narrow selection of dates. By default, the Date range is
the default time frame specified in Settings Setup. Changes to the default
time frame affect the initial state of all queries.
More information on Changing Default Time Frame see page 68.
• Click the Apply filter button to match records to the selection criteria. The
Apply filter first Refreshes the main archive panel so all records are searched.
• Click the Clear All button to set selection criteria back to the default values.
Finding and Filtering Records in the Formatting View
This option finds records that match the settings in the search box.
60
• Click the Archive button on the top menu bar, and click the Formatting button.
• Select a name from the Queue and Process and/or Document type drop down
menu, or type required values in these fields.
These three fields are case sensitive and can be part completed. For instance, key inv in the
Queue text field to see invoice-email and invoice-print, but not Invoice-Email.
• Date range is the time frame of the search and can substantially improve performance by being a narrow selection of dates. By default, the Date range is
the default time frame specified in Settings Setup. Changes to the default
time frame affect the initial state of all queries.
More information on Changing Default Time Frame see page 68.
• Click the Apply filter button to match records to the selection criteria. The
Apply filter first Refreshes the main archive panel so all records are searched.
• Click the Clear All button to set selection criteria back to the default values.
Error Messages from FormTrap Spooler
FTSpooler keeps all the job processing and delivery information in one job archivem and
provides different views, i.e. All, Delivered, Errors, Data, Replication, Formatting, Working
and Logs.
Archive shows three panels: searching and filtering, main panel and detail panel.
More information on Archive Database see page 66.
61
Self Explanatory Errors
Most errors from the Spooler itself are self explanatory, for example, this one, in the left-hand
panel of Archive, Errors.
Input type mismatch: expected input file type is [PCLXL], actual input type is
[TXT] Process (PCLXL to any printer), path(pclxlprn.exe) - file does not exist. :
Program is saying it EXPECTS a
PCLXL file,
expected input file type is
[PCLXL]
but no PCLXL file can be found,
actual input type is [TXT]
hence the process must be
wrong.
Process (PCLXL to any printer),
path (pclxlprn.exe)
Check by looking at the Archive, All display of files at the right, if this shows (for example)
.pcl or .ps files, you are using the wrong filter program in this queue.
Printer Errors, E0xxxxxxx
FormTrap Server ignores the highlighted errors from the list below. If you want additional
Printer Errors ignored in your site, please notify [email protected].
PRINTER_STATUS_PAUSED
PRINTER_STATUS_ERROR
PRINTER_STATUS_PENDING_DELETION
PRINTER_STATUS_PAPER_JAM
PRINTER_STATUS_PAPER_OUT
PRINTER_STATUS_MANUAL_FEED
PRINTER_STATUS_PAPER_PROBLEM
PRINTER_STATUS_OFFLINE
PRINTER_STATUS_IO_ACTIVE
PRINTER_STATUS_BUSY
PRINTER_STATUS_PRINTING
PRINTER_STATUS_OUTPUT_BIN_FULL
PRINTER_STATUS_NOT_AVAILABLE
PRINTER_STATUS_WAITING
PRINTER_STATUS_PROCESSING
PRINTER_STATUS_INITIALIZING
PRINTER_STATUS_WARMING_UP
PRINTER_STATUS_TONER_LOW
PRINTER_STATUS_NO_TONER
PRINTER_STATUS_PAGE_PUNT
PRINTER_STATUS_USER_INTERVENTION
PRINTER_STATUS_OUT_OF_MEMORY
PRINTER_STATUS_DOOR_OPEN
PRINTER_STATUS_SERVER_UNKNOWN
PRINTER_STATUS_POWER_SAVE
PRINTER_STATUS_SERVER_OFFLINE
PRINTER_STATUS_DRIVER_UPDATE_NEEDED
0x00000001
0x00000002
0x00000004
0x00000008
0x00000010
0x00000020
0x00000040
0x00000080
0x00000100
0x00000200
0x00000400
0x00000800
0x00001000
0x00002000
0x00004000
0x00008000
0x00010000
0x00020000
0x00040000
0x00080000
0x00100000
0x00200000
0x00400000
0x00800000
0x01000000
0x02000000
0x04000000
Vague or Meaningless Errors
If error is vague or even meaningless, then it is likely coming from Windows. Please next look
in the FormTrap Knowledge Base (within www.formtrap.com), by entering keyword searches
with key words from the error message. For example, using "error code" as the keyword will
return common printer statii reported by Windows and what you can do about them.
62
If You are Still Stuck
Please email FormTrap Support ([email protected]) with these documents and files:
1. Screen shot of the error taken from Archive, Errors with the item causing the
problem highlighted, we're interested in the bottom two panels on the screen
which is the best (sometimes only) information available.
2. Screen shot of Archive, All showing the file list at the right.
3. Saved formatted document (suffix .pcl, .ps or .pclxl) from the above (use this to
save the document to a folder).
4. First document and (if this exists) the last .txt document from the above.
5. From (.frm) file from the FTDesign environment (bothnotes.frm), WITH any
repagination file (.rpg) used by the form.
6. Zip all of the files and include with your email. If you have HTML format email,
you can drop the screen shots in directly.
7. Please send the file from Archive, Log.
8. If the error is in a Windows System component (SMTP, W2KFax), please look at
the Event Viewer and if there are entries that look relevant, please zip and send that
63
as well.
The above should allow us to respond efficiently to you.
Not a current customer:
If you are not a supported customer (current on Support and Upgrades), we will call you on
the next business day to request credit card payment. That may be an email if you are not in
the same time zone.
64
Setup
Core Components
FTSpooler Core components shows the versions and locations of all the FTSpooler
essentials. Locations of forms, substitution files and rule files can be changed under Home
folder.
Home Directory (%fthome%): is shown for information. It cannot be changed on this
screen, but can be changed by first stopping the FormTrap Spooler then using program
FTHome Locator (access via Start > Programs >FormTrap > Server V7).
Note: If changes to queues disappear when you stop the FormTrap Spooler, please
see:
Install directory (%ftinst%): is shown for information, it is the location of your FormTrap
executable files and cannot be changed.
In Formatting section, specify Location of forms and substitution files, normally
%fthome%\data.
In Identification and split section, specify the Location of rule files, normally
%fthome%\rules.
65
Archive
Archive manages the database server and archive location, monitors the local database
service status, and performs maintenance.
Logging is to a FireBird data base (also 32 or 64 bit). The DB need not be on the same
machine or operating system.
FTSpooler has one FireBird database for all the job processing and delivery information.
Location is stated in Database server and archive location. Recovery is built-in by
logging of the data for each task before release to the external process. The database deletes
no longer required transactions several times per day, and you should schedule Backup and
Recovery as the database gets too large. Backup and Recovery removes deleted space from the
database, returning it to the system as free space.
Note: Setup of the archive on another machine is not a part of these instructions.
Please contact [email protected] for details and a quotation if you
would like your system set up this way.
• Select the Server location (IP address) from the dropdown menu. "localhost"
means the database is located on the local machine.
• Enter the Folder name, and make sure to use drivers that are local to "localhost"
server.
Start or Stop the Local database service and check status. Jobs in Archive View will only
display if the Service status is Ok.
Note: It is not recommended to stop the Local database service as FTSpooler stops
operating. The only case would be to obtain a “cold” backup of the database.
66
The current File size can be found in the Maintenance section.
The FireBird DB operates as “high watermark” meaning the file size never shrinks, instead
deleted space is re-used. The DB auto-expands until the point where deletions roughly equate
to additions, at which time it stabilizes. That is typically around the 10 GB mark and depends
on the retention period "Number of days to keep records" in Queues, General tab. A
zero value in Number of days ... means indefinite retention, hence a large and growing DB.
Deletion of obsolete records happens several times per day and is automated by the Spooler.
You may place the DB on a different drive, this is recommended if your DB is large and
infrequently backed up and restored.
Managing your DB
These tools are available to control your FireBird DB.
Save and Restore save an exact copy of the DB and can be used for restoring in the event of
a DB outage. Backup... and Restore... are preferred.
67
Backup... and Restore... are used to bring the DB back to minimum size. FireBird does not
recover deleted space (but does reuse deleted space, so while the DB may not shrink, it has
room for additions). Backup/Restore recovers deleted space. Stop archiving prior to
Backup/Restore and Start archive when completed.
Delete file... and Create file... allow deletion of the entire current DB and replacement
with an empty DB. Stop prior and Start when complete. You should wait around 30 seconds
after Delete file... before pressing the Create file... command.
Settings
FTSpooler Settings allows changes to process control, logging information saved, and user
interface presented.
You need to restart FTSpooler for this to take effect.
Maximum number of processing threads regulates the number of jobs being
processing simultaneously. External process timeout (seconds) provides a timeout for
external processes. FTSpooler registers an error if control is not returned to it within the
specified timeout.
Logging is particularly helpful in determining problems and troubleshooting. Select one of
the Log level views:
• No logging - Do not keep the log records when running FTSpooler
• Normal - Keep basic log records when running FTSpooler
• Verbose - Keep detailed log records when running FTSpooler
Click on the View button to see the debug log file.
To configure FTSpooler's User Interface:
• Choose the windows start up status to be either Normal, Normal with an icon
on the taskbar, or Hidden with an icon on the taskbar.
• When updating queue properties, FTSpooler can Save changes in the following
ways:
• Prompt - reminder pops up to ask for whether or not to save the changes.
• Save automatically - changes are saved automatically without any prompts.
• Do not save automatically - changes are not saved unless the Apply button
is pressed in each properties tab.
• The field Initially in the archive show records that are no older than a certain number of days monitors the default time frame for the Archive when
starts up. This number affects the initial state of all the queries to the Archive.
68
More information on Default Time Frame in Archive see page 57.
Filters
This option allows addition or removal of filter(s), and management of the filter's properties
such as name, description, path and input/output type. Filters MUST deliver a modified
version of the input file back as output, otherwise you will get a Spooler error Filtering:
empty output file produced by process [C:\Program
Files\TCGIS\FTLabelPrint\FTLabPrt.exe] with arguments ….
Note: Do not register FTLabelPrint as a filter, it is an Application.
To add a filter:
• Click the New button
• Name the filter and provide a brief Description.
• Enter the Path to the filter. Path could be in absolute form, or relative to the
FTSpooler’s Installation Directory (%ftinst%) or any other directory specified by the ‘PATH’ System environment variable. For the purpose of maximum
portability it is recommended to place all executables in the %ftinst% directory and specify just the executable name (without path).
• Enter the command line Arguments. If you are not using the standard input and
output devices (Use standard input/output checkbox) the input and output
files are specified in the command line using “%1” and “%2” parameters. You
are responsible for correctly quoting the command line arguments.
69
• Initial directory is usually left empty. In this case it defaults to the executable’s
location.
• Choose the Input type and Output type from the dropdown menu.
• Check other options if applicable:
• Check status
• Require output
• Use standard input/output
• Hide console (will fail for GUI application)
• Hide GUI window (will fail for console)
• Click the Save button.
To delete a filter:
• Select on the filter to be deleted.
• Click the Delete button.
• Confirmation dialog box pops up.
• Click Yes to finish.
70
Note: The PostScript to PDF filter includes the Compatibility Level required, this is
supplied as 1.3 but can be changed to 1.4 as shown.
Run
This option allows addition or removal of process(es) that run simultaneously with
FTSpooler, but run independently. These processes are started by FormTrap at the start of
FTSpooler. Typical examples are independent delivery services, such as Prodocom Fax
Service which is a delivery “agent” on the same computer as the FTSpooler.
To add a process:
• Click the New button.
• Name the process and provide a brief Description.
• Enter the Path to the process. Path could be in absolute form, or relative to the
FTSpooler’s Installation Directory (%ftinst%) or any other directory specified by the ‘PATH’ System environment variable. For the purpose of maximum
portability it is recommended to place all executables in the %ftinst% directory and specify just the executable name (without path).
• Enter the command line Arguments. You are responsible for correctly quoting
the command line arguments.
• Initial directory is usually left empty. In this case it defaults to the executable’s
location.
• Check other options if applicable:
• Hide console
• Hide GUI window
Note: These are mutually exclusive, the application will either be: a Windows
program (in which case Hide console will cause an error) or a command line
program (in which case Hide GUI window will cause an error)
• Click the Save button.
To delete a process:
• Select the process to be deleted.
• Click the Delete button.
• Confirmation dialog box pops up.
71
• Click Yes to finish.
Data Input
File System
This option allows the user's application or a copy statement to write a file directly to the
queue folder.
To configure the file system option:
• Tick the Enable at start-up checkbox to enable the file system option at
FTSpooler start-up.
•
You need to Stop and Start as below for this to take effect.
• Alter the location of the Folder being watched if required.
• Click the Save button.
Start or Stop and Start the service and check Current state is Ready.
72
More information on Submit Queue via Network see page 84.
LP (Line Printer)
This option allows FTSpooler to listen for print requests from LPR clients (via the Line Printer
Protocol) and to act as the Print Server (LPD). FTSpooler also acts as a print server to
requests coming from a Work Station Customisation Object from AS/400 computers.
To configure FTSpooler to act as an LP server:
• Tick the Enable at start-up checkbox.
Note: You need to Stop and Start as below for this to take effect.
• Specify the port number to avoid Windows/UNIX conflicts. The port may be
changed to support client applications that use non-standard port numbers to
send print requests. Usually this option will not be changed with the default port
number (515) used by the Print Daemon. Contact Us for more information on
this feature.
• Click the Save button.
Start or Stop and Start the (File System/LP/Named Pipes) input service and check
Current state is Ready.
73
More information on Submit Queue via Line Printer see page 85.
Named Pipes
This option allows the user to pipe data from their application to a queue, provided the
application is able to directly use a pipe. FTSpooler generates a pipe called
\\ServerName\pipe\QueueName (where ServerName is replaced with "." (dot) if writing
from an application on the FormTrap server to the queue on the same machine).
To configure the named pipes options:
• Tick the Enable at start-up checkbox to enable pipes at FTSpooler start-up.
You need to Stop and Start as below for this to take effect.
• Enter the Pipe prefix.
• Press Save.
Start or Stop and Start the service and check Current state is Ready.
74
More information on Submit Queue via Named Pipes see page 84.
If you have other applications using pipes, you can prevent conflict by using more of the prefix
to uniquely identify FormTrap pipes. In this case, consider a prefix of "\\.\pipe\ft-" to identify
FormTrap pipes (ft- can be whatever you require). The final pipe name might be
"\\.\pipe\ft-invoices".
Delivery
Print Servers
This option allows the addition of print server(s) available for delivering documents from
FTSpooler. Printers installed on selected server(s) are listed. Individual printers may be
licensed using Printer licensing from the Delivery menu at screen left. Local printers are
ALWAYS shown.
More information on Printer Licensing see page 76.
To add a print server:
• Enter the Server name and click the Add to the list button. The list of Print
servers used to deliver documents is updated.
To remove a printer server:
• Select one of the print servers and click the Remove from the list button.
• Confirmation dialog box pops up.
75
• Click Yes to finish.
Printer Licensing
FTSpooler is licensed to a given number of printers.
The list of printers is copied from printer servers known to FTSpooler and must include one
local or networked laser printer with PCL5 or PCLXL (PCL 6) or PostScript driver. If you have
Version 7.1 or above, you may tick and print to other printers/drivers using the "Print to ANY
Windows Printer" option from files output as PCLXL using a filter. GUI drivers such as PDF
drivers WILL NOT WORK and will time out. GhostScript PDF conversion from PostScript is
provided.
76
Note: FormTrap produces print-ready files for laser printers and requires just the
physical address, hence you may choose just the one driver for a given printer
(say the PostScript driver) and print in PCL5 or PCLXL or PostScript to it.
Some older/deficient printers may not operate with Unicode, test files are
available within the Knowledge Base (keyword "Printer Test"). This DOES
NOT apply to the "Print to ANY Windows Printer" option which relies on the
driver. Observations on specific printers that fail are available form the KB
(keyword "Print").
More information on Print to ANY Windows Printer see page 31.
More information on Print Servers see page 75.
To configure printer licensing:
• Check the printers in the list that you wish FTSpooler to print to, up to the maximum number of licensed printers.
• Click the Save button.
Email
FTSpooler offers two e-mailing methods: Simple Mail Transfer Protocol (SMTP) and
Microsoft® Outlook/Exchange (MAPI).
To configure the SMTP connection:
77
• Enter the full domain name of the SMTP server in the Host textbox.
• Choose a login type from the Login drop down menu.
• For login options other than None, enter the User and Password to be used by
FTSpooler to log into the SMTP server when sending email.
• Choose an encoding type from the Encoding drop down menu.
• Enter a full email address in the Default sender textbox to define the sender
details for outgoing email.
• Click the Save button.
Note: Microsoft Exchange Version 7 has differences from earlier versions, you will
need to check these items in Exchange 7 and set them when installing or
transferring to Exchange 7.
Check and modify these in Exchange 7 (this information is offered as a guide only, consult
Microsoft documentation):
• In Authentication Properties tab enable Basic Authentication and disable
Offer Basic authentication only after starting TLS. TLS is the default for
Exchange 7 and is not supported by FormTrap.
• If you intend using an SMTPFrom name that is different from the authenticated user, give permission to Send As a different address. For details of how to
grant this permission, refer to the following Microsoft article:
http://technet.microsoft.com/en-us/library/aa998291(EXCHG.80).aspx
If you do not do this and set SMTPFrom different from the authenticated user, you will
get this error:
550 5.7.1 Client does not have permissions to send as this sender
To use Outlook/Exchange, the profile information must be available to FTSpooler. The profile
name is mandatory, password is optional and required only if the profile is
password-protected.
To configure Outlook/Exchange settings:
• Select the appropriate email profile from the Logon Profile list. No profile
listed means there is no MAPI profile configured. Create and configure a profile
on that machine before continuing.
• Enter the password for that profile.
78
• Click the Save button.
Application
Applications are delivery points for the FTSpooler. An application is a one-off procedure that
is started each time the FTSpooler delivers to it, and stops on completion. Most applications
are concerned with Fax delivery. As an example, the Prodocom Application runs each time a
fax needs to be delivered to Prodocom, delivers to the Prodocom Run task which is available
from the time the FTSpooler starts until it stops. The Prodocom Run task does the actual
delivery to Prodocom’s computers via a private and secure protocol, asynchronously.
To add an application:
• Click the New button.
• Name the application and provide a brief Description.
• Enter the Path to the application. Path can be absolute or relative to the
FTSpooler’s Installation Directory (%ftinst%) or any other directory specified by the ‘PATH’ System environment variable. For maximum portability we
recommend placing executables in the %ftinst% directory and specify just the
executable name (without a path).
• Enter the command line Arguments. If you are not using the standard input and
output devices (Use standard input/output checkbox) the input and output
files are specified in the command line using “%1” and (optional) “%2” parameters. %1 is the print file, with extension .pcl or .pclxl (PCL6) or .ps (Post-
79
Script). This name given in %1 can be used by your application to also open the
Associated File by substitution of .af as the extension.
You may specify other parameters on the command line using the [assoc file name]
format. For example, if you have an Associated File entry Netfax=123 456 7890 and
the application has a parameter –fNetFaxNumber, you can send it in this format as
part of the Argument line: "-f[Netfax]” (where the quotes are required as the data contains spaces). This delivers "-f123 456 7890” to the application. Arguments are normal
where individual delivery is required with fax applications being the most common. It
is your responsibility to test applications and especially variations in recipient data.
• Initial directory is usually left empty. In this case it defaults to the executable’s
location.
• Check other options if applicable:
• Hide console
• Hide GUI window
• Wait until finished
• Check status
• Use standard input/output
• Click the Save button.
To remove an application:
• Select on the application to be deleted.
• Click the Delete button.
• Confirmation dialog box pops up.
• Click Yes to finish.
80
More information on Queue Properties - Applications see page 31.
Delivery Monitor
The Delivery Monitor enables you to view which delivery engines are currently running in the
Spooler. It also enables you to disable one or more of the delivery engines. Reasons you might
want to do this include errors in the release of files to FormTrap, or a failing device within
your system, such as Email. This applies particularly where individual documents are
delivered individually. Once a process (such as Printing) is turned off, the scheduled jobs can
be managed from the Archive and either deleted or moved.
81
The Delivery Monitor can be accessed from Setup, Delivery, Monitor.
To disable a Delivery engine:
• Select the Delivery engine(s) you want to disable.
• Click the Stop button.
To enable a Delivery engine:
• Select the Delivery engine(s) you want to enable:
• Click Start
82
Submit
Submit Input Data for Job Processing
Once queues are created, you may produce and deliver FormTrap documents by submitting
data to the queue input folder or named pipe or by printing to the line printer (TCP/IP
printer). In addition you can drag and drop files with "*.txt" and "*.dat" extension to the
FTSpooler main Window, and drop directly into the required queue.
Activity Monitor
Activity Monitor shows the real-time job processing and delivery information, in brief, on
the pop-up right hand side panel.
To minimize the monitor panel, click on the
button.
83
A red light flashes indicating an error has occurred. Click to go to the Errors view of Archive
for troubleshooting.
Submit Queue via Network
Once the queue folders are shared on the network, you can process data with FTSpooler by
copying or writing the data file to the appropriate folder. FTSpooler automatically detects the
arrival of a new file in the queue and processes it.
More information on Configuring Data Input of the Queue see page 10.
More information on File System Setup see page 72.
If you give access via FTP to the queue folder, FTSpooler can then act as a remote document
gateway and take advantage of the system's delivery facilities over the Internet.
Submit Queue via Named Pipe
This option allows the user to write directly to FTSpooler using a pipe in place of a file, either
directly from a suitable application program or by using command line Copy statement. A
"suitable" application program will generally be a command line application, writing to
"standard output device".
84
FTSpooler generates the pipe \\.\pipe\Queue_Name for users to send the data into. "."
(dot) in the pipe refers to the current machine (on which FTSpooler is running).
For example, with FTSpooler installed on machine B with "pipe" in force to queue name
"Sample_Queue", FormTrap generates this pipe: \\.\pipe\Sample_Queue.
To write to this pipe from Machine A, this is the pipe statement:
\\MachineBName\pipe\Sample_Queue.
More information on Configuring Data Input of the Queue see page 10.
More information on Named Pipe Setup see page 74.
Submit Queue via LPR Printer
FTSpooler supports the Line Printer (LP) protocol by acting as an LP Daemon (LPD).
FTSpooler acts like a printer. The LP protocol is a special way of printing data across a TCP/IP
network and is most commonly found on UNIX systems, although it is supported by all major
network operating systems, including AS/400.
The LP protocol enables you to print a document located on one machine to a printer attached
to another machine on the network (a network printer).
More information on Configuring Data Input of the Queue see page 10.
More information on Line Printer Setup see page 73.
Printing from Windows Applications
In Windows-based systems create an LPR printer port for Windows applications to be able to
"print" jobs to an LP Server. These printers act as redirection tools so that applications can
print to the FTSpooler queues. It will help to think of them as "Virtual" printers as they have
no direct connection to a physical printer.
Before creating your LPR printers it is necessary to create the corresponding queues in
FTSpooler. The name(s) of the FTSpooler queue(s) will be used when creating the LPR port.
More information on Creating a FTSpooler Queue see page 4.
For Windows XP:
Ensure the following prerequisites are in place before you get started:
• You have the administrator rights.
• LPR Port is installed.
More information on How to Step Up an LPR Port on your PC.
• FTSpooler Version 5 or above is installed.
Configuration steps:
• Select Printer and Fax from the Start menu.
85
• Click on Add a Printer in the left bar.
• Click Next and choose Local Printer in the Add Printer Wizard. Do ensure
the Automatically detect and install my Plug and Play printer box is not
checked and click Next.
86
• Select Create a new port and then choose LPR Port from the Type of port
drop down menu.
• In the Name or address of server providing LPD text box, enter the IP
address of the machine on which FTSpooler is installed (e.g.192.168.0.1). In the
Name of printer or print queue on that server text box, enter the queue name
defined in FTSpooler. Click OK.
• Choose the printer driver according to the final destination printer, and then
click Next.
• Enter the printer name in the Printer Name text box. We recommend clearly
labelling this as a "virtual" FormTrap queue by using the following format:
Q_location to a MAXIMUM of TWELVE characters. Click Next.
87
• Select the Share as option and use the same printer name used in step above.
Click Next.
• In the Location and Comment window, enter related information and then
click Next.
• Select No on Print Test Page and click Next.
• Click Finish button to complete the installation.
Note: Setup process may alter for different operating system.
Printing from UNIX applications
These printers act as redirection tools so applications can print to the FTSpooler queues.
Before creating your LPR printers create the corresponding queues in FTSpooler. The
name(s) of the FTSpooler queue(s) are used when creating the LPR port.
More Information on Creating a FTSpooler Queue see page 4.
88
The following table splits the different UNIX-based platforms on which FormTrap runs
according to their basic printing subsystem. Use the table below as a reference guide when
setting up Unix Systems for use with FormTrap.
IBM AIX is a special case and does not fall under either category. Please contact us to
configure FormTrap to run on IBM AIX.
For a System V UNIX print subsystem:
89
For a BSD UNIX print subsystem:
Configuring Printers in your Application
Once you have created the LPR printers you must then create printers in your application to
directly output data to these "virtual printers".
To configure the printer in your application:
• In the printer setup of your program, create new printers to direct output to
FormTrap. These should have a meaningful name, or use the same name as the
"virtual" printer defined above.
More information on Printing from Windows Applications see page 85.
• For each printer, the device path settings must point to the appropriate LPR
printer just created.
Instructions on how to set up the LPR port in your PC
For Windows XP:
90
• Go to Start menu - Control Panel, choose Add or Remove Programs.
• Choose Add/Remove Windows Components and the Windows Components
Wizard pops up. Check Other Network File and Print Services option if not
selected, then press the Details button.
91
• There will be a list of available subcomponents of Other Network File and
Print Services in your PC, choose the one called Print Services for Unix.
Then click OK.
• Click Next in the Windows Components Wizard Screen to finish installation.
92
Associated Files
What are Associated Files
The Associated File is a powerful facility within FormTrap designed to allow
document-specific information to be extracted from a FormTrap form into a separate file at
run-time. Most often, the associated file is used to extract delivery details such as the fax
number or email address of the recipient, but can be used in conjunction with any user
process, either embedded (File and Output Filter processes) or external (written to output
and used by external programs).
How Associated Files Work
The Associated File is a simple text file containing entries in a name=value syntax. The name
is simply a field name used to identify the data contained in the value. For example,
[email protected] identifies the value [email protected] as being
an EmailTo field.
• Associated file entries may direct processes: archive=yes
• may provide data to a process: DocNum=PO60803
• or may both direct and provide data to a process: [email protected]
Within FTSpooler, there are a number of reserved names that are recognised and used for
delivery and archiving purposes.
See the full list of Reserved Names see page 117.
For example, at run time, a print stream maybe split into five documents. As the first of these
is formatted an Associated File is produced that contains the entry FaxTo=1 234 567 8900.
The name FaxTo is recognised by FTSpooler as requiring the document to be faxed to the
number 1 234 567 8900. This process is repeated for each and every document with FaxTo
in the Associated File.
FTSpooler recognizes the reserved names and delivers the document accordingly, however,
all names are recorded automatically in the successful or unsuccessful jobs archives with their
documents. You can carry out meaningful index data searches using Associated File Names.
You can also utilize user-defined names in any post-processing operations you may wish to
perform (usually in the optional write to file or output filter facilities). For example, you may
create index keys for long term archiving, or FTP details to aid in automated delivery of large
files to alternative printing facilities (e.g. mailing bureau) or even direct delivery to the
recipient.
Using Associated Files 3 Steps
To make the effective use of the Associated File facility, these steps are required in the
development process:
• Step 1 - Create new text objects in FTDesign to carry the Associated File fields
93
• Step 2 (optional) – Define appropriate identification and split rules in FTSplitDef
• Step 3 (optional) – Configure your FTSpooler queues with the correct Associated File handing options
Special Associated File names defined on forms are available to deliver documents by Email,
Fax and to File.
More information on Associated File Reserved Names see page 117.
Other Associated File entries may be used by your own procedures or simply to locate
documents from the FTSpooler Archive view.
Step 1 - Create Associated File fields in FTDesign
Text objects of the form ##A#name#data# generate one line in the output Associated File
(suffix .af, txt format in UTF-8,) and do not print. name may be a reserved word used for
delivery or may be your own name for your own purposes, data may be constant or taken
from input data. We recommend placing Associated File fields in an "impossible" area such as
in the detail area and in color and all together.
The examples below assume operation on a single document file produced via the Splitter.
More information on Associated File Reserved Names see page 117.
Example 1: Emailing the Document using Email Address from Input Data
A client email address within the input data can be used to email a form. At run time, an
Associated File entry is created that directs the Spooler to email. The reserved name
SMTPTo (there is a MAPI equivalent) directs the spooler to email via SMTP.
To Create an Associated File Field in FTDesign:
• Choose Text from the Draw menu or click the Text button in the toolbar.
• Click and drag diagonally to add the text frame.
• Release the mouse and the Text dialog box will open.
• On the Definition tab, type the associated file command and a sample email
address in the Text box.
94
##A#SMTPTo#[email protected]#
• Highlight the sample email address and click the Link Selection button as
shown above.
• The Link to field dialog box appears. On the field dropdown menu, select a
field name or click the Browse button to create a new field. The link field must
map the email address in the input data file.
95
• Click OK.
Example 2: Using Substitution
This builds on the previous example, except in this case the client’s fax number is not in the
input data file. The client's fax number is saved (once only) in a text file where the client
number replaces “xxxxx” as part of the file name – for example Fax-xxxxx.txt becomes
Fax-TCG01.txt . The content of the file “substitutes” into the Associated File field at run time.
One substitution file (.txt format, stored as UTF-8) containing their fax number should exist
for each client requiring fax delivery where the file name includes their client number (TCG01
in the examples).
To create a substitution file:
• Open Notepad (or other text editors such as Word or PSPad).
• Type in the Associated File commands in the Notepad. In our example, the formatted statement will be emailed to [email protected] or (second example) faxed to +61293105172.
Where substitution files contain characters above hex 127 (examples: currencies ¢ £ €
¥, symbols © ™ ®, foreign letters é Ö ß etc. or smiley faces) substitution files MUST
be saved in UTF-8 format (Notepad > File > Save as window, Encoding prompt,
96
UTF-8 from the drop down list).
• Save the file(s) into the Substitution Folder (Data folders, Add substitutions
files … from the menu bar).
• The text file name must include client identifier (e.g. include customer number
in the substitution file name). TCG01 in this example.
This is the Associated File text object to notify FTSpooler to deliver a fax to the client.
To create a variable substitution field:
• Choose Text from the Draw menu or click the Text in tool bar.
• Click and drag diagonally to add the text frame.
• Release the mouse button and the Text dialog box will open.
97
• On the Definition tab, type a sample customer number in the Text box.
• Highlight the sample customer number and click Link Selection button.
• The Link to field dialog box will pop up. On the field dropdown menu, select
the customer number field name or click the Browse button to create a new
field.
• Check the Substitute from file checkbox, Prefix is Fax- and Suffix is .txt in
our example. The full file name is then Fax-CCCNN.txt.
Note: Suffix, defining the file type, can be any file extension and is normally .txt.
Neither prefix nor suffix is mandatory.
98
• Click OK.
Example 3: Using Multiple Associated Fields
The Associated file may contain many fields. Furthermore, multiple identical reserved names
will either concatenate (for recipients) or subsequent same-named entries are ignored
(non-recipients). In the following example, two Associated File entries are created.
To add both the Associated File fields:
• Choose Text from the Draw menu or click the Text in tool bar.
• Click and drag diagonally to add the text frame.
• Release the mouse button and the Text dialog box will open.
• On the Definition tab, type the associated file commands for email address and
subject line, with provision to link to data.
##A#SMTPTo#[email protected]#
99
##A#Subj#Our invoice: inv-no against your PO: po-num is attached.#
• Email address is included as shown in Example 1 or 2.
Example 3: Using Multiple Associated Fields
This generates three sample entries, one each for Invoice, PO Number and Date. Refer to Step
3 for usage.
100
To Create an Associated File Field in FTDesign:
• Choose Text from the Draw menu or click the Text button in the tool bar.
• Click and drag diagonally to add the text frame.
• Release the mouse and the Text dialog box will open.
• On the Definition tab, type the associated file commands for Invoice and PO
Number in the Text box.
##A#Invoice#invoice#
##A#PO Num#po-num#
##A#Date#doc-date#
101
• Link the fields to data as shown. doc-date shows custom masking to produce
2010-05-14 as output.
Step 2 - Define appropriate identification and split rules in FTSplitDef
Configure FTSplitDef to identify the file and to split it into individual documents. Each
individual document can be then delivered to an individual recipient.
This step is optional and is normally used when a multi-document file needs to be split to
deliver to multiple individual recipients (e-mail, fax, etc).
Create a New Entry
A new entry is created for each different type of document that is recognized. The
identification, unwanted page and split rules can then be configured.
• Select New from the Entry menu or click Add new entry button.
• In the Entry box, give a meaningful name to the entry, such as document type.
• Set the Maximum number of rows per page of the sample data.
102
Note: For Records Mode Files, maximum number of rows per page is always 1.
• Click OK.
The new entry will appear in the bottom left hand corner of the FTSplitDef screen.
Load Sample Data
Load a sample data file to use as a test case:
• Select Load print stream from the File menu.
103
• Select an appropriate test case file in the Open dialog box and click the Open
button.
104
• The test case data file appears in the main window of the FTSplitDef screen.
Create an Identification Rule
The identification rule is mandatory and is used by FTSplitDef to determine the type of file
being processed. Identification is checked ONCE ONLY, within the first three pages, and the
ENTIRE FILE is considered to be that case. To repeat, you cannot use Identification Rule to
divide a file into components, the entire file is identified once only.
• Select the Identification rule button
• Highlight the text that will be used to identify the document.
105
• The identification rule and text used to evaluate the rule, are shown in the rules
window.
Create a Split Rule
Split rules are optional and are used to split a print run into individual documents. FTSplitDef
begins writing data to file until the first split rule succeeds. The file is then closed and
FTSplitDef begins writing a new file until the split rule again succeeds. It will do this until the
entire file has been processed writing separate files.
• Select the Split rule button.
• Highlight the text that you want FTSplitDef to evaluate.
106
• The split rule, its location, evaluation and the text used to evaluate, are shown in
the rules window.
• Two methods to detect the start of a document are commonly used:
• A change in the document number (as shown above), for which you must
change the rule evaluation to “Split on Change” (preferred)
• Field is equal to Page: 1, for which you must “Split on Match and check the
rule for “Equal to”.
Note: Check that Pages 10,11 … and 100, 101 … do NOT overlap on Page 1,
otherwise if they do overlap, test for Page: 1 with a blank following.
Create an Unwanted Page Rule
Unwanted page rules are optional and are used to identify unwanted pages such as line-up
pages and control totals.
• Select the Unwanted page rule button.
• Highlight the text that you want FTSplitDef to evaluate.
107
• The unwanted page rule, its location and evaluation and the text used to evaluate, are shown in the rules window.
Configure the Rule Evaluation
After defining the identification of unwanted and split rules, you may need to configure the
rule evaluation for each entry in the rule file.
• Select Evaluation Rules from the Rules menu.
• For each rule type, set whether all rules or at least one rule must be satisfied
before the action occurs.
• On the Split tab, select the correct Split on option.
• Click OK.
108
Save the rule file
Save rule file and transfer it to the computer where FTSpooler is installed (if Developer's Kit
and FTSpooler are installed on different computers). The location where the file should be
copied can be found or modified in FTSpooler Core components Setup.
More information on Rule Files Location in FTSpooler see page 65.
Configure Rule Evaluation
Double click on the rules to change the properties. Options for Comparison rules includes:
Equal to, Not equal to, Greater than, Greater or equal to, Less than, Less or equal
to, Empty, and Non empty.
Step 3 - Configure your FTSpooler queues with the correct Associated File
handling options
Once the rules for identifying and splitting the documents have been created, FTSpooler must
be configured to use the correct rule file.
Configuring FTSpooler settings to apply rule files
To configure FTSpooler:
• Open FTSpooler.
• In the Queue Window, select the queue you want to apply rule files on.
• On the Processing tab of the Properties Bar, select the appropriate rule file
from the Resolve drop down menu.
• The entries of the Rule file are displayed in the Formatting and Replication
box on the right.
• Double click on the first entry in the list.
• To add a form, double click on the required entry from the Formatting and
replication list, then click on Select forms to select a form from the drop down
list. More than one form can be selected, and the bottom tick box for “Form
109
name is embedded into the input data” covers that case (uncommon). Multiple
forms print in collating sequence of their names as complete sets covering the
entire input file.
110
• To add a queue, double click on the required entry from the Formatting and
replication list, then click on Select queues to select a queue from the drop
down list. More than one queue can be selected.
• Ensure that you have a form and/or queue selected for each entry in the list.
• Documents not recognized by the rule file are delivered to the –ID FAILURE –
entry. All entries in the Formatting and replication list are defaulted to fail
with an error message as they have no forms or queues.
111
• Click OK.
Configuring Associated File entry options
To configure the Associated File entries options:
• Open FTSpooler.
• In the Queues Window, select the queue you need to configure.
• On the Processing tab of the Properties Bar, you can see four options for
Associated File entries:
• As well as - all delivery method(s) (email/fax/print) specified in the Associated File as well as those specified in the Queue properties are used.
• Ignore - the Associated File delivery method(s) in the Form are ignored.
• Overwrite (recipients of the same type) - If the delivery method specified
in the Associated File and the delivery method specified in the Queue prop-
112
erties are the same (e.g. both email) then the delivery option specified in the
Associated File is used.
• Overwrite (all recipients) - Delivery method(s) specified in the Associated
File delivery options are used. If there is no delivery method (i.e. recipient)
specified in the Associated File, the delivery method specified in the Queue
properties is used.
Using Associated Files in FTSpooler Queues Properties
Associated file variables defined on forms are optionally available in queues tabs Email, Fax,
and File.
To use associated file values, place square brackets "[" and "]" around the associated file entry
name, e.g. [inv-name].
More information on Associated File Entry 3 Steps see page 93.
113
Configuring Associated File Variables in Queues Properties
The following field in Queues Properties accept Associated File Variables:
• Email tab, Title, Subject line, and Body.
• Fax, Cover page name, Subject line, and Body.
• File tab, File title.
The two following examples are provided to help you understand how to use associated file
variables in queues properties.
In this example "[month]" in the Subject line inserts the associated file variable value for
the name month (i.e. there is an Associated File line of the form "month=july"). The
recipient will see subject as "March Statement" or "April Statement", depending on the
associated file value.
The File title field in File tab accepts Associated File variables for both folder structure as
well as document name in either direct or [name] form. These are examples:
"F:\TCG\Sales\[salesperson]\[customer]\Dr[Invoice].pdf”
where the Associated File contained “salesperson=John-1001”, “customer=FormTrap
Systems” and “invoice=32245” giving this as the file name:
”F:\TCG\Sales\John-1001\FormTrap Systems\Dr32245.pdf”
“F:\TCG\Sales\[full path]”
where the Associated File contains “full path=Amy-1002\Widgit Brokers\Dr32250” giving
the result:
114
”F:\TCG\Sales\Amy-1002\Widgit Brokers\Dr32250”
Reserved Names
Associated file commands are entered into a text object in FTDesign using the syntax
##A#<name>#<value>#, where <name> is either a reserved command such as those
listed below, or Associated file command for use with archiving or other purposes, and
<value> is the field populated by the incoming data stream and/or constant text. Such text
objects are not printed by the formatting process, but instead placed line by line into the
Associated file. FTSpooler delivers documents using the delivery engine, activated by
Associated File reserved names. Each delivery engine implements a different way of
outputting formatted documents.
The standard delivery engines are:
Print
E-mail using MAPI (Outlook) or SMTP
115
Windows Fax Service
Output to directory
A complete list of reserved names is displayed below. Entry names are not case sensitive.
Note: 1. Associated file Reserved Names with no following values ARE IGNORED.
Hence an "SMTPTo=" will NOT be delivered to SMTP, it will be ignored.
2. Recipients on Associated File are accumulated. This is in contrast to
non-recipients where the first value only is used.
Examples:
116
Associated File Reserved Names
To see this table online, see
http://www.formtrap.com/enterprise/v7.5/manuals/en/associated_files_reserved_names.h
tml
117
118
119
120
121
122
123
Related Batch Processes
These separately-run programs update system information.
Home Locator changes the folder for the Spooler-specific files (indicated by "fthome") and
is normally changed to a separate drive as archive information becomes more extensive than
originally planned.
Settings Merger updates system files in response to a file sent from FormTrap Support and
Sales. This is normally number of printers upgrades, but may include the client name where
the client advises a change in ownership.
Version Upgrade is run when updating to differently numbered version of FormTrap
Spooler (eg v6 to v7).
Version Upgrade
Locate Components
Version Upgrade needs to locate the components of FTSpooler, such as queues, forms and
rules before it processes the conversion.
Components that may not be obvious include:
• Settings which are transferred from V6 registry files into the XML equivalent
in the Version 7.
• Archive transfers data from the V6 "successful jobs" archive (Microsoft DB) to
the V7 FireBird DB. Standard location for Version 6 is
C:\Documents and Settings\username\Application Data\TCGIS\Archive.mdb
Note: You must have the FireBird service running for conversion of Archive.
To locate components:
124
• Initially the Path column is blank (uninitialized).
• Click on the Locate components button. The Select Installation screen pops
up with a list of available Installation IDs which refer to the windows user IDs.
Multiple Installation IDs are displayed as the machine may have more than one
125
login. The Installation ID that last modified a queue is recommended, and
always listed first.
• Select one of the Installation IDs to show Components and Paths.
• Click OK.
126
• That path of each individual component can be changed manually. Use this
option if program cannot automatically locate components of if you want to
import data from alternative locations (for example backed up folders).
To edit the located components:
• Select on one of the components.
• Click on the Edit component location.
• Locate the component in the Browse dialog box.
• Click OK.
Note: Please note that the settings component represents user’s installation and
cannot be changed this way. To select different user installation please click
Locate components.
Forms Components
The Forms component is the previous Data Folder for FormTrap Spooler (regardless of
version). The normal location is:
127
..\Documents and Setting\username\TCGIS\FTDataRoot for versions 6.x, otherwise
..\TCGIS\FTSpooler\FTDataRoot for versions 5.x and earlier.
For old versions, the program will transfer the files, thus saving the structures and form name
association into queues (which would otherwise be lost). This transfers the logic of the
Spooler, even though Project files require (new FTDesign) Project, Build … with the built
file(s) loaded through (FTSpooler) Data folders, as below.
Version 7.1 can use 6.4 files without any subsequent Build or Reload forms. Earlier version
files cause an error message from formtrap.exe.
Convert Components
Version Upgrade converts the selected or all components based on the chosen configuration
file. To located the configuration file, manually enter the path in the location text box, or click
on the Browse button. For contingency purposes you are recommended to backup your
existing config.xml file before commencing with conversion.
To convert components:
• Click on the Convert all components button, or select on one of the components and click the Convert selected component button.
128
• The Conversion report shows the processes that are done.
Home Locator
Home Locator changes the address of the Spooler files and FireBird DB.
Before running Home Locator, please do the following:
•
(optionally) run Setup, Archive, Backup and Restore to compress the DB back to
the current record limit.
•
From Control Panel, Administrative Tools, Services, stop FormTrap Server
and FireBird (in that order).
•
Copy the folder C:\fthome\v7 to its required new location.
129
Home Locator is contained in the FormTrap, Spooler program group:
130
This window opens, showing the address of the current "fthome" folder. Select Change
home directory... and select the new "fthome" folder.
Restart FireBird and FormTrap Server (in that order).
Settings Merger
Settings Merger updates the spooler control files with new or replacement information and
is run whenever FormTrap Support or your vendor sends a new License Upgrade file to you.
License Upgrade is an executable which runs an InstallShield procedure which includes
stopping the FormTrap Server, running the update and restarting the FormTrap Server.
After running you should see changes to the Licensed to: display at the top of the FTClient
display in either or both of organization name and number of printers.
131
Registry Update to FormTrap Spooler
Installing .reg files under a 64-bit operating system
FormTrap comprises a 32-bit FTDesign module and a 32-bit (normal) or 64-bit (additional
cost) Production System.
For the 32-bit versions, you may be running on either a 32-bit or 64-bit machine.
We will occasionally send out Registry Updates to either FTDesign or to the Production
Systems (Enterprise or SBE Spoolers), you will need to select the correct version of
regedit.exe to install those updates.
32-bit program on 32-bit operating system
or
run the .reg file sent to you
64-bit program on 64-bit operating system
save the registry.zip file sent to you to the machine running that program, also save it
where you saved your original InstallShield program uploaded from the web site that
represents your current installation
stop the program or service
double-click the registry.zip file
click the .reg file shown to update your registry
restart the program or service
32-bit program run on 64-bit operating system - you must select the correct version of
regedit. The 32-bit version is in folder ..\Windows\syswow64\ Do the following:
unzip the registry.zip file sent to you and save the file on the machine to be updated,
also save it where you saved your original InstallShield program uploaded from the
web site that represents your current installation
stop the program or service
connect to the ..\Windows\syswow64\ folder
right-click on the Windows icon at screen left, Properties, open the Windows Command Processor at the top of the list for a CMD line (DOS Command)
key in the command regedit.exe <registry.reg>
restart the program or service
132
Other Add-Ons
Prodocom Fax
Using Prodocom Fax with FTSpooler Version 7
Prodocom provides faxing services for FormTrap clients who prefer not to get involved with
the infrastructure and hassles of managing their own faxing. FormTrap has been "handing
off" to Prodocom for at least 10 years with reliable service provided all of that time. The
handoff to Prodocom is via the Web and Prodocom provides an online monitor to see all of
your in flight faxes. The name "NetFax" is used to provide compatibility with prior versions.
Form changes (upgrade)
For forms that already use Prodocom (NetFax) no changes required as they already
incorporate the NetFax Associated File fields.
New forms
For new forms include at minimum the "NextFax" associated file field.
• ##A#Netfax#0293105172#
• ##A#Netfax#0293105172, Paul Green#
• ##A#Netfax#0293105172,, TCG Information Systems Pty. Ltd.#
• ##A#Netfax#0293105172, Paul Green, TCG Information Systems Pty.
Ltd.#
The remaining fields are optional:
• ##A#DocID#123454678#
• ##A#DocType#Purch Ord#
document identifier, use to track your jobs.
document type, use to track your jobs.
Installation
Prodocom is installed after FormTrap Server.
Have your technical staff "poke a hole" in the firewall to allow direct communication between
your FormTrap Server and the Prodocom Server. The port used is 6721. Prodocom's server
address is 202.92.68.243.
Stop the FormTrap Spooler server and install Prodocom. Restart the FormTrap Spooler
Service. Check that these two programs are running:
• Send Service.exe
• Rip2CompName.exe
These are Prodocom programs and communicate securely and directly between your
FormTrap Spooler Service machine and the Prodocom Server.
133
Track fax jobs
Use login name and password provided by the Prodocom to login to www.prodocom.com.au
and track the jobs.
Replace Filter
Note: This software is supplied with three months warranty, with no ongoing
support or charges. It is designed for single-byte encoding systems only.
Introduction
This filter is used to modify FormTrap input or output. Data to change is recognised by a
character string, with optional replacement of that character string. To delete, use " "″ as the
empty replace string.
Components
There are two components to the filter:
1. replace.exe - the executable program
2. replace.ini - stores character sequences to be identified and replaced and must be
in the same directory as the program.
Both are normally in the same %ftinst% folder.
Format of replace.ini
replace.ini is built in sections. Sections are set up in the following format:
[section]
"old_string" "new_string" all/first
Where
• section is a name to identify this operation;
• "old string" is the string to be replaced;
• "new string" is the replacement; and
• <all/first$gt; defines whether the replacement should occur on only the first
instance or all instances of the string in the file.
For example, a section to select output bin 2, normal on the HP 9040 with the optional HP
Q5693A 8-bin mailbox is shown below:
[OutputBin2Normal]"@PJL COMMENT" "@PJL SET OUTBIN=OPTIONALOUTBIN2\0D\0A@PJL SET
FINISH=NONE\0D\0A@PJL COMMENT" First
(all on one line)
Special Characters: Unprintable characters (eg. escape, form feed) are represented by
using a backslash "\" character followed by the ASCII representation of the character in
hexidecimal format. For example, the escape character is represented as "\1b" - any case for
characters a-f (A-F).
134
Multiple "old string" "new string" "all/first" lines may be provided and are inspected in the
order given. Already processed replacement strings are NOT reinspected.
Usage - Command Line
Command line is the norm for Unix/Linux and may be used for Windows outside of the
normal Spooler procedure. You can use "replace" on any file, outside of FormTrap. The filter
takes three parameters:
input file
output file
section name.
For example:
replace "c:\files\input.pcl" "c:\formtrap\output.pcl"
short
Installation within Spooler V7 via Setup
This is the norm for the replace filter, where each Section is a different filter within Setup.
Filters are normally invoked as External input (and MUST precede the "Western" filter)
or invoked as Post formatting filter for output manipulation (normally to drive special
features of laser printers).
Version 7 Installation, SBE and Enterprise:
Copy replace.exe and replace.ini to the %ftinst% folder.
Define each different required Section in Setup, Filters (see the manual page via F1 and
below) and invoke via Queues, Filters tab.
135
This is the Setup Filters screen for the filter to output to Bin 2, Normal for the HP 9040 with
HP Q5693A 8-bin mailbox attached.
136
Special Forms
This section gathers a number of article previously published in the Knowledge Base on the
website (www.FormTrap.com).
The articles describe and provide examples of special forms and documents that FormTrap
can handle.
CSV Output File
Comvita (NZ Medical Honey company) use a third party fulfillment system in Hong Kong to
fill orders and required an automated way to get the data from their QAD picking/invoicing
systems to the third party. After discussion with TCG we designed a form to pass the data to
the third party computer fulfillment system using Separated Files produced from FormTrap.
You can output a CSV file using the Associated File command, like this:
137
Here we construct Associated File lines with all of the fields required, starting with the ;
(semi-colon) separator (so this is strictly a semi-colon separated file). The same is done for
the initial "Header" portion and for each of the Detail and Comment lines as well. The Red
items are missing the initial #, hence print and are used for checking the output during
testing. These are taken out for production (subsequent provision in FTDesign to look at the
Associated File now makes the red lines redundant).
This is the output.
Spaces etc, can be removed if required by masking and there is no “maximum length” on the
output.
Please note these two items:
1. Headings are best done on the Trailer label (i.e. you get one record per input document). Details will be produced as they occur so are in sequence. This document
has no "trailer" so the Associated File records for Header and Trailer are duplicated
further down.
2. The first character in the “detail” section must be the separator.
Follow-up via Email from Customer, one month later:
Headers on a CSV file, only 1 required.
Hi Paul,
How do I prevent the HEADER from repeating if there are more than 1 pages?
We should only get the HEADER on top of page 1.
Cheers
Comvita
=================================
From: paul [mailto:[email protected]]
Hi Comvita,
Use Print Rules to do this only for "Page: 1" (on both Header fields).
138
=================================
Hi Paul,
Job done!
That was so easy thank you very much.
Cheers
Comvita
QAD Forms in Chinese
This covers implementation of a form in Chinese for a Western company with a Chinese
manufacturing branch, wanting to place orders on other Chinese companies in Chinese. The
example used was Australian company AUSTRAL GROUP who have kindly allowed their
example to be used in this tutorial.
The ?? (Gweilo – Google it) designing the form does not understand Chinese but has someone
who does that he can refer to for a final validation.
Preparatory Work
You require two identical data files, produced using a “locale Chinese”, one with English and
one with Chinese literals. These are output by the QAD “standard report writer” with items
below the line turned off (i.e. without any PCL or other printer language inserts). The files are
run through the Spooler, with the Input Filter “Chinese (936)“ applied, then saved back into a
folder as “filenameC UTF-8.txt” (Chinese) and “filenameE UTF-8.txt” (English).
All form design is done on an English locale machine. The original English file is used to
recognize data, with filenameC UTF-8.txt used to copy literals. Most sites will require both
a Chinese and English version of the form. This is the Spooler setup for UTF-8 conversion:
139
General tab, Archive and Treat absence of recipients as an error:
and the Filters tab:
140
Repagination
In FTDesign, load the original Chinese file (Tools, Load data file ...) with
Custom,
and select Chinese (936) to Unicode as the load parameters:
Repaginate by comparing to the Notepad view of the English UTF-8 file. Results are shown
below:
141
Form Constants
Take these from the same position on the report via Copy from the Notepad Chinese version
and paste via Ctrl+V into the literal on the FormTrap form. See below for illustration:
Notepad, cutting the literal "Order Number" in Chinese:
FormTrap, copying "Order Number" in Chinese (use Ctrl+V):
142
Special characters and strings, such as page number are shown here, this field is shown below:
This is "accepted" format for Chinese equivalent of "Page 1 of 2" in English.
These are other "constants" you may require in the finished output:
"Brought forward"
"Carried forward to Page 2"
Other can be taken from the PDF but please ensure the finished form is checked carefully by a
person educated in China.
Other "Substitution" Translations:
143
This form had a number of literals, for which Chinese translation was required. These include
Units of Measure, Final (and while not done in this instance) Terms and Freight Terms.
Literals for "Units of Measure" (UoM) were supplied in Spread Sheet format, see below, and
Cut and Pasted into individual .txt files for use as substitutions. See the screen shots following
for details.
In the form, substitution of the literals from the Substitution .txt files is shown in this screen
shot:
144
Multi-Page Forms
FormTrap is capable of generating contracts using either sub-forms to move between pages or
using detail lines to move between pages. Note that FormTrap was not designed to operate in
this way, but does a great job provided the bulk of the contents do not vary by more than a few
lines for each page. If you are inserting long blocks of text from data then you may end up with
“short” pages.
We supply better products, including Forms-on-Demand which is designed to allow form
design as well as "filling-in" on computer, saving both the data and a PDF of the document.
Form-on- Demand allows for logic within the form and is specifically for manual computer
data entry, whereas FormTrap is designed for automated operations.
Using Sub-Forms as Pages
These are the recommendations for sub-forms as pages, with a limit of 9 pages (one for each
of the available sub-form letters, plus the Base Page).
Please look at example files by downloading the “Multi-page Subforms.zip” file, unzip it and
open documents and read along with this, starting with Multi-page Subform.frm. Note that
this used Records Mode, but that the same thing is possible (a little more difficult) using Print
Line Extract.
1. All data is carried in the Base Page record - we've shown it on the form in red, but
for most contacts you will not want to have a Base Page for a contract. Typical data
elements are compnay names, abbreviations, person names and titles, addresses,
dates, products and amounts.
2. Base Page with Copy Control as shown for duplex contracts.
145
3. Each sub-form fills one page and (apart from the first) has these attributes:
4. Your Document Maximum Pages with this approach is 9 pages. To see the results,
please load the supplied .asc file into your spooler, set the queue up like this and
view the archive to see results:
146
Using Detail Lines as Pages
The same approach can be used with detail lines if you require a document beyond 9 pages,
giving a maximum of 35 pages (9 sub-forms plus 26 detail lines).
You would adopt the same approach, with this as the detail:
In Records Mode, details and sub-forms can be mixed and appear in the order of the file.
Please Load and look at the second set of form and data with the name "Multi-page Subforms
and Details" for an example.
Personal Emails
Klinger wanted their Order Acknowledgements to be immediately directed back to customers
via a PDF Email, and wanted the person responsible for the order to be the “From” email
address. Klinger believes this both enhances communication as well as keeping the Klinger
staff members “in the loop” with their clients.
In FormTrap this is simple, PROVIDED two pieces of data are present in the incoming data.
These are:
either the Client Email address or the Client Number (see below) to select the email address
for the client;
147
and the Klinger Employee email address or Employee Identification (see below) to select
the From email address. In Klinger’s case this is the employee initials. Substitution uses
known data to access and insert other data (identified by the known data). In this case Client
Email is identified by the Client Number and Sender Email is identified by Employee Initials.
These are typical examples, showing the actual screen shots from the FormTrap Developer’s
Kit that provides the data source to FormTrap:
“billto no” is inserted between prefix and suffix to give file name: SMTPTo-122334.txt (for
Customer 122334), content is the email address of the client.
148
Similarly, Employee Initials are used to form a file name containing the correct Email Address
for SMTPFrom as shown below:
“salesper[1]” is inserted between prefix and suffix giving this as the file name: SMTPFrom
WPG.txt (from WPG as sales person’s initials).
Populating the required substitution files for both the client email addresses and the Klinger
staff email addresses completes the exercise. Email address are simple .txt files and can be
automatically transferred from other systems.
The result for Klinger is a personalized email, from their sales staff, member, produced and
sent within seconds of completing the order. This provides better customer service, early
detection of errors and their correction and better intercompany communications – and all
fully automatic under FormTrap’s control.
149
Poster Printing
FormTrap is ideal for poster printing as you can manipulate the image sizes, overlay them and
produce a high quality resulting document combining text and graphics. The resulting image
can be attached to other documents (for example, to emailed invoices showing specials for
this month) and sent at no cost to all people receiving emailed invoices.
Similarly, direct emails to prospects can be quickly organized in-house and distributed via
FormTrap given a "data file" containing their email addresses - or you could split and send
similar or related materials to their last purchase.
The poster attached represents a typical PDF document, with finished size around the 850Kb
mark which delivers a high quality output document, either printed or visual.
Contracts and Other Documents
This description is based on a requirement to send a contract with every PO sent to suppliers.
The contract terms and conditions is in two columns and does not vary.
We used the Repaginator to append controls for a new document called “Terms” behind each
PO document, then reverting to the original form for the next document, and so on.
Repaginator
This is Append with Text set to initiate the new form. What the controls represent is shown
by the blue arrows:
Note: The Append with Text set must NOT be used when testing the form as these
will cause the PDF creator to crash. The form can be tested individually but
the entire set of forms can only be tested using the production system.
150
Terms Form
The “Terms” form is set up as attached. In this case the Base Page contains just the heading
and footers, while EACH SIDE is set up as one Detail Record. I have shown the first Detail-A
page, with the numbered terms split into two columns, and the bolded headings set up as
separate objects. The first line of text for each section starts after the terms heading which is
bold, and must be spaced past the heading “by eye”.
This is the text for the first paragraph, with the initial spaces enough to clear the bolded
heading:
You will need this as a .txt file to test the term form:
151
You MUST also set up this as shown in Tools, Options:
To test the entire set:
1. Insert the Append with text lines as above.
2. Build the project with Project Settings quoting the above Unicode subrange.
3. Load the forms into FTSpooler and test the entire set(s) there.
Quantity Masking - Whole or Decimal
This question comes up occasionally, particularly with ERP systems where the excess
decimals are there to cover all bases and are rarely used by most of the FormTrap customers.
This particular data file has four decimals of quantity. Most quantity data is whole numbers,
with the bulk of the remainder having two or less decimals. Four decimals occurs usually
where the quantity involves "1/3rd" and "2/3rd" type values where expression in decimal is
recurring and the additional precision is not useful.
This example form prints the detail lines only, showing whole numbers without decimals, and
decimals to their last non-zero digit (the better alternative is to round to two decimals).
152
This is how you do it:
1. Define three fields:
Entire field
Decimal portion only (incl. the decimal point)
Whole Number portion only
2. Make your value in the Definition Tab over 1,000 so we can align with the next
field (in red in the example).
Use conditional printing to print Whole Numbers, aligned right. The Print Test is Decimal Portion Equal to (text) ".0000".
Masking for this is Amount/Numeric.
3. Make your value (Definition tab) a number that includes the same value as the
above for alignment (blue in the example).
Use conditional printing to print the entire field, aligned decimal. The Print Test is Decimal
Portion Not Equal to (text) ".0000".
Masking is "Custom", and comprises a field of the same length as the original, ie 14
underscores, with two trailing decimal positions masked right, thousand separator commas inserted for alignment, and the first 8 underscores masked left (this leaves "0.12 as
the minimum value printed).
(Alternative is to use Amount/Numeric and define the field as "Use input separator",
with two output decimals which rounds the decimal portion).
4. Finally and at high magnification, align the whole numbers on top of each other,
using the arrow keys and Nudge distance of 1 for final alignment.
A PDF from the example form and data file shows below:
This question was put by Scholle Corporation who uses FormTrap globally and have policy
decisions on "rationalization" of their computer outputs - such as this one.
153
Salutation Masking
Salutation masking from generic files with Last Name and optionally containing Title, Initials
and First Name presents problems for the user, especially if the local "rules" are intended to
provide the most "acceptable" salutation for the addressee.
This is the data file we'll use, it contains all of the possible variations for a total of 8 different
combinations.
We'll use Conditional Processing to identify the different combinations, and to provide the
"best fit" salutation from the available data. Note that unless we have no Title, the II
LastName format is least preferred.
The Form Definition is attached, and the required output is shown below, with its original
data. You will need to look at the Conditional Processing rules (Print Rules tab) for each of the
objects, which are overlapped and shown in different colors.
154
Widow/Orphan Size
The Widow/Orphan size element of a label can be used to check for enough room to print
the trailer information on the last page. For instance, if we want the detail box to extend to the
bottom of every page, except the last page where the trailer information will print at the
bottom of the page.
To do this we need to have a test label. The test label is the last label called and is used to
check for sufficient room at the bottom of the page for the trailer information to print. If there
is not enough room, FormTrap breaks to a new page and will print any remaining information
on the next page.
To do this we:
1.
2.
3.
4.
Select Add Label from the Define menu.
Give the Label a Name, Layer ID and Height.
Set the Widow/Orphan size to the size that the Totals information occupies.
Click on the OK button.
Writing Letters
Dunning and follow-up letters are a key part of managing your financial exposure, especially
in hard times like right now. FormTrap is an effective and excellent letter writing tool,
allowing a variety of letters of different tones from a very simple data file.
This is how it’s done:
Data Extract from your DB
For most letters, this is all of the information you’ll require, printed as a small document or as
a records mode file in the Base Page record:
Company Name and Address
Person being written to (or a standard title like “The Accountant”)
Amount outstanding
Date of last action
Date of next action
Employee Number
In addition, you’ll require these two indictors (for Records Mode make them additional
one-character records):
Letter Type – indicates the text required and variables to be inserted – done in Form Design
rather than here as part of the record/variable.
Closure type – allow for a signature, Name and Title only format, plus the above with an
Email address. Again, done in the form design, with just an indicator/record letter here.
155
Form Design
There are two simple design elements, being the Base Page and the one or two Closure Detail
Records. Base page contains the date and customer address and looks as below:
The “Closure” Detail Lines contain just the Employee field and get their data from
substitution files, where you can set up new employees without changing the FormTrap form,
or even set up “dummies” for certain letter events – like the threat to pass their details to a
credit agency.
This is a typical “Closure” Detail Line:
156
All of the information (in the above, the signature and below, employee details), are
Substitutions based on Employee, here are the text substitutions:
The above produces the file name “NameXXXX.txt” with employee number replacing the
XXXX. The data from the matching file name in the Substitutions folder is inserted. These
are a few of the substitution files with an example:
157
Letter Texts:
These are again just detail lines, which can incorporate data and use the special Advanced
tab to define themselves as Variable height and to allow Whitespace after the final line.
Data from the Base page is incorporated into the letter text as are required substitutions (see
«employee» used to substitute this person’s extension number).
158
Your Data Extract program then simply needs to provide for the correct letter type and
closure to print a large variety of letters. Financial institutions can use this to direct
personalized and sophisticated letters from a simple “extract” source to provide letters that
look individually written and can direct their replies to a person or function within the
company.
This document is available (Version 7) with appropriate substitutions and data file from
Downloads, Tutorials.
Samples follow:
159
160
161
Fax from your ERP System
Most Unix ERP systems have methods to present faxes as the normal document, with
preceding cover page. In the NDS ERP system, this appears as shown below (Invoice with
preceding fax cover sheet).
From this output we require the normal invoice but with it's preceding cover sheet, in the
same file, for conversion to TIFF format and faxing. For this case, we'll create a Cover Sheet
Form, with company substitutions operating in exactly the same way, based on the Location.
This is how it is done, identifying the points at which changes are required to your FormTrap
processing.
162
New Fax Cover Sheet Form
This form is a simple one, comprising Base Page fields only, with the "WK2Fax" associated
File line to direct the output fax. This is how it's defined (see later for the print version).
Repagination for the Fax Form
This needs to be added to the normal repagination, in this case the Invoice Form. This is how
it's done:
1. Load the Invoice repagination, but with the Fax plus Invoice data. It will be "out of
whack" on the first page and you'll need to move the Header and Detail portions
163
down as shown to repaginate correctly.
2. (After moving all other areas down), add a new entry (Insert, Entry ...), and define
the entire Fax as the header. Now go to Edit, Order of entries ... and move Entry
(2) to Highest.
3. For Entry (2), select Properties ... and replace Append with text: with this line:
##F#formname# - this starts a new form once the first form has finished, in this
164
case enter ##F#INVOICE#. Tick Form feed at the end.
4. Finally test the Repaginator, where output should look like this:
165
Testing the Fax Form
When running Tools, Preview (b&w) you will get this message from FTDesign indicating
the INVOICE form definition cannot be found.
However you can view the Fax form via Tools, Preview files and look at out.
This is the final output from FormTrap run through the Production System:
Production System Changes
You will initially need to split to a Fax queue (as individual documents as each requires it's
individual delivery) in which you then identify by the following document type and invoke the
correct version of the Fax form with different repagination for each of their associated
documents. The best way is to repeat the fax form with different repaginations and name
them (eg Fax-Invoice form). Do this for all faxed documents, in the same queue. For these
forms and example data files, etc., please download by clicking here.
166