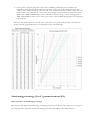
1
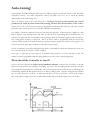
V006 A Guide to PID Control for Sous Vide Cookery FRESH MEALS SOLUTIONS SousVideMagic PID Temperature Controller For Precision Sous Vide Cooking Model: TM-1500D RELEASE 2, JULY 18, 2011 Authored by: Peter Black (Australia), Dr. Peter Gruber (Switzerland), Frank Hsu (Canada), Robert Jueneman (United States) Send all comments to: [email protected] Introduction ―I AM A BUSY CHEF AND I HAVE ENOUGH PROBLEMS JUST LOOKING UP ALL THE TEMPERATURE AND TIME TABLES TO COOK SOUS VIDE, WHY SHOULD I BE BOTHERED WITH PID?‖ The most important aspect of sous vide cooking is the stability and accuracy of the constant temperature bath. Our engineers, with a given cooker, will have no problem tuning SousVideMagic™ (SVM) to hold temperature within 0.1°C stability. But not everyone is a process control engineer. That’s why we have given you the PID auto-tuning tool to help adapting your SVM to work with your cooker to the best of its ability. The beauty of the SousVideMagic approach is that there is no restriction as to the type of electric cookers you can pair with SVM, provided they are not ―smart‖ cookers with their own controls. But there will be instances where the PID settings derived by Auto-tune may not be refined enough for your liking. Some understanding of PID will help you further adjust the PID settings for better sous vide performance meeting your personal preferences. A PID temperature controller is essentially a precision thermostat with a control mechanism to correct errors that cause a deviation from the desired temperature. By comparison, regular thermostats like those found in most domestic appliances are simply on/off control devices. For this explanation we assume that we are controlling an electrical (resistive) heating device. With a simple on/off control, once the set temperature (Set Point) is reached, power is cut to the heating element. However, because the heating element is still hot the temperature continues to rise until the latent heat of the element is dissipated. When this happens the temperature starts to drop until a certain point somewhere below the Set Point is reached, whereupon power is applied to the heating element again. This has the effect of big swings (overshoot, followed by undershoot, and sometimes a continuing cycle of oscillations) in temperature around the Set Point. For most kitchen applications (or for the air-conditioning in your house for that matter) these swings do not make much difference and may not even be noticeable. With sous vide (SV) cookery the variance of only 1°C or 2°C can have a noticeable impact on the finished product. A PID Controller helps to overcome these swings. Unlike a simple thermostat, which has only the Set Point as its single parameter, a PID controller involves three additional parameters. These are the Proportional, the Integral and Derivative values. The Proportional (P) value determines the reaction to the current error. In our application this refers to the number of degrees below the Set Point at which the power to the heating element will start to be reduced. The effect of having proportional control is that instead of power to the heating element being applied continuously until the Set Point is reached; it is slowly reduced from 100% power to zero as the measured temperature gets closer to the Set Point. The Proportional value is measured in degrees (Celsius or Fahrenheit), and specifies the temperature at which the proportional decrease begins. For example, if the Set Point is 60°C and P = 10, then power will be begin to be decreased beginning at 50°C. To achieve the same effect when the unit is operating in the Fahrenheit mode, it is necessary to multiply by 9/5 or 1.8, or P = 18. The Integral (I) value determines the reaction based on the sum of recent errors, and is measured in seconds. What this means in practice is that the longer the temperature is below the Set Point and the further away from the Set Point it is, the more power is applied to the heating element. Basically, the ―I‖ value specifies how long the averaging period should be. The effect of decreasing ―I‖ is to cause the Controller to try to reduce the offset more quickly (stronger I action). However, although with a low ―I‖ value the offset will be reduced more quickly, it can also have the effect of increasing the resulting overshoot and may even cause oscillation. On the other hand, if the ―I‖ value is too high, the unit may never come up to temperature fully, but instead may stabilize at one or two degrees too low. With ―I‖ set to zero there is no reaction in the controller to integral differences – the controller acts as a pure Proportional controller. Counter-intuitively, nearly the same effect is obtained by specifying a very large value – almost nothing happens. On the other hand, an ―I‖ value of 1 will have an absolutely huge effect. Logically, the ―0‖ value should be thought of as ―infinity,‖ but that would be difficult to enter on the digit selection! The Derivative (D) value determines the reaction based on the rate at which the error has been changing. The ―D‖ value alters the speed at which the controller reacts to a sudden change in temperature (disturbance). This is useful to get the temperature back to Set Point more quickly after adding cold food to the bath. It can be viewed as, ―how quickly should I try to overcome this rapid change?‖ A small value in ―D‖ will mean that the reaction of the controller will be to attempt to counteract the change for a shorter time. If the ―D‖ value is too high it will attempt to correct the temperature for a longer time so the outcome could be overshoot, where as if it is too low it may take too long to compensate for the initial error. Just to confuse matters further all of these outcomes are considered separately, but when added together to adjust the heating element the outcome is often unpredictable and the process of optimizing the values sometimes becomes a trial and error effort. SousVideMagic™ TM-1500D has a PID auto-tune feature; you might ask why the user needs to understand PID at all. No matter how smart the auto-tune software is written, the results may not be perfect and further PID refinement by a human may be necessary for better temperature control to fit your particular goals and preferred cooking style. For example, if you customarily add the food to the SVM at the same time that you start the heating up the water, then there will never be any sudden drop in the bath temperature, and hence no reason to worry about a D value. You can set D to 0, and then try to optimize the P and I values so that the water bath temperature stabilizes as quickly as possible, but without any overshoot. On the other hand, you might control a SVM with an electrical timer so that it will turn on at 4:00 PM, so it will be up to temperature before you come home from the office. Then you might want to throw in a pre-bagged frozen steak, and you would like the steak to thaw and come up to the perfect sous vide internal temperature as quickly as possible, and then stay there until your guests arrive and you are ready for dinner. In that case, a mild degree of overshoot in the temperature of the water bath may actually be beneficial, because the heat still has to penetrate to the core of the steak. One way to optimize these values is to use an external thermometer probe inserted in something that is the equivalent shape and thermal conductivity as the food you intend to cook. Since you probably don’t want to ruin a steak by putting it in the water without a bag, you can cut a potato to the same thickness as the steak, and insert the thermometer into the edge of the potato. The thermal conductivity of the potato and a steak are close enough for most purposes. Note: Heat always flows into the center from the sides, so it doesn’t matter whether the steak is a small filet or a huge rib-eye, if they are both the same thickness and relatively flat, they will both come up to temperature in the same amount of time. Now, if on the other hand you were cooking a baseball or a rolling pin that would be different matter! Also note that the cooking time increases with the square of the thickness, so a thick 50mm steak will take four times longer to come up to temperature as a thinner 25mm cut There are guidelines in this document to simplify the process of getting it right for your situation. PID Control for Sous Vide Cookery SousVideMagic™ TM-1500D PID Temperature Controller If you are using SousVideMagic™ with a rice cooker, the SVM’s default PID settings (14F,800,40 or 8C,800,40) are generally adequate for most sous vide cooking situations. Here is what we recommend you should do with your cooker: PID tuning strategy: 1. Use the default PID settings first to cook some sample food pouches. A 1 to 2% (1°C to 2°C) initial overshoot is quite acceptable and if the settings are appropriate it should soon settle to your desired set temperature. 2. If the temperature stability is not adequate, you should first try to use the PID settings suggested for some of the cookers listed in Table 1 (Recommended PID Parameter Values) in the SVM 1500D User Manual. 3. If you don’t want to manually adjust the PID settings, Auto-Tune is the next thing you should try. 4. In order to perform manual PID tuning or further refinement of the auto-tune results, an understanding of PID controller tuning is required. How to best tune a PID controller depends upon how the process (temperature bath) responds to the controller's corrective efforts. Processes that react instantly and predictably don't really require feedback control at all. A car's headlights, for example, come on as soon as the driver hits the switch. No subsequent corrections are required to achieve the desired illumination. On the other hand, the car's cruise controller cannot accelerate the car to the desired cruising speed so quickly. Because of friction and the car's inertia, there is always a delay between the time that the cruise controller activates the accelerator and the time that the car's speed reaches the set point. A PID controller must be tuned to account for such lags. Auto-tuning: SousVideMagic™ (SVM)'s most powerful feature is its ability to regulate virtually any electric cooker with stable temperature control. For stable temperature control, the SVM needs to be set to match the thermal characteristics of the cooker being used. That is, it must be tuned to the cooker being used. Tuning is the process that matches the control parameters (P, I and D) of the SVM to the heating and heat loss characteristics of the cooker. SVM is tuned to the cooker when its memory is programmed with values that effectively tell it how fast that particular cooker warms up and cools off, and how efficiently it transfers heat. For example, consider the difference between a heat lamp and a hot plate. When electricity is applied to a heat lamp it begins to heat instantaneously, and when it's turned off it stops heating almost instantaneously. In contrast, a hot plate may take several minutes to begin heating when the electricity is applied, and even longer to start cooling when electricity is turned off. But to do this it must be programmed with the correct time constants, which describe how fast the heater heats up when electricity is turned on and how fast it begins to cool when it's turned off. These time constants are called the tuning parameters. In some circumstances (especially with high wattage heater, well-insulated cookers) the SVM may also need to be set to attenuate the power output to reduce overshoot. Every type of cooker has its own unique set of optimum PID parameters. For the controller to heat with stability, it must be programmed with the tuning parameters for the cooker currently being used. When should the Controller be tuned? If your cooker is not listed in the Table 1 of the 1500D User Manual of our pre-selected cookers, or the PID parameters we provide are not working to your liking, you can use the auto-tuning function to let the controller to determine the PID parameters automatically. The auto-tuning function (it’s often known as self-tuning) can automatically optimize the PID parameters for your chosen cooking system. The auto-tuning function will heat up your cooker then let it cool down. It will repeat this heat/cool cycle several times. Based on the response time of the whole cooking system, the controller will calculate and set the PID parameters for your cooker. Before using the auto-tune function, you must set the cooking equipment up in the exact configuration in which it will be used. For example, to tune a rice cooker, place the sensor in the room temperature pot filled with water and plug the cooker into the controller. If the cooker has its own thermostat or power control, turn both as high as they will go. If you think your cooker’s heater is too powerful for the task on hand, set the SVM controller to the appropriate power output level (Level 3’s SLA parameter). Turn the controller and cooker on, and then enter the desired set point temperature close to your normal cooking temperature range. The amount of water in the pot should be what you would use normally. Basically, you must set up your cooking system to be as close to your actual cooking environment as possible. If you cannot decide what power output level and set point temperature to use, you should start with the default values: 100% and 60°C (140°F) respectively. To activate auto-tuning, just enter the Level 2 menu’s AL1/ATU/PID setting mode. Set ATU to 1 to start tuning process. The Auto-tune red LED indicator will be flashing throughout the whole tuning process. You will see both the current water bath temperature and set temperature being displayed indicating that auto-tuning is in progress. When the Auto-Tune indicator stops flashing (this may take several hours, depending on the thermodynamic characteristics of your cooker), the auto-tune is finished. Now, the newly calculated PID parameters are set and used for the system. The new parameters will be maintained in the memory even when the power is off. When auto-tune is finished, SVM will be automatically put in heat control mode, you don’t need to do anything. Note: You should always write down the current PID parameters before changing any parameters or perform auto-tuning. This way if something goes wrong, you can always go back to your old PID parameters by reentering them manually. The duration of auto-tuning depends on how fast the system is responding to the heating and cooling cycle. If the temperature of the cooker takes a long time to drop—when heater is off—auto-tuning could be a very long tuning process. This is especially true with a well-insulated cooker. The auto-tuning should be able to tune most cookers available with fairly good result. However, the auto-tune function cannot read minds! It doesn’t understand your habits or preferences, or what you are cooking with the SVM. Tempering chocolate at 82°F is quite different from cooking corn on the cob at 185°F! It is therefore recommended that you should use the recommended default PID settings for a new cooker, before trying auto-tuning. Using the auto-tuned settings together with actual usage experiences, you can further finetune the PID parameters manually for a better result. If you understand PID parameters well and are experienced with PID tuning, you can combine both human intelligence and auto-tune logic to derive the best PID settings for optimal performance in your particular environment. Another important thing we like to stress here is that if you just don’t want to learn PID, we have a world-wide network of very experienced SVM users who can help you with tips and guidelines, and very often with their own proven PID settings. Just email us ([email protected]) and we will spread the word. Manually tuning the SousVideMagic™ Some process control terminology: PV (Process Value) - it is the current bath temperature (BT) and often known as controlled temperature. SP (Set Point) - it is constant bath temperature you want to achieve. It is often known as Set Temperature. ST (Set Time) - it is the duration time in hh:mm format for holding the Set Point (SP) before turning on the alarm in a normal case. SVM 1500D is designed with food safety considerations, so when timer is up, the system will trigger an alarm, but will continue to hold at the set temperature indefinitely. P: Proportional band (˚C or ˚F) Range: 0° and 1° to 50° (from software version R5 up: 0.0° and 0.1° to 50.0°) If a P value is set and I and D = 0, SVM becomes a Proportional controller. Very often you will find that just by using P alone you can hold a constant temperature bath within 0.5% accuracy. This is especially true with 1500D R5 and newer, allowing decimal P values, and with the FreshMealsMagic with minimal thermal inertia, in conjunction with SousVidemagic™’s use of the thermistor sensing technology. If P=0 (irrespective of any value in I or D), SVM becomes a simple on/off temperature controller. In practice, this setting is never used, because it just cannot control a constant temperature bath with enough precision for sous vide cooking. Proportional band (P) is defined as the band measured in ˚C or ºF from SP where heating action is applied in proportion to its deviation from set point (SP). For example, SP = 70˚C (Set Temperature) P=10˚C (Proportional band is 60˚C.. 70˚C.. 80˚C) When Bath Temperature BT=50ºC; outside P band: 100% heat is applied. When BT=61˚C; 10% inside the P: 90% heat is applied. When BT=65˚C; 50% inside the P: 50% heat is applied. When BT=66˚C; 60% inside the P: 40% heat is applied When BT=69˚C; 90% inside the P: 10% heat is applied When BT=70˚C; PV=SP: 0% heat is applied. When BT=72˚C; 20% above SP, no heat is applied. What P (Proportional Band) should I use for my cooker? That will depend on your cooker’s inherent thermodynamic characteristics, kitchen environment, your personal sous vide cooking style, and the quantity (mass) and temperature of your sous vide pouches. Generally, if P is narrow (single digits), you get faster (more responsive) and more precise control with high gain power, but with an increasing likelihood of overshooting your set temperature. Narrow band means more power per degree of deviation from Set Temperature. In a narrow band setting (P), the SousVideMagic (SVM) is elevated to work in a higher gain or higher amplification setting. In this high gain condition, the slightest amount of error (deviation between the Bath Temperature (BT) and the Set Temperature (SP)), can cause a large change in the power output of the SVM controller. In other words, a slight error (i.e., difference between BT and SP) will give your SVM high-gain heat control as you get closer to your SP. For example, if we narrow the Proportional band to 5˚C. SP = 70˚C (Set Temperature) P=5˚C (Proportional band is 65˚C ... 70˚C ... 75˚C) When BT=65˚C; outside P: 100% heat is applied. When BT=66˚C; 20% inside the P: 80% heat is applied. When BT=69˚C; 80% inside the P: 20% heat is applied. When BT=70˚C; PV=SP: 0% heat is applied. When BT=72˚C; 40% above SP, no heat is applied Now, compare the two examples, when BT=69˚C, at P=10˚C, SVM gives you 10% heat and at P=5˚C, SVM gives you 20% heat, which is doubling the heat of SVM (P=10˚C) when BT is 1˚C from SP. Under this situation, you will have a greater chance of overshooting SP, especially in a low heat loss situation (e.g., using a well-insulated commercial rice cooker). That is why, if the P is too narrow (i.e., the SVM too sensitive) even a slight temperature disturbance may cause temperature instability and possibly even a temperature oscillation around SP. This temperature oscillation behavior can actually be very helpful in finding the best P for your cooker. Finding the best P for your particular cooker (I=0 and D=0) by closed loop tuning: 1 2 3 4 5 Set P = X˚C; for our type of cookers, P=20°C is a good starting point. If BT hovers below SP and stabilizes below SP, divide X by 2 and observe the temperature stability. Decreasing P gives your cooker more heating power. Repeat until BT oscillates around SP. If BT oscillates violently around the SP, multiple X by 2 and observe temperature stability. Increasing P gives your cooker less heating power. Repeat until BT stabilizes below SP. Set P at the average of the two previous values. See example below. If BT stabilized around the SP, P is the band you may want to use. For example, Set Temperature=70˚C and P=20 Set P=20 Temperature stabilizes around 62˚C (i.e., 8˚C below SP) P=10, Divide P by 2 Temperature stabilizes around 68˚C P=5, Divide P by 2 Temperature oscillates around 70˚C P= 7 (7.5 rounded), Multiple 5 by 2=10 Average of 5 and 10 = 7.5 7˚C is the established Proportional Band (P) of your cooker from this systematic process of trial and error. You can further fine tune this P by ±1 for better temperature stability at SP. If the P band is wide (double digits), the temperature points at which SVM controller turns full on and the temperature at which it turns full off are quite far apart. At this point, the gain of the controller amplifier is set low. It takes quite a change in the bath temperature to result in a change of the heater output. This results in slow corrections of temperature. There is little or no chance of overshooting and therefore the temperature is quite stable. But although the temperature is relatively stable it may be off of the desired SP mark because of the gain not being high enough to keep up with changes in the environment around the controlled temperature bath. This situation may occur when an unexpected blast of frozen food pouches are added to the controlled temperature bath. The P band, therefore, must be adjusted according to conditions in and around the controlled temperature bath and other thermal dynamics such as lack of insulation and thermal conductivity, which results in loss of heat at a certain rate. In a well-insulated cooker, heat loss is low and the P band must be set wide. In a condition where there may be considerable heat loss, the P band can be set narrower. What you want to adjust the controller for is an optimum point between stability and response time — between holding a stable temperature and making fast corrections. A typical example of closed loop PID tuning is given in a post in eGullet forum’s sous vide topic on Jan 1st. 2011, see http://egullet.org/p1777743. It shows that for a FreshMealsMagic in its uninsulated 18qt. polycarbonate container, with P=0.5°C or P=0.6°C and I=0 D=0, a very stable and extremely responsive system can be achieved with only minimal negative offset. Note: In software versions older than version 3 there was a special feature in the 1500D which can be used to help derive the optimal P band. Because the 1500D always turns off the heat completely when it reaches the lower limit of the proportional band it allows you to test the latent heat and heat loss value of your chosen cooker. You can observe how far the temperature will rise after the heating is stopped until PID controlled heat starts acting again. If the temperature rises by 3 degree, as a rule of thumb, you can set your P band by just doubling the temperature rise (i.e., 3 degree rise implies P=6) if you want a fast heating system or trebling it (P=9) if you want a slower system. With a low heat loss cooker the time until heating resumes will be longer than with a high heat loss cooker. This observation can be helpful in deriving the Integral value mentioned later. Now we know about proportional control. We also know about gain and stability. There is one more consideration and that is the ability to hold a given temperature SP. Due to heat loss, BT may stabilize below the desired SP at a point within the P band corresponding to the percentile heat loss. For example, if your cooker’s maximum heating power is 400W and you need 50W to compensate for the heat loss and keep BT stable, then the percentile heat loss is 50/400 = 12.5%. If your P band is 10°C, then your BT will stabilize at SP – 1.25°C. In this situation, you need I action to correct this offset (undershoot). I: Integral Time (0-3600 seconds) Integral time is used to eliminate offset from SP. When the integral time is short, the returning (recovery) speed to SP is accelerated; however, the cycle of oscillation is also accelerated and the control can become unstable and lead to possible overshoot. Basically, the ―I‖ value specifies the time duration over which the errors should be eliminated. If there is a significant error, and only a short time specified during which the system should recover, a very strong action is called for. This in turn may result in misestimating and a temperature overshoot may occur, especially if there is a significant lag in the response time of the system. Then, once the Controller sees that the temperature has become too high, it tries to compensate, but it ends up reducing the power too much, leading to an undertemperature condition, and the cycle begins all over again. In the worst case the system is under-damped, and the oscillations continue without limit, and may even become more violent. For a given constant heater power output condition, heat loss through the insulation will cause the actual temperature to be slightly less than it would be in a well insulated heated area. This difference can be manually corrected with ―I‖; it is like changing the position of the proportional band center point (called offset) so the result is the temperature you want to hold. By adding Integral time action, you will eliminate offset and converge to SP faster. For example, let’s assume that you are able to hold constant temperature very well with your brand X cooker using P=10˚C and I=600 seconds (assuming D=00). Because you want to save energy and/or you need a larger sous vide bath, you decide to buy a well-insulated commercial rice cooker with a 14L pot. The old offset as expressed by I is likely to be too strong thus causing temperature overshoot, so you want to decrease the offset (i.e., increase integral time) by increasing the ―I‖ value, to slow down the heat output speed to prevent overshoot. As a rule of thumb, it is probably better to start out with a large I value (3600) and see how long the system takes to come to a stable point, and whether that stable point is actually at the Set Point. If it is at the Set Point but it is taking an hour to get there, you can cut the I value in half, and try it again. By continuing that process, you will eventually come to a point where there is an inflection point, i.e., where the temperature increases and shows a slight overshoot, then decreases slightly, then increases and finally settles out. Depending on your tolerance for how fast you want the process to stabilize, and how great an overshoot you are willing to tolerate will dictate the final I value. Of course, there are other ways to establish a constant temperature bath, like increasing the P band or a combination of increasing or decreasing P and Integral time. The problem is that if there is a sudden heat loss change (disturbance) and the system begins to lose heat faster, then that changes the offset and you may not be there to manually correct it. This is often the case, for some sous vide cooks have the habit of adding cold or frozen food pouches to a constant temperature bath at SP. This requires extra dynamic derivative heating power that is not allowed for by the original offset (I) setting. D: Derivative Time (0-3600 seconds) To compensate for this sudden temperature drop, we monitor the rate of temperature change over time of the bath temperature. In other words, derivative action is used to restore the change in bath temperature according to the rate of change. It reduces the amplitude of undershooting. It restores temperature stability faster. Integral actions alone cannot correct this sudden disturbance in a responsive way, you need extra help and it is called the Derivative action. If the D is shortened, restoring value becomes small, and if the derivative time is made longer, an excessive over correction can occur thus causing the bath temperature to oscillate and become unstable. In classical control process theory, the D value should be always about 25% of the I value. For example, if I=240 then D should be 60 (i.e. 240/4=60). But in sous vide cooking using an insulated pot, very often the D value will be much smaller than 25% of the I value. Note: SVM TM-1500D has a special feature so you don’t need to add food at setpoint (SP). Timer is set to start only when SP is reached. This feature allows you to add food earlier. If you ramp up food with the bath, you only need to use very small D values (less than 50) thus making the PID tuning effort much easier. Ar: Integral Limit (0-100%) aka Anti - reset windup ―Integral‖ is used synonymously with ―reset‖. What is Integral windup (= reset windup) ? The integral function adds up (integrates) temperature deviation from SP as the area under the curve. With increasing integral, the integral function adds more output to the output allowed by the proportional function to help in counteracting negative offset. As long as the temperature is below the proportional band (e.g. during ramping up from ambient temperature to SP), the proportional function allows 100% output, and the integral function increases output to more than 100%, but more than 100% output is physically not possible and temperature rise cannot get faster as intended by the integral function. So the integral term gets larger and larger (it winds up), and when SP has been reached and the output by the proportional term would be zero, the integral term still creates output, leading to temperature overshoot, until the integral term has been unwound. How is Integral windup avoided? Modern PID-controllers shut off integral action as long as the temperature is outside the proportional band. This is called ―Ar‖ or ―Anti - reset windup‖ or ―Anti - integral windup‖. Despite this Ar function, integral windup may happen even at temperatures within the proportional band if integral time is set very short (strong integral action) and/or if derivative action adds additional output during disturbance (e.g. by adding a pouch with cold food). The SousVideMagic 1500D has an advanced Ar function which allows to restrict integral action to the upper range of the proportional band, thus obviating the need to make otherwise adequate integral and/or derivative weaker. For example: SP=55°C P=10°C I=900sec D=100sec So the proportional band would be 45-55°C. With Ar=100%, integral action would be active between 45-55°C. With Ar=30%, integral action would be allowed only in the upper 30% of the P-band, i.e. between 52-55°C. What is the advantage of reducing Ar below 100% ? The ex-factory default setting is Ar=50% . This allows for strong integral and derivative settings for fast disturbance recovery without having to accept overshoot after ramping up or after a disturbance load (adding cold food). Summary Sometimes with an ―I‖ value that adequately compensates for negative offset, ―I‖ action may be too strong especially in response to a disturbance (temperature drop) and lead to overshoot and eventually oscillation. Instead of making ―I‖ weaker (increasing integral time), ―Ar‖ can be set to a value lower than 100%, thus restricting the integration of negative offset to the upper range of the proportional band, e.g. setting ―Ar‖ = 30% with a P-band of 10°C and SP=55°C would allow integration of negative offset only between 52-55°C instead of 45-55°C, i.e. the upper 30% of the P-band. In the lower range of the P-Band, output power allowed by the proportional function may be sufficient to counteract disturbance without the help of the integral function, but in the upper range of the P-band, the proportional function reduces output so much that additional output power must be contributed by the integral function. PID tuning: A balancing act A proportional-integral-derivative or PID controller performs much the same function as a thermostat but with a more elaborate algorithm for determining its output. It looks at the current value of the error, the integral of the error over a recent time interval, and the current derivative of the error signal to determine not only how much of a correction to apply, but for how long. Those three quantities are each multiplied by a tuning constant (P, I or D) and added together to produce the current controller output. If the current error is large or the error has been sustained for some time or the error is changing rapidly, the controller will attempt to make a large correction by generating a large output. Conversely, if the bath temperature variable has matched the setpoint for some time, the controller will take no action. This is how a constant temperature bath can be achieved. As we have seen, the SVM controller’s power output varies from 0% to 100% as a result of the sum of Proportional (P), Integral (I) and Derivative (D) actions. Obtaining good temperature stability despite possible disturbances is like riding a bicycle around a corner. It requires a good balancing act! Output Power Limit % (Level 3 parameter menu SLA) What is the effect of power output limit? The PID-controller can only switch power on or off, it cannot reduce the voltage applied to the heater. The controller recalculates the necessary power in cycles of 2 seconds (default setting, should not be changed), and it switches power on for a fraction of the 2-seconds-cycle, e.g. to output 25%, power is ON for 0.5 seconds and OFF for 1.5 seconds every 2seconds-cycle. In other words, output power is not controlled by reducing the voltage applied to the heater and thus reducing the current and wattage, but by applying full power during a percentage (time slice) of each 2-seconds-controlcycle. Output power applied to the heater is output power calculated by the PID-algorithm multiplied by the Output power limit percentage, thus simulating a heater with a lower nominal wattage. What is the purpose of Output Power Limit? A well-insulated high-power cooker with high thermal inertia (typically rice cookers) may be difficult to tune appropriately without significant temperature overshoot. Reducing output power may reduce overshoot and make tuning easier. In the 120V-world where 1800W-cookers draw 15A current, reducing output power to 1200W helps reducing heat stress on the SousVideMagic controller during ramping up. You may want to purposely ramp up slowly for turbo-conditioning (tenderizing action of calpaines and cathepsines), taking about four hours from room temperature to 55°C/131°F. The table below shows what combos of water volume and wattage will achieve this. As the minimum Output Power Limit setting is 20%, this method will not easily work with rice cookers as they have too high a wattage in relation to their water volume. With a 120V/1500W FreshMealsMagic, it will work with a 28-30 liter beverage cooler by reducing power to 300W. With a 400W stock-pot or slow-cooker, power can be reduced to 80W allowing 8 liters to be ramped up in about 4 hours. Please note that the table below does not take into account heat loss of a poorly insulated cooker as well as slower heating within the proportional band, so real heating times may be somewhat longer. Autotuning percentage (Level 3 parameter menu SL8) What is the effect of Autotuning percentage? With AT percentage 100% (the default setting), autotuning is performed at the SP (Set Point temperature). Lowering AT percentage lowers the temperature at which autotuning is performed, thus yielding ―softer‖ PID-parameters. What is the purpose of Autotuning percentage? Example: if your usual cooking temperature will be 55°C, you perform AT with SP=55°C. When cooking at lower temperatures, e.g. 45°C, your system might become unstable, as heat loss which counteracts overshoot is lower at lower temperatures. In this case, you may perform AT at SP=55°C, but with AT percentage set to 82%, so AT will be performed at 45°C (55°C * 82%), yielding ―softer‖ PID-parameters which will result in a stable system at the lower temperature at the price of a slightly less reactive system at the higher temperature. For further details, please see Application Tips in the 1500D User Manual. Impact of Thermodynamic Properties of a cooker on PID-Tuning Water Volume The higher the water volume, the better temperature stability and the smaller the temperature drop from adding cold food, at the price of slower ramping up. Insulation / Heat Loss Evaporation cooling may account for a significant percentage of total heat loss. Evaporation should be avoided, i.e. the bath covered, especially in long-time cooking; it is easy to evaporate 5 liters in 48 hours at 55C. Poor insulation leading to high heat loss has the advantage of easier PID-tuning, as higher heat loss counteracts overshoot faster (at the price of some energy wasting). Power Rating A high power rating has the advantage of fast ramping up and fast disturbance recovery at the price of more overshoot requiring a broader P-band. Thermal inertia of the heating system Heat content and heat conductivity of the heating element itself and the material between heating element and water are responsible for the thermal inertia of the heating system; the greater the inertia, the greater the overshoot, requiring a broader proportional band to avoid overshoot. Immersion heaters (i.e. the heating element is in the water) like the FreshMealsMagic or immersion circulators have minimal thermal inertia, whereas rice cookers have greater thermal inertia and tendency to overshoot. Hints for Data Logging The various authors have tried several schemes for recording, plotting, and analyzing the data resulting from numerous PID optimization runs. One thing that quickly becomes obvious is that manually recording data every 10 seconds, or even once a minute, for several hours, is extremely tedious! One way to solve that problem is with a data logging thermometer and a computer. The data can be recorded over several hours, then imported into a spreadsheet and plotted. Unfortunately, data logging thermometers with a resolution of 0.1°C or better are expensive – they can cost as much as the SVM plus a commercial rice cooker. Another approach that eliminates some of the tedium is to set up a digital camera that is equipped with an interval timer and take pictures of the Controller at a predefined interval, and then enter that data manually. Perhaps the simplest way to qualify PID settings without all the above-mentioned complexity is with a digital thermometer (resolution at least 0.1°F, absolute accuracy is not crucial) with minimum-maximum memory and an ice brick (―blue ice‖) of about 400-500g frozen to -20°C. Start heating the bath at about 5-10°C below the set temperature and reset the thermometer’s memory. As soon as temperature has stabilized at set temperature, write down the maximum temperature (= initial overshoot) and the stabilized temperature. Reset the thermometer’s memory. After an hour or more, write down the minimum and maximum temperature (= oscillation or stability). Reset the thermometer’s memory. Drop an ice brick in the water and after another hour or more, write down the minimum temperature (= disturbance dip) and the maximum temperature (= post-disturbance overshoot), then reset the thermometer’s memory again and repeat stability measurement, as sometimes oscillation is initiated by disturbance. It would be interesting to determine also the duration of the disturbance dip, but this involves watching the display for maybe half an hour. If all else fails, you can try to persuade your teenaged son or daughter that this would make an excellent project for their next Science Fair. Good Luck! A sample spreadsheet for the evaluation of PID-tuning results can be downloaded here: http://peter-gruber.gmxhome.de/SV/TESTING_PID-SETTINGS.htm LEGAL DISCLAIMER The materials herein and products mentioned in this document are offered for information purposes, awareness and as non -classified educational material. These general concepts, ideas and guidelines may or may not apply in some specific circumstances or situations and we do not give warranty for any workability in specific conditions pertaining to your personal or business situation. Neither FMS nor the authors will be responsible for specific results from any recommendations or concepts nor for consequences thereof, proven or otherwise. The authors are volunteers whose sole aim is to contribute to the knowledge of the sous vide cooking community in general and have not intended to make any financial gain from the publication of this document. COPYRIGHT Copyright © 2010, Fresh Meals Solutions. All rights reserved. This document may not be copied in part or full without express written permission from the publisher and authors.