1
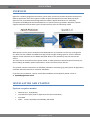
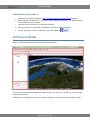
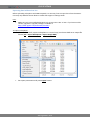
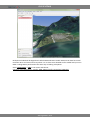
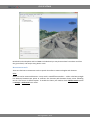
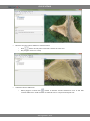
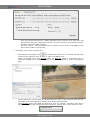
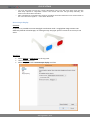
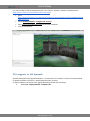
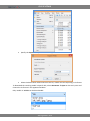
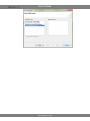
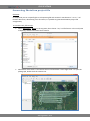
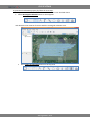
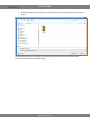
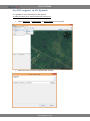
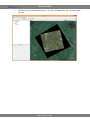
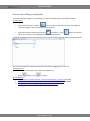
GIS SPUTNIK GIS SPUTNIK version 1.0 User manual www.geoscan.aero GIS SPUTNIK ©GeoScan, 2015 www.geoscan.aero GIS SPUTNIK Content OVERVIEW ..................................................................................................................................................... 4 INSTALLATION AND STARTUP ....................................................................................................................... 4 System requirements: ............................................................................................................................... 4 Installation procedure: .............................................................................................................................. 5 GETTING STARTED ......................................................................................................................................... 5 TUTORIALS..................................................................................................................................................... 6 Loading orthophoto and DEM generated with Agisoft PhotoScan ........................................................... 6 Overview ............................................................................................................................................... 6 Exporting data in PhotoScan Pro........................................................................................................... 7 Loading orthophoto and DEM in Sputnik .............................................................................................. 9 Measurement tools .............................................................................................................................11 Volume measurement in Sputnik........................................................................................................14 Stereoscopic display ............................................................................................................................18 Loading 3D models generated in Agisoft Photoscan ..............................................................................19 TLS support in GIS Sputnik ......................................................................................................................21 Connection to WMS servers....................................................................................................................23 Generating PhotoScan project file ..........................................................................................................26 GeoTIFF support in GIS Sputnik ...............................................................................................................29 Tours recording in Sputnik ......................................................................................................................31 TROUBLESHOOTING ....................................................................................................................................32 www.geoscan.aero GIS SPUTNIK OVERVIEW Sputnik is a modern geographic information system (GIS). It aimed to provide situational awareness at different application areas and supports number of Open Geospatial Consortium (OGS) standards. Sputnik is fully compatible with photogrammetric software Agisoft PhotoScan Pro. Uploading orthophoto and DEM generated with PhotoScan is a smooth and easy procedure. Moreover, Sputnik supports PhotoScan LOD-enabled export formats both for photo and elevation model. With Sputnik you may import orthophoto and DEM without any limitations on file size, coverage area etc. Basic low scale LandSat and SRTM coverage provide a single working space for all users’ datasets. Support of OGC standards such as WMS, WFS, KML allows to link Sputnik up with the external GISservers. The main format most often used in Sputnik is KML. It makes possible to upload in Sputnik virtually any data including 3D models, spherical panoramas, various real time sensors data etc. This manual contains instructions on software installation and starting up, description of application interface and basic tutorials on common workflows. If you have any comments, reports and recommendations on GIS Sputnik please e-mail us at [email protected]. INSTALLATION AND STARTUP System requirements: Windows XP, 7, 8 (32/64-bit) 1 Gb HDD free space (used for application files and cached data) 2 Gb RAM Video: Nvidia, ATI/AMD, Intel HD 4000, 1Gb VRAM www.geoscan.aero GIS SPUTNIK Installation procedure: Download installation package from http://www.geoscan.aero/en/gis-sputnik webpage. Run installation file Sputnik_1.0…x64.exe (for 64-bit Windows) or Sputnik_1.0…x86.exe (for 32bit) with administrator privileges. Follow onscreen instructions to complete installation. After installation is finished, KML and KMZ files will be associated with Sputnik. To start application choose it in Windows Start menu: Start GETTING STARTED When you launch application the main program window appears: The main parts of application window are Map area (1), User menu (2), Toolbar (3), Layers (4) and Properties (5) panels. Default basic coverage used in Sputnik is Landsat imagery combined with SRTM elevation model. www.geoscan.aero GIS SPUTNIK When Map view is active you may use keyboard and mouse buttons for navigation on a map: Navigation options User action Scaling (zoom in/zoom out) Mouse: rotate mouse wheel Keyboard: use “+” and “-” buttons on a keyboard Moving on a map Mouse: press left button while on the map and drag to move the map Keyboard: (press left mouse button) and move the map using keyboard cursor keys Free change of view direction Mouse: while pressing right mouse button: - move mouse forward and backward — this will change vertical angle of view; - move mouse right and left —this will rotate “virtual camera” around pointed location Keyboard: - <Shift> + Up/Down cursor keys — to change vertical angle of view - <Shift> + Right/Left cursor keys — to rotate camera view Reset angle to view "top-down" and rotate map to "north-up" view Press «R» on keyboard Reset view to "North up" Press «N» on keyboard All the user custom maps, elevation and 3D models opened in Sputnik are shown in Layers list. To enable or disable a layer check/uncheck the box near its title. To rearrange layers order simply drag and drop layer with left mouse button. TUTORIALS This section contains short descriptions of loading different types of geospatial data, establishing connection with WMS servers and so on. Loading orthophoto and DEM generated with Agisoft PhotoScan Overview Photoscan Pro software (www.agisoft.com) produces highly accurate 3D models, true orthophoto maps, and digital surface models based on aerial survey data. In PhotoScan it is possible to export all these data types with so called image or model pyramids, i.e. range of lower scale datasets having different level of detail (LOD). Sputnik fully supports this option and allows to load images, elevation and 3D models of unlimited size. www.geoscan.aero GIS SPUTNIK Exporting data in PhotoScan Pro Before uploading orthophoto and DEM to Sputnik it is necessary first to export them from PhotoScan. Currently only KMZ file format allows to enable full support of LOD pyramids. First: Make sure you have installed PhotoScan Pro version 0.9.1.1703 or later. If you have an older version, upgrade it. Upgrade package is available at http://www.agisoft.com/downloads/installer/. To export orthophoto: When model is built, export orthophoto in a normal way, but choose KMZ as an output file format (File > Export Orthophoto > Export Google KMZ): Set export parameters and press Export button: www.geoscan.aero GIS SPUTNIK An orthophoto map generated may be loaded and displayed in any geoviewers supporting KML, e.g. Google Earth. To export elevation model: Select File > Export DEM > Export Sputnik KMZ: Set export parameters and press Export button: www.geoscan.aero GIS SPUTNIK Special extension of KML has been developed by GeoScan team in collaboration with Agisoft to export elevation models in form of pyramid of different LOD mosaic layers. Loading orthophoto and DEM in Sputnik Use your own data or sample data that you may download from ftp://ftp.geoscan.aero/public/Sputnik_demo/orthophoto_and_DEM.zip (118 Mb). Unpack archive if you are using sample data. To open orthophoto in Sputnik select Import Maps > KML in user menu and choose orthofoto_and_DEM/quarry_sensefly_orto_27mm_mosaic/Switzerland_ortho.kml: When orthophoto is loaded new layer appears in “Layers” pane. To move map to the location of orthophoto, open Layers tree and double click on Switzerland_ortho.kml. Use checkboxes to hide and show layers. Zoom map in to view it in details: www.geoscan.aero GIS SPUTNIK Orthophoto loaded will be aligned with default SRTM elevation model. SRTM terrain data have areal resolution 90 m and vertical accuracy about 1 m. To have more detailed surface model load your own DEM. Loading DEM is performed in the same way as loading orthophoto: Select Import Maps > KML in user menu and choose: orthofoto_and_DEM/quarry_sensefly_DEM_90mm/sensfly_Switzerland_DEM.kml: www.geoscan.aero GIS SPUTNIK Now both local orthophoto and local DEM are loaded and you may browse them from above and from the ground level, and analyze using built-in tools. Measurement tools There are few basic measurement tools in Sputnik that allow to measure heights and distances. Ruler Ruler is a tool to measure distances. It may work in two different modes — either calculates straight line distance between two points or measure the shortest path between these points following terrain. The former is default option. To enable the latter you need to check Follow terrain option in Settings > Preferences user menu. www.geoscan.aero GIS SPUTNIK To perform a measurement, select Ruler on tool panel, then click on a map to mark a path. Balloon at each point shows its distance from the starting point. In straight mode: www.geoscan.aero GIS SPUTNIK And in follow terrain mode: To move a point, simply drag it with left mouse button. To stop marking a path, place the last point using right mouse button. Circle Circle measurement tool allows to display a circle on a map and measure its radius. It might be useful for simple approximation. To measure radius: Select on tool panel. Place a point on a map with left mouse button. This point is a circle center. Dragging blue square mark change circle radius. To move circle drag its central point. www.geoscan.aero GIS SPUTNIK Volume measurement in Sputnik Overview Volume measurement tool automates measurements of changing surface features. It allows to calculate both positive and negative deviation of one digital surface model in comparison with another within selected area. Currently Agisoft PhotoScan generated DEM (GeoTIFF tiles in kml/kmz) is supported Demo data: DEM#0 — ftp.geoscan.aero/public/Sputnik_demo/Volume/avtodor_dem0.kmz DEM#1 — ftp.geoscan.aero/public/Sputnik_demo/Volume/avtodor_dem1.kmz Orthophoto — ftp.geoscan.aero/public/Sputnik_demo/Volume/avtodor_ortho.kmz Download data to local file storage. Basic tutorial Run Sputnik Pro Open data files: o Choose Document > Open in program menu o Select file and press Open button o Repeat previous steps to open all demo files o Loaded files are displayed in “Layers and Objects” pane. While data loading and processing a stop watch icon is displayed at the file name o Double click on file name to position map on area of interest www.geoscan.aero GIS SPUTNIK Mark an area for volume difference measurement: o o Click button on tool pane to activate “Select an area” tool Set polygon vertex on a map Calculate volume difference: o When polygon is build click button to actvate “Volume difference” tool. It will add “Volume difference” child element to selected area in “Layers and objects” list www.geoscan.aero GIS SPUTNIK o Select initial and final DEMs using Browse buttons and Open file dialog or simply by dragging corresponding layers to o element When both DEM selected press Calculate button. Calculation may take a while. When it is over the results will be shown in corresponding section on the “Properties” pane www.geoscan.aero GIS SPUTNIK o o User may set fixed grid size for volume caclutaions using “Use the given step” and “Use the best step” options in “Algorightm” section. The former lets user set grid step manually, the latter uses native DEM resolution Arrows at “Initial…” and “Final DEM source” let quickly reverse order of two DEMs in case they’ve been loaded in wrong order. Calculating volume from reference level o o o o After building the polygon press to activate the Volume tool. It will add “Volume” child element to the selected "Area" element in “Layers and Objects” list. Select initial DEM source using Browse button and Open file dialog in “Properties” pane or simply by dragging the corresponding layer to the Volume element in “Layers and Objects” pane: Set the Reference level you want to calculate difference from. If the reference level isn’t set, the height of the lowest polygon boundary point will be used by default. Press Calculate button after DEM and Reference level are selected, calculation may take a while, you can follow the process with the progress bar, that will occur in the right top corner: www.geoscan.aero GIS SPUTNIK o o You may set fixed grid size for volume calculations using “Use the given step” and “Use the best step” options in “Algorithm” section. The former lets user set grid step manually, the latter uses native DEM resolution. After calculations are finished the positive deviations from the Reference level will be shown in the "Fill" field and negative – in the field "Removal". Stereoscopic display Overview In Sputnik it is possible to activate Anaglyph visualization mode. Anaglyph 3D image contains two differently filtered colored images, its viewing through anaglyph glasses reveals the stereoscopic 3D effect. Workflow Select Settings > Preferences on the top pane. Select Interface section. Select Anaglyph mode in Stereoscopic display scroll bar. www.geoscan.aero GIS SPUTNIK To get the stereoscopic 3D effect view the image through anaglyph glasses. Loading 3D models generated in Agisoft Photoscan Overview In addition to producing orthophoto and elevation models PhotoScan may be used to create textured georeferenced 3D models of real objects. You may try to follow this tutorial with your own data or with sample 3D model of ruined milk farm which is heritage object located in north part of St. Petersburg (Russia). The model was generated in PhotoScan Pro based on images taken with a camera installed on quadcopter. Sample data is available from the following link: ftp.geoscan.aero/public/Sputnik_demo/house_3D.zip (13 Mb). Save file and unpack it. Workflow 3D models are loaded in the same way as maps and elevation models: Select Import Maps > KML, then choose file house_1.kmz from unpacked sample dataset. When model is loaded new layer appears in “Layers” pane. To display model double click on its name in layers list. www.geoscan.aero GIS SPUTNIK Use navigation options to change viewing angle and position. Repeat procedure to load another file house_2.kmz. That will bring a neighboring building on a map. www.geoscan.aero GIS SPUTNIK It is also possible to load 3D designed models. Let’s take, for example a model from 3dwarehouse (http://www.sketchup.com/products/3D-warehouse): go to http://sketchup.google.com/3dwarehouse/details?mid=be26635c5be9f21b9b9685fd76f6c8 5&prevstart=0. Select Download Model > Google Earth 4 (.kmz). Save schloss-neuschwanstein.kmz file on your computer. Load it into Sputnik: TLS support in GIS Sputnik Sputnik GIS supports the Agisoft PhotoScan *.tls format for tile models. Tls format is implemented in Agisoft PhotoScan version 1.1.0 build 1976 and later versions. To export model in tls format from Agisoft PhotoScan follow the next steps: Select File Export Model Export Tiles… www.geoscan.aero GIS SPUTNIK Specify the Export Tiles parameters in the appeared window Select the destination folder and name the file, model will start exporting in tls format To download the resulting model in Sputnik GIS, select Document Open on the main pane and choose the tls format in the appeared window Only models in WGS84 can be downloaded. www.geoscan.aero GIS SPUTNIK Connection to WMS servers Overview WMS is the most common protocol used to make maps available via intra- or internet. Number of free available maps including Open Street Map (OMS) and satellite imagery are distributed as WMS service. This tutorial describes how to connect to WMS servers. First: Make sure you have broadband internet connection. Check that website http://irs.gis-lab.ru/?VERSION=1.1.1 is available. Setting connection Select Import Maps > WMS in user menu. Input address of known WMS server, for example http://irs.gis-lab.info/?VERSION=1.1.1: When list of layers provided by this server is loaded, select layers you want to have on a map (use arrow buttons or double click on layer name to move it to “Selected” list): www.geoscan.aero GIS SPUTNIK www.geoscan.aero GIS SPUTNIK Press Finish button. As a result selected layer will be displayed on a map. If several layers were selected they will form a group: In a similar way data may be added from any OGC-compliant servers, including ArcGIS, Geoserver (www.geoserver.org) and others. www.geoscan.aero GIS SPUTNIK Generating PhotoScan project file Overview In GIS Sputnik you can inspect flight’s track importing file with camera’s coordinates in *.txt or *.tel formats. Moreover, determining zone of interest, it is possible to generate PhotoScan project file straight away. To visualize track follow steps: Select Documents > Open on the top pane, then choose *.txt, *.tel file format in the scroll pane of Opening window and select file of interest Selected file with camera’s coordinates will be visualized like a UAV’s flight track . To open the photograph, double click the camera icon. www.geoscan.aero GIS SPUTNIK To generate the PhotoScan project file follow the next steps: Open *.txt or *.tel file with camera’s coordinates like it was described above Select Rectangular selection button on the top pane and determine the cameras of interest with the rectangular selection zone: Press Export to PhotoScan button on the top pane www.geoscan.aero GIS SPUTNIK PhotoScan project saving dialog will be opened, select the containing folder and name of the project Consequently PhotoScan project file will be automatically generated. Selected cameras will be included in one chunk of the created project. www.geoscan.aero GIS SPUTNIK GeoTIFF support in GIS Sputnik It is possible to open GeoTIFF files in GIS Sputnik. To open the raster file of interest follow the instructions: Select Document Import Maps Raster Image on the top panel Select the raster of interest in the emersed window www.geoscan.aero GIS SPUTNIK Selected file will automatically be shown in the Layers and Objects list and visualized in Map window: www.geoscan.aero GIS SPUTNIK Tours recording in Sputnik Tour tool in GIS Sputnik gives you the ability to create the demonstrations and presentations/ To start a tour: Press “save observer’s position” on the tool panel, that will create the Tour object in “layers and objects” pane and record current position Add view positions successively pressing and pauses - using button on the tool panel. This creates corresponding elements within active Tour. To define the pause duration select wait element in the list and edit duration field (in Properties pane): You can also change the sequence of positions and pauses dragging them in the list. To play the tour: Select Tour of interest in the “layers and objects” list Press Sample dataset button. Press to pause. ftp.geoscan.aero/public/Sputnik_demo/Volume/avtodor_dem1.kmz (197 Mb) ftp.geoscan.aero/public/Sputnik_demo/Volume/avtodor_ortho.kmz (142 Mb) ftp.geoscan.aero/public/Sputnik_demo/Volume/Tour.kmz (4 Kb) www.geoscan.aero GIS SPUTNIK TROUBLESHOOTING If Map window is not displayed (grayed out), please download the latest version of Java from Oracle website: http://www.oracle.com/technetwork/java/javase/downloads/jdk8-downloads2133151.html Then reinstall Sputnik. Please be aware that Sputnik and Java versions must correspond to system type (64-bit or 32-bit). www.geoscan.aero GIS SPUTNIK With any questions on Sputnik purchase and technical support please contact us via e-mail: [email protected]. Geoscan team web: www.geoscan.aero ©GeoScan, 2015 www.geoscan.aero


![SpeedAngle SA to KML Converter User Manual [April 2013]](http://vs1.manualzilla.com/store/data/005858940_1-650ff431a5d53db72218f3209001fa9f-150x150.png)