1
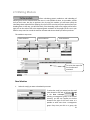
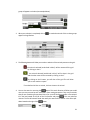
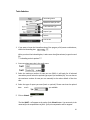
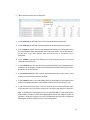
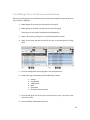
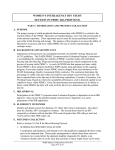
Getting Started with the New
Online Program
User’s Manual
Canadian Sheep Genetic Evaluation System
- SWA 2.0 March 17th 2014
Table of Contents:
1. Getting Started
1.1 Requirements
1.2 Logging Onto and Logout the System
1.3 Important Things to Remember
1.4 Basic Navigation of the Program
5
5
6
7
2. Application Tabs
2.1 Start
2.2 User
2.21 Producer Info
2.22 Changing Your Password
2.3 Animals
2.3.1 Search Tool (filters)
2.3.2 Global Search Tool
2.3.3 Information on an Individual Animal (certificates)
2.3.4 Editing Selected Animal
2.3.5 Entering New Animals
2.3.5.1 New Flocks to CSGES
2.3.5.2 Animal ID Basics
2.3.5.3 National ID
2.3.5.4 Entering New Animals
2.3.6 Editing a Group
2.3.7 Entering Founders
2.3.8 Uploading Data
2.3.8.1 Uploading Formats
2.3.8.1.1 Ewebyte Export
2.3.8.1.2 Ultrasound Data (CSV)
2.3.8.1.3 Birth Data Export (CSV)
2.3.8.1.4 50 Day Weight Data Export (CSV)
2.3.8.1.5 100 Day Weight Data Export (CSV)
2.3.8.1.6 Founder Data Export (CSV)
2.3.8.1.7 Complete Lamb Data (CSV)
2.3.8.1.8 Disposal (CSV)
2.3.9 Disposal and Transfers
2.4 Reports
2.4.1 Lamb Report (rawdata and genetic index in a management group)
2.4.2 Compact Lamb Report
2.4.3 EPD Report (Full EPD Report for Lambs in A Management Group)
2.4.4 Ewe Inventory Report (Inventory of Ewes)
8
8
8
9
10
10
11
13
15
16
16
17
18
18
25
27
29
33
33
33
34
35
35
36
37
38
39
42
43
43
44
45
3
2.4.5 Ram Inventory Report (Inventory of Rams)
2.4.6 EPD Parent Report(Full EPD Report for Parents)
2.4.7 Flock Evaluation Report (Flock Summary Information)
Export Files
2.4.8 EPD Export
2.4.9 Inventory Export
2.4.10 Progeny Statistics Export (Progeny Stats Export)
2.4.11 Rawdata Report (Export Producer)
2.5 Mating Module
46
46
47
48
49
50
51
52
2.5.1 Mating Group Export File
2.5.2 Mating File for the Electronique Notebook
56
58
3. Other Useful Information
3.1 Animal Record Validation
60
Appendices
Appendix 1: Management Group Notion
Appendix 2: Breed Codes
Appendix 3: Disposal Codes and Comment Codes
Appendix 4: Common Error Codes
Appendix 5: How to Set the Upload File Date Format
Appendix 6: How to Set Up the Decimal Separator
Appendix 7: Heading Template For Upload Data File
Appendix 8: EPD Export File Header
Appendix 9: Conversion from CSV File to Excel File
Appendix 10: Inventory Export File Header
Appendix 11: Progeny Stats Export File Header
Appendix 12: Export Producer File Header
Thanks to Delma Kennedy and its team for their help in the realisation of
this User’s Manual.
4
2.5 Mating Module
allows calculating genetic predictions and inbreeding of
offspring from cross of selected ewes and rams. It is also possible to select, in the module, animals
that you don’t own, but plan to purchase. Also, by using this module, you will know quickly the
inbreeding values expected of the offspring from cross of the ram that you look to purchase and your
breeding ewes. In that way, you will know easily if the inbreeding values of its progeny will be low or
high. You can also take a look at the expected genetic evaluation of the progeny of this ram in your
flock for many traits. You can do the same for the ewes and the ewe-lambs you want to purchase.
This module is easy to use:
Rams Selection
Ewes Selection
Traits Selection
To create the export file
for the electronic
notebook
Ram Selection
1.
Select the ram(s) you want to breed with your ewes.
To select the ram(s) you owned, use the scroll
menu located at the right of the word Groups
in the Sires side
. By
selecting a management group or the current
inventory, you will see it appear on the box
located at the right of the scroll menu. It is
possible to select more than a management
group. Every time you click on a group, this
52
group will appear on the box (see example below).
2. When your selection is completed, click on
appear in the grid below.
to make the animals of this or these groups
3. The following buttons will allow you to make a selection of the animals present on the grid:
: the
animals selected (underlined in blue)* will be removed of the grid
by clicking on the X.
the animals selected (underlined in blue)* will be kept in the grid
and the other ones will be removed by clicking on the Y.
:
: by
clicking on the C button, you will clear all the grid. This will allow
you to start another request.
*To underlined in blue an animal, click one time on the animal.
4. You can also search a ram using the
button. This search function will allow you to add
rams you may not own but are interested in from mating perspective. They may be animals
that you are considering for purchase. Enter all or a part of the tattoo number or the national
Id in the box located at the left of the Find button and press
. This may take few
minutes. The first 99 animals found that satisfy the search will be shown in the select pulldown located at the right of the
button.
53
Thus be as specific as you can when entering the animal Id. The word WAIT will appear at the
right of the FIND button during the search. When the search is completed, WAIT disappears
and the pull-down button is available. Select the animal you want to add to the grid and press
the
button to the right.
5. You can sort the animals present in the grid by clicking on the column headers of the grid.
This will allow you to sort animals by:
a.
b.
c.
d.
e.
BG: Breed Group
Sire: Sire Tattoo
SireN: Sire National ID
Last Lamb: Birth date of his last lamb
MaxU: maximum number of ewes that can be bred by this ram (for
the optimal option –indicate it on the SMU box)
6. When you ram selection is completed, you can now process your ewe selection.
Ewe Selection
1. When your ram selection is completed, do the same thing for the ewes in the right grid
named Dams.
2. The column headers of the grid are:
a.
b.
c.
d.
BG: Breed Group
Dam: Dam Tattoo
DamN: Dam National ID
Last Lamb: Last lambing date
3. When all the rams and the ewes are selected, you must choose two traits for which you
want to know the expected genetic evaluation of the progeny of all parent combinations.
54
Traits Selection
Inbreeding Value
Maximum ewes per ram
Traits Selection (2)
Report Type
Submit
Get the file
1. If you want to know the inbreeding value of the progeny of all parent combinaisons,
check the Inbreeding box.
When you check the Inbreeding box, it takes more time (few minutes) to get the result
file.
** Inbreeding value is optional***
2. You must select two traits in the scroll menu.
3. Select the maximum number of ewes per ram (SMU). It will apply for all selected
rams when you will select the optimal type report (not available yet). You can also set
the maximum number of ewes per ram manually in the column MaxU of the sires
side.
4. Select the type of report you want (basic or optimal). Please note that the optimal
data
aren’t
yet available.
5. Click on Submit.
The label WAIT... will appear at the under of the Submit button. You must wait in the
mate tab for the computations to finish. If not, the computation will be stopped.
55
6. When the file will be ready, the WAIT... label will change to the
name of the server file (PA....) that contains the result. To get
this file, click on Fetch.
6. You will obtain a CSV file that can be easily converted in an Excel format.
2.5.1 Mating Results Export File
This is the file obtained from the mating module. This is a CSV file that can be easily converted in an
Excel format.
1. Click
and a pop will open. Click ok.
2. A save box will appear, shown beside. Check “Open with”
then OK.
3. A download box will open. Double click on the name of the
file to open it.
4. Convert the CSV file in an Excel format (refer to Appendix 9 for the details).
56
5. When opened in Excel, this file looks like:
1. In the column A you will find the sire of each selected ewe and its breed.
2. In the column B you will find the selected ewes of the Dams grid and its breed.
3. In the column C you will find the expected genetic evaluation of the progeny from
the cross between each selected ewe of the column B and the ram of the column C
for the trait 1 you have selected. Look on the case C3 to see which trait is
evaluated.
4. In the column C you will also find the sire of the selected ram (line 1) and the
selected ram itself (line 2).
5. In the column D you will also find the percentile related to the expected genetic
evaluation of the progeny from the cross between each selected ewe of the column
B and the ram of the column C.
6. In the column E and F you will have the same information than in the column C and
D but for the second trait you have selected.
7. In the column G there is the inbreeding value (in percentage) of the progeny from
each cross between the ewes in the column B and the ram in the column C. (I%)
8. If you have selected more than a ram, the columns H to L will be exactly the same
as the columns C to G, but for the second ram. This will be the same for a third ram.
Tips: To optimize the mating planner use it is recommanded to create small groups
of about 60 to 70 ewes. This will allow getting quick results and avoid the system to
get down. Using taller groups may crash this application and you will be obliged to
select again the ewes and the rams to create a new report.
57
2.5.2 Mating File for the Electronique Notebook
When your mating groups are completed you can create the mating file to upload data into
your electronic notebook.
1. Make appear all the rams you will need in the Sires grid.
2. Make appear all the dams that will be bred in the Dams grid.
These steps are very useful to facilitate the following ones.
3. Select a first ram by clicking on its row (will be underlined in blue)
4. Select all the ewes that will be bred by this ram in the Dams grid by clicking
them.
5. Enter the management year and group in the appropriate box.
6. Indicate the type of breeding and the PMSG dose (if used):
a.
b.
c.
d.
e.
f.
Natural
Photoperiod
CIDR Sponge
MGA
Ram effect
AI (Artificial Insemination)
7. Enter the pen given for the ram (you can also enter a color, a pen and a color
or the ram name)
8. Enter the indate and outdate of the ram.
58
9. When all the information is completed, click on
.
10.
Important Notes:
*When you have clicked on
, it is not possible to add ewe to the
first ram. You will get an error message saying this ram is already used.
*Animals national ID must be entered in the GenOvis program to be able to use this file
in the electronic notebook.
11. Repeat steps 3 to 9 for the second ram... and again for the third one...
12. When you have finished, click on
.
13. The label WAIT... will appear at the under of the Submit button. You must wait
in the mate tab for the computations to finish. If not, the computation will be
stopped.
14. When the file will be ready, the WAIT... label will change to the name of the
server file (PA....) that contains the result. To get this file, click on Fetch.
15. You will obtain a CSV file to upload in your electronic notebook.
59
3 Useful Information
3.1 Animal Record Validation
When an animal record save is attempted the following validations are performed:
a. You must be properly logged into the system.
b. The dam specified must be found in the Pedigree and her sex must be “F”.
c. The sire specified must be found in the Pedigree and his sex must be “M”.
d. The lamb birth date must be a valid date and must be consistent with the birth dates
of the parents (see table below). This validation is not performed if a phantom sire
or dam (i.e. “XXram” or “XXewe”, where XX is the breed code) is used.
e. The breed code of the lamb is computed from the parents.
f. The 50, 100 and ultrasound dates are validated as specified in the table.
g. The weights and other measurements are validated.
h. The 100 day date must be at least 28 days greater than the 50 day date.
i. The previous lambing date for the dam must be at least 147 days prior to the current
lambing.
j. A Foster ID needs to have lambs within the past 30 days.
Ranges for Validation of Data Input
Variable
Minimum
Maximum
LambBirthDate-DamBirthDate
LambBirthDate-SireBirthDate
LambBirthDate-Day50Date
LambBirthDate-Day100Date
LambBirthDate-UltraDate
BirthWeight
BornAs
RaisedAs
50DayWeight
100DayWeight
UltraDayWeight
UltraDayLoinDepth
UltraDayFatThickness
Lambing Interval
50 day and 100 day weighing interval
8 months
7 months
28 days
70 days
70 days
1 kg
0
0
4 kg
10 kg
11kg
7 mm
0 mm
147 days
28 days
13 years
31 years
69 days
120 days
150 days
13 kg
7
6
55 kg
91 kg
99 kg
50 mm
15 mm
*Note that these values can be changed by the administration.
60