1
© 2003-2011 Doctor Web. All rights reserved.
This document is the property of Doctor Web. No part of this document
may be reproduced, published or transmitted in any form or by any
means for any purpose other than the purchaser's personal use without
proper attribution.
TRADEMARKS
Dr.Web, the Dr.WEB logo, SpIDer Mail, SpIDer Guard, CureIt!, the
Dr.WEB INSIDE logo are trademarks and registered trademarks of
Doctor Web in Russia and/or other countries. Other trademarks,
registered trademarks and company names used in this document are
property of their respective owners.
DISCLAIMER
In no event shall Doctor Web and its resellers or distributors be liable for
errors or omissions, or any loss of profit or any other damage caused or
alleged to be caused directly or indirectly by this document, the use of or
inability to use information contained in this document.
Dr.Web® Anti-virus for Windows Mobile
Version 6.00.0
User Manual
17.03.2011
Doctor Web Head Office
2-12A, 3rd str. Yamskogo polya
Moscow, Russia
125124
Web site: www.drweb.com
Phone: +7 (495) 789-45-87
Refer to the official web site for regional and international office
information.
Doctor Web
Doctor Web develops and distributes Dr.Web® information
security solutions which provide efficient protection from
malicious software and spam.
Doctor Web customers can be found among home users from all
over the world and in government enterprises, small companies
and nationwide corporations.
Dr.Web antivirus solutions are well known since 1992 for
continuing excellence in malware detection and compliance
with international information security standards. State certificates
and awards received by the Dr.Web solutions, as well as the
globally widespread use of our products are the best evidence of
exceptional trust to the company products.
We thank all our customers for their support and
devotion to the Dr.Web products!
4
Table of Contents
Document Conventions
6
Chapter 1. Introduction
7
Main Features
7
System Requirements
8
Distribution Kit
8
Chapter 2. Licensing
9
Key File Acquisition
9
Chapter 3. Installation
11
Install via synchronization
11
Install without synchronization
12
Recover and Uninstall
13
Chapter 4. Getting Started
15
Launch and Exit the Application
15
Interface
16
Help system
18
Operation Mode
18
Chapter 5. Application Functions
21
Constant Anti-Virus Protection
21
On-demand Scan
23
Malicious Objects Neutralization
26
Anti-spam
26
Update
30
Quarantine
30
User Manual
5
Appendices
33
Appendix A. Central Anti-virus Protection
33
Appendix B. Contacting Support
35
Index
36
User Manual
Document Conventions
Document Conventions
The following conventions and symbols are used in this document:
Convention
Description
Bold
Names of buttons and other elements of the
graphical user interface (GUI), and required user
input that must be entered exactly as given in the
guide.
Green and bold
Names of Dr.Web products and components.
Green and underlined
Hyperlinks to topics and web pages.
Monospace
Code examples, input to the command line and
application output.
Italic
Placeholders which represent information that must
be supplied by the user. For command-line input, it
indicates parameter values.
In addition, it may indicate a term in position of a
definition.
CAPITAL LETTERS
Names of keys and key sequences.
Plus sign ('+')
Indicates a combination of keys. For example,
ALT+F1 means to hold down the ALT key while
pressing the F1 key.
Exclamation mark
A warning about potential errors or any other
important comment.
The following abbreviations are used in this document:
GUI - Graphical User Interface
OS - Operating System
User Manual
6
Chapter 1. Introduction
Chapter 1. Introduction
Thank you for purchasing Dr.Web® Anti-virus for Windows
Mobile (hereinafter referred to as Dr.Web Anti-virus). It offers
reliable protection pocket PCs and communicators working under
Microsoft® Windows Mobile® operating systems from various virus
threats designed specifically for mobile devices. The program employs
the most advanced developments and technologies of Doctor Web
aimed at detection and neutralization of malicious objects which may
represent a threat to the device operation and information security.
This manual is intended to help users of pocket PCs with installation
and adjustment of Dr.Web® Anti-virus for Windows Mobile. It
also describes all the basic functions of the application. The appendices
contain information on other products of Doctor Web and technical
support.
Main Features
Dr.Web Anti-virus is a reliable anti-virus solution for users of mobile
devices working under a Microsoft Windows Mobile operating system.
The application protects devices from information security threats and
performs the following functions:
Constant on-access real-time protection of the file system (onaccess scanning of files, programs which are being installed,
attachments in e-mails etc).
On-demand scanning of files located on the device itself or on
removable memory cards, including archives.
Deletion or quarantine of the infected objects.
Phone calls and messages filtering based on pre-installed and
custom filtering profiles;
Dr.Web virus databases updates via Internet.
Detailed reports about real-time, on-demand scans and also
about calls and messages filtering.
Access to contextual Help from any active application window.
User Manual
7
Chapter 1. Introduction
Dr.Web Anti-virus has user-friendly interface and easy customizable
settings which help you configure all necessary scanning options.
System Requirements
To install and use Dr.Web Anti-virus, ensure your mobile device
works under one of the following operating systems:
Microsoft® Windows Mobile® 2003
Microsoft® Windows Mobile® 2003 Second Edition
Microsoft® Windows Mobile® 5.0
Microsoft® Windows Mobile® 6.0
Microsoft® Windows Mobile® 6.1
Microsoft® Windows Mobile® 6.5
Dr.Web Anti-virus operates only on the devices with touch
screen.
Distribution Kit
Dr.Web® Anti-virus for Windows Mobile can be purchased either
from the Dr.Web Web shop or from official distributors. For more
information on purchasing, visit the Doctor Web official web site at
http://estore.drweb.com/.
The distribution kit of Dr.Web® Anti-virus for Windows Mobile
includes the drweb-wince-en.msi installation file, the drweb-wince-enarm.cab archive, and the drweb-wince-en.pdf file with this guide.
User Manual
8
Chapter 2. Licensing
Chapter 2. Licensing
The key file regulates the use rights for the product.
Key File Acquisition
When operating in the central protection mode, the key file is
downloaded and registered automatically on Agent connected to
the server. In this case, the key file is not stored locally on your
mobile device.
As a license key file for Dr.Web® Anti-virus for Windows Mobile,
you can use a valid license key file for Dr.Web® for Windows,
Dr.Web® Security Space, Dr.Web® Bastion for Windows,
Dr.Web® for Windows+Linux or Dr.Web® SOHO bundle
products.
Also you can obtain a key file after registration of the product on the
official Doctor Web Web site at http://buy.drweb.com/register/ or by
using the key file receiving procedure.
Receive a key file
The key file receiving procedure requires a working connection to
the internet via HTTP. To open the connection, use either the builtin GPRS module or an Infrared, Bluetooth, Wi-Fi, or USB ActiveSync
connection to a computer with access to the internet.
1. Do one of the following:
In the warning notification, tap Register.
From the main application window, tap Menu -> Get
Key File to launch the key file receiving procedure
manually.
User Manual
9
Chapter 2. Licensing
2. Select the type of a key file you want to receive:
If you have a serial number, tap Get license key.
If you want to install the product for evaluation, tab Get
demo key to receive a demo key file and proceed to step
4.
3. Enter the serial number and tap Next.
4. Enter your personal data and tap Next. This information is
necessary to receive a key file.
5. The procedure connects to the registration server and obtains
the key file. The message box displays the procedure log:
If the license key is downloaded successfully, the message
box indicates the file location.
If an error occurred, the message box displays error
details.
User Manual
10
Chapter 3. Installation
Chapter 3. Installation
You can install, recover or remove Dr.Web Anti-virus either by using
the ActiveSync application/Windows Mobile Device Center, or
manually.
Install via synchronization
If you use ActiveSync/Windows Mobile Device Center for
synchronization of your device with the computer, then to install Dr.
Web Anti-virus do the following:
1. Synchronize the device on which you wish to install the
application with a computer using ActiveSync/Windows Mobile
Device Center.
2. Double-click drweb-wince-en.msi to open the Dr.Web® Antivirus for Windows Mobile Installation Wizard.
If Dr.Web® Anti-virus for Windows Mobile operates
in the central protection mode, to avoid the procedure of
authorization on server after installation, you can create
and launch a configuration bat-file, which should be placed
in the same directory with the installation file drweb-winceen.msi. The configuration file has the following structure:
msiexec.exe /i drweb-wince-en.msi SERVER="10.3.0.76"
ID="c00a76b5-d11d-b211-aaad-e409beb1d587"
PASS="12345678"
Specify the IP address of the central protection server, th
ID and password received from the anti-virus network
administrator.
If you start the installation by launching the bat-file, do not
close the installation process notification on the PC before
the installation of Dr.Web® Anti-virus for Windows
Mobile completes.
3. On the Welcome page, click Next.
User Manual
11
Chapter 3. Installation
4. On the next page, select a destination folder on the computer,
where you want to copy the installation files. You can either
enter the path to the folder in the corresponding field or click
Browse, select the required folder, and then click OK. Use the
options below to configure access to the installation folder and
click Next to continue.
5. On the Ready to Install the Program page, review the
installation settings and click Back to make changes or click
Next to begin the installation.
6. When the files are copied to the specified folder, the Add or
Remove Programs window of ActiveSync/Windows Mobile
Device Center displays. This starts installation of Dr.Web
Anti-virus to your device. An installation progress bar appears
on the screen of your mobile device.
7. The application attempts to launch Monitor. However, this
component cannot operate without a valid license key file. The
“Monitor cannot be launched” warning appears on
the screen of the device. Tap Close to close the warning, or
tap Register to launch the key file receiving procedure.
8. Click OK to finish the installation.
9. Copy the license key file to the Dr.Web Anti-virus installation
folder on your device (default is \Program Files\DrWeb) or
launch the key file receiving procedure on the device if you
have no valid key file.
Install without synchronization
If you do not have ActiveSync/Windows Mobile Device Center installed
on your computer, then you can use the applied CAB-archive to install
Dr.Web Anti-virus on your device. Do the following:
1. Copy the drweb-wince-en-arm.cab archive to your device
through direct connection to the computer or by using a
memory card.
2. Launch the cab-archive. An installation progress bar appears on
the screen of your mobile device.
User Manual
12
Chapter 3. Installation
3. The application attempts to launch Monitor. However, this
component cannot operate without a valid license key file. The
“Monitor cannot be launched” warning appears on
the screen of the device. Tap Close to close the warning, or
tap Register to launch the key file receiving procedure.
4. Tap OK to finish the installation.
5. Copy the license key file to the Dr.Web Anti-virus installation
folder on your device (default is \Program Files\DrWeb) or use
the key file receiving procedure if you have no valid key file.
If Dr.Web® Anti-virus for Windows Mobile operates in the
central
protection
mode,
you
need
to
pass authorization on the server. To avoid the authorization
procedure after program installation, you can copy the
configuration file agent.cfg on the device to the \Program
Files\DrWeb directory before starting the installation. The agent.cfg
file has the following structure:
SERVER = 10.3.0.76 ID =
dc0d9c68edba PASS = 12345678
c01e2b55-d21d-b211-8d64-
Specify the IP address of the central protection server, the ID and
password received from the anti-virus network administrator.
Recover and Uninstall
You can recover an already installed version of Dr.Web Anti-virus or
delete it from the device.
To recover or delete application via ActiveSync
1. Synchronize the device with your computer using ActiveSync/
Windows Mobile Device Center.
2. Do one of the following:
Launch the drweb-wince-en.msi installation file and select
the operation to perform in the installation wizard.
User Manual
13
Chapter 3. Installation
Open the main window of ActiveSync application, from the
menu select Service -> Add or remove programs,
then select/clear the Doctor Web, Ltd. Dr.Web Antivirus check box and click OK.
Open the main window of Windows Mobile Device Center,
hover the mouse pointer on Programs and Services
and click Add or remove programs, then select/clear
the Doctor Web, Ltd. Dr.Web Anti-virus check box
and click OK.
3. Dr.Web Anti-virus is reinstalled or deleted from your device.
If you do not have ActiveSync installed on your computer, you can
delete Dr.Web® Anti-virus for Windows Mobile manually.
To delete the application manually
1. In the device, tap Start -> Settings and select the System
tab.
2. Tap Remove programs, then in the list of installed programs
select Doctor Web, Ltd. Dr.Web Anti-virus and tap
Remove. Dr.Web Anti-virus is deleted from your device.
User Manual
14
Chapter 4. Getting Started
Chapter 4. Getting Started
This section describes the Dr.Web Anti-virus interface and provides
step-by-step procedures for launching or exiting the application and
accessing Online Help.
Launch and Exit the Application
By default, Dr.Web Anti-virus is installed to the \Program
Files\DrWeb folder.
To launch the application
Do one of the following:
Tap the DrWeb.exe file located in the installation folder.
Tap Start -> Programs and then tap Dr.Web Antivirus.
To switch to background operation
In the current window, tap the close button. The application
remains loaded in memory.
To exit the application
In any window, tap Menu and then tap Exit (see Interface).
The application is unloaded from memory.
When the application is launched, you can use the Dr.Web Antivirus icon in the recently launched programs section of the Start
menu to activate the application. When you launch Dr.Web Antivirus, the application opens on the main window. When you activate
the application from the background operation, the application opens
on the last active window.
User Manual
15
Chapter 4. Getting Started
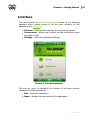
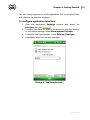
Interface
The main window of Dr.Web Anti-virus consists of the following
elements which provide access to all the main functions of the
application (see Picture 1):
Full scan – launches the scanning of the whole file system.
Custom scan – allows you to select the files and folders which
you want to scan.
Settings – opens the application settings.
Picture 1. The main window.
The tool bar which is located at the bottom of the main window
contains the following elements:
Exit – closes the application.
Menu – displays the main menu of the application.
User Manual
16
Chapter 4. Getting Started
You can change appearance of the application GUI by adjusting fonts
and selecting the interface language.
To configure application interface
1. View the application Settings window and select the
Interface tab (see Picture 2).
2. To adjust font sizes for texts in the device so that they depend
on the system settings, select Allow system font size.
3. To enable ClearType function, select Enforce ClearType.
4. If available, select an interface language.
Picture 2. The Interface tab.
User Manual
17
Chapter 4. Getting Started
Help system
You can access the context help system implemented in Dr.Web
Anti-virus from any active window of the application, the help system
automatically opens on the information about the active window.
To access the help system
Tap Start -> Help.
To access help contents
In the main window, tap Menu - > Help.
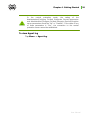
Operation Mode
If necessary, you can use your installation of Dr.Web Anti-virus to
connect to corporate networks managed by Dr.Web Control Center.
To operate in such central protection mode, you do not need to install
additional software or uninstall Dr.Web Anti-virus.
In central protection mode the following additional functions are
performed:
Updating and configuring the anti-virus packages and
performing other tasks according to Dr.Web Control Center
instructions and sending the results on the tasks completion
Downloading license key file and managing rights for configuring
program components and enabling/disabling Monitor
Sending notifications on predefined events (e.g., infected
objects detection or Scanner launch) in operation of anti-virus
packages to Dr.Web Control Center
In central protection mode, the user can perform the following actions:
Start computer scanning, if necessary
Modify the settings of the Dr.Web Anti-virus components
including disabling the central protection mode
User Manual
18
Chapter 4. Getting Started
Connection to anti-virus network is carried out by a special component
- Agent. Agent can be enabled and configured on the Agent tab (see
Picture 3) of program settings window.
Picture 3. Setting window. Agent tab.
To configure central protection mode
1. Contact an anti-virus network administrator of your company
or IT provider for a public key file and parameters of
connection to Dr.Web Control Center (the central protection
server).
2. On the Agent tab select the check box Enable Agent.
3. On the Connection to ES/AV-Desk Server section, enter
the server IP address, ID and password received from the antivirus network administrator.
4. Agent will receive options and the rights specified on the
server. Further Dr.Web Agent will work without dependence
from connection with Dr.Web Control Center.
User Manual
19
Chapter 4. Getting Started
In the central protection mode, the values of the
Administration\Configure Dr.Web Enterprise Server\Compression
and Administration\Configure Dr.Web Enterprise Server\Encryption
server parameters should be "No" or "Possible". If the value of any
of these parameters is "Yes", the connection to the central
protection server cannot be established.
To view Agent log
Tap Menu -> Agent log.
User Manual
20
Chapter 5. Application Functions
Chapter 5. Application Functions
This section describes main featured of Dr.Web Anti-virus and
provides step-by-step procedures for configuring protection of your
device.
When operating in central protection mode, a user may change
the settings of the Agent and the components provided that he
has corresponding permissions to such actions. The permissions
are set at Server by the anti-virus network administrator.
Constant Anti-Virus Protection
The main function implemented in Dr.Web Anti-virus is the ability to
constantly scan the file system in real-time mode. This function is
provided carried out by a component called file monitor. It resides in
the memory of the device and checks all files as they are created or
modified. This means that there is no way for malicious objects to
appear in the system while Monitor is active.
Providing you have a working license key file, Monitor automatically
activates upon installation and begins protecting the file system of the
device. It remains active even if you close the application. Monitor
icon
on the Today screen indicates Monitor activity. You can tap
the icon to display Monitor statistics.
Dr.Web Anti-virus also allows you to view the statistics of the
Monitor operation and Monitor log, which contain information on all
events connected with Monitor operation (i.e. Monitor starts and
stops, detection of malicious objects, inability to check a certain file,
etc.).
User Manual
21
Chapter 5. Application Functions
To view Monitor statistics
Do one of the following:
In the main window, tap Menu -> Monitor statistics.
If available, in the command bar of the Today screen
(Home screen), tap the Monitor icon
.
To view Monitor log
Tap the Menu -> Monitor log.
To configure Monitor
1. View the application Settings window and select the Monitor
tab (see Picture 4).
2. Do the following:
To hide the Monitor icon, clear the Show Monitor icon
option.
To disable Monitor, clear the Enable option.
To configure types of events for Monitor to register in
the log, select the appropriate options in the Monitor log
events group.
To scan files in archives, select the types of archives in
which you want to scan the files.
User Manual
22
Chapter 5. Application Functions
Picture 4. The Monitor tab.
On-demand Scan
Another function which Dr.Web Anti-virus provides you is ondemand scanning of the file system. You can perform full check on
your file system including files and archives removable memory cards
or scan critical files and archives only. This function is performed by
the scanner.
Dr.Web Anti-virus logs events connected with the operation of the
on-demand Scanner (Scanner starts and stops, detection of
malicious objects, inability to check a certain file, etc).
To view the Scanner log
Tap Menu -> Scanner log.
User Manual
23
Chapter 5. Application Functions
To configure Scanner
1. View the application Settings window and select the Scanner
tab (see Picture 5).
2. Do the following:
To disable scanning of files on data carriers, clear the
Scan files on storage cards option.
To disable scanning of firmware files, clear the Scan
firmware files option.
To configure types of events for Scanner to register in
the log, select the appropriate options in the Scanner log
events group.
To scan files in archives, select the types of archives in
which you want to scan the files.
It is strongly recommended to periodically scan the file system in
case Monitor had not been active for some time.
Picture 5. The Scanner tab.
User Manual
24
Chapter 5. Application Functions
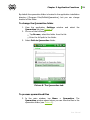
To perform a full scan
In the main window, tap Full scan (see Picture 1).
To scan certain files, archives and folders
1. In the main window, tap Custom scan (see Picture 1).
2. Select objects to scan (see Picture 6) and tap Start.
When the scanning process ends, Dr.Web Anti-virus displays the
scanning results window where you can choose necessary actions for
detected malicious objects.
Picture 6. Custom Scan window.
User Manual
25
Chapter 5. Application Functions
Malicious Objects Neutralization
Dr.Web Anti-virus allows you to choose between the following
actions for malicious object:
Delete – the objects is completely removed from the memory of
the device.
Quarantine – the object is moved to a special folder where it is
isolated from the rest of the file system.
Ignore - the application does not perform any operations under
the malicious object and leaves it intact.
If the malicious object is detected by Monitor, then a window offering
the user to choose an action for this object appears on the screen.
Scanner however, allows you to select the necessary actions only
after the scanning process is completed.
Anti-spam
Anti-spam filters messages and phone calls allowing to block in
automatic or manual mode the undesired messages and calls, such as
advertisements or messages and calls from unknown numbers. The
filtering is based on built-in and custom filtering profiles.
Dr.Web Anti-virus logs events connected with the operation of
messages and calls filtering (Anti-spam starts and stops, blocking
calls and messages, etc).
To view Anti-spam log
Tap Menu -> Scanner log.
User Manual
26
Chapter 5. Application Functions
To configure Anti-spam
1. View the application Settings window and select the Antispam tab (see Picture 7).
2. Do the following:
To enable incoming SMS/MMS and calls filter, in the
Incoming section select the Enable SMS/MMS filter
and/or Enable calls filter check boxes.
Select the filtering profile. You can select one of the builtin filters: Block all, Block by black list, Allow
numbers from phone book, as well as one of the userdefined profiles.
To enable the outgoing SMS filter, in the Outgoing
section select the Enable SMS filter check box. In case
this filter is selected, before sending SMS messages, the
user will be asked to confirm/reject it.
To allow sending SMS on the numbers included into the
phone book without confirmation, select the Allow
Contacts check box.
If your device operates under Windows Mobile 2003 or Windows
Mobile 2003 SE operating system, and the Allow numbers from
phone book and/or the Allow Contacts profiles are selected in
the Incoming and Outgoing sections respectively, you need to
open the Anti-spam tab in the window of Dr.Web Anti-virus
settings and tap OK each time you make changes in the phone
book contacts stored in the phone memory to make these changes
applied to filtering.
User Manual
27
Chapter 5. Application Functions
Picture 7. The Anti-spam tab.
Filtering profiles for the incoming messages and calls
The following profiles are available for the incoming calls and
messages filtering:
Block all - to block all the incoming calls and messages.
Block by black list - to block only the messages and calls
coming from the numbers included into the black lis. All other
call and messages are accepted.
Allow numbers from phone book - to accept only calls and
messages from the numbers included into the phone book.
To create user filtering profile
In addition to the predefined filtering profiles, Dr.Web Anti-virus
allows to create an unlimited number of custom profiles with separate
lists of numbers and program actions for the calls and messages
coming from them.
User Manual
28
Chapter 5. Application Functions
To create a new profile, tap New under the list of available profiles. A
New profile window will open. Enter the profile name and select on e
of the following the filter actions:
Use profile as white list - to accept all the calls and messages
coming from the nu,bers included in the profile list.
Add profile to black list - to block all the incoming messages
and calls from the numbers from the profile list in addition to the
ones coming from the numbers from the black list.
To view and edit black list and user profiles lists
To view the black list/user profile list of numbers:
In the Incoming section select Block by black list or a user
filtering profile
Tap View
To add a number into the black list/the list of the user filtering profile:
In the profile window tap New
Enter the phone number and a comment for the number you are
adding
Tap OK. The number will be added to the list
To modify information for a number from the black list/user filtering
profile list:
In the profile window tap Edit
In the Edit number and comments window modify the phone
number and/or comments
Tap OK
To delete a number from the black list/list of the user filtering profile:
Select the number in the list of the corresponding profile
Tap Delete
User Manual
29
Chapter 5. Application Functions
Update
Dr.Web Anti-virus uses Dr.Web virus databases to detect
malicious software. These databases contain details and signatures for
all viruses and malicious programs for mobile devices known at the
moment of the application release. However modern computer viruses
are characterized by the evolvement and modification; also new
viruses sometimes emerge. Therefore, to mitigate the risk of infection
during the licensed period, Doctor Web provides you with periodical
updates to virus databases and application components. The updater
component of the Dr.Web Anti-virus helps you download the
updates via Internet and automatically installs them.
To update the application and virus databases
Tap Menu -> Update, and then tap Start.
The updating procedure requires a working connection to the
internet via HTTP. To open the connection, use either the built-in
GPRS module or an Infrared, Bluetooth, Wi-Fi, or USB ActiveSync
connection to a computer with access to the internet.
You can check the program version and the version and creation date
of the virus databases in the Dr.Web Anti-virus information window.
To open application information
Tap Menu -> About.
Quarantine
Dr.Web Anti-virus allows you to move the infected files to
quarantine folder where they are isolated from the rest of file system.
Later you can send the stored infected files to the Dr.Web anti-virus
laboratory for further investigation.
User Manual
30
Chapter 5. Application Functions
By default the quarantine folder is located in the application installation
directory (\Program Files\DrWeb\Quarantine), but you can change
location of the folder.
To change the Quarantine folder
1. View the application Settings window and select the
Quarantine tab (see Picture 8).
2. Do one of the following:
Tap Browse, select the folder from the list.
Enter the full path to the folder.
3. Select Path to Quarantine folder.
Picture 8. The Quarantine tab.
To process quarantined files
3. In the main window, tap Menu -> Quarantine. The
Quarantine window opens where you can view the files in the
quarantine folder (see Picture 9).
User Manual
31
Chapter 5. Application Functions
4. Select the files you want to manage and do one of the
following:
Tap Restore to return the files back to the folder where
they were moved from.
Tap Delete to completely remove the files from the
device.
Picture 9. The Quarantine folder.
User Manual
32
Appendices
Appendices
Appendix A. Central Anti-virus
Protection
Solutions for central protection from Doctor Web help automate and
simplify configuring and managing information security of computers
within logical structures (for example, company computers that access
each other from both inside and outside of company's local networks).
Protected computers are united in one anti-virus network which
security is monitored and managed from central server by
administrators. Connection to centralized anti-virus systems
guarantees high level of protection while requiring minimum efforts
from end-users.
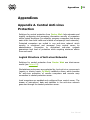
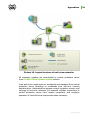
Logical Structure of Anti-virus Networks
Solutions for central protection from Doctor Web use client-server
model (see Picture 10).
Workstations and servers are protected by local anti-virus components
(agents, or clients; herein, Dr.Web) installed on them, which provides
for anti-virus protection of remote computers and ensures easy
connection to central protection server.
Local computers are updated and configured from central server. The
stream of instructions, data and statistics in the anti-virus network
goes also through the central protection server.
User Manual
33
Appendices
Picture 10. Logical structure of anti-virus networks.
All necessary updates are downloaded to central protection server
from Dr.Web Global Update System servers.
Local anti-virus components are configured and managed from central
protection server according to commands from anti-virus network
administrators. Administrators manage central protection servers and
topology of anti-virus networks (for example, validate connections to
central protection server from remote computers) and configure
operation of local anti-virus components when necessary.
User Manual
34
Appendices
Appendix B. Contacting Support
Support is available to customers who have purchased a commercial
version of Doctor Web products. Visit the Doctor Web Technical
Support Web site at http://support.drweb.com/.
If you encounter any issues installing or using company products, take
advantage of the following Doctor Web support options:
Download and review the latest manuals and guides at http://
download.drweb.com/
Read the frequently asked questions at http://support.drweb.
com/
Look for the answer in Dr.Web knowledge database at http://
wiki.drweb.com/
Browse the Dr.Web official forum at http://forum.drweb.com/
If you have not found solution for the problem, you can request direct
assistance from Doctor Web Technical Support by filling in the
web-from in the corresponding section of the support site at http://
support.drweb.com/.
For regional office information, refer to the Doctor Web official Web
site at http://company.drweb.com/contacts/moscow.
User Manual
35
36
Index
Scanner
A
about
30
ActiveSync
18
conventions
6
D
settings
18
Anti-spam
distribution kit
26
black list
26
Anti-spam
settings
black list
26
custom
distribution kit
23
anti-virus network
exit
33
central protection
33
technical support
35
15
26
C
central protection
configure
interface
26
16
21
15
18
11, 12, 13
interface
16
key file
9
launch
15
license
9
main features
Monitor
18
Anti-spam
18, 33
21
getting started
install
background operation
8
26
functions
help
B
21
15
filetring
appendices
Agent
33
constant protection
23
15
26
central protection
anti-virus check
Monitor
26
background operation
26
black list
8
Dr.Web® Anti-virus for Windows
Mobile
7
26
filtering profiles
full
context help
11, 13
Agent
log
23
7
21
on-demand scan
operation mode
processing threats
quarantine
23
18, 33
26
30
User Manual
37
Index
Dr.Web® Anti-virus for Windows
Mobile
7
recover
13
remove
11, 13
Scanner
23
technical support
16
K
8
35
30
key file
9
L
launch program
E
license
exit program
15
9
log
15
Anti-spam
F
file monitor
21
filetrs
black list
21
Scanner
23
M
26
26
main features
create
26
Monitor
log
26
calls
21
21
statistics
26
26
21
N
messages
profiles
7
21
settings
filtering
black list
26
Monitor
built-in
user
12
interface
settings
system requirements
update
without synchronization
26
neutralize threats
26
26
O
H
help system
operation mode
18
Agent
I
configure
install program
18, 33
18
18
11
via synchronization
11
User Manual
38
Index
P
program functions
21
Q
quarantine
26, 30
R
recover program
13
remove program
11
via synchronization
13
without synchronization
13
S
Scanner
log
23
23
settings
statistics
23
21
system requirements
8
T
technical support
35
threats
actions
detection
26, 30
23, 26
U
update
30
W
Windows Mobile Device Center
13
11,
User Manual
© 2003-2011 Doctor Web