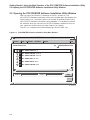
1
POLYCENTER Software
Installation Utility User’s Guide
Order Number: AA–Q28NA–TK
March 1994
This document describes how to use the POLYCENTER Software
Installation utility to install and remove software products on your
system.
Revision/Update Information:
This is a new manual.
Software Version:
OpenVMS AXP Version 6.1
OpenVMS VAX Version 6.1
Digital Equipment Corporation
Maynard, Massachusetts
March 1994
Digital Equipment Corporation makes no representations that the use of its products in the
manner described in this publication will not infringe on existing or future patent rights, nor do
the descriptions contained in this publication imply the granting of licenses to make, use, or sell
equipment or software in accordance with the description.
Possession, use, or copying of the software described in this publication is authorized only pursuant
to a valid written license from Digital or an authorized sublicensor.
© Digital Equipment Corporation 1994. All rights reserved.
The postpaid Reader’s Comments forms at the end of this document request your critical evaluation
to assist in preparing future documentation.
The following are trademarks of Digital Equipment Corporation: Alpha AXP, AXP, Bookreader,
DEC, DECdtm, DECwindows, Digital, OpenVMS, POLYCENTER, VAX, VAX DOCUMENT, VMS,
and the DIGITAL logo.
Motif is a registered trademark of the Open Software Foundation, Inc.
NFS is a registered trademark of Sun Microsystems, Inc.
All other trademarks and registered trademarks are the property of their respective holders.
ZK5951
This document is available on CD–ROM.
This document was prepared using VAX DOCUMENT Version 2.1.
Send Us Your Comments
We welcome your comments on this or any other OpenVMS manual. If you have suggestions for
improving a particular section or find any errors, please indicate the title, order number, chapter,
section, and page number (if available). We also welcome more general comments. Your input is
valuable in improving future releases of our documentation.
You can send comments to us in the following ways:
[email protected]
•
Internet electronic mail:
•
Fax:
•
A completed Reader’s Comments form (postage paid, if mailed in the United States), or a
letter, via the postal service. Two Reader’s Comments forms are located at the back of each
printed OpenVMS manual. Please send letters and forms to:
603-881-0120 Attn: OpenVMS Documentation, ZKO3-4/U08
Digital Equipment Corporation
Information Design and Consulting
OpenVMS Documentation
110 Spit Brook Road, ZKO3-4/U08
Nashua, NH 03062-2698
USA
You may also use an online questionnaire to give us feedback. Print or edit the online file
SYS$HELP:OPENVMSDOC_SURVEY.TXT. Send the completed online file by electronic mail to our
Internet address, or send the completed hardcopy survey by fax or through the postal service.
Thank you.
Contents
Preface . . . . . . . . . . . . . . . . . . . . . . . . . . . . . . . . . . . . . . . . . . . . . . . . . . . . . . . . . . . .
ix
1 Introduction to the POLYCENTER Software Installation Utility
1.1
1.2
Installing and Managing Software Products: Overview . . . . . . . . . . . . . . .
Information You Need to Install Software Products . . . . . . . . . . . . . . . . . .
1–1
1–3
2 Getting Started: Using the Motif Interface of the POLYCENTER
Software Installation Utility
2.1
2.2
2.3
2.4
2.5
2.6
2.7
2.8
2.9
2.10
2.11
2.11.1
2.11.2
2.11.3
2.11.4
2.11.5
2.11.6
2.11.7
Basic Concepts for DECwindows Motif Users . . . . . . . . . . . . . . . . .
Opening the POLYCENTER Software Installation Utility Window .
Selecting the Task to Be Performed: Mode Menu . . . . . . . . . . . . . .
Display Conventions for List Boxes . . . . . . . . . . . . . . . . . . . . . . . . .
Selecting and Installing Products . . . . . . . . . . . . . . . . . . . . . . . . . . .
Specifying a Product Name and Version Number . . . . . . . . . . . . . . .
Selecting Product Options . . . . . . . . . . . . . . . . . . . . . . . . . . . . . . . .
Starting the Task . . . . . . . . . . . . . . . . . . . . . . . . . . . . . . . . . . . . . . .
Getting Help: Help Menu . . . . . . . . . . . . . . . . . . . . . . . . . . . . . . . .
Exiting from the POLYCENTER Software Installation Utility . . . .
Customizing the DECwindows Motif Interface . . . . . . . . . . . . . . . . .
Customizing the Session Menu . . . . . . . . . . . . . . . . . . . . . . . . .
Customizing the Mode Menu . . . . . . . . . . . . . . . . . . . . . . . . . . .
Customizing the Qualifiers Menu . . . . . . . . . . . . . . . . . . . . . . . .
Customizing the Options Menu . . . . . . . . . . . . . . . . . . . . . . . . .
Saving Your Customized Settings . . . . . . . . . . . . . . . . . . . . . . .
Adding Text-Entry Fields and File Filters to the Main Window .
Customizing the Interface to Control Site-Specific Installations
.
.
.
.
.
.
.
.
.
.
.
.
.
.
.
.
.
.
.
.
.
.
.
.
.
.
.
.
.
.
.
.
.
.
.
.
.
.
.
.
.
.
.
.
.
.
.
.
.
.
.
.
.
.
.
.
.
.
.
.
.
.
.
.
.
.
.
.
.
.
.
.
.
.
.
.
.
.
.
.
.
.
.
.
.
.
.
.
.
.
2–1
2–2
2–4
2–4
2–5
2–6
2–7
2–7
2–8
2–8
2–8
2–9
2–9
2–9
2–9
2–10
2–10
2–10
.
.
.
.
.
.
.
.
.
.
.
.
.
.
.
.
.
.
.
.
3–2
3–2
3–3
3–3
3 Getting Started: Using the DCL Interface of the POLYCENTER
Software Installation Utility
3.1
3.2
3.3
3.4
Selecting the Task to Be Performed: PRODUCT Subcommands
Locating a Product on the Distribution Kit . . . . . . . . . . . . . . . .
Getting Help: DCL HELP Command . . . . . . . . . . . . . . . . . . . . .
Including PRODUCT Commands in a Command Procedure . . .
.
.
.
.
.
.
.
.
.
.
.
.
v
4 Installing Software: Getting Started
4.1
4.2
4.2.1
4.2.2
4.2.3
4.3
4.4
4.4.1
4.4.2
4.4.3
4.4.4
4.5
4.5.1
4.5.2
Installing Software: Brief Introduction . . . . . . . . . . . . . . . . . . . . . . . . . .
Basic Procedure for Software Installation . . . . . . . . . . . . . . . . . . . . . . . .
Default Installation Criteria . . . . . . . . . . . . . . . . . . . . . . . . . . . . . . .
Product Distribution: How the POLYCENTER Software Installation
Utility Categorizes Software . . . . . . . . . . . . . . . . . . . . . . . . . . . . . . .
Postinstallation Procedures . . . . . . . . . . . . . . . . . . . . . . . . . . . . . . . .
Selecting Product Options . . . . . . . . . . . . . . . . . . . . . . . . . . . . . . . . . . . .
Making Configuration Choices with Product Configuration Files . . . . . . .
How to Create and Use PCFs . . . . . . . . . . . . . . . . . . . . . . . . . . . . . .
How to Use PCFs . . . . . . . . . . . . . . . . . . . . . . . . . . . . . . . . . . . . . . . .
Recording Your Configuration Choices . . . . . . . . . . . . . . . . . . . . . . . .
Modifying an Existing PCF . . . . . . . . . . . . . . . . . . . . . . . . . . . . . . . .
Simplifying Product Integration with the POLYCENTER Software
Installation Utility . . . . . . . . . . . . . . . . . . . . . . . . . . . . . . . . . . . . . . . . . .
Detecting and Satisfying Dependencies Among Software Products . .
Types of Information Contained in the Product Database . . . . . . . . .
.
.
.
4–1
4–1
4–2
.
.
.
.
.
.
.
.
4–2
4–3
4–3
4–4
4–4
4–4
4–5
4–7
.
.
.
4–7
4–7
4–7
5 Installing Software: Some Tasks During an Installation
5.1
5.2
5.2.1
5.2.2
5.2.3
5.2.4
5.3
5.3.1
5.3.2
5.3.3
5.4
5.5
5.6
5.7
Extracting Release Notes . . . . . . . . . . . . . . . . . . . . . . .
Starting the Installation . . . . . . . . . . . . . . . . . . . . . . .
Specifying a Kit Location . . . . . . . . . . . . . . . . . . . .
Specifying Where You Want the Products Installed
Supplying Answers from a PCF . . . . . . . . . . . . . . .
Creating a New PCF During the Installation . . . .
Responding to Installation Questions . . . . . . . . . . . . . .
Getting an Online Explanation of Questions . . . . .
Selecting Options . . . . . . . . . . . . . . . . . . . . . . . . . .
Answering Fewer Questions: The Noexpand Key .
Confirming Your Answers . . . . . . . . . . . . . . . . . . . . . .
Stopping an Installation in Progress . . . . . . . . . . . . . .
Performing the Installation as a Batch Job . . . . . . . . .
Registering a Noncompliant Product . . . . . . . . . . . . . .
.
.
.
.
.
.
.
.
.
.
.
.
.
.
.
.
.
.
.
.
.
.
.
.
.
.
.
.
.
.
.
.
.
.
.
.
.
.
.
.
.
.
.
.
.
.
.
.
.
.
.
.
.
.
.
.
.
.
.
.
.
.
.
.
.
.
.
.
.
.
.
.
.
.
.
.
.
.
.
.
.
.
.
.
.
.
.
.
.
.
.
.
.
.
.
.
.
.
.
.
.
.
.
.
.
.
.
.
.
.
.
.
.
.
.
.
.
.
.
.
.
.
.
.
.
.
.
.
.
.
.
.
.
.
.
.
.
.
.
.
.
.
.
.
.
.
.
.
.
.
.
.
.
.
.
.
.
.
.
.
.
.
.
.
.
.
.
.
.
.
.
.
.
.
.
.
.
.
.
.
.
.
.
.
.
.
.
.
.
.
.
.
.
.
.
.
.
.
.
.
.
.
.
.
.
.
.
.
.
.
5–1
5–1
5–2
5–3
5–3
5–3
5–4
5–4
5–4
5–5
5–5
5–5
5–5
5–6
.
.
.
.
.
.
.
.
.
.
.
.
.
.
.
.
.
.
.
.
.
.
.
.
.
.
.
.
.
.
.
.
.
.
.
.
.
.
.
.
.
.
.
.
.
.
.
.
6–1
6–1
6–2
6–2
6–2
6–2
6–3
6–3
.
.
.
.
.
.
.
.
.
.
.
.
.
.
.
.
.
.
.
.
.
.
.
.
.
A–1
A–1
A–1
A–1
A–2
6 Removing and Managing Installed Software Products and Kits
6.1
6.2
6.3
6.4
6.5
6.6
6.6.1
6.6.2
Removing an Installed Product . . . . . . . . . . . . . . . . . . . . . . . .
Reconfiguring an Installed Product . . . . . . . . . . . . . . . . . . . . .
Recording a Change in Volume Label in the Product Database
Copying a Software Kit to a New Location . . . . . . . . . . . . . . .
Converting a Software Kit from One Format to Another . . . . .
Retrieving Product Information . . . . . . . . . . . . . . . . . . . . . . . .
Displaying Information About Product Files . . . . . . . . . . .
Displaying Information About the Products . . . . . . . . . . . .
.
.
.
.
.
.
.
.
.
.
.
.
.
.
.
.
.
.
.
.
.
.
.
.
A How the POLYCENTER Software Installation Utility Differs from
VMSINSTAL
A.1
A.2
A.3
A.4
A.5
vi
Order of Configuration and Installation . . . . .
Interrupting an Installation in Progress . . . .
No Questions About Backing Up the System .
Running Product IVPs Automatically . . . . . .
Installing Several Products at the Same Time
.
.
.
.
.
.
.
.
.
.
.
.
.
.
.
.
.
.
.
.
.
.
.
.
.
.
.
.
.
.
.
.
.
.
.
.
.
.
.
.
.
.
.
.
.
.
.
.
.
.
.
.
.
.
.
.
.
.
.
.
.
.
.
.
.
.
.
.
.
.
.
.
.
.
.
.
.
.
.
.
.
.
.
.
.
B DECWindows Motif Quick-Reference Information for Product
Installations
C PRODUCT Command Summary
PRODUCT . . . . . . . . . . . . . . . . . . .
CONFIGURE . . . . . . . . . . . . . .
COPY . . . . . . . . . . . . . . . . . . . .
EXTRACT RELEASE_NOTES .
FIND . . . . . . . . . . . . . . . . . . . .
INSTALL . . . . . . . . . . . . . . . . .
PACKAGE . . . . . . . . . . . . . . . .
RECONFIGURE . . . . . . . . . . .
REGISTER PRODUCT . . . . . .
REGISTER VOLUME . . . . . . .
REMOVE . . . . . . . . . . . . . . . . .
SHOW HISTORY . . . . . . . . . . .
SHOW OBJECT . . . . . . . . . . . .
SHOW PRODUCT . . . . . . . . . .
.
.
.
.
.
.
.
.
.
.
.
.
.
.
.
.
.
.
.
.
.
.
.
.
.
.
.
.
.
.
.
.
.
.
.
.
.
.
.
.
.
.
.
.
.
.
.
.
.
.
.
.
.
.
.
.
.
.
.
.
.
.
.
.
.
.
.
.
.
.
.
.
.
.
.
.
.
.
.
.
.
.
.
.
.
.
.
.
.
.
.
.
.
.
.
.
.
.
.
.
.
.
.
.
.
.
.
.
.
.
.
.
.
.
.
.
.
.
.
.
.
.
.
.
.
.
.
.
.
.
.
.
.
.
.
.
.
.
.
.
.
.
.
.
.
.
.
.
.
.
.
.
.
.
.
.
.
.
.
.
.
.
.
.
.
.
.
.
.
.
.
.
.
.
.
.
.
.
.
.
.
.
.
.
.
.
.
.
.
.
.
.
.
.
.
.
.
.
.
.
.
.
.
.
.
.
.
.
.
.
.
.
.
.
.
.
.
.
.
.
.
.
.
.
.
.
.
.
.
.
.
.
.
.
.
.
.
.
.
.
.
.
.
.
.
.
.
.
.
.
.
.
.
.
.
.
.
.
.
.
.
.
.
.
.
.
.
.
.
.
.
.
.
.
.
.
.
.
.
.
.
.
.
.
.
.
.
.
.
.
.
.
.
.
.
.
.
.
.
.
.
.
.
.
.
.
.
.
.
.
.
.
.
.
.
.
.
.
.
.
.
.
.
.
.
.
.
.
.
.
.
.
.
.
.
.
.
.
.
.
.
.
.
.
.
.
.
.
.
.
.
.
.
.
.
.
.
.
.
.
.
.
.
.
.
.
.
.
.
.
.
.
.
.
.
.
.
.
.
.
.
.
.
.
.
.
.
.
.
.
.
.
.
.
.
.
.
.
.
.
.
.
.
.
.
.
.
.
.
.
.
.
.
.
.
.
.
.
.
.
C–2
C–3
C–5
C–6
C–7
C–8
C–10
C–11
C–13
C–15
C–16
C–17
C–19
C–21
Sample Command Procedure for Running the POLYCENTER
Software Installation Utility . . . . . . . . . . . . . . . . . . . . . . . . . . . . . . . .
Sample CONFIGURE Procedure . . . . . . . . . . . . . . . . . . . . . . . . . . . . .
Sample Command Procedure for Installing a Product . . . . . . . . . . . . .
3–3
4–5
5–6
POLYCENTER Software Installation Utility Main Window .
Mode Menu . . . . . . . . . . . . . . . . . . . . . . . . . . . . . . . . . . . . .
Install Product List Window . . . . . . . . . . . . . . . . . . . . . . . .
Selected Products Window . . . . . . . . . . . . . . . . . . . . . . . . . .
The Work In Progress Window . . . . . . . . . . . . . . . . . . . . . . .
Index
Examples
3–1
4–1
5–1
Figures
2–1
2–2
2–3
2–4
2–5
.
.
.
.
.
.
.
.
.
.
.
.
.
.
.
.
.
.
.
.
.
.
.
.
.
.
.
.
.
.
.
.
.
.
.
.
.
.
.
.
2–2
2–4
2–5
2–7
2–8
.
.
.
.
.
.
.
.
1–2
3–2
4–5
5–2
..
6–3
..
6–3
Tables
1–1
3–1
4–1
5–1
6–1
6–2
Summary of POLYCENTER Software Installation Utility Features
and Related Tasks . . . . . . . . . . . . . . . . . . . . . . . . . . . . . . . . . . . . . .
Summary of Tasks and PRODUCT Subcommands . . . . . . . . . . . . . .
Function Keys for Recording Configuration Choices . . . . . . . . . . . . .
Features You Can Request When You Start an Installation . . . . . . .
SHOW OBJECT Command: Displaying Managed Object
Information . . . . . . . . . . . . . . . . . . . . . . . . . . . . . . . . . . . . . . . . . . .
SHOW PRODUCT and SHOW HISTORY Commands: Displaying
Product Information . . . . . . . . . . . . . . . . . . . . . . . . . . . . . . . . . . . . .
vii
Preface
Intended Audience
This document is intended for software installers, system managers, and anyone
responsible for maintaining software products for a large group of users. It
explains how to install and upgrade software as well as how to manage the
software products that are installed on your system.
Document Structure
This document is organized as follows:
•
Chapter 1 provides an overview of the POLYCENTER Software Installation
utility.
•
Chapter 2 introduces the DECwindows Motif interface of the POLYCENTER
Software Installation utility.
•
Chapter 3 introduces the keyboard user (DCL command line) interface of the
POLYCENTER Software Installation utility.
After reading the introductory chapters, some users may want to refer to
Appendix B for quick-reference information about installing products using
the DECwindows Motif interface to the POLYCENTER Software Installation
utility and to Appendix C for reference information about the DCL commands
and qualifiers for the POLYCENTER Software Installation utility.
•
Chapter 4 describes the steps to install software products using the keyboard
user interface of the POLYCENTER Software Installation utility.
•
Chapter 5 provides some step-by-step examples of using the keyboard user
interface.
•
Chapter 6 describes how to remove software products that have been installed
with the POLYCENTER Software Installation utility. The chapter also
describes other management tasks (such as displaying information about
products or moving kits from one location to another).
•
Appendix A compares the POLYCENTER Software Installation utility to the
VMSINSTAL utility.
•
Appendix B is a quick-reference list to installing software products using
the DECwindows Motif interface to the POLYCENTER Software Installation
utility.
•
Appendix C is a reference section for PRODUCT commands and qualifiers;
the PRODUCT command provides keyboard user (DCL-level) access to the
POLYCENTER Software Installation utility. You can use the PRODUCT
command interactively or in batch mode.
ix
Associated Documents
For more information, refer to the following manuals:
Manual
Description
OpenVMS User’s Manual
Provides basic information on how to use the
DIGITAL Command Language (DCL)
Using DECwindows Motif for
OpenVMS
Provides basic information on how to use
DECwindows Motif
OpenVMS System Manager’s
Manual
Describes how to manage an OpenVMS operating
system
POLYCENTER Software
Installation Utility Developer’s
Guide
Describes how to build software product kits
and platforms with the POLYCENTER Software
Installation utility
Conventions
In this manual, every use of OpenVMS AXP means the OpenVMS AXP operating
system, every use of OpenVMS VAX means the OpenVMS VAX operating system,
and every use of OpenVMS means both the OpenVMS AXP operating system and
the OpenVMS VAX operating system.
In this manual, every use of DECwindows and DECwindows Motif refers to
DECwindows Motif for OpenVMS software.
The following conventions are also used in this manual:
x
Ctrl/x
A sequence such as Ctrl/x indicates that you must hold down
the key labeled Ctrl while you press another key or a pointing
device button.
PF1 x
A sequence such as PF1 x indicates that you must first press
and release the key labeled PF1 and then press and release
another key or a pointing device button.
Return
In examples, a key name enclosed in a box indicates that
you press a key on the keyboard. (In text, a key name is not
enclosed in a box.)
...
Horizontal ellipsis points in examples indicate one of the
following possibilities:
•
Additional optional arguments in a statement have been
omitted.
•
The preceding item or items can be repeated one or more
times.
•
Additional parameters, values, or other information can be
entered.
.
.
.
Vertical ellipsis points indicate the omission of items from
a code example or command format; the items are omitted
because they are not important to the topic being discussed.
()
In command format descriptions, parentheses indicate that, if
you choose more than one option, you must enclose the choices
in parentheses.
[]
In command format descriptions, brackets indicate optional
elements. You can choose one, none, or all of the options.
(Brackets are not optional, however, in the syntax of a directory
name in an OpenVMS file specification or in the syntax of a
substring specification in an assignment statement.)
{}
In command format descriptions, braces surround a required
choice of options; you must choose one of the options listed.
boldface text
Boldface text represents the introduction of a new term or the
name of an argument, an attribute, or a reason (user action
that triggers a callback).
Boldface text is also used to show user input in Bookreader
versions of the manual.
italic text
Italic text emphasizes important information and indicates
complete titles of manuals and variables. Variables include
information that varies in system messages (Internal error
number), in command lines (/PRODUCER=name), and in
command parameters in text (where device-name contains up
to five alphanumeric characters).
UPPERCASE TEXT
Uppercase text indicates a command, the name of a routine,
the name of a file, or the abbreviation for a system privilege.
-
A hyphen in code examples indicates that additional
arguments to the request are provided on the line that follows.
numbers
All numbers in text are assumed to be decimal unless
otherwise noted. Nondecimal radixes—binary, octal, or
hexadecimal—are explicitly indicated.
xi
1
Introduction to the POLYCENTER Software
Installation Utility
Before you use any software, you must first install the software on a system. The
POLYCENTER Software Installation utility is a tool that lets system managers
and other privileged users install software.
The POLYCENTER Software Installation utility has several advantages over
other traditional software installation mechanisms. The POLYCENTER Software
Installation utility offers rapid installation of products; it is generally significantly
faster than the VMSINSTAL procedure. In addition, the POLYCENTER Software
Installation utility:
•
Lets you install many products at the same time (that is, with the same
command)
•
Lets you remove software products that have been installed using the
POLYCENTER Software Installation utility
•
Provides information about software products
You can use the POLYCENTER Software Installation utility to install those
software products that conform to the installation requirements of the
POLYCENTER Software Installation utility. A software product that conforms to
these requirements includes an explicit statement in its installation information
to indicate that it can be installed using the POLYCENTER Software Installation
utility.
To use the POLYCENTER Software Installation utility, you must have the
SYSPRV privilege on the local node and authorization for the SYSPRV privilege
on any remote node on which you want to use the POLYCENTER Software
Installation utility. You can use the POLYCENTER Software Installation utility
with either a DECwindows Motif interface or a DCL keyboard user interface. All
users have access to the DCL interface; you can use the Motif interface only if
you have a workstation with DECwindows Motif for OpenVMS or an X terminal.
If you use the windows interface, you may be interested in the quick-reference
information in Appendix B, which lists the steps for installing software products
using the POLYCENTER Software Installation utility. If you use the DCL
interface, a reference section of the available DCL commands is in Appendix C.
1.1 Installing and Managing Software Products: Overview
Installing and managing software products involves knowing how to do one or
more of the following tasks:
•
Installing operating system and applications software
•
Selecting specific options or configuration choices to customize software
products
1–1
Introduction to the POLYCENTER Software Installation Utility
1.1 Installing and Managing Software Products: Overview
•
Integrating a collection of software products and resolving dependencies and
prerequisites among those products
•
Maintaining installed software products
•
Removing products that were installed with the POLYCENTER Software
Installation utility
The POLYCENTER Software Installation utility helps you perform each of these
tasks by providing the features listed in Table 1–1.
Table 1–1 Summary of POLYCENTER Software Installation Utility Features and
Related Tasks
Task
POLYCENTER Software Installation Utility Features
Installing software
•
Rapid, reversible installations
•
Common user interface for all types of installations
•
Listings of products available on a distribution kit
•
Access to product release notes
•
Use of product configuration files (PCFs)
•
Installation verification
•
Removal (deinstallation) of installed products
•
Common user interface for all types of products
•
Default values provided by product manufacturer
•
Product database that stores current selections for future
reference
•
Choices saved in a product configuration file (PCF)
•
Online, product-specific description of options
•
Automated management of product dependencies and
relationships
•
Database that records and retrieves product information
•
Method for registering information about a product
that cannot be installed by the POLYCENTER Software
Installation utility (a product that is not compliant with
the Software Product Integration Architecture, SPIA)
Selecting product
options
Integrating product
sets
(continued on next page)
1–2
Introduction to the POLYCENTER Software Installation Utility
1.1 Installing and Managing Software Products: Overview
Table 1–1 (Cont.) Summary of POLYCENTER Software Installation Utility
Features and Related Tasks
Task
POLYCENTER Software Installation Utility Features
Maintaining products
•
Copying product kits to a new location or converting them
to a new format
•
Changing the configuration choices for a product after the
product has been installed
•
Registering changes in the name of a volume that contains
installed product files
This manual explains how you can undertake these tasks using the
POLYCENTER Software Installation utility.
Chapter 2 introduces the Motif interface, and Chapter 3 introduces the DCL
interface.
1.2 Information You Need to Install Software Products
When you install a software product using the POLYCENTER Software
Installation utility, you will need to know how to use the utility to install
software, and you might also need to know specific information about the
software product that you are installing. Be sure to read the software installation
information about the products that you plan to install before attempting to
install them with the POLYCENTER Software Installation utility.
1–3
2
Getting Started: Using the Motif Interface of
the POLYCENTER Software Installation Utility
You can use the Motif interface with a workstation or X terminal running
DECwindows Motif for OpenVMS. If you are using either of these, the Motif
interface is the default interface for the POLYCENTER Software Installation
utility. (See Chapter 3 if you are using either of these and want to use the DCL
interface.)
To begin an installation or other software management task using the Motif
interface of POLYCENTER Software Installation utility, enter the PRODUCT
command at the DCL prompt ( $ ), as follows:
$ PRODUCT
Return
Section 2.1 includes more information about the DECwindows Motif interface.
Appendix B is quick-reference information that describes the procedure for
installing one or more products using the Motif interface of the POLYCENTER
Software Installation utility.
2.1 Basic Concepts for DECwindows Motif Users
The steps for performing a task with the DECwindows Motif interface to the
POLYCENTER Software Installation utility are as follows:
1. Select the task to be performed from the Mode menu.
2. Select one or more products.
3. Select product options, expanding lists of suboptions as needed.
4. Perform the task.
For general information on how to use DECwindows Motif, see Using
DECwindows Motif for OpenVMS.
By default, the POLYCENTER Software Installation utility looks for products
in the directory defined by the logical name PCSI$SOURCE. Define this logical
name to point to the device and directory where your software distribution kits
are located. For example, if the software to be installed on your system will
typically be in the directory DISK1:[KITS], you could include the following line in
the system manager’s login command file (or some other appropriate file):
$ DEFINE PCSI$SOURCE DISK1:[KITS]
2–1
Getting Started: Using the Motif Interface of the POLYCENTER Software Installation Utility
2.2 Opening the POLYCENTER Software Installation Utility Window
2.2 Opening the POLYCENTER Software Installation Utility Window
After you enter the PRODUCT command at the DCL prompt ( $ ), the
POLYCENTER Software Installation utility main window opens and displays the
Show Product List. The Show Product List includes all products known to the
POLYCENTER Software Installation utility database. If no products are found
(for example, when you use the POLYCENTER Software Installation utility on
your system for the first time), the Show Product List is empty.
Figure 2–1 is a sample main window displaying a Show Product List.
Figure 2–1 POLYCENTER Software Installation Utility Main Window
POLYCENTER Software Installation
Session
Mode
Customize
Qualifiers
Options
Help
(6)
Show Product List
Multiple Select Hold
DEC VAXVMS ACMB V3.2
DEC VAXVMS DECRTX V1.1−2
DEC VAXVMS DECXYZ V1.1−A
DEC VAXVMS MPL V1.4−5
DEC VAXVMS RELAY V4.1
DEC VAXVMS SECURE V6.1
Product *
Version
*
Filter
Reset
ZK−6650A−GE
2–2
Getting Started: Using the Motif Interface of the POLYCENTER Software Installation Utility
2.2 Opening the POLYCENTER Software Installation Utility Window
The items in this window include the following:
•
The title bar displays the name of the window.
•
The menu bar displays the menu names for the POLYCENTER Software
Installation utility.
•
The Show Product List box displays the list of software products that are
available for operations with the POLYCENTER Software Installation utility.
For each product, the box displays the producer name, the base system, the
product name, and the version number. Note that the names used might be
abbreviations—for example, DEC might be used as the producer name when
the producer is Digital, and VAXVMS might be used as the base system name
when the OpenVMS VAX operating system is being referenced.
Note
The sample software product names used in this manual are intended
only as examples. The software product names shown do not necessarily
exist as software products with which you can use the POLYCENTER
Software Installation utility.
•
The Product and Version fields display an asterisk ( * ) wildcard character,
indicating that all versions of all products are displayed in the Show Product
List box. To display only specific products or versions, enter the product name
and version number in the respective fields, and click on the Filter button.
•
To perform an operation on a product (for example, to install it), you must
select the product by double clicking on the product name.
•
The Source field, available through the Customize Qualifiers menu, displays
the default location for software kits. The default source location is defined
by the logical name PCSI$SOURCE. To search for a product in an alternate
location, enter the device and directory in the Source field, and click on the
Filter button.
•
The Destination field, available through the Customize Qualifiers menu,
displays the default location for installing software kits. The default
destination location is defined by the logical name PCSI$DESTINATION.
To place files in an alternate location, enter the device and directory in the
Destination field, and click on the Filter button.
•
The Work field, available through the Customize Qualifiers menu, lets you
specify a work area to be used by the POLYCENTER Software Installation
utility for temporary files created by the POLYCENTER Software Installation
utility during an operation.
2–3
Getting Started: Using the Motif Interface of the POLYCENTER Software Installation Utility
2.3 Selecting the Task to Be Performed: Mode Menu
2.3 Selecting the Task to Be Performed: Mode Menu
The operation that you perform when using the POLYCENTER Software
Installation utility is controlled by the mode that you select. To perform an
operation using the POLYCENTER Software Installation utility, pull down the
Mode menu as shown in Figure 2–2 and choose one of the following:
Figure 2–2 Mode Menu
Mode
Installation
Reconfiguration
Remove
Show Product
Show History
Copy
Registration
ZK−6646A−GE
•
To install one or more products, select the Installation option.
•
To configure or reconfigure a product, select the Reconfiguration option.
•
To remove one or more products that have previously been installed using the
POLYCENTER Software Installation utility, select the Remove option.
•
To display a list of the products that have been installed on your system by
the POLYCENTER Software Installation utility, select the Show Product
option. (This window is displayed when you initiate a Motif session with the
POLYCENTER Software Installation utility.)
•
To display a history of the operations performed on one or more products
by the POLYCENTER Software Installation utility, select the Show History
option.
•
To copy a software kit from one location or format to another, select the Copy
option.
•
To register one or more products in the product database, select the
Registration option.
2.4 Display Conventions for List Boxes
The POLYCENTER Software Installation utility uses icons to indicate whether
and how a product option has been selected, as follows:
•
The check mark icon indicates whether an option has been selected (a check
mark appears in the box) or omitted (the box is blank).
•
The selection icon indicates which option has been selected when several
mutually exclusive options are offered. It has three states:
An unfilled diamond means the option has not been selected.
2–4
Getting Started: Using the Motif Interface of the POLYCENTER Software Installation Utility
2.4 Display Conventions for List Boxes
A hollow diamond within a diamond means the option has been selected
as the default value.
A completely filled diamond within a diamond means the option has been
selected explicitly by the user (in other words, the user either has selected
a value other than the default or has explicitly selected the default
value).
•
A question mark ( ? ) in a box is a request for confirmation. After you read the
information next to the icon, click on the icon. The icon changes to a check
mark.
2.5 Selecting and Installing Products
To install a product, you must select the Installation option from the Mode menu
and then select one or more products from the Install Product List. Figure 2–3
shows a sample Install Product List window.
Figure 2–3 Install Product List Window
POLYCENTER Software Installation
Session
Mode
Customize
Qualifiers
Options
Help
(103)
Install Product List
Multiple Select Hold
DEC VAXVMS ACMB V3.2
DEC VAXVMS DECRTX V1.1−2
DEC VAXVMS DECXYZ V1.1−A
DEC VAXVMS MPL V1.4−5
DEC VAXVMS RELAY V4.1
DEC VAXVMS SECURE V6.1
Product *
Install
Version
*
Filter
Reset
ZK−6647A−GE
This window is similar to the Show Product List window (Figure 2–1), and it also
includes the following:
•
The operation button displays the task (install, remove, and so on) to be
performed.
2–5
Getting Started: Using the Motif Interface of the POLYCENTER Software Installation Utility
2.5 Selecting and Installing Products
•
The Reset button discards your changes and returns the settings to the state
they were in before you made any selections; all products are deselected.
To select a product, double click on the product name in the list of products. If
you want to select multiple products (for example, if you want to install several
products in the same operation), the Multiple Select Hold button in the upper
right must be filled. (If it is not filled, click on the button to fill it.) Then, click
on each product for which you want the operation to be done. When you have
selected all of the products, click on the Multiple Select Hold button to clear it,
and you can then perform the operation.
For example, suppose you wanted to install the following products that appeared
in the product list:
DECdtm
MPL for OpenVMS
DEC Secure for OpenVMS
To install these products in the same operation, do the following:
1. Choose the installation mode by pulling down the Mode menu and clicking on
Installation.
2. Be sure that the Multiple Select Hold button is filled in; if the button is clear,
click on it once to fill it in.
3. Double click on the name of each product that you want to install. As you
select each one, the diamond to the left of the product name is partially filled
in.
4. When you have selected all the products to install, clear the Multiple Select
Hold button by clicking on it.
5. When Multiple Select Hold has been cleared, only the products to be installed
are displayed. To install the products, click on the Install button at the
bottom of the screen.
Follow this same procedure for all other operations on multiple products.
2.6 Specifying a Product Name and Version Number
By default, the product list box displays a list of all the products on the
distribution kit. You can scroll through the list to find a product. You can also
shorten the list of products displayed by entering a specific product name, version
number, or both, in the Product and Version fields. Clicking on the Filter button
updates the list.
Additional fields for listing products by base system or producer are available
from the Qualifiers menu and the Customize Qualifier... dialog box.
Note that a product name can include wildcard characters ( * ), but it does not
include the producer name (such as DEC) or the base system (such as VAXVMS).
Section 4.2.1 provides a more detailed description of valid product names,
producer names, and base systems.
2–6
Getting Started: Using the Motif Interface of the POLYCENTER Software Installation Utility
2.7 Selecting Product Options
2.7 Selecting Product Options
A product has options if a right-pointing triangle is displayed to the left of the
product name. After you select a product, you can select and display information
about product options by double clicking on the right-pointing triangle. You can
also double click on the option name to get a full description of the option, if the
product provides one.
2.8 Starting the Task
To proceed with an installation or other task, click on the operation button
(Install, Remove, and so on) in the lower left corner of the window.
For example, if you want to install one or more products, the Selected Products
window is displayed when the Multiple Select Hold button is cleared, as shown in
Figure 2–4.
Figure 2–4 Selected Products Window
POLYCENTER Software Installation
Session
Mode
Customize
Qualifiers
Options
Selected Products to be Installed
Help
Multiple Select Hold
DECdtm (Distributed Transaction Monitor)
MPL for OpenVMS
DEC Secure for OpenVMS
Install
Reset
ZK−6648A−GE
To install the products listed, click on the Install button in the lower left of
the window. When the installation begins, a work in progress window displays
messages as the operation takes place. A percentage above the window indicates
how much of the procedure is done. An example of the work in progress window
is shown in Figure 2–5.
Use the Reset button when you want to create a product configuration file (PCF)
without actually installing the product. See Section 4.4 for information about
PCFs.
2–7
Getting Started: Using the Motif Interface of the POLYCENTER Software Installation Utility
2.8 Starting the Task
Figure 2–5 The Work In Progress Window
Work In Progress Dialog
Work In Progress
74% done
Show Details
Clear
Terminate Operation
Start new Operation
ZK−6649A−GE
You can increase or decrease the amount of information displayed in the work in
progress window by clicking on the Show Details button.
2.9 Getting Help: Help Menu
More information is available in online help. To get help on the POLYCENTER
Software Installation utility main window, select the On Window menu item
from the Help menu. Help provides additional information on how to install and
manage software products.
To learn more about using the online help system, select the On Help menu item
from the Help menu.
2.10 Exiting from the POLYCENTER Software Installation Utility
When you are done with your installation and management tasks, you can close
the POLYCENTER Software Installation utility window by choosing End Session
from the Session menu.
2.11 Customizing the DECwindows Motif Interface
The POLYCENTER Software Installation utility lets you tailor the DECwindows
Motif interface to suit your own environment. For example, you might want to
reduce the number of fields or options available to an installer to make it easier
for less experienced personnel to perform an installation. Alternatively, you
might want to make certain features more readily available.
This section describes how to customize the following areas of the POLYCENTER
Software Installation utility main window:
2–8
•
Session menu
•
Mode menu
Getting Started: Using the Motif Interface of the POLYCENTER Software Installation Utility
2.11 Customizing the DECwindows Motif Interface
•
Qualifiers menu
•
Options menu
•
File filters and text-entry fields
•
Miscellaneous buttons
The section also explains how to save your customized settings for future sessions
and how to use your customizations to control site-specific installations.
2.11.1 Customizing the Session Menu
To add or remove items on the Session menu:
1. Choose Customize File... from the Customize menu. The Customize Session
dialog box opens.
2. Click on any button that you want to change, and modify any text input.
3. Click on OK to apply your change and dismiss the dialog box.
2.11.2 Customizing the Mode Menu
To add or remove items on the Mode menu:
1. Choose Customize Mode... from the Customize menu. The Customize Mode
dialog box opens.
2. To remove a command from the menu, click on the button next to the
command.
3. Click on OK to apply your change and dismiss the dialog box.
2.11.3 Customizing the Qualifiers Menu
To add or remove items on the Qualifiers menu:
1. Choose Customize Qualifiers... from the Customize menu. The Customize
Qualifiers... dialog box opens.
2. Click on the Qualifiers pull-down enable button next to the menu item you
want to add or remove. Toggle the button on to add an item; toggle the button
off to remove an item.
3. Click on OK to apply your change and dismiss the dialog box.
Note that you can also use the Customize Qualifiers... dialog box to customize the
fields and filters in the main window. By entering values in the fields provided,
you determine the default values for those fields. For more information, see
Section 2.11.7.
2.11.4 Customizing the Options Menu
To add or remove items on the Options menu:
1. Choose Customize Options... from the Customize menu. The Customize
Options... dialog box opens.
2. Click on the buttons that you want to change.
3. Click on OK to apply your change and dismiss the dialog box.
2–9
Getting Started: Using the Motif Interface of the POLYCENTER Software Installation Utility
2.11 Customizing the DECwindows Motif Interface
2.11.5 Saving Your Customized Settings
By default, the customizations you make remain active only during your current
session. After you exit from the POLYCENTER Software Installation utility, the
settings return to their default values. To preserve a change from one session to
the next, choose Save Settings from the Customize menu.
2.11.6 Adding Text-Entry Fields and File Filters to the Main Window
You can use the Qualifiers menu to customize the filters and text-entry fields in
the main window. You can then enter information in the added filters or fields
to change the variables for the task you want to perform. For example, you can
specify the source of product files for an installation or the name of a Product
Configuration File (PCF).
By default, you can use the Qualifiers menu to make the following changes:
•
Add the Producer filter to select products by manufacturer.
•
Add the Base System filter to select products by operating system or hardware
configuration.
•
Remove fields (for example, to prevent the values from being changed or to
simplify the window). You can remove one or more of the following:
Product/Version filter
Producer/Base System filter
•
Add the Read Configuration field to specify the name of a PCF for an
installation.
•
Add the Write Configuration field to specify the name of the PCF you want to
create.
•
Add a Remark field to enter a comment in the product database.
You can also include additional items on the Qualifiers menu by using the
Customize Qualifiers... dialog box, as described in Section 2.11.3.
2.11.7 Customizing the Interface to Control Site-Specific Installations
You can use the Customize Qualifiers... dialog box to create a controlled
environment for software installers. For example, if you want to discourage
others from changing the values you set in the Producer, Source, and Destination
fields, do the following:
1. Choose Customize Qualifiers... from the Customize menu.
2. In the Producer, Source, and Destination fields, enter the values you want to
set for future installations.
3. Toggle both buttons to the left of these fields to disable them.
By disabling the buttons, you prevent the fields from being listed on the
Qualifiers menu or displayed in the main window. The fields are ‘‘hidden’’
and, therefore, are less likely to be changed inadvertently.
4. Click on OK to apply your change and dismiss the dialog box.
5. Save your settings by choosing Save Settings from the Customize menu.
2–10
3
Getting Started: Using the DCL Interface of the
POLYCENTER Software Installation Utility
This chapter describes the use of the DCL interface of the POLYCENTER
Software Installation utility. Before using the POLYCENTER Software
Installation utility to install products, verify that the logical name
PCSI$SOURCE points to the correct location for the products that you
want to install. To use the DCL (DIGITAL Command Language) interface to the
POLYCENTER Software Installation utility, enter the PRODUCT command, the
name of the task to be performed, and the name of one or more products, in the
following format:
PRODUCT subcommand product-name [/qualifier1,...]
(Some subcommands do not require a product-name parameter; see Appendix C
for syntax information for each subcommand.)
For example, to install COBOL Version 5.0 and LSE Version 3.0, enter the
following command:
$ PRODUCT INSTALL COBOL/VERSION=5.0,LSE/VERSION=3.0
Return
The following products have been selected:
DEC OpenVMS COBOL V5.0
DEC OpenVMS LSE V3.0
Do you want to continue [YES]
Return
You can enter PRODUCT commands at the DCL prompt ( $ ) or in a DCL
command procedure. The PRODUCT command accepts standard DCL syntax for
file names and other parameters (excluding the product name parameter, which
cannot include hyphens [-]).
To obtain a list of the product kits that are available for installation on your
system, issue the following command:
$ PRODUCT FIND *
The following sections describe how to do the following:
•
Select the task you want to perform, such as installing a software product
•
Specify the product name and version number
•
Locate a product on a product distribution kit
•
Request help on the PRODUCT commands, parameters, and qualifiers
•
Include PRODUCT commands in command procedures, which can be run as
batch jobs
For general information on how to use DCL, refer to the OpenVMS User’s
Manual.
3–1
Getting Started: Using the DCL Interface of the POLYCENTER Software Installation Utility
3.1 Selecting the Task to Be Performed: PRODUCT Subcommands
3.1 Selecting the Task to Be Performed: PRODUCT Subcommands
To select the task you want to perform, specify the appropriate PRODUCT
subcommand in the PRODUCT command line. Table 3–1 summarizes the
subcommands for a variety of tasks; Appendix C lists complete reference
information for the PRODUCT command and each of its subcommands.
Table 3–1 Summary of Tasks and PRODUCT Subcommands
Task
Command
For More
Information...
Installing a product
PRODUCT INSTALL
See Chapter 5.
Extracting release notes to a file
PRODUCT EXTRACT RELEASE_NOTES
See Section 5.1.
Determining whether a product is
on the distribution media
PRODUCT FIND
See Section 3.2.
Removing an installed product
PRODUCT REMOVE
See Section 6.1.
Creating a product configuration file
(PCF)
PRODUCT CONFIGURE
See Section 4.4.
Modifying the configuration choices
for an installed product
PRODUCT RECONFIGURE
See Section 6.2.
Registering a product that was
previously installed with a tool
other than the POLYCENTER
Software Installation utility
PRODUCT REGISTER PRODUCT
See Section 5.7.
Registering a change in the volume
label for a device that contains
installed products
PRODUCT REGISTER VOLUME
See Chapter 6.
Copying product kits to a new
location
PRODUCT COPY
See Section 6.4.
Displaying information about
managed objects (for examples,
files or directories) created during a
software product installation
PRODUCT SHOW OBJECT
See Section 6.6.
Displaying a log of actions, users,
and remarks
PRODUCT SHOW HISTORY
See Section 6.6.
Displaying information about
products installed on your system
PRODUCT SHOW PRODUCT
See Section 6.6.
3.2 Locating a Product on the Distribution Kit
By default, the POLYCENTER Software Installation utility looks for products in
the directory defined by the logical name PCSI$SOURCE. You should define this
logical name to point to the device and directory where your software distribution
kits are located. For example, if the software to be installed on your system will
typically be in the directory DISK1:[KITS], you could include the following line in
the system manager’s login command file (or some other appropriate file):
$ DEFINE PCSI$SOURCE DISK1:[KITS]
3–2
Getting Started: Using the DCL Interface of the POLYCENTER Software Installation Utility
3.2 Locating a Product on the Distribution Kit
To locate a product on the distribution kit, enter the PRODUCT FIND command.
For example, to determine whether Version 3.0 of LSE is available for operations
using the POLYCENTER Software Installation utility, enter the following
command:
$ PRODUCT FIND LSE/VERSION=3.0
If the distribution kit is not located on the device specified by the logical name
PCSI$SOURCE, specify the location with the /SOURCE qualifier. For example, if
the product kit for LSE Version 3.0 is located in DISK5:[ALT_KITS], you would
enter the following command to confirm its location:
$ PRODUCT FIND/SOURCE=DISK5:[ALT_KITS] LSE/VERSION=3.0
3.3 Getting Help: DCL HELP Command
Online help is available for all the PRODUCT commands and qualifiers. For help
on a specific command, enter the DCL command HELP followed by the name of
the command. For example, to get help on the PRODUCT INSTALL command,
enter the following command:
$ HELP PRODUCT INSTALL
Return
3.4 Including PRODUCT Commands in a Command Procedure
To run the POLYCENTER Software Installation utility as a batch job, include
PRODUCT commands in a command procedure, and submit the procedure to a
batch queue.
Example 3–1 is an example of a command procedure that runs the POLYCENTER
Software Installation utility as a batch job; it reformats the product kit from its
current state to a reference output.
Example 3–1 Sample Command Procedure for Running the POLYCENTER
Software Installation Utility
$
$
$
$
$
$
$
SAVE_PROC_VERIFY = F$ENVIRONMENT("VERIFY_PROCEDURE")
SAVE_IMAGE_VERIFY = F$ENVIRONMENT("VERIFY_IMAGE")
SET VERIFY
ON ERROR THEN GOTO ERROR_EXIT
START_TIME = F$TIME()
WRITE SYS$OUTPUT "START TIME -- ’’START_TIME’"
PRODUCT COPY VMS /VERSION=5.5 /SOURCE=DISK_1:[KITS] /DESTINATION=DISK_PCSI:[REF.VMS055] /FORMAT=REFERENCE /LOG
$ERROR_EXIT:
$ END_TIME = F$TIME()
$ TEMP = F$VERIFY(SAVE_PROC_VERIFY,SAVE_IMAGE_VERIFY)
$ WRITE SYS$OUTPUT " --------------------------------"
$ WRITE SYS$OUTPUT " END TIME -- ’’END_TIME’"
$ WRITE SYS$OUTPUT "START TIME -- ’’START_TIME’"
$ WRITE SYS$OUTPUT " --------------------------------"
$ EXIT
3–3
4
Installing Software: Getting Started
This chapter discusses some of the tasks and concepts related to installing
and managing software products. Although the examples shown are for the
DCL interface of the POLYCENTER Software Installation utility, the same
concepts apply if you are using the Motif interface. Appendix B lists some specific
procedures using the Motif interface.
4.1 Installing Software: Brief Introduction
Before you can use a product, you must install it on your system. Over time,
you might choose to upgrade the product to take advantage of the extra features
in a new version. You might also need to apply software patches, which are
corrections to the software that eliminate known problems.
The procedures described in this chapter are, in most cases, based on the DCL
interface to the POLYCENTER Software Installation utility. If you are using the
Motif interface, the same concepts apply, using the Motif windows and menus.
With Motif, all software installations are done using the Software Installation
window.
For any software product that you plan to install, follow these steps before
beginning any installation procedure:
•
Read and understand the product’s software installation instructions. In
addition to describing the installation procedure, the software installation
instructions also list any prerequisite software that you might need to ensure
is installed and any prerequisite tasks that you might need to perform.
•
Perform any required preinstallation tasks in accordance with the product’s
installation instructions.
•
Be sure that you have both the product’s installation instructions and the
relevant parts of this manual available when you install the software.
4.2 Basic Procedure for Software Installation
To install software, use the PRODUCT INSTALL command, using the name
of the software product distribution file as indicated in the product’s software
installation instructions. For example, to install a product named LOADBALANCE, you could enter the following command at DCL level:
$ PRODUCT INSTALL LOAD-BALANCE
4–1
Installing Software: Getting Started
4.2 Basic Procedure for Software Installation
4.2.1 Default Installation Criteria
By default, the POLYCENTER Software Installation utility looks for software
product kits in the directory (or search list) pointed to by the logical name
PCSI$SOURCE. For more information about how to define PCSI$SOURCE, see
Section 3.2.
When searching for products in PCSI$SOURCE, the POLYCENTER Software
Installation utility might encounter multiple software kits that match the name
defined in the PRODUCT INSTALL command. For example, in the command
PRODUCT INSTALL LOAD-BALANCE, the POLYCENTER Software Installation
utility might find Versions 3.0, 3.1, and 4.0 of the product for use on OpenVMS
VAX systems and Versions 1.0 and 1.5 for use on OpenVMS AXP systems. If
you do not specify the kit that you want to install, the POLYCENTER Software
Installation utility installs products using the following default criteria:
•
Hardware and operating system environment (also referred to as
platform)—The environment from which you are running the POLYCENTER
Software Installation utility.
•
Software producer (manufacturer)—All software, regardless of producer.
•
Software version number—A version that begins with the letter V. If more
than one version meeting this criterion is found, you are prompted for the
correct one.
You can override any or all of these defaults. In DCL, override the defaults
by using the appropriate command qualifiers, as described in the INSTALL
subcommand description in Appendix C. In Motif, override the defaults by pulling
down the Qualifiers menu, selecting the qualifier that you want to override, and
entering the appropriate value.
4.2.2 Product Distribution: How the POLYCENTER Software Installation Utility
Categorizes Software
The POLYCENTER Software Installation utility packages and installs the
following types of product distribution kits:
4–2
•
Applications software (FULL)
•
Operating system software (OPERATING SYSTEM)
•
A new version or update for a product that is currently installed (PARTIAL)
•
A required update, which produces functionally updated software with the
same version number (MANDATORY UPDATE)
•
A correction to existing software (PATCH)
•
A software system containing multiple separate products (PLATFORM)
•
A partial description of a version of a product that was not installed with the
POLYCENTER Software Installation utility (TRANSITIONAL)
Installing Software: Getting Started
4.2 Basic Procedure for Software Installation
4.2.3 Postinstallation Procedures
During an installation procedure, a product might display informational messages
about product requirements, postinstallation procedures, or configuration choices.
It is important that you record this information for future reference.
Individual product installation guides describe what you might need to do after
you install a product. Although the POLYCENTER Software Installation utility
can inform you of changes required in system startup procedures or parameter
settings, it cannot run the procedures or make the changes for you.
For more information, refer to the installation guides for the products you are
installing.
4.3 Selecting Product Options
Some software products allow or require you to make a set of choices when
you install the product. For example, if you are installing a tool that checks
spelling, you might choose which languages you want to include. When you use
the POLYCENTER Software Installation utility, you can select the options for, or
configure, a product in one of three ways:
•
By responding to questions asked during the installation procedure
•
By modifying your choices after you install a product (reconfigure)
•
By creating a product configuration file (PCF) before you install the
product
Information that will help you make the choice of options for installation
may be included in the product’s installation information or release notes. In
addition, the following information is available using the POLYCENTER Software
Installation utility:
•
The product description file (PDF), provided by the software manufacturer,
contains all the information the POLYCENTER Software Installation utility
needs to install either a software product or a set of software products. It
includes the list of choices the product offers, the default choices, and the
product requirements (such as minimum hardware configurations and system
parameter values).
•
The product database is created automatically by the POLYCENTER
Software Installation utility and records the active configuration of products
in a computing facility. You can access the database to identify dependencies
between products or to produce reports on products that are currently
installed. You can also use the database to recall the configuration choices for
a product that is currently active on your system. For example, if you want to
choose the same options for the new version of a product that you chose when
you installed the current version, the POLYCENTER Software Installation
utility can use the database to display your choices as the default responses.
•
A product configuration file (PCF) contains answers to some or all of the
installation questions for a product. You can use a PCF to ensure consistency
in subsequent installations of a given product and to eliminate the need to
respond to the same questions for subsequent installations.
A PCF is optionally created by the POLYCENTER Software Installation
utility during the installation of a software product using the POLYCENTER
Software Installation utility. Alternatively, you can create or modify a PCF
outside of an installation session and then use that PCF during a subsequent
installation. Section 4.4 discusses the use of PCFs.
4–3
Installing Software: Getting Started
4.3 Selecting Product Options
4.4 Making Configuration Choices with Product Configuration Files
The POLYCENTER Software Installation utility lets you save your answers to
installation questions in, or read your answers from, a product configuration
file (PCF). By saving your answers in a PCF and using the file for subsequent
installations, you can reduce or eliminate the questions asked when you install
a product using the DCL interface of the POLYCENTER Software Installation
utility.
The following sections describe the use of PCFs.
4.4.1 How to Create and Use PCFs
You can create multiple PCFs for each product. This lets you customize software
installations for unique hardware situations or for different usage patterns within
a group.
You can create a PCF during an installation, or you can create a PCF as a
separate operation. You can customize the PCF with the following options:
•
Saving your answer. You can specify that your response to a question (rather
than the current default value) be stored in the PCF.
•
Using your answer only once. When creating a PCF during an installation,
you can answer a question without recording your answer in the PCF. This
is useful for responding to questions that are specific to a single system or
installation.
•
Deferring a question so that it is asked again during a future installation. For
example, you might want an installer to verify that a particular response is
still valid for the systems on which each installation is being performed.
•
Preventing a question from being asked again. If you do not defer a question
when you create a PCF, the response recorded in the PCF is used during
future installations. The installer is not prompted for the information. This
reduces the length and complexity of the actual installation procedure.
When you use a PCF, it applies only to selected and referenced products for which
values exist in the PCF at the time that the PCF is read in. The PCF does not
configure referenced products that will subsequently be installed. (A referenced
product is a product that is referenced by the product you are installing using
the POLYCENTER Software Installation utility) If a version of a referenced
product is selected for installation or other operations after the PCF is read, the
PCF values are not applied.
When used at DCL level, PCFs will retroactively reconfigure referenced products.
That is, if a PCF contains an referenced product that has already been installed,
the referenced product will be reconfigured.
4.4.2 How to Use PCFs
To make configuration choices for a product before installing it, define a PCF by
entering the PRODUCT CONFIGURE command. For example:
$ PRODUCT CONFIGURE CHESSMASTER
By default, the POLYCENTER Software Installation utility creates a PCF in
your current default directory. If you want to override the default file name
or directory, use the /CONFIGURATION=OUTPUT qualifier, as described in
Appendix C.
4–4
Installing Software: Getting Started
4.4 Making Configuration Choices with Product Configuration Files
To define a PCF when installing products using the Motif interface of the
POLYCENTER Software Installation utility, use the Install operation. To create
a PCF without actually installing the products when using the Motif interface,
select the products for installation, but use the Reset button on the Install
window rather than the Install button.
4.4.3 Recording Your Configuration Choices
After you enter the PRODUCT CONFIGURE command, the POLYCENTER
Software Installation utility displays questions about the product configuration.
By responding to the questions and using a predefined set of function keys, you
determine how and whether your responses are recorded in the PCF.
To identify your answer as the response, which will be displayed next to the
question during subsequent installations of the product, enter your answer and
press the Return key.
To request that an option be offered again during future installations or to
prevent an answer from being recorded in the PCF, use the function keys listed in
Table 4–1.
Table 4–1 Function Keys for Recording Configuration Choices
Key
Function
F17
Ask the same question during a future installation. (Defer answer.)
F18
Do not record the answer in the PCF.
If you do not use either of the function keys, the PCF records your response.
During a future installation, the value recorded in the PCF is used to answer the
question; you are not asked the question again during the installation.
Note that both F17 and F18 act as toggle (on/off) switches: you can press the key
more than once. For example, if you previously deferred an answer but decide
you do not want it to be deferred, you can press the F17 key again. The key
toggles the status of your answer from deferred to answered.
Example 4–1 shows how to use the function keys to record answers in the PCF
for the installation of the product UCX (DEC TCP/IP Services for OpenVMS);
note that this is an example only and does not necessarily represent an actual
PCF for a product.
Example 4–1 Sample CONFIGURE Procedure
$ PRODUCT CONFIGURE/LOG UCX
The following product has been selected:
DEC OPENVMS UCX V2.0
Do you want to continue [YES]
Return
DEC TCP/IP Services for OpenVMS
Copyright © 1992 Digital Equipment Corporation
Digital Equipment Corporation
This product has the PAKs: UCX and UCX-IP-RT.
(continued on next page)
4–5
Installing Software: Getting Started
4.4 Making Configuration Choices with Product Configuration Files
Example 4–1 (Cont.) Sample CONFIGURE Procedure
Do you want all the default values for this product [YES] N
Return
1
Release notes available at SYS$HELP:UCX020.RELEASE_NOTES...
Do you want to continue [YES] Return
Optional example files may be installed... [YES] F17 2
%PCSI-I-DEFER, that item has been deferred. Please set the default value.
Optional example files may be installed... [YES]
Optional NFS files may be installed... [YES]
F18
Optional NFS files may be installed... [YES] NO
3
Return
4
Return
4
Optional applications may be installed... [YES] NO 5
Do you want to view your answers [NO]
Return
DEC TCP/IP Services for OpenVMS
Optional example files may be installed...: YES <DEFERRED>
Optional NFS files may be installed...: [NO] <NOWRITE>
Optional applications may be installed...: NO
6
Are you satisfied with your answers [YES] Return
%SPIU-I-WRICON, writing configuration file WORK1:[SMYTH]DEFAULT.PCSI$CONFIGURATION;1 7
%SPIA-I-SUCCESS, operation completed successfully
$
The callouts in Example 4–1 mark the following actions:
1
Chooses to select values for individual options instead of accepting the default
values for all of the options.
2
Requests (by using the defer key, F17) that the installer be given the choice of
whether or not to install the optional example files.
3
Records the default response (Yes) in the PCF. During a future installation,
the installer can select the optional example files by pressing the Return key.
4
Requests (by using the nowrite key, F18) that the response (No) be omitted
from the PCF.
5
Chooses not to install optional applications during any installations that use
the PCF. The PCF records the default response as No and does not offer the
choice again during a future installation.
6
Displays the options, the response, and whether the response is marked in
the PCF as deferred (to be asked again during the installation) or as one that
is not recorded.
7
Displays the name of the PCF that has been created,
DEFAULT.PCSI$CONFIGURATION. The POLYCENTER Software
Installation utility displays this message only when you enable message
logging by including /LOG in the PRODUCT CONFIGURE command line.
To review your configuration choices, specify the name of an existing PCF on
the PRODUCT CONFIGURE command line. You can then scan your answers,
pressing the Return key to leave your answers unchanged.
4–6
Installing Software: Getting Started
4.4 Making Configuration Choices with Product Configuration Files
When you use a single DCL command or Motif operation to install or configure
more than one product and write the responses to a PCF, the information for all
of the products installed or configured is contained in a single PCF. Use separate
operations to install or configure a set of products when you want to keep each
product’s configuration values in its own PCF.
4.4.4 Modifying an Existing PCF
To modify the choices in an existing PCF, specify the name of the PCF to be
modified and the name of the PCF to be created. Include both the INPUT and
the OUTPUT keywords with the /CONFIGURATION qualifier on the PRODUCT
CONFIGURE command line. For example:
$ PRODUCT CONFIGURE _$ /CONFIGURATION=(INPUT=PRODUCTA_REV1.DAT,OUTPUT=PRODUCTA_REV2.DAT) _$ PRODUCTA
This example reads the default values from the file PRODUCTA_REV1.DAT.
You can then change your answers by entering different responses or change the
status of your answers by pressing the nowrite key (F18) or the defer key (F17).
When you are done, the POLYCENTER Software Installation utility creates the
file PRODUCTA_REV2.DAT.
4.5 Simplifying Product Integration with the POLYCENTER
Software Installation Utility
You can use the product database to monitor product interdependencies and to
recall information about the products installed on your system.
4.5.1 Detecting and Satisfying Dependencies Among Software Products
Some software products have dependencies upon other software products; for
example, a software product might work only when specific versions of another
software product are installed on the system. The POLYCENTER Software
Installation utility detects and tracks the dependencies of the products that you
install. Additionally, the POLYCENTER Software Installation utility attempts to
satisfy the requirements of multiple products.
In some instances, the POLYCENTER Software Installation utility is unable
to resolve product dependency issues. In such instances, the POLYCENTER
Software Installation utility provides feedback on the nature of the conflict and
asks you to decide how to proceed.
4.5.2 Types of Information Contained in the Product Database
The POLYCENTER Software Installation utility automatically stores information
in the product database based on information supplied by the software
manufacturer. Although the POLYCENTER Software Installation utility stores
product information for you automatically, you can also add your own information.
When you perform a task, you can include a remark—a comment to be recorded
in the product database—along with the other information about the task being
performed. To add a remark to the product database, use the /REMARK qualifier
with either the PRODUCT CONFIGURE or PRODUCT REGISTER PRODUCT
command. See Appendix C for information about these commands and the
/REMARK qualifier.
4–7
5
Installing Software: Some Tasks During an
Installation
The steps for installing a software product are as follows:
1. Review a copy of the product’s release notes and the product’s installation
information.
2. For an installation using the DCL user keyboard interface, start the
installation procedure using the PRODUCT INSTALL command. For a Motif
installation, use the PRODUCT command, and use the menus and options
that correspond to the DCL commands and operations described in this
chapter.
3. Select product options by responding to questions. At this stage, you make
configuration choices for the product. The product is not installed on your
system until you confirm your selections.
4. Proceed with the installation by confirming your configuration choices.
This chapter describes how to install a product with the PRODUCT INSTALL
command. It includes sections on viewing and extracting release notes and on
registering the product description for transitional products.
For additional information on how to install products with the DECwindows
Motif interface to the POLYCENTER Software Installation utility, choose On
Window from the Help menu.
5.1 Extracting Release Notes
To extract a copy of the release notes for a product to a file, enter the PRODUCT
EXTRACT RELEASE_NOTES command. After extracting the release notes to a
file, you can then print the file. It is not necessary to install a software product
before you use the POLYCENTER Software Installation utility to extract its
release notes.
The PRODUCT EXTRACT RELEASE_NOTES command is available only
through the DCL interface.
5.2 Starting the Installation
To start an installation, enter the PRODUCT INSTALL command. For example:
$ PRODUCT INSTALL CMS
To install more than one product at a time, enter a list of product names
separated by commas. For example:
$ PRODUCT INSTALL CMS/VERSION=3.4,LSE,COBOL/VERSION=5.0
5–1
Installing Software: Some Tasks During an Installation
5.2 Starting the Installation
If you do not know the names of the products to be installed, enter an asterisk
( * ) wildcard character in place of the product names. The POLYCENTER
Software Installation utility displays a list of the available products. You can
select products by entering the numbers listed to the left of the product names.
By including qualifiers on the command line, you can control various aspects of
the installation, such as whether a product configuration file (PCF) is used or
whether an installation verification procedure (IVP) is run after the installation
finishes. Table 5–1 lists some of the features you can control with command
qualifiers.
Table 5–1 Features You Can Request When You Start an Installation
Feature
Qualifier
Default
Supply answers from a PCF
/CONFIGURATION=INPUT=file-spec
None
Create a new PCF
/CONFIGURATION=OUTPUT=file-spec
None
Determine where product files
are placed
/DESTINATION=location
PCSI$DESTINATION
Display full descriptions of all
product installation options and
information
/HELP
/NOHELP
Display log messages on your
terminal
/LOG
/NOLOG
Save previous versions of
product files during an upgrade
/KEEP
/NOKEEP
Include a remark in the product
database
/REMARK
Null remark
Specify where the distribution
kit is located
/SOURCE
PCSI$SOURCE
Specify configuration variables
/CONFIGURATION=keyword
CURRENT
Specify a work area for
temporary files
/WORK=device
Current default
directory
The following sections describe, in more detail, how to do the following:
•
Specify a kit location (/SOURCE)
•
Specify where product files are to be placed (/DESTINATION)
•
Create or supply answers from a PCF (/CONFIGURATION=keyword)
For a summary of all the qualifiers that apply to the PRODUCT INSTALL
command, see Appendix C or refer to online help.
5.2.1 Specifying a Kit Location
You can specify the location of a kit (the source) in one of two ways:
•
If you plan to use the same location for all of your product kits, define the
logical name PCSI$SOURCE to point to that location. For example, the
following command defines DISK$:[LOCAL_KITS] as the device and directory
that contains products to be installed:
$ DEFINE PCSI$SOURCE DISK$:[LOCAL_KITS]
When you install a product, the POLYCENTER Software Installation utility
looks for the product kit in PCSI$SOURCE.
5–2
Installing Software: Some Tasks During an Installation
5.2 Starting the Installation
•
If you need to specify a different location each time you install a product,
include the /SOURCE qualifier on the PRODUCT INSTALL command line.
For example:
$ PRODUCT INSTALL/SOURCE=CD$READER CMS
This command installs CMS from the CD$READER device.
5.2.2 Specifying Where You Want the Products Installed
You can specify where you want products installed (the destination) in one of two
ways:
•
If you plan to install all product kits in the same location, define the logical
name PCSI$DESTINATION to point to that location. For example, the
following command defines DISK$:[APPLICATIONS] as the device and
directory that contains installed products:
$ DEFINE PCSI$DESTINATION DISK$:[APPLICATIONS]
When you install a product, the POLYCENTER Software Installation
utility places product files in PCSI$DESTINATION. If you do not define
PCSI$DESTINATION, the POLYCENTER Software Installation utility places
files in SYS$COMMON:[VMS$COMMON].
•
If you need to specify a different destination each time you install a product,
include the /DESTINATION qualifier on the PRODUCT INSTALL command
line. For example:
$ PRODUCT INSTALL/DESTINATION=MYDISK:[TEST_PRODUCTS] CMS
This command installs CMS into MYDISK:[TEST_PRODUCTS].
For more information on the use of PCFs, see Section 4.4.
5.2.3 Supplying Answers from a PCF
To reduce the number of questions that you need to answer manually, you can
supply answers from a PCF. Include the /CONFIGURATION=INPUT qualifier on
the PRODUCT INSTALL command line. For example:
$ PRODUCT INSTALL/CONFIGURATION=INPUT=DEC-VAXVMS-CMS.PCSI$CONFIGURATION _$ CMS/VERSION=3.4
This command installs the product CMS with the configuration choices recorded
in the PCF named DEC-VAXVMS-CMS.PCSI$CONFIGURATION.
5.2.4 Creating a New PCF During the Installation
While you are performing an installation, you can create a new PCF. Include the
/CONFIGURATION=OUTPUT=filename qualifier on the PRODUCT INSTALL
command line. For example:
$ PRODUCT INSTALL/CONFIGURATION=OUTPUT=CMSV3.DAT CMS/VERSION=3.0
As you respond to questions about the options for CMS Version 3.0, your
responses are recorded in the PCF named CMSV3.DAT in your current default
directory.
For more information on the use of PCFs, see Section 4.4.
5–3
Installing Software: Some Tasks During an Installation
5.3 Responding to Installation Questions
5.3 Responding to Installation Questions
During an installation at the DCL interface, you can respond to installation
questions as follows:
•
By requesting additional information, which might be provided by the product
•
By entering your own value and pressing the Return key
•
By pressing the Return key to accept a default value
•
By pressing the noexpand key (F19) to accept default values for a subset of
options
5.3.1 Getting an Online Explanation of Questions
When you enter the PRODUCT INSTALL command, you can include the /HELP
qualifier to request a full description of all product options and information. You
can also selectively request information for individual options by pressing the
Help key in response to a question. The POLYCENTER Software Installation
utility displays a description (if one is available) and a summary of disk and
memory requirements for the option. For example:
$ PRODUCT INSTALL UCX
.
.
.
Optional example files may be installed... [YES]
Help
The example files include client server programming examples.
Block Size Total:
Global Pages Total:
Global Sections - Total:
507 Optional:
0 Optional:
0 Optional:
0 Required:
0 Required:
0 Required:
Optional example files may be installed... [YES]
.
.
.
507
0
0
Return
The amount of information can vary depending on the product being installed.
Some products provide more information than others. If no information is
available, the POLYCENTER Software Installation utility displays the following
message:
%PCSI-E-NOHELP, there is no help available at this time.
5.3.2 Selecting Options
To select an option, enter Yes and press Return. If Yes is the default response
(shown in brackets next to the question), press the Return key to select the
option. For example:
.
.
.
Optional example files may be installed... [NO] YES Return
5–4
Installing Software: Some Tasks During an Installation
5.3 Responding to Installation Questions
5.3.3 Answering Fewer Questions: The Noexpand Key
Some product options are subdivided into lists of suboptions. During an
installation procedure, you can choose to accept the default values for all of
the suboptions, or you can select one suboption at a time.
By default, the POLYCENTER Software Installation utility displays all of the
options and all of the suboptions. To view a more limited display, press the
noexpand key (F19). For example, instead of choosing from a list of options for
a flight simulator, you can select the simulator and all of the default options by
pressing the noexpand key, as follows:
Do you want to install the simulator [YES] F19
%PCSI-I-NOEXPANDC, that item has been selected. Subitems will take the defaults.
5.4 Confirming Your Answers
After you respond to questions about product options, the POLYCENTER
Software Installation utility lets you view a summary of your answers. For
example:
Do you want to view your answers [YES] Return
DEC TCP/IP Services for OpenVMS
Optional example files may be installed...: NO
Optional NFS files may be installed...: NO
Optional applications may be installed...: YES
The following question then prompts to see whether you want to continue with
the installation:
Are you satisfied with your answers [YES]
Return
If you decide to change your answers, answer No to this question. You can
then choose between reentering your answers and exiting from the installation
procedure, as follows:
Do you want to re-enter your answers [YES] NO
%PCSI-I-USERABORT, operation aborted by user
Return
By answering No to this question, you can end the installation procedure. The
product is not installed; your system remains unchanged.
5.5 Stopping an Installation in Progress
Although it is not recommended, you can stop an installation before it finishes.
To stop an installation in progress, press Ctrl/Y.
5.6 Performing the Installation as a Batch Job
You can install products using a command procedure, and you can subsequently
submit the command procedure to be run as a batch job. Use the
/CONFIGURATION qualifier on the command lines in the procedure to specify
how the POLYCENTER Software Installation utility provides responses to
questions about product options and configuration choices.
Example 5–1 shows how a product might be installed using a command
procedure.
5–5
Installing Software: Some Tasks During an Installation
5.6 Performing the Installation as a Batch Job
Example 5–1 Sample Command Procedure for Installing a Product
$
$
$
$
$
$
$
SAVE_PROC_VERIFY = F$ENVIRONMENT("VERIFY_PROCEDURE")
SAVE_IMAGE_VERIFY = F$ENVIRONMENT("VERIFY_IMAGE")
SET VERIFY
ON ERROR THEN GOTO ERROR_EXIT
START_TIME = F$TIME()
WRITE SYS$OUTPUT "START TIME -- ’’START_TIME’"
PRODUCT INSTALL CHESSMASTER /CONFIGURATION=PRODUCER /HELP /LOG
$ERROR_EXIT:
$ END_TIME = F$TIME()
$ TEMP = F$VERIFY(SAVE_PROC_VERIFY,SAVE_IMAGE_VERIFY)
$ WRITE SYS$OUTPUT " --------------------------------"
$ WRITE SYS$OUTPUT " END TIME -- ’’END_TIME’"
$ WRITE SYS$OUTPUT "START TIME -- ’’START_TIME’"
$ WRITE SYS$OUTPUT " --------------------------------"
$ EXIT
5.7 Registering a Noncompliant Product
To register a product that was installed with a tool other than the POLYCENTER
Software Installation utility, enter the PRODUCT REGISTER PRODUCT
command. For example:
$ PRODUCT REGISTER PRODUCT TOOLCHEST
The PRODUCT REGISTER PRODUCT command records the information
provided by a product description in the product database. The product
description must be present before you can use the PRODUCT REGISTER
PRODUCT command.
5–6
6
Removing and Managing Installed Software
Products and Kits
Product maintenance involves removing and changing installed products. It can
also include registering changes to the system, such as a change in volume label.
This chapter explains how to do the following:
•
Remove an installed software product
•
Reconfigure an installed software product to change configuration choices
made during the installation
•
Register a new volume label for a disk that contains installed products
•
Copy a software kit from one location to another
•
Convert a software kit from one format to another
•
Retrieve product information
For information about performing these tasks with the Motif interface, choose On
Window from the Help menu.
6.1 Removing an Installed Product
When you use the POLYCENTER Software Installation utility to remove an
installed product, all of the files, accounts, and other objects that were created for
the product when it was installed are removed from your system and from the
product database.
To remove an installed product, enter the PRODUCT REMOVE command. For
example:
$ PRODUCT REMOVE CMS
6.2 Reconfiguring an Installed Product
After you install a product, you might decide to change the configuration choices
made during the installation. This is called reconfiguration. When you
reconfigure a product, the POLYCENTER Software Installation utility determines
whether the active product needs to be reinstalled. You choose the options you
want; the POLYCENTER Software Installation utility makes all the necessary
changes.
To change the configuration choices for an installed product, use the PRODUCT
RECONFIGURE command. See Appendix C for information about the PRODUCT
RECONFIGURE command.
6–1
Removing and Managing Installed Software Products and Kits
6.3 Recording a Change in Volume Label in the Product Database
6.3 Recording a Change in Volume Label in the Product Database
To record a changed volume label in the product database, enter the PRODUCT
REGISTER VOLUME command followed by the current volume label and the
new volume label.
This command replaces all occurrences of the old volume label with the new
volume label. (The POLYCENTER Software Installation utility reads the new
label from the disk.) See Appendix C for information about the PRODUCT
REGISTER VOLUME command.
Note that the PRODUCT REGISTER VOLUME command changes the
information in the product database only; it does not change the label on
the volume. To rename a volume, use the DCL command SET VOLUME. Then,
use the PRODUCT REGISTER VOLUME command to record the new name.
(For more information about changing volume names, see the OpenVMS System
Manager’s Manual.)
You can also use the PRODUCT REGISTER VOLUME command to record a
change in the physical or logical device name.
6.4 Copying a Software Kit to a New Location
You can use the POLYCENTER Software Installation utility to copy product
distribution kits from one location to another. If you transfer a kit from tape to
disk, you can change the format from a sequential copy to a reference copy.
To copy a software kit from one location to another, use the PRODUCT COPY
command. Specify the current location with the /SOURCE qualifier and the new
location with the /DESTINATION qualifier. For example:
$ PRODUCT COPY/SOURCE=WORK_DISK:[KITS]/DESTINATION=LOCAL_DISK:[KIT_INSTALL] CMS
6.5 Converting a Software Kit from One Format to Another
You can convert a software kit from reference format (on disk or CD–ROM) to
sequential format or from sequential format to reference format by using the
PRODUCT COPY command with the /FORMAT qualifier. For information about
this command, see Appendix C.
For example, to convert CMS from sequential format to reference format, enter
the following command:
$ PRODUCT COPY/FORMAT=REFERENCE/SOURCE=MUA1:/DESTINATION=LOCAL_DISK:[KIT_INSTALL] CMS
The POLYCENTER Software Installation Utility Developer’s Guide contains more
information on how to convert software kits.
6.6 Retrieving Product Information
All of the information stored by the product database (PDB) can be accessed by
using the SHOW OBJECT, SHOW PRODUCT, and SHOW HISTORY commands.
This section describes how to use these commands to retrieve information from
the PDB.
For information on how to display information about installed products with the
DECwindows Motif interface to the POLYCENTER Software Installation utility,
choose On Window from the Help menu.
6–2
Removing and Managing Installed Software Products and Kits
6.6 Retrieving Product Information
6.6.1 Displaying Information About Product Files
To display information about the managed objects (for example, files, accounts,
directories) associated with the products installed on your system, use the SHOW
OBJECT command. Table 6–1 lists questions you can ask with the SHOW
OBJECT command.
Table 6–1 SHOW OBJECT Command: Displaying Managed Object Information
Question
Command
What files or other
objects did this product
create?
PRODUCT SHOW OBJECT * /PRODUCT=product-name
What product created
this file or other object?
PRODUCT SHOW OBJECT object-name
6.6.2 Displaying Information About the Products
You can obtain information about products installed on your system with the
SHOW PRODUCT and SHOW HISTORY commands. Table 6–2 lists some of the
questions that can be answered with these commands.
Table 6–2 SHOW PRODUCT and SHOW HISTORY Commands: Displaying Product Information
Question
Command
Which products have
been installed?
PRODUCT SHOW HISTORY */OPERATION=INSTALL
PRODUCT SHOW PRODUCT *
Product
interdependencies: Is
product A referenced by
product B?
PRODUCT SHOW PRODUCT A/FULL
PRODUCT SHOW PRODUCT */REFERENCED_BY=B
Which products are
installed on the
WORKDISK volume?
PRODUCT SHOW OBJECT */DEVICE=WORKDISK /FULL
Which user installed a
product?
PRODUCT SHOW HISTORY product-name /FULL
Which products were
installed before March
31, 1994?
PRODUCT SHOW HISTORY */BEFORE=31-MAR-1994
Were any software
patches applied to a
product?
PRODUCT SHOW PRODUCT product-name/FULL
6–3
A
How the POLYCENTER Software Installation
Utility Differs from VMSINSTAL
This appendix compares the POLYCENTER Software Installation utility to the
VMSINSTAL procedure for installing software products. It describes the features
offered by the POLYCENTER Software Installation utility that VMSINSTAL does
not provide. It also provides a list of the ways in which you can perform the same
tasks with the POLYCENTER Software Installation utility that you previously
performed with VMSINSTAL.
A.1 Order of Configuration and Installation
When you use the POLYCENTER Software Installation utility, you perform an
installation by choosing your software configuration and then moving the product
files from the distribution media to their ultimate destination. In contrast,
VMSINSTAL begins an installation before you make configuration choices.
A.2 Interrupting an Installation in Progress
When you press Ctrl/Y during a VMSINSTAL procedure, the procedure leaves
your system in the same state it was in prior to the start of the installation.
If you press Ctrl/Y (or click on the Cancel button) while the POLYCENTER
Software Installation utility is installing a product, some files may be left on your
system, and the system could be in an inconsistent state. You can correct this by
reinstalling the product to a successful completion and then using the PRODUCT
REMOVE command to deinstall the product. (Note that you cannot use the
PRODUCT REMOVE command for a product unless the product installation is
complete.)
A.3 No Questions About Backing Up the System
The POLYCENTER Software Installation utility assumes that you have a valid
backup of your system disk. Therefore, you are not asked if you have backed up
your system disk before you begin an installation.
A.4 Running Product IVPs Automatically
When you use the POLYCENTER Software Installation utility to install a
product, it searches for and runs any installation verification procedures (IVPs)
provided by the selected products. In contrast, VMSINSTAL procedures always
include a question asking whether the product IVP should be run as part of the
installation procedure.
You can prevent the POLYCENTER Software Installation utility from running an
IVP by including the /NOTEST qualifier on the PRODUCT INSTALL command
line. (In Motif, you can toggle off the Test [IVP] button.)
A–1
How the POLYCENTER Software Installation Utility Differs from VMSINSTAL
A.5 Installing Several Products at the Same Time
A.5 Installing Several Products at the Same Time
The POLYCENTER Software Installation utility allows you to install several
products at the same time. VMSINSTAL does not.
A–2
B
DECWindows Motif Quick-Reference
Information for Product Installations
The following list is a step-by-step description of how to use the DECwindows
Motif interface of the POLYCENTER Software Installation utility to install one
or more software products.
1. Enter the Motif interface of the POLYCENTER Software Installation utility
using the following command at DCL level:
$ PRODUCT
Return
The main window is displayed.
2. Pull down the Mode menu, and click on Installation.
The Install Product List window is displayed.
3. If you want to install only one product, double click on the product name or
the button to the left of that product. (You may have to scroll down to find
the product you want to install.) Skip to Step 6.
4. To install more than one product, first be sure that the Multiple Select Hold
button in the upper right portion of the screen is filled in. If the button is
clear, click on it once to fill it in.
5. Double click on each of the products that you want to install, scrolling as
needed to find the products. As you select each one, the diamond to the left of
the product name is partially filled in.
After you have selected all the products to install, clear the Multiple Select
Hold button by clicking on it.
6. The Selected Products window displays the products that you have selected
for installation. Note that, by default, any IVP tests will be run, and
superseded versions of installed products will be deleted.
To install the products listed on the screen, click on the Install button at
the bottom of the screen. As the installation progresses, the POLYCENTER
Software Installation utility displays the status of the work done.
7. Return to the Install Product List window by clicking on the Start New
Operation box in the lower right corner of the screen.
B–1
C
PRODUCT Command Summary
This appendix is a reference section describing the PRODUCT command and its
subcommands. You use the PRODUCT command and subcommands to install
software, remove software, and perform other tasks from the DCL level.
C–1
PRODUCT Command Summary
PRODUCT
PRODUCT
The PRODUCT command lets you use the POLYCENTER Software Installation
utility to install a software product, remove a software product, or do any of
several tasks associated with these activities.
Format
PRODUCT [subcommand product-name [/qualifiers]]
Parameters
subcommand
The activity that you want to do using the POLYCENTER Software Installation
utility. The subcommands that you can use with the PRODUCT command are
described in this appendix. To use the Motif interface of the POLYCENTER
Software Installation utility, use only the PRODUCT command with no
subcommand, product-name, or qualifiers.
product-name
The name of the product to which you want to apply the activity specified by
subcommand. Some subcommands do not require the product-name parameter;
refer to the format statements for individual subcommands for more information.
You can use wildcards ( * ) for all or part of the product-name parameter, and you
can include a list of products.
Qualifiers
See the description of each subcommand for information about the qualifiers that
you can use.
The symbol (D) indicates the default value for the qualifier where appropriate.
C–2
PRODUCT Subcommands
CONFIGURE
CONFIGURE
Creates a product configuration file (PCF) for one or more products in reference
format, optionally using the values in an existing PCF to create the new PCF.
Format
PRODUCT CONFIGURE product-name[,...] [/qualifiers]
Subcommand Qualifiers
/BASE_SYSTEM=base-system-name[,...]
Performs the operation only for those products for the base system or list of base
systems named. The default value is the platform (that is, the hardware and
software combination) on which the POLYCENTER Software Installation utility
is executed.
/CONFIGURATION=keyword
Specifies whether the default configuration choices should be supplied by the
current values recorded for the latest version of the product, by the values
specified by the software manufacturer in the product description for the new
version, or by a PCF. You can also use /CONFIGURATION to specify the output
file name for a PCF created by this operation. This qualifier accepts the following
values:
CURRENT—Use the default values from the product database
PRODUCER—Use the configuration values specified by the software
manufacturer for this version of the product.
INPUT=filename—Use the configuration choices from the specified PCF.
OUTPUT=filename—Write the configuration choices to a PCF using
the specified file name. If no file name is supplied, a file named
DEFAULT.PCSI$CONFIGURATION is created.
The default value is CURRENT. The keywords CURRENT, PRODUCER, and
INPUT are mutually exclusive.
/HELP
/NOHELP (D)
Controls whether the POLYCENTER Software Installation utility displays
detailed explanations of product options and text. The first time you install a
product, these explanations can help you decide which options to select. When
you perform subsequent installations or upgrades, you might choose to bypass the
explanations to save time.
/LOG
/NOLOG (D)
Displays messages as the POLYCENTER Software Installation utility performs
an operation.
/PRODUCER=producer-name[,...]
Performs the operation only on software products that are produced by the
specified manufacturer or list of manufacturers. By default, the operation is
performed for all producers.
C–3
PRODUCT Subcommands
CONFIGURE
/REMOTE
Causes the nonproduct scope destinations (including the POLYCENTER Software
Installation utility database location) to reference the logicals PCSI$SYSDEVICE
and PCSI$SPECIFIC instead of SYS$SYSDEVICE and SYS$SPECIFIC. This
qualifier is provided primarily for operating system installations. It allows
software to be installed on a system other than the currently running system.
This qualifier is supported only for use in command procedures supplied by
Digital. Other uses may corrupt the POLYCENTER Software Installation utility
database, corrupt installed products, or cause other problems.
/SOURCE=name
Specifies the location of the software product kit on which you want to perform
the operation. By default, the POLYCENTER Software Installation utility
searches the location defined by PCSI$SOURCE; if PCSI$SOURCE is not defined,
the current default directory is searched.
/VERSION=version[,...]
Performs the operation only on software products that have the specified version
or list of versions. By default, the operation is performed for all versions.
C–4
PRODUCT Subcommands
COPY
COPY
Manipulates a product distribution kit. You can use COPY to create a sequential
copy from a reference copy, to create a reference copy from a sequential copy, or
to create a copy without changing the format. The /DESTINATION qualifier is
required with this command.
Format
PRODUCT COPY product-name /DESTINATION=device:[directory] [/qualifiers]
Subcommand Qualifiers
/BASE_SYSTEM=base-system-name[,...]
Performs the operation only for those products for the base system or list of base
systems named. The default value is the platform (that is, the hardware and
software combination) on which the POLYCENTER Software Installation utility
is executed.
/DESTINATION=device:[directory]
Specifies the primary disk and directory for placement of software product files.
The default is the value associated with the logical name PCSI$DESTINATION.
/FORMAT=keyword
Specifies that the output format of the product kit being copied is either
sequential (/FORMAT=SEQUENTIAL) or reference (/FORMAT=REFERENCE).
The default is the format of the input.
/LOG
/NOLOG (D)
Displays messages as the POLYCENTER Software Installation utility performs
an operation.
/OWNER_UIC=uic
Specifies the owner user identification code (UIC) for files created during a copy
operation. By default, the files for a software product are owned by the user
executing the operation. For example, if you are logged in to your own account,
you can use this qualifier during a copy operation to assign ownership of the
product files to SYSTEM rather than to your own account.
/PRODUCER=producer-name[,...]
Performs the operation only on software products that are produced by the
specified manufacturer or list of manufacturers. By default, the operation is
performed for all producers.
/SOURCE=name
Specifies the location of the software product kit on which you want to perform
the operation. By default, the POLYCENTER Software Installation utility
searches the location defined by PCSI$SOURCE; if PCSI$SOURCE is not defined,
the current default directory is searched.
/VERSION=version[,...]
Performs the operation only on software products that have the specified version
or list of versions. By default, the operation is performed for all versions.
C–5
PRODUCT Subcommands
EXTRACT RELEASE_NOTES
EXTRACT RELEASE_NOTES
Accesses the release notes for the selected product or group of products.
Format
PRODUCT EXTRACT RELEASE_NOTES product-name[,...] [/qualifiers]
Subcommand Qualifiers
/BASE_SYSTEM=base-system-name[,...]
Performs the operation only for those products for the base system or list of base
systems named. The default value is the platform (that is, the hardware and
software combination) on which the POLYCENTER Software Installation utility
is executed.
/FILE=filename
Specifies the name of a file created by the POLYCENTER Software Installation
utility from the release notes of the specified products. If no file name is given,
the release notes are written to a file named DEFAULT.PCSI$RELEASE_NOTES.
/LOG
/NOLOG (D)
Displays messages as the POLYCENTER Software Installation utility performs
an operation.
/PRODUCER=producer-name[,...]
Performs the operation only on software products that are produced by the
specified manufacturer or list of manufacturers. By default, the operation is
performed for all producers.
/SOURCE=name
Specifies the location of the software product kit on which you want to perform
the operation. By default, the POLYCENTER Software Installation utility
searches the location defined by PCSI$SOURCE; if PCSI$SOURCE is not defined,
the current default directory is searched.
/VERSION=version[,...]
Performs the operation only on software products that have the specified version
or list of versions. By default, the operation is performed for all versions.
/WORK=device:[directory]
Specifies the name of the device and directory to be used as a temporary work
area. By default, temporary files are created in the current working directory.
C–6
PRODUCT Subcommands
FIND
FIND
Examines a location and reports on a product or products found in that location.
By default, the location examined is defined by the logical name PCSI$SOURCE.
Format
PRODUCT FIND product-name[,...] [/qualifiers]
Subcommand Qualifiers
/BASE_SYSTEM=base-system-name[,...]
Performs the operation only for those products for the base system or list of base
systems named. The default value is the platform (that is, the hardware and
software combination) on which the POLYCENTER Software Installation utility
is executed.
/LOG
/NOLOG (D)
Displays messages as the POLYCENTER Software Installation utility performs
an operation.
/PRODUCER=producer-name[,...]
Performs the operation only on software products that are produced by the
specified manufacturer or list of manufacturers. By default, the operation is
performed for all producers.
/SOURCE=name
Specifies the location of the software product kit on which you want to perform
the operation. By default, the POLYCENTER Software Installation utility
searches the location defined by PCSI$SOURCE; if PCSI$SOURCE is not defined,
the current default directory is searched.
/VERSION=version[,...]
Performs the operation only on software products that have the specified version
or list of versions. By default, the operation is performed for all versions.
C–7
PRODUCT Subcommands
INSTALL
INSTALL
Installs one or more software products on your system.
Format
PRODUCT INSTALL product-name[,...] [/qualifiers]
Subcommand Qualifiers
/BASE_SYSTEM=base-system-name[,...]
Performs the operation only for those products for the base system or list of base
systems named. The default value is the platform (that is, the hardware and
software combination) on which the POLYCENTER Software Installation utility
is executed.
/CONFIGURATION=keyword
Specifies whether the default configuration choices should be supplied by the
current values recorded for the latest version of the product, by the values
specified by the software manufacturer in the product description for the new
version, or by a PCF. You can also use /CONFIGURATION to specify the output
file name for a PCF created by this operation. This qualifier accepts the following
values:
CURRENT—Use the default values from the product database
PRODUCER—Use the configuration values specified by the software
manufacturer for this version of the product.
INPUT=filename—Use the configuration choices from the specified PCF.
OUTPUT=filename—Write the configuration choices to a PCF using
the specified file name. If no file name is supplied, a file named
DEFAULT.PCSI$CONFIGURATION is created.
The default value is CURRENT. The keywords CURRENT, PRODUCER, and
INPUT are mutually exclusive.
/DESTINATION=device:[directory]
Specifies the primary disk and directory for placement of software product files.
The default is the value associated with the logical name PCSI$DESTINATION.
/HELP
/NOHELP (D)
Controls whether the POLYCENTER Software Installation utility displays
detailed explanations of product options and text. The first time you install a
product, these explanations can help you decide which options to select. When
you perform subsequent installations or upgrades, you might choose to bypass the
explanations to save time.
/KEEP (D)
/NOKEEP
Keeps the previous version of a software product when an upgrade makes a
newer version of that product available across the entire system. By default,
the POLYCENTER Software Installation utility deletes all previous versions of a
software product. For example, if you make Version 2.2 of a product available to
all nodes in the cluster, the POLYCENTER Software Installation utility deletes
Version 2.1 unless you use the /KEEP qualifier. If Version 2.2 is available to only
some nodes in the cluster, the utility does not delete Version 2.1.
C–8
PRODUCT Subcommands
INSTALL
/LOG
/NOLOG (D)
Displays messages as the POLYCENTER Software Installation utility performs
an operation.
/PRODUCER=producer-name[,...]
Performs the operation only on software products that are produced by the
specified manufacturer or list of manufacturers. By default, the operation is
performed for all producers.
/REMARK=string
Records a comment in the product database about the task you are performing.
The SHOW HISTORY command displays the recorded comments. For each
product, the POLYCENTER Software Installation utility stores a chronological
list of the tasks you perform and the corresponding remarks. The default value is
null (no remark is recorded).
/REMOTE
/NOREMOTE (D)
Causes the nonproduct scope destinations (including the POLYCENTER Software
Installation utility database location) to reference the logicals PCSI$SYSDEVICE
and PCSI$SPECIFIC instead of SYS$SYSDEVICE and SYS$SPECIFIC. This
qualifier is provided primarily for operating system installations. It allows
software to be installed on a system other than the currently running system.
This qualifier is supported only for use in command procedures supplied by
Digital. Other uses may corrupt the POLYCENTER Software Installation utility
database, corrupt installed products, or cause other problems.
/SOURCE=name
Specifies the location of the software product kit on which you want to perform
the operation. By default, the POLYCENTER Software Installation utility
searches the location defined by PCSI$SOURCE; if PCSI$SOURCE is not defined,
the current default directory is searched.
/TEST (D)
/NOTEST
Requests that the POLYCENTER Software Installation utility run the
installation verification procedure (IVP) for the product.
/VERSION=version[,...]
Performs the operation only on software products that have the specified version
or list of versions. By default, the operation is performed for all versions.
/WORK=device:[directory]
Specifies the name of the device and directory to be used as a temporary work
area. By default, temporary files are created in the current working directory.
C–9
PRODUCT Subcommands
PACKAGE
PACKAGE
A POLYCENTER Software Installation utility operation used by software
manufacturers. Information about the PRODUCT PACKAGE command is
available in the optional manual, POLYCENTER Software Installation Utility
Developer’s Guide.
C–10
PRODUCT Subcommands
RECONFIGURE
RECONFIGURE
Changes the active configuration choices for a product.
Format
PRODUCT RECONFIGURE product-name [/qualifiers]
Subcommand Qualifiers
/BASE_SYSTEM=base-system-name[,...]
Performs the operation only for those products for the base system or list of base
systems named. The default value is the platform (that is, the hardware and
software combination) on which the POLYCENTER Software Installation utility
is executed.
/CONFIGURATION=keyword
Specifies whether the default configuration choices should be supplied by the
current values recorded for the latest version of the product, by the values
specified by the software manufacturer in the product description for the new
version, or by a PCF. You can also use /CONFIGURATION to specify the output
file name for a PCF created by this operation. This qualifier accepts the following
values:
CURRENT—Use the default values from the product database
PRODUCER—Use the configuration values specified by the software
manufacturer for this version of the product.
INPUT=filename—Use the configuration choices from the specified PCF.
OUTPUT=filename—Write the configuration choices to a PCF using
the specified file name. If no file name is supplied, a file named
DEFAULT.PCSI$CONFIGURATION is created.
The default value is CURRENT. The keywords CURRENT, PRODUCER, and
INPUT are mutually exclusive.
/HELP
/NOHELP (D)
Controls whether the POLYCENTER Software Installation utility displays
detailed explanations of product options and text. The first time you install a
product, these explanations can help you decide which options to select. When
you perform subsequent installations or upgrades, you might choose to bypass the
explanations to save time.
/LOG
/NOLOG (D)
Displays messages as the POLYCENTER Software Installation utility performs
an operation.
/PRODUCER=producer-name[,...]
Performs the operation only on software products that are produced by the
specified manufacturer or list of manufacturers. By default, the operation is
performed for all producers.
C–11
PRODUCT Subcommands
RECONFIGURE
/REMARK=string
Records a comment in the product database about the task you are performing.
The SHOW HISTORY command displays the recorded comments. For each
product, the POLYCENTER Software Installation utility stores a chronological
list of the tasks you perform and the corresponding remarks. The default value is
null (no remark is recorded).
/REMOTE
/NOREMOTE (D)
Causes the nonproduct scope destinations (including the POLYCENTER Software
Installation utility database location) to reference the logicals PCSI$SYSDEVICE
and PCSI$SPECIFIC instead of SYS$SYSDEVICE and SYS$SPECIFIC. This
qualifier is provided primarily for operating system installations. It allows
software to be installed on a system other than the currently running system.
This qualifier is supported only for use in command procedures supplied by
Digital. Other uses may corrupt the POLYCENTER Software Installation utility
database, corrupt installed products, or cause other problems.
/SOURCE=name
Specifies the location of the software product kit on which you want to perform
the operation. By default, the POLYCENTER Software Installation utility
searches the location defined by PCSI$SOURCE; if PCSI$SOURCE is not defined,
the current default directory is searched.
/TEST (D)
/NOTEST
Requests that the POLYCENTER Software Installation utility run the
installation verification procedure (IVP) for the product.
/VERSION=version[,...]
Performs the operation only on software products that have the specified version
or list of versions. By default, the operation is performed for all versions.
/WORK=device:[directory]
Specifies the name of the device and directory to be used as a temporary work
area. By default, temporary files are created in the current working directory.
C–12
PRODUCT Subcommands
REGISTER PRODUCT
REGISTER PRODUCT
Registers a product in the product database.
Format
PRODUCT REGISTER PRODUCT product-name [/qualifiers]
Subcommand Qualifiers
/BASE_SYSTEM=base-system-name[,...]
Performs the operation only for those products for the base system or list of base
systems named. The default value is the platform (that is, the hardware and
software combination) on which the POLYCENTER Software Installation utility
is executed.
/DESTINATION=device:[directory]
Specifies the primary disk and directory for placement of software product files.
The default is the value associated with the logical name PCSI$DESTINATION.
/LOG
/NOLOG (D)
Displays messages as the POLYCENTER Software Installation utility performs
an operation.
/PRODUCER=producer-name[,...]
Performs the operation only on software products that are produced by the
specified manufacturer or list of manufacturers. By default, the operation is
performed for all producers.
/REMARK=string
Records a comment in the product database about the task you are performing.
The SHOW HISTORY command displays the recorded comments. For each
product, the POLYCENTER Software Installation utility stores a chronological
list of the tasks you perform and the corresponding remarks. The default value is
null (no remark is recorded).
/REMOTE
/NOREMOTE (D)
Causes the nonproduct scope destinations (including the POLYCENTER Software
Installation utility database location) to reference the logicals PCSI$SYSDEVICE
and PCSI$SPECIFIC instead of SYS$SYSDEVICE and SYS$SPECIFIC. This
qualifier is provided primarily for operating system installations. It allows
software to be installed on a system other than the currently running system.
This qualifier is supported only for use in command procedures supplied by
Digital. Other uses may corrupt the POLYCENTER Software Installation utility
database, corrupt installed products, or cause other problems.
/SOURCE=name
Specifies the location of the software product kit on which you want to perform
the operation. By default, the POLYCENTER Software Installation utility
searches the location defined by PCSI$SOURCE; if PCSI$SOURCE is not defined,
the current default directory is searched.
C–13
PRODUCT Subcommands
REGISTER PRODUCT
/VERSION=version[,...]
Performs the operation only on software products that have the specified version
or list of versions. By default, the operation is performed for all versions.
C–14
PRODUCT Subcommands
REGISTER VOLUME
REGISTER VOLUME
For a volume containing installed products, records a change in volume label in
the product database.
Format
PRODUCT REGISTER VOLUME old-name device-name [/qualifiers]
Parameters
old-name
The old (existing) volume label.
device-name
The device for which the volume label is to be changed in the product database.
Subcommand Qualifiers
/LOG
/NOLOG (D)
Displays messages as the POLYCENTER Software Installation utility performs
an operation.
/REMOTE
/NOREMOTE (D)
Causes the nonproduct scope destinations (including the POLYCENTER Software
Installation utility database location) to reference the logicals PCSI$SYSDEVICE
and PCSI$SPECIFIC instead of SYS$SYSDEVICE and SYS$SPECIFIC. This
qualifier is provided primarily for operating system installations. It allows
software to be installed on a system other than the currently running system.
This qualifier is supported only for use in command procedures supplied by
Digital. Other uses may corrupt the POLYCENTER Software Installation utility
database, corrupt installed products, or cause other problems.
C–15
PRODUCT Subcommands
REMOVE
REMOVE
Removes a software product from your system and the product database.
Format
PRODUCT REMOVE product-name [/qualifiers]
Subcommand Qualifiers
/BASE_SYSTEM=base-system-name[,...]
Performs the operation only for those products for the base system or list of base
systems named. The default value is the platform (that is, the hardware and
software combination) on which the POLYCENTER Software Installation utility
is executed.
/LOG
/NOLOG (D)
Displays messages as the POLYCENTER Software Installation utility performs
an operation.
/PRODUCER=producer-name[,...]
Performs the operation only on software products that are produced by the
specified manufacturer or list of manufacturers. By default, the operation is
performed for all producers.
/REMARK=string
Records a comment in the product database about the task you are performing.
The SHOW HISTORY command displays the recorded comments. For each
product, the POLYCENTER Software Installation utility stores a chronological
list of the tasks you perform and the corresponding remarks. The default value is
null (no remark is recorded).
/REMOTE
/NOREMOTE (D)
Causes the nonproduct scope destinations (including the POLYCENTER Software
Installation utility database location) to reference the logicals PCSI$SYSDEVICE
and PCSI$SPECIFIC instead of SYS$SYSDEVICE and SYS$SPECIFIC. This
qualifier is provided primarily for operating system installations. It allows
software to be installed on a system other than the currently running system.
This qualifier is supported only for use in command procedures supplied by
Digital. Other uses may corrupt the POLYCENTER Software Installation utility
database, corrupt installed products, or cause other problems.
/VERSION=version[,...]
Performs the operation only on software products that have the specified version
or list of versions. By default, the operation is performed for all versions.
/WORK=device:[directory]
Specifies the name of the device and directory to be used as a temporary work
area. By default, temporary files are created in the current working directory.
C–16
PRODUCT Subcommands
SHOW HISTORY
SHOW HISTORY
Displays a log of actions, users, and remarks that apply to a particular product.
Format
PRODUCT SHOW HISTORY product-name [/qualifiers]
Subcommand Qualifiers
/BASE_SYSTEM=base-system-name[,...]
Performs the operation only for those products for the base system or list of base
systems named. The default value is the platform (that is, the hardware and
software combination) on which the POLYCENTER Software Installation utility
is executed.
/BEFORE=time
Selects entries that were created before the specified date and time.
/FULL
/NOFULL (default)
Controls whether all the available information is displayed (/FULL) or only a
condensed version is displayed (/NOFULL).
/LOG
/NOLOG (D)
Displays messages as the POLYCENTER Software Installation utility performs
an operation.
/OPERATION=keyword
Specifies one of the following operations:
INSTALL
RECONFIGURE
REGISTER_PRODUCT
REGISTER_VOLUME
REMOVE
/PRODUCER=producer-name[,...]
Performs the operation only on software products that are produced by the
specified manufacturer or list of manufacturers. By default, the operation is
performed for all producers.
/REMOTE
/NOREMOTE (D)
Causes the nonproduct scope destinations (including the POLYCENTER Software
Installation utility database location) to reference the logicals PCSI$SYSDEVICE
and PCSI$SPECIFIC instead of SYS$SYSDEVICE and SYS$SPECIFIC. This
qualifier is provided primarily for operating system installations. It allows
software to be installed on a system other than the currently running system.
This qualifier is supported only for use in command procedures supplied by
Digital. Other uses may corrupt the POLYCENTER Software Installation utility
database, corrupt installed products, or cause other problems.
/SINCE=time
Selects records that were created after the specified date and time.
C–17
PRODUCT Subcommands
SHOW HISTORY
/USER=username
Displays information about the products installed, configured, or removed by the
specified user.
/VERSION=version[,...]
Performs the operation only on software products that have the specified version
or list of versions. By default, the operation is performed for all versions.
C–18
PRODUCT Subcommands
SHOW OBJECT
SHOW OBJECT
Displays information about objects created during a software product installation.
Format
PRODUCT SHOW OBJECT object-name [/qualifiers]
Parameter
object-name
An object (for example, a file) created during an installation.
Subcommand Qualifiers
/BASE_SYSTEM=base-system-name[,...]
Performs the operation only for those products for the base system or list of base
systems named. The default value is the platform (that is, the hardware and
software combination) on which the POLYCENTER Software Installation utility
is executed.
/DEVICE=device-name
Specifies a physical device name, a logical device name, or a volume label.
Use this qualifier to select objects or entries that reside on the specified device.
/DIRECTORY=directory-name
Specifies the location for the files to be selected.
Use this qualifier to select objects or entries that reside in the specified directory.
/FULL
/NOFULL (default)
Controls whether all the available information is displayed (/FULL) or only a
condensed version is displayed (/NOFULL).
/LOG
/NOLOG (D)
Displays messages as the POLYCENTER Software Installation utility performs
an operation.
/PRODUCER=producer-name[,...]
Performs the operation only on software products that are produced by the
specified manufacturer or list of manufacturers. By default, the operation is
performed for all producers.
/PRODUCT=
Specifies the name of a software product.
/REMOTE
/NOREMOTE (D)
Causes the nonproduct scope destinations (including the POLYCENTER Software
Installation utility database location) to reference the logicals PCSI$SYSDEVICE
and PCSI$SPECIFIC instead of SYS$SYSDEVICE and SYS$SPECIFIC. This
qualifier is provided primarily for operating system installations. It allows
software to be installed on a system other than the currently running system.
C–19
PRODUCT Subcommands
SHOW OBJECT
This qualifier is supported only for use in command procedures supplied by
Digital. Other uses may corrupt the POLYCENTER Software Installation utility
database, corrupt installed products, or cause other problems.
/VERSION=version[,...]
Performs the operation only on software products that have the specified version
or list of versions. By default, the operation is performed for all versions.
C–20
PRODUCT Subcommands
SHOW PRODUCT
SHOW PRODUCT
Displays information about the products installed on your system.
Format
PRODUCT SHOW PRODUCT product-name[,...] [/qualifiers]
Subcommand Qualifiers
/BASE_SYSTEM=base-system-name[,...]
Performs the operation only for those products for the base system or list of base
systems named. The default value is the platform (that is, the hardware and
software combination) on which the POLYCENTER Software Installation utility
is executed.
/FULL
/NOFULL (default)
Controls whether all the available information is displayed (/FULL) or only a
condensed version is displayed (/NOFULL).
/LOG
/NOLOG (D)
Displays messages as the POLYCENTER Software Installation utility performs
an operation.
/MAINTENANCE=product-name
Specifies a specific patch kit (product) that was applied as a correction to
installed products. You can also list all of the patches that have been applied to
a particular product by using the PRODUCT DISPLAY PRODUCT product-name
/FULL command.
/PRODUCER=producer-name[,...]
Performs the operation only on software products that are produced by the
specified manufacturer or list of manufacturers. By default, the operation is
performed for all producers.
/REFERENCED_BY=product-name
Displays all products that are referenced by the named product (that is, products
on which the named product is dependent).
/REMOTE
/NOREMOTE (D)
Causes the nonproduct scope destinations (including the POLYCENTER Software
Installation utility database location) to reference the logicals PCSI$SYSDEVICE
and PCSI$SPECIFIC instead of SYS$SYSDEVICE and SYS$SPECIFIC. This
qualifier is provided primarily for operating system installations. It allows
software to be installed on a system other than the currently running system.
This qualifier is supported only for use in command procedures supplied by
Digital. Other uses may corrupt the POLYCENTER Software Installation utility
database, corrupt installed products, or cause other problems.
/VERSION=version[,...]
Performs the operation only on software products that have the specified version
or list of versions. By default, the operation is performed for all versions.
C–21
Index
A
Autoanswer file, another name for, 4–3
C
Changing configuration choices, RECONFIGURE
subcommand, C–11
Changing formats (of software kits), COPY
subcommand, C–5
Command procedures
installing products with, 5–5
using PRODUCT commands in, 3–3
Configuration, 4–3
changing, 6–1
changing choices, 4–6
changing choices using DCL interface, C–11
changing choices using Motif interface, 2–4
reviewing choices, 4–6
/CONFIGURATION=INPUT qualifier, 5–3
/CONFIGURATION=OUTPUT qualifier, 5–3
/CONFIGURATION qualifier, 4–4
See also specific subcommands (Appendix C)
CONFIGURE subcommand, C–3
Copying a software kit, COPY subcommand, C–5
COPY subcommand, 6–2, C–5
DECwindows Motif interface (cont’d)
Product field, 2–3
reconfiguring products, 2–4
registering products in the product database,
2–4
removing products, 2–4
Show Product List, 2–2
Source field, 2–3
Version field, 2–3
work field, 2–3
Defer key, 4–5
Deinstallation
See Removing products
Destination
See Software products, placement of files
/DESTINATION qualifier, 5–3, 6–2
See also specific subcommands (Appendix C)
Disks, changing volume label, 6–2
Disk space requirements, 5–4
Display conventions, 2–4
Distribution directory, logical name for, 3–2
Distribution kits, locating product, 3–2
Distribution media, specifying location, 5–2
Distribution types, 4–2
Documentation comments, sending to Digital, iii
E
D
Database, product
See PDB
DCL syntax, 3–1
DECwindows Motif interface, 2–1
copying a software kit, 2–4
display conventions, 2–4
displaying information about products, 2–4
exiting from, 2–8
getting help, 2–8
Install button, 2–7
installing products, 2–4
invoking the POLYCENTER Software
Installation utility, 2–1
main window, 2–2
Mode menu, 2–4
Multiple Select Hold button, 2–5
operating on multiple products, 2–5
Options menu, 2–7
EXTRACT RELEASE_NOTES subcommand, 5–1,
C–6
F
F17 key, 4–5
F18 key, 4–5
F19 key, 5–5
Feedback on documentation, sending to Digital, iii
Files
autoanswer, 4–3
placement of product, 5–3
product configuration, 4–3
storing messages in, 5–2
temporary work areas for, 2–3
FIND subcommand, 3–2, C–7
Format conversion, 6–2
Index–1
/FORMAT qualifier, 6–2
See also specific subcommands (Appendix C)
Full product distribution, 4–2
Function keys, 4–5, 5–4
H
Help
DCL interface, 3–3
Motif interface, 2–8
/HELP qualifier, 5–4
See also specific subcommands (Appendix C)
Hyphen ( - ), restriction on use of, 3–1
I
INPUT keyword, 5–3
See also specific subcommands (Appendix C)
Installation
See also INSTALL subcommand
choosing subset of options, 5–5
controlling, 5–2
creating a new PCF during, 5–3
customizing, 4–4
default directory for kits, 3–2
default installation criteria, 4–2
ensuring consistency, 4–3
Install button, 2–7
Motif interface, 2–5 to 2–8
step-by-step description, B–1
multiple products, 2–5, 5–1
Multiple Select Hold button, 2–5
noncompliant products, 5–6
performing with a command procedure, 5–5
requesting full description of options, 5–4
responding to questions, 5–4
reversible, 1–2
saving messages, 5–2
supplying answers from a PCF, 5–3
tasks and related PRODUCT subcommands,
3–2
use of product guides, 4–3
verifying, 5–2
Installation Verification Procedures
See IVPs
INSTALL subcommand, 5–1, C–8
/CONFIGURATION=INPUT qualifier, 5–3
/CONFIGURATION=OUTPUT qualifier, 5–3
/DESTINATION qualifier, 5–3
/HELP qualifier, 5–4
qualifiers, 5–2
/SOURCE qualifier, 5–2
Integration, product, 1–2
IVPs, 5–2
Index–2
K
Kits
See Software products
L
Labels, changing a volume, 6–2
Logical names
for distribution directory, 3–2
M
Mandatory updates, 4–2
Media
changing volume labels, 6–2
copying product to new format, 6–2
specifying source of product kits, 5–2
Memory requirements, 5–4
Messages, saving in a file, 5–2
Mode menu, 2–4
Motif
See DECwindows Motif interface
Multiple products, operating on, 2–5
Multiple Select Hold button, 2–5
N
Noexpand key, 5–5
NOHELP message, 5–4
Nowrite key, 4–5
O
Operating system, distribution type, 4–2
Operation button, 2–5, 2–7
Options
accepting default values for subset, 5–5
changing choice of, 4–5
deferring choice of, 4–6
disk space and memory requirements, 5–4
displaying full description, 5–2
features for selecting, 1–2
full description of, 5–4
product, features for selecting, 1–2
rejecting default values, 4–6
selecting, 5–4
ways of recording selection, 4–5
Options menu, 2–7
OUTPUT keyword, 4–4, 5–3
See also specific subcommands (Appendix C)
P
Partial product distribution, 4–2
Patches, 4–2
PCFs (product configuration files), 3–3, 4–3, 4–4
CONFIGURE subcommand, C–3
creating during installation, 5–3
default, 4–4
default name, 4–4, 5–3
naming, 4–4
reviewing choices in, 4–6
revising, 4–7
supplying answers from, 5–3
using, 5–2
writing, 4–4
PCSI$DESTINATION logical name, 2–3
PCSI$DESTINATION logical name, defining, 5–3
PCSI$SOURCE logical name, 3–3
PCSI$SOURCE logical name, defining, 5–2
PDB (product database)
recording a volume label change, C–15
registering a product in, C–13
PDFs (Product description files), 4–3
Post-installation procedure, 4–3
PRODUCT command, 3–1, C–2
CONFIGURE subcommand, C–3
COPY subcommand, C–5
DCL syntax, 3–1
EXTRACT RELEASE_NOTES subcommand,
C–6
FIND subcommand, C–7
help on, 3–3
INSTALL subcommand, C–8
RECONFIGURE subcommand, C–11
REGISTER PRODUCT subcommand, C–13
REGISTER VOLUME subcommand, C–15
REMOVE subcommand, C–16
SHOW HISTORY subcommand, C–17
SHOW OBJECT subcommand, C–19
SHOW PRODUCT subcommand, C–21
subcommand usage summary, 3–2
Product configuration, making choices, 4–3
Product configuration files
See PCFs
Product database
See PDB
Product description files
See PDFs
Product field, 2–3
Product information, sources of, 4–3
Product integration, 1–2
Product interdependencies, 4–7
Product List boxes
Install Product List, 2–5
Selected Product List, 2–7
Show Product List, 2–3
Product names, specifying, 2–6
Product options
See Options
Product requirements, 4–3
Products
See Software products
R
Reconfiguration, 6–1
RECONFIGURE subcommand, C–11
REGISTER PRODUCT subcommand, 5–6, C–13
REGISTER VOLUME subcommand, 6–2, C–15
Release notes, 5–1
EXTRACT RELEASE_NOTES subcommand,
C–6
REMOVE subcommand, 6–1, C–16
Removing products, 6–1, C–16
Reporting on product interdependencies, 4–7
Requirements
disk space, 5–4
memory, 5–4
Reset button, 2–5
S
Selected Products list box, 2–3
Session menu, 2–8
SHOW HISTORY subcommand, C–17
SHOW OBJECT subcommand, C–19
Show Product List, 2–2
SHOW PRODUCT subcommand, C–21
Software kits
See Software products
Software products
accepting default options, 5–5
changing choice of options, 4–5
changing configuration choices in PCF, 4–7
changing format, 6–2
choosing options, 4–5
consistent installation of, 4–3
controlling installation, 5–2
copying, 6–2
database, 4–3
deferring choice of option, 4–6
disk space and memory requirements, 5–4
displaying description of options, 5–2
distribution type, 4–2
full description of options, 5–4
installing, 5–1
installing more than one, 5–1
kit location, 5–2
locating on distribution kit, 3–2
placement of files, 5–3
reconfiguring, 6–1
registering, 5–6
release notes, 5–1
Index–3
Software products (cont’d)
removal, 6–1
removing, 6–1
reviewing configuration choices, 4–6
saving previous versions of files, 5–2
selecting, 2–5
selecting a specific option, 4–6
selecting options, 5–4
specifying the name, 4–2
transitional, 4–2, 5–6
upgrade, 5–2
use of installation guides, 4–3
Source field, 2–3
/SOURCE qualifier, 3–3, 5–2, 6–2
See also specific subcommands (Appendix C)
System management, tasks and related PRODUCT
subcommands, 3–2
T
Transitional product distribution, 4–2
U
Upgrades, 5–2
V
Verification (installation), 5–2
Version field, 2–3
Version number, specifying, 2–6
Volume labels, changing, 6–2
W
Work area, temporary files, 2–3
Work field, 2–3
Index–4