1
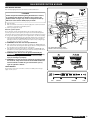
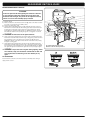
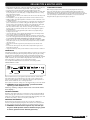
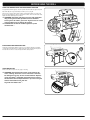
BEFORE USING THE GRILL SLIDE-OUT GREASE TRAY AND DISPOSABLE DRIP PAN Your grill was built with a grease collection system. Check the slide-out grease tray and disposable drip pan for grease build-up each time you use your grill. Remove excess grease with a plastic spatula; see illustration. When necessary, wash the grease tray and drip pan with a soap and water solution, then rinse with clean water. Replace the disposable drip pan as needed. m WARNING: Check the slide-out grease tray and disposable drip pan for grease build-up before each use. Remove excess grease to avoid a grease fire. A grease fire can cause serious bodily injury or damage to property. m CAUTION: Do not line the slide-out grease tray with aluminum foil. X ELECTRONIC IGNITER INSPECTION Verify that your AA battery (alkaline only) is in good condition and that it is installed correctly (1). Some batteries have a plastic protective wrap around them. This plastic must be removed. Do not confuse this plastic with the battery label. X 1 HOSE INSPECTION The hose should be inspected for any signs of cracking. m WARNING: Check hose before each use of barbecue for nicks, cracking, abrasions or cuts. If the hose is found to be damaged in any way, do not use the barbecue. Replace using only Weber® authorized replacement hose. Contact the Customer Service Representative in your area using the contact information on our web site. Log onto www.weber.com®. X 12 MAIN BURNER IGNITION & USAGE MAIN BURNER IGNITION Note: Summary lighting instructions are inside the left-hand cabinet door. 5 m DANGER 1 Failure to open the lid while igniting the barbecue’s burners, or not waiting five minutes to allow the gas to clear if the barbecue does not light, may result in an explosive flare-up which can cause serious bodily injury or death. 2 2 A) Open the lid (1). B) Make sure all burner control knobs are turned off (2). (Push control knob in and turn it clockwise to ensure that it is in the OFF position.) C) Turn the gas supply valve on (3). 6 Electronic Ignition System Each control knob operates an individual burner, and each burner ignites with an electronic igniter. The electronic ignition system ignites each burner individually with a spark from the igniter electrode inside the Gas Catcher™ ignition chamber. You generate the energy for the spark by pushing the electronic ignition button. You will hear it clicking. 8 4 5 D) Ignite the burners individually from left to right. Begin with the burner on the left; push control knob in and turn it to START/HI (4). Push and hold in the electronic ignition button (5). You will hear it clicking. Check that the left burner is lit by looking through the cooking grates. You should see a flame (6). 7 m WARNING: Do not lean over the open barbecue. E) Ignite center burner by pushing control knob in and turning it to START/HI (7). Then, push and hold in the electronic ignition button (5). You will hear it clicking. Check that the center burner is lit by looking through the cooking grates. F) Ignite right burner by pushing control knob in and turning it to START/HI (8). Push and hold in the electronic ignition button (5). You will hear it clicking. Confirm that the right burner is lit by looking through the cooking grates. 3 The grill illustrated may have slight differences than the model purchased. m WARNING: Each burner must be ignited individually by pushing the electronic ignition button. Failure to do so may cause a flare-up of gas which can cause serious bodily injury and damage to property. m WARNING: If any burner fails to ignite during lighting, within five seconds, stop, turn the burner control knob to OFF and wait five minutes to allow the gas to clear before you try again or light with a match. X 2 4 7 8 TO EXTINGUISH Push in and turn each burner control knob clockwise to the OFF position. Turn gas supply off at the source. X OFF START/HI MEDIUM LOW WWW.WEBER.COM® 13 MAIN BURNER IGNITION & USAGE MAIN BURNER MANUAL IGNITION m DANGER 1 Failure to open the lid while igniting the barbecue’s burners, or not waiting five minutes to allow the gas to clear if the barbecue does not light, may result in an explosive flare-up which can cause serious bodily injury or death. A) Open the lid (1). B) Make sure all burner control knobs are turned off (2). (Push control knob in and turn it clockwise to ensure that it is in the OFF position.) C) Turn the gas supply valve on (3). D) Ignite the burners individually from left to right. Begin with the burner on the left. Put match in the match holder and strike match. Insert match holder with lit match down through cooking grates, past the Flavorizer® bars and adjacent to the left burner (4). Push control knob in (5) and turn it to START/HI to ignite the left burner. Check that the left burner is lit by looking through the cooking grates. You should see a flame (6). 4 2 2 6 8 m WARNING: Do not lean over the open barbecue. E) Ignite center burner by putting match in the match holder and striking match. Then, insert match holder with lit match down through cooking grates, past the Flavorizer® bars and adjacent to the center burner. Push control knob in (7) and turn it to START/HI to ignite the center burner. Check that the center burner is lit by looking through the cooking grates. F) Ignite right burner by putting match in the match holder and striking match.Then, insert match holder with lit match down through cooking grates, past the Flavorizer® bars and adjacent to the right burner. Push control knob in (8) and turn it to START/ HI to ignite the right burner. Check that the right burner is lit by looking through the cooking grates. m WARNING: If any burner fails to ignite during lighting, within five seconds, stop, turn the burner control knob to OFF and wait five minutes to allow the gas to clear before you try again. X TO EXTINGUISH Push in and turn each burner control knob clockwise to the OFF position. Turn gas supply off at the source. X 14 5 7 3 The grill illustrated may have slight differences than the model purchased. 2 5 7 8 GRILLING TIPS & HELPFUL HINTS r "MXBZTQSFIFBUUIFHSJMMCFGPSFDPPLJOH4FUBMMCVSOFSTPO)*IFBUBOEDMPTFMJEIFBU GPSNJOVUFTPSVOUJMUIFSNPNFUFSSFHJTUFSTm'm$ r 4FBSNFBUTBOEDPPLXJUIUIFMJEEPXOGPSQFSGFDUMZHSJMMFEGPPEFWFSZUJNF r (SJMMJOHUJNFTJOSFDJQFTBSFCBTFEPO'$ XFBUIFSBOEMJUUMFPSOPXJOE"MMPX more cooking time on cold or windy days, or at higher altitudes. Allow less cooking time in extremely hot weather. r (SJMMJOHUJNFTDBOWBSZCFDBVTFPGUIFXFBUIFSPSUIFBNPVOUTJ[FBOETIBQFPGUIF food being grilled. r 5IFUFNQFSBUVSFPGZPVSHBTHSJMMNBZSVOIPUUFSUIBOOPSNBMGPSUIFGJSTUGFXVTFT r (SJMMJOHDPOEJUJPOTNBZSFRVJSFBEKVTUNFOUPGUIFCVSOFSDPOUSPMTUPBUUBJOUIFDPSSFDU cooking temperatures. r *OHFOFSBMMBSHFQJFDFTPGNFBUXJMMSFRVJSFNPSFDPPLJOHUJNFQFSQPVOEUIBOTNBMM pieces of meat. Foods on a crowded cooking grate will require more cooking time than just a few foods. Foods grilled in containers, such as baked beans, will require more time if grilled in a deep casserole rather than a shallow baking pan. r 5SJNFYDFTTGBUGSPNTUFBLTDIPQTBOESPBTUTMFBWJOHOPNPSFUIBOBTDBOUJODI NN PGGBU-FTTGBUNBLFTDMFBOVQFBTJFSBOEJTBWJSUVBMHVBSBOUFFBHBJOTU unwanted flare-ups. r 'PPETQMBDFEPOUIFDPPLJOHHSBUFEJSFDUMZBCPWFCVSOFSTNBZSFRVJSFUVSOJOHPS moving to a less hot area. r 6TFUPOHTSBUIFSUIBOBGPSLGPSUVSOJOHBOEIBOEMJOHNFBUTUPBWPJEMPTJOHOBUVSBM juices. Use two spatulas for handling large whole fish. r *GBOVOXBOUFEGMBSFVQTIPVMEPDDVSUVSOBMMCVSOFSTPGGBOENPWFGPPEUPBOPUIFS area of the cooking grate. Any flames will quickly subside. After flames subside, relight the grill. NEVER USE WATER TO EXTINGUISH FLAMES ON A GAS GRILL. r 4PNFGPPETTVDIBTBDBTTFSPMFPSUIJOGJTIGJMMFUTXJMMSFRVJSFBDPOUBJOFSGPSHSJMMJOH Disposable foil pans are very convenient, but any metal pan with ovenproof handles can also be used. r "MXBZTCFTVSFUIFTMJEFPVUHSFBTFUSBZBOEDBUDIQBOBSFDMFBOBOEGSFFGSPN debris. r %POPUMJOFUIFTMJEFPVUHSFBTFUSBZXJUIGPJM5IJTDPVMEQSFWFOUUIFHSFBTFGSPN flowing into the catch pan. r 6TJOHBUJNFSXJMMIFMQUPBMFSUZPVXIFOiXFMMEPOFuJTBCPVUUPCFDPNFiPWFSEPOFuX FLAVORIZER® SYSTEM When meat juices drip from the food onto the specially angled Flavorizer® bars, they create smoke that gives foods an irresistible barbecued flavor. Thanks to the unique design of the burners, Flavorizer® bars and the flexible temperature controls, uncontrolled flare-ups are virtually eliminated, because YOU control the flames. Because of the special design of the Flavorizer® bars and burners, excess fats are directed through the slide-out grease tray into the grease catch pan. X PREHEATING Your Weber® gas barbecue is an energy-efficient appliance. It operates at an economical low BTU rate. Preheating the grill before grilling is important. Light your grill according to the instructions in this Owner’s Guide. To preheat: after lighting, turn all burners to START/HI, close the lid, and heat until the temperature reaches between 500° and 550° 'BOE$ UIFSFDPNNFOEFECSPJMJOHUFNQFSBUVSF5IJTXJMMUBLFUP minutes depending on conditions such as air temperature and wind. You can adjust the individual burners as desired. The control settings are OFF, START/HI, MEDIUM, or LOW. OFF START/HI MEDIUM LOW Note: For the first few uses of your grill, the temperature inside the cookbox may be hotter than shown in your cookbook because the surfaces of the cookbox are still reflective. Cooking conditions, such as wind and weather, may require adjustment of burner controls to obtain the correct cooking temperatures. Note: If grill loses heat while cooking, refer to the troubleshooting section of this manual. m WARNING: Do not move the Weber® gas barbecue when operating or while barbecue is hot. If burners go out during cooking, turn all burner knobs off and wait five minutes before relighting. X COVERED COOKING All grilling is done with the lid down to provide uniform, evenly circulated heat. With the lid closed, the gas grill cooks much like a convection oven. The thermometer in the lid indicates the cooking temperature inside the grill. All preheating and grilling is done with the lid down. No peeking — heat is lost every time you lift the lid. X DRIPPINGS AND GREASE The Flavorizer® bars are designed to “smoke” the correct amount of drippings for flavorful cooking. Excess drippings and grease will accumulate in the catch pan under the slide-out grease tray. Disposable foil drip pans are available that fit the catch pan. m WARNING: Check the slide-out grease tray and catch pan for grease build-up before each use. Remove excess grease to avoid a grease fire in the slide-out grease tray. X WWW.WEBER.COM® 15