1
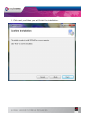
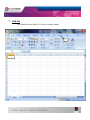
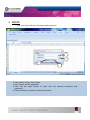
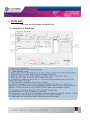
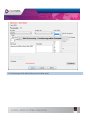
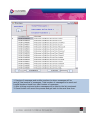
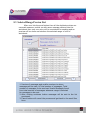
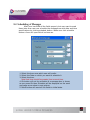
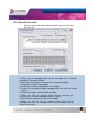
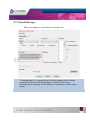
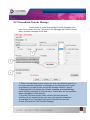
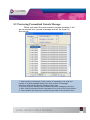
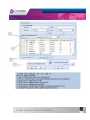
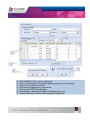
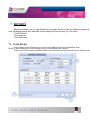
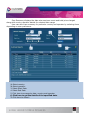
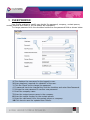
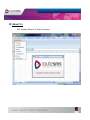
User Manual IND-BulkSms Excel Add-In Version 1.0 Contents 1 2 3 4 5 6 7 Overview ................................................................................................................................ 3 Steps to run an Excel Add-In Setup: ................................................................................... 4 Add-Ins ................................................................................................................................ 11 LOGIN ................................................................................................................................. 12 SEND SMS........................................................................................................................... 13 5.1 Send Text or Flash Sms .................................................................................................................... 13 5.2 Select Range ...................................................................................................................................... 16 5.3 Selected Range Preview List ............................................................................................................. 17 5.4 Scheduling of Messages .................................................................................................................... 18 5.5 Scheduled Message ........................................................................................................................... 19 5.6 Unicode Converter ............................................................................................................................ 20 5.7 Unicode Message .............................................................................................................................. 21 5.8 Personalized Unicode Message: ........................................................................................................ 22 5.9 Previewing Personalized Unicode Message: .................................................................................... 23 JOB MANAGEMENT.................................................................................................... REPORTS .......................................................................................................................... 7.1 Credit Details: ................................................................................................................................... 7.2 Sms Report: ....................................................................................................................................... 7.3 Sms Summary: .................................................................................................................................. 8 USER PROFILE ........................................................................................................... 9 COVERAGE DETAILS ................................................................................................ 10 About Us ............................................................................................................................ 24 28 28 29 30 31 35 36 1 Overview The proposed system serves as a solution to add the Add-Ins to MSExcel-2003 and MS-Excel-2007 with the name BulkSms Excel which allows the user to send sms to list of Mobile Numbers with specified messages which are present in an Excel sheet. When user is using this system, user can send sms to specified range of mobile numbers present in different columns of worksheet. In this system user can send messages in the form of Unicode messages & flash messages. Here user is provided with the facility of converting a message to Unicode form and user can write an Arabic message too. This system provides the facility of scheduling of messages i.e. when to send the messages to specified mobile numbers; user can specify the time and date for scheduling. In this system user can view the JobreportsManagement, for Reports, “User Profile, and Coverage Details for login user. 2 Steps to run an Excel Add-In Setup: 1. Click the first .exe File: "Setup". Then one will see the installation interface: 2. First it will ask to install 3 to 4 components that are required for excel add in to run. 3. Then Follow the below steps: 4. Click next and then choose the path to install the Add in . Don’t change the path specified for installing setup. 5. Click next, and then you will finish the installation. 6. Open the Excel; see the tab of Add-In “IND-BulkSms ”. 3 Add-Ins The BulkSms Excel Add-In in Excel is shown below: 1. 2. 1. After we run the setup a tab will appear like this. 2. After clicking the Add-Ins tab IND-BulkSms tab will get open on left upper corner 1. After clicking the IND-BulkSms tab all the menu buttons get open. a) User Login b) Send SMS c) Job Management d) Reports e) User Profile f) Coverage Details g) About us h) Proxy Settings 4 LOGIN User can login with the username and password. 1 2 3 4 1. User enters his/her User Name. 2. User enters his/her password. 3. User hits the Login button to login with the entered username and password. 4. Cancel button to go back to Excel worksheet. 5. SEND SMS User can send messages using this tab. 5.1 Send Text or Flash Sms 16.Template field. 1. A wait message will be shown til the preview window opens 1. Preview of messages and mobile numbers to whom messages will be sent;& Total number of messages, Total number of messages to be send and Invalid Numbers found from total number of messages 2. After clicking continues button messages will be sent to the list previewed. 3. Cancel button will cancel the process and get back to the send sms form. 5.2 Select Range 1. When user select the “Select Range” radio button then and „To‟ will enabled and „Mobile Number‟ dro can write message or set it in any form and after this user can schedule or send the message. Range A1-A17 means this will select all the numbers which comes in the fields from cell A1 till A17. After user select to send the message first all the duplicates have been removed from list and final list shown as shown in the next screen shot. 5.3 Selected Range Preview List After user hits the send button then all the duplicate entries are removed means an mobile no with same message entered into the worksheet then only one entry will be considered for sending and an preview will be shown as between the selected range of cells of worksheet. 1 1 2 3 1. Preview of messages and mobile numbers to whom messages will be sent; & Total number of messages, Total number of messages to be send and Invalid Messages found from total number of messages whenever range is selected for messages to be sent. 2. After clicking continues button messages will be sent to the list previewed. 3. Cancel button will cancel the process and get back to the send Sms form. 5.4 Scheduling of Messages After user has filled all the fields properly but user want to send these later then user can schedule the messages as with date and time specifications by clicking schedule button. When user click schedule button a form will open which is shown as. 1 2 3 4 5 1. Select the time zone which user will prefer. 2. Select the Date on which you want to schedule it. 3. Select the time. Note that time should be greater than current time. 4. Ok button will set the schedule & a message box is shown as you press Ok then Schedule will be displayed on the send sms page as we show in next picture. 5. Reset button will reset all the fields to initial state. 5.5 Scheduled Message The Message is scheduled as shown below: 1. Displays the scheduled Time, Date and Time Zone that user had selected during scheduling. 5.6 Unicode Converter When we select the radio button Unicode type then this form will open as. 1. Select type of message which can be converted into a Unicode message i.e. Normal or Arabic. 2. Enter text of message to convert into a Unicode message. 3. Shows the number of messages. 4. Shows the number of characters in a message. 5. Shows the converted Unicode message when user hits the convert button. 6. Shows the length of the Unicode message. 7. When user hits the convert button written message get converted into Unicode message & shown in step 5. 8. Reset button reset every field to initial stage. 9. When user hits the set as message button then Unicode message is send to the message field of send message form; as shown in next step. 5.7 Unicode Message After an message is converted into unicode form. 1. Message after it is converted into Unicode message from Unicode converter and button „Set As Message‟ is hitted by user. And schedule this for sending. In this Number of characters in total is also shown. 5.8 Personalized Unicode Message: If user want to send Personalized Unicode Message then, user has to select Unicode Type and in the Message add Fields of Excel which contains message to be sent. 1. Select Unicode Radio button which will open new Window where one can type required characters of message in any language which gets converted to Unicode format and set as Message shown in Step 2. 2. Message field will display the Unicode message and selected tags while sending messages in Unicode form. Then either we can schedule these messages or send directly. 3. Unicode Converter button when clicked Unicode converter window will get opened where user can type required characters of message in any language which gets converted to Unicode format and then set it as Unicode Message. 5.9 Previewing Personalized Unicode Message: When user send the personalized unicode message it will get converted into unicode message and will be shown in preview as: 1. Total number of messages, Total number of messages to be send and number of Invalid Messages found from total number of messages whenever personalized Unicode messages to be sent. 2. Preview of phone numbers and converted Unicode messages to be sent. 3. After clicking continues button messages will be sent to the list previewed. 4. Cancel button will cancel the process and get back to the send sms form. 6 JOB MANAGEMENT Job Management option displays details of the jobs uploaded by the user from Send Sms. 7 REPORTS Reports enables user to view details of messages sent by User and delivery status of sent messages along with detailed credit usage and current day for the users: Credit Details. Sms Reports. Sms Summary. 7.1 Credit Details: Credit Detail report displays the current credit balance and the outstanding OverDraft. It also displays the credit change log for the selected time interval. To get the credit change log details select the Start and End Date and then click Search butto 3 1 4 2 5 6 7 1. Displays the current Over-Draft credit. 2. Displays the current credit balance. 3. Select Start Date. 4. Display Select End Date. 5. Click here to get the credit change log. 6. Shows Number of records found between Start and End Date. 7. Click here to view the records in the respective pages. 7.2 Sms Report: Sms Report displays the detailed information of all sent sms and price charged along with delivery status for selected date range. User can search for a particular mobile number, sender or message details by adding search filters. User can also export sms report in comma-separated value format (.csv). 1 2 3 4 6 7 5 8 9 1. Enter Mobile Number. 2. Enter Sender. 3. Enter Message details. 4. Select Delivery Status. 5. Select Start Date. 6. Select End Date 7. Click here to get the details of the specified data. 8. Click here to download report in .csv format 9. Click here to refresh 7.3 Sms Summary: Sms Summary displays the date-wise sent sms count and total price charged along with country-operator details for selected date range. User can also view summary for particular country and operator by selecting them depending on user preference. 1. Select country. 2. Select operator. 3. Select Start Date. 4. Select End Date 5. Click here to arrange by date, country and operator 6. Click here to get the details of the specified data. 7. Click here to refresh 8 USER PROFILE User Profile enables to modify user details like password, company, contact person, contact number and email id. All the details are mandatory. To change password click the checkbox beside the new password field as shown below. 1 2 3 4 5 6 7 8 9 10 1. This displays the username for the logged in user. 2. Enter password, required for validation of the user. 3. Click the Check box to change the password. 4. If password has to be changed the click the checkbox and enter New Password. 5. Re-type the new password to confirm new password. 6. Enter the company name. 7. Enter the contact person name in the company. 8. Enter the mobile number for the contact person. 9. Enter the valid email-id for the contact person or company. 10. Click here to save the updated User Details. 9 COVERAGE DETAILS Coverage Details provides the coverage information of the user. User can view the default price, the assigned pricing and the special prefix pricing. 1. Displays the default price assigned to the user 2. Click here to download Coverage Detail report in pdf format 3. Click here to view the recent assigned routing changed logs 4. Click here to view the recent special prefix routing changed logs logs. User can also view the last seven days routing changed logs and special prefix pricing changed 10 About Us Will display Details of User Company.