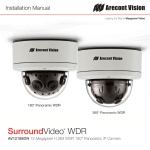
1
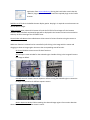
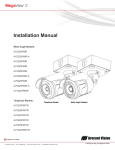
Introducing the new Arecont Vision camera Web interface Arecont Vision is also introducing a new web interface for our cameras. Currently, SurroundVideo products do not have this new feature. In addition to a newer cleaner look this interface offers two different methods of menu navigation and controls for a number of new features. Menu Navigation The new interface allows the same type of tabbed menu browsing as did older model cameras at the top of the web interface. But features a new look and better defined buttons. Clicking on any button will cause the menu displayed on the left side of the page to jump to the settings section for the selected function. In addition the settings menus can also be browsed a second way; scrolling the menu window on the left which allows access to the various settings menus sequentially. Image Menu Slider bars and numeric text boxes allow control of the following image features: Brightness controls the overall brightness of the camera image and works in conjunction with the exposure controls to maintain the image brightness Sharpness controls sharpness and edge definition of the image. Setting this to higher levels may make overall image to appear a bit softer while causing lines and edges in the image to look smoother Saturation controls the color saturation of the image. Blue manual control for blue color level Red manual control for red color level Gamma manual control for Gamma level (affects the overall luminance of the image) Radio buttons allow selection or enabling of the following features: Flip Image allows image to be digitally flipped 180° Flexible Cropping when selected this will enable the flexible cropping feature of the camera Auto Exposure enables or disables the electronic auto exposure function of the camera (it is recommended this be left on for most applications; unselecting/ disabling will prevent the camera from adjusting to changing illumination and exposure values in the image) Casino Mode this feature is only available on the AV2255 model cameras, when enabled it will override the configured Exposure mode on the camera to keep frame rate output from dropping below 30 fps Note: In low light there will be increased image noise and degraded image quality since the camera cannot increase exposure time to compensate when this mode is active. Lighting used to select local AC power frequency. This can help prevent flicker caused by oscillation frequency of indoor lighting. Options are 50Hz (Europe) or 60Hz (US/Japan). Illumination controls the auto white balance of the camera. Radio buttons allow selection of one of 4 AWB options. Automatic is setting default and works for most situations Indoor will compensate for excessive “red” levels of illumination Outdoor will compensate for excessive “blue” levels of illumination Mix will compensate for excessive “red and blue” levels of illumination Exposure Mode settings allows radio button selection for one of 5 low light modes. This setting is responsible for the camera exposure response to changing illumination levels. The settings automatically controlled under these groupings include exposure and gain control, backlight compensation, and noise reduction. These functions are grouped together into these preset modes and will automatically adjust at rates determined by the “Exposure Mode” selected. High Speed This mode enables manual setting of exposure time between 1 and 80ms. Shorter exposure times reduce motion blur for applications such as monitoring fast moving objects and reading license plates. The trade‐off is an increased level of noise. Exposure time is user configurable in this mode using the “Exposure” slider bar on the “Exposure Mode” panel. This is the only low light mode that allows for user selectable exposure time and this drop menu will be grayed out when any of the other modes are selected. It is recommended that this mode be used only when there is constant scene illumination sufficient to provide a quality image. When this mode is selected the Exposure (ms) field and slider bar controls will be enabled to allow user selection of base exposure time. This control is not available when other modes are selected. Speed In this mode, the first stage of exposure control limits exposure time to 10ms while allowing gain to go up to 20ms and the second stage is up to 80ms exposure time while maintaining gain as low as possible. In the second stage the speed mode will behave the same as balanced mode. Balanced This is the camera default setting. Similar to the Quality setting except the first stage is limited to 20ms with gain allowed going up to 20, followed by the second stage with exposure time up to 80ms. This is the default setting for Arecont Vision cameras and will provide the best exposure settings balance for typical installations assuming good lighting conditions. Exposure times and motion blur will increase in low light but not as much as with Quality or Moonlight modes Quality This mode is similar to MoonLight mode except for a shorter exposure time‐‐ first stage is up to 40 ms exposure with the gain limited to 5, second stage is up to 200 ms exposure while keeping the gain as low as possible. This mode is a good compromise between reducing noise and motion blur under most lighting conditions, but with an increase in motion blur under low light conditions. MoonLight™ This mode will produce the best image quality under very low light conditions with the least amount of image noise. The trade‐off is in favor of low noise at the expense of high motion blur. There are two stages of exposure control: first stage is limited to 40 ms exposure time with gain limited to 5, followed by a second stage (if the target brightness was not reached) with up to 500 ms exposure while maintaining gain as low as possible. Low Light noise filter (%) this slider bar setting allows manual user control of noise reduction intensity. Increase of the value percentage will reduce image noise reducing bit rates and false motion events in low light. Trade off of increasing noise reduction is an overall softening of the image clarity in low illumination. Day/Night settings control operation of this functionality in Day/ Night model cameras. Radio buttons allow selection of one of 3 mode options. Automatic is default setting enabling the camera to automatically change from color (Day) to black and white (Night) modes as illumination levels drop off. Day this mode will manually place the camera in color mode, no automatic function is available. Night this mode will manually place the camera in black and white mode, no automatic function is available. Switching Level this slider bar and numeric field control the switching point when the camera switches from “Day” (color) into “Night” (black & white) mode. Higher values cause the camera to stay in “Day” mode at lower illumination levels, lower values will cause the camera to switch to “Night” mode in higher illumination. Toggle Guard this slider bar and numeric field control the level of brightness required to switch from “Night” (black & white) into “Day” (color) mode. Higher values will cause the camera to stay in “Night” (black & white) mode longer than lower values as illumination levels rise. Toggle Guard should be adjusted to prevent the mode from toggling between “Night” and “Day” modes in areas where transitional lighting exists in the scene. Focus after D/N switching this radio button enables the camera to automatically re‐focus after switching between Day and Night modes. Enable Auto Iris this radio button enables the DC auto iris control function on the camera. When this option is selected the Gain slider bar and numeric field control the manual opening or closing of the lens aperture. The higher the gain setting, the later the auto‐iris will open as illumination levels decrease. Binning these radio buttons control operation of the “binning” function when using a 3, 5, or 10mp camera model. Note: this option is only available on AV3255 & AV5255 model cameras. Binning in day mode when selected this radio button will place the camera in binning mode when the camera is in “Day” mode. Binning in night mode when selected this radio button will place the camera in binning mode when the camera is in “Night” mode. When both are selected the camera will be binned in both modes. Binning mode combines 2x2 pixels on sensor to improve low light performance. Low light sensitivity is improved by 4x as a larger pixel area is available to collect light. The binning mode also increases Signal to noise ratio (SNR) by 2x. The tradeoff with binning is between low light performance and resolution as when active binning mode will decrease available resolution by 4x. Video Menu This menu allows selection control of the video compression displayed in the web page. Show Video type these radio buttons control selection of display mode. H.264 over RTP/UDP will display video using H.264. If viewing this way for the first time you will see the following prompt to download the necessary browser plug – in allowing display of video in the browser using this compression. Note: H.264 video display is not available in Internet Explorer. To enable this capability in the Firefox browser you must first download the VLC player application from www.videolan.org, during the install make certain that the “Mozilla” plugin option is checked to install the required plugin to the Firefox browser. MJPEG over HTTP this is the default browser display option. No plug in is required as most browsers can decode MJPEG images. Video to Screen when selected this button will scale the full field of view image to fit the browser window. When in default unselected images will be displayed in the browser at their native resolution and may not allow viewing of the full field of view. Control video with Mouse these radio buttons allow control of various functions using the mouse to select them on screen. Whichever function is selected can be controlled by left clicking in the image with the mouse and dragging to select an image region relevant to the corresponding control function. No Control disables mouse control of these functions. PTZ will open a zoom window for the selected region. Double clicking in the image will restore the image to default. ROI Reference will create a custom exposure reference using the selected region to customize backlight compensation for difficult exposure scenes. Motion detection Mask will allow masking the selected image regions from motion detection when the motion detection on the camera is active. Privacy will create a privacy mask in the image areas selected will not be visible once “privacy” option is enabled. Focus Window will create a custom focus reference window for the area selected. Resolution this setting controls the image size, JPEG compression level, and image cropping features. JPEG Quality this slider bar and numeric field control the image compression level for the camera’s JPEG encoder. Higher levels reduce the compression and result in higher quality images with trade off for larger file sizes. Lower levels increase image compression reducing file sizes with the trade off for lower quality image detail. Left, Top, Right, and Bottom numeric fields allow setting custom image size cropping and crop area coordinates in pixels. Values applicable are 0 to – maximum resolution in pixels (maximum varies based on the sensor resolution being cropped). Apply now button sets the current resolution settings for the current session until the browser is closed. Apply & make default button sets the current resolution settings and saves them to camera flash memory. The settings will be default for every session until changed or the camera is reset. H.264 H.264 RTSP/RTP/AVP stream settings control port setting, compression and bit rate limits, frames per second, and multicast settings for H.264 video streaming from the camera. RTSP Unicast port: this numeric field allows configuration of the application port for RTSP Unicast video streams. Default is 554 valid values that can be set are 1 – 65535 Setting up bit rate control for our current generation single sensor cameras: Note: Constant bit rate control features automatically adjust image compression to keep the bit rate output of the camera at the rate level set by the user. For constant bit rate control if the bit rate value is configured to a very low value this would cause the camera to automatically increase compression to maintain the bit rate at the configured limit. In this situation image quality will be affected as compression automatically increases or decreases. Variable Bitrate Control when this radio button is selected the camera will maintain the Quality setting configured. There may be variation in the bit rate output from the camera because this mode ignores bit rate. H.264 Quality this field allows configuration of the H.264 image quality setting for variable bit rate control. Setting a lower value results in lower image quality, higher value results in higher image quality. Enable Rate Limit this button enables variable bit rate control to function like the constant bit rate control when bit rate rises above the level set. Rate limit allows setting of the rate level. Constant bit rate control will enable constant bit rate control option. The camera will automatically adjust compression to keep bit rate at the level set. Bitrate this numeric field allows setting the bit rate for constant bit rate control. Frames per second: allows setting a frame rate for the camera video stream. Reducing the frame rate is another way to control bandwidth use from the camera; the tradeoff is obvious reduction of video frame rate. Preview this button will not apply the configured settings to the camera. Clicking this button will modify the H.264 request string based on current settings in the webpage for pasting into a 3rd party media player like VLC. This button essentially just updates the request string to include any changes made by the user since they started the current connection to the camera web page. Apply this button will apply the configured H.264 settings to the camera for the current web page connection. This button will not save the current settings to camera flash memory. Go to the “Administration” menu and click the “Save to Flash” button to save the current session settings as default for every session until changed or the camera is reset. Link for external media players: once the H.264 settings have been applied to the camera this field will display a link to the camera and H.264 video stream that can be cut and pasted into 3rd party media players to view the camera. RTP/UDP multicast stream these settings enable and configure the multicast feature of the camera for H.264. Enable RTP Multicast radio button when selected enables the RTP Multicast streaming from the camera. IP Address: this field is for input of the destination multicast IP address. Valid range is from 244.0.0.0 to 239.255.255.255, default setting is 232.0.0.2. RTP Port: this field is for configuring the destination multicast UDP port number. Valid values are 1 to 65535, default is 1234. SAP Destination IP: this field is for setting the Service Advertising Protocol IP address. Valid range is from 244.0.0.0 to 239.255.255.255, default is 244.0.0.255. Note: Multicasting will require use of an IGMP capable router or switch and IT personnel familiar with configuring multicast routing and IGMP for proper implementation. Enabling this feature at the camera without multicast routing management configured on the network could result in increased load on the local network segment. Zoom & Focus This menu controls the remote focus and zoom features available in the MegaDome®2 camera family. Zoom: these buttons allow manual zoom of the remote varifocal zoom lens on the camera. Options are + or – in stepped increments of 20, 5, or 1. Smaller values make finer zoom increments; larger values make larger zoom increments. Enable Auto Focus after zoom radio button when selected will activate the camera’s automatic focus process following any changes made to the lens zoom. The selected or default focus window will flash red and green as the auto focus process proceeds and will be white when it is complete. Focus: these buttons allow manual focus adjustment of the camera. Options are + or – in stepped increments of 20, 5, or 1. Smaller values make finer focus increments; larger values make coarser focus increments. Full‐range Focus button when selected auto focuses the camera using the entire image as reference. Focus process will stop when best focus balance of the full scene content is achieved. Short‐range Focus button when selected auto focuses the camera using the selected or default focus window as a focus reference. Focus process will stop when best focus of the scene area within the selected focus window is achieved. Stop this button will stop the focus procedure in process when pressed. Focus Aid: this field cannot be changed and shows an approximate numeric value relevant to the level of focus achieved in a given field of view. A higher value means a better level of focus throughout the image; a lower value means the image is less focused. Update Focus Aid when pressed this button will update the “Focus Aid:” window (the value displayed in the window can sometimes lag behind the actual focus value achieved in the image; measured focus is affected by image noise and illumination change). Note: regarding the focus reference window the color will change as the image is auto or manually focused. As better focus is achieved you will also see the value of the focus aid increase, as the image gets less focused this value will fall. Focus window GREEN indicates getting better focus Focus window turning RED indicates going out of focus Focus window turning YELLOW indicates no change from the original focus setting Focus window turning Grey indicates the focus procedure is done Network IP Assignment these settings allow configuration of the camera IP address and related options. IP Address: the camera IP address can be manually configured in this field. Subnet Mask: the sub net of the local network can be manually configured in this field. Default Gateway: the gateway IP address for the local network can be manually configured in this field. Apply button will set the manual changes to IP setting to the camera. Once IP address has been applied the factory reset function will not change IP settings when resetting the rest of the camera. IP Options these settings allow configuration of the DHCP, IP lock, and MTU size options. DHCP/ Fixed Selection these radio buttons allow configuring the camera as either Fixed IP (manually configured), or DHCP (auto addressed from local DHCP server) when selected. Lock IP will prevent the camera IP address from being changed by the AV100 installation tool or network command. When selected the IP must be manually unlocked in order to change the camera’s IP address. Limit MTU Size when selected this function will allow custom setting of the camera Maximum Transmission Unit in the By: field. MTU size is the limit for largest size frame packet that a given protocol can pass over the network. Larger MTU size is more bandwidth efficient, but large packets can also bottleneck on slow interfaces causing increased delivery latency. The default MTU size for the camera is 1500 in bytes. Miscellaneous settings allow assignment of a camera name in the Camera Name: field, and creating an alternate HTTP access port in the Second HTTP port: field. Motion Detection Enable radio button enables the motion detection feature when selected. When this button is selected no additional changes can be made to the other settings in this menu. Extended radio button enables the “extended” motion detection from default 64 to 1024 detection zones for enhanced detection sensitivity. Zone Size this slider bar and numeric field determine the size of the detection zone grid displayed when motion detection feature is enabled. Note: if the zone size is set too small for image sensor pixel resolution the motion detection grid can be made smaller than the actual image size. Areas not covered by the grid will not be monitored for motion. Detail: this slider bar and numeric field determines the size of each zone displayed by the motion detection grid contains sub zones the number of which is determined by the zone size setting up to 32x32 (pixels). This setting configures the sensitivity of the motion detection to the size of objects in the image moving through the zone. Higher values will trigger motion only for larger objects moving through the zone, lower values will cause detection of smaller objects in the zone (increasing sensitivity to smaller size objects moving through the image). Level threshold: this slider bar and numeric field determines the sensitivity to brightness changes between dark and light objects within each grid zone. As example “Detail” will set the size of the object being detected within the zone, “level” sets the duration that movement must be maintained to trigger motion detection. Lower settings can increase false motion alarms caused by image noise, higher settings will require more movement to trigger a motion event. Motion Sensitivity, %: this slider bar and numeric field determines the sensitivity to sudden overall brightness changes in the image. This setting can be useful to prevent false motion alarms due to sudden exposure changes such as car head lights from triggering motion detection. Larger values will disregard larger changes affecting the entire image, smaller values will make motion detection more sensitive to large changes in the image. Note: the motion mask setting under the Video menus requires Enable to be selected as on before areas can be masked to prevent motion detection in selected zones. Privacy Enable Privacy Mask this radio button when selected will enable any privacy masks that have been configured by the Privacy Mask function in the Video menu. Note: masked areas of an image are transmitted with the mask in place, it is part of the video and cannot be turned off or removed from video that is being viewed or recorded after transmission. Administration Access Control this menu allows setting password security on the camera to restrict access to camera settings menus and/ or access to viewing the video. admin password: set a password here to restrict access to the camera menus and settings. confirmation: you need to type the selected password a second time in this field to prevent error. Set and Erase buttons will apply or erase the password. viewer password: set a password here to restrict access to viewing the camera video. confirmation: you need to type the selected password a second time in this field to prevent error. Set and Erase buttons will apply or erase the password. Save & Restore Settings allow saving the current camera configuration as new default or restoring the camera to out of box settings. Save all settings to flash button will save the current camera configuration as setting default. Restore to factory default button will restore all settings to factory default (except the camera IP address). Firmware upgrade allows selection and application of a firmware file to be applied to the camera. Browse… button and field allow selection of the firmware file location on the local PC. Upgrade button will apply the selected firmware file to the camera. About This menu displays important information about the camera model being viewed. Camera Type: What model and features Firmware: Version installed on the camera JPEG Engine: Hardware version installed on the camera Net Version: Net version installed on the camera MAC Address: Physical address/ Serial number of the camera