1
Flash Tutorials
Daniel K. Schneider (ed.)
PDF generated using the open source mwlib toolkit. See http://code.pediapress.com/ for more information.
PDF generated at: Fri, 31 Oct 2014 04:56:08 CET
Contents
Articles
Flash and the CS6 authoring tool
1
Flash
1
Flash CS6 desktop tutorial
7
Basic drawing
18
Flash drawing tutorial
18
Flash layers tutorial
33
Basic animation
37
Flash animation overview
37
Flash frame-by-frame animation tutorial
40
Flash classic motion tweening tutorial
63
Flash CS6 motion tweening tutorial
81
Flash shape tweening tutorial
96
Flash embedded movie clip tutorial
106
Flash animation summary
113
Use of external media
126
Flash video component tutorial
126
Timed Text
133
Flash sound tutorial
138
Clipart
147
Texture
151
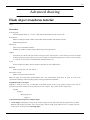
Advanced drawing
153
Flash object transform tutorial
153
Flash arranging objects tutorial
169
Flash colors tutorial
174
Flash bitmap tracing tutorial
186
Flash pen tutorial
192
Basic interactivity and use of components
194
Flash button tutorial
194
Flash components overview
212
Flash component button tutorial
223
Flash video component tutorial
237
More animation
245
Flash mask layers tutorial
245
Flash inverse kinematics tutorial
249
Flash CS4 motion tweening with AS3 tutorial
263
More interactivity
268
Flash using embedded movie clips tutorial
268
Flash augmented video tutorial
276
Flash video captions tutorial
294
Flash actions-frame tutorial
300
Flash datagrid component tutorial
303
Flash drag and drop tutorial
316
ActionScript 3 interactive objects tutorial
328
ActionScript 3 event handling tutorial
354
Working with ActionScript libraries
362
Flash ActionScript 3 overview
362
Flash using ActionScript libraries tutorial
368
AS3 tweening platform
373
FliNT particle system
389
Flash Papervision3D tutorial
398
Other Flash articles of interest
409
Flash CS3 keyboard shortcuts
409
Flash formats and objects overview
413
Flash - being organized
416
Flash 3D
418
References
Article Sources and Contributors
422
Image Sources, Licenses and Contributors
423
Article Licenses
License
428
1
Flash and the CS6 authoring tool
Flash
Draft
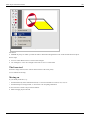
This page needs to be updated for Flash CS6, but principles remain the same ...
Definition
“Adobe Flash (previously called Macromedia Flash) is a multimedia platform originally acquired by Macromedia
and currently developed and distributed by Adobe Systems. Since its introduction in 1996, Flash has become a
popular method for adding animation and interactivity to web pages. Flash is commonly used to create animation,
advertisements, and various web page components, to integrate video into web pages, and more recently, to develop
rich Internet applications. Flash can manipulate vector and raster graphics and supports bidirectional streaming of
audio and video. It contains a scripting language called ActionScript. Several software products, systems, and
devices are able to create or display Flash content, including Adobe Flash Player, which is available free for most
common web browsers, some mobile phones and for other electronic devices (using Flash Lite).” (Wikipedia,
retrieved May 23 2009).
In addition, Flash is used as a format for desktop applications under the name of "Adobe Integrated Runtime"
(Adobe AIR).
We could distinguish four kinds of Flash authors: (a) People who use simple offline or online tools to generate
applications like slide shows. (b) Multi-media authors who create good looking Flash movies. (c) Multi-media /
light-weight programmers who create interactive Flash applications and (d) "Real programmers" who write so-called
rich internet applications. Today, many tools can produce runnable Flash contents. However, only Adobe's
commercial Flash authoring tools allow non-programmers to exploit the full capabilities of this format.
Programmers, on the other hand, may use Adobe's free Flex software development kit instead of the commercial
Flex builder.
Flash tutorials and articles in EduTech wiki
EduTech Wiki includes introductory Flash and ActionScript 3 (AS3) tutorials for Flash version 11 using mostly
Adobe Flash CS6 Professional and for Flash version 9 using CS3, plus some CS4/CS5 tutorials that introduced new
features not in CS3).
We used these in COAP 2110 (Fall 1 2007, Fall 2008, Spring 2010, Sprint 2013, Webster University), STIC III (Fall
2007, fall 2008, Geneva university), and STIC IV (spring 2010, in french, Geneva university) courses. Some
tutorials better than others and none is top quality so far, but most can serve as lecture notes and for some self-study.
Most tutorials have been upgraded to CS6 in winter 2013. CS4 and CS5 users can read CS6 tutorials, but should take
files from tutorials developed for CS3 and CS4. The interface changes between CS3 and CS4/CS5/CS6 are
substantial but not major. The differences between CS4, CS5 and CS6 are rather minor.
We produced three families of tutorials with some overlaps:
• Flash tutorials (Flash CS6 plus ActionScript 3 for non-programmers, and links to deprecated CS3/4/5 versions)
• Actionscript 3 (Beginner's tutorials for "pure" AS3, i.e. tool independent coding, these should be further
expanded, but are not so far ...)
• Flex tutorials (very few)
Flash
2
All materials (*.fla, *.swf, etc.) are available at http:/ / tecfa. unige. ch/ guides/ flash/ under a CC BY-NC-SA
licence.
1.
2.
3.
4.
5.
6.
Flash CS3 keyboard shortcuts
Flash ActionScript 3 overview -- a conceptual little overview of AS3
Flash formats and objects overview (not ActionScript objects !)
Flash - being organized (some advice for beginning Flash CS3 designers)
Actionscript 3 -- a complete programming language. An entry page for AS3 tutorials
Flash 3D -- overview page of of Flash 3D tools and AS3 libraries
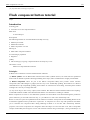
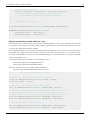
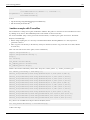
The Flash framework
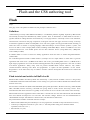
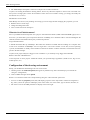
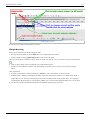
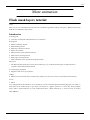
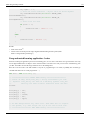
In the past, Flash was just a web animation/interactive multimedia technology. Today (2008) Flash is a serious
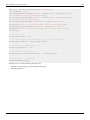
contender for one-stop rich internet application technology as the following picture shows:
Adobe Flash Platform for RIAs. Retrieved nov 2008 from http:/ /
www. adobe. com/ devnet/ actionscript/ articles/ atp_ria_guide. html
Flash
3
Flash versions compared
CS3 was a major break from earlier versions (Flash 8 and earlier) with respect to ActionScript. ActionScript 3 is
much more difficult to learn than ActionScript since it uses a modern typical user interface paradigm. In Flash 8 one
could directly attach scripts to objects. In Flash 9 and later scripts are attached to frames.
Changes/Additions in CS4:
•
•
•
•
A completely redesigned interface
Easier motion tweening (CS 3 motion tweening was renamed "classic tween")
inverse kinematics
Support for 3D animation of 2D objects.
CS5 includes:
• Better looping support in motion tweens. E.g. ctrl-select first keyframe, then ALT-drag to right after the tween
span, then inverse keyframes with the right click menu)
• Physic engine additions to inverse kinematics, e.g. spring functions
• Support for IPhone applications (not sure that it works, since Apple doesn't like other's developing environments)
• Much better text support
• Code snippets (helps beginners to write AS3 code).
• XML-based source code: Either compressed *.fla files or *.xfl folders.
• Easier management of cue points in videos (directly in CS5)
• Better deco brushes, e.g. you now can easily draw a tree...
CS6 includes:
• Better support for mobile technology
• and more .... (to document)
Since CS5, Flash includes code snippets. Therefore, these newer versions are better suited for teaching Flash to
beginners. However, for learning modern Flash, it doesn't make a big difference whether you use CS3, CS4 or CS5
or CS6. Some schools simply can't afford upgrading at an 18 month rate ...
Alternative technologies
General formats
• DHTML, i.e. the combination of HTML, CSS, DOM and JavaScript and AJAX, the same combo plus
server-client communication trough JavaScript. There exist various software packages (e.g. hippo [1]) and
libraries (e.g. GSAP [2]).
• SVG, an XML-based vector graphics format sponsored by WC3. SVG is a powerful format, but lacks support
from authoring tool and web browser makers. Adobe, before it acquired Macromedia, used to support SVG. SVG
works well in the Opera browser and increasingly better in Firefox.
• HTML5. It includes SVG and "DHTML"
• SMIL, an XML-based multi-media integration language that supports timing, layout, animations, etc. SMIL is
included in the full SVG profile. SMILE works with several media players (e.g. RealPlayer and Adobe Media
Player). A variant exists for Internet Explorer.
• Microsoft Silverlight [3], a mostly failed attempt by Microsoft attempt to have its own "Flash"
Others
See also multimedia authoring systems and computer games. Some of these have their own format, some can export
to more common formats.
Flash
4
Links for software and media elements
General / Indexes
• OsFlash [4] has a large comprehensive list of links to Open Source Flash projects, both those hosted on OSFlash
and elsewhere. Of particular interest are tools that generate flash in various ways.
Viewers
• Adobe [5] (Flash player download)
• Gnash [6] (Wikipedia article) A project which aims to create a player and browser plugin for the Adobe Flash file
format which is free software.
Authoring tools
• Adobe Flash CS5 Professional [7]. The commercial authoring tool. Students: You can get huge discounts either
through some stores or Adobe's education program [8] (takes some times to fight through this web site and to find
the appropriate page). In both cases you will have to send proof to Adobe before you will get a key. Teachers pay
more, institutions can make deals that are more difficult to get.
Adobe Flash CS3 Professional was released in April 2007, CS4 Professional in October 2008 and CS5 in April 2010.
CS4 adds inverse kinematics, easier motion tweening (i.e. object-based animation finally!) and some basic support
for 3D animations of 2D objects. CS5 adds for example a physics engine.
• SWISH [9]. An alternative set of commercial products to produce Flash. Much cheaper and somewhat easier it
seems, but doesn't export to *.fla files (so you can't import to the Adobe authoring tool). See the Wikipedia [10]
article.
• Salasaga [11]. An free (and OSS) Integrated Development Environment for producing animated swf files, similar
to Adobe Captivate. Goal is to create a free, easy to use GUI authoring environment that helps you create visually
impressive and actually useful learning material. Example swf output here [12].
Decompilers
A decompiler can translate an *.swf to *.fla. Useful if you want to learn (not steal) from examples on the web or if
you lost by mistake your *.fla sources.
• Sothink decompiler: Flash Decompiler [13], SWF Decompiler [14], SWF to FLA [15]
• Flash Decompiler Trillix [16]
• See also Flash Decompiler Trillix [17] (strange website without any documentation)
Translators and common formats
E.g. *.fla to *.html
• Wallaby [18] "Wallaby" is the codename for an experimental technology that converts the artwork and animation
contained in FLA files (retrieved Feb 2011).
• The *.fxp file format is used by Flash Catalyst to create a (compressed/zipped) Flex project archive that is
understandable by Flash Builder. I.e. designers can create a project in Catalyst and then hand it over to a
Flash/Flex programmer who will work with Flash Builder.
• Conversely, *.fxg enables cross communication among Creative Suite, Flash Catalyst and Flash Builder. “The
FXG format is new to Flash Professional CS5. It allows Flash to exchange graphics with other Adobe applications
such as Illustrator, Fireworks, and Photoshop with all of the complex graphic information preserved. Flash allows
you to import FXG files (version 2.0 only) as well as save selections of objects on the Stage or the entire Stage in
FXG format. FXG is based on a subset of MXML, the XML-based programming language used by the Flex
Flash
5
framework.” (Flash glossary: FXG [19], retrieved March 7 2011).
Special purpose authoring tools
There is an increasing variety of tools and for a wide range of people, covering casual users to programmers.
• Adobe Captivate [20]. An authoring environment to create simulations, scenario-based training, and robust
quizzes. Can import/export to Flash *.fla documents.
• Adobe Acrobat Connect [21] (formerly called Breeze) is a flash-based videoconferencing software.
• Adobe Flex [22] is a software development kit and an IDE for a group of technologies to make rich internet
applications with Flash, HTML, JavaScript etc.).
• Toufee [23], an online tool to make Flash presentations (movies). Free in a basic version. Drag and drop pictures
or special elements to a stage, add special effects, buttons, etc. Also saves in other formats.
• OpenOffice Impress (the power point clone) can produce *.swf
• Some capturing tools (see screen capture, photo gallery makers, and video editing software can export to Flash.
Server technology
• Silex [24] is free open-source CMS with a Flash Interface (and AS API). Source Forge project of the month June
2009.
• red 5 [25] is an open source Flash Server. I supports Streaming Audio/Video (FLV and MP3, Recording Client
Streams (FLV only), Shared Objects, Live Stream Publishing and Remoting (AMF) (nov/2008)
• Adobe has a global Flash framework [26] that includes e.g. a Flash Media Server Family.
Generating Flash
• Ming [27] Ming is a C library for generating SWF ("Flash") format movies, plus a set of wrappers for using the
library from C++ and popular scripting languages like PHP, Perl, Python, and Ruby.
• SWFMill [28] xml2swf and swf2xml processor that can be used to create (non interactive) multiframe SWF
animations.
• HaXe [29]. Programming language very similar to actionscript that can compile a SWF file for Flash Players 6 to
9. Free to use.
In addition, you also should know that you can import several vector graphics formats. e.g. Windows Metafile
formats into Flash CS3 (speeds up drawing).
Programming Editors for ActionScript
• Flashdevelop [30]. Free and open source tool that provides syntax support and an interface with the Flex
compilers.
• Some multi-purpose editors (like emacs also may support Actionscript 3 programming
• Adobe Flex Builder [22] - a commercial Eclipse plugin from Adobe, but that is free for education upon request.
Media for building your own scenes
• See clipart
• See texture
Flash
6
Extra Resources
•
•
•
•
Flash and AS3 links - general
Flash and AS3 links - tutorials
Flash and AS3 links - documentation (Flash and AS3 Books, Reference Manuals and Cheatsheets)
Flash and AS3 links - toolkits (AS 3 Toolkits, Libraries, Flash reusable components, AS 3 reusable code, etc.)
References
[1] https:/ / www. hippostudios. co/
[2] http:/ / greensock. com/ gsap
[3] http:/ / www. microsoft. com/ silverlight/
[4] http:/ / osflash. org/ projects
[5] http:/ / www. adobe. com/ products/
[6] http:/ / en. wikipedia. org/ wiki/ Gnash
[7] http:/ / www. adobe. com/ products/ flash/
[8] http:/ / www. adobe. com/ education/
[9] http:/ / www. swishzone. com/ index. php
[10] http:/ / en. wikipedia. org/ wiki/ SWiSH_Max
[11] http:/ / www. salasaga. org/
[12] http:/ / www. salasaga. org/ downloads/ alpha3/ projects/ Installing_on_Ubuntu804. html
[13]
[14]
[15]
[16]
[17]
[18]
[19]
[20]
[21]
[22]
[23]
[24]
[25]
[26]
[27]
[28]
[29]
[30]
http:/ / www. sothink. com/ product/ flashdecompiler/ index. htm
http:/ / www. swf-decompiler. com/
http:/ / www. swf-to-fla. com/
http:/ / www. eltima. com/ products/ flashdecompiler/
http:/ / www. flash-decompiler. com/
http:/ / labs. adobe. com/ technologies/ wallaby/
http:/ / www. adobe. com/ devnet/ flash/ articles/ concept_fxg. html
http:/ / www. adobe. com/ products/ captivate/
http:/ / www. adobe. com/ products/ acrobatconnect/
http:/ / www. adobe. com/ products/ flex/
http:/ / www. toufee. com/
http:/ / silex-ria. org
http:/ / osflash. org/ red5
http:/ / www. adobe. com/ flashplatform/
http:/ / ming. sourceforge. net/
http:/ / swfmill. org/
http:/ / haxe. org/
http:/ / www. flashdevelop. org/
Flash CS6 desktop tutorial
Flash CS6 desktop tutorial
Draft
Introduction
Learning goals:
• Learn about various components of the Flash CS6 Desktop
• Learn how to configure the workspace and how to save configurations
• Learn about menu groups and other ways of interaction with Flash CS6
Prerequisites:
• none
Next steps:
• Flash drawing tutorial
• Flash layers tutorial
Alternative:
• Flash CS3 desktop tutorial
• Flash CS4 desktop tutorial
The Flash CS6 desktop works like the CS5 and the CS4 desktops. Differences are minor and mostly cosmetic. See
the Flash CS4 desktop tutorial if you own an older CS4 or CS5 version.
7
Flash CS6 desktop tutorial
8
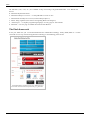
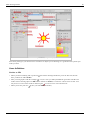
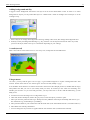
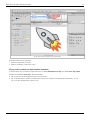
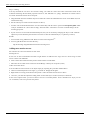
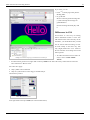
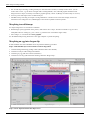
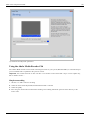
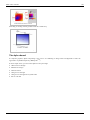
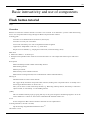
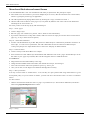
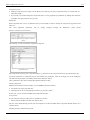
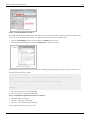
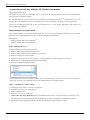
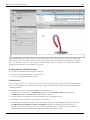
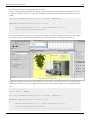
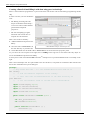
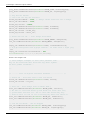
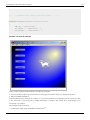
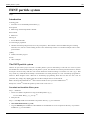
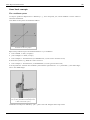
Opening the desktop from the Flash welcome screen
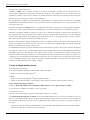
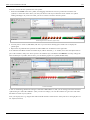
After launching Flash, you will see a welcome panel in the middle of the tool. Most of the CS6 functionality are
disabled at this stage. The welcome panel offers a few options for creating a Flash file.
Flash CS6 Welcome Screen
To start working with a Flash file, you may either use the File Menu or select an item within the welcome panel. The
welcome panel includes three columns
• To the left are predefined templates defining somewhat standard workspace sizes (i.e. x/y dimensions of the flash
clip that the users will see)
• In the middle you can select various types of Flash variants that we will not introduce here
• In the right column, you have links to Adobe's introductory texts from the Flash Dev center. Contents will open in
your default web browser.
If you tick Don't show again on bottom left, you won't see this panel anymore, but the same options are available
through the File Menu. If you want it back: Edit->Preferences; General Category; On launch: select Welcome
screen.
To start learning the Flash desktop, we now suggest to click on ActionScript 3.0. This will open a 550x400 px
workspace and configure Flash for using ActionScript 3 (aka AS3). AS3 is the most recent Flash scripting standard
and works fine since Flash 9, i.e. since summer 2006. Avoid ActionScript 2.0.
Now click on ActionScript 3.0 and enter the tool for real ...
Flash CS6 desktop tutorial
9
Layout and configuration of the Flash Desktop
Definition: By Flash Desktop (Desktop in short) we mean the whole CS3 authoring environment that you can see
when you work on some Flash animation.
The default desktop(s)
When you first open a the Flash Desktop you will not see all the tools you later will use nor will it be necessarly
adapted to the task you will engage in. You can arrange the Flash Desktop in various ways (see below).
The desktop is arranged in as many columns of panels as you like, but usually about three. We usually keep the
following organization
• the main tool panel and the properties panel to the left,
• the time-line and the drawing area (stage) in the middle column
• some tools panels and libraries in the right column
Selecting the right desktop layout depends on both the task and the size of your screen. Developing Flash with a
small laptop is painstaking.
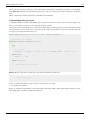
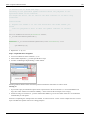
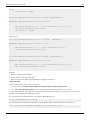
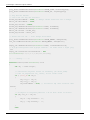
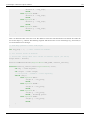
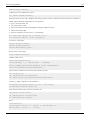
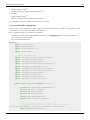
Play with the provided desktop layouts
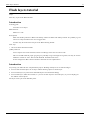
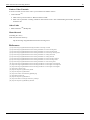
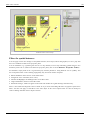
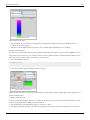
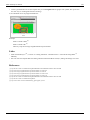
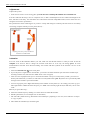
On top right, there is pull-down menu that allows you select from several preset configurations. The same menu is
also available through the Window->Workspace menu.
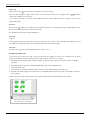
After you added your own configurations, the pull-down menu might look like this:
Flash CS6 workspaces menu
For the kind of stuff you will learn in our Flash tutorials series, the best initial bet is to use the designer layout.
Flash CS6 desktop tutorial
10
Configuring the desktop layout
Before we introduce the menu items, we suggest that you learn how to arrange your Desktop.
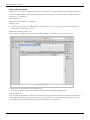
Firstly, we'd like to show how to display additional panels (tools and libraries). Having most tools and resource
libraries at your fingertip is in our opinion always a good idea if your screen is big enough. If you can afford to buy
CS6, it maybe is also possible to invest in a monitor that can display 1900x1200 pixels or more.
Panels are tools providing various editing and object mangement functionalities. Since some of these functionalities
can't be found through the menus (and the other way round), you have to learn what kind of panels exist. All existing
panels can be opened through the Window' menu on top.
CS6 lets you arrange such panels in various ways:
• They can be floating (undocked). Usually you would move them outside the Flash Desktop. This is very practical
if you have a large screen or dual monitor setup.
• They can be docked to the panel areas to the right, the middle or the left. In each of these areas you can dock a
new panel below or above an existing one.
• They can be docked in groups of panels (each one will show as a tab)
If at some point all the panels you put on the desktop did disappear, just hit F4 (or Window->Show Panels). F4
toggles between more space for drawing and more tools.
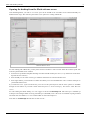
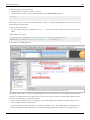
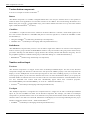
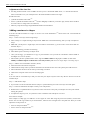
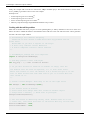
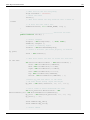
To dock a panel, simply grab it with the mouse (press the left-mouse
button in a empty area in its top bar) and then drag it to a "place" that
will "light up" in some light blue color.
• If you see a blue line (vertical or horizontal) and then release the
mouse the panel will dock below or to the right of the line as a
"lone" panel
• If a rectancle will light (i.e. the borders of a panel), you will dock
your panel next to the other panel(s), i.e. it will appear in a tab.
If this is not clear, just play moving around panels and pay attention to
lines or rectangles that light up. Don't worry about "breaking the
desktop". You always can re-start with a standard layout as we
described above.
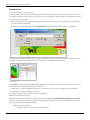
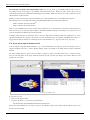
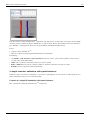
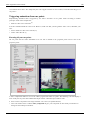
The following three screenshots should illustrate the general principle.
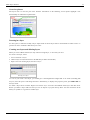
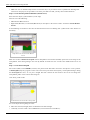
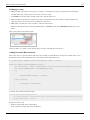
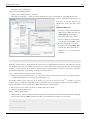
Docking in an empty panel area to the right
If you want to reproduce this example, close all panels (see below) or
select the "Debug" configuration. Then open the swatches panel: Menu
Window->Swatches or hit CTRL-F9. Now try to dock this panel.
Docking a swatches panel to the right (creating a
new column)
In the sceenshot to the right, the Swatches panel (shown in transparent color) is being dragged to the very right. You
should see a faint blue vertical line on your flash desktop if you move the panel close to the right border.
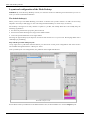
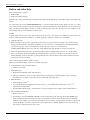
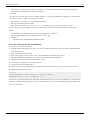
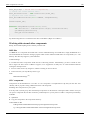
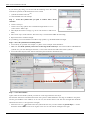
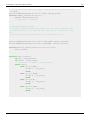
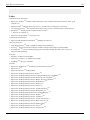
Panel groups - docking together with an other panel example
Panels can be organized in groups. We usually lump together panels with similar functionality, but professional
Flash designers also probably keep visible the tools they use most. In addition, they might know how to open a panel
with a shortcut and keep some on a second monitor.
Anyhow, in the next example, the (transparent) Color panel is in the process of being docked together with the
swatches panel. The borders of the swatches panel area is blue, i.e. ready for docking
Flash CS6 desktop tutorial
Docking the color panel as a tab
Now the color panel is firmly docked as a "tab" grouped together with the swatches panel. You could add another
panel below this panel group, e.g. the libary panel.
Docking the library panel below the
color/swatches panels
11
Flash CS6 desktop tutorial
12
Other panel operations
Frankly, we never use these features, but they may come handy if you want to maximize the drawing area and/or if
you have a small monitor. Also you may accidently do one of these things, so don't be surprised if panel minimizes
as an icon or as a simple bar...
To undock a panel
Drag it to some place that doesn't light blue.
Closing a panel
• On top-right of each panel is a pulldown menu. Click on "close" or "close group". You also can undock a panel
and the click top-right on the "x" icon.
Minimizing / Iconizing panel groups
Panel areas (left and right) can be minimized by double-clicking on its top bar or by using the tiny arrow.
Iconized panels
• This option is only useful if you got a small screen.
• If you just need more space for drawing, hit F4 and F4 again to get the full workspace back.
Adjusting panel size
You can adjust panel width to a certain extent: Just drag the right or bottom borders. Each panel has a minimal size
(width and height) and you can't reduce below it. E.g. if you want a classic vertical main tools panel you can, but you
need to put it into its own column (else the other panels will impose a minimal size).
Flash CS6 desktop tutorial
13
Saving an environment
To make sure that you can find a configuration again, you may save it under a given name. If you do different kind
of work with Flash, you may save several kinds of working environments.
• Window->Workspace->Save Current ...
If you are happy with what you did, save your configuration now ...
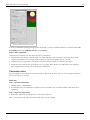
An example configuration
Here is an example configuration Daniel K. Schneider was using for Flash CS4. I like to have most tools at my
fingertips and I have a big enough monitor to allow for this. My real workspace is bigger than the one shown in the
screen capture, which I made smaller in order to fit into this text.
Example configuration of a CS4 Flash desktop
Roughly, the tools are arranged in the following three-column layout:
Drawing tools
Properties
Time-line
Drawing area
Color + Alignment + Transformation
Library + Components + Info
Flash CS6 desktop tutorial
Built-in and online Help
There are two sorts of support:
• Built-in help
• Help from Adobe's website
Built-in help is quite good, although contextual help could be better (like being a systematic option on the right-click
menu).
For some stuff you can get context-dependent help, i.e. learn something about certain objects, an item, etc. It will
open a more or less appropriate section in the help tree. Select an item first (e.g. in the Workspace or in a panel), then
either get Help from the Menu / hit F1 / or click on the little help icon in the properties panel. In addition, in the
built-in help menu you can find links to external sites.
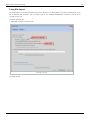
Trouble
In some Flash versions and on rainy days, help doesn't work for me. You may have to update help but you also may
have to install / upgrade other software (e.g. Adobe application manager or Adobe Air). Good luck !
• Upgrade CS6 first !
• Removing older versions is also a good idea (if and only if you don't need these anymore). E.g. when I tried to
update CS6 documentation I landed in an updater for CS 5.5. However, uninstalling also can uninstall software
you want to keep. E.g. I lost Acrobat Pro when I removed CS5.5. I never ever had a flawless
installation/uninstallation experience with any Adobe Master Pack. The absolute worst one was with CS3.
• Within the built-in help texts there can be broken links (Adobe reorganized their web site on a regular basis).
Also, you should be aware that updating documentation after a new release can take a few month (or more for
foreign language versions). Therefore you might land in CS5.x documentation (which doesn't matter much since
the interface remains the same).
However there is good stuff on Adobe's website.
Most important Adobe online resources for absolute beginners
• Video tutorials can be useful to beginners:
• tutorials [1] at Adobe
• Flash Help topics
• Flash Professional Help / Help and tutorials [2]
• This page centralizes various resources (but not all) in a single page. I includes Adobe videos (see above),
devnet articles (see below), external resources, Adobe help pages and more
• Flash developer
• Flash Developer center [3]
• You can find thematic introductions to certain topics, e.g. Learn Flash Professional in five steps [4] or
Animation Learning Guide [5]
• Consult Flash and AS3 links - documentation for some navigation aids to Adobe's online documentation.
• The overall Flash Help page
• Flash resources [6]
• In particular, you can find HTML and PDF versions of the built-in help. You may find online HTML pages
more practical than the internal help window since the built-in window can not be detached from the Flash
workspace and will hide your workspace area while your are reading. An good trick is to dock the built-in help
against the Main tool panel (as shown in the screen capture above). Finally, PDF versions of the on-line site
can printed, consider printing in some cases.
14
Flash CS6 desktop tutorial
Getting ready to work with CS6
In this section we will summarize functionalities of some Flash components. We will introduce more functionalities
in other tutorials. This is just a short overview.
The Work area and the stage
The stage
The stage in the middle (white by default) is the area where you work on your Flash contents. It will display the
default size of your flash clip as the end-user will see it.
The workarea
The stage is part of the work area. The gray part of the work area (also called backstage) can contain graphic
elements on which you are working and that you plan to integrate into the stage sometimes, i.e. make them visible to
the user. In deployed Flash "movies" this area also could hold motion animation objects that later will "walk" into
the scene.
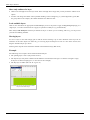
Setting up the size of the stage and other parameters
You can change the size of the stage (i.e. of the flash clip) in two ways.
(1) Use the Modify->Document menu:
• You can redefine the size of the stage. Stage size is the size your final Flash application will have. Therefore,
think twice about the size before you start composing...
• You may change the background color (per default it is white and it will display as white in your animation).
• In the same Document menu, you also should give your work a title and a short description
(2) You also can change size and background color by clicking on an empty spot in the workspace and then modify
its parameters the properties panel that sits to left in the "designer" workspace configuration
15
Flash CS6 desktop tutorial
16
Resized stage with different background color
The Menu Bar
Flash lets you use tools and manipulate objects in three different ways:
•
•
•
•
Interact through menus
Use shortcuts
Use a context menu on object (right-click)
Interact through panels
On top of the desktop is the menubar (on the Mac it will be on top of the screen). Available operations in menus and
panels are context dependent, i.e. they differ in function of what you are working on in the workspace. They also
adapt to the Flash "Publish Setting" (e.g. ActionScript 2 vs. ActionScript 3).
Here is a short and incomplete summary of the menu groups' functionalities:
File
Opening and creating new files
Import assets (e.g. a picture)
Definition of Publish Settings (you may change settings you initially defined)
Edit
Editing the scene
Editing elements that are active
View
Define zoom level, grids, snapping (i.e. how the workspace displays)
Flash CS6 desktop tutorial
Note: Other important "view" items are in the Windows menu
Insert
Add new layers, frames, symbols etc. into the timeline
Add a new scene
Modify
Modify elements on the workspace, e.g. convert a graphic to a symbol (make it a reusable object) or change
the shape of a drawing
Modify timeline elements
Text
Change text properties
Spell checking
Commands
Run macros
XML export / import
Control
Test animation in various ways (including just sub-elements)
Debug
Tools to find errors in your scripts
Window
Configure the workspace (add/remove panels)
Help
Built-in help and links to useful on-line resources
Now you should be ready to start learning how to create drawings with Flash. Move on to the Flash drawing tutorial.
References
[1]
[2]
[3]
[4]
[5]
[6]
http:/ / tv. adobe. com/ product/ flash/ Video
http:/ / helpx. adobe. com/ flash/ topics. html
http:/ / www. adobe. com/ devnet/ flash. html
http:/ / www. adobe. com/ devnet/ flash/ training. html
http:/ / www. adobe. com/ devnet/ flash/ learning_guide/ animation. html
http:/ / www. adobe. com/ support/ documentation/ en/ flash/
17
18
Basic drawing
Flash drawing tutorial
Draft
Introduction
Learning goals
Learn about some features of the Flash CS3 drawing environment
Learn painting and drawing simple (!) objects
Prerequisites
Flash CS3 desktop tutorial or Flash CS4 desktop tutorial
Flash layers tutorial (first part)
Related pages
texture and clipart (import media elements)
Materials (*.fla files you can play with)
http://tecfa.unige.ch/guides/flash/ex/drawing-intro/
Quality and level
This text should technical people get going. It's probably not good enough for beginners, but may be used as
handout in "hands-on" class. That is what Daniel K. Schneider made it for. Screen captures were made with
CS3, but the overall logic is the same for CS4 and CS5.
Next steps
• More about drawing: Flash object transform tutorial and Flash arranging objects tutorial
• Any other introductory tutorial indexed in the Flash article.
Alternative
• Flash CS3 drawing tutorial
Setting up the stage
Besides choosing the right settings for publication (Flash version) with which we shall not deal here, you should
select the right size for your your stage, i.e. the size of your future flash document. You can do this either when you
create a new file or later.
Defining document size
Creating a new document
Flash lets you create a new document from various templates: File->New. Then choose from General or Templates.
These templates either just define the size of your stage or load "half-baked" interactive applications that you will
have to clip. Ignore the latter for now ...
• Size of the stage
• Version of Flash (e.g. Actionscript 2 or 3 or AIR for desktop/mobile phone applications)
Flash drawing tutorial
• The Media Playback templates contain for example tools to make a slideshow.
Anyhow, for learning about Flash's drawing feature, don't worry about the template to choose from. Just make sure
that you have enough space to draw. If an initial size turns out to be too small or too big, you simply can modify the
document's size (see next).
Modification of a document
With Modify->Document (or by clicking on an empty spot in the stage and then changing the properties) you can:
• Redefine the size of the stage.
• Change the background color
• Give it a title and a short description
What size for a Flash document ?
Size of your Flash document depends on its purpose. Since Flash documents (unlike well made HTML pages) have a
fixed size, you must find a good compromise between readability (users should be able to read and distinguish all
elements) and the horizontal/vertical space you flash clip will use.
Larger flash documents
A default documents takes up 550x400px. This makes the document viewable without scrolling on a computer with
a bad screen resolution of 800x600px. Do not forget that a screen also contains a tools bar (in most Operating
systems) and that Flash is usually viewed within a web browser that also contains menu bars, a bottom bar and some
pixels to the left and right.
Anyhow, most people today have bigger screen resolutions so you certainly can go bigger than 550x400.
Banners and other embedded items
Advice depends on their purpose. Think hard about your potential target population (small screens, big screens,
mobile phones, etc.)
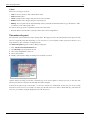
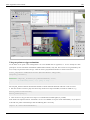
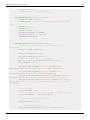
Configuration of the drawing environment
Firstly you should know that drawing tools exist in two forms:
1. Drawing tools in the main tools panel (that appears by default on top left of the desktop if you selected the
"designer" configuration)
2. Tools available through various panels
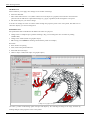
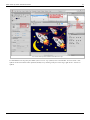
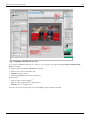
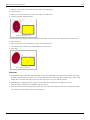
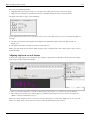
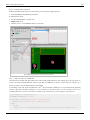
Below is a screenshot I made from a simple drawing using the oval tool and the pencil tool.
• You can see that the properties panel (left) will display properties of the object that is selected or being drawn.
E.g. when you use the pencil, it will display color of the stroke, size of the stroke, type of the line, fill color, etc.
• The same is true for the color panel that we display in the lower right.
19
Flash drawing tutorial
20
The Flash CS6 drawing environment (designer workspace)
Since these panels give you shortcut access to features of objects you are drawing, it's a good idea to keep them open
while you draw.
Some definitions
Strokes vs. fills
• When you draw something with a pencil tool
or another drawing tool like the pen or the line tool, then the
lines you draw are called strokes.
• Wen you crate graphics with the rectangle
, oval, etc. tools you will by default both get strokes and fills. The
insides of these drawing objects are fills and the outlines are strokes, i.e. both have various forms of color. You
may choose to remove either stroke or fill (using the no color icon in a color selection tool.
• When you use the paint tool
, then you create fills (not strokes).
Flash drawing tutorial
Colors
There are several types of colors:
•
•
•
•
•
None: You may choose to draw without fill or stroke
Solid: Standard colors
Linear: Gradient color changes that go from one side to another
Radial: Gradient color changes that goes from inside out
Bitmap: You can paint with an imported bitmap. This is particular useful with textures. E.g. to draw floors, walls
or outdoors scenes with repetitive tiles.
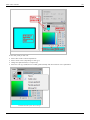
To select a color type, there is a pull-down menu in the color panel.
• Read the Flash colors tutorial if you want to know more colors and gradients ...
The main tools panel
The main tools panel contains the major drawing tools. We suggest to leave this panel docked in the upper left side
(since it's frequently used). But depending on your screen size, you can display it either grouped (as shown) or as a
long column (try the "essentials" workspace layout).
The main tools panel organizes tools by different categories:
1.
2.
3.
4.
5.
First, selection and transformation tools
Next Drawing tools (annotations in red)
Next, color manipulation, eraser etc,.
Next color selection
Finally, options (these change according to the tool that you select)
Flash CS6 drawing tools panel
Options change according to tool that is selected. E.g. in the screen capture to the left you can see how the tools
panels shows with the selection tool (left) and the brush tool (right).
Some tools are piled on top of each other, i.e. there are variants of a similar kind. In this case you can see a little
down arrow in the icon. To see variants you must press the left mouse for a while or Shift-click. E.g. instead of the
Oval tool you could for example display/access the Rectangle tool.
21
Flash drawing tutorial
Merge (shape) vs. object drawing
Flash has two drawing models:
• The merge model will erase shapes below something you draw (but not graphic objects as defined next)
• The object drawing model draws shapes as separate objects (that you later can manipulate like in a typical vector
graphics program).
Usually, you rather should work with the object model since the shape of each object can be easily modified later
on. However the merge model can be used to draw complex shapes, e.g. you can draw a circle and then carve off
things by drawing over it. The merge mode is also useful when you "paint" things (as opposed to drawing). You later
can convert "paintings" to objects of course.
By default, the object model may be turned off, so turn it on by clicking on the Object drawing button. You can find
in the options section of the tools panel after clicking on some drawing tool (e.g. the Pencil). You can see if it's on
when there is a rectangle drawn around the button, like this:
You can see the difference between the 2 kinds of objects created in the Properties Panel:
• Objects are called Drawing Objects
• Simple drawings (from the merge model) are called Shapes.
The behavior of tools changes according to mode used and it's not so obvious to remember what Flash does.
In merge mode
• In merge mode, when you draw a shape over another shape, it erases the shape underneath by default. You can
change this with the control options (see later)
• When you draw another object (line, pencil, etc.) it will draw over the painting, but not erase it.
In object mode
• Shapes drawn in object mode with the brush tool are drawn either within, on top or behind objects depending on
how to set the controls of the brush tool.
• Shapes drawn in object mode with the pencil, the pen tool etc. are drawn on top of other objects. But in the
object mode they can be moved behind with the right-click->Arrange context menu.
If you already tried to draw more complex shapes, you noticed that it is difficult to work with a single layer (e.g. to
select objects), so you now have to learn how to work with layers.
• If you are not familiar with layers, please read the Flash layers tutorial now.
Conversions
• To convert an object (instance) into its original components : Right click->Break apart
• To convert some shapes into a drawing object: Select them first (e.g. with the Lasso), then select Menubar
Modify->Combine Objects->Union
• To convert some shapes into a symbol, Right-click; Convert to Symbol
22
Flash drawing tutorial
List of standard tools
Also see the figure "Items of the Flash CS3 tools panel" above in order to identify the corresponding icons in the
tools panel. Some tools are stacked on top of each other. Hold down the mouse button for while to see the hidden
ones.
Selection tool
The selection tool ( ) lets you select elements (shapes, strokes, fills, symbols, bitmaps) in the work area by clicking
on it (simple click). If you wish to select several objects together hold down the SHIFT key or use a the lasso or a
selection box (click then drag the mouse).
Advanced uses:
• Double-clicking would put you into object editing mode for various parts (depending on where you click). To
return from this mode (which we will not explain here), double-click in some empty area in the workspace.
• This tool also can act as a distortion tool ! See the Flash object transform tutorial. If no object is selected (e.g.
click on an empty spot in the workspace), then you can use this tool to distort shapes. Move it close to an edge or
a corner and pull as soon as the cursor changes. Always make sure that you see a big "cross-hair" cursor before
you start moving around anything.
Subselection tool
The subselection tool (
) allows you to select paths of an object so that you can make more sophisticated
modifications. Click on the outlines of objects. You then can drag around the little squares and dots that will appear,
i.e. modify portions of shapes. See the Flash object transform tutorial for details.
If you want to modify a symbol (in the properties panel you can see something like "Instance-of") you have to break
it apart: Right-click->Break Apart.
Free Transform and Gradient Transform tools
The Free Transform tool (
) will allow you to make several kinds of transformations. When you select an object
with this tool and then move the mouse over different spots, you will that the mouse cursor changes shapes. Each
one will allow you do different transformations:
• Scale an object: double-ended arrow
• Rotate an object: circle arrow
• Skew (distort an object): double ended double arrow
To do a proportional scale, hold down the SHIFT key and then drag a corner.
There are more options to the free transform tool, e.g. so-called envelope transform, see the Flash object transform
tutorial if your are curious about this.
The Gradient Transform tool (
) is hidden below the free transform tool (by default) and allows you to change
the ways in which color gradients flow. Hold down the mouse for a while and then change the tool. See the Flash
colors tutorial.
23
Flash drawing tutorial
24
Lasso tool
With the lasso tool (
you can select several objects or parts of a shape.
This tool also includes a "magic wand" mode (see the optional controls) and a polygone lasso (
selection by clicking on several spots.
that allows
If you want to edit parts of a shape, either double-click on the object until it becomes a shape or break it apart
(right-click menu).
Pen tool
The pen tool ( ) allows you to make the most complex drawings, i.e. defining paths using so-called Bezier curves.
Do not confuse this with the more simple pencil tool.
See the Flash pen tutorial (currently unfinished ...)
Text tool
Add text.
In the properties panel you may define various text properties such as fonts, color and positioning, alignment, etc. If
you click on the paragraph symbol, you can define indent, line spacing and margins.
Line tool
The line tool (
) allows drawing simple lines (no surprise here ...)
Rectangle and other tools
On the same spot of the tools panel you got several tools. By default you will see the rectangle tool. To select
another tool: hold the left mouse button down for while and then select the one you want.
• Rectangle tool (by default): Draw simple rectangles. In the parameter's panel you can define strokes and filling
properties.
• Rectangle primitive tool: Lets you define additional properties like rounded corners
• Oval tool: Draw ovals
• Oval primitive tool: Define in addition other features, such as start/end angle, inner radius etc.
• Polystar tool: Define polygons and stars (there is a small pull-down menu in the properties panel that you should
not overlook !)
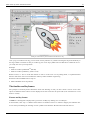
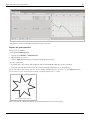
Below you can see a few drawings. The screen capture has been taken with the Polystar tool activated.
Various drawings with the rectangle, oval,
polystar tools (CS3, same principle)
Flash drawing tutorial
25
Pencil tool
With the Pencil tool you make drawings like with a Pen. However, there is optional support to draw
straight or smooth lines since drawing with a mouse isn't very obvious. You can define various options.
"Line" drawing Options
In the options section you can select different ways of drawing support. I.e. the the straight icon looks like this:
Below is a screen-dump that demonstrates the difference between straight, freehand and smooth drawing.
.
The three pencil drawing modes (CS3, same
principle)
Stroke, color and line properties.
In the properties panel you can define various options like stroke (pen) color, fill color, various dashes or not, and
how the end of lines should look.
Brush tool
The paint brush tool lets you paint, i.e. create shapes (
several modes.
) made of simple fills. There are several special effects and
Object or merge mode
• In merge mode you only can paint fills
• In object mode you can add a stroke to your painting (by default it is off). Look at the properties panel.
The Brush Mode
With the "Brush Mode" in the options section (not the properties panel) you can select the paint mode. Make sure to
understand these and to verify that the wanted mode is on, else you likely run into frustrations ...
• Paint Normal: paints over lines and fills on the same layer. Like painting with a "heavy" paint.
• Paint Fills: Fills empty areas leaving lines unaffected.
• Paint Behind: Paints in blank areas of the Stage on the same layer, leaving lines and fills unaffected (this may be
be default, I am not sure).
• Paint Selection: Applies a new fill to a selection. Therefore, before you start painting select a fill color first, then
select the object with the selection tool, then paint. This is the quickest way to color drawings.
• Paint Inside: Fills the area within a "fill" (i.e. where you start paining) and does not overpaint lines. If you start
painting in an empty area outside a fill, painting will not affect existing filled areas.
Selection of brushes and size
Choose from the options in the options section ....
Flash drawing tutorial
26
Ink Bottle tool
This tool allows you to apply color changes to the strokes of drawings.
• Select the ink bottle
• Then select either a Stroke color (and/or a Fill Color if the object is a graphic) from controls in the main tools
panel. If want to make more sophisticated changes (e.g. apply a gradient) do this through the color panel.
• The click on objects you want to change.
You also can change the color of a fill or stroke through the properties panel or the color panels, but make sure to
select the object(s) you want to change first.
Paint bucket tool
The paint bucket tool works like the ink bottle tool. It has two purposes:
• Change colors of simple shapes (primitive drawings). Tip you can change the color of strokes by editing
(double-click)
• Change color of fills (inside of a graphics object)
• Fill in empty areas (insides of drawings made with the pencil for example)
Procedure
•
•
•
•
First, deselect everything
Next, click on the paint bucket tool
Select fill color (and style)
Click on shape or fill (inside shape of a graphic object)
Filling a closed graphic with paint
Of course, you also could change paint of shapes and object by first selecting the thing in the stage, and then by
making changes in the properties or the colors panels.
Flash drawing tutorial
Tips:
• If you can't select a fill color, then try to click on the black and white icon and then set the colors again. I don't
know if that is a bug or a feature ....
• If you want to fill an area that is not entirely closed, you can do so by modifying the gap size by changing the
"Gap size" control in the tool panel options. E.g. choose "Close medium gaps". Then click again on the shape or
inside the area you want to fill
• If the paint bucket "won't work" on the "insides" of a complex drawing then:
• Make sure that the area is closed (no gaps between the enclosing strokes or shapes)
• Also try making the area you want to fill into a single drawing: menu Modify->Combine Objects->Union
Eyedropper tool
You can select a color from some spot on the workarea. The tool will then automatically change to the paint bucket
tool (see above).
Erasor tool
Erase stuff. See the Flash object transform tutorial for details.
Option controls and tools configuration
Some option tools are always displayed, some only for certain tools.
Hand tool
• Move the stage around (useful for big drawings/small screens or with a strong zoom)
Zoom tool
• Zoom in/out
Pen color
• Select the pen (stroke) color
Fill color
• Select the fill color
Swap color
• Change fill color to stroke color
Configuration of the Tools panel
The Tools panel can be configured via Edit->Customize Tools Panel (but for now I suggest not to change anything
there).
27
Flash drawing tutorial
28
Configuration of drawing settings
Select Edit->Preferences and then change parameters in the section Drawing. (no need to do this now). Basically
you can modify how Flash helps you drawing objects (e.g. connected lines, vertical/horizontal) and how it identifies
objects when you click on them.
Painting simple objects
In this chapter we will show how to make a complete (but simple!) drawing. Disclaimer: Daniel K. Schneider doesn't
even remotely feel to be graphics designer. If you are not familiar with layers, you now really should have a look at
the Flash layers tutorial
Firstly, you can find lots of free clipart (drawings) on the Internet. As a principle it is a better idea to search for
vector graphics as opposed to bitmaps and for three reasons:
• Vector graphics are smaller
• They can be re-edited
• They adjust nicely to size. A smaller or bigger version still looks as good as the original.
To find vector objects you can for instance type in Google "free clipart download" or see the links in the clipart
article (finding good and free clipart on the web is not easy).
Most often, clipart is distributed in *.wmf format (Windows Meta File format). Flash can handle this format. It also
can handle Illustrator *.ai format, Enhanced Windows Metafile *.emf, Freehand, Flash *.swf, and Autocad *.dxf. It
can not handle SVG (but you can open SVG files with Illustrater and then copy/paste).
You also can import a series of bitmap formats like the "standard" *.png, *.jpg, *.gif, but also Photoshop *.psd and a
variety of Quicktime formats if it is installed on your computer.
Drawing fuzzy objects
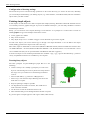
The basic principles for paint-challenged people like me is the
following:
• Create a new layer. It is usually a good policy to create a new
layer for each drawing. Do not worry about size and position at
this stage, since you can later move the drawing around and
resize it.
• Zoom in (like 200%), e.g. with View->Magnification
• Select merge mode from the Object Drawing tool and set the
brush tool to overpaint.
• Keep the painting as simple as possible
• Use large Pencils or brushes for starters, then small ones to
work on borders if needed.
• Use the eraser to trim off strokes that went too far
• Draw stuff that will go to the background first and then overpaint
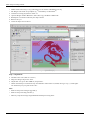
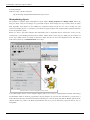
E.g. To the right is a simple apple tree with a green snake (I later erased).
An apple tree drawn in merge mode
Flash drawing tutorial
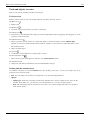
29
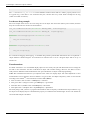
Drawing animals and such
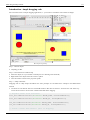
A really ugly cat drawn mostly in object mode
• Find a recipe to draw these, e.g. on Google type: "how to draw a cat"
• Then reproduce if you can ;)
• Rather use object mode and disable stroke since these models often ask you to overlay ovals. Without stroke you
may overlay various geometric shapes of the same color.
E.g. here is a cat made as explained in Creature Features [1].
Alternatively you also can first draw the object with the pencil tool (or the pen tool) and then use the Paint Selection
or Paint inside mode of the brush tool to apply colors.
Of course in the same drawings you can mix pencil, pre-built objects like rectangles and paint. E.g. draw the outline
of house with the pencil and then draw the roof with the paint tool.
Save each object as symbol
Once you are happy with a drawing, you should convert it to a (reusable graphic symbol): Right-click->Convert to
Symbol; Graphic. E.g. call it "cat". You then can remove the layer you used to draw this object, since the raw
drawing is no longer needed.
convert a select object to a symbol
Flash drawing tutorial
Once you have it in the library you can use several times, in various sizes and distortions. You also can copy the
object and e.g. make a new one with different colors ... If you are unhappy with the results (as I ought to be), you can
just break a graphic apart and restart again...
When you insert a library object into stage you can make it smaller. Drag it from your library into the stage (but onto
another layer) and then select the Free Transform tool; Press Shift (proportional reduction) and make it as small (or
big) as you like.
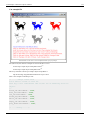
Importing clipart
Flash can handle various vector formats and even better: you can modify these within Flash. However, most free clip
art is in the SVG format and that cannot be directly imported to Flash (Shame on adobe !)
To import:
• File->Import->Import to Stage or alternatively Import to Library
• If you import it to the stage and like it, then save it to the library with Right-click->Convert to Symbol; Graphic as
explained above.
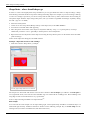
A cat from www.free-clip-art.com. Copyright: Personal and educational use
E.g. here is a cat I imported from Free Clip Art [2]. This site has free clipart images for personal use. You can use
them for school, fun, non-profit Web sites, and other personal needs.
Using SVG Clipart
•
•
•
•
•
•
•
Get one from http://www.openclipart.org/
Display the SVG image in your browser, then just File->Save As the SVG page
Open the SVG in Adobe Illustrator
Select All
Copy
Paste to Flash (using default settings)
Use directly ALT-CTL-S to resize.
Read more in Clipart
30
Flash drawing tutorial
Adding background and Sky
I suggest to draw background stuff with a new layer You can do this beforehand or after. In order to see either
background or objects you can put all other layers in "outline mode". Click on rectangles near each layer or on the
rectangle on top.
Making use of the "Layer Outline Mode"
• First of all you can change the background of the stage: Modify->Document; then change the background color.
• If the layer with your background drawings (e.g. sky) is drawn over the objects instead of the other way round,
just move this layer (either to the top or to the bottom depending on your settings).
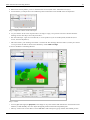
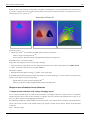
A result (sort of)
Here is the result of a three times two trees, two of my cats, an imported cat and a little house.
A flash document with trees and cats
Using textures
Of course, you may find the grass to be too ugly. A good solution might be to replace a background color with
textures. Search on the web for "free textures grass" and save the file (usually a *.jpg).
You should be aware that there are textures and textures meant to be tiled. Simple pictures (if smaller than the stage)
will produce tiles that you can see (not exactly what you want). So instead you can search for something "free
tileable grass textures". If you can't find good tiles, you may learn how to do this with this Photoshop [3] from
DadyyCool.
• You then can resize the image if it is too big and/or crop it.
• After that, deselect all objects (click in the gray area) or select the object you want to paint.
• Then open the color panel and select type: Bitmap from the pulldown menu. Import the bitmap and select it (you
also will find a copy of the bitmap in your library).
• Then paint the outline of your textured area with the brush tool (in the "Paint behind mode" (see brush tool above)
• Then fill the rest with the paint bucket.
• You can change the way textures are applied with the free transform tool (see Flash colors tutorial).
31
Flash drawing tutorial
A flash document with trees and cats
This result is not exactly better, but it's different and you can see that you can draw with bitmaps :). Of course one
now also should repaint the house and the trees. I also rotated the gradient for the sky by the way.
Of course, one can do better graphics and colors. See more advanced Flash tutorials on drawing, e.g. the Flash object
transform tutorial, the Flash arranging objects tutorial or the Flash colors tutorial
Files to download
You can download the *.fla files here:
• http://tecfa.unige.ch/guides/flash/ex/drawing-intro/
• flash-cs3-drawing-trees.fla is the one with a simple background
• flash-cs3-drawing-trees3.fla uses gradients and drawings outside the stage are clipped away (so it's a clean
version of the above and I will use this one in the Flash motion tweening tutorial).
• flash-cs3-drawing-trees2.fla is the one with the textures.
References
[1] http:/ / www. abc. net. au/ creaturefeatures/ draw/ draw_a_cat. htm
[2] http:/ / www. free-clip-art. com/ members/ content/ cgi-bin/ imageFolio. cgi?direct=Animal_Clip_Art
[3] http:/ / www. learn2photoshop. com/ tilabletex. htm
32
Flash layers tutorial
Flash layers tutorial
Draft
This entry is part of the Flash tutorials.
Introduction
Learning goals
Learn how to use layers
Flash/CS level
Flash CS3 - CS6
Prerequisites
Flash CS3 desktop tutorial or Flash CS4 desktop tutorial or Flash CS6 desktop tutorial. It's probably a good
idea to use a layout similar to the ones I suggest there.
You also may first look at the first part of the Flash drawing tutorial.
Next steps
• One of the basic animation tutorials
Quality and level
Screen captures were made with CS3, but the overall logic is the same for CS4 to CS6.
This text should technical people get going. It's probably not good enough for beginners, but may be used as
handout in "hands-on" class. That is what Daniel K. Schneider made it for...
It aims at beginners. More advanced features and tricks are not explained here.
Introduction
Layers help you deal with more complex Flash projects. Working with layers has several advantages:
• You can draw and edit objects in one layer without affecting objects in another layer.
• You can lock layers (to protect their embedded objects from unwanted editing)
• You can hide layers, make them visible (i.e. you can see their objects in the workspace), or you can display just
the outlines of their objects.
The layers tool is part of the Timeline panel.
33
Flash layers tutorial
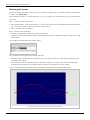
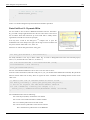
Overview picture
The layers tool is in the left part of the timeline. Annotations in the following screen capture highlight a few
functionality we will further explain below.
The Flash CS3 Layers tool
Drawing in a layer
To draw, paint, or otherwise modify a layer simple click on the the layer name in the Timeline to make it active. A
pencil icon next to it indicates that the layer is active.
Creating new layers and deleting layers
When you create a Flash document, it only contains a single layer, i.e. less than you need.
To create a new layer, either:
• Insert->Timeline->Layer
• Click on layer icon (left most item in the Edit bar just below the timeline)
• Right-click on an existing layer, then Insert Layer
Inserting a new layer
As soon as you create a new layer, you should give it meaningful name. Right-click on its name (something like
Layer 2) select Properties and change the name. Alternatively, to display this properties panel, just double-click on
the layer name.
To delete a layer and its contents: Right-click->Delete Layer. You also can lock/hide other layers with this menu.
Before you delete a layer make sure that you save its objects if you plan to keep them. You can insert them in the
library as symbols or copy them to another layer.
34
Flash layers tutorial
Show only outlines of a layer
• Click on the rectangle next to the layer name. If this rectangle turns empty then you only should see outlines of its
objects.
• You also can change the outline color by double-clicking on the rectangle. E.g. if your background is green (like
the grassy hills in our example), the outline should be of a different color.
Lock and hide layers
Click on the dots below the appropriate hide/lock/display icons in the panel to apply locking/hiding/displaying to a
single layer, or on the icons themselves to apply an operation to all layers (e.g. lock them all).
TIP: Always lock all layers and then just unlock the layer on which you are working. This way you can prevent
yourself from making mistakes.
Moving layers
To move a layer in the stack simply grab it with the mouse and drag it up or down. Position of the layer has an
influence on the order objects are drawn. E.g. if a moving object should pass in from of a tree and it doesn't, then
drag the animation layer up or down.
Drawing order depends on the load order defined in the Publish Settings (File menu)
Example
The following screen capture shows hidden and locked layers:
• The painting layer is active (the pencil is shown)
• The objects layer only shows outlines and in addition it is locked (the lock sign is on and the rectangle is empty.
Its objects are drawn in light green, i.e. the color of the rectangle)
• The Sky layer is hidden (The red "X" sign is on).
The Flash CS3 Layers tool, shown with outlines
of layer and a hidden layers
35
Flash layers tutorial
Layer folders
Once your documents get really complex, you can organize layers into folders, e.g. one folder per task: Static
objects, animations, background etc.
To create layer folders, either:
• click on the folder icon in the Edit bar (third item)
• or use Insert->Timeline->Layer Folder
You then can drag around layers. Hiding, locking etc. works more or less like with folders (try it out ...)
However, at some point you also will have to decide whether you really want to work with an "everything is in the
main time line model". Consider organizing and planning your project with embedded movie clip objects (see the
Flash embedded movie clip tutorial). Putting everything in the main time line is like programming with "goto's"...
Scenes
Once your animation gets bigger, you most certainly should break it down to several scenes. There is no urgency to
work with scenes if you are new to Flash, but you should know about this now. Scenes are played in the order you
defined them.
To insert a new scene
Menu Insert->Scene
To rename/reorder the scenes
• Menu Window->Other Panels->Scene (SHIFT-F2)
• Then drag up or down the scenes
• To rename, double-click on a scene name in this panel.
To navigate between scenes
• Either via the scenes panel, or the Edit Bar (displayed below the timeline). If you can't see it:
Window->Toolbars->Edit Bar.
One advantage of using scenes is that you can just test a single scene (menu Control->Test->Scene).
36
37
Basic animation
Flash animation overview
Draft
Overview
Learning goals
Learn about the various methods to create animations in Flash
Learn about timeline representations of the Flash Professional Interface (you can consult that later again)
Prerequisites
Flash CS6 desktop tutorial (or Flash CS3 desktop tutorial or Flash CS4 desktop tutorial)
Flash layers tutorial (first part)
Flash drawing tutorial (at least some of it)
Flash frame-by-frame animation tutorial (not absolutely needed, but probably useful)
Next steps
Flash classic motion tweening tutorial (optional, CS3-style tweening for CS3 and better)
Flash CS4 motion tweening tutorial (CS4, CS5, CS6)
Flash shape tweening tutorial (all)
AS3 TweenLite tweening engine (CS3-CS6, intermediate)
Moving on
Flash CS4 inverse kinematics tutorial
Flash animation summary
Flash CS4 motion tweening with AS3 tutorial
After these (or even before) you should be ready for interactivity. E.g. do the Flash button tutorial
Quality and level
This is just an overview article.
Introduction
Animation means changing properties of objects (e.g. position, size or color) over time.
In Flash CS3 to CS6, you can create several kinds of animations and associated special effects. To create animations,
there are several options:
(1) Frame-by-frame animation Frame by frame animation is an ancient technique used for cartoons. This leads to
precise results but is time consuming, since you will have to draw each picture. See the Flash frame-by-frame
animation tutorial.
(2) Motion tweening with the CS Flash authoring interfaces Wikipedia [1], retrieved 20:45, 7 August 2007 (MEST)
defines “Tweening, short for in-betweening, as the process of generating intermediate frames between two images to
give the appearance that the first image evolves smoothly into the second image. Inbetweens are the drawings
between the keyframes which help to create the illusion of motion. Tweening is a key process in all types of
Flash animation overview
animation, including computer animation. Sophisticated animation software enables one to identify specific objects
in an image and define how they should move and change during the tweening process. Software may be used to
manually render or adjust transitional frames by hand or use to automatically render transitional frames using
interpolation of graphic parameters.”. In other contexts, one uses also "morphing". E.g. PCMag [2] (retrieved 20:45, 7
August 2007 (MEST)) defines tweening as “An animation technique that, based on starting and ending shapes,
creates the necessary "in-between" frames. See morphing”.
In CS4/CS5/CS6, there exist two variants:
1. Classic motion tweening as known from CS3 and earlier versions. See the Flash classic motion tweening
tutorial. You can skip this.
2. Motion tweening, a more oject-oriented method introduced in Flash CS4. See Flash CS4 motion tweening
tutorial
(3) Shape animations
• Shape tweening, since you can position key frames of shapes in different positions.
(4) Motion and shape tweening with ActionScript code
There exist many different possibilities, e.g.
• Using a third party library like the Greensocks AS3 TweenLite tweening engine. Must need to know for
everyone who plans to create interactive educational scenarios.
• Dynamically changing x and y positions of a display object over time, e.g. through using the Timer class. See the
unfinished Flash games tutorial for an example.
• Using the Adobe "fl.motion" classes. See the Flash CS4 motion tweening with AS3 tutorial
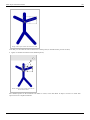
(4) Inverse kinematics
• Inverse kinematics is the animation of armatures for shapes or connected symbols instances. See Flash CS4
inverse kinematics tutorial
What can be animated with built-in motion tweening ?
In Flash 9/10/11, you can animate all sorts of compound objects:
• Symbols, i.e. any object that is an instance of a library object, e.g.
• Graphic symbols
• Movie clips
• Buttons
• Compound objects (things that you grouped together)
• Text boxes
The ground rules are the following:
• Motion animation means just changing x/y positions of an object over time. Of course during the motion path one
also can change other properties, e.g. orientation, size and tint.
• With all built-in tools, an animation is usually done in a single layer with a single instance of something that sits
in the library.
• With ActionScript it depends, but usually you also would use "heavy" objects like movie clips.
38
Flash animation overview
Flash CS4/5/6 timeline representations of interpolations
Adobe show different types of animations using the timeline in the following way: According to Animation basics
[3]
, (retrieved 11:17, 25 April 2010 (UTC))
• A span of frames with a blue background indicates a motion tween. A black dot in the first frame of the span
indicates that the tween span has a target object assigned to it. Black diamonds indicate the last frame and any
other property keyframes. Property keyframes are frames that contain property changes explicitly defined by you.
You can choose which types of property keyframes to display by right-clicking (Windows) or Command-clicking
(Macintosh) the motion tween span and choosing View Keyframes > type from the context menu. Flash displays
all types of property keyframes by default. All other frames in the span contain interpolated values for the
tweened properties of the target object.
• A hollow dot in the first frame indicates that the target object of the motion tween has been removed. The tween
span still contains its property keyframes and can have a new target object applied to it.
• A span of frames with a green background indicates an inverse kinematics (IK) pose layer. Pose layers contain IK
armatures and poses. Each pose appears in the Timeline as a black diamond. Flash interpolates the positions of the
armature in the frames in between poses.
• A black dot at the beginning keyframe with a black arrow and blue background indicates a classic tween.
• A dashed line indicates that the classic tween is broken or incomplete, such as when the final keyframe is missing.
• A black dot at the beginning keyframe with a black arrow and a light green background indicates a shape tween.
• A black dot indicates a single keyframe. Light gray frames after a single keyframe contain the same content with
no changes. These frames have a vertical black line and a hollow rectangle at the last frame of the span.
• A small a indicates that the frame includes an associated script (created with the Actions panel).
• A red flag indicates that the frame contains a label. This allows for instance to write AS code like:
''GotoAndPlay("label");''
• A green double slash indicates that the frame contains a comment.
• A gold anchor indicates that the frame is a named anchor.
39
Flash animation overview
References
[1] http:/ / en. wikipedia. org/ wiki/ Tweening
[2] http:/ / www. pcmag. com/ encyclopedia_term/ 0,2542,t=tweening& i=53271,00. asp
[3] http:/ / help. adobe. com/ en_US/ Flash/ 10. 0_UsingFlash/ WS42406111-940D-4eff-A9F3-16EFDA4F1340. html
Flash frame-by-frame animation tutorial
Draft
Introduction
Frame-by-frame animation means displaying a series of images, one image after another. That creates the illusion of
a movie. Real movies actually work that way too.
Learning goals
Learn basic Flash CS6 frame-by-frame animation, one kind of Flash animation.
Learn about embedded movie clips and symbol edit mode.
Save a frame-by-frame animation as reusable movie clip.
Learn about some object transformation features
Prerequisites
Flash CS3 desktop tutorial
Flash layers tutorial
Flash drawing tutorial (for starters some of it, at some point you'll have to dig into it a bit)
Flash animation overview
Moving on
If you want to do serious frame-by-frame animation, you probably better drawing skills. In particular, you
should read the Flash object transform tutorial and the Flash arranging objects tutorial since you'll have to
change graphics from one frame to the next one.
If you respect our advice on "being modular", you also should look at the first parts of the Flash embedded
movie clip tutorial
The Flash article has a list of other tutorials. You probably should continue with the Flash classic motion
tweening tutorial or Flash CS4 motion tweening tutorial. It will teach how to make fly things. You also can
read the Flash shape tweening tutorial which tells how to do morphing animation.
Quality
This text should technical people get going and may not be good enough for self-learning beginners. It can be
used as handout in a "hands-on" class. That is what Daniel K. Schneider made it for...
Level
It aims at beginners. More advanced features and tricks are not explained here.
Materials (*.fla files you can play with)
http://tecfa.unige.ch/guides/flash/ex6/frame-by-frame-intro/
Alternative version
Flash CS3 frame-by-frame animation tutorial (deprecated)
The principle
40
Flash frame-by-frame animation tutorial
41
Purpose: Frame-by-frame animation gives you very detailed control over the movie (since it's the technology used to
make animation pictures until recently before different 2D and 3D computer animation techniques came into the
existence). Disadvantage is that frame-by-frame drawing is very time consuming work. Therefore, most often,
designers use a combination of frame-by-frame animation and interpolation techniques (called tweening in Flash
lingo). Often, frame-by-frame animation is used to animate single objects that in turn can be used as part of larger
Flash animations. A typical example are buttons that highlight when you move the mouse over them or when you
click on them.
Flash animations are defined through so-called timelines. Each flash file has a timeline, i.e. the so-called main
timeline. Within each flash file you then can insert so-called embedded movie clips. Each of these has their own
timeline. In other words, you can include animated objects within animations.
According to Adobe's Creating your first Flash Professional CS6 document [1], “The Timeline controls the timing
that specifies when elements in the movie appear on the Stage. The playhead begins at Frame 1 and moves from left
to right as the movie proceeds through the frames. Drag the layers in the Timeline to arrange the layering order of
graphics on the Stage. Graphics in the higher layers appear to be placed on top of the graphics in the lower layers.”
The following example is a very simple animation that lasts for 15 frames. Since we set the frame rate to 12
frames/second, it will last about 1.25 seconds.
Files:
• flash-cs6-simple-fbf.html [2]
• flash-cs6-simple-fbf.fla [3] (source code)
Below a screenshot of this example.
Basic frame-by-frame animation
Executive summary of the procedure:
• Insert drawings in various keyframes (as seen in the picture above). Any graphic will do. You also could use as
many layers as you like. Technically speaking frame-by-frame animation is simple !
• Over time (from frame to frame), these drawings should differ only a bit in general.
• Creating a simple animation chain as above works like this:
• (a) Create a drawing.
• (b) Make sure that it or its frame is selected, then hit F6 to copy the drawing to a new keyframe
• (c) Click into the new frame and modify the drawing.
• (d) repeat (F6, drawing)
Flash frame-by-frame animation tutorial
Further below, we will provide more details through examples and more extended "how to's"
Play time:
• Either load this flash-cs6-simple-fbf.fla [3] file and make some modifications
• Or implement a quick and dirty animation yourself.
Testing the result
• Press CTRL-Enter (or menu Control-> Test Movie).
The big decision - film or modular thinking
When you plan a simple flash project, you can think of it in two very different ways
• Plan to work like a computer designer and think of your flash as combination of modular elements. We prefer that
design philosophy.
• Plan to work like a Flash graphic designer and use hundreds of frames and dozens of layers, i.e. use a "film"
metaphor. Most Flash textbooks for non-programmers would teach you this.
Animations are called "movie clips". This is confusing, but can be explained by the Flash history. A flash file as
whole can be a movie clip. But you also can have clips within clips within clips, e.g. a Flash file can contain several
movie clips that in turn may contain other clips.
Let's have a look at two variants of an example that will demonstrate these principles.
Flying rocket in the main timeline
The following screenshot shows a rocket frame by frame animation [4] made in the main timeline.
•
•
•
•
The animation only uses three frames, i.e. we only implement some minimalistic "flaming" animation.
We use three layers for drawings, one for the rocket and two for the flames
Yellow flaming is made with three different drawings in frames 1-2-3 (layer 2)
Red flaming is made with three different drawings in frames 1-2-3 (layer 3)
If you want to add a second, a third rocket and other flying objects you will have to duplicate the three layers. In the
six new layers you will have to move the drawings to positions. This is awfully complicated and we will not show an
example. Therefore, in most cases, do not create animations in the main timeline.
42
Flash frame-by-frame animation tutorial
43
Rocket frame-by-frame animation in the main timeline
Example to look at and to play with:
• flash-cs6-rocket.html [4] (result)
• flash-cs6-rocket.fla [5] (fla source code)
Flying rocket symbols, no main timeline animation
A much smarter way is to define a single rocket as a so-called embedded movie clip, also called movie clip symbol.
Think of an embedded movie clip as flash within flash.
• We use one layer for the background (sky, moon and starts)
• We use another layer to position several instances of the same rocket movie clip that sits in the library. As you
can see we also changed their respective size.
Flash frame-by-frame animation tutorial
44
Use of rocket frame-by-frame animation embedded movie clips
An embedded movie clip (also just called symbol or movie clip symbol) has its own timeline. You can create a new
symbol via the menu Insert->New Symbol (Ctrl-F8) or by selecting an object on the stage, right click -> Convert to
symbol.
Flash frame-by-frame animation tutorial
45
Editing the rocket frame-by-frame animation embedded movie clip
Once you got a rocket movie clip, you can create as many instances as you like. Just drag the clip from the library to
the stage. What's even better is that you could copy one movie clip symbol from one flash file to a different one. I.e.
you easily can reuse your components.
Example:
• flash-cs6-rocket-symbol.html [6] (Result)
• flash-cs6-rocket-symbol.fla [7] (Source code)
Rocket science, i.e. how to work with frames in order to create some sort of pulsing flame, is explained further
below in this article. Let's now introduce the frame-by-frame animation engineering.
Read more about embedded movie clips in:
• Flash embedded movie clip tutorial
The timeline and keyframes
The principle of frame-by-frame animations made with drawings is that you draw various versions of the same
objects in different frames. These are then displayed one after each other in rapid order (most often between 12-24
frames / second).
Frames and key frames
A frame is a drawing that is displayed at a given time. Usually any drawing uses several layers.
In the timeline, each "stop" is called a frame. Frames are numbered from 1 to whatever length your animation has.
Let us start by introducing the meaning of a few symbols in the timeline. We later will come back to these.
Flash frame-by-frame animation tutorial
46
If you feel that display of timeline frames is too tiny, you can fix this with the time line options (little pull-down
menu in the upper right). This menu also allows displaying a preview of the animation (but that takes up space of
course).
Time line options pulldown menu
When you start drawing with Flash, everything is drawn by default into a first frame in layer 1.
The default keyframe is frame # 1
E.g. if you insert a letter, for example, you will see something like in the screen capture just above.
• The first frame in the timeline will have a dot inside. Therefore, if you see a frame with a ".", it means that there
is a drawing inside the frame for this layer. A frame with contents is called a keyframe.
• A frame with a small white circle is called an empty keyframe. It will display nothing.
• A frame without a dot, doesn't have any drawing inside and it will either display the drawing from the prior
keyframe (black dotted frame to the left) or nothing if there is no keyframe to the left.
• The playhead showing the current frame (the red rectangle) sits on top of frame one by default and you can move
it around to inspect your animation.
Flash frame-by-frame animation tutorial
Executive summary - creating a frame-by-frame animation
Before pressing a button or using the menu, make sure that your are positioned in the right frame in the right layer. It
also is a very smart idea to lock all other layers (see the Flash layers tutorial)
Let's recall the principle:
• Frame-by-frame animation works by displaying drawings after drawings at a rapid pace. By default, Flash CS6
will show 24 frames (drawings) by second.
You don't need to have a drawing in every frame, i.e. a keyframe every five frames is good enough. A keyframe is a
frame that contains a picture or other object. In the timeline, a keyframe is indicated by a black dot.
Here are some useful shortcuts:
• F6 - Copy the graphics of the previous keyframe (Insert Keyframe).
• F7 - Inserts a blank keyframe
• F5 - Extends the drawing of the previous keyframe in the timeline up to this point (Insert Frame).
Right-click on a frame gives you more options, e.g. destroy or empty a frame...
The procedure:
1. Create a new layer or reuse a layer
2.
3.
4.
5.
6.
Draw something (for starters, try a "stick man").
Insert 3-5 empty frames: Press F5 4 times
Click on the last frame (the white rectangle)
Press F6 - Create a second keyframe with content identical to the first
Slightly change the design of this new keyframe
Repeat as desired (ie 3 times F5 and F6, go to the end, then change the drawing). If your animation is complex, using
multiple layers
In your timeline, you should see something like:
Now, add a nice static background:
• Create at least one new layer and draw a picture, such as a sky.
• Go up to the last frame of the animation and for each of these new layers, press F5. You should see something
like this the timeline:
Now test your animation sequence:
• Press CTRL-Enter (or use the menu Control-> Test Movie)
• You can also move the red control that sit on top of the timeline to the left or to the right.
We now will introduce three frame-by-frame animation examples. We sometimes will do this in the main time line
of the *.fla file. Alternatively (and better), you first should create a new so-called movie clip symbol and then edit
that object.
47
Flash frame-by-frame animation tutorial
48
A simple stickman
We will shortly show how to create a "stickman" animation using an embedded movie clip. Look at
stickman-cs6.html [8] first.
Step 1 - New Flash file and background
• Create a new Flash file
• Draw a simple background in the first layer and call it "background" or something. E.g. we just drew 2
rectangles...
• Lock this layer
• Create a new layer and call it Stickman animation
Step 2 - Create a drawing and make it a symbol
•
•
•
•
•
In the new layer created in step 1, create your drawing
Select all the elements
Right click -> Convert to symbol. Select "Movie Clip" and name it "Stickman"
Kill the drawing on the stage (!). Don't worry, it now sits in the library
Now drag the Stickman from the library to the stage. You could make several clones and adjust their respective
size in the properties panel. You might see something like this:
First drawing of our stickman
In order to edit this movie clip symbol again, double click on the object on the stage or double click on the library
item. In the first case, you will see the background as shown in the next picture
Flash frame-by-frame animation tutorial
49
First drawing of our stickman
Simply click on "Scene 1" about the stage in order to return to the stage...
Step 2 alternative - Create a new embedded movie clip first
• Insert a new symbol (Ctrl-F8)
Flash frame-by-frame animation tutorial
50
Create new movie clip symbol - part 1
• Call it "Stickman" and make it of type "Movie Clip"
Create new movie clip symbol - part 2
Flash frame-by-frame animation tutorial
51
• You are now editing the Stickman symbol. You should see an empty stage, "layer 1" and a little + sign in the
middle
• Start drawing around this "+" sign which roughly should be in the center of your drawing.
Step 3 - Frame by frame animation
(same for both methods)
•
•
•
•
•
•
Hit F5 (about 5 times)
Click in the frame with the white rectangle or the one after it
Hit F6 (create new keyframe with a copy of the old one)
Modify the drawing a bit, e.g. just turn an arm
Hit F5 (about 4 times)
Hit F6
Repeat ...
Drawing tips:
If you play with a stickman, then you might learn how to use the Free Transform tool (
(change the center point and rotate).
) in order rotate limbs
• Select the tool
• Select a limb and move the little white circle towards and end
• Then move the mouse to a corner until the mouse cursor changes to rotation. Then drag to rotate.
• Read the Flash object transform tutorial for more information
Enjoy !
Example:
• stickman-cs6.fla [9] (source)
• stickman-cs6.html [8]
A simple letter after letter animation
The following animation was made in the maintime line and with Flash CS3. You can open the example files in
Flash CS4/5/5.5/6 without problems. The only problem one may encounter with CS3 files is that since CS 5.5 fonts
must be embedded (that's a small change).
Have a look at the this simple animation [10] first.
The *.fla, *.swf and *.html files flash-cs3-frame-by-frame-hello.* can be found at http:/ / tecfa. unige. ch/ guides/
flash/ex/frame-by-frame-intro/
We will produce an animation that will display the word "HELLO", one letter after each other. The principle is quite
simple: We will insert new letters in new keyframes. One could do this by inserting "H" into keyframe 1, then add
"E" to keyframe 2 etc. In order to slow down the animation, we insert a keyframe about every 5 frames.
Step 1
We insert the letter "H" in frame 1 (alternatively you may start in frame 5, i.e. the user won't see the "H" when the
frame loads. Anyhow, later you always can add extra empty frames.
Steps 2 to 5
Now we repeat this procedure by adding new letters in new frames. So first we will transform frame 5 into a new
keyframe. It is important to understand that there are two kinds of new keyframes:
1. Blank ones that will clear the stage, i.e. the objects will be gone. That's not what we want here.
2. Keyframes that carry "forward" contents of the keyframe before. We will use this one.
The procedure is the following (see the picture below)
Flash frame-by-frame animation tutorial
52
• Right-click in a frame, then select Insert Keyframe (not insert blank keyframe). Alternatively hit F6, i.e.use the
[Flash CS3 keyboard shortcutsshortcut.
Editing keyframe #5
Repeat this, until you incrementally spelled out "HELLO".
Step 6
Test if it works:
• Firstly you can simply move back and forth the playhead (red rectangle that sits on the top of the timeline)
• Then you can test the movie through the menu Control->Test Movie or hit CTRL-Return. This will open a up a
new window where you can see more or less what an end-user would see.
Step 7
Now we want to tune a few things:
(1) You may not be happy that the movie starts with letter "H" already displayed. Right-Click on Frame 1 and Insert
Frame (not a keyframe!) or hit F5. Repeat this 4-5 times. Then hold down the mouse and drag the black dot in the
new frame 1 to frame 5.
(2) Your Movie may be too slow or too fast. Flash animation made with the CS3 drawing tools is not time-based (as
in SVG for instance) so you have to fix a frame rate. You can change the frame rate (number of pictures
shown/second) in two ways:
• Click on an empty spot on the stage and change the rate in the properties panel that you should see below
• Menu Modify->Document (CTRL-J)
For this animation, about 15 frames are about right I think.
(3) You also may align the letters. But you have to do this in each keyframe, else they will jump around, which
actually may be an effect you like.
Flash frame-by-frame animation tutorial
53
To align all letters in all frames: Click on the Edit multiple frames button.
Select all frames
• Then, you can select the frames you want to edit together by moving the "[" "]" sliders on top of the timeline
• Then select letter-by-letter groups, then use the align pane (Window->Align), but untick To stage.
This tool is quite dangerous, since it's hard to control what happens in each frame. Make sure to save your file before
you engage in this ! Anyhow, next time make sure to place your objects where they should be.
Step 8
Now you can publish this as a web page.
• Make sure to save the animation in some place you can remember, because Flash will put the exported Flash,
HTML and JavaScript there.
• Then, click on an empty spot in the stage and click the "Publish Settings" button or menu File->Publish Settings.
• Click the publish button when you are happy with the settings. It will put all the necessary files in the same
directory where your *.fla file sits.
• Then click on either the Flash *.swf file or the *.html file and see if it works.
As an exercise, you now can add extra keyframes after frame 1,5,10, etc. and move up or down letters. Alternatively,
read on ...
Frame-by-frame shaky animation
Sometimes, e.g. in trailers or in little advertisement boxes you can see some sort of shaky or jittery icons, like in the
example [11] we are going to discuss now.
The *.fla, *.swf and *.html files flash-cs3-shaking-hello.* can be found here: http:/ / tecfa. unige. ch/ guides/ flash/
ex/frame-by-frame-intro/
Step 1 - change stage size
• Define size and background color of your stage (I use 400x200 px this time). To do so, click with the selection
tool on an empty spot of the stage and change the properties of the stage in the properties panel (usually shown
below the stage).
• This time, we will use two layers, so create 2 layers, call one of these "hello".
Step 2 - draw a hello word
• In the "hello" layer, draw the word "Hello" with the pencil for a change
• Select the pencil
• Put the Pencil tool into "Smooth mode".
• Put Flash into object mode (circle in the options area of the tools panel)
Flash frame-by-frame animation tutorial
• Select a wide stroke (15px or more)
Go back to the drawing tutorial if you don't how to use object mode and how to set the smooth control for the pencil.
Step 3 - fix the hello word
• You may have to fix the Word "Hello", since despite smooth mode your drawing may not be so hot.
• Firstly use the Free Transform tool to adjust size, rotation, etc. of each letter.
• Then use the Subselection tool to fix certain letters, probably your "o" will be ugly.
• To do good work, you need to set magnification to something like 400 (Menu View->Magnification).
• Then you can drag around the distortion points (squares) and kill some of these and/or move the 'curve
control handles (dots attached to a line).
• You can read further explanation about envelope transforms
• Finally select all letters with the selection tool and center them. You may also make the whole drawing bigger or
smaller (just change the "W" property in the properties panel while everything is selected, i.e. see the screen
capture below).
So now you should have (very) roughly something like this:
Hello with the pencil
Step 4 - Draw an oval
• Draw an oval or something around the "Hello" word if you want. Use another layer for this and lock the "Hello"
layer while you do this. See the Flash layers tutorial if you don't know how to use layers.
• Again, use the subselection tool to fine tune if needed. If you need more explanation about object transformation,
have a peek at the Flash object transform tutorial.
Step 5 - Make a new keyframe for both layers
Create a new keyframe in frame 2 (as explained above).
54
Flash frame-by-frame animation tutorial
• Hit F6 or Right-click; Insert Key Frame for the "hello" layer
• Hit F6 or Right-click; Insert Key Frame for the "oval" layer
• Now you should have a copy of both the "hello" word and the Oval in the new frame.
Step 6 - Make changes
• Now you can make slight changes to your drawings in frame 2 (so make sure that frame 2 is selected !)
• I changed color a bit for both the oval and the hello word.
• Unlock the "hello" layer if it's still locked.
• "Edit->Select All"
• Change the color in the properties window
• Then twist a little bit some letters and maybe the Oval
• You can do this for instance with the subselection tool or the Freetransform tool. (I only used the subselection
tool and basically turned a few Curve control handles).
Below is a picture of the slightly altered graphics:
Hello with the pencil - second frame
Step 7 - Add other frames
Just two frames will do, but you can add more of course :)
This example was a bit more professional. We tried to select a good stage size and made some efforts to get the
drawings right.
Rocket science
Frame-by-frame animation is also quite useful if you want to create animated objects that you then can reuse in
another animation as a movie clip. Let's first look at this little rocket [12] we shall discuss.
The *.fla, *.swf and *.html files flash-cs3-rocket.* can be found here: http:/ / tecfa. unige. ch/ guides/ flash/ ex/
frame-by-frame-intro/
I imported this rocket from Uncyclomedia Commons [13]:
http://commons.uncyclomedia.org/wiki/Image:Rocket.svg
• It's an SVG file that I first opened with Illustrator.
• I then copy/pasted it to Flash. See the Clipart article (i.e. the section on Importing to Flash).
Now we would like to animate the flames of this little rocket.
Step 1 - Break the rocket into components
55
Flash frame-by-frame animation tutorial
• Break the rocket apart (right-click->Break Apart). You now should see various rectangles drawn around its
various shapes.
• Flames are made with 2 shapes (the two rectangles in the lower right)
A broken apart imported SVG rocket
Step 2 - Put the flames into another layer
The easiest way is to use distribute these to other layers
• Select the 2 flames (hold down the SHIFT key and click on the orange and yellow parts
• Then Right-click->Distribute to layers
• Rename the two layers you created.
Now you should have something like in the screen dump below. I am positioned in the yellow flame layer and show
the other two as outlines.
56
Flash frame-by-frame animation tutorial
Rocket with flames in layers
Step 3 - Duplicate frame 1 to frames 2 and 3 in these two layers.
• As explained above, in frame 2: Right-click->Insert Keyframe. Do this for each of the three layers
• Repeat this for frame 3.
Step 4 - Change the flames for each frame
• I simply used the Free Transform tool and dragged the rectangle towards the lower right.
• By doing this you also might have moved the rectangle itself, just push it back underneath the rocket... (either
with the arrows, or with the selection tool).
• In order to get this right, you should each time put all the other layers (rocket plus one of the flames) in outline
mode with the layers tool.
57
Flash frame-by-frame animation tutorial
Rocket with flames in layers
Step 5- Tuning
• The animation is now a bit too fast. We would like to get the kind of effect you see in old and cheap cartoons on
TV.
• If you wish you can drag the keyframes (each dot to the right). I made a keyframe in every 5, but I also adjusted
the Framerate to 30/second. That's good TV quality. (click on workspace and adjust in properties panel)
Rocket frames stretched
• Then you also could improve drawing of the flames (see the Flash object transform tutorial and/or add more
keyframes. Finally, you could add motion tweens between the keyframes. I didn't do this since motion tweening is
not part of this tutorial.
Step 4 - Test and publish
• Test and enjoy :)
• Publish
Step 5 - Export as a video clip only
File->Export Movie will just save a *.swf Flash animation file (no HTML and JS).
There are two ways of exporting an *.swf movie.
58
Flash frame-by-frame animation tutorial
59
• "Normal", i.e. compressed. This means that when import this flash file into another flash file, you can't edit the
object anymore.
• "Uncompressed". This means that after you import the rocket you can edit it somewhat. To get this option, untick
Compress Movie in the settings dialog that will pop up.
Step 6 - Turn it into a movie clip symbol (optional)
You also can turn this whole animation into a movie clip symbol. This is best strategy if you want to build a library
of fully editable flash movie clips you can import into other animations. Also, as we shall point out later, you
actually could start by creating a movie clip symbol and then create an animation.
• Select all layers and frames (click on the first layer, then SHIFT-click on the last). Make sure that every frame and
layer in the timeline is black
• Copy all the frames (everything) Menu Edit->Timeline->Copy Frames
• Menu Insert->New Symbol. Tick the Movie clip option and give it a good name, e.g. "Rocket".
• Then you should be in Rocket editing mode and just see "Layer 1" on top
• Put the cursor in the first frame
• The paste the whole rocket code: Menu Edit->Timelines->Paste Frames
You now should see something like this:
Rocket animation made into a symbol
Next you can copy this symbol to another flash file which you may call my_library.fla. We just killed everything in
the file (except the symbol) and saved it under a different name (flash-cs3-rocket-symbol.fla)
Result
Now we have two versions of rocket *.swf move clipt that we can reuse in another Flash animations
• flash-cs3-rocket.swf [14]
• flash-cs3-rocket-uncompressed.swf [15]. This version also has the improved flames
In addition we have file *.fla file with just a rocket symbol inside. You can copy/paste symbols from one flash file to
another one.
• flash-cs3-rocket-symbol.fla [16]
Below is a short how-to re-use *.swf files , but you also can directly go and read the Flash motion tweening tutorial.
Flash frame-by-frame animation tutorial
60
Reuse frame-by-frame animations as movie clips
Reuse of swf files
The swf flash files we just created can be used as components in new Flash animation, although we would rather
recommend using embedded movie clips for that purpose.
The *.fla, *.swf and *.html files flash-cs3-rocking-hello.* can be found here: http:/ / tecfa. unige. ch/ guides/ flash/
ex/frame-by-frame-intro/
Step 1 - Import *.swf files into the library of a new Flash file
• Create a new flash file (File->New)
• Then import stuff you made: File->Import->Import to library
• Select the flash-cs3-rocket.swf file
• Do the same with the flash-cs3-shaking-hello.swf file
You now have a nice rocket and a flashing hello in your library:
Hello and rocket movies in your library
Step 2 - Drag the symbols (movies) to the stage
• Drag the item in the library onto the stage
• Now your rocket is too big :(
• No problem. Use the Free Transform tool to make it smaller and to rotate
• Hold down the SHIFT key when you resize it from a corner !
Here is the result:
Flash frame-by-frame animation tutorial
Hello and rocket movies used
Step 3 - Learn about motion animation
Of course, now you should do a moving animation with these flashing objects. See the Flash motion tweening
tutorial and before this enjoy the flying rocket:
http://tecfa.unige.ch/guides/flash/ex/motion-tweening-intro/flash-cs3-rocket-moving.html
Creation and reuse of embedded movie clips
Let us recall an important design principle. In the simple Rocket science example and in the others too, we created
the animation in the main time line. Alternatively, as explained in the beginning, you should first start by creating a
new symbol:
• Either create an initial drawing and then convert it to a movie clip symbol. Double click on an instance for editing
and creating the animation.
• Or use menu Insert->New Symbol to create a new one. Tick the Movie clip option and give it a good name, e.g.
"Rocket". Then you land directly in symbol editing mode and you can create an animation for just this object.
• Once you are done with symbol editing, double-click on "scene" in the edit bar (on top of the stage) or click on
the little "back arrow". Always make sure that know whether you edit just a symbol or whether you are in the
main timeline (the whole scene) !
Read more in the Flash embedded movie clip tutorial about creating and using embedded movie clips. This tutorial
will also introduce some ActionScript code that is needed to stop/start embedded animations.
Also remember that you can copy/paste anything from one *.fla file to another and this includes movie clips. So it's a
good idea to create somewhere a private library (a *.fla file) that includes all your major artwork.
61
Flash frame-by-frame animation tutorial
Links
Example materials
Example files used (including *.fla source) can be found here:
http://tecfa.unige.ch/guides/flash/ex6/frame-by-frame-intro/(CS6)
http://tecfa.unige.ch/guides/flash/ex/frame-by-frame-intro/(older CS3)
• Click on either an *.html or *.swf file to see.
• Get just the *.fla file if you want to make modifications. The standard copyright of this wiki applies.
References
[1]
[2]
[3]
[4]
[5]
[6]
[7]
http:/ / www. adobe. com/ devnet/ flash/ articles/ create-first-flash-document. html
http:/ / tecfa. unige. ch/ guides/ flash/ ex6/ frame-by-frame-intro/ flash-cs6-simple-fbf. html
http:/ / tecfa. unige. ch/ guides/ flash/ ex6/ frame-by-frame-intro/ flash-cs6-simple-fbf. fla
http:/ / tecfa. unige. ch/ guides/ flash/ ex6/ frame-by-frame-intro/ flash-cs6-rocket. html
http:/ / tecfa. unige. ch/ guides/ flash/ ex6/ frame-by-frame-intro/ flash-cs6-rocket. fla
http:/ / tecfa. unige. ch/ guides/ flash/ ex6/ frame-by-frame-intro/ flash-cs6-rocket-symbol. html
http:/ / tecfa. unige. ch/ guides/ flash/ ex6/ frame-by-frame-intro/ flash-cs6-rocket-symbol. fla
[8] http:/ / tecfa. unige. ch/ guides/ flash/ ex6/ frame-by-frame-intro/ stickman-cs6. html
[9] http:/ / tecfa. unige. ch/ guides/ flash/ ex6/ frame-by-frame-intro/ stickman-cs6. fla
[10] http:/ / tecfa. unige. ch/ guides/ flash/ ex/ frame-by-frame-intro/ flash-cs3-frame-by-frame-hello. html
[11] http:/ / tecfa. unige. ch/ guides/ flash/ ex/ frame-by-frame-intro/ flash-cs3-shaking-hello. html
[12] http:/ / tecfa. unige. ch/ guides/ flash/ ex/ frame-by-frame-intro/ flash-cs3-rocket. html
[13] http:/ / commons. uncyclomedia. org/ wiki/ Main_Page
[14] http:/ / tecfa. unige. ch/ guides/ flash/ ex/ frame-by-frame-intro/ flash-cs3-rocket. swf
[15] http:/ / tecfa. unige. ch/ guides/ flash/ ex/ frame-by-frame-intro/ flash-cs3-rocket-uncompressed. swf
[16] http:/ / tecfa. unige. ch/ guides/ flash/ ex/ frame-by-frame-intro/ flash-cs3-rocket-symbol. fla
62
Flash classic motion tweening tutorial
Flash classic motion tweening tutorial
Draft
Overview
Motion tweening means motion animation with interpolation as explained in the Flash motion interpolation
overview. In this article we present one of the possible methods, i.e. the so-called "classic motion tween".
Learning goals
Learn about classic motion animation, called simply motion tweening in CS3 and classic motion tweening in
CS4/CS5. Motion animation means moving an object from A to B, to C through keyframes that you define and
(sometimes) a user-defined motion path.
Add some simple shape transforms to the animated object
Learn how to to frame-by-frame animations with embedded movie clips.
Prerequisites
Flash CS3 desktop tutorial
Flash layers tutorial (first part)
Flash drawing tutorial (at least some of it)
Flash animation overview
Flash frame-by-frame animation tutorial (not absolutely needed, but probably useful)
Immediate next steps
Flash CS4 motion tweening tutorial (CS4, CS5)
AS3 TweenLite tweening engine (CS3-CS5, intermediate)
Moving on
Flash shape tweening tutorial
Flash animation summary
After that you should be ready for interactivity. E.g. do the Flash button tutorial
Quality and level
This text should technical people get going. It's probably not good enough for beginners, but may be used as
handout in "hands-on" class. That is what Daniel K. Schneider made it for...
It aims at beginners. More advanced features and tricks are not explained here.
Materials (*.fla file you can play with)
http://tecfa.unige.ch/guides/flash/ex/motion-tweening-intro/
In CS4, the motion tween tool has been replaced with an easier tool, but this tool is still available as "motion tween
classic" as explained further down.
63
Flash classic motion tweening tutorial
64
Introduction
If you want to work on your own project ...
In this tutorial we will mostly work with graphic and motion clip symbols. So the first thing you may have to do - if
you want to work on your own project - is to convert one of your graphics to either a graphic or a motion clip symbol
and to put it in a separate layer.
• Right-click on the object (click down the right mouse button) and then select Convert to Symbol .... Alternatively
just select the object and hit F8.
• Each object to be animated should be in a separate layer. All the other objects may remain in a single layer.
convert a select object to a symbol
So before we start, make sure that you have a least one graphic symbol, i.e. the object that you would like to move
around in your library. E.g. the library of the "cat example" we will build now contains this:
Library items (only graphic symbols)
Use of layers
You must use a different layer for each separate animation. If you plan to animate several of your objects, there is a
practical shortcut to distribute each object to a new layer:
1. Select objects you want to distribute into layers (e.g. with right-click->select all or shift-click on each object)
2. Then, Modify->Timeline->Distribute to layers
3. Finally, rename the layers in order to help you find things...
Motion tweens within movie clips
Instead of using the main timeline, we always recommend to consider creating animations within movie symbols.
This way you can easily reuse these animations in other Flash applications or play several animations at the same
time. E.g. you would have structure like this:
Main timeline (no animation)
Animation_clip (a movie clip with its own timeline)
Flash classic motion tweening tutorial
Animated_object (e.g. a motion tween) in a layer of Animation_clip
Animation of the animated_object (e.g. a frame-by-frame animation, etc.)
See the example at the end and also Flash embedded movie clip tutorial.
Introductory example - moving a cat
In this example, we will use the drawings made for the flash drawing tutorial and move one of the cats around. If you
want to reproduce what we do here, you can start from file flash-cs3-drawing-trees3.fla [1]. Objects you will need are
already in the library. I am aware that these drawings are ugly, but it makes these tutorials so much more human ....
Executive summary
The principle of motion tweening is quite simple:
(1) Firstly position an object in different locations at different times
• We call these positions keyframes in the timeline, since objects are frozen in different states.
• Btw, you also can change other features than just the position of an object (more later)
(2) Then, you have to apply some interpolation method (tweening) between the two keyframes, i.e. you tell the
computer to generate some in-between picture for each frame between the 2 keyframes in the timeline.
• Simple motion tweening is a linear path, i.e. the object will move on a line from x1,y1 to x2,y2.
• You can also apply a motion tween along a random path (but this is bit more complicated and we will introduce
this technique below).
Moving a cat from x to y
You should lock all other layers. This way you are sure not to edit by mistake a frame of another layer.
Step 1 - Create a a new layer and insert an object for animation
• Create a new layer and call it "animation cat" for example (see the Flash layers tutorial if you forgot how).
• Select this layer
• Put an tween-able object inside, e.g. drag it from your library onto the stage, or cut/paste or copy/paste from an
other layer or *.fla document.
• In our case we cut/paste the existing cat that was sitting in the lower left in the "Objects" layer.
• We move the object (cat) outside of the stage, because the cat in our scenario will move into the scene.
Remember, that you can not motion tween editable objects, so you need to turn a drawing into a symbol first.
So you should see something like this:
65
Flash classic motion tweening tutorial
The cat before animation. It sits outside the stage and waits
Now you already have a first keyframe for your animation. I.e. the cat is waiting in keyframe 1 to be moved.
Step 2 - Create a second keyframe
• Make sure that you still have the "animation cat" layer selected.
• Right-click somewhere in the timeline, e.g. at 20 and Insert Keyframe
• This will create a new keyframe and copy the contents of the keyframe before, i.e. contents of frame 1 just for
this layer.
• Drag the object (cat) to its final position, e.g. to the right and which can be outside the stage again.
Step 3 - Create the motion tween
• Click on a random frame between the two keyframes (still in the same layer)
• Then right-click and select Create Motion Tween. Alternatively, you also could have used the Tween pull-down
menu in the properties panel at the bottom and select motion.
Creation a motion tween with the right-click
menu
The timeline for the layer including this object should now include a solid line with an arrow (if it is dashed
something went wrong).
The result should look like in the screen capture below:
66
Flash classic motion tweening tutorial
67
• Between the two keyframes you see a solid line with an arrow (look at the "Animation cat" layer).
• You should see your object moved to a different position somewhere in the middle of the two keyframes.
Creating a motion tween for the cat
Step 4 - Replicate contents of the other layers
• As you could see in the screen captures above, the stage is empty, except for the cat. This is because all other
drawings for the other layers exist only for frame 1.
• For each other layer, right-click on frame 20 (i.e. in the position of your second keyframe) and hit F5 (Insert
Frame, not insert keyframe !)
• This will "stretch" your drawings from frame 1 to frame 20. The drawings still sit in frame 1, but they are carried
over up-to frame 20. This is shown in the timeline by a little white rectangle.
You now should have something like this:
The first result
Step 5 - Test it
• You can glide (left-right) the playhead (red rectangle on top of the red line that indicates the current frame in the
timeline). It will manually move the object through all positions within the interpolation path.
• Then try: menu Control->Test Movie or hit CTRL-Enter. This will open a popup window with a Flash preview.
Flash classic motion tweening tutorial
Step 6 - Tuning
You may find that the cat moves too fast. First thing you could do is lower the frame rate/second. Click on the
workarea and change the document properties. However, this will lead to a "jumpy" animation. It's a better idea to
use frame 50 instead of frame 20 as end-point.
• Drag the black dot in the animation layer from frame 20 to frame 50. Hold down the mouse on the black dot, wait
a bit and then drag.
• For the other layers: hit F5 in frame 50 (same as above).
• You also can accelerate/decelerate the cat's movement. Play with the "Ease" option in the Properties panel. Click
on layer "animation cat", then select an empty "between frame" somewhere. You now can make changes in the
tweening properties.
• If your cat moves in front instead of behind objects, then you can fix this by arranging the layers' order: Grab the
objects layer in the timeline panel and move it before or after the animation layer (i.e. pull it up or down).
Results
• You can look at my published result: flash-cs3-motion-tweening.html [2]
• You can grab all the files from this directory:
http://tecfa.unige.ch/guides/flash/ex/motion-tweening-intro/
Adding more motion tweens
We want the cat to move back where it came from.
Turning the cat
In our case we have an animation from left to right and the cat will leave the stage. Once it's off the stage we will
turn it so that it can walk back.
• Next to frame 50 I made a third key frame. Click on frame 51 and hit F6.
• Then turn the cat: Click on the cat and use menu Modify->Transform->Flip Horizontal)
Add a new motion tween
You can add more motion tweens to an object simply by repeating the procedure outlined above.
• Add a new fourth keyframe to the right, e.g. in frame 81. Simply hit F6 again.
• Right-click on an empty frame between keyframe 3 and 4 and add a motion tween as above
• Of course, you then also adjust the ending frame for the other layers as above (hit F5) in column 80.
In the screen capture below you can see that we now have several keyframes. In the "animation cat" layer you can
see several dots, each one represents a keyframe.
68
Flash classic motion tweening tutorial
69
Moving a cat
You can look at the published
flash-cs3-motion-tweening2.html [3]
result
(the
cat
will
walk
back
where
it
came
from)
here:
The directory including the *.fla file which you can load into your Flash and play with is here:
http://tecfa.unige.ch/guides/flash/ex/motion-tweening-intro/
Adding (some) motion shape tweening
In each frame you can change some properties of the moving object. In the next example, we will have the cat move
up on top of the hill. We want to implement 2 effects:
• The cat should become smaller (because it's further away)
• It should change color (because it's an effort to run up a hill).
Step 1 - Insert a new keyframe
• I inserted a new keyframe in frame 25 (i.e. between the first two existing key frames)
• In the (new) 2nd keyframe the cat was moved next to the other little one on top of the hill.
Step 2 - Change size of cat in keyframe 2
• Go to the frame (click on frame 25 or wherever yours is)
• Select the object (i.e. the little cat)
• Select the Free Transform Tool in the tools panel (see flash drawing tutorial), hold down the SHIFT key and drag
a corner.
Step 3 - Change the color of the cat in keyframe 2
• Go to the frame
• Select the cat
Flash classic motion tweening tutorial
• In the properties panel you can change the tint (a kind of color) of the cat.
Here is a screen capture. The animated cat is pink and sits next to the other cat. It's pink because moving up the hill
takes effort ...
Moving a cat and changing its size and color
You can look at the published result here: flash-cs3-motion-shape-tweening.html [4]
The directory including the *.fla file which you can load into your Flash and play with is here:
http://tecfa.unige.ch/guides/flash/ex/motion-tweening-intro/
Doing more informed work
Edit bar
If you have to do some frequent zooming you can display the Edit Toolbar (see the screen capture below).
• Get the edit toolbar: Window->Toolbars->Edit bar
This bar also will allow you to directly edit symbols you got in your library.
Onion skins
You can display the path an object will take by clicking one of the onion skin buttons in the Controller toolbar. This
is handy if you have several objects that move.
• Get the controller toolbar: Window->Toolbars->Controller and then click on either the Onion Skin or the Onion
Skin Outlines icon.
70
Flash classic motion tweening tutorial
71
Onion skins for the moving cat
Grids and rules
To achieve what we just did, you don't need these. But for more precise artwork you certainly will...
• Right-click somewhere on the workarea and play with Rules, Grids and Guides ...
Rotating animations
Instead of moving an object from point A to point B, you also can rotate it around point A. A good example would
be hands in a clock.
Step 1 - create the object to animate
• Create a separate layer for the object you want to rotate.
• Draw the object (and don't make any new keyframes yet)
• Transform it into a symbol (right-click and select graphic symbol).
Step2 - move the center point
• Then with the free transform tool move its center point somewhere else if you want. E.g. to rotate an hour hand
for clock move it towards and end (the center of the clock).
Flash classic motion tweening tutorial
Move the center point of the hour hand - Rotating
clock
Step 3 - make a motion tween
• Make a new keyframe, i.e.hit F6 in a new frame. You can leave the object where it is (depends on the aim of your
animation)
• Then create the motion tween (right-click anywhere in between the two keyframes)
• Now in the parameters panel select Rotate = CW (clockwise) as in the example shown in the picture. Btw
""CCW" would mean "countclock wise"
• If you want to rotate it more than once during the animation time, enter "XX times". E.g. we entered 12 for the
minute hand in the clock animation.
Motion tween around a center - Rotating clock
Clock example
If you want, you can:
• Look [5] at rotating clock example
• Or get the flash-cs3-rotating-clock.fla [6] file from http://tecfa.unige.ch/guides/flash/ex/
motion-tweening-intro/and play with it.
72
Flash classic motion tweening tutorial
You don't like my cats ? / Embedded movie clips
As we pointed out in the Flash drawing tutorial, you can import professionally made clipart into Flash. Furthermore,
you now should learn how to move animated objects, i.e. use so-called embedded movie clips. See also the Flash
embedded movie clip tutorial.
Use of embedded movie clips
Instead of using the main timeline to create all your animations, you also can animate so-called "movie clips", i.e.
instances of movie clips.
• Menu Insert->New Symbol
• Select Movie Clip (and give a good name)
• Double-click on this newly created movie clip in the library. You now can edit this object's own timeline.
Alternatively transform an object into a movie clip:
• Select the object (or use the lasso or another appropriate tool to select several objects)
• Right-click->Convert to Symbol; Select Movie clip
• Double-click on this object to edit.
There are two ways to edit a movie clip:
(1) In "stand-alone" view, i.e. you only will see the components of the movie clip. Double click on the movie
symbol's icon (not it's name) in the library. You now can edit, e.g. a add a motion animation or change its drawings.
Most of time, this editing mode is preferable.
(2) Edit with the scene as background. If you put an instance of the movie clip on the stage and then double-click on
this instance, you can edit the same movie clip symbol, but you will see the objects of the stage while you edit.
By editing a movie symbol you basically can do the all the stuff you have learnt so far, e.g. in the Flash
frame-by-frame animation tutorial. In other words, movie clips have their own timeline.
A pulsating moving sun
Let's now create a very simple animation, i.e. a pulsating sun that is moving from left to right in the sky. First, we
will make a simple motion tween of a yellow circle moving from left to right:
•
•
•
•
•
Create a new Flash fileand change the size to 800x200 pixels
Draw a yellow circle and put it to the left of the stage
Convert it to a movie clip symbol (Right-click->Convert to Symbol; Select Movie clip)
Hit F6 in frame 120 and move the circle that is now an instance of a movie clip to the right of the stage
Make a motion tween.
Then edit the sun symbol to create a frame-by-frame animation
Editing a movie clip symbol used in a motion
tween
• As you can see, we are editing the sun "symbol". Look at the Edit bar (that sits between the timeline and the
stage). It displays the editing hierarchy, i.e. "Scene 1" and "Sun".
• This frame-by-frame animation changes both the color and the size of the circle. Read the Flash frame-by-frame
animation tutorial if you don't know how to create frame-by-frame animations.
73
Flash classic motion tweening tutorial
74
Do not forget to go back to the main timeline (scene) once you are done, e.g. by double-clicking on the "scene" in
the edit bar (on top of the stage) or by clicking on the little "back arrow". When you edit a movie clip you are in
symbol edit mode and you should not add anything else by mistake. Make sure that you are aware at which level you
edit and where to place objects !
Finally you also may add a sky in the main timeline (e.g. with a gradient color, see the flash colors tutorial)
The example code is in the http://tecfa.unige.ch/guides/flash/ex/motion-tweening-intro/directory
flash-cs3-motion-tweening-sun.html [7]
flash-cs3-motion-tweening-sun.fla [8]
Note: we use embedded movie clips in many other tutorials. E.g. see ActionScript 3 interactive objects tutorial or
Motion tweening of an animated object chapter in the Flash animation summary or the Shape tweens of motion tween
elements chapter in the Flash shape tweening tutorial
I usually prefer this kind of animation, since I am more interested in creating interactive application (vs. video
clip-like animations). If you plan to learn this, you also should learn how to stop/play embedded movie clips, i.e.
trigger with the help of a button or something else an event that will movie_clip.play() and movie_clip.stop().
Use of swf movie clips in motion tweens
You can import ready made flash animations, e.g. a cat that would have moving legs. In the next chapter we use a
simpler animation that uses a rocket. Rocket making itself is described in the Flash frame-by-frame animation
tutorial.
To import a Flash movie as object: Use File->Import->Import to library You then will see the *.swf files as items
and you can drag them on the stage. With the Transform tools you then can adapt a few features (like size and
rotation) to your needs.
movie clip (*.swf) library items
If you want, you can:
• Look [9] at the flying rocket
• Or get the file flash-cs3-rocket-moving.fla from here:
http://tecfa.unige.ch/guides/flash/ex/motion-tweening-intro/
Don't worry about details of *.swf movie clip reuse. The motion guide tweens chapter below will show how to do
this in some more detail.
Flash classic motion tweening tutorial
Motion guide tweens
Instead of having an object move from one point to another in a straight path, we can make it follow an arbitrary path
we draw, i.e. a motion guide.
Note: In Flash CS4, there is a simpler alternative, i.e. you can easily create motion guides with the "normal" motion
tween tool.
Step 1 - Create a normal motion tween
• Like explained above, create two keyframes, i.e. one for start and one for the end. Each keyframe should contain a
copy of the same symbol (as above). Then insert a motion tween.
• This is important, else you will fail ...
Step 2 - Insert a motion guide layer
• Select the first keyframe and layer that starts your animation
• On the layer edit bar in the time line click on the little motion guide icon (looks like a slinky) or Right-click->Add
Motion Guide.
You should get something like in the capture below:
A Motion Guide layer
Step 3 - Draw the motion guide in the motion guide layer
• Make sure that you selected the motion guide layer you just created selected. You may lock the other layers and
just display their outlines.
• Then. with the pencil tool. draw the line your rocket has to follow. Use "Object mode" and "Smooth drawing"
from the tools panel controls (see the Flash drawing tutorial if you forgot how to use the pencil).
In the screen capture below, the motion guide would be the red (fatter) line on top of the hill's outline.
A rocket motion guide drawn with the pencil in the Motion Guide layer
75
Flash classic motion tweening tutorial
Step 4 - Snap the animated object to the start of the motion guide
• Unlock all layers
• Select the animation layer (not the motion guide layer !) and select your start frame.
• Then drag the object (i.e. our rocket) to the start of the line until the little white circle in the center of the rocket
will "snap" to the line. Just drag, don't click...
A rocket snaps to the motion guide
Step 5 - Snap it to the end
• Select the end frame first
• Then drag the object (the rocket) to the end of the line until it snaps. It should snap with the little white circle.
Step 6 - Orient to path
•
•
•
•
You can have the object tilt along the path if you want
Select the animation layer (not the guide)
Select a frame in between start and end
In the properties panel (bottom of the desktop), check the box "Orient to path"
If you want, you can:
• Look [10] at the flying rocket
• Or get the file flash-cs3-motion-guide-tweening.fla from here and play with it.
http://tecfa.unige.ch/guides/flash/ex/motion-tweening-intro/
Publishing and stopping an animation
Publish settings
When you publish a Flash animation, you should first choose the correct settings.
Step 1 - Get the settings
• Either click on an empty spot on the workarea, then hit the Publish button in the properties panel
• Or, menu File->Publish Settings
Step 2 - Choose the Flash version
If you want to make sure that your animation plays on most every computer, select Flash Player 8 (the previous
version). Otherwise Flash Player 9 is now widely deployed. You must select "9" if you use Action Script 3.
Step 3 - HTML
Then select the HTML tab (also in the Publish settings)
• You can untick the loop button (but see below for a more solid solution)
Step 4 - Hit the publish button
This will copy three files to the same directory where you *.fla file sits.
76
Flash classic motion tweening tutorial
• A *.swf
• A *.html
• A *.js
Copy all three to your website. Then you can edit the html file and add some more HTML if you like. (Make sure to
save copy of this HTML file, since when you publish again the html file will be overwritten).
Stopping an animation
We will improve a bit the flying rocket example, i.e. have the animation stop and display some friendly "Hello".
Step 1 -Create a new layer
• Create a new layer and call it "action"
Add a new keyframe for this layer
• Select the layer
• Right-click after the last frame of your animation and add Insert Blank Keyframe (in our case this is frame 21) or
hit F7.
Add some Action Script
• Hit the F9 button
• This will open the Actions-Frame panel in ActionScript 2 (you can dock it to the properties panel) or the Actions
panel in ActionScript 3.
• Insert this (in either AS2 or AS3):
stop();
• As you can see in the screenshot below, the last frame in the action layer has a little "a" in it. This means that
there is some scripting attached to it.
Fine tune
• In our case I dragged the Background layer to the right (or hit F5).
• Then I inserted a "Hello" movie into this last frame. I took the one we made in the Flash frame-by-frame
animation tutorial
Here is screen dump with the 2 new layers and the bit of ActionScript code.
77
Flash classic motion tweening tutorial
78
If you want, you can:
• Look [11] at the flying rocket plus the
flashing hello.
• Or get the file
flash-cs3-motion-guide-tweening2.fla
[12]
file from http://tecfa.unige.ch/
guides/flash/ex/
motion-tweening-intro/and play with
it.
Differences in CS4
In CS4 there is a new way of creating
motion animations which is easier. We
will document this some other day. In the
meantime, you should know that you still
can do "classic motion tweening" in CS4.
It works exactly in the same way. The
only (slight) differences ca be found in
the user interface for creating tweens and
motion guides:
Adding a short action script stop(); instruction to the action layer
• To add a tween between two frames in
a layer, select "Create Classic
Tween"
• To add a motion guide in CS4, right click on the layer name to the left of the newly created classic tween and
select Add Classic Motion Guide.
The same rules apply:
• Only symbols can be animated.
• Only one symbol can be on the stage per animated layer.
Attached two pictures:
Classic Motion tween in CS4
Now right-click on the layer name (not in the timeline itself !)
Flash classic motion tweening tutorial
Classic Guided Motion tween in CS4
Resources and discussion
Resources
• clipart
• Follow up the links in Flash and AS3 links - general and Flash and AS3 links - tutorials for other tutorials.
Daniel K. Schneider's opinion
I do have to say that I find the SMIL/SVG time-based animation model including its interpolation mechanisms more
elegant and simpler to understand. In SVG, you simply decide which property of the object (position, size, shape,
whatever) you want to animate and how interpolation should be done.
CS4 moved in the right direction, i.e. the standard motion tween now creates an "object" by itself...
In CS3, that kind of animation can be done in Flash through ActionScript programming. E.g. by using a tweening
library like TweenLite and its sister classes.
Software
Besides Flash from Adobe, certain animation software can export in Flash. I didn't find any software that can export
to *.fla, just *.swf. Therefore using such tools is ok if you just want to produce animations in an easier way.
E-Frontier products (commercial)
• E-Frontier home page [13]
• E.g. Anime Studio Anime Studio (Wikipedia) [14]
• Motion Artist
Toufee (free online software, needs registration)
• Toufee Home Page [23]
• Toufee [15] (Wikipedia)
• Toufee Wiki [16]
KToon (not tested)
•
•
•
•
Frame-by-frame animation drawing tool for Unix systems (including Linux).
Ktoon can export animations in Flash or a series of PNG images.
KToon Home Page [17]
KToon Wikipedia article [18]
79
Flash classic motion tweening tutorial
Links to Video Tutorials
You also can look at some of the videos you can find on the Adobe web site
• Video tutorials [19]
• Click in the top left window on "Flash CS3 Professional"
• Then view in particular "Creating animations with motion tweens" and "Understanding the timeline, keyframes
and frame rate.
Other Links
• Flash animation [20] (Wikipedia)
Materials used
(including the *.fla's)
Grab stuff from this directory:
http://tecfa.unige.ch/guides/flash/ex/motion-tweening-intro/
References
[1] http:/ / tecfa. unige. ch/ guides/ flash/ ex/ drawing-intro/ flash-cs3-drawing-trees3. fla
[2] http:/ / tecfa. unige. ch/ guides/ flash/ ex/ motion-tweening-intro/ flash-cs3-motion-tweening. html
[3] http:/ / tecfa. unige. ch/ guides/ flash/ ex/ motion-tweening-intro/ flash-cs3-motion-tweening2. html
[4] http:/ / tecfa. unige. ch/ guides/ flash/ ex/ motion-tweening-intro/ flash-cs3-motion-shape-tweening. html
[5] http:/ / tecfa. unige. ch/ guides/ flash/ ex/ motion-tweening-intro/ flash-cs3-rotating-clock. html
[6] http:/ / tecfa. unige. ch/ guides/ flash/ ex/ motion-tweening-intro/ flash-cs3-rotating-clock. fla
[7] http:/ / tecfa. unige. ch/ guides/ flash/ ex/ motion-tweening-intro/ flash-cs3-motion-tweening-sun. html
[8] http:/ / tecfa. unige. ch/ guides/ flash/ ex/ motion-tweening-intro/ flash-cs3-motion-tweening-sun. fla
[9] http:/ / tecfa. unige. ch/ guides/ flash/ ex/ motion-tweening-intro/ flash-cs3-rocket-moving. html
[10] http:/ / tecfa. unige. ch/ guides/ flash/ ex/ motion-tweening-intro/ flash-cs3-motion-guide-tweening. html
[11] http:/ / tecfa. unige. ch/ guides/ flash/ ex/ motion-tweening-intro/ flash-cs3-motion-guide-tweening2. html
[12] http:/ / tecfa. unige. ch/ guides/ flash/ ex/ motion-tweening-intro/ flash-cs3-motion-guide-tweening2. fla
[13] http:/ / www. e-frontier. com/
[14] http:/ / en. wikipedia. org/ wiki/ Anime_Studio
[15] http:/ / en. wikipedia. org/ wiki/ Toufee
[16] http:/ / www. toufee. com/ wiki/ index. php/ Main_Page
[17] http:/ / ktoon. toonka. com/
[18] http:/ / en. wikipedia. org/ wiki/ KToon
[19] http:/ / www. adobe. com/ designcenter/ video_workshop/
[20] http:/ / en. wikipedia. org/ wiki/ Flash_animation
80
Flash CS6 motion tweening tutorial
Flash CS6 motion tweening tutorial
Draft
Overview
Motion tweening means motion animation with interpolation.
Learning goals
Learn about basic motion animation
Add some simple filter transforms (e.g. size, color) to the animated object
Learn how to use frame-by-frame animations within embedded movie clips.
Prerequisites
Flash CS4 desktop tutorial or Flash CS6 desktop tutorial
Flash layers tutorial (first part)
Flash drawing tutorial (at least some of it)
Flash frame-by-frame animation tutorial (not absolutely needed, but probably useful)
Flash motion interpolation overview
Moving on
Flash shape tweening tutorial
Flash animation summary
Flash embedded movie clip tutorial (explains in some more depth how to use embedded clips)
After that you should be ready for interactivity. E.g. do the Flash button tutorial
Quality and level
This text should technical people get going. It's probably not good enough for beginners, but may be used as
handout in "hands-on" class. That is what Daniel K. Schneider made it for...
It aims at beginners. More advanced features and tricks are not explained here.
Materials (*.fla file you can play with)
http://tecfa.unige.ch/guides/flash/ex6/motion-tweening-intro/
Alternative version
Flash classic motion tweening tutorial (CS3 style animation)
Flash CS4 motion tweening tutorial (similar, but less)
Introduction
Wikipedia [1], retrieved May 28 2009 defines tweeing as “Inbetweening or tweening is the process of generating
intermediate frames between two images to give the appearance that the first image evolves smoothly into the second
image. Inbetweens are the drawings between the keyframes which help to create the illusion of motion.
Inbetweening is a key process in all types of animation, including computer animation.”.
In this tutorial we will introduce Flash CS4/CS5/CS6 motion interpolation. See also Flash animation overview and
the Flash classic motion tweening tutorial
Built-in motion tweens are applicable only to "heavy" Flash objects, in particular instances of movie clip symbols
and text fields. Other types of objects (e.g. drawings or shapes) must first be wrapped into a symbol when
interpolation is applied to them. We suggest that you should not let Flash do this, i.e. think ahead and and transform
81
Flash CS6 motion tweening tutorial
drawings into symbols beforehand.
In Flash, a symbol can be a graphic, a button or movie clip created that is reusable in the same document or in
others. Each symbol that you use/create is inserted into the library. The symbol itself is never directly used in an
animation, you always must create an instance. In practical terms this means that you must drag the object from the
library to the scene, then give it a name as discussed below.
For a programmer, a symbol can be understood as a kind of class (i.e. a generic object). To learn more, read Flash
embedded movie clip tutorial. You also can use symbols as classes in ActionScript code, e.g. create an instance and
insert it into the scene
You only can animate one single instance of a symbol in the same layer. You later can of course replace the graphics
inside. If you want to create animations with multiple objects, use either multiple layers or embedded movie clips.
When the interpolation includes a trajectory (as opposed to a rotation for example), a "motion path" will appear on
the stage. This path shows the position of the object in each interpolation frame. In each frame, you can change the
position of the object and the interpolated trajectory will change. To do so, just drag the object to another position.
This will create new keyframes and therefore modify the path.
Finally in each keyframe (starting, ending and those that you added), you also can transform other properties of the
object, for example: size, rotation, tint, 3D position etc.. It is important to understand that you will not change the
graphic itself, but rather just apply a "filter" to it.
Traditional Flash desginers create all animations in the main timeline (scenario). The scenario will then be divided
into sequences, called scenes. A modern Flash developer rather would tend to place individual animations within and
embedded "movie clip" and then place those clips in space and time. As explained in the Flash frame-by-frame
animation tutorial, a movie clip symbol has its own timeline. It also may include other movie clips. For example: you
could create a movie clip called "bird animation. In this movie clip, you could create a moving object ("bird") which
in turn would flap its wings. These wings are are again symbols embedded at a third level and we will have a the
following hierarchy: Bird animation -> Bird -> Wings.
Create a simple motion tween
Let's now look at an example:
You can download the following file that already contains the objects
• flash-cs-4-motion-tweening-empty.fla [1]
Solution:
• flash-cs-4-motion-tweening.html [2] (already admire the result)
• flash-cs-4-motion-tweening.fla [3] (the solution, do not cheat if you want to learn using this example !)
Step 1: Prepare the object to animate
Important: Each object must be interpolated in a different layer and that object must be a symbol.
If you do not have symbols in your library, this is a procedure:
(1) Create a new layer
(2) In this layer, draw a picture using any drawing tools, images etc.. you want.
(3) transform the drawing into a symbol. If you do not, Flash will do it for you and not necessarily the way you
like. So even if Flash provides all sorts of help to unite the selected objects and to create layers for each symbol, do
not let Flash do that work for you! To create a symbol which will be placed in the library and create a instance on
the stage:
• In the layer with your drawings select all objects on the stage. Then right-click and Create Symbol. Select "Movie
Clip" because this type of symbol is the most powerful.
82
Flash CS6 motion tweening tutorial
• Make sure it is no unwanted object in the scene for this layer. If you want to create a symbol from drawings that
extend over many layers, the procedure is the same, just make sure that you only select wanted elements.
Step 2: Create the interpolation animation (motion tween)
First select the object (symbol instance) on the stage
Then do one of the following:
• Menu Insert> Motion Tween
• Right-click (Windows) or Ctrl-click (Macintosh) on the object or the current "frame" and choose Create Motion
Tween.
In the following screenshot we show how to add a motion tween to an "Raising Sun" symbol of the "Sun" which is in
the library.
Right-click on the sun, then Create Motion
Tween
Flash now creates a motion tween span with an interpolation of 24 frames (default). Span refers to the range of the
interpolation, from the beginning to the end. By default 24 frames last one second at the default frame rate of 24
FPS.
Step 3: Create the motion path
The control (slider) in the timeline (scenario) was placed in the last frame. Now move the object to a new position.
A motion path (trajectory) appears on the scene. The motion path shows the trajectory of interpolated images during
the tween span. For now, we see just a straight line that connects the first frame to last. You can change this
interpolation path to create a more interesting one.
Once done, you'll see this:
In the last frame, the sun shot into a new position
To see the object moving along the route:
• Move the control (rectangle) in the red timeline to the left and right
• Or already view the results : Press CTRL-Enter (or menu Control-> Test Movie).
83
Flash CS6 motion tweening tutorial
Notes: If the object is not "tweenable" object, or if multiple objects are selected on the same layer, a dialog box
appears. The dialog box allows you to convert the selection to a movie clip symbol. If the object to be interpolated is
the only item in the layer, Flash will add the motion tween span to the same layer. If there are other objects on the
layer, Flash creates multiple layers, each containing an object an its tween.
• If the original object sits in the first frame of the scenario and the frame rate is 24 frames per second, the span will
contain 24 frames. If the original object was present in more than one adjacent frames, the span of the
interpolation will spread from first to last frame.
Step 4: Adjust the length and extend the other layers
To adjust the duration: Drag either end of the tween span in order to shorten or to lengthen the span. You also can
move the span to the right or left.
Before doing so, we advise you to adjust the other "layers" to the same length, otherwise the screen does not display
background. A simple method: Select a layer with a background, click in the last frame (eg. 24) and press F5. F5 is a
shortcut to insert a static frame (ie a frame without drawing). In other words, a static frame simply extends the
duration of the first found keyframe left. If you see "white" in a layer, this means that no image will appear. See also
the screenshot for step 6, which shows an animation with 2 layers for the background ("Hills and Sky" and a layer to
interpolation ("Sun").
Step 6: Adjust the path
Now you can change the motion path using two methods.
• Firstly you can add keyframes that define intermediate positions. Select a frame, then drag the object. E.g. you
could start by adding one in the middle. A little diamond in the "tween layer" indicates a keyframe. The motion
path will change accordingly.
• Then you also can directly make changes to the motion path graph. We suggest you use the selection (deselect
everything first) or the subselection tool to to this.
Additions keyframes and realignment
Important: If you want to adjust the position of the object in a frame, remember to first click into a frame in the
animation layer, otherwise you will do damage elsewhere.
Step 7: Transformations of the object
In each keyframe, you can now make changes. These transformations are grafted onto the object, but does not alter
the "symbol" itself. For this reason, using drawing tools will "not work".
To start, we advise you to use two types of transformation:
• Change size or rotation
• Change hue (color effect)
For both, follow these steps:
• Select a frame or a blank keyframe first, then click on the object
• Then change the values in the properties panel (Ctrl-F3 if not already visible).
Alternatively, you can also use the Free Transform tool
84
Flash CS6 motion tweening tutorial
Transformations with the properties panel
You also can add filters (bottom panel properties) and finally, you also can add 3D rotations or positions with the 3D
Translation tool and the 3D Rotation Tool in the tool panel.
Step 8: Other Adjustments
Animation may be too fast. To slow down, there are several options:
• Decrease the frame rate (fps). Default CS4 use 24. Click outside the stage somewhere and change the fps in the
properties panel (FPS: 16 for example). This would give it a more jerky quality (thus try to avoid).
• Lengthen the span, eg 60 frames. Just pull the tween layer and then with F5 to extend the other layers.
• You'll also can see that the sun's movement is not very regular. This is because we pulled into the sun keyframe
left or right instead of moving only vertically. Try to adjust this.
The motion editor
The editor allows to move all kinds of operations that are difficult to do on the stage. It is a fine tuning tool that may
not be necessary for your project.
Basic use
Step 1: Open the Motion editor
• Windows Menu -> Motion Editor
• It is advisable not to fix it within the workspace, because it contains a lot of controls. Pull the panel until you see
everything.
Step 2: Adjust the visible frames
• Bottom left: Adjust the "Visible Frames" to a necessary maximum.
Here is a screenshot of the editor and motion which shows our sun example.
85
Flash CS6 motion tweening tutorial
86
The motion editor of CS4
You can, for example:
•
•
•
•
Adjust the X position in a keyframe by pulling up or down the control (or by entering precise coordinate)
Fit a transform, eg size
Right-click on a keyframe to kill it
Moving laterally a keyframe in the Timeline
Flash CS6 motion tweening tutorial
The motion controls of the editor
The controls of this tool are not too difficult to learn. Just know that moving up / down means decrease / increase
value. Moving laterally moving means moving in the scenario (timeline).
The motion controls of the editor: Source: Editing property curves with the Motion Editor, Adobe, accessed 30/09/2009
A. Property values (for editing finely ...)
B. Reset Values button (back, takes everything as a group)
C. Playhead (to move in the timeline)
D. Property area curve
E. Previous Keyframe button (keyframe preceding navigated)
F. Add or Remove Keyframe button (add or remove a keyframe). Otherwise right-click.
G. Next Keyframe button (keyframe navigated suvi)
Each property that we can animate has his own graphic in this tool. You can open / close a group of properties to
save space and enlarge / reduce the graph. Also, if you click in the properties panel on the left, the display space
for the curve will grow.
87
Flash CS6 motion tweening tutorial
88
The motion editor of CS4 - values change
Here is a slightly modified file (and the right state of motion editor). It has smoothed the curve a bit, killed a
keyframe animation and inverse size (the sun is now smaller when it is up).
Final Solution:
• flash-cs-4-motion-tweening.html [4] (solution adjusted slightly
• flash-cs-4-motion-tweening.fla [5]
Fine tuning and replacing the motion path
Let's now fine tune the trajectory.
Editing curves
We have already seen that we can add a keyframe in different ways:
• Right-click in an empty frame of a tween layer in the timeline. Then select Insert Keyframe and select the type.
• Move the symbol of a motion tween layer in the timeline
• Use the motion editor.
According to Adobe's Flash CS6 manual, you can edit or change the motion path of a motion tween in the following
ways:
• Change the position of the object in any frame of the tween span. Move the playhead and the just move the
symbol using the selection tool
• Move the entire motion path to a different location on the Stage. Select and drag it.
• Change the shape or size of the path with the Selection, Subselection, or Free Transform tools.
• Change the shape or size of the path with the Transform panel or Property inspector.
Flash CS6 motion tweening tutorial
•
•
•
•
Use the commands in the Modify -> Transform menu.
Apply a custom stroke as motion path (copy/paste)
Use the Motion Editor.
Reverse start/and end (right-click)
Adjusting the rough shape of the motion path with the selection tool
• Click on the selection tool
• Click on the object that is being animation (e.g. the rocket)
• Drag segments without selecting them ! Watch out for the "moon" cursor
Fine tuning with the subselection tool
• Click on the Subselection tool
• To move a control point, drag it with the Subselection tool.
• To adjust the curve of the path around a control point, drag the Bezier handles of the control point with the
Subselection tool.
• If the handles are not extended, you can extend them by Alt-dragging (Windows) or Option-dragging (Macintosh)
the control point.
• To delete an Anchor point click on it with Delete Anchor Point tool that sits underneath the pen tool. Most anchor
points generated with Selection tool are so-called smooth points.
• To convert an anchor point click on it with 'Convert Anchor Point tool that sits underneath the pen tool in the
tools panel. The anchor changes to an angle point.
Locating the Delete Anchor point and convert
anchor point tools
A short definition of anchor points
• A "smooth point" smoothes two connected curves.
• A corner point only lets you change one end.
Btw, you also can use the subselection tool in the Motion Editor
• Right-click to change to define the nature of the point (corner, or smooth point)
• For smooth points, you then can drag the Bezier controls
Here is a screenshot of the Adobe CS4 manual that illustrates this principle:
89
Flash CS6 motion tweening tutorial
90
Controls "Bezier" the motion editor to the transformations: Source: Editing property curves with the Motion Editor, Adobe, accessed 09/30/2009
. The graphics of CS6 is a bit different, but the principle is the same.
Replace the path animation
There are two possibilities:
(1) Using Flash Motion presets.
• Open the panel Window-> Motion Presets
• Play with different versions
• Click on Apply (Flash will ask if you want to replace the ancient route)
(2) Copy / paste a line
• In another layer, draw a path, with a beginning and an end and no fills (fills). E.g. use the pencil tool.
• Copy and paste this path into the motion tween layer (then kill your drawing, or put in the library).
Tip: If you want a perfect circle, star, etc.: To the drawing with the Oval tool, polystar.', etc. but without fill. Then
use the eraser to a very small incision to obtain a beginning and an end, i.e. a path.
Drawing tool designed polystar
Here is the result of "cutting and pasting" a polystar drawing into the motion tween layer:
Flash CS6 motion tweening tutorial
Drawing interpolation movement is the tool
polystar
Create a motion path for an animated object
Let's now enhance the moving sun animation.
• We want the sun pulsating, i.e. change color and size in regular intervals
• Add a motion animation using the rocket from the Flash frame-by-frame animation tutorial
(flash-cs6-rocket-symbol.html [6])
This is a fairly simple task. We just need to add an frame-by-frame animation to the sun and then create a new
motion tween for the rocket. For the rocket we will have to substitute the flight path and also adjust rotation in
various locations.
If you plan to work along while you read, we suggest starting either from:
• flash-cs-6-motion-tweening-empty.fla [6] (only includes a sun)
• flash-cs6-motion-tweening.fla [7] (includes the sun animation)
• A rocket movie clip [6] can be found in the library of flash-cs6-rocket-symbol.fla [7]
Look at the result:
• flash-cs-6-motion-tweening-a-clip.html [8]
Below is a screenshot explaining the architecture
91
Flash CS6 motion tweening tutorial
92
Two motion tweens using 2 embedded movie clips
Flash CS6 motion tweening tutorial
93
Adding a frame-by-frame animation to the sun
• Double click on the sun (either on the clip in the library or else on the instance on the scene)
• Add the frame-by-frame animation. If you don't know how, read the flash frame-by-frame animation tutorial
Creating a frame-by-frame animation for the Sun
Adding a motion tween for the rocket
Get the rocket clip
• Open file flash-cs6-rocket-symbol.fla [7]
• Copy the rocket clip (Select in the library and CTRL-C)
• Paste into the library of the sun animation
Create a motion tween for the rocket
Now do the animation as before ....
•
•
•
•
•
Create a new layer called "Rocket motion" or similar
Select this frame
Drag the rocket on the scene
Hit CTRL-ALT-S and make it about 20%
Move the rocket either to the left (easier) or to the right
Create the motion tween
• Create the motion tween (click-right on rocket ....)
• Go to the last frame and drag the rocket over there. You know should see a linear flight path
• Adjust the flight path using the selection or the subselection tools (see explanations above ...)
For creating a new the path, you also could use the following (easier) procedure
Flash CS6 motion tweening tutorial
•
•
•
•
•
•
94
Create a new layer called "temp"
Lock all layers, except "temp"
Draw the flight path with the pencil tool
Copy the path
Paste in place (CTRL-SHIFT-V) into layer "Rocket motion" (unlock it first)
If the rocket flies from right to left, get the selection tool, right-click in the tween span and select
Motion-Path->Reverse Path (!)
Adjust the rotation of the rocket in the path
(a) Automatic
• Select the motion path
• Change the setting in the properties panel to auto-rotate
(b) Adjust the rotation of the rocket manually creating some keyframes
•
•
•
•
Move the playhead to the start (either left or right)
Select the Free Transform tool
Move the rocket a bit and adjust rotation. This will create new keyframe that you can see in the timeline
Repeat that a lot until the rocket flies smoothly ...
Adjust rotations
Solution
• flash-cs-6-motion-tweening-a-clip.html [8]
• flash-cs-6-motion-tweening-a-clip.fla [9]
Flash CS6 motion tweening tutorial
Links
• Creating a simple Flash animation [10] by Doug Winnie, Adobe, 2 / 2009. (retrieved Jan 2013)
• Animation Learning Guide for Flash [5] (CS 5.5, ok link as of Jan 2013).
• Exploring motion tweens [11]
• Manipulating motion tweens [12]
• Using motion paths in animations [13]
• Using the Motion Editor [14]
• Animating with preset and custom eases [15]
• CS6 Help PDF (17 MB) [16] (Ok reference, but the above links are better for beginners) (retrieved Jan 2013)
• Flash Professional / Drawing in Flash [17] (retrieved Jan 2013)]
References
[1]
[2]
[3]
[4]
[5]
http:/ / tecfa. unige. ch/ guides/ flash/ ex4/ motion-tweening-intro/ flash-cs-4-motion-tweening-empty. fla
http:/ / tecfa. unige. ch/ guides/ flash/ ex4/ motion-tweening-intro/ flash-cs-4-motion-tweening. html
http:/ / tecfa. unige. ch/ guides/ flash/ ex4/ motion-tweening-intro/ flash-cs-4-motion-tweening. fla
http:/ / tecfa. unige. ch/ guides/ flash/ ex4/ motion-tweening-intro/ flash-cs-4-motion-tweening-adjusted. html
http:/ / tecfa. unige. ch/ guides/ flash/ ex4/ motion-tweening-intro/ flash-cs-4-motion-tweening-adjusted. fla
[6] http:/ / tecfa. unige. ch/ guides/ flash/ ex6/ motion-tweening-intro/ flash-cs-6-motion-tweening-empty. fla
[7] http:/ / tecfa. unige. ch/ guides/ flash/ ex6/ motion-tweening-intro/ flash-cs-6-motion-tweening. fla
[8] http:/ / tecfa. unige. ch/ guides/ flash/ ex6/ motion-tweening-intro/ flash-cs-6-motion-tweening-a-clip. html
[9] http:/ / tecfa. unige. ch/ guides/ flash/ ex6/ motion-tweening-intro/ flash-cs-6-motion-tweening-a-clip. fla
[10] http:/ / www. adobe. com/ devnet/ flash/ articles/ animation_intro. html
[11] http:/ / www. adobe. com/ devnet/ flash/ learning_guide/ animation/ part05. html
[12] http:/ / www. adobe. com/ devnet/ flash/ learning_guide/ animation/ part06. html
[13] http:/ / www. adobe. com/ devnet/ flash/ learning_guide/ animation/ part07. html
[14] http:/ / www. adobe. com/ devnet/ flash/ learning_guide/ animation/ part08. html
[15] http:/ / www. adobe. com/ devnet/ flash/ learning_guide/ animation/ part09. html
[16] http:/ / helpx. adobe. com/ pdf/ flash_reference. pdf
[17] http:/ / help. adobe. com/ en_US/ flash/ cs/ using/ WSd60f23110762d6b883b18f10cb1fe1af6-7e8aa. html
95
Flash shape tweening tutorial
Flash shape tweening tutorial
Draft
Overview
Shape tweening means transforming an object from one state into an other. This is usually called morphing.
Learning goals
Learn how to create basic Flash 9-11 (CS3-CS6) morphing, i.e. shape tweening.
Learn how to use shape hints
Learn how to use shape tweens within embedded movie clips
Prerequisites
Flash CS4 desktop tutorial or Flash CS6 desktop tutorial
Flash layers tutorial
Flash drawing tutorial
Flash object transform tutorial
Flash frame-by-frame animation tutorial or Flash motion tweening tutorial
Moving on
The Flash article has a list of other tutorials.
Quality
This text should technical people get going and may not be good enough for self-learning beginners. It can be
used as handout in a "hands-on" class. That is what Daniel K. Schneider made it for. Some examples should be
updated to CS6. However they do work.
Level
It aims at beginners. More advanced features and tricks are not explained here.
Materials (*.fla file you can play with)
http://tecfa.unige.ch/guides/flash/ex6/shape-tweening-intro/
Alternative version
Flash CS3 shape tweening tutorial
Introductory example
The principle
You can transform any form (shape) into any other form. Shape tweens work on so-called editable objects, e.g. it
will not work with symbols or grouped objects. You may shape tween:
• Drawing objects (drawings made in object mode)
• Shapes (drawings made in merge mode)
Also, as in motion tweening, the object(s) to be shaped must be in a separate layer.
Step 1 - Draw an object
• We draw an oval with a thick border with the Oval tool and also set the background.
• Then we center the oval in the stage. To do so, use the Align panel (Window->Align, or hit Crtl-K)
• Check to stage and click on the Align icons until you get it right :)
96
Flash shape tweening tutorial
97
You should have something like this:
A starting frame with an Oval to be morphed
Step 2 - Insert a new blank keyframe
• Select about frame 20 and hit F7 or right-click on frame 20 and select Insert Blank Keyframe. Do not use "Insert
Frame" / "Insert Keyframe" (F6))
F7 will insert an empty new Keyframe
Step 3 - Add a new object to the new keyframe
In this frame, draw a new object, i.e. we inserted a Polystar, also in object mode.
• Select the Polystar tool (It sits below the rectangle tool and you must hold down the mouse to get at it)
• Then, in the properties panel, select from the Options pull-down menu: Star and Number of sides = 9
• Then, draw it by dragging out the mouse
Flash shape tweening tutorial
Configuring the polystar tool for a star with 9
points
Step 4 - Change its shape and align it with the oval and the stage
Then make it a bit "oval" and adjust it more or less to the size of the oval
• Change the width (in the Properties panel or with the Free Transform tool)
• Align with the oval: To see the oval at the same you can click on the "Edit multiple frames" icon in the Timeline
control bar and drag the onion skin marker on top of the timeline all to the left
• To achieve a perfect centering, use the Align panel. Read Flash arranging objects tutorial if needed.
You should achieve something like this:
A polystar
Step 5 - Change colors of the polystar
• Firstly, untick the "Edit multiple frames" icon !!
• Then you can change the colors of the stroke and the fill
Step 6 - Morph
• Right-click on an empty frame between the two keyframes and select Create Shape Tween
• Alternatively you also could click into an emtpy frame and select Shape Tweenin the Insert menu on top
98
Flash shape tweening tutorial
Create a shape tween between two keyframes that
contain editable graphics
Step 7 - Repeat the other way round
• Insert a new empty keyframe around frame 40
• Copy the picture from frame 1 (select it and hit CTRL-C in frame 1)
• Paste-in-place it to the empty keyframe (CTRL-SHIFT-V)
• Add the shape tween as above
Test;
• Move around the playhead
• Menu Control->Test Movie
If the animation is too fast, drag the keyframes to the right
• Click on the keyframe first. You should see a cursor with a rectangle
• Only then you can drag.
Extend shape tween span by dragging the second
keyframe
Done :)
Result and source
You can admire the result [1]
Source: flash-cs6-shape-tweening-intro.fla [2]
Directory: http://tecfa.unige.ch/guides/flash/ex6/shape-tweening-intro/
Trouble shooting
If CS6 refuses to create a shape tween, you probably work with a symbol (e.g. a movie clip or a graphic symbol) or
another non-editable object. Forget it, it won't work !. To extract the graphics from a symbol instance:
Right-click->Break apart or double click on the symbol or symbol instance to enter symbol editing mode, then copy
paste the graphics you need.
Some design tips
• You should consider doing a shape transform in several steps, i.e. use several shape tweens in a row (for the same
shape) or use shape hints. This wasn't done here.
99
Flash shape tweening tutorial
100
• For smooth shape tweening, working with objects without borders (strokes) is usually a better choice. (set the
stroke color to none, e.g. the white rectangle with a red diagonal bar). Also, unbreak graphics until the whole
thing becomes a shape. You always can make it graphic again by "union" it (Modify->Combine Objects->Union).
• You can put several shape tweens in different layers.
• Do not use shape tweening for simple re-sizing animations. A motion tween can do that. Simply use the free
transform tool to change the size (width/height) of the tweened symbol in some keyframes.
Morphing traced bitmaps
To morph images there are two kinds of solutions:
• Break images apart (right-click on the picture). This turns it into a shape. You then can make a copy of it and
manipulate all sorts of things (e.g. size, colors, e.g. with the lasso tool and the magic wand).
• Trace images, i.e. turn them into vector graphics.
See the Flash bitmap tracing tutorial for some ugly examples or portrait morphing.
Morphing an egg into dragon clip
In this animation I used an embedded movie clip with the following procedure
Step 1: Main timeline layers and creation of a Movie clip symbol
•
•
•
•
Created a background using grading colours (Read the flash colors tutorial)
Created a new layer called "Dragon Animation"
Created a grey egg with the oval tool (no borders)
Created a movie clip symbol from this drawing. Named it "Dragon clip".
Main time line setup: 1 Layer for the background, 1 layer for the dragons (no animation)
Step 2: Movie clip that includes the shape tween
Flash shape tweening tutorial
•
•
•
•
•
•
•
101
Double click on the Dragon clip symbol the scene to edit this embedded movie clip
The Dragon was found on openclipart.org [3] and made by Ivo Grimaldi [4]
Created a new empty keyframe in frame 72
Open the Dragon SVG in Illustrator, Select All, Copy, and Paste to Flash CS6
Break apart several times until only the shape remains
Remove the eyes
Create the shape tween as above
Editing the Dragon Movie Clip symbol
Step 3: Adjustments
•
•
•
•
Go back to the scene (click on "Scene 1)
Drag more dragon clips to the Scene
Adjust their size (press ALT-CTRL-S) and position...
Add an ActionScript 3 command to stop the animation: Select frame 72, hit F9, then type stop ();, hit F9 again.
Use another layer if you prefer clean code...
Files
• flash-cs6-shape-tween-dragon-egg.html [5]
• flash-cs6-shape-tweening-intro.fla [2]
• Directory: http://tecfa.unige.ch/guides/flash/ex6/shape-tweening-intro/
Flash shape tweening tutorial
Shape hints - where should shapes go
In order to create some slightly better shape animations you can give Flash hints where a shape should go. “Shape
hints identify points that should correspond in starting and ending shape. For example, if you are tweening a drawing
of a face as it changes expression, you can use a shape hint to mark each eye. Then, instead of the face becoming an
amorphous tangle while the shape change takes place, each eye remains recognizable and changes separately during
the shift.” ([6], retr. nov 2008)
•
•
•
•
Select the first keyframe
Create one or more shape hints (Modify->Shape->Add shape hint) or hit CTRL-SHIFT-h.
You will see some little letters that appearing
Then, drag these onto borders of the shapes in a keyframe until they "snap", i.e. to points (places) of a shape
outline that you want to "move" gracefully to another place in the next keyframe.
• Repeat this in the next keyframe of this shape tween. Drag the shape hints to places on the border where the initial
points should go.
Notice: If the shape hints disappear, hit CTRL-ALT-H.
Example - shape hints for letters and webdings
• Look first at the live Shape hints [7] example.
Correctly applied shape hints for the first letter
Correctly applied shape hints for the second letter
The shapes have been made with the the text tool. Since characters are not shapes, you will have to break apart a
text (right-click menu). The heart and the forbidden sign was mad with the webdings font. Read webdings and
wingdings in order to learn about these very special fonts.
Source: shape-tweening-intro/flash-cs3-shape-hints.fla [8]
Bad example
Let's now look at a bad example. To do shape hinting right, each morphed shape should be in a different layer if I
understand right and they should be attached to borders. In the following example they sit on the shape and do
nothing at all. (Yes I know I should fix this, but did not have time)
102
Flash shape tweening tutorial
103
Below are three screen captures for keyframe 1, keyframe 2 and keyframe 3 of an animation that starts with a tear on
top. It then separates into 2 tears. In the third keyframe one becomes a hill and the other one morphs into a tree. It
almost looks good, as you can see [9]
Shape hints in Flash CS3
No shape hint in first keyframe
Unused shape hint in middle keyframe
Unused shape hint in last keyframe
Results and source:
• Admire the result [9]. It's absolutely dreadful (Ok it was done in 5 minutes ....)
flash-cs3-shape-tweening-hints.fla [10]
Source directory: http://tecfa.unige.ch/guides/flash/ex/shape-tweening-intro/
Remember how to view all shape hints
Shape hints will disappear from view when edit something.
• Select the layer(s) within which you have shape hints and select View->Show Shape Hints or hit CTRL-ALT-h
• Notice: To add new shape hints, press CTRL-SHIFT-h.
Alternative example
• Flash Professional / Shape tweening [11], Adobe, retrieved jan 2013.
In the Flash bitmap tracing tutorial we tried shape hints for a portrait morphing. A 2-color portrait was morphed into
another. Some objects were given shape hints.
Fla file: flash-cs3-shape-picture-morphing2.fla [12]
Directory: http://tecfa.unige.ch/guides/flash/ex/shape-tweening-intro/
Shape tweens of motion tween elements
A simple motion animation with 2 shape changing objects
To use a shape tweened object in a motion tween animation, you simply could save a shape tween as *.swf (Flash)
and then import as movie. But you also can draw everything in the same *.fla file using embedded movie clips as we
have seen above using the simple Egg/dragon animation.
The following example was made in Flash CS3 and used what is now called "classic tweening" and guided motion
tweens. Since CS4, the same result could be achieved by simpler "normal" motion tweens, but the old method still
works fine.
Step 1 - Draw the object
Flash shape tweening tutorial
• anything (but preferably without strokes since shape tweens don't render these very well) ...
Step 2 - Turn into movie symbol
• Select the object
• Right-click->Convert to Symbol
• Select Movie clip !
Repeat this for the other objects you want to animate, e.g. create a blue circle that represents a planet.
Convert an object to movie symbol
Step 3 - Edit the movie clip symbols
• Double-click on the instance of the symbol in the stage (or the movie clip in the library)
• Do shape tweens. Make sure that you really are in symbol edit mode. E.g. in the screen capture below you can see
in the Edit bar that we are editing "Planet" (a movie) and not "Scene 1".
Edit a Movie Symbol (the planet)
Click on scene 1 (or whatever your scene is called) to get back to the normal stage (alternatively use the pull-down
menus to the right).
• The planet was made with a simple gradient transform. In the first keyframe there is some green on the upper left
and in the second keyframe it is on the lower right.
• The star simply changes color from yellow to orange and then from orange back to yellow.
Step 4 - Create a motion animation for each of the shape tween movie clips
• Tip: if you want to move an object around an ellipse, draw a real ellipse then cut of tiny bit with the eraser. It then
becomes a motion guide line.
The picture below shows the kind of time line in you should get in the main scene.
Edit a Movie Symbol (the planet)
Final Tips
104
Flash shape tweening tutorial
• Make sure at which level you are editing (scene or embedded movie clip) !
• Use a different layer for each motion animation. In each layer just put one symbol. Then add (if you want) a
motion guide layer to each of these layers... otherwise you met get really unexpected results (E.g. if you see a
"tween" in your library something went wrong).
Results
• You can admire the result [13]
• Get files flash-cs3-shape-tweening-in-motion.* from:
Source: flash-cs3-shape-tweening-in-motion.fla [14]
Directory: http://tecfa.unige.ch/guides/flash/ex/shape-tweening-intro/
A simple doubly embedded motion animation with 2 shape changing objects
Of course a planet should turn around the star. Therefore we should embed the planet motion animation with the star
motion animation, e.g. something like this motion-in-motion animation [15]
Source
• Get files flash-cs3-shape-tweening-in-motion2.* from:
Source: flash-cs3-shape-tweening-in-motion2.fla [16]
Directory: http://tecfa.unige.ch/guides/flash/ex/shape-tweening-intro/
Links
Example materials
Example files used (including *.fla source) can be found here:
http://tecfa.unige.ch/guides/flash/ex6/shape-tweening-intro/(CS6 examples)
http://tecfa.unige.ch/guides/flash/ex/shape-tweening-intro/(CS3 examples)
• Click on either an *.html or *.swf file to see.
• Get the *.fla file if you want to make modifications. The standard copyright of this wiki applies, unless spelled
otherwise.
Adobe documentation
• Control shape changes with shape hints [6] (Adobe Flash C3 Help). There is a nice example morphing "1" into
"2".
References
[1] http:/ / tecfa. unige. ch/ guides/ flash/ ex6/ shape-tweening-intro/ flash-cs6-shape-tweening-intro. html
[2] http:/ / tecfa. unige. ch/ guides/ flash/ ex6/ shape-tweening-intro/ flash-cs6-shape-tweening-intro. fla
[3] http:/ / openclipart. org/ detail/ 168398/ black_dragon_tatoo-by-ivoermejo
[4] http:/ / openclipart. org/ user-detail/ ivoermejo
[5] http:/ / tecfa. unige. ch/ guides/ flash/ ex6/ shape-tweening-intro/ flash-cs6-shape-tween-dragon-egg. html
[6] http:/ / livedocs. adobe. com/ flash/ 9. 0/ UsingFlash/ WSd60f23110762d6b883b18f10cb1fe1af6-7d78. html
[7] http:/ / tecfa. unige. ch/ guides/ flash/ ex/ shape-tweening-intro/ flash-cs3-shape-hints. html
[8] http:/ / tecfa. unige. ch/ guides/ flash/ ex/ shape-tweening-intro/ flash-cs3-shape-hints. fla
[9] http:/ / tecfa. unige. ch/ guides/ flash/ ex/ shape-tweening-intro/ flash-cs3-shape-tweening-hints. html
[10] http:/ / tecfa. unige. ch/ guides/ flash/ ex/ shape-tweening-intro/ flash-cs3-shape-tweening-hints. fla
[11] http:/ / help. adobe. com/ en_US/ flash/ cs/ using/ WS58E1E1A4-9296-4b75-AB74-D9D545892556. html
[12] http:/ / tecfa. unige. ch/ guides/ flash/ ex/ shape-tweening-intro/ flash-cs3-shape-picture-morphing2. fla
[13] http:/ / tecfa. unige. ch/ guides/ flash/ ex/ shape-tweening-intro/ flash-cs3-shape-tweening-in-motion. html
105
Flash shape tweening tutorial
[14] http:/ / tecfa. unige. ch/ guides/ flash/ ex/ shape-tweening-intro/ flash-cs3-shape-tweening-in-motion. fla
[15] http:/ / tecfa. unige. ch/ guides/ flash/ ex/ shape-tweening-intro/ flash-cs3-shape-tweening-in-motion2. html
[16] http:/ / tecfa. unige. ch/ guides/ flash/ ex/ shape-tweening-intro/ flash-cs3-shape-tweening-in-motion2. fla
Flash embedded movie clip tutorial
Draft
Overview
Learning goals
• Learn how to create embedded movie clips
• Learn how to copy/paste animations from the main timeline into a a movie clip symbol
Prerequisites
Flash drawing tutorial
Flash motion tweening tutorial
Flash component button tutorial
Some ActionScript, e.g. ActionScript 3 interactive objects tutorial to understand the examples towards the end.
Moving on
Flash using embedded movie clips tutorial (adding interactivity)
Flash drag and drop tutorial
The Flash tutorials index has a list of other tutorials.
Level and target population
• It aims at beginning Flash designers. Embedded movie clips are used in various other tutorials, but here we
explain it a bit more systematically.
Quality
This text should technical people get going and may not be good enough for self-learning beginners. It can be
used as handout in a "hands-on" class. That is what Daniel K. Schneider made it for...
Alternative versions
• Flash CS3 embedded movie clip tutorial
Movie clips are Flash animations/applications. In other words, your whole Flash file is a movie clip. Now, in a *.fla
file you can have embedded movie clips having their own timeline. In other words, you can have flash clips within
flash clips.
There are several types of movie clips:
• Movie symbols (and instances). That's the main topic of of this tutorial.
• Movie clips (and instances) that were imported as *.swf files. Not really recommended.
• Compiled movie clips imported through the *.swc format
The goal of having such embedded animations is to create animations of "moving/changing" objects that are
independent of the flow of the main timeline. You may have seen such embedded animations in other tutorials, e.g.
in the Flash motion tweening tutorial. The new thing is that you should learn how to play/stop and make
visible/invisible these clips.
106
Flash embedded movie clip tutorial
107
Creation and manipulation of embedded movie clips
Creation of an embedded movie clip
Let's now look a how to create flash movie clips within flash files.
To create a new movie clip within a flash animation file do the following:
• Menu Insert->New Symbol
• Select Movie Clip and give a good name
Alternatively you also can transform an existing graphic into a movie clip symbol
• Draw an object on the stage
• right-click->Create Movie Symbol. Select Movie Clip
Finally you also change the nature of symbols. E.g. to transform a graphic symbol into a movie clip:
• Right-click on the symbol in the library, select "symbol properties" and change it. This will make the the graphic
symbol "heaver", e.g. it will add a timeline.
The reference and center points
• Each movie clip has a Registration point, i.e. it defines what the x and y coordinates mean for a given object
(e.g. upper left or middle). This registration point can later be seen with a little cross (+ sign). You can define the
registration point when you create the new movie symbol. Click on a different square next to "Registration" if you
don't to use the default (either upper left or your previous choice). See the screen capture below:
Create a movie clip symbol - set the registration point to center
Anyhow, you later can change this reference point by moving the drawing to another place in symbol edit mode. By
default a registration point is in the upper left corner. I personally like to have in the middle for objects that I will use
in animations. Let's look at the following example.
Flash embedded movie clip tutorial
108
• The registration point (cross) is slightly off the center (I moved the Dragon drawings a bit by editing the symbol)
• In the main scene, the dragon instance sits in a position x=300 (right) and y=260 (down)
Registration point is near center
The white circle you can see in the middle of a movie clip is called the Center Point and has a similar function. It
defines where the object will be attached to a motion guide or around which point it will rotate for example. You can
move it to a different place with the Free Transform Tool.
If you edit the symbol again, you can see that the drawings have negative coordinates, since it's origin is not top left,
but somewhere in the center.
Flash embedded movie clip tutorial
109
Registration point is near center
In the following screen-shot, we moved all the drawings so that the registration point is in the upper left:
Registration point is upper left
Flash embedded movie clip tutorial
Editing a movie clip
There are two ways to edit a movie clip:
(1) In "stand-alone" view, i.e. you only will see the components of the movie clip. Double click on the movie
symbol's icon (not it's name) in the library. You now can edit, e.g. a add a motion animation or change its drawings.
(2) Edit with the scene as background. If you put an instance of the movie clip on the stage and then double-click on
this instance, you can edit the same movie clip symbol, but you will see the objects of the stage while you edit. This
is quite handy if you plan to create some motion animation. Below is a screen dump of a situation where we edit a
movie clip symbol after double-clicking on an instance of it that sits on the stage. The scene itself is somewhat
visible (picture and buttons).
Editing a movie clip symbol
By editing a movie symbol you basically can do the all the stuff you have learnt about creating flash movies in
previous tutorials, e.g. in the Flash motion tweening tutorial. In other words, movie clips have their own timeline as
you can see in the above picture. There is a motion tween for the "Kite" drawing and a Motion guide layer. The
whole thing is called the "Kite_movie" movie clip.
Do not forget to go back to the scene once you are done, e.g. by double-clicking on the "scene" in the edit bar (on top
of the stage) or by clicking on the little "back arrow". When you edit a movie clip you are in symbol edit mode and
you should not for example add navigation buttons that concern the whole scene. Make sure that you are aware at
which level you edit and where to place objects !
Using a swf file as movie clip
Your whole *.fla also is a movie clip that you could in principle import to other Flash animations. As a result you
will get frame-by-frame animations. This solution is not really recommended, since you can't easily edit this type of
animation and if you make changed in the original you will have to reimport...
This is a copy/paste of the Reuse frame-by-frame animations as movies section in the frame-by-frame animation
tutorial.
Firstly, have a look at the result [1], i.e. a flashing hello and little rocket with a pulsating engine. Both were made
originally in separate *.fla files and then compiled (saved) to
• flash-cs3-shaking-hello.swf [2]
• flash-cs3-rocket.swf [14]
The *.fla, *.swf and *.html files flash-cs3-rocket-hello.* as well as the imported movie clips can be found here: http:/
/tecfa.unige.ch/guides/flash/ex/frame-by-frame-intro/
Step 1 - Import *.swf files into the library of a new Flash file
• Create a new flash file (File->New)
• Then, import flash movies you made: File->Import->Import to library. In our example, get:
110
Flash embedded movie clip tutorial
111
• flash-cs3-rocket.swf file
• flash-cs3-shaking-hello.swf file
You now have a nice rocket and a flashing hello in your library:
Hello and rocket movies in your library
Step 2 - Drag the symbols (movies) to the stage
• Drag the item in the library onto the stage
• Use the Free Transform tool to resize it or to rotate it (see the Flash object transform tutorial if you don't know
how.
• Hold down the SHIFT key when you resize it from a corner !
Here is the result with a picture
Hello and rocket movies used
Of course, you then also could use imported movie clips within motion animations, e.g. as in this Flying rocket
Source code is flash-cs3-rocket-moving.fla [3]
[9]
.
Flash embedded movie clip tutorial
Important notice: Importing *.swf files will only work with very simple animations ! Instead of importing directly
the *.swf you rather should consider the next strategy, i.e. use embedded movie clips.
Creating an embedded movie clip from a non-embedded animation
Let's assume that you have an interesting animation in fla file that you rather would use as a embedded movie clip.
Step 1 - Create a new movie clip symbol
(see above)
• Let's assume that the file is called clips.fla
• Menu Insert->New Symbol
• Select Movie Clip and give a good name
You now should see a blank stage be in symbol edit mode. Hold that.
Step 2
You can either copy full layers or just selected frames.
Copying layers
• Open the fla file with the main timeline animation.
• SHIFT-Click on each layer you want to copy
• Right-click and "Copy layers"
• Go back to your clips.fla file and right-click on layer 1 and "Paste Layers"
Copying frames (more difficult)
• Open the fla file with the timeline-based animation. Let's assume the file is called anim.fla
• Select all frames in the layers you want: Click on the first frame in the first layer, then shift-click on the last frame
in the last layer you want.
• Right-click somewhere in the timeline and select Copy frames
• Now go back to your open clips.fla file (you still should be in symbol edit mode, if you are not, double-click on
the new symbol in the library).
• Click in frame 1 of layer 1 of the newly created movie clip symbol
• Then Right-click and Paste frames.
Voilà, you now have an embedded movie clip. Go back to the scene.
Using a *.fla file as your own external assets library
Once you have a set of embedded movie clips you could create a library for later reuse.
Step 1 - Create a new *.fla file
• Copy paste interesting movie clips and graphics (whatever) in the library of this fla file
• Then save the file
Step 2 - import a *.fla file as external library
Menu File->Import->Open external library
Step 3 - repeat
• Each time you create something of interest that you often plan to use, open the fla file file and copy/paste again.
112
Flash embedded movie clip tutorial
References
[1] http:/ / tecfa. unige. ch/ guides/ flash/ ex/ frame-by-frame-intro/ flash-cs3-rocket-hello. html
[2] http:/ / tecfa. unige. ch/ guides/ flash/ ex/ frame-by-frame-intro/ flash-cs3-shaking-hello. swf
[3] http:/ / tecfa. unige. ch/ guides/ flash/ ex/ motion-tweening-intro/ flash-cs3-rocket-moving. fla
Flash animation summary
Draft
This entry is part of the Flash tutorials. It should be fully updated to CS6 ....
Introduction
This article in our Flash series is a summary of: Flash frame-by-frame animation tutorial, Flash motion tweening
tutorial and Flash shape tweening tutorial. It also includes some of: Flash CS3 desktop tutorial, Flash drawing
tutorial, Flash CS3 keyboard shortcuts, Flash object transform tutorial, Flash arranging objects tutorial, Flash colors
tutorial and Flash bitmap tracing tutorial.
Learning goals
• Review some technical design guidelines and procedures regarding frame-by-frame, motion and shape animations
in Flash CS3 to CS6
Flash level
• Flash 9 / CS3 or better
Public
• Beginners (about week four of a 4h/week Flash course)
You can use this as self-reviewing aid: If you don't understand some items, you will have to go over some Flash
tutorials again. This entry also includes two exercises with *.fla files that we used as tasks for mid-term exams...
General principles
Description of the *.fla file and stage size
• Make sure to start with an appropriate stage size. Change it via the properties panel or menu Modify->Document
• Fill in a description associated with the *.fla source, in CS3 also available through the menu Modify->Document,
in CS4 and later in menu File->File info.
Configuration of the desktop
The way you want your desktop configured depends on your screen size and the type of animation you build. If your
screen is big enough, put as many tools at your finger tips as you can. In particular:
•
•
•
•
All toolbars
Properties panel at the bottom
Colors, Swatches, Align, Info and Transform on top right
Libraries middle right
E.g. something like this for CS3
113
Flash animation summary
114
Example configuration of a CS3 Flash desktop
or this for CS5 and later
Flash animation summary
115
Flash CS6 workspaces menu
Tips
• You can hide/show panels with F4 (e.g. if stage size is big)
• You can save a configuration and give it a name
If you are lost: go back to the Flash CS3 desktop tutorial, Flash CS4 desktop tutorial or Flash CS6 desktop tutorial
depending on your version
Layers and Frames
• Put each object to be animated in a separate layer ! Yes, do not animate two or more different objects in one
layer (except in frame-by-frame animation)
• To create a new layer click on the insert layer icon (left underneath the layers)
• Immediately give this layer a meaningful name.
• simply double-click on the layer name
• If objects of one layer should be in front/in the back of an other layer you can grab a layer with the mouse and
move it up or down.
• When you edit objects in one layer, it's good policy to lock all the other layers !
Flash animation summary
116
The Flash CS3 Layers tool
If you are lost: go back to the Flash layers tutorial
Simple drawing
There are two modes: merge mode and object mode:
• In merge mode (default) you draw shapes and over or under-paint other shapes.
• In object mode you draw graphic objects that you later can edit again.
Most of your drawings should be in object mode. So make sure that this icon is on when you select a drawing tool:
• Only use merge mode when you paint like you would with real paint.
• You then can assemble these shapes with menu Modify->Combine Objects->Union. The result is a graphic
object.
Other commands:
• To select several objects: either hold down the SHIFT key, use a selection box or the Lasso tool.
• To break apart a drawing (well anything actually): right-click; Break Apart. However, to edit the shape inside a
graphic objects you don't need to break it apart. You also can double-click on the graphic shape. You should see
something like "Drawing Object" in the Edit bar". Make sure to return to main timeline editing once you are done.
If you are lost: go back to the Flash drawing tutorial and Flash arranging objects tutorial
Flash animation summary
Intermediate drawing
Tips
• Always lock other frames when you draw on one frame.
• For advanced drawing, you should consider learning how to use the pen tool (Flash pen tutorial).
Object transformation
To transform an object or shape there are several tools, most importantly:
• The Select tool: Make sure all objects are de-selected, then move the cursor close to a stroke of an object or a
shape. When the cursor changes shape you can distort it.
• The Free Transform Tool has three different modes you can select with the options controls in the tools bar:
• Change size, rotate, skew (by default you get this). Move the cursor close to lines or corners and watch the
cursor change form.
• Distort tool
• Envelope tool
• The Subselection tool lets you fine tune things you did with the above tools
• Subselection Tool, Distort Tool and Envelope tool let you either drag distortion points (squares), turn or drag
curve control handles (circles).
Additional stuff is in the Modify menu. Also see the Flash CS3 keyboard shortcuts.
• Make sure you only selected one single object (unless it's on purpose) before you start transforming.
• Flash changes the cursor when it switches to a given "transform mode" and it may display additional handles.
There are lots and you should become familiar with these.
If you feel lost, go back to the Flash object transform tutorial.
Arranging objects
• To align objects, work with the align panel (menu Window->Align or Ctrl-k). There are also shortcuts.
• To assemble shapes into a graphic object, use the Modify->Combine Objects->Union or turn the selected shapes
into a symbol
• To break apart an object, use right-click->Break Apart. If you want to produce shapes, you may have to repeat
this step.
Tips
Set snapping preferences right: View->Snapping or right-click on the workspace. Then Edit snapping
If you need this: see the Flash arranging objects tutorial.
Colors and filters
• You can achieve a lot just by changing colors, color gradients or by adding filters to movie clip symbols you use
in animations.
See the Flash colors tutorial if needed.
Frame-by-frame animation
Is useful for several things, e.g.
• To do precision work, e.g. drawing 15 frames for just an arm movement;
• To make pulsating objects that you can move around;
• To insert/remove objects into the animation
117
Flash animation summary
Procedure
Frame by frame animations work with anything. Just draw any kind of shapes or graphic objects or whatever else in
various frames. A frame with content is called a keyframe. Animation is based on the principle that keyframe
contents shown to the user in rapid succession, by default 24 frames/second in Flash CS5/CS6 and 16 frames/second
in Flash CS3.
To add new keyframes and copy over contents from the last keyframe:
• In the timeline (in the right layer!) click into the new frame
• Hit F6 (or right-click->Insert Keyframe). This will copy contents from previous keyframe to the new one.
To add new keyframes that are empty:
• In the timeline (in the right layer!) click into the new frame (or move the read playhead)
• Then hit F7 (or right-click->Insert New Keyframe)
• Then draw something new or copy/paste from an other frame.
Tips
• Play with the frame rate, but don't go too low nor too fast !
• To slow down animation you rather should space out keyframes (click on a keyframe, then drag it in the timeline
or hit F5 to extend a frame).
• To align objects in several frames, enable Edit multiple frames in the edit bar. Move the "onion skin" handles on
top of the timeline to select the frames you want to work with (don't forget to disable this once you are done!).
If you are lost: go back to the Flash frame-by-frame animation tutorial
CS4/CS5/CS6 motion tweens
•
•
•
•
Create a new layer
Place a single symbol instance inside
Right-click and select Create motion tween'
Modify the motion path either by manipulating the path itself or by selecting a frame in the timeline and then
dragging the object
If you are lost: go back to the Flash motion tweening tutorial
Classic motion tweening
Most readers could ignore this section. You will have to learn this technique if you must work with flash projects
made with CS3.
Simple classic tweens
You only should animate non-editable objects (symbols, text boxes, etc.). It's best to turn all your animated objects
into movie clips because you then can use Filters. E.g. add a glow or a bevel to an object.
Procedure
• Create a new layer
• Draw something in a keyframe (e.g. frame 1) of this new layer and make it a movie symbol (right-click->Convert
to Symbol)
• Create a new keyframe (e.g. in frame 20) by hitting F6 (this will copy the object from the previous frame). F7 will
create an empty keyframe and you will have to copy/paste manually.
• Then move the object in the new frame to its new place.
• If you did things right, you now have an object in a start keyframe and another in the end keyframe. These objects
should be instances of the same symbol in the library or better (you can copy/paste from frame 1 too).
118
Flash animation summary
• Then, click anywhere in the timeline between these 2 frames and right-click->Create Motion Tween.
Iron principles
• Every animation object must be in its own layer and it must be a movie clip (or another non-editable object)
• There must be nothing else in the same layer. Unless you are an expert, don't put more than one object into an
animation layer and don't use simple graphics or shapes (results are unpredictable, i.e. you get a tween object in
the library and you won't be able to work properly on your animation).
Tips
• You can accelerate/decelerate motion in the properties panel.
• If you see a "tween" object in your library, something went wrong (!) or you are an expert and know what you
do. Break the tween objects a part, then save all your graphics to symbols (right-click on each and create
symbol. Then, kill the tween objects in the library and start over again.
• You can have several motion tweens in a row within a layer. Just hit F6/F7 to extend again.
• If you want to rotate an object (instead of moving it), change the rotate parameters in the parameters panel.
Classic motion tweening with shape modification
(1) You can add a little bit of shape tweening to motion tweening if your animation is based (as we told you) on
symbols. To do so:
•
•
•
•
Click on the symbol instances in start frame or end frame. Then you can:
Change tint, alpha etc. in the properties panel.
Use the Free transform tool to rotate or change the size of an instance.
Add filters in the filters panel (it should sit next to the properties panel, else add it with menu
Window->Properties-Filters).
This is not shape tweening, but consider using this technique before you try to do motion with a shape tween (putting
shapes in different positions in the two keyframes will not just move the shape but also transform it while moving).
(2) Alternatively, add a shape tween inside of the movie clip. Double click on the item in the library and edit it.
Note: Timeline effects will be covered in a later tutorial.
Classic motion guide tweening
Procedure
•
•
•
•
•
•
Select the layer for which you want to create a motion guide.
Make sure it includes a motion tween, else create it now.
Then click on the first (!) keyframe (e.g. frame 1) and insert a motion guide layer.
Draw the motion guide line with the pencil in this new motion guide layer
In the animation layer snap the object to the line (in frame 1 and the other keyframes).
Display onion skins if you want to see the animation path while working on a background for example.
Tips:
• You can have several motion tweens in a row in the animation layer
• In order to move an object around a perfect circle, draw the circle with the oval tool in object mode (and without
fill). Then make a tiny somewhere with eraser tool. This will produce a nice curve.
• Play with acceleration/deceleration, i.e. create several keyframes and move objects in the intermediate keyframes
along the motion guide.
• Again: Do not create motion tweens for shapes and graphics. Use symbols !
• Again: You can only have one symbol instance in an animation layer ! Put all other graphics in a different layer.
If you are lost: go back to the Flash classic motion tweening tutorial
119
Flash animation summary
Shape tweening
You can only animate editable objects, i.e. shapes and simple drawing objects.
Therefore if you want to morph a graphic symbol, a textbox, a picture, etc. break it apart. You may have to break it
apart more than once. In case you don't want to break apart a symbol because you also want to use it in a motion
animation, double-click on it to enter symbol edit mode and copy/paste the graphics. Then, go back to the main
timeline.
Then simply follow the same procedure as for the motion animation:
• Make a drawing in one frame
• Hit F6 in a distant frame and modify the shape/ simple drawing in the new frame
• Click in a empty frame in-between and add the shape tween.
Tip:
• To morph simple graphic objects you may want to take the stroke away (change its color to none).
• Do not try to create a motion animation with shape tweening !
• Instead, try a motion tween and modify the shape. You can in the properties panel distort symbols and change
their tint. Or better, create a shape tween within the movie clip symbol.
• Create several layers if you work with several shapes. Then you also can use shape hints.
• To morph bitmaps (e.g. *.jpg photographs) you will have to trace them (see the Flash bitmap tracing tutorial).
If you are lost: go back to the Flash shape tweening tutorial
Manipulation of frames
• To extend a drawing layer (e.g. a background) so that it displays until the end of an animation defined in an other
layer: Click on the wanted end-frame position and hit F5 (or right-click->Insert Frame).
• To move a keyframe, click on it (cursor must now include a white rectangle) and drag it left or right.
• To kill frames, select all the frames you want (click on one end, then SHIFT-click on the other end). Then, use
right-click->Remove Frames.
If you are lost: go back to the Flash motion tweening tutorial.
Motion tweening of an animated object
You can create animations within animations:
•
•
•
•
Hit CTRL-F8 to create a new symbol or convert an existing graphic to a movie clip symbol with F8.
Make sure to select Movie Clip !
Give this movie clip an appropriate name
Then you can drag the symbol from the library to the stage or directly edit it in the library. Double click on the
movie clip symbol or the instance to edit and create any animation you like. Make sure that know whether you are
editing a symbol or your main timeline ...
You also can copy/paste a series of frames (e.g. a frame-by-frame animation or a motion tween to this new
embedded movie symbol from another *.fla file. This is a bit tricky:
• Select all the frames within all layers you want (SHIFT click) then right-click->Copy Frames somewhere in the
timeline (not over the layers !)
• Go to frame one of layer 1 of your new movie symbol and right-click->Paste Frames.
So it is copy/paste frames, not "normal" copy/paste !
You also can copy paste full layers:
• SHIFT-Click on each layer name you want to copy
120
Flash animation summary
• Still with the mouse over the selected layers, right-click and copy layers
• Within a new symbol (double click on an existing one), right-click on a layer name and paste layers
Important: Make sure where you are when you edit, check whether are you editing a scene and the main timeline or
whether you are editing a movie clip i.e. in symbol edit mode ! If you mix up the two (or more) levels of editing you
are likely to mess up things ! This is the same problem as customizing button symbols
If you are interested in working with embedded movie clips, there is more detailed explanation in the Flash
embedded movie clip tutorial
If you are totally lost: go back to the Flash frame-by-frame animation tutorial, Flash motion tweening tutorial and the
Flash shape tweening tutorial (there is some useful information in each of them). Finally you may have a glance at
the ActionScript 3 interactive objects tutorial if you need some more ActionScript tricks.
Testing and Publishing
• Hit Ctrl-ENTER to test
• Menu File->Export->Movie just to export the *.swf (Flash)
• Menu File->Publish Settings Verify settings, then hit the PublishButton.
Important principles and tips
•
•
•
•
As soon as you are happy with a drawing, save it to the library as graphic symbol or movie clip.
Name your layers
Lock all other layers when you work on one layer.
Do motion animation with symbols only. Avoid having any "tween" objects in your library (most likely
something went wrong).
• Only use one symbol per motion animation layer.
• Shape animation works with either shapes and/or simple editable graphics.
• To convert a non-editable object to a shape or simple graphic: Break it apart (right-click on the object and
Break Apart)
• To convert an editable object or a shape (or several of these) into a non-editable object select these and
right-click->Create symbol.
• To convert a shape into a graphic object: Modify->Combine Objects->Union
Self-revision example 1 - weather animation
Tasks
Complete a weather animation by using the existing layers and the objects in the library. You only need to add one
extra motion guide layer to complete the tasks described below.
Download the *.fla file from here:
• flash-cs3-cloud-animation-problem.fla [1]
Then look at the solution (swf file):
• flash-cs3-cloud-animation-solution.html [2]
Notes:
• All drawing objects you need are in the library and instances are on the stage too. All layers are locked. Unlock as
needed.
• This animation has about 50 frames. There is no need to go further, but the animation layers are only defined for
frame 1. I.e. it is up to you to add motion and shape tweens and insert a frame-by-frame animation
121
Flash animation summary
• Clouds and the sun are not in the right start position when you open the *.fla file
• This animation is not really professional. We kept it as simple as possible.
(1) Cloud animation
• At start, clouds must be very small and then gradually move forward and become big.
Tip: This is a motion tween animation with a shape transform of the cloud instance (not a shape tween !)
(2) Rain animation
• Insert animated rain underneath a big cloud once it is close, e.g. around frame 40
Tip: Use a frame-by-frame animation (e.g. about 10 frames)
(3) Sun animation
• The Sun must rise from the left and from behind the hills, then move to the top and finally set behind the hills to
the right.
• The sun must follow a more or less smooth path, i.e. an arc and not just two lines.
Tip: This is a motion guide tween.
(4) Sky animation
• Sky should be brighter around the sun
• Bonus: Also make the sky darker when the clouds arrive
Tip: This includes at least 2 shape tweens in a row. Use color gradients: 1-2 color bands should do. Do the gradient
transform before you start duplicating the sky of frame 1. Alternatively you also can add a glow to the sun with a
filter ...
(5) Extra effect
• Add one other animation effect somewhere. Whatever you like.
Advice and Cheatsheet
Frames
• F5 will extend a frame
• F6 will make a new keyframe and copy its contents
• F7 will make a new empty keyframe
Scaling
• ALT-CTRL-S will allow to scale a selected object
Shape tweening
• Right-click->Break Apart will turn a symbol instance into its components. E.g. the sky as symbol instance will
become a Drawing Object.
• Alternatively, double click on a symbol object to edit its graphics.
Advice
•
•
•
•
Always lock layers you are not working on.
Backtrack (ctrl-Z) as soon as you see a "tween" object in your library. None is needed.
Do not kill library objects !
If you completely messed up a layer, lock all layers, unlock the bad one, select all frames (use SHIFT-click) and
remove them (right-click menu). Then restart again with a library object.
122
Flash animation summary
Solution
You can find the solution here:
• http://tecfa.unige.ch/guides/flash/ex/animation-summary/
• File: flash-cs3-cloud-animation-solution.fla [3]
Note: some vector graphics, i.e. the trees and the cloud have been taken from the Open Clip Art Library [4]. You can
find the SVG files in the same directory. Before importing to Flash I made some modifications with Illustrator
Self-revision example 2 - tux and manga
Tasks
Complete this animation by using the existing layers and the objects in the library. It should take you no more than
70 minutes (about 10 minutes for each task).
Please complete the six tasks described below. Most of the work is already done, you only need to complete
animations and change properties:
• All drawing objects you need are in the library
• All layers are locked. Unlock as needed.
• Symbol instances are on the stage and in the right frame, but you may have to break these apart.
• Key frames are also predefined.
• This animation has about 110 frames. In principle, there is no need to go further.
Look at a possible solution first
• flash-cs3-tux-manga-solution.html [5]
Download the *.fla file
• flash-cs3-tux-manga-problem.fla [6]
(1) Background animation (shape tween of gradient color)
• At start, it is rather dark and it should stay dark at start.
• However, the sky should become clearer during the animation.
• At the end of the animation, the background should be lighter and the upper sky should become some sort of
yellow
Tip: This is a shape tween (morphing) of a gradient color rectangle (frame 1 to frame 100)
(2) Pumpkin to Girl animation (shape tween)
• Transform the pumpkin into the Manga girl
• The Manga girl should appear at the same position as the pumpkin (roughly)
• Animation should start around frame 50 and end at frame 100
Tip: Remember that you only can morph shapes (paint) and graphics, but not symbols. The manga girl and the
pumpkin are symbols (and this is a first problem).
(3) Penguin size (motion animation)
• The Penguin should be really small when it starts walking
Tip: This is a motion tween of a movie clip symbol (frame 1 to frame 49). Shape of an instance (the Penguin in a
given frame) can be changed in the properties panel.
(4) Penguin feet animation (frame-by-frame animation)
• The Penguin should "move" its "feet" while it walks (frame 1 to 49). This is not necessary for Penguin2 (frame 50
- 100).
123
Flash animation summary
Tip: This is a frame-by-frame animation of an embedded movie clip (double click on the Penguin in the library).
Four frames will do.
(5) Moon animation (guided motion)
• The Moon must rise from the left then move to the top (around frame 50) and finally set down to the right.
• The moon must follow a more or less smooth path, i.e. an arc and not just two lines.
Tip: This is a motion guide tween, i.e. same logic as the (almost finished) penguin walk
(6) Extra animation
• Add one other animation effect somewhere that would improve the overall animation. Whatever you like.
• I for myself added a credits button (don't try, it's not part of this test)
Cheatsheet and advice
Frames
• F5 will extend a frame without adding keyframes
• F6 will make a new keyframe and copy contents from the prior keyframe in the timeline
• F7 will make a new empty keyframe
Scaling
• ALT-CTRL-S will allow to scale a selected object. Else just use the properties panel.
Embedded movie clip animation
• To edit a movie clip, double click in the library on the symbol (e.g. do this for the penguin feet)
Shape tweening
• Right-click->Break Apart will turn a symbol instance into its components. You cannot morph symbols !!
• To align objects across frames: Lock all layers (!) except the ones you work on. Click on "Edit multiple Frames"
on the Edit bar (underneath the timeline). Move onion skin delimiters. Select the objects (hold down the SHIFT
key) and use for example the align panel. Be careful with this method, e.g. don't forget to untick "Edit multiple
Frames"...
Other Advice
• Always lock layers you are not working on.
• Make sure the select tool is "on" in the tools panel, before you think about moving objects or changing their size
or color
• Backtrack (ctrl-Z) as soon as you see a "tween" object in your library. None is needed.
• Do not kill library objects (except these bad tween objects after you saved the graphics inside) !
• If you completely messed up a layer, lock all layers, unlock the bad one and remove all unwanted stuff (including
bad tweens). Then restart again with a library object or one from the backup folder.
• Use F4 to hide / show panels if you need more drawing space. You also can zoom in/out
124
Flash animation summary
Solution
• flash-cs3-tux-manga-solution.fla [7]
• Directory: http://tecfa.unige.ch/guides/flash/ex/animation-summary/
Links
• Open Clip Art Library [4] (SVG clipart to play with, but you will need to pass trough Illustrator to import to Flash)
• Example directory referenced in the various tutorials: http://tecfa.unige.ch/guides/flash/ex/
References
[1]
[2]
[3]
[4]
[5]
[6]
[7]
http:/ / tecfa. unige. ch/ guides/ flash/ ex/ animation-summary/ flash-cs3-cloud-animation-problem. fla
http:/ / tecfa. unige. ch/ guides/ flash/ ex/ animation-summary/ flash-cs3-cloud-animation-solution. html
http:/ / tecfa. unige. ch/ guides/ flash/ ex/ animation-summary/ flash-cs3-cloud-animation-solution. fla
http:/ / www. openclipart. org/
http:/ / tecfa. unige. ch/ guides/ flash/ ex/ animation-summary/ flash-cs3-tux-manga-solution. html
http:/ / tecfa. unige. ch/ guides/ flash/ ex/ animation-summary/ flash-cs3-tux-manga-problem. fla
http:/ / tecfa. unige. ch/ guides/ flash/ ex/ animation-summary/ flash-cs3-tux-manga-solution. fla
125
126
Use of external media
Flash video component tutorial
Draft
Introduction
Video components are prebuilt interface elements (widgets) that will speed up video integration. In particular, the
FLVPlayBack Video Component allows to render videos without any ActionScript programming. It includes a nice
choice of skins for user controls. Videos also can be enhanced with captioning or they may interact with the rest of
the animation. This is discussed in the Flash augmented video tutorial
Learning goals
Learn how to encode *.flv and (older) *.f4v files
Learn how to use the Flash 11 (CS6) video component for simple video playback
Prerequisites for the first part
Flash CS6 desktop tutorial
Flash drawing tutorial
Flash component button tutorial
Moving on
Flash augmented video tutorial
Flash video captions tutorial
The Flash article has a list of other tutorials.
Quality
This text should technical people get going and may not be good enough for self-learning beginners. It can be
used as handout in a "hands-on" class. That is what Daniel K. Schneider made it for...
Level
It both aims at beginners (FLV encoding, using the video playback component and embedding a video in the
timeline) and intermediate Flash designers (inserting captions and using cue points to trigger animations).
The executive summary about Flash Videos
Flash has built-in video management components.
• The FLVPlayBack Video Component is really easy to use since it provides a series of ready-made skins (user
interfaces) from which you can choose.
• The Caption (subtitle) component requires some XML Editing. Read the Flash video captions tutorial.
• For more sophisticated interactions with a video you need to code with ActionScript, as explained in the Flash
augmented video tutorial
The executive how-to summary for simple video playbacks
• If your video uses a format that is not *.flv, *.f4v or *.mp4 of if you plan to reduce its size or trim it then prepare
it first with the Adobe Media Encoder. This tool is included in the Flash distribution. It may differ a bit from the
full CS6 version.
• Drag the FLVPlayBack Video Component to the stage.
Flash video component tutorial
• Open the component inspector panel. Choose a skin (user interface configuration) and provide the file name or
URL of the *.flv video
Note: In CS3 and CS4, only the Adobe *.flv format was supported. Since Flash 10/CS5, Adobe provides the more
efficient *.f4v format and also directly supports other formats for playback.
Using the Flash video component
Using Flash CS6 (and CS5) component is really easy
• You can use *.mp4 videos without prior encoding to a Flash video format
• All operations are centralized in the properties panel
• The only difficulties relate to file path operations (correct paths and copying files)
In most cases, you would have to adapt your video file, i.e. at least make it smaller and cut of unwanted beginning
and end.
Just below we explain the procedure for an *.mp4, *.flv or *.f4v video that already is "ready" for production.
Step 1: Drag the component to the stage and save the file
1. Open the components panel (Menu Window->Components or CTRL-F7)
2. Drag FLPLayback 2.5 on the stage
3. Now save your Flash file, else it will not work, since Flash will not find the video file !
4. Copy the video file into the same directory as your flash file (unless you know how to deal with relative file
paths, something that you may have learned creating HTML pages using pictures)
Step 2: Configure the properties of the component
1. Select the component
2. Set the name of the video file with source in the Properties panel (e.g. BFB-BBC.mp4). Make sure to shorten
the file path!
• Bad: C:\...\flash\ex6\screenshots\my_video.mp4
• Good: my_video.mp4
3. Select an appropriate skin. A skin will define what kinds of controls the user will have. You also can make
adjustements to the color
4. Keep the defaults for starters, e.g. maintainAspectRation for starters.
... That's it.
127
Flash video component tutorial
128
RapMan video from BBC
Step 3: Publishing a flash file that uses video
If you plan to publish the flash file on a web site or if you mail your application, do not forget to include all the
files, for example
•
•
•
•
flash-cs6-mp4-video.html (the HTML file, optional)
flash-cs6-mp4-video.swf (the Flash file)
BFB-BBC.mp4 (the video)
SkinUnderAllNoFullscreen.swf (the skin library)
Example files:
• flash-cs6-video-component.html [1]
• flash-cs6-video-component.fla [2] (Flash source)
• BFB-BBC.mp4 [3] (original video)
The video shows the first 3D printer I owned, a RapMan (bought sometimes in 2009).
Flash video component tutorial
129
Using File import
As an alternative, you could use the File import menu. However, you might make wrong choice and therefore we do
not recommend this procedure. This procedure will use the standard FLVPlayback component (not the more
versatile version 2.5)
(1) Import the video file
• Menu File -> Import -> Import video
Importing a video file
(2) Select the skin
Flash video component tutorial
130
Select the skin
(3) Click next and adjust the parameters
Using the Adobe Media Encoder CS6
The Adobe Media encoder can be found in the Program menu of your system (Windows/Mac) or in the File Import
process in Flash CS6 as explained in the previous section.
Important: You cannot transcode or edit *.flv files !! Use another source format like *.mp4 ! I can't explain why,
but it's Adobe's choice ....
Simple transcoding
1.
2.
3.
4.
Click on + to add a video for encoding
Select the video format. By default, the Flash F4V format is selected
Select the quality
Press the green arrow button to launch the encoding. The resulting file will be put in the same directory as the
source video.
Flash video component tutorial
Adding a video to the Adobe Media Encoder CS6
Editing
The Media Encoder allows to "edit a video file in various ways. It is not a full video editor like Premiere, but allows
to do a few very useful operations:
• You can remove frames in the start or the end
• You can clip each side (top, bottom, left, right). This is particularly useful, if you shot the video yourself, e.g. with
a cell phone.
• You also can add so-called cue-points. However we suggest not to use this feature and rather use so-called
ActionScript cue points.
The editor is difficult to find. Do the following
• Select the output video line (underneath the imported video, see the screen capture above: the *.flv file is
selected)
• Menu Edit -> Export settings or hit CTRL-E (...fine name ....)
The picture below explains, how to make a few edits.
• Clip the video: Click on the Source tab first, select the rectangle icon to the left, then either change the values of
left, top, right, bottom or use the clipping rectangle
• Look at frames: Move the yellow play head
• Remove frames from the start and/or the end: Use the small white triangles
131
Flash video component tutorial
132
Adobe Media Encoder editing (export settings)
Once you are done:
• Click on OK
• The click on the green arrow button to encode (as above)
Links
Finding videos on the Internet
Finding and downloading videos
• You may download videos from the Internet (make sure that copyright allows you to do so). Getting videos from
sites like YouTube is not easy without download helpers (see below). Therefore, try sites like http://vimeo.com
first.
• Firefox video download helper extension: https://addons.mozilla.org/en-US/firefox/addon/3006
• Google video search: http://video.google.com/.Use advanced search [4] in order to restrict search to duration.
Video sites:
• http://vimeo.com/Includes open source (creative commons) videos. After a search, you can tick a box for only
showing downloadable videos.
• http://vids.myspace.com/Needs special tools to download
• http://youtube.com/Needs special tools to download
Flash video component tutorial
Adobe documentation
• Flash Professional / Create video files for use in Flash [5], at Adobe, retrieved Feb 18 2013.
• The FLVPlayback component [6]
• Media Encoder Help / Help and tutorials [7] at Adobe, retrieved Feb 18 2013.
References
[1]
[2]
[3]
[4]
[5]
[6]
[7]
http:/ / tecfa. unige. ch/ guides/ flash/ ex6/ component-video-intro/ flash-cs6-video-component. html
http:/ / tecfa. unige. ch/ guides/ flash/ ex6/ component-video-intro/ flash-cs6-video-component. fla
http:/ / tecfa. unige. ch/ guides/ flash/ ex6/ component-video-intro/ BFB-BBC. mp4
http:/ / video. google. com/ videoadvancedsearch
http:/ / help. adobe. com/ en_US/ flash/ cs/ using/ WSb03e830bd6f770ee-70a39d612436d472f4-8000. html
http:/ / help. adobe. com/ en_US/ flash/ cs/ using/ WS62A31643-EF23-45ec-80D0-04DB8CE1AB1F. html
http:/ / helpx. adobe. com/ media-encoder/ topics. html
Timed Text
Definition
“The Timed-Text specification should cover all necessary aspects of timed text on the Web. Typical applications of
timed text are the real time subtitling of foreign-language movies on the Web, captioning for people lacking audio
devices or having hearing impairments, karaoke, scrolling news items or teleprompter applications.” (Timed-Text [1],
retrieved 18:16, 27 September 2007 (MEST)).
Timed text (also called TTML or simply TT) is quite a complex format, but in some contexts (e.g. Flash captioning)
understanding of a small subset will do.
See also: WebVTT (another, similar standard)
Typical applications
According to this [2]:
•
•
•
•
•
•
•
Subtitles of movies on the Web (foreign languages)
Captions for people lacking audio devices or having hearing disabilities
Karaoke
Scrolling news, credits rolls
TickerTape, marquee, "crawls"
Text overlay
TelePrompter
133
Timed Text
134
Related formats and software
Timed Text is supported to various degrees by various software, e.g.
• Flash
• Real Player
There is also an interaction with other formats, e.g.
• SMIL
• MPEG-4
• 3GPP
TT in Flash CS3
Flash CS3 seems to support the W3C Working Draft 27 April 2006
Adobe's manual and example
I find the documentation in Flash a bit sloppy. Also, I don't think that id's should be numbers. In addition, I tried to
validate the Adobe example against both the candidate specification and the older April version and it doesn't
validate. Maybe it's no only Adobe's fault, but I really don't like situations where you are supposed to use a standard
and where examples given don't match standards.
Here is the example from the Using Timed Text captions [3] in the Flash CS3 Documentation:
<?xml version="1.0" encoding="UTF-8"?>
<tt xml:lang="en" xmlns="http://www.w3.org/2006/04/ttaf1"
xmlns:tts="http://www.w3.org/2006/04/ttaf1#styling">
<head>
<styling>
<style id="1" tts:textAlign="right"/>
<style id="2" tts:color="transparent"/>
<style id="3" style="2" tts:backgroundColor="white"/>
<style id="4" style="2 3" tts:fontSize="20"/>
</styling>
</head>
<body>
<div xml:lang="en">
<p begin="00:00:00.00" dur="00:00:03.07">I had just joined <span tts:fontFamily="monospaceSansSerif,proportionalSerif,TheOther"tts:fontSize="+2">Macromedia</span> in 1996,</p>
<p begin="00:00:03.07" dur="00:00:03.35">and we were trying to figure out what to do about the internet.</p>
<p begin="00:00:06.42" dur="00:00:03.15">And the company was in dire straights at the time.</p>
<p begin="00:00:09.57" dur="00:00:01.45">We were a CD-ROM authoring company,</p>
<p begin="00:00:11.42" dur="00:00:02.00">and the CD-ROM business was going away.</p>
<p begin="00:00:13.57" dur="00:00:02.50">One of the technologies I remember seeing was Flash.</p>
<p begin="00:00:16.47" dur="00:00:02.00">At the time, it was called <span tts:fontWeight="bold" tts:color="#ccc333">FutureSplash</span>.</p>
<p begin="00:00:18.50" dur="00:00:01.20">So this is where Flash got its start.</p>
<p begin="00:00:20.10" dur="00:00:03.00">This is smart sketch running on the <span tts:fontStyle="italic">EU-pin computer</span>,</p>
<p begin="00:00:23.52" dur="00:00:02.00">which was the first product that FutureWave did.</p>
<p begin="00:00:25.52" dur="00:00:02.00">So our vision for this product was to</p>
<p begin="00:00:27.52" dur="00:00:01.10">make drawing on the computer</p>
<p begin="00:00:29.02" dur="00:00:01.30" style="1">as <span tts:color="#ccc333">easy</span> as drawing on paper.</p>
</div>
</body>
Timed Text
135
</tt>
A Timed Text DTD (mini DTD!)
<!-- mini-tt.dtd
Mini Timed TEXT DTD for use with Flash CS3
Version 0.9 Sept 27 2007
Copyright: Freeware
Daniel K. Schneider, TECFA, http://edutechwiki.unige.ch/en/Timed_Text
Disclaimer: It's not complete, I don't understand Timed Text
I find Adobe's doc shaky. My only claim is that this validates their example ;)
-->
<!ELEMENT tt (head, body)>
<!ATTLIST tt xmlns CDATA #FIXED "http://www.w3.org/2006/04/ttaf1">
<!ATTLIST tt xml:lang CDATA #FIXED "en">
<!ATTLIST tt xmlns:tts CDATA #FIXED "http://www.w3.org/2006/04/ttaf1#styling">
<!ELEMENT head (styling?)>
<!ELEMENT styling (style*)>
<!ELEMENT style EMPTY>
<!ATTLIST style
style CDATA #IMPLIED
id CDATA #REQUIRED
tts:backgroundColor CDATA #IMPLIED
tts:color CDATA #IMPLIED
tts:fontFamily CDATA #IMPLIED
tts:fontSize CDATA #IMPLIED
tts:fontStyle (normal|italic|inherit) "inherit"
tts:fontWeight CDATA #IMPLIED
tts:textAlign (left|right|center|start|end|inherit) "inherit"
tts:wrapOption (wrap|noWrap|inherit) "inherit"
>
<!ELEMENT body (div)>
<!ELEMENT div (p*)>
<!ATTLIST div xml:lang CDATA #FIXED "en">
<!ELEMENT p (#PCDATA|span)*>
<!ATTLIST p
begin CDATA #REQUIRED
dur CDATA #IMPLIED
end CDATA #IMPLIED
style CDATA #IMPLIED
>
Timed Text
136
<!ELEMENT span (#PCDATA)>
<!ATTLIST span
tts:backgroundColor CDATA #IMPLIED
tts:color CDATA #IMPLIED
tts:fontFamily CDATA #IMPLIED
tts:fontSize CDATA #IMPLIED
tts:fontStyle (normal|italic|inherit) "inherit"
tts:fontWeight CDATA #IMPLIED
tts:textAlign (left|right|center|start|end|inherit) "inherit"
tts:wrapOption (wrap|noWrap|inherit) "inherit"
>
I then made this mini DTD that should help you writing these files. Disclaimer:
• I made it in 30 minutes and I hate computers and don't know how to use them.
• Adobe probably implements more features, but this should do for starters.
Notes about attributes:
id
Attributes of the style element can't be ID attributes the way they are used. Same holds for the style attribute of
p element and that can refer to one of the styles defined in the styling section.
color
Either use a the typical #RRGGBB hex notation
or choose from white | black | silver | grey | maroon | red | purple | fuchsia | magenta | green | lime | olive |
yellow | navy | blue | teal | aqua | cyan | transparent
FontFamily
Choose from a combination of monospace, sansSerif, serif, monospaceSansSerif, monospaceSerif,
proportionalSansSerif
Duration
Choose from of these formats:
00:03:00.1
03:00.1
10
(hours:minutes:seconds:milliseconds)
(minutes:seconds:milliseconds)
(seconds)
A Template and example
Template using my mini DTD
<?xml version="1.0" encoding="UTF-8"?>
<!DOCTYPE tt SYSTEM "mini-tt.dtd">
<tt xml:lang="en" xmlns="http://www.w3.org/2006/04/ttaf1"
<head>
<styling>
</styling>
</head>
<body>
<div xml:lang="en">
xmlns:tts="http://www.w3.org/2006/04/ttaf1#styling">
Timed Text
137
<p begin="1" dur="4">Let's start</p>
</div>
</body>
</tt>
Example that works, see Flash video component tutorial for more.
<?xml version="1.0" encoding="UTF-8"?>
<!DOCTYPE tt SYSTEM "mini-tt.dtd">
<tt xml:lang="en" xmlns="http://www.w3.org/2006/04/ttaf1"
xmlns:tts="http://www.w3.org/2006/04/ttaf1#styling">
<head>
<styling>
<style id="title" tts:backgroundColor="transparent" tts:color="red" tts:fontSize="24"/>
</styling>
</head>
<body>
<div xml:lang="en">
<p begin="0" dur="9" style="title">Daniel's Office</p>
<p begin="5" dur="4">My Palm Tree (from NYC)</p>
<p begin="10" dur="13" style="title">Books ....</p>
<p begin="11" dur="7">My Bookshelf</p>
<p begin="18" dur="5">My favorite Flash Drawing <span tts:color="red">Book</span></p>
<p begin="24" dur="16" style="title">Computers ....</p>
<p begin="25" dur="5">My DELL XPS Laptop Flash machine</p>
<p begin="30" dur="5">My <span tts:backgroundColor="yellow" tts:color="black">Ubuntu Linux workstation</span></p>
<p begin="35" dur="5"><span tts:backgroundColor="transparent"></span>Working hard on Flash Tutorials using the Xemacs Editor</p>
<p begin="40" dur="4">The outside (not my bike)</p>
</div>
</body>
</tt>
Flash CS6 and examples
• Flash video captions tutorial
• Examples files are the same as for CS3 below...
Flash CS3 and examples
• Flash CS3 video component tutorial
• flash-cs3-video-simple-server-caption2.html [4]
• Grab the flash-cs3-video-video-simple-server-caption2.* files from
http://tecfa.unige.ch/guides/flash/ex/component-video-intro/
Timed Text
Links
• Timed-Text [1] W3C Home Page
• Timed Text (TT) Authoring Format 1.0 - Distribution Format Exchange Profile (DFXP) [5]
• Timed Text Markup Language (TTML) 1.0 [5]. W3C Recommendation 18 November 2010
• Timed Text (TT) Authoring Format 1.0 - Distribution Format Exchange Profile (DFXP) [6] OLD W3C Working
Draft 27 April 2006.
• What is Timed Text? [7], InDelv.com, Aug 2007.
• Timed Text Tags [8] (List of supported tabs, Adobe Flash)
References
[1]
[2]
[3]
[4]
[5]
[6]
[7]
http:/ / www. w3. org/ AudioVideo/ TT/
http:/ / www. aristote. asso. fr/ Presentations/ SMIL-2003/ P/ Michel/ Michel_all. htm
http:/ / livedocs. adobe. com/ flash/ 9. 0/ main/ 00000604. html
http:/ / tecfa. unige. ch/ guides/ flash/ ex/ component-video-intro/ flash-cs3-video-simple-server-caption2. html
http:/ / www. w3. org/ TR/ ttaf1-dfxp/
http:/ / www. w3. org/ TR/ 2006/ WD-ttaf1-dfxp-20060427/
http:/ / audio-video-images. indelv. com/ timed-text-the-basics. html
[8] http:/ / livedocs. adobe. com/ flash/ 9. 0/ main/ 00000611. html
Flash sound tutorial
Draft
Overview
Learning goals
Use sound (attach sound to frames and button frames)
Edit the sound envelope with the Flash tool
Load sound files with ActionScript
Play sound with ActionScript, both sound textures from the library and loaded sound files
Prerequisites
Flash CS6 desktop tutorial
Flash drawing tutorial
flash layers tutorial
flash button tutorial
Flash CS6 motion tweening tutorial or some other technique that uses the timeline
Moving on
The Flash article has a list of other tutorials.
Flash Video component tutorial
Quality
This text should technical people get going and may not be good enough for self-learning beginners. It can be
used as handout in a "hands-on" class. That is what Daniel K. Schneider made it for...
Level
138
Flash sound tutorial
It aims at beginners. More advanced features and tricks are not explained here.
Learning materials
Grab the various *.fla files from here:
http://tecfa.unige.ch/guides/flash/ex/sound-intro/
Alternative versions
Flash CS3 sound tutorial (old version)
Basics
Sound types
Flash can handle several sound formats:
•
•
•
•
•
AAC (Advanced Audio Coding):
AIFF (Audio Interchange File Format) - Mac only ?
MP3 (Moving Pictures Expert Group Level-Layer-3 Audio)
AVI (Audio Video Interleave)
WAV (Waveform Audio Format)
• AU (Sun)
(Some formats may depend on whether QuickTime is installed on your computer).
Best bet is to use MP3 format, since it is very popular. E.g. it is easy to find music or sound textures on the Internet.
Flash CS3 and CS4 provide some sounds in a library (Menu: Window -> Common Libraries -> TNT sounds). CS4
has a much better choice...
Sound imports to frames of the timeline
We shall explain the whole procedure using a simple animation example.
The animation with sound example [1] shows a motion animation with a global music sound track and 4 layers with
sound "textures" that are limited in time.
Source code:
• flash-cs6-cloud-animation-sound.fla [2]
• The sound clips are already in the library. Consult Sound Assets if you are looking for some free sounds. Also
consider using the built-in sound library: Menu Window -> Common libraries -> Sounds
Background sounds
Smaller sound files (not full CD tracks !) should be imported to the library.
To import à sound file
• File->Import->Import To library (or drag and drop).
Attaching sound to a frame
Step 1 - Create a new layer and import sound to a frame
You can attach sound to any frame via the properties panel
• Create a new layer for this sound (not mandatory, but good practice)
• Insert a keyframe (F7) where you want the sound to start
• Select a sound from the sound pull-down menu in the properties panel.
• Configure it in the same panel (see next)
139
Flash sound tutorial
140
Ideally, each sound should have its own layer. This way it is much easier to control fade in/outs, when to stop etc.
Flash sound layers
You also can see exactly how far the sound will extend on the timeline. Hit F5 or F7 (if you later want to stop the
sound) somewhere to the right.
Flash sound layers (full picture)
Step 2 - Configuration of sounds
In the configuration panel you can change certain parameters and also edit a bit.
Sync: Will defined how sound is synchronized with the timeline.
• Event: Sound plays until it is done (independently of the rest). It has its own "timeline". Also, if this sound is
triggered again (e.g. a user enters the same frame), a new sound will play even if the old one is not over.
• Start: Similar as event. Will play the sound when the frame loads but will not play it if the old sound is still
playing. Note: This doesn't always work as expected. Probably best to use together with the Stop (see below).
• Stop : Will stop the sound of a layer at this frame (therefore include it after a sound frame). Insert a new
keyframe (F7) where you want it to stop and just edit the properties.
Flash sound tutorial
• Stream: Will try to match the length of sound with the other layers, e.g. 20 frames of sound should play during
animation of 20 frames. After that it should stop. Sound as stream should not be looped. Use this for example for
comic strips (talking characters).
Repeat:
• You can repeat the sound as many times as you like (or even have it loop forever).
Effect:
• You can choose from various fade in/out and left/right options, but you probably want to do your own custom
fades (see next).
Editing sounds
Editing sound with the Edit Envelope editor
• Click in the sound layer in some frame where you have sound
• In the Properties Panel, Click the Edit ... button next to the Effect: field
• This opens the Edit Envelope sound volume editor.
Manipulation of the sound envelope
• You can drag left/right Time In and Time Out controls in middle pane. I.e. you can cut off sound from the either
the beginning or the end of the sound track.
• You can drag down volume controls (black lines on top) for the left and the right stereo channel
• Click to insert a new distortion point for these volume controls
• Up: means louder / maximum sound
• Down: means more silent / no sound
• Use the arrow (down left) to test
• At bottom right there are zoom buttons and a switch that either shows seconds or frames.
141
Flash sound tutorial
142
Flash CS6 Sound envelope editor
Example used
Animation with sound
• You can look at my published animation with sound example [3]. It shows a motion animation with a global music
sound track and 4 layers with sound "textures" that are limited in time.
• Source: flash-cs3-cloud-animation-sound.fla [4]
• You can grab all the files flash-cs6-cloud-animation-sound.* from this directory:
http://tecfa.unige.ch/guides/flash/ex6/sound-intro/
Attaching sound to buttons
You can attach sounds to buttons in the same manner as above.
•
•
•
•
•
Double-click on the button in the library panel
Edit the button's timeline (e.g. the mouse over, down and hit frames )
For each sound you want to attach, create a layer
Then insert a new keyframe (F7) and attach the sound
You may try to stop a sound (insert a new keyframe)
Flash sound tutorial
143
Flash CS3 Attaching sound to buttons
Button with sound files
• See the button with sound [5].
• Source: flash-cs3-button-sound.fla [6]
Load and play sounds with ActionScript
It is better to load sounds with ActionScript if your sound file is large, e.g. a background music or if you want to to
trigger a sound as a result of some complex user interaction. Select the frame where the sound should start (typically
in a "script" layer), then insert this kind of code with F9.
To load a sound from an external file:
var request:URLRequest = new URLRequest("track.mp3");
var your_sound:Sound = new Sound();
your_sound.load(request);
Alternatively, to load a sound from the library:
• Export the sound for ActionScript 3:
• Right click on the sound in the library, select properties
• Select the ActionScript tab
• Tick Export for ActionScript
• Define the classname, e.g name class for a file called "noise.mp3" something like "Noise_sound".
• Then create a new sound from this class (just this single line)
var cool_noise_sound:Sound = new Noise_sound();
Flash sound tutorial
To play your sounds:
your_sound.play();
cool_noise_sound.play ();
To play 5 loops:
your_sound.play(0,5);
To stop all sounds (this is a static method, just insert the line as is).
SoundMixer.stopAll();
Stopping a single sound takes some more code, your_sound.stop() will not work, since you will have to stop a Sound
channel (as opposed to just the sound file). Use the following code fragment. See the on/off button example just
below for a complete example.
var channel:SoundChannel;
channel = s.play();
.....
channel.stop();
For a on/off button
Select the symbol which is aimed to be the button, in the frame where the on / off has to happen. Select the code
snippet "click to play/stop sound" in the audio and video category. Give an occurrence name to your symbol and
target your soundfile name instead of the flash example.
/* Click to Play/Stop Sound
Clicking on the symbol instance stops the sound.
Clicking on the symbol instance plays the specified sound again.
*/
stop_start.addEventListener(MouseEvent.CLICK, start_stop_sound);
var fl_SC:SoundChannel;
var s:Sound = new Sound(new URLRequest("music.mp3"));
//This variable keeps track of whether you want to play or stop the
sound
var fl_ToPlay:Boolean = true;
function start_stop_sound(evt:MouseEvent):void
{
// want to play
if (fl_ToPlay)
{
// Need to capture the SoundChannel that is used to play
fl_SC = s.play();
}
else
{
144
Flash sound tutorial
145
fl_SC.stop();
}
// switch state of wanting to play
fl_ToPlay = ! fl_ToPlay;
}
Example code:
• flash-cs6-stop-start-sound.fla [7] (source)
• flash-cs6-stop-start-sound.html [8]
Example using the "play()" and "stopAll()" methods
For an example used in the Flash drag and drop tutorial, look at flash-cs3-drag-and-drop-matching-3.* [9]
• Source: flash-cs3-drag-and-drop-matching-3.fla [10]
Play sounds randomly with one button
With this exemple you will learn how to play different sounds with one button.
import flash.utils.Dictionary;
import flash.events.MouseEvent;
//loading sounds (in our case the four sounds correspond to the sounds
of the notes C#, D#, F#, G#)
var request:URLRequest = new
URLRequest("http://tecfaetu.unige.ch/etu-maltt/tetris/karanis0/stic-1/ex6/C%23_2.mp3");
var ci_diese:Sound = new Sound();
ci_diese.load(request);
var request_two:URLRequest = new
URLRequest("http://tecfaetu.unige.ch/etu-maltt/tetris/karanis0/stic-1/ex6/D%23.mp3");
var d_diese:Sound = new Sound();
d_diese.load(request_two);
var request_three:URLRequest = new
URLRequest("http://tecfaetu.unige.ch/etu-maltt/tetris/karanis0/stic-1/ex6/F%23.mp3");
var f_diese:Sound = new Sound();
f_diese.load(request_three);
var request_four:URLRequest = new
URLRequest("http://tecfaetu.unige.ch/etu-maltt/tetris/karanis0/stic-1/ex6/G%23.mp3");
var g_diese:Sound = new Sound();
g_diese.load(request_four);
var play_liste = 0;
// dictionary which associates numbers with sounds in order to play the
sounds randomly
Flash sound tutorial
var dictSounds = new Dictionary ();
dictSounds[1] = d_diese;
dictSounds[2] = ci_diese;
dictSounds[3] = f_diese;
dictSounds[4] = g_diese;
// changing the cursor into hand over button (in our case we created an
instance on the scene and we named it "play_sounds")
play_sounds.buttonMode = true;
// Listener on the button that will play our sounds
play_sounds.addEventListener (MouseEvent.MOUSE_DOWN, mouseDownHandler);
// this function will play the sound that correspond to the random
number.
// by using the random function we create numbers between 1 and 4.
function mouseDownHandler (event:MouseEvent) : void {
play_liste = Math.ceil(Math.random () *4);
dictSounds[play_liste].play ();
}
Links
• Sound Assets (look this up if you need websites with free sounds)
Documentation
• Working with sound [11] (Adobe), Using sounds, some AS2, no AS3
• Sound [12] (Adobe AS3 reference)
• SoundMixer [13] (Adobe AS3 reference)
• Maths functions including Random [14]
References
[1] http:/ / tecfa. unige. ch/ guides/ flash/ ex6/ sound-intro/ flash-cs6-cloud-animation-sound. html
[2] http:/ / tecfa. unige. ch/ guides/ flash/ ex6/ sound-intro/ flash-cs6-cloud-animation-sound. fla
[3] http:/ / tecfa. unige. ch/ guides/ flash/ ex/ sound-intro/ flash-cs3-cloud-animation-sound. html
[4] http:/ / tecfa. unige. ch/ guides/ flash/ ex/ sound-intro/ flash-cs3-cloud-animation-sound. fla
[5] http:/ / tecfa. unige. ch/ guides/ flash/ ex/ sound-intro/ flash-cs3-button-sound. html
[6] http:/ / tecfa. unige. ch/ guides/ flash/ ex/ sound-intro/ flash-cs3-button-sound. fla
[7] http:/ / tecfa. unige. ch/ guides/ flash/ ex6/ sound-intro/ flash-cs6-stop-start-sound. fla
[8] http:/ / tecfa. unige. ch/ guides/ flash/ ex6/ sound-intro/ flash-cs6-stop-start-sound. html
[9] http:/ / tecfa. unige. ch/ guides/ flash/ ex/ drag-and-drop-intro/ flash-cs3-drag-and-drop-matching-3. html
[10] http:/ / tecfa. unige. ch/ guides/ flash/ ex/ drag-and-drop-intro/ flash-cs3-drag-and-drop-matching-3. fla
[11] http:/ / livedocs. adobe. com/ flash/ 9. 0/ UsingFlash/ help. html?content=WSd60f23110762d6b883b18f10cb1fe1af6-7ce9. html
[12] http:/ / livedocs. adobe. com/ flash/ 9. 0/ ActionScriptLangRefV3/ flash/ media/ Sound. html
[13] http:/ / livedocs. adobe. com/ flash/ 9. 0/ ActionScriptLangRefV3/ flash/ media/ SoundMixer. html
[14] http:/ / www. actionscript. org/ resources/ articles/ 90/ 1/ Maths-Functions-including-Random/ Page1. html
146
Clipart
147
Clipart
Definition
Clip art, in the graphic arts, refers to pre-made images used to illustrate any medium. Clip art is divided into two
different data types represented by many different graphics file formats: bitmap and vector art. Clip art vendors may
provide images of just one type or both. (Wikipedia)
This article is also part of the Flash tutorials.
Formats used in repositories
The most common bitmap formats for clipart distributed on the web is *.jpg, *.png, and *.fig. But one may also find
*.bmp (for smaller things), or TIFF and TGA.
Most common vector formats are:
• Adobe's EPS [1] (Encapsulated PostScript), also the related PDF format.
• Microsoft WMF [2] (Windows Metafile) and its variants
• EMF - Enhanced Metafile)
• WMZ - Compressed Windows Metafile
• EMZ - Compressed Windows Enhanced Metafile
• SVG (in the open source community)
• Illustrator *.ai file (rarely)
Importing clipart to Flash
Most often, clipart is distributed in *.wmf format (Windows Meta File format) or the more recent *.emf (Windows
extended ...). Flash can handle this format. It also can handle:
•
•
•
•
•
Illustrator *.ai format,
Enhanced Windows Metafile *.emf (handles curves better than WMF)
Freehand,
Flash *.swf
Autocad *.dxf.
It can not handle:
• SVG
• EPS (to verify)
To import, either copy/paste it from an open application or use File->Import, either to stage or to library.
If you own Adobe Illustrator, first import to Illustrator, then select, copy and paste the Clipart from Illustrator to
Flash. Illustrator can handle many formats, SVG and EPS for example.
Since most open source clipart is in SVG (OpenClipArt [4] which Adobe Flash can't import, I suggest sending angry
e-mail to Adobes. They do have the technology and it would be a matter of hours to implement this feature. In the
meantime use one of the many opensource convertors or the free Inkscape [3] SVG drawing program and then either
save to *.wmf or *.emf. You probably will loose some drawing elements.
If you only need to recover shapes (as opposed to a full vector graphics structure): Select an object in a drawing
program (such as Inksapce), then copy it. In Flash, you then can use Edit->Paste Special and select Picture
(Metafile). This will paste the drawing as a group of shapes that you then can explode.... no lines.
Clipart
148
Using Fonts as ClipArt
In many graphic tools you can select a font with pictures, e.g. WebDings.
In Flash
•
•
•
•
•
•
Use text tool
In the properties panel, set the character size to something big, e.g. 200pt
Select a "....dings" font, e.g. Webdings.
Type a letter
Break it apart
Then menu Modify->Unition
Tip: Under Windows, select programs->Accessories->System Tools->Character tables. Explore a table. If you like a
"letter art", then select and copy/paste to Flash, google sketchup or any other tool that can handle text.
See webdings and wingdings for pictures of these fonts.
Clipart repositories
We are mostly interested in vector formats. Alternatively, you may also search through other applications you
installed on your computer, e.g. Office products like Word and Powerpoint and the Open Office equivalent.
Indexes
It is extremly difficult to find good free clipart sites. Best bet is really the Open Clip Art Library
have to transform SVG into another vector format, e.g. if you work with Flash.
[4]
, but then may
• Clip Art [4] (DMOZ, most links are junk).
• The Big List of Clip Art Topics [5] (about.com) Also fairly useless for finding vector images.
• Cliparts index on the widged wiki [6], handpicked and categorized by license (100% free, free for education).
Extra link for "Images with an Education Theme"
• photobucket [7]svg, png, animations to edit online,download, and share (free/cheap pro membership)
In SVG Format
SVG became the most standard format in the open source community. SVG also is part of HTML5. Many
commercial programs can import SVG, but some like Flash or Stitch Era embroidery software can not. In this case
use you can for instance:
• Import to Illustrator or Corel Draw, then either copy/paste to the other application or import the proprietary
format (e.g. *.ai)
• Open with the free Inkscape [3] tool and export as *.emf (Enhanced Windows Metafile) (worked for me), *.ai
(Illustrator) or *.dxf (Autocad) and then import to Flash (import of the two latter didn't work for me when I last
tested a few years ago)
•
•
•
•
Open Clip Art Library [4] (SVG and PNG).
The Noun project [8] (sign-up required)
Files from the Openclipart library [9]
Nuvola SVG icons [10]
Clipart
149
Windows Meta File Repositories
Free
• free-clip-art.com [11]
Commercial
• Graphicsfactory [12]
• Prodraw [13] (some free bitmaps)
EPS File Repositories
(Encapsulated PostScript)
• Web Design Blog [14]
• vecteezy [15] (stupid name, cool vectors)
AI (Illustrator Repositories
• vecteezy [15] (stupid name, cool vectors). The ones I tried give you a zip with EPS/AI/JPEG inside.
• Rick Johnson/Graffix [16] Clip art for technical Illustrators. Some free isometric building blocks.
Bitmaps only repositories
•
•
•
•
•
•
Nuvola icons [17], see also Project Nuvola 2.0+ [18]
School Clip Art [19] (only bitmaps)
Inki's Clipart [20]
Clip Project [21]
Wp Clipart [22]
Best of Clipart [23] (needs registration)
Other Links
File formats
•
•
•
•
Fileformat.Info [24]
File format [25] (Overview Wikipedia)
List of file formats [26](Wikipedia). This is quite complete.
Alphabetical list of file extensions [27] (Wikipedia). This is quite complete.
General
• Clip art [28] (Wikipedia article)
• Open Clip Art Library [29] (Wikipedia entry)
Clipart
150
Software
Most graphics vector graphics editors can import/export various formats.
• Comparison of vector graphics editors [30] (Wikipedia).
• List of vector graphics editors [31] (Wikipedia)
Free online tools
• SVG to JPEG/PNG/TIFF [32] at fileformat.info
Free Vector editors
• Inkscape [33]
• OpenOffice Draw [34]
References
[1]
[2]
[3]
[4]
[5]
[6]
http:/ / en. wikipedia. org/ wiki/ Encapsulated_PostScript
http:/ / en. wikipedia. org/ wiki/ Windows_Metafile
http:/ / inkscape. org/
http:/ / www. dmoz. org/ Computers/ Graphics/ Clip_Art/
http:/ / webclipart. about. com/ od/ webclipartatoz/ l/ blnettop. htm
http:/ / www. widged. com/ wiki/ doku. php?id=en:assets:medias:cliparts:cliparts
[7] http:/ / photobucket. com/
[8] http:/ / thenounproject. com/
[9] http:/ / commons. uncyclomedia. org/ wiki/ Category:Openclipart
[10] http:/ / commons. wikimedia. org/ wiki/ Category:Nuvola_SVG_icons
[11] http:/ / www. free-clip-art. com/
[12] http:/ / www. graphicsfactory. com/
[13] http:/ / www. prodraw. net/ cartoon/
[14] http:/ / www. garcya. us/ blog/ free-vector-graphics/
[15] http:/ / www. vecteezy. com/
[16] http:/ / rj-graffix. com/ clipart. html
[17] http:/ / commons. wikimedia. org/ wiki/ Nuvola
[18] http:/ / commons. wikimedia. org/ wiki/ Commons:Project_Nuvola_2. 0+
[19] http:/ / www. school-clip-art. com/
[20] http:/ / www. inki. com/ clipart/ textlist. php
[21] http:/ / www. clipproject. info/
[22] http:/ / www. wpclipart. com/ index. html
[23] http:/ / www. best-of-clipart. com/
[24] http:/ / www. fileformat. info/
[25] http:/ / en. wikipedia. org/ wiki/ File_format
[26] http:/ / en. wikipedia. org/ wiki/ List_of_file_formats
[27] http:/ / en. wikipedia. org/ wiki/ Alphabetical_list_of_file_extensions
[28] http:/ / en. wikipedia. org/ wiki/ Clipart
[29] http:/ / en. wikipedia. org/ wiki/ Open_Clip_Art_Library
[30] http:/ / en. wikipedia. org/ wiki/ Comparison_of_vector_graphics_editors
[31] http:/ / en. wikipedia. org/ wiki/ List_of_vector_graphics_editors
[32] http:/ / www. fileformat. info/ convert/ image/ svg2raster. htm
[33] http:/ / en. wikipedia. org/ wiki/ Inkscape
[34] http:/ / en. wikipedia. org/ wiki/ OpenOffice. org_Draw
Texture
151
Texture
Draft
Definition
Texture mapping is a method for adding detail, surface texture, or colour to a computer-generated graphic or 3D
model. A texture map is applied (mapped) to the surface of a shape, or polygon. This process is akin to applying
patterned paper to a plain white box. (Wikipedia [1])
In particular to thanks computer game technology, texture mapping has become very sophisticated. (Start reading
from Wikipedia's texture mapping article [1] and follow up the specialized articles [2])
This article is also part of the Flash tutorials
Types of textures
(This needs to be written ....)
For 2D artwork, you should distinguish between textures you apply as a whole to an object (e.g. door) and textures
that you use to "paint" tiles. The latter should be tileable, i.e. not show artificial borders.
Importing textures into Flash
You can use textures as paint. Here is a short "how to"
• Open the color panel (Window->Color). Then select type: Bitmap from the pull-down menu. Import the bitmap to
the libray and select it.
• Then paint the outline of your textured area with the brush tool. You probably should use the "Paint behind
mode".
• Then fill the rest with the paint bucket.
Note:
• Since a texture file is just an image, you also can use it as image of course, then break it apart etc and apply a few
transformations to it, e.g. make it smaller or bigger.
• Bitmap fills can also be distorted with the Gradient Transform tool
Texture repositories
Most high quality textures are sold commercially, but some commercial sites give out free samples. You also may
dig in your computer. If you have games installed, e.g. Neverwinter Nights there are directories with lots of textures,
but these are probably under copyright. Unfortunately, searching for free textures on the Internet is trouble. Most of
the time you stumble on sites that just contain links and adds. But there are some excellent free and commercial
resources. Below a few that include free textures.
•
•
•
•
•
•
A-Z Textures [3] Free high resolution textures for commercial and non-commercial use.
One Odd Dude / Free textures [4]
The Fat Strawberry [5] (LinkWare, i.e. you must provide a link to this site, if you use a texture).
Free stuff from textureworks.com [6]
KTN3D [7] Large choice, Free for none commercial use.
2dvalley.com [8]. Smaller collection of free textures
• 2textured.com [9] Large choice (no copyright indication)
• Free3DTextures.com [10] Large choice of free textures.
Texture
•
•
•
•
•
•
152
Pixeldecor [11] Tapestry-like textures. Free only for desktop use.
Freetextures from m3corp [12] (but too much publicity to cope with).
Free Textures created for Elephants Dream [13]
Free Seamless Background Textures [14] from absolutecross.com.
Textures index [15] on the widged wiki, handpicked, no information on copyright
Squifingers patterns [16]. Over 150 free patterns in *.gif format. By Travis Beckham.
Links
• Texture mapping [1] (Wikipedia)
• Textures with Photoshop [3] from DadyyCool.
References
[1]
[2]
[3]
[4]
[5]
http:/ / en. wikipedia. org/ wiki/ Texture_mapping
http:/ / en. wikipedia. org/ wiki/ Texture_mapping#See_also
http:/ / www. aztextures. com/
http:/ / www. oneodddude. net/ FreeTextures. php
http:/ / www. fatstrawberry. com/
[6] http:/ / www. textureworks. com/ freestuff. html
[7] http:/ / ktn3d. com/
[8] http:/ / www. 2dvalley. com/
[9] http:/ / www. 2textured. com/ main. php
[10] http:/ / free3dstextures. com/
[11] http:/ / www. pixeldecor. com/
[12] http:/ / www. m3corp. com/ a/ download/ 3d_textures/ pages/ index. htm
[13] http:/ / www. akebulan. com/ Free_Textures. html
[14] http:/ / www. absolutecross. com/ graphics/ textures/
[15] http:/ / www. widged. com/ wiki/ doku. php?id=en:assets:game-content:texture:texture
[16] http:/ / www. squidfingers. com/ patterns/
153
Advanced drawing
Flash object transform tutorial
Draft
Overview
Learning goals
Learn about basic Flash 9 - 11 (CS3 - CS6) object transformations with various tools.
Prerequisites
Flash CS3 desktop tutorial or Flash CS4 desktop tutorial or Flash CS6 desktop tutorial
Flash drawing tutorial
Moving on
Select one from the Flash tutorials.
Probably you'd like to animate shapes (Flash shape tweening tutorial)
Quality
Screenshots were made with CS3. However the logic is the same for later versions (CS4,5,6). This text should
technical people get going and may not be good enough for self-learning beginners. It can be used as handout
in a "hands-on" class. That is what Daniel K. Schneider made it for...
Level
It aims at beginners. More advanced features and tricks are not explained here.
Materials
None, just play with your own objects :)
Alternative version
Flash CS3 object transform tutorial
Flash has quite powerful object transformation tools. You should learn about these in order to create more
sophisticated drawings and/or morphing (shape tweening) animations animations.
Typical hierarchy of an object
Graphics is what the users can see. Basically, most Flash objects do have some graphics inside. These may be
grouped or layered if needed. The most primitive level are "shapes". E.g. strokes do have shape inside.
Symbol
Group(s)
Drawing object(s)
Shape(s)
Various drawing strategies for complex objects
1. Create shapes: Draw/paint in merge mode. Strokes will go in front, fills made with the paing brush to the back.
But both will produce just shapes. Once you are happy with the result, group and/or convert to symbol. You also
could "union" the shapes into a Drawing object.
Flash object transform tutorial
154
2. Create drawing objects: Draw in object mode, then group and/or convert to symbol. You can edit the shape of a
drawing object by double clicking on it
3. Carve out shapes with the eraser.
4. Transform a drawing object or shape with the select tool, envelope transforms (Free transform and Envelope
transform tools), and the sub-selection tool.
5. Assemble objects (see Flash arranging objects tutorial), then any of the above.
Executive summary - transform tools in the tools panel
• The Select tool allows to quickly distort an unselected object by
moving the cursor close to it until it changes to curve or edge shape.
The you simply drag the mouse. (BTW this is a very dangerous tool,
by mistake you can dammage your drawings if you don't lock the
other layers ...)
• Use the Free Transform tool
to make simple transforms of the
envelope of a shape, e.g. learn how to use the envelope transform.
Tools for transformations in the tools panel
• The Subselection tool allows draging "squares" (anchor/distortion points) and turn/drag circles (curve control
handlers). You can use the controls underneath the pen tool to change the nature of these so-called anchor points.
• With the Eraser
you can "carve" out objects (like a woodcutter or a chainsaw artist).
• Anchor pointer tools (underneath the pen tool) allow to change the type of anchor points.
Executive summary - transform tools in other places
• The menu Modify->Transform can get you directly into the modes of one of these tools.
• The Transform panel (Window->Transform) lets do you the default free transforms by entering property values
for size, rotate and skew.
• Hit CTRL-ALT-S to resize or rotate a selected object by entering a number.
• The menu Modify->Shape has a few tools to automatically adjust shape.
• Finally, there are also transformation icons on the main toolbar (which is not shown by default, use
Window->Toolbars->Main).
There is a rather confusing amount of tools. Probably I forgot something. Anyhow, let's now look in detail at the
major tools and strategies.
Path manipulation with the select tool
The select tool
strangely enough has two functions. These are entirely different and may lead to confusion.
• Select objects
• Distort objects, i.e. make changes to paths that define lines and outlines
The selection tool is the easiest way for distorting objects, read on ...
Default behaviour of the select tool
If you click on an object like an oval or if you select it with a selection box you see this:
• A hooked cross icon
• A white circle in the middle of the selected object (or selected objects)
You then can reposition this drawing, but that's not what we are interested in right now. The only important thing
you may remember is the following:
• when you see a cross, it means that you successfully selected the object.
• The white dot represents the center, e.g the point where an object will snap to a motion guide line.
Flash object transform tutorial
A simple oval
... this is not what you want, if your purpose it to change its outline...
Let's now make a banana
Ok, now let's distort an object. Let's start with an oval drawn in object mode. See the picture above or below.
Make a rounded banana with the selection tool
•
•
•
•
First, deselect everything (including the banana), e.g. click on the gray workspace area.
Select the select tool.
Then move it close to the stroke (outline).
When the cursor turns into a curve, then hold down the mouse and drag
Select tool - curve icon
Here is a result, a nice banana:
A simple oval turned into a banana
Make sharper ends
•
•
•
•
Copy/paste the banana, if you like the old one. (select, ctrl-c, ctrl-v)
Again, deselect everything
Then hold down the ALT key and slowly search around the ends of the banana.
If you see the angle icon, then drag. The angle icon won't show up everywhere, it's basically meant to drag
corners.
155
Flash object transform tutorial
Select tool - curve icon
Result: two bananas of different shape:
A sharp and a round
banana
You then can fine tune things with the subselection tool (see below).
Turning lines
• To turn a line (made with the line tool, not the pencil !) use the select tool and move to one end. When the edge
icon shows up, you can turn/stretch a line.
Edge/angle icon - turning/stretching a line
Hint: To rotate around a random rotation point, see the free transform tool below
The nature of paths
In order to better manipulate graphics, you should understand how their "shapes" are defined by so-called paths. You
can come back to this section later, if you wish. According to Adobe [17], you create a line called a path whenever
you draw a line or shape. When you draw a polygon, it will be made up of one or more path.
A path is made up of one or more straight or curved segments. The beginning and end of each segment is denoted by
anchor points, which work like pins holding a wire in place. A path can be closed (for example, a circle), or open,
with distinct endpoints (for example, a wavy line).
You change the shape of a path
• by dragging its anchor points,
156
Flash object transform tutorial
• by dragging the direction points at the end of direction lines that appear at anchor points,
• by dragging the path segment itself
• by adding or removing anchor points
There are various occasions when you will have to work with path, e.g. adjusting a drawing with the subselection
tool, envelope transforms, inverse kinematics, motion animation. The graphical representation of an anchor point
may differ from tool to tool and from Flash version to Flash version.
Components of a path
•
•
•
•
•
•
A: Selected (solid) endpoint
B. Selected anchor point
C. Unselected anchor point
D. Curved path segment
E. Direction point
F. Direction line.
Paths can have two kinds of anchor points: corner points and smooth points. At a corner point, a path abruptly
changes direction. At a smooth point, path segments are connected as a continuous curve. You can draw a path using
any combination of corner and smooth points. If you draw the wrong type of point, you can always change it.
• A corner point can connect any two straight or curved segments
• A smooth point always connects two curved segments.
Points on a path
• A. Four corner points
• B. Four smooth points
• C. Combination of corner and smooth points.
• A corner point can connect both straight segments and curved segments.
Corner points
A path outline is called a stroke. A color or gradient applied to an open or closed path interior area is called a fill. A
stroke can have weight (thickness), color, and a dash pattern. After you create a path or shape, you can change the
157
Flash object transform tutorial
characteristics of its stroke and fill.
Let's now see how we can use curve controls, i.e. direction lines and direction points in order to adjust the curves.
When you select an anchor point that connects curved segments (or select the segment itself), the anchor points of
the connecting segments display direction handles, which consist of direction lines that end in direction points. The
angle and length of the direction lines determine the shape and size of the curved segments. Moving the direction
points reshapes the curves.
Direction points and direction lines
After selecting an anchor point (left), direction lines appear on any curved segments connected by the anchor point
(right).
A smooth point always has two direction lines, which move together as a single, straight unit. When you move a
direction line on a smooth point, the curved segments on both sides of the point are adjusted simultaneously,
maintaining a continuous curve at that anchor point.
In comparison, a corner point can have two, one, or no direction lines, depending on whether it joins two, one, or no
curved segments, respectively. Corner point direction lines maintain the corner by using different angles. When you
move a direction line on a corner point, only the curve on the same side of the point as that direction line is adjusted.
Adjusting direction lines on a smooth point (left)
and a corner point (right)
Direction lines are always tangent to (perpendicular to the radius of) the curve at the anchor points. The angle of
each direction line determines the slope of the curve, and the length of each direction line determines the height, or
depth, of the curve.
Moving and resizing direction lines changes the
slope of curves
158
Flash object transform tutorial
Transforming anchor points
There are shortcuts, but unless you draw often we suggest to use the tools hidden underneath the Pen tool.
Underneath the pen tool ...
Changing the type of anchor point
• To change a corner point into an smooth point. Hold down the ALT key and drag (tested with CS6)
• To change a smooth point into a corner point. Use the the Convert Anchor Point tool or hit C. It is hidden
underneath the Pen tool.
Adding deleting anchor points
• Use the add anchor point tool
• Use the Delete anchor point tool
The Free transform tool
Make sure that you understand drawing basics, i.e. have an idea what kinds of tools you got in the tools panel. If you
don't, please go read the Flash drawing tutorial.
Features of the free transform tool
The Free transform tool can be found in the tools panel and allows to do do several transformation
• By default: Scale, rotate, skew and distort
• Envelope transforms
• Distorts (but see the selection tool)
So again, you face a multipurpose tool. You can define its different variants by selecting different mode in the
options part of the tools panel (lower end). Read on ...
The Transform panel
Instead of dragging around handles with the Free Transform tool as explained below, you also may change
transformation values in the Transform panel. That's useful for technical drawings.
Get this panel with the Window->Transform menu. I usually have this docked somewhere to the right as in the
following screen capture. (If you don't know how to dock, please read the Flash CS6 desktop tutorial).
159
Flash object transform tutorial
160
Free Transform tool (used here) and Transform panel
Simple transformations using the default settings
By default the free transform tool let's you scale, rotate, skew.
To select an object for transforms
• Select the Free Transform tool
• Click on an object (or the other way round)
The transformation controls
• You object will be in a rectangular box with a distortion control in each corner and one in the middle of each line.
To scale in both directions (x and y)
• Grab a corner and drag as in the screen dump below:
X and Y size transform
• If you want to scale a graphic and keep the proportions, hold down the SHIFT key.
To scale into one direction (x or y)
Flash object transform tutorial
• Drag one of the points in the center of a line (of the surrounding box).
To rotate an object
• Move your mouse outside near a corner. You will see a rotation icon.
• You then can turn around the object.
Rotate with the transform tool
You also will see the changes in the transformation panel. Btw. you can move the rotation point (see next section).
To skew an object
• Move your mouse over a stroke (line), but not over a distortion box
• You will see some vertical or horizontal double arrow (skew icon)
• Then drag ...
Skew with the transform tool
Rotations
• By default an object will rotate around the white circle in the middle. But you can move this rotation point. Grab
it with the mouse and move it where ever you want. Flash also gives some help. E.g. if the drawing is a line it will
display the center of the line and you then can move the point to one of its ends for example.
In the following screendump we have a picture of a stick man and we'd like turn his right arm. To do so:
• Click on the Free Transform tool (standard options as above)
• Then move the little dot in the right arm towards the "inner end" of the stick man. The cursor should have a little
circle next to it in this mode. See the screen shot below.
161
Flash object transform tutorial
Change rotation point with the Free Transform Tool
After that you can rotate the arm around its new rotation point (as described in the previous section).
• Again, use the Free Transform tool (standard options)
Rotate around the new rotation point with the
Free Transform Tool
The standard options of the transform tool allows to rotate, resize and distort an object. You have to work with
options for more complex transforms.
162
Flash object transform tutorial
Envelope transforms
Envelope transforms allow to change the shape of an object in a more controlled way. It works on both shapes and
objects. While this tool is an option of the "free transform tool", it actually behaves in a very different way.
Therefore consider it to be a different tool.
Let's now make a designer chair starting with a simple rectangle.
Step 1 - Draw a rectangle
• Do it with the rectangle tool.
Step 2 - Go into envelope transform
• Select the object first, i.e. the rectangle.
• Click on the Free Transform Tool.
• Select the Envelope option (see the screen capture below).
Envelope Transform with the Free transform tool
Step 3 - Transform
• Drag any little square. These are called distortion points.
• Once you start transforming you also get curve control handles (the little circles). You can turn these in order to
smoothen out curves. See the screendump just below. Or you can drag them to add new distortion (or combine
both movements of course)
163
Flash object transform tutorial
164
Envelope transforming to make a designer chair
More transforms with the Modify menu
The modify menu includes a large palette of tools. Most can be found in other places, but some are unique...
Transform Tools in the Modify menu
The Menu Modify->Transform gives you the choice of several kinds of transformations
• Select the object(s) to be transformed first
• Then select from several options
The transform group in the Modify menu
Basically, through the menu one can select all the Free Transform tool options, but there is more ...
Flash object transform tutorial
Transforming Shapes
The Shape Tools
You can smoothen out shapes, make them blurry or straigthen, etc.
• Menu (Modify->Shape) has a few tools
You can for example:
•
•
•
•
Smooth, i.e. take away some edges
Reduce the amount of edges (optimize)
Add soft edges, i.e. make the borders "blurry"
Straighten
Here is an example of soft edges and straighten:
Modify->Shape Tools
Some of the operations do not work with composite objects. E.g. in order to add soft edges
1. Ungroup / break groups apart
2. Union the parts into a single shape
Subtractive geometry
The Modify menu Combine objects group allows to
• Union two or more single shapes and/or drawing objects into a single drawing object. If you sketch a drawing,
e.g. human, that you later wish to fill with some paint, use union first !! The paint can most often doesn't
work on a selection, therefore consider union it ....
• Intersect drawing objects
• Punch a drawing object into others (the one on top will punch)
• Use a drawing object to crop drawings underneath
165
Flash object transform tutorial
Punch a moon (blue/right circle punches yellow/left one)
The Subselection tool
This tool allows envelope transformations or rather fixing envelope transforms made with the selection tool or with
the transform tool in envelope or distortion mode. Handles work like in the Envelope transform tool.
Let us recall, that the little squares are anchor points, i.e. they define the outline of a shape. You also can look at
these as "distortion" points. At least in CS6, when you select an anchor point, it turns round (which is annoying).
• You can drag these anywhere to change the shape of the object
• You also can drag them along the stroke before you drag them out
• You can delete these. Move the cursor over one of these and when the cursor changes shape, click first, then hit
delete. This will simplify a stroke.
As we explained in the section on paths, the little dots are curve control handles with which you can adjust the
curves in two ways:
• You can turn them to change the curve: smooth or sharpen.
• You also can drag these around to change the direction, angle and size of a curve
To get curve control handles click on a distortion point. If the anchor point is a corner point, try dragging it out
holding down the ALT key.
166
Flash object transform tutorial
Dragging out a shape with a curve control
If you can't see well what your are doing (I can't in 100% mode), zoom in like 200 or 400%. However, the little
squares and dots will remain small ...
The Eraser tool
The eraser tool allows you to carve objects. In the options / controls in the tool panel, you can change the way the
eraser works.
Erasing shapes (drawn in merge mode) and graphics objects (drawn in object mode) doesn't lead exactly to the same
results. When you carve an object it remains an object. When you carve a (single) shape, it will divide into other
shapes.
We shall not explain much here, better try it out ...
• Draw three nice fat ovals with a fat stroke. Two of them overlapping
• Then, select the eraser mode. This works like the paint tool
• Use Ctrl-Z to undo what you have done .... so you can try other options.
Eraser modes
Here are the modes:
•
•
•
•
•
Erase normal: Will erase as you paint
Erase fill: Will only erase fills (paint)
Erase lines: Will only erase strokes (lines, contours of objects)
Erase selected fills: Will only erase fills that you have selected (hold down the SHIFT key to select several)
Erase inside: Will erase fills inside an object if you start erasing inside the object.
In the following screen dump we used the 'erase fill option to take out fills from the oval and the rectangle.
167
Flash object transform tutorial
168
Eraser options
The faucet
• Will kill any shape on which you click. It makes a distinction though between the stroke and the fill of an object.
Eraser shape
• You can select different sizes of circles and rectangles
• Use rectangles to carve off rectangles and circles to carve of round stuff.
The Lasso tool
Includes a magic wand (see the controls at the bottom of the tools panel)
(to be continued some day)
Moving on
If you already didn't do it, try
• the Flash frame-by-frame animation tutorial, i.e. learn how animate movement, size, tint, etc.
• the Flash shape tweening tutorial, i.e. learn how to do morphing animations.
In the same line of work as object transformation:
• Flash arranging objects tutorial
Flash arranging objects tutorial
Flash arranging objects tutorial
Draft
Overview
Learning goals
Learn to align, stack, combine, break objects in Flash CS3
Flash level
CS3. However, principles are the same for CS4 to CS6
Prerequisites
Flash CS3 desktop tutorial
Flash layers tutorial (first part)
Flash drawing tutorial (at least some of it)
Quality and level
This text should technical people get going. It's probably not good enough for beginners, but may be used as
handout in "hands-on" class. That is what Daniel K. Schneider made it for...
It aims at beginners. More advanced features and tricks are not explained here.
Snapping
Snapping refers to a kind of assistance you may get for technical drawings. It helps to position an object with respect
to the others and without using the Align Panel.
You can tune the desktop to various snapping modes
• Menu View->Snapping or right-click on the workspace
• Then turn on/off snapping modes or better click on Edit snapping
I usually just have these ones. (But more often I turn snapping off and then rather align objects with the align panel).
• Snap align
• Snap to objects
• Horizontal and Vertical Center alignment (will also allow to snap against centers of objects, otherwise you only
can snap against sides)
169
Flash arranging objects tutorial
170
Edit Snapping
Snap to Objects
• Will snap an object you move against parts of an object. Move slowly...
Snap Align (when snap objects is also on)
• Will snap to dotted lines that will appear
Snap to Grid
• Works when you turn on the Grid with menu View->Grid
• Useful when you do technical drawings for instance.
Snap to Guides
• Same principle as snap to grid. (View->Guides).
Snap to Pixels
• For high precision work. Magnify the stage to at least 400%.
Object spacing does what its name says:
• Horizontal or vertical object spacing defines the snapping distance in relation to the edges of other objects
• Note: By default, an object snaps to center of a line ! E.g. if distance is 0px and your lines are 5px wide, your
objects will overlap.
Disclaimer: I am not sure what certain combinations do. Here is for example what happens if you drag the red
rectangle close to the yellow one in snap align / snap objects mode with zero object spacing:
Flash arranging objects tutorial
171
Align object snapping
Aligning objects
To align objects on the stage, there exist three solutions:
• Use the align panel (Open it with Window->Align or CTRL-K and dock it next to the Colors panel
• Use menu Modify->Align
• Use the shortcuts (see Flash CS3 keyboard shortcuts)
Various align interfaces of Flash CS3
With the align panel, you can align, distribute or resize a series of selected objects.
Flash arranging objects tutorial
172
There are two fundamental modes:
• Align/distribute referring to the stage. I.e. you may want to align a picture in the center of the stage.
• Align one or several objects with the first selected, or distribute among the first two selected objects.
The align panel (with "to stage" option unticked):
Various align interfaces of Flash CS3
To see what each icon does, move your mouse cursor over it. The align panel icons convey the following kind of
message:
1. The line represents the border against which alignment or distribution will be made (left, right, middle, top,
bottom, etc.)
2. The dark and the white rectangle represent the selected objects
Match size will change the size (either width, height or both) of smaller objects with a larger object. Space works a
bit like distribute.
Aligning objects in several frames
You also may align objects in several frames. For example, to align letters in all frames: Click on the Edit multiple
frames button in the bar below the timeline.
Select all frames
• Then, you can select the frames you want to edit together by moving the "[" "]" sliders on top of the timeline
• Then select groups of objects you want to align (e.g. different letter groups in our case), then use the align pane
(Window->Align), but untick To stage (!)
This tool is quite dangerous, since it is hard to control what happens in each frame. Make sure to save your file
before you engage in this ! Also, when you are done, untick the Edit multiple frames button.
Flash arranging objects tutorial
Stacking
When you draw a new object it is drawn on top of the others.
You can move forward or backwards any selected object(s)
• Use the right-click->Arrange menu or:
CTRL+Up Arrow - Move Ahead
CTRL+Down Arrow - Move Behind
Grouping
Turning shapes into objects
To combine several shapes into an object:
• Menu Modify->Combine Objects->Union
To break apart an object:
• Menu Modify->Break Apart or Right-click->Break Apart or CTRL-B
Tip: This operation is not innocent, i.e. it creates a new single editable object. If you just want to group vector
graphics into a composite object use "grouping" (see below).
Creating a new object from others
Menu Modify->Combine Objects lets you combine objects in several ways:
• Union as above: It will create a new object and respect the stacking (i.e. as you see it on the stage)
• Intersect will only the take the common area
• etc ...
To break apart an object:
• Menu Modify->Break Apart or Right-click->Break Apart or CTRL-B
• The result will be shapes, not the original objects.
Grouping Objects
Use this feature, if you plan to re-edit hierarchies of grouped objects as you may have in complex drawings. To
group several objects:
• Select the objects you want to group.
• Hit CTRL-g or menu Modify->Group
To ungroup an object
• Select it
• Hit CTRL-SHIFT-g or menu Modify->UnGroup
Note: Flash will allow you to animate grouped objects in a motion tween, but it will create tweening objects in the
library (like it does for simple, editable objects). You can't ungroup these anymore, except by breaking them apart. I
suggest alwaysusing movie clip symbols for motion animation! Tween objects are bad (at this stage).
173
Flash arranging objects tutorial
Grouping Objects into a symbol
• Select several objects
• Right-click->Convert to Symbol or hit F8
Then you have to select the type:
• "Graphic" means a graphic (i.e. an named group of objects)
• "Button" will create a button symbol (you then can fine tune the button frames)
• "Movie Clip" will allow you to use the object for motion animation
All these symbols can later be edited (double click in the library or the stage to land in symbol editing mode).
Tips:
• Use movie clips, unless you have a reason to do otherwise. A movie clip is really not the same kind of object as
button for example.
• Always give your symbols a meaningful name !
Conclusion / more
• If you draw a lot, you may want to print the list of Flash CS3 keyboard shortcuts
• At some point you also should learn about the various kinds of objects you can have in a *.fla file. They all have
different purposes, e.g. various kinds of tweens only work on certain kinds of objects. See the Flash formats and
objects overview.
There is more stuff in the Modify Menu, but that's its enough for now ... :)
Flash colors tutorial
Draft
Introduction
This is part of the Flash tutorials.
Learning goals
Learn about the color types (normal, gradient and bitmaps)
Learn about color models (RGB and HSB)
Prerequisites
Flash CS6 desktop tutorial
Flash layers tutorial
Flash drawing tutorial (at least some of it)
Quality and level
This text should technical people get going. It's probably not good enough for beginners, but may be used as
handout in "hands-on" class. That is what Daniel K. Schneider made it for...
It aims at beginners. More advanced features and tricks are not explained here.
Materials (*.fla files you can play with)
• http://tecfa.unige.ch/guides/flash/ex6/colors-intro/
• The Colors SWF [1] includes a short demo of bitmap colors, the alpha channel, gradients and filters.
Color types overview
174
Flash colors tutorial
In Flash there are three kinds of colors
• Normal colors (solid)
• Gradients (linear and radial)
• Bitmaps
Both RGB and HSB model is supported for colors. See also the computer colors tutorial
Tools overview
Color related tools
Flash CS6 has several color tools and controls
In the tools panel
• Paint bucket and ink buckets
• Stroke color and fill color (for most tools). Select colors before you choose a tool to draw
In the properties panel
• Stroke color and fill color
Color panel
• Color selection
Swatches
• Preset colors
How to use the color selection popups
When you select (or change) fill or stroke color, a color popup swatches pane will pop up. You then can select a
color with the eye-dropper tool or alternatively from any color in the Flash workspace.
You also can change alpha channel or type a 6 digit hexadecimal RGB Code (see color panel explanation below)
How to use the color and the swatches panels
We recommend to have the color panel docked on top right, else get it with menu Window-Color (or SHIFT-F9).
In order to work with the color or the swatches panel, select an object on the stage.
175
Flash colors tutorial
176
The Flash CS6 Color panel
In the color panel you then can:
•
•
•
•
Select either stroke or fill for adjustments
Select various colors (depending on color type)
Change the alpha channel (i.e. transparency)
Select the color type (Solid, linear or radial gradient, bitmap fill). See below for more explanations
The Flash CS6 Color panel - select color type
Flash colors tutorial
177
The swatches panel includes a series of standard colors. These are same ones you get with the Fill controls in the
Tools and Parameters panel.
The Flash CS6 Color swatches panel
Let's now introduce various color types in more detail.
Solid colors
Solid colors can be defined in various ways (and there is a whole science behind it). Let's just recall a few principles.
For more information, please see the Wikipedia links in the color article.
Let's define a few terms first:
Hue
• means "color"
Saturation
• means amount of a color you apply, i.e. the intensity.
Brightness
• How much light you apply. A lot of light makes a the color washed out and very little light makes it very dark.
Transparency
• How much you can see trough
• See alpha channel below
RGB colors
RGB colors are the most popular ones used in computing applications. A color is defined by the amount of Red Green - Blue. By default, the CS6 color panel is in RGB mode.
RGB is the way computer monitors work. E.g. to get a nice yellow you need 100% Red + 100% Green + 0% Blue.
RGB is a so-called additive color mixing model. “Projection of primary color [2] lights on a screen shows secondary
colors where two overlap; the combination of all three of red, green, and blue in appropriate intensities makes
white.” (Wikipedia [3]). Now if you project each of these primary colors with different intensity, overlapping colors
will change.
Flash colors tutorial
178
This model is not how colors work when you mix real paint. Then
you'd rather work with a red-yellow-blue model. Color printers yet
work with another model, i.e. magenta, cyan and yellow (or more).
RGB colors can be encoded in various ways. For Internet formats such
as HTML, CSS or Flash, most often a hex triplet is used, i.e. a
hexadecimal 6 digit number. With 2 hexadecimal digits you can
represent numbers in the range of 0 to 255.
With ordinary numbers you would represent a full red like this:
(255,0,0) - meaning full red, no green, no blue
The corresponding hex triplet is FF 00 00:
#FF0000
In terms of percentage of colors you get:
(100%, 0% , 0%)
Let's now have a look at a few colors in a diagram we copied from Wikipedia [3] on sept 8 2007: It represents
"Truecolor", i.e. RGB values in 24 bits per pixel (bpp). In Truecolor, colors can be defined using three integers
between 0 and 255, each representing red, green and blue intensities. For example, the following image shows the
three "fully saturated" faces of the RGB cube, unfolded into a plane:
•
•
•
•
•
•
•
•
[4]
(0, 0, 0) is black
[5]
(255, 255, 255) is white
[6]
(255, 0, 0) is red
[7]
(0, 255, 0) is green
[8]
(0, 0, 255) is blue
[9]
(255, 255, 0) is yellow
[10]
(0, 255, 255) is cyan
[11]
(255, 0, 255) is magenta
yellow
(255,255,0)
green
(0,255,0)
red
(255,0,0)
cyan
(0,255,255)
blue
(0,0,255)
red
(255,0,0)
magenta
(255,0,255)
For more information about colors see links in the color article. Have a look at Wikipedia's great list of colors [12] if
you need to find a number for your favorite color name. (If you speak french, get this one [13]. You also may read the
Wikipedia Web colors [14] article. It also includes a list of colors and explains what a hex triplet is.
Using the Flash color panel with solid RGB colors
• It's probably a good idea to starting picking out a standard color from the swatches panel that will display
so-called "web-safe" colors. You also could create your own palette.
• Once you start from a "standard" color, you then can either adjust RGB values or color/brightness/saturation with
the slider (see the HSB model below) or select another color from clicking into the Color Picker. The color range
you will see depend on selections made to the right.
Below is a standard blue (the brightness/saturation slider remains in the middle)
The Flash - Standard RBG Blue
Flash colors tutorial
179
The HSB/HSV model
The HSB (Hue, Saturation, Brightness) also known as HSV (Hue, Saturation, Value) defines a color in terms of three
components:
1. Hue, the color: Represented as a position in the 360 degrees of a color circle.
2. Saturation, the intensity or "purity" of the color: Ranges from 0-100%. 0 means no color (white), 100 means
intense color.
3. Value or Brightness of the color: Ranges from 0-100%. 0 is always black. Depending on the saturation, 100 may
be white or a more or less saturated color.
The Hue scale from 0 to 360 degrees is the following:
The hue scale (Wikipedia
[15]
)
In many graphics tools (not in Flash) you get a HSV color wheel that looks like this:
The hue scale (Wikipedia
[16]
)
On the outside you can select a color (H), then on the inside you can select V and S.
For more information about HSV, read Wikipedia's HSV color space [17] article.
In Flash, with the slider to the right you can either
• change color
• adjust both Saturation
• adjust Brightness.
Flash colors tutorial
Clicking into the color picker will change all three.
Below is a washed out blue with less saturation. We selected the saturation button selected and move the slider to
40%.
The Flash - Washed out Blue
Tint and Shade
According to Wikipedia [18], “In color theory, a tint is the mixture of a color with white, and a shade is the mixture of
a color with black. Mixing with white increases value or lightness, while mixing with black reduces chroma. Mixing
with any neutral color, including black and white, reduces chroma or colorfulness. The intensity does not change.”
In Flash, tint is a color that you can add to a symbol in motion tweening. Alternatively (but not at the same time) you
can modify its brightness. In addition you can change its alpha value (make it more or less transparent)
See the Flash special effects tutorial tutorial.
Flash Color Gradients
Flash supports there are 2 kinds of color gradients (see the picture below)
• Linear: the color changing in one direction
• Radial: the color changing from the center to the outside
Linear and radial gradients and Gradient
Transform
Color gradients work with color bands. You can define 2 or more colors and Flash will fill in intermediate colors
between them. The result then depends:
• on the choice of colors
• on the width of the color band (from one color to the next one)
You can change these be defining and dragging color pointers in the Color panel. Read on ...
180
Flash colors tutorial
Defining color bands
There are some built-in gradients (linear and radial) that you may use as is, however you most likely want to define
your own. In order to achieve that, you need the color panel and then manipulate the controls in the preview window.
If you select either "linear" or "radial" Type you will see the gradient preview window at the bottom of the color
panel:
Color panel - Gradients - Color points
The little "arrow squares" you now can move from left-to-right are called color pointers and they delimit color
bands.
Here is a list of common operations:
(a) Adjust color bands
• To make a color band smaller or larger, move various color pointers left or right
(b) Add new color bands
• Click into the area of the color pointers. This will add a new color pointer.
(c) Change the color of a color pointer
• Click on a color pointer. The selector pointer should have a black arrow (instead of a white). Now select a color in
the panel above.
(d) Remove a color pointer
• Drag it down and off (below the gradient preview window)
(e) Copy a color from a pointer
• Hold down the mouse for a while will work like the Eyedropper tool
Transforming gradients
With the gradient transform tool (hidden underneath the Free Transform tool) you can do five things:
1.
2.
3.
4.
5.
rotate gradients (both linear and radial).
stretch out the gradient
stretch the radial gradient in only one direction (make an oval)
Make the "rings" of a radial gradient asymmetric
Move the center of the gradient color
Procedure
• Select the tool (hold down the mouse over the Free Transform tool in the tools panel) and select the Gradient
Transform Tool ( )
• After selecting an object you will see five handles with which you can: stretch in one direction, resize, turn, make
the rings ellipsoid, and finally move the whole gradient. See the screen capture below, which shows the handles
for a radial gradient transform:
181
Flash colors tutorial
Radial Gradient Transform controls
Stretching or rotating a linear gradient works in a similar way:
Linear gradient transform controls - turning
The alpha channel
In computer graphics, alpha compositing is the process of combining an image with a background to create the
appearance of partial transparency (Wikipedia [19])
In more simple terms, you can set the alpha to some percentage:
•
•
•
•
•
•
100% can't see through
80% bad see trough
50% in between
30% good see through
10% good see through, but very little color
0% no color left
182
Flash colors tutorial
183
Alpha color channel
Hint: With the alpha channel you can create other effects than see-through "windows". E.g. you can overlay textures
with color or the other way round.
Drawing with bitmaps
You can use any bitmap (e.g. a picture of yourself) as color. To do so, you firstly must import the bitmap file (e.g. a
*.jpg file) and then adjust the size with the gradient transform tool
Importing a bitmap
There are two solutions:
• You can just paste a bitmap graphic into the library from the clipboard. For example, if you see a nice (and
copyright free) texture on the Internet with the Firefox navigator, do the following: (1) View image, (2) Copy
Image, (3) CTRL-V into Flash
• Save the image on your computer then click on the Import button in the colors panel.
Finding textures
• See the texture article
Using a bitmap
• You can use a bitmap graphics either as stroke or as fill color.
Adjusting "grain size"
With the gradient transform tool you can adjust how a bitmap will be applied. You can change:
• Size, i.e. whether the bitmap is applied as is, or reduced or magnified in x, y direction or both
• Rotation
• Skew (a kind of distortion)
Select the Gradient Transform tool (
) underneath the Free Transform tool, and then
• Click on the fill or stroke
• Play with the handles (if the bitmap is big, you may have to search for these handle way out of the stage !)
Flash colors tutorial
184
Gradient Transform tool on bitmaps
Filters for symbol instances
You can apply various color changes to all symbol instances (movie clips, buttons and graphics). To do so, play with
the Color and Blend controls in the properties panel.
You can add filters (e.g. a gradient glow a bevel or a drop shadow) to movie clip and button symbol instances. Use
the Filters panel to do so, (click on the tab in the properties panel), else use menu Windows->Properties->Filters)
To add filters, simply click on the + sign and then play with the parameters. Using different sorts of "Quality" also
has an important effect on the rendering, high quality may slow down certain computers.
•
•
•
•
•
Blur X and Blur Y define the size of the affected area
Strength the force of the filter (more or less)
Shadow and Highlight, the dark/light colors of the filter effect
Angle and Distance, direction of the filter effect
Knockout and Type, whether it applies to the inside and whether the orginal drawing is knocked away.
This is a nice feature that beginners often overlook. So if you need cool looking 3D effects on graphics explore these
filters. You also can apply several filters to the same object. In the screen capture below we show an attempt to
create a floating 3D button from a simple red circle.
Flash colors tutorial
Flash CS6 filters you can apply to movie clip and
button instances
Tip: Since filters are applied to instances of movie clips, you may use them in motion tweens. Examples:
• Create a sun with increased glow (big in start and end frame, small on top)
• Create a flying plane with a drop shadow that is far down.
Links
General color
• See the color article. It includes links to good Wikipedia articles
Other kinds of assets
• Texture
• Clipart
• Sound Assets
Adobe links
• Flash Professional / Color [20]
• Flash Professional Help / Strokes, fills, and gradients [21]
References
[1] http:/ / tecfa. unige. ch/ guides/ flash/ ex6/ colors-intro/ flash-cs6-colors-intro. swf
[2] http:/ / en. wikipedia. org/ wiki/ Primary_color
[3] http:/ / en. wikipedia. org/ wiki/ RGB_color_model
[4] http:/ / en. wikipedia. org/ wiki/ black
[5] http:/ / en. wikipedia. org/ wiki/ white
[6] http:/ / en. wikipedia. org/ wiki/ red
[7] http:/ / en. wikipedia. org/ wiki/ green
[8] http:/ / en. wikipedia. org/ wiki/ blue
[9] http:/ / en. wikipedia. org/ wiki/ yellow
[10] http:/ / en. wikipedia. org/ wiki/ cyan
[11] http:/ / en. wikipedia. org/ wiki/ magenta
[12] http:/ / en. wikipedia. org/ wiki/ List_of_colors
[13] http:/ / fr. wikipedia. org/ wiki/ Liste_de_couleurs
[14] http:/ / en. wikipedia. org/ wiki/ Web_colors
[15] http:/ / en. wikipedia. org/ wiki/ Image:HueScale. svg
[16] http:/ / en. wikipedia. org/ wiki/ Image:Triangulo_HSV. png
[17] http:/ / en. wikipedia. org/ wiki/ HSV_color_space
[18] http:/ / en. wikipedia. org/ wiki/ Tints_and_shades
185
Flash colors tutorial
[19] http:/ / en. wikipedia. org/ wiki/ Alpha_channel
[20] http:/ / help. adobe. com/ en_US/ flash/ cs/ using/ WS18B74DFC-C9B7-47c1-8B25-B4F196059B7C. html
[21] http:/ / helpx. adobe. com/ content/ help/ en/ flash/ using/ strokes-fills-gradients. html
Flash bitmap tracing tutorial
Draft
This entry is part of the Flash tutorials.
Overview
Bitmap tracing means transforming a bitmap graphic (e.g. a photograph) into a vectorized object.
Learning goals
Learn about basic Flash 9 (CS3), Illustrator and Inkscape bitmap tracing.
Prerequisites
Flash CS3 desktop tutorial
Flash drawing tutorial
Flash layers tutorial
Flash shape tweening tutorial
Moving on
The Flash article has a list of other tutorials.
Quality
This text should technical people get going and may not be good enough for self-learning beginners. It can be
used as handout in a "hands-on" class. That is what Daniel K. Schneider made it for...
Level
It aims at beginners. More advanced features and tricks are not explained here.
Materials (*.fla file you can play with)
http://tecfa.unige.ch/guides/flash/ex/tracing-intro/
http://tecfa.unige.ch/guides/flash/ex/shape-tweening-intro/
Bitmap tracing will turn a bitmap (e.g. a photograph or a non-vectorized graphic) into vector graphics. This allows
you for example to
• Shape tween portraits (see also the Flash shape tweening tutorial)
• To take bitmap graphics found on the Internet and turn them into somewhat usable vector graphics for animation
(useful if you can find any appropriate vectorized clipart).
186
Flash bitmap tracing tutorial
187
Extracting a drawing from a picture
That's a tough problem, since a picture got many colors and
sometimes objects overlap (i.e. you have to remove these and then
repair with painting).
To the right you see the picture of some lion that can be found in
Vienna (plus the head of a research assistant). We show how we
extracted just the lion (about 30 minutes of work).
Step 1 - Trace the picture
• Menu: Modify->Bitmap->Trace Bitmap
• Parameters used were: Color threshold=80, minimum area=5,
Curve Fit= tight, Corner threshold = normal
This will lead to a set of shapes that are neither too big nor to
small
Vienna Lion picture
Step 2 - Kill unwanted shapes and erase overlapping ones
There are several kinds of tools and tactics you may use:
• Use the Lasso in the tools panel to get rid of most the unwanted background, but don't use it too close to the shape
you want to keep.
• Magnify after this to something like 400 percent
• Use the eraser tool
• Use the lasso again or Shift-Click on unwanted objects. Then hit the DEL key.
• Use the eraser to draw fine lines (elect a very small rubber) if you have to cut wanted/unwanted area in the same
shape. Then kill the unwanted one
• Use the eyedropper to select a color and then the paint brush to repair some stuff.
• Do not use object drawing mode for this.
• You should set the paint controls to "paint behind", i.e. to repair outlines rather paint behind something when
you touch it with the brush.
• ...
Step 3 - Smooth it and make it a drawing
object
Select all the shapes (hit CTRL-A). Then
• Menu->Modify->Shape->Optimize. Set
this to maximum.
• Menu->Modify->Union
Step 4 - Convert to symbol and use it
The result is really dreadful as you can see
in the thumbnail to the right:)
Source
See the "lion*" files in http:/ / tecfa. unige.
ch/guides/flash/ex/tracing-intro/
Vienna vectorized lions scene
Flash bitmap tracing tutorial
Tracing parameters in Flash CS3
There exist four parameters in the tracing panel:
(1) Color threshold
• When two pixels are compared, if the difference in the RGB color values is less than the color threshold, the two
pixels are considered the same color. As you increase the threshold value, you decrease the number of colors. If
you want a minimum of colors, try something like 255 (or even more)
(2) Minimum area
• The number of surrounding pixels to consider when assigning a color to a pixel. I.e. if you want few resulting
vector shapes, set this high
(3) Curve fit
• This will determine how smoothly outlines are drawn. E.g. in a portrait you can make disappear things like
standing our hair.
(4) Corner threshold
• Defines whether sharp edges are retained or smoothed out.
See this little gallery of my traced portrait [1].
Typical settings you could use are:
(a) A trace that keeps most of the information (many many graphic shapes in the result
• Color threshold=10, minimum area=1, Curve Fit= Pixels, Corner threshold = many corners
(b) A sort of "normal" picture that gets most of the important outlines
• Color threshold = 30 and minimum area = 30, corner threshold and curve fits = normal
(c) A few colors picture result with sharp lines
• Color threshold = 200 and minimum area = 2
Source of the demo application (it uses a component for navigation)
Directory: http://tecfa.unige.ch/guides/flash/ex/tracing-intro/
Fla: flash-cs3-tracing-parameters.fla
Tuning
Of course, once you have your trace, you then can remove unwanted elements (e.g. backgrounds in a portrait),
change colors or apply all other drawing techniques you know.
Bitmap shape tweening in Flash
We will trace of portrait picture (jpg bitmap) and then add a shape tween to it.
Step 1 - Import a bitmap
• Import the picture to Flash, e.g. by dragging it to the Flash desktop.
• You may resize the picture first with an external tool
Step 2 - Trace it
• Menu: Modify->Bitmap->Trace Bitmap
• You can play around with a few settings
Here is an example that shows the original and the traced result side by side
188
Flash bitmap tracing tutorial
189
Live tracing with Flash CS3
Step 3 - Make a shape tween
• Hit F6 in some distant frame
• Make changes to the vector image in the new frame. E.g. distort or change colors (use the Select or the Lasso tool
to select areas of the picture)
• Add the shape tween.
You can admire the result [2] (files flash-cs3-shape-picture-morphing3.*)
Tuning
• Adjust the size of the picture to the scene with the
• You may extend the first frame to remain stable for a while so that users can see the original
• Then you could add a "stop();" in the Last Frame. Hit F9 and type
stop();
• This will stop the animation. (See the Flash button tutorial for more about ActionScript.
Of course this is really ugly ...
Tracing a bitmap with Illustrator
Step1 - Trace the bitmap
Illustrator CS3 has more sophisticated bitmaps tracing features. Here is a very short example that includes a shape
tween:
•
•
•
•
Open the picture in Illustrator
Select it
Now you will have a "Live Trace button" on the control panel on top
Next to it is a little pulldown menu from which you can select various options, for a portrait you may choose
"Color 16"
Flash bitmap tracing tutorial
190
Live tracing with IllustratorCS3
Once you hit the trace button, the controls on top will change and you can play with all sorts tracing methods and
parameters
Live tracing controls with IllustratorCS3
Step2 - Import to Flash
• Copy/paste if from Illustrator with the options: Paste using AI File Importer preferences and untick maintain
layers
• You may adjust the size of the stage to the size of the picture somewhat, I chose to add some big margins for a
reason you will see later.
• Convert it to a symbol (so that you have a copy in the library)
Step 3 - Break it Apart
• Then right-click->Break Apart
• You have to do this several times, since illustrator produced object groups within object groups (use ctrl-Z if you
think you went too far).
Flash bitmap tracing tutorial
Step 4 - Create a new keyframe
• Right-click on frame 20 and hit F6 to create a new keyframe with the same picture.
Step 5 - Distort the picture in keyframe 1
Try everything you can
• Select parts and change the color with the paint bucket. That's actually the only thing I did
• You also can move parts, but probably you then should start with a much simple ray trace.
• Distort parts with the Selection Tool, the Subselection tool and the Free Transform tool
Step 6 - Add a shape tween between the two frames
... enjoy
Tune
• You also may at the very end (after the last keyframe) insert the original jpg picture. Tracing bitmaps is a very
difficult issue, since there are many kinds of algorithms you can select from.
Basically the machine must be told how to group similar pixels together into a vector objects. For example, an
algorithm can group together pixels with similar brightness, similar color, or try to find lines from similar pixels.
Publish
• In the HTML setting you probably want to take off the "loop" option
You can admire the result [3]
Files: flash-cs3-shape-picture-morphing.*)
Directory: http://tecfa.unige.ch/guides/flash/ex/shape-tweening-intro/
Tracing a picture with Inkscape
The free Inkscape
give it a try.
•
•
•
•
[3]
editor can also trace. If you don't own Illustrator and need more than CS3 can offer, you may
File->New ; Select the bitmap file (e.g. a *.jpg)
Select it (!)
Path -> Trace Bitmap item (or Shift-Alt B)
You then will see a popup with various options, Click on Update to make as many trials you like. Make sure your
picture is selected. Then play with:
• Brightness cutoff
• Edge detection
• Color quantisation
• Each of these does different sort of traces.
• Click on OK once you are happy
• The original picture will still be there. Remove it and save the result with File->Save As
Using two graphics from start
This time I used another strategy:
•
•
•
•
I made two different traces with Inkscape
I used one for keyframe 1 and the other for keyframe 2 and saved them in SVG
Since Flash cannot import SVG (why the hell ?) I open these files in Illustrator and then pasted to Flash.
I then used the erasor tool to isolate a few graphics shapes (e.g. hair and eyes)
• I then put "hair" and "eyes" in a different layer
• I finally inserted some shape hints (see the flash shape tweening tutorial
Changing the background color
191
Flash bitmap tracing tutorial
• I added a new layer and painted a rectangle over the stage in Keyframe 1
• Same for a new keyframe
• Then I also added a shape animation between the two.
You can admire the result [4]. It's also fairly ugly (despite some extra work)
Source
Fla file: flash-cs3-shape-picture-morphing2.fla [12]
Directory: http://tecfa.unige.ch/guides/flash/ex/shape-tweening-intro/
Ok that would be the only picture of me in edutech wiki. In addition I made these very quickly which is not what you
should do in a "real" production. The result is really ugly and useless ...
Links
• Convert bitmaps to vector graphics [5] (Adobe Flash C3 Help)
• Control shape changes with shape hints [6] (Adobe Flash C3 Help)
References
[1]
[2]
[3]
[4]
[5]
http:/ / tecfa. unige. ch/ guides/ flash/ ex/ tracing-intro/ flash-cs3-tracing-parameters. html
http:/ / tecfa. unige. ch/ guides/ flash/ ex/ shape-tweening-intro/ flash-cs3-shape-picture-morphing3. html
http:/ / tecfa. unige. ch/ guides/ flash/ ex/ shape-tweening-intro/ flash-cs3-shape-picture-morphing. html
http:/ / tecfa. unige. ch/ guides/ flash/ ex/ shape-tweening-intro/ flash-cs3-shape-picture-morphing2. html
http:/ / livedocs. adobe. com/ flash/ 9. 0/ UsingFlash/ WSd60f23110762d6b883b18f10cb1fe1af6-7e8c. html
Flash pen tutorial
Draft
This entry is part of the Flash tutorials.
Introduction
Learning goals
Learn about basic Flash 9 (CS3), Illustrator and Inkscape bitmap tracing.
Prerequisites
Flash CS3 desktop tutorial
Flash drawing tutorial
Flash layers tutorial
Moving on
The Flash article has a list of other tutorials.
Quality
Not complete. This tool is fairly complex ...
Level
It aims at beginners. More advanced features and tricks are not explained here.
Materials (*.fla file you can play with)
http://tecfa.unige.ch/guides/flash/ex/tracing-intro/
http://tecfa.unige.ch/guides/flash/ex/shape-tweening-intro/
192
Flash pen tutorial
The pen tool allows to create complex shapes with lots of straight lines and perfect arcs.
Basic use
• To insert a series of connect points with straight lines, just click on several points in a row
• You may want to display a grid (Menu View->Grid->Edit Grid or View->Grid->Show Grid
• Once you are done: double click on the last point to create a closed shape or hit ESC or select another tool.
• To insert curves, select a new point where the curve should start, but hold down the mouse for a while, then drag
the mouse either out (along the line) or turn right/left.
• To draw a line after a curve, click on the last curve control (round circle you just created), the click elsewhere.
Controls
• The tiny rectangles (magnify if you can't see them) are called anchor points. You may later move them with the
subselection tool.
• The little dots are called curve controls. You can drag them in all directions to create the arces you'd like.
• To close a curve, move it over an anchor point. A little circle should appear next to the mouse pointer. Click.
Other pen tools
When you hold down the mouse over the pen tool you can get three other tools that you may use while your are
working on a drawing (before hitting ESC)
• The Add Anchor Point tool: To add an anchor point to a segment, click on it.
• The Delete Anchor Point tool: To delete a point click on it.
By default, the Pen tool changes to the Add Anchor Point tool as you position it over a selected path, or to the Delete
Anchor Point tool as you position it over an anchor point.
Later, you also can use the subselection tool to repair.
Links
• Drawing with the Pen tool [1]. These help pages are fairly well done, e.g. look at:
• Draw curves with the Pen tool [2] (Adobe Flash Help)
References
[1] http:/ / livedocs. adobe. com/ flash/ 9. 0/ UsingFlash/ WSd60f23110762d6b883b18f10cb1fe1af6-7e76. html
[2] http:/ / livedocs. adobe. com/ flash/ 9. 0/ UsingFlash/ WS066812D8-0910-4345-ABDB-012C3CBCB685. html
193
194
Basic interactivity and use of components
Flash button tutorial
Draft
Overview
Buttons are interactive interface elements on which a user can click. As an alternative you also could start learning
how to use component buttons and go through the Flash component button tutorial.
Learning goals
Learn how to use built-in buttons (from library buttons.fla).
Learn how to create your own buttons.
Learn some ActionScript 3 in order to implement timeline navigation
Applications: Simple Flash "web sites", e.g. slide shows.
Prepare for more difficult, e.g. simple games with levels (each frame being a level)
Flash level
• Flash CS6 - Flash 11 - Actionscript 3
• Principles and explanations also work for CS4 and CS5. However *.fla example files will not open with CS3 to
CS5.5
Prerequisites
Flash CS6 desktop tutorial or Flash CS4 desktop tutorial
Flash drawing tutorial
Flash layers tutorial
Flash frame-by-frame animation tutorial
Flash motion tweening tutorial (for the rocket launcher and the animated buttons)
Moving on
The Flash article has a list of other tutorials.
We suggest firstly the Flash component button tutorial (working with component buttons is actually easier
than using the kind of buttons we discuss here...).
Then you can move to other interactivity tutorials, e.g. Flash drag and drop tutorial, ActionScript 3 interactive
objects tutorial, or ActionScript 3 event handling tutorial.
Quality
This text should technical people get going and may not be good enough for self-learning beginners. It can be
used as handout in a "hands-on" class. That is what Daniel K. Schneider made it for...
Level
It aims at beginners. More advanced features and tricks are not explained here.
Learning materials (*.fla and *.swf files)
http://tecfa.unige.ch/guides/flash/ex/buttons-intro/ [1]
Alternative version
Flash button tutorial
• Flash CS3 button tutorial, for the older CS3 version
• In this tutorial we will cover ActionScript 3 programming elements. Read the flash button tutorial - AS2 if you
must use ActionScript 2.
The executive summary - buttons
Buttons are interface components to add simple interactivity, such as displaying extra information, launch a movie
clip etc. Any object can be button. However, Flash CS3 provides two built-in button types that already include the
typical "mouse-over", "mouse-out", and "mouse-click" animations that users need in order to understand that an
object on the screen represents a button
(1) To create a Flash button:
• either draw an object and make it a button (Right-click Convert to Symbol and select Button);
• or get a button from the built-in Library - buttons.fla
(2) To make use of a button:
• You have to do add some ActionScript code and that will react to a user "gesture" like a mouse click.
• Using code snippets is the easiest method for beginners.
Tip
If you lack any sort of programming experience, then download the source files I made and play with them, e.g. add
an extra picture and fix the code if needed...
Overview of the built-in Flash button symbols
Flash contains a good variety of pre-built buttons and they can be found in the buttons library: Menu
Window->Common Libraries->Buttons. You may consider docking the Library-Buttons.fla panel next to your
libraries panel. See the Flash CS6 desktop tutorial on how to dock a panel.
In this section we will first just discuss the architecture of a Flash button. That type of button is just a kind of built-in
movie clip symbol that implements "button animation" with four built-in frames.
In built-in buttons library, buttons are arranged in folders. Double click to open these. Then, you may may inspect
various button symbols by clicking on a button. In the upper part of the library panel you will get a preview. Click on
the arrow to see how the button behaves.
195
Flash button tutorial
196
The Flash buttons library
For use in your own animation I suggest to copy a button first to your own library (else Flash will do it for you too)
1. Right-click on the Symbol and Copy
2. Paste it to your own library. Open the library panel and hit crtl-V
Next, from your library panel simply drag the button on the stage. This will create an instance of the button. To
remove it from the stage, select it and hit the delete key. You will see in the properties panel something like Instance
of: rounded orange and you now should give it a name, e.g. my_button.
Customizing button symbols
Editing buttons
To customize a button symbol, double-click on either on the icon of the button symbol in the library panel or on an
instance that you dragged to the scene. This will let you edit just the contents this symbol, i.e. you could think of it as
Symbol editing mode.
You now could edit any graphic in any frame in any layer, e.g. change font, change the graphic or the color. For
now, we suggest to leave the buttons as is for the moment and only adapt the label.
As you can see in the picture below, on the Edit Bar from left to right you can see the that we are editing the "orange
bubble" button.
Flash button tutorial
197
Editing the Flash button symbol
To change the label (and font) of a button symbol:
• Remember to double click to get in the symbol editing mode. You will see a kind of frame-by-frame animation
movie (read the Flash frame-by-frame animation tutorial if you are not familiar with this).
• Lock all layers, but unlock the text layer with the label
• Change the text
• You also could change font properties of course
• Then you may have to adjust the position of the label. Click on the selection tool and move the text box with the
cursors until it looks right (look at your library panel).
Creating another button
A symbol is basically something that you can use several times over, but its graphics will remain the same, including
its label. Therefore, if you need buttons with other labels you must create copies of these symbols. In your library
panel right-click on the icon of the symbol and select duplicate from the popup menu. Choose an appropriate name,
e.g. "do not press"
Finding your workspace again
• If not already done so, I suggest adding the Edit bar: Window->Toolbars->Edit bar. It will show you exactly at
what level you are editing, e.g. at the scene or at the button symbol.
There are several solutions for going back to the scene:
• Either double-click on "Scene 1" (or equivalent) or select Edit->Edit Document or hit (Ctrl-e).
Flash button tutorial
The four frames and the button layers
Built-in button symbols contain four frames and several layers. For each frame, different drawings may be defined
but some, e.g. the label text may be reused in several layers. Look at the various frames. The four mandatory frames
for button symbols (including the ones you may create) are:
Up
The button, i.e. the drawing that appears "as is" when the button is displayed in a frame of your animation.
Over
The button graphics as it appears when the user moves the mouse over it. E.g. it defines highlighting.
Down
The button as it appears when the user presses the mouse (just during the time the mouse button is held). It
shows the pressing down effect.
Hit
This frame allows to define the sensible area (usually the complete button) with a graphic. Its contents will not
be shown.
Various kinds of buttons have various layers (usually between three and five) depending on the complexity of the
drawings. These layers contains just drawing for these four button frames. The Flash engine will then select the
appropriate frame for display according to user action (mouse over, mouse down, etc.).
Beginners just should use built-in buttons. There is no need to change anything in the keyframes or the layers except
the label. However, you later can change any drawings in any way you like. A button can be made of any sort of
graphics you like (even pictures as you shall learn below) and you even may add animation with embedded movie
clips.
Using the built-in buttons
You can attach behaviors in various ways to buttons but there is no difference between built-in buttons and the ones
you can create yourself. The most obvious one is to jump to a different frame in the main timeline after the user
clicks on a button.
In the next section we will use a button to launch a rocket.
A button in frame 1 to start animation in frame 2
Rocket launcher example
The goal is make a flash animation that stops at frame one when the file loads. The user then will see a button on
which he can click. The animation should restart in frame 2 after the user clicked.
Preparation
• Create a background layer (we called it "sky")
• Create a layer for the button and insert a button
Create a motion tween that starts in frame 2
•
•
•
•
If you do not how to create motion animations, please read the Flash CS6 motion tweening tutorial
Create a new layer (we called it "Rocket")
Position the playhead in frame 2
Hit F7 in order to create a new empty keyframe
• Insert a drawing, make it a symbol and then create the motion tween.
• The final structure of the timeline will look like this (the "Action" layer will be added later).
198
Flash button tutorial
Rocket launcher timeline
Drag a button to the stage
• You can adjust its size with the Free Transform Tool (but make sure that you are not in symbol edit mode, i.e.
working on the button graphics)
• Edit the text field (double click twice) on the text for example, make this label "Go!" for example.
Name the button instance
We have to give the launch button (not the symbol in the library but the thing we got on stage) a name. Once you
drag a library item to the stage you produce an instance of the symbol. In order to find this instance, Flash needs to
know it by name. It's like in magic: you name it - you control it ;)
• Let's call this button instance:
launch_button
• Open the properties panel and fill in the field (see below):
Name the button symbol instance
Make sure that the name is doesn't have any blanks or special symbols inside (actually Flash will complain if you
define an illegal name).
Adding ActionScript code
In order to make Flash buttons interactive, we will have to write some code. This code must be defined for the same
frame(s) as the button but we usually use a different layer.
• The scripting layer is usually called "Script" or "Action" or "AS3".
• To enter the ActionScript editor, just select the right frame in the "script" layer and the hit F9. So, let's code now:
199
Flash button tutorial
200
Add AS3 stopping code to the timeline
• Add another layer and call it "Action" or "Script"
• Click on Frame 1 in this new layer, then hit F9 and in the Actions-Frame panel insert:
stop();
This will just stop the execution of the main timeline "movie". I.e. Flash will only display the contents of the first
frame (all layers) and then wait.
Add AS3 code for navigation
• Now we will add some more code below the stop (); line. So click again in frame 1 of the Action Layer and
hit F9:
Add this below the "stop();":
launch_button.addEventListener(MouseEvent.CLICK,launchRocket);
function launchRocket(event:MouseEvent) { gotoAndPlay(2); }
You should see something like this:
Some ActionScript 3 code to associate a user event (click on button) with some action
We cannot really explain event driven programming here (see the ActionScript 3 event handling tutorial), but the
principle is the following: For each object that can react to user actions you have to define what will happen when
the user does something, e.g. click with the mouse.
• Firstly, define a function that "does something", e.g. move the playhead in the timeline to another frame. In our
case we called the function launchRocket.
• Second, associate this function with the "user clicks on the button" event. The addEventListener method let's you
define what function will be called when a user does something with the button (in this case, clicking on it). In
Flash button tutorial
other words, you add an Event Listener to the button (e.g. one that will observe button clicks) and you tell this
Event Listener what function to call when this happens.
Code reuse
Of course you can reuse this code for a similar problem, i.e. moving the animation to another spot of the timeline
when the user presses a button. All you need to do is this:
• Put a button on your stage (e.g. one from the Flash library)
• Then give this button instance a name
• Then change the number in gotoAndPlay(2);. E.g. change it to 5 if you want it to jump to frame 5.
Tip: If your code is getting bigger, un-dock the Actions Frame panel and pin it down. Hit F9 to to hide it again.
Results
• You can look at my published result: flash-cs6-rocket-launcher-as3.html [2]
• You can grab the flash-cs6-rocket-launcher-as3.fla [3] file to play.
• Directory:
http://tecfa.unige.ch/guides/flash/ex6/buttons-intro/
Exercise - Enter button for an animation
• Get one of your motion animations
• Drag all animation keyframes from frame 1 to frame 2. Click and drag when you see the white rectangle attached
to the mouse cursor.
• Add a new layer and call it Action
• Insert some graphics / text on frame 1 (else your flash animation will look really empty)
• Then add a button that will allow a user to jump to frame 2 when he hits the button
• Add the ActionScript (don't forget to also add a "stop();".
If this sounds too complicated, you can start with less:
1. Create a new layer and select frame 1
2. Drag a button from the button library to the stage and name this button instance "start" in the properties panel.
3. Hit F9 and copy/paste this code:
stop();
start.addEventListener(MouseEvent.CLICK,launch);
function launch (ev){ gotoAndPlay (2); }
We now have an "Enter" button in the first frame of the animation. As soon as the user will click on it, the animation
will move to frame 2 and play the rest. Of course, this means that you have to put something in frame 2 (and beyond)
that users can look at.
201
Flash button tutorial
202
Exercise - Use code snippets to enter ActionScript ocde
Instead of typing or copy/pasting code, you also could use the code snippets panel:
• Get it with menu Windows->Code Snippets
• Select the button on the stage
• Open "Timeline Navigation" and select "Click to Got to Frame and Play"
Naming Frames
• Flash then will create an Action Layer if it doesn't already exist and insert the following code.
/* Click to Go to Frame and Play
Clicking on the specified symbol instance moves the playhead to the
specified frame
in the timeline and continues playback from that frame.
Can be used on the main timeline or on movie clip timelines.
Instructions:
1. Replace the number 5 in the code below with the frame number you
would like the
playhead to move to when the symbol instance is clicked.
*/
launch_button.addEventListener(MouseEvent.CLICK,
fl_ClickToGoToAndPlayFromFrame);
function fl_ClickToGoToAndPlayFromFrame(event:MouseEvent):void
{
gotoAndPlay(5);
}
• All you have to do is make some minor modification. In our case, you will have to replace "5" by "2" and add a
"stop ();".
• You can look at my published result: flash-cs6-rocket-launcher-as3-code-snippets.html [4]
• You can grab the flash-cs6-rocket-launcher-as3-code-snippets.fla [3] file and compare it with the solution above.
As you can see, the behavior of both is identical.
• Directory with files:
http://tecfa.unige.ch/guides/flash/ex6/buttons-intro/
Flash button tutorial
Menu-based flash sites and named frames
You can build little flash "web" sites with buttons with what you just learned. The principle is simple:
1. Put contents in in various frames (you can use multiple layers of course). We also will show how to name frames,
which is a good policy for that type of application.
2. We will stop Flash from playing all the frames by inserting the "stop();" instruction in frame 1.
3. We then will create a button for each "page" X (i.e. keyframe X) and then write some code for each button that
will transport the user to frame "Y".
We show you how to do this step-by-by with ActionScript 3:
Step 1 - create "pages"
• Create a "Pages" layer
• Put each "page" into a frame (text, pictures, videos, whatever static information)
• If you don't want menus to overlap with contents, make sure to leave an empty area for the menu on each of these
pages (e.g. on top or to the left of the picture)
Step 1b - variant with animations
• You also can add animations if you like. But put these in different layers or alternatively and better create these as
movie clips, i.e create a movie symbol first, then edit it. But make sure that no frames from different layers
overlap. The principle of a simple flash web site is that a user will jump to different frames.
Step 2 - Create the menu
• Create a new layer and call it "Menu" for example
• Insert in frame #1 of this "Menu" layer all the buttons that will lead to each of the "pages". Extend this layer to the
last frame of your "pages" layer (hit F5). We want the navigation menu to visible all the time.
For each button:
•
•
•
•
Drag a button from the buttons library to the stage
Change the label: Double click on the button, then unlock the text layer, then change it.
Give it also an instance name in the parameters panel, e.g. sunrise_btn.
Once you are done, use the align tool to distribute and align them correctly.
Step 4 - name your frames
You may not have heard of "named frames" so far, but they are quite practical and using named frames is good
development policy. If you use names for frames, you later can move them around. Also it is easier to remember
names.
To name a frame:
• Click in each frame that marks the start of a "page" in your flash site (i.e. where buttons will lead to) and insert a
name in the properties inspector at the bottom.
Naming Frames in CS6
Step 5 - Verify
203
Flash button tutorial
• Each button instance must have name.
• Each frame which you want the user to reach with a button click, should have a name.
Step 6 - Create the script
•
•
•
•
Create a new layer and call it "scripts" for example
Edit frame 1 of this layer ("scripts): Hit F9
Extend this layer if needed (e.g. hit F5 in frame 8), else you won't see your buttons.
Insert Action Script for each button as below.
We basically use two actions:
gotoAndStop ("your_frame_name"); to jump to a frame and stop
gotoAndPlay (...); to jump to a frame and let it play until it runs into a stop.
The script then should look something like this. I think I made it as simple as possible for non-programmers. Code
inserted between /* .... */ is just comment, i.e. information that Flash will not interpret but that is useful to you as a
developer.
/* This will stop Flash from playing all the frames
User must stay in Frame 1 */
stop();
/* Associate a different handler function for each button instance:
Syntax: button_name.addEventListener(Event.type, function_name
Lines below mean:
* If the user clicks on the palmtree_btn with the mouse,
then the function clickHandler3 defined below will execute
*/
home_btn.addEventListener(MouseEvent.CLICK, clickHandler1);
lake_btn.addEventListener(MouseEvent.CLICK, clickHandler2);
palmtree_btn.addEventListener(MouseEvent.CLICK, clickHandler3);
sunrise_btn.addEventListener(MouseEvent.CLICK, clickHandler4);
/* Each function defines where to move the playhead in the animation.
E.g. clickHandler2 will go to frame 3 and then stop
*/
function clickHandler1(event:MouseEvent) { gotoAndStop("home"); }
function clickHandler2(event:MouseEvent) { gotoAndStop("lake"); }
function clickHandler3(event:MouseEvent) { gotoAndStop("palmtree"); }
/* This one does not stop, it will play the animation */
function clickHandler4(event:MouseEvent) { gotoAndPlay("sunrise"); }
If it doesn't work
• There may be syntax errors and Flash will tell you so in the Output panel that will pop up. Look at the line
numbers.
• You many have misspelled the button and frame names in the script. ActionScript is case-sensitive !
Results
• You can look at my published result here [5]
204
Flash button tutorial
• Source: flash-cs3-simple-menu-site.fla [6]
• You can grab all the files flash-cs3-simple-menu-site.* from this directory:
http://tecfa.unige.ch/guides/flash/ex/buttons-intro/
Next steps
• You can do the same thing with so-called button components. You can't change the button form easily, but it's a
slightly faster procedure. See the Flash components tutorial.
A simple slide show with your own buttons
Objectives
• We will first show how to create your own simple buttons.
• Then we show some ActionScript code that demonstrates how to make a simple slide show with only two buttons
(forward/backward) and that extend throughout the animation.
The purpose of this application is again to explain buttons and some Action Script, not to make the perfect slide
show tool.
To create a slideshow, we will first import the pictures and adjust the stage. This way we we can get a feel for the
size of buttons needed. Then we draw the buttons. Finally we will make it interactive
Step 0 - Open a new file
• Select Action Script 3 (This code will not run with Action Script 2.0 !).
Step 1 - prepare some pictures
• Before importing the pictures, it's a good idea to make them all the same size, e.g. I made my pictures 640x480. If
you work under windows, simply use the MS Office Picture manager. It's better to start with right (small) size,
since this will reduce the size of the Flash file you later will deliver.
• Then import these pictures to the library: Menu File->Import->Import to Library. Select all the pictures you
would like to import, then click OK. (Alternatively, just drag the pictures into the library panel from Windows).
• Importing to the library will turn them into symbols. That way we can later reuse them if we want to.
Step 2 - Adjust the stage size
• Create a new layer, called "Pictures". In the first keyframe you may insert some text with the TextTool, e.g.
"Picture show" (you can fix this later)
• Create a new keyframe in frame 2 (hit F7)
• Drag a picture on the stage of frame 2, then make the stage as big (at least) as the picture. You also can make the
stage a big bigger and then select for instance a black background
• To adjust the pictures' position, use the properties panel below, i.e. set W and H to 0 (else use the align panel).
Step 3 - Put your pictures into different keyframes
• If you have 8 pictures you need to add 7 new keyframes.
• One way to do this is to put your cursor in frame 2 of the picture layer, then hit F7 ("Insert new blank keyframe")
7 times
• Then drag a picture into each of these keyframes and align them too (as above).
• Control if all pictures are ok and in place by moving the playhead from left to right (red rectangle on top of the
timeline)
So you should have something like this.
205
Flash button tutorial
206
A timeline with keyframes that hold pictures
Step 4 - Draw a forward, a home and a backward button
• Create a new layer and name it Buttons and select it (also lock the pictures layer).
• To draw buttons, you may use the Polystar tool and a variety of transform tools, or just simply draw a triangle and
get done with it ...
• Then you also want to reduce the alpha channel (i.e. make these buttons transparent). In the color panel, put
Alpha to 40%.
• Once you got a forward button, make a copy and flip it horizontally (menu Modify->Transform->Flip
Horizontal).
Step 5 - convert these graphics into to symbols
• Save both buttons as button symbols (right-click on each graphic you made).
• Use decent names for these, e.g. "button_forward"
Turn a graphic into a button symbol
• Remove the graphics from the stage (yes kill them!)
Step 6 - place the buttons and name them
•
•
•
•
Select the buttons layer (the one with the single frame).
Drag a forward and backward button from the library to the stage
Move both buttons into an a appropriate position.
Then give a name to each of these 2 instances in the properties panel: "forward_btn" and "back_btn".
So now you should have something like 2 button symbols in the library and an named instance of each on the stage.
Flash button tutorial
207
Two button symbol instances on the stage
Step 7 (optional) - Add some highlighting
• Double-click on the backward button in the library. This will get you in symbol editing mode.
• Hit F6 in frame 2 ("Over")
• Change the color of the button.
As you will see, the button will change color when you move the mouse over it. Do the same with the other button.
Painting the "over" state of a button
Step 8 - Add action script code to the timeline
• Insert a new layer, call it "Action"
• Go to frame one of this layer and hit F9
Firstly insert a stop to the animation:
stop();
This is ActionScript code that will stop the animation right after frame one is loaded. Only by clicking the buttons
can the user then go forward or backward.
Then insert this slide show code:
Flash button tutorial
forward_btn.addEventListener(MouseEvent.CLICK,forward);
back_btn.addEventListener(MouseEvent.CLICK,backward);
function forward(event:MouseEvent) {
if (this.currentFrame == this.totalFrames)
{
gotoAndStop(1);
}
else
{
nextFrame();
}
}
function backward(event:MouseEvent) {
if (this.currentFrame == 1)
{
gotoAndStop(this.totalFrames);
}
else
{
prevFrame();
}
}
This ActionScript 3.0 code firstly adds Event Listeners to each button as we have seen before.
The forward function has some "if-then-else" logic inside. Let's look at its "if-then-else" statement.
if (this.currentFrame == this.totalFrames) { gotoAndStop(1); }
else { nextFrame(); }
Meaning: When the user clicks on the forward button, the Flash engine will check if the current frame is the last
frame then move to frame 1 else just move to the next frame.
The backward function implement the following:
if (this.currentFrame == 1) { gotoAndStop(this.totalFrames); }
else { prevFrame(); }
Meaning: If we are on the first frame then go to last frame, else go to the previous frame.
In order to use this slide-show code for your own slide show you do not need to understand it. Just copy and paste it,
but make sure that your forward button instance is called "forward_btn" and the backward button instance
"back_btn".
Tip: If this doesn't work, make sure that your Publish settings say ActionScript 3. It won't work with ActionScript 2.
Also make sure that your button instances are named and that these names correspond to the ones you use in the
script. It doesn't matter how you name the button symbols, we talk about button instances here !
Step 9 - Make sure your buttons extend to all frames
Finally, make sure that these buttons are displayed throughout the "movie"
208
Flash button tutorial
• Select the buttons layer, click the last frame (where the last picture sits) and Right-click->Insert Frame (or hit
F5). A the end you should see little white rectangle.
Your timeline should roughly look like this:
The final time line for a simple slideshow
Step 10 - Tuning
You may want to fix the title page.
Results
• You can look at my published resulthere [7]
• Source: flash-cs3-simple-slide-show-as3.fla [8]
• You can grab all the files flash-cs3-simple-slide-show-as3.* from this directory:
http://tecfa.unige.ch/guides/flash/ex/buttons-intro/
This slide show was fairly simple. Now you maybe would like to use fancier buttons. See Animated buttons below.
Image maps with pictures
You can make image maps from bitmaps too. I.e. you could use a picture and then insert "hot spots".
Steps (more details when I have time):
Prepare an image
• Put an image on the stage
• Break it apart
Carve out a fragment
• Deselect the image !
• Grab some region with the Lasso tool
• Right-click -> Convert to symbol. Select button !. You now should have an image fragment in the library
Edit this button and change the "mouse-over" and "mouse down" pictures
• Double-click on this button in the library. You should be in symbol edit mode. Alternatively you can click on the
button in the stage. This will show you the whole picture ... I prefer the first method for this job.
• Hit F6 three times to produce copies in the same positions
• In Frame 2 and 3 make a copy of the shape, then move it while the cursor is still on to an empty space
• Modify->Union this copy into a graphic
• Make it a color with a low alpha
• Move it over the picture shape (but do not move the shape in any way).
.... This gets you a roll-over region :)
Results
• You can look at my published resulthere [9]
• The source file:
flash-cs3-image-map.fla [10]
209
Flash button tutorial
• Directory:
http://tecfa.unige.ch/guides/flash/ex/buttons-intro/
Buttons with tweens inside
If you like the idea of crazy buttons, you really can use all your graphics and animation skills. Buttons can include
any kind of graphics, including embedded movie clips.
In order to use animations within button symbol frames, you simply create an embedded movie clip (see Flash
motion tweening tutorial or Flash embedded movie clip tutorial) and then put it in one of the "up", "over" or "down"
frames of the button symbol.
Results
• You can look at my published result here [11]
• The source file:
flash-cs3-button-animation.fla [12]
• Directory:
http://tecfa.unige.ch/guides/flash/ex/buttons-intro/
ActionScript summary
First, create a layer in the timeline called "Script" or "Action". Use frames in this layer to script behaviors. You can
extend the scope of a script by hitting F5 in the timeline (same principle as for backgrounds).
To attach some behavior to a mouse click, use code like this:
button_instance_name.addEventListener(MouseEvent.CLICK,function_name);
function function_name (event:MouseEvent):void {
gotoAndPlay(2);
}
Replace 'button_instance_name' and 'function_name' by whatever naming is appropriate.
• 'button_instance_name' refers to the name of the button instance (in the properties panel !
• function_name can be anything you like (but do not use spaces or special characters in function names, except
the underscore "_".
Here is a good example:
go_button.addEventListener(MouseEvent.CLICK,goFrameA);
function goFrameA (event:MouseEvent) { gotoAndPlay(2); }
Here is a bad example ("go-button" has a dash, and "go Frame" is two words)
go-button.addEventListener(MouseEvent.CLICK,goFrameA);
function go FrameA (event:MouseEvent) { gotoAndPlay(2); }
Some useful ActionScript "instructions":
stop();
will stop the animation. You can insert stops(); wherever you like in your timeline.
gotoAndStop(4);
will jump to frame #4 and stop. Use this for still pictures.
210
Flash button tutorial
gotoAndPlay("my_frame");
will jump to frame called "my_name" and play that frame and the following ones. Use this for animations that
extend over several frames. But then consider inserting a "stop();" in the last frame of that animation.
gotoAndPlay(4);
will jump to frame #4 and play the rest (as above).
Other kinds of buttons
• Any movie clip symbol (and other sprites) can be made into a button
• See also the built-in Flash component button
To turn a symbol into a button (see for example the ActionScript 3 interactive objects tutorial
// changes just the cursor into a hand
thing.buttonMode = true;
// add an event listener like for a normal button
thing.addEventListener(MouseEvent.CLICK, do_something);
function do_something (event) {
// launch some animation, i.e. an movie clip that is embedded in the
thing.
// trigger something ...
}
Links
Manuals
• Flash Professional Help / Creating buttons [13] (Adobe, retr. Feb 2013)
Slide shows
If you search the Internet you can find lots of Flash slide shows. Some commercial, some tutorials, some good, some
outdated. Here are a few:
Text tutorials
• http://www.toxiclab.org/tutorial.asp?ID=79
• http://www.flashvault.net/tutorial.asp?ID=118
Video tutorials
• Creating slideshows in Flash CS3 [14] by Craig Campbell. The basic version is free.
Examples of slide show tools
• Slideshowpro [15] (commercial kit)
211
Flash button tutorial
212
References
[1] http:/ / tecfa. unige. ch/ guides/ flash/ ex/ buttons-intro/
[2] http:/ / tecfa. unige. ch/ guides/ flash/ ex6/ buttons-intro/ flash-cs6-rocket-launcher-as3. html
[3] http:/ / tecfa. unige. ch/ guides/ flash/ ex6/ buttons-intro/ flash-cs6-rocket-launcher-as3. fla
[4] http:/ / tecfa. unige. ch/ guides/ flash/ ex6/ buttons-intro/ flash-cs6-rocket-launcher-as3-code-snippets. html
[5] http:/ / tecfa. unige. ch/ guides/ flash/ ex/ buttons-intro/ flash-cs3-simple-menu-site. html
[6] http:/ / tecfa. unige. ch/ guides/ flash/ ex/ buttons-intro/ flash-cs3-simple-menu-site. fla
[7] http:/ / tecfa. unige. ch/ guides/ flash/ ex/ buttons-intro/ flash-cs3-simple-slide-show-as3. html
[8] http:/ / tecfa. unige. ch/ guides/ flash/ ex/ buttons-intro/ flash-cs3-simple-slide-show-as3. fla
[9] http:/ / tecfa. unige. ch/ guides/ flash/ ex/ buttons-intro/ flash-cs3-image-map. html
[10] http:/ / tecfa. unige. ch/ guides/ flash/ ex/ buttons-intro/ flash-cs3-image-map. fla
[11] http:/ / tecfa. unige. ch/ guides/ flash/ ex/ buttons-intro/ flash-cs3-button-animation. html
[12] http:/ / tecfa. unige. ch/ guides/ flash/ ex/ buttons-intro/ flash-cs3-button-animation. fla
[13] http:/ / helpx. adobe. com/ flash/ using/ creating-buttons. html
[14] http:/ / www. learnwebdevelopment. com/ creating-slideshows. html
[15] http:/ / slideshowpro. net/
Flash components overview
Draft
This is part of Flash tutorial series.
Introduction
Components are prebuilt interface elements (widgets) that will speed
up programming of interactive Flash pages.
Learning goals
This is a high level overview:
• Learn where to find components
• Learn about the purpose of various Flash 9 (CS3) components
Prerequisites
Flash CS3 desktop tutorial
Flash drawing tutorial
Flash button tutorial (not absolutely necessary)
Moving on
This article is just a conceptual overview. There are some
specific component tutorials you may be interested in:
Flash component button tutorial
Flash Video component tutorial
Flash datagrid component tutorial
The Flash tutorials article has a list of other tutorials.
Quality
This text should technical people get going and may not be
good enough for self-learning beginners. It can be used as
handout in a "hands-on" class. That is what Daniel K.
Schneider made it for...
Flash CS3 component library
Flash components overview
Level
It aims at beginners. More advanced features and tricks are not explained here.
Learning materials
• There is component demo [1] you can look at (source file is flash-cs3-components-overview.fla [2] ... in progress).
• Grab the various *.fla files from here:
http://tecfa.unige.ch/guides/flash/ex/components-intro/
The executive summary
Flash has a few built-in components (called widgets or gadgets in other contexts) and that will allow to you to build
an interactive environment more quickly than by coding all by yourself.
However, making good use of most of these components still requires basic knowledge of ActionScript. In this
article we will try to show a few design patterns that you can copy and adapt.
The executive summary
•
•
•
•
Open the component library (Window->Components or CTRL-F7)
Drag a component to the stage
Fill in some parameters
Add some ActionScript code that will handle user action events.
ActionScript (AS2) vs. ActionScript (AS3)
• In CS3, a component library is available for both versions
• The AS3 one is smaller as you could see in the screenshot above. We shall focus on Flash 9 and Action Script 3
here. However, the principle of using AS2 parameters is the same.
In this article we are going to look at User Interface components only, see the Flash video component tutorial for the
Video elements.
To open the component library
• Window->Components or CTRL-F7
• I suggest to dock it against your library.
'Warning - AS2 components are different from AS3 components (!!)
• It really is important to plan ahead, i.e. you must decide whether you work with AS2 or AS3 before you start
using any component !
• As long as you don't use components, as long as you don't insert any ActionScript code you can easily switch
between various Flash and ActionScript versions. Once you start using AS or AS-based components you can't !
AS 3 built-in component overview
I am (slowly) making a demo [1] (not yet fully completed, but somewhat instructive).
• Get the source from http://tecfa.unige.ch/guides/flash/ex/components-intro/flash-cs3-components-overview.
fla
Use of components with the Flash Desktop
• Using the UI Components [3]
Using components
• Open the component library (Window->Components or CTRL-F7)
• Drag a component to the stage. This will also add this component to the library.
• Once a component is in your library, just drag it from there
213
Flash components overview
214
Component assets
• Adding a component to the stage or to the library also will copy necessary Component Assets in a folder. Do not
delete this folder !
• If you wish you can then change the components skins (i.e. the graphical representation) by editing these elements
(but make sure that you know what you do).
Parameters
Each component has a series of parameters that you can modify in order to change the component's appearance and
behavior.
The most important parameters
Window->Properties>Parameters)
can
be
simply
changed
through
the
Parameters
panel
(menu
Flash CS3 Parameters panel (button component
shown)
Alternatively, you also can use the Components Inspector.
Flash CS3 Component inspector panel (button
component shown)
The components inspector gives extra information, e.g. the name of the component used (on top just below the tab).
Tip: If the parameter or component inspect won't display the parameters, click on an empty spot on the workspace
and select the object again. (You likely selected more than one object).
Other parameters only can be changed through ActionScript coding.
Sizing components
With the free transform tool (or similar) you can resize component instances
• Just click on it on the stage and do it
• Alternatively set the size through the parameters or properties panel.
In any case, you do not need to fiddle with component internals ....
Live preview
If your component doesn't really show, (re)enable live preview:
• Select Control > Enable Live Preview (tick the box)
The rest of this article briefly presents each UI component. See also the Flash Video component tutorial which is in a
separate article.
Working with the Actions Frame panel
Flash components overview
Tip: If your screen is large enough, it's a good idea to drag out this panel to the Desktop (do not let it "touch" Flash.
Then pin it down with the pin at the bottom. This way you can move around in your frames and layers and still edit
code.
(More is needed here, maybe I will write an ActionScript panel tutorial).
Understanding what is going on
A beginner usually has trouble understanding why a script doesn't show any effect. Errors are mostly likely in the
data, e.g. in the names you give to your component instances or fields.
One way to track a few things down is to print out messages. Below is really ugly piece of code that attempts to print
out information (even if it doesn't exist). Just insert it in the scripts layer after/before your other code. This will write
messages to the output pane that will pop up.
this.addEventListener(MouseEvent.CLICK, onMouseClickEvent);
// Then make the callback
function onMouseClickEvent(e:Event)
{
try
{
// trace(e);
trace(">>" + e.type + " event from " + e.target.name + " called on "
+ this.name);
trace("------");
}
catch (e:Error)
{
// trace("Error occurred!");
}
}
Remove it once you are done or better just put comments around the code like this:
/*
.... above code here ....
*/
I have to complete this function, with some more useful infos at some point ....
• See also Event [4] (Adobe)
Below we summarize functionalities of the other button components. (More details will be added sometimes, in the
meanwhile, please consult the official documentation)
215
Flash components overview
Various button components
You can see a simple use of these in thedemo [1].
Button
“The Button component is a resizable, rectangular button that a user can press with the mouse or the spacebar to
initiate an action in the application. You can add a custom icon to a Button. You can also change the behavior of a
Button from push to toggle. A toggle Button stays pressed when clicked and returns to its up state when clicked
again” Adobe documentation [5] (see above)
CheckBox
“A CheckBox is a square box that can be selected or deselected. When it is selected, a check mark appears in the
box. You can add a text label to a CheckBox and place it to the left, right, above, or below the CheckBox” Adobe
documentation [6]
• Using the CheckBox [7] (Adobe Using ActionScript 3.0 Components)
• Checkbox class [8] (ActionScript 3.0 Language and Components Reference)
RadioButton
“The RadioButton component lets you force a user to make a single choice within a set of choices. This component
must be used in a group of at least two RadioButton instances. Only one member of the group can be selected at any
given time. Selecting one radio button in a group deselects the currently selected radio button in the group. You set
the groupName parameter to indicate which group a radio button belongs to.” Adobe documentation [9]
• RadioButton [10] (Adobe Using ActionScript 3.0 Components)
Number and text input
TextArea
“The TextArea component is a wrapper for the native ActionScript TextField object. You can use the TextArea
component to display text and also to edit and receive text input if the editable property is true. The component can
display or receive multiple lines of text and wraps long lines of text if the wordWrap property is set to true. The
restrict property allows you to restrict the characters that a user can enter and maxChars allows you to specify the
maximum number of characters that a user can enter. If the text exceeds the horizontal or vertical boundaries of the
text area, horizontal and vertical scroll bars automatically appear unless their associated properties,
horizontalScrollPolicy and verticalScrollPolicy, are set to off. ” Adobe documentation [11]
• TextArea [12] (ActionScript 3.0 Language and Components Reference)
TextInput
“The TextInput component is a single-line text component that is a wrapper for the native ActionScript TextField
object. If you need a multiline text field, use the TextArea component. For example, you could use a TextInput
component as a password field in a form. You could also set up a listener that checks whether the field has enough
characters when a user tabs out of the field. That listener could display an error message indicating that the proper
number of characters must be entered. ” Adobe documentation [13]
• TextField [14] (ActionScript 3.0 Language and Components Reference)
216
Flash components overview
Numeric Stepper
“The NumericStepper component allows a user to step through an ordered set of numbers. The component consists
of a number in a text box displayed beside small up and down arrow buttons. When a user presses the buttons, the
number is raised or lowered incrementally according to the unit specified in the stepSize parameter until the user
releases the buttons or until the maximum or minimum value is reached. The text in the NumericStepper
component's text box is also editable.” Adobe documentation [15]
• Using the NumericStepper [15] (Using ActionScript 3.0 Components)
• NumericStepper class [16] (ActionScript 3.0 Language and Components Reference)
Slider
“The Slider component lets a user select a value by sliding a graphical thumb between the end points of a track that
corresponds to a range of values. You can use a slider to allow a user to choose a value such as a number or a
percentage, for example. You can also use ActionScript to cause the slider's value to influence the behavior of a
second object. For example, you could associate the slider with a picture and shrink it or enlarge it based on the
relative position, or value, of the slider's thumb. ” Adobe documentation [17]
• Slider class [18] (ActionScript 3.0 Language and Components Reference)
Other
ColorPicker
“The ColorPicker component allows a user to select a color from a swatch list. The default mode of the ColorPicker
shows a single color in a square button. When a user clicks the button, the list of available colors appears in a swatch
panel along with a text field that displays the hexadecimal value of the current color selection.” Adobe
documentation [19]
• Using the ColorPicker [20] (Using ActionScript 3.0 Components)
• ColorPicker class [21] (ActionScript 3.0 Language and Components Reference)
ComboBox
A ComboBox component allows a user to make a single selection from a drop-down list. Adobe documentation [22]
Label
“The Label component displays a single line of text, typically to identify some other element or activity on a web
page. You can specify that a label be formatted with HTML to take advantage of its text formatting tags.” Adobe
documentation [23]
ProgessBar
“The ProgressBar component displays the progress of loading content, which is reassuring to a user when the content
is large and can delay the execution of the application. The ProgressBar is useful for displaying the progress of
loading images and pieces of an application. The loading process can be determinate or indeterminate. A determinate
progress bar is a linear representation of a task's progress over time and is used when the amount of content to load is
known. An indeterminate progress bar is used when the amount of content to load is unknown. You can also add a
Label component to display the progress of loading as a percentage. ” Adobe documentation [24]
217
Flash components overview
ScrollPane
“You can use the ScrollPane component to display content that is too large for the area into which it is loaded. For
example, if you have a large image and only a small space for it in an application, you could load it into a
ScrollPane. The ScrollPane can accept movie clips, JPEG, PNG, GIF, and SWF files. ” Adobe documentation [25]
Uploader
“The UILoader component is a container that can display SWF, JPEG, progressive JPEG, PNG, and GIF files. You
can use a UILoader whenever you need to retrieve content from a remote location and pull it into a Flash application.
For example, you could use a UILoader to add a company logo (JPEG file) to a form. You could also use the
UILoader component in an application that displays photos. Use the load() method to load content, the
percentLoaded property to determine how much content has loaded, and the complete event to determine when
loading is finished. ” Adobe documentation [26]
UIScollBar
“The UIScrollBar component allows you to add a scroll bar to a text field. You can add a scroll bar to a text field
while authoring, or at run time with ActionScript. To use the UIScrollBar component, create a text field on the Stage
and drag the UIScrollBar component from the Components panel to any quadrant of the text field's bounding box. ”
Adobe documentation [27]
List-based components
Lists
These components are based on lists
• A list is a row
• Rows can have columns
• A cell is either an element of a simple row or the intersection of a row with a column
Items
• Contents of cells are items
• Items are objects with various properties (depending on the component)
The dataProvider parameter
• For ComboBox, List, and TileList click on the dataProvider parameter to enter data.
DataGrid
“ The DataGrid component lets you display data in a grid of rows and columns, drawing the data from an array or an
external XML file that you can parse into an array for the DataProvider. The DataGrid component includes vertical
and horizontal scrolling, event support (including support for editable cells), and sorting capabilities.” Adobe
documentation [28]
See the Flash datagrid component tutorial in this Wiki.
218
Flash components overview
List
“ The List component is a scrollable single- or multiple-selection list box. A list can also display graphics, including
other components. You add the items displayed in the list by using the Values dialog box that appears when you
click in the labels or data parameter fields. You can also use the List.addItem() and List.addItemAt() methods to add
items to the list.” Adobe documentation [29]
TileList
“The TileList component consists of a list that is made up of rows and columns that are supplied with data by a data
provider. An item refers to a unit of data that is stored in a cell in the TileList. An item, which originates in the data
provider, typically has a label property and a source property. The label property identifies the content to display in a
cell and the source provides a value for it. ” Adobe documentation [30]
See Displaying images with the TileList component [31] (Adobe tutorial) by Bob Berry
A little ComboBox with ActionScript only
After a day or two learning ActionScript I already was fed up with working with the drag and drop method. Problem
is that I can't remember any instance names, label names, etc. and writing little pieces of ActionScript is very time
consuming that way.
If you have the same problems, you should write as much as you can directly in ActionScript.
For instance, instead of dragging a ComboBox to the desktop, filling the dataProvider field in the Parameters panel
etc. you just write the whole code that creates, positions and fills this ComboBox.
Code below (more or less) has been used to make the CS3 components overview [1]
import fl.controls.ComboBox;
import fl.data.DataProvider;
import flash.net.navigateToURL;
var items_CB:Array = new Array(
{label:"HOME", data: "home_frame"},
{label:"User Input - buttons", data: "buttons_frame"},
{label:"Color Picker", data: "color_picker_frame"},
{label:"Data Grid", data: "data_grid_frame"},
{label:"Lists", data: "lists_frame"},
{label:"User Input - more", data: "user_input_frame"},
{label:"Scrolling", data: "scroll_frame"}
);
var menu_CB:ComboBox = new ComboBox();
// Width of items
menu_CB.dropdownWidth = 200;
// With of the menu button
menu_CB.width = 150;
// Position (from to right: x,y)
menu_CB.move(380, 7);
// Number of rows to display without scrollbar
menu_CB.rowCount = 7;
// Label of the menu button
219
Flash components overview
menu_CB.prompt = "Flash CS3 UI Components";
// Insert the items defined above
menu_CB.dataProvider = new DataProvider(items_CB);
// Register the event handler
menu_CB.addEventListener(Event.CHANGE, changeHandler);
addChild(menu_CB);
function changeHandler(event:Event):void {
var destination = ComboBox(event.target).selectedItem.data;
gotoAndStop(destination);
menu_CB.selectedIndex = -1;
}
Tip: Positioning the box is not that hard. Just turn on the Rulers (Right-click->Rulers).
Working with external other components
Firstly, don't install anything from a website you don't trust.
MXP files
An MXP file is a component file format that is used in Adobe Exchange. To install these, simply doubleclick on it
and it will launch the extensions manager program which in turn will then install either swc component(s) or a *.fla
libraray. This also may happen if you download it.
Adobe Exchange
Is a website that offers components under all sorts of licensing schemes. Unfortunately, you have to click on each
title to figure out what version of Flash it supports, if it's crippleware of really free, etc. Don't download without
reading the description first ...
• You can search, browse by categories, and list according to various criteria
• At the same time you may filter by license type
Link:
Adobe Flash Exchange [32]
SWC components
Components can be distributed as *.swc files. A *.swc component is a compiled movie clip that you can't edit. You
still may edit its properties. They publish faster than *.fla component.
Installing other components in your system
You may find or (mostly) buy other ActionScript components on the Internet or through Adobe's website. You just
can open a component file, but then it will not permanently be in your System. To make a component permanently
available:
1. Quit Flash
2. Copy the component to the components directory
Under Windows XP:
C:\Program Files\Adobe\Flash CS3\language\Configuration\Components
e.g. C:\Program Files\Adobe\Adobe Flash CS3\en\Configuration\Components
220
Flash components overview
Under Windows Vista:
C:\Programs\Adobe\Adobe Flash CS3\language\Configuration\Components
e.g. C:\Programs\Adobe\Adobe Flash CS3\en\Configuration\Components
Under MacIntosh:
Macintosh HD:Applications:Adobe Flash CS3:Configuration:Components
Alternatively you also can install these in a user directory:
• Win XP: C:\Documents and Settings\username\Local Settings\Application Data\Adobe\Adobe Flash
CS4\en\Configuration\Components
• Windows Vista: C:\Users\username\Local Settings\Application Data\Adobe\Adobe Flash
CS4\en\Configuration\Components
• Mac OS X: Macintosh HD:Users:<username>:Library:Application Support:Adobe Flash
CS4:Configuration:Components
If you can't see these folders: In the Windows Explorer, select Tools- >Folder Options; View tab. Then select the
Show hidden files and folders radio button.
FLA components
“A FLA-based component is a movie clip that is editable by a Flash developer. When you drag a FLA-based
component from the Components panel to the Stage or to the Library, behind the scenes it is just as though you
opened a FLA file as an External Library and dragged in a symbol from that Library.” (Creating ActionScript 3.0
components in Flash – Part 1: Introducing components [33])
Installed *.fla libraries can be found through the menu Window->Common libraries. You then can dock it next to
your library for example.
Managing external components in CS3
Open Help->Manage components. You then can for example:
• enable/disable
• delete
The same tool also gives access to the Adobe exchange, help files, etc.
Links
Reference
For Designers
• Flash CS3 Documentation [34] - Select Using ActionScript 3 Components or here [35] then click on top left menu
icon. (Yes Adobe can't manage URLs for pages and menus)
For programmers
• UIComponent [36] (Adobe AS3 reference manual). For programmers.
External component files
• Working with component files [37]
221
Flash components overview
Tutorials
• Getting started with Flash CS3 user interface components [38], Bob Berry, Adobe
• Flash and ActionScript components learning guide [39]
• Creating ActionScript 3.0 components in Flash – Part 1: Introducing components [33] by Jeff Kamerer, Adobe
(sept. 2007).
Component libraries
• Meta-Index at HotScripts.com [40] (but not sorted by Flash version ....)
• Adobe Exchange beta [41] (various licences, also commercial). Not everything a component.
• Atellis [42] (Good reflection component, dead ??).
References
[1]
[2]
[3]
[4]
http:/ / tecfa. unige. ch/ guides/ flash/ ex/ components-intro/ flash-cs3-components-overview. html
http:/ / tecfa. unige. ch/ guides/ flash/ ex/ components-intro/ flash-cs3-components-overview. fla
http:/ / livedocs. adobe. com/ flash/ 9. 0/ main/ wwhelp/ wwhimpl/ js/ html/ wwhelp. htm
http:/ / livedocs. adobe. com/ flash/ 9. 0/ ActionScriptLangRefV3/ flash/ events/ Event. html
[5] http:/ / livedocs. adobe. com/ flash/ 9. 0/ main/ 00000420. html
[6] http:/ / livedocs. adobe. com/ flash/ 9. 0/ main/ 00000424. html#wp125595
[7] http:/ / livedocs. adobe. com/ flash/ 9. 0/ main/ 00000424. html
[8] http:/ / livedocs. adobe. com/ flash/ 9. 0/ ActionScriptLangRefV3/ fl/ controls/ CheckBox. html
[9] http:/ / livedocs. adobe. com/ flash/ 9. 0/ main/ 00000456. html#wp143494
[10] http:/ / livedocs. adobe. com/ flash/ 9. 0/ ActionScriptLangRefV3/ fl/ controls/ RadioButton. html
[11] http:/ / livedocs. adobe. com/ flash/ 9. 0/ main/ 00000468. html
[12] http:/ / livedocs. adobe. com/ flash/ 9. 0/ ActionScriptLangRefV3/ fl/ controls/ TextArea. html
[13] http:/ / livedocs. adobe. com/ flash/ 9. 0/ main/ 00000472. html
[14] http:/ / livedocs. adobe. com/ flash/ 9. 0/ ActionScriptLangRefV3/ flash/ text/ TextField. html
[15] http:/ / livedocs. adobe. com/ flash/ 9. 0/ main/ 00000448. html
[16] http:/ / livedocs. adobe. com/ flash/ 9. 0/ ActionScriptLangRefV3/ fl/ controls/ NumericStepper. html
[17] http:/ / livedocs. adobe. com/ flash/ 9. 0/ main/ 00000464. html
[18] http:/ / livedocs. adobe. com/ flash/ 9. 0/ ActionScriptLangRefV3/ fl/ controls/ Slider. html
[19] http:/ / livedocs. adobe. com/ flash/ 9. 0/ main/ 00000428. html#wp236747
[20] http:/ / livedocs. adobe. com/ flash/ 9. 0/ main/ 00000428. html
[21] http:/ / livedocs. adobe. com/ flash/ 9. 0/ ActionScriptLangRefV3/ fl/ controls/ ColorPicker. html
[22] http:/ / livedocs. adobe. com/ flash/ 9. 0/ main/ 00000432. html
[23] http:/ / livedocs. adobe. com/ flash/ 9. 0/ main/ 00000440. html#wp125926
[24] http:/ / livedocs. adobe. com/ flash/ 9. 0/ main/ 00000452. html
[25] http:/ / livedocs. adobe. com/ flash/ 9. 0/ main/ 00000460. html
[26] http:/ / livedocs. adobe. com/ flash/ 9. 0/ main/ 00000480. html
[27] http:/ / livedocs. adobe. com/ flash/ 9. 0/ main/ 00000484. html
[28] http:/ / livedocs. adobe. com/ flash/ 9. 0/ main/ 00000436. html
[29] http:/ / livedocs. adobe. com/ flash/ 9. 0/ main/ 00000444. html
[30] http:/ / livedocs. adobe. com/ flash/ 9. 0/ main/ 00000476. html
[31] http:/ / www. adobe. com/ devnet/ flash/ quickstart/ tilelist_component_as3/
[32] http:/ / www. adobe. com/ cfusion/ exchange/ index. cfm?event=productHome& exc=2& loc=en_us
[33] http:/ / www. adobe. com/ devnet/ flash/ articles/ creating_as3_components. html
[34] http:/ / livedocs. adobe. com/ flash/ 9. 0/ main
[35] http:/ / livedocs. adobe. com/ flash/ 9. 0/ main/ Part2_Using_AS3_Components_1. html
[36] http:/ / livedocs. adobe. com/ flash/ 9. 0/ ActionScriptLangRefV3/ fl/ core/ UIComponent. html
[37] http:/ / help. adobe. com/ en_US/ ActionScript/ 3. 0_UsingComponentsAS3/ WS5b3ccc516d4fbf351e63e3d118a9c65b32-7feb.
html#WS5b3ccc516d4fbf351e63e3d118a9c65b32-7fc6
[38] http:/ / www. adobe. com/ devnet/ flash/ quickstart/ getting_started_ui_components/
[39] http:/ / www. adobe. com/ devnet/ flash/ articles/ components_guide. html
[40] http:/ / www. hotscripts. com/ Flash/ Components/ index. htmlFlash::Components
[41] http:/ / www. adobe. com/ cfusion/ exchange/ index. cfm?view=sn110
222
Flash components overview
[42] http:/ / labs. atellis. com/ category/ components/
Flash component button tutorial
Draft
Introduction
Learning goals
• Learn how to use the component button
Flash level
9 / ActionScript 3
Prerequisites
The following tutorials are recommended but not fully necessary
• Flash layers tutorial
• Flash button tutorial
• Flash components overview
Moving on
• Flash Video component tutorial
Level and target population
• Beginners
Quality
• This should get you going, component buttons are fairly easy to use.
Alternative version
Flash CS3 component button tutorial
Principles
In Flash CS3 to CS6 there exist three different kinds of buttons:
(1) Button symbols. See the Flash button tutorial. These button symbols (classes) are made with four predefined
frames and can include any kind of drawing (including movie clips). Their visual behavior is highly customizable.
(2) Button components. These are part of the built-in components library that provides various interface
components (also called widgets or gadgets) that are easy to use. Technically speaking, these buttons are a kind of
embedded movie clip. Graphically speaking, these buttons are some kind of nice looking, semi-transparent rounded
rectangles. It is not easy to change their look.
(3) Any movie clip (or other "heavy" object) can be a button. The difference between built-in buttons and "anything"
is that built-in buttons include some animation that tells the user that he/she is clicking on a button.
Button components are easier to use than button symbols since their labels can be defined through the parameters
panel. Otherwise, you use both in the same way, i.e. you will have to write some ActionScript code.
Before we start, let's quote an explanation from the Adobe user manual: “Components are the building blocks for the
rich Internet applications that provide these experiences. A component is a movie clip with parameters that allow
you to customize the component either during authoring in Flash or at run time with ActionScript methods,
properties, and events. Components are designed to allow developers to reuse and share code, and to encapsulate
complex functionality that designers can use and customize without using ActionScript.” (Using ActionScript 3.0
223
Flash component button tutorial
Components [1], retrieved nov 2008).
Simple timeline navigation with a button
This example introduces an easy way of using buttons for so-called timeline navigation. You can skip it and dive
into the next section
Example code:
• flash-cs6-timeline-navigation.html [2]
• flash-cs6-timeline-navigation.fla [3]
Step 1 - Display the components panel
All built-in Flash components are available through a specific library. To use this library:
• Menu Window->Components or hit CTRL-F7
• Then dock the panel somewhere (best is next to your own library)
Step 2 - create two or more empty frames with some contents
Layer with empty keyframes
• Add some contents, e.g. draw something or drag a picture from your system to the stage.
Step 3 - add a button
• Select frame 1 (move the red play head all to the left)
• Drag a button to the scene
Button of the Flash CS6/ActionScript3
component library
Step 4 - name and label the button instance
•
•
•
•
Click on the button
Select the Parameters panel (menu Window->Properties->Parameters)
Give the button instance a unique name: e.g. button is fine. ActionScript will need that.
Change its label, i.e. the text that the user will see. You can adjust the size of the label in the properties panel
(display section) or using the Free Transform tool
224
Flash component button tutorial
Layer with empty keyframes
Step 5 - stop the animation in frame 1
By default, Flash will play all the frames. This makes sense for a frame-by-frame animation in the main timeline, but
it does not for an application where the user is supposed to navigate. We must stop Flash now ;)
• Open the Code Snippets panel. It can be found in the Windows menu on top.
• Open the TimeLine Navigation section and double-click on Stop at this Frame
Layer with empty keyframes
Flash will now create a new Actions layer and the ActionScript programming panel will pop up. Do not dock it. It
will have the following code inside:
/* Stop at This Frame
The Flash timeline will stop/pause at the frame where you insert this
code.
Can also be used to stop/pause the timeline of movieclips.
*/
stop();
• Close the ActionScript panel by hitting F9
• Test your clip if you want (Hit CTRL-Enter).
Step 6 - Implement navigation from frame 1 to frame 2
• Select the button on the stage
• Open the code snippets panel again
• This time, select "Click to Frame and Stop"
In the ActionScript panel, you will see this:
225
Flash component button tutorial
/* Click to Go to Frame and Stop
Clicking on the specified symbol instance moves the playhead to the
specified frame in the timeline
and stops the movie. Can be used on the main timeline or on movie clip
timelines.
Instructions:
1. Replace the number 5 in the code below with the frame number you
would
like the playhead to move to when the symbol instance is clicked.
*/
button.addEventListener(MouseEvent.CLICK,
fl_ClickToGoToAndStopAtFrame);
function fl_ClickToGoToAndStopAtFrame(event:MouseEvent):void
{
gotoAndStop(5);
}
• Replace the "5" by a "2"
Step 6 - Implement more navigation
• You now could do the same in frames 2, 3, etc.
• Select another keyframe, e.g. 2 and repeat the above steps
• You also could imagine implementing a "back" button.
Button and ActionScript of keyframe 2
Warning: Both the button and the ActionScript must be defined in same frame in order to work.
Moving on
• If you want to play an animation sequence that is implemented in the main timeline (i.e. not an embedded movie
clip), then select "Click to Got to Frame and Play". At the end of the the tweenspan, insert a stop();
• Instead of using "Go to frame X", you also could instruct Flash to go to the next frame. There are several timeline
methods that you can explore.
Instead of completing the example with more details, we will now show a more serious example that uses several
layers and that also explains some more coding principles.
226
Flash component button tutorial
A menu-based web site with the AS 3 button component
Design goal of the example
The goal is to make a sort of simple Flash web site. The user at all times will have a menu to the left that will allow
him to navigate to different contents.
We will build several versions of this. Have a look at the menu-based slide show [4] example before you start
reading. Also, we will introduce some ActionScript in a way that is hopefully appropriate for non-programmers.
Notice: In the Flash button tutorial we also demonstrated how to create similar applications with built-in and
home-made buttons symbols.
Implementation of a global menu
This example explains how to build a simple "Flash" site, i.e. a series of pages through which the user can navigate.
Different versions with different buttons are introduced in the Flash button tutorial....
Example file:
• flash-cs6-simple-slide-show-menu.html [4]
• flash-cs6-simple-slide-show-menu.fla [5]
Step 1- Planning the layers
In this example we will work with five layers:
•
•
•
•
•
Actions: will include a little Action Script code
Buttons: will include the buttons (displayed on all "pages")
Pictures: Contents we want to display
Credits: A special page for the "who's done it" (we also could have used the pictures layer for this).
Background: A simple background that will remain stable.
Your layers should look roughly like this:
Timeline of the menu-based slideshow
Create these layers now ! If you don't remember how, see the Flash layers tutorial. As you can see, the timeline is
rather short since this is an a application and not an animation that uses the main timeline.
Step 2 - Add pictures or other contents
•
•
•
•
•
Decide how many pictures you want (we took four)
Lock all layers (except the pictures layer)
Select the Pictures layer
Frame 1 is reserved for a Title page.
Create a few new empty keyframes (hit F7) and fill them with pictures or any other content or drawings you'd
like. To import a picture either drag it from the desktop to the stage or the library or use Menu File->Import
Your timeline and layers will later look like this. For the moment, just look at the pictures layer
227
Flash component button tutorial
Timeline of the menu-based slideshow
Step 3 - Get buttons from the components library
• Select the buttons layer and lock all the other layers
• Open the component library. You can find it in menu Window->Components. We suggest docking this panel
next to the library.
• In this library, open the "User Interface" folder and drag as many buttons to the stage as you have pictures. Add
an extra one for the credits page.
• Move the buttons into a good position. You may use the Align panel to align and to distribute them properly (see
the Flash arranging objects tutorial if needed).
Step 4 - Consider some ActionScript 3 principles
Let's introduce/recall some ActionScript principles here. In order to make a symbol (e.g. a Flash button or a button
component) interactive, we have to do three things.
1. Give a name to the instance of the component on the stage
2. Adjust some parameters, e.g. add a label for the button. We will do this in the parameters panel.
3. Add some ActionScript to the timeline that will:
• Tell the button to associate a user interaction event (e.g. clicks) with an "action" function
• Program this action function. In our case the function will move the user to another frame in the timeline.
Step 5 - Give a name to each button and change its label
• Click on a button (make sure to lock other layers)
• Select the Parameters panel (menu Window->Properties->Parameters)
• Give the button instance a unique name: e.g. btn_rainbow is fine. ("btn" means "button" and "rainbow" because
this button will lead to a rainbow picture). This "naming" is necessary for ActionScript to work. You will have to
adopt a "programmer's" name:
• Start the name with a letter
• For the rest of the name you can use letters, digits or the underscore "_".
• Do not use white spaces or punctuation characters or dashes. If you do it wrongly, Flash will complain.
• I suggest that you use only lower case letters (Names are case sensitive)
• Then, you should change the label parameter of the button. This is what the user will see. Type anything there,
but don't make it too long (it's a button after all).
• If your text is bigger than the label, either change the button width in the same panel (modify the W: and H:
fields) or use the free transform tool.
Probably you noticed now that it is easier to work with a component button vs. using Flash buttons as explained in
the Flash button tutorial
228
Flash component button tutorial
Parameters of the ActionScript3 button
Repeat this step for all buttons.
Step 6 - Copy/paste and adapt code
• Click in Frame 1 of the Action Layer you already should have defined (see step 1)
• Hit F9 to open the "Actions-Frame" panel. In case it is docked with the parameters, you may undock it to have
some more space.
• Then paste all the code below and adapt it. Alternatively, open the flash-cs6-simple-slide-show-menu.fla [5] file
and copy the code from there.
In case you don't want to copy/paste, just read the following explanations and sample code and then do it on your
own....
stop();
btn_rainbow.addEventListener(MouseEvent.CLICK, clickHandler);
btn_tecfa.addEventListener(MouseEvent.CLICK, clickHandler);
btn_bosses.addEventListener(MouseEvent.CLICK, clickHandler);
btn_my_computers.addEventListener(MouseEvent.CLICK, clickHandler);
btn_credits.addEventListener(MouseEvent.CLICK, clickHandler);
function clickHandler(event:MouseEvent):void {
switch (event.currentTarget.label)
{
case "Rainbow" :
gotoAndStop(2);
break;
case "TECFA" :
gotoAndStop(3);
break;
case "Bosses" :
gotoAndStop(4);
break;
case "My computers" :
gotoAndStop(5);
break;
case "Credits" :
gotoAndStop(6);
break;
229
Flash component button tutorial
}
}
Things you will have to change:
1. The instance names of buttons, e.g. btn_rainbow
2. The labels of the buttons, e.g. "Rainbow"
3. The frame to jump to and play, e.g. gotoAndStop(2) or gotoAndStop("Paradise");
Let's explain the code a bit:
Code that is delimited by /* */ represents so-called comments, i.e. code that is not interpreted by Flash, but that
we inserted just to remember what our code is supposed to do. It's always a good idea to document your code ...
Stopping the animation from playing in frame one:
The stop() instruction will stop Flash from playing all the frames, i.e. we want the user to stay in Frame 1 after the
file loads.
stop();
Associating buttons with an event handler function
ActionScript programming will include two things:
1. You must define which ActionScript function is executed when a user clicks on a button. Think of a function as a
named set of instructions that Flash will execute.
2. You must define the ActionScript code for these functions. Actually, in this example, we will use the same
function for all our buttons (a simpler but longer code example is below).
The syntax for associating a handler function for a button instance is the following:
button_name.addEventListener(Event.type, function_name);
For example, if the user clicks on the btn_rainbow with the mouse, then the function clickHandler defined below will
execute and so forth ...
btn_rainbow.addEventListener(MouseEvent.CLICK, clickHandler);
btn_tecfa.addEventListener(MouseEvent.CLICK, clickHandler);
btn_bosses.addEventListener(MouseEvent.CLICK, clickHandler);
btn_my_computers.addEventListener(MouseEvent.CLICK, clickHandler);
btn_credits.addEventListener(MouseEvent.CLICK, clickHandler);
When a user clicks a button, a so-called MouseEvent is happening. This event is then given to the function that we
called clickHandler for further treatment.
Writing a clickHandler function
Note: you could have chosen an other name, but - as a general rule - function names should be meaningful to you
and to other people who read your program.
Let's now look at the complete function code:
function clickHandler(event:MouseEvent):void {
switch (event.currentTarget.label)
{
case "Rainbow" :
gotoAndStop(2);
break;
case "TECFA" :
230
Flash component button tutorial
gotoAndStop(3);
break;
case "Bosses" :
gotoAndStop(4);
break;
case "My computers" :
gotoAndStop(5);
break;
case "Credits" :
gotoAndStop(6);
break;
}
}
When a user clicks a button, a so-called MouseEvent is happening. This event is then given to the function for
further treatment. Formally speaking, when we defined the clickHandler function, we did defined a event parameter
for the information it will receive from Flash
(event:MouseEvent)
means that we define a parameter called "event" (i.e. we name the information that is handed over) and we tell Flash
that this parameter is of type "MouseEvent".
We then can use use this "event" information. In order to understand which button was clicked, we can retrieve this
from the event information. The following expression:
event.currentTarget.label
will tell us the label of the button that was the current target.
We use this expression in a so-called switch (or case) statement. It starts on line 2 and ends on line 19. Its syntax is
the following:
switch (value) {
case value_1 :
/* do something */
break;
case value_2 :
/* do something */
break;
}
Now, for each label we then define what Flash should do. We only need one single instruction: Go to frame x and
stop again. The instruction is
gotoAndStop(x)
E.g.
gotoAndStop(2)
means "move the animation to frame 2" and stop there.
231
Flash component button tutorial
232
If things go wrong
• Make sure that your syntax is correct. E.g. one single ":" missing may break your program. In the ActionScript
window click on the "Check syntax" icon to test for correct syntax.
• Also indent your code properly. Simply click on the "Auto Format" icon.
• Make sure that the Action layer extends to the end of your timeline. Put code in frame 1 and then hit F5 in the
right-most frame you use (insert frame and not insert keyframe !)
• Make really sure that your code is in frame 1 and in the Action layer.
• Make sure that button instance names and label names are exactly the same in the Parameters panel and in your
Script.
Here is the picture of the timeline again:
Timeline of the menu-based slideshow
Notice the little "a" in frame 1 of the Actions layer. It means "ActionScript code inside" :)
Adding external URLs to buttons
This shows how to program a button that will open an URL in a Web Browser (look at the example file you can
download). Code is a bit complicated since it also will test if the URL really exists.
btn_edutech_wiki.addEventListener(MouseEvent.CLICK, GoToUrl);
function GoToUrl(event:MouseEvent):void {
var url:String =
"http:/ / edutechwiki. unige. ch/ en/ Flash_components_tutorial";
var request:URLRequest = new URLRequest(url);
try
{
navigateToURL(request, '_blank');
}
catch (e:Error)
{
trace("Error occurred!");
}
}
A simpler way of doing it without testing:
function GoToUrl(event:MouseEvent):void {
var request:URLRequest = new URLRequest("http:/ / edutechwiki. unige. ch/ en/ Flash_components_tutorial");
navigateToURL(request, '_blank');
Results and source code
• flash-cs6-simple-slide-show-menu.html [4]
• Source: flash-cs6-simple-slide-show-menu.fla [5]
Flash component button tutorial
• Grab the flash-cs6-simple-slide-show-menu.* files from
http://tecfa.unige.ch/guides/flash/ex6/components-intro/
A simpler but longer solution
Too complicated ? You may use a simpler but less elegant code if you have no programming knowledge and feel not
comfortable with the "switch" statement. The result will be same, though I changed the color of the background:
menu-based slide show with simple AS code [6]
So here is what you need to change:
(1) Event listener registration
So the principle is: For each button you got to register an event listener function. Change:
• The number of addEventListener definitions (here we got five)
• Make sure that each btn-xxx corresponds to names you gave to your own button instances
myButton.addEventListener(MouseEvent.CLICK, Handler_A);
(2) Define event listener functions
• Copy/Paste/Change definitions of functions
• So change the name of the function, e.g. clickHandler1 into clickHandler2 and the frame it has to jump to.
function clickHandler2(event:MouseEvent):void {
gotoAndStop(2);
}
Note: Formatting in ECMAScript languages does not matter. You could have written the above line as:
function Handler_A(event:MouseEvent):void {gotoAndStop(2); }
However, make sure to keep delimiters like the { } ; !!
Start from this complete code
/* This will stop Flash from playing all the frames
User must stay in Frame 1 */
stop();
/* Associate a different handler function for each button instance:
Syntax: button_name.addEventListener(Event.type, function_name
Lines below mean:
* If the user clicks on the btn_rainbow with the mouse,
then the function clickHandler defined below will execute
*/
btn_rainbow.addEventListener(MouseEvent.CLICK, clickHandler1);
btn_tecfa.addEventListener(MouseEvent.CLICK, clickHandler2);
btn_bosses.addEventListener(MouseEvent.CLICK, clickHandler3);
btn_my_computers.addEventListener(MouseEvent.CLICK, clickHandler4);
btn_credits.addEventListener(MouseEvent.CLICK, clickHandler5);
/* Each function defines where to move the playhead in the animation.
E.g. clickHandler2 will go to frame 3 and then stop
*/
233
Flash component button tutorial
function clickHandler1(event:MouseEvent):void
gotoAndStop(2);
}
function clickHandler2(event:MouseEvent):void
gotoAndStop(3);
}
function clickHandler3(event:MouseEvent):void
gotoAndStop(4);
}
function clickHandler4(event:MouseEvent):void
gotoAndStop(5);
}
function clickHandler5(event:MouseEvent):void
gotoAndStop(6);
}
234
{
{
{
{
{
/* This shows how to open an URL in a WebBrowser */
btn_edutech_wiki.addEventListener(MouseEvent.CLICK, GoToUrl);
function GoToUrl(event:MouseEvent):void {
var request:URLRequest = new
URLRequest("http://edutechwiki.unige.ch/en/Flash_components_tutorial");
navigateToURL(request, '_blank');
}
Results and source code
• flash-cs6-simple-slide-show-menu-fewcode.html [6]
• Source: flash-cs6-simple-slide-show-menu-fewcode.fla [7]
• Directory
http://tecfa.unige.ch/guides/flash/ex6/components-intro/
Moving on
If you got more and/or bigger pictures, you actually should not include the pictures in the *.swf, but rather load these
from the Internet. You then have to learn how to use/program a preloader (we will cover this in some other tutorial).
• You may add text (labels) to each picture
• You also could add another URL button (e.g. I should add one to the TECFA Logo on top left).
Exercise
• Add some contents to frame one and add a "home" button to navigate there.
Flash component button tutorial
Customizing buttons
You can customize button skins, but this is not easy.
• Double click the button on the stage
However, before you try this:
• Be aware that you can change width and height simply though the parameters panel
• Color will adapt to background (buttons are transparent)
Read more about Customizing the Button [8] at Adobe
Buttons that work only in a single frame
It is easy to add buttons that only work in a single frame. But you will have to understand this:
•
•
•
•
The Script must "see" the button, i.e. you can't define a script in frame 1 for a button that sits in frame 2
Button instance names therefore must be defined in the same frame
Hit F7 to create an empty keyframe in the Actions layer
At some point you will have to create other Action layers (Flash doesn't care about the layer name, but
unfortunately, the Code snippets panel always will copy code to the "Actions" layer. In other words, you may
have to copy/paste code if you use this tool.
Example files for self-study:
• flash-cs6-simple-slide-show-menu2.html [9]
• flash-cs6-simple-slide-show-menu2.fla [10]
Component buttons in an animation example that uses scenes
You may consult this example in order learn:
• that one can add a button anywhere in the timeline
• how to work with scenes
Scenes can be understood as fragments of a long timeline (likes scenes in a theatre). They have the following
advantage:
• The timeline becomes shorter and more manageable
• You can test scenes independently
To add a scene:
• Menu insert scene
• To rename a scene: menu Window->Other panels->Scene; then double-click on the scene
To navigate from one scene to another, use code like this:
The following code will move the user to a scene called "Credits" in frame 1 and stop after she presses the
"credits_btn".
credits_btn.addEventListener(MouseEvent.CLICK, goCredit);
function goCredit(event:MouseEvent):void {
gotoAndStop(1,"Credits");
}
The following code will move the user to a scene called "Animation" in frame 1 and play
restart_btn.addEventListener(MouseEvent.CLICK, restart);
235
Flash component button tutorial
function restart(event:MouseEvent):void {
gotoAndPlay(1,"Animation");
}
Example and code
• You can see the flash-cs3-cloud-animation-sound2.* [11] example
• Source: components-intro/flash-cs3-cloud-animation-sound2.fla [12]
• The files are here: http://tecfa.unige.ch/guides/flash/ex/components-intro/
Component buttons to start/stop embedded movie clips
See the flash embedded movie clip tutorial for details
E.g. in the flying kites [13] example, we use the following code:
kite.stop();
start_button.addEventListener(MouseEvent.CLICK,start_kite);
stop_button.addEventListener(MouseEvent.CLICK,stop_kite);
function start_kite(event:MouseEvent):void {
kite.play();
}
function stop_kite(event:MouseEvent):void {
kite.stop();
}
kite is the instance name of the embedded "Kite movie".
• kite.play() will play the Kite movie
• kite.stop() will stop the Kite movie
In other words, if you want the user to be able to start/stop an embedded movie clip, you can do this. All your
embedded animations then can sit in a single lone frame (no animation on the main timeline). On other example
using several frames that is discussed in the flash embedded movie clip tutorial is an example [14] from an exam.
Links
• Using ActionScript 3.0 Components [1] (Adobe)
References
[1]
[2]
[3]
[4]
[5]
[6]
[7]
[8]
http:/ / livedocs. adobe. com/ flash/ 9. 0/ main/ wwhelp/ wwhimpl/ js/ html/ wwhelp. htm?href=Part2_Using_AS3_Components_1. html
http:/ / tecfa. unige. ch/ guides/ flash/ ex6/ components-intro/ flash-cs6-timeline-navigation. html
http:/ / tecfa. unige. ch/ guides/ flash/ ex6/ components-intro/ flash-cs6-timeline-navigation. fla
http:/ / tecfa. unige. ch/ guides/ flash/ ex6/ components-intro/ flash-cs6-simple-slide-show-menu. html
http:/ / tecfa. unige. ch/ guides/ flash/ ex6/ components-intro/ flash-cs6-simple-slide-show-menu. fla
http:/ / tecfa. unige. ch/ guides/ flash/ ex6/ components-intro/ flash-cs6-simple-slide-show-menu-fewcode. html
http:/ / tecfa. unige. ch/ guides/ flash/ ex6/ components-intro/ flash-cs6-simple-slide-show-menu-fewcode. fla
http:/ / livedocs. adobe. com/ flash/ 9. 0/ main/ wwhelp/ wwhimpl/ common/ html/ wwhelp. htm?context=LiveDocs_Parts& file=00000488.
html#wp149914
[9] http:/ / tecfa. unige. ch/ guides/ flash/ ex6/ components-intro/ flash-cs6-simple-slide-show-menu2. html
[10] http:/ / tecfa. unige. ch/ guides/ flash/ ex6/ components-intro/ flash-cs6-simple-slide-show-menu2. fla
[11] http:/ / tecfa. unige. ch/ guides/ flash/ ex/ components-intro/ flash-cs3-cloud-animation-sound2. html
236
Flash component button tutorial
[12] http:/ / tecfa. unige. ch/ guides/ flash/ ex/ components-intro/ flash-cs3-cloud-animation-sound2. fla
[13] http:/ / tecfa. unige. ch/ guides/ flash/ ex/ embedded-movie-clips/ kite-movie. html
[14] http:/ / tecfa. unige. ch/ guides/ flash/ ex/ exams2007/ final-exam-coap2110-solution-2007. html
Flash video component tutorial
Draft
Introduction
Video components are prebuilt interface elements (widgets) that will speed up video integration. In particular, the
FLVPlayBack Video Component allows to render videos without any ActionScript programming. It includes a nice
choice of skins for user controls. Videos also can be enhanced with captioning or they may interact with the rest of
the animation. This is discussed in the Flash augmented video tutorial
Learning goals
Learn how to encode *.flv and (older) *.f4v files
Learn how to use the Flash 11 (CS6) video component for simple video playback
Prerequisites for the first part
Flash CS6 desktop tutorial
Flash drawing tutorial
Flash component button tutorial
Moving on
Flash augmented video tutorial
Flash video captions tutorial
The Flash article has a list of other tutorials.
Quality
This text should technical people get going and may not be good enough for self-learning beginners. It can be
used as handout in a "hands-on" class. That is what Daniel K. Schneider made it for...
Level
It both aims at beginners (FLV encoding, using the video playback component and embedding a video in the
timeline) and intermediate Flash designers (inserting captions and using cue points to trigger animations).
The executive summary about Flash Videos
Flash has built-in video management components.
• The FLVPlayBack Video Component is really easy to use since it provides a series of ready-made skins (user
interfaces) from which you can choose.
• The Caption (subtitle) component requires some XML Editing. Read the Flash video captions tutorial.
• For more sophisticated interactions with a video you need to code with ActionScript, as explained in the Flash
augmented video tutorial
The executive how-to summary for simple video playbacks
• If your video uses a format that is not *.flv, *.f4v or *.mp4 of if you plan to reduce its size or trim it then prepare
it first with the Adobe Media Encoder. This tool is included in the Flash distribution. It may differ a bit from the
full CS6 version.
• Drag the FLVPlayBack Video Component to the stage.
237
Flash video component tutorial
• Open the component inspector panel. Choose a skin (user interface configuration) and provide the file name or
URL of the *.flv video
Note: In CS3 and CS4, only the Adobe *.flv format was supported. Since Flash 10/CS5, Adobe provides the more
efficient *.f4v format and also directly supports other formats for playback.
Using the Flash video component
Using Flash CS6 (and CS5) component is really easy
• You can use *.mp4 videos without prior encoding to a Flash video format
• All operations are centralized in the properties panel
• The only difficulties relate to file path operations (correct paths and copying files)
In most cases, you would have to adapt your video file, i.e. at least make it smaller and cut of unwanted beginning
and end.
Just below we explain the procedure for an *.mp4, *.flv or *.f4v video that already is "ready" for production.
Step 1: Drag the component to the stage and save the file
1. Open the components panel (Menu Window->Components or CTRL-F7)
2. Drag FLPLayback 2.5 on the stage
3. Now save your Flash file, else it will not work, since Flash will not find the video file !
4. Copy the video file into the same directory as your flash file (unless you know how to deal with relative file
paths, something that you may have learned creating HTML pages using pictures)
Step 2: Configure the properties of the component
1. Select the component
2. Set the name of the video file with source in the Properties panel (e.g. BFB-BBC.mp4). Make sure to shorten
the file path!
• Bad: C:\...\flash\ex6\screenshots\my_video.mp4
• Good: my_video.mp4
3. Select an appropriate skin. A skin will define what kinds of controls the user will have. You also can make
adjustements to the color
4. Keep the defaults for starters, e.g. maintainAspectRation for starters.
... That's it.
238
Flash video component tutorial
239
RapMan video from BBC
Step 3: Publishing a flash file that uses video
If you plan to publish the flash file on a web site or if you mail your application, do not forget to include all the
files, for example
•
•
•
•
flash-cs6-mp4-video.html (the HTML file, optional)
flash-cs6-mp4-video.swf (the Flash file)
BFB-BBC.mp4 (the video)
SkinUnderAllNoFullscreen.swf (the skin library)
Example files:
• flash-cs6-video-component.html [1]
• flash-cs6-video-component.fla [2] (Flash source)
• BFB-BBC.mp4 [3] (original video)
The video shows the first 3D printer I owned, a RapMan (bought sometimes in 2009).
Flash video component tutorial
240
Using File import
As an alternative, you could use the File import menu. However, you might make wrong choice and therefore we do
not recommend this procedure. This procedure will use the standard FLVPlayback component (not the more
versatile version 2.5)
(1) Import the video file
• Menu File -> Import -> Import video
Importing a video file
(2) Select the skin
Flash video component tutorial
241
Select the skin
(3) Click next and adjust the parameters
Using the Adobe Media Encoder CS6
The Adobe Media encoder can be found in the Program menu of your system (Windows/Mac) or in the File Import
process in Flash CS6 as explained in the previous section.
Important: You cannot transcode or edit *.flv files !! Use another source format like *.mp4 ! I can't explain why,
but it's Adobe's choice ....
Simple transcoding
1.
2.
3.
4.
Click on + to add a video for encoding
Select the video format. By default, the Flash F4V format is selected
Select the quality
Press the green arrow button to launch the encoding. The resulting file will be put in the same directory as the
source video.
Flash video component tutorial
Adding a video to the Adobe Media Encoder CS6
Editing
The Media Encoder allows to "edit a video file in various ways. It is not a full video editor like Premiere, but allows
to do a few very useful operations:
• You can remove frames in the start or the end
• You can clip each side (top, bottom, left, right). This is particularly useful, if you shot the video yourself, e.g. with
a cell phone.
• You also can add so-called cue-points. However we suggest not to use this feature and rather use so-called
ActionScript cue points.
The editor is difficult to find. Do the following
• Select the output video line (underneath the imported video, see the screen capture above: the *.flv file is
selected)
• Menu Edit -> Export settings or hit CTRL-E (...fine name ....)
The picture below explains, how to make a few edits.
• Clip the video: Click on the Source tab first, select the rectangle icon to the left, then either change the values of
left, top, right, bottom or use the clipping rectangle
• Look at frames: Move the yellow play head
• Remove frames from the start and/or the end: Use the small white triangles
242
Flash video component tutorial
243
Adobe Media Encoder editing (export settings)
Once you are done:
• Click on OK
• The click on the green arrow button to encode (as above)
Links
Finding videos on the Internet
Finding and downloading videos
• You may download videos from the Internet (make sure that copyright allows you to do so). Getting videos from
sites like YouTube is not easy without download helpers (see below). Therefore, try sites like http://vimeo.com
first.
• Firefox video download helper extension: https://addons.mozilla.org/en-US/firefox/addon/3006
• Google video search: http://video.google.com/.Use advanced search [4] in order to restrict search to duration.
Video sites:
• http://vimeo.com/Includes open source (creative commons) videos. After a search, you can tick a box for only
showing downloadable videos.
• http://vids.myspace.com/Needs special tools to download
• http://youtube.com/Needs special tools to download
Flash video component tutorial
Adobe documentation
• Flash Professional / Create video files for use in Flash [5], at Adobe, retrieved Feb 18 2013.
• The FLVPlayback component [6]
• Media Encoder Help / Help and tutorials [7] at Adobe, retrieved Feb 18 2013.
244
245
More animation
Flash mask layers tutorial
Draft
This entry is part of the Flash CS3 tutorials and it should be upgraded to CS6 at some point - Daniel K. Schneider
(talk) 20:12, 25 February 2013 (CET)
Introduction
Learning goals
• Learn how to add mask and masked layers to animations
Prerequisites
• Flash CS3 desktop tutorial
•
•
•
•
•
•
•
Flash drawing tutorial
Flash object transform tutorial
Flash colors tutorial
Flash frame-by-frame animation tutorial
Flash motion tweening tutorial
Flash shape tweening tutorial
Flash embedded movie clip tutorial for guided masks
Moving on
• The Flash tutorials article has a list of other tutorials. E.g. you could start learning how to make interactive
programs with the Flash button tutorial.
Level and target population
• Beginners (but see the prerequisites)
Quality
• Rather low. This tutorial doesn't contain many details, just some short "how to"s and feature demonstrations.
To Do
• Filters
“For spotlight effects and transitions, use a mask layer to create a hole through which underlying layers are visible. A
mask item can be a filled shape, a type object, an instance of a graphic symbol, or a movie clip. Group multiple
layers under a single mask layer to create sophisticated effect” (About mask layers [1], retrieved 16:51, 8 October
2007 (MEST)).
Flash mask layers tutorial
246
Mask and masked layers
Masks are layers that will allow you to see what is underneath through a sort of hole (i.e. a drawing). You then can
animate this hole with a motion tween for example. Masked layers are the layers underneath.
In the following picture, a mask lets you see part of bookshelf through an oval.
A mask with an oval
Step 1 - Create some contents:
• Put these contents in one or several layers. We will turn these layers "masked" in step 3.
Step 2 - Add a mask layer:
• On top of these layers, create a new layer
• Right-click on the layer name and select Mask. This layer will mask the others and it should contain a single
graphic element (shape, graphic symbol or group).
Step 3 - Define the masked layers:
• The layer just beneath the Mask layer already should be masked. If it is not, right-click on the layer name and
select Masked.
• You can turn other layers underneath to be masked with the same procedure. Move normal layers to a position
after the mask layer or an already masked layer or create new ones...
To undo a masked layer, just right-click and revert back it to "normal". We show a picture of mask and masked
layers further down. Such static masks are of course not very interesting, so let's move on ...
Flash mask layers tutorial
Masks animated by a simple motion tween
Non-linear motion tweens are simple to create in CS4 to CS6. In CS3, you must learn how to create guided tweens
using an embedded movie clips (see below)
Step 1 - Add a simple motion tween:
• Select the mask layer
• Draw a non-editable object (graphic object, symbol)
Step 2 - Do a motion tween
• Like in a normal motion tween as explained in the Flash motion tweening tutorial.
The user will only see things that will lie underneath the tweened object. E.g. if you move a circle, only the stuff that
sits under the moving circle will be shown.
Example:
flash-cs3-mask.html [2]
Source: flash-cs3-mask.fla [3]
Directory: http://tecfa.unige.ch/guides/flash/ex/special-effects
Shape tweens with mask layers
• Step 1 - Draw a shape in the mask layer
• Step 2 - Do a shape tween
The tweened shape will determine what parts of the drawing in the masked layer(s) you can see.
Guided motion tweens with mask layers (CS3)
The principle is not the same as for the simple motion tween. You will have to created an embedded movie clip in
the mask layer. If you don't understand embedded movie clips, read the Flash embedded movie clip tutorial.
Step 1 - Create a movie symbol
• Select the mask layer
• Create an embedded movie clip, e.g. in frame 1
• E.g. Create first a drawing then Right-click->Convert to Symbol, select Movie Clip
• E.g. Menu Insert New Symbol (CTRL-F8), then draw the object in symbol edit mode.
Timeline might look like this:
Movie clip in a mask
Step 2 - Edit the movie symbol
• Double click on the symbol
247
Flash mask layers tutorial
• Create a guided motion tween (this implies that you should again make the graphic into symbol, then proceed in
the same way as normal guided motion tweening).
Your embedded movie clip might look like this:
A guide motion animation of a movie clip as
mask
Example:
flash-cs3-mask-2.html [4]
flash-cs3-mask-2.fla [5]
Directory: http://tecfa.unige.ch/guides/flash/ex/special-effects
Links
• Work with mask layers [6], a section of "creating animation - animation basics" of the Adobe Using Flash [7]
Manual].
• For CS4: See also Graphic Effects Learning Guide for Flash CS4 Professional [8]. Things did change since CS3
....
References
[1] http:/ / livedocs. adobe. com/ flash/ 9. 0/ UsingFlash/ WSd60f23110762d6b883b18f10cb1fe1af6-7d98. html
[2] http:/ / tecfa. unige. ch/ guides/ flash/ ex/ special-effects/ flash-cs3-mask. html
[3]
[4]
[5]
[6]
[7]
[8]
http:/ / tecfa. unige. ch/ guides/ flash/ ex/ special-effects/ flash-cs3-mask. fla
http:/ / tecfa. unige. ch/ guides/ flash/ ex/ special-effects/ flash-cs3-mask-2. html
http:/ / tecfa. unige. ch/ guides/ flash/ ex/ special-effects/ flash-cs3-mask-2. fla
http:/ / livedocs. adobe. com/ flash/ 9. 0/ UsingFlash/ WSd60f23110762d6b883b18f10cb1fe1af6-7d97. html
http:/ / livedocs. adobe. com/ flash/ 9. 0/ UsingFlash/
http:/ / www. adobe. com/ devnet/ flash/ learning_guide/ graphic_effects/
248
Flash inverse kinematics tutorial
Flash inverse kinematics tutorial
Draft
Introduction
Learning goals
•
•
•
•
Insert bones in shapes
Connect symbols with bones
Create a motion animation with bones
Attach envelope points to bones
Flash level
• Flash CS6 or better
Prerequisites
• Basic drawing and animation (e.g. the level of Flash animation summary)
Moving on
• See the Flash tutorials
Level and target population
• Beginners
Quality
• This is a first draft. I will have to complete things, add some more screen captures, rewrite some stuff, and add
more examples, etc.
Alternative Version
Flash CS4 inverse kinematics tutorial
The bones tool is an inverse kinematics (IK) tool with which one can create armatures for shapes or connected
symbols instances. These armatures connect objects or parts of shape in a hierarchical tree. These parts can be called
bones or limbs. "Outer" (or child) limbs that are moved also will move "inner" (or parent) limbs. E.g. In a human
avatar, if you pull a finger, the hand will move too and the hand in turn will move the lower arm, etc. So in contrast
to "forward kinematic animation", where each movement for each component must be planned, only the starting and
ending locations of a limb are necessary to get a basic animation going.
249
Flash inverse kinematics tutorial
250
“Inverse kinematics is the process of determining the parameters of a jointed
flexible object (a kinematic chain) in order to achieve a desired pose. Inverse
kinematics is a type of motion planning. Inverse kinematics are also relevant
to game programming and 3D animation, where a common use is making
sure game characters connect physically to the world, such as feet landing
firmly on top of terrain.” (Wikipedia [3], retrieved 27 November 2008 ).
“Inverse kinematic animation (IKA) refers to a process utilized in 3D
computer graphic animation, to calculate the required articulation of a series
of limbs or joints, such that the end of the limb ends up in a particular
location. In contrast to forward kinematic animation, where each movement
for each component must be planned, only the starting and ending locations
of the limb are necessary.” (Inverse kinematic animation [4], retrieved 17:52,
28 November 2008 (UTC)).
A group of several symbols with IK
[1]
bones attached. Copyright: Adobe
[2]
License: Creative Commons by-nc-sa
A shape with an IK armature added.
[1]
Copyright: Adobe
License: Creative
[2]
Commons by-nc-sa
“The characters in a game have skeletons. Similar to our own skeleton, this is
a hidden series of objects that connect with and move in relation to each
other. Using a technique called parenting, a target object (the child) is
assigned to another object (the parent). Every time the parent object moves,
the child object will follow according to the attributes assigned to it. A
complete hierarchy can be created with objects that have children and parents
[...] Once the skeleton is created and all of the parenting controls put in place,
the character is animated. Probably the most popular method of character
animation relies on inverse kinematics. This technique moves the child object
to where the animator wants it, causing the parent object and all other
attached objects to follow.” (How stuff works [5], retrieved 27 November
2008).
Since Adobe CS4, Flash fully integrates inverse kinematics modelling.
“Inverse kinematics (IK) is a method for animating an object or set of objects
in relation to each other using an articulated structure of bones. Bones allow
symbol instances and shape objects to move in complex and naturalistic ways
with a minimum of design effort. For example, inverse kinematics lets you
create character animation, such as arms, legs, and facial expressions much
more easily.
You can add bones to separate symbol instances or to the interior of a single
shape. When one bone moves, the other connected bones move in relation to
the bone that initiated the movement. When animating using inverse
kinematics you need only specify the start and end positions of objects.
Inverse kinematics lets you create natural motion much more easily.” (Using
inverse kinematics [6], retrieved 27 November 2008).
Simple demo
The following application shows the difference between an IK structure (armature) made with red symbols and an
another made with a blue shape.
Flash inverse kinematics tutorial
Symbol vs. shape IK structures
Load the symbol-vs-shape-armature.html [7] application and drag the tips (or other parts of the shapes around. Make
sure that you have a Flash 10 player installed. Else, it will not work. Notice: The armatures have been defined as
type "Runtime", meaning that we let the user do the animation (manipulate the IK structure).
Source:
• symbol-vs-shape-armature.fla [8]
• Directory: http://tecfa.unige.ch/guides/flash/ex6/inverse-kinematics/
Terminology:
• An armature or IK structure or bones structure defines how "bones" connect either symbols or various areas
of a shape into an articulated whole.
• Nodes refer to symbols connected by a bone to a "parent" symbol
• Bones or limbs means connectors of either symbols or elements of the bones structure of a shape.
• Ik shape refers to a shape that contains an armature
A simple armature animation with symbol instances
Armatures can be used either for animation, or for end-user manipulations. In this section we shall explain how to
create an animation using a set of connected symbols.
Creation of a simple IK animation with symbol instances
Have a look at the symbols-ik-armature-intro [9] example first.
251
Flash inverse kinematics tutorial
252
If you want to play along, you can start with the following source file. It only
includes the symbols, the IK armature has to be created:
• symbols-ik-armature-intro.fla [10]
A connected balls and ovals example
Step 1 - create the symbols that you plan to connect with a bones
structure
• Create a new layer
• Create a movie clip symbol, draw a red ball and right-click convert to
symbol. Select "Movie clip".
A simple IK animation with symbol
instances
• Then adjust the instance on stage (e.g. fix its color and size or add a bevel
filter)
• Then create copies of this instance. The fastest way is to hold down CTRL-ALT and drag.
• Repeat this with a rounded rectangle.
In your library you now should have two Movie clip symbols, e.g. Red ball and Red rectangle
Step 2 - move the symbols into an initial position
• You could try to reproduce our example, i.e. plan to create a simple "chain animation"
• Make sure that all the symbols you need are on the stage in the same layer. You won't be able to add additional
symbols once you start defining the armature, i.e. the bones structure that will connect these symbols.
• You could rotate objects (either with the transform panel of the Free Transform tool).
Symbols that a ready for assembling into an IK armature
Step 3 - create the armature
Again, make sure that all the symbols you need are on the stage and in the same layer.
The armature must have a hierarchical structure. The "parent" will be attached to the stage, its children to the parent,
and the great children to the children, etc. In our case, this means that we start with the rectangle that should be
attached to the floor (i.e. the right-most rectangle).
• Select the bone tool and click on the first symbol. The first one you select will be the parent shape, i.e. it will
attach the whole armature to the scene. Again, in our case we start with the rectangle to the right.
Flash inverse kinematics tutorial
253
Now let's connect this first symbol to the next symbol:
• From from the inside of this first symbol, start dragging with the bone tool, stop somewhere inside the next
symbol, i.e. release the mouse where you want your bone to end. If you release the mouse outside of a symbol
nothing will happen. If you are succesful, you can see a bone as shown in the next picture.
Connecting the first two elements (right-to-left)
• You may have to zoom in (200-400%). Hit "F4" if you need more drawing space and hit "F4" to display the
panels again.
• Repeat this step until all of the symbols are linked. Make sure to link these in the right order.
You will notice that Flash created an armature layer (called "Armature_1" or similar). You can't edit objects that are
part of the armature). They have been copied to the armature layer and did become ikNodes. You may change the
name of that layer if you like, and of course, you can edit the graphics of a symbol (double click).
Connected armature
A note on terminology: Each bone will get a name like "ikBoneName1" (that you can change) and each connected
symbol will get a name like "ikNode1" (that you also can change). So in an IK armature we got bones and nodes.
The latter are made of your symbols.
Now you can play a bit, e.g. drag the last child in the IK structure around and see if the joints are in the right place. If
not, adjust (see below)
Flash inverse kinematics tutorial
Adjustments
Adjust center points
• If the start of a bone is in the wrong place, you can move the rotation point with the free transform tool.
You also could turn the shape, move it or adjust its size, so that it would adjust to the new rotation and length of the
bone, but that's a bit tricky. You will learn move about bone and node manipulation later, but for starters this it is
enough to move bones up and down.
The picture below shows what happens if you move a shape and change its rotation point. The result is not entirely
convincing (compare with the previous picture above) ...
Adjusting joints (enter points) with the Free
Transform tool in Flash CS4
Animation
Let's now create an IK animation. Before you start, make sure that the IK structure is what you want. It must be
complete. You won't be able to change the structure itself later on. You only can change poses, do some
transformations and other more advanced tuning. You cannot add other symbols to the armature. So here is the
procedure.
• Select the selection tool ( ) in the tools panel
• If you only have a single frame in the timeline, you need to extend the armature span. Select the armature layer
and drag out frame one (watch for the double arrow cursor to appear)
• Now move the red playhead on top to a new frame and define a new pose. In any frame you like, you can move
all the joints. Each time you do this, it will create a new keyframe with a pose. Keyframes are represented by little
lozenges in the armature span in the timeline.
• You can copy/paste poses: Right-click directly in the timeline on a keyframe (i.e. an existing pose) and copy pose.
Then right-click in a different frame and paste pose. Make sure to directly right-click (no click first), else it won't
work.
What if you got it all wrong ?
• Select the armature layer by clicking on it. This selects the whole IK structure
• Kill the parent bone (in our example it its on the bottom)
• The select all symbols and copy them back to the initial layer ("plaything" in our case). You could use ctrl-shift-v
to "copy in place".
• Then delete the armature layer and start again.
254
Flash inverse kinematics tutorial
Adjustment of the time line
• Just drag the latest frame out or in. Make sure that you see a horizontal double arrow, i.e. don't click in the last
frame. In the latter case you would just move the whole animation chain to the right.
Result and source
• symbols-ik-armature-intro.html [9]
• Source: symbols-ik-armature-intro.fla [11] (Notice: Magnify to 400% if you want to play with it, the bevel filters
do seem to have a strange effect on selection).
• Directory: http://tecfa.unige.ch/guides/flash/ex6/inverse-kinematics/
Adding armatures to shapes
You also can add an armature to a shape as we have seen in the initial demo [7] shown at the start. I recommend the
following steps:
Step 1 - Create a new layer with a single shape
• Draw a shape or a simple drawing in object mode. Make sure to finish the drawing, later you only can adjust its
shape.
• Make that you only have a single shape, else CS4 will sort of freak out, e.g. freeze a bit or create more than one
armature layers ....
I suggest the following procedure for drawing:
• Draw all the parts of the shape in object mode
• Once you are happy, you should save a copy of your artwork in case you want to come back to it later: CTRL-A
and Right-click; Create Symbol.
• Then break a part the symbol instance on the stage and make a union of all graphics: CTRL-A, then menu
Modify->Combine Objects->Union. This is necessary because you do need a single shape or drawing object'.
Step 2 - Add the inverse kinematic structure (bones)
•
•
•
•
•
Select the bone tool from the tool panel
Click inside the shape where you the the armature to be attached to the scene. The parent point will not move.
Then hold down the mouse at the same spot and drag out a bone
Click at the end point of this new bone and drag again
etc.
You now will see an armature layer and you can't edit your objects anymore since they all have been moved to the
armature layer.
Step 3 - Add another shape.
• If you want to create an other IK structure (shape or symbol-based) just create a new layer and start again.
Step 4 - Create the animation and adjust various poses in keyframes
• Rotate bones as explained abouve. If you turn on the circle close to the joint you will just move the joint without
turning the parents.
• To adjust the shape in poses, see just below. Also consult the tools and objects overview.
Two flowers example
This example is really ugly. I would have to do it again. It seems that using the pencil tool (strokes), for the blue
flower was not such a good idea. If you need fat lines, rather use the rectangle tool or the paint tool. Then you could
adjust the envelope later on.
• bones-in-shape-intro.html [12]
• Source: bones-in-shape-intro.fla [13]
255
Flash inverse kinematics tutorial
• Directory: http://tecfa.unige.ch/guides/flash/ex6/inverse-kinematics/
Shape rubberman example
This shape has been drawn with the Paint tool in object mode.
Once the drawing was done, we made a union of all its parts
(Modify->Combine Objects->Union) and then optimized
(Modify->Shape-Optimize) at 100%.
• The rubberman has many joints as you can see in the picture.
• The parent bone starts in the hip area.
• We not only animated the poses but also move the rubberman
in different positions in various keyframes.
• shape-ik-rubberman-animation.html [14]
• Source: shape-ik-rubberman-animation.fla [15]
• Directory: http://tecfa.unige.ch/guides/flash/ex6/
inverse-kinematics/
The result isn't great, but given the time we spent on it (little) it's
ok.
Fixing the shape in poses
You sometimes can see that the shape doesn't really follow the
bones (I mean these sharp edges that can appear). Such behavior
can be fixed:
• Use the Subselection tool to move shape control to a different
place. Firstly, magnify the scene (at least 400%). Then you can
Shape-based IK structure of a rubberman
move or kill the blue control points or adjust them with the
red curve control handlers. Take it slowly and wait to see the
result of a manipulation since Flash recomputes the whole interpolations ! Even my DELL M1740 high-end
laptop needs to think about it, before it let's me see a deletion, a move or a curve change happen. Also bones may
be shown displaced. Click in another keyframe and come back ...
• Use the bind tool to associate shape controls with bones.
Fixing a curve of the shape in a IK pose with the
subselect tool
Unless you are looking for a "snake-like" behavior, it is probably better to use a symbol-based armature as in the
next chapter.
256
Flash inverse kinematics tutorial
A stickman avatar
(not done yet ... try it yourself)
Let's now create a stickman avatar that roughly has human proportions. In order to create a "human" stick man we
need a few objects to represent body parts. Here are a few rules of thumbs regarding size of body parts:
•
•
•
•
•
•
•
Total body height should be about 6-8 times the size of the head
Head to crotch and crotch to feet is about the same size
shoulders and hips are about the same (shoulder is smaller for females and bigger for males)
Waist (if you have one is midway between shoulders and crotch
Arm length: From shoulder to mid-thigh (or shorter)
Feet length: About the same as forearm
Face is an oval, about 6-8 smaller than the total size. Eyes are roughly in the middle.
Adjust properties
Select a bone and play with the options in the properties panel
• Speed refers to the rotation speed in relation to the rest (default is 100%)
• Joint rotation constraints are rotational constraints on the joints of a bone structure.
257
Flash inverse kinematics tutorial
258
Animation by user action
You can produce a inverse kinematics armature that the user can manipulate. To do so:
• Only use frame 1 of the Armature layer, i.e. don't do any animation (kill all the other frames in the Armature
layer)
• Select the armature layer
• In the properties panel, choose Type -> Runtime.
Runtime Armature (no animation), the user can play
• You now can play the movie (publish it) and play as in the demo that we showed at the beginning of this tutorial
• Demo: symbol-vs-shape-armature.html [7]
• Source: symbol-vs-shape-armature.fla [8]
• Directory: http://tecfa.unige.ch/guides/flash/ex6/inverse-kinematics/
Flash inverse kinematics tutorial
Tools and objects overview
This is a sort of short manual for the IK tools an objects
Tools overview
Below is a list of tools you may use and their function. See further down for "how to".
The Bones tool
• Define bones
The Bind tool
• Associate envelope points with a given bone. (more later)
The Selection tool
• Select bones or associated ikNodes (shapes) for further manipulation, either by dragging, ALT-dragging or via the
properties or transform panel.
The Subselection tool
• Allows you to move joints of bones (i.e. make them longer or shorter and rotate) of bones within a shape
armature. I.e. this won't work with IK structures that use symbols. To move bones for symbol armatures, use the
Free Transform tool.
• Allows to adjust shapes
The pen tool
• As alternative tool to add/remove control points to a shape.
The Free Transform tool
• Allows to move joints (starting points of bones) of an symbol-based armature.
The Transform panel
• Change size and rotation of both bones and associated ikNodes (shapes).
Dealing with the armature layer
An armature is defined in a special Armature layer. By clicking on the layer, you then can change some of its
properties in the properties panel:
• Ease: You can define ease-in and ease-out parameters as in other tweening animations
• Options:
• Change type: Authortime to animate yourself in the armature layer, runtime to allow the user move the IK
structure. In the latter case, you can't have your own animations. I.e. you only can define frame 1.
• Style: This will display the bone structure in various ways. Use solid for simple stuff and wire to be able to
work on finer details.
259
Flash inverse kinematics tutorial
260
Flash CS4 armature properties
Flash automatically moves all the object from the drawing layer to the armature layer as soon as you create an IK.
Therefore if you want to break the armature, make sure to copy first all your stuff from the armature layer to another
layer or much better, before you start adding an armature, simply save your drawings as a symbol in the library
(break apart the instance on stage again after you saved).
Dealing with the whole IK structure
• To select the whole IK structure or shape, click on it.
• You then can change its position (e.g. use the arrows)
• You can scale it using the Transform panel
Editing Bones
After creating bones (i.e. the connectors), there are many ways of editing them. You can reposition the bones and
their associated objects, move a bone within an object, change the length of a bone, delete bones, and edit the objects
containing the bones.
Remember that you should edit the bones before you start adding poses !
• To select a bone, use the select tool. shift-select will select several and double-click will select all bones.
• To kill a bone, select it and hit delete. This will also kill its children.
• To edit properties of a selected (or several selected bones) use the parameters panel.
You can define 3 sets of parameters for each bone (or set of bones)
• Joint translation is disabled by default, i.e. the size of limbs remains the same. To allow stretching of bones edit
the child's Joint: X translation and Joint: Y translation parameters. You then may define how far in x/y
direction you can stretch the joint, i.e. the start of the bone. Basically, when you move a joint in x/y direction
(which normally you can't) the parent bone will grow/or shrink and change its angle.
Flash inverse kinematics tutorial
• To limit rotation (by default you can rotate in 360 degrees) edit the Joint: rotation parameters. Positive numbers
mean "clockwise".
To rotate a bone (turn it), use the selection tool to drag the bone (or the shape). All bones that are in the same branch
also will move. But if you select a spot closer to the joint, they will move less.
To rotate a bone without moving the parents, shift-drag (hold down the shift key).
To move a joint, select the joint with the free transform tool. In other words, you simple move the rotation point,
i.e. little white circle you should know from old style CW motion animation. You also can play with the transform
panel. If you want to stretch the bone of parent A, select child B.
I did not manage to move bone ends with the Subselection tool for symbol-based armatures, only within a
shape-based IK.
IK nodes in symbol-based armatures
Symbol instances connected with bones become ikNodes. I.e. when you click on a shape with the select tool, you
will see something like ikNode_3 in the properties panel.
• In the transform panel you now can change its size (x and y) and also it's rotation. E.g. if you did some wild
bone manipulation stuff you can realign a shape with the bone.
• Alternatively, you also can drag the ikNode (shape) with ALT-drag.
In both cases the bones will adapt, i.e. stretch and rotate.
Dealing shape-based IK shapes
• To edit a shape in a shape-based IK structure, use the Subselection tool
• If you click on the stroke (the border of the shape) you will see control points. You then can drag control points
or click on one and adjust the shape with the curve controls that will appear.
• To add a new control point click somewhere on the stroke.
• To delete a control point, select it and hit delete
Tip: Magnify a lot (e.g. 400%), it's really hard to get the right point. Also CS4 behaves a bit erratically, i.e. I
sometimes have trouble inserting a new control point vs. moving a curve control. Therefore you also can use the pen
tool and its sub-tools to add/remove controls.
Bind bones to shape points
When you move the bone structure to a different pose, you may not be happy with the result, but you can fix that. By
default, the control points of a shape are connected to the bone that is nearest to them, but you can change that with
the bind tool (that sits underneath the bone tool in the tools panel).
If you click on a bone it will show all associated control points (i.e. parts of the shape that go with a bone). The bone
will be red and the associated control points yellow. Points that are associate with just one bone are yellow squares.
The ones that connect to more than one bone are yellow triangles.
• To remove a control point association with a bone, CTRL-click on the yellow.
• To associate a control point with a bone, SHIFT-click on a red (not associated) control point.
• To add a control point, use the Subselection tool.
The other way round. If you click on a control point (blue if no bone is selected) it will become red and show the
associated bones in yellow.
261
Flash inverse kinematics tutorial
Links
Introductions to inverse kinematics
•
•
•
•
Inverse kinematics [3] (Wikipedia)
Inverse kinematic animation [4] (Wikipedia).
Inverse Kinematics - Improved Methods [16] by Hugo Elias, 2004. Very technical.
How do the characters in video games move so fluidly? [5] (Howstuffworks.com).
Adobe documentation
• Using inverse kinematics [6] (Using Flash CS4 Professional)
Introductions
• Flash Downunder - The Bone Tool and the Deco Tool [17] Video by Paul Burnet.
• Using inverse kinematics [18] by Chris Georgenes. Includes a video, examples files and text. This is a really useful
tutorial that explains all the basics.
Examples
• Dress up dolls [19] (Flash)
Avatars (theory, technology and design)
• See the avatar article
References
[1] http:/ / help. adobe. com/ en_US/ Flash/ 10. 0_UsingFlash
[2] http:/ / creativecommons. org/ licenses/ by-nc-sa/ 3. 0/
[3] http:/ / en. wikipedia. org/ wiki/ Inverse_kinematics
[4] http:/ / en. wikipedia. org/ wiki/ Inverse_kinematic_animation
[5] http:/ / electronics. howstuffworks. com/ question538. htm
[6] http:/ / help. adobe. com/ en_US/ Flash/ 10. 0_UsingFlash/ WS58BD3A02-DA25-488f-B534-AE5463A24833. html
[7] http:/ / tecfa. unige. ch/ guides/ flash/ ex6/ inverse-kinematics/ symbol-vs-shape-armature. html
[8] http:/ / tecfa. unige. ch/ guides/ flash/ ex6/ inverse-kinematics/ symbol-vs-shape-armature. fla
[9] http:/ / tecfa. unige. ch/ guides/ flash/ ex6/ inverse-kinematics/ symbols-ik-armature-intro. html
[10] http:/ / tecfa. unige. ch/ guides/ flash/ ex6/ inverse-kinematics/ symbols-ik-armature-intro0. fla
[11] http:/ / tecfa. unige. ch/ guides/ flash/ ex6/ inverse-kinematics/ symbols-ik-armature-intro. fla
[12] http:/ / tecfa. unige. ch/ guides/ flash/ ex6/ inverse-kinematics/ bones-in-shape-intro. html
[13] http:/ / tecfa. unige. ch/ guides/ flash/ ex6/ inverse-kinematics/ bones-in-shape-intro. fla
[14] http:/ / tecfa. unige. ch/ guides/ flash/ ex6/ inverse-kinematics/ shape-ik-rubberman-animation. html
[15] http:/ / tecfa. unige. ch/ guides/ flash/ ex6/ inverse-kinematics/ shape-ik-rubberman-animation. fla
[16] http:/ / freespace. virgin. net/ hugo. elias/ models/ m_ik2. htm
[17] http:/ / tv. adobe. com/ #vi+ f1552v1001
[18] http:/ / www. adobe. com/ designcenter/ flash/ articles/ lrvid4058_fl. html
[19] http:/ / www. virtualitoy. com/ Fashion/ DressUpDolls/
262
Flash CS4 motion tweening with AS3 tutorial
263
Flash CS4 motion tweening with AS3 tutorial
Draft
Introduction
While you'd rather would use AS3 TweenLite tweening engine, there are ways of doing simple motion tweens with
official Adobe classes.
Example directory:
• http://tecfa.unige.ch/guides/flash/ex4/cs4-as3-animation/
Hand crafted example
Here is a simple example that shows
• how to automatically move a circle
• how to create a button that will move another circle with the same kind of motion path
To make it work, you need to create:
• A sun symbol. Put two instances on the stage, one called sun1 and the other sun2
• A component button, called go_button
CS4 motion tween made with ActionScript 3
Flash CS4 motion tweening with AS3 tutorial
ActionScript code
Copy the following AS3 code:
// modules required to support the motion tween
import fl.motion.Motion;
import fl.motion.MotionBase;
import fl.motion.AnimatorFactory;
import flash.geom.Point;
go_button.addEventListener(MouseEvent.CLICK,go_sun_go);
function go_sun_go(ev:Event):void {
animFactory_sun.addTarget(sun2, 1,true,1,false);
}
var sun_motion:MotionBase;
if (sun_motion==null) {
sun_motion = new Motion();
sun_motion.duration=50;
// Motion array
sun_motion.addPropertyArray("x", [0, 30, 50, 80, 120, 150, 200,
250, 300, 350, 400]);
sun_motion.addPropertyArray("y", [0, 30, 50, 80, 100, 120, 140,
160, 180, 180, 160]);
/*
// Not needed here
sun_motion.addPropertyArray("scaleX", [1.0]);
sun_motion.addPropertyArray("scaleY", [1.0]);
sun_motion.addPropertyArray("skewX", [0]);
sun_motion.addPropertyArray("skewY", [0]);
*/
// Create an AnimatorFactory instance, which will manage
// targets for its corresponding Motion.
var animFactory_sun:AnimatorFactory =
new AnimatorFactory(sun_motion);
// Call the addTarget function on the AnimatorFactory
// instance to target a DisplayObject with this Motion.
// The second parameter is the number of times the animation
// will play - the default value of 0 means it will loop.
animFactory_sun.addTarget(sun1, 1,true,1,false);
}
264
Flash CS4 motion tweening with AS3 tutorial
Using Copy Motion as AS3
•
•
•
•
•
Create a symbol on the stage
Give it a useful instance name, e.g. sun
Create a motion tween (normal, not "classic")
Right-click in the motion tween and "Copy Motion as ActionScript 3"
Paste into an editor (or directly the CS4 AS Actions window).
Copy Motion as ActionScript 3
Code will look like this, i.e. same thing as above with some useless lines. Just make sure to edit the last line in the
code !
I.e. uncomment and add the instance name in your own animation
Before:
// __animFactory_sun.addTarget(<instance name goes here>, 0);
After
__animFactory_sun.addTarget(sun1, 0);
You also can substitute these ugly Adobe-generated names :=)
import fl.motion.AnimatorFactory;
import fl.motion.MotionBase;
import flash.filters.*;
import flash.geom.Point;
265
Flash CS4 motion tweening with AS3 tutorial
var __motion_sun:MotionBase;
if(__motion_sun == null) {
import fl.motion.Motion;
__motion_sun = new Motion();
__motion_sun.duration = 16;
// Call overrideTargetTransform to prevent the scale, skew,
// or rotation values from being made relative to the target
// object's original transform.
// __motion_sun.overrideTargetTransform();
// The following calls to addPropertyArray assign data values
// for each tweened property. There is one value in the Array
// for every frame in the tween, or fewer if the last value
// remains the same for the rest of the frames.
__motion_sun.addPropertyArray("x",
[0,1.26375,3.95822,8.54839,15.7885,26.9318,44.2074,70.3181,103.374,136.755,167.907,196.946,224.342,250.49,275.65,299.95]);
__motion_sun.addPropertyArray("y",
[0,34.0446,68.0259,101.803,135.142,167.312,196.591,218.077,224.978,218.669,204.911,187.101,166.847,144.953,121.888,98]);
__motion_sun.addPropertyArray("scaleX", [1.000000]);
__motion_sun.addPropertyArray("scaleY", [1.000000]);
__motion_sun.addPropertyArray("skewX", [0]);
__motion_sun.addPropertyArray("skewY", [0]);
__motion_sun.addPropertyArray("rotationConcat", [0]);
__motion_sun.addPropertyArray("blendMode", ["normal"]);
// Create an AnimatorFactory instance, which will manage
// targets for its corresponding Motion.
var __animFactory_sun:AnimatorFactory = new
AnimatorFactory(__motion_sun);
__animFactory_sun.transformationPoint = new Point(0.500000,
0.500000);
// Call the addTarget function on the AnimatorFactory
// instance to target a DisplayObject with this Motion.
// The second parameter is the number of times the animation
// will play - the default value of 0 means it will loop.
// __animFactory_sun.addTarget(<instance name goes here>, 0);
}
Tip: There are two ways of doing this:
(1) If you already got a Flash file with drawings
• create a new layer, called junk
• create an instance of the Movie clip symbol you would like to animate.
• Then make sure that you will have another instance of the same symbol somewhere on the stage
266
Flash CS4 motion tweening with AS3 tutorial
• Create a Script layer and copy/paste the code.
• After completion, kill the layer, called junk
Alternatively do it with a new *.fla file (same as above), but simply don't save this file ...
Links
• Creating animation in ActionScript 3.0 [1] Adobe Flash Developer Center
• Working with motion tweens [2] (Programming ActionScript 3.0 for Flash, Adobe)
Flash CS4 Professional ActionScript 3.0 Language Reference:
• Motion [3]
• AnimatorFactory [4]
• MotionBase [5]
References
[1] http:/ / www. adobe. com/ devnet/ flash/ articles/ creating_animation_as3_07. html
[2] http:/ / help. adobe. com/ en_US/ ActionScript/ 3. 0_ProgrammingAS3/ WS5b3ccc516d4fbf351e63e3d11ae9c168f3-8000. html
[3] http:/ / help. adobe. com/ en_US/ AS3LCR/ Flash_10. 0/ fl/ motion/ Motion. html
[4] http:/ / help. adobe. com/ en_US/ AS3LCR/ Flash_10. 0/ fl/ motion/ AnimatorFactory. html
[5] http:/ / help. adobe. com/ en_US/ AS3LCR/ Flash_10. 0/ fl/ motion/ MotionBase. html
267
268
More interactivity
Flash using embedded movie clips tutorial
Draft
Overview
Learning goals
• Learn how to launch embedded animated movie clips with some ActionScript code
• Learn how to create instances of movie clips with ActionScript
Prerequisites
Flash drawing tutorial
Flash motion tweening tutorial
Flash component button tutorial
flash embedded movie clip tutorial (important)
Some more ActionScript, e.g. ActionScript 3 interactive objects tutorial to understand the examples towards
the end.
Moving on
Flash drag and drop tutorial
ActionScript 3 interactive objects tutorial will teach other "tricks" (properties and methods) that you could use
with movie clips
The Flash tutorials index has a list of other tutorials.
Level and target population
• It aims at beginning Flash designers. Embedded movie clips are used in various other tutorials, but here we
explain it a bit more systematically.
Quality
This text should technical people get going and may not be good enough for self-learning beginners. It can be
used as handout in a "hands-on" class. That is what Daniel K. Schneider made it for...
Alternative version
Flash CS3 embedded movie clip tutorial (CS3, guided motion tweens, second part)
Flash using embedded movie clips tutorial
Using a movie clip - principle
If you don't know how to create so-called component buttons, you should also read the Flash component button
tutorial first. You also need to understand how to created embedded movie clips and you if you don't you should read
the Flash embedded movie clip tutorial. You also could at some point look at the Flash video component tutorial
since it it show how to "augment" videos with embedded movie clips.
If there is no instance of the movie clip on the stage, drag a movie from the library to the stage and then immediately
give it an instance name. Remember that instance names must be symbols, e.g. movie_books, not something like
movie of books. Use a letter, followed by other letters, numbers or the "_" sign only.
Let's assume that the instance name of a clip is movie_books. You now can use ActionScript code to do various
things. For example:
Playing a movie clip
movie_books.play();
Stopping a movie clip
movie_books.stop();
Making it visible or invisible
movie_books.visible=false;
movie_books.visible=true;
Tip: Movie clips start playing as soon as they are found in the current frame. E.g. if you put them in frame one, they
will play forever until the main timeline moves to another frame. If this is not desired, you can adopt one of the
following solutions
(1) Stop the movie within its own timelime
• Edit the movie clip in symbol edit mode (double click)
• Add a layer called "script"
• Add this ActionScript method in frame 1.
stop();
(2) As above, stop it in the maintimeline
• Create an Actions Layer or use the coding assistant
• Insert something like:
your_clip.stop();
Flying kite example
This example shows how to play and stop an embedded movie clip with a component button. Look at the flying kite
application [1] to get an idea. See also the picture above in the previous section.
Step 1 - Create the movie clip
• Create a movie clip object as explained above
• Menu Insert->New Symbol
• Select Movie Clip and call it kite_movie
Step 2 - Drag it to the scene and name it
• From the library drag it to the scene
• In the properties panel, select "parameters" and call it kite
269
Flash using embedded movie clips tutorial
270
You should see something like in the following screen capture:
A scene with a movie clip instance
Step 3 - Create a motion tween for the movie clip
•
•
•
•
•
•
Double click on the instance
Then proceed as explained in the Flash motion tweening tutorial
I.e. drag a graphic onto the stage (here we use the "Kite" graphic)
Create a motion tween (here we use 60 frames)
Adjust the flight (motion) path
Click in the tween span and tick "Orient to path" in the properties panel
Flash using embedded movie clips tutorial
271
Editing a movie clip symbol
Really make sure that you exactly know at which level you edit. Look at the edit bar. It should read "Kite_movie".
Step 4 - Add buttons and ActionScript code to launch / stop the animation
• Go back to the scene (e.g. click on "Scene 1" in the edit bar)
• We use two component buttons (as explained in the Flash component button tutorial)
• Each of this button has an instance name: stop_button and start_button
Step 5 - Add the ActionScript code
• At start we tell the movie clip to stop with the instruction kite.stop();. Else the kit will automatically start
flying.
• The start_button will launch the start_kite function when the user clicks on it. This function then will execute
"kite.play()".
• The stop_button is programmed in the same way. Read the Flash component button tutorial if you need some
more detailed explanation about the use of buttons.
kite.stop();
start_button.addEventListener(MouseEvent.CLICK,start_kite);
stop_button.addEventListener(MouseEvent.CLICK,stop_kite);
function start_kite(event:MouseEvent) {
kite.play();
}
function stop_kite(event:MouseEvent) {
kite.stop();
Flash using embedded movie clips tutorial
}
Get the fla.* code and play
kite-movie.html [1]
Source: kite-movie.fla [2]
Directory: http://tecfa.unige.ch/guides/flash/ex6/embedded-movie-clips/ [3]
Exercise: Add another movie clip animation. E.g. a flying pulsating alien.
A Flash application with several movie clip animations
You can look at this example [14]. It's a solution of a final exam of a beginner's Flash course.
This application has 5 frames. The frames hold an entry/title page and 4 other pages with animations. Each "what's
going on here ??" button in the other 4 pages will launch a movie clip.
Exercise
If you feel that you need a more substantial exercise:
• Start with the final-exam-coap2110-2007.fla [4] file and make it look like the solution (example presented above)
• This fla *.file already includes all the artwork, the navigation buttons (that need repairing) and a script for each
frame (that needs completion).
Multi-use of a movie clip for animations
Let's image that you want a sky-full of more or less the same animations. One solution is copy/paste/modify movie
clips or movie clip instances. In some situations it is easier to do this with a little bit of ActionScript coding.
Flying kites example
This examples shows how to use an embedded action script movie multiple times. We want some kites flying over
the same picture from right to left.
To make it bit more interesting, we randomly change for each kite:
• the position, i.e. it could be flying lower or higher
• the size of movie clip, it could change from 50 to a 100% of its original size
• the color of the movie clip, i.e. the alpha value can vary from 80 to 100%.
Have a look at the flying kites example [5] now. If you prefer you can call it "flying bats".
Step 1 - Create a movie clip with a motion animation
• Make sure that the animation starts a lot to the right and extends a lot to the left of the picture (since we will resize
the movie clip and it become as small as half the original size).
• The movie clip in this example is called "Kite_movie", i.e. we just build on top of our previous example.
Step 2 - Export for ActionScript
•
•
•
•
Right click on the movie clip symbol in the library and select Properties
Open the Advanced section (little down arrow) if needed
Tick the Export for ActionScript box
Optional: Change the name of the exported class that you will use later in ActionScript. In our example we shall
use Kite_movie.
• Click on ok
• ActionScript now can "see" a movie clip defined in the library. By default, it ignores everything that sits in your
library.
272
Flash using embedded movie clips tutorial
Step 3 - The ActionScript code
Create new instances of a Movie clip symbol that was exported as "Kite_movie", and to add these to the scene:
(1) In ActionScript, create an instance of a class (exported symbol) like this:
kite1 = new Kite_movie();
kite2 = new Kite_movie(); // have a second one
Normally, one also could position these kites now, but see below.
kite1.x = 200;
kite1.y = 250;
.....
(2) Then add the instances to the scene like this:
addChild(kite1);
addChild(kite2);
To play a movie clip, you can launch it with the "play" method:
kite1.play();
kite2.play();
However, in our case we have to write some more complex code, since we want to generate lots of kites. Instead of
dragging kites on the stage and then name the instance of each kite, we create kite instances with ActionScript and
put these into an array.
var kites:Array = new Array();
An array is variable with lots of drawers and within each we will store a kite instance. So, in order to store a kite
movie clip we just go:
kites[i] = new Kite_movie();
After that we then can modify its properties a bit, e.g. change the size and the position of the movie clip.
kites[i].scaleX = Math.random() * 0.5 + 0.5;//min = 50% max = 100%
kites[i].scaleY = kites[i].scaleX;
kites[i].x = 400;
kites[i].y = Math.random() * (this.height - 240) - 100;
kites[i].alpha = Math.random() * 0.8 + 0.2;
Finally we want our kites to appear one after each other and for this we use the setInterval function. It will call the
addKite function, i.e. the kite movie clip factory, after each 500 milliseconds.
setInterval(addKite,500);
The addKite function will create new kite movies, modify them, add them to stage and launch them. But it only will
do it 10 times. We have a counter that will increase:
i++;
And then the test will check if i is still smaller than 10 before doing anything:
if (i<10) {
The complete ActionScript code
273
Flash using embedded movie clips tutorial
var i = 0;
var kites:Array = new Array();
setInterval(addKite,500); //calls addKite every 0.5 seconds.
function addKite() {
if (i<10) {
kites[i] = new Kite_movie();
kites[i].scaleX = Math.random() * 0.5 + 0.5;//min = 50% max = 100%
kites[i].scaleY = kites[i].scaleX; // same size
kites[i].x = 400; // movie clips start outside right hand
kites[i].y = Math.random() * (this.height - 240) - 100;
kites[i].alpha = Math.random() * 0.8 + 0.2;//random number between 60 and 100% alpha
addChild(kites[i]);
kites[i].play();
i++;
}
}
Get the fla.* code and play
kites.html [5]
Source: kites.fla [6]
Directory: http://tecfa.unige.ch/guides/flash/ex6/embedded-movie-clips/ [3]
Exercise: Make a snowflakes animation that goes from top to bottom
Notice: This program is not really elegant. E.g. the addKite function will be called every 0.5 seconds. Instead we
could have used a timer that creates our N kites and then stops. But this would have required more programming...
Trouble and controlling the main time line from an embedded clip
Sometimes you need to control the main timeline from inside an embedded clip. E.g. you may want move the user to
another frame as a result of some interaction. To do so you will have to tell the script inside a clip that you refer to an
object or a method that is directly attached to the main timeline. Use something like:
MovieClip(root).yourbutton.visible=true;
MovieClip(root).gotoAndPlay("activity_1");
MovieClip(root) in front of a property or a method basically tells Flash to go and look in the main time line instead
of the current embedded clip.
In more technical terms you'll have to cast the root property into a movie clip. “.root is of type DisplayObject, and
.parent is of type DisplayObjectContainer. Neither of those have multiple frames, so that’s why timeline control
methods won’t work on them. All you need to do is cast root or parent to MovieClip (a subclass of both of those
classes)”. (AS3: Main Timeline Control From Inside a Movie Clip, retrieved June 2007 [7]
This is vital "know how" for developing games and interactive educational applications where the main time
line is usually just used to define various sub games/activities or maybe different states.
When you combine main timeline navigation and embedded clips you often will get error messages like:
TypeError #1009: Cannot access a property or method of a null object reference.
at try_fla::MainTimeline/fl_MouseOverHandler_2()".
Firstly, allow debugging in the settings. This will give you some additional information
274
Flash using embedded movie clips tutorial
• Menu File-> Publish Setting
• Open "Advanced" and tick "Permit debugging"
Examples with good solutions
The following examples makes sure that Scripts and Buttons are restricted to single keyframes and doesn't use a
tricky mouse-out (open the source)
• flash-cs6-mouse-over-button.html [8]
• flash-cs6-mouse-over-button.fla [9]
The next example inserts the mouse-over animation of a button into and embedded clip and therefore can use a
mouse-over that would break the previous example.
• flash-cs6-mouse-over-button2.html [10]
• flash-cs6-mouse-over-button2.fla [11]
Links
Technical documentation at Adobe
• Working with movie clips [12], Adobe, retrieved Feb 2013. See in particular:
• Controlling movie clip playback [13], Adobe, retrieved Feb 2013.
• Handling events [14], Adobe, retrieved Feb 2013.
References
[1] http:/ / tecfa. unige. ch/ guides/ flash/ ex6/ embedded-movie-clips/ kite-movie. html
[2] http:/ / tecfa. unige. ch/ guides/ flash/ ex6/ embedded-movie-clips/ kite-movie. fla
[3] http:/ / tecfa. unige. ch/ guides/ flash/ ex6/ embedded-movie-clips/
[4] http:/ / tecfa. unige. ch/ guides/ flash/ ex/ exams2007/ final-exam-coap2110-2007. fla
[5] http:/ / tecfa. unige. ch/ guides/ flash/ ex6/ embedded-movie-clips/ kites. html
[6] http:/ / tecfa. unige. ch/ guides/ flash/ ex6/ embedded-movie-clips/ kites. fla
[7] http:/ / www. kongregate. com/ forums/ 4/ topics/ 3935
[8] http:/ / tecfa. unige. ch/ guides/ flash/ ex6/ buttons-intro/ flash-cs6-mouse-over-button. html
[9] http:/ / tecfa. unige. ch/ guides/ flash/ ex6/ buttons-intro/ flash-cs6-mouse-over-button. fla
[10] http:/ / tecfa. unige. ch/ guides/ flash/ ex6/ buttons-intro/ flash-cs6-mouse-over-button2. html
[11] http:/ / tecfa. unige. ch/ guides/ flash/ ex6/ buttons-intro/ flash-cs6-mouse-over-button2. fla
[12] http:/ / help. adobe. com/ en_US/ as3/ dev/ WS5b3ccc516d4fbf351e63e3d118a9b90204-7e1d. html
[13] http:/ / help. adobe. com/ en_US/ as3/ dev/ WS5b3ccc516d4fbf351e63e3d118a9b90204-7d9d.
html#WS5b3ccc516d4fbf351e63e3d118a9b8ea63-7ffd
[14] http:/ / help. adobe. com/ en_US/ as3/ dev/ WS5b3ccc516d4fbf351e63e3d118a9b90204-7fca. html
275
Flash augmented video tutorial
Flash augmented video tutorial
Draft
Introduction
Video components are prebuilt interface elements (widgets) that will speed up video integration. As explained in the
Flash video component tutorial the FLVPlayBack Video Component allows to render videos in an easy way since
it includes a nice choice of skins for user controls. Videos also can be enhanced with captioning, read the Flash video
captions tutorial or they may interact with the rest of the animation. Some of these techniques require some some
ActionScript as we shall explain here. As an alternative, you also can add a video to the main timeline, but this will
create very large *.swf files and its therefore a technique that should be used with care. Finally, you also could
program your own video interface using ActionScript, a topic that will not be covered here.
Learning goals
Learn how to create augmented videos, e.g. animations that are triggered by so-called cue points or buttons
that allow the user to access specific frames in the video.
Prerequisites
Flash CS6 desktop tutorial
Flash video component tutorial (important)
Flash drawing tutorial
Flash component button tutorial
Flash button tutorial
Flash motion tweening tutorial, Flash shape tweening tutorial, Flash special effects tutorial
Flash embedded movie clip tutorial
Moving on
Flash video captions tutorial Adding subtitles to a video
The Flash tutorials article has a list of other tutorials.
Quality
This text should technical people get going and may not be good enough for self-learning beginners. It can be
used as handout in a "hands-on" class. That is what Daniel K. Schneider made it for...
Level
It both aims at beginners (FLV encoding, using the video playback component and embedding a video in the
timeline) and intermediate Flash designers (inserting captions and using cue points to trigger animations).
By "augmented video", we refer to several ways of adding some extra value to a video:
1. Add navigation buttons that will move the user to particularly interesting scenes of a video
2. Trigger animations that will illustrate or otherwise relate to a given video scene
3. Add a set of subtitles or "side-text" to the video. This is covered in the flash video captions tutorial.
In this article we shall present two types of technologies:
• You could import a video to the timeline, as opposed to using some kind of playback or player component. This
easy solution suffers from some technical drawbacks and we will introduce it first.
• You can implement both video navigation and video-triggered events with so-called cue points (labels that
identify precise video frames, i.e. time in milliseconds).
276
Flash augmented video tutorial
277
Importing a video to the timeline
Instead of using the playback component as explained in the Flash video component tutorial we will include the
video into the timeline (each video frame will be a timeline frame). This will allow us to create videos augmented
with animations in an easy way.
Timeline video with simple controls
If you embed a video into the timeline, then you don't get the ready-made video control as explained in the Flash
video component tutorial. Therefore, only embed video in the timeline if you plan to add animations and if the video
file is really small. Also you shouldn't care about smaller synchronization problems with the audio track.
Embedded video will make your timeline really long, although you can choose to have it its own timeline. Anyhow,
in this example we took the "hundreds of frames" timeline option.
We will insert the video in frame #2. We also will add a play button that will jump to frame 2 and play the video.
Step 1 - FLV files
Timeline embedded videos only work with the Flash *.flv video format.
• You therefore should encode a non *.flv format with the Media Encoder first or Flash will refuse to import.
Step 2 - Import the video as embed
•
•
•
•
•
Create a new layer and call it "video"
Insert a new empty keyframe in frame 2 (since we don't want the video play on load in this case).
Select this new empty keyframe in the video layer.
Menu File->Import->Import Video
In the video deployment dialog, choose "Embed video in SWF and play in timeline".
Select video dialog
Flash augmented video tutorial
The click next
• Use the defaults
Step 3 - Add some simple controls
• You need at least a play button, but adding some extra buttons that will allow a user to jump to given frames also
may be handy.
• We just used the button component described in the Flash components tutorial.
In our example we added three buttons for video control
• The "PLAY" button will move the playhead to frame 2 where the video starts.
• The "Go to Book Scene" button will move it to frame 230.
• The "Credits" button will go to the very end.
The ActionScript code:
/* This will stop Flash from playing all the frames
User must stay in Frame 1 */
stop();
/* Associate a handler function for each button instance */
btn_credits.addEventListener(MouseEvent.CLICK, clickHandler);
btn_play.addEventListener(MouseEvent.CLICK, clickHandler);
btn_book.addEventListener(MouseEvent.CLICK, clickHandler);
/* Instead of writing a function for each button, we just create one.
In order to understand which button was clicked, we ask from the
event
the label of the button(event.currentTarget.label).
Then we gotoAndStop(x) to Frame 374 for Credits
Or we can play the movie that sits in frame 2
*/
function clickHandler(event:MouseEvent):void {
switch (event.currentTarget.label)
{
case "Credits" :
gotoAndStop(609);
break;
case "PLAY" :
gotoAndPlay(2);
break;
case "Go to Book Scene" :
gotoAndPlay(230);
break;
}
}
/* This shows how to open an URL in a WebBrowser */
btn_edutech_wiki.addEventListener(MouseEvent.CLICK, GoToUrl);
278
Flash augmented video tutorial
function GoToUrl(event:MouseEvent):void {
var url:String =
"http://edutechwiki.unige.ch/en/Flash_video_component_tutorial";
var request:URLRequest = new URLRequest(url);
try
{
navigateToURL(request, '_blank');
}
catch (e:Error)
{
trace("Error occurred!");
}
}
The "embed in timeline option" is probably only useful if you plan to play around with fine grained frame-by-frame
jumping around or if you plan to add animations that synchronize with the video as described in the next example.
Otherwise it is better to use a external video with the video playback component as described in the Flash video
component tutorial.
Results
• flash-cs6-video-simple-embedd.html [1]
• Source: flash-cs6-video-simple-embedd.fla [2]
• Directory: http://tecfa.unige.ch/guides/flash/ex6/component-video-intro/
Note: I noticed that when you import more than once a video, file size will grow a lot ! Probably a side-effect of the
undo mechanism. So 'do not do this. If you notice this problem, save the file with "save as". The new version will be
ok. (Maybe there is another solution to trim down file size).
279
Flash augmented video tutorial
280
Enhanced video embedding into timeline
Embedding video into the timeline makes sense (IMHO) if you are looking for an easy way to synchronize other
animations with the video. This technique requires no more additional ActionScript knowledge than you need for
simple animation and navigation. However, embedded videos will make the *.fla and the resulting *.swf really huge.
Embedded video with some animations
In this example, we add various animations (e.g. two motion tweens and a shape tween) to the project. Below you
can see that books are tumbling out of a bookshelf while the video shows a "real" bookshelf.
Below is the action script code to implement a simple play button, plus two other ones that are not really necessary,
i.e. a "credits" and a "goto ..." button.
All the rest are just simple Flash animations that are embedded in the main timeline.
/* This will stop Flash from playing all the frames
User must stay in Frame 1 */
stop();
/* Associate a handler function for each button instance */
btn_credits.addEventListener(MouseEvent.CLICK, clickHandler);
btn_play.addEventListener(MouseEvent.CLICK, clickHandler);
/* Instead of writing a function for each button, we just create one.
In order to understand which button was clicked, we ask from the
event
the label of the button(event.currentTarget.label).
Flash augmented video tutorial
Then we gotoAndStop(x) to Frame 572 for Credits or
we can play the movie by moving the user to frame 2.
*/
function clickHandler(event:MouseEvent):void {
switch (event.currentTarget.label)
{
case "Credits" :
gotoAndStop(572);
break;
case "PLAY" :
gotoAndPlay(2);
break;
}
}
/* This shows how to open an URL in a WebBrowser */
btn_edutech_wiki.addEventListener(MouseEvent.CLICK, GoToUrl);
function GoToUrl(event:MouseEvent):void {
var url:String =
"http://edutechwiki.unige.ch/en/Flash_video_component_tutorial";
var request:URLRequest = new URLRequest(url);
try
{
navigateToURL(request, '_blank');
}
catch (e:Error)
{
trace("Error occurred!");
}
}
Results
• flash-cs6-video-timeline-embedd.html [3]
• Source: flash-cs6-video-timeline-embedd.fla [4]
• Directory: http://tecfa.unige.ch/guides/flash/ex6/component-video-intro/
281
Flash augmented video tutorial
282
Cue points
Working with cue points is another way to have your video interact with the user and/or other animations. It's a
slightly more difficult solution than using timeline videos as above, but more flexible and more elegant since the
resulting flash files will be small and the (external) video could be put on a streaming server.
Let's recall what cue points are with some text that was copied and slightly adapted from Adobe's
points".
[5]
"use cue
A cue point is a point at which the video player dispatches a cuePoint event while a video file plays. You can add
cue points to an FLV file at times that you want an action to occur for another element on the web page. You might
want to display text or a graphic, for example, or synchronize with a Flash animation, or affect the playing of the
FLV file by pausing it, seeking a different point in the video, or switching to a different FLV file. Cue points allow
you to receive control in your ActionScript code to synchronize points in your FLV file with other actions on the
web page.
There are three types of cue points: navigation, event, and ActionScript. The navigation and event cue points are also
known as embedded cue points because they are embedded in the FLV file stream and in the FLV file’s metadata
packet.
A navigation cue point allows you to seek a particular frame in the FLV file because it creates a keyframe within the
FLV file as near as possible to the time that you specify. A keyframe is a data segment that occurs between image
frames in the FLV file stream. When you seek a navigation cue point, the component seeks to the keyframe and
starts the cuePoint event.
An event cue point enables you to synchronize a point in time within the FLV file with an external event on the web
page. The cuePoint event occurs precisely at the specified time. You can embed navigation and event cue points in
an FLV file using either the Video Import wizard or the Adobe Media Encoder.
An ActionScript cue point is an external cue point that you can add either through the component’s Flash Video Cue
Points dialog box or through the FLVPlayback.addASCuePoint() method. The component stores and tracks
ActionScript cue points apart from the FLV file, and consequently, they are less accurate than embedded cue points.
However, ActionScript cue points are still accurate to a tenth of a second.
In ActionScript and within the FLV file’s metadata, a cue point is represented as an object with the following
properties: name, time, type, and parameters. The name property is a string that contains the assigned name of the
cue point. The time property is a number representing the time in hours, minutes, seconds, and milliseconds
(HH:MM:SS.mmm) when the cue point occurs. The type property is a string whose value is "navigation", "event", or
"actionscript", depending on the type of cue point that you created. The parameters property is an array of specified
name and value pairs.
When a cuePoint event occurs, the cue point object is available in the event object through the info property.
Video timeline navigation using cue points
In the following example we used the Media encoder to define most cue points, i.e. they are integrated in the *.flv
video file. You also can add cue points in the properties panel after selecting the Flv playback component on the
stage. The second solution is much less time consuming since you won't have to re-encode the video. However, cue
points are less accurate.
Look first at this example
• flash-cs6-video-goto-cues.html [6]
Then, you could also grab the source.
• Source: flash-cs6-video-goto-cues.fla [7]
• Video: office-dks3.flv [8]
Flash augmented video tutorial
283
In order to understand this section, you must know how to use buttons. Read the Flash component button tutorial if
you do not.
• Optional: Add cue points using the Media encoder, an external program described in the flash video component
tutorial). This option requires that you have a file in the original source format (*.flv files won't work).
• Insert a video playback component from the component library. (Read the Flash video component tutorial) if you
do not know how).
• Add a video file using the source parameter
• Add cue points in the properties panel as needed.
• Give the playback component on the stage an instance name like video
• Then copy paste the code below and adapt, i.e. change the cue point names. Alternatively, use the Code snippets
assistant.
Cue points attached to selected video playback component
Tip:
• Cue points that you add in the properties panel are attached to the playback component instance. If you remove
Playback instance from the stage, the cue points will be gone.
• Therefore you might prefer adding them directly in the ActionScript code, like this:
your_video_component_instance.addASCuePoint(40, "End");
video.addASCuePoint(120, "Hot moment");
Now let's see how to implement a button that move the user to a given spot in the video. The logic is very similar as
the one use for timeline navigation.
1. Define a button
2. Define a click event handler for the button
Flash augmented video tutorial
284
3. In the function, define video navigation plus other stuff.
Below is code fragment that illustrate the principle. Note the two lines of code needed for navigation. In your own
example, you would to replace video (the name of playback instance on the scene) and the name of the cue point, i.e.
"XPS".
btn_laptop.addEventListener(MouseEvent.CLICK, jumpLapTop);
function jumpLapTop(event:MouseEvent):void
{
var cuePointInstance:Object = video.findCuePoint("XPS");
video.seek(cuePointInstance.time);
}
As a bonus I added some invisible trees that will become visible when the user jumps to the "XPS" cue point. These
were imported from an SVG drawing and made it into a symbol. The instance on the stage was called trees.
Navigating a video using Cure points
Below is the complete code that you also can find in the source file [7]. To adapt this code to your needs: Change
"XPS" to the name of your cue point. Replace the trees with any other graphics symbol or even an embedded movie
clip
// hide the trees
trees.visible = false;
btn_laptop.addEventListener(MouseEvent.CLICK, jumpLapTop);
function jumpLapTop(event:MouseEvent):void
{
var cuePointInstance:Object = video.findCuePoint("XPS");
video.seek(cuePointInstance.time);
// remove the following line if you do not have "trees" on the
Flash augmented video tutorial
stage
trees.visible = true;
}
btn_book.addEventListener(MouseEvent.CLICK, jumpFlashBook);
function jumpFlashBook(event:MouseEvent):void
{
var cuePointInstance:Object = video.findCuePoint("Flash_book");
video.seek(cuePointInstance.time);
trees.visible = false;
}
Without trees:
btn_laptop.addEventListener(MouseEvent.CLICK, jumpLapTop);
function jumpLapTop(event:MouseEvent):void
{
var cuePointInstance:Object = video.findCuePoint("XPS");
video.seek(cuePointInstance.time);
}
btn_book.addEventListener(MouseEvent.CLICK, jumpFlashBook);
function jumpFlashBook(event:MouseEvent):void
{
var cuePointInstance:Object = video.findCuePoint("Flash_book");
video.seek(cuePointInstance.time);
}
Example
• flash-cs6-video-goto-cues.html [6]
• Source: flash-cs6-video-goto-cues.fla [7]
• Directory http://tecfa.unige.ch/guides/flash/ex6/component-video-intro/
Important notice:
The code above works with any sort of cue points:
• navigation cue points that are inserted into and *.flv file using the Adobe media encoder
• or so-called ActionScript cue points that were inserted with the component inspector or in a script.
In some older textbooks, you might find instructions that will tell how to navigate to specific types of cue points. In
particular you will find the two following variants:
For cue points that are encoded into the video with the Media Encoder, use:
video.seekToNavCuePoint ("XPS");
For cue points that were defined in CS6 (either in the parameters panel or with ActionScript commands, use:
video.seek(video.findCuePoint("XPS","actionscript").time);
285
Flash augmented video tutorial
286
Our solution above that is also adopted by the code snippets assistant is more verbose, but works with all types of
cue points....
Triggering animations from cue points
Implementing animation that is triggered by the video's encounter of cue points works according to similar
principles. Look at the example first:
• flash-cs6-video-cue-events.html [9]
You also could download the source code. However, make sure that you also grab the video or else, substitute your
own.
• Source: flash-cs6-video-cue-events.fla [10]
• Video: office-dks3.flv [8]
Knowing all your cue points
All cue points that are either embedded in an *.flv file or defined in the properties panel can bee seen in the
properties panel.
Cue point list in the properties panel
A more complicated solution is to to write a little program that tracks cue points. The following code will display a
trace of all your cue points in the Flash CS6 output window. Alternatively To make it work:
• Insert a video component on the stage and add a *.flv source (as explained before)
• Give it an instance name. I called it video_component. If give your component an other name you will have to
change the ActionScript code below.
Flash augmented video tutorial
// You must import this class (even when you just script the timeline
!!)
import fl.video.MetadataEvent;
video_component.addEventListener(MetadataEvent.CUE_POINT, cp_listener);
function cp_listener(eventObject:MetadataEvent):void {
trace("Elapsed time in seconds: " +
video_component.playheadTime);
trace("Cue point name is: " + eventObject.info.name);
trace("Cue point type is: " + eventObject.info.type);
}
When you play the *.flv video you can see these kinds of messages in the output window:
Elapsed time in seconds: 7.485
Cue point name is: palm_tree
Cue point type is: event
Elapsed time in seconds: 9.888
Cue point name is: books
Cue point type is: navigation
Elapsed time in seconds: 20.52
Cue point name is: missing_manual
Cue point type is: event
Elapsed time in seconds: 26.188
Cue point name is: XPS
Cue point type is: navigation
Elapsed time in seconds: 31.674
Cue point name is: ubuntu
Cue point type is: event
Adding some embedded movie clips
The plan is to trigger a series of stopped embedded movie clips with cue points. We will hide/stop these clips and
then unhide/play them at given times. So let's create some Flash movie clips as explained in the Flash embedded
movie clip tutorial. Of course, you could use clips that you already have in some other flash file.
• Hit CTRL-F8 (menu Insert->New Symbol) and select "movie clip"
• Then, double click on the new library item to get into symbol edit mode. Create any animation you like. Make
sure that you are aware at which level you edit, i.e. make sure to return to the scene when you are done !!
• Alternatively, you also may import simple Flash animations you made before as movie clips.
Once you got one or more of these animations:
• Create an instance of each on the stage and give it an instance name, e.g.
movie_books
• Then in the AS code you may want to stop() each movie clip instance and also make some of them invisible, e.g.
use code like:
movie_books.stop();
movie_books.visible=false;
287
Flash augmented video tutorial
288
Embedded movie clip that will be played after a cue point occurs
Using cue points to trigger animations
At the heart of cue point events management is an event handler that is registered, i.e. we use exactly the same
principle as for user interaction with buttons (Flash button tutorial). Only this, time events are not generated by the
user, but by cue points that will "emerge" when the video is played. Flash will have to watch out for these.
video_component.addEventListener(MetadataEvent.CUE_POINT,
cuepoint_listener);
function cuepoint_listener(obj:MetadataEvent):void {
// .... do something here, e.g. play a clip ....
}
The cuepoint_listener function shown below includes a switch statement that deals with each event it receives.
• For most of these events we play some movie clip. If the movie clip was hidden, we make it visible too, e.g.
movie_books.visible=true;
movie_books.play();
• Also we have to stop previous movie clips or even make them invisible again (as you like)
Note about bout imported classes: Sometimes we have to tell Flash to import certain functionality. If you plan to
work with cue points in ActionScript, then the following line is necessary:
import fl.video.MetadataEvent;
Flash augmented video tutorial
If you want music textures, you can for example import a sound file into the library and then export it for action
script (Right-click on it). Make sure you remember its class name. Else you can dynamically import sound from
external files as shown in the Flash drag and drop tutorial.
So here is the complete code you can find in the *.fla file of this example:
import fl.video.MetadataEvent;
// Stop all the animations of the various movie clips
// Make the bookshelf invisible
movie_trees.stop();
movie_books.stop();
movie_books.visible=false;
movie_penguin.stop();
movie_manual.stop();
movie_manual.visible=false;
// This is a sound of the class music
// Was defined by exporting the music file in the library
var music:Music = new Music();
var volume = new SoundTransform(0.2, 0);
// Add a cuepoint for the end and which is not in the flv movie
video_component.addASCuePoint(40, "End");
video_component.addEventListener(MetadataEvent.CUE_POINT,
cuepoint_listener);
function cuepoint_listener(obj:MetadataEvent):void {
switch (obj.info.name)
{
case "palm_tree" :
movie_trees.play();
break;
case "books" :
movie_trees.stop();
movie_books.visible=true;
movie_books.play();
break;
case "missing_manual" :
movie_books.stop();
movie_books.visible=false;
movie_manual.visible=true;
movie_manual.play();
break;
case "XPS" :
movie_manual.stop();
movie_manual.visible=false;
var song = music.play(0,3,volume);
break;
289
Flash augmented video tutorial
case "ubuntu" :
movie_penguin.play();
break;
case "End" :
// song.stop();
movie_penguin.stop();
movie_penguin.visible=false;
movie_books.visible=false;
}
}
/* This shows how to open an URL in a WebBrowser */
btn_edutech_wiki.addEventListener(MouseEvent.CLICK, GoToUrl);
function GoToUrl(event:MouseEvent):void {
var url:String =
"http://edutechwiki.unige.ch/en/Flash_video_component_tutorial";
var request:URLRequest = new URLRequest(url);
try
{
navigateToURL(request, '_blank');
}
catch (e:Error)
{
trace("Error occurred!");
}
}
Example (using classic motion tweens, sorry)
• flash-cs6-video-cue-events.html [9]
• Source: flash-cs6-video-cue-events.fla [10]
• Video: office-dks3.flv [8]
• Directory: http://tecfa.unige.ch/guides/flash/ex6/component-video-intro/
Cue points work-through example
Adapt the following example
• Substitute the video by your own
• Change/add cue points
• Change/remove/add your own embedded movie clips
Look at this first: flash-cs6-video-cue-events-exercise.html [11]
Download:
• flash-cs6-video-cue-events.fla [12]
• Optional (else you can run the example as is): office-dks3.flv [8]
Make this your own cue-points enhanced component video. Prerequisites:
• Flash component button tutorial
• Flash embedded movie clip tutorial
290
Flash augmented video tutorial
• (Optional) ActionScript 3 interactive objects tutorial
Below is a copy of the AS3 code you should modify. It sits in the Actions layer.
import fl.video.MetadataEvent;
/* Instructions:
1. Add a *.flv video to the video component (edit with the properties
panel for CS6)
2. Add more cue points, using the properties panel. Move the playhead
in the playback
component in position, the click on the "+" in the properties panel
3. Fix the code below:
a. Add cue points below or in the properties or component inspector
b. stop all your animations, make them invisible if you like
c. Add "if clauses" in the cuepoint_listener function
d. Edit the jump1 function for navigation
*/
// 3.a. Add a cuepoint with ActionScript, else use the component
inspector
video_component.addASCuePoint(10.5, "wonder");
//
//
//
//
3.b. Add movie clips to the scene, make them invisible and stop them
1. Add more animations here and kill the example anim
2. Your embedded clips must have an instance name in the Flash Scene
copy/paste the two following lines, i.e. add anim2 etc. and adapt
anim1.visible=false;
anim1.stop();
// Optional: Add sound from a sound file in the library.
// Was defined by exporting the music file in the library to AS3
var guitar_music = new Guitarmusic();
var volume=new SoundTransform(0.2,0);
// 3.c Add more if clauses to the cuepoint_listener function
video_component.addEventListener(MetadataEvent.CUE_POINT,
cuepoint_listener);
function cuepoint_listener(event) {
// get the event name
var event_name = event.info.name;
// the next three lines will just print out information to the
console
291
Flash augmented video tutorial
// you later can remove these if you want
trace("Elapsed time in seconds: " +
video_component.playheadTime);
trace("Cue point name is: " + event_name);
trace("Cue point type is: " + event.info.type);
// deal with the cue events. If you know how-to, you'd rather use
a switch statement here
if (event_name == "wonder") {
anim1.visible=true;
anim1.play(); // should be stopped at some point ....
guitar_music.play();
}
/* remove this start comment line
if (event_name == "something") {
anim2.visible=true;
anim2.play();
}
remove this end comment line */
}
// 3.d - Navigation - Adapt to your cuepoint
button1.addEventListener(MouseEvent.CLICK, jump1);
function jump1(event) {
var cuePointInstance:Object =
video_component.findCuePoint("wonder");
video_component.seek(cuePointInstance.time);
anim1.visible=true;
anim1.play();
}
Manipulating the video component with ActionScript
• Read Controlling web video with ActionScript 3 FLVPlayback programming [13]. However, this article was
written for CS5 and at least looping won't work in Flash 11 (CS6).
See a fixed example:
• flash-cs6-video-component-looping.fla [14]
• flash-cs6-video-component-looping.html [15]
292
Flash augmented video tutorial
Links
Manual entries
For Designers
• Using the FLVPlayback Component [16] (CS5)
Below some more technical links which so far are not really used much in this tutorial.
ActionScript overview documentation for programmers
AS3 FLVPLayback documentation [17]
Tutorials
• (To do ....)
Artwork and finding videos
All Artwork (clipart) is from:
• http://www.openclipart.org/(sorry I didn't write down names of individual creators). These are SVG files in the
public domain I imported via Illustrator (I really can't understand why Flash doesn't support SVG in some ways...)
Sound (except voice track on videos) is from:
• http://simplythebest.net/sounds/MP3/MP3_sounds.html
Finding and downloading videos
• You may download videos from the Internet (make sure that copyright allows you to do so). Getting videos from
sites like YouTube is not easy without download helpers (see below). Therefore, try sites like http://vimeo.com
first.
• Firefox video download helper extension: https://addons.mozilla.org/en-US/firefox/addon/3006
• Google video search: http://video.google.com/.Use advanced search [4] in order to restrict search to duration.
Video sites:
• http://vimeo.com/Includes open source (creative commons) videos. After a search, you can tick a box for only
showing downloadable videos.
• http://vids.myspace.com/Needs special tools to download
• http://youtube.com/Needs special tools to download
External Flash Video Component Sources
• Flowplayer [18]
• JW Video Player [19]
• Flash Video Player [20]
Acknowledgements and copyright modification
The general section on cue point was copied from Let's recall what cue points are with some text that was copied and
slightly adapted from Adobe's [5] "use cue points". You also must cite this source if you reuse this material.
293
Flash augmented video tutorial
References
[1] http:/ / tecfa. unige. ch/ guides/ flash/ ex6/ component-video-intro/ flash-cs6-video-simple-embedd. html
[2] http:/ / tecfa. unige. ch/ guides/ flash/ ex6/ component-video-intro/ flash-cs6-video-simple-embedd. fla
[3] http:/ / tecfa. unige. ch/ guides/ flash/ ex6/ component-video-intro/ flash-cs6-video-timeline-embedd. html
[4] http:/ / tecfa. unige. ch/ guides/ flash/ ex6/ component-video-intro/ flash-cs6-video-timeline-embedd. fla
[5] http:/ / help. adobe. com/ en_US/ as3/ components/ WS5b3ccc516d4fbf351e63e3d118a9c65586-7feb. html
[6] http:/ / tecfa. unige. ch/ guides/ flash/ ex6/ component-video-intro/ flash-cs6-video-goto-cues. html
[7] http:/ / tecfa. unige. ch/ guides/ flash/ ex6/ component-video-intro/ flash-cs6-video-goto-cues. fla
[8] http:/ / tecfa. unige. ch/ guides/ flash/ ex6/ component-video-intro/ office-dks3. flv
[9] http:/ / tecfa. unige. ch/ guides/ flash/ ex6/ component-video-intro/ flash-cs6-video-cue-events. html
[10] http:/ / tecfa. unige. ch/ guides/ flash/ ex6/ component-video-intro/ flash-cs6-video-cue-events. fla
[11] http:/ / tecfa. unige. ch/ guides/ flash/ ex6/ component-video-intro/ flash-cs6-video-cue-events-exercise. html
[12] http:/ / tecfa. unige. ch/ guides/ flash/ ex6/ component-video-intro/ flash-cs6-video-cue-events-exercise. fla
[13] http:/ / www. adobe. com/ devnet/ flash/ articles/ flvplayback_programming. html
[14] http:/ / tecfa. unige. ch/ guides/ flash/ ex6/ component-video-intro/ flash-cs6-video-component-looping. fla
[15] http:/ / tecfa. unige. ch/ guides/ flash/ ex6/ component-video-intro/ flash-cs6-video-component-looping. html
[16] http:/ / help. adobe. com/ en_US/ as3/ components/ WS5b3ccc516d4fbf351e63e3d118a9c65b32-7fe9. html
[17] http:/ / help. adobe. com/ en_US/ FlashPlatform/ reference/ actionscript/ 3/ fl/ video/ FLVPlayback. html
[18] http:/ / flowplayer. org
[19] http:/ / www. longtailvideo. com
[20] http:/ / www. hdwebplayer. com
Flash video captions tutorial
Draft
Introduction
Video components are pre-built interface elements (widgets) that will speed up video integration. As explained in the
Flash video component tutorial, the FLVPlayBack Video Component allows to render videos in an easy way since
it includes a nice choice of skins for user controls. Videos also can be enhanced with captioning, i.e. subtitles or
side-text as we shall explain in this tutorial. For this purpose, you need another component: FLVPlayback
Captioning
Learning goals
Learn how to encode *.fl4 and (older) *.flv files
Learn how to use the Flash 10/11 (CS5/6) video component for simple video playback
Prerequisites for the first part
Flash CS6 desktop tutorial
Flash drawing tutorial
Flash video component tutorial (important)
Timed Text
Flash embedded movie clip tutorial (maybe)
Moving on
The Flash article has a list of other tutorials.
Quality
This text should technical people get going and may not be good enough for self-learning beginners. It can be
used as handout in a "hands-on" class. That is what Daniel K. Schneider made it for...
Level
294
Flash video captions tutorial
It both aims at beginners that do have some web technology background and intermediate Flash designers.
Making use of captions
A caption is a text that is displayed dynamically while the video is playing. Captions may serve several purposes:
• You can deploy videos to people with hearing disabilities
• Users can look at videos without making noise
• You can emphasize important passages, or paraphrase or comment voice tracks.
In order for captions to work, you must do three things:
• Use a skin for the playback component that includes a Caption button, e.g. SkinUnderAllNoFullscreen.swf.
• Make use of the FLVPlayback Captioning component (in addition to the playback component)
• Encode captions in an XML file (there are at least two options). This XML file then must be registered with the
captioning component.
To import the video, use the same procedure as in the Flash video component tutorial
• Drag the video component to the stage
• Configure the file name and skin in the properties panel
The caption component with timed text
The Timed Text standard and XML
If you are not familiar with XML, you may have a glance at the XML article and maybe the DTD tutorial. Then, we
also suggest to work with an XML editor in order to insure that your file is well formed. We suggest the free
Exchanger XML Lite [1]. If you don't feel learning XML, just make very sure that you exactly use a template as
described below. One missing tag or or some syntax mistake like a missing ">" will make your animation fail.
Flash doesn't support the full Timed Text specification and the documentation at Adobe is rather shaky. For those
who are familiar with XML I wrote a little DTD that helps editing. Just grab it from the Timed Text article and also
copy/paste the XML template.
Notes: Timed Text is defined with a complex XML Schema but since Adobe Flash only implements a subset, it's not
worth using this. Also, Internet Explorer 10 supports Timed Text in the HTML5 video tag, read HTML5 audio and
video.
Figuring out time for captions
There are several methods:
• Use the Adobe Media Encoder, i.e. the playhead in the Export Settings as explained in the Flash video component
tutorial
• Use a Skin with full controls, then slide the playhead you can see in the component on the stage to the right
position. Add a cue point. It will show the current "time". Of course, don't save these cue points...
A minimal example XML captioning file
As a minimum we suggest to enter the following data. For each caption enter:
• A <p> </p> tag. Each "p" should include:
• a begin attribute that defines when the caption should appear,
• a dur attribute that defines how long it will stay on screen.
Time is in seconds, but also may use a more complex format like
02:30.5
meaning 2 minutes, 30 seconds and a half.
295
Flash video captions tutorial
Here is the file we called timed-text.xml and that we used in this example
<?xml version="1.0" encoding="UTF-8"?>
<tt xml:lang="en" xmlns="http://www.w3.org/2006/04/ttaf1"
xmlns:tts="http://www.w3.org/2006/04/ttaf1#styling">
<head>
<styling>
</styling>
</head>
<body>
<div xml:lang="en">
<p begin="1" dur="4">Daniel´s Office</p>
<p begin="5" dur="5">My Palm Tree (from NYC)</p>
<p begin="11" dur="7">My Bookshelf</p>
<p begin="18" dur="5">My favorite Flash Drawing Book</p>
<p begin="25" dur="5">My DELL XPS Laptop Flash machine</p>
<p begin="30" dur="5">My Ubuntu Linux workstation</p>
<p begin="33" dur="5">Working hard on Flash Tutorials using the Xemacs Editor</p>
<p begin="42" dur="5">The outside (not my bike)</p>
</div>
</body>
</tt>
Note: Captions may overlap, i.e. Flash will display a new caption on a new line if the previous one is still on. You
can see this in the example we present in the next section.
For now, just grab the template below and add "p" tags, make sure to close them as in the example above. Replace
"Let's start" by your own caption of course.
<?xml version="1.0" encoding="UTF-8"?>
<tt xml:lang="en" xmlns="http://www.w3.org/2006/04/ttaf1"
xmlns:tts="http://www.w3.org/2006/04/ttaf1#styling">
<head><styling></styling></head>
<body>
<div xml:lang="en">
<p begin="1" dur="4">Let´s start</p>
</div>
</body>
</tt>
Using the FLVPlayback Captioning component
• Create a new layer and call it "Caption" or something like that. Go there.
• Then drag the "FLVPlayback Captioning component" somewhere to the workspace or even to the stage.
• Unlike the playback component, this component will not be seen by the end user, so you can place it anywhere.
Customization of the component
Click on the component and edit the parameters, either in the Parameters or the Component Inspector panel
(CS3 only). Then,
296
Flash video captions tutorial
297
set showCaptions to true if you want all users to see captions (probably most users don't know how to turn it
on or off, so turn it on)
specify the source file of the Timed Text XML file to download. So, create the xml file now, if you didn't so
far. Make sure to get the spelling right.
The FLVPlayback Captioning component and its parameters
The example
•
•
•
•
flash-cs3-video-simple-server-caption.html [2]
flash-cs3-video-simple-server-caption.fla [3]
XML file: timed-text.xml [4]
Directory: http://tecfa.unige.ch/guides/flash/ex/component-video-intro/
Tuning
• You can style text and background of the Caption Box (see below)
• Put down the volume: Set it to 0.5 in the parameters of the FLVPlayer or even lower. I am fed up listening to my
own voice, really.
CaptionsBox and Style
You can use a different text box to display the captions, i.e. nothing prevents you from displaying the text
somewhere in the middle of the video or outside of the playback component's area.
Step 1 - Draw a textbox for the captions to appear
• Create a captions layer if you don't already have one
• Draw a textbox
•
•
•
•
Give it the instance name caption_box
Select font size, color etc.
Select Multiline
Make it Dynamic Text (if it is not)
Flash video captions tutorial
298
Step 2 - Configure the component
Tell the captioning component to use the textbox you just made to display captions:
• Select FLVPlayback Captioning component
In the Properties panel:
• Set captionTargetName = caption_box
• Untick autoLayout
• Add the source, i.e. the XML file name (or do it later)
The FLVPlayback Captioning component and its parameters
Step 3 - Add some style to the XML File
Just look at this example (file timed-text2.xml). I don't really understand how some styling tags work. I'd expect for
instance to behave backgroundColor within a span like in HTML but it doesn't. I don't know this behavior is a
feature or a bug or my misunderstanding of the manual.
If something is not clear, please download the *.fla [5] file and look at it. Make sure to verify that both the playback
and the captioning component parameters are ok and that you put all the files in your computer or the server
(including the skin *.swf, the *.flv and the *.xml file) in the same directory. Do not forget to copy the skin !
<?xml version="1.0" encoding="UTF-8"?>
<!DOCTYPE tt SYSTEM "mini-tt.dtd">
<tt xml:lang="en" xmlns="http://www.w3.org/2006/04/ttaf1"
xmlns:tts="http://www.w3.org/2006/04/ttaf1#styling">
<head>
<styling>
<style id="title" tts:backgroundColor="transparent" tts:color="red" tts:fontSize="24"/>
Flash video captions tutorial
</styling>
</head>
<body>
<div xml:lang="en">
<p begin="0" dur="9" style="title">Daniel´s Office</p>
<p begin="5" dur="4">My Palm Tree (from NYC)</p>
<p begin="10" dur="13" style="title">Books ....</p>
<p begin="11" dur="7">My Bookshelf</p>
<p begin="18" dur="5">My favorite Flash Drawing <span tts:color="red">Book</span></p>
<p begin="24" dur="16" style="title">Computers ....</p>
<p begin="25" dur="5">My DELL XPS Laptop Flash machine</p>
<p begin="30" dur="5">My
<span tts:backgroundColor="yellow" tts:color="black">
Ubuntu Linux workstation</span>
</p>
<p begin="35" dur="5">
<span tts:backgroundColor="transparent"></span>
Working hard on Flash Tutorials using the Xemacs Editor
</p>
<p begin="40" dur="4">The outside (not my bike)</p>
</div>
</body>
</tt>
The result
•
•
•
•
flash-cs3-video-simple-server-caption2.html [4]
Source: flash-cs3-video-simple-server-caption2.fla [5]
XML file: timed-text2.xml [6]
Directory: http://tecfa.unige.ch/guides/flash/ex/component-video-intro/
Adding captions with Cue Points
There is an alternative method and the principle is obvious if you understood the principles explained in the flash
augmented video tutorial.
1. Add cue points to your video, i.e. one for each "moment" where you plan to display some text.
2. Use these cue points to display various hidden statics text boxes, or better, substitute text of the same dynamic
text box.
Absolute beginners solution:
• Put textboxes on the stage and give each a different instance name, e.g. text1, text2, etc.
• In the ActionScript code hide these at start:
text1.visibility = false;
text2.visibility = false;
• Define event handlers for each of these, as explained above
• In the function that is called when a cue point event occurs:
text1.visibility = true;
299
Flash video captions tutorial
In some distant future we may create an example. For the moment, implementation is left as an exercise to the
reader.
A totally different solution is to directly edit the video file. E.g. read Captions for Video with Flash CS3 (Part Two)
[7]
, by Tom Green, Digital Web Magazine, June. We don't know if this solution works and is still accurate.
Links
Timed Text (TT)
• Timed-Text [1], W3C Specification
• Timed Text Tags [8] (List of supported tabs, Adobe, retrieved Feb 2013)
References
[1]
[2]
[3]
[4]
[5]
[6]
http:/ / www. freexmleditor. com/
http:/ / tecfa. unige. ch/ guides/ flash/ ex/ component-video-intro/ flash-cs3-video-simple-server-caption. html
http:/ / tecfa. unige. ch/ guides/ flash/ ex/ component-video-intro/ flash-cs3-video-simple-server-caption. fla
http:/ / tecfa. unige. ch/ guides/ flash/ ex/ component-video-intro/ timed-text. xml
http:/ / tecfa. unige. ch/ guides/ flash/ ex/ component-video-intro/ flash-cs3-video-simple-server-caption2. fla
http:/ / tecfa. unige. ch/ guides/ flash/ ex/ component-video-intro/ timed-text2. xml
[7] http:/ / www. digital-web. com/ articles/ captions_flash_video_2/
[8] http:/ / help. adobe. com/ en_US/ as3/ components/ WS5b3ccc516d4fbf351e63e3d118a9c65b32-7ee5. html
Flash actions-frame tutorial
Draft
Introduction
Learning goals:
• Use code snippets
• Use assistance features in the "Actions" pane
Prerequisites:
• Flash CS4 desktop tutorial or Flash CS6 desktop tutorial
• Understand symbols and basic drawing
Next steps:
• (none)
300
Flash actions-frame tutorial
The actions frame
To add interactivity to your flash animations, you need to add little scripts. To create scripts embedded in a FLA file,
create a new layer called "Actions" then open the Actions panel (F9). The Actions panel consists of three panes: the
Actions toolbox, which groups ActionScript elements by category; the Script navigator, which lets you move
quickly between the scripts in your Flash document; and the Script pane, where you type your ActionScript code.
A. Script panel, B. Panel menu, C. Actions
toolbox, D. Script navigator. Source: Adobe CS5
[1]
docs
Use context-sensitive help from the Actions panel
To select an item for reference, do any of the following:
• Select an ActionScript term in the Actions panel toolbox pane (on the left side of the Actions panel).
• Select an ActionScript term in the Actions panel in the Script pane.
• Place the insertion point before an ActionScript term in the Actions panel in the Script pane.
To open the Help panel reference page for the selected item, do one of the following:
• Press F1.
• Right-click the item and select View Help.
• Click Help above the Script pane.
Using code snippets
The Code Snippets panel assists both non-programmers and programmers to produce ActionScript code. The former
may learn some code or at least will make less mistakes and both can type less and work faster. This feature only
became available in CS5.
Code snippets are ActionScript snippets for a variety of purposes:
• Write code that affects an object (i.e. a symbol) on the stage
• Write code for time line navigation
• Other
The menu of available snippets is grouped in five categories
•
•
•
•
•
•
Actions: various stuff, most deal with manipulating movie clips
Timeline Navigation: inserting "stop();", gotoAndStop(); etc. commands
Animation: Same as actions, i.e. change properties of a clip on the stage
Load and Unload:
Audio and Video:
Event handlers: Adding major event handling code to a symbol (both the event registration and a dummy
function)
301
Flash actions-frame tutorial
302
Using Flash CS5 code snippets
Preliminary work
(1) Make sure that you have an Actions layer, else Flash will add it for you. In other words, if you are used to another
name like Script, rename it. This is annoying behavior, personnally I don't like Action at all, it's just confusing.
(2) If you plan to add behavior and interactivity to object on the stage:
• Make sure that they are symbol instances (preferably movie clips). Right-click on the object and "Convert to
symbol".
• Make sure that these symbol instances are named.
Else Adobe will do it for you and you should avoid this since Flash will select names in your place ...
Add code snippets to either an object or a frame
(1) Select an object on the stage if you want to add interactivity or behavior of the object. Select a frame in the
Timeline if you wish to add code that affects the frame as a whole (e.g. timeline navigation)
If you select an object that is not a symbol instance or a TLF text object, Flash converts the object to a movie clip
symbol when you apply the snippet. If you select an object that does not already have an instance name, Flashadds
one when you apply the snippet.
Therefore, do it yourself and before !
(2) Open the Code Snippets panel (either by clicking on the icon on top of the actions panel or directly
Window->Code Snippets on the stage), then double-click the snippet you want to apply.
If you selected an object on the Stage, Flash adds the snippet to the Actions panel in the frames containing the
selected object and uses the object's instance name.
Flash actions-frame tutorial
If you selected a Timeline frame, Flash also inserts code as above to the actions layer of the selected frame.
(3) In the Actions panel, view the newly added code and replace any necessary items according to the instructions at
the top of the snippet.
Links
• Working with ActionScript [2] (Adobe, 2011).
References
[1] http:/ / help. adobe. com/ en_US/ flash/ cs/ using/ WS3e7c64e37a1d85e1e229110db38dec34-7ffca. html
[2] http:/ / help. adobe. com/ en_US/ flash/ cs/ using/ WSd60f23110762d6b883b18f10cb1fe1af6-7beba. html
Flash datagrid component tutorial
Draft
This is part of the flash tutorials
Introduction
Learning goals
• Learn how to fill the the DataGrid component with data
Flash level
• CS3 and ActionScript 3
Prerequisites
• Flash components overview
• To use the DataGrid component, you should know some ActionScript, e.g. from the ActionScript 3 interactive
objects tutorial or the Flash drag and drop tutorial. This includes some basic programming skills (conditionals,
loops and arrays).
• Flash button tutorial and a little bit how event handling works (ActionScript 3 event handling tutorial).
• Some XML (for some sections)
Moving on
• The Flex datagrid component tutorial shows how to do this with Flex.
• See the Flash tutorials
Level and target population
• Beginners
Quality
• Not done yet, but this piece should help you solve some easy how to display data problems.
To do
• Interact with the data grid
303
Flash datagrid component tutorial
304
Data Grid level 0 - Creating a DataGrid and filling it with data
“The DataGrid class is a list-based component that provides a grid of rows and columns. You can specify an optional
header row at the top of the component that shows all the property names. Each row consists of one or more
columns, each of which represents a property that belongs to the specified data object. The DataGrid component is
used to view data; it is not intended to be used as a layout tool like an HTML table. (DataGrid [1], retrieved 10:12, 30
October 2008 (UTC)).”
Let's create a table to display information about Learning management systems, i.e. a data grid with 3 columns.
Column 1 is called "Name", column 2 is "License", column 3 is "Description. We then also will add 4 rows of data.
You may have a look at the data-grid-0
thumbnail of the screen dump to the right.
[2]
example now or open the
Below we will show three solutions and point to a forth one:
• Creating a most simple DataGrid with Flash CS3 by dragging a component
to the stage.
• Doing it with CS3 but using only ActionScript
• Doing it with AS3 only through CS3
Two simple Flash DataGrids
• Doing it with Flex: see the Flex datagrid component tutorial
Adding code to a DataGrid instance
Step 1 - Make a DataGrid instance
• Open the components library (e.g. hit CTRL-F7)
• Drag a DataGrid to the stage
• Give it an instance name, e.g. datagrid
You now will see an empty square on the stage without any visual appeal.
Step 2 - Resize
In the properties panel, make it a big bigger, e.g. w:300 and H:200
Step 3 - Fill in some data with ActionScript
If your instance name is datagrid then hit F9 in frame 1 (or wherever you want it to be) and copy/paste this code.
The result is a three column table with headers.
datagrid.addColumn("Name");
datagrid.addColumn("License");
datagrid.addColumn("Description");
datagrid.addItem({Name:"Moodle", License:"GPL (free)",
Description:"Good for blended activity-oriented teaching"});
datagrid.addItem({Name:"ATutor", License:"Free", Description:"Good for
content-oriented teaching"});
datagrid.addItem({Name:"Blackboard", License:"Commercial",
Description:"Good for content and exercice-oriented teaching"});
datagrid.addItem({Name:"MediaWiki", License:"GPL (free)",
Description:"Good for writing-to-learn and technical mini-projects
teaching"});
The result is not absolutely convincing, since you can't read the contents of column three. It shows the minimum AS
code you need to know in order to fill in DataGrid tables.
Flash datagrid component tutorial
You can tune some properties of this grid within the Component Inspector (Shift-F7) or the properties panel. E.g. we
made the cells editable. But most tailoring has to be done through ActionScript coding. There are dozens of
properties and methods. In addition since the DataGrid is an assembly of Column and Cell objects you also may
change things at these levels.
You can find the link to the *.fla source after the slightly improved version which we shall discuss now.
Alternative - data grid creation through AS3
Instead of opening the component library, then dragging the component to the stage and giving it an instance name,
you could just enter the code below in frame 1 of the main timeline. However, you still need a DataGrid component
in your library ! (E.g. drag the component to the stage, then kill the instance).
Firstly we have to import some standard packages that we will need.
// Import the necessary packages
import fl.controls.DataGrid;
import fl.controls.ScrollPolicy
// Now create a a new instance of DataGrid and name it "datagrid_AS"
var datagrid_AS:DataGrid = new DataGrid();
We also tailor the size of column three and make the whole widget horizontally scrollable. To do so we have to
assign the column instance we want to change to a variable. This way, we can change its properties:
// this is to make col. 3 a bit bigger
var col3 = datagrid_AS.addColumn("Description");
col3.minWidth = 350;
Then we have to set the size for the whole Grid
// Fix the size
datagrid_AS.width = 400;
// Set the height to the number of rows + 1 (for the header).
datagrid_AS.rowCount = datagrid_AS.length + 1;
Finally, we position this instance relative to the stage and put it on the stage for real.
// Position it at x=300 and y = 70
datagrid_AS.move(300, 70);
// Then add it to the stage
addChild(datagrid_AS);
Here is the complete code (that also can be found in the *.fla source file below):
// Import the necessary packages
import fl.controls.DataGrid;
import fl.controls.ScrollPolicy
// Now create a a new instance of DataGrid and name it "datagrid_AS"
var datagrid_AS:DataGrid = new DataGrid();
datagrid_AS.addColumn("Name");
datagrid_AS.addColumn("License");
// this is to make col. 3 a bit bigger
305
Flash datagrid component tutorial
var col3 = datagrid_AS.addColumn("Description");
col3.minWidth = 350;
datagrid_AS.addItem({Name:"Moodle", License:"Free", Description:"Good
for blended activity-oriented teaching"});
datagrid_AS.addItem({Name:"ATutor", License:"Free", Description:"Good
for content-oriented teaching"});
datagrid_AS.addItem({Name:"Blackboard", License:"Commercial",
Description:"Good for content and exercise-oriented teaching"});
datagrid_AS.addItem({Name:"MediaWiki", License:"GPL (free)",
Description:"Good for writing-to-learn and technical mini-projects
teaching"});
// Fix the size
datagrid_AS.width = 400;
// Set the height to the number of rows + 1 (for the header)
datagrid_AS.rowCount = datagrid_AS.length + 1;
// Position it at x=400 and y = 50
datagrid_AS.move(300, 70);
// Horizontal scrolling is on
datagrid_AS.horizontalScrollPolicy = ScrollPolicy.ON ;
// Then add it to the stage
addChild(datagrid_AS);
Example code - Creating and filling with data (CS3)
• Directory: http://tecfa.unige.ch/guides/flash/ex/data-grid/
• File: data-grid-0.fla [3]
306
Flash datagrid component tutorial
Creating a DataGrid and filling it with data using pure ActionScript
This is a section that non-programmers or persons who don't want to learn a lot of ActionScript programming should
skip.
In order to do this you first should also
read:
• The Writing and using AS Code
chapter of the Flash ActionScript 3
overview in order to understand the
general AS development
perspective.
• The AS3 Compiling a program
tutorial in order to learn how to
compile AS code with CS3
Here is the executive summary:
1. Add the DataGrid component to the
library.
2. Save this code as DataGridFill.as in
A Flash DataGrid with pure ActionScript in CS3
the same directory as your FLA file.
3. Set the Document class in the FLA file to DataGridFill. You can do this in the properties panel.
As you can in the screen capture to the right, there is nothing on the stage nor in some frame. The only object we
need is the DataGrid component in the library
You may have a look at the DataGridFill-CS3.html [4] example now or open the thumbnail of the screen dump to the
right.
Here is the ActionScript code. It is quite similar to the AS code above, except that we work with a class structure and
that we also add a label on top of the data grid.
package {
// Only works with CS3 - i.e. the DataGridFill.as file must be in
the library
//
1. Add the DataGrid component to the library.
//
2. Save this code as DataGridFill.as in the same directory as
your FLA file.
//
3. Set the Document class in the FLA file to DataGridFill.
import
import
import
import
flash.display.Sprite;
fl.controls.DataGrid;
fl.controls.ScrollPolicy;
flash.text.TextField;
public class DataGridFill extends Sprite {
var data_grid:DataGrid;
var textLabel:TextField;
public function DataGridFill () {
createTitle ();
307
Flash datagrid component tutorial
createDataGrid ();
// fixStage (); // too complicated
}
private function createTitle():void {
textLabel = new TextField();
textLabel.text = "DataGrid entirely made with AS3 through
CS3";
textLabel.x = 10;
textLabel.y = 10;
textLabel.width = 400;
textLabel.selectable = false;
textLabel.textColor = 0xFF0000;
addChild (textLabel);
}
private function createDataGrid():void {
// Create a a new instance of DataGrid and name it
"data_grid"
data_grid = new DataGrid();
data_grid.addColumn("Name");
data_grid.addColumn("License");
// this is to make col. 3 a bit bigger
var col3 = data_grid.addColumn("Description");
col3.minWidth = 350;
data_grid.addItem({Name:"Moodle", License:"Free",
Description:"Good for blended activity-oriented teaching"});
data_grid.addItem({Name:"ATutor", License:"Free",
Description:"Good for content-oriented teaching"});
data_grid.addItem({Name:"Blackboard", License:"Commercial",
Description:"Good for content and exercise-oriented teaching"});
data_grid.addItem({Name:"MediaWiki", License:"GPL (free)",
Description:"Good for writing-to-learn and technical mini-projects
teaching"});
// Fix the size
data_grid.width = 500;
// Set the height to the number of rows + 1 (for the header)
data_grid.rowCount = data_grid.length + 1;
// Position it at x=400 and y = 50
data_grid.move(10, 70);
// Horizontal scrolling is on
data_grid.horizontalScrollPolicy = ScrollPolicy.ON ;
308
Flash datagrid component tutorial
309
// Then add it to the stage
addChild(data_grid);
}
}
}
Notice: see the Flex datagrid component tutorial for the Flex equivalent.
Data Grid level 1 - Dynamic fill-in
We now shall see how to fill in a DataGrid with data from user interaction.
E.g. we built a simple application that let's the user select three colors from a
list of buttons which then will show up in the Grid. This is totally useless
application, but it allows to show the principle.
You may have a look at the data-grid-1 [5] example now or open the
thumbnail of the screen dump to the right. On the stage we have 6 buttons and
they have instance names like "red", "blue" etc.
This time we call our data grid instance "data_grid":
A dynamic data grid growing with user
interaction data
var data_grid:DataGrid = new DataGrid();
We firstly introduce a new way to define colums. E.g. we want to distinguish between the short internal property
name ("c1") and what the users will see ("1st choice:").
var col1:DataGridColumn = new DataGridColumn ("c1");
col1.headerText = "1st choice:";
data_grid.addColumn(col1);
The rest of the DataGrid definition code is more or less the same as above.
Now let's look at the buttons (and if this really new to you, you should read the Flash button tutorial). We put all the
button's instance names into an array. Then we register the same "colorPick" event handling function for the mouse
click event.
// This is the list of instance names we create in CS3
var button_list:Array = [blue,cyan,green,pink,red,yellow];
// For all we register the same Event Handler function
for (var i:Number=0; i<button_list.length; i++) {
button_list[i].addEventListener(MouseEvent.CLICK, colorPick);
}
The colorPick function does the following:
line 2: The object (button) on which the user clicked
line 4: After a user clicked on button it will be invisible
line 5: we add the picked color to the end of a list
line 7: If the user has picked three colors then we will act
line 9: Add the three picked colors to the DataGrid
Flash datagrid component tutorial
line 11-13: Make all buttons visible again
line 13: Reset the list of picked colors
function colorPick(evt:MouseEvent):void {
var obj = evt.target;
// A picked object goes hidden
obj.visible = false;
selected_colors.push(obj.name);
// Once the user got three, we display and reset all buttons to
visible
if (selected_colors.length==3) {
// fill in the three cols. Warning: it's the "c1" etc. property
defined above
data_grid.addItem({c1:selected_colors[0],
c2:selected_colors[1], c3:selected_colors[2]});
for (var i:Number=0; i<button_list.length; i++) {
button_list[i].visible = true;
}
selected_colors = new Array ();
}
}
Here is the complete AS code as in the downloadable *.fla file (see below).
// Import the necessary packages
import fl.controls.DataGrid;
import fl.controls.ScrollPolicy;
import fl.controls.dataGridClasses.DataGridColumn;
// --------------------- DataGrid init ---------------------------// Now create a a new instance of DataGrid and name it "data_grid"
var data_grid:DataGrid = new DataGrid();
var col1:DataGridColumn = new DataGridColumn ("c1");
col1.headerText = "1st choice:";
var col2:DataGridColumn = new DataGridColumn ("c2");
col2.headerText = "2nd choice:";
var col3:DataGridColumn = new DataGridColumn ("c3");
col3.headerText = "3rd choice:";
data_grid.addColumn(col1);
data_grid.addColumn(col2);
data_grid.addColumn(col3);
// Fix the size
data_grid.width = 300;
// data_grid.height=300;
310
Flash datagrid component tutorial
// Set the height to five rows
data_grid.rowCount = 5;
// Position it on the stage
data_grid.move(250, 70);
// Then add it to the stage
addChild(data_grid);
// ----------------------- Buttons code
// This is the list of instance names we create in CS3
var button_list:Array = [blue,cyan,green,pink,red,yellow];
// For all we register the same Event Handler function
for (var i:Number=0; i<button_list.length; i++) {
button_list[i].addEventListener(MouseEvent.CLICK, colorPick);
}
// A an array of max 3 elements (i.e. what the user picked)
var selected_colors = new Array ();
function colorPick(evt:MouseEvent):void {
var obj = evt.target;
// A picked object goes hidden
obj.visible = false;
selected_colors.push(obj.name);
// Once the user got three, we display and reset all buttons to
visible
if (selected_colors.length==3) {
// fill in the three cols. Warning: it's the "c1" etc. property
defined above
data_grid.addItem({c1:selected_colors[0],
c2:selected_colors[1], c3:selected_colors[2]});
for (var i:Number=0; i<button_list.length; i++) {
button_list[i].visible = true;
}
selected_colors = new Array ();
}
}
• Directory: http://tecfa.unige.ch/guides/flash/ex/data-grid/
• File: data-grid-1.fla [6]
311
Flash datagrid component tutorial
Data Grid - using external data sources
Typically data that should go for display and editing in a data grid may sit in data structures produced by a
server-side application. The best way to deal with these data sources is probably exporting/importing as XML.
The well-formed kind of XML structure you can use is list of elements with attributes or a list of elements with
subelements. Translated in XML, this means that you need structure like this (element and attribute names don't
matter of course as you shall see):
<list>
<line attr1="xxx" attr2="yyy" attr3="zzz"/>
</list>
<list>
<line>
<element1>xxx</element1> <element2>yyy</element2> <element3>zzz<element3>
</line>
</list>
A list of LMSs using elements
You first can have a look at the data-grid-xml.html [7] example. It's just a simple DataGrid table as introduced above.
The only difference is that data is imported from a lms-list.xml [8] file. The XML inside looks like this:
<?xml version="1.0"?>
<list>
<entry>
<Name>Moodle</Name>
<Type>LMSware</Type>
<License>GPL</License>
<Description>Good for blended activity-oriented learning</Description>
</entry>
<entry>
<Name>PageFlakes</Name>
<Type>Webtop service</Type>
<License>Free to use</License>
<Description>A minimal persona learning environment</Description>
</entry>
<entry>
<Name>Drupal</Name>
<Type>Portalware</Type>
<License>GPL</License>
<Description>Good for project-oriented teaching</Description>
</entry>
</list>
Here is the ActionScript code. As you can see need some lines of codes to get the XML into the table. Unless you
want to do some data filtering, e.g. the XML file structure doesn't match the DataGrid structure, you can copy/paste
the code as is:
// Import the necessary packages
import fl.controls.DataGrid;
312
Flash datagrid component tutorial
import fl.data.DataProvider;
// --------------------- DataGrid init ---------------------------// Create a a new instance of DataGrid and name it "data_grid"
var data_grid:DataGrid = new DataGrid();
data_grid.addColumn("Name");
data_grid.addColumn("Type");
data_grid.addColumn("License");
var col4 = data_grid.addColumn("Description");
col4.minWidth = 300;
// Fix the size
data_grid.width = 600;
// Set the height to five rows
data_grid.rowCount = 5;
// Position it on the stage
data_grid.move(10, 70);
// Then add it to the stage
addChild(data_grid);
// ------ DataProvider and XML loading code
var dp:DataProvider;
// define a URL and make it a request instance
var url:String = "lms-list.xml";
var request:URLRequest = new URLRequest(url);
// define a loader and have it load the request
var url_loader:URLLoader = new URLLoader();
url_loader.addEventListener(Event.COMPLETE, completeHandler);
url_loader.load(request);
// define a function that will execute after data has finished loading
function completeHandler(event:Event):void {
var ldr:URLLoader = event.currentTarget as URLLoader;
// create XML datastructure from loaded XML
var xmlDP:XML = new XML(ldr.data);
// create a new data provider with this and register it with the
DataGrid
dp = new DataProvider(xmlDP);
data_grid.dataProvider = dp;
}
Source code
Directory: http://tecfa.unige.ch/guides/flash/ex/data-grid/
313
Flash datagrid component tutorial
FLA file: data-grid-xml.fla [9]
A list of LMSs using attributes
You first can have a look at the data-grid-xml-attrs.html [10]
The AS code is exactly the same. Only, as you can see below, the XML code uses attributes instead of elements. We
also changed the formatting of each entry a bit (just to see if Adobe did a good job - it did).
<?xml version="1.0"?>
<list>
<entry
Name="Moodle"
Type="LMSware"
License="GPL"
Description="Good for blended activity-oriented learning"
/>
<entry Name="PageFlakes" Type="Webtop service" License="Free to use"
Description="A minimal personal learning environment"
/>
<entry
Name="Drupal" Type="Portalware"
License="GPL" Description="Good for project-oriented teaching"/>
<entry
Name="Blackboard" Type="LMS"
License="Commercial" Description="Good for grading exercises"/>
</list>
We will not show the AS code here, since it's the same (except for the file name).
Source code
Directory: http://tecfa.unige.ch/guides/flash/ex/data-grid/
FLA file: data-grid-xml-attrs.fla [11]
Moving on exercice
Generate some XML data with PHP that comes from a database. That's just a PHP coding exercise.
Interested in the Flex equivalent ?
See the Flex datagrid component tutorial
Editing DataGrids
(to do ....)
Links
Directory: http://tecfa.unige.ch/guides/flash/ex/data-grid/
FLA file: data-grid-xml-attrs.fla [11]
Adobe tutorials
• Creating, populating, and resizing the DataGrid component [12]
• Customizing and sorting the DataGrid component [13]
• Filtering and formatting data in the DataGrid component [14]
314
Flash datagrid component tutorial
• Flex Quick Starts: Handling data [15] (not very useful)
• Reading an XML file into an XML object [16] (not very useful)
• Working with XML [17] (Programming ActionScript 3)
Other tutorials
• Using the DataGrid Component [18] by Kirupa (July 2006).
Official documentation for Flash and AS3
• Using the DataGrid [28] Adobe Flash CS3 Documentation
• DataGrid [1] (AS3 Language and components reference)
• fl.controls.dataGridClasses [19]. Includes classes that the DataGrid component uses to maintain and display
information. (ActionScript 3.0 Language and Components Reference)
• fl.controls.dataGridClasses [20]. Similar. (Adobe ActionScript 3.0 Language and Components Reference)
• fl.data [21] Reference manual for data associated (Adobe ActionScript 3.0 Language and Components Reference)
More needed and some cleanup too ...
References
[1] http:/ / help. adobe. com/ en_US/ AS3LCR/ Flash_10. 0/ fl/ controls/ DataGrid. html
[2] http:/ / tecfa. unige. ch/ guides/ flash/ ex/ data-grid/ data-grid-0. html
[3] http:/ / tecfa. unige. ch/ guides/ flash/ ex/ data-grid/ data-grid-0. fla
[4] http:/ / tecfa. unige. ch/ guides/ flash/ ex/ data-grid/ DataGridFill-CS3. html
[5] http:/ / tecfa. unige. ch/ guides/ flash/ ex/ data-grid/ data-grid-1. html
[6] http:/ / tecfa. unige. ch/ guides/ flash/ ex/ data-grid/ data-grid-1. fla
[7] http:/ / tecfa. unige. ch/ guides/ flash/ ex/ data-grid/ data-grid-xml. html
[8] http:/ / tecfa. unige. ch/ guides/ flash/ ex/ data-grid/ lms-list. xml
[9] http:/ / tecfa. unige. ch/ guides/ flash/ ex/ data-grid/ data-grid-xml. fla
[10] http:/ / tecfa. unige. ch/ guides/ flash/ ex/ data-grid/ data-grid-xml-attrs. html
[11] http:/ / tecfa. unige. ch/ guides/ flash/ ex/ data-grid/ data-grid-xml-attrs. fla
[12] http:/ / www. adobe. com/ devnet/ flash/ quickstart/ datagrid_pt1/
[13] http:/ / www. adobe. com/ devnet/ flash/ quickstart/ datagrid_pt2/
[14] http:/ / www. adobe. com/ devnet/ flash/ quickstart/ datagrid_pt3/
[15] http:/ / www. adobe. com/ devnet/ flex/ quickstart/ accessing_xml_data/
[16] http:/ / livedocs. adobe. com/ flex/ 3/ html/ help. html?content=Filesystem_16. html
[17] http:/ / livedocs. adobe. com/ flex/ 3/ html/ help. html?content=13_Working_with_XML_01. html
[18] http:/ / www. kirupa. com/ developer/ flash8/ datagrid. htm
[19] http:/ / help. adobe. com/ en_US/ AS3LCR/ Flash_10. 0/ fl/ controls/ dataGridClasses/ package-detail. html
[20] http:/ / livedocs. adobe. com/ flash/ 9. 0/ ActionScriptLangRefV3/ fl/ controls/ dataGridClasses/ package-detail. html
[21] http:/ / livedocs. adobe. com/ flash/ 9. 0/ ActionScriptLangRefV3/ fl/ data/ package-detail. html
315
Flash drag and drop tutorial
Flash drag and drop tutorial
Draft
Overview
Dragging and dropping objects is a popular brick in edutainment programs. This is part of Flash CS3 tutorials. It is
probably not suitable for Flash designers without any programming experience.
Learning goals
Learn how to create simple drag and drop programs with Flash 9 (CS3) components
Learn a little bit of Action Script 3
Prerequisites
Flash CS3 desktop tutorial
Flash drawing tutorial
Flash layers tutorial
flash button tutorial
ActionScript 3 interactive objects tutorial
Moving on
The Flash article has a list of other tutorials.
Flash Video component tutorial
Quality
This text should technical people get going and may not be good enough for self-learning beginners. It can be
used as handout in a "hands-on" class. That is what Daniel K. Schneider made it for...
Level
It aims at beginners. More advanced features and tricks are not explained here.
Learning materials
Grab the various *.fla files from here:
http://tecfa.unige.ch/guides/flash/ex/drag-and-drop-intro/
Tip: This page contains more code than screen dumps. You should download the source code and play with it.
The executive summary
•
•
•
•
•
•
Draw something on the canvas
Transform it to a movie symbol (buttons don't work)
Assign an instance name
Instance_name.startDrag()
Instance_name.stopDrag()
Test if the object sits over another object (target) and then script some action.
316
Flash drag and drop tutorial
317
Introduction - simple dragging code
The screenshot shows a simple dragging application, i.e. you can move around the circle and the rectangle.
Most simple drag and drop
Step 1 - Draw an object
• Anything you like
Step 2 - Transform it into a Movie Clip
• Select the object (or if you created several objects for a drawing select them all)
• Right-click on the object and create a movie symbol
• Give the instance a name in the properties panel !
Step 3 - Adapt code below
Dragging code is really simple and follows the same principles we encountered for example in the Flash button
tutorial.
• Associate an event listener with an event handler function. This time we listen to "mouse down" and "mouse up"
events and for each we need to write a function that will do the dragging.
// Register mouse event functions
blue_btn.addEventListener(MouseEvent.MOUSE_DOWN, mouseDownHandler);
blue_btn.addEventListener(MouseEvent.MOUSE_UP, mouseUpHandler);
red_btn.addEventListener(MouseEvent.MOUSE_DOWN, mouseDownHandler);
red_btn.addEventListener(MouseEvent.MOUSE_UP, mouseUpHandler);
// Define a mouse down handler (user is dragging)
Flash drag and drop tutorial
function mouseDownHandler(evt:MouseEvent):void {
var object = evt.target;
// we should limit dragging to the area inside the canvas
object.startDrag();
}
function mouseUpHandler(evt:MouseEvent):void {
var obj = evt.target;
obj.stopDrag();
}
Results
• Admire the result (flash-cs3-drag-and-drop-intro.html) [1]
• Get the source from http://tecfa.unige.ch/guides/flash/ex/drag-and-drop-intro/(files
flash-cs3-drag-and-drop-intro.*)
Drag and drop over another object
The goals is to write a little Flash application that will tell the user whether he correctly dragged and dropped an
object over another one.
Step 1 - Start from the file above
• I.e. we want to have the user drag the red circle over the blue rectangle.
Step 2 - Add a text box
This textbox should initially display instruction, then display feedback: "made it" and "missed".
• Use the Textool in the tools panel to enter the text.
• Then in the properties panel, change the type to Dynamic Text.
Dynamic Text
Step 3 - Action script code
// Register mouse event functions
blue_btn.addEventListener(MouseEvent.MOUSE_DOWN, mouseDownHandler);
blue_btn.addEventListener(MouseEvent.MOUSE_UP, mouseUpHandler);
red_btn.addEventListener(MouseEvent.MOUSE_DOWN, mouseDownHandler);
red_btn.addEventListener(MouseEvent.MOUSE_UP, mouseUpHandler);
// Define a mouse down handler (user is dragging)
function mouseDownHandler(evt:MouseEvent):void {
var object = evt.target;
// we should limit dragging to the area inside the canvas
object.startDrag();
}
318
Flash drag and drop tutorial
function mouseUpHandler(evt:MouseEvent):void {
var obj = evt.target;
// obj.dropTarget will give us the reference to the shape of
// the object over which we dropped the circle.
var target = obj.dropTarget;
// If the object exists AND it is the blue button, then we change
// the text in the TextBox.
// Since obj.dropTarget is a Shape, we need its parent.
if (target != null && target.parent == blue_btn)
{
textField.text = "Made it !!";
}
else
{
textField.text = "Missed :(";
}
obj.stopDrag();
}
Results
• Admire the result [2]
• Get the source from http://tecfa.unige.ch/guides/flash/ex/drag-and-drop-intro/(files
flash-cs3-drag-and-drop-intro2.*)
Improvements to be made
• Styling of the textbox: You can do this with the filters panel. Click on the + sign to add filters and then play
around with the options.
• Move the red circle back to its initial position
• Special effects maybe
Drag and match learning application - dumb version
The goal is to move objects to a textbox containing the first letter of its name. E.g. "Cat" should be moved to the "C"
box. If there is a hit, the user will get some success message and can't move the object anymore. If he is done, he
should get an extra message.
Step 1 - Create movie clips for object to be moved
• As above with the red and blue circle
• Each object should have an instance name
Step 2 - Create textboxes
• Also as above
• Create one for each object (E.g. a "C" for the cat, etc.)
• Make sure they are dynamic and they have a name.
Step 3 - Foreground/Background
Make sure that the textboxes are in the background or the movie clips in the foreground. Otherwise a dropped object
will not find its target.
• Select all the movie clips, then right-click->Arrange->Bring to Front.
319
Flash drag and drop tutorial
Step 3 - Write Action Script code
Code below is fairly awful since it lacks abstraction, but it has the advantage to use a minimal variety of AS3.
var hits = 0;
// Register mouse event functions
dog.addEventListener(MouseEvent.MOUSE_DOWN, mouseDownHandler);
dog.addEventListener(MouseEvent.MOUSE_UP, mouseUpHandler);
rocket.addEventListener(MouseEvent.MOUSE_DOWN, mouseDownHandler);
rocket.addEventListener(MouseEvent.MOUSE_UP, mouseUpHandler);
cat.addEventListener(MouseEvent.MOUSE_DOWN, mouseDownHandler);
cat.addEventListener(MouseEvent.MOUSE_UP, mouseUpHandler);
bat.addEventListener(MouseEvent.MOUSE_DOWN, mouseDownHandler);
bat.addEventListener(MouseEvent.MOUSE_UP, mouseUpHandler);
// Define a mouse down handler (user is dragging)
function mouseDownHandler(evt:MouseEvent):void {
var object = evt.target;
// we should limit dragging to the area inside the canvas
object.startDrag();
}
function mouseUpHandler(evt:MouseEvent):void {
var obj = evt.target;
// obj.dropTarget will give us the reference to the shape of
// the object over which we dropped the circle.
var target = obj.dropTarget;
// If the target object exists the we ask the test_match function
// to compare moved obj and target where it was dropped.
if (target != null)
{
test_match(target, obj);
}
obj.stopDrag();
}
function test_match(target,obj) {
// test if either one of the four pairs match
if ( (target == box_c && obj == cat) ||
(target == box_d && obj == dog) ||
(target == box_r && obj == rocket) ||
(target == box_b && obj == bat) )
{
// we got a hit
hits = hits+1;
textField.text = "Yes ! You got one !";
// make the object transparent
320
Flash drag and drop tutorial
321
obj.alpha = 0.5;
// kill its event listeners - object can't be moved anymore
obj.removeEventListener(MouseEvent.MOUSE_DOWN,
mouseDownHandler);
obj.removeEventListener(MouseEvent.MOUSE_UP,
mouseUpHandler);
// Test if we are done
if (hits == 4)
{
textField.text = "Made it !!";
}
}
else
{
textField.text = "Missed :(";
}
}
Results
• Look at the result [3]
• Get the source from http://tecfa.unige.ch/guides/flash/ex/drag-and-drop-intro/(files
flash-cs3-drag-and-drop-matching.*)
Drag and match learning application - better
Instead of writing an application just for four matching pairs, we can write code that is more general. This code only
needs slight modifications to adapt to other named instances and text boxes and you can insert as little/many pairs
you like. Just make sure that the target textboxes are in the background.
Btw this is the first AS3 code that includes a tiny bit of programming I ever made (I probably also should type
variables but then I am not a real programmer ....)
var dict = new Dictionary ();
// =================== START USER
// Insert as many "dict[text_box]
// Replace: text_box by the name
//
movie by the name of
around.
dict[box_c]
dict[box_d]
dict[box_r]
dict[box_b]
dict[box_a]
=
=
=
=
=
Config =====================
= movie;" statements you like
of a matching dynamic text_box
movie instances users can move
cat;
dog;
rocket;
bat;
apple;
// Do NOT change/delete any other line. Also make sure to respect
// the syntax, e.g. dont forget the ";" at the end of each line.
// ===================== END USER Config ====================
Flash drag and drop tutorial
var hits = 0; // counts succesful hits
var max = 0; // used to compute dictionary length
// For each item in the dictionary we add event listeners
// "for each" will loop through the values ... not the keys
for each (var item in dict)
{
item.addEventListener(MouseEvent.MOUSE_DOWN, mouseDownHandler);
item.addEventListener(MouseEvent.MOUSE_UP, mouseUpHandler);
item.buttonMode = true; //needed for the hand cursor to work
max = max + 1;
}
// Define a mouse down handler (user is dragging)
function mouseDownHandler(evt:MouseEvent):void {
var object = evt.target;
// we should limit dragging to the area inside the canvas
object.useHandCursor = true;
object.startDrag();
}
function mouseUpHandler(evt:MouseEvent):void {
var obj = evt.target;
// obj.dropTarget will give us the reference to the shape of
// the object over which we dropped the circle.
var target = obj.dropTarget;
// If the target object exists the we ask the test_match function
// to compare moved obj and target where it was dropped.
if (target != null)
{
test_match(target, obj);
}
obj.stopDrag();
}
function test_match(target,obj) {
// test if the pairs match
if (dict[target] == obj)
{
// we got a hit
hits = hits+1;
textField.text = "Yes ! You got one !";
// make the object transparent
obj.alpha = 0.5;
322
Flash drag and drop tutorial
323
// kill its event listeners - object can't be moved anymore
obj.removeEventListener(MouseEvent.MOUSE_DOWN,
mouseDownHandler);
obj.removeEventListener(MouseEvent.MOUSE_UP,
mouseUpHandler);
// Test if we are done
if (hits == max)
{
// here we should play an animation
textField.text = "Made it !!";
}
}
else
{
textField.text = "Missed :(";
}
}
Results
• Look at the result [4]
• Get the source from http://tecfa.unige.ch/guides/flash/ex/drag-and-drop-intro/(files
flash-cs3-drag-and-drop-matching-2.*)
Improvements to be made
• Make it more flashy when there is a hit / miss and when it's over.
• Add sound. A child can not read instructions, but a parent could tell :)
• Move the object back to its origin when there is a miss.
Drag and match learning application - still better
Our last version for now includes some more features.
• It has sound (though the initial "talk" is missing)
• Objects go back where they came from
// Daniel K. Schneider - TECFA - sept 2007
// Copyright: See http://edutechwiki.unige.ch/en/
var dict = new Dictionary ();
// =================== START USER
// Insert as many "dict[text_box]
// Replace: text_box by the name
//
movie by the name of
around.
dict[box_c]
dict[box_d]
dict[box_r]
dict[box_b]
=
=
=
=
cat;
dog;
rocket;
bat;
Config =====================
= movie;" statements you like
of a matching dynamic text_box
movie instances users can move
Flash drag and drop tutorial
dict[box_a] = apple;
// Do NOT change/delete any other line. Also make sure to respect
// the syntax, e.g. dont forget the ";" at the end of each line.
// ===================== END USER Config ====================
// Sound
// should I preload this somehow ?
var request:URLRequest = new URLRequest("applause_3.mp3");
var applause:Sound = new Sound();
applause.load(request);
var request2:URLRequest = new URLRequest("music.mp3");
var music:Sound = new Sound();
music.load(request2);
var request3:URLRequest = new URLRequest("baby_laugh.mp3");
var laugh:Sound = new Sound();
laugh.load(request3);
// Drag and match code
var hits = 0; // counts succesful hits
var max = 0; // used to compute dictionary length
var ori_x;
var ori_y;
// For each item in the dictionary we add event listeners
// "for each" will loop through the values ... not the keys
for each (var item in dict)
{
item.addEventListener(MouseEvent.MOUSE_DOWN, mouseDownHandler);
item.addEventListener(MouseEvent.MOUSE_UP, mouseUpHandler);
max = max + 1;
item.buttonMode = true;
}
// Define a mouse down handler (user is dragging)
function mouseDownHandler(evt:MouseEvent):void {
var object = evt.target;
ori_x = object.x
ori_y = object.y
object.useHandCursor = true;
object.startDrag();
324
Flash drag and drop tutorial
}
function mouseUpHandler(evt:MouseEvent):void {
//stop all sounds
SoundMixer.stopAll();
var obj = evt.target;
// obj.dropTarget will give us the reference to the shape of
// the object over which we dropped the circle.
var target = obj.dropTarget;
// If the target object exists the we ask the test_match function
// to compare moved obj and target where it was dropped.
if (target != null)
{
test_match(target, obj);
}
obj.stopDrag();
}
function test_match(target,obj) {
// test if the pairs match
if (dict[target] == obj)
{
// we got a hit
hits = hits+1;
textField.text = "Yes ! You got one !";
applause.play();
// make the object transparent
obj.alpha = 0.5;
// kill its event listeners - object can't be moved anymore
obj.removeEventListener(MouseEvent.MOUSE_DOWN,
mouseDownHandler);
obj.removeEventListener(MouseEvent.MOUSE_UP,
mouseUpHandler);
// Test if we are done
if (hits == max)
{
textField.text = "Made it !!";
music.play(0,5);
}
}
else
{
obj.x = ori_x;
obj.y = ori_y;
textField.text = "Missed :(";
laugh.play();
325
Flash drag and drop tutorial
}
}
Results
• Look at the result [9]
• Get the source from http://tecfa.unige.ch/guides/flash/ex/drag-and-drop-intro/(files
flash-cs3-drag-and-drop-matching-3.*)
Improvements to be made
•
•
•
•
Add a restart button
Rewrite this as an ActionScript 3 application that would take random pairs and play several scenes
The word of an object should be told aloud when the user picks it up
etc ....
Reference
I may move these to some other article sometimes soon.
Sprites and DisplayObjects
Objects that you can drag around are Movie Clips. These are children of Sprites. Sprites have associated graphics.
From the ActionScript 3.0 Language and Components Reference [5]:
The class hierarchy looks like this: MovieClip [6] -> Sprite [7] -> DisplayObjectContainer [8] -> InteractiveObject [9]
-> DisplayObject [10] -> EventDispatcher [11] -> Object [12]
When you drop a sprite over another sprite, the Flash will give the shape of the target object. This shape is a
DisplayObject and from a DisplayObject we can get its parent, i.e. a Movie Clip in our case.
Important: When you look at the definition of Class, there are buttons to open inherited properties and methods.
Mostly likely you need these.
Event Listener Interface
Movie clips can use normal Event Handling:
• EventDispatcher [11] (Adobe AS3 reference)
Graphics
• Graphics [13] (Adobe AS3 reference)
Dictionaries
• AS3: Dictionary Object [14] (gskinner.blog)
TextFields
The TextField class is used to create display objects for text display and input.
• TextField [14] (Adobe AS3 reference)
• Basics of working with text [15] - for designers.
326
Flash drag and drop tutorial
Sounds
• Sound [12] (Adobe AS3 reference)
• SoundMixer [13] (Adobe AS3 reference)
Tutorials
• Drag and Drop in ActionScript 3.0 [16] A very easy to follow tutorial on how to implement drag and drop in AS3
by MonkeyFlash.com. FLA file provided. (This link is not current any more)
• An easy to follow tutorial [17] about drag and drop in Flash CS5 by lynda.com.
• An other very detailed tutorial (approximately 20 minutes) in 3 parts:
• Drag and Drop Tutorial in Flash CS5 - Actionscript 3 (Part 1/3) [18]
• Drag and Drop Tutorial in Flash CS5 - Actionscript 3 (Part 2/3) [19]
• Drag and Drop Tutorial in Flash CS5 - Actionscript 3 (Part 3/3) [20]
Links
AS CS4 reference:
• startDrag() and stopDrag() [21]
References
[1] http:/ / tecfa. unige. ch/ guides/ flash/ ex/ drag-and-drop-intro/ flash-cs3-drag-and-drop-intro. html
[2] http:/ / tecfa. unige. ch/ guides/ flash/ ex/ drag-and-drop-intro/ flash-cs3-drag-and-drop-intro2. html
[3] http:/ / tecfa. unige. ch/ guides/ flash/ ex/ drag-and-drop-intro/ flash-cs3-drag-and-drop-matching. html
[4] http:/ / tecfa. unige. ch/ guides/ flash/ ex/ drag-and-drop-intro/ flash-cs3-drag-and-drop-matching-2. html
[5] http:/ / livedocs. adobe. com/ flash/ 9. 0/ ActionScriptLangRefV3/
[6] http:/ / livedocs. adobe. com/ flash/ 9. 0/ ActionScriptLangRefV3/ flash/ display/ MovieClip. htm
[7] http:/ / livedocs. adobe. com/ flash/ 9. 0/ ActionScriptLangRefV3/ flash/ display/ Sprite. html
[8] http:/ / livedocs. adobe. com/ flash/ 9. 0/ ActionScriptLangRefV3/ flash/ display/ DisplayObjectContainer. html
[9] http:/ / livedocs. adobe. com/ flash/ 9. 0/ ActionScriptLangRefV3/ flash/ display/ InteractiveObject. html
[10] http:/ / livedocs. adobe. com/ flash/ 9. 0/ ActionScriptLangRefV3/ flash/ display/ DisplayObject. html
[11] http:/ / livedocs. adobe. com/ flash/ 9. 0/ ActionScriptLangRefV3/ flash/ events/ EventDispatcher. html
[12] http:/ / livedocs. adobe. com/ flash/ 9. 0/ ActionScriptLangRefV3/ Object. html
[13] http:/ / livedocs. adobe. com/ flash/ 9. 0/ ActionScriptLangRefV3/ flash/ display/ Graphics. html
[14] http:/ / www. gskinner. com/ blog/ archives/ 2006/ 07/ as3_dictionary. html
[15] http:/ / livedocs. adobe. com/ flash/ 9. 0/ main/ wwhelp/ wwhimpl/ common/ html/ wwhelp. htm?context=LiveDocs_Parts& file=00000219.
html
[16] http:/ / www. monkeyflash. com/ flash/ drag-and-drop-in-as3/
[17] http:/ / www. lynda. com/ Flash-CS5-tutorials/ flash-professional-cs5-code-snippets-and-templates-in-depth/ Adding-drag-and-drop/
72925-4. html
[18] http:/ / www. youtube. com/ watch?v=ALqGYMsRWxw
[19] http:/ / www. youtube. com/ watch?v=1hR3CVIdfuY
[20] http:/ / www. youtube. com/ watch?v=g1kvSTHkbtQ
[21] http:/ / help. adobe. com/ en_US/ AS3LCR/ Flash_10. 0/ flash/ display/ Sprite. html#stopDrag()
327
ActionScript 3 interactive objects tutorial
ActionScript 3 interactive objects tutorial
Draft
Overview
Learning goals
The purpose of this tutorial is go a little bit beyond dealing with mouse clicks, buttons and button components as
seen in previous tutorials, i.e. you will learn how to change properties of objects (such as position, size and visibility)
and how to play embedded movie clips:
•
•
•
•
•
Learn about how to use mouse and key-press events.
Learn about some object properties you can easily change with a little ActionScript code
Learn some ActionScript control statements (if-then-else clause and assignments)
Learn how to play embedded Flash movie clips.
Learn how to use embedded Flash movie clips for multiple animations
Prerequisites
Flash CS6 desktop tutorial
Flash drawing tutorial
Flash button tutorial
Flash component button tutorial
Flash embedded movie clip tutorial
Other recommended prior tutorials (not necessary, but can help)
Flash video component tutorial
Flash sound tutorial
ActionScript 3 event handling tutorial
Moving on
Flash drag and drop tutorial
Flash games tutorial
Flash ActionScript 3 overview
The Flash tutorials index has a list of other tutorials.
Alternative versions
ActionScript 3 interactive objects tutorial (CS3) (old version)
Level and target population
• It aims at Flash designers, not beginning ActionScript 3 programmers, although programmers can read this to get
a feeling for object properties before digging into a real documentation like Adobe's Flash 9 reference manual [5].
Also, some of the code should be rewritten a bit. I skipped type declarations on purpose and should even rip off
more. These don't make sense for a few lines of code written by/for non-programmers. The goal is to keep code as
simple as possible. I should at some point decide whether I should remove all type declarations from the examples
or consistently leave the ones that might be useful in order to receive compiler warnings.
Quality
This text should technical people get going and may not be good enough for self-learning beginners. It can be
used as handout in a "hands-on" class. That is what Daniel K. Schneider made it for...
328
ActionScript 3 interactive objects tutorial
Learning materials
Grab the various *.fla files from here:
http://tecfa.unige.ch/guides/flash/ex6/action-script-3-intro/
Manipulating objects
The principle of (simple) object manipulation is fairly simple: change properties of a display object. The tricky
thing is to know what you can change on a given kind of object. Some changes are easy to make, others are really
hard. Typically, most objects are non-editable (its component objects maybe are). It's easy to change size and
position of a display object, i.e. operations you could do on grouped objects and symbol instances with the transform
tool or the parameters panel.
Below, we show a few little examples that demonstrate how to manipulate objects with mouse events (see the
ActionScript 3 event handling tutorial for more details). All the objects on the stage (e.g. black_cat) are instances of
movie clip symbols. These are a kind of interactive object and react to mouse and keyboard events. The kind of
tricks will we show act on named instances movie clips.
Symbol instances you want to manipulate must be named
You could imagine dozens of other simple examples, but it's not so easy to understand the technical ActionScript
documentation which is made for programmers and not designers. If you feel more adventurous, you may have a
look at the class hierarchy described in the Flash ActionScript 3 overview and in particular the Display Object and its
children. Follow up a link to the Flash documentation and see if you can find other properties that are easy to
manipulate...
329
ActionScript 3 interactive objects tutorial
Simple repositioning example
To understand what is going on below, you may want to look at:
actionscript3-simple-object-manipulation.html [1]
And also load the *.fla file
actionscript3-simple-object-manipulation.fla [2]
In order to reposition an object, change its x and y properties.
In the following example, when you click on the interactive object (a symbol instance that is called "black_cat") it
will move itself to position x= 200 and y=200. Note: Position is defined by the center of the display object (i.e. the
little "+" sign who's value depends on how you made it).
black_cat.addEventListener(MouseEvent.CLICK, moveCat);
function moveCat(event:MouseEvent):void {
black_cat.x = 200;
black_cat.y = 200;
}
A statement like
cat.x = 100;
is called an assignment and means: The x property of the cat object will become "100".
If you want to move the cat forth and back you'd rather use this code:
black_cat.addEventListener(MouseEvent.CLICK, moveCat);
// cat can be in original position or not (true,false)
var black_cat_ori_pos = true;
function moveCat(event:MouseEvent):void {
if (black_cat_ori_pos == true)
{
black_cat.x += 200;
black_cat.y += 200;
black_cat_ori_pos = false;
}
else
{
black_cat.x -= 200;
black_cat.y -= 200;
black_cat_ori_pos = true;
}
}
In this function we use a so-called if-then-else statement. The line
if (black_cat_ori_pos == true)
checks if the variable black_cat_ori_pos has the value of true. If this is true we then execute the clause {
black_cat.x += ... ; black_cat.y ..... } that follows. If it is not true we execute the other {...}
clause after the else.
330
ActionScript 3 interactive objects tutorial
Also note the difference between an assignment ("=") and an equality test ("=="). The latter will test if two values
are the same. Note to beginners: never use just the "=" inside the conditional of an "if". Use "==".
Let's describe this at a more conceptual level: black_cat_ori_pos can be called a "flag" variable since it will register
whether the cat is in a new position or the original old position. If it's in the new one, we will move it back, and the
other way round. So
black_cat_ori_pas == true
tests if the cat sits in its original position.
X and Y positions are defined with respect to the upper left corner. E.g. if x is 100 and y is 100, the registered center
point of the object is 100 pixels to the right and 100 pixels down. The instruction:
x += 100;
x -= 100;
means "add 100 to x" or "subtract 100 from x". So it's a shortcut for x = x + 100;, i.e. "new value of x becomes old
value of x plus 100".
Code above isn't of the kind that a real programmer would use. Therefore, if you are familiar with programming,
rather go for something like the following. Beginners, please ignore. The following function would work with any
object (not just a given cat). It will retrieve the symbol instance from the event object. Original position of the object
is remembered in the object itself, using a new property we create (ori_x and ori_y).
function moveIt(event:MouseEvent):void
{
var obj = event.target;
// initialize original values if necessary (on first pass)
// test if properties ori_ exist, if not create them
if (! ("ori_x" in obj))
{
obj.ori_x = obj.x;
obj.ori_y = obj.y;
obj.buttonMode = true; // for better UX, this could be done
before
}
// Is object in original position ? If so move close to friend
if (obj.ori_x == obj.x)
{
obj.x =+ 200;
obj.y =+ 200;
}
else
{
obj.x = obj.ori_x;
obj.y = obj.ori_y;
}
}
331
ActionScript 3 interactive objects tutorial
Change size
Changing size, means to change width and height properties. In the following example, when you click on the
interactive object (a symbol instance that is called "blue_cat") it will double its size when you hold down the mouse
button and go back to normal when you release it. Note: If you hold down the button and then move the mouse out
(still holding down), and only then release the button, the mouse will stay big since it never will catch the mouse up
event.
blue_cat.addEventListener(MouseEvent.MOUSE_DOWN, resizeCat);
function resizeCat(event:MouseEvent):void {
blue_cat.width = blue_cat.width * 2;
blue_cat.height = blue_cat.height * 2;
}
blue_cat.addEventListener(MouseEvent.MOUSE_UP, resizeCat2);
function resizeCat2(event:MouseEvent):void {
blue_cat.width = blue_cat.width / 2;
blue_cat.height = blue_cat.height / 2;
}
This code may not exactly do what you want. As we said, if the user holds down the mouse button and moves it out,
the MOUSE_UP event will never happen, i.e. the cat will grow permanently. A better solution can be found in the
example code that we included at the end of this section.
Visibility
In the following example, we will make a white cat invisible when you click on it. Technical note: It is still there, but
the user can't click on it.
white_cat.addEventListener(MouseEvent.CLICK, hideCat);
function hideCat(event:MouseEvent):void {
white_cat.visible = false;
}
Once the cat is hidden, the user never will be able to bring it back. Therefore, in the next example we decided to
implement a switch between a cat and a dog:
// can't see the dog for starters
brown_dog.visible=false;
brown_dog.addEventListener(MouseEvent.CLICK, hideShow);
white_cat.addEventListener(MouseEvent.CLICK, hideShow);
function hideShow(event:MouseEvent):void {
// instead of using white_cat.visible = false; we just switch it to
the opposite
white_cat.visible = !white_cat.visible;
brown_dog.visible =!brown_dog.visible;
332
ActionScript 3 interactive objects tutorial
}
The "!" used for white_cat.visiblein the hideShow function means that the "visible" property will be set to
its opposite. E.g. if the value is true it will become false, and the other way round. Same technique for the dog
(which is invisible for starters).
Let the user drag example
The next example shows how to let a user drag the red cat object with the mouse (button pressed down) and then
drop the cat when the user releases the mouse button.
red_cat.addEventListener(MouseEvent.MOUSE_DOWN, startDragging);
red_cat.addEventListener(MouseEvent.MOUSE_UP, stopDragging);
function startDragging(event:MouseEvent):void
{
red_cat.startDrag();
}
function stopDragging(event:MouseEvent):void
{
red_cat.stopDrag();
}
For a tutorial on dragging and dropping, see the Flash drag and drop tutorial that demonstrates how to implement a
simple children's educational game. You will learn for instance how to test if a dropped object will sit on top of
another one.
Transformations
So-called "transforms" of a non-editable display object are more tricky. We just will demonstrate how to change the
tint with a color transform. You also could skew an object with a similar strategy. However, this kind of code is
really a bit too difficult to understand without some prior introduction to object-oriented programming.
Color: The ColorTransform class lets you adjust the color values in a display object. The color adjustment or color
transformation can be applied to all four channels: red, green, blue, and alpha transparency. Here are the formula
according to the manual [3], retrieved 20:58, 8 October 2007 (MEST):
•
•
•
•
New red value = (old red value * redMultiplier) + redOffset
New green value = (old green value * greenMultiplier) + greenOffset
New blue value = (old blue value * blueMultiplier) + blueOffset
New alpha value = (old alpha value * alphaMultiplier) + alphaOffset
The tricky thing is that you have to program transformations with a temporary ColorTransform object and then copy
this object to the display object's colorTransform property if I understood the manual right. See the code toward the
end of the full example code below.
333
ActionScript 3 interactive objects tutorial
Cat example file
Demonstration of some mouse events and implementation of property changes
The (all-in-one) file with the examples we discussed above is here:
actionscript3-simple-object-manipulation.html [1]
actionscript3-simple-object-manipulation.fla [2]
Directory with files actionscript3-simple-object-manipulation.*:
http://tecfa.unige.ch/guides/flash/ex6/action-script-3-intro/
Here is the complete ActionScript code:
/* ----- Change cursor form
add a hand to cursor to each cat
This way a user understands that he/she can do something with the
object.
*/
black_cat.buttonMode = true;
blue_cat.buttonMode = true;
red_cat.buttonMode = true;
brown_dog.buttonMode = true;
white_cat.buttonMode = true;
empty_cat.buttonMode = true;
grey_mouse.buttonMode = true;
/* ---- moving ---- */
334
ActionScript 3 interactive objects tutorial
black_cat.addEventListener(MouseEvent.CLICK, moveCat);
// cat can be in original position or not (true,false)
var black_cat_ori_pos = true;
function moveCat(event:MouseEvent):void {
if (black_cat_ori_pos == true)
{
black_cat.x += 200;
black_cat.y += 200;
black_cat_ori_pos = false;
}
else
{
black_cat.x -= 200;
black_cat.y -= 200;
black_cat_ori_pos = true;
}
}
/* ---- resizing ---- */
blue_cat.addEventListener(MouseEvent.MOUSE_DOWN, resizeCat);
var cat_size = 1;
function resizeCat(event:MouseEvent):void {
blue_cat.width = blue_cat.width * 2;
blue_cat.height = blue_cat.height * 2;
cat_size = 2;
}
// We have to test both mouse up and mouse out since user can
// press mouse and move out. Cat in this case would stay big.
// Also we have to test if cat is already big when user moves in.
blue_cat.addEventListener(MouseEvent.MOUSE_UP, resizeCat2);
blue_cat.addEventListener(MouseEvent.MOUSE_OUT, resizeCat2);
function resizeCat2(event:MouseEvent):void {
if (cat_size > 1)
{
blue_cat.width = blue_cat.width / 2;
blue_cat.height = blue_cat.height / 2;
cat_size = 1;
}
}
/* ---- dragging ---- */
red_cat.addEventListener(MouseEvent.MOUSE_DOWN, startDragging);
red_cat.addEventListener(MouseEvent.MOUSE_UP, stopDragging);
335
ActionScript 3 interactive objects tutorial
function startDragging(event:MouseEvent):void {
red_cat.startDrag();
}
function stopDragging(event:MouseEvent):void {
red_cat.stopDrag();
}
/* ---- Hiding ---- */
// can't see the dog for starters
brown_dog.visible=false;
brown_dog.addEventListener(MouseEvent.CLICK, hideShow);
white_cat.addEventListener(MouseEvent.CLICK, hideShow);
function hideShow(event:MouseEvent):void {
// instead of white_cat.visible = false; we just switch it to the
opposite
white_cat.visible = !white_cat.visible;
brown_dog.visible =!brown_dog.visible;
}
/* ---- transforms ---This is a bit more difficult.... */
empty_cat.addEventListener(MouseEvent.CLICK, transformCatColor);
// R,G,B,A multipliers and R,G,B,A offsets
// We start with a light grey cat
var resultColorTransform = new ColorTransform
(0.1,0.1,0.1,1,120,120,120,255);
empty_cat.transform.colorTransform = resultColorTransform;
function transformCatColor(event:MouseEvent):void {
var resultColorTransform = empty_cat.transform.colorTransform;
// Create a new color transform object and change it
// red color will peak at 255, blue color offset will cycle from
+255 to -100
resultColorTransform.redOffset =
Math.min(resultColorTransform.redOffset+10,255);
resultColorTransform.redMultiplier =
Math.min(resultColorTransform.redMultiplier+0.1,1);
resultColorTransform.blueOffset += 10;
if (resultColorTransform.blueOffset >= 255)
{
resultColorTransform.blueOffset = -100;
}
resultColorTransform.blueMultiplier = 0.1;
336
ActionScript 3 interactive objects tutorial
// Copy that to the cat
empty_cat.transform.colorTransform = resultColorTransform;
//trace("redOffset="+resultColorTransform.redOffset +
//
" blueOffset="+resultColorTransform.blueOffset);
}
/* ---- permanent size change ---- */
grey_mouse.addEventListener(MouseEvent.MOUSE_WHEEL, changeMouse);
function changeMouse(event:MouseEvent):void {
grey_mouse.width += event.delta*3;
grey_mouse.height += event.delta*3;
}
Simple repositioning example with better code
The example of the previous section uses some kind of "baby programmer" code, e.g. the functions only work with
very specific objects and there are many global variables. Somewhat better code will include functions that could
work with any object and avoid using variables.
In the following example you can associate any function with any symbol. E.g. the red cat now can be both dragged
and change size using the mouse wheel. Same of the mouse. The code is also separateed it in two sections. On top,
we define event handlers for objects. An end-user (Flash Designer) could just add his/her own objects and decide
which event handlers to use ....
The (all-in-one) file with the examples we discussed above is here:
actionscript3-simple-object-manipulation2.html [4]
actionscript3-simple-object-manipulation2.fla [5]
Directory with files actionscript3-simple-object-manipulation.*:
http://tecfa.unige.ch/guides/flash/ex6/action-script-3-intro/
/* ------- List of objects and Event handlers ------------- */
// black cat - will move next to his red friend
black_cat.addEventListener(MouseEvent.CLICK, moveIt);
black_cat.friend = red_cat;
// blue cat - will change size on mouse down ;
blue_cat.addEventListener(MouseEvent.MOUSE_DOWN, resizeIt);
// We have to test both mouse up and mouse out since user can;
// press mouse and move out. Cat in this case would stay big.
// Also we have to test if cat is already big when user moves in.
blue_cat.addEventListener(MouseEvent.MOUSE_UP, downsizeIt);
blue_cat.addEventListener(MouseEvent.MOUSE_OUT, downsizeIt);
// red cat and mouse - can be dragged
red_cat.addEventListener(MouseEvent.MOUSE_DOWN, startDragging);
red_cat.addEventListener(MouseEvent.MOUSE_UP, stopDragging);
337
ActionScript 3 interactive objects tutorial
grey_mouse.addEventListener(MouseEvent.MOUSE_DOWN, startDragging);
grey_mouse.addEventListener(MouseEvent.MOUSE_UP, stopDragging);
// dog and cat switch
// can't see the dog for starters
brown_dog.buttonMode = true; // change cursor form here for a change
white_cat.buttonMode = true;
brown_dog.visible = false;
brown_dog.addEventListener(MouseEvent.CLICK, hideShow);
white_cat.addEventListener(MouseEvent.CLICK, hideShow);
white_cat.friend = brown_dog;
brown_dog.friend = white_cat;
// mouse and red cat -- size change with wheel
grey_mouse.addEventListener(MouseEvent.MOUSE_WHEEL, changeSize);
red_cat.addEventListener(MouseEvent.MOUSE_WHEEL, changeSize);
empty_cat.addEventListener(MouseEvent.CLICK, transformCatColor);
// R,G,B,A multipliers and R,G,B,A offsets - we start with a light grey
cat
empty_cat.transform.colorTransform = new
ColorTransform(0.1,0.1,0.1,1,120,120,120,255);
Below is the complete code
/* This example attempts to write more portable code.
Any of the functions will work with any movie symbol.
No more global variables...
*/
/* ------- List of objects and Event handlers ------------- */
// black cat - will move next to his red friend
black_cat.addEventListener(MouseEvent.CLICK, moveIt);
black_cat.friend = red_cat;
// blue cat - will change size on mouse down ;
blue_cat.addEventListener(MouseEvent.MOUSE_DOWN, resizeIt);
// We have to test both mouse up and mouse out since user can;
// press mouse and move out. Cat in this case would stay big.
// Also we have to test if cat is already big when user moves in.
blue_cat.addEventListener(MouseEvent.MOUSE_UP, downsizeIt);
blue_cat.addEventListener(MouseEvent.MOUSE_OUT, downsizeIt);
// red cat and mouse - can be dragged
red_cat.addEventListener(MouseEvent.MOUSE_DOWN, startDragging);
red_cat.addEventListener(MouseEvent.MOUSE_UP, stopDragging);
338
ActionScript 3 interactive objects tutorial
grey_mouse.addEventListener(MouseEvent.MOUSE_DOWN, startDragging);
grey_mouse.addEventListener(MouseEvent.MOUSE_UP, stopDragging);
// dog and cat switch
// can't see the dog for starters
brown_dog.buttonMode = true; // change cursor form here for a change
white_cat.buttonMode = true;
brown_dog.visible = false;
brown_dog.addEventListener(MouseEvent.CLICK, hideShow);
white_cat.addEventListener(MouseEvent.CLICK, hideShow);
white_cat.friend = brown_dog;
brown_dog.friend = white_cat;
// mouse and red cat -- size change with wheel
grey_mouse.addEventListener(MouseEvent.MOUSE_WHEEL, changeSize);
red_cat.addEventListener(MouseEvent.MOUSE_WHEEL, changeSize);
empty_cat.addEventListener(MouseEvent.CLICK, transformCatColor);
// R,G,B,A multipliers and R,G,B,A offsets - we start with a light grey
cat
empty_cat.transform.colorTransform = new
ColorTransform(0.1,0.1,0.1,1,120,120,120,255);
/* ---- moving ---- */
function moveIt(event:MouseEvent):void
{
var obj = event.target;
// initialize original values if necessary (on first pass)
// test if properties ori_ exist, if not create them
if (! ("ori_x" in obj))
{
obj.ori_x = obj.x;
obj.ori_y = obj.y;
obj.buttonMode = true; // for better UX, this could be done
before
}
// Is object in original position ? If so move close to friend
if (obj.ori_x == obj.x)
{
obj.x = obj.friend.x + 50;
obj.y = obj.friend.y - 10;
}
else
339
ActionScript 3 interactive objects tutorial
{
obj.x = obj.ori_x;
obj.y = obj.ori_y;
}
}
/* ---- resizing ---- */
function resizeIt(event:MouseEvent):void
{
var obj = event.target;
// initialize properties if needed
if (! (obj.hasOwnProperty("bigger")) )
{
obj.bigger = false; // remembers its size big or not
obj.buttonMode = true;
}
// make the object bigger
obj.width = obj.width * 2;
obj.height = obj.height * 2;
obj.bigger = true;
}
function downsizeIt(event:MouseEvent):void
{
var obj = event.target;
if (! (obj.hasOwnProperty("bigger")) )
{
obj.bigger = false; // remembers its size big or not
obj.buttonMode = true;
}
// if orginal width is not the same as current, we assume that
it's bigger
// and then divide it by 2
if (obj.bigger == true)
{
obj.width = obj.width / 2;
obj.height = obj.height / 2;
}
}
/* ---- dragging ---- */
function startDragging(event:MouseEvent):void
340
ActionScript 3 interactive objects tutorial
{
var obj = event.target;
obj.startDrag();
}
function stopDragging(event:MouseEvent):void
{
var obj = event.target;
obj.stopDrag();
}
/* ---- Hiding ---- */
function hideShow(event:MouseEvent):void
{
var obj = event.target;
// target becomes invisible
obj.visible = false;
// friend becomes visible
obj.friend.visible = true;
}
/* ---- transforms ---This is a bit more difficult.... */
function transformCatColor(event:MouseEvent):void
{
var obj = event.target;
var resultColorTransform = empty_cat.transform.colorTransform;
// Create a new color transform object and change it
// red color will peak at 255, blue color offset will cycle from
+255 to -100
resultColorTransform.redOffset =
Math.min(resultColorTransform.redOffset + 10,255);
resultColorTransform.redMultiplier =
Math.min(resultColorTransform.redMultiplier + 0.1,1);
resultColorTransform.blueOffset += 10;
if (resultColorTransform.blueOffset >= 255)
{
resultColorTransform.blueOffset = -100;
}
resultColorTransform.blueMultiplier = 0.1;
// Copy that to the cat
obj.transform.colorTransform = resultColorTransform;
//trace("redOffset="+resultColorTransform.redOffset +
//
" blueOffset="+resultColorTransform.blueOffset);
341
ActionScript 3 interactive objects tutorial
}
/* ---- permanent size change with mouse wheel ---- */
function changeSize(event:MouseEvent):void
{
var obj = event.target;
obj.width += event.delta * 3;
obj.height += event.delta * 3;
}
Remote cat control example
Demonstration II of some mouse events and implementation of property changes
Here is another example that demonstrates the following principles:
• You can modify an object's properties from an event triggered on another object (e.g. button components)
• Play an embedded animation
I also simplified the way functions are written, i.e. I ripped off argument type declarations and the return type. This
is not necessarily a good thing, but it should demonstrate to designers that a little bit of ActionScript is not
necessarily very complex ....
The example can be viewed here:
• actionscript3-simple-object-manipulation-buttons.html [6]
342
ActionScript 3 interactive objects tutorial
• Source: actionscript3-simple-object-manipulation-buttons.fla [7]
• Directory:
http://tecfa.unige.ch/guides/flash/ex6/action-script-3-intro/
Here is the complete code: On the stage are several buttons (named like "bigger", "smaller", etc.), a cat movie clip
instance called "cat" and a dog called "brown_dog".
/* ---- moving ---- */
move.addEventListener(MouseEvent.CLICK, moveCat);
// cat can be in original position or not (true,false)
var cat_ori_pos = true;
function moveCat(ev) {
if (cat_ori_pos == true)
{
cat.x += 200;
cat.y += 200;
cat_ori_pos = false;
}
else
{
cat.x -= 200;
cat.y -= 200;
cat_ori_pos = true;
}
}
/* ---- resizing ---- */
bigger.addEventListener(MouseEvent.MOUSE_DOWN, growCat);
function growCat(ev) {
cat.width = cat.width * 2;
cat.height = cat.height * 2;
}
smaller.addEventListener(MouseEvent.MOUSE_DOWN, shrinkCat);
function shrinkCat(ev) {
cat.width = cat.width / 2;
cat.height = cat.height / 2;
}
/* ---- dragging ---- */
cat.buttonMode = true;
cat.addEventListener(MouseEvent.MOUSE_DOWN, startDragging);
cat.addEventListener(MouseEvent.MOUSE_UP, stopDragging);
function startDragging(event:MouseEvent) {
343
ActionScript 3 interactive objects tutorial
cat.startDrag();
}
function stopDragging(event:MouseEvent) {
cat.stopDrag();
}
message_text.visible=false;
instructions.addEventListener(MouseEvent.CLICK, messageText);
function messageText(ev) {
message_text.visible = !message_text.visible;
}
/* ---- Hiding ---- */
// can't see the dog for starters
brown_dog.visible=false;
hide.addEventListener(MouseEvent.CLICK, hideShow);
function hideShow(ev) {
// we just switch visibility to the opposite
cat.visible = !cat.visible;
brown_dog.visible =!brown_dog.visible;
}
/* ----- Playing ---- */
// There is a little problem here. If the cat movie gets bigger, the
motion guide also
// will grow big. Size does not refer to the cats drawing but to the
composite object.
// Changing just the cat requires much more advanced AS.
playcat.addEventListener(MouseEvent.CLICK, playCat);
function playCat(ev) {
// make sure cat is visible
cat.visible = true;
brown_dog.visible = false;
cat.play ();
}
Notice on function definitions:
If you want to write clean AS 3 code, you should define functions like this:
function growCat(ev:MouseEvent):void {
cat.width = cat.width * 2;
cat.height = cat.height * 2;
344
ActionScript 3 interactive objects tutorial
}
The following line
function growCat(ev:MouseEvent):void {
means that we define a function (i.e. a recipe) called growCat. When an event happens, this function will be called
(invoked) and given a mouse event argument to process. We called this argument i.e. the information to process ev
and declared it of type MouseEvent. In our code we actually never use this event information but we could for
instance figure out at what exact position the user clicked. :void means that the function will not return any result.
The function will in fact just modify properties of the cat when the event happens. We do not care about the event
itself ...
If you script in the timeline, this simplified code will also do
function growCat(ev) {
cat.width = cat.width * 2;
cat.height = cat.height * 2;
}
As you can notice, in the above code we use (for demonstration purposes) both the easy "scripting" syntax and the
more object-oriented one you need to adopt if you write external ActionScript code that could be loaded into your
*.fla file.
Stop / start movie clips
You can stop or start an embedded movie clip like this:
movie_clip.start();
movie_clip.stop();
Flying Kite Example
This example is discussed in the Flash embedded movie clip tutorial. Here we just include the AS code snippet that
will allow you to start and stop a movie clip animation with two buttons.
kite.stop();
start_button.addEventListener(MouseEvent.CLICK,start_kite);
stop_button.addEventListener(MouseEvent.CLICK,stop_kite);
function start_kite(event:MouseEvent) {
kite.play();
}
function stop_kite(event:MouseEvent) {
kite.stop();
}
kite-movie.html [1]
Source: kite-movie.fla [2]
Directory: http://tecfa.unige.ch/guides/flash/ex6/embedded-movie-clips/ [3]
345
ActionScript 3 interactive objects tutorial
Dealing with keypress events
Flash lets you intercept key presses in the same way you can intercept and deal with mouse clicks. There are some
subtle differences though and I find key press events more difficult to deal with because figuring out how Flash
focuses on buttons is a bit tricky.
Moving an object with arrow keys example
The goal is to implement some code that lets you move around an object with the left/right/up/down arrow keys.
The basic event handling code is very much the same as for buttons:
instance_of_symbol.addEventListener(KeyboardEvent.KEY_DOWN,
key_even_handler);
function key_event_handler(event:KeyboardEvent):void {
move_it .....
}
The following example is based on the assumption that somewhere on the stage you have a sprite, e.g. a movie clip
or a component button that is called missile and that you want to be able to move it around with around with the
arrow keys.
You need to implement the following things
• A event listener registration like we just explained.
• Tell the stage to focus on the missile
stage.focus = missile;
• The event handler function has to decide what to do with which key.
Let's look at a clause of the switch statement like the following one.
case Keyboard.LEFT :
missile.x -= big_step;
break;
This means the following: If the user presses the left arrow key, then we will change the "x" (horizontal) position of
the missile to x minus big_step (set to 9). So if the missile was in position x=100, after a mouse press event it will be
in position x=91.
// how many pixels to move left/right
var big_step = 9;
// Put initial focus on missile
// Focus will change when user clicks on another object (so don't)
stage.focus = missile;
missile.addEventListener(KeyboardEvent.KEY_DOWN, missile_control);
function missile_control(event:KeyboardEvent):void {
var key = event.keyCode;
switch (key) {
case Keyboard.LEFT :
346
ActionScript 3 interactive objects tutorial
missile.x -= big_step;
break;
case Keyboard.RIGHT :
missile.x += big_step;
break;
case Keyboard.UP :
missile.y -= big_step;
break;
case Keyboard.DOWN :
missile.y += big_step;
break;
}
}
Here is an alternative take of the same code. The difference is that the code that will move the missile also will work
for an other object, e.g. a button. The following fragment will ask from the event on which target (e.g. the missile) it
was used and then move the target.
// how many pixels to move left/right
var big_step = 9;
// User clicked on missile
// Put initial focus on missile
// Focus will change when user clicks on another object (so don't)
stage.focus = missile;
missile.addEventListener(KeyboardEvent.KEY_DOWN, missile_control);
function missile_control(event:KeyboardEvent):void {
var key = event.keyCode;
var target = event.target;
// trace(event + "CODE=" + event.keyCode);
switch (key) {
case Keyboard.LEFT :
target.x -= big_step;
break;
case Keyboard.RIGHT :
target.x += big_step;
break;
case Keyboard.UP :
target.y -= big_step;
break;; Learning goals:
case Keyboard.DOWN :
target.y += big_step;
break;
}
}
347
ActionScript 3 interactive objects tutorial
Sadly, this example will not work in a web browser, only in the Flash player. The missile will never receive focus.
So it's probably a good idea to move to the next example.
Example code:
•
•
•
•
actionscript3-keypress-move-0.html [8]
actionscript3-keypress-move-0.swf [9]
Source: actionscript3-keypress-move-0.fla [10]
Directory: http://tecfa.unige.ch/guides/flash/ex6/action-script-3-intro/
Dealing with the tab list problem
Flash has the feature that when you press an arrow up/left/right key it will by default move the focus on the next
button. In order to inhibit this behavior I found that I had to add some extra code which is below. I don't guarantee
that this is the most simple solution.
/* ActionScript for timeline scripting
Shows how to move around a flash movie with key-presses and not
loose focus
Works ONLY if you have 2 objects on the stage:
* A movie clip instance called "missile"
* A button component instance called "button"
*/
// FocusManager package has to be imported.
import fl.managers.FocusManager;
// how many pixels to move left/right
var big_step = 9;// User clicked on missile
/* If you have buttons in addition to missile on stage, then the
the missile will not work as expected, i.e. it will loose focus.
Extra code needed is: Tell the missile it's a button and put it on the
list of "tab" buttons and also some code to put it in focus when the
user clicks on it.
*/
// Create a focus manager. Will help to set us the right focus
var manager = new FocusManager(this);
// Put initial focus on missile
// since focus will change when user clicks on another object
// stage.focus = missile; // works also in principle
manager.setFocus(missile);
// The line below is absolutely bloody vital. Missile must be on the
// "tab" list, else focus will move to the button when key is hold down
missile.tabEnabled = true;
missile.buttonMode = true;
348
ActionScript 3 interactive objects tutorial
// The missile will listen to a mouse click we will use to put focus on
it again.
missile.addEventListener(MouseEvent.CLICK, change_focus);
function change_focus(ev:MouseEvent) {
manager.setFocus(missile);
// stage.focus = missile;
}
/* Managing keyboard events
We register keyboard events for missile and the button component. The
listener function is the same for both. The move_it function will ask
the
target over which key was pressed who it is and then move it
*/
missile.addEventListener(KeyboardEvent.KEY_DOWN, missile_control);
button.addEventListener(KeyboardEvent.KEY_DOWN, missile_control);
function missile_control(event:KeyboardEvent):void {
move_it(event);
}
function move_it(event) {
var key = event.keyCode;
var target = event.target;
// trace(event + "CODE=" + event.keyCode);
switch (key) {
case Keyboard.LEFT :
target.x -= big_step;
break;
case Keyboard.RIGHT :
target.x += big_step;
break;
case Keyboard.UP :
target.y -= big_step;
break;
case Keyboard.DOWN :
target.y += big_step;
break;
}
}
349
ActionScript 3 interactive objects tutorial
Moving a Missile with key presses
Example code:
• actionscript3-keypress-move-1.html [11]
• Source: actionscript3-keypress-move-1.fla [12]
• Directory: http://tecfa.unige.ch/guides/flash/ex6/action-script-3-intro/
Note: This code is not optimal for gaming, since Flash has to wait for each key press event that the keyboard will
send in order to move the missile one more step. It's probably a better idea to have the rocket keep moving as long as
there isn't any keyUP event, but this requires more coding.
Using the missile
Getting some revenge on your teacher ....
• actionscript3-keypress-move.fla [13]
• actionscript3-keypress-move.html [14]
Properties of the keyDown event
The keyDown event is dispatched when the user presses a key. The most important properties you may use are:
•
•
•
•
•
keyCode (a special code for the key, used above)
charCode (the character code value)
ctrlKey, shiftKey (know if either one of these has been pressed too)
target (the target in focus over which a key has been pressed, used above).
currentTarget (object that is processing the key event)
KeyCodes are represented as numbers or constants. I prefer to use constants.
• See the Keyboard [15] class documentation at Adobe.
So instead of using something like:
if (key == 37) ...
use
if (key === Keyboard.LEFT) ....
350
ActionScript 3 interactive objects tutorial
351
Summary of essential events and action script tricks
Let's summarize a few events and actionscript tricks that might be useful for starters and that should not be very
difficult to use.
Events
Here is a short summary of mouse events that can be intercepted by a registered event handler for a given object. So
these events are only useful if you define both an event handler function and register it with an object. In the
following example "cat" is an interactive object, e.g. a movie clip symbol with which we shall register a function for
a mouse down event.
cat.addEventListener(MouseEvent.MOUSE_DOWN, resizeCat);
function resizeCat(event:MouseEvent) {
cat.width = blue_cat.width * 2;
}
MouseEvent.MOUSE_DOWN
User holds mouse button down over the object
MouseEvent.MOUSE_UP
User releases mouse button
MouseEvent.MOUSE_OUT
User moves mouse away from the object
MouseEvent.MOUSE_WHEEL User turns mouse wheel
MouseEvent.MOUSE_OVER
User moves mouse over the object
MouseEvent.CLICK
User clicks on object
Note: Technically speaking these are actually event properties (see the ActionScript 3 event handling tutorial if you
want to know more).
ActionScript tricks
Playing movie clips: Movie clips symbols are embedded Flash animations.
• To edit: Double click on the symbol on the stage (to see the context) or in the library (to work with an empty
background)
• To create
• CTRL-F8 to create a new empty movie clip
• Right-click->Create Movie Symbol; 'Movie Clip on a graphic to transform it
• To play an stop a movie clip instance called "movie_books"
movie_books.stop();
movie_books.play();
Making objects visible/invisible, works with any display object but you should work with an object that you can
name, i.e. a symbol instance.
• If you have an object called cat:
cat.visible = true;
cat.visible = false;
Moving position of an object, works with any display object
ActionScript 3 interactive objects tutorial
• If you have an object called cat you can set both its x and y position. x starts from the left and y means "down".
Therefore, x=0 y=0 means the upper left corner of the stage.
Example - position cat at x is 100 and y is 200 pixels:
cat.x = 100; cat.y = 200;
Example - add 50 px to cat's current position
cat.x += 50; cat.y += 50;
Resize an object, works with any display object
• If you have an object called cat:
Example, cat will be 100 px wide and 120px tall
cat.width = 100;
cat.height = 120;
Example, cat will double its size. Expression below means, set cat.width to old cat.width times 2.
cat.width = cat.width * 2;
cat.height = cat.height * 2;
Dragging an object, works with any interactive object
• If you have an object called cat, you can start/stop dragging. Usually these are bound to MOUSE_DOWN and
MOUSE_UP.
cat.startDrag();
cat.stopDrag();
Moving around in the timeline. You can either go to a frame and play it (until it encounters a stop) or go there and
stop.
If you want to go to frame 12 of the same scene:
gotoAndPlay(12);
gotoAndStop(12);
If you want to go to frame 13 of a scene called "test":
gotoAndPlay(13,"test");
gotoAndStop(13,"test");
Tweening and interactivity self-revision examples
Examples from an exam (to be improved and documented at some point)
2007 Exam
• Frame 1 (home): Buttons should not lead you to frame 1 (home), but to the various other keyframes. Also add
your name.
• Frame 2 (Sailing): (a) Play the tween animation of boat with the 'what's going on here' button. (b) BONUS Point:
Create and play a motion animation of a plane.
• Frame 3 (Driving): (a) Create an animation that will start moving the car from right to left and slightly forward
too (i.e. keep it on the road). To animate the car edit the 'old car' symbol and make it a motion tween. Then link it
352
ActionScript 3 interactive objects tutorial
to the what's going on here button (b) BONUS Point: Do something with the yellow car.
• Frame 4 (Island): (a) Make the trees visible when the user clicks on the what's going on button. (b) BONUS point:
Improve the frame-by-frame animation of the big tree.
• Frame 5 (Rocket): (a) Write code that will launch the rocket. (b) BONUS: Do something with the snakes
Tip: For starters, you can navigate with the little button on top right. Do not edit layer one !
•
•
•
•
final-exam-coap2110-solution-2007.html [14] (look at the solution first)
Source exam file: final-exam-coap2110-2007.fla [4] (download this and try reproduce the solution)
Source solution: final-exam-coap2110-solution-2007.fla [16] (if you are stuck)
Directory: http://tecfa.unige.ch/guides/flash/ex/exams2007/
2008 Exam
•
•
•
•
final-coap2110-2008-SOLUTION.html [17] Look at the solution first
Read the exam tasks [18] (PDF file)
Source exam file: final-coap2110-2008.fla [19] (download this and try to "do the exam" according to instructions)
Source solution: final-coap2110-2008-SOLUTION.fla [20] (if you are stuck)
Links
Important manual pages
The Actionscript manual [21] at Adobe is almost impossible to understand for non programmers, but other than that,
the ActionScript documentation at Adobe is excellent. Beginners can at least figure out property names and some
easy to use methods...
• InteractiveObject [22]. This InteractiveObject class is the abstract base class for all display objects with which the
user can interact, using the mouse and keyboard. Most Events are documented here. (Make sure to list also the
inherited events).
• Movie clip [23] (this subclass adds properties and methods for timeline scripting)
• DisplayObject [24]. Describes the display object, e.g. properties you can change. Note that there are additional
properties for each specific kind of object, i.e. see the class hierarchy described in the Flash ActionScript 3
Overview.
Clip Art
• Free Clip Art [2]. Original cat and dog
• Open Clip Art Library [4]. The grey mouse and the original rocket.
References
[1]
[2]
[3]
[4]
[5]
[6]
[7]
[8]
[9]
http:/ / tecfa. unige. ch/ guides/ flash/ ex6/ action-script-3-intro/ actionscript3-simple-object-manipulation. html
http:/ / tecfa. unige. ch/ guides/ flash/ ex6/ action-script-3-intro/ actionscript3-simple-object-manipulation. fla
http:/ / livedocs. adobe. com/ flash/ 9. 0/ ActionScriptLangRefV3/ flash/ geom/ ColorTransform. html
http:/ / tecfa. unige. ch/ guides/ flash/ ex6/ action-script-3-intro/ actionscript3-simple-object-manipulation2. html
http:/ / tecfa. unige. ch/ guides/ flash/ ex6/ action-script-3-intro/ actionscript3-simple-object-manipulation2. fla
http:/ / tecfa. unige. ch/ guides/ flash/ ex6/ action-script-3-intro/ actionscript3-simple-object-manipulation-buttons. html
http:/ / tecfa. unige. ch/ guides/ flash/ ex6/ action-script-3-intro/ actionscript3-simple-object-manipulation-buttons. fla
http:/ / tecfa. unige. ch/ guides/ flash/ ex6/ action-script-3-intro/ actionscript3-keypress-move-0. html
http:/ / tecfa. unige. ch/ guides/ flash/ ex6/ action-script-3-intro/ actionscript3-keypress-move-0. swf
[10] http:/ / tecfa. unige. ch/ guides/ flash/ ex6/ action-script-3-intro/ actionscript3-keypress-move-0. fla
[11] http:/ / tecfa. unige. ch/ guides/ flash/ ex6/ action-script-3-intro/ actionscript3-keypress-move-1. html
[12] http:/ / tecfa. unige. ch/ guides/ flash/ ex6/ action-script-3-intro/ actionscript3-keypress-move-1. fla
353
ActionScript 3 interactive objects tutorial
[13]
[14]
[15]
[16]
[17]
[18]
[19]
[20]
[21]
[22]
[23]
[24]
http:/ / tecfa. unige. ch/ guides/ flash/ ex6/ action-script-3-intro/ actionscript3-keypress-move. fla
http:/ / tecfa. unige. ch/ guides/ flash/ ex6/ action-script-3-intro/ actionscript3-keypress-move. html
http:/ / livedocs. adobe. com/ flash/ 9. 0/ ActionScriptLangRefV3/ flash/ ui/ Keyboard. html
http:/ / tecfa. unige. ch/ guides/ flash/ ex/ exams2007/ final-exam-coap2110-solution-2007. fla
http:/ / tecfa. unige. ch/ guides/ flash/ ex/ exams2008/ final-coap2110-2008-SOLUTION. html
http:/ / tecfa. unige. ch/ guides/ flash/ ex/ exams2008/ final-coap2110-2008-handout. pdf
http:/ / tecfa. unige. ch/ guides/ flash/ ex/ exams2008/ final-coap2110-2008. fla
http:/ / tecfa. unige. ch/ guides/ flash/ ex/ exams2008/ final-coap2110-2008-SOLUTION. fla
http:/ / help. adobe. com/ en_US/ FlashPlatform/ reference/ actionscript/ 3/ index. html?filter_flashplayer=11. 6#
http:/ / help. adobe. com/ en_US/ FlashPlatform/ reference/ actionscript/ 3/ flash/ display/ InteractiveObject. html
http:/ / help. adobe. com/ en_US/ FlashPlatform/ reference/ actionscript/ 3/ flash/ display/ MovieClip. html
http:/ / help. adobe. com/ en_US/ FlashPlatform/ reference/ actionscript/ 3/ flash/ display/ DisplayObject. html
ActionScript 3 event handling tutorial
Draft
Overview
Learning goals
Learn some essentials of the event handling model of Flash 9 (CS3) / ActionScript 3.
Learn some Action Script 3 (to be used within the Flash IDE)
Prerequisites
Flash CS3 desktop tutorial
Flash drawing tutorial
Flash button tutorial
Flash components tutorial
Moving on
ActionScript 3 interactive objects tutorial (you also may directly read this piece)
The Flash article has a list of other tutorials.
Quality
This text should technical people get going and may not be good enough for self-learning beginners. It can be
used as handout in a "hands-on" class. That is what Daniel K. Schneider made it for...
Level
It aims at Flash design beginners, not beginning ActionScript 3 programmers, although programmers can read
this to get a quick overview before digging into a real documentation like Adobe's Flash 9 reference manual [5]
Learning materials
Grab the various *.fla files from here:
http://tecfa.unige.ch/guides/flash/ex/action-script-3-intro/
354
ActionScript 3 event handling tutorial
Introduction
According to the Flash CS3 documentation [1], retrieved 12:43, 7 September 2007 (MEST):
Every component broadcasts events when a user interacts with it. When a user clicks a Button, for example, it
dispatches a MouseEvent.CLICK event and when a user selects an item in a List, the List dispatches an
Event.CHANGE event. An event can also occur when something significant happens to a component such as when
content finishes loading for a UILoader instance, generating an Event.COMPLETE event. To handle an event, you
write ActionScript code that executes when the event occurs.
Below a few basic principles
Principles of event driven programming
Events are detected by some object
Usually, events are broadcasted by an instance of an interactive object, typically a graphic on the screen that is a
symbol instance. User interactions are, technically speaking, events generated by Flash objects. You then have to
write code that can deal with these events. Firstly you must give a name to each symbol instance, users interact with.
Otherwise your AS code can't find them.
• So before you code anything in ActionScript that deals with events generated by some user interaction with an
object, click on this instance, open the parameters window and fill in label parameter.
This name must be legal:
• Start the label name with a letter
• Do not use whitespaces or punctuation characters or dashes
ActionScript for Flash designers
All ActionScript goes to the timeline
• Always put AS code into a separate layer, e.g. call it "Action"
• Note: AS2 also would allow you to attach code to instances. You can't do this.
Action script code extends to frames in the same way as drawings
E.g. if you want the user to interact with buttons after the animation loads:
• Click on frame 1 of the "Action" layer
• Hit F9, then code :)
Code will only work within the frames the layer extends to. So if your code is supposed to be valid throughout the
animation.
• Go to the last frame in your timeline
• Hit F5
Event registration
For each event (user action or something else) you would like to intercept, you must register a so-called event
listener function.
The syntax is the following:
addEventListener(Type_of_event.Name_of_event, Name_of_function_YOU_define);
Example:
• Let's say you have a button instance. In the parameters panel you named it hello_button.
355
ActionScript 3 event handling tutorial
• If you want to tell the button to watch out for user clicks then you have to write something like to register the
event with a function (see below).
• So goto the ActionScript layer and hit F9. Then type:
hello_button.addEventListener(MouseEvent.CLICK, click_handler);
Programmers (only): You should be aware that a a component's events inherit from the parent classes. You also can
remove a listener with the removeEventListener(). Also the correct explanation is "Registers an event listener object
with an EventDispatcher object so that the listener receives notification of an event".
The event object
Let's recall that when an event happens, Flash will create an object that will be sent to the registered function. This
object contains at least the following information:
type - a string indicating the type of event
target - the instance that sent the event (i.e. a reference to it).
Since target refers to an object you then can also extract information about the target, e.g. its label (if it has one).
The Event handler function
The event handler function (also called a callback function) will be called by Flash as soon as the event happens.
Think a function as a kind of recipe that will do something with a given event. This function that you have to define
yourself will receive the following information:
• A single event object (just described before) that will contain information about the event type and the instance
(e.g. the hello_button in our case).
• In other words, the function will know "what" happened and "where".
Now you must write some code that deals with it, e.g. moves to playhead in the timeline to another frame.
Note: about multiple events and multiple listeners:
• You can register multiple listeners to one instance.
• You can register the same listener to multiple instances.
After you registered an event handling function like
hello_button.addEventListener(MouseEvent.CLICK, click_handler);
you then have to define this function. E.g. if we called our function click_handler we get the following template:
function click_handler(event_object:MouseEvent) {
/* Do something with this event */
}
event_object is a parameter name (we came up with) and that will contain a representation of the event and that
includes a reference to the instance on which the user clicked, e.g. the 'hello_button in our case.
A simple example
From the Flash button tutorial. When a user clicks on the "launch_button", then the launchRocket function is called.
It will move the animation to Frame 2 and let it play.
launch_button.addEventListener(MouseEvent.CLICK,launchRocket);
function launchRocket(event:MouseEvent) { gotoAndPlay(2); }
356
ActionScript 3 event handling tutorial
An example
This is the copy/pasted example from the Flash components tutorial.
We first register an event handling function with five different buttons.
btn_rainbow.addEventListener(MouseEvent.CLICK, clickHandler);
btn_tecfa.addEventListener(MouseEvent.CLICK, clickHandler);
btn_bosses.addEventListener(MouseEvent.CLICK, clickHandler);
btn_my_computers.addEventListener(MouseEvent.CLICK, clickHandler);
btn_credits.addEventListener(MouseEvent.CLICK, clickHandler);
The function itself looked like this:
function clickHandler(event:MouseEvent):void {
switch (event.currentTarget.label)
{
case "Rainbow" :
gotoAndStop(2);
break;
case "TECFA" :
gotoAndStop(3);
break;
case "Bosses" :
gotoAndStop(4);
break;
case "My computers" :
gotoAndStop(5);
break;
case "Credits" :
gotoAndStop(6);
break;
}
}
The function will receive an object that contains information about the event.
Let's now look at the first line. What does it mean ?
function clickHandler(event:MouseEvent):void {
• The function is called clickHandler (we can give it any name we like)
• The event object it will receive for processing when something happens is associated with event. In more
technical terms event is a parameter that you can use as a variable in subsequent code.
• MouseEvent is the type of the event variable and we should declare this.
• :void means that the function will not return any information.
Non-programmers: Just insert these last two elements the same way and don't worry.
Note: Flash also allows Flash designers who typically just insert little bits of code to ignore typing, e.g. you just
could write:
function clickHandler(event)
but this is considered bad practice, it makes your program less secure.
357
ActionScript 3 event handling tutorial
358
switch is a programming statement that is use to organize program flow. In other words, we need to take different
action for different user input. Its syntax is the following:
switch (value) {
case value_1 :
/* do something */
break;
case value_2 :
/* do something */
break;
....
}
So event.currentTarget.label means that we ask the event object event its current target (i.e. the button on which the
user clicked) and from this its label (i.e. what the user sees). This will allow us to figure out which button was
clicked.
Events obverview
All display objects with which you can interact can produce events: mouse, keyboard, and focus.
• InteractiveObject [9] (Adope ActionScript 3.0 Language and Components Reference)
List of events
Here is a short list of all (most?) events that can be generated by interactive objects with which a user can interact
through mouse, keyboard, and the more general concept of focus. It also includes loading/modification events like
animation entering a frame or an object being inserted to the stage.
For (very) technical information, consult in Adope ActionScript 3.0 Language and Components Reference:
InteractiveObject [9] (see also its subclasses) and Event [4] (and subpages like MouseEvent [2])
Here is a list of events and mouse/keyboard/focus event properties:
Event
Description
Happens in
target
Event property
activate
Dispatched when Flash Player gains operating system focus
and becomes active.
EventDispatcher
added
Dispatched when a display object is added to the display list.
DisplayObject
addedToStage
Dispatched when a display object is added to the on stage
DisplayObject
display list, either directly or through the addition of a sub tree
in which the display object is contained.
click
Dispatched when a user presses and releases the main button
of the user's pointing device over the same InteractiveObject.
InteractiveObject MouseEvent.CLICK
deactivate
Dispatched when Flash Player loses operating system focus
and is becoming inactive.
EventDispatcher
doubleClick
Dispatched when a user presses and releases the main button
of a pointing device twice in rapid succession over the same
InteractiveObject when that object's doubleClickEnabled flag
is set to true.
InteractiveObject MouseEvent.DOUBLE_CLICK
enterFrame
Dispatched when the playhead is entering a new frame.
DisplayObject
focusIn
Dispatched after a display object gains focus.
InteractiveObject FocusEvent.FOCUS_IN
ActionScript 3 event handling tutorial
359
focusOut
Dispatched after a display object loses focus.
InteractiveObject FocusEvent.FOCUS_OUT
keyDown
Dispatched when the user presses a key.
InteractiveObject KeyboardEvent.KEY_DOWN
keyFocusChange
Dispatched when the user attempts to change focus by using
keyboard navigation.
InteractiveObject FocusEvent.KEY_FOCUS_CHANGE
keyUp
Dispatched when the user releases a key.
InteractiveObject KeyboardEvent.KEY_UP
mouseDown
Dispatched when a user presses the pointing device button
InteractiveObject MouseEvent.MOUSE_DOWN
over an InteractiveObject instance in the Flash Player window.
mouseFocusChange Dispatched when the user attempts to change focus by using a
pointer device.
InteractiveObject FocusEvent.MOUSE_FOCUS_CHANGE
mouseMove
Dispatched when a user moves the pointing device while it is
over an InteractiveObject.
InteractiveObject MouseEvent.MOUSE_MOVE
mouseOut
Dispatched when the user moves a pointing device away from
an InteractiveObject instance.
InteractiveObject MouseEvent.MOUSE_OUT
mouseOver
Dispatched when the user moves a pointing device over an
InteractiveObject instance in the Flash Player window.
InteractiveObject MouseEvent.MOUSE_OVER
mouseUp
Dispatched when a user releases the pointing device button
InteractiveObject MouseEvent.MOUSE_UP
over an InteractiveObject instance in the Flash Player window.
mouseWheel
Dispatched when a mouse wheel is spun over an
InteractiveObject instance in the Flash Player window.
removed
Dispatched when a display object is about to be removed from DisplayObject
the display list.
InteractiveObject MouseEvent.MOUSE_WHEEL
removedFromStage Dispatched when a display object is about to be removed from DisplayObject
the display list, either directly or through the removal of a sub
tree in which the display object is contained.
render
Dispatched when the display list is about to be updated and
rendered.
DisplayObject
rollOut
Dispatched when the user moves a pointing device away from
an InteractiveObject instance.
InteractiveObject MouseEvent.ROLL_OUT
rollOver
Dispatched when the user moves a pointing device over an
InteractiveObject instance.
InteractiveObject MouseEvent.ROLL_OVER
tabChildrenChange
Dispatched when the value of the object's tabChildren flag
changes.
InteractiveObject Event.TAB_CHILDREN_CHANGE
tabEnabledChange
Dispatched when the object's tabEnabled flag changes.
InteractiveObject Event.TAB_ENABLED_CHANGE
tabIndexChange
Dispatched when the value of the object's tabIndex property
changes.
InteractiveObject Event.TAB_INDEX_CHANGE
ActionScript 3 event handling tutorial
360
Events decomposed
Each generated event contains different information, but some is inherited by all kinds of events:
All events
Technical note: The basic event class includes total (included inherited ) 8 properties, 26 constants and 13 public
methods.
The most interesting property of an event is
• currentTarget, the object that is actively processing the Event object with an event listener. E.g. the button on
which a user clicked. You probably will use this one a lot.
Now let's look at mouse events. Flash defines 10 different types of mouse events (see the event overview table
above). Each of these events contains extra information the may be useful. Let's have a look at the click event ojbect
(as defined in the Adobe [3] reference manual. This object conatins about 12 different properties that describe the
event.
Property
Value
bubbles
true
buttonDown
true if the primary mouse button is pressed; false otherwise.
cancelable
false; there is no default behavior to cancel.
ctrlKey
true if the Control key is active; false if it is inactive.
currentTarget The object that is actively processing the Event object with an event listener.
localX
The horizontal coordinate at which the event occurred relative to the containing sprite.
localY
The vertical coordinate at which the event occurred relative to the containing sprite.
shiftKey
true if the Shift key is active; false if it is inactive.
stageX
The horizontal coordinate at which the event occurred in global stage coordinates.
stageY
The vertical coordinate at which the event occurred in global stage coordinates.
target
The InteractiveObject instance under the pointing device. The target is notalways the object in the display list that registered the
event listener. Use the currentTarget property to access the object in the display list that is currently processing the event.
What this technical documentation means is that we can extract extra information from the generated event object,
e.g.
• if the user pressed the CTRL or SHIFT key
• where the target object sits, either relative to the stage or relative to a parent object.
• Of course, we also can extract the target itself, since a Mouse Click Event is a kind of general Event described
above.
ActionScript 3 event handling tutorial
Event propagation and bubbling
(to do, see http://www.adobe.com/devnet/actionscript/articles/event_handling_as3_03.html for now ...)
Links
Tutorials
• Introduction to event handling in ActionScript 3.0 [4] by Trevor McCauley, Adobe Developer Connection (good
tutorial)
Important manual pages
These are almost impossible to understand for non programmers, but otherwise the documentation at Adobe is
excellent.
• InteractiveObject [9]. This InteractiveObject class is the abstract base class for all display objects with which the
user can interact, using the mouse and keyboard. Most Events are documented here. (Make sure to list also the
inherited events).
• Event [4]. The Event class is used as the base class for the creation of Event objects, which are passed as
parameters to event listeners when an event occurs.
• EventDispatcher [11]. This is the page you should consult when you want to look up details for methods like
addEventListener().
• Summary of All Flash Player Classes [5],
References
[1] http:/ / livedocs. adobe. com/ flash/ 9. 0/ main/ wwhelp/ wwhimpl/ common/ html/ wwhelp. htm?context=LiveDocs_Parts& file=00000397.
html#wp124974
[2] http:/ / livedocs. adobe. com/ flash/ 9. 0/ ActionScriptLangRefV3/ flash/ events/ MouseEvent. html
[3] http:/ / livedocs. adobe. com/ flash/ 9. 0/ ActionScriptLangRefV3/ flash/ events/ MouseEvent. html#CLICK
[4] http:/ / www. adobe. com/ devnet/ actionscript/ articles/ event_handling_as3. html
[5] http:/ / livedocs. adobe. com/ flash/ 9. 0/ ActionScriptLangRefV3/ class-summary. html
361
362
Working with ActionScript libraries
Flash ActionScript 3 overview
Draft
ActionScript 3 overview information
This is part of the Flash and ActionScript series of articles. But it is not a tutorial. The purpose of this entry is to
provide some general information about ActionScript and some useful links.
See also:
• The entry page for AS3 tutorials in this wiki is Actionscript 3.
• Flash and AS3 links - general
• Flash and AS3 links - tutorials
• Flash and AS3 links - documentation (Flash and AS3 Books, Reference Manuals and Cheatsheets)
• Flash and AS3 links - toolkits (AS 3 Toolkits, Libraries, Flash reusable components, AS 3 reusable code, etc.)
Introduction - Writing and using AS Code
“ActionScript 3.0 is a dialect of ECMAScript which formalizes the features of ActionScript 2.0, adds the capabilities
of ECMAScript for XML (E4X), and unifies the language into a coherent whole.” (Grossman, 2006). ActionScript 3
was built on a proposal for ECMAScript 4.0 that then got rejected or stalled. Read Mike Chambers' piece on
ActionScript 3 and ECMAScript 4 [1].
Basically, there are two different ways of using ActionScript 3. Each has sub variants:
1. Within a Flash CS3 environment:
• Use the Flash CS3 environment more or less as "in the ActionScript 2" way, i.e. you add bits of code to certain
frames and that refer to objects in the library and/or on the stage.
• Write action code with a class structure in a file, then import to a frame through the properties panel.
• Write your code in a file and compile it (you also may use Flash CS3 that way). No drawings, just code !
2. Within an Adobe Flex environment: Flex is a framework introduced by Adobe that also compiles into swf files.
Flex is meant to make it easier to conceive rich Internet applications that contain a variety of interactive interface
elements (buttons, textfields, lists of images, etc.). The Flex SDK [2] is free to use but lives in a command line
environment. Flex Builder [3] provides a visual development environment. It is free for students and educators
starting (upon request).
• Use the actionscript compiler bundled in the Flex framework to compile AS3 files. See also our own Adobe Flex
installation tips and AS3 Compiling a program
• Write a Minimal MXML application that contains little else than a call to a main function. An example of this can
be found in Minimal MXML example by Moock [4].
• Write a Flex/MXML document that includes a script element. The use of actionscript within a <mx:Script> tag is
explained in the Flex Language Reference [5] or this blog post on Using ActionScript in Flex applications [6]
Flash ActionScript 3 overview
Using ActionScript like a Flash Designer
• Create a new layer
• Click on a frame (typically frame 1)
• Hit F9, the copy/paste or write your code
This is the way most of the Flash examples made in our tutorials were made
Scripting in the timeline does not require from you to use classes. However, sometimes you need to import packages,
i.e. when Flash whines that it can't find a method. Examples are:
import Fl.managers.FocusManager; // to work with keypress events
import fl.video.MetadataEvent; // to work with cue points in flv videos
Using ActionScript classes in CS3
Most examples in the official Using ActionScript 3.0 Components [35] and ActionScript 3.0 Language and
Components Reference [5] are made with a class structure and require that you learn this (read also Using examples
in the ActionScript 3.0 Language Reference [7]):
1. Write code in a AS file and give the file the same name as the primary class (for example:
ContextMenuExample.as).
2. Create and save a new empty FLA file in the same directory as the AS file.
3. In the Properties tab of the Property inspector enter the class name of the primary class for the example in the
Document class text box (for example: ContextMenuExample).
4. Save your changes to the FLA file.
Note for Flash designers: Some of the code in the Flash doc can be simplified to work with the "timeline scripting
method". Other code can not and you do have to code with a "class structure".
Stand-alone AS3 code development / SDK and editors
You do not need to buy Flash CS3 (that's actually a cool thing) to program in AS3 and to create *.swf files. You can
either use:
• Flex Builder - a commercial Eclipse plugin available from Adobe [8] (free for education upon request).
• Just the Flex SDK [8] together with a "normal" programming editor.
In addition you may use MXML, an XML-based user interface markup language.
Read how to install the Flex Framework.
Using the compiler
• Just type something like:
mxmlc HelloWorld.as
.... This will make an *.swf file
Development support other than Eclipse
If you find IDEs (.e. the Flash builder) too hard to use you can find editors with ActionScript support or at least
syntax support for JavaScript/Java, e.g.
• Flashdevelop [30]
• Emacs (read this if you know about Emacs)
• JEdit [9]. You can use the Java beautifier, but you may have to find the plugins with google and install manually.
Btw. JEdit also has a wikipedia mode)
• If configuring and learning Flashdevelop, Emacs, JEDIT etc appears too complex to master, a very easy to use
editor in Unix/Linux environments is pico [10] (but you will not get any syntax support). See text editor article in
363
Flash ActionScript 3 overview
this wiki for a discussion/presentation of some editing software.
• Finally, you also can use the CS3/Flash ActionScript editor if you own this package.
The class hierarchy
At the origin, there is the Object [12]. It has many subclasses (about 151 I'd say).
EventDispatcher
EventDispatcher implements is the base class for the DisplayObject class, i.e. all displayed objects. It is a direct child
of Object and has 29 subclasses. A few are:
•
•
•
•
•
DisplayObject [10] (see below)
NetStream NetStream [11] (use to deal with streaming connections)
Sound [12] (use to load/play external sound)
SoundChannel [12] (control sound)
Timer [13] (use for time-based animation)
The DisplayObject
The ActionScript 3.0 flash.display package defines a whole lot of different kinds of visual objects that can appear in
the Flash Player. DisplayObject is a child of EventDispatcher, child of Object
Below is summary table of AS3 / Flash 9 / CS3 interactive display objects (not covering Flex). It shows that
interactive objects are defined as hierarchical classes. Methods and properties that work for a parent class (e.g.
Sprite) also will work for its child classes (e.g. UIComponent). Links point to the technical reference manual at
Adobe. Please note that the graphics are defined by very different classes. Graphics are inserted into the graphics
properties of display objects.
• DisplayObject [10], see also Core display classes [14] overview.
1. InteractiveObject [9] (base class for all interactive objects)
1. DisplayObjectContainer [8]
1. Loader [15]: Class for loading objects (Bitmaps, AS3 Sprites or Movieclips, or AS 1/2 AVM1Movie).
2. Sprite [7]: Manipulable container of objects
1.
2.
3.
4.
MovieClip [16]: refers to a movie clip symbol created in the Flash authoring tool.
FLVPlayback [17] FLVPlayback] (CS3 only)
FLVPlaybackCaptioning [18] (CS3 only)
UIComponent [36] (only in CS3, Flex has equivalent MXML classes)
1. BaseButton [19]
2. BaseScrollPane [20]
3. ColorPicker [21]
4. ComboBox [21]
5. IndeterminateBar [22]
6. Label [23]
7. NumericStepper [16]
8. ProgressBar [24]
9. ScrollBar [25]
10. Slider [18]
11. TextArea [12]
12. TextInput [26]
13. UILoader [27]
364
Flash ActionScript 3 overview
2.
3.
4.
5.
6.
7.
3. Stage [28]
2. SimpleButton [29]
3. TextField [14]
AVM1Movie
Bitmap: for displaying a bitmap image
MorphShape:
Shape: on-screen canvas for drawing content
StaticText: Frozen text
Video: contains video
Below is a Flash 10/ CS5 version
• DisplayObject [30]
1. InteractiveObject [22] (base class for all interactive objects)
1. DisplayObjectContainer [31]
1. Loader [32]
2. Sprite [33] Sprites are like Movie Clips without timeline
1. FLVPlayback [17]
2.
3.
4.
5.
2.
3.
4.
5.
6.
7.
FLVPlaybackCaptioning [34]
HTMLLoader [35]
MovieClip [23]
UIComponent [36] Includes several subclasses, for example:
1. BaseButton [37]
2. TextArea [38]
3. Stage [39]
4. TextLine [40]
2. SimpleButton [41]
3. TextField [42]
AVM1Movie [43]
Bitmap [44]
MorphShape [45]
Shape [46] is a very light-weight display object (as opposed to a Sprite)
StaticText [47]
Video [48]
Events
The Event class is used as the base class for the creation of Event objects, which are passed as parameters to event
listeners when an event occurs. Event is a direct child of the object. There are 26 direct subclasses for Flash (CS3)
and Flex (MXML) has even more. We only will show a few flash and fl events.
• Event [4]
1.
2.
3.
4.
5.
ComponentEvent [49] (UIComponent class related)
KeyboardEvent [50] (user presses key)
MetadataEve [51] (cue points and user metadata requests)
MotionEvent [52] (related to fl.motion.Animator class)
MouseEvent [2] (user does something with the mouse)
6. SliderEvent [53] (related to the UI Slider component)
7. TimerEvent [54] (related to Timer class)
365
Flash ActionScript 3 overview
8. VideoEvent [55] (when the user plays a video)
Interfaces:
1. IVPEvent [56] (related to the FLV component)
When Flash executes
The display list
At at given time in your animation, your Flash application contains a hierarchy of displayed objects: the display list.
It contains all the visible elements and they fall in one of the following categories:
• The stage: Each application has one stage object and it contains all on-screen display objects (i.e. containers or
simple objects). This includes objects that the user can't see (e.g. ones that are outside of the stage).
• Display object containers, i.e. objects that can contain both simple display objects and other display object
containers.
• (Simple) display objects
Read for example Introduction to the Display List [57] (Yahoo developper network) or Creating, Deleting and
Accessing Display Objects at Runtime in Flash CS3 [58] if you want to learn how to code adding and removing
display objects.
Stage and Timeline
• http://www.kirupa.com/forum/showthread.php?p=2129548#post2129548:
“To summarize: one stage, one root per SWF (which is the main timeline) and that root is an instance of a document
class or the MainTimeline class if a document class isn't provided”
Action Script entries in this wiki
Action Script tutorials
(1) In this wiki we teach some Action Script to Flash designers, e.g.:
•
•
•
•
Flash button tutorial
ActionScript 3 event handling tutorial.
ActionScript 3 interactive objects tutorial
Flash embedded movie clip tutorial
See the Flash tutorials entry for a full list.
(2) Then we also have "pure" Action Script tutorials for people who wish to learn how to program.
• The entry point is Actionscript 3 As of november 2007 there is a complete list of novice tutorials. Other levels are
under constuction. Start with:
• Adobe Flex (includes how to install the Flex SDK)
• AS3 Compiling a program
• AS3 Tutorials Novice
• All the Actionscript related articles are tagged with Actionscript 3. Alternatively, see Tutorials
366
Flash ActionScript 3 overview
Useful Links pages in this wiki
•
•
•
•
Flash and AS3 links - general Links to Flash/AS3 websites, propaganda and such...
Flash and AS3 links - tutorials Links to (hopefully) good tutorials on other web sites.
Flash and AS3 links - documentation (Flash and AS3 Books, Reference Manuals and Cheatsheets)
Flash and AS3 links - toolkits (AS 3 Toolkits, Libraries, Flash reusable components, AS 3 reusable code, etc.)
Links
Most links are in specialized links pages (see just above)
Development environments
• Flash/ActionScript3 Programming under Ubuntu [59] ... Tested, this works :)
Blogs and stuff
• Tag: Actionscript3 [60] at Wordpress
• Drawk's blog [61] Publishes also source and a good tweener [62] library.
• WS-Blog [63] by Jens Krause.
References
[1] http:/ / www. mikechambers. com/ blog/ 2008/ 08/ 14/ actionscript-3-and-ecmascript-4/
[2] http:/ / www. adobe. com/ products/ flex/ sdk/
[3] http:/ / www. adobe. com/ products/ flex/ flexbuilder/
[4] http:/ / www. moock. org/ eas3/ examples
[5] http:/ / livedocs. adobe. com/ flex/ 201/ langref/ mxml/ script. html
[6] http:/ / kanuwadhwa. wordpress. com/ 2007/ 10/ 05/ using-actionscript-in-flex-applications/
[7] http:/ / livedocs. adobe. com/ flash/ 9. 0/ ActionScriptLangRefV3/ ExampleInstruct. html
[8] http:/ / www. adobe. com/ products/ flex/ downloads/
[9] http:/ / www. jedit. org/
[10] http:/ / www. computerhope. com/ unix/ upico. htm
[11] http:/ / livedocs. adobe. com/ flash/ 9. 0/ ActionScriptLangRefV3/ flash/ net/ NetStream. html
[12] http:/ / livedocs. adobe. com/ flash/ 9. 0/ ActionScriptLangRefV3/ flash/ media/ SoundChannel. html
[13] http:/ / livedocs. adobe. com/ flash/ 9. 0/ ActionScriptLangRefV3/ flash/ utils/ Timer. html
[14] http:/ / livedocs. adobe. com/ flash/ 9. 0/ main/ 00000143. html
[15] http:/ / livedocs. adobe. com/ flash/ 9. 0/ ActionScriptLangRefV3/ flash/ display/ Loader. html
[16] http:/ / livedocs. adobe. com/ flash/ 9. 0/ ActionScriptLangRefV3/ flash/ display/ MovieClip. html
[17] http:/ / livedocs. adobe. com/ flash/ 9. 0/ ActionScriptLangRefV3/ fl/ video/ FLVPlayback. html
[18] http:/ / livedocs. adobe. com/ flash/ 9. 0/ ActionScriptLangRefV3/ fl/ video/ FLVPlaybackCaptioning. html
[19] http:/ / livedocs. adobe. com/ flash/ 9. 0/ ActionScriptLangRefV3/ fl/ controls/ BaseButton. html
[20] http:/ / livedocs. adobe. com/ flash/ 9. 0/ ActionScriptLangRefV3/ fl/ containers/ BaseScrollPane. html
[21] http:/ / livedocs. adobe. com/ flash/ 9. 0/ ActionScriptLangRefV3/ fl/ controls/ ComboBox. html
[22] http:/ / livedocs. adobe. com/ flash/ 9. 0/ ActionScriptLangRefV3/ fl/ controls/ progressBarClasses/ IndeterminateBar. html
[23] http:/ / livedocs. adobe. com/ flash/ 9. 0/ ActionScriptLangRefV3/ fl/ controls/ Label. html
[24] http:/ / livedocs. adobe. com/ flash/ 9. 0/ ActionScriptLangRefV3/ fl/ controls/ ProgressBar. html
[25] http:/ / livedocs. adobe. com/ flash/ 9. 0/ ActionScriptLangRefV3/ fl/ controls/ ScrollBar. html
[26] http:/ / livedocs. adobe. com/ flash/ 9. 0/ ActionScriptLangRefV3/ fl/ controls/ TextInput. html
[27] http:/ / livedocs. adobe. com/ flash/ 9. 0/ ActionScriptLangRefV3/ fl/ containers/ UILoader. html
[28] http:/ / livedocs. adobe. com/ flash/ 9. 0/ ActionScriptLangRefV3/ flash/ display/ Stage. html
[29] http:/ / livedocs. adobe. com/ flash/ 9. 0/ ActionScriptLangRefV3/ flash/ display/ SimpleButton. html
[30] http:/ / help. adobe. com/ en_US/ FlashPlatform/ reference/ actionscript/ 3/ index. html
[31] http:/ / help. adobe. com/ en_US/ FlashPlatform/ reference/ actionscript/ 3/ flash/ display/ DisplayObjectContainer. html
[32] http:/ / help. adobe. com/ en_US/ FlashPlatform/ reference/ actionscript/ 3/ flash/ display/ Loader. html
[33] http:/ / help. adobe. com/ en_US/ FlashPlatform/ reference/ actionscript/ 3/ flash/ display/ Sprite. html
[34] http:/ / help. adobe. com/ en_US/ FlashPlatform/ reference/ actionscript/ 3/ fl/ video/ FLVPlaybackCaptioning. html
367
Flash ActionScript 3 overview
[35]
[36]
[37]
[38]
[39]
[40]
[41]
[42]
[43]
[44]
[45]
[46]
[47]
[48]
[49]
[50]
[51]
[52]
[53]
[54]
[55]
[56]
http:/ / help. adobe. com/ en_US/ FlashPlatform/ reference/ actionscript/ 3/ flash/ html/ HTMLLoader. html
http:/ / help. adobe. com/ en_US/ FlashPlatform/ reference/ actionscript/ 3/ fl/ core/ UIComponent. html
http:/ / help. adobe. com/ en_US/ FlashPlatform/ reference/ actionscript/ 3/ fl/ controls/ BaseButton. html
http:/ / help. adobe. com/ en_US/ FlashPlatform/ reference/ actionscript/ 3/ fl/ controls/ TextArea. html
http:/ / help. adobe. com/ en_US/ FlashPlatform/ reference/ actionscript/ 3/ flash/ display/ Stage. html
http:/ / help. adobe. com/ en_US/ FlashPlatform/ reference/ actionscript/ 3/ flash/ text/ engine/ TextLine. html
http:/ / help. adobe. com/ en_US/ FlashPlatform/ reference/ actionscript/ 3/ flash/ display/ SimpleButton. html
http:/ / help. adobe. com/ en_US/ FlashPlatform/ reference/ actionscript/ 3/ flash/ text/ TextField. html
http:/ / help. adobe. com/ en_US/ FlashPlatform/ reference/ actionscript/ 3/ flash/ display/ AVM1Movie. html
http:/ / help. adobe. com/ en_US/ FlashPlatform/ reference/ actionscript/ 3/ flash/ display/ Bitmap. html
http:/ / help. adobe. com/ en_US/ FlashPlatform/ reference/ actionscript/ 3/ flash/ display/ MorphShape. html
http:/ / help. adobe. com/ en_US/ FlashPlatform/ reference/ actionscript/ 3/ flash/ display/ Shape. html
http:/ / help. adobe. com/ en_US/ FlashPlatform/ reference/ actionscript/ 3/ flash/ text/ StaticText. html
http:/ / help. adobe. com/ en_US/ FlashPlatform/ reference/ actionscript/ 3/ flash/ media/ Video. html
http:/ / livedocs. adobe. com/ flash/ 9. 0/ ActionScriptLangRefV3/ fl/ events/ ComponentEvent. html
http:/ / livedocs. adobe. com/ flash/ 9. 0/ ActionScriptLangRefV3/ flash/ events/ KeyboardEvent. html
http:/ / livedocs. adobe. com/ flash/ 9. 0/ ActionScriptLangRefV3/ fl/ video/ MetadataEvent. html
http:/ / livedocs. adobe. com/ flash/ 9. 0/ ActionScriptLangRefV3/ fl/ motion/ MotionEvent. html
http:/ / livedocs. adobe. com/ flash/ 9. 0/ ActionScriptLangRefV3/ fl/ events/ SliderEvent. html
http:/ / livedocs. adobe. com/ flash/ 9. 0/ ActionScriptLangRefV3/ flash/ events/ TimerEvent. html
http:/ / livedocs. adobe. com/ flash/ 9. 0/ ActionScriptLangRefV3/ fl/ video/ VideoEvent. html
http:/ / livedocs. adobe. com/ flash/ 9. 0/ ActionScriptLangRefV3/ fl/ video/ IVPEvent. html
[57]
[58]
[59]
[60]
[61]
[62]
[63]
http:/ / developer. yahoo. com/ flash/ articles/ display-list. html
http:/ / www. flashandmath. com/ intermediate/ names/ index. html
http:/ / www. williambrownstreet. net/ wordpress/ ?p=78
http:/ / wordpress. com/ tag/ actionscript3/
http:/ / drawk. wordpress. com/ tag/ development/ flash/ as3/
http:/ / code. google. com/ p/ tweener/
http:/ / www. websector. de/ blog/
Flash using ActionScript libraries tutorial
Draft
Introduction
Learning goals
• Learn how to reuse example code that illustrate features of ActionScript libraries.
• Learn how to be able to import 3rd party packages by defining an ActionScript classpath.
Prerequisites
• Basic interactivity, i.e. some very limited ActionScript 3 coding experience. See for example the Flash button
tutorial or the Flash component button tutorial and theFlash embedded movie clip tutorial.
• In addition, you also could start from "pure" Actionscript 3 coding (but we will provide no explanations here for
flex style development...)
Environment
• Flash CS3
Moving on
• See the Flash tutorials.
Level and target population
• Beginners (but see the prerequisites)
Quality
368
Flash using ActionScript libraries tutorial
• useable, but under progress.
To Do
• Other examples
There exist several free high quality ActionScript libraries available and that can be used by Flash designers that
only possess very little programming skills.
Typical examples of such libraries are:
• Flash 3D libraries that allow a CS3 developer to create animated and interactive 3D scenes.
• Special purpose animation libraries like the FLiNT particle system [1] that allows you to create stuff like fireworks
and snowflakes.
• Tweening libraries like TweenLite [2] that allow you to define sophisticated animations with a few method calls
(instead of spending hours of drawing).
• Physics engines like Box2DFlashAS3 [3]
Flash libraries can come in several forms (see Flash formats and objects overview). In this short tutorial we will deal
with
• .swc - compiled clips that include ActionScript code and other stuff
• .fla - Flash CS3/CS4 source code files
• .as - Action script code.
In this tutorial, we just will a short overview. If want to go through an example, either read the FliNT particle system
introductory tutorial. FLiNT is a very useful library to create very cool animations with particles flying around or
play around with the easier to use AS3 tweening platform.
List of libraries that are part of these Flash tutorials:
• FliNT particle system
• Flash Papervision3D tutorial
• AS3 tweening platform
Others:
• see Reusable AS components and libraries
Installing and using libraries overview
This is a short executive overview on using ActionScript libraries
To use external ActionScript libraries that you downloaded and installed, Flash must locate the external ActionScript
files that contain the class definition. Usually, the list of folders in which Flash searches for class definitions is called
the classpath for ActionScript 2.0 and the source path for ActionScript 3.0
You may set the source path either globally (for all your projects) or per *.fla file. You usually should adopt the
later, even if it means some extra work.
Local source path:
Through File->Publish Settings; Flash Tab; Settings Tab; you can set the following ActionScript locations in Flash
for a specific *.fla file:
• Source path: Defines the location of source ActionScript source files. Typically you would use this for libraries
that you download as AS source code.
• Library path: “specifies the location of pre-compiled ActionScript code which resides in SWC files you have
created. The FLA file that specifies this path loads every SWC file at the top level of this path and any other code
resources that are specified within the SWC files themselves. If you use the Library path, be sure none of the
compiled code in the SWC files is duplicated in uncompiled AS files in the Source path. The redundant code will
369
Flash using ActionScript libraries tutorial
370
slow down compilation of your SWF file.”. Typically, you would use the library path when you use *.swc code
from major ActionScript libraries like PaperVision3D or the Greensock tweening libraries.
• External library path: specifies the location of SWC files that contain code used for compiler error definitions.
This path can be used to load external code resources in SWC format so that the classes within them can be used
at runtime. When you compile a SWF, the SWC files in the External Library path are not added to the SWF file,
but the compiler verifies that they are in the locations you specified. The External Library path is most often used
for runtime shared libraries. For more information about runtime shared libraries, see working with runtime
shared assets [4]
• Document class (also can be set in Document Property inspector). Used to associate a specific class with a
document, i.e. typically used to compile an ActionScript program you write yourself.
Local source path (alternative option):
Alternatively (not recommended):
• Instead of defining the source path: You also could copy the com directories that include source to the directory
where your *.fla file sits,
• Instead of defining a library path: Copy the *.swc file to the same directory of your *.fla file and add . to the
library path.
Global source path:
Through Edit->Preferences->ActionScript 3.0 Settings you can set source pathes for all your projects:
• Source path
• Library path
• External library path
Setting source pathes
Below we reproduce the detailed explanations from Adobe's Set the location of ActionScript files
17:37, 10 May 2010 (UTC)):
[5]
(retrieved
Set the source path for ActionScript 3.0
To set the document-level source path:
1. Select File -> Publish Settings, and click Flash.
2. Verify that ActionScript 3.0 is selected in the ActionScript Version pop‑up menu, and click Settings. Your Flash
Player version must be set to Flash Player 9 or later to use ActionScript 3.0.
3. Specify the frame where the class definition should reside in the Export Classes in Frame text field.
4. Specify the Errors settings. You can select Strict Mode and Warnings Mode. Strict Mode reports compiler
warnings as errors, which means that compilation will not succeed if those types of errors exist. Warnings Mode
reports extra warnings that are useful for discovering incompatibilities when updating ActionScript 2.0 code to
ActionScript 3.0.
5. (Optional) Select Stage to automatically declare stage instances.
6. Specify ActionScript 3.0 or ECMAScript as the dialect to use. ActionScript 3.0 is recommended.
7. To add paths to the source path list, do any of the following:
• To add a folder to the source path, click the Source path tab and then click the Browse To Path button
browse to the folder to add, and click OK.
,
• To add a new line to the Source path list, click the Add New Path button. Double-click the new line, type a
relative or absolute path, and click OK.
• To edit an existing Source path folder, select the path in the Source path list, click the Browse To Path button,
browse to the folder to add, and click OK. Alternatively, double-click the path in the Source path list, type the
Flash using ActionScript libraries tutorial
desired path, and click OK.
• To delete a folder from the source path, select the path in the Source path list and click the Remove From Path
button .
To set the application-level source path:
1. Choose Edit Preferences (Windows) or Flash > Preferences (Macintosh) and click the ActionScript category.
2. Click the ActionScript 3.0 Settings button and add the path(s) to the Source path list.
Set the Library path for ActionScript 3.0 files
To set the document-level Library path, the procedure is similar to setting the Source path:
1.
2.
3.
4.
Choose File Publish Settings and click the Flash tab.
Make sure ActionScript 3.0 is specified in the Script menu and click Settings.
In the Advanced ActionScript 3.0 dialog box, click the Library path tab.
Add the library path to the Library path list. You can add folders or individual SWC files to the path list.
To set the Application-level Library path:
1. Choose Edit Preferences (Windows) or Flash > Preferences (Macintosh) and click the ActionScript category.
2. Click the ActionScript 3.0 Settings button and add the path(s) to the Library path list.
Set the External Library path for ActionScript 3.0 files
To set the document-level External Library path, the procedure is similar to setting the Source path:
1.
2.
3.
4.
Choose File Publish Settings and click the Flash tab.
Make sure ActionScript 3.0 is specified in the Script menu and click Settings.
In the Advanced ActionScript 3.0 dialog box, click the External Library path tab.
Add the library path to the External Library path list. You can add folders or individual SWC files to the path list.
To set the Application-level External Library path:
1. Choose Edit->Preferences (Windows) or Flash->Preferences (Macintosh) and click the ActionScript category.
2. Click the ActionScript 3.0 Settings button and add the path(s) to the External Library path list.
A note on classes and packages
All ActionScript code that you will import is defined with classes (see the Actionscript 3 tutorials if you really want
to learn how programming works.). Theses classes can then be bundled together in so-called packages which allows
to organize code into discrete groups that can be imported by other scripts.
In other words, if you want to use a class that is inside a package, you must import either the package or the specific
class. “In general, import statements should be as specific as possible. If you plan to use only the SampleCode class
from the samplespackage, you should import only the SampleCode class rather than the entire package to which it
belongs. Importing entire packages may lead to unexpected name conflicts. You must also place the source code that
defines the package or class within your classpath . The classpath is a user-defined list of local directory paths that
determines where the compiler will search for imported packages and classes. The classpath is sometimes called the
build path or source path” (Importing packages [6], retrieved 17:37, 10 May 2010 (UTC)).
Syntax:
import samples.*;
Example from the TweenMax engine of the AS3 tweening platform:
import com.greensock.*;
import com.greensock.easing.*;
371
Flash using ActionScript libraries tutorial
TweenMax.to(mc, 3, {bezier:[{x:277, y:174}, {x:300, y:345}],
orientToBezier:true, ease:Bounce.easeOut});
For programmers (see the ActionScript 3 tutorials, to create your own packages:
package packageName {
class someClassName {
}
}
More information about packages can be found in Adobe's Packages and namespaces [7] chapter in the Programming
ActionScript 3.0 [8] tutorial which is very technical.
ActionScript document classes
According to ActionScript publish settings [9], retrieved 17:37, 10 May 2010 (UTC):
When you use ActionScript 3.0, a SWF file may have a top-level class associated with it. This class is called the
document class. When the SWF is loaded by Flash Player, an instance of this class is created to be the SWF file's
top-level object. This object of a SWF file can be an instance of any custom class you choose.
For example, a SWF file that implements a calendar component can associate its top level with a Calendar class,
with methods and properties appropriate to a calendar component. When the SWF is loaded, Flash Player creates an
instance of this Calendar class.
1. Deselect all objects on the Stage and in the Timeline by clicking a blank area of the Stage. This displays the
Document properties in the Property inspector.
2. Enter the filename of the ActionScript file for the class in the Document Class text box in the Property inspector.
Do not include the .as filename extension.
Note: You can also enter the Document Class information in the Publish Settings dialog box.
Links
• ActionScript publish settings [10] (Adobe Flash CS4)
• Sharing library assets [11] (Adobe Flash CS4)
• Packages and namespaces [12] (Adobe Flash CS4)
References
[1]
[2]
[3]
[4]
[5]
http:/ / flintparticles. org/
http:/ / blog. greensock. com/ tweenliteas3
http:/ / box2dflash. sourceforge. net/
http:/ / help. adobe. com/ en_US/ Flash/ 10. 0_UsingFlash/ WSd60f23110762d6b883b18f10cb1fe1af6-7dc7a. html
http:/ / help. adobe. com/ en_US/ Flash/ 10. 0_UsingFlash/ WS3e7c64e37a1d85e1e229110db38dec34-7fa4a.
html#WS08FEE6E4-2209-45d8-9101-8C60140B3533
[6] http:/ / help. adobe. com/ en_US/ ActionScript/ 3. 0_ProgrammingAS3/ WS5b3ccc516d4fbf351e63e3d118a9b90204-7f9e.
html#WS5b3ccc516d4fbf351e63e3d118a9b90204-7f92
[7] http:/ / livedocs. adobe. com/ flash/ 9. 0/ main/ wwhelp/ wwhimpl/ common/ html/ wwhelp. htm?context=LiveDocs_Parts& file=00000040.
html
[8] http:/ / livedocs. adobe. com/ flash/ 9. 0/ main/ wwhelp/ wwhimpl/ js/ html/ wwhelp. htm?href=Part1_Programming_AS3_1. html
[9] http:/ / help. adobe. com/ en_US/ Flash/ 10. 0_UsingFlash/ WS3e7c64e37a1d85e1e229110db38dec34-7fa4a.
html#WS026C9121-F7D4-496d-94C8-368BF6938149a
[10] http:/ / help. adobe. com/ en_US/ Flash/ 10. 0_UsingFlash/ WS3e7c64e37a1d85e1e229110db38dec34-7fa4a. html
[11] http:/ / help. adobe. com/ en_US/ Flash/ 10. 0_UsingFlash/ WSd60f23110762d6b883b18f10cb1fe1af6-7dc9a. html
372
Flash using ActionScript libraries tutorial
[12] http:/ / help. adobe. com/ en_US/ ActionScript/ 3. 0_ProgrammingAS3/ WS5b3ccc516d4fbf351e63e3d118a9b90204-7f9e. html
AS3 tweening platform
Draft
Introduction
Prerequisite: Read Flash using ActionScript libraries tutorial. You must understand how to tell CS3/CS4 where to
find an ActionScript library !!
Warning: Documentation in here refers to an older version. I believe that everything should still work fine, but
newer releases for all libraries do have additional functionality. Since I wrote the original piece in 2008, the official
documentation has become much better anyhow :) - Daniel K. Schneider 12:53, 18 April 2010 (UTC).
TweenNano, TweenLite, TweenFilterLite, TweenMax, TimelineLite, TimelineMax and TransformManager,
are Actionscript 3 tweening classs written by Jack Doyle, GreenSock [1] The purpose of this page is to have a
printable version of the documentation (useful for teaching in a lab with small screens) and to add some examples
that could be useful to "simple" Flash designers.
TweenNano [2] - a super-lightweight (1.6k in AS3 and 2k in AS2) version of TweenLite.
TweenLite [3] - a light-weight and fast tween class to create animation and shape tweens in one go.
TweenMax [4] - does both of Tweenlite and TweenFilterLite and more. It's still bigger and bit slower.
TimelineLite [5] is a timeline class for building and managing sequences of TweenLite, TweenMax, TimelineLite,
and/or TimelineMax instances, i.e. a kind of a virtual MovieClip timeline or a container where you place tweens
over the course of time.
• TimelineMax [6] •
•
•
•
• TransformManager [7] - add interactive scaling/rotating/moving of DisplayObjects in your Flash animation.
Please refer to the GreenSock [8] website for official information and also consider donating something to Jack. You
will get some additional benefits. Since I only teach Flash once in a while I only gave $30 in 2008 and $50 in 2010 Daniel K. Schneider.
Deprecated modules:
• TweenFilterLite [9] (Deprecated, eplaced by features in either TweenLite or Tweenmax) - did extend TweenLite to
add more filters (like blurs, glows, contrast, brightness, etc.)
• TweenGroup [10] (deprecated and replaced by TimelineLite) - did allow to manage groups of
TweenLite/FilterLite/Max tweens.
In order to understand what some of the parameters and properties do, you may have to consult the AS3 manuals at
Adobe, in particular the ActionScript3 language reference [5].
See also: Flash CS4 motion tweening with AS3 tutorial, i.e. a short introduction to Adobe's not as nice solution...
373
AS3 tweening platform
Installation
Executive download, installation and use summary:
1.
2.
3.
4.
5.
6.
Download the tweening platform from Greensock [11]
Unzip the file and if you want, copy the *.swf file to some actionscript libraries directory you may have.
Open/create a new *.fla file
Open the File->Publish Settings - Flash tab
Make sure that "ActionScript 3" is selected, then click on the Settings
Select Library path (not source, external library, etc.!) and tell CSx the directory where it can find the *.swf file.
Again, read the Flash using ActionScript libraries tutorial, if you don't understand this.
Summary documentation
Syntax used
Syntax used for datatypes
If you see something like this xxx:YYY, it means that you have to use value of type YYY. Typically, you must
specify:
Objects
If you work with CS3/CS4/etc, instance names of movie clips)
target:Object
e.g. my_rocket or movie_clip
Objects also can refer to ECMAScript objects that you create on the fly with {...}
variables:Object
E.g. an object with properties x=120 and y=110 is created like this:
{x:120,y:110}
Numbers
x:Number
e.g. 15
Color_uint
E.g. for red you could use the following Hex value:
0xFF0000
Boolean
xxx:Boolean
e.g. knockout:true
Functions
You will have to give a function name. This can be a Class.method.
xxx:Function
E.g. ease:Strong.easeInOut
Arrays
374
AS3 tweening platform
375
You have to create an array using [...]. Typically this is used to pass parameters to methods , e.g.
easeParams:[1.5, 2.45]
Tweenlite Usage summary
This class includes a few static methods that you can use like functions.
1.
2.
3.
4.
5.
6.
TweenLite.to - create a tween of multiple properties of an object
TweenLite.from - same as above (you specify the result of the tween))
TweenLite.delayedCall - Call a function after number of seconds
TweenLite.killDelayedCallsTo - Kill delayed calls (see previous line)
TweenLite.killTweensOf - Kills all tweens of a particular object
TweenLite.removeTween - Removes a tween
TweenLite.to
Description: Tweens the target's properties from whatever they are at the time you call the method to whatever you
define in the variables parameter.
Disclaimer: Information be wrong and/or outdated - Daniel K. Schneider 17:13, 28 October 2008 (UTC).
Syntax:
TweenLite.to(target:Object, duration:Number, variables:Object);
You can keep track of an instance if you want to (e.g. to kill it):
var myTween:TweenLite = TweenLite.to(target:Object, duration:Number, variables:Object);
Alternative object-oriented syntax:
var myTween:TweenLite = new TweenLite(target:Object, duration:Number, variables:Object);
This is almost equivalent to the above. The former is usually preferable since it will handle garbage collection.
Mandatory parameters
1. target:Object Target MovieClip (or any object) whose properties we're tweening
2. duration:Number Duration (in seconds) of the tween
3. variables:Object An object containing the end values of all the properties you'd like to have tweened (or if
you're using the TweenLite.from() method, these variables would define the BEGINNING values). Putting quotes
around values will make the tween relative to the current value. For example, x:"-20" will tween x to whatever it
currently is minus 20 whereas x:-20 will tween x to exactly -20.
Here is a simple example that will move a symbol called "mouse" to position x=120 in about 1.5 seconds)
TweenLite.to(clip_mc, 1.5, {x:120}
Properties you can defined in the variables object:
You can change many properties at the same time and this one reason why this library is so nice. In the following
example a movie clip called "clip:mc" will move to position x=120, it's alpha will fade to 50% and its volume will
fade out completely:
TweenLite.to(clip_mc, 1.5, {alpha:0.5, x:120, volume:0});
alpha
Number
AS3 tweening platform
376
The alpha (opacity level) that the target object should finish at (or begin at if you're using TweenLite.from()).
For example, if the target.alpha is 1 when this script is called, and you specify this parameter to be 0.5, it'll
transition from 1 to 0.5.
autoAlpha
Same as changing the "alpha" property but with the additional feature of toggling the "visible" property to
false if the alpha ends at 0. It will also toggle visible to true before the tween starts if the value of autoAlpha is
greater than zero.
timeScale
Number
Speed up or slow down a tween
x
Number
To change a MovieClip's x position, just set this to the value you'd like the MovieClip to end up at (or begin at
if you're using TweenLite.from()).
y
Number
To change a MovieClip's y position (like above).
scaleX
Number
Scaling in X direction, i.e. making the with smaller or larger
scaleY
Number
Scaling in Y direction, i.e. making the height smaller or larger
rotation
Number
Clock-wise rotation in degrees.
delay
Number
Number of seconds you'd like to delay before the tween begins. This is very useful when sequencing tweens
ease
Function
You can specify a function to use for the easing with this variable. For example,
fl.motion.easing.Elastic.easeOut. The Default is Regular.easeOut (and Linear.easeNone for volume).
You can use all the standard AS3 methods defined in fl.motion.easing [12] and fl.transitions.easing [13]
If you want to create your own easing equation use Jack's Custom Ease Builder [14] on-line tool.
Example
TweenLite.to(logo,0.4,{scaleX:1,scaleY:1,alpha:1,ease:Strong.easeInOut,delay:0.8,overwrite:false});
Example of custom function definition and use
import com.greensock.easing.CustomEase;
CustomEase.create("myCustomEase",
AS3 tweening platform
[{s:0,cp:0.509,e:0.612},{s:0.612,cp:0.715,e:0.412},{s:0.412,cp:0.109,e:1}]);
TweenLite.to(mc, 2, {x:"250", ease:CustomEase.byName("myCustomEase"")});
easeParams
Array
Allows to pass parameters to the ease function (see above)
TweenLite.to(my_mc, 2, {_x:200, ease:Elastic.easeOut, easeParams:[1.5, 2.45]});
volume
Number
To change a MovieClip's volume, i.e. the SoundTransform property. Set this to the value you'd like the
MovieClip to end up at (or begin at if you're using TweenLite.from()).
tint
Color_uint
To change a MovieClip's color, set this to the hex value of the color you'd like the MovieClip to end up at(or
begin at if you're using TweenLite.from()). An example hex value would be 0xFF0000. If you'd like to remove
the color from a MovieClip, just pass null as the value of tint.
removeTint
Boolean
To remove the tint of a DisplayObject. Use the value true.
frame
Integer
To tween a MovieClip to a given frame.
roundProps
Array
Allows to define inbetween rounding values. E.g.
TweenMax.to(my_mc, 3, {_x:500, _y:0, bezier:[{_x:250, _y:50}]});
onStart
Function
If you'd like to call a function as soon as the tween begins, pass in a reference to it here. This can be useful
when there's a delay and you want something to happen just as the tween begins.
onStartParams
Array
An array of parameters to pass the onStart function.
onUpdate
Function
If you'd like to call a function every time the property values are updated (on every frame during the time the
tween is active), pass a reference to it here.
onUpdateParams
Array
An array of parameters to pass the onUpdate function (this is optional)
377
AS3 tweening platform
onComplete
Function
If you'd like to call a function when the tween has finished, use this.
onCompleteParams
Array
An array of parameters to pass the onComplete function (this is optional)
overwrite
Int
You can enter 4 values: 0 (NONE) = No tweens are overwritten; 1 (ALL) = All tweens of the same object are
completely overwritten immediately when the tween is created; 2 (AUTO) = Searches for and overwrites only
individual overlapping properties in tweens that are active when the tween begins; 3 (CONCURRENT):
Overwrites all tweens of the same object that are active when the tween begins.
persist
Boolean
If true, the TweenLite instance will not automatically be removed by the garbage collector when it is complete.
By default, it is false.
renderOnStart
Boolean
If you're using TweenLite.from() (or runBackwards:true) with a delay and want to prevent the tween from
rendering until it actually begins, set this special property to true. By default, it's false which causes
TweenLite.from() to render its values immediately, even before the delay has expired.
runBackwards
Boolean
Flips the start and end values in a tween. That's the same as using the from() method (see below).
TweenLite.from
TweenLite.from(target:Object, duration:Number, variables:Object);
Description: Exactly the same as TweenLite.to(), but instead of tweening the properties from where they're at
currently to whatever you define, this tweens them the opposite way - from where you define TO where ever they are
now (when the method is called). This is handy for when things are set up on the stage where the should end up and
you just want to animate them into place.
Parameters: Same as TweenLite.to(). (see above)
TweenLite.delayedCall
TweenLite.delayedCall(delay:Number,onComplete:Function,onCompleteParams:Array);
Description: Provides an easy way to call any function after a specified number of seconds. Any number of
parameters can be passed to that function when it's called too.
Parameters:
1. delay: Number of seconds before the function should be called.
2. onComplete: The function to call
3. onCompleteParams [optional] An array of parameters to pass the onComplete function when it's called.
378
AS3 tweening platform
TweenLite.killTweensOf
TweenLite.killTweensOf(target:Object);
Description: Provides an easy way to kill all tweens of a particular Object/MovieClip.
Parameters:
• target: Any/All tweens of this Object/MovieClip will be killed.
TweenLite.killDelayedCallsTo
TweenLite.killDelayedCallsTo(function:Function);
Description: Provides an easy way to kill all delayed calls to a particular function (ones that were instantiated using
the TweenLite.delayedCall() method).
Parameters:
• function: Any/All delayed calls to this function will be killed.
TweenLite examples
As you can see in the code below, in order to use this class, you will have to do the following.
• If you work with CS3 you need an instance of MovieClip that is named, e.g. "movie_clip".
• Then, in some keyframe, hit F9 and you can write AS code. The code must include at least:
import com.greensock.TweenLite;
• When Flash requires that you import "official" flash classes you will have to import these too. E.g.
import fl.motion.easing.Back;
As a simple example, you could tween the alpha to 50% (0.5) and move the x position of a MovieClip named
"movie_clip" to 120 and fade the volume to 0 over the course of 1.5 seconds like so:
import com.greensock.TweenLite;
TweenLite.to(movie_clip, 1.5, {alpha:0.5, x:120, volume:0});
The following example shows how to tween the movie_clip MovieClip over 3 seconds, changing the alpha to 50%
(0.5), the x coordinate to 460 using the Back.easeOut easing function, and adding a starting delay of 1 seconds. In
addition, we call a function named "onFinishTween" when it has completed and pass it a few parameters (a value of
5 and a reference to the movie_clip).
AS3 code:
import com.greensock.TweenLite;
import fl.motion.easing.Back;
TweenLite.to(movie_clip, 3, {alpha:0.5, x:460, ease:Back.easeOut,
delay:1, onComplete:onFinishTween,
onCompleteParams:[5, movie_clip]});
function onFinishTween(parameter1_num:Number,
parameter2_mc:MovieClip):void {
trace("The tween has finished! parameters: " + parameter1_num + ", and
" + parameter2_mc);
}
379
AS3 tweening platform
380
Simple Tweenlite example
Example code:
• tween-lite-ex1.fla [15] (CS4 or better)
• tween-lite-ex1.html [16]
If you have a MovieClip on the stage that is already in its end position and you just want to animate it into place over
5 seconds (drop it into place by changing its y property to 100 pixels higher on the screen and dropping it from
there), you could:
import com.greensock.TweenLite;
import fl.motion.easing.Elastic;
TweenLite.from(movie_clip, 5, {y:"-100", ease:Elastic.easeOut});
Sequence of tweens so that they occur one after the other. Just use the delay property and make sure you set the
overwrite property to false (otherwise tweens of the same object will always overwrite each other to avoid conflicts).
Here's an example where we colorize a MovieClip red over the course of 2 seconds, and then move it to a _y
coordinate of 300 over the course of 1 second:
import com.greensock.TweenLite;
TweenLite.to(movie_clip, 2, {tint:0xFF0000});
TweenLite.to(movie_clip, 1, {y:300, delay:2, overwrite:false});
AS3 tweening platform
Usage of filters
Both Tweenlite and TweenMax add the ability to tween filters (like blurs, glows, drop shadows, bevels, etc.) as well
as advanced effects like contrast, colorization, brightness, saturation, hue, and threshold.
To understand what filters are, you may read documentation at Adobe:
• Flash graphic effects learning guide [17] An Adobe tutorial made for CS3 designers and that also explains
concepts.
• About filters [18] (Chapter of the Adobe Using Flash (CS3) manual)
To understand what the tweening platform filters do, you also could consult the AS3 or Flex documentation. The
parameters of the greensock classes are much easier to use than the properties and the methods of the "official" AS3
libraries. However this documentation may help to understand the meaning of these parameters and what kind of
values you should use.
• flash.filters package [5] (ActionScript 3.0 Language and Components Reference) or
• Package flash.filters [19] (Adobe Flex 2.0.1 Language Reference)
TweenMax features
TweenMax builds on top of TweenLite and TweenFilterLite. It uses again the same syntax and just adds some
functionalities that are less essential. The only tradeoff is some slight increase in size, i.e. 11K of AS code (which is
still very small).
In addition to FilterLite and TweenLite, you can do the following (and more that we may document some other
time):
bezier
Array
Allows to tween with a bezier array.
TweenMax.to(my_mc, 3, {_x:500, _y:0, bezier:[{_x:250, _y:50}]})
bezierThrough
Array
Pass points through which the bezier values should move.
orientToBezier
Array (or Boolean)
MovieClip/Sprite to orients itself in the direction of a Bezier path. The arrays need the following elements:
Position property 1 (typically "x"), Position property 2 (typically "y"), Rotational property (typically
"rotation"), Number of degrees to add (optional - makes it easy to orient your MovieClip/Sprite properly).
[["x", "y", "rotation", 0]].
Note: This is an array within an array
globalTimeScale
Globally speed up/down all tweens
blurFilter
Object
Create a blur with one or more of the following properties:
Parameters: blurX, blurY, quality.
Example:
381
AS3 tweening platform
TweenFilterLite.to(movie_clip, 2, {blurFilter:{blurX:1, blurY:2}})
glowFilter
Object
Apply a glow effect to display objects
Parameters: alpha, blurX, blurY, color, strength, quality, inner, knockout,
colorMatrixFilter
Object
Apply various color filters
Parameters: colorize, amount, contrast, brightness, saturation, hue, threshold, relative, matrix,
Example
TweenFilterLite.to(movie_clip, 2,
{colorMatrixFilter:{colorize:0xFF0000, amount:1}});
dropShadowFilter
Object
Will add a drop shadow to an object.
Parameters alpha, angle, blurX, blurY, color, distance, strength, quality
Flex Adobe dropShadowFilter doc [20]
bevelFilter
Object
Create a bevel effect gives, i.e. three-dimensional look
Parameters angle, blurX, blurY, distance, highlightAlpha, highlightColor, shadowAlpha, shadowColor, , gth,
quality
Simple TweenMax example
The goal is to take a picture and make it look old or otherwise bad as in the following tweenmax-photo-filter.html
[21]
example. Instead, you might have used the TweenFilterLite library too.
Procedure:
•
•
•
•
•
Drag a *.jpg picture into the library
Drag it to the stage and make it a movie clip symbol (Right-click->Convert to symbol). Call it "picture_mc".
Kill the picture on the stage
Drag two copies of the new movie clip symbol to the stage
Name the first one "picture" and the second one "picture2". This way the AS3 code can use them as objects.
AS3 code:
import com.greensock.TweenMax;
import com.greensock.easing.*;
TweenMax.to(picture,
5,
{colorMatrixFilter:{colorize:0xffcc33, amount:0.4,
contrast:0.6, brightness:1.1, saturation:0.4},
ease:Back.easeOut});
TweenMax.to(picture2,
382
AS3 tweening platform
5,
{colorMatrixFilter:{amount:0.4, contrast:0.3,
brightness:2.0, saturation:0.8},
ease:Back.easeOut});
Source:
• http://tecfa.unige.ch/guides/flash/ex/greensock/directory
• File tweenmax-photo-filter.fla [22]
Another example with TweenMax
The code below is coming from a game, dedicated to children. The goal is to count cheeses and send them into a box
by clicking on any cheese. The feedback depends on the amount of cheeses in the box.
We used TweenMax (http:/ / www. greensock. com/ tweenmax/ ) to build up this game and choose Tweenmax
Explorer, bezierThrough.
• Before doing anything else, it’s necessary to download GreenSock Tweening Platform v11 AS3, http://www.
greensock.com/v11/
• Then, copy the com directory to the directory with your *.fla file (no need to copy to the web server later, all will
be in the swf)
Here’s the AS3 code for the cheese game (see the result below):
import com.greensock.*;
import com.greensock.easing.*;
stop();
var score=0;
red_mouse.visible=false;
mc_jumping_emilie.visible=true;
mc_jumping_emilie.stop();
Define a list of cheese indexed by cheese name. Arrays are ("cheese_name", x, y, useless_x2, useless_y2) :
var cheese_list:Array = new Array ();
cheese_list["cheese1"]=new Array("cheese1",23.9,104.3,402.8,222.7);
cheese_list["cheese2"]=new Array("cheese2",109.9,104.3,402.8,194.3);
cheese_list["cheese3"]=new Array("cheese3",192.9,104.3,399.9,166.3);
cheese_list["cheese4"]=new Array("cheese4",274.9,104.3,399.9,136.3);
cheese_list["cheese5"]=new Array("cheese5",19.9,149.3,475.9,222.7);
cheese_list["cheese6"]=new Array("cheese6",109.9,152.3,475.9,170.3);
cheese_list["cheese7"]=new Array("cheese7",193.9,149.3,475.9,196.3);
cheese_list["cheese8"]=new Array("cheese8",278.9,149.3,471.9,138.3);
cheese_list["cheese9"]=new Array("cheese9",15.9,201.3,401.6,113.3);
cheese_list["cheese10"]=new Array("cheese10",101.9,200.3,475.9,113.3);
cheese_list["cheese11"]=new Array("cheese11",191.9,201.3,401.6,86.3);
cheese_list["cheese12"]=new Array("cheese12",279.9,201.3,475.9,86.3);
box_cheese is an invisible movie clip for the box and (later) cheese :
var box_cheese:MovieClip = new MovieClip();
Add it to the stage :
383
AS3 tweening platform
addChild(box_cheese);
Add the grey box as child of box_cheese :
box_cheese.addChild(cube);
Insert the cheese on the stage. Attention: You must export mc_cheese to "Export for Action Script" in the library !
Library objects cannot be used if they are not exported ! :
•
•
•
•
•
get x,y from the cheese_list
give each instance a nme
put it on the stage (one also could imagine creating a container for this)
make it more button-like
add an event listener to each cheese, e.g. fromage[N]
for each (var cheese_def in cheese_list) {
var cheese:mc_cheese = new mc_cheese();
Var cheese = cheese[0]; :
cheese.x=cheese_def[1];
cheese.y=cheese_def[2];
cheese.name=cheese_def[0];
Put the cheese on the stage :
stage.addChild(cheese);
Add the "hand" curser :
cheese.buttonMode=true;
trace("fromage = " + cheese.name + " added");
cheese.addEventListener(MouseEvent.CLICK, moveCheese);}
function moveCheese(event:MouseEvent) {
Cheese the user clicked on, we need its name to look up values :
var x1,x2,y1,y2;
var cheese=event.currentTarget;
var cheese_name:String=event.currentTarget.name;
Get the x,y origin coordinates for the animation :
x1=cheese_list[cheese_name][1];//x1 = 2nd element
y1=cheese_list[cheese_name][2];
After each user action, grey mouse on, red mouse off :
red_mouse.visible=false;
mc_jumping_emilie.visible=true;
if (cheese.parent==stage) {
Score :
score=score+1;
trace("cheese moved = " + cheese, ", cheese.name =" +
cheese_name, ",score = " + score);
384
AS3 tweening platform
Compute new cheese coords from left to right and up :
if (score%2==1) {
x2=404+Math.random()*6;// we put them randomly
y2=220-score*14;
} else {
x2=483+Math.random()*6;
y2 = 220 - (score-1) *14;}
Parameters for the cheese animation :
var
var
var
var
vide_avant_caisse_x=x2-30;
vide_avant_caisse_y=y2-100;
vide_avant_caisse2_x=x2;
vide_avant_caisse2_y=y2-50;
Create tween max animation with parameters defined above :
TweenMax.to(cheese, 3,
{bezierThrough:[
{x:vide_avant_caisse_x, y:vide_avant_caisse_y},
{x:vide_avant_caisse2_x, y:vide_avant_caisse2_y},
{x:x2, y:y2}],
ease:Bounce.easeOut});
Now move the whole box_cheese container down a bit, add the cheese as child of the container. In case you want to
remove the cheese, also put back to stage or somewhere else :
box_cheese.addChild(cheese);
box_cheese.y+=2;
} else {
Now allow the child to put the cheese back if he's mistaken :
score-=1;
trace("cheese moved = " + cheese, ", cheese.name =" +
cheese_name, ",score = " + score);
TweenMax.to(cheese, 2,
{bezierThrough:[
{x:cheese.x-50, y:cheese.y-50},
{x:x1, y:y1}],
ease:Bounce.easeOut});
box_cheese.removeChild(cheese);
stage.addChild(cheese);}
}
Verify score :
validation_btn.addEventListener(MouseEvent.CLICK, validateScore);
function box_down() {
TweenMax.to(box_cheese, 3,
{bezierThrough:[
{x:0, y:140},
385
AS3 tweening platform
{x:0, y:160}],
ease:Bounce.easeOut});
}
function box_up() {
TweenMax.to(box_cheese, 3,
{bezierThrough:[{x:0, y:0},{x:0, y:0}],ease:Bounce.easeOut,
delay:5});}
Define sounds :
var sound_request:URLRequest=new URLRequest("too_much_cheese.mp3");
var too_much_cheese_sound:Sound = new Too_much_cheese_class();
var bravo_cheese_sound:Sound
= new Bravo_cheese_class();
function do_nothing() {
}
Define what's happened wen the player wins the game :
function validateScore(ev) {
if (score==8) {
red_mouse.visible=false;
mc_jumping_emilie.visible=true;
validation_btn.visible=false;
bravo_cheese_sound.play();
box_down();
setTimeout(do_nothing,10000);
TweenLite.to(mc_jumping_emilie, 5, {x:mc_jumping_emilie.x-600, y:mc_jumping_emilie.y,delay:3.9});
TweenLite.to(box_cheese, 5, {x:box_cheese.x-600, y:box_cheese.y+160,delay:4,onComplete:onFinishTween});
function onFinishTween():void {
removeChild(box_cheese);
for each (var cheese_def in cheese_list) {
var cheese_name=cheese_def[0];
var cheese=stage.getChildByName(cheese_name);
if (cheese) {
stage.removeChild(cheese);}}
trace("The tween has finished!");
gotoAndPlay( "goodbye_emilie" );}
Define what's happened if the player doesn't count correctly (not enough cheeses) :
} else if (score<8) {
red_mouse.visible=false;
mc_jumping_emilie.visible=true;
mc_jumping_emilie.play();
setTimeout(do_nothing,10000);
box_down();
setTimeout(do_nothing,2000);
box_up();
Define what's happened if the player doesn't count correctly (too much cheeses) :
386
AS3 tweening platform
} else if (score>8) {
box_down();
red_mouse.visible=true;
mc_jumping_emilie.visible=false;
setTimeout(do_nothing,2000);
TweenLite.to(box_cheese, 3, {x:box_cheese.x-10, y:box_cheese.y+160, ease:Bounce.easeOut});
box_up();
TweenLite.to(red_mouse, 5, {x:red_mouse.x-50, y:red_mouse.y, ease:Bounce.easeOut});
box_up();
too_much_cheese_sound.play();}}
And we drop to box to the bottom with style (http://www.greensock.com/tweenmax/) :
TweenMax.to(box_cheese, 3,
{bezierThrough:[
{x:0, y:140},
{x:0, y:160}],
ease:Bounce.easeOut});
Feedback :
if (score==8) {
trace("YOU win");
} else if (score<8) {
trace("NOT enough");
} else if (score>8) {
trace("TOO much");}
}
Source
Admire the result [23]
TimelineLite and TimelineMax
(to be written)
“TimelineLite is a lightweight, intuitive timeline class for building and managing sequences of TweenLite,
TweenMax, TimelineLite, and/or TimelineMax instances. You can think of a TimelineLite instance like a virtual
MovieClip timeline or a container where you place tweens (or other timelines) over the course of time”
(TimelineLite [24], retrieved 18:39, 10 May 2010 (UTC).
“TimelineMax extends TimelineLite, offering exactly the same functionality plus useful (but non-essential) features
like AS3 event dispatching, repeat, repeatDelay, yoyo, currentLabel, addCallback(), removeCallback(), tweenTo(),
tweenFromTo(), getLabelAfter(), getLabelBefore(), and getActive() (and probably more in the future). It is the
ultimate sequencing tool. Think of a TimelineMax instance like a virtual MovieClip timeline or a container where
you position tweens (or other timelines) over the course of time.” (TimelineMax [25], retrieved 18:39, 10 May 2010
(UTC)).
387
AS3 tweening platform
Links
• Greensock.com [26]
References
[1] http:/ / blog. greensock. com/
[2] http:/ / www. greensock. com/ tweennano/
[3] http:/ / www. greensock. com/ tweenliteas3/
[4] http:/ / www. greensock. com/ tweenmaxas3/
[5] http:/ / www. greensock. com/ timelinelite/
[6] http:/ / www. greensock. com/ timelinemax/
[7] http:/ / www. greensock. com/ transformmanageras3/
[8] http:/ / wwww. greensock. com/ tweenliteas3
[9] http:/ / www. greensock. com/ tweenfilterliteas3/
[10] http:/ / www. greensock. com/ tweengroup/
[11] http:/ / www. greensock. com
[12] http:/ / livedocs. adobe. com/ flash/ 9. 0/ ActionScriptLangRefV3/ fl/ motion/ easing/ package-detail. html
[13] http:/ / livedocs. adobe. com/ flash/ 9. 0/ ActionScriptLangRefV3/ fl/ transitions/ easing/ package-detail. html
[14] http:/ / blog. greensock. com/ customease/
[15] http:/ / tecfa. unige. ch/ guides/ flash/ ex4/ tween-lite/ tween-lite-ex1. fla
[16] http:/ / tecfa. unige. ch/ guides/ flash/ ex4/ tween-lite/ tween-lite-ex1. html
[17]
[18]
[19]
[20]
[21]
[22]
[23]
[24]
[25]
[26]
http:/ / www. adobe. com/ devnet/ flash/ articles/ graphic_effects_guide_02. html
http:/ / livedocs. adobe. com/ flash/ 9. 0/ UsingFlash/ help. html?content=WSd60f23110762d6b883b18f10cb1fe1af6-7d64. html
http:/ / livedocs. adobe. com/ flex/ 201/ langref/ flash/ filters/ package-detail. html
http:/ / livedocs. adobe. com/ flex/ 201/ langref/ flash/ filters/ DropShadowFilter. html
http:/ / tecfa. unige. ch/ guides/ flash/ ex/ greensock/ tweenmax-photo-filter. html
http:/ / tecfa. unige. ch/ guides/ flash/ ex/ greensock/ tweenmax-photo-filter. fla
http:/ / tecfaetu. unige. ch/ etu-maltt/ pixel/ ghebali4/ clef/ greensock-as3/ turbo_escargot_vfinale. swf
http:/ / blog. greensock. com/ timelinelite/
http:/ / blog. greensock. com/ timelinemax/
http:/ / www. greensock. com/
388
FliNT particle system
FliNT particle system
Draft
Introduction
Learning goals
• Learn how to use the FLiNT particle library [1]
Prerequisites
• Flash using ActionScript libraries tutorial
Environment
• Flash CS3
Moving on
• See the Flash tutorials.
Level and target population
• Absolute ActionScript beginners (but see the prerequisites). This tutorial is meant for Flash designers working
with CS3, CS4, CS5 etc. and are willing to learn some ActionScript in order to reuse Flint example code to create
special effects.
Quality
• useable, but under progress.
To Do
• Other examples
The FliNT particle system
“Flint is an open-source project to create a versatile particle system in ActionScript 3. The aim is to create a system
that handles the common functionality for all particle systems, has methods for common particle behaviour, and lets
developers extend it easily with their own custom behaviours without needing to touch the core code. ([1])”. That
may sound very technical and it actually is. Such libraries are meant primarily for "real" ActionScript programmers.
However, Flash designers with a little bit of ActionScript programming know-how can also use such code. In
particular, they simply may slightly adapt the excellent examples that are for download.
Flint is developed by Richard Lord [2] and is released under the free open source MIT licence [3].
Firstly have a look [4] at what this particle system can do. Cool isn't it ?
Download and install the Flint system
Step 1 - download
• Get the swc (Flash compiled movie clip) from flintparticles.org [1]
As of oct 2009: Flint_2_1_2_swc.zip [5]
• Dezip the file.
Step 2 - You may install it into the Flash Components directory, e.g. for CS4/Vista:
• Close Flash Professional (e.g. CS4)
• Copy the directory that includes the files Flint2d.swc and Flint3d.swc to the components directory of your flash
installation, e.g. in CS4/VISTA:
389
FliNT particle system
390
C:\Programs\Adobe\Adobe Flash CS4\Common\Configuration\Components
The directory now should look like this:
c:\Program Files\Adobe\Adobe Flash CS4\Common\Configuration\Components:
0
0
0
0
1778688
0
306176
Nov
Oct
Nov
Nov
Sep
Oct
Sep
26 2008 Data
15 18:39 Flint_2_1_2_swc
26 2008 Media
26 2008 User Interface
09 2008 User Interface.fla
01 15:22 Video
09 2008 Video.fla
Open CS4 again, your components panel now should include the Flint classes. This is probably a dumb thing to do,
but the advantage is that you can remember that you have these libraries and where ;) Anyhow, putting these files
there, will not change a thing with respect to the next step .....
Step 3 - Fix the source path
• Read Flash using ActionScript libraries tutorial for a detailed explanation, else we will show how to do this
below.
Alternative: Install the source
Skip this step if you took the *.swc files !
Step 1 - download the FliNT particle system
Get a zip file of FliNT source from http://flintparticles.org/.took:
• E.g. on May 2010: Flint_2_1_4_swc.zip [6]
You also may download extra stuff, i.e. documentation and examples (both can be found in the same place [7])
Dezip these three archives in a new directory.
Now since we are interested in snowflakes were are actually really lucky. There is both example code (in the
example zip file) and a nice Introducing Flint with a snow effect [8] tutorial made by Richard Lord the author of the
Flint system.
Step 2 - create a new Flash (ActionScript 3.0) file
• Create a new directory for this project
• Make sure that you really use ActionScript 3.0, else change that in the File->PublishSettings - Flash tab too.
• If you want, you can move the "src" sub-directory of the Flint system to the root of this new directory and rename
it to something like "flint"
Let's snow
You might want snowflakes. Creating a nice snowing animation with lots of snowflakes by drawings would be very
tedious and programming them yourself is a bit difficult (unless you are a "real" programmer). You now have two
options:
1. Finding some special purpose snowflakes code on the web
• There is for example the Creating Falling Snowflakes in Flash Using ActionScript 2 [9] video tutorial. We also
have a flying kites example in the Flash embedded movie clip tutorial that you could repurpose.
2. Using a more general purpose library that will create the whole animation (including the snowflakes), something
that you will learn now. Basically we just copy/paste the code from Introducing Flint with a snow effect [8]. Or
more precisely we took the example code from the downloaded Flint_2_0_0_b_examples.zip [10] on oct 23, 2008
FliNT particle system
391
and made 2-3 tiny modifications.
Step 0 - Fix the Classpath in Flash
• Open the File->Publish Settings - Flash tab
• Then click on the Settings ... button next to the ActionScript version. You should see something like this now:
In these ActionScript 3.0 settings, you
then have to add the name of the
subdirectory where the flint system
sits.
Important differences:
• If you are working with the source
code version of Flint, then open the
source path tab (by default it's
open), then click on the "target"
Browse to Path icon and select the
"src" directory of the FliNT system.
• If you work with the svc version
(compiled), then select libary path
and select the place where the swc
library sits. e.g. the "dumb" place I
put it into:
Setting the classpath in Flash CS3
C:\Program Files\Adobe\Adobe Flash CS4\Common\Configuration\Components\Flint_2_1_2_swc
Basically, what you have to understand at this point is that your application has to know in which directory to look
for the FliNT code. The "org" subdirectory of the source code version must be a direct sub-directory of the classpath
directory you just defined. If you want to understand more about packages and classes you'll have to dig fairly
deeply into ActionScript programming, something we will not do here ...
Step 1 - Create a frame for which you want snowfall.
• Firstly you need a typical winter scene, e.g. a nice photo, such as the one that you can see in the original example
[11]
made by Richard Lord. A local copy of the swf is here [12]).
Personally, I'd like to have some snow in my Office as you can see in our own version [13]. So firstly we need to
import a picture. I made the orginal much darker with higher contrasts in order to be able to see the snowflakes. It
may be too dark on your screen, but on my DELL M1730 laptop it looks just fine.
• This picture is now in frame one of layer 1. Rename the layer to picture.
• Add a new layer and call it script.
Step 2 - Add the Action Script
• Click in frame 1 of the script layer, hit F9 and copy/paste the following code. You also must include the copyright
notice. I believe that we really are lucky to be able to use such libraries. So please, be respectful !
/*
* FLINT PARTICLE SYSTEM
* .....................
*
* Author: Richard Lord
FliNT particle system
* Copyright (c) Big Room Ventures Ltd. 2008
* http://flintparticles.org/
*
* Licence Agreement
*
* Permission is hereby granted, free of charge, to any person obtaining a copy
* of this software and associated documentation files (the "Software"), to deal
* in the Software without restriction, including without limitation the rights
* to use, copy, modify, merge, publish, distribute, sublicense, and/or sell
* copies of the Software, and to permit persons to whom the Software is
* furnished to do so, subject to the following conditions:
*
* The above copyright notice and this permission notice shall be included in
* all copies or substantial portions of the Software.
*/
import org.flintparticles.common.counters.*;
import org.flintparticles.common.displayObjects.RadialDot;
import org.flintparticles.common.initializers.*;
import org.flintparticles.twoD.actions.*;
import org.flintparticles.twoD.emitters.Emitter2D;
import org.flintparticles.twoD.initializers.*;
import org.flintparticles.twoD.renderers.*;
import org.flintparticles.twoD.zones.*;
// We keep the same here - unlike the original
// addChild( new SnowBackground() );
var emitter:Emitter2D = new Emitter2D();
emitter.counter = new Steady( 150 );
emitter.addInitializer( new ImageClass( RadialDot, 2 ) );
// Modified DKS - our picture is a bit larger
// emitter.addInitializer( new Position( new LineZone( new Point( -5, -5 ), new Point( 605, -5 )) ) );
emitter.addInitializer( new Position( new LineZone( new Point( -5, -5 ), new Point( 645, -5 ) ) ) );
emitter.addInitializer( new Velocity( new PointZone( new Point( 0, 65 ) ) ) );
emitter.addInitializer( new ScaleImageInit( 0.75, 2 ) );
emitter.addAction( new Move() );
// Modified DKS - our picture is a bit larger
// emitter.addAction( new DeathZone( new RectangleZone( -10, -10, 620, 420 ), true ) );
emitter.addAction( new DeathZone( new RectangleZone( -10, -10, 645, 485 ), true ) );
emitter.addAction( new RandomDrift( 20, 20 ) );
var renderer:DisplayObjectRenderer = new DisplayObjectRenderer();
renderer.addEmitter( emitter );
392
FliNT particle system
393
addChild( renderer );
emitter.start();
emitter.runAhead( 10 );
// We keep the same here - unlike the original
// addChild( new SnowForeground() );
That was really easy. We just took the code from the Flint_2_0_0_b_examples.zip [10] archive and made 2 little
modifications. We only use a single background and commented out 2 lines. Also, we changed two parameters since
our picture is a bit bigger.
Step 3 - Error messages ?
If you see something like this:
Scene1, Layer 'Script', Frame 1, line 22
1172: Definition org.flintparticles.common.counters could not be found.
then you most likely got your classpath definition wrong. See above !
If it isn't snowing all over your picture, then you will have to adjust 2 lines in the AS3 code. Figure it out yourself by
looking at our inserted comments in the AS code above. Also you should get the DeathZone right. This is a hidden
area underneath the picture where the falling down flakes are killed.
Result and source code
The result:
• flint-snowflakes.html [13]
Get the flint-snowflakes.fla file from the following places. But please recall that you will have to set the classpath
(aka source-path) for the FLiNT library. It will not work "as is" !
• flint-snowflakes.fla [14] (CS3)
• flint-snowflakes2.fla [15] (CS4)
There is no difference between CS3 and CS4 versions, except that one can't open CS4 files in CS3.
Want to understand a bit more ?
Read the Introducing Flint with a snow effect [8] tutorial made by Richard Lord.
Our only contribution was to add some explanations on how to define a classpath, i.e. the very basics about how to
reuse such an example and which R.L. doesn't explain (since he made this library for programmers and not designers
in the first place).
Burning Logos
Something else you can with this particle system is to create burning Logos, e.g. something that symbolizes how hot
the master program you should join [16] is.
The example below is just a adaptation of the example distributed in the Downloads
maybe different online version of the burning Flint Logo [17].
[7]
. You also can look at the
To create your own burning logo you need two things:
• A *.png file with a logo. This file must have the following properties
• Background color should be Alpha channel. In GIMP for example, menu Colors->Color to Alpha, then select
the color, e.g. white if your drawing is orange on white. Else your whole picture will burn.
• Color of the letters should be orange (FF9900) unless you make more changes to the code.
FliNT particle system
394
• A "fireblob", i.e. a small graphic with a radial color gradient (see the Flash colors tutorial). You can just copy the
one that you will find in the source code of this example.
Step 1 - Import logo and the fireblob to your library
• Create a logo and put in the library (just the drag the png from the file explorer into the library)
• Copy the blob from our fla file
Step 2 - Make these linkable classes
• This is already done for the fireblob
• Right click on the icon of the *.png bitmap in the library and select linkage
• Type "Logo" (not LOGO or anything else) and check "Export for ActionScript" then hit OK
Class: Logo
You now should have a setup that looks like this (minus the fire log which we shall create below). Enlarge the
picture below if you can't make out the details.
Step 3 - Copy some ActionScript code
and make a few adjustments
• Click on Frame 1 and hit F9, then
paste the code you will find below
You then have to make adjustments
where I inserted comments:
• Set the size of the Logo (just look it
up in the properties of the graphic in
the library)
Setting up a linkage property for the Logo to set on fire
var bitmapData:BitmapData = new Logo( 332, 99);
• Position the Logo, wherever you want it to be
bitmap.x = 35;
bitmap.y = 35;
• Position the Fires, should be the same as above
emitter.x = 35;
emitter.y = 35;
Code to copy/paste:
/*
* FLINT PARTICLE SYSTEM
* .....................
*
* Author: Richard Lord
* Copyright (c) Big Room Ventures Ltd. 2008
* http://flintparticles.org/
*
FliNT particle system
395
* Licence Agreement
*
* Permission is hereby granted, free of charge, to any person obtaining a copy
* of this software and associated documentation files (the "Software"), to deal
* in the Software without restriction, including without limitation the rights
* to use, copy, modify, merge, publish, distribute, sublicense, and/or sell
* copies of the Software, and to permit persons to whom the Software is
* furnished to do so, subject to the following conditions:
*
* The above copyright notice and this permission notice shall be included in
* all copies or substantial portions of the Software.
*
*/
import org.flintparticles.common.debug.*;
import org.flintparticles.common.actions.*;
import org.flintparticles.common.counters.*;
import org.flintparticles.common.displayObjects.RadialDot;
import org.flintparticles.common.initializers.*;
import org.flintparticles.twoD.actions.*;
import org.flintparticles.twoD.emitters.Emitter2D;
import org.flintparticles.twoD.initializers.*;
import org.flintparticles.twoD.renderers.*;
import org.flintparticles.twoD.zones.*;
import org.flintparticles.common.energyEasing.TwoWay;
// Look up the dimensions of your logo (Right-click in the library->Properties)
var bitmapData:BitmapData = new Logo( 332, 99);
var bitmap:Bitmap = new Bitmap();
bitmap.bitmapData = bitmapData;
addChild( bitmap );
// Position the bitmap graphic on the scene
bitmap.x = 35;
bitmap.y = 35;
var emitter:Emitter2D = new Emitter2D();
emitter.counter = new Steady( 600 );
emitter.addInitializer( new Lifetime( 0.8 ) );
emitter.addInitializer( new Velocity( new DiscSectorZone( new Point( 0, 0 ), 10, 5, -Math.PI * 0.75, -Math.PI * 0.25 ) ) );
emitter.addInitializer( new Position( new BitmapDataZone( bitmapData ) ) );
emitter.addInitializer( new ImageClass( FireBlob ) );
emitter.addAction( new Age( TwoWay.quadratic ) );
emitter.addAction( new Move() );
emitter.addAction( new Accelerate( 0, -20 ) );
emitter.addAction( new ColorChange( 0xFFFF9900, 0x00FFDD66 ) );
FliNT particle system
emitter.addAction( new ScaleImage( 1.4, 2.0 ) );
emitter.addAction( new RotateToDirection() );
var renderer:BitmapRenderer = new BitmapRenderer( new Rectangle( 0, 0, 500, 200 ) );
renderer.addEmitter( emitter );
addChild( renderer );
// The fire must be in the same position as the bimap
emitter.x = 35;
emitter.y = 35;
emitter.start( );
Step 4 - Admire the result and play with the source code
• the result [18]
• The source code: flint-firelogo.fla [19]
• Other files are also in the same http://tecfa.unige.ch/guides/flash/ex/flint/directory.
Step 5 - Change colors
Maybe you may rather want to demonstrate how burning cool your institutions is. All you need to do is make a Logo
in blue and then change a line in the AS3 code.
To change the color of the fire emitter, you have to understand that the ColorChange class wants 2 arguments: The
color of Logo and the color of the bright parts of the flames. That being said, you can use any colors you want of
course. So we change this orange fire:
emitter.addAction( new ColorChange( 0xFFFF9900, 0x00FFDD66 ) );
into a blue cool fire:
emitter.addAction( new ColorChange( 0xFF0000FF, 0x00DDFFFF ) );
• the result [20]
• The source code: flint-blue-fire-logo.fla [21]
Step 6 - reuse these logos as movie clips
In principle you should be able to import *.swf "movies" to the library and then use them like internal movie clips,
but I wasn't able to import these into the library for a reason I don't understand yet (Flash doesn't give any feedback,
it just doesn't import).
Instead I'll show you how to have multiple Logos on fire within a same Flash file. All you need is to create
embedded movie clips for each Logo and then attach an AS3 script to each of these. See the Flash embedded movie
clip tutorial if don't know how to create embedded movie clips.
Some hints (for the rest, please dig into the fla file below):
• Registration point of the embedded movie clips should be in the upper left
• x and y coordinates for the fire animation should be 0 (see the AS3 code in the Fla file)
• Also in one AS code the Class representing the Bitmap was renamed to Logo2. This also requires a change in one
of the scripts.
Results:
• the result [22]
• The source code: flint-fire-ad.fla [23]
396
FliNT particle system
Of course, this needs some tuning, e.g. it's too fast and the frame rate is too low and it's otherwise ugly. Anyhow, I
wouldn't join a degree program that banks on the effect of a Flash Logo ;)
Playing around with the other FliNT examples
The Flint examples all come in two versions, either Flash or PureAS3. Go for the Flash version (unless you want to
learn how to play with Flex in which case you will have to start reading the Adobe Flex and AS3 Compiling a
program tutorials in this wiki).
The Flash version examples usually have just a single line in the script code that you insert in frame 1:
include Frame1.as
This instruction simply includes the contents of the file "Frame1.as" that you will find in the same directory. In our
examples above we just copy/pasted the contents of these *.as files into the AS script. The result is the same, but the
strategy of including an *.as file is smarter if you plan to reuse your code and if your prefer to use a different editor.
We included the code in the *.fla for the simple reason that this way you only need to grab a single file.
To play with the examples in the Flash CS3 environment, the only thing you will have to do is to open the respective
*.fla and then fix the classpath, i.e. tell Flash where the Flint_xxxx/src directory is located. E.g. if you need a
firework, open in CS3 the
Flint_2_0_0_b_examples/examples2D/Firework/Flash/Firework.fla
Then fix the classpath as described in the Let's snow example
Finally hit CTRL-Enter or publish.
Notice: The resulting swf always will include all the necessary ActionScript code, i.e. you won't have to copy the
Flint files to the server.
Links
• FLINT particle system [1]
• Documentation [24]
• download directory [7]
References
[1] http:/ / flintparticles. org/ about
[2] http:/ / bigroom. co. uk/
[3] http:/ / www. opensource. org/ licenses/ mit-license. php
[4] http:/ / flintparticles. org/ examples
[5] http:/ / flint-particle-system. googlecode. com/ files/ Flint_2_1_2_swc. zip
[6] http:/ / flint-particle-system. googlecode. com/ files/ Flint_2_1_4_swc. zip
[7] http:/ / code. google. com/ p/ flint-particle-system/ downloads/ list
[8] http:/ / flintparticles. org/ tutorials/ snowfall
[9] http:/ / www. oman3d. com/ tutorials/ flash/ video/ snowflakes. php
[10] http:/ / flint-particle-system. googlecode. com/ files/ Flint_2_0_0_b_examples. zip
[11] http:/ / flintparticles. org/ examples/ snowfall
[12] http:/ / tecfa. unige. ch/ guides/ flash/ ex/ flint/ Snowfall. html
[13] http:/ / tecfa. unige. ch/ guides/ flash/ ex/ flint/ flint-snowflakes. html
[14] http:/ / tecfa. unige. ch/ guides/ flash/ ex/ flint/ flint-snowflakes. fla
[15] http:/ / tecfa. unige. ch/ guides/ flash/ ex4/ flint/ flint-snowflakes2. fla
[16] http:/ / tecfa. unige. ch/ guides/ flash/ ex/ flint/ flint-fire-logo. swf
[17] http:/ / flintparticles. org/ examples/ logofire
[18] http:/ / tecfa. unige. ch/ guides/ flash/ ex/ flint/ flint-fire-logo. html
[19] http:/ / tecfa. unige. ch/ guides/ flash/ ex/ flint/ flint-firelogo. fla
397
FliNT particle system
[20]
[21]
[22]
[23]
[24]
http:/ / tecfa. unige. ch/ guides/ flash/ ex/ flint/ flint-blue-fire-logo. html
http:/ / tecfa. unige. ch/ guides/ flash/ ex/ flint/ flint-blue-fire-logo. fla
http:/ / tecfa. unige. ch/ guides/ flash/ ex/ flint/ flint-fire-ad. html
http:/ / tecfa. unige. ch/ guides/ flash/ ex/ flint/ flint-fire-ad. fla
http:/ / flintparticles. org/ documentation
Flash Papervision3D tutorial
Draft
Introduction
Learning goals
• Create a simple 3D scene with Papervison3D (PV3D)
• The objective is to show the logic of such a library. Once you are done with this you will have to spend of few
weeks going through real tutorials and the documentation...
Flash and Papervision3D level
• Flash 9 / CS3
• Papervision 2.0
Prerequisites
• Some ActionScript knowledge
• Flash using ActionScript libraries tutorial
Moving on
• See the Flash tutorials
Level and target population
• Absolute beginners
Quality
• Not very good, I need to go over this and add better (easy) examples.
Download and install
Use the swc library
Papervision3D is distributed in several formats. The most practical method is to install a *.swc library.
Download
Download from Code.google/papervision3D [1] (take the latest or a featured *.swc version).
• E.g. on May 2010 we took Papervision3D_2.1.932.swc [2].
Install
• Read Flash using ActionScript libraries tutorial
Basically, CS* must be able to find this library:
• Open File->Publish Settings
• Click on Flash tab
• Click on Settings
• Select libary path, click on the + and select the place where your swc library sits.
398
Flash Papervision3D tutorial
Alternatively, you also could just put the *.swc file in the same directory as your flash file. But then you will many
multiple copies ...
Using source code SVN repository
For some reasons, i.e. if you you want to work with the source you can downloaded from the SVN repository. Read
the Revision control system tutorial if you don't know how to use these repositories.
http://papervision3d.googlecode.com/svn/trunk/as3/trunk/
Create a new directory somewhere, go there then download. On windows you can use a GUI client like, under Linux
go to the new directory and type:
subversion checkout http:/ / papervision3d. googlecode. com/ svn/ trunk/ as3/ trunk/
You then should have a directory "trunk" with a sub-directory structure like this:
bin
build
docs
examples
src
.svn
CS3/CS4 setup
• CS Flash professional must be able to find this library in a classpath. Read Flash using ActionScript libraries
tutorial if you want to learn more about this. Otherwise, just follow precisely these instructions.
• Open the File->Publish Settings - Flash tab
• Then click on the Settings ... button next to the ActionScript version.
• Click on the "target"/"Browse to Path" icon and select the "src" directory of the Papervison library in your
computer.
E.g. I keep the subversion tree on my Linux machine, but I copied the trunk directory to my laptop and renamed it. I
added this classpath:
c:\lib\pv3d\src
On your PC you may have something like that:
s:\flash\pv3d\trunk\src
The only thing that really matters is that Flash can find the contents of the "src" directory
399
Flash Papervision3D tutorial
Some basic concepts
The coordinate system
An object's position in Papervision is defined by x, y, and z and pitch, yaw, roll. In addition it can be scaled or
otherwise transformed.
Coordinates in 3D systems are defined as follows:
Coordinates in 3D vector graphics
Papervision positions in space are defined with these x-y-z coordinates:
• x axis = Width, i.e. left(-) to right(+)
• y axis = Height, i.e. down(-) to up(+)
• z axis = Depth, i.e. close/forward (+) to far/backward (-) (z-axis comes out of the screen)
In most other systems, e.g. X3D, the z-axis is inverted:
• z axis = Depth, i.e. close/forward (-) to far/backward (+) (z-axis goes into the screen)
You can picture the "normal" 3D coordinate system with the right hand rule: "x" is your thumb, "y" the index finger,
and "z" the middle finger.
The right hand rule in X3D vector graphics, you
have to rotate your hand forward for Papervision
or think of a left hand system ;)
Orientation of an object is defined by "yaw", "pitch" and "roll". Imagine what a ship can do:
400
Flash Papervision3D tutorial
• Yaw is left-right orientation. Imagine turning your head or your body around to look at something. "The ship can't
hold its track."
• Pitch is backwards-forwards up/down orientation. "The ship goes straight into big waves."
• Roll is left-right up/down orientation. "The ship is hit on the side by big waves."
Therefore, in 3-D graphics there are six degrees of freedom: 3 positions (x,y,z) plus yaw (around the y axis ), pitch
(around the x axis) and roll (around the z axis)
The rendering mechanism
For objects to be seen, they need to have a visible material, be placed in the scene and rendered from a camera that
looks at them.
An introductory example
Some more explanation should be added sometimes. For now all the help is in the code :)
A simple CS3 timeline script
If you look at pv3d examples on the web they all assume that you program with a class structure and external
ActionScript files. Here we first show how to use pv3d in a simple timeline script. Of course, it doesn't do anything
of interest. Look at this rotating cube [3]
To make this example work you need a correctly configured classpath (as above). The just copy paste this code into
a frame of your time line (e.g. frame 1 of layer 1). In the example we also added a layer with a background and a
layer with a credits button. You won't need these.
// Probably some imports can be trimmed...
import flash.display.*;
import flash.filters.*;
import flash.display.Stage;
import flash.events.*;
// Import Papervision3D
import org.papervision3d.cameras.Camera3D;
import org.papervision3d.scenes.*;
import org.papervision3d.objects.*;
import org.papervision3d.objects.primitives.*;
import org.papervision3d.materials.*;
import org.papervision3d.materials.special.*;
import org.papervision3d.materials.utils.*;
import org.papervision3d.render.*;
import org.papervision3d.view.*;
import org.papervision3d.events.*;
import org.papervision3d.core.utils.*;
// Make sure we can see everything
stage.scaleMode = "showAll";
// This will launch the loop function once a frame is loaded
// It will turn the cube a bit.
401
Flash Papervision3D tutorial
addEventListener( Event.ENTER_FRAME, loop );
// Create viewport
var viewport = new Viewport3D(0, 0, true, true);
addChild( viewport );
var renderer = new BasicRenderEngine();
// This will create the list of colors for each face of the cube
var materials:MaterialsList = new MaterialsList( {
front: new ColorMaterial(0xFF0000),
back: new ColorMaterial(0x0000FF),
right: new ColorMaterial(0x00FF00),
left: new ColorMaterial(0x000000),
top: new ColorMaterial(0xFF0000),
bottom: new ColorMaterial(0xFF0000) } );
//Create my_cube and add it to the scene
// We also define width, depth and height
var my_cube = new Cube( materials, 500, 500, 1000 );
// Let's create a floor underneath the cube
var wire_materials:MaterialsList = new MaterialsList({all: new
WireframeMaterial(0xFF0000)});
var my_floor = new Cube(wire_materials, 800, 800, 50);
my_floor.y = -600;
// Create a 3D scene and add the cube to it
var scene = new Scene3D();
scene.addChild(my_cube);
scene.addChild(my_floor);
// Create camera
// By default the camera looks forward, we push it a bit backwards
var camera = new Camera3D();
camera.z = -800 ;
camera.zoom = 10;
// ___________________________________________________________________
Loop
function loop(event:Event):void {
my_cube.yaw(.5);
renderer.renderScene(scene, camera, viewport);
}
Source CS3
402
Flash Papervision3D tutorial
403
• simple-noclass-pv3d.fla [4]
• Directory: http://tecfa.unige.ch/guides/flash/ex/pv3d/
Source CS4
• simple-noclass-pv3d.fla [5]
• Directory: http://tecfa.unige.ch/guides/flash/ex4/pv3d/
Let's now take our previous example and make it a class structure.
An AS version of the rotating cube
You can read the AS3 Compiling a program article if you want to learn how to compile AS programs in various
environments. Here, we explain how to do it with Flash CS3.
Have a look at the simple-as-pv3d.html [6] result before.
• Create a new ActionScript file (not a Flash file). Now, save it as Simplepv3d.as (stick to this name unless you
want to change code further down).
• Copy paste the following code
package {
import
import
import
import
flash.display.*;
flash.filters.*;
flash.display.Stage;
flash.events.*;
// Import Papervision3D
import org.papervision3d.cameras.Camera3D;
import org.papervision3d.scenes.*;
import org.papervision3d.objects.*;
import org.papervision3d.objects.primitives.*;
import org.papervision3d.materials.*;
import org.papervision3d.materials.special.*;
import org.papervision3d.materials.utils.*;
import org.papervision3d.render.*;
import org.papervision3d.view.*;
import org.papervision3d.events.*;
import org.papervision3d.core.utils.*;
public class Simplepv3d extends MovieClip {
private
private
private
private
private
private
var
var
var
var
var
var
renderer:BasicRenderEngine;
scene :Scene3D;
my_cube:Cube;
my_floor:Cube;
camera:Camera3D;
viewport:Viewport3D;
//__________________________________ init
// This method with the same name as the class will be
called when the class is instantiated (when the thing loads)
public function Simplepv3d() {
Flash Papervision3D tutorial
404
// Make sure we can see everything
stage.scaleMode = "noScale";
// Build the scene
init3D();
// This will launch the loop function once a frame is
loaded
// It will turn the cube a bit.
addEventListener( Event.ENTER_FRAME, loop );
}
//__________________________________ build the 3D scene
public function init3D() {
// Create viewport
viewport = new Viewport3D(0, 0, true, true);
addChild( viewport );
// Create a rendering engine
renderer = new BasicRenderEngine();
// Create a 3D scene (the scene property is defined
by pv3d)
scene = new Scene3D();
// This will create the list of colors for each face
of the cube
var materials:MaterialsList = new MaterialsList( {
front: new ColorMaterial(0xFF0000),
back: new ColorMaterial(0x0000FF),
right: new ColorMaterial(0x00FF00),
left: new ColorMaterial(0x000000),
top: new ColorMaterial(0xFF0000),
bottom: new ColorMaterial(0xFF0000) } );
//Create my_cube and add it to the scene
// We also define width, depth and height
my_cube = new Cube( materials, 500, 500, 1000 );
// Let's create a floor underneath the cube
var wire_materials:MaterialsList = new
MaterialsList({all: new WireframeMaterial(0xFF0000)});
my_floor = new Cube(wire_materials, 800, 800, 50);
my_floor.y = -600;
scene.addChild(my_cube);
scene.addChild(my_floor);
// Create camera
Flash Papervision3D tutorial
405
// By default the camera looks forward, we push it a
bit backwards
camera = new Camera3D();
camera.z = -800 ;
camera.zoom = 5;
renderer.renderScene(scene, camera, viewport);
}
// ________________________________________ Loop
private function loop(event:Event):void {
// trace("New frame");
my_cube.yaw(.5);
renderer.renderScene(scene, camera, viewport);
}
}
}
• Don't forget to save this file.
• Then create a new Flash / ActionScript 3 file and insert the name of the file without the "as" extension in the
Document class of the Properties panel. If don't understand this read AS3 Compiling a program or simply look at
the source file.
Result and Source CS3
•
•
•
•
simple-as-pv3d.html [6]
simple-as-pv3d.fla [7]
Simplepv3d.as [8] (same code as above in principle)
Directory: http://tecfa.unige.ch/guides/flash/ex/pv3d/
Programming with a class structure in PV version 1.5
According to Anre Stubbe's ExampleBaseCode article [9] in the Papervision3D wiki, basic Papervision 1.5 code (i.e.
the previous but still popular version in nov 2008) should look like this:
package
{
import flash.display.Sprite;
import flash.events.Event;
import org.papervision3d.cameras.Camera3D;
import org.papervision3d.scenes.MovieScene3D;
[SWF(width='400',height='400',backgroundColor='0x000000',frameRate='30')]
public class ExampleBaseCode extends Sprite
{
private var container :Sprite;
private var scene :MovieScene3D;
private var camera :Camera3D;
Flash Papervision3D tutorial
406
public function ExampleBaseCode()
{
// create the container
// the scene object will place all displayable
objects into this container
container = new Sprite;
// center the containers screen coordinates to the
middle of the flash stage
// the scene world center (x=0,y=0,z=0) is now where
the screen coordinates of the container are (x=200, y=200)
container.x = 200;
container.y = 200;
// don't forget to add the container to the stage,
otherwise you'll see nothing
addChild( container );
// create a scene
scene = new MovieScene3D( container );
//scene = new Scene3D( container ); more primitive
alternative, compare scenes.Scene3D.as and scenes.MovieScene3D.as to
discover why.
// create a camera
camera = new Camera3D();
camera.z = -500; // push the camera a bit backward
camera.zoom = 5;
// add something to your scene
// scene.addChild( something );
// create an enterframe loop
stage.addEventListener( Event.ENTER_FRAME,
onEnterFrame );
}
private function onEnterFrame( event: Event ): void
{
// render the scene
scene.renderCamera( camera );
}
Flash Papervision3D tutorial
}
}
Links
Official and semi-official sites
• Papervision 3D blog [10]. Includes all the information (news, download information, tutorials, links, good
examples etc.)
• PaperVision3D [11] (PV3D). Demo page (not very useful), links to to blog.papervision3d.org.
• dev.papervision3d.org [12] this is the PV3D developers blog (to keep in touch with latest developments)
• PV3World [13]. Testing ground, tutorial and other resources.
• directory of examples [14]
• Papervision 3D downloads [1] (at google code).
ActionScript documentation
• Papervision3D Official Documentation [15] (Packages and classes).
Other important sites
• Daily Papervision3d [16] Daily compilation of Papervision3d Websites.
• Pv3d.org [17] Papervision3D, ActionScript, and Flex examples and tutorials by John Lindquist
• Pv3world.com [13]. An experimental testing ground, tutorial knowledge base and resource center for
Papervision3D technology
Examples
• Examples [18] (Papervision3D Wiki)
• 'Papervision' Category [19], Meandering thoughts
• TittyBingo [20] (blog post with link)
Tutorials
• Papervision 3D Tutorials [21] and Papervision3D Tutorials in Flex3 [22]
• Papervision 2 [23]
• Papervision tutorials [24] at Bright Hub.
•
•
•
•
•
•
•
•
•
•
•
•
•
•
•
Papervision 3D Programing Tutorial - 3D Text [25]
Papervision 3D Programming Tutorial - Loading and Displaying a 3D Model [26]
Papervision 3D Programming Tutorial - Particle Systems with Flint [27]
Papervision 3D Programming Tutorial - Modify Textures At Runtime [28]
Papervision 3D Programming Tutorial - WOW Physics [29]
Papervision 3D Programming Tutorial - Shading [30]
Papervision 3D Programming Tutorial - Effects [31]
Papervision 3D Programming Tutorial - Animated Textures [32]
Papervision 3D Programming Tutorial - BitmapViewport [33]
Papervision 3D Programing Tutorial - Environment Mapping [34]
Papervision 3D Programming Tutorial - SkyBox [35]
Papervision 3D Programming Tutorial - Animation [36]
Papervision 3D Programming Tutorial - Texture Smoothing [37]
Papervision 3D Programming Tutorial - Mouse Selection [38]
Papervision 3D Programming Tutorial - Enhanced Fog [39]
• Papervision 3D Programming Tutorial - Terrain [40]
• Papervision 3D Programming Tutorial - Simple LOD [41]
407
Flash Papervision3D tutorial
• Papervision 3D Programming Tutorial - Mesh Splitting [42]
References
[1] http:/ / code. google. com/ p/ papervision3d/ downloads/ list
[2] http:/ / papervision3d. googlecode. com/ files/ Papervision3D_2. 1. 932. swc
[3] http:/ / tecfa. unige. ch/ guides/ flash/ ex/ pv3d/ simple-noclass-pv3d. html
[4] http:/ / tecfa. unige. ch/ guides/ flash/ ex/ pv3d/ simple-noclass-pv3d. fla
[5] http:/ / tecfa. unige. ch/ guides/ flash/ ex/ pv3d/ simple-noclass-pv3d-cs4. fla
[6] http:/ / tecfa. unige. ch/ guides/ flash/ ex/ pv3d/ simple-as-pv3d. html
[7] http:/ / tecfa. unige. ch/ guides/ flash/ ex/ pv3d/ simple-as-pv3d. fla
[8] http:/ / tecfa. unige. ch/ guides/ flash/ ex/ pv3d/ Simplepv3d. as
[9] http:/ / www. andrestubbe. com/ downloads/ papervision3d/ ExampleBaseCode. as
[10] http:/ / blog. papervision3d. org/
[11] http:/ / www. papervision3d. org/
[12] http:/ / dev. papervision3d. org/
[13] http:/ / pv3world. com/ blog/
[14] http:/ / pv3world. com/ labs/
[15] http:/ / papervision3d. googlecode. com/ svn/ trunk/ as3/ trunk/ docs/ index. html
[16] http:/ / dailypv3d. wordpress. com/
[17] http:/ / pv3d. org/
[18]
[19]
[20]
[21]
[22]
[23]
[24]
[25]
[26]
[27]
[28]
[29]
[30]
[31]
[32]
[33]
[34]
[35]
[36]
[37]
[38]
[39]
[40]
[41]
[42]
http:/ / wiki. papervision3d. org/ index. php?title=Examples
http:/ / extralongfingers. com/ wordpress/ ?cat=4
http:/ / dailypv3d. wordpress. com/ 2010/ 01/ 12/ titty-bingo-2/
http:/ / flashenabledblog. com/ tutorials/ papervision-3d-tutorials/
http:/ / flashenabledblog. com/ 2008/ 05/ 12/ papervision3d-tutorials-in-flex-3/
http:/ / papervision2. com/
http:/ / www. brighthub. com/ internet/ web-development/ tags/ papervision. aspx
http:/ / www. bukisa. com/ articles/ 31862_papervision-programming-tutorial-3d-text
http:/ / www. brighthub. com/ internet/ web-development/ articles/ 12902. aspx
http:/ / www. brighthub. com/ internet/ web-development/ articles/ 13650. aspx
http:/ / www. brighthub. com/ internet/ web-development/ articles/ 13775. aspx
http:/ / www. brighthub. com/ internet/ web-development/ articles/ 13776. aspx
http:/ / www. brighthub. com/ internet/ web-development/ articles/ 13880. aspx
http:/ / www. brighthub. com/ internet/ web-development/ articles/ 14251. aspx
http:/ / www. brighthub. com/ internet/ web-development/ articles/ 14372. aspx
http:/ / www. bukisa. com/ articles/ 31590_papervision-3d-programming-tutorial-bitmapviewport
http:/ / www. bukisa. com/ articles/ 32125_papervision-3d-programming-tutorial-environment-mapping
http:/ / www. bukisa. com/ articles/ 32650_papervision-programming-tutorial-skybox
http:/ / www. bukisa. com/ articles/ 32992_papervision-programming-tutorial-animations
http:/ / www. bukisa. com/ articles/ 33410_papervision-3d-programming-tutorial-texture-smoothing
http:/ / www. bukisa. com/ articles/ 33421_papervision-3d-programming-tutorial-mouse-selection
http:/ / www. bukisa. com/ articles/ 34039_papervision-3d-programming-tutorial-enhanced-fog
http:/ / www. bukisa. com/ articles/ 34551_papervision-3d-programming-tutorial-terrain
http:/ / www. bukisa. com/ articles/ 35656_papervision-3d-programming-tutorial-simple-lod
http:/ / www. bukisa. com/ articles/ 36723_papervision-3d-programming-tutorial-mesh-splitting
408
409
Other Flash articles of interest
Flash CS3 keyboard shortcuts
Authors: Daniel K. Schneider (TECFA) and Marielle Lange [1] (WidgEd)
This page contains the most important Flash CS3 keyboard shortcuts. There may be some mistakes and omissions
for now (e.g. programming/debugging is not covered). Table size optimized for Mozilla/Windows.
The useful list
Modifying and editing
Standard windows commands not shown here
CTRL+G - Group
F5 - Add simple frame
CTRL+SHIFT-G - Ungroup
F6 - Add new Keyframe
CTRL+B - Break Apart
F7 - Add blank Keyframe
CTRL+ENTER - Test a Movie
CTRL+A - Select All
CTRL+SHIFT+A - Deselect All
F9 - Action Panel
CTRL+C - Copy
F4 - Show/Hide All Panels
CTRL+V - Paste
F10 - Keystroke Menu command mode
CTRL+SHIFT+V - Paste in Place
CTRL+D - Duplicate
CTRL+SHIFT+O - Optimize Curves
CTRL+T - Modify Font
CTRL+SHIFT+T - Modify Paragraph
CTRL+left Arrow - Narrower Letter Spacing (kerning)
CTRL+right Arrow - wider Letter Spacing (kerning)
CTRL+SHIFT+9 - Rotate 90° Clockwise
CTRL+SHIFT+7 - Rotate 90° Counter clockwise
CTRL+SHIFT+Z - Remove Transform
CTRL+ALT+S - Scale and Rotate
CTRL+SHIFT+Z - Remove Transform
Flash CS3 keyboard shortcuts
Tools Panel
While drawing on the stage you quickly can change tools that way.
410
Arranging
CTRL+Up Arrow - Move Ahead
CTRL+Down Arrow - Move Behind
V - Selection Tool
A - Sub Selection Tool
CTRL+SHIFT+Up Arrow - Bring to Front
CTRL+SHIFT+Down Arrow - Send to Back
Q - Free Transform tool
F - Gradient Transform Tool
CTRL+ALT+1 - Left Align
L - Lasso Tool
CTRL+ALT+2 - Horizontal Center
CTRL+ALT+3 - Right Align
P - Pen Tool
N - Line Tool
T - Text Tool
R - Rectangle Tool
O - Oval Tool
Y - Pencil Tool
B - Paint Brush
S - Ink Bottle
K - Paint Bucket
I - EyeDropper
D - Dropper
E - Eraser
H - Hand Tool
M,Z - Magnifier (Zoom)
CTRL+ALT+4 - Top Align
CTRL+ALT+5 - Vertical Center
CTRL+ALT+6 - Bottom Align
CTRL+ALT+7 - Distribute Widths
CTRL+ALT+9 - Distribute Heights
CTRL+ALT+SHIFT+7 - Make Same Width
CTRL+ALT+SHIFT+9 - Make Same Height
CTRL+ALT+8 - Set "Align to stage"
Flash CS3 keyboard shortcuts
Windows and Panels
411
Timeline
Open/close various Panels
Enter - Play Movie
F1 - Help
CTRL+0 (zero) - Rewind Movie
F4 - Show/Hide Panels
< - Previous Frame
CTRL+K - Align Panel
> - Next Frame
CTRL+T - Transform
CTRL+ENTER - Test Movie
SHIFT+F9 - Color Mixer
CTRL+SHIFT+ENTER - Debug Movie
CTRL+F9 - Color Swatches
CTRL+L - Show/Hide Library
Home - Goto First Scene
F9 - Actions
End - Goto Last Scene
Page Up - Goto Previous Scene
If your screen is big enough you won't need
these a lot ...
Page Down - Goto Next Scene
CTRL+F3 - Properties Inspector
CTRL+F2 - Tools Panel
Files
CTRL+ALT-T - Timeline
CTRL+M - Modify Movie
Properties
CTRL+N - New File
CTRL+E - Toggle between Edit
Movie& Edit Symbol Mode
CTRL+S - Save File
CTRL+O - Open File
CTRL+SHIFT+L - Show/Hide
Timeline
CTRL+R - Import Image/Sound/etc...
CTRL+SHIFT+O - Open as Library
CTRL+SHIFT+W - Show/Hide
Work Area
SHIFT+F12 - Publish
CTRL+SHIFT+R - Export to .swf/.spl/.gif/etc...
Frames and Symbols
View
(most of the time, position first inside the
timeline)
CTRL+1 - View movie at 100% size
CTRL+2 - Show Frame
F5 - Add frame (extend the
timeline)
CTRL+3 - Show All
SHIFT+F5 - Delete Frame
F6 - Add Key Frame (and copy
over old contents)
SHFIT-F6 - Clear Key Frame
F7 - Add Blank Key Frame (and
leave the stage empty)
F8 - Turn into Symbol
CTRL+F8 - Make new Symbol
CLICK DRAG - Move keyframe
(Select, release - then drag !)
CTRL-DRAG - Select several
Frames
Generate shortcut table
•
•
Menu Edit->Keyboard shortcuts
Click on the little icon on top right (Export Set as HTML). This will generate a single HTML file
with several tables, showing all commands that can have a shortcuts plus the shortcuts currently
defined.
Flash CS3 keyboard shortcuts
Links
•
•
•
•
What Are the Flash Shortcut Keys? [2] by Adobe, a good short list.
Flash Keyboard Shortcuts [3] (another, more recent Adobe document, 2011)
Most useful Flash 8 Shortcut Keys [4] by Anders Bergmann.
Full reference for Flash CS3 shortcuts [5] can also be printed. (commercial $15)
Conventions
• On a Mac replace "Control" by "Command"
• In this table, "+" means hold down both (usually I just use a "-" for this)
Other tricks
(from Adobe, to sort out)
With the arrow cursor: Control + Click and Drag - Duplicates a shape By hitting the control key first (Macintosh &
Windows) and THEN clicking and dragging on a selected shape or group of shapes, you will create a duplicate of
those shapes at the spot where you release the mouse button.
CTRL+Clicking a keyframe to move frame: CTRL+clicking a frame in the timeline switches the cursor to a slider,
and allows you to click and drag that frame to a new place in the timeline within that same layer. Useful if you want
to stretch out tweens for example
With the magnifier tool:
Control + Click - Toggles to the opposite magnifier. If the + magnifier (zoom in) is active, and you hit Control while
clicking, you will switch to the - magnifier and actually zoom OUT.
With the dropper tool:
Shift + Click - Select a color for both fill and outline tools Clicking a red fill will do the same, giving you the Bucket
tool, and switching fill colors to red. But the outline tool colors are not changed. Clicking on text switches the text
tool to that color, and gives you the text tool. Shift clicking with the dropper makes the color you click on active for
ALL tools, and doesn't automatically switch you to any tool. It leaves the dropper active.
This is one of the least well known short cuts in Flash, and is the ONLY way to use the dropper on an outline for
example, and then be able to switch to the fill tool and have that color automatically active already.
References
[1]
[2]
[3]
[4]
[5]
http:/ / widged. com/
http:/ / www. adobe. com/ go/ tn_12105
http:/ / helpx. adobe. com/ flash/ kb/ flash-keyboard-shortcuts. html
http:/ / www. myflashresource. com/ index. php?s=shortcut+ keys
http:/ / www. solotype. com/ en-us/ Products/ 154-flash-shortcuts. aspx
412
Flash formats and objects overview
413
Flash formats and objects overview
Draft
Introduction
This articles lists a few file formats and objects you can have on the stage or in the library and explains some of the
terminology. It is part of the Flash series.
It's purpose is to help you identify objects you are working with as a Flash designer. We don't use the term "object"
here in the sense of an ActionScript object !
Note: This text is a rough draft. Some things may be wrong or missing.
Flash related file formats and extensions
Copyright notice: The table below has been copied more or less as it from Wikipedia's Macromedia Flash [1] article
on July 12, 2007. Its contents are available under the GNU Free Documentation License [2].
Ext.
Explanation
. swf
[3]
.swf files are completed, compiled and published files that cannot be edited with Adobe Flash. However, many '.swf decompilers' do exist.
Attempting to import .swf files using Flash allows it to retrieve some assets from the .swf, but not all.
.fla
.fla files contain source material for the Flash application. Flash authoring software can edit FLA files and compile them into .swf files.
. as
[4]
[4]
.as files contain ActionScript source code
in simple source files. FLA files can also contain Actionscript code directly, but separate
external .as files often emerge for structural reasons, or to expose the code to versioning applications. They sometimes use the extension
.actionscript
.swd
.swd files are temporary debugging files used during Flash development. Once finished developing a Flash project these files are not needed
and can be removed.
.asc
.asc files contain Server-Side ActionScript, which is used to develop efficient and flexible client-server Macromedia Flash Communication
Server MX applications.
. flv
[5]
.flv files are Flash video files, as created by Adobe Flash, ffmpeg
[9]
[10]
(mostly) h.263
for video and MP3
for audio.
.swc
.swc files are used for distributing components; they contain a compiled clip, the component's ActionScript class file, and other files that
describe the component.
.jsfl
.jsfl files are used to add functionality in the Flash Authoring environment; they contain Javascript code and access the Flash Javascript API.
.swt
.swt files are 'templatized' forms of .swf files, used by Macromedia Generator.
.flp
.flp files are XML files used to reference all the document files contained in a Flash Project. Flash Projects allow the user to group multiple,
related files together to assist in Flash project organization, compilation and build.
.spl
.spl files are FutureSplash
.aso
.aso files are cache files used during Flash development, containing compiled ActionScript byte code. An ASO file is recreated when a
change in its corresponding class files is detected. Occasionally the Flash IDE does not recognize that a recompile is necessary, and these
cache files must be deleted manually. They are located in %USERPROFILE%\Local Settings\Application
Data\Macromedia\Flash8\en\Configuration\Classes\aso on Win32 / Flash8.
.avi
[12]
AVI file is a video file, standing for Audio Video Interleave. Flash includes several compression codecs, including some from Radius.
.gif
[13]
A GIF image; either a single static frame or multi-frame animation.
[11]
[6]
, Sorenson Squeeze
[7]
, or On2 Flix
[8]
. It's container format that uses
documents.
Flash formats and objects overview
.png
[14]
A PortableNetworkGraphic image.
On the stage
On the stage you can have various kinds of graphics objects, i.e. objects that you can move, copy, delete, transform,
stack, align, and group.
See also the Flash drawing tutorial, Flash object transform tutorial and Flash arranging objects tutorial for more
details.
Shapes
Shapes are the most primitive objects. When you draw shapes that overlap each other in the same layer, the topmost
shape cuts away the part of the shape according to your drawing controls. When you draw a graphic like a rectangle
in merge mode with both stroke (the outline) and a fill (paint), they become separate shapes and can be moved
independently.
You can transform a shape into graphic object with menu Modify->Combine objects union
Tip: As a general rule, avoid shapes (unless you work like a painter or a drawing artist). In other words, put the
controls of the Tools panel in object mode:
Graphic objects
When you draw in object mode, then you will produce graphic objects. You can transform a graphic object into a
shape (right-click->break Apart).
Composite objects
When select several objects you have a composite object. When you group them together too.
There exist different variants:
• Group: A group of graphics object and shapes
• Mixed: A group of graphics and e.g. a component instance.
Tip: Make sure that you don't work on a composite object when you believe that you just edit a simple object. E.g.
watch out what you have selected before you turn it into a symbol ...
Instances
Instances are made from objects that you have in your library. You only can apply certain transformations to these
(without changing the library objects). E.g. you can
• Change its tint or brightness and alpha (transparency)
• You can scale, rotate and skew it with a transform tool. But can not apply envelope transforms
• you can move them of course.
You can attach behaviors to instance object in ActionScript 2. In ActionScript 3 you can also do this, but only via the
timeline.
Some instances let you edit parameters, i.e. compiled clips
414
Flash formats and objects overview
Special objects
Modifying lines and shapes can alter other lines and shapes on the same layer. See Flash motion tweening tutorial for
example.
In your library
Graphic symbols
Graphic symbols are named graphic objects. You can transform a drawing or shape into a graphic symbol with the
right-click menu. Actually, as soon as you are happy with a creation you should do this.
Movie symbols
Movie symbols are Flash animations that you can edit by double-clicking. You can use them as components for more
sophisticated animations.
Button symbols
Button symbols are special movies that implement the graphics or button touching, pressing, releasing, etc.
Bitmaps
Bitmaps Are imported bitmaps of various formats, e.g. *.jpg, *.gif, *.png
Tweens
Represent motion tweens. I never use these. If you have these in your library it means either:
• You are an advanced Flash designer
• Something went wrong when you made a motion animation (e.g. you animated more than a single object or an
editable object).
Movie clips
Movie clips are simply imported Flash files *.swf. You can drag them on the stage and for example use them in a
motion animation.
Compiled clips
Compiled clips are ActionScript objects exported/imported trough the *.swc format. If you drag an instance to the
scene you then can edit its particular parameters through the properties or the component inspector panels.
Flash videos
These are Flash video containers in *.flv format. When you drag these to the stage, they will integrate to the
timeline. E.g. a short movie may extend over several hundred frames. Most often you'd rather use the FLV playback
component to play such videos. See the Flash video component tutorial.
415
Flash formats and objects overview
References
[1] http:/ / en. wikipedia. org/ wiki/ Macromedia_Flash
[2] http:/ / en. wikipedia. org/ wiki/ GNU_Free_Documentation_License
[3] http:/ / en. wikipedia. org/ wiki/ SWF
[4] http:/ / en. wikipedia. org/ wiki/ ActionScript
[5] http:/ / en. wikipedia. org/ wiki/ FLV
[6] http:/ / en. wikipedia. org/ wiki/ ffmpeg
[7] http:/ / en. wikipedia. org/ wiki/ Sorenson_Squeeze
[8] http:/ / en. wikipedia. org/ wiki/ On2_Flix
[9] http:/ / en. wikipedia. org/ wiki/ H. 263
[10] http:/ / en. wikipedia. org/ wiki/ MP3
[11] http:/ / en. wikipedia. org/ wiki/ FutureSplash
[12] http:/ / en. wikipedia. org/ wiki/ AVI
[13] http:/ / en. wikipedia. org/ wiki/ GIF
[14] http:/ / en. wikipedia. org/ wiki/ PNG
Flash - being organized
Draft
This is a reminder of a few simple "how to work with the Flash environment" tips.
The workspace
• Learn how to dock panels and how to save the workspace (menu Windows)
• Learn about F4 (hiding/showing panels)
• Learn how to pin down the AS panel (use pin at the bottom of the panel).
Drawings
Unless you are gifted,
• keep your drawings simple
• Draw in "object" mode (as opposed to merge mode)
• Use external clipart.
Always make sure:
• to lock layers you don't work with
• to know at which level you edit ! (scene level or symbol edit mode).
Layers
Use a separate layer
•
•
•
•
for each object you want to animate
for each script
for each sound
for each complex background drawing
Use layer folders if you get too many layers
416
Flash - being organized
Names
Always name things:
•
•
•
•
•
Layers
Scenes
Keyframes into which users can navigation
Symbols in the library
Instances
Use conventions for naming (more later)
Scenes
If you can divide an animation into scenes, use different scenes
• Name each scene
Library
Use folders
• at least for complex projects
Create your own external library
• If you work on several projects copy your important artwork to a separate *.fla file.
• You can use your own *.fla file as library: Menu File->Import->Open External library.
• Dock it next to the "normal" library.
Remove junk
• Remove really useless stuff from the library of each project
• Remove teen objects made by error (but make sure that they are not used in an animation). If they are, break
these apart, insert the object as symbol in the library, then rebuild your animation with these symbols. Only then
kill the tween.
Quality
Even for small projects:
•
•
•
•
•
Identify clear goals, i.e. what the user should experience
Work with a simple but effective user-centered design method.
Make sure that he will be able to experience (cognitive ergonomics)
Make sure your application is usable.
Make sure you understand what you did (use explit names for instances, library objects and AS variables and
function names)
• Remove errors (broken tweens for example)
• Document your code, i.e. use comments in AS code, fill in the documentation: menu Modify-Document (CS3),
File->Document Info (CS6).
417
Flash 3D
Flash 3D
Draft
Definition
Flash 3D refers to various attempts to create 3D objects or even scenes with Flash. This is a short overview piece on
various technologies.
There exist 3 "solutions" from an designer point of view.
• Buy a special toolkit
• Use ActionScript libraries together with some ActionScript programming either in CS3/4/5 or with the Flex
compiler (or both)
• Use the new Flash 10 3D ActionScript library with the free Flex compiler
• Use Adobe CS4/CS5 (for some 3D animations of 2D objects)
Since Flash (until version 10) was just "2D", performance was not outstanding. With Flash 10, on a normal
computer, one can get decent framerates for not too complex scences.
With respect to 3D contents, I'd certainly prefer X3D-based (human readable format) solutions, but it seems that this
may never become popular. Industry and many designers don't seem to like such formats. We can understand that
gaming engines need to be optimized and ultra fast, but simple scenes on the web ?
See also:
• Flash Papervision3D tutorial
Products / Software
... that help to create 3D Flash in various ways.
Firstly you may draw things with a "normal" 3D modeling software. You then can find various ways to import these
into Flash.
Modeling tools and engines
• FreeSpin 3D [1]. Enables the importing of 3D Models directly into Adobe Flash as a Flash Movie Clip object.
With timeline support and an Action Script interface. In August 2008 this product was in Beta stage and it is free
(registration needed). The first final version will be sold.
• Swift 3D [2] is a popular commercial tool ($250 on Aug. 2008) to create 3D objects and animations for Flash (and
other 2D formats).
• Swift 3D [3] (Wikipedia entry).
• 3D Flash Animator [4] (3dfa) is a cheap ($50) 3D Flash tool. (not tested).
• Rozengain Exporter to Away3D, Papervision3D and Sandy3D [5] for the popular Blender free open source 3D
content creation suite [6]. (Daniel K. Schneider would start with this if I had to draw something).
• Sophie3D [7] is an engine (using the Flash Player) that can render Wavefront [8] objects and offers some user
controls. A version with an advertisement is free.
418
Flash 3D
ActionScript 3D engines
The two most popular engines seems to be Away3D and PaperVison3D. Both are free.
• Away3D [9] is a realtime 3D engine, i.e. an ActionScript library for Flash. Freeware (you can give donations). The
website includes tutorials, a wiki, downloads and examples. It works together with Flashdevelop [30], a code
editor for ActionScript 2/3 and other languages.
• Tutorials [10] (There are also examples, a wiki, etc.)
• The FlashMagazine Flash 3D Basics [11] article is using this library.
• PaperVision3D [11] (PV3D) is another popular library and you get to see some fish.
• Papervision 3D blog [10]. Includes all the information (downloads, tutorials, links, etc.)
• PV3World [13]. Testing ground, tutorial and other resources.
• Papervision 3D downloads [1] (at google code). There is also a CS3 component for version 1.5 made in 2007,
Current (nov 2008) version is 3.0.
• Papervision3D documentation [12] (Packages and classes)
• See also: Flash Papervision3D tutorial
• Sandy 3D Engine [13]. Sandy is an intuitive and user-friendly 3D open-source library developed in ActionScript
2.0 and ActionScript 3.0 for Adobe Flash.
• list of tutorials [14]
• WireEngine3D [15] is a lightweight, free (GPL) and fast 3D Engine for Flash 8/9. (as of aug 2010, last update:
april 2008).
• Alternative Platform [16]. An SWC library for 3D-scenes in Flash. Authoring tools and a client-server solution
will be available later (added: aug 2008)
• Documentation and tutorials home [17]
• Flare3D [18], “3D Engine for Flash optimized for games and animations. Flare 3D bridges the gap between
Autodesk 3Ds Max” (retrieved 10:53, 26 August 2010 (UTC))
Physics engines
• WOW Engine [19]. a free AS3 open source physics engine written by Seraf (Jérôme Birembaut) capable to handle
positions in a 3D environment. It uses the Sandy library [13] (see above)
• APE [20] is a free AS3 open source 2D physics engine for use in Flash and Flex, released under the MIT License.
APE is written and maintained by Alec Cove.
Flash 10 3D
• Flash Player 10 [21]
• Flash Player beta downloads [22] (released as Beta in sept. 2008). This page (at the bottom) also has a link for
the Flex SDK needed and the documentation (zip file)
• This engine seems to offer better performance than the AS 3 libraries (above) and this is not surprise of course.
• But it has less features it seems.
419
Flash 3D
Libraries working with ActionScript engines
• FLiNT particle system [1] by Richard Lord. Flint is an open-source project to create a versatile particle system in
ActionScript 3. The aim is to create a system that handles the common functionality for all particle systems, has
methods for common particle behavior, and lets developers extend it easily with their own custom behaviors
without needing to touch the core code. FLINT can (as an option) be used with PaperVision3D and Away3D.
• Paradox: The Flash based first person 3D engine [23] (FAQ). This is still under development (sept. 2008) and its
not clear if and when the engine will be available.
ActionScript editors
Since all the free ActionScript engines imply that you have to code ActionScript, you may consider using a good
editor/IDE.
See Flash_ActionScript 3 overview for some suggestions.
Links
Overviews and comparisons
• 3D Flash [24] (Wikipedia, only a stub in aug 2008).
• Flash Player 10 3D versus Away3D [25]. AirtightInteractive (2008).
Tutorials
(none tested or endorsed for far ...)
General
• Flash 3D Tutorials Index [26] from Steve's Tutes site.
• Macromedia Flash 3D Tutorials [27]
Away3D related
• Flash 3D basics [11](Flashmagazine.com).
PaperVision 3D
• See Flash Papervision3D tutorial
Alternativa
• Alternativa Tutorial - Getting Started [28]
Some free 3d objects
• Flash3D.org [29]. See "Games and Free stuff".
Examples
• Flash3D [30] Category in "Best Flash V2.2".
• Floorplannner [31] Papervision 3D example.
Websites
(needs some sorting, deletions and additions ...)
• draw.logic [32] has several Flash/AS3 3D-related articles. Also many good links.
• Infinite Turtles [33] by Rob Bateman. Has news and demos.
• Flash 3D [34] includes both Away3D, Papervision and Sophie3d information (most in Italian)
420
Flash 3D
421
• Masputih [35]
• Developer Connection: Learn 3D/animation in Flash [36] (Adobe).
References
[1] http:/ / www. freespin3d. com/
[2] http:/ / www. erain. com/
[3] http:/ / en. wikipedia. org/ wiki/ Swift3D
[4] http:/ / www. 3dfa. com/
[5] http:/ / www. rozengain. com/ blog/ 2008/ 01/ 02/ export-your-blender-objects-straight-to-away3d-papervision3d-and-sandy/
[6] http:/ / www. blender. org/
[7] http:/ / www. sophie3d. com/
[8] http:/ / en. wikipedia. org/ wiki/ http:/ / en. wikipedia. org/ wiki/ Wavefront_Technologies
[9] http:/ / away3d. com/
[10] http:/ / away3d. com/ tutorials
[11] http:/ / www. flashmagazine. com/ tutorials/ detail/ flash_3d_basics/
[12] http:/ / docs. pv3d. org/
[13] http:/ / www. flashsandy. org/
[14] http:/ / www. flashsandy. org/ tutorials/ 3. 0
[15] http:/ / osflash. org/ we3d
[16] http:/ / alternativaplatform. com/ en/
[17]
[18]
[19]
[20]
[21]
[22]
[23]
[24]
[25]
[26]
[27]
[28]
[29]
[30]
[31]
[32]
[33]
[34]
[35]
[36]
http:/ / docs. alternativaplatform. com/ display/ TDEN/ Home
http:/ / www. flare3d. com/
http:/ / seraf. mediabox. fr/ wow-engine/
http:/ / www. cove. org/ ape/ index. htm
http:/ / labs. adobe. com/ technologies/ flashplayer10/
http:/ / labs. adobe. com/ downloads/ flashplayer10. html
http:/ / animasinteractive. com/ propaganda/ 2007/ 10/ 08/ paradox-the-flash-based-first-person-3d-engine-faq/
http:/ / en. wikipedia. org/ wiki/ 3D_Flash
http:/ / www. airtightinteractive. com/ news/ ?p=114
http:/ / www. video-animation. com/ flash3d_001. shtml
http:/ / www. tutorialized. com/ tutorials/ Flash/ 3D/ 1
http:/ / www. thetechlabs. com/ 3d/ alternativa-3d-getting-started/
http:/ / flash3d. org/
http:/ / www. bestflashanimationsite. com/ archive/ flash-3d/
http:/ / www. floorplanner. com/ 3ddemo
http:/ / drawlogic. com/
http:/ / www. infiniteturtles. co. uk/ blog/
http:/ / www. flash3d. net/ index_en. html
http:/ / www. masputih. com/
http:/ / www. adobe. com/ devnet/ flash/ 3d_animation. html
Article Sources and Contributors
Article Sources and Contributors
Flash Source: http://edutechwiki.unige.ch/mediawiki/index.php?oldid=53866 Contributors: Bydf3, Daniel K. Schneider, JustinClift, Widged
Flash CS6 desktop tutorial Source: http://edutechwiki.unige.ch/mediawiki/index.php?oldid=41568 Contributors: Daniel K. Schneider
Flash drawing tutorial Source: http://edutechwiki.unige.ch/mediawiki/index.php?oldid=41920 Contributors: Daniel K. Schneider
Flash layers tutorial Source: http://edutechwiki.unige.ch/mediawiki/index.php?oldid=41826 Contributors: Daniel K. Schneider, WikiSysop
Flash animation overview Source: http://edutechwiki.unige.ch/mediawiki/index.php?oldid=41695 Contributors: Daniel K. Schneider, WikiSysop
Flash frame-by-frame animation tutorial Source: http://edutechwiki.unige.ch/mediawiki/index.php?oldid=49273 Contributors: Daniel K. Schneider, Eirini.Karani
Flash classic motion tweening tutorial Source: http://edutechwiki.unige.ch/mediawiki/index.php?oldid=27451 Contributors: Daniel K. Schneider
Flash CS6 motion tweening tutorial Source: http://edutechwiki.unige.ch/mediawiki/index.php?oldid=42146 Contributors: Daniel K. Schneider, WikiSysop
Flash shape tweening tutorial Source: http://edutechwiki.unige.ch/mediawiki/index.php?oldid=41886 Contributors: Daniel K. Schneider
Flash embedded movie clip tutorial Source: http://edutechwiki.unige.ch/mediawiki/index.php?oldid=42155 Contributors: Daniel K. Schneider
Flash animation summary Source: http://edutechwiki.unige.ch/mediawiki/index.php?oldid=42158 Contributors: Daniel K. Schneider, WikiSysop
Flash video component tutorial Source: http://edutechwiki.unige.ch/mediawiki/index.php?oldid=42279 Contributors: Daniel K. Schneider
Timed Text Source: http://edutechwiki.unige.ch/mediawiki/index.php?oldid=43096 Contributors: Daniel K. Schneider, WikiSysop
Flash sound tutorial Source: http://edutechwiki.unige.ch/mediawiki/index.php?oldid=50703 Contributors: Daniel K. Schneider, Eirini.Karani
Clipart Source: http://edutechwiki.unige.ch/mediawiki/index.php?oldid=42711 Contributors: Daniel K. Schneider, Goor, Widged
Texture Source: http://edutechwiki.unige.ch/mediawiki/index.php?oldid=22259 Contributors: Daniel K. Schneider, Juc, Widged
Flash object transform tutorial Source: http://edutechwiki.unige.ch/mediawiki/index.php?oldid=41926 Contributors: Daniel K. Schneider
Flash arranging objects tutorial Source: http://edutechwiki.unige.ch/mediawiki/index.php?oldid=41927 Contributors: Daniel K. Schneider, WikiSysop
Flash colors tutorial Source: http://edutechwiki.unige.ch/mediawiki/index.php?oldid=41994 Contributors: Daniel K. Schneider
Flash bitmap tracing tutorial Source: http://edutechwiki.unige.ch/mediawiki/index.php?oldid=34814 Contributors: Daniel K. Schneider, WikiSysop
Flash pen tutorial Source: http://edutechwiki.unige.ch/mediawiki/index.php?oldid=29467 Contributors: Daniel K. Schneider, WikiSysop
Flash button tutorial Source: http://edutechwiki.unige.ch/mediawiki/index.php?oldid=42045 Contributors: Daniel K. Schneider
Flash components overview Source: http://edutechwiki.unige.ch/mediawiki/index.php?oldid=23608 Contributors: Daniel K. Schneider, WikiSysop
Flash component button tutorial Source: http://edutechwiki.unige.ch/mediawiki/index.php?oldid=49302 Contributors: Daniel K. Schneider, Eirini.Karani
Flash video component tutorial Source: http://edutechwiki.unige.ch/mediawiki/index.php?oldid=42279 Contributors: Daniel K. Schneider
Flash mask layers tutorial Source: http://edutechwiki.unige.ch/mediawiki/index.php?oldid=42412 Contributors: Daniel K. Schneider
Flash inverse kinematics tutorial Source: http://edutechwiki.unige.ch/mediawiki/index.php?oldid=42393 Contributors: Daniel K. Schneider, WikiSysop
Flash CS4 motion tweening with AS3 tutorial Source: http://edutechwiki.unige.ch/mediawiki/index.php?oldid=26802 Contributors: Daniel K. Schneider
Flash using embedded movie clips tutorial Source: http://edutechwiki.unige.ch/mediawiki/index.php?oldid=42198 Contributors: Daniel K. Schneider
Flash augmented video tutorial Source: http://edutechwiki.unige.ch/mediawiki/index.php?oldid=42417 Contributors: Daniel K. Schneider
Flash video captions tutorial Source: http://edutechwiki.unige.ch/mediawiki/index.php?oldid=43105 Contributors: Daniel K. Schneider
Flash actions-frame tutorial Source: http://edutechwiki.unige.ch/mediawiki/index.php?oldid=42390 Contributors: Daniel K. Schneider
Flash datagrid component tutorial Source: http://edutechwiki.unige.ch/mediawiki/index.php?oldid=23609 Contributors: Daniel K. Schneider, WikiSysop
Flash drag and drop tutorial Source: http://edutechwiki.unige.ch/mediawiki/index.php?oldid=37362 Contributors: Daniel K. Schneider, Loic.boujol, Widged, WikiSysop
ActionScript 3 interactive objects tutorial Source: http://edutechwiki.unige.ch/mediawiki/index.php?oldid=43277 Contributors: Daniel K. Schneider
ActionScript 3 event handling tutorial Source: http://edutechwiki.unige.ch/mediawiki/index.php?oldid=24016 Contributors: Daniel K. Schneider, WikiSysop
Flash ActionScript 3 overview Source: http://edutechwiki.unige.ch/mediawiki/index.php?oldid=29752 Contributors: Daniel K. Schneider, Widged, WikiSysop
Flash using ActionScript libraries tutorial Source: http://edutechwiki.unige.ch/mediawiki/index.php?oldid=43539 Contributors: Claire Peltier, Daniel K. Schneider, WikiSysop
AS3 tweening platform Source: http://edutechwiki.unige.ch/mediawiki/index.php?oldid=36746 Contributors: Claire Peltier, Daniel K. Schneider, Joyservice, Ortaer, WikiSysop
FliNT particle system Source: http://edutechwiki.unige.ch/mediawiki/index.php?oldid=27635 Contributors: Daniel K. Schneider
Flash Papervision3D tutorial Source: http://edutechwiki.unige.ch/mediawiki/index.php?oldid=28071 Contributors: Daniel K. Schneider, WikiSysop
Flash CS3 keyboard shortcuts Source: http://edutechwiki.unige.ch/mediawiki/index.php?oldid=39760 Contributors: Anzorik, BugCleaner, Daniel K. Schneider, WikiSysop
Flash formats and objects overview Source: http://edutechwiki.unige.ch/mediawiki/index.php?oldid=23614 Contributors: Daniel K. Schneider, WikiSysop
Flash - being organized Source: http://edutechwiki.unige.ch/mediawiki/index.php?oldid=42141 Contributors: Daniel K. Schneider, WikiSysop
Flash 3D Source: http://edutechwiki.unige.ch/mediawiki/index.php?oldid=28999 Contributors: Daniel K. Schneider
422
Image Sources, Licenses and Contributors
Image Sources, Licenses and Contributors
image:atp_ria_guide_ria_picture.jpg Source: http://edutechwiki.unige.ch/mediawiki/index.php?title=File:Atp_ria_guide_ria_picture.jpg License: unknown Contributors: image:flash-cs6-welcome-screen.png Source: http://edutechwiki.unige.ch/mediawiki/index.php?title=File:Flash-cs6-welcome-screen.png License: unknown Contributors: image:flash-cs6-workspaces-menu.png Source: http://edutechwiki.unige.ch/mediawiki/index.php?title=File:Flash-cs6-workspaces-menu.png License: unknown Contributors: image:flash-cs4-docking-swatches-panel.png Source: http://edutechwiki.unige.ch/mediawiki/index.php?title=File:Flash-cs4-docking-swatches-panel.png License: unknown Contributors: image:flash-cs4-docking-color-panel.png Source: http://edutechwiki.unige.ch/mediawiki/index.php?title=File:Flash-cs4-docking-color-panel.png License: unknown Contributors: image:flash-cs4-docking-library-panel.png Source: http://edutechwiki.unige.ch/mediawiki/index.php?title=File:Flash-cs4-docking-library-panel.png License: unknown Contributors: image:flash-cs6-workspace-iconized-panels.png Source: http://edutechwiki.unige.ch/mediawiki/index.php?title=File:Flash-cs6-workspace-iconized-panels.png License: unknown
Contributors: image:flash-cs4-dks-workspace.png Source: http://edutechwiki.unige.ch/mediawiki/index.php?title=File:Flash-cs4-dks-workspace.png License: unknown Contributors: image:flash-cs6-stage-resized.png Source: http://edutechwiki.unige.ch/mediawiki/index.php?title=File:Flash-cs6-stage-resized.png License: unknown Contributors: image:flash-cs6-drawing-tutorial-workspace.png.png Source: http://edutechwiki.unige.ch/mediawiki/index.php?title=File:Flash-cs6-drawing-tutorial-workspace.png.png License: unknown
Contributors: image:Pencil tool.png Source: http://edutechwiki.unige.ch/mediawiki/index.php?title=File:Pencil_tool.png License: unknown Contributors: image:Rectangle tool.png Source: http://edutechwiki.unige.ch/mediawiki/index.php?title=File:Rectangle_tool.png License: unknown Contributors: image:No color tool.png Source: http://edutechwiki.unige.ch/mediawiki/index.php?title=File:No_color_tool.png License: unknown Contributors: image:Brush tool.png Source: http://edutechwiki.unige.ch/mediawiki/index.php?title=File:Brush_tool.png License: unknown Contributors: image:flash-cs6-drawing-tutorial-tools.png Source: http://edutechwiki.unige.ch/mediawiki/index.php?title=File:Flash-cs6-drawing-tutorial-tools.png License: unknown Contributors: image:cs3_tool_object_draw.png Source: http://edutechwiki.unige.ch/mediawiki/index.php?title=File:Cs3_tool_object_draw.png License: unknown Contributors: image:Selection tool.png Source: http://edutechwiki.unige.ch/mediawiki/index.php?title=File:Selection_tool.png License: unknown Contributors: image:Subselection tool.png Source: http://edutechwiki.unige.ch/mediawiki/index.php?title=File:Subselection_tool.png License: unknown Contributors: image:free_transform_tool.png Source: http://edutechwiki.unige.ch/mediawiki/index.php?title=File:Free_transform_tool.png License: unknown Contributors: image:Gradient transform tool.png Source: http://edutechwiki.unige.ch/mediawiki/index.php?title=File:Gradient_transform_tool.png License: unknown Contributors: image:Lasso tool.png Source: http://edutechwiki.unige.ch/mediawiki/index.php?title=File:Lasso_tool.png License: unknown Contributors: image:LassoPolygon.png Source: http://edutechwiki.unige.ch/mediawiki/index.php?title=File:LassoPolygon.png License: unknown Contributors: image:Pen tool.png Source: http://edutechwiki.unige.ch/mediawiki/index.php?title=File:Pen_tool.png License: unknown Contributors: image:Line tool.png Source: http://edutechwiki.unige.ch/mediawiki/index.php?title=File:Line_tool.png License: unknown Contributors: image:c3_tool_polystar.png Source: http://edutechwiki.unige.ch/mediawiki/index.php?title=File:C3_tool_polystar.png License: unknown Contributors: image:cs3_tool_pencil.png Source: http://edutechwiki.unige.ch/mediawiki/index.php?title=File:Cs3_tool_pencil.png License: unknown Contributors: image:cs3_tool_pencil_straight.png Source: http://edutechwiki.unige.ch/mediawiki/index.php?title=File:Cs3_tool_pencil_straight.png License: unknown Contributors: image:flash-cs3-drawing-tools-pencil.png Source: http://edutechwiki.unige.ch/mediawiki/index.php?title=File:Flash-cs3-drawing-tools-pencil.png License: unknown Contributors: File:Flash-cs6-paint-bucket-annotated.png Source: http://edutechwiki.unige.ch/mediawiki/index.php?title=File:Flash-cs6-paint-bucket-annotated.png License: unknown Contributors: image:Black_and_white_tool.png Source: http://edutechwiki.unige.ch/mediawiki/index.php?title=File:Black_and_white_tool.png License: unknown Contributors: image:apple-tree.png Source: http://edutechwiki.unige.ch/mediawiki/index.php?title=File:Apple-tree.png License: unknown Contributors: image:cat.png Source: http://edutechwiki.unige.ch/mediawiki/index.php?title=File:Cat.png License: unknown Contributors: image:flash-cs3-convert-to-graphic-symbol.png Source: http://edutechwiki.unige.ch/mediawiki/index.php?title=File:Flash-cs3-convert-to-graphic-symbol.png License: unknown
Contributors: image:cat-free-clip-art-com.png Source: http://edutechwiki.unige.ch/mediawiki/index.php?title=File:Cat-free-clip-art-com.png License: unknown Contributors: image:flash-cs3-drawing-outline-mode.png Source: http://edutechwiki.unige.ch/mediawiki/index.php?title=File:Flash-cs3-drawing-outline-mode.png License: unknown Contributors: image:flash-trees-and-cats-drawing.png Source: http://edutechwiki.unige.ch/mediawiki/index.php?title=File:Flash-trees-and-cats-drawing.png License: unknown Contributors: image:flash-trees-and-cats-drawing2.png Source: http://edutechwiki.unige.ch/mediawiki/index.php?title=File:Flash-trees-and-cats-drawing2.png License: unknown Contributors: image:cs3_layers_annotated.png Source: http://edutechwiki.unige.ch/mediawiki/index.php?title=File:Cs3_layers_annotated.png License: unknown Contributors: image:flash-cs3-insert-layer.png Source: http://edutechwiki.unige.ch/mediawiki/index.php?title=File:Flash-cs3-insert-layer.png License: unknown Contributors: image:cs3_layers2.png Source: http://edutechwiki.unige.ch/mediawiki/index.php?title=File:Cs3_layers2.png License: unknown Contributors: image:an_motion_tween_span.png Source: http://edutechwiki.unige.ch/mediawiki/index.php?title=File:An_motion_tween_span.png License: unknown Contributors: image: an_motion_tween_span_no_target.png Source: http://edutechwiki.unige.ch/mediawiki/index.php?title=File:An_motion_tween_span_no_target.png License: unknown Contributors: image: an_pose_layer_span.png Source: http://edutechwiki.unige.ch/mediawiki/index.php?title=File:An_pose_layer_span.png License: unknown Contributors: image: motion_tween-classic.png Source: http://edutechwiki.unige.ch/mediawiki/index.php?title=File:Motion_tween-classic.png License: unknown Contributors: image: classic-motion_timeline_broken.png Source: http://edutechwiki.unige.ch/mediawiki/index.php?title=File:Classic-motion_timeline_broken.png License: unknown Contributors: image: shape_timeline.png Source: http://edutechwiki.unige.ch/mediawiki/index.php?title=File:Shape_timeline.png License: unknown Contributors: image: keyframe_timeline.png Source: http://edutechwiki.unige.ch/mediawiki/index.php?title=File:Keyframe_timeline.png License: unknown Contributors: image: frame_script.png Source: http://edutechwiki.unige.ch/mediawiki/index.php?title=File:Frame_script.png License: unknown Contributors: image: frame_label.png Source: http://edutechwiki.unige.ch/mediawiki/index.php?title=File:Frame_label.png License: unknown Contributors: image: frame-commented.png Source: http://edutechwiki.unige.ch/mediawiki/index.php?title=File:Frame-commented.png License: unknown Contributors: image: anchor_tween.png Source: http://edutechwiki.unige.ch/mediawiki/index.php?title=File:Anchor_tween.png License: unknown Contributors: image:flash-cs6-simple-fbf.png Source: http://edutechwiki.unige.ch/mediawiki/index.php?title=File:Flash-cs6-simple-fbf.png License: unknown Contributors: image:flash-cs6-rocket.png Source: http://edutechwiki.unige.ch/mediawiki/index.php?title=File:Flash-cs6-rocket.png License: unknown Contributors: image:flash-cs6-rocket-symbol.png Source: http://edutechwiki.unige.ch/mediawiki/index.php?title=File:Flash-cs6-rocket-symbol.png License: unknown Contributors: image:flash-cs6-rocket-symbol-editing.png Source: http://edutechwiki.unige.ch/mediawiki/index.php?title=File:Flash-cs6-rocket-symbol-editing.png License: unknown Contributors: image:flash-cs3-timeline-options.png Source: http://edutechwiki.unige.ch/mediawiki/index.php?title=File:Flash-cs3-timeline-options.png License: unknown Contributors: image:flash-cs3-frames1.png Source: http://edutechwiki.unige.ch/mediawiki/index.php?title=File:Flash-cs3-frames1.png License: unknown Contributors: image:Frame-by-frame-timeline.png Source: http://edutechwiki.unige.ch/mediawiki/index.php?title=File:Frame-by-frame-timeline.png License: unknown Contributors: image:Keyframe_timeline.png Source: http://edutechwiki.unige.ch/mediawiki/index.php?title=File:Keyframe_timeline.png License: unknown Contributors: image:flash-cs6-stickman.png Source: http://edutechwiki.unige.ch/mediawiki/index.php?title=File:Flash-cs6-stickman.png License: unknown Contributors: image:flash-cs6-create-new-symbol3.png Source: http://edutechwiki.unige.ch/mediawiki/index.php?title=File:Flash-cs6-create-new-symbol3.png License: unknown Contributors: image:flash-cs6-create-new-symbol.png Source: http://edutechwiki.unige.ch/mediawiki/index.php?title=File:Flash-cs6-create-new-symbol.png License: unknown Contributors: image:flash-cs6-create-new-symbol2.png Source: http://edutechwiki.unige.ch/mediawiki/index.php?title=File:Flash-cs6-create-new-symbol2.png License: unknown Contributors: image:Free transform tool.png Source: http://edutechwiki.unige.ch/mediawiki/index.php?title=File:Free_transform_tool.png License: unknown Contributors: image:flash-cs3-frames2.png Source: http://edutechwiki.unige.ch/mediawiki/index.php?title=File:Flash-cs3-frames2.png License: unknown Contributors: image:flash-cs3-select-all-frames.png Source: http://edutechwiki.unige.ch/mediawiki/index.php?title=File:Flash-cs3-select-all-frames.png License: unknown Contributors: -
423
Image Sources, Licenses and Contributors
image:flash-cs3-shaking-hello1.png Source: http://edutechwiki.unige.ch/mediawiki/index.php?title=File:Flash-cs3-shaking-hello1.png License: unknown Contributors: image:flash-cs3-shaking-hello2.png Source: http://edutechwiki.unige.ch/mediawiki/index.php?title=File:Flash-cs3-shaking-hello2.png License: unknown Contributors: image:flash-cs3-rocket-components.png Source: http://edutechwiki.unige.ch/mediawiki/index.php?title=File:Flash-cs3-rocket-components.png License: unknown Contributors: image:flash-cs3-rocket-components-layers.png Source: http://edutechwiki.unige.ch/mediawiki/index.php?title=File:Flash-cs3-rocket-components-layers.png License: unknown Contributors:
image:flash-cs3-rocket-yellow-flame.png Source: http://edutechwiki.unige.ch/mediawiki/index.php?title=File:Flash-cs3-rocket-yellow-flame.png License: unknown Contributors: image:flash-cs3-rocket-frames.png Source: http://edutechwiki.unige.ch/mediawiki/index.php?title=File:Flash-cs3-rocket-frames.png License: unknown Contributors: image:flash-cs3-rocket-symbol.png Source: http://edutechwiki.unige.ch/mediawiki/index.php?title=File:Flash-cs3-rocket-symbol.png License: unknown Contributors: image:flash-cs3-rocket-hello-library.png Source: http://edutechwiki.unige.ch/mediawiki/index.php?title=File:Flash-cs3-rocket-hello-library.png License: unknown Contributors: image:flash-cs3-rocket-hello-use.png Source: http://edutechwiki.unige.ch/mediawiki/index.php?title=File:Flash-cs3-rocket-hello-use.png License: unknown Contributors: image:flash-cs3-library-example.png Source: http://edutechwiki.unige.ch/mediawiki/index.php?title=File:Flash-cs3-library-example.png License: unknown Contributors: image:flash-cs3-motion-tweening0.png Source: http://edutechwiki.unige.ch/mediawiki/index.php?title=File:Flash-cs3-motion-tweening0.png License: unknown Contributors: image:flash-cs3-motion-tweening1.png Source: http://edutechwiki.unige.ch/mediawiki/index.php?title=File:Flash-cs3-motion-tweening1.png License: unknown Contributors: image:flash-cs3-motion-tweening2.png Source: http://edutechwiki.unige.ch/mediawiki/index.php?title=File:Flash-cs3-motion-tweening2.png License: unknown Contributors: image:flash-cs3-motion-tweening3.png Source: http://edutechwiki.unige.ch/mediawiki/index.php?title=File:Flash-cs3-motion-tweening3.png License: unknown Contributors: image:flash-cs3-motion-tweening.png Source: http://edutechwiki.unige.ch/mediawiki/index.php?title=File:Flash-cs3-motion-tweening.png License: unknown Contributors: image:flash-cs3-motion-shape-tweening.png Source: http://edutechwiki.unige.ch/mediawiki/index.php?title=File:Flash-cs3-motion-shape-tweening.png License: unknown Contributors: image:flash-cs3-onion-skins.png Source: http://edutechwiki.unige.ch/mediawiki/index.php?title=File:Flash-cs3-onion-skins.png License: unknown Contributors: image:flash-cs3-rotating-clock-hour-hand.png Source: http://edutechwiki.unige.ch/mediawiki/index.php?title=File:Flash-cs3-rotating-clock-hour-hand.png License: unknown Contributors: image:flash-cs3-rotating-clock.png Source: http://edutechwiki.unige.ch/mediawiki/index.php?title=File:Flash-cs3-rotating-clock.png License: unknown Contributors: image:flash-cs3-motion-tweening-sung.jpg Source: http://edutechwiki.unige.ch/mediawiki/index.php?title=File:Flash-cs3-motion-tweening-sung.jpg License: unknown Contributors: image:flash-cs3-rocket-moving-library.png Source: http://edutechwiki.unige.ch/mediawiki/index.php?title=File:Flash-cs3-rocket-moving-library.png License: unknown Contributors: image:flash-cs3-motion-layer.png Source: http://edutechwiki.unige.ch/mediawiki/index.php?title=File:Flash-cs3-motion-layer.png License: unknown Contributors: image:flash-cs3-rocket-motion-guide.png Source: http://edutechwiki.unige.ch/mediawiki/index.php?title=File:Flash-cs3-rocket-motion-guide.png License: unknown Contributors: image:flash-cs3-motion-guide-snapping.png Source: http://edutechwiki.unige.ch/mediawiki/index.php?title=File:Flash-cs3-motion-guide-snapping.png License: unknown Contributors: image:flash-cs3-motion-guide-tweening2.png Source: http://edutechwiki.unige.ch/mediawiki/index.php?title=File:Flash-cs3-motion-guide-tweening2.png License: unknown Contributors: image:flash-cs4-motion-tween-classic.jpg Source: http://edutechwiki.unige.ch/mediawiki/index.php?title=File:Flash-cs4-motion-tween-classic.jpg License: unknown Contributors: image:flash-cs4-motion-tween-classic-guide.jpg Source: http://edutechwiki.unige.ch/mediawiki/index.php?title=File:Flash-cs4-motion-tween-classic-guide.jpg License: unknown
Contributors: File:flash-cs4-motion-tween-sun.png Source: http://edutechwiki.unige.ch/mediawiki/index.php?title=File:Flash-cs4-motion-tween-sun.png License: unknown Contributors: File:flash-cs4-motion-tween-sun2.png Source: http://edutechwiki.unige.ch/mediawiki/index.php?title=File:Flash-cs4-motion-tween-sun2.png License: unknown Contributors: File:flash-cs4-motion-tween-sun3.png Source: http://edutechwiki.unige.ch/mediawiki/index.php?title=File:Flash-cs4-motion-tween-sun3.png License: unknown Contributors: File:flash-cs4-motion-tween-sun4.png Source: http://edutechwiki.unige.ch/mediawiki/index.php?title=File:Flash-cs4-motion-tween-sun4.png License: unknown Contributors: File:motion-editor.png Source: http://edutechwiki.unige.ch/mediawiki/index.php?title=File:Motion-editor.png License: unknown Contributors: File:an_tween_editor_overview_popup.png Source: http://edutechwiki.unige.ch/mediawiki/index.php?title=File:An_tween_editor_overview_popup.png License: unknown Contributors: File:motion-editor2.png Source: http://edutechwiki.unige.ch/mediawiki/index.php?title=File:Motion-editor2.png License: unknown Contributors: image:flash-cs6-underneath-the-pen-tool.png Source: http://edutechwiki.unige.ch/mediawiki/index.php?title=File:Flash-cs6-underneath-the-pen-tool.png License: unknown Contributors: File:an_corner_and_curve_points_popup2.png Source: http://edutechwiki.unige.ch/mediawiki/index.php?title=File:An_corner_and_curve_points_popup2.png License: unknown
Contributors: File:flash-polystar.png Source: http://edutechwiki.unige.ch/mediawiki/index.php?title=File:Flash-polystar.png License: unknown Contributors: File:Flash-polystar-interpolation-path.png Source: http://edutechwiki.unige.ch/mediawiki/index.php?title=File:Flash-polystar-interpolation-path.png License: unknown Contributors: image:flash-cs-6-motion-tweening-a-clip-overview.png Source: http://edutechwiki.unige.ch/mediawiki/index.php?title=File:Flash-cs-6-motion-tweening-a-clip-overview.png License:
unknown Contributors: image:flash-cs-6-motion-tweening-a-clip-edit1.png Source: http://edutechwiki.unige.ch/mediawiki/index.php?title=File:Flash-cs-6-motion-tweening-a-clip-edit1.png License: unknown
Contributors: image:flash-cs-6-motion-tweening-a-clip-rotate.png Source: http://edutechwiki.unige.ch/mediawiki/index.php?title=File:Flash-cs-6-motion-tweening-a-clip-rotate.png License: unknown
Contributors: image:flash-cs6-shape-tweening-intro.png Source: http://edutechwiki.unige.ch/mediawiki/index.php?title=File:Flash-cs6-shape-tweening-intro.png License: unknown Contributors: image:flash-cs6-polystar.png Source: http://edutechwiki.unige.ch/mediawiki/index.php?title=File:Flash-cs6-polystar.png License: unknown Contributors: image:flash-cs6-shape-tweening-intro2.png Source: http://edutechwiki.unige.ch/mediawiki/index.php?title=File:Flash-cs6-shape-tweening-intro2.png License: unknown Contributors: image:flash-cs6-create-shape-tween.png Source: http://edutechwiki.unige.ch/mediawiki/index.php?title=File:Flash-cs6-create-shape-tween.png License: unknown Contributors: image:flash-cs6-extend-tween-span.png Source: http://edutechwiki.unige.ch/mediawiki/index.php?title=File:Flash-cs6-extend-tween-span.png License: unknown Contributors: image:flash-cs6-shape-tween-dragon-egg.png Source: http://edutechwiki.unige.ch/mediawiki/index.php?title=File:Flash-cs6-shape-tween-dragon-egg.png License: unknown Contributors: image:flash-cs6-shape-tween-dragon-egg2.png Source: http://edutechwiki.unige.ch/mediawiki/index.php?title=File:Flash-cs6-shape-tween-dragon-egg2.png License: unknown Contributors: image:flash-cs3-shape-hints3.jpg Source: http://edutechwiki.unige.ch/mediawiki/index.php?title=File:Flash-cs3-shape-hints3.jpg License: unknown Contributors: image:flash-cs3-shape-hints4.jpg Source: http://edutechwiki.unige.ch/mediawiki/index.php?title=File:Flash-cs3-shape-hints4.jpg License: unknown Contributors: image:flash-cs3-shape-hints0.jpg Source: http://edutechwiki.unige.ch/mediawiki/index.php?title=File:Flash-cs3-shape-hints0.jpg License: unknown Contributors: image:flash-cs3-shape-hints1.jpg Source: http://edutechwiki.unige.ch/mediawiki/index.php?title=File:Flash-cs3-shape-hints1.jpg License: unknown Contributors: image:flash-cs3-shape-hints2.jpg Source: http://edutechwiki.unige.ch/mediawiki/index.php?title=File:Flash-cs3-shape-hints2.jpg License: unknown Contributors: image:flash-cs3-convert-to-movie-symbol.png Source: http://edutechwiki.unige.ch/mediawiki/index.php?title=File:Flash-cs3-convert-to-movie-symbol.png License: unknown Contributors: image:flash-cs3-edit-movie-clip.png Source: http://edutechwiki.unige.ch/mediawiki/index.php?title=File:Flash-cs3-edit-movie-clip.png License: unknown Contributors: image:flash-cs3-shape-tweens-in-motion.png Source: http://edutechwiki.unige.ch/mediawiki/index.php?title=File:Flash-cs3-shape-tweens-in-motion.png License: unknown Contributors: image:flash-cs6-create-movie-clip-symbol.png Source: http://edutechwiki.unige.ch/mediawiki/index.php?title=File:Flash-cs6-create-movie-clip-symbol.png License: unknown Contributors: image:flash-cs6-create-movie-clip-symbol2.png Source: http://edutechwiki.unige.ch/mediawiki/index.php?title=File:Flash-cs6-create-movie-clip-symbol2.png License: unknown
Contributors: image:flash-cs6-create-movie-clip-symbol3.png Source: http://edutechwiki.unige.ch/mediawiki/index.php?title=File:Flash-cs6-create-movie-clip-symbol3.png License: unknown
Contributors: image:flash-cs6-create-movie-clip-symbol4.png Source: http://edutechwiki.unige.ch/mediawiki/index.php?title=File:Flash-cs6-create-movie-clip-symbol4.png License: unknown
Contributors: image:flash-cs3-embedded-movie-clip-edit.jpg Source: http://edutechwiki.unige.ch/mediawiki/index.php?title=File:Flash-cs3-embedded-movie-clip-edit.jpg License: unknown Contributors: image:flash-cs3-desktop-1000x865-annotated.png Source: http://edutechwiki.unige.ch/mediawiki/index.php?title=File:Flash-cs3-desktop-1000x865-annotated.png License: unknown
Contributors: image:cs3_layers_annotated-small.png Source: http://edutechwiki.unige.ch/mediawiki/index.php?title=File:Cs3_layers_annotated-small.png License: unknown Contributors: -
424
Image Sources, Licenses and Contributors
image:flash-cs6-video-component-annotated.png Source: http://edutechwiki.unige.ch/mediawiki/index.php?title=File:Flash-cs6-video-component-annotated.png License: unknown
Contributors: image:flash-cs6-import-video-select-video.png Source: http://edutechwiki.unige.ch/mediawiki/index.php?title=File:Flash-cs6-import-video-select-video.png License: unknown Contributors: image:flash-cs6-import-video-select-video2.png Source: http://edutechwiki.unige.ch/mediawiki/index.php?title=File:Flash-cs6-import-video-select-video2.png License: unknown
Contributors: image:flash-cs6-media-encoder.png Source: http://edutechwiki.unige.ch/mediawiki/index.php?title=File:Flash-cs6-media-encoder.png License: unknown Contributors: image:flash-cs6-media-encoder-export-settings-annotated.png Source: http://edutechwiki.unige.ch/mediawiki/index.php?title=File:Flash-cs6-media-encoder-export-settings-annotated.png
License: unknown Contributors: image:flash-cs6-sound-layers-annotated.png Source: http://edutechwiki.unige.ch/mediawiki/index.php?title=File:Flash-cs6-sound-layers-annotated.png License: unknown Contributors: image:flash-cs3-sound-layers.png Source: http://edutechwiki.unige.ch/mediawiki/index.php?title=File:Flash-cs3-sound-layers.png License: unknown Contributors: image:flash-cs6-sound-edit-annotated.png Source: http://edutechwiki.unige.ch/mediawiki/index.php?title=File:Flash-cs6-sound-edit-annotated.png License: unknown Contributors: image:flash-button-sound.png Source: http://edutechwiki.unige.ch/mediawiki/index.php?title=File:Flash-button-sound.png License: unknown Contributors: image:flash-cs3-transformation-tools.png Source: http://edutechwiki.unige.ch/mediawiki/index.php?title=File:Flash-cs3-transformation-tools.png License: unknown Contributors: File:Subselection_tool.png Source: http://edutechwiki.unige.ch/mediawiki/index.php?title=File:Subselection_tool.png License: unknown Contributors: file:erasor.png Source: http://edutechwiki.unige.ch/mediawiki/index.php?title=File:Erasor.png License: unknown Contributors: image:flash-cs3-hooked-cross-icon.png Source: http://edutechwiki.unige.ch/mediawiki/index.php?title=File:Flash-cs3-hooked-cross-icon.png License: unknown Contributors: image:flash-cs3-curve-icon.png Source: http://edutechwiki.unige.ch/mediawiki/index.php?title=File:Flash-cs3-curve-icon.png License: unknown Contributors: image:flash-cs3-banana.png Source: http://edutechwiki.unige.ch/mediawiki/index.php?title=File:Flash-cs3-banana.png License: unknown Contributors: image:flash-cs3-angle-icon.png Source: http://edutechwiki.unige.ch/mediawiki/index.php?title=File:Flash-cs3-angle-icon.png License: unknown Contributors: image:flash-cs3-two-bananas.png Source: http://edutechwiki.unige.ch/mediawiki/index.php?title=File:Flash-cs3-two-bananas.png License: unknown Contributors: image:flash-cs3-angle-icon2.png Source: http://edutechwiki.unige.ch/mediawiki/index.php?title=File:Flash-cs3-angle-icon2.png License: unknown Contributors: image:flash_path_components.png Source: http://edutechwiki.unige.ch/mediawiki/index.php?title=File:Flash_path_components.png License: unknown Contributors: image:flash_points_on_path.png Source: http://edutechwiki.unige.ch/mediawiki/index.php?title=File:Flash_points_on_path.png License: unknown Contributors: image:flash_corner_points.png Source: http://edutechwiki.unige.ch/mediawiki/index.php?title=File:Flash_corner_points.png License: unknown Contributors: image:flash_direction_lines.png Source: http://edutechwiki.unige.ch/mediawiki/index.php?title=File:Flash_direction_lines.png License: unknown Contributors: image:flash_direction_lines2.png Source: http://edutechwiki.unige.ch/mediawiki/index.php?title=File:Flash_direction_lines2.png License: unknown Contributors: image:flash_direction_lines3.png Source: http://edutechwiki.unige.ch/mediawiki/index.php?title=File:Flash_direction_lines3.png License: unknown Contributors: image:flash-cs6-underneath-pen-tool.png Source: http://edutechwiki.unige.ch/mediawiki/index.php?title=File:Flash-cs6-underneath-pen-tool.png License: unknown Contributors: image:flash-cs6-free-transform.png Source: http://edutechwiki.unige.ch/mediawiki/index.php?title=File:Flash-cs6-free-transform.png License: unknown Contributors: image:flash-cs3-transform-size.png Source: http://edutechwiki.unige.ch/mediawiki/index.php?title=File:Flash-cs3-transform-size.png License: unknown Contributors: image:flash-cs3-transform-rotation.png Source: http://edutechwiki.unige.ch/mediawiki/index.php?title=File:Flash-cs3-transform-rotation.png License: unknown Contributors: image:flash-cs3-transform-skew.png Source: http://edutechwiki.unige.ch/mediawiki/index.php?title=File:Flash-cs3-transform-skew.png License: unknown Contributors: image:flash-cs3-change-rotation-point.png Source: http://edutechwiki.unige.ch/mediawiki/index.php?title=File:Flash-cs3-change-rotation-point.png License: unknown Contributors: image:flash-cs3-change-rotation-point2.png Source: http://edutechwiki.unige.ch/mediawiki/index.php?title=File:Flash-cs3-change-rotation-point2.png License: unknown Contributors: image:flash-cs3-enevelope-transform.png Source: http://edutechwiki.unige.ch/mediawiki/index.php?title=File:Flash-cs3-enevelope-transform.png License: unknown Contributors: image:flash-cs3-designer-chair.png Source: http://edutechwiki.unige.ch/mediawiki/index.php?title=File:Flash-cs3-designer-chair.png License: unknown Contributors: image:flash-cs6-modify-menu.png Source: http://edutechwiki.unige.ch/mediawiki/index.php?title=File:Flash-cs6-modify-menu.png License: unknown Contributors: image:flash-cs3-shape-tools-cat.png Source: http://edutechwiki.unige.ch/mediawiki/index.php?title=File:Flash-cs3-shape-tools-cat.png License: unknown Contributors: File:Flash-cs6-modify-punch.png Source: http://edutechwiki.unige.ch/mediawiki/index.php?title=File:Flash-cs6-modify-punch.png License: unknown Contributors: image:flash-cs3-subselection-curve-control.png Source: http://edutechwiki.unige.ch/mediawiki/index.php?title=File:Flash-cs3-subselection-curve-control.png License: unknown Contributors:
image:flash-cs3-eraser-options.png Source: http://edutechwiki.unige.ch/mediawiki/index.php?title=File:Flash-cs3-eraser-options.png License: unknown Contributors: image:flash-cs3-edit-snapping.png Source: http://edutechwiki.unige.ch/mediawiki/index.php?title=File:Flash-cs3-edit-snapping.png License: unknown Contributors: image:flash-cs3-align-object-snapping.png Source: http://edutechwiki.unige.ch/mediawiki/index.php?title=File:Flash-cs3-align-object-snapping.png License: unknown Contributors: image:flash-cs3-align-tools.png Source: http://edutechwiki.unige.ch/mediawiki/index.php?title=File:Flash-cs3-align-tools.png License: unknown Contributors: image:flash-align-panel.png Source: http://edutechwiki.unige.ch/mediawiki/index.php?title=File:Flash-align-panel.png License: unknown Contributors: image:flash-cs6-color-panel1.png Source: http://edutechwiki.unige.ch/mediawiki/index.php?title=File:Flash-cs6-color-panel1.png License: unknown Contributors: image:flash-cs6-color-panel3.png Source: http://edutechwiki.unige.ch/mediawiki/index.php?title=File:Flash-cs6-color-panel3.png License: unknown Contributors: image:flash-cs6-color-panel2.png Source: http://edutechwiki.unige.ch/mediawiki/index.php?title=File:Flash-cs6-color-panel2.png License: unknown Contributors: Image:AdditiveColor-192px.png Source: http://edutechwiki.unige.ch/mediawiki/index.php?title=File:AdditiveColor-192px.png License: unknown Contributors: Image:RGBR.png Source: http://edutechwiki.unige.ch/mediawiki/index.php?title=File:RGBR.png License: unknown Contributors: image:flash-cs6-color-full-blue.png Source: http://edutechwiki.unige.ch/mediawiki/index.php?title=File:Flash-cs6-color-full-blue.png License: unknown Contributors: image:hue-scale.png Source: http://edutechwiki.unige.ch/mediawiki/index.php?title=File:Hue-scale.png License: unknown Contributors: image:HSV-color-wheel.png Source: http://edutechwiki.unige.ch/mediawiki/index.php?title=File:HSV-color-wheel.png License: unknown Contributors: image:flash-cs6-color-washedout-blue.png Source: http://edutechwiki.unige.ch/mediawiki/index.php?title=File:Flash-cs6-color-washedout-blue.png License: unknown Contributors: image:flash-cs3-radial-gradient-transform.jpg Source: http://edutechwiki.unige.ch/mediawiki/index.php?title=File:Flash-cs3-radial-gradient-transform.jpg License: unknown Contributors: image:flash-cs6-color-panel-gradients-annotated.png Source: http://edutechwiki.unige.ch/mediawiki/index.php?title=File:Flash-cs6-color-panel-gradients-annotated.png License: unknown
Contributors: image:Gradient_transform_tool.png Source: http://edutechwiki.unige.ch/mediawiki/index.php?title=File:Gradient_transform_tool.png License: unknown Contributors: image:flash-cs6-radial-gradient-transform1-annotated.png Source: http://edutechwiki.unige.ch/mediawiki/index.php?title=File:Flash-cs6-radial-gradient-transform1-annotated.png License:
unknown Contributors: image:flash-cs3-linear-gradient-transform.jpg Source: http://edutechwiki.unige.ch/mediawiki/index.php?title=File:Flash-cs3-linear-gradient-transform.jpg License: unknown Contributors: image:flash-cs3-color-alpha-channel.jpg Source: http://edutechwiki.unige.ch/mediawiki/index.php?title=File:Flash-cs3-color-alpha-channel.jpg License: unknown Contributors: image:flash-cs6-bitmap-colors.png Source: http://edutechwiki.unige.ch/mediawiki/index.php?title=File:Flash-cs6-bitmap-colors.png License: unknown Contributors: image:flash-cs6-filters-annotated.png Source: http://edutechwiki.unige.ch/mediawiki/index.php?title=File:Flash-cs6-filters-annotated.png License: unknown Contributors: image:vienna-lion.jpg Source: http://edutechwiki.unige.ch/mediawiki/index.php?title=File:Vienna-lion.jpg License: unknown Contributors: image:vienna-lion-lions-capture.jpg Source: http://edutechwiki.unige.ch/mediawiki/index.php?title=File:Vienna-lion-lions-capture.jpg License: unknown Contributors: image:flash-cs3-bitmap-trace.jpg Source: http://edutechwiki.unige.ch/mediawiki/index.php?title=File:Flash-cs3-bitmap-trace.jpg License: unknown Contributors: image:illustrator-cs3-live-trace.jpg Source: http://edutechwiki.unige.ch/mediawiki/index.php?title=File:Illustrator-cs3-live-trace.jpg License: unknown Contributors: image:illustrator-cs3-live-trace2.jpg Source: http://edutechwiki.unige.ch/mediawiki/index.php?title=File:Illustrator-cs3-live-trace2.jpg License: unknown Contributors: image:flash-cs6-library-buttons.png Source: http://edutechwiki.unige.ch/mediawiki/index.php?title=File:Flash-cs6-library-buttons.png License: unknown Contributors: image:flash-cs6-button-editing-annotated.png Source: http://edutechwiki.unige.ch/mediawiki/index.php?title=File:Flash-cs6-button-editing-annotated.png License: unknown Contributors: image:flash-cs6-rocket-launcher2-as3.png Source: http://edutechwiki.unige.ch/mediawiki/index.php?title=File:Flash-cs6-rocket-launcher2-as3.png License: unknown Contributors: -
425
Image Sources, Licenses and Contributors
image:flash-cs6-rocket-launcher-as3.png Source: http://edutechwiki.unige.ch/mediawiki/index.php?title=File:Flash-cs6-rocket-launcher-as3.png License: unknown Contributors: image:flash-cs6-rocket-launcher3-as3.png Source: http://edutechwiki.unige.ch/mediawiki/index.php?title=File:Flash-cs6-rocket-launcher3-as3.png License: unknown Contributors: Image:flash-cs6-rocket-launcher3-as3-code-snippets.png Source: http://edutechwiki.unige.ch/mediawiki/index.php?title=File:Flash-cs6-rocket-launcher3-as3-code-snippets.png License:
unknown Contributors: Image:flash-cs6-simple-menu-site.png Source: http://edutechwiki.unige.ch/mediawiki/index.php?title=File:Flash-cs6-simple-menu-site.png License: unknown Contributors: image:flash-cs3-frames-for-pictures.jpg Source: http://edutechwiki.unige.ch/mediawiki/index.php?title=File:Flash-cs3-frames-for-pictures.jpg License: unknown Contributors: image:flash-cs3-convert-to-button-symbol.png Source: http://edutechwiki.unige.ch/mediawiki/index.php?title=File:Flash-cs3-convert-to-button-symbol.png License: unknown Contributors: image:flash-cs3-button-symbol-instance.png Source: http://edutechwiki.unige.ch/mediawiki/index.php?title=File:Flash-cs3-button-symbol-instance.png License: unknown Contributors: image:flash-cs3-button-over.png Source: http://edutechwiki.unige.ch/mediawiki/index.php?title=File:Flash-cs3-button-over.png License: unknown Contributors: image:flash-cs3-buttons-timeline.png Source: http://edutechwiki.unige.ch/mediawiki/index.php?title=File:Flash-cs3-buttons-timeline.png License: unknown Contributors: image:flash-cs3-component libraries.png Source: http://edutechwiki.unige.ch/mediawiki/index.php?title=File:Flash-cs3-component_libraries.png License: unknown Contributors: image:flash-cs3-parameters-panel.png Source: http://edutechwiki.unige.ch/mediawiki/index.php?title=File:Flash-cs3-parameters-panel.png License: unknown Contributors: image:flash-cs3-component-inspector-panel.png Source: http://edutechwiki.unige.ch/mediawiki/index.php?title=File:Flash-cs3-component-inspector-panel.png License: unknown
Contributors: File:Flash-cs6-timeline-navigation.png Source: http://edutechwiki.unige.ch/mediawiki/index.php?title=File:Flash-cs6-timeline-navigation.png License: unknown Contributors: image:flash-cs6-button-component.png Source: http://edutechwiki.unige.ch/mediawiki/index.php?title=File:Flash-cs6-button-component.png License: unknown Contributors: File:Flash-cs6-timeline-navigation2.png Source: http://edutechwiki.unige.ch/mediawiki/index.php?title=File:Flash-cs6-timeline-navigation2.png License: unknown Contributors: File:Flash-cs6-timeline-navigation3.png Source: http://edutechwiki.unige.ch/mediawiki/index.php?title=File:Flash-cs6-timeline-navigation3.png License: unknown Contributors: File:Flash-cs6-timeline-navigation4.png Source: http://edutechwiki.unige.ch/mediawiki/index.php?title=File:Flash-cs6-timeline-navigation4.png License: unknown Contributors: image:flash-cs6-simple-slideshow-timeline2.png Source: http://edutechwiki.unige.ch/mediawiki/index.php?title=File:Flash-cs6-simple-slideshow-timeline2.png License: unknown
Contributors: image:flash-cs6-simple-slideshow-timeline.png Source: http://edutechwiki.unige.ch/mediawiki/index.php?title=File:Flash-cs6-simple-slideshow-timeline.png License: unknown Contributors:
image:flash-cs6-button-component-parameters.png Source: http://edutechwiki.unige.ch/mediawiki/index.php?title=File:Flash-cs6-button-component-parameters.png License: unknown
Contributors: image:flash-cs3-mask.png Source: http://edutechwiki.unige.ch/mediawiki/index.php?title=File:Flash-cs3-mask.png License: unknown Contributors: image:flash-cs3-mask-movie-clip.png Source: http://edutechwiki.unige.ch/mediawiki/index.php?title=File:Flash-cs3-mask-movie-clip.png License: unknown Contributors: image:flash-cs3-mask-guided-movie-animation.png Source: http://edutechwiki.unige.ch/mediawiki/index.php?title=File:Flash-cs3-mask-guided-movie-animation.png License: unknown
Contributors: image:an_ik_symbols.png Source: http://edutechwiki.unige.ch/mediawiki/index.php?title=File:An_ik_symbols.png License: unknown Contributors: image:an_ik_shape.png Source: http://edutechwiki.unige.ch/mediawiki/index.php?title=File:An_ik_shape.png License: unknown Contributors: image:symbol-vs-shape-armature.png Source: http://edutechwiki.unige.ch/mediawiki/index.php?title=File:Symbol-vs-shape-armature.png License: unknown Contributors: image:symbols-ik-intro.png Source: http://edutechwiki.unige.ch/mediawiki/index.php?title=File:Symbols-ik-intro.png License: unknown Contributors: File:Flash-cs6-ik-armature-0.png Source: http://edutechwiki.unige.ch/mediawiki/index.php?title=File:Flash-cs6-ik-armature-0.png License: unknown Contributors: image:Bone tool.png Source: http://edutechwiki.unige.ch/mediawiki/index.php?title=File:Bone_tool.png License: unknown Contributors: image:flash-cs6-creating-bones2.png Source: http://edutechwiki.unige.ch/mediawiki/index.php?title=File:Flash-cs6-creating-bones2.png License: unknown Contributors: image:flash-cs6-creating-bones1.png Source: http://edutechwiki.unige.ch/mediawiki/index.php?title=File:Flash-cs6-creating-bones1.png License: unknown Contributors: image:flash-cs4-adjusting-joints.png Source: http://edutechwiki.unige.ch/mediawiki/index.php?title=File:Flash-cs4-adjusting-joints.png License: unknown Contributors: image:flash-cs4-shape-ik-stickman.png Source: http://edutechwiki.unige.ch/mediawiki/index.php?title=File:Flash-cs4-shape-ik-stickman.png License: unknown Contributors: image:flash-cs4-fixing-curves-ik.png Source: http://edutechwiki.unige.ch/mediawiki/index.php?title=File:Flash-cs4-fixing-curves-ik.png License: unknown Contributors: File:Symbol-vs-shape-armature-1.png Source: http://edutechwiki.unige.ch/mediawiki/index.php?title=File:Symbol-vs-shape-armature-1.png License: unknown Contributors: image:Bone_tool.png Source: http://edutechwiki.unige.ch/mediawiki/index.php?title=File:Bone_tool.png License: unknown Contributors: image:Bind_tool.png Source: http://edutechwiki.unige.ch/mediawiki/index.php?title=File:Bind_tool.png License: unknown Contributors: image:Selection_tool.png Source: http://edutechwiki.unige.ch/mediawiki/index.php?title=File:Selection_tool.png License: unknown Contributors: image:Subselection_tool.png Source: http://edutechwiki.unige.ch/mediawiki/index.php?title=File:Subselection_tool.png License: unknown Contributors: image:Pen_tool.png Source: http://edutechwiki.unige.ch/mediawiki/index.php?title=File:Pen_tool.png License: unknown Contributors: image:Free_transform_tool.png Source: http://edutechwiki.unige.ch/mediawiki/index.php?title=File:Free_transform_tool.png License: unknown Contributors: image:flash-cs4-armature-properties.png Source: http://edutechwiki.unige.ch/mediawiki/index.php?title=File:Flash-cs4-armature-properties.png License: unknown Contributors: image:flash-cs4-as3-motion-tween.jpg Source: http://edutechwiki.unige.ch/mediawiki/index.php?title=File:Flash-cs4-as3-motion-tween.jpg License: unknown Contributors: image:flash-cs4-copy-motion-as-as3.jpg Source: http://edutechwiki.unige.ch/mediawiki/index.php?title=File:Flash-cs4-copy-motion-as-as3.jpg License: unknown Contributors: image:flash-cs6-embedded-movie-clip.png Source: http://edutechwiki.unige.ch/mediawiki/index.php?title=File:Flash-cs6-embedded-movie-clip.png License: unknown Contributors: image:flash-cs6-embedded-movie-clip-edit.png Source: http://edutechwiki.unige.ch/mediawiki/index.php?title=File:Flash-cs6-embedded-movie-clip-edit.png License: unknown Contributors:
image:flash-cs6-video-deployement-dialog.png Source: http://edutechwiki.unige.ch/mediawiki/index.php?title=File:Flash-cs6-video-deployement-dialog.png License: unknown Contributors:
image:flash-cs6-embedded-video-plus-animation.png Source: http://edutechwiki.unige.ch/mediawiki/index.php?title=File:Flash-cs6-embedded-video-plus-animation.png License: unknown
Contributors: File:Flash-cs6-cue-points-properties-panel2.png Source: http://edutechwiki.unige.ch/mediawiki/index.php?title=File:Flash-cs6-cue-points-properties-panel2.png License: unknown
Contributors: File:flash-cs6-cue-point-navigation.png Source: http://edutechwiki.unige.ch/mediawiki/index.php?title=File:Flash-cs6-cue-point-navigation.png License: unknown Contributors: File:Flash-cs6-cue-points-properties-panel.png Source: http://edutechwiki.unige.ch/mediawiki/index.php?title=File:Flash-cs6-cue-points-properties-panel.png License: unknown
Contributors: File:Flash-cs6-cue-points-embedded-clips.png Source: http://edutechwiki.unige.ch/mediawiki/index.php?title=File:Flash-cs6-cue-points-embedded-clips.png License: unknown Contributors:
image:flash-cs6-video-captions.png Source: http://edutechwiki.unige.ch/mediawiki/index.php?title=File:Flash-cs6-video-captions.png License: unknown Contributors: image:flash-cs6-video-captions2.png Source: http://edutechwiki.unige.ch/mediawiki/index.php?title=File:Flash-cs6-video-captions2.png License: unknown Contributors: image:as_actions_panel_new_popup.png Source: http://edutechwiki.unige.ch/mediawiki/index.php?title=File:As_actions_panel_new_popup.png License: unknown Contributors: image:help.png Source: http://edutechwiki.unige.ch/mediawiki/index.php?title=File:Help.png License: unknown Contributors: image:flash-CS5-code-snippets.jpg Source: http://edutechwiki.unige.ch/mediawiki/index.php?title=File:Flash-CS5-code-snippets.jpg License: unknown Contributors: image:flash-data-grid-0.png Source: http://edutechwiki.unige.ch/mediawiki/index.php?title=File:Flash-data-grid-0.png License: unknown Contributors: image:flash-data-grid-as3.png Source: http://edutechwiki.unige.ch/mediawiki/index.php?title=File:Flash-data-grid-as3.png License: unknown Contributors: image:flash-data-grid-1.png Source: http://edutechwiki.unige.ch/mediawiki/index.php?title=File:Flash-data-grid-1.png License: unknown Contributors: image:flash-cs3-drag-and-drop-simple.png Source: http://edutechwiki.unige.ch/mediawiki/index.php?title=File:Flash-cs3-drag-and-drop-simple.png License: unknown Contributors: image:flash-cs3-dynamic-text-properties.png Source: http://edutechwiki.unige.ch/mediawiki/index.php?title=File:Flash-cs3-dynamic-text-properties.png License: unknown Contributors: -
426
Image Sources, Licenses and Contributors
image:flash-cs6-named-symbol-instance.png Source: http://edutechwiki.unige.ch/mediawiki/index.php?title=File:Flash-cs6-named-symbol-instance.png License: unknown Contributors: image:flash-cs3-mouse-events-property-changes.png Source: http://edutechwiki.unige.ch/mediawiki/index.php?title=File:Flash-cs3-mouse-events-property-changes.png License: unknown
Contributors: image:flash-cs3-mouse-events-property-changes2.png Source: http://edutechwiki.unige.ch/mediawiki/index.php?title=File:Flash-cs3-mouse-events-property-changes2.png License: unknown
Contributors: image:flash-cs3-keypress-moving.png Source: http://edutechwiki.unige.ch/mediawiki/index.php?title=File:Flash-cs3-keypress-moving.png License: unknown Contributors: image:browse_to_path.png Source: http://edutechwiki.unige.ch/mediawiki/index.php?title=File:Browse_to_path.png License: unknown Contributors: image:add_path.png Source: http://edutechwiki.unige.ch/mediawiki/index.php?title=File:Add_path.png License: unknown Contributors: image:remove_path.png Source: http://edutechwiki.unige.ch/mediawiki/index.php?title=File:Remove_path.png License: unknown Contributors: image:tween-lite-1.jpg Source: http://edutechwiki.unige.ch/mediawiki/index.php?title=File:Tween-lite-1.jpg License: unknown Contributors: image:flash-CS3-setting-classpath.jpg Source: http://edutechwiki.unige.ch/mediawiki/index.php?title=File:Flash-CS3-setting-classpath.jpg License: unknown Contributors: image:flash-cs3-linkage-properties.jpg Source: http://edutechwiki.unige.ch/mediawiki/index.php?title=File:Flash-cs3-linkage-properties.jpg License: unknown Contributors: image:3d-coordinates.gif Source: http://edutechwiki.unige.ch/mediawiki/index.php?title=File:3d-coordinates.gif License: unknown Contributors: image:right-hand-rule.gif Source: http://edutechwiki.unige.ch/mediawiki/index.php?title=File:Right-hand-rule.gif License: unknown Contributors: -
427
License
License
CC BY-NC-SA Licence
EduTech_Wiki:Copyrights
http:/ / creativecommons. org/ licenses/ by-nc-sa/ 3. 0/
428