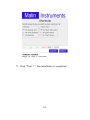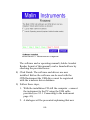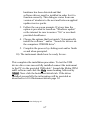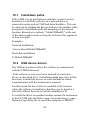
1
Malin Instruments
MALIN
CRANKSHAFT DEFLECTION METER mkII
USER MANUAL
MALIN INSTRUMENTS LTD
TEL: +44 (0)1920 469269
FAX: +44 (0)1920 469600
e-mail: [email protected]
[email protected]
9E SWAINS MILL
CRANE MEAD
WARE, HERTS, SG12 9PY
UK
IM2138 23/3/2007
1
(Blank page)
2
Warning!
Be sure to follow the installation steps given in 16 APPENDIX
I – Software installation page 61 before connecting the
instrument to the PC. Failure to comply with this step may
cause Windows 2000/XP/Server 2003 and Vista to assign an
incorrect driver to the device making installation difficult.
3
1
Table of Contents
1
2
3
4
Packing list................................................................................ ...7
Introduction.............................................................................. ....8
Sequence of operations.................................... ..........................10
Instrument overview....................................... ...........................11
4.1 General description......................................... ....................11
4.2 Malin CDM micrometer................................................. .....13
5 Instrument operation............................................. .....................17
5.1 Take readings.......................................................... ............17
5.2 Charging.................................................. ...........................21
5.3 Switching off..................................................................... ..21
5.4 Erasing data........................................................................ .22
5.5 Manual mode.............................................. ........................22
6 Software.......................................................................... ...........25
6.1 Installation................................................. .........................25
6.2 Engine profiles....................................................... .............25
6.3 Creating an engine profile....................................... ............25
6.3.1 Profile name..................................................... ...........26
6.3.2 Engine name.................................... ...........................26
6.3.3 Situation........................................................... ...........27
6.3.4 Number of journals............................... ......................27
6.3.5 Average readings............................. ...........................27
6.3.6 Rotation direction..................................................... ...27
6.3.7 V-Engine............................................................ .........27
6.3.8 Bottom and check errors..................... ........................28
6.3.9 Maximum allowable and permissible deflections.......28
6.3.10 Rotation order.................................... .......................29
6.3.11 Crank arrangement......................................... ...........29
6.3.12 Save............................................... ...........................29
6.4 Transferring engine parameters to the instrument...............30
6.5 Downloading data from the instrument...............................31
6.6 View downloaded data.............................................. ..........31
6.6.1 Summary panel.................................... .......................32
6.6.2 Deflections panel............................. ...........................32
6.6.3 Crankline................................................................... ..32
4
6.7 Exporting data............................................................ .........33
6.8 Printing Data......................................................... ..............33
6.9 Update.......................................................................... .......34
6.10 About dialogue.......................................................... ........35
6.10.1 About.................................................. ......................35
6.10.2 License........................................................... ...........35
6.10.3 Support................................................................. .....35
6.10.4 Instrument details............................................ ..........36
6.10.4.1 CDM kit number................................ ...............36
6.10.4.2 CDM instrument serial number.........................36
6.10.4.3 Transducer calibration numbers........................36
6.10.4.4 Battery calibration numbers..............................36
6.10.4.5 Battery voltage.................................... ..............36
7 Internal battery unit......................................................... ...........38
8 Appendix A – Extension pieces......................... ........................39
9 Appendix B – Connecting leads...................................... ...........41
9.1 Connecting Lemo plug and socket......................................41
9.2 Disconnecting Lemo plug from socket............................ ....42
9.3 USB PC connection lead.......................................... ...........43
9.3.1 Connecting to the instrument......................................43
9.3.2 Connect to the PC.............................. .........................44
10 Appendix C – Specification............................. ........................45
10.1 Specification............................................ .........................45
11 Appendix D – Alignment curve calculations........................ ....46
11.1 Stage 1 – displacement readings.......................................47
11.2 Stage 2 – checking the readings........................................47
11.3 Stage 3 – deflection values........................................ ........48
11.4 Stage 4 – drawing the curve........................... ...................49
12 Appendix E – Typical diagrams................................... ............51
Engine Data Report............................................................. .......51
Deflection in vertical and horizontal plane diagram...................52
Vertical section diagram..................................... .......................53
Horizontal section diagram..................................... ...................54
13 Appendix F – Cylinder bore measuring attachment.................55
13.1 Instructions for use.................................................... ........55
14 Appendix G – General arrangement drawing – Micrometer
transducer...................................................................................... ...59
5
15 Appendix H – General arrangement drawing – Bore
measurement attachment......................................................... .........60
16 APPENDIX I – Software installation............................. ..........61
16.1 Installation paths............................................. ..................68
16.2 USB device drivers................................... ........................68
Example – Windows 98/ME................................. ................69
Example – Windows 2000/XP/Server 2003/Vista................69
16.3 Other operating systems........................................ ............69
17 Appendix J – User notes.......................................................... .70
6
1
Packing list
Please take a few moments to ensure you have received the full
kit of parts as detailed below.
1) 1 x Malin CDM instrument,
2) 1 x micrometer transducer,
3) 1 x USB cable,
4) 1 x software CD,
5) 1 x power supply / charger,
6) 2 x spanners (8mm/10mm),
7) 3 x short points,
8) 2 x long points,
9) 1 x 25 mm extension rod,
10) 1 x 40mm extension rod,
11) 1 x 65mm extension rod,
12) 1 x 165mm extension rod,
13) 1 x 115mm extension rod,
14) 1 x 215mm extension rod,
15) hand-held instrument case,
16) mains power cable,
17) points container,
18) manual,
19) calibration certificate.
7
2
Introduction
Producing main bearing alignment curves by the traditional
method of measuring the variation in the gap between the webs
as the crankshaft is rotated is a hot, oily, time consuming
operation. The results inevitably depend on the engineer who
reads the gauge, and on the time available to analyse and draw
the deflection curves.
The Malin CDM crankshaft deflection meter has been designed
to be accurate and easy to use. Not only does it reduce the time
to take measurements on large diesel engines to about one
minute per journal, but it actually calculates and prints the
alignment curves (via the included PC software). This mkII
unit is based on the same principals as the original CDM
Instrument but has taken advantage of modern technology to
improve battery life, reduce size and weight, and improve user
friendliness.
Using the latest technology coupled with precision engineering
the CDM is a powerful tool which, as it is moved from journal
to journal, resets to zero and then measures and stores the
relative displacement with a displayed resolution of 0.001
millimetres (i.e.1µm) ready for transfer to a computer.
The CDM uses a spring-loaded electronic micrometer sensor,
which fits between the webs of the crankshaft using a series of
threaded extension pieces. This is connected, by a lightweight
flexible cable to a hand held microprocessor controlled
recording instrument.
8
Once the hand held crankshaft deflection meter has been
initialised by the computer software, it will prompt the user to
press a key at each measurement point as the crankshaft is
rotated, thus recording the necessary measurements between
the webs. The instrument automatically indicates which journal
to measure next, to minimise unnecessary rotation of the
engine.
When all the measurements have been read into the instrument
they are transferred to a computer, where the data can be
analysed and where the alignment curves are prepared for
viewing and printing. These alignment curves can be compared
with previously acquired data, and all the data can be exported
to spreadsheets or other programs for statistical analysis, the
results of which may be used in planned maintenance routines.
Alternatively the instrument can be used in manual mode,
without the use of a computer, to measure displacements
relative to a zero point. These can be noted and analysed by
hand.
The optional Cylinder Bore Measurement attachment allows
you to use the electronic micrometer to check cylinder wear
and ovality.
Help files for the computer software are available which can be
accessed throughout the software.
9
3
Sequence of operations
The method of operation is described in detail in this manual.
The basic steps to take measurements and analyse the
crankshaft deflection are shown below, with reference to the
relevant section in the manual.
1)
Enter the details of the engine on the computer (one time
operation). See 6.3 Creating an engine profile page 25.
2)
Transfer these details to the Malin CDM (one time
operation). See 6.4 Transferring engine parameters to the
instrument page 30.
3)
Take measurements from the crankshaft. See 5.1 Take
readings.
4)
Transfer the data from the Malin CDM to the computer.
See 6.5 Downloading data from the instrument page 31.
5)
Examine the data and analyse the deflection curves on the
computer. See 6.6 View downloaded data page 31.
6)
Print copies of the diagrams, or copy the data to other
programs. See 6.7 Exporting data page 33and 6.8 Printing
Data page 33.
We recommend reading this manual in its entirety and
familiarising yourself with both the instrument and software
before attempting to use the instrument to take readings from
an engine.
10
4
4.1
Instrument overview
General description
The Crankshaft Deflection Meter comprises an electronic
micrometer sensor connected by a heat and oil resistant cable
to a hand held battery powered instrument designed to take and
store measurements, which can then be transferred to a
computer running the CDM software for analysis.
The instrument has a 2x16 alphanumeric LCD display that is
used to prompt the user with the next crankshaft position to be
measured, and to show the actual displacement at that point.
The three sockets at the top of the instrument accept the cables
from the battery charger, the CDM micrometer and the USB
port for data transfer to the computer. The plugs and sockets
are chosen so that it is not possible to connect a device
incorrectly.
Image 1: CDM connection sockets
11
There are three keypad buttons on the front of the instrument
which control all the functions, these are labelled as (accept
or enter), (up arrow) and (down arrow).
To switch on the instrument press any key. The sequence of
messages on the LCD screen will show “CDM Main Menu”,
“Power Off” and then as you press or
you will see
Take Readings
Manual Mode
Erase Data
Power Off
Press to select your chosen menu heading. Pressing and
at the same time allows you to quit a function or bring you
back to the main menu. Within the menu headings there are
further instructions and questions, which must be enabled or
answered in similar manner.
To switch the instrument off, select Power Off and then press
. Press again to Confirm. Alternatively press or to
select “Cancel” and then press to continue using the
instrument.
To use the instrument in automatic mode, it is first necessary to
define the engine parameters on the computer, and then to
transfer this data to initialise the instrument. Full details are
given in 6.2 Engine profiles page 25
12
Note: The instrument is powered by a battery which has to be
recharged after about 8 hours use. As it goes flat the instrument
will display the message “Battery Empty” and will then
automatically turn itself off after about 10 seconds. Any
completed sets of measurements on journals are safe, but the
measurements from a half completed journal will be lost. When
the instrument has been recharged and “Take Readings” is
reselected, you will be prompted to start again at this journal.
To avoid this inconvenience when using the instrument it is
recommended that the batteries are always charged overnight
before use.
4.2
Malin CDM micrometer
This comprises a spring loaded transducer with a hardened
steel point in a sealed housing with a length of cable for
connection to the hand held instrument. A tapped hole at one
side allows for extension pieces to suit the gap between the
crankshaft webs.
An increase in the width between the webs will be measured as
a positive displacement from zero, while a decrease will be
measured as negative displacement.
13
Image 2: Transducer complete with long and
short point and 65mm Extension rod.
The dimensions of the extension rods are listed in Appendix B.
Select the pieces to suit the dimensions of the crankshaft being
examined and screw them firmly together, with the threaded
end in the micrometer. Choose the appropriate point and fit it
to the end of the rods. Spanners are provided to tighten the
joints in the rods.
Insert the micrometer into the gap in the crankshaft and adjust
the knurled end cap and locking ring so that it is firmly fixed
and supported by the hardened steel points.
To ensure that the micrometer is correctly set, so that up to 2
mm of displacement can be measured in either direction a
small amber LED is provided.
14
Image 3: Transducer with Lit
Amber centred position LED.
When the instrument is connected and switched on this will
light when the transducer is near to its mid point of travel.
Adjust the knurled end cap to this point and tighten the locking
ring.
The instrument automatically sets itself to read zero at the first
measurement point of each journal.
In manual mode the micrometer can be used to show values of
displacement relative to a set zero position. The readings are
not recorded, they must be noted by hand and thus they cannot
be transferred to a computer. This mode should be used if the
micrometer is to be used in place of a dial gauge when setting
up bearings.
In automatic mode all measurements are stored ready for
transfer to the computer. It does not matter which journal is
measured first, the instrument allows you to enter the number
of the chosen journal, and will thereafter tell you the order in
which to take readings with the minimum of unnecessary
engine turning as specified in the profile.
15
A screw eye is provided to which a piece of light cord may be
attached which may assist the handling of the micrometer
around the back of a crankshaft.
16
5
5.1
Instrument operation
Take readings
Ensure the instrument has the required engine profile loaded by
browsing the available profiles under the “Take Readings ”
menu. To create and load new profile see 6.2 Engine profiles
page 25.
Ensure the instrument is free of readings. This can be achieved
via the “Erase Data” function explained in section 5.4 Erasing
data page 22.
Make sure that the instrument has been fully charged before
use, and prepare the micrometer with appropriate extension
pieces. Plug the cable from the micrometer into the middle
socket on the instrument.
Remove the crankcase covers to expose the journals and
connecting rods. Turn the engine by hand so that the
connecting rod journal in the cylinder to be examined first is
just past its bottom position, so that the micrometer can be set
between the crankshaft webs. As the engine is turned the
connecting rod should be moving away from the sensor.
This position is referred to as Near Bottom Starboard, however
depending on the direction of rotation, and the location of
access galleries, this starting point may be at Near Bottom Port.
Two measurements are taken near to bottom dead centre,
which can then be averaged. With a “Vee” engine, the
micrometer can be set with the journal at the lowest point with
17
both cylinders near to bottom dead centre, where neither
connecting rod fouls the micrometer and only one bottom
measurement is needed. When ready to take the first reading,
press any key to switch the instrument on. Select “Take
Readings” and select the required profile and engine. The
instrument will ask for the journal number. Look at the engine
and select the journal where the crankshaft webs are nearest to
the start position.
Note:
For optimum accuracy the unit should be left on for at
least 2 minutes prior to taking the readings.
Use the key until this shows the correct number for the
journal, which you have chosen. Then press and the screen
will show the message “Journal nn NBS”, nn being the
number which was chosen for the first journal, the second line
of the display will be read with the message “A when LED is
on”. (Depending on the direction of rotation specified for the
engine, NBP may replace NBS).
Now fit the micrometer between the webs of the crankshaft. On
most engines a pair of pockmarks is provided in the webs by
the manufacturer into which the micrometer can be located.
Adjust the knurled end cap to grip the micrometer in these
pockmarks, and then set it so that the amber LED is lit.
Tighten the locking ring so that there is no risk of movements
while taking the measurements.
If there are no pockmarks, you must visually choose the
position of the micrometer so that it is in the correct position.
18
The spring in the micrometer should be strong enough to hold
it in position, but extreme care will be needed to ensure that it
does not move.
When the micrometer is set correctly and showing the amber
LED, press and the display will change to “Waiting for
NBS”, “Reading = 0000”. When you are ready, and the
crankshaft is as close as practical to bottom dead centre,
allowing for the mechanical restriction of the connecting rod,
press .
The screen will show “Reading = 0000” on the second line
and the top line will change to “Waiting for STB” (or if
rotating in the opposite direction “Waiting for PORT”). As the
engine is turned the reading will change to show a positive or
negative measurement in units of 0.001 mm.
Turn the engine a quarter turn, so that the journal is at the
horizontal position, and press to accept this reading. The
instrument will now show Waiting for TDC. Turn the engine a
further quarter turn so that the journal is at the highest vertical
position, (i.e. Top Dead Centre for an in line engine), press
again to accept the reading and the instrument will show
Waiting for PORT.
Continue to turn the engine, take this reading and finally at
Waiting for NBP take the last reading when the micrometer is
close to the connecting rod at near bottom port position. This is
the final, fourth/fifth1 reading for this journal.
1
Depending on whether or not the V-Engine option is selected in the engine profile.
19
If the average option was chosen in the engine profile, you will
now be prompted to repeat the readings in the reverse direction,
taking a further four/five readings before getting back to the
starting point.
If any of the measurements are outside the specified tolerances
the offending value will be presented followed by the message
“Repeat Readings? ”,”No”. If the values are not acceptable
press to select “Yes” and press to retake the
measurements for the journal.
If the values are acceptable press to continue to the next
journal. For an explanation of these values see 11 Appendix D
– Alignment curve calculations page 46. The tolerances
referred to are those entered in the database.
Having taken the final measurement for the set, the message on
the instrument will change to “Journal nn NBS”, together
with the message “A when LED on”.
The number shown will be the next journal in the sequence
entered in the database order of rotation. Set up the micrometer
at this position, reset to zero, and proceed to take the readings.
When the complete set of measurements have been taken the
screen will show “All completed” and revert to the main
menu.
20
5.2
Charging
When the battery needs to be recharged while the instrument is
in use the message “Battery Empty” will be shown on the
screen for about 10 seconds, and the instrument will then
switch off. Any data saved in the instrument will be preserved,
but half completed journal measurements2 will be lost and must
be remeasured when the battery is charged. We recommend
charging the instrument overnight before taking measurements
to avoid inconvenience.
Check that the charger is suitable for your supply voltage, Plug
into the instrument, and then switch on the supply.
Alternatively the unit will charge whilst connected to the PC
via the USB cable but at a reduced rate. A full charge will take
approximately 48 hours when charged from the USB port.
Note: The supplied charger provides a five Volt DC supply to
the instrument. Use of incorrect supply will likely cause
damage to the instrument. Use only the supplied power supply
unit with the instrument.
5.3
Switching off
To switch off the instrument select “Power OFF” by pressing
the key, then press . The message “Power OFF”,
“Confirm” Will be shown. Press to confirm and the screen
2
If eight journals are to be measured and the fifth is being measured when the battery goes
flat. Readings will resume form the beginning of the fifth journal after charging the
instrument.
21
will go blank.
During normal operation the unit will automatically power off
after 10 minutes of inactivity. Taking of readings will resume
at the first incomplete journal on subsequently selecting “Take
Readings”.
Data and engine details are preserved whist the unit is off.
Note : Leaving the CDM Instrument in the “Power OFF”
confirmation screen will cause the unit to stay on until the
battery is exhausted. This can be useful for checking the battery
life. If the battery fails to last for the expected duration after a
full charge the instrument can be returned to the supplier for a
replacement battery. The transducer should always be
connected whilst performing this test in order to achieve
accurate results.
5.4
Erasing data
Should for any reason it become necessary to start over or abort
taking of readings any data stored can be erased using the erase
function from the menu. Use the
or keys to select
“Erase Data” and press the key. Use the
or keys to
select “Confirm”. Then press the key. Any journal readings
are now erased and the unit is ready to take a new set of
readings from any of the engine profiles that have been
transferred to the instrument.
5.5
Manual mode
In this mode the micrometer can be used to show values of
displacement relative to the set zero position. The readings are
22
not recorded, and cannot be transferred to a computer. This
mode should be used if the micrometer is to be used for setting
up individual bearings or other alignment measurements.
Set up the micrometer as described for automatic mode
measurements, with suitable extension pieces. Connect the
cable to the middle socket on the instrument and press any key
to switch it on.
Press
or to select Manual Mode and press , the screen
will show “Manual Mode” and “A when LED is on”.
Adjust the knurled end cap so that the amber LED is lit and
tighten the locking ring. Then press to set this zero position
- the messages on the screen will change to “Manual Mode”
and “Reading = 0000”.
As the crankshaft is rotated the displacement from this zero
reference point will be displayed continuously. The values are
in units of 0.001 mm. Readings will normally be in the range
from about +2 mm to –2 mm, although if zero was set when the
micrometer was not truly centred the values could be offset,
they might for example be in the range +1.8 mm to –2.2 mm,
i.e. a total range of about 4 mm.
Any measurements you wish to record should be noted by
hand.
To take readings from another location press and at the
same time. Reselect Manual mode using
or followed by
23
. Move the micrometer to the new location and set it up to
show the amber LED. Press to reset the zero reference point
and start again.
24
6
6.1
Software
Installation
The software is installed by inserting the supplied installation
medium and following the on screen prompts,
Refer to page for detailed instructions.
6.2
Engine profiles
Before readings can be taken the engine details must be
provided. These are entered in the profiles dialogue of the
software and then transferred to the instrument. The Instrument
can hold up to twenty sets of engine parameters at any one
time.
6.3
Creating an engine profile
Launch the Malin CDM Software. Click the Options heading
in menu followed by Profiles. The Profiles dialogue is
presented.
25
6.3.1
Profile name
The Profile / Ship Name entry box allows engines to be put
into groups, generally by ship name. Click the down arrow to
the right to select an existing Profile / Ship. Alternatively create
a new Profile / Ship by entering the desired name and then
clicking the Add New Profile button. Names should be
alphanumeric and can be up to sixteen characters long.
6.3.2
Engine name
Existing engines within the specified Profile will be presented
in the Engines box. New Engines can be added to the chosen
Profile by entering the desired name and clicking the Add new
Engine button. Names should be alphanumeric and can be up
to sixteen characters long.
26
6.3.3
Situation
The situation box is used to specify whether the engine is ship
or land based. This alters the way some data is presented in the
software and also some of the on screen prompts of the
instrument. For example in land based mode Left would be
specified in place of Port. When ship based engine data is
downloaded some boxes are provided for entering the ships
draughts if desired.
The number of cylinders / journals is entered in the drop down
list.
6.3.4
Number of journals
Select the number of journals for which measurements must be
taken.
6.3.5
Average readings
The average readings check box causes the readings for each
journal to be taken in both directions and then averaged.
Without this box checked the readings will be taken once only
in the Rotation Direction specified.
6.3.6
Rotation direction
Specify the rotation direction of the engine.
6.3.7
V-Engine
On in-line engines the reading for BDC cannot generally be
taken due the connecting rod being in the way. It is therefore
necessary to take the reading near BDC each side and the two
27
readings averaged to obtain a figure for BDC. This maybe
unnecessary for V-Engines. For this reason the V-Engine box
is provided to allow just one reading at BDC to be taken.
6.3.8
Bottom and check errors
The errors are a check carried out at the end of a journal
reading to verify that the data obtained is likely to be valid. If
the transducer were to slip at some point during the cycle the
reading obtained would likely be of greater magnitude than
expected and these figures should be set accordingly;
For bottom error what would be expected as the maximum
likely difference between the two readings at BDC. For VEngine this figure is ignored and should be set as 0.
This figure is in units of 1µ and cannot be greater than 255.
For Check error what would be the maximum result expected
for C - D where C is the sum of the TDC and BDC readings
and D is the sum of the Port and Stbd Readings.
This figure is in units of 0.001mm (1µm) and cannot be greater
than 255.
6.3.9 Maximum allowable and permissible
deflections
These should be provided by the engine manufacturer. They
are used by the software to colour the background of the
deflections chart either green (Good), yellow (Allowable), Red
(Above Maximum Allowed). These figures are in units of
0.01mm (10µm) and cannot be greater than 255.
28
6.3.10
Rotation order
This determines the default order in which the instrument
prompts for journal readings. This should be set up so that the
minimum amount of manual turning of the engine crank is
required between each journal reading. This would generally
(though not necessarily) be the same as the firing order.
Use the earlier and later buttons to move selected journal
numbers up and down the list.
6.3.11
Crank arrangement
This is used to specify the arrangement of journal and bearings
on the crank. Use the provided buttons to build up a
representation of the engines crank.
6.3.12
Save
Press the save button when you are finished editing a particular
set of engines parameters.
Tip : When the instrument is to be used with multiple engines
of the same type the profiles can be copied by entering a new
engine name and clicking the Add new engine button followed
by the Save button.
Example;
1) Create engine ME_PORT and click Save,
29
2) Replace ME_PORT for ME_STBD in the “Engine
name” entry field. Click Add new engine. Click Save.
6.4 Transferring engine parameters to the
instrument
Connect the CDM to an unused USB Port on the computer.
Choose Communications from the Malin CDM Software
menu and then click Setup.
The dialogue presented contains two “tree lists”. The left list
headed “Available profiles” is populated with the engine
profiles that have been entered into the software. The right list
headed “CDM” will be empty and represents engines that are
to be sent to the CDM instrument. The trees can be expanded
by clicking the arrows to reveal individual engines within a
profile. Profiles and or individual engines can be selected.
Pressing > ADD > button transfers the selected items in the left
tree to the tree list on the right. If an unwanted engine is
accidentally transferred to the CDM list it can be removed by
selecting it and pressing the < REMOVE < button. When the
30
list contains all desired engines click the Send button.
The dialogue status text will change from “Idle” to “Setup
Successful” on completion. Once the engine details are sent to
the CDM they are retained until a new set of engine profiles are
transferred. Generally an instrument based on a single ship or
shared within a fleet would only need to be setup in this way
once with the required engines whereas a service engineer
taking an instrument from vessel to vessel would create new
profiles and download them to the instrument for each ship he
visits.
6.5
Downloading data from the instrument
With the instrument connected to the PC via the USB cable
launch the Malin CDM software, click Communications from
the Software menu and then click Download. A dialogue is
displayed. Click the Download button. A Second or so later the
dialogues status message will change from “Idle” to
“Download Successful”. Enter values in the provided boxes
where desired and then click Save followed by Close.
6.6
View downloaded data
Click the File menu within the Software menu and then click
Open. A dialogue will be presented listing the profiles and
engines available. Choose a profile followed by an engine and
then click Plot. The latest set of downloaded data is displayed
by default. The Previous and Next Data buttons can be used to
navigate through the history of readings.
The tabs below the toolbar titled “Summary”, “Deflections”
and “Crankline” are used to switch between the way in which
31
the data can be presented.
The calculations used to draw the diagrams are described in 11
Appendix D – Alignment curve calculations page 46, and
typical diagrams are shown in 12 Appendix E – Typical
diagrams page 51.
6.6.1
Summary panel
The readings, Aft, Mid & Fwd Draughts, Engine, Water & Oil
Temperatures, and date are all shown in the summary panel.
6.6.2
Deflections panel
Within the deflections tab horizontal colour-coded bands define
the permissible deflection and maximum allowable deflection
limits, which were set out in the profile for this engine.
6.6.3
Crankline
The horizontal axis of the diagram does not necessarily
correspond with the physical centre line of the engine, however
the software allows each curve to be shifted or transposed
laterally and by rotation so that it appears on the diagram as
might be expected in the actual engine. For example the weight
of the propeller shaft is likely to cause greater vertical
deflections at that end of the crankshaft. This can be taken into
account as the adjustments are made.
32
Adjustment of either one of the curves does not affect the
other. As there will normally be more deflection vertically,
start by displaying the vertical section. If the upper curve on
the screen is dropping down to the right, use the anti-clockwise
rotation arrow button to rotate the curve about the left hand
end. Use the up & down arrow buttons to vertically shift the
curve.
6.7
Exporting data
Each of the displayed sets of data (Summary, deflections chart
and Crankline) can be exported to files. The currently
displayed item is exported by clicking File from the Menu and
then clicking Export. A dialogue is displayed from where the
desired destination and filename are specified.
The summary page is exported as a clear text file with the
extension .cdm. The columns are separated by tabs.
The Deflections and Crank line are exported in the Portable
Network Graphics format ending with .png. Use the
Vertical/Horizontal button to change between exporting of
Vertical and Horizontal Cranklines.
6.8
Printing Data
Each of the displayed sets of data (Summary, deflections chart
and Crankline) can be printed. The currently displayed item is
printed by clicking File from the Menu and then clicking Print.
A print dialogue is then displayed from where the desired
printer and settings can be specified.
Use the Vertical/Horizontal button to change between printing
33
of Vertical and Horizontal Cranklines.
6.9
Update
From time to time updates may be published adding
functionality or other benefits.
This feature allows the Instruments firmware to be updated on
site via the PC USB connection.
Update files will be provided (via email or download) in the
form of a single file which must be saved to the
Folder/Directory called “updates” in the CDM's installation
Folder.
All profiles and readings held within the instrument are lost as
a result of this procedure. It is therefore advised to ensure that
the latest readings have been downloaded prior to performing
this operation.
Before performing any updates be sure to close any
applications that cause the PC to run slowly or erratically.
We recommend restarting the PC before performing this task to
ensure stable update environment.
To perform an update Connect the Instrument to the PC using
the USB cable.
Launch the Malin mkII CDM software and click the
Communications heading from the software menu. Now click
the Update item from within the drop down menu.
A dialogue is presented which contains a list of available
updates.
Select the required update. The box to the right will display
34
release notes and any relevant information that may be of help.
Click the Send to CDM button to update the instrument.
The update should take approximately 10 seconds. During this
this time the Instrument display will show “Malin Boot Vx.yz”
where x.yz is the version of the current boot firmware.
The instrument will then return to the USB connected screen
after briefly displaying the new Firmware version.
Engine profiles can now be reloaded into the instrument as
explained in 6.4 Transferring engine parameters to the
instrument page 30.
6.10
About dialogue
The about dialogue presents various information about the
software and instrument. The about dialogue is invoked by
clicking Help in the software menu followed by About.
There are four tabs within the about dialogue.
6.10.1
About
The software version is shown here.
6.10.2
License
The software license is found here.
6.10.3
Support
Full contact details for help and support can be found here.
35
6.10.4
Instrument details
When connected, information about the instrument can be
found here.
6.10.4.1
CDM kit number
This is the kit number which identifies the entire kit and allows
us to keep track of the relevant calibration documents and
quality documents. This number should be quoted in any
communication with the Malin Instruments Ltd regarding
service or repair.
6.10.4.2
CDM instrument serial number
This is the serial number of the instrument.
6.10.4.3
Transducer calibration numbers
These numbers are used internally by the instrument to convert
the position of the micrometer plunger into a reading in
microns.
6.10.4.4
Battery calibration numbers
These numbers are used by the instrument to accurately
determine the battery voltage.
6.10.4.5
Battery voltage
This figure reflects the status of the internal battery. The
battery is at least 70% capacity at 4.20 Volts. The battery is
too low to operate the instrument below approximately 3.5
Volts.
36
The battery voltage never exceeds 4.20 Volts although it
continues to 100% capacity when left to charge.
See 7 Internal battery unit. page 38 for further details on the
instruments internal battery.
37
7
Internal battery unit.
The CDM instrument is powered buy an internal Lithium Ion
battery. A full charge offers approximately 8 hours use when
new. Over time the battery unit will degrade, lasting less time
for a full charge, and will eventually need to be replaced.
The battery is fully charged in approximately 10 hours when
charged with the supplied power supply unit. The battery will
slowly charge if left connected to only the PC. A full charge
from the PC will take approximately 48 hours.
When both are connected the instrument continues to
communicate with the PC but will only accept charge from the
power supply unit.
Note : Lithium Ion batteries require special charging circuitry
and on no account should any attempt be made to charge the
internal battery by traditional means.
The CDM instrument is not designed to be opened or modified
by the end user and any attempt to do so would terminate the
warranty.
38
8
Appendix A – Extension pieces
The dimensions of the extension rods and needlepoints are
shown in Table 1. The length of the micrometer, which can be
adjusted from approximately 58 mm to 73 mm (allowing for
+/- 2mm travel), must be added to the length of the rods and
needlepoints to give the correct selection for any particular
engine crankshaft.
The range of lengths available is from 68 mm to 698 mm,
adding in shorter rods or using different needle lengths can
obtain intermediate lengths on the following list.
To select the required parts find the Range that matches the
journals to be measured and then select the extension rods
indicated. Adjustments within this range are made using
different combinations of needlepoints. A range of 10 – 30mm
can be selected. A further adjustment can be made using the
screw collet on the micrometer body.
39
Extension Rods
0
0
0
25
40
65
65 + 25
65 + 40
115
115 + 25
115 + 40
165
165 + 25
165 + 40
215
165 + 40 + 25
165 + 65
215 + 25
215 + 40
215 + 65
215 + 65 + 25
215 + 115
215 + 115 + 25
215 + 165
215 + 165 + 25
215 + 165 + 40
215 + 165 + 65
215 + 165 + 65 + 25
215 + 165 + 115
215 + 165 + 115 + 25
215 + 165 + 115 + 40
215 + 165 + 115 + 40 + 25
215 + 165 + 115 + 65
215 + 165 + 115 + 65 + 25
215 + 165 + 115 + 65 + 40 + 25
Body
58 – 73
58 – 73
58 – 73
58 – 73
58 – 73
58 – 73
58 – 73
58 – 73
58 – 73
58 – 73
58 – 73
58 – 73
58 – 73
58 – 73
58 – 73
58 – 73
58 – 73
58 – 73
58 – 73
58 – 73
58 – 73
58 – 73
58 – 73
58 – 73
58 – 73
58 – 73
58 – 73
58 – 73
58 – 73
58 – 73
58 – 73
58 – 73
58 – 73
58 – 73
58 – 73
Needles
5+5
5 + 15
15 + 15
10 – 30
10 – 30
10 – 30
10 – 30
10 – 30
10 – 30
10 – 30
10 – 30
10 – 30
10 – 30
10 – 30
10 – 30
10 – 30
10 – 30
10 – 30
10 – 30
10 – 30
10 – 30
10 – 30
10 – 30
10 – 30
10 – 30
10 – 30
10 – 30
10 – 30
10 – 30
10 – 30
10 – 30
10 – 30
10 – 30
10 – 30
10 – 30
Range
68 – 83
78 – 93
88 – 103
88 – 123
103 – 138
128 – 163
148 – 183
163 – 198
178 – 213
198 – 233
213 – 248
228 – 263
243 – 278
263 – 198
278 – 313
283 – 318
288 – 323
398 – 333
318 – 353
338 – 373
358 – 393
388 – 423
408 – 443
438 – 473
458 – 493
473 – 508
498 – 533
518 – 553
548 – 583
568 – 603
583 – 618
603 – 638
623 – 658
643 – 680
663 – 698
Table 1: Extension rod combinations for each range between 70 and
700mm.
40
9
9.1
Appendix B – Connecting leads
Connecting Lemo plug and socket
The Malin CDM transducer and instrument are fitted with a
“Lemo” plug and socket.
To connect , line up the red dot on the plug with the red mark
on the socket and push the plug into the socket. This will latch
the plug so that it cannot simply be pulled out.
Image 4: Take note of
red marks.
Image 5: Align with
red dots and insert
plug
Image 6: Push home
until knurled
surround locks
Do not attempt to twist or rotate the plug in the socket.
41
9.2
Disconnecting Lemo plug from socket.
Image 7: Grasp collet as
shown and pull away from
socket
To remove the lead, grip the knurled surround as shown in
Image 6 and pull out. The knurled surround starts to move
about 1 mm over the body of the plug, releasing the latching
mechanism. The body of the plug can then be withdrawn from
the socket.
Do not attempt to twist or rotate the plug in the socket.
Do not attempt to pull the plug out by the cable.
42
9.3
USB PC connection lead
The PC connection cable is a standard “USB A” to “mini
B” cable as shown in Image 8.
9.3.1
Image 8: USB A to mini B
cable
Connecting to the instrument
Align the mini B end shown in Image 9 so that the wider part
faces up and insert into the USB socket on the instrument as
shown in Image 10 and Image 11.
Image 9: USB Mini
B, Connect to the
instrument
Image 10: Align so
that wider part of
plug faces top of
instrument
43
Image 11: Push into
socket.
9.3.2
Connect to the PC
Connect the USB A (Image 12) plug to the PC observing the
required orientation.
Image 12: USB A plug, Connect to PC
Whilst connected to the PC the instrument will display a “USB
connected”, “Charging (PC)”. The instrument is ready to
communicate with the PC CDM mkII software whilst
connected.
The instruments internal battery is slowly charged whilst
connected to the PC and will become fully charged after
approximately 48 hours. The battery voltage can be monitored
from the About dialogue within the CDM mkII software as
explained in 6.10.4.5 Battery voltage page 36.
44
10 Appendix C – Specification
10.1
Specification
Measuring Range
Deflection
Resolution
Accuracy
Operating Temperature
Battery Life
Battery charger
Hz
Sensor IP rating
Instrument IP rating
Communications
68 mm to over 698 mm
± 2 mm
0.001 mm
±0.01 mm
0 to 50 C
8 hours after full charge
100 - 240 Volts AC 50-60
IP56
IP64
USB
45
11 Appendix D – Alignment curve
calculations
The computer software generates a displacement plot for the
crankshaft in the horizontal and vertical planes, a data report
containing all the stored measurements for the engine, and
alignment curves for the horizontal & vertical planes. Prints of
the computer displays for the data in this example are shown in
Appendix F on page 21.
The alignment curves are found from the readings taken by the
micrometer. The following calculations are based on this
typical set of readings.
JOURNALS
Crank Position
Near bottom starboard
Starboard
Top dead centre
Port
Near bottom port
X
S
T
P
Y
1 2 3 4
0 0 0 0
-4 -2 -2 2
-7 -4 -2 3
-1 0 1 2
0 1 2 2
5 6 7 8
0 0 0 0
0 -1 -6 -3
1 -1 -9 -7
1 1 -1 1
1 1 1 2
Note that these readings can be exported as an ASCII file to a
spreadsheet.
The micrometer measurements between the crankshaft webs
are proportional to the crankshaft deflection and therefore can
be used to indicate the crankshaft alignment.
46
The alignment is only considered in two planes, top and bottom
dead centre (TDC and BDC) being the vertical plane, and Port
and Starboard being the horizontal plane.
11.1
Stage 1 – displacement readings
Deflection values obtained are for TDC, BDC, Port and
Starboard. In an “In line” engine the value for BDC is obtained
by averaging the two readings X and Y which are taken at near
bottom starboard and near bottom port (due to mechanical
restriction). In a “Vee” engine the reading can normally be
taken directly. The values are relative, not absolute, and are all
expressed in units of 0.001 millimetres.
In the worked example, which is shown below, near bottom
starboard is the starting point hence the first measurement is
always zero. If the engine were rotated in the opposite
direction, near bottom port would be the starting point. It is
possible to take the readings first in one direction and then the
other in which case the average of the two readings is
calculated by the instrument and is then used. See figures 1 & 2
on drawing No. CDM 1.1 on page 20.
11.2
Stage 2 – checking the readings.
To ensure that the measurements, which have been taken, are
valid, and that the gauge did not slip, two checks are made.
Firstly the difference between near bottom port and near
47
bottom starboard is checked to make sure that any errors are
small. Secondly the sum of the TDC and BDC readings and
Port and Starboard readings, which should be nearly the same
are checked. The results of these checks are shown below.
Check on gauge readings
1
2
3
4
BDC = ½(X+Y)
B
0
0.5
1
1
TDC + BDC = (T+B)
C
-7
-3.5
-1
4
Stbd + Port = (S+P)
D
-5
-2
-1
4
Limits for the values of C-D and B are set in the notepad for
each engine, the instrument will ask you to repeat the readings
if these limits are exceeded at any location.
11.3
Stage 3 – deflection values.
The deflections due to horizontal and vertical misalignment are
now calculated.
Horizontal alignment
Stbd – Port = (S-P)
H
Vertical alignment
TDC – BDC = (T-B)
V
48
1
2
3
4
-3
-2
-3
0
1
2
3
4
-7
-4.5
-3
2
11.4
Stage 4 – drawing the curve.
Using the deflection values for the vertical alignment, start at
bearing 1 at the left hand axis and draw a straight line for
journal 1 parallel to the horizontal axis.
At journal 1 a line is drawn at an angle α relative to the base
line, where tan α is proportional to the value of V at journal 1,
i.e. (T-B) which equals –7. At journal 2 a line is drawn at an
angle β relative to the line which has just been drawn through
journal 1, where tan β is proportional to the value of v at
journal 2, i.e. (T-B) which equals –4.5
Similar lines are drawn for each journal in turn, with allowance
for any double bearings, and a curve is then fitted to go through
the points corresponding to the bearings, which represents the
misalignment of the crankshaft.
In the example shown as figure 3 on drawing No. CDM 1.2 on
page 20, it can be seen that both end bearings are “lower” than
the others relative to the tangential line drawn across the top of
the curve. If there are any double bearings at chain drives,
which have been listed in the notepad file, the program will
draw a straight line through them.
All of these calculations are carried out by the computer, and
the final curve is drawn on the screen. The software then
allows the Engineer to “rotate” and “shift” the curve so that the
tangential line is near to the horizontal axis of the drawing,
with adjustments to take account of particular knowledge about
the engine, such as propeller shaft loads.
49
A similar curve is also prepared for the horizontal alignment,
although normally there is less significant misalignment in the
horizontal plane.
50
12
Appendix E – Typical diagrams
Engine Data Report
Journal
1
2
3
4
5
6
7
8
Near BDC,STBD (X)
0.5
-0.1
0.1
0.0
0.0
0.0
0.0
0.1
Stbd (S)
-42..9
-17.8
-23.5
22.5
0.0
-9.0
-58.6
-29.4
Top (T)
-67.8
-39.6
-23.5
30.8
12.4
-9.0
-85.9
-69.5
Port (P)
-8.4
2.3
13.2
22.2
12.4
9.9
-11.3
12.6
2.3
10.6
19.5
22.2
12.4
9.9
10.7
23.1
1.4
5.3
9.8
11.1
6.2
4.9
5.4
12.1
Top-Bottom (V)
-69.2
-44.9
-33.3
19.7
6.2
-13.9
-91.3
-81.6
Stbd-Port (H)
-34.6
-20.0
-36.7
0.3
-12.4
-18.9
-47.3
-42.1
T+B (C)
-66.4
-34.3
-13.7
41.8
18.6
-4.1
-80.6
-57.4
S+P (D)
-51.3
-15.5
-10.3
44.7
12.4
0.9
-69.9
-16.8
Near BDC, Port (P)
Near BDC, Port (Y)
Bottom (X+Y)/2 (B)
51
Deflection in vertical and horizontal plane
diagram
Image 13: Example deflections drawing
52
Vertical section diagram
Image 14: Example vertical deflections drawing
53
Horizontal section diagram
Image 15: Example horizontal deflections drawing
54
13 Appendix F – Cylinder bore measuring
attachment
13.1
Instructions for use.
Start with unit as used when making crankshaft measurement.
1.
Remove the hardened point that normally engages in
the crankshaft from the transducer.
2.
Assemble the bore measurement unit as shown on
Drawing No. SB 1579
3.
Use as many of the CDM extension rods as required
making the length to just below that of the bore
diameter (for example use the 115 mm and 215 mm
rods plus the transducer for a 500 mm bore).
4.
Fit the twin leg adaptor (A) with its legs (A1) and
fixing screw (E). The flat side of the adaptor should
be next to the LED light on the CDM. Then fit bronze
ends (B) to the two legs.
5.
Fit the end support (D), leg (C) and bronze end (B) to
the extension rods.
6.
Place assembled unit into a cleaned area of the bore at
the top of the cylinder where there is a minimum of
wear, or into a jig which is machined to the nominal
55
bore diameter. Make sure that A and D sit squarely.
7.
Use the knurled adjustment screws and locking ring
to lengthen the rod to give minimal pressure.
8.
Remove from the bore or jig and use the short pins to
help tighten all screwed connections.
9.
Replace in the bore and check that the minimal
pressure is still achieved. Use the knurled adjustment
screws and locking ring to lengthen the rod if
necessary.
10. Plug the transducer into the CDM.
11. Switch on the CDM , if the correct software is
installed in the CDM the LCD screen on the
instrument will show CDM 2 Bore v n . n and will
then revert to normal operation.
12. Select the additional menu option Bore and then
press .
13. The LCD screen will show Nominal Bore – nnn.
nnn mm.
56
14. Compare the value displayed with the nominal bore
diameter, if it is correct press two times.
15. If the value is not correct use the or buttons to
change the integer number (millimetres) value and
then press once. Repeat for microns.
16. Remove the unit from the bore or jig.
17. Attach a safety wire to the eye on the CDM
transducer.
18. Fit one set of extension rods (G)
19. Enter unit into the bore at a slight angle to avoid
scratching the bore lining.
20. Fit a support bracket or frame over the top of the
bore, and clamp to the head if desired. This frame
can be simply two pieces of angle iron back to back
spanning the bore.
21. Add additional extension rods (G) and lower the unit
into the bore to the desired depth, keeping the unit at
a slight angle until it is at the correct depth. Fit the
handles (H).
22. Use the clips provided through the holes in the handle
rods to rest the unit on the support bracket. Additional
holes can be drilled if required to suit particular
depths.
57
23. The current reading is displayed on the LCD screen in
millimetres with a resolution of one micron as Bore,
nnn . nnn mm.
24. Gently rotate the unit through the horizontal using the
rods until a minimum reading is reached. This is the
bore diameter at that depth which should be recorded.
Note that you must ensure that the bronze ends are all
in complete contact with the bore i.e. the
measurements always vary as rotation is performed.
25. Make and record measurements at all depths in all
cylinders.
26. Press
to exit bore measurement mode.
27. Switch off the CDM as usual and dismantle the bore
jig assembly.
58
14
Appendix G – General arrangement drawing – Micrometer transducer
Illustration 1: CDM micrometer transducer
59
15
Appendix H – General arrangement drawing – Bore measurement attachment
Illustration 2: Bore measurement kit
60
16
APPENDIX I – Software installation
Please ensure the installation process is completed prior to
connecting the CDM Instrument to the PC. Windows 2000/XP
and Vista may automatically assign an incorrect driver if this
step is ignored.
On Windows 2000 and above this process may require
“Administrative” privileges. Consult your IT department
should this be the case.
To install the software follow these steps.
1) Insert the Installation medium (CD-ROM) in the
computers CD drive.
2) Await the Malin Instruments CDM installer dialogue
Image 16: Step 1 - Welcome
Image 16: Step 1 - Welcome
61
3) Click “Next >” button. Image 17: Step 2 - Operating
system selection / driver installation is presented. The
installer will attempt to determine your operating
system to select the required driver. Some
system/software combinations may cause this to be
detected incorrectly. If you know the selection is wrong
please correct it here.
Image 17: Step 2 - Operating system selection /
driver installation
If the other option is selected by default and you believe
this to be correct see 16.3 Other operating systems.
page 69.
62
Image 18: Step 3 - Software Installation
4) Click “Next >”. Image 18: Step 3 - Software
Installation is presented. Choose where you would like
the software to be installed. At this step the choice can
be made3 to install the software on the local harddisk
(normally C:\), on a network drive/share or on a
removable device such as USB flash memory stick. The
latter is convenient for keeping all records and the
software with the instrument rather than tied to a
particular PC. The memory stick can then be used at
any PC for access to the software and records4.
Ensure the specified path ends with “MalinCDMmkII”.
i.e. Something line “C:\MalinCDMmkII\” or
3 Using the provided “Browse”. button.
4 The USB device drivers will need to be installed to each PC to communicate with the
instrument. See 16.2 USB device drivers page 68 and 16.1 Installation paths page 68 for more
details on this kind of install.
63
“C:\Program Files\MalinCDMmkII\” and not simply
“C:\” or “C:\Program Files\”
5) Click “Next >”.
The following prompt will likely be presented ; Image
19: Create non existing path
Image 19: Create non existing path
Click Yes to proceed to the next step.
6) The software will be installed and Image 20: Step 4 Shortcuts will be presented.
Shortcuts to the application can be placed in the “Start
menu” and on the Desktop. Use this dialogue to decide
where you would like these placed.
64
Image 20: Step 4 - Shortcuts
7) Click “Next >”. The installation is completed,
65
Illustration 3: Installation complete
The software and or operating manual (Adobe Acrobat
Reader format of this manual) can be launched here by
checking the provided boxes.
8) Click Finish. The software and drivers are now
installed. Before the software can be used with the
CDM Instrument the USB driver must be registered
with the windows driver database.
9) Follow these steps,
1. With the installation CD still the computer - connect
the instrument to the PC using the USB cable
provided (see 9.3.1 Connecting to the instrument
page 43);
2. A dialogue will be presented explaining that new
66
hardware has been detected and that
software/drivers must be installed in order for it to
function correctly. This dialogue varies from one
version of windows to the next and between applied
updates/service packs.
3. Follow the on screen prompts. If at any time the
option is provided to search on “Windows update”
or the internet be sure to answer “No” or un-check
provided checkboxes.
4. Choose the options that best match “Automatically
install the software” and/or “Search for drivers on
the computers CDROM drive”.
5. Complete the process by clicking next and/or finish
as and when prompted.
10) The instrument should now be ready for use.
This completes the installation procedure. To test the USB
device driver was successfully installed connect the instrument
to the PC via the provided USB cable5. Launch the Malin CDM
mkII software and click the Help menu heading followed by
About. Now click the Instrument details tab. If the driver
installed successfully the information will be provided as
described in 6.10.4 Instrument details page 36.
5 See 9.3 USB PC connection lead page 43
67
16.1
Installation paths
If the CDM is to be used between multiple vessels it may be
beneficial to install the software on a network drive or
removable media such as USB flash drive/harddrive. This can
be achieved by clicking the Browse button in the installer when
prompted for installation path and navigating to the desired
location. Remember to include “\MalinCDMmkII\” at the end
of the chosen path in order to keep the software files organised
in their own path.
Examples:
Network installation;
\\Server\shared\MalinCDMmkII\
Flash disk installation;
E:\MalinCDMmkII\
16.2
USB device drivers
The USB device drivers allow the software to communicate
with the CDM Instrument.
If the software is to be run from a network or removable
device as described in 16.1 Installation paths page 68 it will be
necessary to install the drivers on each machine on which
communication with the instrument is required.
For this reason the driver files are installed to the location
where the software is installed so that they can be found at a
later date without the need to find the installation CD.
To install the driver on another machine connect the instrument
to the PC USB port and follow steps 9 onwards above ( page ).
Instead of specifying the to search the computers CDROM
68
drive the path to the drivers should be specified.
Examples;
Example – Windows 98/ME
mapped network drive/removable drive :
m:\MalinCDMmkII\ftdi\98_me
Network path :
\\Server\shared\MalinCDMmkII\ftdi\98_me
Example – Windows 2000/XP/Server 2003/Vista
mapped network drive/removable drive :
m:\MalinCDMmkII\ftdi\NT5
Network path :
\\Server\shared\MalinCDMmkII\ftdi\98_me
16.3
Other operating systems.
The supplied installation media provides software and drivers
for the most commonly used operating systems, and will only
function correctly on Microsoft operating systems such as
those listed below. Should you require software and drivers for
systems other than Windows 98/ME/XP/Server 2003/Vista
please contact Malin Instruments.
Please be aware that we cannot provide such software/drivers
for systems without full USB support, i.e. Any systems prior to
Windows 98.
69
17
Appendix J – User notes.
70