1
IBM Tealeaf cxConnect for Data Analysis
Version 9 Release 0.1
December 4, 2014
cxConnect for Data Analysis
Administration Manual
Note
Before using this information and the product it supports, read the information in “Notices” on page 57.
This edition applies to version 9, release 0, modification 1 of IBM Tealeaf cxConnect for Data Analysis and to all
subsequent releases and modifications until otherwise indicated in new editions.
© Copyright IBM Corporation 1999, 2014.
US Government Users Restricted Rights – Use, duplication or disclosure restricted by GSA ADP Schedule Contract
with IBM Corp.
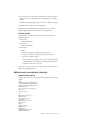
Contents
cxConnect for Data Analysis
Administration Manual . . . . . . . . v
Chapter 1. cxConnect for Data Analysis
overview . . . . . . . . . . . . . . 1
Primary features and capabilities
Using cxConnect for Data Analysis
How it works . . . . . . .
Task execution . . . . . .
Handling exceptions . . . . .
Related resources . . . . . .
.
.
.
.
.
.
.
.
.
.
.
.
.
.
.
.
.
.
.
.
.
.
.
.
.
.
.
.
.
.
.
.
.
.
.
.
.
.
.
.
.
.
1
1
1
2
2
2
Chapter 2. cxConnect installation . . . . 3
Installation steps . . . . . . . . . . . . . 3
Deployment options . . . . . . . . . . . 3
1. Install cxConnect . . . . . . . . . . . 3
2. Restart TMS . . . . . . . . . . . . . 4
3. Create cxConnect Server. . . . . . . . . 4
4. Configuration for Data Files . . . . . . . 4
5. Run test extract . . . . . . . . . . . 5
6. Configure permissions . . . . . . . . . 5
7. Install complete . . . . . . . . . . . 5
Configuring events for cxConnect . . . . . . . 5
Configuration for the data files option . . . . . . 5
1. Creating the database . . . . . . . . . 6
2. Configuring the insert scripts . . . . . . . 6
3. Running the data insertion . . . . . . . . 7
Upgrading cxConnect . . . . . . . . . . . 7
Upgrading from Release 7.x or later . . . . . 7
Upgrading from Release 6.x or earlier . . . . . 7
Initial cxConnect configuration . . . . . . . . 8
Prerequisites . . . . . . . . . . . . . 9
cxConnect installation . . . . . . . . . . 9
Adding cxConnect server . . . . . . . . . 9
Adding a configured task . . . . . . . . . 9
Other configuration options . . . . . . . . 12
Testing your configuration . . . . . . . . 12
References . . . . . . . . . . . . . . 12
Chapter 3. cxConnect for Data Analysis 13
cxConnect configuring tasks . . .
Configured Tasks window . . .
Configured tasks context menu .
Editing tasks or creating new tasks
General tab . . . . . . .
CX Servers tab . . . . . .
© Copyright IBM Corp. 1999, 2014
.
.
.
.
.
.
.
.
.
.
.
.
.
.
.
.
.
.
.
.
.
.
.
.
.
.
.
.
.
.
.
.
.
.
.
.
13
13
14
14
14
17
Data Set tab . . . . . . . . . . . .
Data Filters tab . . . . . . . . . . .
Destination tab . . . . . . . . . . .
Notification tab . . . . . . . . . . .
Job performance . . . . . . . . . . .
cxConnect metrics . . . . . . . . . . .
Time values in cxConnect. . . . . . . .
Integration example - Data Files . . . . . .
Creating the database . . . . . . . . .
Changing the database name from TLWEB to
TLWEB_TEST . . . . . . . . . . . .
Modifying sample load script . . . . . .
Creating cxConnect task . . . . . . . .
cxConnect scheduling tasks . . . . . . . .
Scheduled Tasks window . . . . . . . . .
Context menu . . . . . . . . . . . .
Task execution . . . . . . . . . . . .
Tealeaf Event Bus . . . . . . . . . . .
Event Bus pipeline . . . . . . . . . .
Workflow . . . . . . . . . . . . .
Installation . . . . . . . . . . . .
Event Bus data . . . . . . . . . . .
Additional event bus configuration information
Chapter 4. cxConnect Schema
.
.
.
.
.
.
.
.
.
17
18
19
26
26
27
27
28
28
.
.
.
.
.
.
.
.
.
.
.
.
29
30
30
31
32
32
33
33
34
34
34
38
39
. . . . 45
cxConnect Data File Schema . . . . . .
Session Data File . . . . . . . .
Hit Data File . . . . . . . . . .
Application Data File . . . . . . .
Cookie Data File. . . . . . . . .
URL Field Data File . . . . . . .
Event Data File for Release 8 . . . .
Event Data File for Release 7.2 and earlier
Dimensions Data File . . . . . . .
Session Attribute Data File . . . . .
SQL Server 2005 requires Active Directory
Delegation when configured for NT
Authentication . . . . . . . . .
Daily tasks fail to start when scheduled .
.
.
.
.
.
.
.
.
.
.
.
.
.
.
.
.
.
.
.
.
.
.
.
.
.
.
.
.
.
.
45
45
46
48
49
49
49
50
50
51
.
.
.
.
. 51
. 52
Chapter 5. IBM Tealeaf documentation
and help . . . . . . . . . . . . . . 55
Notices . . . . . . . . . . . . . . 57
Trademarks . . . . . . .
Privacy Policy Considerations .
.
.
.
.
.
.
.
.
.
.
.
.
. 59
. 59
iii
iv
IBM Tealeaf cxConnect for Data Analysis: cxConnect for Data Analysis Administration Manual
cxConnect for Data Analysis Administration Manual
IBM Tealeaf cxConnect for Data Analysis enables the extraction and delivery of
Tealeaf® session data. Using a Portal-based interface, you can configure the tasks
that are required to retrieve sessions that are based on criteria you specify and
deliver the content to one of the supported export formats for use in integrating
Tealeaf with third-party systems that can consume Tealeaf data for various
enterprise needs. Use the links below to access specific topics in the manual.
The IBM Tealeaf cxConnect for Data Analysis product line contains the following
products:
v cxConnect for Data Analysis Administration Manual
v "cxConnect for Web Analytics Administration Manual" in the IBM Tealeaf
cxConnect for Web Analytics Administration Manual
v "cxConnect for Voice of Customer Administration Manual" in the IBM Tealeaf
cxConnect for Voice of Customer Administration Manual
v "cxConnect for Multivariate Testing Administration Manual" in the IBM Tealeaf
cxConnect for Multivariate Testing Administration Manual
© Copyright IBM Corp. 1999, 2014
v
vi
IBM Tealeaf cxConnect for Data Analysis: cxConnect for Data Analysis Administration Manual
Chapter 1. cxConnect for Data Analysis overview
IBM Tealeaf cxConnect for Data Analysis provides you with the ability to analyze
and report on data captured by Tealeaf within various third-party solutions,
including custom reporting tools and databases, warehouses, business intelligence
environments, and web analytics products. Additionally, IBM Tealeaf cxConnect for
Data Analysis enables the creation of a persistent store of session data from your
web applications.
Primary features and capabilities
A list of the main features that are used for extraction in IBM Tealeaf cxConnect for
Data Analysis.
v Graphical user interface for managing extraction tasks
v Extraction to either data file or log file (W3C format)
v Complete logging and audit trail of all extraction activities
v Automated batch-load extraction of archived session data that is recorded by
IBM Tealeaf CX for database destinations
v Scheduling of extraction tasks for future execution or at regular intervals (Daily
or Hourly)
v Flexible controls for defining the exact data set to be extracted
v Constraint-based extraction to limit the sessions that are extracted
v Variable extraction to limit the data that is extracted from within sessions
v Ability to extract data from multiple IBM Tealeaf CX servers
v Ability to extend packaged extraction capabilities with an extensible API
Using cxConnect for Data Analysis
You can use the Tealeaf Portal to track and schedule tasks within IBM Tealeaf
cxConnect for Data Analysis.
Through the Tealeaf Portal, you can access IBM Tealeaf cxConnect for Data
Analysis, where you can define tasks to extract Tealeaf session data using specific
time periods or other criteria for forwarding to other systems. These tasks can be
scheduled to occur hourly, daily, or according to another defined schedule, so that
external systems are regularly updated with Tealeaf data.
Scheduled tasks can be monitored through the Tealeaf Portal, where you can track
the initiation, progress, and completion of each IBM Tealeaf cxConnect for Data
Analysis task. If needed, scheduled tasks can be stopped or manually re-executed
through the Portal.
How it works
IBM Tealeaf cxConnect for Data Analysis consists of a user interface, a service that
schedules and extracts selected customer session data, and packaged APIs.
The extractor runs on a server that is maintained by Tealeaf, which can be either a
dedicated server or the same machine that hosts the database server.
© Copyright IBM Corp. 1999, 2014
1
Note: You can have only one IBM Tealeaf cxConnect for Data Analysis server
running at any time.
IBM Tealeaf cxConnect for Data Analysis tasks are able to run on an ad hoc basis
or according to a pre-set daily or hourly basis.
Task execution
IBM Tealeaf cxConnect for Data Analysis tasks complete the following tasks:
1. Queries the Tealeaf Processing Server to return a list of matching sessions,
according to the search strings that are applied as part of the task definition
2. Queries the Tealeaf Processing Server to return the XML session document for
each matching session
3. Extracts name-value data from the returned XML, such as URL field name and
URL field value
4. Exports the data to one of the defined destinations:
v A set of data files, each corresponding to an individual type of session data
v A flat log file in W3C-compliant format
Handling exceptions
If the data extraction process receives a socket exception while communicating
with the Tealeaf Processing Server, it performs the following retry logic:
1. Tries to ping the IBM Tealeaf CX Server. If the server is not reachable for some
configurable period, it stops processing and logs an error. If there is more than
one IBM Tealeaf CX Server, it attempts to connect to the next IBM Tealeaf CX
Server.
2. If the IBM Tealeaf CX Server machine is reachable, it tries to contact the Tealeaf
Search Server service by performing a simple command to retrieve the event
list. If the Tealeaf Search Server service is not responding for some configurable
period, it stops processing and logs an error. If there are multiple IBM Tealeaf
CX Servers, the extractor process attempts to connect to the next IBM Tealeaf
CX Server.
Related resources
For schema and other technical information, see Chapter 4, “cxConnect Schema,”
on page 45.
2
IBM Tealeaf cxConnect for Data Analysis: cxConnect for Data Analysis Administration Manual
Chapter 2. cxConnect installation
This section contains preparation information and the required steps to install IBM
Tealeaf cxConnect for Data Analysis on an existing IBM Tealeaf CX system.
Note: Before you install software for IBM Tealeaf cxConnect for Data Analysis, you
must install IBM Tealeaf CX first. See "CX Installation and Setup" in the IBM Tealeaf
CX Installation Manual.
v For more information about upgrades, see “Upgrading cxConnect” on page 7.
For more information on downloading IBM Tealeaf, see IBM® Passport Advantage
Online.
Installation steps
Complete the following steps in the order that is listed below.
v Depending on the destination database location and type, more configuration
might be required.
v These steps refer to other sections in the IBM Tealeaf cxConnect for Data
Analysis documentation.
Deployment options
Instructions for running the installer for IBM Tealeaf cxConnect for Data Analysis
based on the following Tealeaf deployments: All-in-One, Multi-Server installing on
the Portal Server, or Multi-Server installing on a dedicated server.
Depending on your Tealeaf deployment, you must run the Installer for IBM Tealeaf
cxConnect for Data Analysis according to the following options:
v All-in-One: If your Tealeaf solution is an All-in-One server, run the Installer
once on the server.
v Multi-Server, installing on the Portal Server: If you are installing IBM Tealeaf
cxConnect for Data Analysis on the Portal Server, run the Installer once on the
Portal Server.
Note: Tealeaf recommends avoiding installation of IBM Tealeaf cxConnect for
Data Analysis on a server with other Tealeaf components. If possible, IBM
Tealeaf cxConnect for Data Analysis should be installed on a dedicated server.
– IBM Tealeaf cxConnect for Data Analysis can be installed on a server that
already contains IBM Tealeaf cxVerify.
v Multi-Server, installing on a dedicated IBM Tealeaf cxConnect for Data
Analysis Server: Run the Installer once on the Portal Server. Then, run the
Installer once on the IBM Tealeaf cxConnect for Data Analysis Server.
Note: This deployment model requires more steps.
1. Install cxConnect
cxConnect is a Tealeaf add-on module that enables IBM Tealeaf cxConnect for Data
Analysis. The Installer enables the product and installs software on the server.
© Copyright IBM Corp. 1999, 2014
3
Note: Before you install IBM Tealeaf cxConnect for Data Analysis, you must install
the IBM Tealeaf CX product, which installs the Portal web application. See "CX
Installation and Setup" in the IBM Tealeaf CX Installation Manual.
Running the cxConnect for Data Analysis Installer
The Installer must be run on the Portal Server and any server where IBM Tealeaf
cxConnect for Data Analysis software must be installed.
1. In the software distribution, go to the folder Enablers\cxConnectDA and run
setup.exe to start the installation.
2. Select the language that you want to use for the installation screens and click
OK.
3. From the Welcome screen, click Next to continue.
4. From the License screen, review the license terms and click I accept the terms;
then, click Next to continue.
5. From the Install Location screen, accept the default settings and click Next.
6. When you are ready to install, click Install to start the installation process.
7. When the Installation Complete screen appears, click Finish.
Preparing a directory for log or data file extraction
IBM Tealeaf cxConnect for Data Analysis allows you to select a destination
directory for extracted log files or data files. If you want to segment a specific area
of the local machine or a remote connected machine, you can create these
directories for later use.
2. Restart TMS
If IBM Tealeaf cxConnect for Data Analysis was installed on a pre-existing server,
such as the Portal Server, then the Tealeaf Management Server must be restarted
from within TMS to complete the IBM Tealeaf cxConnect for Data Analysis
installation.
v See "TMS Administration" in the IBM Tealeaf cxImpact Administration Manual.
3. Create cxConnect Server
To enable communications between the Tealeaf Portal and IBM Tealeaf cxConnect
for Data Analysis, you must create an instance of the IBM Tealeaf cxConnect for
Data Analysis Server in the Portal Management page.
v See "Managing Tealeaf Servers" in the IBM Tealeaf cxImpact Administration
Manual.
4. Configuration for Data Files
If you are using the Data Files option, configure the two SQL scripts in
<Tealeaf_install_directory>\dataextractor\scripts to define the database and
tables.
v If the user is not trusted, you must add -U userid -P password and remove -T
option for all bcp scripts. See “Configuring load scripts to use SQL
authentication” on page 6.
v bcp_load_data_files.bat - Update the MSSQL_CONNECT= statement.
v All other .bat files must be updated the BCPOPTIONS= statement
v Run the two database scripts.
– See “Configuration for the data files option” on page 5.
4
IBM Tealeaf cxConnect for Data Analysis: cxConnect for Data Analysis Administration Manual
5. Run test extract
Before you begin configuring large extract jobs that involve a high number of
sessions, configure a test extract of no more than three sessions.
v Configure a search that returns only three sessions. Copy the search string from
the session list page that is used to run the search. See "Searching Session Data"
in the IBM Tealeaf cxImpact User Manual.
v Configure a IBM Tealeaf cxConnect for Data Analysis task that uses this search
string to retrieve the sessions. The search string can be pasted into the
configuration. See “cxConnect configuring tasks” on page 13.
v Run the task immediately and verify the results.
6. Configure permissions
Note: If you installed this product as part of a new installation of Tealeaf, access to
product features through the Portal are provided to the ADMIN group automatically.
Automatic access is also granted if you licensed this product for an existing Tealeaf
solution and were not modified your ADMIN group permissions since original
installation.
v If you modified the ADMIN group and are deploying this product to an existing
Tealeaf solution, you must update menu permissions manually for that group.
v For all other users and groups, you must configure the appropriate permissions.
v See "CX User Administration" in the IBM Tealeaf cxImpact Administration Manual.
7. Install complete
If you are able to successfully complete the test extraction, you can begin to use
IBM Tealeaf cxConnect for Data Analysis normally.
Configuring events for cxConnect
In order for events and their data to be made available for export through IBM
Tealeaf cxConnect for Data Analysis, the Searchable and Reportable check box
must be selected in the event definition in the Event Manager. This setting must be
selected for each event that you want to export through IBM Tealeaf cxConnect for
Data Analysis.
v See "TEM Events Tab" in the IBM Tealeaf Event Manager Manual.
Configuration for the data files option
To use the data files options, you must customize a set of provided scripts to create
a set of database tables to receive the outputted database files and to insert data
into the databases.
As part of the software distribution, sample scripts are provided on the server
where IBM Tealeaf cxConnect for Data Analysis is installed in the following
directory:
<TL_install_directory>\DataExtractor\Scripts
You can customize these scripts to upload a batch ETL to any staging or master
integration database.
v Uploading operations must be scheduled on an interval such that the number of
concurrent log files in the export directory does not exceed the value that is
defined for the Concurrent Logs setting.
Chapter 2. cxConnect installation
5
1. Creating the database
In the above directory, the two SQL files, CreateDB.sql and CreateSchema.sql are
used to create the database.
1. Edit CreateDB.sql to set the database file location.
2. Run CreateDB.sql to create the DB data files.
3. Run CreateSchema.sql to create the schema.
4. The database is created.
5. You must now configure the insert scripts. See “2. Configuring the insert
scripts.”
2. Configuring the insert scripts
Eight provided batch files load data files into the database.
In the above directory, you must edit bcp_load_data_files.bat and set the
following variables if needed:
set
set
set
set
BULKDIR=C:\TeaLeaf\DataExtractor\DataFiles
SCRIPTDIR=C:\TeaLeaf\DataExtractor\Scripts
DBSERVER=localhost
DATABASE=TLWEB.dbo
Variable
Description
BULKDIR
The directory on the local server where the generated data files are
outputted.
SCRIPTDIR
The directory where the scripts are located. If the script files were not
moved, this value should be set to the DataExtractor\Scripts folder inside
the Tealeaf installation directory.
DBSERVER
The host name of the server where the database is stored.
DATABASE
The name of the database.
Configuring load scripts to use SQL authentication
To use SQL authentication with the BCP load scripts, you must set the BCPOPTIONS
variable for several script files.
For example, if the set BCPOPTIONS declaration is the following in your script files:
set BCPOPTIONS=-F 2 -b 250000 -m 50 -a 32000 -T
It must be changed to the following:
set BCPOPTIONS=-F 2 -b 250000 -m 50 -a 32000 -U login_id -P password
Where:
Parameter
Description
-U login_id
Login ID used to connect to SQL Server.
6
IBM Tealeaf cxConnect for Data Analysis: cxConnect for Data Analysis Administration Manual
Note: When the bcp utility is connecting to SQL Server with a trusted
connection using integrated security, use the -T option (trusted connection)
instead of the user name and password combination.
-P password
Password for the login ID.
v If this option is not used, the bcp command prompts for a password.
v If this option is used at the end of the command prompt without a
password, bcp uses the default password (NULL).
In the <Tealeaf_install_directory>\dataextractor\scripts directory, the
following files must be updated with the above command:
bcp_bulkappdate.bat
bcp_bulkattribute.bat
bcp_bulkcookie.bat
bcp_bulkevent.bat
bcp_bulkhit.bat
bcp_bulksesn.bat
bcp_bulkurlfield.bat
3. Running the data insertion
v After a Data Files job completes, run bcp_load_data_files.bat to load the data.
v The bcp_load_data_files.bat scripts loops through the data files available in
the BULKDIR directory and calls the appropriate bcp_bulk*.bat file to load the
data into the appropriate table.
– The bcp_load_data_files.bat can be called as a Post Command after
successful execution of a IBM Tealeaf cxConnect for Data Analysis job.
Upgrading cxConnect
Upgrading from Release 7.x or later
Steps for upgrading IBM Tealeaf cxConnect for Data Analysis from Release 7.x or
later.
If you are upgrading IBM Tealeaf cxConnect for Data Analysis from Release 7.x or
later, run the IBM Tealeaf CX Upgrade provided with the software distribution on
the server that hosts IBM Tealeaf cxConnect for Data Analysis.
v See "Upgrading Tealeaf Software on a Server" in the IBM Tealeaf CX Upgrade
Manual.
Upgrading from Release 6.x or earlier
If you are upgrading IBM Tealeaf cxConnect for Data Analysis from Release 6.x or
earlier, more steps are required.
1. Before you upgrade, acquire your IBM Tealeaf cxConnect for Data Analysis job
definitions file from your current installation. This file is in the following
location:
<Tealeaf_install_directory>\DataExtractor\JobListCfg.xml
2. Save this file into a location outside of the Tealeaf installation directory.
3. Uninstall all IBM Tealeaf cxConnect for Data Analysis software from the server.
To uninstall:
a. Log in to the server where IBM Tealeaf cxConnect for Data Analysis is
installed.
Chapter 2. cxConnect installation
7
4.
5.
6.
7.
8.
b. From the Windows Start menu, open the Control Panel.
c. Select Add/Remove Programs.
d. Uninstall IBM Tealeaf cxConnect for Data Analysis from the Add/Remove
Programs control panel.
If performing an upgrade of IBM Tealeaf cxImpact at the same time, upgrade
IBM Tealeaf cxImpact.
v See "Tealeaf CX Release 8 Upgrade Manual" in the IBM Tealeaf CX Upgrade
Manual.
Verify that IBM Tealeaf cxImpact is properly functioning.
Reinstall IBM Tealeaf cxConnect for Data Analysis from the software
distribution from which you upgraded IBM Tealeaf cxImpact.
v See “Installation steps” on page 3.
Verify that IBM Tealeaf cxConnect for Data Analysis is accessible from the
Tealeaf Portal.
Re-create your IBM Tealeaf cxConnect for Data Analysis jobs using the job
specifications in JobListCfg.xml as your source content.
Note: Do not overwrite JobsListCfg.xml into the new installation. The format
changed, and the file does not work.
v See “cxConnect configuring tasks” on page 13.
9. Verify that your IBM Tealeaf cxConnect for Data Analysis jobs are working
properly in the upgraded Portal.
Initial cxConnect configuration
It is necessary to perform configurations of your IBM Tealeaf CX deployment.
Depending on your Tealeaf solution deployment, more configuration might be
necessary.
Note: This section provides a framework for performing the initial configuration of
one component of the IBM Tealeaf CX system in a simplified deployment model.
Depending on your Tealeaf solution's deployment, more configuration may be
required. If you have questions about configuration, contact http://
support.tealeaf.com.
Tealeaf IBM Tealeaf cxConnect for Data Analysis provides you with the ability to
analyze and report on data that is captured by Tealeaf-captured data within
various third-party solutions, including custom reporting tools and databases,
warehouses, business intelligence environments, and web analytics products.
Additionally, IBM Tealeaf cxConnect for Data Analysis enables the creation of a
persistent store of session data from your web applications.
Note: IBM Tealeaf cxConnect for Data Analysis is a separately licensable
component of the IBM Tealeaf CX system. please contact your IBM Tealeaf
representative.
This page describes how to perform the initial configuration of IBM Tealeaf
cxConnect for Data Analysis.
v For more information about IBM Tealeaf cxConnect for Data Analysis, see
"cxConnect for Data Analysis Administration Manual" in the IBM Tealeaf
cxConnect for Data Analysis Administration Manual.
8
IBM Tealeaf cxConnect for Data Analysis: cxConnect for Data Analysis Administration Manual
Prerequisites
Certain prerequisites are required to perform the initial configuration of IBM
Tealeaf cxConnect.
v It is assumed that all Tealeaf software was installed on Windows and Linux
servers. Before you begin, complete all software installation first. See "CX
Installation" in the IBM Tealeaf CX Installation Manual.
v Additionally, you should already perform the initial configuration steps for the
IBM Tealeaf cxImpact product components. See "Overview of CX Configuration"
in the IBM Tealeaf CX Configuration Manual.
cxConnect installation
Before you begin, IBM Tealeaf cxConnect for Data Analysis must be installed
through the separate installation program. See "cxConnect Installation" in the IBM
Tealeaf cxConnect for Data Analysis Administration Manual.
Adding cxConnect server
IBM Tealeaf cxConnect for Data Analysis requires its own Tealeaf server to manage
extraction and data output.
1. Log in to the Tealeaf Portal as an administrator.
2. From the Portal menu, select Tealeaf > Portal Management.
3. The Portal Management page appears.
4. In the left navigation pane, click Tealeaf Servers.
5. Click the Manage Servers link. The list of currently available Tealeaf servers is
displayed.
6. If a IBM Tealeaf cxConnect for Data Analysis server does not exist, click New.
Select CxConnect Server from the drop-down menu. If a IBM Tealeaf
cxConnect for Data Analysis server exists, select it and click Edit.
7. Edit the IBM Tealeaf cxConnect for Data Analysis Server properties.
a. Click the Active check box.
b. Enter the display name for the server. The default value cxConnect Server
is recommended.
c. From the drop-down, select the server that is hosting the IBM Tealeaf
cxConnect for Data Analysis Server.
d. Enter the port number to use. The default value for IBM Tealeaf cxConnect
for Data Analysis is 19000.
e. Click Save.
8. The server is added to the list. See "Managing Tealeaf Servers" in the IBM
Tealeaf cxImpact Administration Manual.
Adding a configured task
Now that the IBM Tealeaf cxConnect for Data Analysis software was installed and
the IBM Tealeaf cxConnect for Data Analysis server was configured, you can create
your first IBM Tealeaf cxConnect for Data Analysis task.
v For more information about configuring IBM Tealeaf cxConnect for Data
Analysis tasks, see "cxConnect Configuring Tasks" in the IBM Tealeaf cxConnect
for Data Analysis Administration Manual.
Chapter 2. cxConnect installation
9
The steps below outline how to create a simple IBM Tealeaf cxConnect for Data
Analysis Data Files task. The Data Files method of export extracts selected Tealeaf
sessions into a flat-file text format. These sessions can then be inserted into your
enterprise system of choice.
Note: The Data Files method of export is the recommended Tealeaf integration
method.
1. Log in to the Tealeaf Portal as an administrator.
2. From the Portal menu, select Tealeaf > IBM Tealeaf cxConnect for Data
Analysis.
3. The IBM Tealeaf cxConnect for Data Analysis page is displayed. The list of
scheduled tasks is displayed.
4. In the left navigation pane, click Configured Tasks.
5. Then, click the + sign.
6. The following sections describe the properties in each tab of the configured task
that must be populated.
General tab
You can review session data by selecting a time period between Extract From and
Extract To values to define a time period of session data that you would like to
review.
1. Click the General tab.
2. Enter a value for the task Name. For example, test_task.
3. For Scheduling, click Run Now.
4. For the Extract parameters, enter a time period when you know that session
data was generated.
v For testing purposes, limit yourself to a one-hour period. Do not overlap
dates for this test.
v To specify a date, click in one of the date fields. Use the calendar tool to
select a date.
v To specify a time value, click in one of the time fields. Use the arrow keys or
enter the value from the keyboard. To set the time value, click Set.
v Verify that your Extract From and Extract To values define a one-hour period
that occurs some time in the past when session data is likely to be captured.
5. Select the Active check box.
CX Servers tab
1. Click the IBM Tealeaf CX Servers tab.
2. Click the check box next to the server from which you want to extract sessions.
v If multiple servers are listed, select only a single server.
Data Set tab
For this test, skip the Data Set tab.
Data Filters tab
For this test, skip the Data Filters tab.
Destination tab
1. Click the Destination tab.
2. Select the Data Files option. The following options appear.
a. Select the Active check box.
10
IBM Tealeaf cxConnect for Data Analysis: cxConnect for Data Analysis Administration Manual
b. If needed, specify the Exported Data Directory value. This directory should
be accessible to you on the IBM Tealeaf cxConnect for Data Analysis Server.
c. For this test, set the Number of Concurrent Exports to 1.
Notification tab
1. Click the Notification tab.
2. Click To.
3. Enter your email address in the space provided.
Save task
After you completed the above steps in each IBM Tealeaf cxConnect for Data
Analysis tab, click Save. The task is saved.
Checking task status
Since the task was specified to run immediately, IBM Tealeaf cxConnect for Data
Analysis begins processing it as soon as possible. You can complete the following
steps to verify task status.
Note: Since you configured the task to notify your email address, you can wait for
the email to be delivered to you. However, if there is a configuration issue with the
mail settings, use IBM Tealeaf cxConnect for Data Analysis to monitor job status
this time.
1. In the IBM Tealeaf cxConnect for Data Analysis left navigation pane, click
Scheduled Tasks.
2. The job is displayed in the list of scheduled tasks. Look for the friendly Name
you specified in the General tab in the list.
3. In the Information column, you can monitor the progress of the task
completion.
v To refresh the display that includes the Information column, click Refresh.
v When the Information column field value concludes with Processed, IBM
Tealeaf cxConnect for Data Analysis completed the task.
4. The notification email arrives shortly. It contains the extraction log for the task,
which can be useful in resolving issues.
Verify output in destination directory
After the task was processed, you can verify that the output files were generated in
the destination directory on the IBM Tealeaf cxConnect for Data Analysis server.
In the specified output directory, files similar to the following should be generated:
BulkAppData.20090925_120000_20090925_115959.test_task_30_1253917972.9480_1.dat
BulkAttrb.20090925_120000_20090925_115959.test_task_30_1253917972.9480_1.dat
BulkEvent.20090925_120000_20090925_115959.test_task_30_1253917972.9480_1.dat
BulkHit.20090925_100000_20090925_105959.test-spo_40_1253918431.9528_1.dat
BulkSesn.20090925_120000_20090925_115959.test_task_30_1253917972.9480_1.dat
BulkUrlField.20090925_120000_20090925_115959.test_task_30_1253917972.9480_1.dat
For more information about the schema of these files, see "cxConnect Configuring
Tasks" in the IBM Tealeaf cxConnect for Data Analysis Administration Manual.
Integration with enterprise databases
These files are ready for integration with the destination enterprise database.
Tealeaf provides a set of sample scripts that can be modified to complete this
integration step. See "cxConnect Configuring Tasks" in the IBM Tealeaf cxConnect for
Data Analysis Administration Manual.
Chapter 2. cxConnect installation
11
Other configuration options
In addition to the Data Files method of output, IBM Tealeaf cxConnect for Data
Analysis provides the following output options:
v Log files - Extract sessions into W3C-compliant log files. See "cxConnect
Configuring Tasks" in the IBM Tealeaf cxConnect for Data Analysis Administration
Manual.
Testing your configuration
After you completed your initial configuration, you can perform the following
steps to verify the configuration.
If you completed the initial test configuration in the preceding steps, you can
verify IBM Tealeaf cxConnect for Data Analysis operations by examining the
results in the output directory, if you did not do so already.
v See “Verify output in destination directory” on page 11.
When all Tealeaf components are configured, complete an end-to-end test. See
"Testing Your Tealeaf Solution" in the IBM Tealeaf CX Configuration Manual.
References
For more information about IBM Tealeaf cxConnect for Data Analysis, see
"cxConnect for Data Analysis Administration Manual" in the IBM Tealeaf cxConnect
for Data Analysis Administration Manual.
v For more information about configuring tasks, see "cxConnect Configuring
Tasks" in the IBM Tealeaf cxConnect for Data Analysis Administration Manual.
v For more information about scheduling tasks, see "cxConnect Scheduling Tasks"
in the IBM Tealeaf cxConnect for Data Analysis Administration Manual.
For another example integration that uses the Data Files method, see "cxConnect
Configuring Tasks" in the IBM Tealeaf cxConnect for Data Analysis Administration
Manual.
12
IBM Tealeaf cxConnect for Data Analysis: cxConnect for Data Analysis Administration Manual
Chapter 3. cxConnect for Data Analysis
IBM Tealeaf cxConnect for Data Analysis enables flexible export and fluid
integration of Tealeaf session data to any external business application to create
multi-channel perspectives of your visitors' experience.
Feeding online customer experience data into your enterprise business intelligence
suite empowers business analysts to expand data analysis and testing, from
cross-channel effectiveness to marketing campaigns to fraud detection, using the
reporting tools with which your analysts are already familiar.
Features:
v Transfer data from your IBM Tealeaf CX datastore to external reporting
environments.
v Deliver data in real time to external systems such as event processing systems
v Data extraction jobs can be run on a scheduled or ad hoc basis.
v Supports extraction into log or data files, which can be used to insert data into
the database of your choice
v Flexible filters and controls can be used to include or exclude any sessions or
parts of sessions.
cxConnect configuring tasks
Through the Tealeaf Portal, you can configure tasks to be run according to
schedule by IBM Tealeaf cxConnect for Data Analysis.
v To open IBM Tealeaf cxConnect for Data Analysis, select Tealeaf > IBM Tealeaf
cxConnect for Data Analysis in the Tealeaf Portal. To see the list of configured
tasks, click Configured Tasks in the left pane.
Note: Accessing IBM Tealeaf cxConnect for Data Analysis requires administrator
privileges in your Tealeaf Portal account. If you cannot see the Tealeaf menu in
the Portal, you do not have administrator privileges.
Note: IBM Tealeaf cxConnect for Data Analysis is a separately licensable
component of the IBM Tealeaf CX solution and might not be available in your
solution. For more information, contact your Tealeaf administrator.
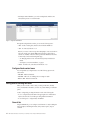
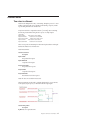
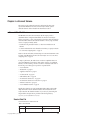
Configured Tasks window
Using the Configured Tasks window you can review, edit, create, and delete
configured tasks.
In the Configured Tasks window, you can review the set of currently configured
tasks. For each task, you can review its start time and frequency (Task Type
column), as well as whether it is enabled.
The ID column contains the internal Tealeaf identifier for the task. Identifiers may
be used by IBM Tealeaf cxConnect for Data Analysis tasks, hidden internal tasks,
and IBM Tealeaf cxVerify tasks, if it is installed.
v Some Tealeaf internal tasks are not displayed, which may result in gaps in the
ID sequence.
© Copyright IBM Corp. 1999, 2014
13
v With unique internal identifiers, you can have multiple tasks with the same
name, but this practice is not recommended.
Figure 1. Configured Tasks Window
Through the Configured Tasks window, you can run the following actions:
v Edit - To edit an existing task, select the task and click the Pencil icon.
v New - To create task, click the + icon.
Note: If you receive an error message when attempting to create a task when no
tasks were created, verify that the IBM Tealeaf cxConnect for Data Analysis
software was installed on the server that is specified for IBM Tealeaf cxConnect
for Data Analysis in the Portal Management page.
– See "Managing Tealeaf Servers" in the IBM Tealeaf cxImpact Administration
Manual.
– See Chapter 2, “cxConnect installation,” on page 3.
v Delete - To delete a task, select the task and click the - icon.
Configured tasks context menu
You can right-click any configured task to reveal the following options in the
context menu:
v Edit Task - Edit the selected task.
v Add Task - Add a task. See “Editing tasks or creating new tasks.”
v Remove Task - Delete the selected task.
Editing tasks or creating new tasks
When you choose to edit or create a task, you must provide name, schedule,
source, and destination information, as well as any content filtering or notification
options.
A task is configured by providing information in each of the following tabs:
v To save a configured task, click Save in the upper-right corner. If the button is
red, the task cannot be saved without providing additional information.
v To cancel changes to a configured task, click Cancel.
General tab
Using the General tab, you can configure several elements of a task, including the
name, description, scheduling information, daily extraction option, and post
command.
14
IBM Tealeaf cxConnect for Data Analysis: cxConnect for Data Analysis Administration Manual
v Name - user-friendly name for the task, which appears in the Configured Tasks
and Scheduled Tasks windows
– Invalid characters are removed from the Name when the task is saved.
v Description - a user-friendly description for the task
v Scheduling - select when the task is to run: Now or Once, Hourly, or Daily at
the scheduled time. See “Scheduling” on page 16.
Note: To account for the processes of indexing sessions and canister session
timeout settings, it is recommended that any daily tasks be scheduled after
02:00:00 each night. See “SQL Server 2005 requires Active Directory Delegation
when configured for NT Authentication” on page 51.
v Daily Extract Option - If you scheduled a Daily extract task, you can choose to
extract from the current day, the previous day, or some day in the past, as
specified by the number of days that are entered in the textbox. Any selections
made here auto-populate the Extraction Period settings. See “Daily extractions”
on page 16.
v Extraction Period - select the time period from which to extract Tealeaf session
data. These fields are constrained based on the Scheduling selection.
– You can apply additional filters to the data through the Data Filters tab.
– Some session data can be excluded as part of the data extract through the
Data Set tab.
v Post Command - runs the specified batch command file after the task
completed. The default directory for the command is
<Tealeaf_install_directory>\DataExtractor.
Note: Post commands run as separate tasks after the current task. These tasks
can be tracked as scheduled tasks. See “cxConnect scheduling tasks” on page 31.
– Run post command on failed task - allows the batch command file to run on
successful or failed tasks.
Chapter 3. cxConnect for Data Analysis
15
v Active - Select the Active check box to enable the task run according to
schedule.
Scheduling
The following scheduling options can be applied to your configured task.
Scheduling Option
Description
Run Now
As soon as the task is configured, run it immediately.
Run Once
Run the task at the scheduled time and then do not run it again.
Run Daily
Run the task at the scheduled time each day. See “Daily extractions.”
Run Hourly
Run the task every hour of every day.
Note: The sessions to include in an extraction are defined by the session time for
each session. The timestamp of a session is the timestamp of the last hit in a
session. For example, if you configure an extract for sessions between 1:00 and
2:00, a session that begins at 1:50 and contains a final hit that is recorded at 2:10 is
not included.
Depending on the type of extraction, IBM Tealeaf cxConnect for Data Analysis
waits the following time periods:
v For repeated tasks such as Daily or Hourly task, IBM Tealeaf cxConnect for Data
Analysis verifies that the session indexes were updated at least 1 hour after the
end of the configured extract time.
– If an hourly job is unable to complete in the allotted number of tries, it is
skipped and is not reattempted. The next hour, the job is run to collect that
hour's data.
v For ad hoc tasks, IBM Tealeaf cxConnect for Data Analysis does not attempt an
extraction until 30 minutes past the end of the extract time.
v Run Now tasks do not check the indexes.
Daily extractions:
Daily extraction tasks can be configured to extract sessions from today, yesterday,
or a specific day further in the past.
These extractions enable you to select a daily slice of sessions for archiving
purposes, which can be used to significantly reduce the cost of storage.
To perform a daily extraction:
1. Select the Run Daily Scheduling option.
2. Select the Daily Extract Option:
Daily Extract Option
Description
Current Day
Extracts sessions from today's date.
16
IBM Tealeaf cxConnect for Data Analysis: cxConnect for Data Analysis Administration Manual
Note: To acquire the full day's sessions, the extraction task should be
scheduled for just before midnight.
Previous Day
Extracts sessions from yesterday's date.
N-th Day ago
Extracts sessions N days before the current date, whenever the task
runs. Specify a value in the textbox for N between 1 and the maximum
age of sessions in the queried canisters.
3. Review the Extraction period to verify that you are extracting from the
appropriate date.
4. Specify the remaining configuration options for the task in the other tabs.
5. Click Save.
CX Servers tab
In the IBM Tealeaf CX Servers tab, you can specify the IBM Tealeaf CX Servers
from which to extract data. The list of available servers identifies all servers
managing Long-Term Canisters in the environment.
Note: Only IBM Tealeaf CX servers that are currently active are available for
selection. For more information on enabling or disabling IBM Tealeaf CX servers,
see "Managing Tealeaf Servers" in the IBM Tealeaf cxImpact Administration Manual.
v To extract data from a server, select the box next to the server's name.
Data Set tab
In the Data Set tab, you can specify search criteria to apply to the available session
data for the selected time period. Additionally, you can specify custom commands
to extract the data and to run after the task was completed.
Chapter 3. cxConnect for Data Analysis
17
v Exclude Single Hit Sessions - Select this option to exclude sessions that are
composed of a single request and a single response. These sessions are not
interesting to Tealeaf users.
v Enable Custom Extract String - In the Portal or the IBM Tealeaf CX RealiTea
Viewer, you can search for specific sessions. For example, you can search for
specific values in fields in the session data.
Note: If it is installed, you can use RTV to specify the search criteria that are
needed for the custom search string for the IBM Tealeaf cxConnect for Data
Analysis job. In the RTV search page, specify the search. Then, click Copy to
Advanced Page.... On the Advanced tab, you can copy the specified search
criteria and use it for your IBM Tealeaf cxConnect for Data Analysis job.
v Custom Search String appears on same page - When enabled, matches of the
custom search string and matches of the other search parameters for the task
must appear on the same page to be displayed in the results.
– Searches configured using this option are limited to retrieving and extracting
a maximum of 16,384 sessions.
For more information about search syntax, see "RealiTea Viewer - Search Syntax" in
the IBM Tealeaf RealiTea Viewer User Manual.
Data Filters tab
Through the Data Filters tab, you can specify whether to include or exclude types
of data that is part of the Tealeaf session dataset.
Before the extractor writes to the database or log file, the data is filtered based on
the criteria you specify in this tab.
Types of Filters:
v Include All - Include all data specified for this type of data from the extract.
v Exclude All - Exclude all data specified for this type of data from the extract.
v Include Specific - Include specific session data matching the comma-separated
criteria you specify in the textbox below.
v Exclude Specific - Exclude specific session data matching the comma-separated
criteria you specify in the textbox below.
18
IBM Tealeaf cxConnect for Data Analysis: cxConnect for Data Analysis Administration Manual
Types of Filtered Data
v URLs - Hits can be filtered by URL.
v HTTP status code - Hits can be filtered by the status code returned by the
server.
v URL Fields - URL Fields can be filtered by the URL Field name.
v cookies - Cookies can be filtered by the cookie name.
v appdata - App Data can be filters by their name.
v Event ID - Events can be filtered by the Event ID.
v Client Side Events - Events captured and submitted by Tealeaf IBM Tealeaf CX
UI Capture for AJAX. See "UI Capture FAQ" in the IBM Tealeaf UI Capture for
AJAX FAQ.
v Mobile Events - Events captured and submitted by one of the client frameworks
and split into individual hits in the Windows pipeline. See "JSON Mobile Parser
Session Agent" in the IBM Tealeaf CX Configuration Manual.
Note: Mobile events cannot be captured from step-based events.
Note: Event information is recorded in the session when it is passed through the
Canister. You cannot apply filters for events that were created after the session was
evaluated in the Canister.
Data filters example:
To exclude all cookies with name _VIEW:
1. Select Cookies data filter.
2. Choose the Exclude Specific radio button.
3. Add _VIEW.
As each hit of the extracted sessions is processed, all cookies with the name _VIEW
are skipped and are not sent to the destination. The other parts of the hit are not
affected.
Destination tab
In the Destination tab, you can select and specify the connection information of
the destination for the extract.
Note: Tealeaf recommends using the data files option for session export, which
simplifies the process and increases the throughput performance.
Note: For any task, only one connection type can be active at any time.
Data Files options
IBM Tealeaf cxConnect for Data Analysis enables you to export the configured
session data to a series of data files, which can be inserted into database tables of
your own configuration.
Note: After IBM Tealeaf cxConnect for Data Analysis exports the data files to the
IBM Tealeaf cxConnect for Data Analysis server, you must move them to their final
destination, which requires more configuration and external script execution. See
Chapter 2, “cxConnect installation,” on page 3.
For schema information about these data files, see Chapter 4, “cxConnect Schema,”
on page 45.
Chapter 3. cxConnect for Data Analysis
19
v Active - Select the Active check box to enable the task to be run according to
schedule.
v Exported Data Directory - Enter the full path to the directory on the IBM Tealeaf
cxConnect for Data Analysis server where the exported data files are to be
stored. Local and network paths are accepted.
– You might need to prepare this directory in advance of exporting the data.
See Chapter 2, “cxConnect installation,” on page 3.
v Data File Roll Size - The maximum size of each data file in megabytes (MB). If
this file size is exceeded, the file is closed, and a new log file is opened.
v Number of Concurrent Exports - The maximum number of data files that can be
concurrently written.
v OnClose Command - Use this field to call a batch file, passing the data file that
was closed as an argument. See “OnClose commands” on page 21.
v Timestamps - Define timestamps in output to be set to GMT time or the local
time of the IBM Tealeaf cxConnect for Data Analysis server.
v Data File Format - Select the export format of the event data in the extracted
sessions. These settings correspond to different tables in the Data Files schema.
See Chapter 4, “cxConnect Schema,” on page 45.
– 8.x - Select this option to export event data into the Release 8 or later format,
which includes the event value and any associated dimensional values.
– 7.x - Select this option to export event data in the Release 7.2 or earlier event
format. Use this option if you upgraded from a pre-Release 8.0 version of
Tealeaf and do not want to change the structure of your output files.
v Include Headers - Select this option to include a header line in each data file.
You may select the fields that you want to include in the export.
v To select all, click Set All at the top of the panel. To clear all fields, click Clear
All.
v You may also select and clear all fields in individual sections.
20
IBM Tealeaf cxConnect for Data Analysis: cxConnect for Data Analysis Administration Manual
For an example data files configuration, see “Integration example - Data Files” on
page 28.
OnClose commands
Using the OnClose text box, you can specify a batch file command that is applied
to every data file after it was written and closed. The closed file is passed to the
batch file as an argument.
For example, Hadoop functions well with files compressed using the LZO
algorithm. Below is a batch file that compresses the closed data file using LZO.
echo off
echo file: %1
:: call lzop to compress file
lzop %1
if errorlevel 0 (
delete %1
goto all_is_good
)
exit /b 1
:all_is_good
exit /b 0
Data file schema information
IBM Tealeaf cxConnect for Data Analysis exports session data into a set of
denormalized flat data files, which can be searched easily and rapidly bulk-loaded
into the destination database.
v For more information about the data file schema, see Chapter 4, “cxConnect
Schema,” on page 45.
v For more information about bulk loading, see Chapter 2, “cxConnect
installation,” on page 3.
Chapter 3. cxConnect for Data Analysis
21
Log Files options
To extract Tealeaf session data to W3C-compliant log files, click Log Files
v Active - If this destination is the active one for this task, click the Active box.
v Log Directory - On the host machine, specify the destination directory for the
log files.
– You may need to prepare this directory in advance of exporting the data. See
Chapter 2, “cxConnect installation,” on page 3 page.
v Max Log File Size - The maximum size of each data file in megabytes (MB). If
this file size is exceeded, the file is closed, and a new log file is opened.
v Concurrent Logs - The maximum number of log files that can be concurrently
written.
v Timestamps - Define timestamps in output to be set to GMT time or the local
time of the IBM Tealeaf cxConnect for Data Analysis server.
v Field Delimiter - In the exported log files, you can specify the separator string
that is inserted between extracted fields. By default, this string is a space.
v Tealeaf Events as individual log entries - A single Tealeaf hit may generate
multiple events. Select this option if you want each Tealeaf event in a hit to be
written as a separate log entry.
– Synthetic URL - For each Tealeaf event, generate a synthetic URL in the log
file.
– Event hit URL - For each Tealeaf event, use the URL in the hit containing the
event in the log file.
v Convert Post to Gets - Some destination systems, such as Web Trends, are
unable to use POST data in Tealeaf sessions. Select this option to convert this
data to GET data.
v Copy TLTURL to cs-uri-stem - If needed, you can convert Tealeaf URL field
(TLTURL) to cs-uri-stem format, which is a W3C standard. The following is an
example of cs-uri-stem:
22
IBM Tealeaf cxConnect for Data Analysis: cxConnect for Data Analysis Administration Manual
/resources/rss/default.xml enum%2B%2Bstatuscode=304&Status%2BCode%2BDistribution=304&Status%2BCodes%2B%2BNumeric=304&Distance%2BEvent%2B%2BHome%2BPage%2B(/)=/&enum%2BConnType=Dialup&ConnType%2BEvent=Di
alup&ResponseSize%2BEvent=263
v Populate cs-uri-query with Tealeaf Events - If needed, you can append all
Tealeaf events to the URI query string. Through this method, all Tealeaf events
are specified as a part of a URI query string.
v Time sort log files - By default, Tealeaf writes log files in hit-by-hit order, which
may not be in a time-based order. Select this option to write log files in order
according to the timestamps of entries.
v Fields - Select the fields that you would like to include in the log files. The
preselected ones represent a good cross-section of session data.
– To select all, click Set All at the top of the panel. To clear all fields, click
Clear All.
Log file fields
The following fields are available for export to log files:
Log File field
Canister field
SessionDate
date
SessionTime
time
RemoteAddr
c-ip
LoginID
cs-username
ServerName
s-computername
ServerAddr
s-ip
ServerPort
s-port
ReqMethod
cs-method
URL
cs-uri-stem
QueryString
cs-uri-query
StatusCode
sc-status
ResponseDataSize
sc-bytes
RequestDataSize
cs-bytes
TimeTaken
time-taken
Chapter 3. cxConnect for Data Analysis
23
Https
cs-version
Host
cs-host
UserAgent
cs(User-Agent)
cookies
cs(Cookie)
referrer
cs(Referer)
TltUrl x(TltUrl)
TltServer
x(TltServer)
TltHostName
x(TltHostName)
TltApplName
x(TltApplName)
AppData
x(AppData)
TealeafReplay
x(Replay)
CanisterName
x(CanisterName)
SessionID
x(SessionID)
TLTSID x(TLTSID)
TLTUID x(TLTUID)
TLTHID x(TLTHID)
ReqCancelled
x(ReqCancelled)
RequestHeaderSize
x(RequestHeaderSize)
ResponseHeaderSize
x(ResponseHeaderSize)
RequestTimeEx
x(ReqTimeEx)
RequestEndTimeEx
x(ReqEndTimeEx)
ResponseStartTimeEx
x(RspStartTimeEx)
ResponseTimeEx
x(RspTimeEx)
ResponseAckTimeEx
x(RspAckTimeEx)
WS_GEN x(WS_GEN)
24
IBM Tealeaf cxConnect for Data Analysis: cxConnect for Data Analysis Administration Manual
NT_GEN x(NT_GEN)
RT_GEN x(RT_GEN)
TTLB
x(TTLB)
TTLA
x(TTLA)
ConnSpeed
x(ConnSpeed)
EventID
x(EventID)
EventTitle
x(EventTitle)
EventTextFound
x(EventTextFound): Fact value
EventValueID
x(EventValueID)
EventValueDescription
x(EventValueDescription)
FirstHitTime
x(FirstHitTime)
LastHitTime
x(LastHitTime)
HitCount
x(HitCount)
TxtCount
x(TxtCount)
ImgCount
x(ImgCount)
MiscCount
x(MiscCount)
Log file example output
The following is an example log file entry with Tealeaf events in the cs-uri-query:
#Software: Tealeaf Technology Inc.
#Version: 6.2.0.6246
#Date: 06-18-2008 11:03:40
#Fields: date time c-ip s-ip cs-method cs-uri-stem cs-uri-query sc-status
cs-username cs(User-Agent) cs(Cookie) cs(Referer) cs-bytes sc-bytes
time-taken cs-versions-computername s-port cs-host x(Replay)
x(TltUrl) x(TltServer) x(TltHostName) x(AppData) x(NTTotal)
x(RTTotal)
x(TTFB) x(TTLB) x(TTLA) x(ConnSpeed) x(ReqTimeEx) x(ReqEndTimeEx)
x(RspStartTimeEx) x(RspTimeEx) x(RspAckTimeEx) x(CanisterName) x(SessionID)
x(ReqCancelled) x(TLTSID) x(TLTHID) x(TLTUID) x(EventID) x(EventTitle)
x(EventTextFound) x(EventValueID) x(EventValueDescription)
2008-06-17 15:00:02 155.70.39.45 63.194.158.200 GET /resources/rss/
default.xmlenum%2B%2Bstatuscode=304&Status%2BCode%2BDistribution=304&Status%2BCodes%2B%2BNumeric=304&Distance%2BEvent%2B%2BHome%2BPage%2B(/)=/&enum%2BConnType=
Dialup&ConnType%2BEvent=Dialup&Re
sponseSize%2BEvent=263 304 - Mozilla/5.0+(Windows;+U;+Windows+NT+5.1;+enChapter 3. cxConnect for Data Analysis
25
US;+rv:1.8.1.14)+Gecko/20080404+Firefox/2.0.0.14 - - 968 263 1 HTTP
63.194.158.200 80
www.tealeaf.com
http://wasatch:19101/Session.tlx?canName=CANISTER.dbs\
LSSN_20080617_WASATCH.dat
&
sessionId=348746 others 63.194.158.200 www.tealeaf.com
Result_for_Rule5_=%2BFalse&TLT_OS=Windows_NT_Generic&TLT_APPLICATION_NAM
E=resources&TLT_BROWSER=Mozilla_All&TLT_HOST_NAME=www.tealeaf.com&Result_
for_Rule6_=%2BFalse&REMOTE_ADDR=155.70.39.45&Request_Method=GET&TLT_URL=
others&TLT_SERVER=63.194.158.200 65 66 1686 0 65010 32364
2008-06-17+15:00:02.995
2008-06-17+15:00:02.995 2008-06-17+15:00:02.997 2008-06-17+15:00:02.997
2008-0617+15:00:03.062 LSSN_20080617_WASATCH 348746 N
FF40E30E4E5BCB4FB255F2A1AC61A233 FF40E30E4E5BCB4FB255F2A1AC61A233
21769BC641CED5E16EF915BA703008BF - - - - - - - - 2008-06-17 15:00:02 155.70.39.45 63.194.158.200 GET
/tlevents/hit_event.tle?eventid=37 - 200
- - - - - - - - - - - - - - - - - - - - - - - - - - - LSSN_20080617_WASATCH
348746 FF40E30E4E5BCB4FB255F2A1AC61A233 FF40E30E4E5BCB4FB255F2A1AC61A233
21769BC641CED5E16EF915BA703008BF - - - - 37 enum
+-+statuscode 304 2002 300+
Notification tab
In the Notification tab, you can define specific email addresses to receive
notification about the status of this task when it is completed, successful or not.
Job performance
Depending on the volume of sessions that are extracted in a job, the extraction
process might take multiple hours to complete. You can try the following options
to improve performance:
v If you are pulling sessions from multiple Canisters, you can configure individual
jobs for each Canister.
– If you are pulling from multiple Canisters concurrently, you should configure
the Extract Service to run concurrent jobs, up to 1 for each Canister from
which you are pulling. See "Configuring the Extract Service" in the IBM
Tealeaf CX Configuration Manual.
v For daily jobs, you can split the job into two jobs, scheduling them to fire before
and after the workday.
26
IBM Tealeaf cxConnect for Data Analysis: cxConnect for Data Analysis Administration Manual
cxConnect metrics
Time values in cxConnect
Tealeaf records multiple time values, or timestamps, during the process of a visitor
making a request, the web server evaluating it and returning a response, and the
response being rendered in the client browser.
Every hit in Tealeaf has a request that contains a [timestamp] section containing
the following measurements during the above process. A sample request:
[timestamp]
RequestTimeEx=
2008-06-05T21:49:43.099484
RequestEndTimeEx=
2008-06-05T21:49:43.099484
ResponseStartTimeEx=
2008-06-05T21:49:43.107374
ResponseTimeEx=
2008-06-05T21:49:43.297154
ResponseAckTimeEx=
2008-06-05T21:49:43.333742
These various points are timestamps from the network packets that are exchanged
between the client browser and web server.
Tealeaf measurements:
Tealeaf measurement
Description
RequestTimeEx
First packet of the request
RequestEndTimeEx
Last packet of the request
ResponseStartTimeEx
First packet of the response
ResponseTimeEx
Last packet of the response
ResponseAckTimeEx
Back from browser for the response
Note: All values are recorded in microseconds.
These measurements are then used to calculate elapsed time for various activities
in the request/response process, as indicated in the following diagram:
Tealeaf Timing Metric
Description
WS_GEN Web server generation time
Chapter 3. cxConnect for Data Analysis
27
RT_GEN Round trip generation time
TTLB
Time to last byte
NT_GEN Network time
TTLA
Time to last Ack
TTFB
Time to First Byte (same value as WS_GEN)
Calculated Timing Values (microseconds)
v
v
v
v
v
TTFB=7890
TTLB=189780
TTLA=36588
WS_Gen=7890
NT_GEN=226368
v RT_GEN=234258
See "Analyzing Performance" in the IBM Tealeaf Reporting Guide.
Integration example - Data Files
This example uses the Data Files integration method of IBM Tealeaf cxConnect for
Data Analysis to extract specific URLs, URL Fields, and Cookies and import this
data into the Data Files temporary database.
Creating the database
The database is created using SQL files that are in the Tealeaf\DataExtractor\
Scripts directory. The two SQL files are CreateDB.sql and CreateSchema.sql.
v CreateDB.sql - creates the databases FileGroups.
– The default database name is TLWEB.
– The default location is D:\DB.
Note: To change the database location, edit CreateDB.sql and change all
occurrences of D:\DB to the preferred location.
Default CreateDB.sql script
USE master;
if exists (select 1 from dbo.sysdatabases where name=’TLWEB’)
DROP DATABASE [TLWEB];
CREATE DATABASE [TLWEB]
ON PRIMARY(
NAME = TLDATA_PRIMARY,
FILENAME = ’D:\DB\TLWEB_primary.mdf’, SIZE = 20,
FILEGROUP TLDATA_SESN( NAME = TLDATA_SESN,
FILENAME = ’D:\DB\TLWEB_SESN.mdf’,
SIZE = 50,
FILEGROUP TLDATA_HIT( NAME = TLDATA_HIT,
FILENAME = ’D:\DB\TLWEB_HIT.mdf’,
SIZE = 50,
FILEGROUP TLDATA_APPD( NAME = TLDATA_APPD,
FILENAME = ’D:\DB\TLWEB_APPD.mdf’,
SIZE = 50,
FILEGROUP TLDATA_FACT( NAME = TLDATA_FACT,
FILENAME = ’D:\DB\TLWEB_FACT.mdf’,
SIZE = 50,
FILEGROUP TLDATA_COOK( NAME = TLDATA_COOK,
FILENAME = ’D:\DB\TLWEB_COOK.mdf’,
SIZE = 50,
FILEGROUP TLDATA_EVNT( NAME = TLDATA_EVNT,
FILENAME = ’D:\DB\TLWEB_EVNT.mdf’,
SIZE = 50,
FILEGROUP TLDATA_ATTR( NAME = TLDATA_ATTR,
28
FILEGROWTH = 5%
),
FILEGROWTH = 20% ),
FILEGROWTH = 20% ),
FILEGROWTH = 20% ),
FILEGROWTH = 20% ),
FILEGROWTH = 20% ),
FILEGROWTH = 20% ),
IBM Tealeaf cxConnect for Data Analysis: cxConnect for Data Analysis Administration Manual
FILENAME = ’C:\DB\TLWEB_ATTR.mdf’,
SIZE = 50,
FILEGROUP TLIDX_SESN( NAME = TLIDX_SESN,
FILENAME = ’D:\DB\TLIDX_SESN.mdf’,
SIZE
FILEGROUP TLIDX_HIT(
NAME = TLIDX_HIT,
FILENAME = ’D:\DB\TLIDX_HIT.mdf’,
SIZE
FILEGROUP TLIDX_APPD( NAME = TLIDX_APPD,
FILENAME = ’D:\DB\TLIDX_APPD.mdf’,
SIZE
FILEGROUP TLIDX_FACT( NAME = TLIDX_FACT,
FILENAME = ’D:\DB\TLIDX_FACT.mdf’,
SIZE
FILEGROUP TLIDX_COOK( NAME = TLIDX_COOK,
FILENAME = ’D:\DB\TLIDX_COOK.mdf’,
SIZE
FILEGROUP TLIDX_EVNT( NAME = TLIDX_EVNT,
FILENAME = ’D:\DB\TLIDX_EVNT.mdf’,
SIZE
FILEGROUP TLIDX_ATTR( NAME = TLIDX_ATTR,
FILENAME = ’C:\DB\TLIDX_ATTR.mdf’,
SIZE
FILEGROWTH = 20% ),
= 50,
FILEGROWTH = 20% ),
= 50,
FILEGROWTH = 20% ),
= 50,
FILEGROWTH = 20% ),
= 50,
FILEGROWTH = 20% ),
= 50,
FILEGROWTH = 20% ),
= 50,
FILEGROWTH = 20% ),
= 50,
FILEGROWTH = 20% )
LOG ON(
NAME = ’TLDATA_LOG’,
FILENAME = ’D:\DB\TLWEB_log.ldf’,
SIZE = 5,
ALTER DATABASE [TLWEB] SET RECOVERY SIMPLE;
FILEGROWTH = 5 );
Changing the database name from TLWEB to TLWEB_TEST
CreateDB.sql:
USE master;
if exists (select 1 from dbo.sysdatabases where name=’TLWEB_TEST’)
DROP DATABASE [TLWEB_TEST];
CREATE DATABASE [TLWEB_TEST]
ON PRIMARY(
NAME = TLDATA_PRIMIRY,
FILENAME = ’D:\DB\TLWEB_TEST_primary.mdf’, SIZE =
FILEGROUP TLDATA_SESN( NAME = TLDATA_SESN,
FILENAME = ’D:\DB\TLWEB_TEST_SESN.mdf’,
SIZE =
FILEGROUP TLDATA_HIT( NAME = TLDATA_HIT,
FILENAME = ’D:\DB\TLWEB_TEST_HIT.mdf’,
SIZE =
FILEGROUP TLDATA_APPD( NAME = TLDATA_APPD,
FILENAME = ’D:\DB\TLWEB_TEST_APPD.mdf’,
SIZE =
FILEGROUP TLDATA_FACT( NAME = TLDATA_FACT,
FILENAME = ’D:\DB\TLWEB_TEST_FACT.mdf’,
SIZE =
FILEGROUP TLDATA_COOK( NAME = TLDATA_COOK,
FILENAME = ’D:\DB\TLWEB_TEST_COOK.mdf’,
SIZE =
FILEGROUP TLDATA_EVNT( NAME = TLDATA_EVNT,
FILENAME = ’D:\DB\TLWEB_TEST_EVNT.mdf’,
SIZE =
FILEGROUP TLDATA_ATTR( NAME = TLDATA_ATTR,
FILENAME = ’C:\DB\TLWEB_ATTR.mdf’,
SIZE = 50,
FILEGROUP TLIDX_SESN( NAME = TLIDX_SESN,
FILENAME = ’D:\DB\TLIDX_TEST_SESN.mdf’,
FILEGROUP TLIDX_HIT(
NAME = TLIDX_HIT,
FILENAME = ’D:\DB\TLIDX_TEST_HIT.mdf’,
FILEGROUP TLIDX_APPD( NAME = TLIDX_APPD,
FILENAME = ’D:\DB\TLIDX_TEST_APPD.mdf’,
FILEGROUP TLIDX_FACT( NAME = TLIDX_FACT,
FILENAME = ’D:\DB\TLIDX_TEST_FACT.mdf’,
FILEGROUP TLIDX_COOK( NAME = TLIDX_COOK,
FILENAME = ’D:\DB\TLIDX_TEST_COOK.mdf’,
FILEGROUP TLIDX_EVNT( NAME = TLIDX_EVNT,
FILENAME = ’D:\DB\TLIDX_TEST_EVNT.mdf’,
FILEGROUP TLIDX_ATTR( NAME = TLIDX_ATTR,
FILENAME = ’C:\DB\TLIDX_ATTR.mdf’,
SIZE
20,
FILEGROWTH = 5%
),
50,
FILEGROWTH = 20% ),
50,
FILEGROWTH = 20% ),
50,
FILEGROWTH = 20% ),
50,
FILEGROWTH = 20% ),
50,
FILEGROWTH = 20% ),
50,
FILEGROWTH = 20% ),
FILEGROWTH = 20% ),
SIZE = 50,
FILEGROWTH = 20% ),
SIZE = 50,
FILEGROWTH = 20% ),
SIZE = 50,
FILEGROWTH = 20% ),
SIZE = 50,
FILEGROWTH = 20% ),
SIZE = 50,
FILEGROWTH = 20% ),
SIZE = 50,
FILEGROWTH = 20% ),
= 50,
FILEGROWTH = 20% )
LOG ON(
NAME = ’TLDATA_LOG’,
FILENAME = ’D:\DB\TLWEB_TEST_log.ldf’,
SIZE = 5,
ALTER DATABASE [TLWEB_TEST] SET RECOVERY SIMPLE;
FILEGROWTH = 5 );
Chapter 3. cxConnect for Data Analysis
29
CreateSchema.sql:
:
USE [TLWEB_TEST]
...
Modifying sample load script
1. Edit bcp_load_data_files.bat to update the following variables as needed.
Variable Name
Description
DBSERVER
SQL server name
DATABASE
Database name.
PARALLELLOAD
Set as TRUE or FALSE. Session extract tasks containing more than 250,000
sessions should have this set to TRUE.
JOBNAME
Typically, this setting does not need to be modified.
CLEARSCHEMA
To empty an existing schema before loading it with data, set this value
to TRUE.
STOPONERROR
When this value is set to TRUE, the Data Extractor stops processing the
job if an error is encountered by BCP.
OVERWRITELOGS
To overwrite existing bcp log files, set this value to TRUE.
BULKDIR
Location of data files.
SCRIPTDIR
Location of TeaLeaf\DataExtractor\scripts directory.
2. For this example, set the following values:
set
set
set
set
set
set
set
set
set
DBSERVER=localhost
DATABASE=TLWEB
PARALLELLOAD=FALSE
JOBNAME=*
CLEARSCHEMA=TRUE
STOPONERROR=TRUE
OVERWRITELOGS=FALSE
BULKDIR=C:\TeaLeaf\DataExtractor\DataFiles
SCRIPTDIR=C:\TeaLeaf\DataExtractor\scripts
3. Save the file.
Creating cxConnect task
Use the following steps to create the extract task. This task exports three data files:
BulkCookie*, BulkHit*, and BulkSesn*.
1. In the Tealeaf Portal menu select Tealeaf > IBM Tealeaf cxConnect for Data
Analysis.
2. Select the Configure Task link.
3. Configure the task:
a. General Tab
30
IBM Tealeaf cxConnect for Data Analysis: cxConnect for Data Analysis Administration Manual
1) Name: Single URL
2) Post Command: C:\Tealeaf\DataExtractor\Scripts\
LoadData_SingleUrl.bat
Note: This script is a modified copy of bcp_data_files.bat with
appropriate variable settings.
b. Data Set Tab
1) Enable Custom Search String: true
2) Search String: url contains alliance-partnership.asp
c. Data Filters Tab
1)
2)
3)
4)
5)
6)
Response Type: Include All
URL: Include the actual URL relative path in request
Status Code: Include All
Urlfield: Include All
Cookie: Include All (This value is not a default value.)
AppData: Exclude All
7) Event ID: Exclude All
8) Var: Exclude All (This area applies only to the earlier SQL Server
database method of export.)
d. Destination Tab
1) Data Files: Active
2) Number of concurrent exports Set this value to 1 for proof of concept.
cxConnect scheduling tasks
Through the Portal, you can monitor your scheduled IBM Tealeaf cxConnect for
Data Analysis tasks.
v To open IBM Tealeaf cxConnect for Data Analysis, select Tealeaf > IBM Tealeaf
cxConnect for Data Analysis in the Tealeaf Portal. To see the scheduled tasks,
click Scheduled Tasks in the left pane.
Note: Accessing IBM Tealeaf cxConnect for Data Analysis requires administrator
privileges in your Tealeaf Portal account. If you cannot see the Tealeaf menu in
the Portal, you do not have administrator privileges.
Note: IBM Tealeaf cxConnect for Data Analysis is a separately licensable
component of the IBM Tealeaf CX solution and might not be available in your
solution. For more information, contact your Tealeaf administrator.
Chapter 3. cxConnect for Data Analysis
31
Scheduled Tasks window
In the Scheduled Tasks window, you can review the tasks that were scheduled to
run, initiated, or completed.
v ID - contains the internal Tealeaf identifier for the task. Identifiers might be used
by IBM Tealeaf cxConnect for Data Analysis tasks, hidden internal tasks, and
IBM Tealeaf cxVerify tasks, if it is installed.
v Name - the user-friendly name for the task
v Status - the status of the task. To refresh the status of all tasks in the window,
click Refresh.
– Waiting to Run - the task waiting to be scheduled.
– Scheduled - the task was scheduled to run.
– Completed - the scheduled task completed successfully. To run a task again,
select the task and click Run Again.
– Failed - the scheduled task failed to complete. To find out why, select the task
and click View Log.
– Stopped - the scheduled task was stopped by a user. To stop any task, select
it and click Stop Task.
– Running - the scheduled task is running. To stop any task, select it and click
Stop Task.
v Start Time - the date and time for the next time the task is scheduled to run.
Time is based on a 24-hour clock.
– Timestamps for when the task started are labeled with an asterisk (*).
v Information - a short message indicating the results of the task. For more
detailed information, see the log for the task.
Context menu
When you right-click on a task in the task list, the following context menu items
are available:
v View Log - View the log associated with the task.
v Extended Log - View the extended log for the task.
Note: Extended logs are available for the following destinations: Data Files, Log
Files, Select Archive, Trim Archive, Session Files, and Image Files. The Extended
logging can be configured in the Tealeaf Extractor Service configuration in TMS.
See "Tealeaf Management System" in the IBM Tealeaf cxImpact Administration
Manual.
32
IBM Tealeaf cxConnect for Data Analysis: cxConnect for Data Analysis Administration Manual
v Run Task Again - Run the task immediately. A copy of the task is created and
run. Subsequent executions occur according to the schedule.
v Stop Task - Stop a task in execution.
v Disable Task - Disable the task from subsequent executions.
Note: Disable task only applies to scheduled tasks or waiting to be scheduled.
Task execution
At the scheduled time, IBM Tealeaf cxConnect for Data Analysis runs the specified
task. At the time of execution, IBM Tealeaf cxConnect for Data Analysis requires
that basic IBM Tealeaf CX services, such as Search Server be available.
Additionally, the Tealeaf Extractor Service must be operational.
Note: For IBM Tealeaf cxConnect for Data Analysis Data Files method of
extraction, if the Post Command is used to load the data into a destination
database, the Tealeaf Extractor Service must run under an account that has
permission to place the data into the database. Typically, tasks fail when there are
network interruptions or when the Tealeaf Extractor Service is unable to connect to
a canister. When a task fails, IBM Tealeaf cxConnect for Data Analysis might
reattempt to complete the task a predefined number of times.
v Errors are reported in the Tealeaf Extractor log and the IBM Tealeaf cxConnect
for Data Analysis Tasks log.
v The number of repeat attempts can be configured through the Tealeaf Extractor
Service configuration in TMS. See "Tealeaf Management System" in the IBM
Tealeaf cxImpact Administration Manual.
If the number of failures reached the limit, then the task is resumed at the next
scheduled time.
Note: When a rescheduled task is resumed, the extraction resumes where it left
off. For example, if the extraction was midway through the second of three
canisters, the sessions in the first canister and the first half of the second canister
are not re-extracted.
Tealeaf Event Bus
The Event Bus streams Tealeaf event data from the Short Term Canister, the
in-memory database, to a Tealeaf pipeline. The pipeline can then deliver the event
data to any system configured to receive it. The ability to send the event data as a
stream in real time makes the event bus useful for integrating with real-time
systems.
v The Event Bus runs out-of-band and does not affect the core Tealeaf processes.
Note: The Tealeaf Event Bus is a component of IBM Tealeaf cxConnect for Data
Analysis, a separately licensable component of the IBM Tealeaf CX platform. please
contact your IBM Tealeaf representative.
Complex Event Processing (CEP) engines can receive the Tealeaf event bus data as
a stream and run computations on the data to observe patterns and sequences on
the data outside of the current Tealeaf event infrastructure. The event bus data can
be correlated against other enterprise data to create new and insightful
correlations.
Chapter 3. cxConnect for Data Analysis
33
Note: The Tealeaf Event Bus is a high-performance pipeline and should be limited
to only session agents required to complete processing. Typically, these pipeline
configurations are limited to either of the following:
v DecoupleEx session agent > Complex Event Processing engine
v DecoupleEx session agent > Socket session agent
If more processing is required on the Event Bus data, it should be forwarded to
another pipeline, which by definition runs out-of-band of the Tealeaf Event Bus.
Event Bus pipeline
The default Event Bus pipeline has the following active session agents:
v DecoupleEx
v Null
The Null session agent ends delivery of event data. Nothing happens until an
appropriate destination is enabled in the pipeline.
The configuration file is TeaLeafEventBus.cfg and is in the Tealeaf installation
directory (<Installed drive>\TeaLeaf). You can modify this file as needed to send
the event bus data to the appropriate session agent for further processing and
transmission of the data to a receiving system.
Note: The preferred method of configuring the Event Bus is through the Tealeaf
Management System.
Workflow
To deliver Tealeaf events to an external complex event processing engine, complete
the following steps:
Steps:
1.
2.
3.
4.
5.
Verify installation of the required components.
Enable the pipeline.
Configure the pipeline.
Test the pipeline locally.
If the Event Bus pipeline is working properly, you can stop the pipeline with
the appropriate session agent and location.
Installation
The Tealeaf Event Bus is a separately configurable component of IBM Tealeaf
cxConnect for Data Analysis.
To install the Tealeaf Event Bus:
1. In your Tealeaf software distribution, navigate to the following directory:
cxConnect\Event Bus
2. Copy all files in this directory to the Tealeaf installation directory on the server
where IBM Tealeaf cxConnect for Data Analysis is installed. These files include
the following:
v CEPCustomFields.cfg - configuration file for custom Event Bus fields. See
“Tealeaf Event Bus” on page 33.
v TeaLeaf.Pipeline.CEP.dll - core Event Bus processing
v Tealeaf EventBus.doc - documentation for Event Bus
34
IBM Tealeaf cxConnect for Data Analysis: cxConnect for Data Analysis Administration Manual
v TeaLeafEventBus.cfg - configuration file for core Event Bus
If any of these fields is missing from the Tealeaf installation directory where IBM
Tealeaf cxConnect for Data Analysis was installed, check the software distribution.
For more information, contact Tealeaf http://support.tealeaf.com.
Enabling the Event Bus
To enable the pipeline, edit the Canister configuration by using Tealeaf
Management System (TMS):
1. Log in to the Portal as an admin user.
2. From the Portal menu, select Tealeaf > TMS.
3. In the Servers view, select the wanted server to drill down to components.
4. Open the Canister node to display the configurations.
5. Click the Canister configuration.
6.
7.
8.
9.
In the Config Actions pane, click View/Edit.
In the Services Perform tab, select the Enable Event Bus check box.
Click Save.
The Canister automatically recognizes the change in configuration and creates
the Event Bus pipeline.
View current status of the Event Bus pipeline:
After you enabled the Event Bus, you can review the status of the Event Bus
pipeline to verify that hits are being delivered to it.
To view the status of the Event Bus pipeline, use the Tealeaf Capture Status utility
on the host server or the Pipeline Status tab in TMS.
Configuring Event bus
You can edit details of the Event bus configuration by using the Pipeline Editor.
1. In TMS, open the Canister node to display the configurations.
2. Click Event bus configuration.
3. In the Config Actions pane, click View/Edit.
4. The Event Bus configuration is displayed in the Pipeline Editor.
Chapter 3. cxConnect for Data Analysis
35
5. In the left pane, select the topmost node: Event Bus configuration. Then, click
Edit.
6. The Event Bus configuration is displayed:
Setting Description
Application Name
For the Event Bus, set this value to TeaLeafEventBus.
VM Free Disable Threshold
The threshold percentage of free virtual memory below which the
pipeline automatically shuts down. To disable this check, set this value
to 0.
VM Free Enable Threshold
After a shutdown, the pipeline restarts when the percentage of free
virtual memory exceeds this value. This value should be greater than
the value set for VM Free Disable Threshold, even if that value is set to
0.
Restart Interval
The interval in seconds at which the pipeline checks to see if a restart is
necessary.
Restart Reset Interval
The period in seconds over which the pipeline can attempt restarts.
Changing timestamps:
If necessary, you can change the timestamp format that is recorded for requests in
the events sent to the Event Bus, by using the Tealeaf Portal.
By default, time values in the request are written into the [timestamp] section of
the request in a familiar format. For example:
[timestamp]
RequestTimeEx=2011-06-28T04:20:35.074529Z
RequestEndTimeEx=2011-06-28T04:20:35.074529Z
36
IBM Tealeaf cxConnect for Data Analysis: cxConnect for Data Analysis Administration Manual
If needed, you can change the timestamp format that is recorded for requests in
the events sent to the Event Bus to use UNIX ticks.
Note: This timestamp format change applies only to HTTP output for CEP.
Note: The change applies only to the RequestTimeEx timestamp in the hit request,
if it is included in the [HTTPFields] section in the CustomFields.cfg file.
Complete the following steps to enable this configuration change.
v The [CEP] section of the request has a DateTime name-value pair that is in
seconds since 1970 format at a resolution of one second. This event timing entry
is not affected by this configuration change.
Note: This change must be applied to each Canister sending events to the Event
Bus.
1. Log in to the Portal.
2. From the Portal menu, select Tealeaf > TMS.
3. Click the WorldView tab.
4. From the View drop-down, select Servers.
5. For each server that hosts a Canister:
a. Select the server.
b. Click the Canister node.
c. Click Event Bus configuration.
d. Click View/Edit Raw.
e. Search the configuration for "[CEP]". This section contains the raw version
of the configuration for the Event Bus on the selected Canister.
f. Search the [CEP] section for HTTP_PageTimeFormat.
g. If the entry does not exist, add the following:
HTTP_PageTimeFormat=unix
v If the entry is not present, the default Tealeaf time formatting is applied.
To switch back to the default, either delete or comment out the line. Or,
you can change the unix value to tealeaf.
h. Click Save.
i. Add the job to a task. Do not submit.
6. Repeat the above steps to the other Canisters hosting the Event Bus.
7. Submit the task to make the change at the same time for all Event Bus
instances.
8. If you did not do so already, insert the RequestTimeEx field in the [HTTPFields]
section in the CustomFields.cfg file.
Sending events to the Event Bus
In order for event data to be delivered to the event bus, you must select the Send
to Event Bus check box in the More Options Step of the event definition in the
Tealeaf Event Manager. This check box must be selected for each event that you
want to send to the Event Bus.
Testing the Event Bus
To test, you can direct the Event Bus to deliver .TLA files to an archive directory.
1. In TMS, open the Canister node to display the configurations.
2. Click Event bus configuration.
Chapter 3. cxConnect for Data Analysis
37
3. In the Config Actions pane, click View/Edit.
4. The Event Bus configuration is displayed in the Pipeline Editor.
5. In the left pane, review the session agents in the Event Bus pipeline. In the
default configuration, the terminating session agent is the Null session agent.
The terminating session agent defines where pipeline data is delivered after
processing by the pipeline. In this case, it is not delivered.
6. From the Available Session Agents pane on the right side of the screen, click
and drag the Archive session agent into the pipeline. Drop it just in front of
the Null session agent.
7. Drag the Null session agent back to the Available Session Agents pane.
8. The Event Bus pipeline is now terminated at the Archive session agent.
9. Select the Archive session agent and click Edit.
10. Review the settings.
v In particular, verify the setting for Archive Directory, which identifies the
folder in which the .TLA files are delivered from the Event Bus pipeline.
This directory is typically the following:
C:\TeaLeaf\Archives
11. Click OK.
12. In the Pipeline Editor, click Save.
13. In the Update Servers dialog, accept all options and click Add Tasks and
Submit.
14. The job is submitted to TMS for immediate processing. The job includes a
restart of the affected Canister(s).
You can monitor the progress of the job in the Jobs tab.
15. When the job is completed, sessions containing Event Bus data are delivered
in Tealeaf archives to the designated directory. Check the directory for the
presence of these files.
16. Select one .TLA file and open it in RTV.
17. Open one of the enclosed sessions.
Note: If you did not include the response in the data sent to the Event Bus,
replay view does not display properly.
18. In the RTV toolbar, click the Request button. The request of the first page is
displayed.
19. Scroll down the request view until you see the [CEP] section.
20. If the data is present, then the Event Bus is working properly.
21. You may now configure the Event Bus to deliver hits to the appropriate
destination.
Disabling the Event Bus
The Event Bus does not run in the same process space as the Tealeaf Transport
Service.
Note: When the Canister Services are shut down for the selected Processing Server,
the Event Bus pipeline is ended.
Event Bus data
The Event Bus receives the request data from each page. If a page has multiple
events, then the Event Bus receives a single hit.
38
IBM Tealeaf cxConnect for Data Analysis: cxConnect for Data Analysis Administration Manual
v The event data is sent to the event bus only if the Send to Event Bus option is
enabled for an event. See "TEM Events Tab" in the IBM Tealeaf Event Manager
Manual.
v In addition to the existing request data, an extra section is added to the request.
The response data is available to the Event Bus pipeline.
Note: Because of the unstructured nature of the response data, none of the
integration pipeline agents to external systems use the response data.
Event Bus packets
Event Bus packets are sent to the destination system on the following event
triggers or conditions:
v Start of Session
– Contains: hit-based facts
v After Every Hit
– Contains: hit-based facts
v End of Session
– Contains:
1. Fact and event data that is derived from last hit of session
2. Facts that are marked for reporting on last instance in the session
3. End of Session trigger evaluation
Note: Events that are configured to close a session are automatically sent
to the Event Bus when it is enabled. The request data in these packets is
provided from the last hit of the session.
At the end of a session, an "end of session" signal event is sent to the Event Bus
pipeline. The UniqueID of the hit is -1.
Additional event bus configuration information
Sample Event Bus request
The following request text is a sample output from the Canister to the Event Bus
pipeline:
[iamie]
TLTSID=EE67713899435C0572EA592C29F3EFF3
TLTHID=34A9A04D49347BA3DC01B016652A296A
TLTUID=342821467A0B03D336BB8127E6019019
LOADGEN_DATA=TRUE
CaptureSource=TeaLeafPassiveCapture2
CaptureType=1
CaptureVersion=3305
[env]
REMOTE_ADDR=63.194.158.183
REMOTE_PORT=1639
LOCAL_ADDR=63.194.158.210
LOCAL_PORT=80
SERVER_NAME=63.194.158.210
SERVER_PORT=80
HTTPS=off
CONNECTION_ID=11730
PCA_NAME=jupiter
PCA_ADDR=127.0.0.1
PCA_UNAME_RELEASE=2.6.9-55.EL
PCA_UNAME_SYSNAME=Linux
Chapter 3. cxConnect for Data Analysis
39
REQ_BUFFER_ENCODING=UTF-8
REQ_BUFFER_ORIG_ENCODING=ISO-8859-1
REQUEST_METHOD=GET
URL=/store/index.php/foresee
SERVER_PROTOCOL=HTTP/1.1
ResponseType=text/html; charset=UTF-8
StatusCode=200
StatusCodeText=OK
RequestHeaderSize=801
RequestDataSize=0
RequestSize=801
ResponseHeaderSize=428
ResponseDataSize=18404
ResponseSize=18832
RESP_BODY_ENCODING=utf-8
ReqCancelled=False
ReqDiscarded=False
StreamingHit=False
StreamingHitType=0
HTTP_ACCEPT=*/*
HTTP_ACCEPT_LANGUAGE=en-us
HTTP_UA_CPU=x86
HTTP_ACCEPT_ENCODING=gzip, deflate
HTTP_USER_AGENT=Mozilla/4.0 (compatible; MSIE 7.0; Windows NT 5.1;
.NET CLR 1.1.4322; .NET CLR 2.0.50727; MS-RTC LM 8)
HTTP_HOST=www.straussandplesser.com
HTTP_CONNECTION=Keep-Alive
HTTP_COOKIE=magento=furtlzy7tijjvxcn1pccoc64hs3ew5rk;
frontend=j5m4cegl15ucj2rrerc4ep8u10;
TLTHID=8E6A041C52741052026CF311152600F5;
TLTSID=3B9E220E52741052026485ECEFD4F08A;
TLTUID=3B9E220E52741052026485ECEFD4F08A;
__utma=131544653.2442909905711142000.1216148505.1216148505.1216148505.1;
__utmb=131544653.2.10.1216148505;
__utmc=131544653;
__utmz=131544653.1216148505.1.1.utmcsr=(direct)|utmccn=(direct)|
utmcmd=(none);
__utmv=131544653.TLTSID%2F3B9E220E52741052026485ECEFD4F08A;
s_cc=true;
s_sq=%5B%5BB%5D%5D
HTTP_SET_COOKIE=TLTHID=DC459D6A5277105200D780232AB9484E; Path=/;
Domain=.straussandplesser.com
TRANSFER_ENCODING=chunked
[TimeBlock]
WEEK=35
MONTH=8
QUARTER=3
YEAR=2010
HOUR_OF_DAY=10
DAY_OF_WEEK=1
DAY_OF_MONTH=23
DAY_OF_YEAR=235
[timestamp]
RequestTimeEx=2010-08-23T17:27:34.000Z
ResponseStartTimeEx=2010-08-23T17:27:34.019Z
ResponseTimeEx=2010-08-23T17:27:34.019Z
ResponseAckTimeEx=2008-07-15T19:27:44.087781Z
TLapiArrivalTimeEx=2008-07-15T19:27:44.088415Z
ReqTTLB=0
RspTTFB=576964
RspTTLB=17197
RspTTLA=260
ConnSpeed=8630119
ConnType=T1
40
IBM Tealeaf cxConnect for Data Analysis: cxConnect for Data Analysis Administration Manual
WS_Generation=576964
WS_Grade=NormalWS
WS_GradeEx=1
NT_Total=17457
NT_Grade=ExcellentNT
NT_GradeEx=0
RT_Total=594421
RT_Grade=NormalRT
RT_GradeEx=1
[urlfield]
[cookies]
TLTHID=DC459D6A5277105200D780232AB9484E
magento=furtlzy7tijjvxcn1pccoc64hs3ew5rk
frontend=j5m4cegl15ucj2rrerc4ep8u10
TLTHID=8E6A041C52741052026CF311152600F5
TLTSID=3B9E220E52741052026485ECEFD4F08A
TLTUID=3B9E220E52741052026485ECEFD4F08A
__utma=131544653.2442909905711142000.1216148505.1216148505.1216148505.1
__utmb=131544653.2.10.1216148505
__utmc=131544653
__utmz=131544653.1216148505.1.1.utmcsr=(direct)|utmccn=(direct)|utmcmd=(none)
__utmv=131544653.TLTSID/3B9E220E52741052026485ECEFD4F08A
s_cc=true
s_sq=[[B]]
TLT_NumCookies=13
[appdata]
REMOTE_ADDR=63.194.158.183
Request_Method=GET
TLT_URL=/store/index.php/foresee
TLT_SERVER=63.194.158.210
TLT_HOST_NAME=www.straussandplesser.com
TLT_APPLICATION_NAME=store
[ExtendedUserAgent]
TLT_BROWSER=IE
TLT_BROWSER_VERSION=IE7.0
TLT_BROWSER_PLATFORM=WinXP
TLT_TRAFFIC_TYPE=BROWSER
TLT_BROWSER_JAVASCRIPT=true
TLT_BROWSER_COOKIES=true
[TLFID_283]
TLFID=283
TLEventID=57
TLFactValue=EE67713899435C0572EA592C29F3EFF3
TLFactNumericValue=0.0
TLDimGroupID=1
TLDim1=TLT$NULL
TLDim2=TLT$NULL
TLDim3=TLT$NULL
TLDim4=TLT$NULL
[TLFID_284]
TLFID=284
TLEventID=57
TLFactValue=EE67713899435C0572EA592C29F3EFF3
TLFactNumericValue=0.0
TLDimGroupID=3
TLDim1=BROWSER
Chapter 3. cxConnect for Data Analysis
41
TLDim2=TLT$NULL
TLDim3=TLT$NULL
TLDim4=TLT$NULL
[TLFID_285]
TLFID=285
TLEventID=57
TLFactValue=EE67713899435C0572EA592C29F3EFF3
TLFactNumericValue=0.0
TLDimGroupID=5
TLDim1=/store/index.php/foresee
TLDim2=www.straussandplesser.com
TLDim3=store
TLDim4=63.194.158.210
[CEP]
EventBusFormat=8.0
Canister=SIERRA4
SesnIdx=943874
HitNumber=6
DateTime=1282584454
CustomVar1=63.194.158.183
DiscardedSession=false
Event Bus request variables: In the above request, the Canister inserts the [CEP]
section when the Event Bus is enabled. The [CEP] request variables are described
below:
v The fact data included in the request contains the event and dimension data
usable by the destination system.
Variable
Description
EventBusFormat
Output format of the Event Bus.
Note: The Event Bus format number is independent of the Tealeaf Release
or build number. The Event Bus version can be incremented at any time.
Canister
The name of the Canister that generated the Event Bus information
SesnIdx
The Canister session index identifier
HitNumber
The hit number for the session
DateTime
The timestamp in seconds in UNIX time (GMT, number of seconds since
1970)
CustomVarX
If one or more session attributes were specified for the session, they and
their values are listed in this section.
DiscardedSession
If this value is set to true, the session SesnIdx in Canister was marked for
discarding.
v This property is used by the IBM Tealeaf cxReveal database, which is
populated by [CEP] data to maintain session attribute and session state
information.
42
IBM Tealeaf cxConnect for Data Analysis: cxConnect for Data Analysis Administration Manual
Coral8 Server
To use the Coral8 Server with the Event Bus, you must do the following
installation and configuration steps:
1. Install the Coral8 Server product on a server. It is recommended that this
server is a different one from the Tealeaf server.
v For more information, go to http://www.aleri.com.
2. Copy the Coral8.dll from the \Coral8\Server\Sdk\Net directory on the
Coral8 server to the Tealeaf installation directory on the Tealeaf server.
3. Install the Coral8 Studio and load the Tealeaf project file. The project should
be initially installed in the Default workspace.
4. Copy the TeaLeaf.Pipeline.CEP.dll to the Tealeaf installation directory.
5. Modify the TeaLeafEventBus.cfg file. Change the [DecoupleEx]
DownStreamConfigSection to CEP.
6. In the [CEP] section, modify the URI value to the correct server address. In
most cases, you can change the value localhost to the correct server name or
IP address.
7. Modify the CEPCustomFields.cfg file, if necessary. This modification can be
done after the system is running.
8. Through TMS, enable the Event Bus in Canister configuration.
9. Use the Capture Status utility to see the status of the Event Bus.
10. Check the NT Event log for any errors.
The TeaLeaf.Pipeline.CEP.dll session agent creates the following log files:
v SA_CEP_C8_CANISTER_EVENT_YYYYMMDD.log - This log file outputs all the
connection status information. Use this file to diagnose connection problems.
v SA_CEP_C8_CANISTER_EVENT_STATS_YYYYMMDD.log - This log file only outputs
processing statistics and does not contain any error information.
Coral8 Studio should be used to view the incoming stream data.
TCP connector with delimited message
The TCP connector sends a delimited message to a receiver for each event bus hit.
The message is formatted with a delimiter and an optional end-of-record indicator.
v If the text in the message contains the delimiter, then the character is
URL-encoded in the string. For example, the comma character (,) would be
encoded as %2C.
The end-of-record indicator can be one of the following values:
v Blank - no value
v LF - line feed (\n)
v CRLF - carriage return with line feed (\r\n)
The following is an example of the configuration in the TeaLeafEventBus.cfg file:
TCP=ON
TCP_Server=localhost
TCP_Port=1971
TCP_Delim=,
# Record Terminator values (CRLF, LF, or blank)
TCP_RecTerminator=LF
Chapter 3. cxConnect for Data Analysis
43
TCP file schema
The TCP connector uses the default schema.
Log File Connector with delimited data
The Log File Connector sends a delimited message to a log file for each event bus
hit. The message is formatted with a delimiter as specified by the configuration.
v If the text in the message contains the delimiter, then the character is URL
encoded in the string. For example, the comma character (,) would be encoded
as %2C.
v The line length limit is 10,000 characters, including the delimiters.
Note: This output connector should be implemented only on a dedicated file
server with a Tealeaf pipeline. This connector allows several input sources to
write to the same log file at one time and frees up disk I/O from the main
Tealeaf system.
Below the FILE_Directory, a new directory is created for each day of data with a
directory name in YYYYMMDD format. The log file names have the following format:
TL_EB_0_YYYYMMDD_mmmm.log
Where:
v YYYY - year
v MM - month
v DD - day
v mmmm - Number of minutes past midnight for current day: 0000 - 1439
These files are structured in the following manner:
OutputType=FILE
File Delim: any character or TAB (note: not CSV compliant)
FILE_Delim=|
FILE_Directory=c:\tealeaf\logfiles
Row Time in minutes - log will be rolled every N minutes
FILE_RollTime=5
Log File schema
The Log connector uses the default schema.
44
IBM Tealeaf cxConnect for Data Analysis: cxConnect for Data Analysis Administration Manual
Chapter 4. cxConnect Schema
This section provides schema information for the flat data files that can be
exported from IBM Tealeaf cxConnect for Data Analysis and the optional
star-based relational schema included in the Data Extractor add-on.
cxConnect Data File Schema
The IBM Tealeaf cxConnect for Data Analysis data file export provides a
streamlined method of integration. IBM Tealeaf cxConnect for Data Analysis
delivers session data to a series of flat data files in text format. These flat data files
can then be bulk-loaded into the destination database of choice, using customized
versions of scripts provided by Tealeaf.
v Data files that are generated in Release 8 or later format include 8x in the
filename.
v Content in individual files can be filtered based on filters you specify in the task.
See “cxConnect configuring tasks” on page 13.
Note: For the Data File schema, all timestamps are in Greenwich Mean Time or the
local time of the IBM Tealeaf cxConnect for Data Analysis server. See “cxConnect
configuring tasks” on page 13.
To improve performance, this method uses a much more simplified schema. For
session data, IBM Tealeaf cxConnect for Data Analysis exports to seven different
data files, each file containing a flat list of records for one database table. Each of
the following session data types is exported to a separate data file.
v
v
v
v
v
v
“Session Data File”
“Hit Data File” on page 46
“Application Data File” on page 48
“Cookie Data File” on page 49
“URL Field Data File” on page 49
“Event Data File for Release 8” on page 49
v “Event Data File for Release 7.2 and earlier” on page 50
v “Dimensions Data File” on page 50
v “Session Attribute Data File” on page 51
Typically, these data files are stored in individual database tables, which enable
simple and insertion into the destination database. These flat data files can be
easily inserted into the destination database of your choice, by customizing and
using the bulk-load scripts that are provided in the following directory:
<TL_install_directory>\DataExtractor\Scripts
Session Data File
Session information is written to this file.
Table 1. Session Data File
UI Field
File Field
Session key SESSION_KEY
© Copyright IBM Corp. 1999, 2014
Description
32-character key unique to the
session
45
Table 1. Session Data File (continued)
UI Field
File Field
Description
Session
timestamp
SESSION_TIMESTAMP
Session timedate stamp
Note: If this field is included in the
Session Data file, it is written as an
extra field in each of the output files.
This timestamp provides an easy
means of clearing a external database
of all related content based on this
value.
Session ID
CANISTER_SESSION_ID
Canister Session ID
CANISTER_SERVER
Canister
server name
Canister server name
LSSN file
name
CANISTER_LSSN
Canister file where session was
extracted
Remote
address
REMOTE_ADDRESS
Remote IP address
Session
duration
SESSION_DURATION
Session duration (in seconds)
Hit count
HIT_COUNT
Number of hits in this session
HTTP user
agent
HTTP_USER_AGENT
Web browser
TLTSID
TLTSID
Tealeaf Session ID
TLTUID
TLTUID
Tealeaf User ID
TLTVID
TLTVID
Tealeaf Visitor ID
Extract ID
EXTRACTID
Identifier for the Extractor task
Tealeaf
TEALEAF_REPLAY
replay link
Replay link
Hit Data File
Note: The following items have been added since Release 7.2:
v session timestamp
v CUI Render
v CUI Dwell
Hit information is written to this file.
Table 2. Hit Data File
UI Field
File Field
Session key SESSION_KEY
32-character key unique to the
session
Hit key
HIT_KEY
32-character key unique to the hit
Hit Number
HIT_NUMBER
Sequence number of this hit within
the session
TLTHID
TLTHID
Tealeaf hit ID
HTTP status HTTP_STATUS
46
Description
HTTP Status code
IBM Tealeaf cxConnect for Data Analysis: cxConnect for Data Analysis Administration Manual
Table 2. Hit Data File (continued)
UI Field
File Field
Description
HTTP secure HTTP_SECURE
Indicates whether this was a HTTPS
hit (secure). Possible values are Y or
N.
Hit
duration
HIT_DURATION
Difference between the request and
response time for a page view or hit
(in milliseconds)
Request
method
REQ_METHOD
GET, POST, etc.
URL
URL
URL string
Referer
REFERER
Previous page
v If the hit is an
application-instrumented event,
this value is TeaEventsIIS.
Query
string
QUERY_STRING
Hit query string
Host name
HOST_NAME
Web server host
Host IP
HOST_IP
Web server host IP
Request
time
REQ_TIMESTAMP
Time Stamp of first request packet
Request end REQ_END_TIMESTAMP
time
Time Stamp of last request
packetTime Stamp of last request
packet
Response
start time
RSP_START_TIMESTAMP
Time Stamp of first response packet
Response
complete
time
RSP_TIMESTAMP
Time Stamp of last response packet
Response
ack time
RSP_ACK_TIMESTAMP
Time Stamp of last response packet
acknowledged by the browser
Request
size
REQ_SIZE
Size of the request (in bytes)
Response
size
RSP_SIZE
Size of the response (in bytes)
Request
cancel
REQ_CANCELLED
Possible values:
v N - not cancelled
v T - cancelled
v C - cancelled by client
v S - cancelled by server
TTFB
RSP_TTFB
Time to First Byte
TTLB
RSP_TTLB
Time to Last Byte
TTLA
RSP_TTLA
Time to Last ACK
Connection
Speed
CON_SPEED
Connection speed
Connection
type
CON_TYPE
Connection speed text
WS_GEN
WS_GEN
Web server generation time (in
microseconds)
Chapter 4. cxConnect Schema
47
Table 2. Hit Data File (continued)
UI Field
File Field
Description
NT_GEN
NT_GEN
Network generation time (in
microseconds)
RT_GEN
RT_GEN
Round-trip generation time (in
microseconds)
Response
type
RSP_TYPE
Tealeaf response type
Accept
language
ACCEPT_LANG
Web browser accept language
session
timestamp
SESSION_TIMESTAMP
Session timedate stamp is inserted in
the output file if the field is included
in the Session Data file.
CUI Render
PAGE_RENDER
The render time for the page, as
extracted from client user interface
events.
v Data in this field requires licensing
and implementation of IBM Tealeaf
CX UI Capture for AJAX. See "UI
Capture FAQ" in the IBM Tealeaf UI
Capture for AJAX FAQ.
CUI Dwell
PAGE_DWELL
The page dwell time, as extracted
from client user interface events.
v Data in this field requires licensing
and implementation of IBM Tealeaf
CX UI Capture for AJAX. See "UI
Capture FAQ" in the IBM Tealeaf UI
Capture for AJAX FAQ.
Application Data File
Note: The following items have been added since Release 7.2:
v session timestamp
Application data is written to this file.
Table 3. Application Data File
UI Field
48
File Field
Description
Session key SESSION_KEY
32-character key unique to the
session
Hit key
HIT_KEY
32-character key unique to the hit
Name
NAME
Application field name
Value
VALUE
Application field value
session
timestamp
SESSION_TIMESTAMP
Session timedate stamp is inserted in
the output file if the field is included
in the Session Data file.
IBM Tealeaf cxConnect for Data Analysis: cxConnect for Data Analysis Administration Manual
Cookie Data File
Note: The following items have been added since Release 7.2:
v session timestamp
Cookie information is written to this file.
Table 4. Cookie Data File
UI Field
File Field
Description
Session key SESSION_KEY
32-character key unique to the
session
Hit key
HIT_KEY
32-character key unique to the hit
Name
NAME
Cookie field name
Value
VALUE
Cookie field value
session
timestamp
SESSION_TIMESTAMP
Session timedate stamp is inserted in
the output file if the field is included
in the Session Data file.
URL Field Data File
Note: The following items have been added since Release 7.2:
v session timestamp
URL field information is written to this file.
Table 5. URL Field Data File
UI Field
File Field
Description
Session key SESSION_KEY
32-character key unique to the
session
Hit key
HIT_KEY
32-character key unique to the hit
Name
NAME
URL field name
Value
VALUE
URL field value
session
timestamp
SESSION_TIMESTAMP
Session timedate stamp is inserted in
the output file if the field is included
in the Session Data file.
Event Data File for Release 8
Event data information is written to this file for Release 8.x or later.
Note: This table is generated only when writing event data to Release 8.x format.
Event information is written to this file.
Table 6. Event Data File for Release 8
UI Field
File Field
Description
Session key SESSION_KEY
32-character key unique to the
session
Hit key
HIT_KEY
32-character key unique to the hit
Event ID
EVENT_ID
Event ID
Chapter 4. cxConnect Schema
49
Table 6. Event Data File for Release 8 (continued)
UI Field
File Field
Description
Event text
found
TEXT_FOUND
Event Text Found
session
timestamp
SESSION_TIMESTAMP
Session timedate stamp is inserted in
the output file if the field is included
in the Session Data file.
Event Data File for Release 7.2 and earlier
Event information is written to this file.
Note: This table is generated only when writing event data to Release 7.2 or earlier
format.
Table 7. Event Data File for Release 7.2 and earlier
UI Field
File Field
Description
Session key SESSION_KEY
32-character key unique to the
session
Hit key
HIT_KEY
32-character key unique to the hit
Event name
EVENT_NAME
Event Name
Event ID
UNIQUE_ID
Event ID
Category ID CATEGORY_ID
Category ID
Session
event
SESSION_EVENT
Y if this event is a session level event,
N otherwise
Group name
GROUP_NAME
Event group name
Event text
found
TEXT_FOUND
Event Text Found
Enum ID
ENUM_ID
Event enum ID
session
timestamp
SESSION_TIMESTAMP
Session timedate stamp is inserted in
the output file if the field is included
in the Session Data file.
Dimensions Data File
Data on exported dimensions is written to this file.
Note: This table is generated only when writing event data to Release 8.x format.
Dimension values must be values other than Tealeaf constant values. See "TEM
Dimensions Tab" in the IBM Tealeaf Event Manager Manual.
Table 8. Dimensions Data File
UI Field
50
File Field
Description
Session key SESSION_KEY
32-character key unique to the
session
Hit key
HIT_KEY
32-character key unique to the hit
Event ID
EVENT_ID
Event ID
Group ID
DIM_GRP_ID
Internal identifier for the report
group
IBM Tealeaf cxConnect for Data Analysis: cxConnect for Data Analysis Administration Manual
Table 8. Dimensions Data File (continued)
UI Field
File Field
Description
Fact ID
FACT_ID
Internal identifier for the recorded
instance of the event and its
dimensions
Fact Value
FACT_VALUE
Event value that is recorded with the
recorded instance of the event and its
dimensions
Dimension
#1
DIMENSION_1
Value of dimension #1, if available
Dimension
#2
DIMENSION_2
Value of dimension #2, if available
Dimension
#3
DIMENSION_3
Value of dimension #3, if available
Dimension
#4
DIMENSION_4
Value of dimension #4, if available
Dimension
#5
DIMENSION_5
Value of dimension #5, if available
Dimension
#6
DIMENSION_6
Value of dimension #6, if available
Dimension
#7
DIMENSION_7
Value of dimension #7, if available
Dimension
#8
DIMENSION_8
Value of dimension #8, if available
session
timestamp
SESSION_TIMESTAMP
Session timedate stamp is inserted in
the output file if the field is included
in the Session Data file.
Session Attribute Data File
Session Attribute data is written to this file.
Table 9. Session Attribute Data File
UI Field
File Field
Description
Session key SESSION_KEY
32-character key unique to the
session
Name
NAME
Attribute name
Value
VALUE
Attribute value
ID
ID
Attribute ID
session
timestamp
SESSION_TIMESTAMP
Session timedate stamp is inserted in
the output file if the field is included
in the Session Data file.
SQL Server 2005 requires Active Directory Delegation when
configured for NT Authentication
IBM Tealeaf cxConnect for Data Analysis requires Active Directory Delegation to
successfully import data into a remote SQL Server 2005 server when configured for
NT Authentication.
Chapter 4. cxConnect Schema
51
Requirements
v SQL Service must be running under an Active Directory account.
v SQL Service account has sufficient rights on the SQL Server (Local Admin).
v SQL Service account has rights to the remote file where IBM Tealeaf cxConnect
for Data Analysis bulk loads data files.
v User running the Tealeaf Extractor Service has rights to the remote Bulk
directory.
To configure:
1. A Service Principal Name must exist for the SQL Service user and server. To
check for an existing SPN, you must install setspn.exe#* The setspn.exe utility
is available in the Windows Resource Kit.
v For more information, please visit http://www.microsoft.com/downloads/
details.aspx?familyid=6EC50B78-8BE1-4E81-B3BE-4E7AC4F0912D
&displaylang=en.
2. When setspn.exe is installed, run the following command:
setspn \-L serviceaccount
3. The results should look like the following:
Registered ServicePrincipalNames for
CN=SQLAccount,OU=Users,OU=Vancouver,DC=domain,DC=corp:
MSSQLSvc/sqlserver.domain.corp:1433
4. If the SPN does not exist add one:
Setspn \-A MSSQLSvc/sqlserver.domain.corp:1433 Domain\SQLAccount
5. The user for the SQL Service must be allowed to delegate in the Active
Directory.
6. Select properties for the SQL Service user, and select Trust this user for
delegation to any service (Kerberos only).
Changes to the Active directory can take up to 24 hours to propagate.
Daily tasks fail to start when scheduled
IBM Tealeaf cxConnect for Data Analysis delays the start of a daily task until all
sessions to be extracted have been indexed into the Long Term Canister. IBM
Tealeaf cxConnect for Data Analysis inserts an extra time margin to ensure that
any idle sessions in the canister have expired.
Any IBM Tealeaf cxConnect for Data Analysis daily task has an end time of 24:00,
and the task cannot begin until one hour after the last session has been indexed.
This one-hour buffer ensures that all sessions marked as "closed" have had time to
be indexed. For a daily task that extracts yesterday's data (00:00 - 24:00 of the date
before today), the earliest start time is 1:00 am.
In addition to the one-hour buffer, sessions do not close until the canister session
idle time has expired. If the session idle time is set for 30 minutes, the earliest
executable start time is 1:30 am.
Suppose that the Nightly Extract is scheduled to run at 00:01 each morning. At
00:05 the Nightly Extract attempts to run and checks the session indexes.
v The last indexed session time was 23:49:50 from the previous day, so the one
hour buffer test failed and the task is scheduled to run again at 01:01.
52
IBM Tealeaf cxConnect for Data Analysis: cxConnect for Data Analysis Administration Manual
v At 00:55, the Nightly Extract attempts to schedule a run at 01:01 and checks the
session indexes. Since the last indexed session time was 23:59:43 from the
previous day, the one-hour buffer test failed at the time of the test, and the task
was scheduled to run again at 02:01.
v At 01:55 the Nightly Extract attempts to schedule a run at 02:01 and checks the
session indexes. The index test passes, and the task is scheduled and started at
02:01:01.
Note: To account for the processes of indexing sessions and canister session
timeout settings, it is recommended that any daily tasks be scheduled after 02:00:00
each night.
Chapter 4. cxConnect Schema
53
54
IBM Tealeaf cxConnect for Data Analysis: cxConnect for Data Analysis Administration Manual
Chapter 5. IBM Tealeaf documentation and help
IBM Tealeaf provides documentation and help for users, developers, and
administrators.
Viewing product documentation
All IBM Tealeaf product documentation is available at the following website:
https://tealeaf.support.ibmcloud.com/
Use the information in the following table to view the product documentation for
IBM Tealeaf:
Table 10. Getting help
To view...
Do this...
Product documentation
On the IBM Tealeaf portal, go to ? > Product
Documentation.
Help for a page on the IBM Tealeaf Portal
On the IBM Tealeaf portal, go to ? > Help
for This Page.
Help for IBM Tealeaf CX PCA
On the IBM Tealeaf CX PCA web interface,
select Guide to access the IBM Tealeaf CX
PCA Manual.
Available documents for IBM Tealeaf products
Use the following table to view a list of available documents for all IBM Tealeaf
products:
Table 11. Available documentation for IBM Tealeaf products
IBM Tealeaf products
Available documents
IBM Tealeaf CX
v IBM Tealeaf Customer Experience Overview
Guide
v IBM Tealeaf CX Client Framework Data
Integration Guide
v IBM Tealeaf CX Configuration Manual
v IBM Tealeaf CX Cookie Injector Manual
v IBM Tealeaf CX Databases Guide
v IBM Tealeaf CX Event Manager Manual
v IBM Tealeaf CX Glossary
v IBM Tealeaf CX Installation Manual
v IBM Tealeaf CX PCA Manual
v IBM Tealeaf CX PCA Release Notes
© Copyright IBM Corp. 1999, 2014
55
Table 11. Available documentation for IBM Tealeaf products (continued)
IBM Tealeaf products
Available documents
IBM Tealeaf CX
v IBM Tealeaf CX RealiTea Viewer Client Side
Capture Manual
v IBM Tealeaf CX RealiTea Viewer User
Manual
v IBM Tealeaf CX Release Notes
v IBM Tealeaf CX Release Upgrade Manual
v IBM Tealeaf CX Support Troubleshooting
FAQ
v IBM Tealeaf CX Troubleshooting Guide
v IBM Tealeaf CX UI Capture j2 Guide
v IBM Tealeaf CX UI Capture j2 Release Notes
IBM Tealeaf cxImpact
v IBM Tealeaf cxImpact Administration Manual
v IBM Tealeaf cxImpact User Manual
v IBM Tealeaf cxImpact Reporting Guide
IBM Tealeaf cxConnect
v IBM Tealeaf cxConnect for Data Analysis
Administration Manual
v IBM Tealeaf cxConnect for Voice of Customer
Administration Manual
v IBM Tealeaf cxConnect for Web Analytics
Administration Manual
IBM Tealeaf cxOverstat
IBM Tealeaf cxOverstat User Manual
IBM Tealeaf cxReveal
v IBM Tealeaf cxReveal Administration Manual
v IBM Tealeaf cxReveal API Guide
v IBM Tealeaf cxReveal User Manual
IBM Tealeaf cxVerify
IBM Tealeaf cxVerify Administration Manual
IBM Tealeaf cxView
IBM Tealeaf cxView User Manual
IBM Tealeaf CX Mobile
v IBM Tealeaf CX Mobile Android Logging
Framework Guide
v IBM Tealeaf Android Logging Framework
Release Notes
v IBM Tealeaf CX Mobile Administration
Manual
v IBM Tealeaf CX Mobile User Manual
v IBM Tealeaf CX Mobile iOS Logging
Framework Guide
v IBM Tealeaf iOS Logging Framework Release
Notes
56
IBM Tealeaf cxConnect for Data Analysis: cxConnect for Data Analysis Administration Manual
Notices
This information was developed for products and services offered in the U.S.A.
IBM may not offer the products, services, or features discussed in this document in
other countries. Consult your local IBM representative for information on the
products and services currently available in your area. Any reference to an IBM
product, program, or service is not intended to state or imply that only that IBM
product, program, or service may be used. Any functionally equivalent product,
program, or service that does not infringe any IBM intellectual property right may
be used instead. However, it is the user's responsibility to evaluate and verify the
operation of any non-IBM product, program, or service.
IBM may have patents or pending patent applications covering subject matter
described in this document. The furnishing of this document does not grant you
any license to these patents. You can send license inquiries, in writing, to:
IBM Director of Licensing
IBM Corporation
North Castle Drive
Armonk, NY 10504-1785
U.S.A.
For license inquiries regarding double-byte (DBCS) information, contact the IBM
Intellectual Property Department in your country or send inquiries, in writing, to:
Intellectual Property Licensing
Legal and Intellectual Property Law
IBM Japan, Ltd.
19-21, Nihonbashi-Hakozakicho, Chuo-ku
Tokyo 103-8510, Japan
The following paragraph does not apply to the United Kingdom or any other
country where such provisions are inconsistent with local law: INTERNATIONAL
BUSINESS MACHINES CORPORATION PROVIDES THIS PUBLICATION "AS IS"
WITHOUT WARRANTY OF ANY KIND, EITHER EXPRESS OR IMPLIED,
INCLUDING, BUT NOT LIMITED TO, THE IMPLIED WARRANTIES OF
NON-INFRINGEMENT, MERCHANTABILITY OR FITNESS FOR A PARTICULAR
PURPOSE. Some states do not allow disclaimer of express or implied warranties in
certain transactions, therefore, this statement may not apply to you.
This information could include technical inaccuracies or typographical errors.
Changes are periodically made to the information herein; these changes will be
incorporated in new editions of the publication. IBM may make improvements
and/or changes in the product(s) and/or the program(s) described in this
publication at any time without notice.
Any references in this information to non-IBM Web sites are provided for
convenience only and do not in any manner serve as an endorsement of those Web
sites. The materials at those Web sites are not part of the materials for this IBM
product and use of those Web sites is at your own risk.
© Copyright IBM Corp. 1999, 2014
57
IBM may use or distribute any of the information you supply in any way it
believes appropriate without incurring any obligation to you.
Licensees of this program who wish to have information about it for the purpose
of enabling: (i) the exchange of information between independently created
programs and other programs (including this one) and (ii) the mutual use of the
information which has been exchanged, should contact:
IBM Bay Area Lab
1001 E Hillsdale Boulevard
Foster City, California 94404
U.S.A.
Such information may be available, subject to appropriate terms and conditions,
including in some cases, payment of a fee.
The licensed program described in this document and all licensed material
available for it are provided by IBM under terms of the IBM Customer Agreement,
IBM International Program License Agreement or any equivalent agreement
between us.
Any performance data contained herein was determined in a controlled
environment. Therefore, the results obtained in other operating environments may
vary significantly. Some measurements may have been made on development-level
systems and there is no guarantee that these measurements will be the same on
generally available systems. Furthermore, some measurements may have been
estimated through extrapolation. Actual results may vary. Users of this document
should verify the applicable data for their specific environment.
Information concerning non-IBM products was obtained from the suppliers of
those products, their published announcements or other publicly available sources.
IBM has not tested those products and cannot confirm the accuracy of
performance, compatibility or any other claims related to non-IBM products.
Questions on the capabilities of non-IBM products should be addressed to the
suppliers of those products.
All statements regarding IBM's future direction or intent are subject to change or
withdrawal without notice, and represent goals and objectives only.
This information contains examples of data and reports used in daily business
operations. To illustrate them as completely as possible, the examples include the
names of individuals, companies, brands, and products. All of these names are
fictitious and any similarity to the names and addresses used by an actual business
enterprise is entirely coincidental.
COPYRIGHT LICENSE:
This information contains sample application programs in source language, which
illustrate programming techniques on various operating platforms. You may copy,
modify, and distribute these sample programs in any form without payment to
IBM, for the purposes of developing, using, marketing or distributing application
programs conforming to the application programming interface for the operating
platform for which the sample programs are written. These examples have not
been thoroughly tested under all conditions. IBM, therefore, cannot guarantee or
imply reliability, serviceability, or function of these programs. The sample
58
IBM Tealeaf cxConnect for Data Analysis: cxConnect for Data Analysis Administration Manual
programs are provided "AS IS", without warranty of any kind. IBM shall not be
liable for any damages arising out of your use of the sample programs.
Trademarks
IBM, the IBM logo, and ibm.com® are trademarks or registered trademarks of
International Business Machines Corp., registered in many jurisdictions worldwide.
Other product and service names might be trademarks of IBM or other companies.
A current list of IBM trademarks is available on the Web at “Copyright and
trademark information” at www.ibm.com/legal/copytrade.shtml.
Privacy Policy Considerations
IBM Software products, including software as a service solutions, ("Software
Offerings") may use cookies or other technologies to collect product usage
information, to help improve the end user experience, to tailor interactions with
the end user or for other purposes. A cookie is a piece of data that a web site can
send to your browser, which may then be stored on your computer as a tag that
identifies your computer. In many cases, no personal information is collected by
these cookies. If a Software Offering you are using enables you to collect personal
information through cookies and similar technologies, we inform you about the
specifics below.
Depending upon the configurations deployed, this Software Offering may use
session and persistent cookies that collect each user's user name, and other
personal information for purposes of session management, enhanced user usability,
or other usage tracking or functional purposes. These cookies can be disabled, but
disabling them will also eliminate the functionality they enable.
Various jurisdictions regulate the collection of personal information through
cookies and similar technologies. If the configurations deployed for this Software
Offering provide you as customer the ability to collect personal information from
end users via cookies and other technologies, you should seek your own legal
advice about any laws applicable to such data collection, including any
requirements for providing notice and consent where appropriate.
IBM requires that Clients (1) provide a clear and conspicuous link to Customer's
website terms of use (e.g. privacy policy) which includes a link to IBM's and
Client's data collection and use practices, (2) notify that cookies and clear gifs/web
beacons are being placed on the visitor's computer by IBM on the Client's behalf
along with an explanation of the purpose of such technology, and (3) to the extent
required by law, obtain consent from website visitors prior to the placement of
cookies and clear gifs/web beacons placed by Client or IBM on Client's behalf on
website visitor's devices
For more information about the use of various technologies, including cookies, for
these purposes, See IBM's Online Privacy Statement at: http://www.ibm.com/
privacy/details/us/en section entitled "Cookies, Web Beacons and Other
Technologies."
Notices
59
60
IBM Tealeaf cxConnect for Data Analysis: cxConnect for Data Analysis Administration Manual
Printed in USA