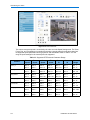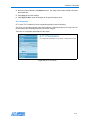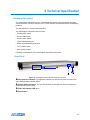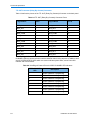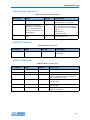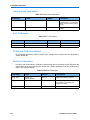
1
Installation and User Guide VideoEdge 8 Channel Encoder Version 1. Part Number 8200-2633-01-A0 Notice The information in this manual was current when published. The manufacturer reserves the right to revise and improve its products. All specifications are therefore subject to change without notice. Copyright Under copyright laws, the contents of this manual may not be copied, photocopied, reproduced, translated or reduced to any electronic medium or machine-readable form, in whole or in part, without prior written consent of Sensormatic Electronics. © Copyright 1997-2008, Sensormatic Electronics Corporation. American Dynamics 6795 Flanders Drive San Diego, CA 92121-2903 U.S.A. Disclaimer Sensormatic Electronics reserves the right to make changes in specifications at any time without notice. The information furnished by Sensormatic Electronics in this material is believed to be accurate and reliable. However, Sensormatic Electronics assumes no responsibility for its use. Trademarks Windows, the Windows logo, Windows 98/2000/Millenium/XP/Vista, and Windows NT, are either registered trademarks or trademarks of Microsoft Corporation in the United States and/or other countries. Apple, the Apple logo, and QuickTime are trademarks of Apple Computer, Inc., registered in the U.S. and other countries. Linux is a registered trademark of Linus Torvalds. Other product and company names mentioned herein may be the trademarks of their respective owners. Java is a registered trademark of Sun Microsystems, Inc. All rights reserved. Trademarked names are used throughout this manual. Rather than place a symbol at each occurrence, trademarked names are designated with initial capitalization. Inclusion or exclusion is not a judgment on the validity or legal status of the term. Customer Service Thank you for using American Dynamics products. We support our products through an extensive worldwide network of dealers. The dealer through whom you originally purchased this product is your point of contact if you need service or support. Our dealers are empowered to provide the very best in customer service and support. ii Installation and User Guide Warnings To Reduce Risk of electric shock, do not remove cover. no user serviceable parts inside. refer servicing to qualified service personnel. Do not expose this appliance to rain or moisture. Do not install this product in hazardous areas where highly combustible or explosive products are stored or used. The lightning flash/arrowhead symbol, within an equilateral triangle, alerts the user to the presence of a shock hazard within the product’s enclosure. Warning Underwriters Laboratories Inc. (“UL”) has not tested the performance or reliability of the security or signaling aspects of this product. UL has only tested for fire, shock or casualty hazards as outlined in the UL's Standard for Safety UL 60950-1. UL Certification does not cover the performance or reliability of the security or signaling aspects of this product. UL makes no representations, warranties or certifications whatsoever regarding the performance or reliability of any security or signaling related functions of this product. Note to Camera System Installer - This reminder is provided to call the camera systems installer's attention to Section 820.93 of the National Electrical Code, ANSI/NFPA 70: 2005, which provide guidelines for proper grounding and, in particular, specify that the coaxial cable shield shall be connected to the grounding system of the building, as close to the point of cable entry as practical. Warning Note to Installer - POE networks that are connected to IP Encoders should not be routed to the exterior or outside of the installed plant location. Warning This equipment has been tested and found to comply with the limits for a Class “A” digital device, pursuant to part 15 of the FCC Rules. These limits are designed to provide reasonable protection against harmful interference when the equipment is operated in a commercial environment. This equipment generates, uses and can radiate radio frequency energy and, if not installed and used in accordance with the instruction manual, may cause interference to radio communications. Operation of this equipment in a residential area is likely to cause harmful interference in which case the user will be required to correct the interference at their own expense. iii Warning Changes or modifications not expressly approved by Sensormatic Electronics the party responsible for FCC compliance, could void the user’s authority to operate the equipment. Warning This product was FCC verified under test conditions that included the use of shielded I/O cables and connectors between system components. To be in compliance with FCC regulations, the user must use shielded cables and connectors for all except power and alarm cables. Warning This class A digital apparatus complies with Canadian ICES-003. Warning Cet appareil numérique de la classe A est conforme à la norme NMB-003 du Canada. Rack Mounting Consult with the supplier of your equipment rack for adequate rack mounting means, with proper consideration for the weight of this product. Consult with the manufacturer of your rack regarding the proper hardware and procedure of mounting this product in a safe and useable fashion Avoid uneven loading or mechanical instability when rack-mounting units. Make sure that units are installed to get enough air flow for safe operation. The maximum temperature for rack-mounted units is 50° C. Avoid uneven loading or mechanical instability when rack-mounting units. Check product label for power supply requirements to assure that no overloading of supply circuits or overcurrent protection occurs. Mains grounding must be reliable and uncompromised by any connections. iv Installation and User Guide License Information READ THIS LICENSE AGREEMENT BEFORE OPENING THE DISK PACKAGE, INSTALLING THE SOFTWARE, OR USING YOUR SYSTEM. THIS LICENSE AGREEMENT DEFINES YOUR RIGHTS AND OBLIGATIONS. BY BREAKING THE SEAL ON THIS PACKAGE, INSTALLING THE SOFTWARE, OR USING YOUR SYSTEM, YOU AGREE TO ALL OF THE TERMS AND CONDITIONS OF THIS AGREEMENT. IF YOU DO NOT AGREE TO ALL OF THE TERMS AND CONDITIONS OF THIS AGREEMENT, YOU MAY, WITHIN 30 DAYS, RETURN THIS PACKAGE, ALL THE DOCUMENTATION, AND ALL ACCOMPANYING MATERIAL(S) TO THE POINT OF PURCHASE FOR A REFUND. SOFTWARE LICENSE The Software includes the computer code, programs, and files, the associated media, hardware or software keys, any printed material, and any electronic documentation. The Software may be provided to you preinstalled on a storage device (the media) as part of a system. The Software is licensed, not sold. GRANT OF LICENSE This agreement between Sensormatic Electronics Electronics Corporation (Sensormatic Electronics) and you permits you to use the Software you purchased. Once you have purchased the number of copies you require, you may use the Software and accompanying material provided you install and use no more than the licensed number of copies at one time. The Software is only licensed for use with specified Sensormatic Electronics supplied equipment. If the Software is protected by a software or hardware key or other device, the Software may be used on any computer where the key is installed. If the key locks the Software to a particular System, the Software may only be used on that System. OTHER RIGHTS AND LIMITATIONS • • A demonstration copy of the Software is considered purchased and is covered by this license agreement. You may not de-compile, disassemble, reverse engineer, copy, transfer, modify, or otherwise use the Software except as stated in this agreement. • The hardware/software key, where applicable, is your proof of license to exercise the rights granted herein and must be retained by you. Lost or stolen keys will not be replaced. • If the Software is provided as part of a System, the Software may only be used with the System. • You may not sub-license, rent or lease the Software, but you may permanently transfer the Software to another party by delivering the original disk and material comprising the Software package as well as this license agreement to the other party. Initial use of the Software and accompanying material by the new user transfers the license to the new user and constitutes the new user's acceptance of its terms and conditions. • The Software is not fault tolerant and may contain errors. You agree that the Software will not be used in an environment or application in which a malfunction of the Software would result in foreseeable risk of injury or death to the operator of the Software, or to others. • Sensormatic Electronics reserves the right to revoke this agreement if you fail to comply with the terms and conditions of this agreement. In such an event, you must destroy all copies of the Software, and all of its component parts (e.g., documentation, hardware box, software key). • The Software may contain software from third parties that is licensed under a separate End User License Agreement (EULA). Read and retain any license documentation that may be included with the Software. Compliance with the terms of any third party EULA is required as a condition of this agreement. • The Software may require registration with Sensormatic Electronics prior to use. If you do not register the Software this agreement is automatically terminated and you may not use the Software. • The Microsoft® Windows® Preinstallation Environment Version 1.2, Services Edition software, if included with this software or system, may be used for boot, diagnostic or recovery purposes only. NOTE: THIS SOFTWARE CONTAINS A SECURITY FEATURE THAT, IF USED AS AN OPERATING SYSTEM, WILL CAUSE YOUR DEVICE TO REBOOT WITHOUT PRIOR NOTIFICATION AFTER 24 HOURS OF CONTINUOUS USE OF THE SOFTWARE. • UPGRADES AND UPDATES. Software Upgrades and Updates may only be used to replace all or part of the original Software. Software Upgrades and Updates do not increase the number copies licensed to you. If the Software is an upgrade of a component of a package of Software programs that you licensed as a single product, the Software may be used and transferred only as part of that single product package and may not be separated for use on more than one computer. Software Upgrades and Updates downloaded free of charge via a Sensormatic Electronics authorized World Wide Web or FTP site may be used to upgrade multiple systems provided that you are licensed to use the original Software on those systems. • TOOLS AND UTILITIES. Software distributed via Sensormatic Electronics authorized World Wide Web or FTP site as a tool or utility may be copied and installed without limitation provided that the Software is not distributed or sold and the Software is only used for the intended purpose of the tool or utility and in conjunction with Sensormatic Electronics products. All other terms and conditions of this agreement continue to apply. Failure to comply with any of these restrictions will result in automatic termination of this license and will make available to Sensormatic Electronics other legal remedies. v COPYRIGHT Under copyright laws, the contents of this manual may not be copied, photocopied, reproduced, translated or reduced to any electronic medium or machine-readable form, in whole or in part, without prior written consent of Tyco International Ltd. © 2008 and its Respective Companies. All Rights Reserved. LIMITED WARRANTY Sensormatic Electronics warrants that the recording medium on which the Software is recorded, hardware key, and the documentation provided with it, will be free of defects in materials and workmanship under normal use for a period of ninety (90) days from the date of delivery to the first user. Sensormatic Electronics further warrants that for the same period, the software provided on the recording medium under this license will substantially perform as described in the user documentation provided with the product when used with the specified hardware. CUSTOMER REMEDIES Sensormatic Electronics's entire liability and your exclusive remedy under this warranty will be, at Sensormatic Electronics's option, to a). attempt to correct software errors with efforts we believe suitable to the problem, b). replace at no cost the recording medium, software or documentation with functional equivalents as applicable, or c). refund the license fee and terminate this agreement. Any replacement item will be warranted for the remainder of the original warranty period. No remedy is provided for failure of the Software if such failure is the result of accident, abuse, alteration or misapplication. Warranty service or assistance is provided at the original point of purchase. NO OTHER WARRANTIES The above warranty is in lieu of all other warranties, express or implied, including, but not limited to the implied warranties of merchantability and fitness for a particular purpose. No oral or written information or advice given by Sensormatic Electronics, its representatives, distributors or dealers shall create any other warranty, and you may not rely on such information or advice. NO LIABILITY FOR CONSEQUENTIAL DAMAGES In no event will Sensormatic Electronics be liable to you for damages, including any loss of profits, loss of data or other incidental or consequential damages arising out of your use of, or inability to use, the Software or its documentation. This limitation will apply even if Sensormatic Electronics or an authorized representative has been advised of the possibility of such damages. Further, Sensormatic Electronics does not warrant that the operation of the Software will be uninterrupted or error free. This limited warranty gives you specific legal rights. You may have other rights that vary from state to state. Some states do not allow the exclusion of incidental or consequential damages, or the limitation on how long an implied warranty lasts, so some of the above limitations may not apply to you. GENERAL If any provision of the agreement is found to be unlawful, void, or for any reason unenforceable, then that provision shall be severed from this agreement and shall not affect the validity and enforceability of the remaining provisions. This agreement is governed by the laws of the State of Florida. You should retain proof of the license fee paid, including model number, serial number and date of payment, and present such proof of payment when service or assistance covered by this warranty is requested. U.S. GOVERNMENT RESTRICTED RIGHTS The software and documentation are provided with RESTRICTED RIGHTS. Use, duplication, or disclosure by the Government is subject to restrictions as set forth in subparagraph (c)(1)(ii) of the Rights in Technical Data and Computer Software clause at DFARS 252.227-7013 or subparagraph (c)(1) and (2) of the Commercial Computer Software-Restricted Rights at 48 CFR 52.227-19, as applicable. Manufacturer is Sensormatic Electronics Electronics Corporation, 6600 Congress Avenue, Boca Raton, FL, 33487. vi Installation and User Guide Table of Contents 1 Introduction Overview . . . . . . . . . . . . . . . . . . . . . . . . . . . . . . . . . . . . . . . . . . . . . . . . . . . . . . . . . . . . . System Configuration . . . . . . . . . . . . . . . . . . . . . . . . . . . . . . . . . . . . . . . . . . . . . . . . . . . . Features . . . . . . . . . . . . . . . . . . . . . . . . . . . . . . . . . . . . . . . . . . . . . . . . . . . . . . . . . . . . . . Connections . . . . . . . . . . . . . . . . . . . . . . . . . . . . . . . . . . . . . . . . . . . . . . . . . . . . . . . . . Frame Rate Performance . . . . . . . . . . . . . . . . . . . . . . . . . . . . . . . . . . . . . . . . . . . . . . . Resolutions . . . . . . . . . . . . . . . . . . . . . . . . . . . . . . . . . . . . . . . . . . . . . . . . . . . . . . . . . . Advanced Features . . . . . . . . . . . . . . . . . . . . . . . . . . . . . . . . . . . . . . . . . . . . . . . . . . . . . Application Overview . . . . . . . . . . . . . . . . . . . . . . . . . . . . . . . . . . . . . . . . . . . . . . . . . . . . Video Streaming . . . . . . . . . . . . . . . . . . . . . . . . . . . . . . . . . . . . . . . . . . . . . . . . . . . . . Web Configuration . . . . . . . . . . . . . . . . . . . . . . . . . . . . . . . . . . . . . . . . . . . . . . . . . . . . 1-1 1-1 1-2 1-2 1-2 1-2 1-3 1-3 1-3 1-3 2 Software - Getting Started Web Interface Software . . . . . . . . . . . . . . . . . . . . . . . . . . . . . . . . . . . . . . . . . . . . . . . . . . System Requirements. . . . . . . . . . . . . . . . . . . . . . . . . . . . . . . . . . . . . . . . . . . . . . . . . . Logging in to the IP Encoder . . . . . . . . . . . . . . . . . . . . . . . . . . . . . . . . . . . . . . . . . . . . . . Password Protected Options . . . . . . . . . . . . . . . . . . . . . . . . . . . . . . . . . . . . . . . . . . . . 2-1 2-1 2-1 2-4 3 Monitoring Live Video Live Video. . . . . . . . . . . . . . . . . . . . . . . . . . . . . . . . . . . . . . . . . . . . . . . . . . . . . . . . . . . . . 3-1 Configuring Alarms and Contact Closures . . . . . . . . . . . . . . . . . . . . . . . . . . . . . . . . . . . . 3-2 Controlling a Pan Tilt Zoom (PTZ) Camera . . . . . . . . . . . . . . . . . . . . . . . . . . . . . . . . . . . 3-3 Configuring a PTZ Camera . . . . . . . . . . . . . . . . . . . . . . . . . . . . . . . . . . . . . . . . . . . . . . 3-3 Controlling the Pan and Tilt Movement of a PTZ Camera . . . . . . . . . . . . . . . . . . . . . . 3-7 Panning a PTZ Camera . . . . . . . . . . . . . . . . . . . . . . . . . . . . . . . . . . . . . . . . . . . . . . . 3-11 Zoom, Focus and Iris Control of a PTZ Camera . . . . . . . . . . . . . . . . . . . . . . . . . . . . . 3-12 PTZ Camera Preset . . . . . . . . . . . . . . . . . . . . . . . . . . . . . . . . . . . . . . . . . . . . . . . . . . 3-16 PTZ Camera Pattern . . . . . . . . . . . . . . . . . . . . . . . . . . . . . . . . . . . . . . . . . . . . . . . . . 3-17 Configuring the Camera from within the Camera’s User Interface . . . . . . . . . . . . . . . 3-18 4 Software Configuration Configuring the Video. . . . . . . . . . . . . . . . . . . . . . . . . . . . . . . . . . . . . . . . . . . . . . . . . . . . 4-1 Analog Video Settings. . . . . . . . . . . . . . . . . . . . . . . . . . . . . . . . . . . . . . . . . . . . . . . . . . 4-2 Video Encoding General Parameters . . . . . . . . . . . . . . . . . . . . . . . . . . . . . . . . . . . . . . 4-3 MPEG-4 Video Codec Settings. . . . . . . . . . . . . . . . . . . . . . . . . . . . . . . . . . . . . . . . . . . 4-6 MJPEG Video Codec Settings . . . . . . . . . . . . . . . . . . . . . . . . . . . . . . . . . . . . . . . . . . . 4-9 Configuring the Audio . . . . . . . . . . . . . . . . . . . . . . . . . . . . . . . . . . . . . . . . . . . . . . . . . . 4-10 Analog Audio Settings. . . . . . . . . . . . . . . . . . . . . . . . . . . . . . . . . . . . . . . . . . . . . . . . . 4-10 vii Table of Contents Audio Encoding. . . . . . . . . . . . . . . . . . . . . . . . . . . . . . . . . . . . . . . . . . . . . . . . . . . . . . Setting Streaming Parameters . . . . . . . . . . . . . . . . . . . . . . . . . . . . . . . . . . . . . . . . . . . . General Streaming Parameters . . . . . . . . . . . . . . . . . . . . . . . . . . . . . . . . . . . . . . . . . Opening Video Streams . . . . . . . . . . . . . . . . . . . . . . . . . . . . . . . . . . . . . . . . . . . . . . . Viewing Running Streams information . . . . . . . . . . . . . . . . . . . . . . . . . . . . . . . . . . . . 4-11 4-14 4-14 4-15 4-17 5 Managing System Settings Network Settings . . . . . . . . . . . . . . . . . . . . . . . . . . . . . . . . . . . . . . . . . . . . . . . . . . . . . . . 5-1 Using the IP Encoder 8-Channel Discovery Tool . . . . . . . . . . . . . . . . . . . . . . . . . . . . . . . 5-3 Changing the IP Address . . . . . . . . . . . . . . . . . . . . . . . . . . . . . . . . . . . . . . . . . . . . . . . 5-4 Changing the User Password. . . . . . . . . . . . . . . . . . . . . . . . . . . . . . . . . . . . . . . . . . . . . . 5-8 Setting up the Clock . . . . . . . . . . . . . . . . . . . . . . . . . . . . . . . . . . . . . . . . . . . . . . . . . . . . . 5-8 Updating the Firmware . . . . . . . . . . . . . . . . . . . . . . . . . . . . . . . . . . . . . . . . . . . . . . . . . . 5-10 System Administration . . . . . . . . . . . . . . . . . . . . . . . . . . . . . . . . . . . . . . . . . . . . . . . . . . 5-11 Resetting the User Password . . . . . . . . . . . . . . . . . . . . . . . . . . . . . . . . . . . . . . . . . . . 5-12 Change System Administrator Password . . . . . . . . . . . . . . . . . . . . . . . . . . . . . . . . . . 5-13 Loading Factory Defaults . . . . . . . . . . . . . . . . . . . . . . . . . . . . . . . . . . . . . . . . . . . . . . 5-13 Changing the Web Interface Language . . . . . . . . . . . . . . . . . . . . . . . . . . . . . . . . . . . 5-16 Reset . . . . . . . . . . . . . . . . . . . . . . . . . . . . . . . . . . . . . . . . . . . . . . . . . . . . . . . . . . . . . . . 5-17 6 Technical Specification Hardware Description. . . . . . . . . . . . . . . . . . . . . . . . . . . . . . . . . . . . . . . . . . . . . . . . . . . . Front Panel . . . . . . . . . . . . . . . . . . . . . . . . . . . . . . . . . . . . . . . . . . . . . . . . . . . . . . . . . . Rear Panel . . . . . . . . . . . . . . . . . . . . . . . . . . . . . . . . . . . . . . . . . . . . . . . . . . . . . . . . . . Hardware Installation . . . . . . . . . . . . . . . . . . . . . . . . . . . . . . . . . . . . . . . . . . . . . . . . . . . . Rear Panel Audio/Video Connectors . . . . . . . . . . . . . . . . . . . . . . . . . . . . . . . . . . . . . . Rear Panel RS232, USB, and Ethernet Connectors. . . . . . . . . . . . . . . . . . . . . . . . . . . Rear Panel Terminal Block Connectors . . . . . . . . . . . . . . . . . . . . . . . . . . . . . . . . . . . . Technical Specification. . . . . . . . . . . . . . . . . . . . . . . . . . . . . . . . . . . . . . . . . . . . . . . . . . . Certifications and Regulations . . . . . . . . . . . . . . . . . . . . . . . . . . . . . . . . . . . . . . . . . . . . . Rackmount Diagram. . . . . . . . . . . . . . . . . . . . . . . . . . . . . . . . . . . . . . . . . . . . . . . . . . . . . 6-1 6-1 6-2 6-3 6-4 6-4 6-5 6-7 6-8 6-9 7 Network Installation 8 RTP/RTSP Video Node RTSP URI Format . . . . . . . . . . . . . . . . . . . . . . . . . . . . . . . . . . . . . . . . . . . . . . . . . . . . . . General Structure . . . . . . . . . . . . . . . . . . . . . . . . . . . . . . . . . . . . . . . . . . . . . . . . . . . . . General Video Parameters. . . . . . . . . . . . . . . . . . . . . . . . . . . . . . . . . . . . . . . . . . . . . . . . MJPEGs Parameter . . . . . . . . . . . . . . . . . . . . . . . . . . . . . . . . . . . . . . . . . . . . . . . . . . . . . MPEG4 Parameters . . . . . . . . . . . . . . . . . . . . . . . . . . . . . . . . . . . . . . . . . . . . . . . . . . . . . General Audio Parameters. . . . . . . . . . . . . . . . . . . . . . . . . . . . . . . . . . . . . . . . . . . . . . . . viii 8-2 8-2 8-3 8-3 8-3 8-4 Installation and User Guide Table of Contents AAC Parameters . . . . . . . . . . . . . . . . . . . . . . . . . . . . . . . . . . . . . . . . . . . . . . . . . . . . . . . PCMA and PCMU Parameters. . . . . . . . . . . . . . . . . . . . . . . . . . . . . . . . . . . . . . . . . . . . . Multicast Parameters . . . . . . . . . . . . . . . . . . . . . . . . . . . . . . . . . . . . . . . . . . . . . . . . . . . . Example URIs . . . . . . . . . . . . . . . . . . . . . . . . . . . . . . . . . . . . . . . . . . . . . . . . . . . . . . . . . Example 1 . . . . . . . . . . . . . . . . . . . . . . . . . . . . . . . . . . . . . . . . . . . . . . . . . . . . . . . . . . . Example 2 . . . . . . . . . . . . . . . . . . . . . . . . . . . . . . . . . . . . . . . . . . . . . . . . . . . . . . . . . . . Example 3 . . . . . . . . . . . . . . . . . . . . . . . . . . . . . . . . . . . . . . . . . . . . . . . . . . . . . . . . . . . Example 4 . . . . . . . . . . . . . . . . . . . . . . . . . . . . . . . . . . . . . . . . . . . . . . . . . . . . . . . . . . . 8-4 8-4 8-4 8-5 8-5 8-5 8-5 8-5 9 Index ix List of Figures Figure 1-1 VideoEdge 8 Channel Encoder in System Installation ..............................................1-1 Figure 2-1 General Sub-menus ...................................................................................................2-1 Figure 2-2 Web Interface .............................................................................................................2-2 Figure 2-3 Identify board .............................................................................................................2-2 Figure 2-4 Enter Password ..........................................................................................................2-4 Figure 2-5 Security Warning ........................................................................................................2-4 Figure 3-1 Live Video Pane .........................................................................................................3-1 Figure 3-2 Alarms and Contact Closures Pane ..........................................................................3-2 Figure 3-3 Setting the Dry Contact Outputs ................................................................................3-2 Figure 3-4 PTZ Commands Page ................................................................................................3-3 Figure 3-5 PTZ Configuration Page .............................................................................................3-4 Figure 3-6 Select Channel ..........................................................................................................3-4 Figure 3-7 Select Camera Protocol .............................................................................................3-5 Figure 3-8 Connection Type ........................................................................................................3-5 Figure 3-9 Select the Baud Rate .................................................................................................3-6 Figure 3-10 Select Full or Half Duplex Mode ...............................................................................3-6 Figure 3-11 Select Bit Count .......................................................................................................3-6 Figure 3-12 Select Stop Bits ........................................................................................................3-7 Figure 3-13 Select Parity .............................................................................................................3-7 Figure 3-14 PTZ Commands ......................................................................................................3-8 Figure 3-15 Select Channel ........................................................................................................3-9 Figure 3-16 Speed Settings .........................................................................................................3-9 Figure 3-17 Arrow Keys and Symbols for Pan and Tilt Control ...................................................3-9 Figure 3-18 PTZ Camera at 0° ..................................................................................................3-11 Figure 3-19 PTZ Camera at 15° ................................................................................................3-11 Figure 3-20 PTZ Camera at 40° ................................................................................................3-12 Figure 3-21 Zoom Area .............................................................................................................3-13 Figure 3-22 Focus Area .............................................................................................................3-13 Figure 3-23 Iris Area ..................................................................................................................3-13 Figure 3-24 PTZ Display ............................................................................................................3-14 Figure 3-25 Zooming In on Parked Car – 12.0 ..........................................................................3-14 Figure 3-26 Zooming In on Parked Car – 30.0 ..........................................................................3-15 Figure 3-27 Out of Focus ...........................................................................................................3-15 Figure 3-28 In Focus .................................................................................................................3-16 Figure 3-29 Preset Area ............................................................................................................3-16 Figure 3-30 Pattern Area ...........................................................................................................3-17 Figure 3-31 Configuration Menu Symbols .................................................................................3-18 Figure 4-1 Video Menu ................................................................................................................4-1 Figure 4-2 Analog Video Settings ................................................................................................4-2 Figure 4-3 Select Channel Number .............................................................................................4-2 Figure 4-4 Video Standard Selection ...........................................................................................4-3 Figure 4-5 Video Streaming General Parameters .......................................................................4-4 Figure 4-6 Video Streaming Channel Select ...............................................................................4-4 Figure 4-7 Adjusting the Image Size ...........................................................................................4-5 Figure 4-8 Frame Rate Settings ..................................................................................................4-5 Figure 4-9 MPEG-4 Parameters ..................................................................................................4-7 Figure 4-10 MPEG-4 Parameters Channel Select ......................................................................4-7 Figure 4-11 Select Rate Control Mode ........................................................................................4-8 Figure 4-12 MJPEG Settings .......................................................................................................4-9 Figure 4-13 MJPEG Channel Select ...........................................................................................4-9 x List of Figures Figure 4-14 Audio Menu ............................................................................................................4-10 Figure 4-15 Analog Audio Settings ............................................................................................4-10 Figure 4-16 Analog Audio Channel Number ..............................................................................4-11 Figure 4-17 Analog Audio Gain Setting .....................................................................................4-11 Figure 4-18 AAC Parameter Selection ......................................................................................4-12 Figure 4-19 AAC Channel Select ..............................................................................................4-12 Figure 4-20 AAC Sample rate ...................................................................................................4-12 Figure 4-21 G.711 Parameters ..................................................................................................4-13 Figure 4-22 General – Streaming Parameters ..........................................................................4-14 Figure 4-23 QuickTime Window ................................................................................................4-15 Figure 4-24 Insert URI ...............................................................................................................4-15 Figure 4-25 QuickTime Player ...................................................................................................4-16 Figure 4-26 No Active Streams .................................................................................................4-17 Figure 4-27 Active Streams .......................................................................................................4-17 Figure 4-28 Audio and Video Running Streams ........................................................................4-17 Figure 4-29 Multicast Stream ....................................................................................................4-18 Figure 4-30 Displaying the Video Stream in the Running Streams Menu .................................4-18 Figure 5-1 System Menu .............................................................................................................5-1 Figure 5-2 Network Settings Pane ...............................................................................................5-2 Figure 5-3 IP Encoder 8-Channel Discovery Tool .......................................................................5-3 Figure 5-4 Insert User Password .................................................................................................5-4 Figure 5-5 Network Settings Setup ..............................................................................................5-4 Figure 5-6 New IP Address .........................................................................................................5-5 Figure 5-7 Reset Prompt .............................................................................................................5-5 Figure 5-8 System Reset .............................................................................................................5-5 Figure 5-9 Ping the Video Edge 8 Channel Encoder Board with new IP Address ......................5-6 Figure 5-10 IP Encoder 8-Channel Discovery Tool with New IP Address ...................................5-7 Figure 5-11 Change User Password Pane ..................................................................................5-8 Figure 5-12 Change Clock Setup ................................................................................................5-9 Figure 5-13 Clock Setup Change Saved ...................................................................................5-10 Figure 5-14 Flash Update Pane ................................................................................................5-10 Figure 5-15 Firmware Upgrade Process ...................................................................................5-11 Figure 5-16 System Administration Header ...............................................................................5-12 Figure 5-17 Authentication Required .........................................................................................5-12 Figure 5-18 Reset the User Password ......................................................................................5-12 Figure 5-19 Change System Administration Password .............................................................5-13 Figure 5-20 Reset to factory Defaults ........................................................................................5-15 Figure 5-21 Restoring Factory Defaults .....................................................................................5-15 Figure 5-22 Web Interface Language Pane ..............................................................................5-16 Figure 5-23 Select Language ....................................................................................................5-16 Figure 5-24 Reset Prompt .........................................................................................................5-17 Figure 5-25 System Reset .........................................................................................................5-17 Figure 6-1 VideoEdge 8 Channel Encoder Chassis Front Panel ................................................6-1 Figure 6-2 VideoEdge 8 Channel Encoder Chassis Rear Panel .................................................6-2 Figure 6-3 VideoEdge 8 Channel Encoder Rear Panel Connectors ...........................................6-3 Figure 6-4 Audio and Video Connections ....................................................................................6-4 Figure 6-5 RS232, USB, and Ethernet Connections ...................................................................6-4 Figure 6-6 Ethernet, TTL (Relay) Out, TTL (Alarm) In, and Power Connections ........................6-5 Figure 6-7 Rackmount Diagram ..................................................................................................6-9 Figure 7-1 Local Area Network Setup .........................................................................................7-2 Figure 7-2 TCP/IP Properties ......................................................................................................7-2 Figure 7-3 IP Address ..................................................................................................................7-3 Figure 7-4 Accessing the Board ..................................................................................................7-3 Figure 8-1 QuickTime Open URI .................................................................................................8-1 xi Installation and User Guide List of Figures Figure 8-2 URI Input Dialog .........................................................................................................8-1 xii List of Tables Table 1-1 Resolutions .....................................................................................................1-2 Table 2-1 Menu Options .................................................................................................2-3 Table 3-1 Supported PTZ Protocols Parameter Range .................................................3-8 Table 3-2 PTZ Movement Control ................................................................................3-10 Table 3-3 Zoom Focus and Iris Symbols ......................................................................3-12 Table 3-4 Preset Symbols ...........................................................................................3-16 Table 3-5 Pattern Symbols ..........................................................................................3-17 Table 3-6 Menu Symbols ..............................................................................................3-18 Table 4-1 Video Formats and Resolutions .....................................................................4-3 Table 5-1 Factory Default Settings ...............................................................................5-14 Table 6-1 RS232 Connector Pinout ................................................................................6-5 Table 6-2 TTL Alarm Input and RS485/422 Connector Pinout .......................................6-5 Table 6-3 TTL OUT (Relay Dry Contacts) Connector Pinout .........................................6-6 Table 6-4 VideoEdge 8 Channel Encoder VIDEO CHANNEL LED Indicators ...............6-6 Table 6-5 System LED Indicators ...................................................................................6-7 Table 6-6 VideoEdge 8 Channel Encoder Technical Specifications ..............................6-7 Table 6-7 Certifications and Regulations ........................................................................6-8 Table 8-1 General Video Parameters .............................................................................8-3 Table 8-2 MJPEG Parameter .........................................................................................8-3 Table 8-3 MPEG-4 Parameters ......................................................................................8-3 Table 8-4 General Audio Parameters .............................................................................8-4 Table 8-5 AAC Parameters ............................................................................................8-4 Table 8-6 Multicast Parameters ......................................................................................8-4 xiii List of Procedures Procedure 2-1 Logging in to the IP Encoder: .................................................................2-1 Procedure 2-2 To access password-protected options: .................................................2-4 Procedure 3-1 To display live video: ..............................................................................3-1 Procedure 3-2 To set dry contact outputs: .....................................................................3-2 Procedure 3-3 To configure the PTZ camera: ................................................................3-3 Procedure 3-4 To set the camera movement speed: .....................................................3-9 Procedure 3-5 To move a PTZ camera: .........................................................................3-9 Procedure 3-6 To define a preset: ................................................................................3-17 Procedure 3-7 To delete a preset: ................................................................................3-17 Procedure 3-8 To define a pattern: ...............................................................................3-18 Procedure 4-1 To configure analog video settings: ........................................................4-2 Procedure 4-2 To set the video streaming general parameters: ....................................4-4 Procedure 4-3 To set the MPEG-4 Video Codec: ..........................................................4-7 Procedure 4-4 To set the MJPEG parameters: ..............................................................4-9 Procedure 4-5 To set the Analog Audio Settings: ........................................................4-10 Procedure 4-6 To set the AAC parameters: .................................................................4-11 Procedure 4-7 To set general streaming parameters: ..................................................4-14 Procedure 4-8 To open a stream in QuickTime: ...........................................................4-15 Procedure 4-9 To display Running Streams information: .............................................4-17 Procedure 4-10 To display a multicast stream: ............................................................4-18 Procedure 5-1 To set up network parameters: ...............................................................5-2 Procedure 5-2 To change the IP address of the board: .................................................5-4 Procedure 5-3 To ping the board: ...................................................................................5-6 Procedure 5-4 To run the IP Encoder 8-Channel Discovery Tool: .................................5-6 Procedure 5-5 To change the user password: ...............................................................5-8 Procedure 5-6 To set up the clock: .................................................................................5-9 Procedure 5-7 To update the firmware: ........................................................................5-10 Procedure 5-8 To change the system administrator’s password: .................................5-13 Procedure 5-9 To return to factory defaults: .................................................................5-15 Procedure 5-10 To change the Web Interface language: .............................................5-16 Procedure 5-11 To reset the board: .............................................................................5-17 Procedure 6-1 To connect the cables: ............................................................................6-3 Procedure 7-1 To set up the PC to board direct network connection: ............................7-1 Procedure 8-1 To open an RTP/RTSP video node: .......................................................8-1 xiv 1 Introduction Overview The VideoEdge 8 Channel Encoder is an IP video streamer with an easy-to-use Web server that incorporates MPEG-4 and M-JPEG video streaming from eight analog video sources. The IP video streamer is a multimedia server supplying compressed video over a TCP/IP network via standard RTP/RTSP streaming protocols. The software is meant to run on the fully featured VideoEdge 8 Channel Encoder. Access to the Web server is through a standard browser. System Configuration Figure 1-1 VideoEdge 8 Channel Encoder in System Installation Figure 1-1 shows an example of a system configuration where the IP Encoder is connected directly to analog camera sources and the network. 1-1 1 Introduction Features The key features of the VideoEdge 8 Channel Encoder are: • Video streaming over the IP network • 8 analog video input sources • Serial Ports for controlling PTZ cameras • TTL Alarm inputs and Relay outputs • Gigabit Ethernet for video streaming and board control • UDP, HTTP, TCP/IP, RTP/RTSP, SNTP, DHCP • MPEG-4 and MJPEG up to D1 Connections The VideoEdge 8 Channel Encoder has the following physical connections: • 8 composite BNC 75 ohm connectors – for connecting to analog cameras • 1 DB9 RS232 serial port via 9 Pin D-Type and 1 RS422/485 via Terminal Block for PTZ camera control • 16 TTL alarm inputs & 8 relay outputs (up to 1 Amp @ 30 VDC load) via terminal block • 8 Audio Mono Line/Microphone inputs via 4 3.5 mm stereo audio jacks • 8 Mono Line outputs via 4 3.5 mm stereo audio jacks • 12V DC power input via 2-pin terminal block • 1 RJ45 10/100/1000 Ethernet network connection Frame Rate Performance Dual Streaming: • 8 channels of D1@25/30 fps and 8 channels of CIF@25/30 fps – PAL and NTSC OR • 8 channels of D1@25/30 fps and 8 channels of [email protected]/15 fps – PAL and NTSC Resolutions Table 1-1 Resolutions NTSC 1-2 PAL D1 720x480 pixels 720x576 pixels 4CIF 704x480 pixels 704x576 pixels 2CIF 352x480 pixels 352x576 pixels HALFD1 360x480 pixels 360x576 pixels CIF 352x240 pixels 352x288 pixels QCIF 176x112 pixels 176x144 pixels Installation and User Guide 1 Introduction Advanced Features • PTZ camera control using serial ports with the following supported protocols: • Pelco P • Pelco D • AD RS422 • BBV StarCard • CyberScan 1 • Philips TC7560 • AD RS422 Dome Application Overview The following sections give a short description of the software features. Video Streaming The unit can stream out video and audio via the standard RTP/RTSP protocol, using UDP in unicast or multicast mode. Video and audio may be presented using a standard player such as Apple QuickTime, VLC, or any other standard video player that has RTSP and MPEG-4/MJPEG decoding abilities. The user can control all stream parameters using a URI supplied to the standard player. The unit will use the default parameters for those parameters that were not supplied to the standard player in the URI. The default parameters can be modified through the unit's Web-based menu. Web Configuration The software can be configured using the Web interface. Note Refer to Chapter 4 Software Configuration for more information. 1-3 2 Software - Getting Started Web Interface Software This section describes how to login to the VideoEdge 8 Channel Encoder Software using the Web interface. To access the Web configuration open a Web browser. The following web browsers are supported: • Microsoft Internet Explorer version 6.0 and later • Mozilla Firefox System Requirements • PC running Windows 2000, Windows XP or Windows Vista • Network access • Internet Web browser Microsoft Internet Explorer (version 6.0 or later), or Mozilla Firefox • Java Software: download the latest version from http://www.java.com/en/download/index.jsp Logging in to the IP Encoder When the web pane is first entered Figure 2-2 is displayed. This is the About sub menu of the General menu. The General menu and its sub levels are shown below. Figure 2-1 General Sub-menus The About pane displays system information about the application such as the board type, MAC Address, Time, System and Application Uptime, Link Status, and CPU Load. In addition, the page displays version information of the Application, Linux Kernel, Boot Loader, and File System. Procedure 2-1 Logging in to the IP Encoder: 1 Open a web browser and enter the unit's IP address in the address bar. For example, enter the following IP address: http://192.168.0.62. This is the default address of the IP Encoder Login Pane. 2-1 2 Software - Getting Started The following screen appears in the browser window (some of the system and version information may vary): Figure 2-2 Web Interface You can click Identify Board to identify the unit in a rack. This causes four LEDs on the front panel of the unit to blink indicating the selected unit. A pop-up window appears as shown below. Figure 2-3 Identify board Click OK. The LEDs will continue to flash for 10 seconds. The left pane of the browser window contains a menu listing available options. When a menu is selected its sub-menus appear (some sub-menus contain a selection of options). The right pane contains the work area for the currently selected option. The following table details all the menu and sub-menu items of the VideoEdge 8 Channel Encoder Web Interface and their functions. Note You can leave the IP Address at the factory installed address of 192.168.0.62, or change to an address of your choice (see Changing the IP Address in Chapter 5). 2-2 Installation and User Guide 2 Software - Getting Started Table 2-1 Menu Options Menu Option Description General About Displays general information about the application Live Video Displays live video feed from all cameras PTZ Allows controlling of a Pan Tilt Zoom (PTZ) camera Alarm & Contact Closure Enables setting (1 or 0) Relay Output; Reading input status Video Analog Video Enables setting analog video settings Video Encoding Sub-menu: General Enables setting video encoding general parameters Sub-menu: MPEG-4 Enables setting MPEG-4 parameters Sub-menu: MJPEG Enables setting MJPEG parameters Audio Analog Audio Enables setting analog audio parameters Audio Encoding Sub-menu: AAC Enables setting AAC parameters. Sub-menu: G.711 Displays G.11 parameters (no configurable parameters) Streaming General Enables setting general streaming parameters Running Streams Displays running streams information System Network Settings Enables setting network parameters (Host name, IP Address, etc.) Change Password Enables changing user password Clock Setup Enables setting the real time clock Firmware Upgrade Enables updating the firmware System Administration Sub-menu: Reset User Password Resets user password Sub-menu: Change System Administrator Password Enables changing system administrator password. Sub-menu: Reset to Factory Defaults Resets all parameters to factory defaults Sub-menu: Change Web Interface Language Select Web Interface Language Reset Resets the board. 2-3 2 Software - Getting Started Password Protected Options Most menu options require a user/password combination to access them. When an option is password-protected the Authentication Required window appears. Procedure 2-2 To access password-protected options: 1 Type your user name and password in the Authentication Required window. Note By default, the User Name is user, and the default Password is user617. Figure 2-4 Enter Password 2 Click OK. 3 A security warning may pop up to verify the applications digital signature. Figure 2-5 Security Warning 4 Click Run. 2-4 Installation and User Guide 3 Monitoring Live Video The software enables you to view a live video feed from the cameras connected to the video server through the Live Video pane. In addition it is possible to monitor video using a media player such as QuickTime (see Opening Video Streams on page 4-15). The software also enables controlling PTZ cameras, configuring Relay outputs, and monitoring TTL alarm inputs. Live Video The Live Video pane enables you to view a live video feed from the cameras connected to the video server. This pane displays the video image of each of the eight video channels. The video sources of the video server are displayed on the Live View pane at 1/4 resolution at 1/3 of the frame rate. Thus, if you are running NTSC, the Live View pane will display the data at 10 frames per second. Figure 3-1 Live Video Pane Procedure 3-1 To display live video: 1 Select the General menu in the left pane, then in the left pane, select Live Video. The right-pane displays the live video of the eight channels. Note Java must be installed in order to run the Graphical User interface (GUI). 3-1 3 Monitoring Live Video Configuring Alarms and Contact Closures The Alarms & Contact Closures pane enables you to view the status of the TTL alarm inputs and set the dry contact outputs. There are 16 alarm inputs and eight dry contact outputs. The inputs are status bits and are read only. The dry contact outputs can be set to Normally Open (1) or Normally Closed (0). Figure 3-2 Alarms and Contact Closures Pane Procedure 3-2 To set dry contact outputs: 1 Select the General menu in the left pane, then in the left pane, select Alarms & Contact Closures. 2 Select 0 or 1 from the drop-down menus in the right pane within in the Contact Closures section. Figure 3-3 Setting the Dry Contact Outputs 3 Click Set TTLs. 3-2 Installation and User Guide 3 Monitoring Live Video Controlling a Pan Tilt Zoom (PTZ) Camera The Web interface enables controling the Pan and Tilt movement of a PTZ camera as well as the zoom, focus, and iris operations. Each of the eight analog video inputs may be connected to a PTZ camera and configured from a choice of seven camera protocols. The following procedures outline how to configure the PTZ camera and how to control its movement. The figure below displays the PTZ control interface. Configuring a PTZ Camera Procedure 3-3 To configure the PTZ camera: 1 Select the General menu in the left pane, then in the left pane, select PTZ Control. The right pane displays the PTZ commands work area. Figure 3-4 PTZ Commands Page 3-3 3 Monitoring Live Video 2 Select the Configuration tab to display the Configurations page. Figure 3-5 PTZ Configuration Page 3 Select the relevant video input channel from the Channel drop-down list. Figure 3-6 Select Channel 3-4 Installation and User Guide 3 Monitoring Live Video 4 Select a camera protocol from the Protocol drop-down list. The choices of protocols are Pelco_P, Pelco_D, AD_RS422, BBV_Star_Card, CyberScan1, Phillips_TC7560, and RS_422_Dome. Figure 3-7 Select Camera Protocol 5 Select the address which is the ID of the selected camera from the Address drop-down list. The ranges vary for each protocol. Refer to Table 3-1, “ Supported PTZ Protocols Parameter Range,” . 6 Choose 232 for RS-232, 222/485 for RS422/485 from the Connection drop-down list. The RS232 and RS422/485 are separate physical ports and have separate connectors. Figure 3-8 Connection Type 3-5 3 Monitoring Live Video 7 Select the baud rate from the Baud Rate drop-down list. Figure 3-9 Select the Baud Rate 8 Select full for full duplex mode or half for half duplex mode from the Duplex drop-down list. Figure 3-10 Select Full or Half Duplex Mode 9 Select 7 or 8 bits from the Bit Count drop-down list. Figure 3-11 Select Bit Count 3-6 Installation and User Guide 3 Monitoring Live Video 10 Select 1 or 2 stop bits from the Stop Bit drop-down list. Figure 3-12 Select Stop Bits 11 Select none, odd, or even parity from the Parity drop-down list. Figure 3-13 Select Parity 12 Click Apply to save the settings 13 Click Apply To All to save the changes to all eight channels at once 14 Select the Commands tab to return to the PTZ Control command display. Controlling the Pan and Tilt Movement of a PTZ Camera Controlling the pan and tilt movement of a PTZ Camera is done by using the keyboard arrow keys or by selecting the appropriate symbol on the graphical user interface. When a key is pressed, the camera moves in the direction of the pressed key. The possible directions are tiltUp, tiltDown, panLeft, panRight, PTLeftUp, PTRightUp, PTLeftDown, and PTRightDown. Note During normal keyboard use, the NumLock key is not activated, which means that the direction arrows on the numeric keypad keys are operational. 3-7 3 Monitoring Live Video Figure 3-14 PTZ Commands The camera movement speed is controlled by the value set in the Speed Settings area. The Zoom, Focus, Pan, and Tilt speeds are controlled by selecting a speed setting from the drop-down lists. Unsupported speed parameters will be grayed out and unavailable. Refer to Table 3-1 for the range of speed settings for the camera protocols supported. Table 3-1 Supported PTZ Protocols Parameter Range Camera Focus Speed Zoom Speed Pan Speed Tilt Speed Preset ID Pattern ID Address Range Pelco_P Min: 0 Max: 3 Min: 0 Max: 3 Min: 0 Max: 64 Min: 0 Max: 63 Min: 1 Max: 255 Min: 1 Max: 4 Min: 1 Max: 32 Pelco_D Min: 0 Max: 3 Min: 0 Max: 3 Min: 0 Max: 64 Min: 0 Max: 63 Min: 1 Max: 32 Min: 1 Max: 8 Min: 1 Max: 255 AD_RS422 Min: 0 Max: 3 Min: 0 Max: 3 Min: 1 Max: 100 Min: 1 Max: 100 Min: 1 Max: 96 Min: 1 Max: 3 Min: 1 Max: 99 BBV_Star_Card Min: 0 Max: 3 Min: 0 Max: 3 Min: 1 Max: 1 Min: 1 Max: 1 Min: 1 Max: 7 Min: 1 Max: 1 Min: 1 Max: 96 CyberScan1 Min: 0 Max: 3 Min: 0 Max: 3 Min: 1 Max: 1 Min: 1 Max: 1 Min: 1 Max: 15 Min: 1 Max: 1 Min: 1 Max: 255 Phillips_TC7560 Min: 0 Max: 3 Min: 0 Max: 3 Min: 1 Max: 1 Min: 1 Max: 1 Min: 1 Max: 99 Min: 1 Max: 1 Min: 1 Max: 1000 RS_422_Dome Min: 0 Max: 3 Min: 0 Max: 3 Min: 1 Max: 1 Min: 1 Max: 1 Min: 1 Max: 4 Min: 1 Max: 3 Min: 1 Max: 99 3-8 Installation and User Guide 3 Monitoring Live Video Procedure 3-4 To set the camera movement speed: 1 Select the video input channel: 1 - 8 from the Channel drop-down list. Figure 3-15 Select Channel Figure 3-16 Speed Settings 2 Zoom speed: In the Speed Settings area, enter a numeric value to set the camera zoom speed. 3 Focus speed: In the Speed Settings area, enter a numeric value to set the camera focus speed. 4 Pan speed: In the Speed Settings area, enter a numeric value to set the camera pan speed. 5 Tilt speed: In the Speed Settings area, enter a numeric value to set the camera tilt speed. Procedure 3-5 To move a PTZ camera: 1 Use the directional arrow keys on the numeric keypad or click the mouse on the graphical user interface to control the camera movement as shown below: . Figure 3-17 Arrow Keys and Symbols for Pan and Tilt Control When you press down an arrow key or symbol the camera moves and when you stop pressing the key the camera stops. 3-9 3 Monitoring Live Video The zeroPanPosition command automatically positions the camera in the zero pan position The Flip symbol causes the camera to flip 180 degrees from its current position. Table 3-2 PTZ Movement Control Key Symbol Description 8 Tilt up 2 Tilt down 4 Pan left 6 Pan right 7 Pan Tilt left up 9 Pan Tilt right up 1 Pan Tilt left down 3 Pan Tilt right down 5 Zero Position Flip 180° 3-10 Installation and User Guide 3 Monitoring Live Video Panning a PTZ Camera The following figures show examples of controlling the panning of a PTZ camera using the symbols. In Figure 3-18 the PTZ camera is set at 0°. The pan right key is used to pan the PTZ camera to the right. Figure 3-19 shows how the picture has moved to the right by 15° and displays the indication 15° overlaid on the picture (the overlay originates from the camera). Figure 3-20 displays a pan of 40°. Figure 3-18 PTZ Camera at 0° Figure 3-19 PTZ Camera at 15° 3-11 3 Monitoring Live Video Figure 3-20 PTZ Camera at 40° Zoom, Focus and Iris Control of a PTZ Camera Zooming in and out, focusing the PTZ camera, and Iris control is performed using the relevant symbols on the graphical user interface page of the PTZ control menu. The table below shows the relevant symbols. Table 3-3 Zoom Focus and Iris Symbols Symbol Description Zoom Tele (In) Zoom Wide (Out) Focus Far Focus Near Open Iris Close Iris 3-12 Installation and User Guide 3 Monitoring Live Video In the Zoom area the Zoom tele symbol causes the camera to zoom in, and the Zoom wide symbol causes the camera to zoom out. Figure 3-21 Zoom Area In the Focus area there is the Focus far and Focus near symbols. On some cameras there is an auto focus command as well. Figure 3-22 Focus Area In the Iris area the left icon causes the camera to open the iris and the right icon causes the camera to close the iris. On some cameras there is an auto iris command as well. Figure 3-23 Iris Area The following figures demonstrate the zoom and focus capability of a PTZ camera. Figure 3-24 shows the picture before zooming in. Notice the parked car in front of the people walking in the center of the picture. The next two figures show the same parked car with the PTZ camera zooming in. An overlay on the picture gives an indication of the zoom. The overlay is a function of the camera. Some cameras have the capability of displaying a zoom factor or a pan angle while others do not. 3-13 3 Monitoring Live Video Figure 3-24 PTZ Display Figure 3-25 Zooming In on Parked Car – 12.0 3-14 Installation and User Guide 3 Monitoring Live Video Figure 3-26 Zooming In on Parked Car – 30.0 The figures below show the parked car out of focus. Use the focus symbols to bring the picture into focus. Figure 3-27 Out of Focus 3-15 3 Monitoring Live Video Figure 3-28 In Focus PTZ Camera Preset Set and store preset locations (camera pan and tilt settings) for the cameras, then recall them with the ID spin box list on the graphical user interface preset area shown below. Figure 3-29 Preset Area The number of presets allowed varies with the camera protocol selected and camera model. Refer to Table 3-1 for the number of presets allowed per protocol. Table 3-4 describes each of the preset symbols. Table 3-4 Preset Symbols Symbol Description GoTo preset location Define preset Delete preset 3-16 Installation and User Guide 3 Monitoring Live Video Procedure 3-6 To define a preset: 1 Select an ID. 2 Move the camera to the desired location by using the Pan and Tilt symbols. 3 Click the Define preset symbol 4 Move the camera to a different location. 5 Click the GoTo preset location to jump to the preset defined. Procedure 3-7 To delete a preset: 1 Select an ID 2 Click the Delete preset symbol on the graphical user interface. PTZ Camera Pattern Set and store patterns of movement (camera pan and tilt settings) for the cameras, then recall them with the ID spin box list on the graphical user interface preset area shown below. Figure 3-30 Pattern Area The number of patterns allowed varies with the camera protocol selected and camera model. Refer to Table 3-1 for the number of patterns allowed per protocol. The symbol table below describes each of the preset symbols. Table 3-5 Pattern Symbols Symbol Description Start define pattern Finish define pattern Run pattern once Run pattern repeatedly 3-17 3 Monitoring Live Video Procedure 3-8 To define a pattern: 1 Select a camera ID. 2 Select the Start define pattern symbol on the graphical user interface. 3 Use the pan and tilt symbols to define a pattern of movement of the camera. 4 Select the finish define pattern symbol. 5 Select the Run pattern once or Run pattern repeatedly to run the defined pattern. Configuring the Camera from within the Camera’s User Interface The selected camera can be defined through a user interface overlaid on the video. The symbol opens the textual menu of the selected camera on the screen. The On Screen Display (OSD) is used to set many of the features of the camera. The Select Menu icon is used to select the item that is highlighted on the OSD. The user interface configuration menu area is shown below. Figure 3-31 Configuration Menu Symbols Table 3-6 describes the configuration menu symbols. Table 3-6 Menu Symbols Symbol Description Open textual menu screen Select menu item The menu that is displayed will vary according to the camera model. 3-18 Installation and User Guide 4 Software Configuration You can configure the video settings for each of the video inputs. The Video menu allows you to configure the analog video settings and the video encoding. This includes setting the video encoding general parameters and the video codecs. Choices of codecs are MPEG-4 and MJPEG. The Audio menu allows you to configure the analog audio settings and set the audio codec parameters. You can control the general streaming parameters and view the active running streams using the Streaming menu. Configuring the Video Video settings for each of the eight analog video inputs can be set in the Video menu. Figure 4-1 Video Menu All other parameters are used as default values for the video streaming. When a stream is opened using an RTSP client, the client may choose to change some of the parameters. The default parameters will remain unchanged. You can supply a partial set of parameters, in which case all remaining parameters will come from the default settings. Note When hovering over a field, the tool tip describes the field. When hovering over a field containing a required parameter, the allowed range of values appears. 4-1 4 Software Configuration Analog Video Settings Click on the Analog Video sub-menu to specify the Video Standard, Brightness, Contrast, Color, and Hue. Possible video standards are PAL and NTSC. Each standard has a different frame size and frame rate. De-Interlace helps prevent visual defects called interlace artifacts or combing which occur with moving objects in the image. The Channel Number is the camera chosen from the eight available video inputs. Figure 4-2 Analog Video Settings Procedure 4-1 To configure analog video settings: 1 Select the Video Settings menu in the left pane, then in the left pane, select Analog Video. The right pane displays the Analog Video Settings area. 2 Select Channel Number 1 – 8 corresponding to the camera input connected to the analog video input to be configured. Figure 4-3 Select Channel Number 4-2 Installation and User Guide 4 Software Configuration 3 Select the video standard for each camera: PAL or NTSC from the Video Standard drop-down lists. Figure 4-4 Video Standard Selection • You can set the brightness, contrast, and color to a value in the range 0 – 100. • You can set the hue to a value in the range -50 to +50. • You can enable De-Interlace by selecting the check box 4 Click Apply to save the settings. 5 Click Apply To All to save the changes to all eight channels at once Video Encoding General Parameters The Video Streaming General Parameters of Image Size and Frame Rate are set in this submenu. Image Size Select the image size of the video stream. The image size can be adjusted between QCIF, CIF, HALFD1, 2CIF, 4CIF, and D1. Table 4-1 shows different video formats and their associated resolutions. Table 4-1 Video Formats and Resolutions Format Video Resolution PAL Video Resolution NTSC QCIF 176 X 144 176 X 112 CIF 352 X 288 352 X 240 HALFD1 360X576 360X480 2CIF 704 X 288 704 X 240 4CIF 704 X 576 704 X 480 D1 720x576 720x480 4-3 4 Software Configuration Frame Rate The frame rates correspond to the number of frames per second. The frame rate is different when in NTSC or in PAL. The supported frame rates for NTSC are: 1, 1.2, 1.25, 1.5, 1.875, 2, 2.5, 3, 3.75, 5, 6, 7.5, 10, 15, 30. The supported frame rates for PAL are: 1, 1.25, 1.5625, 2.5, 3.125, 5, 6.25, 12.5, 25 Procedure 4-2 To set the video streaming general parameters: 1 Select the Streaming menu in the left pane, then in the left pane, select Video and then Streaming Parameters. The right pane displays the Video Streaming General Parameters area. Figure 4-5 Video Streaming General Parameters 2 Select Channel Number 1 – 8 corresponding to the camera input connected to the analog video input to be configured. Figure 4-6 Video Streaming Channel Select 4-4 Installation and User Guide 4 Software Configuration 3 Select the image size of the video stream for each camera from the Image Size drop-down list. The image size can be adjusted between QCIF, CIF, HALFD1, 2CIF, 4CIF, and D1 as shown in the figure below. Figure 4-7 Adjusting the Image Size 4 Select the frame rate for each camera from the Frame Rate drop-down list. Figure 4-8 Frame Rate Settings 5 Click Apply to save the settings. 6 Click Apply To All to save the changes to all eight channels at once. 4-5 4 Software Configuration MPEG-4 Video Codec Settings You can control the MPEG-4 video codec settings of GOP Size, Rate Control Mode, Constant Bitrate, Qmax, Qmin, and Qinitial. GOP Sizes In order to allow high compression rates for digital video it may be encoded into GOPs, or Groups of Pictures, which consist of keyframes (I-Frames) and delta frames (P or B Frames). A GOP always begins with a Keyframe which is a normal frame that consist of a complete picture, and may be followed by delta frames which only include changes from the previous keyframe or even a previous Delta Frame. The Group of Pictures GOP Size defines the distance between consecutive I-Frames in a video stream. Rate Control Mode The RateControlMode parameter defines Rate control options for the MPEG4 encoder. The options are CBR and Constant_Q. Constant Bitrate (CBR) In CBR encoding the bitrate is kept constant. CBR is useful for streaming multimedia content on limited capacity channels since it is the maximum bit rate that matters, not the average, so CBR would be used to take advantage of all of the capacity. CBR would not be the optimal choice for storage as it would not allocate enough data for complex sections (resulting in degraded quality) while wasting data on simple sections. Constant_Q In Constant_Q mode only QInitial is entered. The default Q is 10 for Constant_Q mode. A low Q setting will have a high bitrate providing high quality. A high Q setting have a low bitrate with lower quality. Bitrate • Bitrate parameters determine the bitrate of the video stream. The rate control mode determines the required parameter. Quantization The Q (Quantization) parameters are quality settings, where 4 is lowest quantization and highest quality (and more bits used), and 31 is highest quantization and lowest quality (and less bits used). The rate control mode determines the required parameter. • Q Max: Maximum quantization that will be used for encoding The default is 31. • Q Min: Minimum quantization that will be used for encoding .The default is 4. • Q Initial: Quantization value used in the first encoded I frame. In Constant_Q mode this value shall remain fixed for all frames. The default is 10. 4-6 Installation and User Guide 4 Software Configuration Procedure 4-3 To set the MPEG-4 Video Codec: 1 Select the Streaming menu in the left pane and select Video and then MPEG4. The right pane displays the MPEG-4 Parameters area. Figure 4-9 MPEG-4 Parameters 2 Select Channel Number 1 – 8 corresponding to the camera input connected to the analog video input to be configured. Figure 4-10 MPEG-4 Parameters Channel Select 3 Select the number of frames in a GOP (Group of Pictures) in the range of 1 – 1000 for each camera, in the GOP Size text-box. The default is 30. 4 For each camera, from the Rate Control Mode drop-down list select the rate control mode for the MPEG4 encoder: • CBR (Constant Bit Rate) • CONSTANT_Q (Constant Quality) 4-7 4 Software Configuration Figure 4-11 Select Rate Control Mode 5 For each camera (CBR mode), enter the Constant Bitrate parameter. The default is 3000000. 6 Enter the Quality parameter for each camera. In CBR mode enter Q Min, Q Max, and Q Initial. In Constant_Q mode enter Q Initial. The range of values for Q Min is 1 - 31. The range of values for Q Max and Q Initial is 4 - 31. 7 Click Apply to save the settings. 8 Click Apply To All to save the changes to all eight channels. 4-8 Installation and User Guide 4 Software Configuration MJPEG Video Codec Settings You can set the MJPEG video codec setting of Q for the cameras. The range for the quality adjustment is 1 to 90. The default setting is 75. At a higher setting, the bitrate will be higher. Quality settings above 75 will result in higher bitrates with little gain in quality and are therefore not recommended. Procedure 4-4 To set the MJPEG parameters: 1 Select the Streaming menu in the left pane, select Video and then MJPEG. The right pane displays the MJPEG Parameters area. Figure 4-12 MJPEG Settings 2 Select Channel Number 1 – 8 corresponding to the camera input connected to the analog video input to be configured. Figure 4-13 MJPEG Channel Select 3 Enter a Q value for the camera between 1 and 90 for each camera in the Quality text-box. 4 Click Apply to save the settings. 5 Click Apply To All to save the changes to all eight channels at once. 4-9 4 Software Configuration Configuring the Audio In the Audio menu you can configure the Analog Audio Settings and the AAC audio codec (the G.711 codec has no configurable parameters). Figure 4-14 Audio Menu Analog Audio Settings In the Analog Audio menu you can configure the Gain Setting for each of the eight audio inputs. The Gain Setting can be either LINE_IN or MIC_In. Procedure 4-5 To set the Analog Audio Settings: 1 Select the Audio menu in the left pane, and select Analog Audio. Figure 4-15 Analog Audio Settings 4-10 Installation and User Guide 4 Software Configuration 2 Select Channel Number 1 - 8. Figure 4-16 Analog Audio Channel Number 3 Select one of the available gain settings suitable for your sound source from the Gain Setting drop-down list. The gain settings available are LINE_IN and MIC_In. Figure 4-17 Analog Audio Gain Setting Audio Encoding In the Audio Encoding menu configure the audio codecs to be used. Choices of codecs are AAC and G.711. AAC Parameters Advanced Audio Coding (AAC) is a standardized, lossy compression and encoding scheme for digital audio. Designed to be the successor of the MP3 format, AAC generally achieves better sound quality than MP3 at many bit rates. Procedure 4-6 To set the AAC parameters: 1 Select the Audio menu in the left pane, and select AAC. The right pane displays the AAC Parameters area. 4-11 4 Software Configuration Figure 4-18 AAC Parameter Selection 2 Select Channel Number 1 – 8. There is one audio input for every video input. Figure 4-19 AAC Channel Select 3 Select one of the available sample rates from the Sample Rate drop-down list. The Sample rates available are 8000, 16000, 24000, 32000, and 48000. Figure 4-20 AAC Sample rate 4-12 Installation and User Guide 4 Software Configuration 4 Enter the required bitrate in the Bitrate text-box. The range of the bitrate is 8000 to six times the sample rate. 5 Click Apply to save the settings. 6 Click Apply To All to save the changes to all eight channels at once. G.711 Parameters G.711 is an ITU-T standard for audio companding primarily used in telephony. The G.711 is a waveform speech coder which features a sampling frequency of 8 kHz and a 64 Kbit/s bitrate (8 kHz sampling frequency x 8 bits per sample). There are no configurable parameters for this codec. Figure 4-21 G.711 Parameters 4-13 4 Software Configuration Setting Streaming Parameters This menu is used to configure the general streaming parameters and to view the active running streams. General Streaming Parameters You can set the MTU and the multicast address streaming parameter. MTU The MTU refers to the size in bytes of the largest packet that a given layer of a communications protocol can pass onwards. A higher MTU means higher bandwidth efficiency. When a transmission is noisy, changing the size of the MTU will improve the communication and bit error rate. Multicast Address The multicast address is the default address used for multicast streaming. Procedure 4-7 To set general streaming parameters: 1 Select the Streaming menu in the left pane, then in the left pane, select General. The right pane displays the General Streaming Parameters area. Figure 4-22 General – Streaming Parameters 2 Enter a MTU value in the range of 368 to 1472 in the MTU text-box. 3 Enter the required multicast address in the Multicast Address text-box. The range of addresses that can be used are as specified by the RFC 3171 standard as 224.0.0.0 to 239.255.255.255. 4 Click Save. 4-14 Installation and User Guide 4 Software Configuration Opening Video Streams The VideoEdge NVR allows opening video streams. Refer to the VideoEdge NVR User Manual. A video stream can also be opened using the QuickTime Media Player. Procedure 4-8 To open a stream in QuickTime: 1 Display the QuickTime window. Figure 4-23 QuickTime Window 2 Choose Open URL from the File menu. 3 In the text-box enter the URI for the stream. The following URI opens an audio and video stream. Figure 4-24 Insert URI The stream will appear in the QuickTime player as shown below: 4-15 4 Software Configuration Figure 4-25 QuickTime Player Note Refer to Example URIs found in the RTP/RTSP Video Node section of this manual (see Chapter 8 RTP/RTSP Video Node). 4-16 Installation and User Guide 4 Software Configuration Viewing Running Streams information The Running Streams screen displays information on the actively running streams. It indicates the type of stream, the codec used, the mode, state, transport type, peer address, clients, and SDP. When there are no active streams, the screen will indicate that there are no active streams running. Procedure 4-9 To display Running Streams information: 1 Select the Streaming menu in the left pane, then in the left pane, select Running Streams. The right pane displays the Running Streams area. No active streams will be displayed if there are currently no active streams. Figure 4-26 No Active Streams The Running Streams pane will display information on all active running streams. Figure 4-27 Active Streams If an audio/video stream was opened the running streams will display the video and audio as separate streams. Figure 4-28 Audio and Video Running Streams 4-17 4 Software Configuration When running a multicast stream the link Get SDP will appear in the SDP column of the Running Streams as shown above. The multicast stream can be viewed directly in the Web interface. Figure 4-29 Multicast Stream Procedure 4-10 To display a multicast stream: 1 Display the Running Streams screen. 2 Click the Get SDP link of the multicast stream. The stream will now appear in the right pane. Figure 4-30 Displaying the Video Stream in the Running Streams Menu 4-18 Installation and User Guide 5 Managing System Settings The System menu enables you to set up the network, change passwords, update the Flash, reset the board, update the clock and manage users. Note Some system managment tasks require a system administrator password. Figure 5-1 System Menu Network Settings You can set up the networking parameters. When configuring the IP address you can select Auto or Fixed network settings. When you select the auto network settings, the unit will try to configure the network stack from a DHCP server. If this step fails, it may cause the unit to remain unconnected. When selecting the fixed network settings, the unit will use the parameters you set to configure the network. You should configure at least the IP address and the Subnet Mask. The Default Gateway is only needed if the board needs to be accessed from outside the local subnet. The DNS Server and Domain Name are also optional; set all optional fields to 0.0.0.0 and leave the Domain Name blank if you do not wish to configure them. The IP Address default setting is 192.168.0.62. The Subnet Mask default setting is 255.255.0.0. You can discover the IP address that the unit received using the IP Encoder 8-Channel Discovery Tool (see Using the IP Encoder 8-Channel Discovery Tool). Note Use great caution when configuring the unit's network parameters. Wrong parameters (such as IP address outside the subnet) may cause the unit to lose communication with the network. There is some protection implemented to prevent entry of invalid settings. 5-1 5 Managing System Settings Procedure 5-1 To set up network parameters: 1 Select the System menu in the left pane, and select Network Settings. The right pane displays the Network Setting area. Figure 5-2 Network Settings Pane 2 Type a name for the host in the Host Name text-box. 3 Select, in the Use DHCP area: • Auto: if you want the hardware to use DHCP to obtain an IP address • Fixed: to assign the static configuration. 4 If you selected Auto proceed to step 5. or Enter the following configuration parameters if you selected Fixed: • Domain name (optional): enter a domain name or leave empty. • IP address (required): the required IP address. • Subnet Mask (required): the required subnet mask. • Default gateway (optional): the default gateway is required if the board needs to be accessed from outside the local subnet; otherwise leave as 0.0.0.0. • DNS server (optional): enter the IP address of the DNS server or leave as 0.0.0.0. 5 Click Save when done, to confirm your new settings. You will be prompted to reset the board. Press Click here to reset the board. Note It is recommended that you use the "Fixed" setting and set the network settings manually. If, however, you wish to use DHCP for automatic configuration, you can enter a unique hostname and select “Auto: Use DHCP”. 5-2 Installation and User Guide 5 Managing System Settings Using the IP Encoder 8-Channel Discovery Tool To discover the IP address given to your board run the IP Encoder 8-Channel Discovery Tool included with this package. This Windows-based application listens for all 8-channel boards on the network and displays their IP address, MAC address, board type and version information. When you run the IP Encoder 8-Channel Discovery Tool, a screen appears which shows all the 8-channel boards on the network as shown in the figure below. In the following example the screen displays the IP Encoder 8-Channel board at the default IP Address 192.168.0.62 Figure 5-3 IP Encoder 8-Channel Discovery Tool Each node comes with a pre-set and globally unique MAC address. You cannot modify this address. 5-3 5 Managing System Settings Changing the IP Address The following procedure illustrates how to change the IP Address of the VideoEdge 8 Channel Encoder Board from its default address of 192.168.0.62. Procedure 5-2 To change the IP address of the board: 1 Choose the Network Settings sub-menu from the System menu. 2 Enter the username user and the password user617 when prompted. Note This password is required for all menu items except "About", and can be changed by clicking "Change User PW". Figure 5-4 Insert User Password 3 Click OK; the Network Settings screen appears. You should see the current IP Address of the Video Edge 8 Channel Encoder board (192.168.0.62). Figure 5-5 Network Settings Setup 4 In the Network Settings area you can configure the Video Edge 8 Channel Encoder for your network. For this example change the IP Address to 192.168.12.50. 5-4 Installation and User Guide 5 Managing System Settings 5 Click Save when done, to confirm your new settings. You will be prompted to reset the board. Press on Click here to reset the board. Figure 5-6 New IP Address 6 Click OK in the confirmation message window to reset the board. Figure 5-7 Reset Prompt Note It is normal for the reset to take up to a minute to complete. During the reset the following screen is displayed. Figure 5-8 System Reset 5-5 5 Managing System Settings You have now completed the setup of your network IP Address. Once the reset is finished, the Video Edge 8 Channel Encoder board is connected and ready to begin working with the Web server software. The Web browser will automatically redirect to the About pane. You can view the new network setting on the Network Setting pane. You can also ping the board or use the IP Encoder 8-Channel Discovery Tool. Procedure 5-3 To ping the board: 1 Open a command window: From the Start menu choose Run; In the Run window text-box type cmd and click OK. 2 Type: ping 192.168.12.50 (or whatever the new IP address is set to) in the CMD window. The result should look like the figure below. Figure 5-9 Ping the Video Edge 8 Channel Encoder Board with new IP Address Procedure 5-4 To run the IP Encoder 8-Channel Discovery Tool: 1 Run the IP Encoder 8-Channel Discovery Tool. A screen appears which shows the boards on the network as shown in the figure below. The screen displays the IP Encoder 8-Channel board at the new IP Address 192.168.12.50. 5-6 Installation and User Guide 5 Managing System Settings Figure 5-10 IP Encoder 8-Channel Discovery Tool with New IP Address 5-7 5 Managing System Settings Changing the User Password You can change the user password. The default user password is user617. Procedure 5-5 To change the user password: 1 Select the System menu in the left pane, and select Change PW. The right pane displays the Change User Password area. Figure 5-11 Change User Password Pane 2 Type the old password in the Old Password text-box. 3 Type the new password in the New Password text-box ; re-type the new password in the Repeat new Password text-box. 4 Click Save to save the new password. Setting up the Clock You can set up an NTP (Network Time Protocol) server for time synchronization. You can also set up the local time zone as well as daylight saving time for the About pane. The board supports the use of NTP to synchronize the board's time to an external clock. This is required for maintaining a long streaming session, compensating for clock skew between the board and the host computer. For it to work correctly the host computer must either be the NTP server or it must synchronize to the same NTP server as the board. Optionally you can set the on-board Real Time Clock according to the current time of your PC. 5-8 Installation and User Guide 5 Managing System Settings Procedure 5-6 To set up the clock: 1 Select the System menu in the left pane, and select Clock Setup. The right pane displays the Clock Setup area. Figure 5-12 Change Clock Setup 2 To enable NTP, check the Use NTP for the time synchronization box and enter the IP address of your server. - or If you are not using NTP, click Set Time to set the unit's clock according to you PC's time. Set Time is not a continuous synchronization operation. Note For the time to be correctly displayed, make sure you set both the Local Time Zone and the Daylight Savings settings. 3 Enter a value between -12 and +13 (the offset relative to GMT) In the Local Time Zone textbox. 4 Check the Daylight Savings Time box if DST is presently used in your region. 5 Click Save. 5-9 5 Managing System Settings The unit will apply the new settings. The Web browser will display the following message. Figure 5-13 Clock Setup Change Saved Updating the Firmware You can update the unit's on-board firmware version. The software updates are provided as files with the .tgz file extension. Procedure 5-7 To update the firmware: 1 Select the System menu in the left pane, and select Firmware Upgrade. The right pane displays the Flash Update area. Figure 5-14 Flash Update Pane 2 Click Browse to select the bin file. 3 Click Update firmware to start the software update. The unit will start writing the Flash memory. Operation was finished successfully will be displayed when the firmware has been updated. 5-10 Installation and User Guide 5 Managing System Settings Figure 5-15 Firmware Upgrade Process 4 Click Click here to restart the board. The About pane of the new version should appear automatically within a minute. Warning Never interrupt the upgrade process in any way, as this may result in a board unable to boot. System Administration Using the System Administration features, an authorized user can reset the user password, change the system administrator's password, reset the system to the factory defaults, change the web interface language, and reset the board. Note All system administration actions require authentication: a system administration password is needed. 5-11 5 Managing System Settings Figure 5-16 System Administration Header The following screen pops up when any of the system administration menus are entered for the first time. p Figure 5-17 Authentication Required Resetting the User Password The following screen pops up when this pane is selected: Figure 5-18 Reset the User Password Click OK to reset the User password. The password will reset to its original default value of user617. 5-12 Installation and User Guide 5 Managing System Settings Change System Administrator Password This pane allows the administrator to change the system administration password. Procedure 5-8 To change the system administrator’s password: 1 Enter the new system administration password, and retype it in the Repeat new Password field. Figure 5-19 Change System Administration Password 2 Click Save. Loading Factory Defaults This pane resets the board to the original factory default settings. After selecting this option the board is restarted and your Web browser will automatically redirect to the About pane. Note This operation will reset all board parameters to their factory default values including IP Address and passwords. All configured information will be lost. Table 5-1 Factory Default Settings lists the factory default settings. 5-13 5 Managing System Settings Table 5-1 Factory Default Settings Factory Defult settings Video Standard = NTSC Brightness = 50 Analog Video Settings Contrast = 50 Color = 50 Hue = 0 De-Interlace = Not active General Streaming Parameters MTU = 1472 Multicast address = 224.1.0.1 Video Streaming Parameters Image Size = CIF Frame rate = 30 fps GOP Size = 30 Rate control Mode = CBR MPEG4 Parameters Constant Bitrate = 3000000 QMax = 31 QMin = 4 Q Initial = 10 MJPEG Parameters Analog Audio Settings AAC Parameters: Quality = 75 Line In Sample Rate = 48000 Bitrate = 96000 DHCP = Fixed Host Name = Blank Domain Name = Blank Network Parameters IP Address = 192.168.0.62 Subnet Mask = 255.255.0.0 Default Gateway = 0.0.0.0 DHS Server = 0.0.0.0 Use NTP = false Clock Setup Parameters NTP Server = 0.0.0.0 Local Time Zone = 0 Daylight Savings Time = false Alarms and Contact Closures Contact Closures Setting = 0 UserPW user617 Web Interface Language English Protocol = Pelco_P Address = 5 PTZ Control Configuration Parameters Connection = 422 Baud Rate = 9600 Duplex = full Bit Count = 8 Stop Bit = 1 Parity = None 5-14 Installation and User Guide 5 Managing System Settings Procedure 5-9 To return to factory defaults: 1 Select the System menu in the left pane, select System Administration and then Factory Defaults. The right pane displays the Factory Defaults area. Figure 5-20 Reset to factory Defaults 2 Click Reset to Factory Defaults. The following message window appears Figure 5-21 Restoring Factory Defaults 3 Click OK to reset the board. 4 Wait for reset to finish. When the reset is finished the About pane is displayed. All of the parameters of the application have been restored to the factory settings including video and network parameters. 5-15 5 Managing System Settings Changing the Web Interface Language The administrator can change the Web Interface language. This enables changing the Graphical User Interface to one of five languages; English, French, Spanish, German, and Portuguese. Procedure 5-10 To change the Web Interface language: 1 Select the System menu in the left pane, select System Administration and then Change the Web Interface Language. The Web Interface Language Pane appears. Figure 5-22 Web Interface Language Pane 2 Select the language of choice from the drop-down list. Figure 5-23 Select Language 3 Click Save. 5-16 Installation and User Guide 5 Managing System Settings Reset An authorized user can reset the board. Such a reset is identical to power cycling the unit, but is safer since it ensures that Flash-based storage is properly flushed before restarting. Use this option to restart the unit. Procedure 5-11 To reset the board: 1 Select the System menu in the left pane, and select Reset. The reset prompt appears Figure 5-24 Reset Prompt After confirmation, the unit restarts automatically. Figure 5-25 System Reset 2 Wait for reset to finish. 3 When the reset is finished the About pane is displayed. 5-17 6 Technical Specification Hardware Description The VideoEdge 8 Channel Encoder is a standalone DSP based multimedia server, supplying compressed video and audio streams over a TCP/IP network via standard RTP/RTSP streaming protocols. The Web Interface is used for streaming video. The VideoEdge 8 Channel Encoder provides: • 8 analog video inputs • 8 mono audio inputs • 8 mono audio outputs • 1 RJ45 Gbit Ethernet port • RS232 and RS422/485 serial ports • 16 TTL Alarm inputs • 8 dry contact outputs Following is a description of the VideoEdge 8 Channel Encoder board. Front Panel X Z Y [ Figure 6-1 VideoEdge 8 Channel Encoder Chassis Front Panel XVideo Channel Indicators: The eight LED indicators on the left side of the front panel are Video Channel status indicator LED’s. Y System Status Indicators: The six LED indicators on the right side of the front panel are System status indicator LED’s. Z Power ON indicator LED (blue) [ Reset Button. 6-1 6 Technical Specification Rear Panel X Y Z Figure 6-2 VideoEdge 8 Channel Encoder Chassis Rear Panel X 24-pin I/O Terminal Connector: The VideoEdge 8 Channel Encoder board provides 8 relay contacts comprised of the Common Contact, the Normally Closed Contact, and the Normally Open Contact. The current through the contacts should not exceed 1Amp @ 30VDC load. The VideoEdge 8 Channel Encoder board also provides 16 TTL alarm inputs. The alarm inputs are designed as a logic input (3.5V - 5.5V for logic1 and GND - 1.5V for logic 0). YGigabit Ethernet port: The VideoEdge 8 Channel Encoder board connects to the network using a standard Ethernet cable on the rear panel. Z Video Inputs/Audio I/O: The VideoEdge 8 Channel Encoder provides eight analog video inputs and eight audio inputs and outputs. The video is connected via 75 ohm coax cables to the BNC video input connectors on the rear panel. The audio inputs connect to four 3.5 mm connectors on the rear panel. The audio outputs connect to four 3.5 mm connectors on the rear panel. 6-2 Installation and User Guide 6 Technical Specification Hardware Installation For viewing video, the video cable, Ethernet cable and power cable must be connected. The figure below shows the rear panel with the BNC video input cables and the Ethernet cable. Procedure 6-1 To connect the cables: 1 Connect the VideoEdge 8 Channel Encoder video using a standard 75 ohm coaxial video cable. 2 Connect the audio inputs using standard 3.5 mm audio cables. 3 Connect the VideoEdge 8 Channel Encoder server to the network using a standard network cable. 4 Connect the power to the supplied external DC power supply. 5 Alarms and TTL inputs are connected via the terminal connector. Figure 6-3 VideoEdge 8 Channel Encoder Rear Panel Connectors This section details the pin assignments of the serial connectors, the environmental and operating specifications of the IP Encoder. 6-3 6 Technical Specification Rear Panel Audio/Video Connectors Figure 6-4 Audio and Video Connections Rear Panel RS232, USB, and Ethernet Connectors Figure 6-5 RS232, USB, and Ethernet Connections 6-4 Installation and User Guide 6 Technical Specification Table 6-1 defines the pinouts of the RS232 DB9 connector on the back panel. Table 6-1 RS232 Connector Pinout Signal Name Pin # RS232_Tx 3 RS232_Rx 2 GND 5 Rear Panel Terminal Block Connectors Figure 6-6 Ethernet, TTL (Relay) Out, TTL (Alarm) In, and Power Connections TTL IN (Alarm) and RS485 Connector Table 6-2 defines the pinouts of the TTL IN/RS485 Connector on the back panel. Table 6-2 TTL Alarm Input and RS485/422 Connector Pinout Signal Name Pin # Signal Name Pin # TTL IN0 1 TTL IN8 13 TTL IN1 2 TTL IN9 14 TTL IN2 3 TTL IN10 15 TTL IN3 4 TTL IN11 16 TTL IN4 5 TTL IN12 17 TTL IN5 6 TTL IN13 18 TTL IN6 7 TTL IN14 19 TTL IN7 8 TTL IN15 20 RS485/422_Tx_P 9 RS485/422_Rx_N 21 RS485/422_Tx_N 10 RS485/422_Rx_P 22 GND 11 GND 23 GND 12 GND 24 6-5 6 Technical Specification TTL OUT Connector (Relay Dry Contact) Connector Table 6-3 defines the pinouts of the TTL OUT (Relay Dry Contacts) Connector on the back panel. Table 6-3 TTL OUT (Relay Dry Contacts) Connector Pinout Signal Name Pin # Signal Name Pin # RLY_COM4 1 RLY_COM0 13 RLY_NC4 2 RLY_NC0 14 RLY_NO4 3 RLY_NO0 15 RLY_COM5 4 RLY_COM1 16 RLY_NC5 5 RLY_NC1 17 RLY_NO5 6 RLY_NO1 18 RLY_COM6 7 RLY_COM2 19 RLY_NC6 8 RLY_NC2 20 RLY_NO6 9 RLY_NO2 21 RLY_COM7 10 RLY_COM3 22 RLY_NC7 11 RLY_NC3 23 RLY_NO7 12 RLY_NO3 24 The VideoEdge 8 Channel Encoder contains 14 front panel mounted LEDs. The eight VIDEO CHANNEL LEDs are used to indicate on which channels video is being captured. In addition, there are six SYSTEM STATUS LEDs which are used to indicate system status, a blue Power ON indicator and a Reset button. Table 6-4 VideoEdge 8 Channel Encoder VIDEO CHANNEL LED Indicators VIDEO CHANNEL LED 6-6 Description 1 Video Channel 1 Capturing 2 Video Channel 2 Capturing 3 Video Channel 3 Capturing 4 Video Channel 4 Capturing 5 Video Channel 5 Capturing 6 Video Channel 6 Capturing 7 Video Channel 7 Capturing 8 Video Channel 8 Capturing Installation and User Guide 6 Technical Specification Table 6-5 System LED Indicators SYSTEM STATUS LED Description 1 Application On 2 Not Used 3 Not Used 4 Streaming On 5 Not Used 6 Not Used Technical Specification Table 6-6 VideoEdge 8 Channel Encoder Technical Specifications Characteristics Specifications Form Factor 19" 1U rack mount chassis Video Input 8 Composite 1Vpp, 75 ohms NTSC/PAL BNC Audio Input 8 mono Line In /MIC In on 4 3.5 mm audio jacks Audio Output 8 mono Line Out on 4 3.5 mm audio jacks Ethernet RJ45 Gigabit Ethernet port Alarm Inputs 16 general purpose Input Lines 1 = 3.5 to 5.5 Volts 0 = GND to 1.5 Volts Relay Outputs 8 dry contact relays (up to 1Amp @ 30 VDC Load) LEDs 8 video capture LEDs, 6 status LEDs, power ON indicator Serial Port RS232 on DB9, RS422/485 on terminal block USB Port USB 2.0 option Power requirements 12V input Voltage Maximum 60 Watts Typical 30 Watts Operating Temperature 0OC to 50OC Storage Temperature -40OC to 85OC Relative Humidity 5% to 90% (non-condensing) Dimensions: Depth Width Height 5.55 inch [141 mm] 17.30 inch [439.5 mm] 1.710 inch [43.6 mm] 6-7 6 Technical Specification Certifications and Regulations Table 6-7 Certifications and Regulations Characteristics Safety Specifications UL: UL-60950-1 1st ED. CE: EN 60950-1 1st ED. CB: IEC 60950-1 1st ED via TUV. GS: EN 60950-1 via TUV. EMC USA: FCC Part 15b 107 & 109, Class B Canada: ICES-003/NMB-003 Class A Australia/New Zealand: C-Tick: AS/NZS CISPR 22 Class A Europe CE: EN55022 EN 61000-3-2 EN 61000-3-3 EN50130-4 IEC61000-4-11 IEC61000-4-2 IEC61000-4-3 IEC61000-4-4 IEC61000-4-5 IEC61000-4-6 RoHS WEEE 6-8 Installation and User Guide 6 Technical Specification Rackmount Diagram Figure 6-7 Rackmount Diagram 6-9 7 Network Installation The VideoEdge 8 Channel Encoder must be configured for use with your LAN so that it will be accessible and not interfere with other network hosts. However, the default setting for new units may not be compatible with your network. To avoid a conflict with the network you can initially set up the network properties with a direct connection from the PC to the board. Note Consult your network administrator if you are on a corporate LAN and are unsure about any of the following steps. You first need to set up the computer so you can access the board with the default settings that usually come with the shipped board. Note You can see the board on your network by pinging the board or by using the IP Encoder 8Channel Discovery Tool (see Using the IP Encoder 8-Channel Discovery Tool). You can then change the network settings to suit whatever address you want for the board. Note The following procedure assumes you are using a computer with Windows 2000/XP operating system that receives its IP address automatically from the network environment using DHCP, but the general procedure would be the same for any environment or operating system. Procedure 7-1 To set up the PC to board direct network connection: 1 Disconnect your workstation from the network and, using a crossed LAN cable or an Ethernet switch, connect it to the network input on the VideoEdge 8 Channel Encoder. 2 Right-click the My Network Places icon on the Windows desktop and select Properties. The Network and Dial-up Connections window appears. 3 Right-click the Local Area Connection and select Properties. 7-1 7 Network Installation The Local Area Connections Properties window appears. Figure 7-1 Local Area Network Setup 4 Double-click Internet Protocol (TCP/IP) (highlighted in blue). The Internet Protocol (TCP/IP) Properties window appears. Figure 7-2 TCP/IP Properties 5 Select the Use the following IP address option. 7-2 Installation and User Guide 7 Network Installation 6 Change the settings according to the settings in using an IP address that is different than the IP address of the board, such as 192.168.0.10. Figure 7-3 IP Address This will enable you to access the VideoEdge 8 Channel Encoder, which is initially set to the fixed IP address 192.168.0.62. 7 Click OK. You should now be able to ping the VideoEdge 8 Channel Encoder. 8 Open a command window: From the Start menu choose Run; In the Run window text-box type cmd and click OK. 9 Type: ping 192.168.0.62 in the CMD window. The result should look like the window below. If you do not receive a reply, make sure you have followed all steps above. Figure 7-4 Accessing the Board 7-3 7 Network Installation It should now be safe to connect the unit to your LAN. Remember to undo the changes made to your workstation’s LAN settings. Make sure everything is functioning by pinging the node using the new IP address or hostname. The new settings are burned to nonvolatile Flash memory and will remain until changed. 7-4 Installation and User Guide 8 RTP/RTSP Video Node You can open an RTP/RTSP video node in QuickTime. If you do not add parameters to the URI, the parameters are taken from the Web configuration. Procedure 8-1 To open an RTP/RTSP video node: 1 Make sure a video source is properly connected to the first input of your board. 2 Input a URI to your video player. In QuickTime this is done by choosing Open URL from the File menu or pressing Ctrl-U on the keyboard: Figure 8-1 QuickTime Open URI The Open URL window appears: Figure 8-2 URI Input Dialog 3 Type your board's current IP address. 4 Click OK. 8-1 8 RTP/RTSP Video Node The encoding parameters are taken from the Web configuration and the default camera 0 is used. Note If an error appears, make sure you have a video source connected and that the video standard is the same as in the Web setup (PAL/NTSC). Also check the "Live Video" web page to verify that the system is receiving video. RTSP URI Format A Uniform Resource Identifiers (URI) is a compact string of characters used to identify or name a resource on the Internet. The main purpose of this identification is to enable interaction with representations of the resource over a network, typically the World Wide Web, using specific protocols. URIs are defined in schemes defining a specific syntax and associated protocols. General Structure The URI is built of stream specifications. Each stream specification contains a keyword that identifies the type of the stream (by which stream handlers are registered in the application), and optionally a list of parameters that modify the default behavior of the stream. rtsp://ip.address/keyword{?param1{=value1}{¶m2{=value2}}…}/keyword… A more detailed example of the RTSP URI format is as follows: rtsp://ip_address/{?multicast{¶m1{=val1}{¶m2{=val2}...}} /}video_media{?param1{=val1}{¶m2{=val2}...}}/audio_media{?pa ram1{=val1}{¶m2{=val2}...}} Note Note: Curly braces indicate optional parameters Where: ip_address is the address of the board. multicast section is optional if the user wants multicast streaming (otherwise streaming is regular unicast) The user can specify a stream of video_media and/or a stream of audio_media video_media can be “mjpeg” or “mpeg4” audio_media can be “aac”, “pcma”, “pcmu” for audio. PCMA and PCMU represent G.711 A-Law and u-Law, respectively param, val: A list of parameters separated by ‘&’. Some parameters appear on their own but most have a value. In that case they will appear as param=value. Except as noted, any parameter not specified in the URI will take its default value from the Web page settings Note The default values given in the following tables are the initial factory settings. With the exception of “cam” and “mic”, they may all be changed in the Web menu. 8-2 Installation and User Guide 8 RTP/RTSP Video Node General Video Parameters Table 8-1 General Video Parameters Parameters cam framerate Imgsize Value Default Description 0 Video input number. 0 - 7 in URI corresponds to 1 - 8 in the GUI Valid values are different depending on video standard. PAL: 1,2,4,5,8,10,16,20,25 NTSC:1,2,3,4,5,6,8,10,12,15, 16,20,24,25,30 1 This is the frame rate divisor. Set it to 1 for full frame rate, 2 for half frame rate, and so on. The actual frame rate will be: PAL 25/n fps NTSC 29.97/n fps D1, 4CIF, 2CIF, HALFD1, CIF, QCIF CIF Encoded image Size 0-7 MJPEGs Parameter Table 8-2 MJPEG Parameter Parameters q Value Default 1 - 90 75 Description Quality setting for JPEG encoder in percentage. MPEG4 Parameters Table 8-3 MPEG-4 Parameters Parameters Value Default Description rcmode CBR, CONSTANT_Q CBR MPEG-4 Rate Control Mode. ngop 1 - 1000 30 Size of GOP (distance between keyframes) const_bitrate 16000 - 15000000 3000000 Constant Bitrate: Applicable only when rcmode = CBR. (Note: A lower quantization value means higher quality). qmin 1 - 31 2 Minimum Quantization: Applicable only when rcmode = CBR. qmax 4 - 31 31 Maximum Quantization: Applicable only when rcmode=CBR. qinit 4 - 31 10 Initial Quantization, or fixed quantization if rcmode = Constant_Q. 8-3 8 RTP/RTSP Video Node General Audio Parameters Table 8-4 General Audio Parameters Parameters Value Default Description mic 0-7 0 Audio input. 0 - 7 in URI corresponds to 1 - 8 in the GUI (Note: Channel mode is always mono). conn LINE, MIC LINE Specify Line In or MIC In gain setting AAC Parameters Table 8-5 AAC Parameters Parameters Value Default Description samplerate 8000, 16000, 24000, 32000, 48000 48000 Input sample rate bitrate 8000 up to samplerate * 6 96000 Bitrate PCMA and PCMU Parameters No changeable parameters. Mode is always mono, sample rate is fixed at 8 kHz and the bitrate is always 64 Kbit/sec. Multicast Parameters In order to request operation in multicast, a special string has to be inserted into the URI before the specifications of the requested streams. It looks like a stream specification, but the media name is empty. See examples below. Table 8-6 Multicast Parameters Parameters Value Default Description mcast_addr 224.0.0.0 to 239.255.255.255 224.1.0.1 Multicast (broadcast) address. mcast_port 0 to 65535 6990 Multicast port; If more than 1 stream is requested, consecutive port numbers are used. mcast_ttl 1 and up 1 TTL for multicast packets. 8-4 Installation and User Guide 8 RTP/RTSP Video Node Example URIs The following are example URIs. Example 1 The following example opens an AAC audio and MJPEG video stream from the server 192.168.0.127, using all the default values as they are configured via the Web configuration. rtsp://192.168.0.127/mjpeg/aac Example 2 The following will open a video and audio stream with the following parameters: Video: MPEG-4 from video input 0. Size will be 4-CIF, framerate will be divided by 2 (so 15 fps for NTSC, 12.5 for PAL), rate control mode will be CBR at 3 Mbits. rtsp://192.168.0.127/mpeg4?cam=0&imgsize=4CIF&framerate=2&rcmode= CBR&const_bitrate=3000000/pcma Example 3 The following example requests a multicast stream of MPEG-4 with default address & port. rtsp://192.168.0.127/?multicast/mpeg4 Example 4 The folllowing example requests a multicast stream to the specified address 224.1.0.3, and uses ports 6790 for the video and 6792 for the audio. rtsp://192.168.0.127/?multicast&mcast_addr=224.1.0.3&mcast_port=6 790/mpeg4/pcmu 8-5 9 Index A AAC 4-11 Analog Video 4-2 IP Encoder 8-Channel Discovery Tool 5-3 L Loading Factory Defaults 5-13 B Bitrate 4-13 C Certification 6-8, 6-9 Change sysadmin Password 5-13 Changing the IP Address 5-4 Changing the User Password 5-8 Connections 1-2 Constant Bitrate 4-6 Controlling A PTZ Camera 3-7 M MJPEG Parameters 4-9 Monitoring Live Video 3-1 Moving a PTZ Camera 3-11 MTU 4-14 Multicast Address 4-14 N Network Settings 5-1, 5-2 D O Default gateway 5-2 DHCP 5-2 DNS server 5-2 Domain name 5-2 Overview 1-1 F Factory Default Settings 5-14 Features 1-2 Frame Rate 4-3, 4-4 Frame Rates 1-2 P Pan Tilt Zoom (PTZ) Control 3-3 PTZ Camera Focus 3-12 Iris Control 3-12 PTZ Camera Speed Focus 3-9 Pan 3-9 Tilt 3-9 Zoom 3-9 G G.711 4-13 GOP Sizes 4-6 Q Quality 4-9 Quantization 4-6 H Hardware Installation 6-3 Host Name 5-2 R I Rear Panel Connectors 6-4 Regulations 6-8 Reset 5-17 Resetting a User Password 5-12 Resolutions 1-2 Image Size 4-3 IP address 5-2 9-1 9 Index RTP/RTSP 8-1 RTSP URI Format 8-2 S Sample Rate 4-12 Setting up the Clock 5-8 Subnet Mask 5-2 System Configuration 1-1 T Technical Specification 6-7 Terminal Block Connector 6-5 U Updating the Firmware 5-10 URI example 8-5 V Video Streaming 1-3 W Web Configuration 1-3 Z Zooming /Focusing A PTZ Camera 3-12 Installation and User Guide 9-2