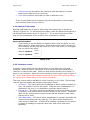
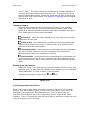
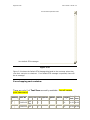
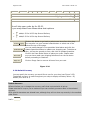
1
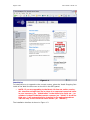
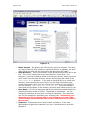
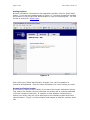
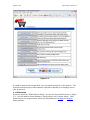
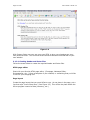
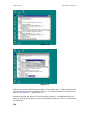
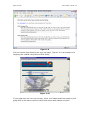
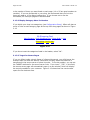
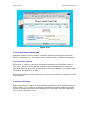
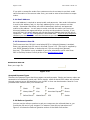
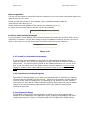
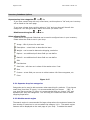
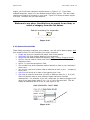
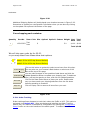
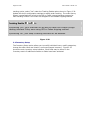
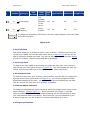
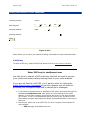
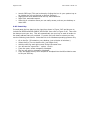
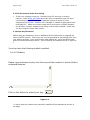
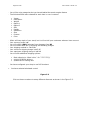
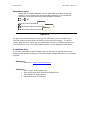
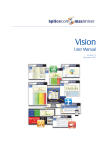
Page 1 of 58
User’s Guide - MCart 4.0
MCart 4.0
User’s Guide
Advanced Internet Technologies, Inc.
June 1, 2004
Search All Your Favorite Engines from a Single Source with tyBit!!! (Download Now)
Revision History:
This is version 1.1 of the MCart 4.0 User’s Guide. All updates to this
document will be noted below.
Version 1.1
• Released after several graphical changes have been made to
the User’s Guide.
• Released after the Human Verification system was
implemented in the checkout program.
Version 1.0
Initial release in February of 2000
Preface:
This document is the user manual for the free shopping cart called MCart 4.0
and the paid for version, MCart Pro 4.0, offered by AIT.
Target Audience:
AIT Customers using MCart 4.0 and MCart Pro 4.0
Page 2 of 58
User’s Guide - MCart 4.0
Table of Contents
1. Introduction................................................ Error! Bookmark not defined.
1.1 Accessing your cpanel/SMT ..................................................................... 4
1.2 Installation ........................................................................................... 4
Mcart Installation Program v4.0 ............................ Error! Bookmark not defined.
1.3 Setting Up Shop .................................................................................... 7
Installation Program v4.0 ..................................... Error! Bookmark not defined.
Mcart Files Installed ....................................... Error! Bookmark not defined.
2. Administration ........................................................................................ 7
2.1 HTML Setup .......................................................................................... 9
2.1.1 Simple Setup................................................................................10
2.1.2 Custom Setup ..............................................................................11
2.1.2.1 Creating header and footer files ................................................12
2.1.2.2 Custom Setup MCart Admin.......................................................15
2.1.3 Additional Options ..............................................................................17
2.1.3.1 Maximum Items per Page .........................................................17
2.1.3.2 Display Category Menu In Headers............................................18
My Shopping Cart .........................................................................................18
2.1.3.3 Target for Secure Pages ............................................................18
2.1.3.4 Alternate Checkout URL ............................................................19
2.1.3.5 Cookie Timeout .........................................................................19
2.2 Order Info Setup...................................................................................19
2.2.1 Order Dept Name .........................................................................20
2.2.2 Phone Number .............................................................................20
2.2.3 Fax Number .................................................................................20
2.2.4 Email Address ..............................................................................21
2.2.5 Ecommerce User ID .....................................................................21
2.2.6 Referrer Question ........................................................................21
2.2.7 E-mail for Informational Messages...............................................22
2.2.8 Commission Tracking Programs ...................................................22
2.3 Configuration Setup ..............................................................................22
2.3.1 Separate shop into categories ......................................................23
2.3.2 Disable search engine ..................................................................23
2.3.3 Select allowed fields ....................................................................24
2.3.4 Optional Field Labels....................................................................25
2.3.5 Inventory control.........................................................................25
2.3.6 Display Stock Information............................................................26
2.3.7 Default ETA Message....................................................................27
2.3.8 Default Currency ..........................................................................29
2.3.9 Sales Tax .....................................................................................31
2.3.10 Basic Shipping Model .................................................................31
2.3.11 Additional Shipping options .......................................................32
2.3.11 Order Tracking ...........................................................................34
2.4 Inventory Setup ...................................................................................35
2.4.1 Category Functions ......................................................................36
2.4.2 Change listing order.....................................................................37
2.4.3 Import/Export Menu....................................................................38
2.4.4 Setting up your inventory item-by-item .......................................44
2.4.4.2 Update list ................................................................................47
2.4.4.3 Edit Item ..................................................................................48
2.4.4.4 Copy Item .................................................................................48
Page 3 of 58
User’s Guide - MCart 4.0
2.4.4.5 Remove Item ............................................................................48
2.5 Change Admin Password ........................................................................48
2.6 Purge Cart Database .............................................................................48
2.7 Review Orders ......................................................................................49
2.7.1 TRACKING INFO SETUP ................................................................49
2.8 PGP Key ..............................................................................................50
2.8.1 Generate public and secret key ....................................................51
2.8.2 Extract your public key ................................................................51
2.8.3 Insert Key....................................................................................52
3. Common Errors ......................................................................................53
3.1 PGP Order Processing ............................................................................53
3.1 Custom Setup Errors .............................................................................53
3.3 Full Ecommerce Order Processing............................................................54
4. Module Key Activation ............................................................................54
5. Discounts ...............................................................................................55
6. Additional Help.......................................................................................58
Page 4 of 58
User’s Guide - MCart 4.0
Introduction
MCart is a shopping cart, catalog and indexing web store all rolled into one. Version
4.0 is provided free of charge to all AIT customers, and there is an upgraded version
(MCart Pro 4.0) that is a paid for upgrade. The addition shopping cart modules that
can be activated are a part of MCart Pro 4.0.
MCart Pro contains many different modules that will allow you to shape MCart to
your own personal needs:
o Order Tracking Module – Allows your shoppers to track their orders
through UPS or FedEx
o Discount Module – Allows you to offer special sales for certain
periods of time. This module also allows wholesale sales.
o Miva® Module – Allows you to import data from a Miva® shopping
cart.
Accessing your cpanel/SMT
To first install MCart, you must gain access to the control panel or SMT. The screen
below can be seen when users open a web browser and go to
http://theirdomain/cpanel/ or http://their.IP.address/cpanel/
The login for the SMT 4.1 is always ‘cpanel’ without the quotes, and the password is
always the main server password. If this has not been changed by the user, then it
is the same password that AIT provided the user after the setup of the account.
Once logged in, the user will see the cpanel/SMT Introduction screen, which should
look something like what is displayed below in Figure 1-1.
Page 5 of 58
User’s Guide - MCart 4.0
Figure 1-1
Installation
To install MCart or to upgrade to the current version, select the Install Shopping Cart
inside of the Web Services menu on the left in the SMT/cpanel.
•
NOTE: If you are upgrading to the Mcart 4.0 from an earlier version,
ALL character strings that are in place of an expected numerical value
in your inventory (ex. “$2000 each” in the Sales Price field, etc…) or
numbers in these fields that contain commas (ex. “2,000” in the Price
field, etc…) will automatically be installed in the appropriate Mcart
4.0 field only as the numerical value shown (ex. “2000.0”).
The installation interface is shown in Figure 1-2.
Page 6 of 58
User’s Guide - MCart 4.0
Figure 1-2
•
•
•
•
MCart Version – By default, the ‘PGP Version’ option is selected. This does
not require that the shop is tied to a merchant account or gateway, but does
require that the shop use PGP encryption and decryption for orders.
Shop Directory – This is the directory under which the MCart files will be put
into. This is very closely tied to the next option of ‘Virtual Host’. For
example, if you wish to add an MCart for a top level domain, simply input the
word ‘mcart’ into the Shop Directory section and the shop will install in the
/www/htdocs/mcart directory. If you wish to install MCart for a virtual host
directory, then inputting the word ‘mcart’ into this field and selecting the
virtual host domain name from the ‘Virtual Host’ section will put the MCart
into the directory /www/htdocs/virtualhost/mcart. Thus, the installer is
smart and puts the MCart in the directory structure that makes sense for you.
User Name – This is the username that will be used as the administrator for
the Administrative section of MCart. The default is shopkeeper. You can
change the username as long as it is at least 6 characters. This username
can only be changed by reinstalling your shopping cart. Reinstalling your
shopping cart will not delete data in your shopping cart; the newer
version simply overwrites the older version and copies all the data in
the process.
Password - The password must be at least 6 characters. If the shop
administrator forgets their password, you can re-install MCart to reset the
password.
Page 7 of 58
User’s Guide - MCart 4.0
Setting Up Shop
Once all information is entered into the installation interface, click the "Setup Shop"
button. If you see the message shown in Figure 1-3, you have successfully installed
MCart and it is time to setup the administration of your new shopping cart. You may
do this by clicking on "MCart Login".
Figure 1-3
After clicking the “MCart Administration Program” link, you’ll be asked for a
username and password. Enter the same information you used to setup your shop.
Human Verification System
A new security feature inside of MCart 4.0 is that of the Human Verification System.
This system will provide a security code that is a random set of numbers generated
to force a human to input them. If a hacker or other attacker is attempting to
exploit your MCart, they will not be able to get to the checkout system due to this
security feature. Figure 1-4 below shows a small sample of what the interface looks
like.
Page 8 of 58
User’s Guide - MCart 4.0
Figure 1-4
Administration
After logging into the MCart Admin area, you are ready to begin setting up your
shopping cart. Figure 2-1 is the main administration interface for MCart.
Page 9 of 58
User’s Guide - MCart 4.0
Figure 2-1
It’s best to start at the top and work your way down through all of the options. This
prevents overlooking any Setup features required to operate your shopping cart to
your preference.
2.1 HTML Setup
Once you select the “HTML Options Setup”, you will see the interface shown in Figure
2-2. You will need to choose between “Simple Setup” and “Custom Setup”. Each
option has its own requirements, which are discussed in the Simple and Custom
Setup sections.
Page 10 of 58
User’s Guide - MCart 4.0
Figure 2-2
2.1.1 Simple Setup
If you select Simple Setup and enter the required information MCart will generate
the HTML for your shop. MCart will generate the HTML dynamically; therefore the
user or shop administrator does not need to know HTML.
IF YOU CHOOSE SIMPLE SETUP YOU MUST FILL OUT ALL INFORMATION
SHOWN IN Figure 2-3.
Page 11 of 58
User’s Guide - MCart 4.0
Figure 2-3
2.1.2 Custom Setup
For Custom Setup, you must provide the location of your own pre-defined HTML files
that MCart uses for the header and footer sections of all its pages. If you select this
option, the user or shop administrator needs to generate HTML files to create and
manage the header and footer of the shop.
IF YOU CHOOSE CUSTOM SETUP YOU ONLY NEED TO FILL OUT THE SECTION
SHOWN IN Figure 2-4.
Page 12 of 58
User’s Guide - MCart 4.0
Figure 2-4
With Custom Setup you may use your own HTML to give your shopping cart your
own personal touch. This is where MCart can have the same look-and-feel of your
own website.
2.1.2.1 Creating header and footer files
Follow the areas below to create the required header and footer files.
HTML page editor
Start with your favorite HTML page editor. (Frontpage, Netscape Editor,
Dreamweaver, etc…) Open a template of your website, or something that you’d like
to use for your shopping cart
Page layout
Create the page layout that you want MCart to use. At one place in the page, put a
line that says “Insert Shop Here”. (See Figure 2-5) This will be the place where the
MCart program inserts its data (inventory, etc…)
Page 13 of 58
User’s Guide - MCart 4.0
Figure 2-5
Save the page
Save the page to an HTML file. This can be called anything, but we’ll suggest you
save it as ‘mcarttemplate.html’
Plain-text editor
Open your favorite plain-text editor (Windows Notepad, vi, etc…). Open the HTML
file in the text editor as shown in Figure 2-6.
Page 14 of 58
User’s Guide - MCart 4.0
Figure 2-6
Figure 2-7
Find the part of the HTML file that contains "Insert Shop Here". Select all of the text
from the top of the file to just before this line. Cut and paste this to a new file, and
save it as header.html. (See Figure 2-7)
Select all the text just after this line to the end of the file. Cut and paste this to a
new file, and save it as footer, this will automatically save as a .txt so it will look like
the footer file.
FTP
Page 15 of 58
User’s Guide - MCart 4.0
FTP (upload) these two files (header.html and footer.html) to your server. We
suggest putting them inside the directory in which you have installed MCart. By
default, this would be the /www/htdocs/mcart directory; but, if you changed the
installation directory in 1.2, then place it in that directory.
Figure 2-8
NOTE: If you have Windows MCart, please call and ask for help because you
will not have FTP access to your webstore.
2.1.2.2 Custom Setup MCart Admin
Enter the locations of the header and footer files into the custom setup section, and
select Preview Page Setup at the bottom of the page to see how your layout turned
out.
A bit of warning... some HTML editors (FrontPage for example) will use relative links
to items in your page like style sheets or images. You will need to change these to
absolute links to make sure the headers/footers work correctly when within MCart.
Go back to your MCart Admin section and enter the complete UNIX file path to both
files. An easy way to ensure you have the correct path is to FTP to your server,
change to the correct MCart directory, and copy the path (directory path) your file is
located in. If you use WS_FTP, the path is in the top of the program. Copy each
path and paste them into the HTML Header and Footer fields with the corresponding
file names as seen in Figure 2-9.
Page 16 of 58
User’s Guide - MCart 4.0
Figure 2-9
Click on Preview Page Setup to see your new page. Figure 2-10 is an example of a
shopping cart created using MCart’s HTML Setup.
Figure 2-10
If your page does not come up correctly, check your header and footer paths by first
going back to the admin section of MCart and ensure both paths are correct.
Page 17 of 58
User’s Guide - MCart 4.0
2.1.3 Additional Options
Additional options can be used in both simple and custom setup options. Figure 2-11
shows the options available.
Figure 2-11
2.1.3.1 Maximum Items per Page
When a customer views a page containing a list of items, MCart automatically splits
the list into separate pages if there are a large number of items. Set this parameter
Page 18 of 58
User’s Guide - MCart 4.0
to the number of items you want listed on each page. (10 or 25 are good numbers to
consider) If you use thumbnails in your shop, we recommend that you limit the
items per page to 10 for faster loading time. If you choose not to use the
thumbnails, 25 items per page are recommended.
2.1.3.2 Display Category Menu In Headers
If you divide your shop into categories, (see Configuration Setup), MCart will place a
menu of links to each category page at the top of all shop pages as shown in Figure
2-12.
My Shopping Cart
Main Entrance | View Shopping Cart | Place Order | Help
Everything | cool | test
Figure 2-12
If you do not want the categories listed in the header, select “No”.
2.1.3.3 Target for Secure Pages
If you run MCart inside a single frame of a framed document, you will discover the
browser does not show the security information correctly when the customer is
transferred to the secure server to place his order. To fix this problem, you can set
the TARGET attribute for the secure server links. If you insert "_TOP", in this field,
the secure server page will automatically open in a new window, which will display
the security needed for your customer. Figure 2-13 shows how the new browser
opens for the checkout area.
Page 19 of 58
User’s Guide - MCart 4.0
Figure 2-13
2.1.3.4 Alternate Checkout URL
Alternate checkout may be used as a different checkout method other than PGP,
MCPS, or Authorize.net. To use this option, enter the URL to redirect for checkout.
2.1.3.5 Cookie Timeout
MCart uses a "cookie" to store the customer's shopping cart ID between visits to
your shop. Use this field to set the number of days to store cookies. After the
expiration date has been met, the customer’s cart will be deleted. It is best to leave
this field at the default of 14 days.
Once all information has been filled out, you can either preview or update your HTML
Setup Options.
2.2 Order Info Setup
Order information is used to provide contact information to your customers placing
offline orders. This is used by a customer that does not want to make a purchase
using the internet interface of your shopping cart, but rather via USPS, telephone,
fax, or email (See Figure 2-14).
Page 20 of 58
User’s Guide - MCart 4.0
The information below is used to tell your customers where to send their orders.
Order Dept Name
My order dept.
Postal Address
Required to accept
Check and Money
Order
payments
421 MaidenLane
Fayetteville, NC
28303
Phone Number
Program will allow
Credit Card Orders by
Phone
if you provide this
number
9103211200
Fax Number
Program will allow
Credit Card Orders by
Fax
if you provide this
number
Email Address
Required to accept
Online Check and
Credit Card
payments
[email protected]
NOTE: If using paypal this must match the email address you
use with paypal.
Ecommerce User ID
Figure 2-14
2.2.1 Order Dept Name
This is the name of the order department (Sales, Orders, Internet Sales, Internet
Orders, etc.)
2.2.2 Phone Number
If you wish to accept phone orders from customers who do not want to put their
credit card information on the secure order form, you will need to enter a phone
number the customer can call.
2.2.3 Fax Number
Page 21 of 58
User’s Guide - MCart 4.0
If you wish to accept fax orders from customers who do not want to put their credit
card information on the secure order form, you need to enter a fax number to accept
orders.
2.2.4 Email Address
An email address is required to accept credit card payments. New order information
is sent to this address, and it is the reply address given to the customer on their
receipt. Remember that MCart will send all attempted, declined, and approved
orders to this address. You will want to make sure that the orders you receive at
this email address are approved before you ship out the product or service. If you
use a PGP key, this email address will also be the email address that the PGP key is
created for. The PGP Key configuration is discussed later. If you’re using Paypal for
checkout your email address must be the same as you use for Paypal login.
2.2.5 Ecommerce User ID
The Ecommerce User ID field is used when MCPS or Linkpoint Gateway is enabled.
Enter your gateway login ID name in this field. Figure 2-15. (This login is supplied by
your MCPS gateway provider or Authorize.net if you are using their gateway
services). This feature is only available if you have selected an option other than
PGP in the Shop Version Control portion of the Configuration Setup.
Ecommerce User ID
Enter your Login ID:
Figure 2-15
Accepted Payment Types
These are the payment types that this program currently accepts. Checks and money orders are
assumed to be handled by postal mail. Online checks, credit card and COD orders are collected
through a secure server and emailed to you via PGP, or they can be phoned or faxed in if you
provided those numbers with your contact info.
Check
COD
Discover
Novus
Money Order
Visa
American Express
Diners
Online Check
MasterCard
JCB
Switch
2.2.6 Referrer Question
You can use the referrer question to ask your customers who referred them to you.
Provide the full text of your request. For instance “How did you hear about us?”
Figure 2-16 shows the Referrer Question section of the Order Info section.
Page 22 of 58
User’s Guide - MCart 4.0
Referrer Question
You can use this option to have MCart ask the customer to give you some information about who
referred them to your shop.
Please provide the full text of your request. Some possible examples might be:
'How did you hear about us?' or
'Please enter the email address of the person who referred you to us.'
or, leave this item blank and no referrer info will be collected.
How did you hear about us?
E-mail for Informational Messages
If you provide an e-mail address here, MCart will send email whenever an offline order form is
viewed by a customer. You will also receive mail at this address whenever an item runs out of
stock in your shop, if you are using one of the MCart inventory control features.
[email protected]
Figure 2-16
2.2.7 E-mail for Informational Messages
If you provide an email address in the Email for Informational Messages section
(Refer to Figure 2-16), MCart will send you an email whenever a customer views an
offline order. You will also receive email at this address whenever you run out of an
item (if you are using one of the MCart inventory control features). If you’re using
Paypal for checkout your email address must be the same as you use for Paypal
login.
2.2.8 Commission Tracking Programs
Commission Tracking allows you to setup your shopping cart to Commission Tracking
Programs that are available on the internet. These services typically provide leads to
you from other sites in exchange for you agreeing to pay a portion of your sale as a
commission for the referral. These programs typically require that you place a hidden
image on your shop checkout page that will report your sales for tracking and
commission payment.
2.3 Configuration Setup
Configuration Setup allows the shopkeeper to modify various shop configuration
options such as categories, item description types, shipping and handling, and other
configuration options. Figure 2-17 depicts part of the Configuration Setup options.
Page 23 of 58
User’s Guide - MCart 4.0
Inventory Database Options
Separate shop into categories:
Yes
No
If you have a small shop with only a few items, set this option to "No" and your inventory
will be listed on the main page.
If you have a larger shop, set this option to "Yes" and your shop will be split into
categories. You also get a basic search tool when you select "Yes".
Disable search engine:
Yes
No
Select allowed fields:
Listed below are optional fields that can be used to configure items in your inventory.
Please select the fields to use in your shop.
Image - URL of picture for each item
Description - a text block to describe the items
Weight - can be used to determine shipping, see below
Option1 - an additional pull-down field you can define
Option2 - an additional pull-down field you can define
SKU
Part Number
Sale Price - will show up in place of the regular price, if set
Size
Custom - a text field you can use to collect custom info like monograms, etc
Color
Figure 2-17
2.3.1 Separate shop into categories
Categories can be used to aid customers when searching for products. If you have a
small shop (less than 75 items), it is recommended that you choose
"NO". If
your shop has more than 75 items, it is recommended that you choose "YES" and
separate your shop into categories. This will help your customers have an easier
shopping experience.
2.3.2 Disable search engine
The search engine is recommended for larger shops where the customer knows the
item number or name but is not sure about the category it’s in. The search engine
features will be displayed on the main page of your shop. To enable the search
Page 24 of 58
User’s Guide - MCart 4.0
engine, you must have categories enabled shown in Figure 2-17. If you have
enabled categories, select no in the Disable Search Engine option. This will enable
customers to search for products in your shop. Figure 2-18 shows a search engine
of a shop. Searches are not case sensitive.
Welcome to our shop. Use this form to search for an item, or
select a category from the list below.
Search inventory for keywords:
Search
Figure 2-18
2.3.3 Select allowed fields
These fields are used to configure your products. You will not be able to assign each
item a specific field. This will configure your entire inventory.
• Image can give your customers a better view of the product.
• Description will give product details to your customer.
• Weight can be used to determine shipping (Refer to Basic Shipping Model)
• Option1 may be used for items that come in different. This will always be a
dropdown menu.
• Option 2 is just like the option 1 field.
• SKU number may be the barcode used to identify an item in your company's
stock room.
• Part number may be a number used to describe an item in your company's
stock room.
• Sale Price will show up in place of the regular price if set
• Size may be used for items that you offer in different sizes (XL, L, M, S,XS)
Sizes can also be used to price products higher that have a certain
characteristic. For example, if you sell t-shirts and you want to charge $2.00
more for an extra large, enter S, M, L, XL + 2.00 in the size field. This will
charge an additional $2.00 for an XL (See Figure 2-19).
Figure 2-19
Page 25 of 58
•
•
User’s Guide - MCart 4.0
Custom field may be used for the items that offer Monograms or custom
lettering (this field will be an input box)
Color can be used for items that you offer in different colors.
If any of these fields are not checked, they will not be shown in the inventory
item interface (See Add Item section).
2.3.4 Optional Field Labels
Optional Field labels can be used to add unique item descriptions or options as
shown in Figure 2-20. To add optional field labels, check the Option1 and Option2 in
the Allowed Fields section shown in Figure 2-17. If you leave these items blank,
they will not be displayed in the inventory item configuration interface.
Optional Field Labels:
If you choose to use the Option1 or Option2 fields in the list above, you can
assign labels for these options here. These labels will be used for all items in
your inventory and they will also show up in your order forms, so we suggest
that you use a short name.
Label for Option1:
Label for Option2:
Option1
Option2
Figure 2-20
2.3.5 Inventory control
Inventory control allows the shop administrator to treat MCart like a physical
storefront. When an item is out of stock, a brick and mortar shop would tell the
customer or make a back order. MCart can keep simple records of the number of
items in your inventory. Select one of the inventory control options seen in Figure 221. Note: MCart cannot keep separate quantities for each of the options available
for a given item. Please plan your item setup accordingly.
There are several options available to control inventory in your shop. The following
lists the options available and provides a description of each:
• No Control – This option allows the shopkeeper to either enable or disable an
item. No quantity is used in this option. Either an item is enabled and it is
displayed in the cart, or it is disabled so customers cannot order it.
• Internal Use – This option allows the shopkeeper to track the number of items
in inventory, and receives email notices if an item is out of stock. Customers
don’t see any notices about inventory levels and are allowed to order items
that are out of stock.
• Show Backorders – This option allows shopkeepers to maintain quantities and
receive notices when items are sold out. This option allows customers to
order items on backorder. A Default ETA message is available for this option
to display a message to customers when they order items that are on
backorder.
Page 26 of 58
•
User’s Guide - MCart 4.0
Limit To Stock – This option allows the shopkeeper to maintain quantities in
inventory and receive notices when items run out. This option is similar to
the Show Backorders options, except this option will not allow a customer to
order an item that is out of stock. The Default ETA Message may be used for
this option as well.
Inventory Control:
Mcart can keep simple records of the number of items in your inventory.
Select one of the inventory control options described below. Note: Mcart
cannot keep separate quantities for each of the options available for a given
item. Please plan your item setup accordingly.
No Control - Items are either enabled or not. The shop will not control
the number of items sold.
Internal Use - Item quantities are maintained and the shopkeeper will
receive notices when items run out. Customers will not be told when they
order more items than are available.
Show Backorders - Item quantities are maintained and the shopkeeper
will receive notices when items run out. Customers will be allowed to
backorder items that are not available in inventory.
Limit to Stock - Item quantities are maintained and the shopkeeper will
receive notices when items run out. Customers will not be allowed to order
more items than are in stock. Items that run out will be disabled in the order
forms.
Display Stock Information:
Select this option if you want Mcart to print the number of items in stock with
the order forms for each item. This display is only availabile if you've selected
"Show Backorders" or "Limit to Stock" in the list above.
Show stock quantities in order forms:
Yes
No
Figure 2-21
2.3.6 Display Stock Information
Select “Yes” under Display Stock Information as seen in Figure 2-21 if you want
MCart to print the number of items in stock on the order forms. This will only be
displayed if you've selected "Show Backorders" or "Limit to Stock" from the
Inventory Control Options set in the Configuration Section of the MCart Admin
interface. Figure 2-22 shows an item that has 5 items in stock and is using the Limit
to Stock Inventory Control method.
Page 27 of 58
User’s Guide - MCart 4.0
test
Part 123123123 - Test Item
Price: $1.00 Sale Price: $1.00
5 items in stock
S
Select a Size
Enter quantity
Add
to cart
Figure 2-22
2.3.7 Default ETA Message
When your shop runs out of an item, it will display a message to your customers
telling them when they can expect the item to be in stock. This message can be
specified individually for each item, or you can set a default message with the
inventory control options that will be printed for any item that does not have an
individual message specified. The Default ETA Message is specified in the
Configuration Settings of your shop as shown in figure 2-23. If you leave this blank,
any item without an individual ETA message will have no ETA message printed at all.
This message will only be used if you've selected "Show Backorders" or "Limit to
Stock" from the inventory control options shown in Figure 2-21.
Default ETA Message:
When Mcart runs out of an item, it will attempt to display a message to your
customers telling them when they can expect you to be back in stock. This
message can be defined individually for each item, and you can also set a
default message here that will be printed for any item that does not have an
individual message attached to it. If you leave this blank, any item without an
individual ETA message will have no ETA message printed at all. This message
will only be used if you've selected "Show Backorders" or "Limit to Stock" in
the list above.
Page 28 of 58
User’s Guide - MCart 4.0
You w ill receive your items soon!
Your default ETA message::
Figure 2-23
Figure 2-24 shows the Default ETA Message displayed to the customer when they
view their cart prior to checkout. If no Default ETA message is specified, there will
be no message.
Your shopping cart contains:
There are only 0 of Test Item currently available. You will receive
your items soon!
Quantity
Part No
Item Color Size Option1 Option2 Custom Weight
Cost Total
Each Cost
2
123123123
Test
Item
S
5.0
$1.00 $2.00
1
123123123 Test
S
5.0
$1.00 $1.00
Page 29 of 58
User’s Guide - MCart 4.0
Item
Sub-Total $3.00
Shipping and Handling $0.00
Total $3.00
We will ship your order by for $0.00,
or you may select from these extra-cost options:
•
add $1.50 for UPS 5-day Ground Delivery
•
add $2.50 for UPS 4-day Ground Delivery
Continue Shopping
Click on this button to go back to select more items from this shop.
You may also use your browser's Back button or select one of the
links at the top of this page.
Update Quantities
You can make changes to the quantities listed above and click the
Update Quantities button to update your shopping cart. To delete an
item, just set the quantity to zero, and click on Update Quantities.
Place Order
Click on the Place Order button to place your order. Please make
sure you have made your shipping selections from the list above
before proceeding to checkout.
Empty Cart
Click on Empty Cart to remove all items from your cart.
Figure 2-24
2.3.8 Default Currency
You can specify the currency you would like to use for your shop (see Figure 2-25).
The default currency is used throughout your shop to display monetary values. By
default, this value is $.
Default Currency
MCart will allow you to change the currency prefix that is printed with all prices.
Please note that it is up to you to make sure you can correctly process orders in the selected
currency.
HTML special characters are allowed here, although they will not show up correctly in the emailed
order forms.
Prefix:
$
Page 30 of 58
User’s Guide - MCart 4.0
Figure 2-25
Page 31 of 58
User’s Guide - MCart 4.0
2.3.9 Sales Tax
You can charge sales tax for your state using the Sales Tax section shown in Figure
2-26, Washington State residents are charged 8% tax. Shipping and handling can
also be tax if specified below the Sales Tax section.
Sales Tax
Your shop can be configured to automatically add sales tax to orders placed from a given state.
Please select the state to charge Sales Tax and the enter current tax rate below.
You may select no tax by leaving the state blank or by setting the tax rate to zero.
You may also specify individual items in your inventory that are not subject to sales tax.
State:
(use 2-letter abbreviation)
Charge Tax on Shipping and Handling?
Rate:
Yes
0.00
%
No
Figure 2-26
2.3.10 Basic Shipping Model
Shipping can be configured in the Configuration Setup portion of MCart. There are
different methods to charge shipping, as well as additional shipping options that can
be predefined by the shopkeeper (see Figure 2-27). The following are different
shipping methods the shopkeeper can setup:
• Flat Rate – shipping is the same for every order, no matter how large or
small.
• Per item – shipping is charged by a flat rate plus an additional rate based on
the number of items ordered.
• By Weight – shipping is charged by a flat rate plus an additional rate based on
the total weight of the order.
• Percentage – shipping is charged by a flat rate plus a percentage of the total
cost of the order.
• By Items – This method allows the shopkeeper to assign a shipping charge to
each item in inventory, and the order is charged the total of all items shipping
fees that were ordered.
• Shipping Rate – This rate is used for the Per Item, By Weight, and Percentage
options of the Basic Shipping Model. If any of these three models are
selected, Shipping Rate is required.
• Minimum Shipping Charge -- This Charge is used if the shopkeeper wishes to
charge a minimum shipping fee on any order. If the total of the shipping
model selected does not amount to the minimum shipping fee, this fee will be
used. For instance if the minimum fee is set to $4, and the total per item fee
is $3, then the minimum fee applies.
Page 32 of 58
•
User’s Guide - MCart 4.0
Maximum Shipping Charge – This charge is similar to the minimum shipping
charge, except it is the maximum fee any customer can pay for shipping. If
the per item rate adds up to $15 and the maximum shipping fee is $10, then
the customer is charged $10 for shipping.
Note: You may only choose one shipping method under the Basic Shipping Model
for your shop.
Basic Shipping Model
Select Shipping
Model:
None - Shipping is not charged and does not appear when viewing a
cart.
None
Flat Rate - Shipping is the same for every order, no matter how large
or small.
Per Item - Shipping is charged based on a flat rate with an additional
charge for each item in the order.
By Weight - Shipping is charged using a flat rate plus an additional
rate based on total order weight.
Percentage - Shipping is charged using a flat rate plus a percentage
of total order cost (enter 5 for 5% not .05).
By Items - Each item has a shipping charge attached to it.
The shipping charge is a total of all item's shipping charges for the
order, plus the flat rate.
Shipping Flat Rate:
0.00
Shipping Rate:
0.00
Minimum Shipping
Charge:
0.00
Maximum Shipping
Charge:
0.00
The base charge for all shipping models.
The per item rate for the Per Item shipping model;
The per pound rate for the By Weight shipping model; or
The percentage rate for the Percentage shipping model.
If an order's calculated shipping charge is less than this value,
the shipping charge for the order will be set to the minimum value.
If an order's calculated shipping is greater than this value,
the shipping charge for the order will be set to the maximum value.
Set this value to zero if you do not want a maximum shipping charge.
Figure 2-27
2.3.11 Additional Shipping options
Page 33 of 58
User’s Guide - MCart 4.0
You can add predefined additional shipping options to your shop. For instance, you
can add a flat rate as an option but also include additional predetermined rates for
Federal Express, UPS, Priority Mail, etc. To add additional shipping Options, you
must select “yes” beside the Additional Shipping Options radio buttons shown in
Figure 2-28. If you do not select yes, the additional shipping options you enter will
not be saved. You need to specify the cost, name, and description of each additional
shipping option (See Figure 2-28).
Additional Shipping Options
Yes
No
If you only want to charge shipping as calculated above, select 'No' and skip down to the end of
this form.
If you want offer additional, extra cost shipping options to your customers, select 'Yes' and fill in
the optional information below.
Describe what kind of shipping customers will get if they do not select any options:
(for example: 'Third-Class US Mail')
Now enter up to 8 additional options in the table below.
Name is a short name that will show up in the order,
Description is the text the customer will see when choosing the options.
(for example: you might want to charge $10 for UPS Next-Day, so enter '10' under cost,
'UPS-NextDay' under name, and 'UPS Next Day Delivery' under description)
Cost
Name
Description
$
$
$
$
$
$
$
$
Leave the Name field blank for options you are not using, and they will not be offered to your
Page 34 of 58
User’s Guide - MCart 4.0
customers.
Figure 2-28
Additional Shipping Options will be displayed upon checkout as seen in Figure 2-29.
Remember to update your configuration information when you are done by clicking
on the update info option at the bottom of the page.
Your shopping cart contains:
Quantity
Part No
123123123
2
Item Color Size Option1 Option2 Custom Weight
Cost
Each
Total
Cost
Test
Item
$1.00
$2.00
S
5.0
Total $2.00
We will ship your order by for $0.00,
or you may select from these extra-cost options:
•
add $1.50 for UPS 5-day Ground Delivery
•
add $2.50 for UPS 4-day Ground Delivery
Continue Shopping
Update Quantities
Place Order
Empty Cart
Click on this button to go back to select more items from this shop.
You may also use your browser's Back button or select one of the
links at the top of this page.
You can make changes to the quantities listed above and click the
Update Quantities button to update your shopping cart. To delete an
item, just set the quantity to zero, and click on Update Quantities.
Click on the Place Order button to place your order. Please make
sure you have made your shipping selections from the list above
before proceeding to checkout.
Click on Empty Cart to remove all items from your cart.
Figure 2-29
2.3.11 Order Tracking
Order tracking allows shoppers to track their orders via FedEx or UPS. This option is
activated via a Module Key. After purchasing and installing the Order Tracking
Module Key, this feature is available for configuration by clicking the “Configuration
Setup” button on the main interface of the admin panel. To enable the order
Page 35 of 58
User’s Guide - MCart 4.0
tracking option, select “Yes” under the Tracking Enable option shown in Figure 2-30.
Update the shop’s configuration settings to enable order tracking. The order History
Report is generated with a link to the UPS or FedEx internet tracking program for
each tracking number if the order was shipped via a traceable shipping method.
Tracking Enable
Yes
No
By selecting 'Yes', your customer will be able to track their orders through
tracking interface if they were using UPS or Fedex shipping method.
By selecting 'No', your shop's tracking interface will be disabled.
Figure 2-30
2.4 Inventory Setup
The Inventory Setup option allows you to modify individual items, modify categories,
change the order items are listed in, and import/export inventory. Figure 2-31
shows the main inventory setup interface. More fields may be shown in the
Inventory matrix if additional modules or fields have been activated.
Page 36 of 58
User’s Guide - MCart 4.0
Figure 2-31
2.4.1 Category Functions
To make changes to a category, select the Category Functions link shown at the top
of Figure 2-31. You can use the interfaces shown in Figure 2-32 to make changes to
all items in a given category, and to rename or delete a category.
Select a Category to Modify
Everything
Select a Category Function
Rename Category
Enter new category name:
Page 37 of 58
User’s Guide - MCart 4.0
Then click
Delete Category
Rename Category
Are you sure you want to permanently remove all items in your
inventory that belong to this category?
Yes
No
Delete Category
Modify All Items in Category
Enable/Disable All Items?
No Change
Make Each Item Taxable?
No Change
Remove Sale Prices on Each Item?
No
Modify Category
Go Back To Main Menu
Figure 2-32
There are a few things you can do with the Category Functions interface. The
following describes each function:
• Rename Category – To rename a category, select the category to rename
from the dropdown menu near the top of the page shown in Figure 2-32.
Enter the new category name in the Rename Category section and click the
Rename Category button. The category will be renamed and the changes will
be made to all items in that category.
• Delete Category – To delete a category, select the category from the
dropdown menu shown in Figure 2-32. By deleting a category, you will delete
all items in that category. Make sure this is what you want to do! After you
delete a category, you will not be able to retrieve any items in that category.
You must select yes to delete all items in that category and click the Delete
Category button.
• Modify All Items in Category – This option will allow you to modify the
quantity for all items in a category, or if the No Control option is set for
Inventory Control Options, you will be able to enable or disable all items in
the category selected. You can also make each item taxable or non-taxable,
or leave them with the same value. Finally, you can remove the sale price on
all items. To update the changes to the category, fill in the specified options
and click the Modify Category button.
2.4.2 Change listing order
To change the order of items in your shop, select the Change Listing Order link
shown in Figure 2-31. Use this option to automatically sort your inventory by
Category and Item Name. You can also order the items in your inventory manually;
they don’t have to be listed in the order they were entered. So, if you have items
Page 38 of 58
User’s Guide - MCart 4.0
that you want customers to see first, you can re-number them here and click the
update sequence button. Refer to Figure 2-33.
Figure 2-33
2.4.3 Import/Export Menu
When you setup a new shop, you don’t have to re-enter your data. You can import
data from a different shop by selecting import/export link shown in Figure 2-31. The
Miva import module can be activated to import data from a Miva database.
Import Inventory Data from a Flat File
This function will import inventory data from a delimited text data file. The file format must
consist of one item per line, with each field separated by the delimiter chosen below. The first line
of the file must consist of the item's field names in the following lines. To better understand this,
use the export function (below) to create an example.
Text Data File:
Give the full path and filename of the file that contains your data.
If you prefer, you can select a file on your local machine and MCart will upload it for you.
Remember that large data files can take a long time to upload. Please be patient.
Choose your delimiter:
Page 39 of 58
User’s Guide - MCart 4.0
Choose a character string to use as a delimeter between the fields in your data. This
delimiter should not appear in the data for any of your items. If you to use the Tab
character as a delimiter, put the word 'tab' here.
Merge with or replace existing inventory data?
Merge
Replace
If you choose to Merge your data, any existing items will be updated with the information
found in your file. New items will be created as needed.
If you choose to replace data, all existing items will be erased, and the items in the import
file will be created as new items.
Import Inventory
Figure 2-34
Import Inventory Data from a Flat File
You can import inventory data from a delimited text data file (this is a file that was
created containing all inventory). The import file must be an ASCII text file. The
fields can be delimited by a pipe (‘|’), tab, *, or any other character (with the
exception of commas) that you select as long as they are not included in any part of
the data. Refer to Figure 2-34 to see the import file section of the Import/Export
interface. Most spreadsheet programs, like Microsoft Excel, can export spreadsheets
into a comma / tab delimited format. You should be able to export data from most
databases as well, e.g. Microsoft Access.
Figures 2-35 through 2-38 show the fields needed to import inventory. In the import
file the first line of the file needs to contain the name of the columns. Each product
must be on its own line of the import file. To see an example of an import file, use
the Export Function to create a properly formatted input file. This will provide a
format to start from if you are importing data from an existing shopping cart.
The following are descriptions of import fields followed by sample data.
Page 40 of 58
User’s Guide - MCart 4.0
This import file format should be used only with the MCart import utility.
Excel
#
Column
name
Type
A
Sequence
Number
No
The order in which the item will be
displayed in the category.
B
Quantity
Number
No
The number of items currently instock.
C
ETA
String
No
A message to be displayed to
customer when items are out of
stock and inventory control method
is “Show backorders” or “Limit to
Stock”.
D
OrderLimit
Number
No
The maximum number that can be
purchased per customer.
E
Name
String
No
The display name of the product.
F
Price
Number
No
The customer purchase price.
G
ShippingCost Number
No
The additional charges for shipping.
H
NoTax
1 or 0
No
To add tax (1 for True, 0 for False).
I
PartNo
String
20
No
The part number associated with the
product.
J
SKU
String
20
No
The SKU number for the product.
K
Weight
Number
No
The weight of one product.
L
Size
String
50
No
The sizes available for the customer
to choose from.
M
Color
String
50
No
The colors available for the customer
to choose from.
N
Option1
String
50
No
Additional options.
O
Option2
String
50
No
Additional options.
P
Custom
String
50
No
Custom field.
Q
SalePrice
Number
No
The sale price for the product.
R
Description
String
1024 No
Description to be displayed on the
web page for the product.
S
Image
String
254
No
An image file that will be displayed
on the web page for the product.
T
ID
String
20
Yes
Product ID. Must begin with IT.
Max Required Description
100
100
Figure 2-35
Page 41 of 58
User’s Guide - MCart 4.0
The following 2 fields are related. If you have one you must include both even
though one may contain no data.
Excel
#
Column name
Type
U
AllowPSale
1 or 0
V
PDiscountPercent Number
Max Required Description
No
Allow periodical sale. (1 for
True 0, for False).
No
Discount percent.
Figure 2-36
The following 5 fields are related. If you have one you must include the remaining 4
even if they contain no data.
Excel
Column name
#
Type
W
AllowWSale
1 or 0
No
Allow wholesale. (1 for True 0,
for False).
X
WMinQty
Number
No
The minimum quantity to
wholesale.
Y
WDiscMethod
1 or 0
No
Which wholesale discount
method to use.
(1 for WDiscountAmount, 0 for
WDiscountPercent).
Z
WDiscountAmount Number
No
The discount amount for the
wholesale.
AA
WDiscountPercent Number
No
The discount percentage for the
wholesale.
Max Required Description
Figure 2-37
Page 42 of 58
User’s Guide - MCart 4.0
The following 3 fields are related. If you have one you must include the remaining 2
even if they contain no data.
Excel
#
Column name
BB
EnableShipNotice 1 or 0
No
Allow shipping notice. (1 for True
0, for False).
CC
LowItemLimit
Number
No
The item limit reached to be
considered as low inventory.
DD
NoticeEmail
String
No
The email to be sent when
inventory is low.
Type
Max Required Description
50
Figure 2-38
Below is a sample that could be imported:
ID|Sequence|Quantity|ETA|Limit|Name|Price|Shipping|NoTax|PartNo|SKU
|Weight|Size|Color|Option1|Option2|Custom|SalePrice|Description|Image|
Category|
IT01|1|20||1|productName|1.00|15.00||partnum12|654321||s,m,l,xl|blue,green.red
|1,2,3,4|5,6,7,8||13.95|description goes here|picture.jpg|ForSale|
Import Data from a Miva Data Source
Miva data may also be imported if you have purchased and activated the module
key. This function will convert your inventory database from the Mcart Xbase format
to a delimited text file, which should be suitable for importing into a spreadsheet or
database program. The file will consist of one item per line, with the fields for each
item separated by the delimiter you select. Figure 2-39 shows the interface to
import Miva data.
If you do not see the Miva import section under the Import/Export interface, make
sure you have purchased the Miva Module key and activated the key.
Page 43 of 58
User’s Guide - MCart 4.0
Figure 2-39
Export Inventory Data to a Flat File
To Export Inventory, fill in the bottom section of the Import/Export interface shown
in Figure 2-40. This function will convert your inventory database (that you already
had from a previous shopping cart or you have recently created) from the MCart
Xbase database to a delimited text file, which is suitable for importing into a
spreadsheet or database. The file will consist of one item per line, with the fields for
each item separated by the delimiter you select. The shopkeeper specifies which
fields are exported by checking the fields to export as shown in Figure 2-40.
Page 44 of 58
User’s Guide - MCart 4.0
Figure 2-40
2.4.4 Setting up your inventory item-by-item
To begin setting up new items in your inventory, use the Inventory Setup Interface.
You can access this interface by clicking the Inventory Setup button on main Mcart
interface.
2.4.4.1 Add Item
You can add items to your inventory from scratch by selecting the Add Item button
shown in Figure 2-31. The information you need to enter to configure your products
is shown in Figure 2-41. If you didn’t check a field to use that you setup in the
Configuration Section, it will not be displayed below. For instance, if you didn’t
check weight, you will not see the weight option. The ETA Message will only be
Page 45 of 58
User’s Guide - MCart 4.0
displayed if you selected “Show Backorders” or “Limit to Stock” from the
Configuration Setup Inventory Control Options.
Quantity - How many of this item are available in your inventory?
1
ETA Message - Message to display when this item has run out in your inventory.
Limit Per Order - Set this value to a number other than zero, and each customer
will be limited to that many of this item per order that they make, regardless of the
available inventory. If you set this value to zero, customers can order as many of
this item as they want (within the limits of your inventory, if set above.)
Part Number:
SKU:
Name:
Category:
Everything
Weight: in lbs.
New Category:
Page 46 of 58
User’s Guide - MCart 4.0
Note on pull-down options:
All pull-down option fields can contain prices or price adjustment information,
which allow you to change your prices based upon user-selected options. Add
an equal sign '=' followed by the new price after an option to set the price to
that value. Add a plus '+' or minus '-' followed by a number, and the price will
be adjusted by that amount when that option is selected. Do not include the
dollar-sign in this number.
For example, you can set a list of shirt-types as:
Sizes:
T-shirt=15,Long-Sleve Shirt=17,Sweatshirt=20
and Mcart will charge 15, 17 or 20 dollars depending upon which type is
selected. Additionally, you could set the Size options to be:
S,M,L,XL,2X+2.25,3X+2.25
and Mcart will add an additional $2.25 to the price when large shirts are
selected.
List available sizes with commas between them. Or leave this field blank to
have no Size options for this item.
Colors:
List available colors with commas between them. Or leave this field blank to
have no Color options for this item.
Option1: (Option1)
List available options with commas between them. Or leave this field blank to
have no Option1 options for this item.
Option2: (Option2)
List available options with commas between them. Or leave this field blank to
have no Option2 options for this item.
Custom field:
Enter the label for a blank text field attached to this item. Some examples:
'Monogram', 'Text to put on Shirt', etc.
Price:
You can leave this field blank, and the Price will not show up with the item
listing (which is useful if you have defined the price of the item from the pulldown options.) You can also set this to a string (like "FREE") if you wish.
$
Sale Price:
If this field is set, then this price will be listed as a special sale price for the
item.
$
Taxable: - is this item subject to sales tax?
Yes
Image URL:
No
Page 47 of 58
User’s Guide - MCart 4.0
Give the URL of a picture of this item, or leave this blank for no picture.
If you prefer, you can select an image on your local machine and Mcart will
upload it and set the URL for you.
If you provide an image file here, it will override the URL stored above.
Item Description:
Enter a brief description of the item. HTML tags are allowed, if you want to
use them. This program will not check your HTML, so be sure you check your
results before making your changes permanent.
Preview Item Listing
Update Item Data
Reset Form
Figure 2-41
You will need to specify any information you desire in the item interface shown
above. Any information that is left blank will not be displayed to the customers.
2.4.4.2 Update list
This option allows you to change the availability of items in this list. Make changes
in the quantity of items and click the update list option as shown in Figure 2-42. If
you have set the inventory control option to “No Control”, you will only be able to
enable or disable the item. If you have selected any other inventory control option,
you will be able to update the quantity of all items in the list.
Page 48 of 58
Enabled
Category
User’s Guide - MCart 4.0
Part
Number
Item
Name
Item
ID
Yes
Everything
The
greatest
Software
In the
World
Yes
james
category
james
product
Update List
SpecialSales
Wholesale
ShipNotice
IT1
No
No
No
IT2
No
No
No
To change the quantities of the items in this list, make changes in the input boxes
above and click here.
Figure 2-42
2.4.4.3 Edit Item
This option allows you to change an item in your inventory. Select an item from the
list that you created, click the edit item option shown in Figure 2-31, and you will be
able to make any changes you need. You will see the same interface as when adding
an item to inventory except the item data will be displayed.
2.4.4.4 Copy Item
To make a new item based on an existing one, select the item from your inventory
and click the copy item button shown in Figure 2-31. This will duplicate the item you
copied, and you can modify any of the contents of the newly copied item.
2.4.4.5 Remove Item
To remove an item from your inventory, select the item from the list you created and
click the remove item option shown in Figure 2-31. You will be prompted to delete
all data associated with the item. You must select to remove all data from the item.
This will remove this item from your inventory completely.
2.5 Change Admin Password
To change the shopping cart admin password, select the Change Admin button of the
admin interface. Refer to Figure 2-1. Once you submit this change, it will take
effect immediately. After submitting a new password, you will be prompted to enter
your new password before proceeding. Once you enter your new password in your
browser's login box, you will be able to continue to administer your shop.
2.6 Purge Cart Database
Page 49 of 58
User’s Guide - MCart 4.0
To purge the cart database, select the Purge Cart Database button on the main
admin interface as seen in Figure 2-1.This helps you save disk space by deleting all
shopping carts that have expired. The expiration time is set in the shop
configuration section discussed in the Cookie Timeout section above. We suggest
you purge expired shopping carts every month or so. Figure 2-43 shows information
displayed after shopping carts are purged.
Your cart database has been purged
Active carts in database
3
Expired carts that have been removed
4
Number of Empty Cart
2
Disk space recovered (bytes)
15
Figure 2-43
2.7 Review Orders
To review orders, select the Review Orders button from the main admin interface.
This will show you all orders. Some of the orders may not be authorized yet, but all
are shown. Once you have used the purge cart database option (see purge cart
database for an example), you will see only declined and approved orders. Mcart will
not distinguish between approved and declined orders.
Review Your Orders
Click on one of the ID's listed below to view, edit, delete, and if the Pro Module Upgrade is
activated, the tracking information for that order (Tracking Info Setup).
ID
Date
Email
Ordered via
69439868
Thu Mar 14 17:18:26 2002
[email protected]
Offline checkout
69441579
Thu Mar 14 17:59:47 2002
[email protected]
Offline checkout
Go back to Main Menu
Figure 2-44
2.7.1 Tracking Info Setup
Page 50 of 58
User’s Guide - MCart 4.0
Tracking Information for Order #69439868
Tracking Number:
dsdsdsd
Date Shipped:
2
Shipping Handler:
FEDEX
Shipping Method:
UPS Next Day Air Early A.M.®
14
2002
Submit
Figure 2-44-1
Mcart allows you to enter your specific tracking information for each individual order.
2.8 PGP Key
To setup a PGP Key, select the PGP key button from the main admin interface.
Enter PGP key for [email protected]
Use this form to submit a PGP public key that will be used to encrypt
your credit-card orders before mailing them to your order address.
If you are not familiar with PGP, you'll want to start by visiting the
Pretty Good Privacy homepage to get the software you will need to
generate your encryption keys and to decode your messages.
1. If you have not already done so, generate a PGP public and secret key pair for
the address [email protected]. Your public key must belong to this email
address, or the order program will not know which key to use when sending
your orders. If this is not the address that you want to use, go back to your
Mcart Admin program and change the Order Email address before returning to
this form.
2. Extract your public key to an ASCII file. On a unix system, the command to
use would be:
o PGP 2.x: pgp -kxa [email protected]
Page 51 of 58
User’s Guide - MCart 4.0
o PGP 5.x: pgpk -x [email protected]
3. Cut and paste the ASCII-armored key data into this box
(Be sure to include the BEGIN and END PUBLIC KEY BLOCK lines!)
4. Click on this button to submit your key:
Set Key
Figure 2-45
The PGP key interface shown in Figure 2-45 displays the email address entered in
the html options setup page (see the email section under 2.2.4) as the email where
all orders will be received. If you are not familiar with PGP, you’ll want to start by
visiting the Pretty Good Privacy at http://www.pgp.org. You can download the
software needed to generate your encryption keys and to decode your messages.
PGP can be obtained as freeware for non-commercial use or can be purchased for
commercial use. The commercial versions are inexpensive for small businesses. For
licensing information, please review the Network Associates website at
http://networkassocicates.com
2.8.1 Generate public and secret key
If you have not already done so, generate a PGP Public and Secret key pair for the
email address orders will be sent to. Your public key must belong to this email
address, or the order program will not know which key to use when sending your
orders. If you want orders sent to a different email, go back to your Order Info
Setup and change the Order Email address before returning to this form.
2.8.2 Extract your public key
Extract your public key to an ASCII file (A readable file). On a UNIX system, the
command is the following:
• PGP 2.x: pgp -kxm [email protected]
• PGP 5.x: pgp -x [email protected]
If you’re using a Windows Operating System, you can extract your key using the
following instructions:
Page 52 of 58
•
•
•
•
User’s Guide - MCart 4.0
Launch PGP keys (This can be done by clicking the icon in your system tray or
by clicking the icon on Outlook or Outlook Express).
Highlight the email address that the key was created for.
Right click, and select export.
Save this to a location where you can easily access, such as your desktop or
main HDD.
2.8.3 Insert Key
Cut and paste the key data into the input box shown in Figure 2-45 and be sure to
include the BEGIN and END PUBLIC KEY BLOCK lines refer to Figure 2-46. Then click
the button to set your key. This will automatically set your key to send all orders to
the email address that you provided. If you do not know how to extract your key,
use the following instructions. Note that this is for Windows operating systems only.
•
•
•
•
•
•
•
Go to the file. (If located on your desktop, just minimize all windows.)
Select the file. (Do not double click, just single click.)
Hold the shift key and right mouse click at the same time.
You will see the “open with..” option. Click it.
From the menu, select notepad or Wordpad.
The key will open in notepad or Wordpad.
Copy and paste the key from notepad or Wordpad into the MCart Admin area
to set your PGP key.
Page 53 of 58
User’s Guide - MCart 4.0
1. Extract your public key to an ASCII file. On a unix system, the
command to use would be:
o PGP 2.x: pgp -kxa emailaddress
o PGP 5.x: pgpk -x emailaddress
2. Cut and paste the ASCII-armored key data into this box
(Be sure to include the BEGIN and END PUBLIC KEY BLOCK
lines!)
-----BEGIN PGP PUBLIC KEY BLOCK----Version: PGP for Personal Privacy 5.0
mQGiBDxMZtgRBADZxLAyz9csSpg3a0IWmoI5iZgIcGC5ykvxvZV4xpy2R
IbNivVr1eTjvHul75AfJZnCtc2CLuy4d8S+b7chTPHUPG+9XHjAFmN9D9Pmu
MxoJ58XRat3Xw iIkcjaw GrZJNsMGW9H7GW2eHhsOxPhC8PcmI9hzz45sC
xRHlJ0BxHiDgyOw FkQTdrCsD/Rw MfXen7atH9BmSf/nlj5HANDEFau8Tnbf
zmVfKy0DsnY99g97G+SI5t4E+matzLx0RE+ENIvq8n+gmLov3MskUw jzOC
NdXBUECNqiJG37Ovn7yDETvvjCV3AJWK136ht2Iknj14IK3jhGZ0Zbbvgr7K
qUFdBACsMgX+A6+DFs6sYRKA68aWLIw 3f79Q8PO5pCLdZJ85VXjN2OK
j05GIUqW3TxgFWrjL3UziOCibceOZuto+Q5xQYWAXh7fey0ZtkZoxGnUOe
vuOPrfcvdym8BcH+y4SVk16tDgeILC0yhQECZXyuP0NHGQsjULQeTWljaG
3. Click on this button to submit your key:
Set Key
Figure 2-46
3. Common Errors
3.1 PGP Order Processing
• A very common error message that will be seen by users of MCart is “The
shopkeeper has not provided a valid PGP key to encrypt your order. Please
contact the shopkeeper about this error.” This error message comes from the
MCart program, which states that the MCart administrator has not setup a PGP
key at all, or that the PGP key being used is not the same as the one in the
“Order Info Setup” area. If you select the PGP Key option for processing orders,
you will need to set up a PGP Key. If you are getting this error, or have
customers getting this error, review this section: 2.2.4 Email Address under
Order Info Setup.
3.1 Custom Setup Errors
•
The error “Could not find header and footer files” comes from MCart’s inability to
find the HTML files that you have created under “Custom Setup.” Review section
2.1.2.1 and ensure you have the complete and correct UNIX path for the header
and footer file. You can check via FTP to ensure that they are in the correct
location.
Page 54 of 58
User’s Guide - MCart 4.0
3.3 Full Ecommerce Order Processing
•
If this error message comes up, “merchant login ID incorrect or account
inactive”, check Order Info Setup and make sure your gateway login ID name
(username given by MCPS when the gateway account is setup) is in the
ecommerce user ID box. Another error message is “unable to open/parse client
certificate file”. Make sure you are using the correct version of MCart because
this problem is usually related to the wrong version being installed. Check that
you are using the correct Cart Version.
4. Module Key Activation
Module Keys are designed to turn on additional MCart functionality or upgrade the
cart to the PRO version. These keys can only be generated by purchasing them from
your hosting provider. Upon receiving the new module key, go to the admin panel
and click on the Module Key button. This will display the interface shown in Figure 41.
You shop have the following module installed:
· Pro 4.0 Modules
Please copy and paste the key into the box and then submit to unlock Mcart's
enhanced features.
Click on this button to submit your key:
Submit Key
Figure 4-1
***notice that any module keys previously installed will be displayed at the top of
the page.
Page 55 of 58
User’s Guide - MCart 4.0
Upon correctly submitting a new module key, the corresponding module will be
activated and available for configuration.
5. Discounts
Discounts allow the shopkeeper to offer special sales for certain periods of time. This
module also allows wholesale sales. This option is activated via a Module Key. This
feature is available for configuration by clicking the “Configuration Setup” option in
the main interface of the admin panel. If you do not see the Sales Control section of
your configuration interface, make sure you have purchased the Discount module
and activated it successfully. Figure 5-1 shows the sales control section of the
configuration setup interface.
Sales Control
There are two sales control methods: Special period sales control and Wholesale control. Special
Period Sales Control will allow the shop administrator config the special period sale between start
date and end date. Wholesale control will allow the shop administrator to wholesale products
respect to wholesale item limit
Special Period Sales Control:
Yes
No
Wholesale Control:
Yes
No
Shop Version Control:
PGP Version
Linkpoint Gateway Version
MCPS Gateway Version
Figure 5-1
After enabling wholesale or special period sales control, you will need to update the
configuration settings. The confirmation screen will have an arrow that will direct
you to the special discounts setup page as shown in Figure 5-2.
Configuration Info has been Updated
Page 56 of 58
User’s Guide - MCart 4.0
· You will be using categories but you have disabled the search engine feature
· The following fields were selected for each item in your inventory:
•
•
•
•
•
•
•
•
•
•
•
·
·
·
·
·
·
·
·
Image
Description
Weight
Option1
Option2
SKU
PartNo
SalesPrice
Size
Custom
Color
MCart will keep track of your stock, but it will not tell your customers when an item runs out
Your currency prefix is $
You will collect 1.50% sales tax from shoppers from NC
You will collect sales tax on Shipping and Handling charges
Your shipping method is: Flat Rate
Your minimum shipping charge is $45.45
Your maximum shipping charge is $46.46
You will offer additional shipping options:
•
•
•
Basic shipping is: What is this " for "??????????//
$11.11 for Quick delivery
$32668.92 for testing next
· You have configured your shop to use PGP checkout
•
You have selected wholesale control
Figure 5-2
Click on the arrow above to setup different discounts as shown in the Figure 5-3.
Page 57 of 58
Start
Date(mm/dd/yyyy)
User’s Guide - MCart 4.0
End
Date(mm/dd/yyyy)
Discount
Percentage
1
22
2002
3
22
2002
15.00
1
22
2002
3
22
2002
10.00
%
%
Create
%
Click to go back to Main Menu
MCart v.4.0
Figure 5-3
To add a discount group, enter the beginning and ending dates and the discount
percentage you would like to use in the bottom input boxes and click the create
button. To modify an existing discount group, update the fields you would like to
modify, and select the change button. To apply sales control to an item, you must
go to each item in your inventory and change the default values to the desired
values.
Figure 5-4 is an example of how to setup an item’s discounts:
Special Sales Control:
Select YES to enable special period sales control. Select NO to disable special
period sales control.
Yes
No
Select the Discount Percentage:
15.00% From 1/22/2002 to 3/22/2002
Page 58 of 58
User’s Guide - MCart 4.0
WholeSale Control:
Select YES to enable wholesale control. Select NO to disable wholesale
control. You can specify the minimal product quantity to be considered
wholesale, as well as the discount percentage or amount.
Yes
No
Minimal product quantity
0
Wholesale discount percentage
Wholesale discount amount
0.00
%
0.00
Figure 5-4
To apply a wholesale discount, select yes for wholesale control, and enter the
minimal product quantity and the discount you would like to apply. To use the
special sales discount, select yes for Special Sales Control and select the discount
you would like to use. You must update the item for the changes to take effect.
6. Additional Help
If you have reviewed the User’s Guide, and you still have a question about your
shopping cart, please contact your Technical Support Representative at your hosting
provider.
Resources:
• Mcart.com - http://www.mcart.com/
Thanks to:
• Paul J. Crispi at PrimoCaps.com
• Sean McCoy and Allen Horman at Netrphia.com
• Steve Barbee at btigroup.com
• Marshall Mermell at c911.com