1
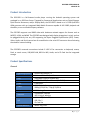
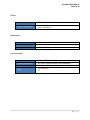
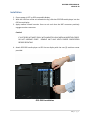
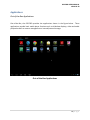
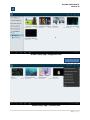
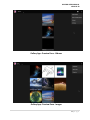
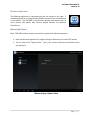
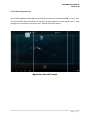
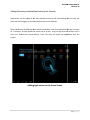
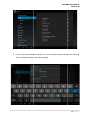
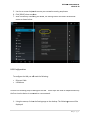
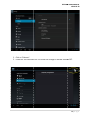
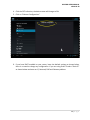
_OPS-DRD : OPS Digital Signage Player_
Users Manual
v2014-02-28
OPS Form Factor Android Player for Commercial Applications
Copyright
The documentation and the software included with this product are copyrighted 2014 by
Technovare Systems Inc. All rights are reserved. Technovare Systems Inc. reserves the right to
make improvements in the products described in this manual at any time without notice. No
part of this manual may be reproduced, copied, translated or transmitted in any form or by any
means without the prior written permission of Technovare Systems Inc. Information provided in
this manual is intended to be accurate and reliable. However, Technovare Systems Inc. assumes
no responsibility for its use, nor for any infringements of the rights of third parties, which may
result from its use.
Acknowledgements
Android and Chrome are trademarks of Google Corporation.
Technovare is a trademark of Technovare Systems Inc.
All other product names or trademarks are properties of their respective owners.
Product Warranty (36 Months)
Technovare warrants to you, the original purchaser, that each of its products will be free from
defects in materials and workmanship for 36 Months from the date of purchase. This warranty
does not apply to any products which have been repaired or altered by persons other than
repair personnel authorized by Technovare, or which have been subject to misuse, abuse,
accident or improper installation. Technovare assumes no liability under the terms of this
warranty as a consequence of such events. Because of Technovare’s high quality-control
standards and rigorous testing, most of our customers never need to use our repair service. If a
Technovare product is defective, it will be repaired or replaced at no charge during the
warranty period. For out of warranty repairs, you will be billed according to the cost of
replacement materials, service time and freight. Please consult your dealer for more details.
Technical Support and Assistance
Visit the NEC Display Solutions Support website at:
http://nec-display-solutions.com/p/hq/en/home.xhtml
Contact your distributor, sales representative, or NEC’s customer service center for technical
support if you need additional assistance. Please have the following information ready before
you call:
• Product name and serial number
• Description of installed peripheral attachments
• Description of installed software
o (operating system, version, application software, etc.)
• A complete description of the problem
• The exact wording of any error messages
If you think you have a defective product, follow these steps:
1. Call your dealer and describe the problem. Please have your manual, product, and any
helpful information readily available.
2. If your product is diagnosed as defective, obtain an RMA (return merchandise authorization)
number from your dealer. This allows us to process your return more quickly.
3. Carefully pack the defective product, a fully-completed Repair and Replacement Order Card
and a photocopy proof of purchase date (such as your sales receipt) in a shippable container. A
product returned without proof of the purchase date is not eligible for warranty service.
Technovare shall not be responsible for lost, stolen or misdirected mail or for damage to the
product incurred during shipping.
4. Write the RMA number visibly on the outside of the package and ship it prepaid to your
dealer.
Packing List
Before installation, please ensure the following items have been shipped with the unit:
•
•
•
1 x OPS-DRD Unit
1 x WiFi Antenna
Users Manual (installed on the OPS-DRD unit)
Declaration of Conformity
CE
This product has passed the CE test for environmental specifications. Test conditions for passing
included the equipment being operated within an industrial enclosure. In order to protect the
product from being damaged by ESD (Electrostatic Discharge) and EMI leakage, we strongly
recommend the use of CE-compliant industrial enclosure products.
FCC Class A
Note: This equipment has been tested and found to comply with the limits for a Class A digital
device, pursuant to part 15 of the FCC Rules. These limits are designed to provide reasonable
protection against harmful interference when the equipment is operated in a commercial
environment. This equipment generates, uses, and can radiate radio frequency energy and, if
not installed and used in accordance with the instruction manual, may cause harmful
interference to radio communications. Operation of this equipment in a residential area is likely
to cause harmful interference in which case the user will be required to correct the interference
at their own expense.
Warnings, Cautions and Notes
Warning!
Warnings indicate conditions, which if not observed, can cause personal injury!
Caution!
Cautions are included to help you avoid damaging hardware or losing data. e.g.
There is a danger of a new battery exploding if it is incorrectly installed. Do not attempt to
recharge, force open, or heat the battery. Replace the battery only with the same or equivalent
type recommended by the manufacturer. Discard used batteries according to the
manufacturer's instructions.
Note!
Notes provide optional additional information.
Safety Instructions
CARE SHALL BE TAKEN TO STORE AND OPERATE THIS EQUIPMENT ACCORDING TO ITS
SPECIFICATIONS.
DO NOT LEAVE THIS EQUIPMENT IN AN ENVIRONMENT WHERE THE STORAGE TEMPERATURE
MAY GO BELOW -20° C (-4° F) OR ABOVE 60° C (140° F). THIS COULD DAMAGE THE EQUIPMENT.
THE EQUIPMENT SHOULD BE IN A CONTROLLED ENVIRONMENT.
•
•
•
•
•
•
Place this equipment on a reliable surface during installation. Dropping it or letting it fall
may cause damage.
The openings on the enclosure are for air convection. Protect the equipment from
overheating. DO NOT COVER THE OPENINGS.
All cautions and warnings on the equipment should be noted.
Never pour any liquid into an opening. This may cause fire or electrical shock.
Never open the equipment. For safety reasons, the equipment should be opened only
by qualified service personnel.
If one of the following situations arises, get the equipment checked by service
personnel:
o Liquid has penetrated into the equipment.
o The equipment has been exposed to moisture.
o The equipment does not work well, or you cannot get it to work according to the
user's manual.
o The equipment has been dropped and damaged.
o The equipment has obvious signs of breakage.
Caution!
DISCARD USED BATTERIES ACCORDING TO THE MANUFACTURER'S INSTRUCTIONS.
OPS-DRD USERS MANUAL
v2014-02-28
Table of Contents
Product Specifications......................................................................................... 8
General .................................................................................................................................................. 8
Power .................................................................................................................................................... 9
Mechanical ............................................................................................................................................ 9
Environmental ....................................................................................................................................... 9
External Connections ........................................................................................ 10
Bottom of Card (BOC).......................................................................................................................... 10
Top of Card (TOC) ................................................................................................................................ 10
Installation ....................................................................................................... 13
Operating Instructions ...................................................................................... 15
Power ON ............................................................................................................................................ 15
Power OFF ........................................................................................................................................... 16
Sleep / Wake ....................................................................................................................................... 16
Unit Reset ............................................................................................................................................ 16
Restore Factory Defaults ..................................................................................................................... 16
Applications ...................................................................................................... 18
Out-of-the-Box Applications................................................................................................................ 18
Installing New Applications ................................................................................................................. 31
Uninstalling Applications .................................................................................................................... 32
Adding/Removing Installed Applications from Desktop ..................................................................... 33
System Configuration........................................................................................ 35
WLAN Configuration ........................................................................................................................... 35
LAN Configuration ............................................................................................................................... 37
System Software Updates ................................................................................. 41
7|Page
OPS-DRD USERS MANUAL
v2014-02-28
Product Introduction
The OPS-DRD is a full-featured media player running the Android operating system and
packaged in an OPS form-factor. Targeted for Commercial Applications such as Digital Signage,
Quick Service Restaurant, and/or Display Walls, the OPS-DRD is based on a 1.0 GHz Quad Core
ARM processor with an integrated Multi-Media Processor capable of full 1080P playback and
the ability to run certified third party software.
The OPS-DRD supports true 1080P video with hardware assisted support for formats such as
MPEG2, H.264, and WM9. The OPS-DRD was designed with display integration in mind, and can
be plugged directly into any LCD supporting the Open Pluggable Specification (OPS). Power,
Video, Audio, and Serial control are all accessible thru the units OPS connector thus eliminating
the need for external cabling.
The OPS-DRD’s external connections include 2 USB 2.0 for connection to keyboard, mouse,
flash, or touch screen, 100/1000 LAN, 802.11n Wifi, Audio, and a SD Card slot for integrated
storage.
Product Specifications
General
Operating System
CPU
GPU
RAM
Flash
Video
Audio
Network
I/O
System Monitor
Android Jelly Bean 4.2.2
Allwinner Tech A31 Quad-Core
Integrated PowerVR SGX544 MP2
2 GB DDR3-1333, Dual Channel (2 x 512M)
8 GB NAND
OPS-HDMI v1.3
1080p @ 50/60 Hz, 720p @ 50/60 Hz
OPS-Analog, Stereo
100/1000BT Ethernet
802.11.b/g/n Wireless
OPS-UART (3.3V LVTTL)
USB 2.0 x 2
SD Card Slot
Watch Dog Timer
8|Page
OPS-DRD USERS MANUAL
v2014-02-28
Power
Input Power
Power Consumption
12.0 V – 19.0 V (16.0V Nominal)
Idle : 2.5 Watts
Max : 12.0 Watts
Mechanical
Dimensions
Weight
Gross Weight
OPS Form Factor (200mm x 119mm x 30mm)
1.2 lbs / 0.52 kg
2.2 lbs / 0.98 kg
Environmental
Operating Temperature
Operating Humidity
Storage Temperature
0 °C to +40 °C Ambient
80 % max, relative humidity, non-condensing
-20 °C to +60 °C
EMC
FCC Section 15
CE
9|Page
OPS-DRD USERS MANUAL
v2014-02-28
External Connections
Bottom of Card (BOC)
The OPS-DRD media player provides a single BOC connector for the purpose of mating with an
OPS compatible display or docking station. This 80-pin connector provides connectivity for the
following interfaces:
a.
b.
c.
d.
HDMI Video
Analog Stereo Audio
UART
3 x USB 2.0
OPS-DRD BOC Connector
Top of Card (TOC)
The OPS-DRD media player provides several TOC connectors for the purpose of extending the
capabilities of the unit. The front face location of these connectors is shown below:
802.11 WLAN
WiFi
RESET
1000BT
SERVICE
SD/SDHC CARD SLOT
SD
MINI-USB
USB
USB PORTS
ETHERNET PORT
10 | P a g e
OPS-DRD USERS MANUAL
v2014-02-28
Port
Description
USB
Two (2) USB interface connectors, which provide complete Plug & Play
and hot swapping capability for up to 127 external devices. The USB
interface is compliant with USB UHCI, Rev. 2.0. The USB interface supports
Plug and Play, which enables you to connect or disconnect a device
without turning off the system.
LAN
One (1) RJ-45 LAN interface connector, fully compliant with IEEE802.3u
10/100 Base-T CSMA/CD standards. The Ethernet port provides a standard
RJ-45 jack connector with LED indicators to show its Active/Link status and
speed status
WLAN
One (1) SMA connector for attaching the provided WiFi antenna. This port
supports 802.11b/g/n wireless standards.
SD
One (1) standard SD Card Slot for installing additional flash storage.
SERVICE
This mini-USB port is for factory service personnel. It is not intended for end-user
access.
Caution!
IMPROPER USE OF THIS PORT MAY RESULT IN COMPLETE LOSS OF UNIT
FUNCTIONALITY.
In addition to the TOC connectors, the OPS-DRD provides several TOC switches as shown below.
SERVICE
UBOOT SWITCH
WiFi
RESET
1000BT
POWER SWITCH
SD
USB
RESET SWITCH
11 | P a g e
OPS-DRD USERS MANUAL
v2014-02-28
Switch
Description
PWR
Power Switch: Allows user to power ON/OFF the unit.
Press and hold button for ~ 1 sec to initiate a power ON/OFF event.
RST
Reset Switch : Allows user to reboot unit.
Press and release button to initiate a reset event.
UBOOT
UBOOT Switch : Provides support for Firmware Upgrades
See section entitled “System Software Updates” for further usage.
12 | P a g e
OPS-DRD USERS MANUAL
v2014-02-28
Installation
1. Ensure power is OFF on OPS-compatible display.
2. With the USB Ports of the unit towards the top, slide the OPS-DRD media player into the
OPS slot on display.
3. Apply medium inward insertion force to unit such that the BOC connector positively
engages monitor connector.
Caution!
IF UNIT DOES NOT MATE EASILY WITH MONITOR USING MEDIUM INSERTION FORCE,
DO NOT INCREASE FORCE. REMOVE UNIT AND VERIFY PROPER ORIENTATION
BEFORE REPEATING.
4. Attach OPS-DRD media player to OPS slot on display with the two (2) machine screws
provided.
OPS-DRD Installation
13 | P a g e
OPS-DRD USERS MANUAL
v2014-02-28
5. Attach peripheral devices as required. See Figure below.
OPS-DRD Connections
14 | P a g e
OPS-DRD
DRD USERS MANUAL
v2014-02-28
Operating Instructions
Power ON
1. Ensure the OPS-DRD
DRD unit is securely installed in an OPS
OPS-compatible
compatible display.
2. The following OPS display configuration may require reference to the manufacturer’s
documentation.
a. Ensure that the Option
Option-Slot Power on the display is configured to ON.
b. Ensure that the displays video input is set to OPTION.
c. Ensure that the displays audio input is set to OPTION.
d. Turn ON the OPS--compatible display.
The OPS-DRD media player power LED should illuminate and the units begin to boot. At the
completion of successful boot, the following screen will be displayed:
OPS
OPS-DRD First Boot Screen
15 | P a g e
OPS-DRD USERS MANUAL
v2014-02-28
To power ON the unit when it is already installed in a powered display:
1. Press and hold the POWER button until the POWER LED becomes illuminated.
Power OFF
1. The OPS-DRD unit can be powered OFF by pressing and holding the POWER BUTTON
until a message indicating device shutdown appears on the display.
Sleep / Wake
1. The OPS-DRD unit can be put to SLEEP from a powered ON state by quickly pressing and
releasing the POWER button. The display will immediately go black and the POWER LED
will turn OFF after a short period.
2. The OPS-DRD unit can be commanded to WAKE from a SLEEP state by quickly pressing
and releasing the POWER button. The display will immediately return to displaying what
was displayed when the unit was placed into the SLEEP state. In addition, the POWER
LED will turn ON.
Unit Reset
1. The OPS-DRD unit can be reset by pressing and holding the RESET BUTTON until the
display goes dark. The unit will begin booting upon release of the RESET BUTTON.
Restore Factory Defaults
Caution!
RESTORING FACTORY DEFAULTS WILL CAUSE ALL INSTALLED APPLICATIONS, DATA AND
SETTINGS TO BE LOST. BACKUP ALL IMPORTANT DATA BEFORE CONTINUING.
1.
2.
3.
4.
Open the Settings application and click on the “Backup & reset” menu item.
Select “Factory data reset” and the pop-up below will be displayed.
Check the “Erase SD card” box.
Click “Reset tablet” button
16 | P a g e
OPS-DRD
DRD USERS MANUAL
v2014-02-28
Restore Factory Defaults
The OPS-DRD unit will begin restoring factory defaults. This process should take approximately 2
minutes.
17 | P a g e
OPS-DRD USERS MANUAL
v2014-02-28
Applications
Out-of-the-Box Applications
Out-of-the-Box, the OPS-DRD provides the applications shown in the figure below. These
applications provide basic media player functions such as slideshow displays, video and audio
playback as well as content management on internal/external storage.
Out-of-the-Box Applications
18 | P a g e
OPS-DRD USERS MANUAL
v2014-02-28
The following applications are pre-installed at the factory. These applications cannot be
deleted from the system.
Application
Description
Adobe Reader
This application allows viewing of documents in Adobe Portable
Document Format (PDF).
Browser
This is a basic web browser application.
Chrome
This is an advanced web browser application supporting HTML5.
Downloads
This application displays all current downloads to the system.
FileManager
This application is used to navigate the OPS-DRD file system, allowing the
user to manage files/folders via create, move, copy and delete operations.
FireAir Receiver
This application provides control over the wireless network radio.
Adobe Flash
Player
This application allows playing content written in Adobe Flash version 11.
Gallery
This is an application for displaying image content. Also provides basic
slideshow capabilities.
Google Settings
This application provides support for Google Play service.
Media Player
This application allows playing of video content.
Miracast Receiver
This application allows mirroring a Miracast Transmitters user interface onto the
OPS-DRD.
Music
This application provides access to all installed music content.
Search
This application provides a browser based search capability of the internet.
Settings
This application provides user access to configure a wide variety of system
settings allowing the user to tailor their system.
19 | P a g e
OPS-DRD USERS MANUAL
v2014-02-28
Media Player Application
The Media Player application is represented by the icon shown on the right.
It provides facilities for the playback/management of video content.
Preview Pane
1. Open the media player by single clicking the Media Player icon in the APPS section.
2. You are now at the “Preview Pane”. Here, your media is automatically found and
displayed, whether on SD card, or USB drive.
3. In the preview pane, on the top right corner are a set of option icons. From left to right,
here are their functions:
a. Media Player icon expands/hides a navigation pane on the left side of the screen.
This allows quick access to Recently Played and Favorite videos along with
content mounted on internal/external media.
b. Magnifying Glass icon allows you to search for media files.
c. The next icon allows you to sort the media in the preview pane alphabetically, or
by size.
d. The next icon will scan for new media and refresh the preview pane.
e. The last icon gives you a drop down menu of available options for the preview
pane, and the App itself. From here, you can disable the animation of the media
in the preview pane, disable the Presentation Display, clear the Recently Played
media, clear the Search History, clear the Favorites, check for software updates
and exit the App.
4. For media playback, simply click the media file you wish to play. The preview panel will
disappear and begin playing your media file. During playback, there are more options
available to you.
20 | P a g e
OPS-DRD USERS MANUAL
v2014-02-28
a
Media Player App : Navigation Pane
b
c
d
e
Media Player App : Preview Pane
21 | P a g e
OPS-DRD USERS MANUAL
v2014-02-28
Playback Controls
1. Lock – This button locks out all other options and the media control bar when activated.
2. This button will minimize the media player into a small window, allowing you to access
the preview panel and other options.
3. This button will allow you to access the list of previous media files that have already
been played.
4. Favorites button – This button will add the current file into your “Favorites” list. If the
media file is already in the favorites list, clicking the button again will not remove it from
the favorites list.
5. Format – This button changes the format/resolution of the media. The three options
are; Native, Full and Stretched.
6. < - This button will skip to the previous media file played.
7. This button is to control the Play/Pause feature.
8. > - This button will skip to the next media file in the playlist.
9. This last button will bring up a sub menu to control the playlist, such as repeat,
sequence play, random and also controls subtitles and audio options.
1
2
3
4
5
6
7
8
9
Media Player App : Playback Controls
22 | P a g e
OPS-DRD USERS MANUAL
v2014-02-28
To access the preview pane from the media player window, simply right click the mouse once,
anywhere on the screen. From the preview pane, you can exit the App by clicking the Menu
button on the top right of the preview pane, and select exit.
23 | P a g e
OPS-DRD
DRD USERS MANUAL
v2014-02-28
Gallery Application
The Gallery application is represented by the icon shown on the right. It
provides facilities for the display of static image content.
Preview Pane
1. Open the Gallery by single clicking Gallery icon in the APPS section.
2. You are now at the “Preview Pane”. Here, your images are automatically found and
displayed, whether on SD card, or USB drive.
3. In the preview pane, on the top left corner is a drop dow
down
n menu for sorting images in
the following ways:
Albums – Sorts the images by specified albums.
Locations – Sorts images based on their location, (USB, SD, Internal).
Times – Sorts images by order of date the photo or file was created.
People – Sorts image
images based on people “tagged” in the image.
e. Tags – Sorts images by user defined tags.
a.
b.
c.
d.
4. In the preview pane, on the top right corner is a drop down menu for viewing the
images. From here, you can tag, group by, select an image for viewing, or add the
current image to a slideshow.
*The camera function on the top toolbar, in the preview pane, will activate a camera if one is
installed. If no camera is installed, the Gallery will stop responding and close.
24 | P a g e
OPS-DRD USERS MANUAL
v2014-02-28
Gallery App : Preview Pane - Albums
Gallery App : Preview Pane - Images
25 | P a g e
OPS-DRD USERS MANUAL
v2014-02-28
5. Once a photo is selected, the media viewer will display the photo. From the viewer, you
have 3 icons/options available to you.
a. The icon on the bottom left will open up the image editor. From here you can
Crop, add effects, add borders, and zoom in and out.
b. The ‘Share’ button located on the top right of the viewing window, will share the
image via Bluetooth, or convert file into PDF form.
c. The ‘Menu’ button located on the top far right of the viewing window will pull
down a menu in which you can access all following image options:
1. Delete – deletes image
2. Slideshow – adds image to current slide show
3. Edit – opens the image editor
4. Rotate – rotates media left and right
5. Crop – allows you to crop images
6. Set picture as – sets the image as a contact photo or wallpaper
b
a
Gallery App : Image Viewer
26 | P a g e
c
OPS-DRD USERS MANUAL
v2014-02-28
Gallery App : Image Edit Controls
6. To exit the App, simply right click until you are back to the Android desktop
27 | P a g e
OPS-DRD USERS MANUAL
v2014-02-28
Miracast Application
The Miracast application is represented by the icon shown on the right. It
provides facilities for receiving wireless display content from a remote device
via the WLAN. The OPS-DRD is the Miracast Receiver and devices such as
smart phones and tablets with wireless display features are Miracast
Transmitters.
Miracast/Wi-Fi Direct
Note : OPS-DRD wireless network connection is optional for Miracast operation
1. Open the Miracast application by single clicking the Miracast icon in the APPS section.
2. You are now at the “Options Pane”. Here, your receiver information and device name
are displayed.
Miracast App : Option Pane
28 | P a g e
OPS-DRD
DRD USERS MANUAL
v2014-02-28
3. Next, follow your device instructions for turning on the “Wireless Display” option. Here
is an example from popular Android devices:
a. Wireless
ess display on Google Play edition devices
i. Some of this information applies only to devices running Android 4.4.
ii. Nexus 4, Nexus 5, Nexus 7 (2013), Nexus 10, and certain Google Play
edition phones are compatible with devices that support the Wi-Fi
Wi
Certified Miraca
Miracast™
st™ protocol for wireless display. To turn on the wireless
display feature, go to
Settings > Device > Display > Cast screen >
Menu,, then check the box next to “Enable Wireless Display.”
iii. You can cast the screen to wirelessly stream video and audio to a variety
v
of displays and other devices that support Miracast - even when a
standard Wi
Wi-Fi
Fi network isn’t available. For example, you can cast the
screen to show your device’s screen on a TV equipped with a certified
Miracast adapter.
4. Once Wireless Display is enabled, the device will search for wireless displays and list any
that are found.
Miracast Transmitter : Available Wireless Displays
29 | P a g e
OPS-DRD USERS MANUAL
v2014-02-28
5. Select a wireless display from the “Paired Display” list on the Miracast Transmitter
device. A connection will be established to the selected wireless display.
6. Once connected, the wireless display will mirror the audio/video content from the
transmitting device.
Wireless Display : Connected - Mirroring Transmitting Device
At this point the wireless display functions of the OPS-DRD will mirror actions and content from
the Miracast Transmitter Device.
To disconnect from the wireless display:
1. Return to the Wireless Display menu on the transmitting device.
2. Click on the connected wireless display. A pop-up will be displayed asked to confirm
disconnection.
3. Click OK to disconnect.
30 | P a g e
OPS-DRD
DRD USERS MANUAL
v2014-02-28
Installing New Applications
Additional applications (.apk file extension) can be installed by the user via network, SD Card or
USB interfaces. Use the FileManager application to navigate to where the .apk is stored and
left-click
click the apk file you want to install. The system will provide an application-dependant
application
prompt asking you to confirm installation. Click Install to initiate the installation.
New Application Install Prompt
31 | P a g e
OPS-DRD
DRD USERS MANUAL
v2014-02-28
Uninstalling Applications
Any installed application that was not provided by the factory can be uninstalled.
uninstalled To do so, leftclick and hold the app icon until an “X Uninstall” prompt appears at center top of screen. Drag
the app over this prompt until it turns red. Release left mouse button.
Application Uninstall Prompt
32 | P a g e
OPS-DRD
DRD USERS MANUAL
v2014-02-28
Adding/Removing Installed Applications from Desktop
Applications can be added to the user desktop simply by left
left-click-holding
holding over the app you
want and then dragging it to the desired location on the desktop.
Once installed on the desktop, they can be removed by a left
left-click
click and hold of the app icon until
an “X Remove” prompt appears at center top of screen. Drag the app over this prompt until it
turns red. Release left mouse button
button.. Note: this does not delete the application from the
system.
Adding Applications to the Home Screen
33 | P a g e
OPS-DRD
DRD USERS MANUAL
v2014-02-28
Removing Applications from the Home Screen
34 | P a g e
OPS-DRD
DRD USERS MANUAL
v2014-02-28
System Configuration
WLAN Configuration
To configure the Wireless LAN you will need the following:
•
•
•
Wireless SSID
Wireless Security Passphrase
USB Mouse
Perform the following steps to configure the Wireless LAN. These steps will need to be
performed only the first time the device is connected to a new network.
.
1. Using the mouse, click on the Settings app on the desktop. The following screen will be
displayed:
Wi-Fi slider to turn WLAN ON.
2. Click on the OFF side of the Wi
3. The screen will change to indicate Wi
Wi-Fi
Fi ON as well as provide a list of available
networks as shown below:
35 | P a g e
OPS-DRD
DRD USERS MANUAL
v2014-02-28
4. Click on the desired WLAN to connect to. If that network provides security, the following
Security Credentials pop--up will be displayed:
36 | P a g e
OPS-DRD
DRD USERS MANUAL
v2014-02-28
5. Use the on-screen
screen keyboard to enter your networks security passphrase.
6. Click [DONE] when complete.
7. After successfully connecting the WLAN, th
the
e Setting screen will show a “Connected”
status as shown below:
LAN Configuration
To configure the LAN you will need the following:
•
•
Ethernet Cable
USB Mouse
Perform the following steps to configure the LAN. These steps will need to be performed only
the first time the device is connected to a new network.
1. Using the mouse, click on the Settings app on the desktop. The following screen will be
displayed:
37 | P a g e
OPS-DRD
DRD USERS MANUAL
v2014-02-28
2. Click on “Ethernet”.
3. Check the “Use Ethernet” box
box. The screen will change to indicate Ethernet OFF.
38 | P a g e
OPS-DRD USERS MANUAL
v2014-02-28
4. Click the OFF indication, the device status will change to ON.
5. Click on “Ethernet Configuration”.
6. If you have DHCP enabled on your router, leave the default settings as shown below,
there is no need to change any configuration. If you are using Static IP select “Static IP”
as shown below and enter an IP, Netmask, DNS and Gateway address:
39 | P a g e
OPS-DRD
DRD USERS MANUAL
v2014-02-28
7. You will be prompted to reboot for MAC address to take effect. Once rebooted you
should have internet connection through your router. To Verify you received an IP
address, after rebooting go back to the Ethernet setup and you should see similar
information pertaining to your own network
network.
40 | P a g e
OPS-DRD
DRD USERS MANUAL
v2014-02-28
System Software Updates
The version of system software installed on the OPS
OPS-DRD media player can be determined via
the
he About Tablet menu item within the Settings Application.
OPS
OPS-DRD Firmware Version
From time to time product improvements may be made available via a system software update.
Contact your authorized service representative for further information
information.
Caution!
UPGRADING YOUR SYSTEM SOFTWARE WILL CAUSE ALL INSTALLED APPLICATIONS, DATA
AND SETTINGS TO BE LOST. BACKUP ALL IMPORTANT DATA BEFORE CONTINUING.
Caution!
UPGRADING YOUR SYSTEM SOFTWARE FROM AN UNAUTHORIZED SOURCE MAY CAUSE THE
DEVICE TO BECOME UNUSABLE. IF UNSURE OF THE SOURCE, CONTACT YOUR SERVICE
REPRESENTATIVE.
---- END OF DOCUMENT ---41 | P a g e