1
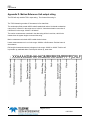
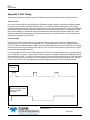
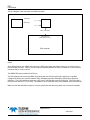
ES3PT INCLUDING ES3 OPERATING SOFTWARE USER MANUAL Version: 1.4 Teledyne Odom Hydrographic 1450 Seaboard Avenue Baton Rouge, Louisiana USA 70810-6261 Telephone: (225) 769-3051 Fax: (225) 766-5122 [email protected] http://www.odomhydrographic.com Number of pages: 53 Date: 31 January 2011 ES3 User Manual Revision History Version 0.1 0.2 0.3 0.4 Date 07-02-2007 07-12-2007 08-12-2007 09-26-2007 Author S. Apsey S. Apsey R. Byrd S. Apsey 0.5 03-12-2008 J. Hoffmann 0.6 10-21-2008 S. Apsey 0.7 0.8 11-14-2008 3-31-2009 S. Apsey S. Apsey 0.9 5-27-2009 S. Apsey 1.0 7-26-2010 S. Apsey 1.1 1-17-2011 M. Redmayne 1.2 1.3 4-18-2011 5-13-2011 M. Redmayne M. Redmayne 1.4 10-26-2011 M. Redmayne Remarks Initial version – draft Added picture of j-box and transducer drawing New Specifications Added MRU and sound velocity input. Added Appendices for Sound velocity string, MRU string and Digibar Pro configuration. Software version 1.02.40. Update menu image samples for ‘Com Port Setup Dialog’ and ‘Profile Point Setup Dialog’. Updated PDI enclosure images. Scaled screen images and fonts. Updated for SW version 1.02.78 Corrected procedure for adjusting system gain. Added description of PPS pulse and UTC time stamping. Added appendix further describing data synchronization Added a more complete description of the ES3 cable including colors for the wires and connections to the wet end. Added acoustic center drawing. Added hot keys for range, gain and display. Updated for the ES3PT. Removed the PDI from the manual and added the RTA. Re-write incorporating ES3 control software version 1.04.11 (21 Dec 10). Added further pin diagrams to Appendix A Correction of Port numbers for alternative data gathering software. Update of Appendix G. Page 2 of 53 10/27/2011 ES3 User Manual © ODOM HYDROGRAPHIC SYSTEMS, INC. 2011 All rights are reserved. Reproduction in whole or in part is prohibited without the prior written consent of the copyright owner. The information presented in this document does not form part of any quotation or contract, is believed to be accurate and reliable and may be subject to change without notice. The publisher will not accept any liability for any consequence of its use. Publication thereof does not convey nor imply any license under patent- or other industrial or intellectual property rights. Page 3 of 53 10/27/2011 ES3 User Manual CONTENTS 1 Introduction ...................................................................................................................................................... 7 1.1 1.2 1.3 2 Purpose ....................................................................................................................................................... 7 Scope .......................................................................................................................................................... 7 Glossary ...................................................................................................................................................... 8 Product description ......................................................................................................................................... 9 2.1 System Overview ........................................................................................................................................ 9 2.2 ES3 General Specifications ........................................................................................................................ 9 Frequency: ............................................................................................................................................................. 9 3 COMPONENTS ............................................................................................................................................... 12 3.1 Transducer/Electronics Housing (Sonar Head) ........................................................................................ 12 3.2 Real Time Appliance (RTA) ...................................................................................................................... 12 3.2.1 Front Panel ........................................................................................................................................ 13 3.2.1.1 Power Switch .............................................................................................................................. 13 3.2.1.2 Fuse ............................................................................................................................................ 13 3.2.1.3 Aux data in LED .......................................................................................................................... 14 3.2.1.4 ES3-1 Trigger / ES3-2 Trigger LED ............................................................................................ 14 3.2.1.5 ES3-1 Link / ES3-2 Link LED ..................................................................................................... 14 3.2.1.6 MRU data in LED ........................................................................................................................ 14 3.2.1.7 Heading data in LED................................................................................................................... 14 3.2.1.8 GPS data in LED ........................................................................................................................ 14 3.2.1.9 PPS LED ..................................................................................................................................... 14 3.2.1.10 Sound Velocity LED .................................................................................................................... 14 3.2.1.11 RTA Configuration USB Port ...................................................................................................... 15 3.2.2 Rear Panel ......................................................................................................................................... 15 3.2.2.1 Power Connector ........................................................................................................................ 15 3.2.2.2 GPS I/O DB9 Connector ............................................................................................................. 15 3.2.2.3 MRU I/O DB9 Connector ............................................................................................................ 15 3.2.2.4 Data Aq. PC RJ45 Connector ..................................................................................................... 15 3.2.2.5 ES3 PC RJ45 Connector ............................................................................................................ 15 3.2.2.6 Aux I/O DB9 Connector .............................................................................................................. 15 3.2.2.7 Heading IN DB9 Connector ........................................................................................................ 16 3.2.2.8 GPS IN DB9 Connector .............................................................................................................. 16 3.2.2.9 PPS BNC Connector .................................................................................................................. 16 3.2.2.10 R/T Sound Velocity Connector ................................................................................................... 16 3.2.2.11 MRU Connector .......................................................................................................................... 16 3.2.2.12 ES3 2 Connector ........................................................................................................................ 16 3.2.2.13 ES3 1 Connector ........................................................................................................................ 16 3.2.3 PPS Pulse dipswitch .......................................................................................................................... 17 3.3 ES3 Controller PC ..................................................................................................................................... 17 3.4 Data Collection Computer ......................................................................................................................... 17 3.5 Global Positioning System ........................................................................................................................ 17 3.6 Sound Velocity Probe (Real Time) ............................................................................................................ 17 3.7 Motion Sensor ........................................................................................................................................... 17 3.8 Heading Sensor ........................................................................................................................................ 17 4 Installation ...................................................................................................................................................... 19 4.1 Software Installation .................................................................................................................................. 19 4.1.1 Network Settings for ES3 PC ............................................................................................................. 20 4.1.2 Network Settings for Data Acquisition PC ......................................................................................... 20 Page 4 of 53 10/27/2011 ES3 User Manual 4.1.3 Hypack configuration ......................................................................................................................... 21 4.1.3.1 Update Hypack Files................................................................................................................... 21 4.1.3.2 Update Hypack Hardware Configuration .................................................................................... 21 4.1.4 Configuring Other Data Acquisition Software to Receive Data from the RTA ................................... 24 4.2 Assembling the Hydrographic System ...................................................................................................... 24 4.3 Configuring the Real Time Appliance ....................................................................................................... 25 4.3.1 USB Driver Installation ....................................................................................................................... 25 4.3.2 Accessing RTA Configuration Program ............................................................................................. 26 4.4 Start Up System ........................................................................................................................................ 27 4.5 Transducer Installation .............................................................................................................................. 27 5 ES3 software .................................................................................................................................................. 29 5.1 Introduction................................................................................................................................................ 29 5.1.1 Range................................................................................................................................................. 29 5.1.2 Gain.................................................................................................................................................... 30 5.1.3 Display Gain ....................................................................................................................................... 30 5.2 Menu Options ............................................................................................................................................ 30 5.2.1 File ..................................................................................................................................................... 30 5.2.1.1 Data From ................................................................................................................................... 31 5.2.1.2 Record Start................................................................................................................................ 31 5.2.1.3 Playback ..................................................................................................................................... 31 5.2.1.4 Fast Playback ............................................................................................................................. 31 5.2.1.5 Use Real-time Playback Speed .................................................................................................. 31 5.2.1.6 Copy Start ................................................................................................................................... 31 5.2.1.7 Convert .837 Sonar Files To .83P Format .................................................................................. 31 5.2.1.8 Convert .837 Sonar Files To .83B Format .................................................................................. 31 5.2.1.9 Convert .837 Sonar Files To .XTF Format ................................................................................. 31 5.2.1.10 Save Screen ............................................................................................................................... 31 5.2.2 Color Table ........................................................................................................................................ 32 5.2.3 Set-up................................................................................................................................................. 32 5.2.3.1 IP Address .................................................................................................................................. 33 5.2.3.2 Units ............................................................................................................................................ 33 5.2.3.3 Automatic File Names................................................................................................................. 33 5.2.3.4 Automatic File Name Type ......................................................................................................... 33 5.2.3.5 Set Maximum Filesize................................................................................................................. 33 5.2.3.6 Velocity ....................................................................................................................................... 33 5.2.3.7 Overlap sonar I/O ....................................................................................................................... 33 5.2.4 Options ............................................................................................................................................... 33 5.2.4.1 Grid ............................................................................................................................................. 34 5.2.4.2 Sector Size ................................................................................................................................. 34 5.2.4.3 Beams ......................................................................................................................................... 34 5.2.4.4 Averaging .................................................................................................................................... 34 5.2.4.5 Gain Equalization........................................................................................................................ 34 5.2.4.6 Display Track Plotter................................................................................................................... 35 5.2.4.7 Clear Track Plotter ...................................................................................................................... 35 5.2.4.8 Display Swath Coverage ............................................................................................................ 35 5.2.4.9 Load Swath Coverage From LOG file ........................................................................................ 35 5.2.4.10 Sidescan Window ....................................................................................................................... 35 5.2.4.11 Echo Sounder Window ............................................................................................................... 35 5.2.4.12 Intensity Window ........................................................................................................................ 36 5.2.4.13 Sweep Window ........................................................................................................................... 36 5.2.4.14 Signal Level ................................................................................................................................ 36 5.2.4.15 Diagnostics ................................................................................................................................. 36 5.2.4.16 Automatic Gain Control .............................................................................................................. 37 Page 5 of 53 10/27/2011 ES3 User Manual 5.2.5 Profile Setup ...................................................................................................................................... 37 5.2.5.1 Profile Point Setup ...................................................................................................................... 38 5.2.5.2 Profile Waterfall Display.............................................................................................................. 39 5.2.5.3 Roll Correction ............................................................................................................................ 40 5.2.5.4 Profile Tilt Angle .......................................................................................................................... 40 5.2.5.5 Display Altitude ........................................................................................................................... 40 5.2.5.6 Grid Type .................................................................................................................................... 40 5.2.6 Data Output Setup ............................................................................................................................. 40 5.2.7 About .................................................................................................................................................. 41 6 SOFTWARE QUICK START GUIDE .............................................................................................................. 42 7 Troubleshooting ............................................................................................................................................ 43 Appendix A. CABLE CONNECTIONS: ................................................................................................................. 44 Appendix B. Sound Velocity Input String ........................................................................................................... 45 Appendix C. Configuring Digibar Pro To Output Data In Real Time ................................................................ 46 Appendix D. Motion Reference Unit output string ............................................................................................. 47 Appendix E. Transducer Dimensions .................................................................................................................. 48 Appendix F. ES3 Timing ....................................................................................................................................... 49 Appendix G. Acoustic Center: .............................................................................................................................. 51 Appendix H. Hot Keys: .......................................................................................................................................... 52 Page 6 of 53 10/27/2011 ES3 User Manual 1 INTRODUCTION The ES3 Multibeam echo sounder is a portable, easy to use system that will collect bathymetry over a 120 swath up to a water depth of up to 60 meters. The small size of the ES3 makes it easy to install on vessels of opportunity and its ease of operation makes it an excellent choice for surveyors who want to make the technical transition from single beam echo sounding to multibeam surveying. To make learning about the features of the ES3 easy to follow, this document is structured as a step-by-step manual. The manual covers the ES3 as a product, it provides instructions on how to install the software and the hardware, suggestions on how to use all the different control settings, how to perform certain critical procedures, how cables are wired to their connectors, and some simple troubleshooting tips. 1.1 Purpose The purpose of this document is to explain the features and operation of the ES3. 1.2 Scope The scope and content of this document is focused on providing useful information to the end-user. Page 7 of 53 10/27/2011 ES3 User Manual 1.3 Glossary BNC CTS DGPS GGA GPS LED NMEA MRU PRF RTA Sonar Head SV SVP Trigger Pulse UDP USB UTC VDC VTG XTF ZDA Bayonet Neill-Concelman; a type of electrical connector Clear To Send; a signal used by RS232 serial connectors Differential Global Positioning System GPS position data string in NMEA format Global Positioning System Light Emitting Diode National Marine Electronics Association Motion Reference Unit (also called motion sensor) Pulse Repetition Frequency Teledyne Odom Real Time Appliance Transducer/Electronics Unit Sound Velocity Sound Velocity Probe The electronic signal sent by the sonar head to indicate a transmit pulse User Datagram Protocol Universal Serial Bus Coordinated Universal Time Volts Direct Current Vessel track and speed data string in NMEA format Extended Triton Format GPS timing data string in NMEA format Page 8 of 53 10/27/2011 ES3 User Manual 2 PRODUCT DESCRIPTION 2.1 System Overview The ES3 PT consists of the ES3 sonar and the Real Time Appliance (RTA). In order to be effectively used as a hydrographic survey system, the user will require additional components for positioning, motion sensing, collection of data, determining sound velocity in the water and a computer to run the operating software. These components may have been supplied with the equipment or can be purchased separately. A basic line diagram of the system can be seen below, and further information on each component can be found in chapter 3 of this manual. Basic component diagram of a hydrographic survey system incorporating the RTA and ES3 2.2 ES3 General Specifications Frequency: 240 kHz Swath Width (Nominal Beam Geometry): 120° x 3° Transmit 120° x 3° Receive Effective Beam Width*: 0.75° Number of Beams**: Default – 480 Selectable – 240, 120 Range Resolution: 0.02% of Range Page 9 of 53 10/27/2011 ES3 User Manual Range: 60m (197ft.) water depth 100m (328ft.) slant range Range Sampling Frequency: 13.65333 µs Source Level: 200dB referenced to 1µPa at 1m Directivity Index (at Nadir): Transmit – 17dB Receive – 31dB Minimum Detectable Range: 0.5m below transducer Ping Rate (PRF) 15 Hz at 20m range (Processor and # of real-time beams selected dependent) Maximum Operating Depth: 100m below the surface (submersion depth) Interface to PC: Ethernet (10 base-T) using TCPIP Maximum Cable Length: 100m using CAT5-e Connector: Underwater wet-mateable 8 conductor Subconn at transducer end, 8 pin Circular MS type connector at JBox end Power Supply: 24 VDC nominal (9 to 30 VDC range using RTA) Power Dissipation <25 Watts total Dimensions: 162mm (6.3”) L, x 117mm (4.62) H, x 92mm (3.63) W Weight: 8.2kg (18 lb) in air Material: Stainless Steel Housing Urethane Transducer Face Real Time Appliance (RTA): (Included in ES3 scope of supply) Three (3) port Ethernet switch (ES3, Data Acquisition PC, and spare) 9 to 30 VDC input range Dimensions: 178 mm (7 in.) W x 102 mm (4 in.) H x 178 mm (7 in.) L Page 10 of 53 10/27/2011 ES3 User Manual * Effective Beam Widths include some overlap between adjacent beams. ** Acoustic data is collected at full resolution for off-line playback/display. The number of beams displayed and output in real time is operator selectable. The number selected inversely affects the system Ping Rate (PRF). Page 11 of 53 10/27/2011 ES3 User Manual 3 COMPONENTS The ES3 is supplied with the transducer/electronics housing referred to in this document as the sonar head, a Real Time Appliance Interface, power cable, transducer cable, Ethernet cables and software on CD. This chapter will detail each of these components, along with the requirements of the additional inputs to a proposed hydrographic survey system. 3.1 Transducer/Electronics Housing (Sonar Head) The ES3 transducer/electronics housing or Sonar Head, is the principle data gathering component of the system. It consists of the multibeam echo sounder transmit and receive elements, housed in a stainless steel mounting. The sonar head is connected to the supplied Real Time Appliance (RTA) via an underwater connector/cable combination. The stainless steel Head can be mounted in the hull of the vessel or over-the-side on a portable pole mount arrangement. Care should be taken when handling the sonar head so that the transmit face of the unit is not scratched or damaged. The Odom ES3 Transducer/Electronics unit or Sonar Head 3.2 Real Time Appliance (RTA) The RTA is the center of the ES3 system. It serves as the connection box for all the sensors as well as providing better than 1 ms timing on all sensors including the ES3. The front panel of the RTA has status LEDs that indicate whether data has been received from the sensor and the rear panel has all the connections to the sensor. There is a USB connection on the front of the RTA which can be used to configure the baud rate of the sensors. Page 12 of 53 10/27/2011 ES3 User Manual Front photograph of the Real Time Appliance The RTA has connectors to receive data from the following components: ES3 transducer (Only one head is implemented as of 01/17/2011) Motion Reference Unit Sound Velocity Probe 1 PPS signal GPS Heading Sensor Aux sensor (not implemented yet) Each component has a corresponding LED on the front panel that indicates whether the RTA is receiving the data correctly. If the baud rate is not set correctly the corresponding LED on the RTA will not blink, however some components that are set to a high baud rate may appear to be ‘on’ rather than blinking due to the fast transmittal of data. There are also connectors to interface with the following components: The ES3 controller PC The Data acquisition PC The MRU (for communication) The GPS (for communication) 3.2.1 3.2.1.1 Front Panel Power Switch The power switch applies DC power (9 to 30 VDC) to the internal switching power supply which powers the RTA, ES3 Sonar Head and Motion Reference Unit via the power/data cables. The power switch has an LED in the middle that lights up when it is turned on. 3.2.1.2 Fuse The external safety fuse ensures a short inside the RTA does not draw more that 75 watts from the external power supply. The rating of the fuse is 3 Amps. Page 13 of 53 10/27/2011 ES3 User Manual 3.2.1.3 Aux data in LED The Aux data in LED indicates the RTA is receiving data through the Aux I/O connector on the rear panel and the baud rate is correct. If the baud rate of the Aux sensor does not match the RTA baud rate configuration the LED will not blink. The LED will blink one for every string the RTA receives through the port. Note: This has not been implemented yet. 3.2.1.4 ES3-1 Trigger / ES3-2 Trigger LED The ES3 Trigger LED indicates the RTA is receiving a trigger pulse from and ES3 connected to the corresponding rear ES3 connector. The ES3 will only trigger this LED if the ES3 software is running and the transducer is connected. The LED will blink once every time the ES3 transmits a pulse. 3.2.1.5 ES3-1 Link / ES3-2 Link LED The ES3 Link LED indicates the RTA’s internal network switch has established a connection with the ES3 connected to the corresponding rear ES3 connector. 3.2.1.6 MRU data in LED The MRU data in LED indicates the RTA is receiving data through the MRU I/O connector on the rear panel and the baud rate is correct. If the baud rate of the MRU sensor does not match the RTA baud rate configuration the LED will not blink. The LED will blink one for every string the RTA receives through the port. If the data rate of the MRU is high, this LED will appear to stay on all the time. 3.2.1.7 Heading data in LED The Heading data in LED indicates the RTA is receiving data through the Heading In connector on the rear panel and the baud rate is correct. If the baud rate of the Heading sensor does not match the RTA baud rate configuration the LED will not blink. The LED will blink one for every string the RTA receives through the port. 3.2.1.8 GPS data in LED The GPS data in LED indicates the RTA is receiving data through the GPS I/O connector on the rear panel and the baud rate is correct. If the baud rate of the GPS sensor does not match the RTA baud rate configuration the LED will not blink. The LED will blink one for every string the RTA receives through the port. 3.2.1.9 PPS LED The PPS LED indicates the RTA is receiving a PPS signal. This LED should blink once a second. To configure the source of the PPS signal refer to the appropriate section of this manual. If this LED does not blink once per second the RTA is not operating correctly. 3.2.1.10 Sound Velocity LED The Sound Velocity data in LED indicates the RTA is receiving data through the R/T Sound Velocity connector on the rear panel and the baud rate is correct. If the baud rate of the Sound Velocity sensor does not match the RTA baud rate configuration the LED will not blink. The LED will blink one for every string the RTA receives through the port. Note that this light will not indicate quality of the data (such as if the unit is operating out of the water) but only that data is being received. Page 14 of 53 10/27/2011 ES3 User Manual 3.2.1.11 RTA Configuration USB Port The RTA uses this port to configure the baud rate of the input sensors and other configuration parameters. To use this port refer to the Configuring RTA section of this manual. 3.2.2 Rear Panel Rear photograph of the Real Time Appliance 3.2.2.1 Power Connector The RTA contains an internal power supply circuit that regulates the DC power applied to the ES3. The input power requirement for the RTA is 9-30 VDC. The power consumption of the ES3 RTA and transducer is approximately 15 Watts. 3.2.2.2 GPS I/O DB9 Connector This connector is used to configure the GPS connected to the GPS In connector. Use this port to configure the GPS. Note that this port should not be used to receive data from the GPS other than to configure. 3.2.2.3 MRU I/O DB9 Connector This connector is used to configure the MRU connected to the MRU connector. Use this port to configure the MRU. Note that this port should not be used to receive data from the GPS other than to configure. 3.2.2.4 Data Aq. PC RJ45 Connector Use this connector to connect the Data Acquisition computer 3.2.2.5 ES3 PC RJ45 Connector Use this connector to connect the computer running the ES3 program. 3.2.2.6 Aux I/O DB9 Connector Note: This has not been implemented yet. Page 15 of 53 10/27/2011 ES3 User Manual 3.2.2.7 Heading IN DB9 Connector This connector is used to connect the Heading sensor to the RTA. The RTA supports any NMEA string that starts with a “$” character and ends with a Line Feed character. The baud rate of the Heading sensor must match the configured baud rate of the RTA. Follow the instructions on configuring the RTA to change the RTA baud rate. The Heading sensor should be configured to output data at 10 Hz. 3.2.2.8 GPS IN DB9 Connector This connector is used to connect the GPS to the RTA. The RTA supports any NMEA string that starts with a “$” character and ends with a Line Feed character. The baud rate of the GPS must match the configured baud rate of the RTA. Follow the instructions on configuring the RTA to change the RTA baud rate. The Heading sensor should be configured to output data at 10Hz. Configure the GPS to output the NMEA GGA, VTG and ZDA string. The RTA will not operate correctly without the NMEA ZDA string, as this is the timing signal required for time stamping. This port can also be used to accept the PPS pulse for a GPS that is outputting a PPS pulse through the GPS connector. Refer to the configuring RTA for PPS pulse section of this manual. 3.2.2.9 PPS BNC Connector If the GPS connected to the RTA has a PPS pulse available through a BNC use this connector. Refer to the configuring RTA for PPS pulse section of this manual. 3.2.2.10 R/T Sound Velocity Connector This connector is used to input the real time sound velocity data from the SVP installed at the sonar head. The data format is detailed at Annex B. 3.2.2.11 MRU Connector This connector is used to connect the MRU to the RTA. The RTA supports the TSS1 string that starts with a “:” character and ends with a Line Feed character. The baud rate of the MRU must match the configured baud rate of the RTA, and it is recommended that the baud rate be set to at least 38400. Follow the instructions on configuring the RTA to change the RTA baud rate, and the respective MRU manual to change the baud rate to match. Note: It is important that the user fully understand the internal settings of the MRU and change them according to the required application. Many MRUs have user selectable settings such as heave bandwith and GPS turn aiding, and these must be configured to ensure that the MRU data output is a true reflection of the vessel’s motion. If a TSS is being used, these settings may be configured using the DMS view or TTY software. 3.2.2.12 ES3 2 Connector If using a dual configuration of the ES3 use this connector for the second ES3. Note: This has not been implemented yet. 3.2.2.13 ES3 1 Connector The ES3 transducer is connected to the RTA through this connector. Always use this connector if only one ES3 is used. Page 16 of 53 10/27/2011 ES3 User Manual 3.2.3 PPS Pulse dipswitch The RTA must receive a PPS pulse to accurately time all the sensors including the ES3. The RTA can be configured to receive the PPS pulse through the BNC connector or through the GPS IN connector. The default input of the PPS pulse is through PIN nine of the GPS IN connector. To change this configuration, remove the six screws securing the lid to the top of the RTA. On the RTA motherboard is a dipswitch labelled SW1. Pin number 1 of the dipswitch is toward the SW1 silkscreen. The ‘ON’ position of the dipswitch is to the left of the RTA. Only one of the switch position 1-3 should be turned on. Position 4 sets the edge. Normally the edge should be ‘ON’ for the rising edge. Switch position 1 sets the RTA PPS source to pin 8 of the GPS IN connector. Switch position 2 sets the RTA PPS source to pin 9 of the GPS IN connector. Switch position 3 sets the RTA PPS source to the BNC connector. 3.3 ES3 Controller PC The ES3 requires a dedicated PC to run the ES3 software and complete all of the processing of the data coming from the sonar head. This computer should be only used for running the ES3, and not to collect data as well due to the increased demand on the system degrading the speed of sounding. The minimum requirements of the ES3 controller are; Windows XP or Windows 2000 and be at least a 2 GHz Pentium IV. The faster the processor speed of the computer the higher the ping rate the ES3 will achieve. 3.4 Data Collection Computer This computer is used to run the data collection and line guidance software, commonly Hypack and Hysweep. This computer remains separate from the ES3 controller, with both systems being monitored by the survey team when in use. 3.5 Global Positioning System Like all hydrographic survey systems a positional input is required. Any GPS that outputs NMEA messages may be used to input data to a hydrographic survey system incorporating the ES3. The specific messages required depend on the collection software, but at a minimum the GGA (position), VTG and ZDA (timing at 1PPS) are required by the ES3 controller and RTA. 3.6 Sound Velocity Probe (Real Time) Like all flat array multibeam sonars, it is vital that the correct sound velocity of the water at the sonar head is used at all times. This ensures that the receive beam is formed correctly and the return echo is therefore accurate. The RTA can receive the output from a SVP in the data format detailed at Annex B. 3.7 Motion Sensor In order to operate correctly the ES3 must have, at a minimum, roll motion input to collect hydrographic data. This is input directly to the sonar head in order to beam correct and focus the nadir beam at right angles to the normal (and therefore the sea floor). For the majority of applications the user will also require roll, heave and pitch (yaw is accounted for by the heading sensor, but may be included in the motion sensor output depending on the MRU’s specifications). The ES3PT will support the TSS1 format, this string starts with a “:” character and ends with a Line Feed character. 3.8 Heading Sensor A heading sensor is required to correct for any yaw changes from one transmit and receive pulse to the next. Page 17 of 53 10/27/2011 ES3 User Manual Commonly this is achieved by a GPS with two antennas offset at a fixed distance and therefore the heading can be calculated by the difference in the two observed positions. Any heading sensor that can transmit a NMEA string that starts with a “$” character and ends with a Line Feed character is supported by the ES3PT. Page 18 of 53 10/27/2011 ES3 User Manual 4 INSTALLATION Installation of the ES3PT as part of a hydrographic survey system is a multi-step process. Each step can be broadly shown in the below diagram. 4.1 Software Installation The minimum requirements for a personal computer to install and run only the ES3 software are: Windows XP, Windows 2000 or Windows 7 Pentium-IV, running at 2 GHz One COM-port (If connecting a sound velocity probe or GPS) One Ethernet port The ES3 program is fully tested on the following Operating Systems: Windows 2000 Windows XP Windows 7 The installation of the software on the PC is straightforward. On the software CD that accompanies the system there is an executable called ES3.exe. This can be installed in its own directory, and run by double clicking, or Page 19 of 53 10/27/2011 ES3 User Manual you can create a shortcut from the desktop for it. We do not recommend using new program wizard or any other installation program. Once launched, the program may start up either in playback mode or in real-time mode. If it is in real-time mode and the sonar head is not connected there may be a delay before the prompt comes back. 4.1.1 Network Settings for ES3 PC Once the software has been successfully installed the communications link between the processing PC and the sonar head must be established. This is achieved through the Ethernet cable, however the static IP (Internet Protocol) address must be entered into the ES3 computer. In order to complete this, on the ES3 computer click Start, Settings, Control Panel. Double click on the icon “Network Settings”. You will then see a list of available LAN connections. Double click on the port to be used, then select “Internet Protocol (TCP/IP)”. Click the button marked “Properties”. Check the button marked “Use the following IP address” and enter the following IP address and Subnet Mask: ES3 PC IP address ES3 PC Subnet Mask 192.168.0.3 255.255.255.0 There is also a settings box for default gateway, but it can be left blank. For troubleshooting purposes you may need to know that the sonar head has IP address 192.168.0.2. Screengrab of entering the correct IP address for the ES3 PC 4.1.2 Network Settings for Data Acquisition PC As in step 4.1.1, a communications link between the data acquisition PC and the RTA must be established. This is achieved through the Ethernet cable, however the static IP (Internet Protocol) address must be entered into the data acquisition computer. In order to complete this, on the Data Acquisition computer click Start, Settings, Control Panel. Double click on the icon “Network Settings”. You will then see a list of available LAN connections. Double click on the port to be used, then select “Internet Protocol (TCP/IP)”. Click the button marked “Properties”. Check the button marked “Use the following IP address” and enter the following IP address and Subnet Mask: Data Acquisition PC IP address Data Acquisition PC Subnet Mask 192.168.0.4 255.255.255.0 There is also a settings box for default gateway, but it can be left blank. Page 20 of 53 10/27/2011 ES3 User Manual Note: In order for the data acquisition software to receive data from the sonar the ES3 software must be running and set up to send processed data points. This is described in full at a later chapter detailing the ES3 software program. 4.1.3 Hypack configuration Before using the RTA with Hypack, the program must be configured to accept the data input through the Ethernet cable. Unlike most hydrographic systems where many sensors are connected to Hypack through many serial cables, the RTA collates this data and sends it through one source with individual time stamps. 4.1.3.1 Update Hypack Files First, the files included in the disk delivered with the RTA must be installed. There are 4 files that need to be copied into 2 locations within the Hypack program folder structure. These are as follows: File included in software CD Gps.dll F180.dll Posmv.dll Hysweep.exe Geo32.dll Scanifc-mt.sll Swpware.exe 4.1.3.2 Location to be copied within Hypack structure Hypack Devices Folder Hypack Devices Folder Hypack Devices Folder Hypack Root Folder Hypack Root Folder Hypack Root Folder Hypack Root Folder Update Hypack Hardware Configuration In Hypack, before using the ES3PT the user must update both the GPS and Hysweep devices to accept the timestamped data. To update the GPS device, first ensure that the new Hypack files have been installed as per step 4.1.3.1. Run Hypack, then click on the hardware button. Add Device, then select GPS. Deselect ‘Depth’, ‘Heading’ and ‘Tide’ under the “Functions” menu. Enter offsets if required at this stage. Under ‘Connect’, select ‘Network Port’, then ‘Protocol’ select ‘UDP’. Under ‘Role’ select ‘Server’ the under ‘Port’ enter 4044. The final screen will look similar to the screengrab below: Page 21 of 53 10/27/2011 ES3 User Manual Screengrab showing the GPS device in Hypack set up to receive data via UDP port 4044 Now click on the ‘Setup...’ button On the pop-up screen, click on ‘Advanced’. Check the box marked ‘RTA messages’, ‘Ignore checksum’ and ‘Show debug messages’. Screengrab showing the GPS setup advanced screen To configure Hypack Hysweep Hardware, under the main menu select ‘Hysweep’ then ‘Hysweep Hardware’. Under the ‘Manufacturer/Model’ tab select ‘Odom ES3’ then click ‘Add’. Page 22 of 53 10/27/2011 ES3 User Manual Screengrab showing the addition of the ES3 under the Hysweep Hardware menu Click on the ‘Connect’ tab and ensure that all of the check boxes are ticked, and in the box marked ‘Port’ enter ‘4040’. Ensure the box marked ‘Internet Address’ is empty. Screengrab showing the connection settings of the ES3 Click back on the tab marked ‘Manufacturer/Model’, then with the ‘Odom ES3’ still highlighted click on the button marked ‘Setup…’. Check the box marked ‘Use RTA Interface’. Page 23 of 53 10/27/2011 ES3 User Manual Screengrab showing the ES3 setup with RTA Interface selected 4.1.4 Configuring Other Data Acquisition Software to Receive Data from the RTA The RTA receives data from all the sensors connected to it, collates it, and then outputs all the data from the sensors through the one network connection to the acquisition PC. All the data is output through the UDP protocol. Hypack is configured to accept the data directly from the RTA however if a different collection software is used the UDP port addresses for each sensor type are detailed in the following table. UDP Port 4040 4042 4044 4046 4048 4050 4.2 Sensor Data ES3 with trigger pulse time stamp MRU with RTA received time stamp GPS with RTA received time stamp Heading with RTA received time stamp Aux. Sensor with RTA received time stamp Sound Velocity with RTA received time stamp Assembling the Hydrographic System In order to use the ES3 and RTA as part of a hydrographic survey system, the user must assemble it to bring all of the components together. The assembled system will be connected in accordance with the diagram below. Page 24 of 53 10/27/2011 ES3 User Manual Connection line diagram of a typical survey system incorporating the ES3 and RTA Before connecting any of the cables, make sure that the computer, the ES3 and other peripherals are turned off. Follow the list below is a sequence of steps for connecting the ES3 with the computer. a) Connect the cable from the ES3 Head to the connector on the ES3 RTA labeled “ES3 1”. b) Connect the power cable for the ES3 RTA to the connector labeled “POWER”. c) Connect the Ethernet cable from the ES3 RTA connector labeled Processing PC to the computer running the ES3 software (note: this should be a dedicated PC running no applications other than the ES3 control software). d) Connect the Ethernet cable from the ES3 RTA connector labeled Data Acquisition PC to the Data Acquisition Computer. e) Connect the Motion Reference Unit to the RTA ‘MRU’ port using the Odom supplied cable. An adapter cable is available for certain other types of MRUs. f) Connect the GPS to the RTA ‘GPS in’ serial connector. g) Connect the Heading sensor to the RTA ‘Heading in’ serial connector. h) Connect the PPS pulse to the RTA either through the GPS connector or the BNC connector. i) Connect the sound velocity probe to the RTA port marked ‘R/T Sound Velocity’. j) Within the ES3 software, set the ES3 program to output data to 192.168.0.255. 4.3 Configuring the Real Time Appliance The RTA has an internal configuration program that is accessed through the USB type ‘B’ port on the front panel. To use this program the computer must have the USB drivers that accompany the system software installed. Once the drivers are installed any terminal program can be used to access the program. 4.3.1 USB Driver Installation The USB port of the RTA uses a virtual serial port driver to send and receive data to the computer. Once the USB drivers are installed, any terminal program will treat the port as normal serial port. Page 25 of 53 10/27/2011 ES3 User Manual 1. Install the software BEFORE plugging the RTA to the computer. 2. Insert the USB driver disk that is included with the RTA in the computer. If the disk is not available, download the program from our web site. 3. Run the CP210xVCPInstaller.exe file. 4. Once the program has installed plug in the RTA to the computer using the included USB type ‘A’ to type ‘B’ cable. 5. On the PC, go to Start, Settings, Control Panel, System, then click on the Hardware tab and select Device Manager. Expand the Ports (COM & LPT) section. The USB drivers will enumerate the RTA to the next available com port. The com port will be labelled “CP210x USB to UART Bridge Controller (COM X)” where X is the com port number that the application should use to communicate with the RTA. In the example below the RTA has enumerated to COM18. Screenshot of the PC device manager showing the connection to the RTA (COM18 in this case) 4.3.2 Accessing RTA Configuration Program Once the USB drivers have been installed run TTY.exe (available on the Installation Software CD). Set the Com port to the one enumerated in the instructions above. Set the baud rate to 19,200. Connect to the RTA. To start the program, press the Escape Key. The following menu will be seen: Page 26 of 53 10/27/2011 ES3 User Manual Follow the instruction on the menu to change the baud rate of the input sensors. 4.4 Start Up System The following sequence must be followed when powering up the equipment: a) Turn on the computer running the ES3 software. b) Power up the ES3 by pushing the power button on the RTA. The red power LED on the RTA will illuminate and the Link light will turn on when the ES3 Head starts transmitting data. c) Start the ES3 Application program. Go to the ‘File’ menu and select ‘Data From…’, then select ‘Head’. Data should appear on the main window if the system is operating correctly. 4.5 Transducer Installation Proper mounting of the transducer is a crucial part of the installation of any hydrographic echo sounder. An improperly mounted transducer will result in poor system operation and unacceptable data quality. This is even more crucial with a multibeam sonar, as any offsets in distance or angle will introduce greater error than what would be expected with a single beam system. There are several different methods of mounting the transducer, the most common being a side mount or bow mount. The following is a table of considerations that the surveyor should be aware of when mounting the sonar. Bubble wash Stability (vessel) Stability (mount) Strength of mount If the sonar is mounted too close to the surface or in the wake of the vessel, the air bubbles caused by vessel motion will pass over the face of the transducer. This will cause false returns, as the acoustic pulse bounces off these bubbles. This commonly occurs if the sonar is mounted to the hull of a vessel with insufficient depth of water above the transducer. The uncertainty of a multibeam system’s data is dependent on motion and how it is measured by the MRU, and therefore it is advantageous to mount the sonar in a position that experiences the least vessel motion. On a small boat, this is near the stern; however this is also an area commonly affected by bubble wash. The distance offset between the mount and the other sensors, particularly the MRU, must remain fixed at all times. If the mount that the sonar is to be attached to flexes or moves, the resulting data will be degraded. The ES3 is a larger transmitter than most single beam transducers, and therefore when a vessel is moving at speed a great deal of stress is put on the mounting pole. The mount and mounting pole should be sufficiently strong to prevent loss of the sonar. Page 27 of 53 10/27/2011 ES3 User Manual It should be noted that the ES3 sonar head is to be mounted with the cable end pointing aft – this will ensure that the resulting data is orientated correctly athwartships and this also reduces bubble wash on the sonar head. To aid in mounting the sonar head, a plastic fairing is available from Odom which reduces bubble wash and drag on the unit. Page 28 of 53 10/27/2011 ES3 User Manual 5 ES3 SOFTWARE Note: This chapter refers to ES3 software version 1.04.11 dated 21 December 2010. 5.1 Introduction The control software supplied with the ES3 is used to set all of the ES3 user defined parameters and it also serves as the electronic beam former. The software interfaces to the ES3 Head through the network cable and outputs the data to the RTA, where it may be subsequently output to the data acquisition PC. This section contains the information necessary to operate the ES3 using the ES3 control program. Screengrab showing the main software window with annotations 5.1.1 Range The dial at the bottom of the ES3 main display sets the maximum slant range for the system. This is not the same as the maximum depth. This range is the maximum angular distance to which any beam can reach. Since the ES3 is capable of up to a 120 swath the range needs to be set to a higher number than the maximum depth value, so that the outer beams will be able to detect the bottom. As a rule of thumb, set the range to twice the maximum anticipated water depth. Note: Increasing the range value will reduce the ping rate for the system due to the increase in travel time for an acoustic pulse to be transmitted and received by the system. Page 29 of 53 10/27/2011 ES3 User Manual 5.1.2 Gain The Gain dial sets the gain for the pre-amplifiers inside the ES3 Head. Setting the Gain correctly is critical to the proper operation of the ES3, and must be monitored constantly by the user. If the gain is set too high the signal will saturate and will not give accurate depths. If the Gain is set at too low a value, there will be gaps in bottom detection. In order to set the Gain correctly, first set the Display dial to 50%. Go to the Profile Setup menu and set the Profile Point Display to High Mix. Increase the Gain knob until there is a good display of the signal on the main display screen. If too much gain is applied side lobes and false bottoms will become visible. If not enough gain is applied the bottom detection algorithms will not be able to determine the bottom across the complete swath. If needed, increase the Display knob to achieve the desired results. 5.1.3 Display Gain Display sets the gain that is applied to the beam former in the ES3 software. As a rule, set this parameter to 50%. If there is too much signal in the main window (multiple of the bottom and side lobe artifacts visible), reduce the Display Gain. If the signal from the ES3 is not reaching out across the entire swath, increase the Display Gain. The signal return seen on the ES3 software depends not only on the way the Gain and Display parameters are set, but also on the reflectivity of the bottom and the amount of attenuation present in the water column. It may not always be possible to achieve full swath coverage with the ideal settings because of these environmental influences. 5.2 Menu Options The following section explains each of the menu options available at the top of the software main window. 5.2.1 File Screengrab showing the options within the ‘File’ menu Page 30 of 53 10/27/2011 ES3 User Manual 5.2.1.1 Data From Selects data in real time or to play back from a previously recorded and stored .837 file. To see data obtained from the sonar head in real time, select Head. 5.2.1.2 Record Start Selecting “Record Start” begins the recording of raw data from the ES3 to a “.837” file that can be played back post mission. This feature is useful for trouble shooting in that the recorded raw data can be sent to our office for analysis. It is also useful for trying out different filter settings to find the optimal setting for different work areas. Note that recording via the ES3 software will not affect any data passed to the data acquisition PC. 5.2.1.3 Playback This selects the file to play back. During playback the systems Range and Gain cannot be changed but all other settings can. 5.2.1.4 Fast Playback This lets the operator skip through the selected file during playback in larger steps to find a particular part of the data. 5.2.1.5 Use Real-time Playback Speed Sets the playback speed to the speed the data was acquired. 5.2.1.6 Copy Start Copy Start is for copying sections of files into a file with a different name and for subdividing long data-files. 5.2.1.7 Convert .837 Sonar Files To .83P Format Raw Sonar files saved in real time are saved as .837 files. This command will convert the raw sonar file into the .83P (point data) file format, used by the data acquisition computer. 5.2.1.8 Convert .837 Sonar Files To .83B Format Raw Sonar files saved in real time are saved as .837 files. This command will convert the raw sonar file into the .83B (beam data) file format. 5.2.1.9 Convert .837 Sonar Files To .XTF Format Raw Sonar files saved in real time are saved as .837 files. This command will convert the raw sonar file into the .XTF file format, used by many types of post-processing software. 5.2.1.10 Save Screen Save Screen is a screen-capture command that creates a .BMP bitmap image of the current screen. Page 31 of 53 10/27/2011 ES3 User Manual 5.2.2 Color Table The Color Table pull-down menu is for changing display colors. Single target detection is often best using the ‘NORM HI’ color table, while images of the bottom with shadows are usually best viewed in ‘Brown’ or ‘Blue’. These colors are for display only; the data can be played back with any color scheme if desired. Screengrab showing the options within the ‘Color’ Menu 5.2.3 Set-up Page 32 of 53 10/27/2011 ES3 User Manual Screengrab showing the options within the ‘Setup’ menu 5.2.3.1 IP Address The IP Address parameter sets the address of the Sonar Head and for the Ethernet data going to the data acquisition software. Normally the Sonar is set to 192.168.0.2. The Output IP address should be set to 192.168.0.255. These settings should not be changed. 5.2.3.2 Units This is used to set the operating units of the ES3. Select Meters or Feet. 5.2.3.3 Automatic File Names This lets the ES3 name the file names automatically based on the date and time they are created. 5.2.3.4 Automatic File Name Type This selects the automatic file naming convention. 5.2.3.5 Set Maximum Filesize... This allows the user to determine a maximum file size before a new file is started, or a default size may be selected. 5.2.3.6 Velocity This is used to set sound velocity of the water at the transducer face. It is critical that this value is as accurate as possible as this will affect the pointing angles of the beams. Ideally a sound velocity probe is installed next to the transducer to monitor the sound velocity and this will update the program continuously. Otherwise the sound velocity is entered here manually and must be updated at a very regular rate dependent on local conditions. 5.2.3.7 Overlap sonar I/O This option allows the ES3 program to have an increased ‘ping rate’ by taking advantage of the idle time while the current ping is in the water to process the previous ping and output the data through the port. This yields an increase of 40-60% on the ping rate, and therefore would usually be set to ‘on’. 5.2.4 Options Page 33 of 53 10/27/2011 ES3 User Manual Screengrab showing the options within the ‘Options’ menu 5.2.4.1 Grid This is used to add a grid to the data display. 5.2.4.2 Sector Size Sets the total sector size the ES3 will measure. The larger the sector-size the wider the swath coverage. The settings are 30, 60, 90 and 120. 5.2.4.3 Beams Sets the number of beams the ES3 will detect, display, and output. The options are 480, 240 and 120 beams. The larger the number of beams the better the across track resolution, but the slower the ping rate. For the highest ping rate, select 120 beams. 5.2.4.4 Averaging This selects the number of pings that are averaged together before the data is output (along track average). The settings are from Off to 7 pings. A setting of 5 has been found to work well in a number of bottom conditions. A higher setting will work better on a very flat bottom with little debris on the seabed while a smaller number should be selected for maximum definition over rough bottom terrain, or if the user is conducting further averaging when processing the data (such as using CUBE). 5.2.4.5 Gain Equalization Use this to normalize the gain across the swath. This is usually checked unless it is deemed unnecessary for a particular application. Page 34 of 53 10/27/2011 ES3 User Manual 5.2.4.6 Display Track Plotter When a GPS is connected to the ES3 software, this command will display a window showing the track the vessel has travelled. 5.2.4.7 Clear Track Plotter This command clears the current track plot on the Track Plotter screen. 5.2.4.8 Display Swath Coverage This command opens a window that shows the achieved swath coverage of the ES3. 5.2.4.9 Load Swath Coverage From LOG file This command allows the user to load swath parameters from a previously saved LOG file. 5.2.4.10 Sidescan Window This opens a window that shows the intensity data from the ES3 in a top-down view, similar to that of a side scan sonar. Screengrab showing the sidescan window 5.2.4.11 Echo Sounder Window This opens up a window showing the signal from the nadir beams in a similar manner to a single beam echo sounder. Page 35 of 53 10/27/2011 ES3 User Manual Screengrab showing the echo sounder window 5.2.4.12 Intensity Window This command opens up another window showing the return signal intensity. 5.2.4.13 Sweep Window Screengrab showing the sweep window This command opens up a window displaying the last 25 pings averaged together. The window is useful to see the mean change in the bottom and to display outliers. Move the mouse cursor from left to right to get information such as the angle Minimum and Maximum for the last 25 pings. The vertical scale is fixed and cannot be changed. 5.2.4.14 Signal Level This displays the signal level of the data coming from the ES3 transducer. The color scale is displayed on the far right. 5.2.4.15 Diagnostics This opens a window that displays diagnostic information for the ES3. When the Motion Reference Unit is connected make sure the Pitch and Roll values are changing. If MRU data is not being received by the system, these figures will turn red to alert the user. In addition, the real time SVP will also become red if data is not being passed to the system. It is recommended that this window be open at all times in order that the user can ensure proper operation of the system and that all sensors are updating accordingly. Page 36 of 53 10/27/2011 ES3 User Manual Screengrab showing the diagnostics window open on the left (in grey) 5.2.4.16 Automatic Gain Control Select this function if the user prefers the gain of the system to be automatically adjusted. Care should be taken with using this function, and as always the system should be monitored to ensure the desired return signal is displayed on the ES3 screen. 5.2.5 Profile Setup Screengrab showing the options within the ‘Profile Setup’ menu Page 37 of 53 10/27/2011 ES3 User Manual 5.2.5.1 Profile Point Setup WARNING: In the majority of cases, most users will need to change settings within this menu that will affect data quality – ensure to read and fully understand these settings before using the system. This command opens a separate window that contains many settings vital to the correct operation of the system. Each element of this window is discussed below. Screengrab of the Profile Point Setup Window 5.2.5.1.1 Profile Point Display This parameter sets the intensity of the signal and the point data that is sent to the data acquisition PC in the main window. The ES3 software will show the signal return data (modified by any filters and averaging as set by the user) as the colored area on the main screen. This data must be parsed down into data points of position and depth that can be sent to the acquisition computer. The Profile Point Setup menu allows the user to change the parameters of what is seen on the screen and therefore ensure that the signal return data and the data points recorded are a good representation of one-another. High to Low mix refers to the intensity of the return signal intensity data. “Points Only” shows the depth points with no signal intensity information in the background. 5.2.5.1.2 Profile Point Detection This instructs the software to determine a minimum and maximum depth below the transducer face. Set these values according to the expected depth of the survey area, remembering the maximum depth the system is capable of achieving. 5.2.5.1.3 Profile Point Filter This determines the detection mode for the ES3. For bathymetry, we will nearly always select the Bottom following setting. The other options are First Return and Maximum Return. First Return will often cause the ES3 to detect objects in the water column. Maximum Energy will cause the ES3 to detect signals with the highest signal level, and this may or may not be the actual seabed depending on the seabed roughness. Along Track Averaging. This function allows for the system to insert interpolated point data in the along track plane, giving a more consistent view off the sea floor. Page 38 of 53 10/27/2011 ES3 User Manual 5.2.5.1.4 Advanced Filter Settings Click on this button to reveal another window of options. Screengrab of the advanced filter settings a) Fill between beams. This setting generates a bottom range point for beams that don’t contain valid range to bottom values in the athwartships plane. The detected range points from adjacent beams are used for interpolating between the beams. b) Flat Bottom Filter. The flat bottom filter reduces bottom artefacts directly beneath the transducer. All beams within +/-30 degrees of nadir are analyzed. If raw data is preferred from the sounder (for processing after gathering using processing algorithms such as CUBE) this should not be checked. c) Remove short outliers. Short outliers are unwanted targets above the bottom and in the water column. The “% of range” entry sets the effective “height off bottom” setting for the filter. This setting is entered as a percentage of the current range scale. For example, if the current range scale is 20m, a value of 20% would mean that all targets higher than 4m above the bottom will be removed. A setting of 20% can be used for relatively flat bottoms, lower settings can be used for very flat bottoms. Increase to 100% to keep all water column targets. d) Display Settings. Select “Show removed points” to display the removed points as enlarged green blocks (using the Norm Hi Color Table). Lower the “Background Level” setting to 0.1 or until the removed points are easily seen. This is a good diagnostic tool for evaluating the short outlier removal filter. All Filter settings are active in real-time or during file playback, so experimentation with these settings will not affect the stored data within the .837 file. The various filter settings may need to be changed depending on the bottom type and/or if there are targets on the bottom or in the water column (i.e. rocks, shipwrecks, fish schools, pilings, etc.). 5.2.5.2 Profile Waterfall Display ‘Profile Waterfall’ can be used to display consecutive cross-sections of the sea floor in a depth vs. color window. To change the depth to color ratio, position the cursor over the small profile image at the left side of the display Page 39 of 53 10/27/2011 ES3 User Manual and left-click to change the start depth then right-click to change the span. Section of a screengrab of the profile waterfall display 5.2.5.3 Roll Correction This function can be selected as on or off, and selects whether the roll input data from the MRU is applied to form receive beams at the same angle with respect to the normal. In most cases this will be checked ‘on’. 5.2.5.4 Profile Tilt Angle Use ‘Profile Tilt Angle…’ to adjust the display if the sonar head has been physically mounted at an angle on the vessel, usually to scan either port or starboard. Valid tilt angles are – 30 to + 30 degrees. 5.2.5.5 Display Altitude This function opens up a separate window that displays the depth of the nadir depths. 5.2.5.6 Grid Type This function changes the grid on the display from a circular grid to a rectangular grid. 5.2.6 Data Output Setup This function opens up a separate command window allowing the user to change the type of data output that is sent to the data acquisition computer. Either the point output (data points derived from the return signal intensity .83P file format) or beam output (beam intensity information - .83B format) can be chosen. For most hydrographic data collection systems the point output is chosen. If the ‘Include Intensities’ button is checked, Hypack will also record intensity data. Page 40 of 53 10/27/2011 ES3 User Manual Screengrab of the data output setup window 5.2.7 About The ‘About’ pull-down contains the software version number and contact details for the Teledyne Odom main office. Page 41 of 53 10/27/2011 ES3 User Manual 6 SOFTWARE QUICK START GUIDE This section will instruct the operator how to quickly start gathering data from their ES3 multibeam. Follow the instructions in this section only once the rest of this operator manual has been reviewed and the ES3 is installed properly. It is assumed that the ES3 is connected correctly and all software is installed. To get more information on the parameters discussed go to the appropriate section of the manual. The instructions below are an initial setup and some parameters might have to be adjusted to work in specific areas. 1. Power up the ES3 RTA. 2. Start the ES3 software. 3. Go to the File menu and select Data From->Head. 4. Set the Units of measure, Setup->Units. 5. Set the maximum anticipated operating depth using the Range dial. Remember the dial indicates the slant range; so set the Range to twice the maximum water depth. 6. Go to Options->Sector Size and enter the desired sector size. 7. Go to Options->Beams and enter the number of beams desired. Remember sector size and number of beams will affect the ping rate of the system. 8. Make sure the PPS pulse is blinking once a second. 9. Make sure the MRU, GPS and Heading LEDs are blinking. 10. Start out be setting the Display dial to 50%. If the whole swath width is not covered with data increase the Gain knob. If there is too much signal in the water column reduce the Gain knob. 11. If there is no sound velocity probe connected to the ES3 head Go to Setup->Sound Velocity and enter the current Sound Velocity at the transducer face. 12. Go to Profile Setup->Profile Point Setup and check the following boxes: Low Mix, Profile Point Detection (Enable) and Bottom Following. 13. While in the Profile Point Setup window click on Advanced Filter Settings… and change according to requirements. 14. Start surveying after patch testing the system with the data acquisition software. Page 42 of 53 10/27/2011 ES3 User Manual 7 TROUBLESHOOTING Symptom No data in the ES3 software No data in the data acquisition software RTA will not turn on Profile is consistently curved up or down at the edges of the swath Solutions 1. In the ES3 software go to File->Data From and make sure Head is selected. 2. Make sure the RTA is turned on and the Red power LED is on. If it is off check the power supply to the RTA. 3. Make sure the Link light is on. If it is off check the power to the RTA and check the cable to the transducer. 4. Check if there is other network traffic colliding with the ES3. Disconnect everything to the ES3 RTA other than the ES3 computer, transducer and power. Switch off the ES3 RTA and reboot the ES3 computer. Power on the ES3 RTA and start the ES3 application. 5. Ensure that any firewall or antivirus software is disabled on the network port used for the ES3. 6. Check the IP address in the ES3 computer is set correctly, and the IP address of the sonar head is set within the ES3 software. 1. Make sure the correct driver is selected for the ES3 in the data acquisition software (see Chapter 4). 2. Check the ES3 software is passing .83P data, not .83B data (see Chapter 5) 3. Check the network cable from RTA to the data acquisition computer. 1. Check power supply to the unit. 2. Check fuse has not blown on unit, replace if necessary. 1. Sound speed is too fast or slow. 2. Check the teal time SVP is passing data to the ES3 software. 3. If a real time SVP is not available, conduct a new sound velocity cast. Page 43 of 53 10/27/2011 ES3 User Manual Connectors as viewed from the RTA Appendix A. CABLE CONNECTIONS: Tranducer Connector TRANSDUCER Cable Connector (Signal Connector) Pin # MS3114E14-5S (Dry End) A B C D E F G H J K Wet End Color Description 1 3 2 Black Red White Power Ground +24 VDC Ethernet TXD- 7 5 8 4 6 White/Black Orange Red/Black Green Blue Trigger Input+ Ethernet RXD+ Trigger Input Ethernet TXD+ Ethernet RXD- B C A J D H K E G F Power Connector POWER Cable Connector (DC only) P/N: MS3114E12-3P Pin # Description A -------------------+12 or 24 VDC B -------------------No Connection C -------------------Return C A B MRU Cable Connector Amphenol MS3116J14-12P (Dry End) A Impulse MHDG-16-CCP-UT (Wet End) 3 Blue - A B 6 White - B C 5 Red - B 13 14 11 12 1 2 Orange White – F Black – E White – E Blue Black 16 Light GN – D D E F G H J K L M Color Description Channel B Tx A Primary COMMS from Sensor Channel B Rx B Primary COMMS from Sensor Channel B Rx A Primary COMMS from Sensor NC GPS Input Ground Connection for MRU Heading data to MRU Ground Connection for MRU +24V DC to MRU Power NC Main Screen Page 44 of 53 10/27/2011 ES3 User Manual Appendix B. Sound Velocity Input String The ES3 will only read the AML string. This string is available from the Digibar Pro sound velocity probe and the format is as follows In meters <space>1477.40<CR><LF> or in feet <space>4847.40<CR><LF> The default for the data protocol ASCII 19200,N,8,1. 19200. Page 45 of 53 10/27/2011 ES3 User Manual Appendix C. Configuring Digibar Pro To Output Data In Real Time To set the Digibar Pro to output the sound velocity in real time set the following parameters in the Digibar Pro: Setup -> Log basis -> Time Setup -> Store cast data -> No Comm -> Output Type -> AML Comm -> Output During -> Yes Page 46 of 53 10/27/2011 ES3 User Manual Appendix D. Motion Reference Unit output string The ES3 will only read the TSS1 output string. The format of the string is: The TSS1 data string contains 27 characters in five data fields. The acceleration fields contain ASCII-coded hexadecimal values. Horizontal acceleration uses units of 3.83cm/s² in the range zero to 9.81m/s². Vertical acceleration uses units of 0.0625cm/s² in the range –20.48 to +20.48m/s². The motion measurements contained in the data string will be in real time, valid for the instant when the system begins to transmit the string. Motion measurements include ASCII-coded decimal values. Heave measurements are in cm in the range –99.99 to +99.99 meters. Positive heave is above datum. Roll and pitch measurements are in degrees in the range –90.99° to +90.99°. Positive roll is port-side up, starboard down. Positive pitch is bow up, stern down. Page 47 of 53 10/27/2011 ES3 User Manual Appendix E. Transducer Dimensions Page 48 of 53 10/27/2011 ES3 User Manual Appendix F. ES3 Timing There are two methods of synchronizing the ES3 data with the data acquisition software and other sensors: Time of arrival In the time of arrival method of synchronizing the ES3 data, the data acquisition computer time stamps the data from each of the sensors including the ES3 upon arrival. The packets of data the ES3 sends out to the data acquisition software include the time from the transmit pulse in the water to when the data is sent out the ES3 port and the data acquisition needs to subtract this time from the time of arrival time stamp. The possible errors that are left are any delays on the network between the ES3 and the data acquisition computer, delays in the data acquisition software acknowledging the ES3 data and time stamping it and the resolution of the time stamp the data acquisition applies to the ES3 data. UTC time stamp In this method of time stamping, the ES3 time stamps the data packets that are sent to the data acquisition software using UTC (Universal Time Coordinated) time. The data acquisition clock is also synchronized to the UTC time. When the data acquisition software receives the ES3 data packets, it knows exactly when the transmit pulse occurred even if there are delays in the network. This is the most robust method for synchronizing the ES3 data with the data acquisition software. In order to embed the UTC time in the ES3 packets a PPS (Pulse Per Second) conditioning circuit (often referred to as a “PPS Box” is required. The along with a GPS receiver that is capable of outputting the NMEA ZDA string along with the PPS pulse. The PPS box must receive the PPS pulse and the ZDA string from the GPS and toggle the CTS signal of the serial connector to the ES3 computer that is also outputting the ZDA string every time the pulse is received. Below is a timing diagram of how the PPS pulse must be received by the ES3 software. PPS pulse from GPS Conditioned signal from PPS box to pin 8 of ES3 GPS input serial connector Page 49 of 53 10/27/2011 ES3 User Manual This is a diagram of the connection to the ES3 computer. PPS pulse GPS PPS Box ZDA string ZDA + PPS pulse ES3 serial port (PPS signal on Pin 8) ES3 computer Notes: Some GPS receivers use a BNC connector for the PPS pulse output and some include it on one of the pins on the serial DB9 connector. Refer to you GPS manual regarding whether the PPS is available or not and on which connector and pin it can be found. The NMEA ZDA string includes the UTC time. The ES3 software can receive the NMEA string along with the GGA string through a serial port on the ES3. Configure the GPS port in the ES3 software and it will display a window showing the PPS pulse to ZDA time difference. This is the difference between the UTC time in the ZDA string and the PPS pulse. The PPS pulse is the exact time when the UTC occurred. The difference in the PPS-ZDA string varies between GPS manufactures. Make sure the data acquisition system is set up to synchronize the data using either one of these two methods. Page 50 of 53 10/27/2011 ES3 User Manual Appendix G. Acoustic Center and MRU Reference Point: In the z plane, the reference point is 3.150” (80mm) in the center of the unit. For the ES3M, the reference point for the DMS is as follows: In the z plane, the MRU reference point is 2.303” (58.5mm) in the center of the unit. Page 51 of 53 10/27/2011 ES3 User Manual Appendix H. Hot Keys: F1 - decrease range F2 - increase range F3 - decrease gain F4 - increase gain F5 - decrease display F6 - increase display The range, gain and display knobs can also be adjusted by hovering the mouse cursor over a knob and then using the up or down arrow keys to increase or decrease the setting. other keys: 'C' or 'c' to clear the screen 'H' or 'h' to hold the display 'R' or 'r' to enter a range number via the number keypad (i.e. R40<Enter> to change to 40m range) 'G' or 'g' to enter a gain number via the number keypad (i.e. G10<Enter> to change the gain to 10dB) 'D' or 'd' to enter a display gain number via the number keypad (i.e. D50<Enter> to change the display gain to 50 percent). Ctrl-S to start logging Ctrl-E to end logging Ctrl-N to start logging a new line (i.e. close current file and open a new file) Page 52 of 53 10/27/2011 ES3 User Manual P Paaggee lleefftt bbllaannkk iinntteennttiioonnaalllyy Page 53 of 53 10/27/2011