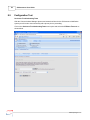
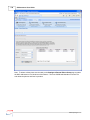
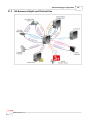
1
SA-Announce Notification System
User Manual Version 7.0.0
©2009 Syn-Apps L.L.C.
About Syn-Apps
Syn-Apps L.L.C. was founded in 2000 as a consulting firm focused
on developing software for IP telephony. Since that time Syn-Apps
has more than tripled in size and has expanded its consulting
services to include enterprise application development. We believe
that our relatively small firm is able to fulfill the needs of our
customers more efficiently and inexpensively than our larger
competitors.
Syn-Apps has an extensive knowledge base in numerous
technologies, including .NET, C#, VB.Net, SQL Server, Java, C++
and other mainstream development tools. Syn-Apps additionally
has a strong background in network design and networking
fundamentals. We believe this combination of experience in a
broad range of technologies allows us to offer our customers an
end-to-end application development solution.
We believe that in order to have a successful application
deployment one should not only understand the development
environment but also understand how the application will interact
with the rest of network. Syn-Apps employs one of the Cisco
Systems Engineers that was responsible for the network
development and design for many Fortune 100 companies. We
believe that this enables us to become a valuable asset to any
development team.
Syn-Apps developers have a wide variety of development
experience in many diverse industries. Our developers have been
employed by, or consulted for companies such as Microsoft, Cisco,
General Motors, General Dynamics, Bloomberg, and many others.
All of our developers have a keen understanding of the software
development life cycle and know how to develop successful
applications.
At Syn-Apps we understand the importance of a team environment
and are comfortable developing and sharing information to ensure
that the best of breed product is produced.
Contents
3
Table of Contents
Part 1 SA-Announce Overview
8
Part 2 Application Features
12
Part 3 Manual Conventions
15
Part 4 System Requirements
17
1 Application ...................................................................................................................................
Server Requirements
17
2 Cisco Communications
...................................................................................................................................
Manager Requirements
19
Communications
..........................................................................................................................................................
Manager 3.x
Communications
..........................................................................................................................................................
Manager 4.x, 5.x , 6.x, 7.x
Adding Device
.........................................................................................................................................................
Pack (CM 5.x, 6.x, 7.x)
Communications
..........................................................................................................................................................
Manager Express
19
19
19
21
3 Network Requirements
................................................................................................................................... 22
Firewall Ports..........................................................................................................................................................
Multicast Configuration
..........................................................................................................................................................
22
22
Part 5 Installation Procedure
24
Part 6 Configuration Utility
30
Part 7 Post Configuration Steps
40
1 Authentication
...................................................................................................................................
URL
41
2 IP Phone Services
................................................................................................................................... 42
Part 8 Initial Application Configuration
44
1 First Time Login
................................................................................................................................... 44
2 Service Configuration
...................................................................................................................................
Options
45
Phone Features
..........................................................................................................................................................
47
3 Multicast Configuration
................................................................................................................................... 48
4 User Accounts
................................................................................................................................... 53
5 Configuration
...................................................................................................................................
Test
54
Part 9 Notification Group Configuration
57
1 SA-Announce:
...................................................................................................................................
Group Types
57
Normal
..........................................................................................................................................................
Holler
..........................................................................................................................................................
Insta-Holler ..........................................................................................................................................................
Holler-RP
..........................................................................................................................................................
Ad Hoc
..........................................................................................................................................................
Text
..........................................................................................................................................................
Emergency Alert
..........................................................................................................................................................
Wokkie Tokkie
..........................................................................................................................................................
(Normal)
Wokkie Tokkie
..........................................................................................................................................................
(Ad Hoc)
58
58
58
58
58
59
59
59
60
©2009 Syn-Apps L.L.C.
3
4
SA-Announce User Guide
RecordNPlay ..........................................................................................................................................................
Respond
..........................................................................................................................................................
60
61
2 Notification ...................................................................................................................................
Group Setup
61
3 Email
................................................................................................................................... 63
4 IP Phones ................................................................................................................................... 64
5 External Phones
................................................................................................................................... 65
6 Syn-Apps IP...................................................................................................................................
Devices
66
7 IP Speaker Integration
................................................................................................................................... 67
8 Alertus
................................................................................................................................... 68
9 Everbridge ................................................................................................................................... 69
10 Activating Services
................................................................................................................................... 70
Part 10 Creating Emergency Alert Groups
72
Part 11 Creating Schedules
77
1 Schedule Overrides
................................................................................................................................... 79
Part 12 Sending A Text Message
81
1 Message Browser
................................................................................................................................... 83
Part 13 Email Settings
86
Part 14 Amber Alert Settings
88
Part 15 Weather Alert Settings
91
Part 16 Background Music Settings
94
Part 17 Configure IP Phone Services
97
1 Page Group ...................................................................................................................................
Directory
98
2 Web Dialer...................................................................................................................................
Directory
100
3 7921 - Push-to-Talk
................................................................................................................................... 102
4 Phone Service
...................................................................................................................................
URL
103
Part 18 Paging Relay Configuration
106
1 Supported ...................................................................................................................................
Paging Relays
108
2 Paging Relay
...................................................................................................................................
Setup
108
3 Paging Relay
...................................................................................................................................
Traffic Flow
109
Part 19 Syn-Apps IP Speaker Configuration
111
1 Supported ...................................................................................................................................
Syn-Apps IP Speakers
113
2 Syn-Apps IP
...................................................................................................................................
Speaker Setup
113
Part 20 Valcom IP Speaker Configuration
116
©2009 Syn-Apps L.L.C.
Contents
5
1 Supported ...................................................................................................................................
Valcom Speakers
117
2 Valcom IP Speaker
...................................................................................................................................
Setup
118
Part 21 CyberData IP Speaker Configuration
121
1 Supported ...................................................................................................................................
CyberData Speakers
122
2 CyberData ...................................................................................................................................
Speaker Setup
123
Part 22 Alertus Configuration
126
1 Supported ...................................................................................................................................
Alertus Devices
127
2 Alertus Device
...................................................................................................................................
Setup
127
Part 23 Everbridge Configuration
129
1 3n Setup ................................................................................................................................... 130
Part 24 Facebook Configuration
132
1 Connection...................................................................................................................................
Diagram
133
Part 25 Twitter Configuration
135
1 Connection...................................................................................................................................
Diagram (COPY)
135
Part 26 Analog Paging System Integration
137
1 Supported ...................................................................................................................................
Analog Systems
139
2 Supported ...................................................................................................................................
Analog Interfaces
139
Part 27 Busy Detection Options
141
1 XML Busy Detection
................................................................................................................................... 141
2 TAPI Busy ...................................................................................................................................
Detection
141
Part 28 Information Center
150
Part 29 Custom Wave File Upload
153
Part 30 Customizing Audio Feedback
156
1 Audio File Descriptions
................................................................................................................................... 156
Part 31 Advanced Paging Configuration
159
1 SA-Announce
...................................................................................................................................
Multicast Router/Switch Configuration
159
2 Multi-Site Centralized
...................................................................................................................................
SA-Announce Server
160
3 SA-Announce
...................................................................................................................................
High-Level Protocol Use
161
Part 32 Help and Support
163
1 Documentation
................................................................................................................................... 163
2 Knowledge...................................................................................................................................
Base
164
3 Prepare Report
................................................................................................................................... 165
©2009 Syn-Apps L.L.C.
5
6
SA-Announce User Guide
4 Contact Syn-Apps
...................................................................................................................................
Support
166
©2009 Syn-Apps L.L.C.
SA-Announce
Overview
Part
1
8
1
SA-Announce User Guide
SA-Announce Overview
SA-Announce Notification System [7.0.0]
The SA-Announce Notification System is a feature-rich notification system that couples to Cisco
Unified Communications Manager to provide text and audio notifications across an enterprise. The
notifications can be real time, such as emergency alerts and live audio notifications (IE paging /
intercom), or they can be scheduled via the scheduling system. SA-Announce integrates the phone
system with a large number of disparate end points such as Cisco IP Phones, Legacy Overhead
Systems, Syn-Apps IP Speakers, Valcom IP Speakers, CyberData IP Speakers, Email, Everbridge
(formerly 3n: National Notification Network), Syn-Apps Paging Relay, and Alertus devices.
Notifications can be made by simply picking up the phone and dialing the notification group directory
number (as well as other methods such as automated via a relay or web).
The SA-Announce Notification System has numerous audio streaming models that can be used to
accommodate almost any notification requirements from one centralized server. With the addition of
the Syn-Apps Paging Relay (a unicast to multicast device) even non-multicast enabled wide-area
networks can provide notification to all remote sites using one centralized SA-Announce server.
Streaming models include Unicast, Server Sourced Multicast, Relay assisted multicast and Phone
Sourced Multicast. Note that Valcom and CyberData IP Speakers are multicast only devices.
New features for SA-Announce 7.0.0 include:
· Dynamic Paging Groups: IP Phones in a notification group can be assigned using a filter;
as you add devices to the system there is no need to manage the notification group.
· Email Integration: Emails can be sent automatically when SA-Announce notification
groups are activated.
· CyberData IP Speakers: Support for the entire suite of CyberData IP Speakers.
· Everbridge (formerly 3n: National Notification Network): Automatically activate
Everbridge scenario(s) when a SA-Announce notification group is activated.
· Alertus: Automatically activate Alertus Beacon Groups when a SA-Announce notification
group is activated.
· Syn-Apps Paging Relay: A unicast to multicast hardware device (PoE) that can be used to
provide multicast over a non multicast enabled WAN.
· SA-Announce Web Service: Automatically activate notification groups and gather
information using the SA-Announce web service.
· Auto Support Ticket Generation: The prepare report interface will FTP all pertinent log
files to Syn-Apps Support and create a ticket via email with the press of a button.
· Activity Logging: Notification group activity, schedule activity, text message activity and
web interface log in activity are all logged and can be easily viewed in the GUI.
· Syn-Apps Device Profile: Syn-Apps has completed the Cisco QED process allowing 0
DLU consumption for CUCM 5, 6, and 7.
New features for SA-Announce 7.0.60 include:
· Facebook Integration: Integrate emergency alert and text groups with your Facebook
account, this can be useful for delivering campus events to students, etc.
· Syn-Apps IP Speakers: SA-Announce now supports Syn-Apps IP Speakers offering plug
and play integration.
· Text Message Enhancement (Polls): Polls can now be sent and results can be viewed in
real-time.
New features for SA-Announce 7.0.70 include:
· Weather Alerts: Integrate emergency alert groups with the National Weather Service and
deliver localized weather alerts (Warnings, Watches and Advisories).
©2009 Syn-Apps L.L.C.
SA-Announce Overview
9
· Amber Alerts: Integrate emergency alert groups with the CodeAmber.org to deliver Amber
Alerts (abducted children alerts) to configured IP Phones.
· Background Music Service: Stream music to your Cisco IP Phones. *A multicast
streaming source such as the Syn-Apps paging relay is required.
· Extension Mobility Support: SA-Announce now supports extension mobility on CUCM
4/5/6/7+.
New features for SA-Announce 7.0.80 include:
· Twitter Integration: Integrate emergency alert groups with Twitter and automatically
update your Twitter status when the group is activated.
Coming soon to SA-Announce:
· Nokia dual mode integration: Nokia dual mode cell phones as a group end-point (paging
to Nokia dual mode phones).
· SA-Announce iPhone: An iPhone application that allows users to send text messages
and activate/deactivate emergency alert groups.
©2009 Syn-Apps L.L.C.
10
SA-Announce User Guide
The SA-Announce Notification System has been created using ASP.NET 3.5 to provide a rich user
interface. Menus and lists that contain multiple items are searchable, simply highlight the menu or
list in question and begin to type, the selection indicator will select the first matching item in the list.
Tables and grids are sortable by clicking on the column header or the column you wish to sort on.
All entries in the GUI are validated on the client side to prevent typographical errors. Tables and
grids that can contain thousands of entries use a client side caching model that will allow for good
performance without overloading the client or server system.
©2009 Syn-Apps L.L.C.
Application
Features
Part
2
12
2
SA-Announce User Guide
Application Features
SA-Announce Notification System offers its users a multitude of features.
·
·
·
·
·
·
·
·
·
·
·
·
·
·
·
·
·
·
·
·
·
·
·
·
Define notification groups of users which you can activate as simply as calling a phone
number
Supports all Cisco XML enabled phones
Valcom IP speaker SA-Announce supports both version 1 and version 2 of the Valcom IP
Speakers
CyberData IP Speakers – SA-Announce now support the full line of CyberData IP speakers
(multicast only)
Extends existing phone systems to notification systems with minimal installation and
management
Users can access the SA-Announce Notification Suite from any phone on the network
(including analog phones)
SA-Announce monitors active calls and prevents conversations from being interrupted by
paging
Web interface built upon Microsoft .NET allows the user to manage notification groups, send
text messages, view current and recent system activity and much more
Internal voice packet broadcasting service allows the implementation of paging without
requiring network multicast configuration if your network is not multicast enabled
Multicast support
o Intelligent multicast sourcing: if the phone originating a SA-Announce page is capable
(7905, 7912, 7940, 7960), SA-Announce will instruct that phone to broadcast the multicast
stream for the page
o Web Dialer mode allows you to originate multicast paging from any of the supported Cisco
phones
Secure page groups
o Any SA-Announce page group can be secured with a DTMF security code
System Information center – View page history, Login history, Scheduled broadcast history,
Text history and all relevant system information
Email integration – SA-Announce now supports email notifications per notification group
Broadcast Manager – SA-Announce 7 now includes all Broadcast Manager (Scheduled
Broadcasts) functionality
Real Time Activity Monitor – SA-Announce now displays real time notification activity within the
web interface
Enhanced User Management – Create user based access with granular permissions and
global administration access
Message Browser – Sort delivered text messages dynamically based on recipient, date, and
message
Responder Group – Responder group allows you to initiate a 1- to-Many notification with the
ability to press a Respond softkey to that turns into 2-way between the caller and the
responder
Emergency Toggle – You now have the ability to enable emergency access on all group types.
This bypasses busy detection and plays audio regardless of user state
Paging Relay – Syn-Apps now provides a hardware solution for non-multicast enabled wide
area network links. Use the paging relay to source multicast streams from the local site. Also
used for multiple site implementations
Everbridge – Integrate SA-Announce with Everbridge (formerly 3n: National Notification
Network) to allow MASS external notifications like SMS, Text-to-Speech, and E-mail
Alertus – Alertus beacons are now integrated with SA-Announce providing ADA compliance
and a more comprehensive coverage model
Dynamic Notification Groups – Dynamically associate end points to a page group by
Extension, IP Address, Device Pool, Description, Calling Search Space and Name filters
External Phones Interface – Easily add virtual phones to integrate with overhead paging
systems and other external resources
©2009 Syn-Apps L.L.C.
Application Features
·
·
·
·
·
·
·
·
·
·
·
13
Troubleshooting – Automatically create and send relevant data to Syn-Apps via FTP
Multicast Troubleshooting – Enhanced multicast tests to determined if your network is properly
configured
Emergency Alert notification groups - Define groups for emergency notification (IE school on
lockdown / tornado warning / etc)
Facebook Integration: Integrate emergency alert and text groups with your Facebook
account, this can be useful for delivering campus events to students, etc.
Syn-Apps IP Speakers: SA-Announce now supports Syn-Apps IP Speakers offering plug and
play integration.
Text Message Enhancement (Polls): Polls can now be sent and results can be viewed in
real-time.
Weather Alerts: Integrate emergency alert groups with the National Weather Service and
deliver localized weather alerts (Warnings, Watches and Advisories).
Amber Alerts: Integrate emergency alert groups with the CodeAmber.org to deliver Amber
Alerts (abducted children alerts) to configured IP Phones.
Background Music Service: Stream music to your Cisco IP Phones. *A multicast streaming
source such as the Syn-Apps paging relay is required.
Extension Mobility Support: SA-Announce now supports extension mobility on CUCM
4/5/6/7+.
Twitter Integration: Integrate emergency alert groups with Twitter and automatically update
your Twitter status when the group is activated.
©2009 Syn-Apps L.L.C.
Manual
Conventions
Part
3
Manual Conventions
3
15
Manual Conventions
This manual describes installation, configuration, administration and use of the SA-Announce
notification system.
Chapters of the manual that refer to the application web administration interface will have the main tab,
page and in some cases secondary tab identifier of the web page begin referred to. For example the
notification group configuration section refers to the main tab "Groups", page "Create / Edit Groups"
and in most cases the secondary tab (e.g. "General"), this would be presented at the top of the manual
page being viewed as "Groups>>Create / Edit Groups: General".
Bold text is generally used to signify items in the configuration / management interface that need to be
or can be configured.
The Notification Group Configuration chapter of the manual describes each of the Create / Edit Groups
tabs in detail, other chapters like Creating Emergency alert Groups do not repeat this information.
First time installations should start with the System Requirements chapter and follow the sections
through to Notification Group Configuration.
©2009 Syn-Apps L.L.C.
System
Requirements
Part
4
System Requirements
4
17
System Requirements
In order for SA-Announce to function properly, there are a few system requirements that need to be
met.
4.1
Application Server Requirements
The Server must meet the following requirements:
· Windows 2003 or Windows 2008 (32-bit versions)
· Microsoft .Net 3.5 (URL:
http://download.microsoft.com/download/6/0/f/60fc5854-3cb8-4892-b6db-bd4f42510f28/dotnetfx35.e
xe )
· Microsoft SQL Server 2000 / 2005 or MSDE (URL:
http://download.microsoft.com/download/e/a/4/ea4b699b-bec4-4722-96d3-254580ed7f9e/SQLEXPR
32.EXE ) ]
· 2 gigabyte of system memory (minimum requirement)
· 10 gigabytes of hard disk space (minimum requirement)
Windows 2003 / 2008 Server Requirements
Windows Components: Open windows components on the application server (Start>Control
Panel>Add Remove Programs>Windows Components).
a. Internet Explorer Enhanced Security Configuration Box must be unchecked.
©2009 Syn-Apps L.L.C.
18
SA-Announce User Guide
b. Under Application Server the ASP.NET check box must be checked.
©2009 Syn-Apps L.L.C.
System Requirements
4.2
19
Cisco Communications Manager Requirements
Cisco Communications Manager Support
·
·
·
·
·
4.2.1
Cisco Communications Manager versions 4.x, 5.x, 6.x, 7.x and Express
SA-Announce only supports the G.711 audio codec
Web Access to IP phones cannot be disabled in Communications Manager
Cisco TSP required if using TAPI busy detection in order to enable TAPI Service Provider
Proper IP access to Communications Manager and phones required
Communications Manager 3.x
This section is provided for legacy installations, Communications Manager 3.x is no longer supported
by Syn-Apps.
If you are using Communications Manager 3.x, you must be logged into the Syn-Apps application
server with the same user name and password that exists on the Communications Manager. This
must be the local Administrator account and must have the same password as the Administrator
account on Communications Manager 3.x.
4.2.2
Communications Manager 4.x, 5.x , 6.x, 7.x
Communications Manager 4.x, 5.x, 6.x or 7.x require setting up the SA-Announce authentication URL.
Please see the Authentication URL section.
Communications Manager(s) must have the Cisco AXL Web Service enabled under Database and
Admin Services in Cisco Unified Serviceability.
4.2.2.1
Adding Device Pack (CM 5.x, 6.x, 7.x)
This section is not required.
Use the Syn-Apps device pack to avoid being charged Cisco license units (DLU's) for the virtual
devices associated with the notification groups on Cisco Unified Call Manager. By default
SA-Announce will add a virtual notification phone for each notification group created, this will consume
2 DLU's becuase the device type used is a 30-VIP. The Syn-Apps device pack will add a new device
to the CUCM system. This will allow SA-Announce to add its virtual paging phones as that special
Syn-Apps device which consumes 0 DLU's.
To complete the installation two major steps must be completed. First install the Syn-Apps device pack
on all Communications Managers in the cluster. After the device pack is successfully installed the
CUCMs must be rebooted for the device to become available for use by SA-Announce. The second
step is to set SA-Announce to use the new device by altering the registry (see details below).
Note: When SA-Announce is set to use the Syn-Apps device the currently created paging groups will
become defunct. The old groups will need to be deleted and new ones created in their place, only
create new groups after completing both steps below.
Step 1: Install the COP File: Install the file on all Communications Managers in the cluster.
©2009 Syn-Apps L.L.C.
20
SA-Announce User Guide
* You must download the Syn-Apps Device Package from the the Syn-Apps web site
(downloads>Syn-Apps device pack) or from the application cd.
Step 1a At the Cisco Unified OS Administration window, choose Software Upgrades ->
Installation/Upgrade
Step 1b From the Source drop-down list, choose the source for the COP file.
Software Location
Source
DVD/CD or Remote Filesystem
Directory
/ for the root or /path for sub directory
Server
IP Address of the ftp server
User Name
User Password
Transfer Protocol
SFTP or FTP
Step 1c Click Next. The Options/Upgrades window appears.
Step 1d Choose the COP file from the drop-down list and click Next.
The system compiles a checksum value.
Step 1e Click Save to accept the checksum value and start installation.
The installation process can take several minutes. An onscreen log reports status of the
installation. Once the COP file is installed the CUCM must be rebooted for the device to become
available to SA-Announce.
Step 2: Configure SA-Announce to use the Syn-Apps device.
Step 2a On the SA-Announce application server Start>Run>regedit and go to
HKLM>Software>Syn-Apps>SA-Announce and edit the value useSynAppsDevice to true.
Step 2b Create notification groups as usual, note that any previously existing notification groups
are now defunct and will need to be deleted.
©2009 Syn-Apps L.L.C.
System Requirements
4.2.3
Communications Manager Express
Communications Manager Express requires setting up the SA-Announce authentication URL.
See the Authentication URL section.
You must enable the xml test variable on the CME by typing the following in config mode:
telephony-service
xml test
exit
wr mem
©2009 Syn-Apps L.L.C.
21
22
4.3
SA-Announce User Guide
Network Requirements
SA-Announce supports both unicast and multicast paging. For systems that will have page groups
with more than 100 endpoints, we recommend the use of multicast.
4.3.1
Firewall Ports
Firewall requirements/port usage:
SA-Announce Server to Communications Manager:
Skinny Client Control Protocol (SCCP) TCP: 2000
HTTP/SOAP/AXL TCP: 80, 443, 8443
Real-Time Protocol (RTP) UDP: 20480-32767
TAPI TCP: 2748
SA-Announce Server to IP Phones:
HTTP TCP: 80
Real-Time Protocol (RTP) UDP: 20480-32767
Multicast Real-Time Protocol (RTP) UDP: 20480-32767
IP Phones to SA-Announce Server:
HTTP TCP: 80
Real-Time Protocol (RTP) UDP: 20480-32767
Multicast Real-Time Protocol (RTP) UDP: 20480-32767
You can also refer to the Communications Manager port usage guide and treat Syn-Apps
SA-Announce just like a standard IP Phone.
http://www.syn-apps.com/Download.aspx?download_guid=2e52b417-817a-45a8-b88b-fc5140d113f3
4.3.2
Multicast Configuration
If you choose to use multicast (strongly suggested with over 100 phones) you must have a multicast
enabled network. All interfaces between the SA-Announce server and the destination phones need to
have IP PIM enabled and the switches should have IGMP/CGMP enabled.
If either the network cannot be multicast enabled or enabling multicast would require a large or
recurring investment then the Syn-Apps Paging Relay should be deployed at the site to allow
SA-Announce to send a single unicast stream over the wan connection and have the Paging Relay
convert the stream into a multicast stream at the remote site. See SA-Announce Overview or contact
Syn-Apps for more information.
Please refer to Cisco TAC or your Telephony partner for the best approach for implementing multicast
on your network.
A Cisco Multicast Quick Start guide can be found at:
http://www.cisco.com/warp/public/105/48.html
or
http://www.syn-apps.com/Download.aspx?download_guid=494b78a5-007b-423a-9110-d4bae6f120b1
©2009 Syn-Apps L.L.C.
Installation
Procedure
Part
5
24
5
SA-Announce User Guide
Installation Procedure
If the application server you are installing SA-Announce on has internet access proceed to the next
paragraph. If the application server does not have internet access then please make sure the required
components ASP.NET 3.5 and SQL Express 2005 have been installed (see the Application Server
Requirements section for the download URLs).
You must be logged onto the application server as an administrator (local or domain) to properly
complete the installation.
To begin the installation, place the Syn-Apps application CD into the drive. The Syn-Apps Splash
screen will start automatically. Select the Install Applications link.
Next, click on the Install SA-Announce link from the Syn-Apps application CD.
If you acquired SA-Announce from the Syn-Apps website then start the installation by double clicking
the setup program.
If the Install Wizard does not start installation, manually begin installation by:
o Click Start off of the Desktop
o Select Run
o Type in: E:\SA-Announce\SA-Announce.exe (where E: represents your CD drive)
©2009 Syn-Apps L.L.C.
Installation Procedure
25
License Agreement
You will be prompted to read your License Agreement to use the Syn-Apps SA-Announce product.
You may use your page down key to view by page. Once you agree with the terms, Click Next to
proceed.
©2009 Syn-Apps L.L.C.
26
SA-Announce User Guide
Information
Click Next after you have reviewed and verified the software product and version requirements.
©2009 Syn-Apps L.L.C.
Installation Procedure
Ready to Install
Click Install if you are ready to proceed with the SA-Announce installation.
©2009 Syn-Apps L.L.C.
27
28
SA-Announce User Guide
Install Complete
©2009 Syn-Apps L.L.C.
Configuration
Utility
Part
6
30
6
SA-Announce User Guide
Configuration Utility
The following section describes the configuration utility of the SA-Announce notification system. The
SA-Announce configuration utility will automatically run at the end of installation. The program can be
run on the application server at anytime by going to:
Start>Programs>Syn-Apps>SA-Announce>Configuration.
In order to use the SA-Announce software, a valid license key must be obtained. You can register
and obtain product licenses by visiting the Syn-Apps website at www.syn-apps.com. If you have
already obtained your key, click Browse to locate the license file that you acquired separately. The
license file screen will only appear if the license file "Syn-Apps.license" does not exist in the program
base directory (C:\Program Files\Syn-Apps\SA-Announce\). If you encounter problems with the
browser below simply place your license in the program base directory and make sure it is copied
there with the precise filename Syn-Apps.license.
Click Next to proceed.
©2009 Syn-Apps L.L.C.
Configuration Utility
31
Configuring Communications Manager Settings
Please select the appropriate checkbox for your version of Communications Manager.
Type the IP address of your Communications Manager Server(s). You are allowed to input a
maximum of five Communications Manager Servers. The first IP address field populated designates
the primary Communications Manager server, if you have multiple Communications Managers on the
cluster list the publisher first.
In the event that you wish to designate a secondary Communications Manager for the SA-Announce
Notification system to rollover to in case of system failure, you may designate up to 4 back up
Communications Manager servers. All servers are required to have the same administrator user ID
and password designated and must be running the same version of Communications Manager.
Additionally all back-up Communications Manager servers must be using the same SQL SA
password.
Click Next to proceed.
©2009 Syn-Apps L.L.C.
32
SA-Announce User Guide
Application Server Credentials
Enter the application server user account credentials. Enter the credentials you are currently logged
onto the application server as, this should be an administrator with all privileges.
*Note: If you are using Communications Manager 3.x, you must be logged into the Syn-Apps
application server with the same user name and password that exists on the Communications
Manager. This must be the local Administrator account and must have the same password as the
Administrator account on Communications Manager 3.x.
Click Next
©2009 Syn-Apps L.L.C.
Configuration Utility
33
Application Database
If you have previously installed Syn-Apps Core Components or if you installed SQL Express 2005
along with this installation leave the default instance name SynApps. If you are using SQL Server
2000 or 2005 enterprise then blank out the instance name field. Only local databases are supported
though remote databases can be used by changing the registry key
HKLM>Software>Syn-Apps>SA-Announce>sqlServerName to the name or IP address of the server
you would like to use. Trusted authentication is required to use this model (the administrator
credentials of the application server and database server machines must match).
Click Next to proceed.
©2009 Syn-Apps L.L.C.
34
SA-Announce User Guide
Communications Manager Authentication
Type the Communications Manager user name and password for CCMADMIN access. This user
must have access to the Communications Manager AXL interface. This will usually be the same as
your application server administrator password. If you have MLA enabled on your Communications
Manager this is probably the CCMAdministrator user name.
Click Next to proceed.
©2009 Syn-Apps L.L.C.
Configuration Utility
35
Multicast Sites Settings
The next step is to designate the multicast site options. This will define the way SA-Announce
partitions devices into sites to determine which streaming model to use. When you select an option
SA-Announce will assume all phones within the Device Pool or Calling Search Space are located at
the same site. This is useful for setting up multicast boundaries.
Select Configure to continue.
©2009 Syn-Apps L.L.C.
36
SA-Announce User Guide
Application Server Settings
Within this step you are able to configure the Virtual Phone IP and Web Server Addresses. These
configurations are usually only implemented on servers with multiple network adapters or web
services running on non-standard ports. The Virtual Phone IP address is the address the virtual
phones use to communicate with the Communications Manager, while the Web Server Address is the
server name, domain name, or IP address of the network interface that the SA-Announce web site is
running on. By default both of these are the primary IP address of the server.
Select Configure to continue.
Configuration Successful
After clicking the Configure button, you will see a series of DOS windows and the status bar will be
updated as steps are completed.
©2009 Syn-Apps L.L.C.
Configuration Utility
When the application is configured you will see a success window.
Click OK to proceed.
Click OK to proceed.
©2009 Syn-Apps L.L.C.
37
38
SA-Announce User Guide
Activation
You are now required to activate your copy of SA-Announce if it has not already been activated.
Select Online if your SA-Announce server has access to the Internet. Select By Email if your
SA-Announce server does not have access to the Internet.
Click Next to proceed.
Online Activation
If you selected the Online option you will be presented with a success window once your application is
activated.
Click OK to continue.
Once the Configuration Wizard has completed the installation you will see a shortcut on the desktop
labeled SA-Announce, use it to access the SA-Announce web administration program. You can also
access the SA-Announce administration web pages form any machine on the network, simply browse
to http://application-server-ip/SA-Announce.
This completes the SA-Announce Configuration Process. The SA-Announce web page should be
displayed automatically. Proceed to the next section to complete the configuration.
©2009 Syn-Apps L.L.C.
Post
Configuration
Steps
Part
7
40
7
SA-Announce User Guide
Post Configuration Steps
Help>>Post Install Instructions: Authentication URL
Once installation and configuration are completed one manual post-configuration step using
Communications Manager administration is required before Cisco IP Phones can be activated by
SA-Announce.
Double click on the SA-Announce shortcut that was created on your desktop. The Help>>Post
Install Instructions: Authentication URL page should appear the first time the program is run. To
access it at any time, simply click on the tab labeled Help at the top of the page and select the Post
Install Instructions. Or see the Authentication URL section of the manual for detailed instructions.
The page also contains a quick start guide for setting up groups, a section with instructions for setting
up the SA-Announce phone service in Communications Manager (Not Required: this is a phone
service that provides a directory of the groups that have been created, one of the most interesting
features of SA-Announce is the ability to simply dial the notification group by number), and other
information.
©2009 Syn-Apps L.L.C.
Post Configuration Steps
7.1
41
Authentication URL
*Note: For Communications Manager 4.x, 5.x, 6.x or 7.x this step must be completed before
continuing.
Setting up the SA-Announce authentication URL:
To avoid overloading the Communications Manager with authentication requests from the phones
during the paging process, SA-Announce requires the Communications Manager Enterprise
Parameter "URL Authentication" be offloaded to point to the SA-Announce server.
Setup:
1. Go to Communications Manager Administration: System / Enterprise Parameters.
2. Set the "URL Authentication" parameter to: http://Application Server IP
Address/SA-Announce/PhoneServices/Authenticate.aspx
3. Press Update.
4. Reset All phones.
*Note: For Communications Manager Express, this step must be completed before
continuing.
In order for your phones to authenticate properly you must define the authentication URL under the
telephony-service.
telephony-service
url authentication http://10.0.3.252/SA-Announce/PhoneServices/Authenticate.aspx
exit
wr mem
©2009 Syn-Apps L.L.C.
42
7.2
SA-Announce User Guide
IP Phone Services
Help>>Post Install Instructions: IP Phone Services
This chapter is not required. The IP Phone Services are not required for operation, skip to the next
section unless one of the following is required:
· A directory of groups accessible on the IP Phones (SA-Announce phone service).
· Phone sourced multicasting is required (SA-Announce web dialer service).
The SA-Announce phone service is used to display a directory of configured notification groups on
the Cisco IP Phones. To deploy the service, add a new IP Phone Service to CUCM using the
Communications Manager administration web pages (Device>>Device Settings>>Phone Services)
and add a new phone service with the URL:
http://SA-Announce-Server-IP/SA-Announce/PhoneServices/GroupsDirectory.aspx. Once the IP
phone service is created, you must subscribe the desired phone(s) to the service from the
Device>Phone(details) page. See the chapter Page Group Directory for information on accessing the
service.
See Web Dialer Directory for information on setting up the SA-Announce web dialer service.
©2009 Syn-Apps L.L.C.
Initial Application
Configuration
Part
8
44
8
SA-Announce User Guide
Initial Application Configuration
This section describes the basic settings in the SA-Announce notification system that should be
understood for all installations.
8.1
First Time Login
After starting the application (or browsing away from the post installation page if it’s the first time the
program has run) you will be prompted to enter your application password before SA-Announce allows
access to the application. Your default user name and password are the same as the Local Machine
administrator account you used in configuration. Enter your user name password and click the Login
button.
©2009 Syn-Apps L.L.C.
Initial Application Configuration
8.2
45
Service Configuration Options
Services>>Broadcast Services: Settings
The Settings Tab contains the following service parameters:
·
·
·
·
·
·
·
·
·
·
·
Confirmation threshold when calling a broadcaster group
o This setting is used to determine when the originator of the page hears confirmation beeps
which alert the user that it is safe to start talking. The default setting is 80%, so if a page
group had 100 phones we would play the tones when 80 phones are activated.
Busy Detection
o To prevent pages from interrupting phones that are on active calls, XML Busy Detection is
enabled by default. Some scenarios require TAPI busy detection. Please refer to the
Configuring TAPI Busy Detection chapter for detailed setup instructions.
Application Server Site
o Select the site that the SA-Announce server resides at (so the broadcaster can determine
a local broadcast versus a inter-site broadcast).
Servers authorized to use the SA-Announce API
o Enter the IP Addresses of servers authorized to access the SA-Announce API (comma
delimited list).
Automatic Restart Service
o Enabling this option will automatically restart the SA-Announce service when changes are
made to your groups.
Page group busy if External Phone busy
o When enabled, SA-Announce will notify the page originator that the external destination
(IE analog paging system) is busy, and the page will end.
SA-DND in Use
o Check when you are using SA-DND Do Not Disturb or another ringer management system
and destinations with disabled ringers will not be paged. If this option is selected the
automatic refresh timer setting will need to be changed, at two hours by default it would
take SA-Announce an hour (average) to discover that a ringer had been turned off. To
change the setting regedit:
HKLM>Software>Syn-Apps>SA-Announce>refreshPhoneSettingsMinutes and change the
value to a minimum of 2 (installations under 500 phones), 4 (installations with 501-1500
phones), 5-10 (installations with over 1501 phones).
Idle URL in Use
o Check when you are using the Idle URL feature on the Cisco IP Phones, this will clear the
phone state prior to trying to page and avoid the xml busy state that the Idle URL creates.
All Busy Detect
o If checked, you will be notified if all destinations of the group are busy.
Extension Mobility Mode Enable
o For use with CUCM 5/6/7+ systems using extension mobility. Using this option will reveal
user device profiles in the Groups>IP Phones section which can then be added to groups.
Multicast Server Mode
o For use with nearly all Cisco phones running recent firmware, when checked the server
will source multicast rather than the source paging phone.
©2009 Syn-Apps L.L.C.
46
SA-Announce User Guide
·
·
Multicast Only
o When checked do not allow unicast notifications. A useful setting when phone sourced
multicast was the default streaming model, with the newer server sourced model the
broadcaster does not need to fail over to unicast when a non Cisco phone dials a live
notification group.
Force Web Lookup (for use with Communications Manager 3.x and 4.x only)
o When checked use deviceListX rather than the AXL API to lookup phone IP's. This
setting is only applied for CM version 4.
o Only enable this option when requested by Syn-Apps Support
Settings Tab Page
Click the Save button to save settings changes.
©2009 Syn-Apps L.L.C.
Initial Application Configuration
8.2.1
47
Phone Features
Settings>>IP Endpoint Setup: XML Phones / Multicast Phones
Use the XML Phones tab to identify those phones that will participate in XML control and
communications. Once new items have been added to the selected side, click Apply. (All supported
phones are selected by default)
Use the Multicast Phones tab to identify those phone models that will be allowed to participate in
multicast phone features. Once new items have been added to the selected side, click Apply. (All
supported phones are selected by default)
©2009 Syn-Apps L.L.C.
48
8.3
SA-Announce User Guide
Multicast Configuration
Settings>>Multicast Settings: Defaults
On the Multicast Settings page, you will find four tabs; Defaults, Sites, Server to Phone Multicast
Test and Phone to Phone Multicast Test. On the Defaults tab you choose whether or not you wish
to enable WAN Multicast and/or Local Multicast globally. Select the Local Multicast Enabled
checkbox to enable local multicast (IE phones at the server site will have a multicast stream sent,
phone that are not at the server site will have unicast streams sent unless Site to Site (WAN)
Multicast Enabled checkbox is checked). Press the Save Defaults button to save any settings
changes on the Defaults tab.
The default multicast addresses provided automatically when you check a checkbox should work for
most implementations. If multicast boundaries (different multicast address for each sites local
multicast traffic) are required use the Sites tab to configure them, most implementations will not need
to make changes on the sites tab.
©2009 Syn-Apps L.L.C.
Initial Application Configuration
49
Settings>>Multicast Settings: Sites
Use the Sites tab to set multicast boundaries for one or more sites. Choose which Calling Search
Space/Device Pool (site) you wish to configure for WAN Multicast and/or Local Multicast. Once a
site is selected from the drop down box, a list of the devices contained within that site will be listed in
the grid to the right. The settings on the Sites tab override the settings on the Defaults tab, to set a
site back to the Defaults (global) settings, use the Back to Defaults button. Note that pressing Save
will cause the selected site to use the current settings on the page, the defaults will be overridden for
that site until the Back to Defaults button is pressed.
The multicast settings have different meaning depending on the mode of operation of the product.
The mode of operation is determined by the method used to access the notification groups. If the
notification groups are being dialed then Multicast Server Mode is in use and if the notification groups
are being activated by the Web Dialer or SA-Announce API then the Web Dialer Mode is in use.
These two modes have different streaming models. Multicast Server Mode uses the SA-Announce
server to source multicast streams to the Cisco IP Phone end-points while the Web Dialer Mode uses
the source Cisco IP Phone to source the multicast stream to the other phones.
If Multicast Server Mode is in use (the default notification mode) then the settings are applied using the
destination Cisco IP Phones in the notification group. If all of the destination phones are in the same
site then the destination phones site Local Multicast setting is applied. If all of the destination phones
are not in the same site then the Server Site WAN Multicast setting is applied, the Server Site setting
should be set to the site that the server resides at in Services>>Broadcast Services: Settings.
If the Web Dialer Mode is in use then the settings are applied using the source (caller's) Cisco IP
Phone. If all of the Cisco IP Phone destinations of the group are in the same site as the caller then the
caller's site Local Multicast setting is applied. If all of the Cisco IP Phone destinations of the group
are either not in the same site or not in the same site as the caller then the caller's site WAN Multicast
setting is applied.
©2009 Syn-Apps L.L.C.
50
SA-Announce User Guide
©2009 Syn-Apps L.L.C.
Initial Application Configuration
51
Settings>>Multicast Settings: Server to Phone Multicast Test
Use this tab to perform a server to phone multicast test. This test will verify the server's ability to
source multicast to a test phone (choose a phone on different switch than the server).
Select a phone to test from the Test phone drop down menu (use the Filter button to filter the entries
in the menu).
Click the Start Transmission button to begin a multicast transmit/receive test.
Verify that a test audio clip is being played on the test phone. If you hear the audio clearly then
multicast is functioning properly between the server and that phone.
To stop the testing, press the Stop Transmission button.
*Note: The primary purpose of this tool is to determine whether multicast is functioning properly on
your network. It is suggested that you try phones from each IP Subnet. This ensures that multicast
routing is functioning on all subnets.
©2009 Syn-Apps L.L.C.
52
SA-Announce User Guide
Settings>>Multicast Settings: Phone to Phone Multicast Test
Use this tab to perform a phone to phone multicast test. This test will verify the source phones ability
to source multicast to a test phone (choose a destination phone on different switch than the source
phone).
Enter the IP Address of the first phone to test in designated area.
Enter the IP Address of the second phone to test in designated area.
Click the Start Transmission button to begin a multicast transmit/receive test.
Verify that audio from the first phone is being played on the second phone and vice versa. If you hear
the audio clearly then multicast is functioning properly between the two phones.
To stop the testing, press the Stop Transmission button.
©2009 Syn-Apps L.L.C.
Initial Application Configuration
8.4
53
User Accounts
Settings>>User Management
This section allows administrators to create new users of the SA-Announce notification system and
assign them various rights.
Select an existing user using the drop down menu or add a new user using the New User button. New
users must be given a unique user name and a password. Select the Administrator check box to
make the user an administrator (administrators have no restrictions in their ability to administer the
SA-Announce notification system). Even though you can add permissions to an administrator (as
shown below) the permissions will not be meaningful as the user already has full rights.
If the user (new or existing) is not an administrator then they will need some permissions in order to log
in and complete an action. Use the Add Permission button to add a permission row to the selected
user. Select the Group Name that you would like to give the user rights to and select one or both
check boxes (Send Text / Modify Group) and then click the Insert link in the Edit Command Column
to insert the new permission. To edit or delete existing permissions click the Edit or Delete link in the
Edit Command column of the permissions table.
©2009 Syn-Apps L.L.C.
54
8.5
SA-Announce User Guide
Configuration Test
Services>>Troubleshooting Tests
With the Communications Manager phones and extensions linked to the SA-Announce Notification
system you will need to test connectivity with a phone prior to proceeding.
Click on the Services>>TroubleshootingTests menu option and select the IP Phone Tests tab as
shown below.
©2009 Syn-Apps L.L.C.
Initial Application Configuration
Select an extension near you from the Test Phone drop down menu.
Click Run all tests
1. A message will display on the application screen confirming if the database connection was
successful.
2. Look at the phone you selected to test to verify that it shows Test on the display screen.
©2009 Syn-Apps L.L.C.
55
Notification
Group
Configuration
Part
9
Notification Group Configuration
9
57
Notification Group Configuration
This section describes how to define the notification groups that users interact with. You will specify
the group type, group directory number, other group settings, and the devices that receive the
broadcast audio/text.
**Please note that for every notification group you create SA-Announce will automatically create a
Syn-Apps virtual phone listed under Device>Phones in Communications Manager, the virtual phone
name will begin with SEPFFFF. This is also true for the external phone dialers (the name here begins
with SEPEEEE). When you delete notification groups in SA-Announce the associated virtual phones
and lines will NOT be deleted from CUCM. After deleting notification groups in SA-Announce please
delete the associated virtual phone and line in CUCM administration by searching Device>Phone on
the notification group line number or device name.
Please refer to the SA-Anounce: Group Types section of this manual to determine which group type
fits your needs.
9.1
SA-Announce: Group Types
Groups>>Create / Edit Groups
The SA-Announce notification system group type choices include:
· Normal – This is a one-to-many notification group the delivers one-way audio
· Holler – Ad hoc two-way audio notification (support shared lines provided that the destination
line number only appears in the line-1 position on one registered phone).
· Insta-Holler – Two-way audio notification (predefined destination).
· Holler-RP - User may set up a filter to quickly holler (two-way communication) extensions (i.e.
#XXXX to intercom extension XXXX)
· Ad Hoc – A dynamic one-way audio broadcast to one or more simultaneous destinations.
· Text – Allows you to send a text message to a selected phone or group of phones, emails,
Alertus, 3n.
· Emergency Alert - Provides ability to send alert tones and text messages across predefined
groups (Alert, Voice, and Timer Modes)
· Wokkie Tokkie – (Normal): A predefined group of phones that emulate a walky-talky when the
notification group is dialed.
· Wokkie Tokkie - (Ad Hoc): Non-predefined group of phones that emulate a walky-talky when
the notification group is dialed.
· Record-N-Play - Record-N-Play allows you to define a pre-set list of endpoints the will receive a
store and forward type broadcast (breaks feedback loops).
· Respond - Respond groups are just like a normal group but all destination phones are sent a
respond soft-key and one user can respond to the originator.
The following section describe the group types in more detail...
©2009 Syn-Apps L.L.C.
58
9.1.1
SA-Announce User Guide
Normal
A normal group allows you to pre-define end-points that will receive the source callers live audio when
the group is activated. This is a one-to-many group the delivers live one-way audio.
9.1.2
Holler
After calling a Holler page group you are prompted for a destination extension followed by the # sign.
SA-Announce opens that destination for 2 way audio (hands-free Cisco phone models only). This is
equivalent of an intercom.
Holler groups use the CSS of the calling line/phone to search for the destination line. In other words, if
the calling phone can dial the destination phone normally then it will be able to holler to it as long as
the destination is not a shared line (see the next paragraph). You can now exclude phones from holler
groups by selecting them in the IP Phones tab or the create edit groups interface, note that in this case
you are selecting phones that are NOT to be included which is the opposite of the other group types.
Since the destination is determined by number and must be unique, shared lines can cause issues. If
a shared line is the first line listed on only one phone, then that phone will be activated for holler. If the
shared line is the first line on more than one phone or the shared line is not the first line on any phone,
then holler will fail and notify the caller that the destination is a shared line. If this issue must be
overcome add unique directory numbers to the phones or see the Insta-Holler group type.
9.1.3
Insta-Holler
An Insta-Holler group allows you to pre-define a single XML Enabled IP Phone that will receive a
two-way audio intercom when the group is activated. This is a one-to-one group that delivers two-way
audio.
9.1.4
Holler-RP
Holler-RP uses a line number mask to allow direct intercom access to any extension. This allows you
to preempt the extension with a wildcard like * or #. For example, in a four digit dial plan using the
pattern #XXXX, dialing #2000 would intercom extension 2000, dialing #2003 would intercom extension
2003 and so on. The extension used must end in a number of "X" characters equal to the length of
the internal dial plan.
Holler groups use the CSS of the calling line/phone to search for the destination line. In other words, if
the calling phone can dial the destination phone normally then it will be able to holler to it as long as
the destination is not a shared line (see the next paragraph). You can now exclude phones from holler
groups by selecting them in the IP Phones tab or the create edit groups interface, note that in this case
you are selecting phones that are NOT to be included which is the opposite of the other group types.
Since the destination is determined by number and must be unique, shared lines can cause issues. If
a shared line is the first line listed on only one phone, then that phone will be activated for holler. If the
shared line is the first line on more than one phone or the shared line is not the first line on any phone,
then holler will fail and notify the caller that the destination is a shared line. If this issue must be
overcome add unique directory numbers to the phones or see the Insta-Holler group type.
9.1.5
Ad Hoc
Call into an AD HOC page group and you are prompted for destination numbers delimited by pound.
You are able to page them without pre-defining a page group or entering the administrative interface.
For example if you wanted to page extensions 1000, 2000, 3000, you would activate the page group by
dialing its directory number and when prompted enter 1000#, 2000#, 3000#, and # again. This would
activate extensions 1000, 2000 and 3000 for an AD HOC one way audio page.
©2009 Syn-Apps L.L.C.
Notification Group Configuration
9.1.6
59
Text
Allows you to send a text message to a selected group of phones that you don't intend to send audio
to. Text groups do not require a device in Communications Manager. Sound notifications have been
added to alert recipients of text message delivery. SA-Announce allows you to cycle through old text
messages and also has a configurable retention timer to save the messages.
Note that any group type that contains an end-point association (holler and ad-hoc have no end-point
associations) can be used on the Groups>>Send a Message page to send text messages.
See Also Text Only Page Groups.
9.1.7
Emergency Alert
Emergency Alert provides the ability to send alert tones across predefined groups (Alert, Voice, and
Timed Modes). Emergency Alert groups are for use in emergency situations, and as such they
override busy detection (phones on a call will still receive the text and audio associated with the group
activation). For example: a school on lockdown alert, tornado warning, fire, etc..
· Alert Mode
o In the default mode (alert mode) the emergency alert group will send the defined alert text and
sound file to the destinations of the group. The sound file will continue to replay and the text will
be visible until the group is called again at which point the alert is turned off and the text is
removed from the devices that support text.
· Voice Mode
o In voice mode the emergency alert group will send the alert text to the phones and play the
sound file once. The caller of the group can then give further instruction by speaking into their
handset. When the caller ends the call the emergency alert text is cleared from all phones.
· Timed Mode
o In timed mode the emergency alert group will play the selected sound file the number of times
specified in the repeat number text box. When the sound completes playing the group is closed
down and the text is removed from the phones.
Selecting the “send caller id to destinations” checkbox on the groups page is especially interesting
here since it will send the originators caller-id to all destinations of the emergency.
See Also Creating Emergency Alert Groups
9.1.8
Wokkie Tokkie (Normal)
Wokkie Tokkie is a predefined group of phones that emulates a walky-talky when the page is dialed.
This is a one-to-many, two-way group. This group type works with multicast only. You must have
multicast configured properly on your network in order for Wokkie Tokkie to function.
After dialing a Wokkie Tokkie group the source phone and destinations will be presented with the
following screen pop:
©2009 Syn-Apps L.L.C.
60
SA-Announce User Guide
Press and hold the Talk softkey to transmit, as you would with a walky-talky. Press Shout to speak
continuously and Stop when you are finished. Press Exit to exit.
9.1.9
Wokkie Tokkie (Ad Hoc)
Wokkie Tokkie (Ad Hoc) allows you to dynamically select destination endpoints delimited by the pound
sign. All other functionality is the same as Wokkie Tokkie (Normal). This is a one-to-many, two-way
group. This group type works with multicast only. You must have multicast configured properly on
your network in order for Wokkie Tokkie to function.
After dialing a Wokkie Tokkie group the source phone and destinations will be presented with the
following screen pop:
Press and hold the Talk soft-key to transmit, as you would with a walky-talky. Press Shout to speak
continuously.
9.1.10 RecordNPlay
Record-N-Play allows you to define a pre-set list of endpoints the will receive a broadcast. The page
originator calls into the group and is prompted for the page message and then hangs up the call when
done. The system will then broadcast the message after the caller has terminated the call. This is
useful in areas that have a lot of background noise and the chance of audio feedback with a live page.
©2009 Syn-Apps L.L.C.
Notification Group Configuration
61
9.1.11 Respond
The Respond notification group type is much like a standard Normal type group (one-way one-to-many
audio), but the IP Phone destinations of the group will have a text display presented that contains a
"Respond" soft-key which when depressed will allow one user to respond to the source caller. Once a
response begins all phones but the source and responder will close down and the source / responder
will be on a one-to-one two-way conversation.
9.2
Notification Group Setup
Groups>>Create / Edit Groups: General
Note: Until the first non-text notification group is created, the SA-Announce Broadcaster service is
stopped and cannot be started.
Click Groups>>Create / Edit Groups from the main menu, the General tab should be displayed.
Click New Group.
Configure the following items:
·
·
·
·
Group Name: Enter a descriptive name for the group, the group name will be displayed in the
phone service menu and as the caller-id of the group.
Group Type - Select a group type, a Normal notification group type is usually the best to
begin with (for Emergency Alert groups see the Creating Emergency Alert Groups section of
this manual).
Group Phone: The group phone area will not be visible with Text type groups as text groups
do not require activation via phone call.
o Line Number - This is the extension that you will use to call (activate) the notification
group, the next available line is placed in the field by default. Enter a unique line number
here.
o Partition - The partition the group phone should belong to (IE Phones must have a CSS
containing this Partition to be able to dial the group).
o Device Pool - Device pool the phone should belong to (the Device Pool must be set such
that anyone calling the group gets a G711 codec lookup).
Misc Settings:
o Use Security Code - To secure the group check this checkbox and enter a DTMF code to
associate to the group.
o Send Caller-ID - IP Phones within the selected group will receive the caller ID associated
with the source phone line.
o Emergency - Busy detection overridden for this group, agents on a call will also receive
the notification audio stream and or text message.
o Volume - The volume of the IP Phone end-points in the group.
©2009 Syn-Apps L.L.C.
62
SA-Announce User Guide
The Volume drop down menu allows you to adjust the volume of your voice coming through over the
phone speaker. The Default volume setting uses the setting of each phones speaker individually,
other settings such as 90%, 80% etc override the current volume setting on the phone and forces the
phone to play the audio at the percentage of maximum volume specified.
**Please note that while this does affect the volume of phones it does not affect the volume of Valcom
IP Speakers / CyberData IP Speakers / Legacy Overhead Systems / Alertus Endpoints.**
**Create a “whisper” group by configuring an emergency group type with a volume setting of 50% or
below, and this would allow you to “whisper” pertinent information to an agent already on a call.
[It is now possible to add the group even though end-points have not been associated yet, this can be
done after adding the group (as presented in this manual) or before adding the group.]
Click Add Group. Once added, you are now free to add, remove and view information about specific
devices within all of the groups that have been created.
©2009 Syn-Apps L.L.C.
Notification Group Configuration
9.3
63
Email
Groups>>Create / Edit Groups
The Email tab on the Create / Edit Groups page allows email(s) to be sent when a group is called (or
otherwise activated).
To use this feature you must first setup the email parameters at Services>>Broadcaster
Services>>Email Settings, see the Email Settings chapter of this manual for more information.
Add one or many email addresses to the group using the provided interface. Use email aliases when
there are many emails to be sent (more than 10) to avoid overloading the SA-Announce system.
***Note: Mass SMS messaging (50 or more messages sent to the same provider) must be done using
an aggregator service such as 3n (National Notification Network). Otherwise, sending too many SMS
messages to a specific cellular provider might result in all messages being treated as Spam.
©2009 Syn-Apps L.L.C.
64
9.4
SA-Announce User Guide
IP Phones
Groups>>Create / Edit Groups: IP Phones
Add phones to a notification group by selecting the IP Phones tab. Use the Arrange List By drop
down menu to resort the list on the selected item.
Select the phones you would like to add by clicking the items and adding them using the ">>" button.
You can use standard ctrl-click and shift-click to select items, or use the Filter column to filter the list.
The Enable Dynamic Group checkbox will dynamically lock the group to use the phones that match
the specified Filter. IE enabling the dynamic group checkbox, arranging by Device Pool and entering
ABC into the filter column will associate all phones that have an Device Pool beginning with "ABC" to
the notification group. This is useful when you have a paging group for a site and that site has a
specific Device Pool / CSS etc, by using the dynamic group option as you add phones to the system
you will not have to manage your SA-Announce notificaiton groups.
Note: For Holler and Holler-RP group types you can now select phones to be disallowed as targets of
Holler and Holler-RP. Remember, in this case you are selecting phones that are not to be included in
the group.
©2009 Syn-Apps L.L.C.
Notification Group Configuration
9.5
65
External Phones
Groups>>Create / Edit Groups: External Phones
Add legacy overhead systems or other dial-able numbers to a notification group by selecting the
External Phones tab. First make sure the overhead system in question can be dialed from the digital
phones, the number used by the digital phones is generally the number that will be used to configure
the notification group to use the overhead system in question.
External dialers must be setup before the external phone integration will work properly, use the
Settings>>External Phone Setup web page to configure external dialers. The setup is described in
detail in the Analog Paging System Integration section.
Use the interface on the page to add external systems to the notification group. Enter a description in
the Description or Name field, enter the number that the overhead system exists at in the Number
field and enter any DTMF zone code if one is required in the Dial Code field. Press the Add button to
add the external system to the selected notification group. To remove an external system from a
group, select the line item from the list box on the right and press the Remove button. To update an
existing external system in a group, select the line item. The current values will populate the entry
fields, change the values and press the Update button.
©2009 Syn-Apps L.L.C.
66
9.6
SA-Announce User Guide
Syn-Apps IP Devices
Groups>>Create / Edit Groups: Syn-Apps IP Devices
This section describes use of Syn-Apps IP Speakers and Paging Relays in SA-Announce notification
groups. Syn-Apps IP Speakers and Paging Relays must be added to the system using the DHCP
option 72 as described in the Paging Relay Setup and Syn-Apps IP Speaker Setup sections of this
manual before they will be visible in the groups or schedules interface.
To add a Syn-Apps IP Speaker to a particular notification group, first select the group in question on
the Groups>>Create / Edit Groups page. On the Syn-Apps IP Devices tab select the IP Speaker(s) to
add to the group from the Available side of the list box and add them to the Selected side using the "
>>" button.
To add a Syn-Apps Paging Relay to a particular notification group, first select the group in question on
the Groups>>Create / Edit Groups page. On the Syn-Apps IP Devices tab select the Paging Relay(s)
to add to the group from the Available side of the list box and add them to the Selected side using the
">>" button.
©2009 Syn-Apps L.L.C.
Notification Group Configuration
9.7
67
IP Speaker Integration
Groups>>Create / Edit Groups: IP Speakers
This section describes how to add Valcom or CyberData IP speakers into desired notification groups.
Use the Valcom section to assign Valcom IP speakers to the group you are currently editing, simply
add the speakers’ group number(s) to the text entry box. To assign multiple Valcom IP speakers to a
group delimit the group numbers with commas. Verify the Valcom IP Speaker settings from the
Settings>>IP Endpoints: Valcom section.
CyberData IP Speaker groups must first be setup using the Settings>>IP Endpoint Setup: CyberData
section. Use the CyberData section to assign CyberData IP Speaker groups to the paging group.
Simply select the CyberData speaker group from the Available side of the list box and press the ">>"
button to add the CyberData group to the Selected side of the list box.
*Note: Prerequisite required, see Valcom IP Speaker Configuration and CyberData IP Speaker
Configuration.
©2009 Syn-Apps L.L.C.
68
9.8
SA-Announce User Guide
Alertus
Groups>>Create / Edit Groups: Alertus
This section describes how to add Alertus Beacon Groups to a SA-Announce notification group. The
section Alertus Configuration must be completed before the Alertus tab will show configured Alert
Profiles and Beacon Groups.
To add Alertus Beacon Groups to a SA-Announce notification group or schedule simply select the
group in question, select an Alert Profile for the alert and select one or more Beacon Groups using
the provided interface.
©2009 Syn-Apps L.L.C.
Notification Group Configuration
9.9
69
Everbridge
Groups>>Create / Edit Groups: Everbridge
This section describes the process of adding Everbridge Scenarios to SA-Announce notification
groups. SA-Announce must be configured with the necessary parameters to contact the Everbridge
system as described in the Everbridge Configuration section of this manual before the Everbridge
Scenarios will appear on the groups page.
Once SA-Announce has been configured with the Everbridge system particulars you can add
Everbridge Scenarios to a SA-Announce paging group by selecting the group in question on the
Groups>>Create / Edit Groups page. Select the Everbridge tab and use the provided interface to
add Scenarios to the notification group. Select one or more scenarios from the Available side of the
list box and use the ">>" button to add them to the Selected side.
©2009 Syn-Apps L.L.C.
70
9.10
SA-Announce User Guide
Activating Services
Services>>Broadcast Services: Services
Once you have created your first notification group you are ready to start the SA-Announce
Broadcaster Service. If you are creating Schedules then both services must be running for the
schedules to function properly (the Scheduler Service activates/uses the Broadcaster Service in this
case).
Under the Services tab, click Start for the service in question.
You cannot start the services until you have set up the first notification group or schedule.
The Refresh Data button will update the SA-Announce database with the latest Communications
Manager device info and Alertus info. Some of this info will not be “live” until the service is restarted.
The IP addresses of the phones are now automatically refreshed, however new phones/lines may still
require a manual refresh. In this case, it is necessary to first Refresh Phone Settings followed by a
Restart of the service. This is because the data is refreshed every two hours by default, so phones
you have just added or IP addresses that have just changed will not automatically manifest in the
SA-Announce notification system. This default timer can be lowered considerably if needed (dynamic
deployments), the timer setting is stored in the registry of the application server (regedit:
HKLM>Software>Syn-Apps>SA-Announce>refreshPhoneSettingsMinutes and change the default 120
to the new value and then restart the SA-Announce broadcaster service). Timer values below 5
minutes are not recommended for large installations (1500 phones and greater).
©2009 Syn-Apps L.L.C.
Creating
Emergency Alert
Groups
Part
10
72
10
SA-Announce User Guide
Creating Emergency Alert Groups
Groups>>Create / Edit Groups
This section describes the creation of SA-Announce Emergency Alert notification groups. The
emergency alert group type is designed to be used for emergency notifications (e.g. Tornado Warning,
School On Lockdown, etc). Emergency alert groups play wave files (which can be customized, use
the Schedules>>Wav File Upload page) and send text to supported devices (Cisco IP Phones,
Alertus and 3n end-points support text messages). With the inclusion of the Send Caller-Id checkbox
the group becomes a very powerful emergency notification system as the security monitoring members
can see who activated the emergency and respond accordingly.
The emergency alert notification group type has a number of different configuration options that are
unique. The mode of an emergency alert group can be changed by selecting the provided check boxes
in the emergency alert Settings area of the General tab (only one mode can be selected). Alert Mode
is the default mode, in this mode the emergency alert group is activated when called (or via the web
service possibly), the group will then send the text message to the supported devices and begin to play
the wave file for 1000 cycles unless the group is called back. Calling an active emergency alert group
in alert mode will cancel the emergency. Voice Mode groups will activate when called and play the
wave file once at which point the source caller can begin to send further instructions by speaking into
their handset, when the source caller hangs up the group terminates and text is cleared from the
supported devices. The Play Once mode simply sets the duration of the emergency alert to one
repeat of the wave file, after the wave file plays once the group will terminate and text will be cleared
from the devices. Finally, selecting Timed Mode will expose a Repeat Number entry box, set the
repeat number to the desired duration of the emergency alert group.
To create an Emergency Alert notification group perform the following:
Select Groups>>Create / Edit Groups from the main menu.
Click New Group.
Configure the following items:
· Group Name: Enter a descriptive name for the group, the group name will be displayed in the
phone service menu and as the caller-id of the group.
· Group Type - Select the Emergency Alert group type.
· Group Phone:
o Line Number - This is the extension that you will use to call (activate) the notification
group, the next available line is placed in the field by default. Enter a unique line number
here.
o Partition - The partition the group phone should belong to (IE Phones must have a CSS
containing this Partition to be able to dial the group).
o Device Pool - Device pool the phone should belong to (the Device Pool must be set such
that anyone calling the group gets a G711 codec lookup).
·
Misc Settings:
o Use Security Code - To secure the group check this checkbox and enter a DTMF code to
associate to the group.
o Send Caller-ID - IP Phones within the selected group will receive the caller ID associated
©2009 Syn-Apps L.L.C.
Creating Emergency Alert Groups
73
with the source phone line.
o Emergency - Busy detection overridden for this group, agents on a call will also receive
the notification audio stream and/or text message.
o Volume - The volume of the IP Phone end-points in the group.
·
·
·
·
·
Tweet when activated: Check this checkbox to send a status update to your Twitter account
(See Twitter Configuration for setup details).
Notify Facebook Friends: Check this checkbox to send a notification to Facebook friends
who have authorized the SA-Announce Facebook application (See Facebook Configuration for
setup details).
Amber Alerts: Check this checkbox to send Amber Alerts to the groups IP Phones, Email,
Alertus and 3n. A Zip Code is required but may or may not be used depending on the system
settings. See Amber Alert Configuration for setup details.
Weather Alerts: Check this checkbox to send Weather Alerts to the groups IP Phones, Email,
Alertus and 3n. A Zip Code is required as weather alerts are localized. See Weather Alert
Configuration for setup details.
Emergency Alert Settings:
o Modes: Alert Mode, Voice Mode, Play Once, Timed Mode. The modes are described at
the top of this page.
o Wav File to Play: Select the wave file to play when the group is activated. Add custom
wave files to the system using the Schedules>>Wav File Upload page.
o Text to Send: Enter the text to be sent with the emergency alert. The text will be sent to
all end-points that support text messages.
©2009 Syn-Apps L.L.C.
74
SA-Announce User Guide
©2009 Syn-Apps L.L.C.
Creating Emergency Alert Groups
75
The Volume drop down menu allows you to adjust the volume of the audio played on the phone
speaker. The Default volume setting uses the setting of each phones speaker individually, other
settings such as 90%, 80% etc override the current volume setting on the phone and forces the phone
to play the audio at the percentage of maximum volume specified.
**Please note that while this does affect the volume of phones it does not affect the volume of Valcom
IP Speakers / CyberData IP Speakers / Legacy Overhead Systems / Alertus Endpoints.**
Note: The Amber Alerts and Weather Alerts features will try to play the selected Wav File when
sending the alert to IP Phones, but this Wav File may not be present on the CM TFTP server, in this
case no sound will play along with the Amber Alert or Weather Alert, move the file to the TFTP server
to allow it to play on the phones (this does not mean the sound will not play for an actual emergency
alert, it will since it is streamed from our server). The Amber/Weather alerts are merged with
emergency alert groups for convenience, they do not activate when you call the group to activate the
alert, they activate when an Amber or Weather alert is in effect. In some cases where your emergency
alert group has a custom wav file like "school on lockdown" you will not want to integrate the Amber
Alerts and Weather Alerts with the group, instead create a new group for the Amber Alerts and Weather
Alerts only.
[It is now possible to add the group even though end-points have not been associated yet, this can be
done after adding the group (as presented in this manual) or before adding the group.]
Click Add Group. Once added, you are now free to add, remove and view information about specific
devices within all of the groups that have been created.
©2009 Syn-Apps L.L.C.
Creating
Schedules
Part
11
Creating Schedules
11
77
Creating Schedules
Schedules>>Scheduled Broadcasts: General
This section describes the creation of SA-Announce schedules. Schedules are used to broadcast
audio/text to predefined end-points at predefined times (e.g. school bell schedules, manufacturing
break bells, etc). It is important to note that for schedules to function properly both the Scheduler
service and the Broadcaster service must be running (See Activating Services). Also be aware that the
scheduler is licensed separately from the broadcaster, contact [email protected] for details.
To create a schedule perform the following:
Select Schedules>>Scheduled Broadcasts: General from the main menu.
Click New Schedule.
Configure the following items:
· Schedule Name: Enter a descriptive name for the schedule.
· Days to Play: Select the days to play the schedule, one or more days may be selected.
· Times to Play: Enter the times to play the schedule in 24 hour format (e.g. 4:00 pm >> 16:00).
· Sound to Play / Other Settings:
o Sound to Play: Select the wave file to play when the schedule is activated. Add custom
wave files to the system using the Schedules>>Wav File Upload page.
o Volume - The volume of the audio played by the IP Phone end-points in the schedule.
o Repeat: The number of times to repeat the wave file when the schedule is activated.
o Text to Send: Enter the text to be sent with the schedule. The text will be sent to all
end-points that support text messages.
o Emergency - Busy detection overridden for this group, agents on a call will also receive
the notification audio stream and or text message.
The Volume drop down menu allows you to adjust the volume of the audio played on the phone
speaker. The Default volume setting uses the setting of each phones speaker individually, other
settings such as 90%, 80% etc override the current volume setting on the phone and forces the phone
to play the audio at the percentage of maximum volume specified.
**Please note that while this does affect the volume of phones it does not affect the volume of Valcom
IP Speakers / CyberData IP Speakers / Legacy Overhead Systems / Alertus Endpoints.**
[It is now possible to add the schedule even though end-points have not been associated yet, this can
be done after adding the schedule or before adding the schedule.]
Click Add Schedule. Once added, you are now free to add, remove and view information about
specific devices within all of the schedules that have been created.
©2009 Syn-Apps L.L.C.
78
SA-Announce User Guide
©2009 Syn-Apps L.L.C.
Creating Schedules
11.1
79
Schedule Overrides
Schedules>>Scheduled Broadcasts: Overrides
The Schedules>>Scheduled Broadcasts: Overrides tab is used to override the selected schedule
for a given time span. If the schedule is overridden it will not play, this can be used to silence bells
during vacation. Use the provided interface to add overrides, press the Add Override button to add a
new override row which will appear in the table, press the Edit link for the row and use the provided
calendars to select a Start Date and End Date for the override. Press the Update link to update the
row changes.
©2009 Syn-Apps L.L.C.
Sending A Text
Message
Part
12
Sending A Text Message
12
81
Sending A Text Message
Groups>>Send Text Message: Send Text Message
To send a text message to a notification group you must first create a group that contains the required
end-points. It can be an existing notification group of any type as long as that type allows you to select
end-points (e.g. holler group types cannot be used for sending text messages). That is to say, even
though Text type groups are only used on the Send a Message page, any group type that contains
end-point associations will be listed on the send a message page. Note: If the group you select
contains end-points that cannot display text, such as IP speakers, they will not receive the text
message.
The Send Text Message page has had some major changes in revision 7.0.60, it now supports saving
message templates (predefined text message groups). A message template is not required for
sending a text message but is required for sending polls.
To send a text message:
·
·
·
·
·
Browse to Groups>>Send Text Message: Send Text Message
Choose the group that you want to send the text message to, by selecting from the Use
End-Points from Group drop down menu.
Select a Sound Notification to accompany the text message (the sound will only be played
on the Cisco IP Phone end-points).
Select an Image to send with the text message.
Enter your text in the Message to Send field.
Press the Send Message button to send the message.
To send a poll:
·
·
·
·
·
·
·
·
Browse to Groups>>Send Text Message: Send Text Message
If the poll is already saved in a message template simply select the Message Template to
Edit and press the Send Message button.
If the poll is not already saved in a message template then create a New Template using the
button.
Choose the group that you want to send the text message to, by selecting from the Use
End-Points from Group drop down menu.
Select a Sound Notification to accompany the text message (the sound will only be played
on the Cisco IP Phone end-points).
Select an Image to send with the text message.
Enter your text in the Message to Send field.
Check the Poll checkbox under the Poll Options section and enter the poll answers in the
provided fields.
Press the Send Message button to send the message. Tab to the Poll Results Browser tab to view
poll results in real-time.
©2009 Syn-Apps L.L.C.
82
SA-Announce User Guide
©2009 Syn-Apps L.L.C.
Sending A Text Message
12.1
83
Message Browser
Groups>>Message Browser
The Groups>>Message Browser page provides a table for viewing recently sent text messages. The
message browser contains a row for each message that has been sent to a particular phone. The
columns of each row contain the following information:
· Message:
o Message Body: The message text that was sent.
o Sender: The user that sent the text message followed by the group the message was sent
to.
· Posted: The date and time the message was posted to the phones.
· Sent To:
o Desc: The description field of the phone the message was sent to.
o Phone: The name of the phone the message was sent to.
o IP: The IP address of the phone the message was sent to.
To sort the list click on the column to sort by. To group items by a column, drag the column header
(for the column to group on) into the light blue table header.
By default the last 30 days worth of messages are retained on the system. To change the retention
value the registry must be edited, regedit: HKLM>Software>Syn-Apps>SAAnnounce>messageRetentionDays, to the number of days you would like to retain messages. If the
messageRetentionDays value does not exist at that location in the registry it can be added as a string
value.
©2009 Syn-Apps L.L.C.
84
SA-Announce User Guide
©2009 Syn-Apps L.L.C.
Email Settings
Part
13
86
13
SA-Announce User Guide
Email Settings
Services>>Broadcaster Service: Email Settings
In order for SA-Announce to send emails when groups are activated the Services>>Broadcaster
Service: Email Settings tab must be filled out.
Enter an SMTP Server in the provided text box and a Mailer from address and press the Save button
to save the changes.
SA-Announce will now be able to send emails when groups that have email destinations are activated.
©2009 Syn-Apps L.L.C.
Amber Alert
Settings
Part
14
88
14
SA-Announce User Guide
Amber Alert Settings
Services>>Broadcaster Service: Amber Alert Settings
The AMBER Alert Program is a voluntary partnership between law-enforcement agencies,
broadcasters, transportation agencies, and the wireless industry, to activate an urgent bulletin in the
most serious child-abduction cases. The goal of an AMBER Alert is to instantly galvanize the entire
community to assist in the search for and the safe recovery of the child.
To utilize AMBER Alerts the SA-Announce application server must have internet access to www.
codeamber.org.
The AMBER Alert service runs inside the broadcaster service as it is coupled to emergency alert
groups. This coupling is for multiple reasons but primarily due to the need to have an endpoint
association for notifications. It is important to understand that the AMBER Alerts do not activate as a
result of calling the emergency alert group, in this case the normal emergency alert functionality is
carried out. Once you have activated AMBER Alerts by checking the Amber Alert checkbox for a
particular group and saving the changes, alerts will be active as long as the broadcaster service is
running. The service checks for new alerts immediately as the service is restarted and then checks
again when the "new alert" interval setting is reached. It is important to have a low "new alert" interval
setting so you will be notified of new alerts shortly after they occur. The "resend alert" interval setting
controls how often active alerts are resent to the group endpoints.
The settings for the Amber Alert service are listed on the Amber Alert Settings tab.
· Check for new alerts every (minutes): This setting controls how often the service checks for
Amber Alerts. 10 minutes is the minimum and the default.
· Resend active alerts (minutes): This setting controls how often alerts are resent. 0 minutes is the
default which means you will only receive AMBER Alerts once per update, the alert will not be resent
while active unless a duration is entered here. IE to send alerts every 4 hours while they are active
enter 240 for the resend value. Note that emails are never resent.
· Send alerts regardless of zip code: This setting controls the localization of Amber Alerts. If the
setting is unchecked you will only receive Amber Alerts that originated in your state. The setting is
on by default which means you will receive all Amber Alerts regardless of the state they originated in.
· Send endangered children "CANS" alerts: This setting controls wether Code Amber News
Service (CANS) endangered children alerts are sent. These are missing or endangered children
alerts that have not been deemed AMBER Alerts. The default setting is checked (on).
©2009 Syn-Apps L.L.C.
Amber Alert Settings
89
Sample Amber Alert:
*Press the Details button to see the complete text message, or visit http://codeamber.com in a web
browser.
©2009 Syn-Apps L.L.C.
Weather Alert
Settings
Part
15
Weather Alert Settings
15
91
Weather Alert Settings
Services>>Broadcaster Service: Weather Alert Settings
The Weather Alert service uses the National Weather Service web service to gather alert data for the
zip code specified by the emergency alert groups that have the feature activated.
To utilize Weather Alerts the SA-Announce application server requires internet access to www.
weather.gov.
The Weather Alert service runs inside the broadcaster service as it is coupled to emergency alert
groups. This coupling is for multiple reasons but primarily due to the need to have an endpoint
association for notifications. It is important to understand that the Weather Alerts do not activate as a
result of calling the emergency alert group, in this case the normal emergency alert functionality is
carried out. Once you have activated Weather Alerts by checking the Weather Alert checkbox for a
particular group and saving the changes, alerts will be active as long as the broadcaster service is
running. The service checks for new alerts immediately as the service is restarted and then checks
again when the "new alert" interval setting is reached. It is important to have a low "new alert" interval
setting so you will be notified of new alerts shortly after they occur. The "resend alert" interval setting
controls how often active alerts are resent to the group endpoints.
The Weather Alert Settings section contains interval timer settings:
· Check for new alerts (minutes): This setting controls how often the service checks for Weather
Alerts. 10 minutes is the minimum and the default.
· Resend active alerts (minutes): This setting controls how often alerts are resent. 120 minutes is
the default which means you will receive a weather alert every two hours while the alert is in effect.
To disable the resend enter 0. Note that emails are never resent.
The Weather Alert Settings section also contains an area to configure which weather Watches,
Warnings and Advisories to send alerts for. By default only the most severe weather alerts are
activated. This is not to say that the other alerts are not just as important, they can be depending on
where you are located. For that reason the list should be checked over and any alerts that may apply
to your geographical location should be enabled (simply select the item from the available side of the
list and press the >> button to move the item to the selected side).
©2009 Syn-Apps L.L.C.
92
SA-Announce User Guide
Sample Weather Alert:
©2009 Syn-Apps L.L.C.
Background
Music Settings
Part
16
94
16
SA-Announce User Guide
Background Music Settings
Services>>Broadcaster Service: Background Music Settings
The Background Music Settings section is used to configure the background music service
parameters. Use of this service requires a multicast music streaming source (IE Syn-Apps Paging
Relay or similar). Once the streaming source is active, add the settings on the Background Music
Settings page and then add a phone service on CUCM with the following URL: http://sa-announceserver-address/sa-anounce/phoneservices/BackgroundMusic.aspx. Finally, subscribe phones to the
service. Subscribed phones can activate the background music by selecting Services and then the
name you used when adding the phone service.
The Background Music Settings section contains the following settings:
· Music Stream Name: This setting controls the display name of the music stream (it will appear on
phones accessing the stream).
· Music Stream IP Address: Enter the IP Address of the multicast background music stream (224.X.
X.X -> 239.X.X.X).
· Music Stream Port: Enter the port of the multicast background music stream (RTP ports only
24000 -> 36000).
©2009 Syn-Apps L.L.C.
Background Music Settings
©2009 Syn-Apps L.L.C.
95
Configure IP
Phone Services
Part
17
Configure IP Phone Services
17
97
Configure IP Phone Services
SA-Announce provides two IP phone services and a number of advanced configuration options to
facilitate phone sourced multicasting. The following chapters describe these configuration options.
1. SA-Announce Directory Service
This service provides a phone directory of notification groups defined within SA-Announce. In
this case the selected group is activated by programmatic dialing of the group phone.
2. SA-Announce Web Dialer Service
This service is used to display and activate Normal, Holler, and Wokkie-Tokkie page groups.
In this case, rather than calling a phone number, the group activation is done via the web to
allow phone sourced multicasting from any supported Cisco phone. Note that in this mode
hooking the source phone will not shut down the group, the "End Page" soft-key must be
pressed to properly shut down the notification group.
3. 7921 Push to Talk
The 7921 push to talk button can be used with SA-Announce Wokkie-Tokkie (walky talky
emulator) type groups. the push to talk button can also be used to activate a particular group.
4. Phone Service URL
This section describes the process of adding a Service URL to an IP Phone line button. It is
possible to reconfigure the phone button template such that a line button (e.g. speed dial)
becomes a Service URL (direct access to a web URL). The Service URL can be used to
activate the Web Dialer directory or activate a specific group via the web. This is useful as it
can provide phone sourced local multicasting at a site located across the WAN from the main
(SA-Announce server) site.
©2009 Syn-Apps L.L.C.
98
17.1
SA-Announce User Guide
Page Group Directory
The SA-Announce phone service is used to display a directory of configured notification groups on
the Cisco IP Phones. In order to use SA-Announce group directory you must define the IP phone
service.
Create a new IP phone service (CUCM Admin: Device>>Device Settings>>Phone Services) with the
following parameters:
Service Name = SA-Announce
Service URL = http://server-ip-address/phoneservices/groupsdirectory.aspx where server-ip-address
equals your SA-Announce server's IP address.
*Note: By default the Group Directory provides a list of all groups. To show only groups that the
accessing phone is a member of use the following Service URL:
Service URL = http://server-ip-address/phoneservices/groupsdirectory.aspx?showAll=true.
Once your IP phone service is created, you must subscribe the desired phone(s) to the service. Once
phones are subscribed to the service use the Services button on the phone and select the SAAnnounce service to enter the directory. After accessing the service from a phone, you will see the
following:
©2009 Syn-Apps L.L.C.
Configure IP Phone Services
Select the desired page groups and press DIAL to initiate the page.
©2009 Syn-Apps L.L.C.
99
100
17.2
SA-Announce User Guide
Web Dialer Directory
The SA-Announce web dialer service is used to initiate phone sourced multicast notifications. In order
to use the SA-Announce web dialer directory you must define the IP phone service.
Create an IP phone service with the following parameters:
Service Name = SA-Announce Web Dialer
Service URL = http://server-ip-address/phoneservices/webgroups.aspx where server-ip-address
equals your SA-Announce server's IP address.
*Note: By default the Web Dialer Directory provides a list of all groups that can be web dialed. To show
only groups that the accessing phone is a member of use the following Service URL:
Service URL = http://server-ip-address/phoneservices/webgroups.aspx?showAll=true.
Once your IP phone service is created, you must subscribe the desired phone(s) to the service. After
accessing the services panel from a subscribed phone, you will see the following:
Select the desired page group and press SELECT to initiate the page.
©2009 Syn-Apps L.L.C.
Configure IP Phone Services
©2009 Syn-Apps L.L.C.
101
102
17.3
SA-Announce User Guide
7921 - Push-to-Talk
To utilize the push-to-talk button on the 7921 wireless phone you must setup a SA-Announce
Wokkie-Tokkie group and then activate it using the Web Dialer methodology. In this case the
push-to-talk button will control the audio stream coming from the 7921. For example, click the
push-to-talk button to activate the group, then hold the push-to-talk button down to talk. Release the
button when done speaking. Note: The source caller must end the page using the "End Page" soft-key
provided on the source phone.
Furthermore, it is possible to set the 7921 push-to-talk button to activate a specific group. In this case
you would set the Application URL of the 7921 (Communication Manager Admin>Device>Phone) to
point to the following URL:
http://server-ip-address/SA-Announce/PhoneServices/GetParams.aspx?id=<group-id> Where
server-ip-address is the IP address of the SA-Announce server and <group-id> is the group-id as
shown on the SA-Announce web administration groups page.
©2009 Syn-Apps L.L.C.
Configure IP Phone Services
17.4
103
Phone Service URL
This section describes the process of adding a Service URL to an IP Phone line button. It is possible to
reconfigure the phone button template such that a line button (e.g. speed dial) becomes a Service URL
(direct access to a web URL). The Service URL can be used to activate the Web Dialer directory or
activate a specific group via the web. This is useful as it can provide phone sourced local multicasting
at a site located across the WAN from the main (SA-Announce server) site.
Create a new IP Phone service that will be assigned to the Service URL button on the source
phones
Create a new IP Phone service in CCMAdmin with the following parameters.
· Service Name = you can call the group whatever you like, suggest that it is left generic as
this service will be used for all sites and multiple destination groups.
· Service Description = something to remind you what to use this service for.
· Service URL = http://x.x.x.x/SA-Announce/PhoneServices/GetParams.aspx - Make sure
you replace the x.x.x.x with the ip address of your SA-Announce server.
Save the service and then add a Service Parameter with the following parameters.
· Parameter Name = id
· Parameter Display Name = Group ID
· Parameter Description = something meaningful to you
· Check “Parameter is Required” at the bottom
· Click “Update" and "Close" at the top of the web page
Before the next step make sure that the phone button template on the destination device has a “
Service URL” defined
Get the Group ID for the destination group from SA-Announce
· Open the SA-Announce web interface
· Navigate the “Groups” page
· Select the desired destination group from the drop-down box
· Make sure the “General” tab is selected and look in the right corner of the tab for “Group ID”
· Make a note of this ID you will need it in the next step
Subscribe the phones that have access to this group to the IP Phone service
· Open the destination phone in CCMADMIN
· Click on the “Subscribe/Unsubscribe Services” hyperlink in the upper right
· Select the service created in the first step
· Enter the ID noted in the previous step in the Group ID parameter
· Save and update
©2009 Syn-Apps L.L.C.
104
SA-Announce User Guide
Add the Service URL Button to the phone
· Navigate back to the device configuration page for the same phone above
· Click “Add/Update Service URL Buttons” and select the service name that you just subscribed to
· Save and Update and then restart the phone
Once you complete the steps above you can use this service for all phones in the company regardless
of the destination group.
Simply replace the Group ID with the destination page Group ID that phone requires.
Once the phone is restarted you should see the button on the right configured with the Service Name.
Important:
Users must press the button to initiate the page and then lift the receiver or they will initiate
a new call.
Users must end the page by pressing the softkey on the phone labeled “End Page”
©2009 Syn-Apps L.L.C.
Paging Relay
Configuration
Part
18
106
18
SA-Announce User Guide
Paging Relay Configuration
Settings>>IP Endpoint Setup: Syn-Apps IP
The Settings>>IP Endpoint Setup: Syn-Apps IP tab is used to view and configure the Paging Relay
parameters. For information on adding Paging Relays to a SA-Announce notification group see the
Syn-Apps IP Devicessection.
The Control Port is set to 6789 by default. Generally this will not need to be changed. If you have
changed the port on the Syn-Apps Paging Relay hardware first make sure the control ports match for
all paging relays in use. Change the Control Port and press Save to set a new control port.
Each paging relay you plan to use with the system must be registered in the Syn-Apps IP Devices
area on the Settings>>IP Endpoint Setup: Syn-Apps IP tab. You may want to enter the following
information for each of the paging relays you plan to use (press Edit to begin editing the row and
Update to finish):
· Name: Enter a name for the paging relay (The MAC is filled in as the name by default).
· Description: Enter a description for the paging relay (The device type is filled in as the description
by default).
Descriptions of the remaining table columns:
Model: (Not Editable) The Syn-Apps IP devices model name.
IP Address: (Not Editable) The IP Address of the Syn-Apps IP Device.
Firmware: (Not Editable) The firmware version of the Syn-Apps IP Device.
Clock: (Not Editable) True if the Syn-Apps IP Device has a clock attached.
Last Seen: (Not Editable) The date and time of the last registration or heartbeat message from the
Syn-Apps IP Device.
· D.N.: The directory number of the Syn-Apps IP device (NA for paging relays).
·
·
·
·
·
©2009 Syn-Apps L.L.C.
Paging Relay Configuration
©2009 Syn-Apps L.L.C.
107
108
18.1
SA-Announce User Guide
Supported Paging Relays
SA-Announce supports all Syn-Apps Paging Relays with firmware version 2.2.1 or greater.
18.2
Paging Relay Setup
This section describes the configuration of the Syn-Apps Paging Relay.
Once you plug the Syn-Apps Paging Relay in it will use DHCP for network settings by default. The
new Syn-Apps Paging Relays can be easily configured to auto register with SA-Announce so no further
setup is required:
Set DHCP option 72 to the IP Address of your SA-Announce server:
IF you are using your routers to server DHCP you will want to add the option 72 command to
the scope that is providing the speakers with IP address information:
ip dhcp pool Voice
network 10.0.12.0 255.255.255.0
default-router 10.0.12.1
option 150 ip 10.0.0.21
dns-server 10.0.0.2
option 72 ip 10.0.5.38
lease 8 23 59
For Windows Server you would perform the following:
http://www.cisco.com/en/US/products/sw/voicesw/ps556/products_tech_note09186a00800942f4.shtml
Note: As of SA-Announce release 7.0.60 older paging relays are no longer supported and will need a
firmware update to version 2.2.1 or greater to function properly with SA-Announce.
Once the relay has registered with the SA-Announce server (see above, setting DHCP option 72) you
can find its IP address by going to Settings>>IP Endpoint Setup: Syn-Apps IP. Click on the devices
IP address in the table to be directed to the relays web page.
The default login credentials for the device are:
· User Name: admin
· Password: admin
After logging into the web page you will see the home page and the basic device settings. To change
the network and other settings of the device use the Admin Setup button.
[Syn-Apps Paging Relay web interface: Admin Setup page]
©2009 Syn-Apps L.L.C.
Paging Relay Configuration
18.3
Paging Relay Traffic Flow
©2009 Syn-Apps L.L.C.
109
Syn-Apps IP
Speaker
Configuration
Part
19
Syn-Apps IP Speaker Configuration
19
111
Syn-Apps IP Speaker Configuration
Settings>>IP Endpoint Setup: Syn-Apps IP
The Settings>>IP Endpoint Setup: Syn-Apps IP tab is used to view and configure the Syn-Apps IP
Speaker parameters. For information on adding Syn-Apps IP Speakers to a SA-Announce notification
group see the Syn-Apps IP Devices section.
The Control Port is set to 6789 by default. Generally this will not need to be changed. If you have
changed the port on the Syn-Apps IP Speaker hardware first make sure the control ports match for all
IP speakers in use. Change the Control Port and press Save to set a new control port.
Each Syn-Apps IP Speaker you plan to use with the system must be registered in the Syn-Apps IP
Devices area on the Settings>>IP Endpoint Setup: Syn-Apps IP tab. You may want to enter the
following information for each of the speakers you plan to use (press Edit to begin editing the row and
Update to finish):
· Name: Enter a name for the paging relay (The MAC is filled in as the name by default).
· Description: Enter a description for the paging relay (The device type is filled in as the description
by default).
· Model: (Not Editable) The Syn-Apps IP devices model name.
· IP Address: (Not Editable) The IP Address of the Syn-Apps IP Device.
· Firmware: (Not Editable) The firmware version of the Syn-Apps IP Device.
· Clock: (Not Editable) True if the Syn-Apps IP Device has a clock attached.
· Last Seen: (Not Editable) The date and time of the last registration or heartbeat message from the
Syn-Apps IP Device.
· D.N.: Enter a directory number for the speaker if it is of the Talk-Back type, this will be used for
holler (intercom) addressing.
©2009 Syn-Apps L.L.C.
112
SA-Announce User Guide
©2009 Syn-Apps L.L.C.
Syn-Apps IP Speaker Configuration
19.1
113
Supported Syn-Apps IP Speakers
SA-Announce supports all Syn-Apps IP Speakers with firmware version 1.0.0 or greater.
19.2
Syn-Apps IP Speaker Setup
This section describes the configuration of Syn-Apps IP Speakers.
Once you plug the Syn-Apps IP Speaker in it will use DHCP for network settings by default. The new
Syn-Apps Paging Relays can be easily configured to auto register with SA-Announce so no further
setup is required:
Set DHCP option 72 to the IP Address of your SA-Announce server:
IF you are using your routers to server DHCP you will want to add the option 72 command to
the scope that is providing the speakers with IP address information:
ip dhcp pool Voice
network 10.0.12.0 255.255.255.0
default-router 10.0.12.1
option 150 ip 10.0.0.21
dns-server 10.0.0.2
option 72 ip 10.0.5.38
lease 8 23 59
For Windows Server you would perform the following:
http://www.cisco.com/en/US/products/sw/voicesw/ps556/products_tech_note09186a00800942f4.shtml
Once the speaker has registered with the SA-Announce server (see above, setting DHCP option 72)
you can find its IP address by going to Settings>>IP Endpoint Setup: Syn-Apps IP. Click on the
devices IP address in the table to be directed to the relays web page.
The default login credentials for the device are:
· User Name: admin
· Password: admin
After logging into the web page you will see the home page and the default device settings. To change
the basic device settings use the Device Config button, to change the network and other settings of
the device use the Networking button.
[Syn-Apps IP Speaker web interface: Home page]
©2009 Syn-Apps L.L.C.
114
SA-Announce User Guide
©2009 Syn-Apps L.L.C.
Valcom IP
Speaker
Configuration
Part
20
116
20
SA-Announce User Guide
Valcom IP Speaker Configuration
Settings>>IP Endpoint Setup: Valcom:
The Valcom IP Speaker settings are located at Settings>>IP Endpoint Setup: Valcom. In most
cases the settings will not need to be changed (assuming you are using Valcom version 2.x firmware,
recommended). If you are using Valcom version 1.x firmware or have non default multicast control
and audio addresses configured on your Valcom speakers you will need to match these settings to
your speaker settings. The Valcom speaker settings are shown in the Valcom VIP-102B IP Solutions
tool under the System>>Network Settings option.
©2009 Syn-Apps L.L.C.
Valcom IP Speaker Configuration
[VIP-102B Setup Tool (System>>Network Settings)]
20.1
Supported Valcom Speakers
SA-Announce supports the entire Valcom IP Speaker platform. These speakers include:
·
·
·
·
·
·
·
·
·
Valcom VIP 130-L (one-way outdoor horn)
Valcom VIP 402 (lay-in ceiling speaker)
Valcom VIP 140 (wall speaker)
Valcom VIP 411 DS (wall mount w/ digital clock)
Valcom VIP 412 DF (wall surface mount w/ digital clock)
Valcom VIP 430 (wall mount talk-back)
Valcom VIP 821 (enhanced network trunk port)
Valcom VIP 822 (duel enhanced network trunk port)
Valcom VIP 824 (quad enhanced network trunk port)
©2009 Syn-Apps L.L.C.
117
118
20.2
SA-Announce User Guide
Valcom IP Speaker Setup
This section describes how to setup your Valcom IP Speakers into groups for use with SA-Announce.
For information on how to add these Valcom groups to a SA-Announce notification group please see
the section IP Speaker Integration.
See the section Valcom IP Speaker Configuration for details on setting up the Valcom audio and
control address/port.
To add Valcom IP speakers to groups for use with SA-Announce first open the VIP-102B IP Solutions
Setup Tool from Valcom and scan for your speakers.
Select System>>Audio Groups from the main menu bar.
A new window will appear, add a Dial Code (the unique group number) select a Priority and finally
give the group a Name. Press the Add button to add the group to the Valcom system.
Next select System>>Audio Group Membership from the main menu bar.
Select a speaker group form the Audio Group drop down menu and then add speakers to the group
by marking the Device checkbox.
The group can now be used in SA-Announce notification groups and schedules (by adding the Dial
Code to the Valcom input area of the IP Speakers tab of a group, see IP Speaker Integration)
[Valcom VIP-102B Setup Tool: System>>Audio Groups]
©2009 Syn-Apps L.L.C.
Valcom IP Speaker Configuration
[Valcom VIP-102B Setup Tool: System>>Audio Group Membership]
©2009 Syn-Apps L.L.C.
119
CyberData IP
Speaker
Configuration
Part
21
CyberData IP Speaker Configuration
21
121
CyberData IP Speaker Configuration
Settings>>IP Endpoint Setup: CyberData
The Settings>>IP Endpoint Setup: CyberData page is used to configure SA-Announce with the
required CyberData speaker group parameters. The CyberData speaker groups are setup using the
CyberData speakers' web page (use the CyberData discovery tool to discover the CyberData speakers
on your network and web to their IP address). The speakers must be setup with multicast groups in
order to function properly with SA-Announce, see the CyberData Speaker Setup section for details.
Multicast is required from the SA-Announce application server to the CyberData speakers.
©2009 Syn-Apps L.L.C.
122
21.1
SA-Announce User Guide
Supported CyberData Speakers
SA-Announce supports the entire IP Speaker platform from CyberData. These speakers include:
·
·
·
·
·
·
·
·
·
·
·
VoIP Ceiling Speaker
VoIP Paging Gateway
VoIP Multicast Gateway
VoIP Loudspeaker Amplifier, PoE
VoIP Loudspeaker Amplifier, AC
VoIP Loudspeaker Amplifier Wireless
VoIP Paging Amplifier
VoIP Intercom
VoIP Paging Server
VoIP 4-Port Zone Controller
VoIP Talk-back Speaker
©2009 Syn-Apps L.L.C.
CyberData IP Speaker Configuration
21.2
123
CyberData Speaker Setup
This section describes how to setup your CyberData Speakers into multicast groups for use with SAAnnounce. See the section CyberData IP Speaker Configuration for details on adding these groups to
the SA-Announce Interface.
First make sure the speakers are in MGROUPS mode. Browse to the web page of the speaker
(default login: admin, admin) and select the Speaker Setup link button. On the Speaker Setup page
set the speaker function to MGROUPS and press the Save Settings button.
Next browse to the MGROUPS Setup page by pressing the MGROUPS Setup button. Add groups to
the speaker by adding a multicast address and port, priority and name for the group. Add the same
group to all other speakers that are to be part of the group.
©2009 Syn-Apps L.L.C.
124
SA-Announce User Guide
©2009 Syn-Apps L.L.C.
Alertus
Configuration
Part
22
126
22
SA-Announce User Guide
Alertus Configuration
Settings>>IP Endpoint Setup: Alertus
The Settings>>IP Endpoint Setup: Alertus tab is used to configure SA-Announce with the required
Alertus parameters. For information on adding Alertus Beacon Groups to a SA-Announce notification
group see the Alertus section.
To setup the Alertus integration the Alertus Web Service URL must be configured. Type the URL
into the Alertus Web Service URL text box and press the Save button to save the changes. The URL
will be verified and if it appears valid the Alertus settings will be extracted for use in SA-Announce.
The Message Duration (Seconds) entry box controls the default Alertus alert duration. For groups
like Emergency Alert and schedules this setting is not used (the alert will be activated with the
Emergency Alert / Schedule and it will be deactivated with the Emergency Alert / Schedule). For
groups like Normal and Text the message duration setting will be used, the Alertus beacons will carry
the message for the specified amount of time.
©2009 Syn-Apps L.L.C.
Alertus Configuration
22.1
127
Supported Alertus Devices
SA-Announce supports all Alertus Beacons.
22.2
Alertus Device Setup
This section describes how SA-Announce integrates with the Alertus System.
SA-Announce can automatically activate Alertus Beacon Groups that you have defined in the Alertus
web configuration pages. Alertus Alert Profiles are also used by SA-Announce, the Alert Profile
defines the way the Alert Beacons behave during an event (how the lights flash, which sound is played
etc).
For proper operation SA-Announce requires that the Alertus system have at least one alert profile and
one beacon group.
[The Alertus web configuration interface]
©2009 Syn-Apps L.L.C.
Everbridge
Configuration
Part
23
Everbridge Configuration
23
129
Everbridge Configuration
Settings>>IP Endpoint Setup: Everbridge
The Settings>>IP Endpoint Setup: Everbridge tab is used to configure SA-Announce with the
required 3n parameters. For information on adding 3n Scenarios to a SA-Announce notification group
see the Everbridge section. Provide the following Everbridge web service information in the provided
interface:
· Everbridge Web Service URL: Enter the Everbridge web service url in the provided entry
box. The default URL is https://www.3nonline.net/nns/3nWebServices.
· User ID: Enter your Numeric Everbridge User ID.
· Organization Name: Enter your Everbridge organization name.
· Password: Enter your numeric Everbridge password.
Press the Save button to save the changes to the Everbridge web service settings. After pressing
save the URL will be contacted so connectivity can be checked, if problems are encountered an error
message will appear. The most likely cause of error would be that the server has no connectivity to
internet.
After setting up the web service parameters you will need to enter your Everbridge Scenarios by
Scenario Id and Name and press the Add button. The Scenario ID must be the same as found on the
Everbridge Scenarios page. See the Everbridge Setup section for details on finding existing scenario
Id's and creating new scenarios.
©2009 Syn-Apps L.L.C.
130
23.1
SA-Announce User Guide
3n Setup
This section describes how SA-Announce integrates with the 3n System.
SA-Announce can automatically activate 3n Scenarios that you have defined in the 3n web
configuration pages when a SA-Announce group is activated.
For proper integration SA-Announce requires that the 3n system have at least one scenario defined.
To view currently created 3n Scenarios browse to the 3n management interface Scenario
Manager>>Manage Scenario the scenario title and number are listed (enter the scenario title/number
of scenarios you would like to use in SA-Announce by browsing to SA-Announce: Settings>>IP
Endpoint Setup: 3n tab. This process is described in the 3n Configuration section.
To create new scenarios in the 3n system you must first create an unscheduled notification (Send
Notification) and then use the Scenario Manager>>Create Scenario to create a scenario using that
unscheduled notification.
[The 3n web configuration interface: Scenario Manager>>Manage Scenario]
©2009 Syn-Apps L.L.C.
Facebook
Configuration
Part
24
132
24
SA-Announce User Guide
Facebook Configuration
Settings>>IP Endpoint Setup: Facebook
The Settings>>IP Endpoint Setup: Facebook tab is used to integrate SA-Announce with your
Facebook account.
The setup process must be preformed on the application server. The application server must have
access to www.facebook.com at all times to provide this service.
From the application server open the SA-Announce administration interface and browse to
Settings>>IP Endpoint Setup: Facebook. Push the Setup Facebook button to perform the setup
procedure. You will be directed to Facebook.com, sign in using your account credentials and click
allow on any requests for authorization.
After the setup completes for the first time you are ready to update your Facebook status automatically
by pressing the button again as instructed by the message shown below the button. This will add a
new status post to your Facebook wall which will instruct your friends to visit a link to allow the
application access to send notifications. Only friends who visit the link and allow access will be able to
receive the notification from SA-Announce. We recommend that you notify your friends (IE students
on a campus) by other means as well to visit the link added to your profile wall to make sure they have
allowed access, otherwise they will not receive notifications.
Once the setup is complete you will be able to use the "Notify Facebook Friends" checkbox on the
Create Edit Groups page (for text and emergency alert group types only). Checking the checkbox for
a particular text or emergency alert group will integrate that group with your Facebook account.
Friends who have allowed the application access will receive a Facebook notification whenever the
group is activated. The notification will consist of the text or emergency alert group message text.
©2009 Syn-Apps L.L.C.
Facebook Configuration
24.1
Connection Diagram
Enter topic text here.
©2009 Syn-Apps L.L.C.
133
Twitter
Configuration
Part
25
Twitter Configuration
25
135
Twitter Configuration
Settings>>IP Endpoint Setup: Twitter
The Settings>>IP Endpoint Setup: Twitter tab is used to integrate SA-Announce with your Twitter
account.
Simply enter your Twitter user name and password in the provided fields and press the Save button to
save any changes. After saving the credentials you are ready to integrate Twitter with an emergency
alert group.
25.1
Connection Diagram (COPY)
Enter topic text here.
©2009 Syn-Apps L.L.C.
Analog Paging
System
Integration
Part
26
Analog Paging System Integration
26
137
Analog Paging System Integration
Settings>>External Phone Setup
This section describes how to setup the dialers that facilitate the analog paging system integration.
The dialers are virtual phones that will be added to your Cisco Unified Communications Manager,
when needed SA-Announce will virtually take them off-hook and dial the overhead system in question.
Communications Manager expertise is required to properly configure the section (IE Device Pool /
Region, CSS, and Partition should be well understood parameters of the Communications Manager in
question).
For information on adding analog systems to a paging group see the External Phones section.
The Settings>>External Phone Setup page allow automatic creation of the dialers used in the analog
paging system integration. It is recommended you add a dialer for each simultaneous overhead
system activation that can occur plus two for busy detection purposes (IE if four sites each have one
overhead system [4 + 2] add 6 dialers).
All dialers should have the same Device Pool and CSS (Calling Search Space) since the dialers act as
a pool and any one may be used for a specific notification group. In other words all dialers must be
able to dial any and all of the overhead systems that are to be integrated with the SA-Announce
system.
The following parameters are requested in the add phone interface:
· Line Number: Enter a unique line number for the virtual dialer phone.
· Partition: Select a partition for the line to reside in (this setting does not affect the dialer
functionality, lines simply require partitions to make them unique and to add control
mechanisms).
· CSS: Select a Calling Search Space for the line to reside in, the calling search space must
contain the partition of the destination numbers you wish to dial.
· Device Pool: Select a Device Pool that will insure a G.711 codec lookup when the dialer
dials the destination numbers you wish to dial (See CUCM Region).
Once the parameters are filled out press the Add Phone button to add the virtual phone to
Communications Manager. Repeat to add all of the necessary dialers.
©2009 Syn-Apps L.L.C.
138
SA-Announce User Guide
Note: To delete a dialer phone use the table on the Settings>>External Phone Setup page to gather
the MAC addresses or Line Numbers of the Phones. Then use CUCM administration to search out
and delete the phones and lines in question.
©2009 Syn-Apps L.L.C.
Analog Paging System Integration
26.1
139
Supported Analog Systems
SA-Announce supports all analog paging systems that integrate to Communications Manager.
If you can dial your paging system from an IP phone, SA-Announce will be able to access the system.
SA-Announce supports single and multi zone systems.
26.2
Supported Analog Interfaces
SA-Announce can connect to paging systems that are integrated with FXS, FXO, E&M interfaces
hosted and ISR gateways, VG224, VG248, and ATA's.
©2009 Syn-Apps L.L.C.
Busy Detection
Options
Part
27
Busy Detection Options
27
Busy Detection Options
27.1
XML Busy Detection
141
XML Busy Detection is the default method SA-Announce uses to determine whether a phone is busy
or idle.
All Cisco IP phones have a priority scheme that allows Syn-Apps to send phones commands that will
only be executed if the phone is idle.
All standard page groups will respect your busy status and will not interrupt active phone calls with a
page unless the emergency checkbox is checked.
27.2
TAPI Busy Detection
TAPI is necessary in some implementations where many phone lines are shared. Please contact
Syn-Apps Technical Support for additional information.
First, download the latest Cisco TAPI Service Provider (TSP) from the Communication
Manager Plugins url located in Applications>Install Plugins.
Once you have downloaded and run the installation, you will need to configure the TSP.
Procedure for 2003 / 2008
Step 1 Open the Control Panel.
Step 2 Double-click Phone and Modem Options.
Step 3 Choose the Cisco TSP that you want to configure.
Step 4 Click Configure.
The system displays the Cisco IP PBX Service Provider dialog box.
Step 5 Enter the appropriate settings as described in "Cisco TSP Configuration Settings"
section.
Step 6 Click OK to save changes.
Cisco TSP Configuration Settings
The following sections describe the fields in the Cisco_IP PBX Service Provider dialog box:
·
General Tab
·
User Tab
·
CTI Manager Tab
©2009 Syn-Apps L.L.C.
142
SA-Announce User Guide
General Tab
The General Tab displays TSP and TSPUI version information, as illustrated in Figure 1.
Figure 1 Cisco IP PBX Service Provider General Tab
©2009 Syn-Apps L.L.C.
Busy Detection Options
143
User Tab
The User tab allows you to configure security information, as illustrated in Figure 2.
Figure 2 Cisco IP PBX Service Provider User Tab
Table 2 contains a list of the fields for the User tab that must be set and their descriptions.
Table 2 User Tab Configuration Fields
Field
Description
User Name Enter the user name of the user that you want to give access to devices. This TSP can access
devices and lines associated with this user. Make sure this user is also configured in the
Cisco Communications Manager, so TSP can connect to Cisco Communications Manager.
The TSP configuration registry keys store the user name and password that you enter.
Note You can designate only one user name and password to be active at a time for a TSP so the
user will need all devices associated.
Password
Enter the password associated with the user that you entered in the User Name field. The
computer encrypts the password and stores it in the registry.
Verify
Password
Reenter the user password.
©2009 Syn-Apps L.L.C.
144
SA-Announce User Guide
CTI Manager Tab
The CTI Manager tab allows you to configure primary and secondary CTI Manager information, as illustrated in
Figure 3.
Figure 3 Cisco-IP PBX Service Provider CTI Manager Tab
Table 3 contains a list of the CTI Manager tab fields that must be set and their descriptions.
Table 3 CTI Manager Configuration Fields
Field
Description
Primary CTI Specifies the CTI Manager to which the TSP attempts to connect first.
Manager
Location
If the TSP is on the same computer as the primary CTI Manager, choose the Local Host radio
button.
If the primary CTI Manager is on a different computer, choose the IP Address radio button and
enter the IP address of primary CTI Manager or choose the Host Name radio button and enter the
host name of primary CTI Manager.
Backup CTI
Manager
Location
Specifies the CTI Manager to which the TSP attempts to connect if a connection to the primary
CTI Manager fails.
If the TSP is on the same computer as the backup CTI Manager, choose the Local Host radio
button.
If the backup CTI Manager is on a different computer, choose the IP Address radio button and
enter the IP address of backup CTI Manager or choose the Host Name radio button and enter the
host name of backup CTI Manager.
©2009 Syn-Apps L.L.C.
Busy Detection Options
145
Communications Manager – Create the TSP User
Next, create the TSP user in Communications Manager. Complete these steps:
Select User > Add a New User from the Cisco Communications Manager Administration web interface
. If you are using Communications Manager version 5, 6 or 7 browse to User Management >
Application User to add a new application user. Also note that on CUCM version 5, 6 and 7 the user
will need to have all CTI permissions associated to it.
Enter the user information as required on the Add a New User page, and click Insert when you are
finished. Make sure you enable CTI Application Use for your new user.
©2009 Syn-Apps L.L.C.
146
SA-Announce User Guide
©2009 Syn-Apps L.L.C.
Busy Detection Options
User Configuration
Click Device Association.
The following page appears.
Associate all IP phones to the TSP user. Do not select Gateways or Analog Ports.
When you are finished, click Update Selected.
©2009 Syn-Apps L.L.C.
147
148
SA-Announce User Guide
Controlled Devices
You should see a screen similar to the following. The Controlled Devices field reflects the association
that you just made.
Note: The controlled device is the phone itself, not the DNs.
©2009 Syn-Apps L.L.C.
Information
Center
Part
28
150
28
SA-Announce User Guide
Information Center
SA-Announce 7.x introduces a new information center that provides quick access to the following
items:
· Changes: This section provides access to the SA-Announce change log. Please refer to this
section to learn about application enhancements and bug fix information.
· Info: This section provides access to the application registry key settings. This is useful when
Syn-Apps support asks system configuration information. You can also use this section to quickly
verify system settings.
· License: The License section provides access to the currently installed license information
including your maintenance contract number and start/end dates. Licenses can also be updated on
this page using the interface at the bottom.
· Groups: This section provides a detailed list of all notification groups configured within
SA-Announce. Information displayed includes Name, Type, Number, Partition, and Device Pool.
· Users: This section displays a list of all users that have been provisioned for access to the
SA-Announce web interface. The values displayed are Username and if the user has been
provisioned as a global administrator.
· Login Act: This section provides a list of all logins to the SA-Announce web interface. Username,
Login time and the IP address of the machine that the user logged into the system from are
displayed.
· Page Act: This section provides a historical view of the notification activity on the system. You will
be able to see who called a given notification group on a specific date and time.
· Text Act: This section is similar to the Page Act section except that it displays the historical view of
all text messages that have been dispatched via SA-Announce.
· Sched Act: This section displays the historical view of all scheduled notifications.
All of this information can be accessed by clicking on the Syn-Apps head graphic located in the upper
left corner of the administration interface. Once you are done viewing the data please click on the Exit
Menu button in the lower right corner or simply click on the main SA-Announce web page to close the
window.
Please note that all data in the information center is retained for 90 days by default. If you would like to
adjust the retention period please modify the following registry key.
Regedit: HKLM>Software>SynApps>SA-Announce>activityRetentionDays (please add the value as a
string if it doesn’t already exist in the registry).
©2009 Syn-Apps L.L.C.
Information Center
©2009 Syn-Apps L.L.C.
151
Custom Wave
File Upload
Part
29
Custom Wave File Upload
29
153
Custom Wave File Upload
Schedules>>Wav File Upload
It is possible to add custom wave files to the SA-Announce notification system, for use with schedules
and emergency alert group types. Browse to the Schedules>>Wav File Upload page to upload new
wave files to the system.
Recording a custom wav file:
For your new audio prompt to be compatible with SA-Announce RTP, it needs to be in the following
format:
· g.711
· CCIT u-Law
· 8k - 8bit, mono
You can use the sound recorder bundled with windows or record a message with Unity Voice Mail.
To use Windows Sound Recorder:
Launch Sound Recorder (Start\Programs\Accessories\Entertainment\Sound Recorder)
· ALWAYS press New before recording; otherwise it will append the existing file
· Record the sound
· File/Save as/ Format Change: CCIT u-Law, 8k, 8bit, mono
To add the new wave file(s) to the system:
·
·
·
·
Browse to Schedules>>Wav File Upload
Press the Browse button to add a file to upload.
Add more files to upload using the Add File button.
Press the Upload button to complete the process and upload the wave file(s) to the system.
The newly added wave files are now available for association to emergency alert groups and
schedules.
©2009 Syn-Apps L.L.C.
154
SA-Announce User Guide
©2009 Syn-Apps L.L.C.
Customizing
Audio Feedback
Part
30
156
30
SA-Announce User Guide
Customizing Audio Feedback
You can customize SA-Announce audio prompts by modifying the wave files included with
SA-Announce. The prompts you hear when dialing a SA-Announce notification group can be found on
the SA-Announce application server at C:\programn files\Syn-Apps\SA-Announce\Broadcaster\Wav
directory. A brief description of each of the files is contained in the next section Audio File Descriptions
.
[See the chapter Custom Wave File Upload to add custom wave files for use with emergency alert
groups and schedules]
SA-Announce 2.0 Voice Prompts
Recording a wav file:
For your new audio prompt to be compatible with SA-Announce RTP, it needs to be in the following
format:
· g.711
· CCIT u-Law
· 8k - 8bit, mono
You can use the sound recorder bundled with windows or record a message with Unity Voice Mail.
To use Windows Sound Recorder:
Launch Sound Recorder (Start\Programs\Accessories\Entertainment\Sound Recorder)
· ALWAYS press New before recording; otherwise it will append the existing file
· Record the sound
· File/Save as/ Format Change: CCIT u-Law, 8k, 8bit, mono
30.1
Audio File Descriptions
AdHoc.wav
When: Played before waiting for target destination numbers.
"You have reached an Ad-Hoc paging group. Please enter the destination extensions, separated
by the pound sign. Once you have completed entering your destinations please enter pound again
to start your page."
Holler.wav
When: Played before waiting for target destination number.
"You have reached a Hoot-n-Holler page group. Please enter destination extension followed by the
pound sign."
HollerError.wav
When: a destination number is invalid.
©2009 Syn-Apps L.L.C.
Customizing Audio Feedback
157
"We were unable to open the destination you requested. The destination extension was invalid."
HollerErrorShared.wav:
When: NOT USED. It’s a warning, only the first line (undefined) will be opened.
"We were unable to open the extension you requested. The destination is a shared line."
SecurityCode.wav
When: before waiting for the security code.
"This is a secure page group, Please enter the DTMF security code."
SecurityCodeWrong.wav
When: when code is wrong, before hanging up.
“You have entered an incorrect security code, please call back and try again. Goodbye."
SomeDestBusy.wav
When: When so many destinations are busy that a confirmation tone would not otherwise be sent.
“Some destinations are busy…"[Paging Continues].
©2009 Syn-Apps L.L.C.
Advanced Paging
Configuration
Part
31
Advanced Paging Configuration
31
159
Advanced Paging Configuration
Enter topic text here.
31.1
SA-Announce Multicast Router/Switch Configuration
Configuring multicast on a network includes enabling Multicast Routing on routers, configuring PIM on
routed interfaces, and enabling IGPM or CGPM on switches.
For more information please refer to the Cisco Multicast Quick- Start Configuration Guide (http://
www.cisco.com/warp/public/105/48.pdf).
©2009 Syn-Apps L.L.C.
160
31.2
SA-Announce User Guide
Multi-Site Centralized SA-Announce Server
©2009 Syn-Apps L.L.C.
Advanced Paging Configuration
31.3
SA-Announce High-Level Protocol Use
©2009 Syn-Apps L.L.C.
161
Help and Support
Part
32
Help and Support
32
Help and Support
32.1
Documentation
163
Help>>Documentation
The Help>>Documentation page contains the SA-Announce User Guide in HTML format, complete
with index and search functions.
©2009 Syn-Apps L.L.C.
164
32.2
SA-Announce User Guide
Knowledge Base
Help>>Request Support: Knowledge Base
The Request Support page contains a Knowledge Base tab that can be used to look at known issues
and to add feature requests. Please consult the knowledge base for solutions to known problem before
proceeding to the Prepare Report tab to enter a new trouble ticket.
©2009 Syn-Apps L.L.C.
Help and Support
32.3
165
Prepare Report
Help>>Request Support: Prepare Report
The Request Support page contains a Prepare Report tab that can be used to generate a Syn-Apps
support request. This is the preferred method of obtaining support as all log files will be automatically
sent to Syn-Apps Support and a trouble ticket will be created. FTP and email access is required for the
process to work fully automatically (See Email Settings to setup the email system before requesting
support).
To request support please fill out the following information in the interface provided on the page:
· Contact Email Address: Enter the email address of the person Syn-Apps Support should contact in
response to this trouble ticket.
· Contact Phone Number: Enter the phone number of the person Syn-Apps Support should contact
in response to this trouble ticket.
· Description: Enter a detailed description of the problem in the provided text box, provide as much
detail as possible as to how the problem is occurring.
©2009 Syn-Apps L.L.C.
166
32.4
SA-Announce User Guide
Contact Syn-Apps Support
Please feel free to contact Technical Support directly with any issues you may have.
[email protected] or 866-664-6071, option 2.
©2009 Syn-Apps L.L.C.
2812 N Norwalk
Suite 112
Mesa, AZ 85215
Phone: (866) 664-6071
Fax: (866) 659-8999
[email protected]
www.syn-apps.com