1
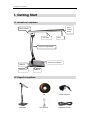
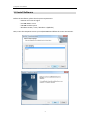
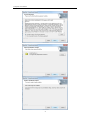
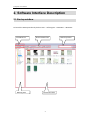
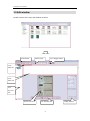
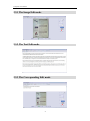
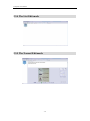
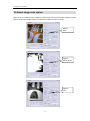
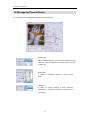
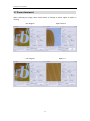
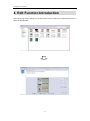
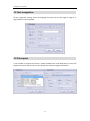
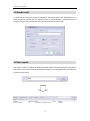
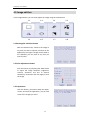
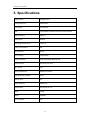
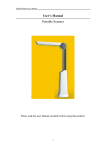
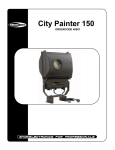
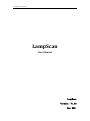
LampScan User Manual LampScan User Manual LampScan Version:V1.00 Mar 2011 LampScan User Manual INDEX 1. Getting start ...................................................................................................................................... 1 1.1 Introduce LampScan ............................................................................................................... 1 1.2 Unpack LampScan ................................................................................................................... 1 1.3 Setup LampScan ................................................................................................................ 2 1.4 Install software ....................................................................................................................... 3 1.5 Launch Software ..................................................................................................................... 5 2. Software interface description .................................................................................................... 6 2.1 Start window ..................................................................................................................... 6 2.2 Capture window .................................................................................................................. 7 2.3 Edit window ....................................................................................................................... 8 2.3.1 The image edit mode ..................................................................................................... 9 2.3.2 The text edit mode ......................................................................................................... 9 2.3.3 The correspoinding edit mode ....................................................................................... 9 2.3.4 The list edit mode ......................................................................................................... 10 2.3.5 The normal edit mode .................................................................................................. 10 3. Software function introduction ..................................................................................................... 11 3.1 Set working area .............................................................................................................. 11 3.2 Capture document .......................................................................................................... 11 3.3 Crop document ................................................................................................................ 12 3.4 Word recognition in document ....................................................................................... 13 3.5 Select image color option ................................................................................................ 14 3.6 Manage and control device ............................................................................................... 15 3.7 Zoom document .............................................................................................................. 16 4. Edit function introduction ......................................................................................................... 17 4.1 Text recognition ............................................................................................................... 17 4.2 File export ....................................................................................................................... 16 4.3 Send email ............................................................................................................................. 17 4.4 Text search ....................................................................................................................... 18 4.5 Image edit bar ................................................................................................................. 20 4.6 Picture function bar ........................................................................................................ 24 5. Specifications .............................................................................................................................. 25 LampScan User Manual 1. Getting Start 1.1 Introduce LampScan Focus control wheel Power Switch Led Lamp Lens Lamp arm (adjustable) Capture hard button USB port Power port USB hub 1.2 Unpack LampScan LampScan CD Power Adapter User Manual USB cable (A to B) -1 LampScan User Manual 1.3 Set up LampScan Use for Led Lamp Use for scan -2 LampScan User Manual 1.4 Install Software Before the installation, please check system requirements: * Pentium 4 1.6 CPU or higher * 512 MB RAM or more * 200 MB hard disc space * Windows XP-SP2 / Vista / Windows 7 (32/64 bit) Next, insert the LampScan CD into your CD/DVD ROM and follow the screen instructions: -3 LampScan User Manual -4 LampScan User Manual 1.5 Launch Software NimoDoc on Desktop OR Start All Program NimoDoc NimoDoc -5 LampScan User Manual 2. Software Interface Description 2.1 Startup window To launch the Startup window by click on Start → All Program → NimoDoc → NimoDoc. File Menu bar Working area Shortcut Menu bar File Preview area -6 Search Input bar LampScan User Manual 2.2 Capture window Click [Capture NSD File] button to open the capture window with interface layout as below: Preview area Image Control area OCR Recognize area Image Output control area Device control area Device setting area NSD project file setting Capture function area -7 LampScan User Manual 2.3 Edit window Double-click the file to open Edit window as below: Function bar Shortcut bar View Toggle button Text Edit bar Text Edit area File Preview bar Pic Preview area Pic Function bar -8 Image Edit bar LampScan User Manual 2.3.1 The Image Edit mode 2.3.2 The Text Edit mode 2.3.3 The Corresponding Edit mode -9 LampScan User Manual 2.3.4 The List Edit mode 2.3.5 The Normal Edit mode - 10 LampScan User Manual 3. Capture Function Introduction 3.1 Set working area (save directory) Right-click any place on the “Working area” to show menu options. Select the [Folder Manager] Working area On Folder Manager, click the Add button to select a directory in the Folder Browser and set it as the working area. After this setting, the captured document will be saved in the set directory. All file can be found in their respective sub-directory in this set directory. 3.2 Capture document Make sure the LampScan is connected correctly to power. Now click on [Capture NSD File] button to open up Capture window. Capture NSD File - 11 LampScan User Manual Place document in position underneath the LampScan Lens. Confirm the correct focus. Make sure the Path and File are in prefer setting. Click Capture button to save to the set directory (working area). Set Path and File name Capture 3.3 Crop document We often come across different document size. It will show up in the preview area in relative proportion. We will be able to select the proportion we want to keep and cut out the unwanted bit. To do it, click [Cut] selection to show a translucent red box on the preview area. Resize this red box to cover the kept area and click [Capture]. Cut - 12 LampScan User Manual 3.4 Word Recognition in document LampScan APP is built with automatic word recognition function. Select the [Recognize] button and select the language of input text. Click on [Capture] button to complete the image capture and process the word recognition. Note: to lift the recognition rate, make sure the image is tolerance of tilt in plus or minus 3°. Recognize Word recognize area - 13 LampScan User Manual 3.5 Select image color option When there is a need to select a different color format, we have three color options to select. We can review the image below in comparison for different color selection: Option: Color Option: White_Black Option: Grey - 14 LampScan User Manual 3.6 Manage and Control Device To manage and control device hardware can be made here: Equipment: When multiple devices are connected simultaneously, selection and management of these devices can be made here. Resolution: A variety of resolution options to choose from here. Frequency: In order to comply voltage to most countries worldwide, a selection of power frequencies to select here. - 15 LampScan User Manual 3.7 Zoom document When capturing the image, some useful feature to enlarge or reduce object is helpful in viewing. Left: Original Right: Zoom In Left: Original Right: 1:1 - 16 LampScan User Manual 4. Edit Function Introduction After capturing, further editing on the document can be made here. Double-click the file to open the Edit window: - 17 LampScan User Manual 4.1 Text recognition On the recognition setting, select the language for input text and the page in range or in page number to be recognized: 4.2 File export A rich number of output file format is made available here. Click Operation to select file export format from the list. You can also specify the number of pages to be export: - 18 LampScan User Manual 4.3 Send e-mail To send capture picture via email is available by selecting E-mail in the Operation list. An email program is opened with the capture picture as the attachment. Complete the email recipient, subject and message field input like normal email task and send. 4.4 Text search Text search is able to navigate through the content within the word recognition document. Type in key words into the search bar and press Search. The result will show a list of file that contains the key words. - 19 LampScan User Manual 4.5 Image edit bar In the image edit bar, you can easily adjust the image using the selected tool. 1-1 1-2 1-3 1-4 1-5 1-6 1-7 1-8 1-1 Rectangular selection button With this selection box, variant in the image of any area you want to operate, and click on the application, the region's image can be saved in the clipboard, you can paste in any area you want to paste 1-2 Color adjustment button Click this button, by adjusting the slider below to adjust the image sharpness, brightness, contrast, saturation and hue to achieve satisfactory results after the click Apply to save the image 1-3 Crop button Click this button, you need to keep the region, variant, and click the application, you can save some of the images you need - 20 LampScan User Manual 1-4 Anti-color button Click this button, click Apply, you can make the current anti-color, black and white on the exchange 1-5 Mirror button Click this button, click Apply, you can make the current picture about the mirror 1-6 Image Rotation button Click this button, drag the slider to adjust the image at any angle of rotation, click Apply to save changes to the image 1-7 Button image binarization Click this button to select automatic binarization, binary image can be made, click Apply to save changes to the image 1-8 Gray button Click this button to generate the current image of the grayscale image, click Apply to save changes to the image - 21 LampScan User Manual 2-1 2-2 2-3 2-4 2-5 2-6 2-1 Character recognition button Use the square symbol to identify the area first. Select the language type and text layout type. Click Apply to show a pop up window with contents of identification. 2-2 Image to the black side buttons Click the button, and click the button below function, you can remove images caused by filming the black side, if the cause misoperation, click the Restore button to restore the original image, click Apply to save the image changes 2-4 Notes tool button Click this button and enter in the text box below the content you want to record, click on the image above you need to record some of that to add notes in the image 2-5 Text Tool button Click this button and enter in the text box below the text you want to add, click on the image above you need to record some of that to add text in the image - 22 LampScan User Manual 2-6 Paintbrush tool button Click the button, and below you to select the color and brush size, you can annotate the image 3-1 3-2 3-3 3-4 3-5 3-6 3-1 Pencil tool button To draw randomly. 3-2 Eraser tool button Click on this button, click on the brush size below and click on applications, you can erase the image above, made before the mark 3-3 Fill tool button Click this button to fill in the image on the color of choice - 23 LampScan User Manual 3-4 Drawing a line button Click this button to fill in the image on the color of choice 3-5 Frame button Click this button, you can frame the image above 3-6 Draw a circle button Click this button to draw a circle in the image above 4.6 Picture Function bar 1 2 3 4 1. 2. 3. 4. 5. 6. 7. 8. 5 6 7 8 9 10 11 12 Previous picture Next picture Best Image Size Original Size Image Narrow Image Zoom Full Screen Playback Counter Clockwise 9. 10. 11. 12. 13. 14. 15. 16. 17. - 24 13 14 Clockwise Image Resizing Undo Redo Print Print Preview Save Save As… Delete 15 16 17 LampScan User Manual 5. Specifications Image sensor 5 Mega pixels Active pixels max 2592*1944 Scan speed one second OSD controlled by software buttons or base buttons USB connection USB 2.0 Illumination 500LUX Operating Temperature -30 to 70 Power consumption 4W Lens material 4G+IR Input voltage 110Vto240V Image resolution 2592*1944,640*480,320*240 output format JPG, PDF, xlsx, doc light source LED Color temperature 5500K pure white Light guide LED number 26pcs camera area A4 Object distance 40CM (A4) Certifications FCC, RoHS, CE, UL Width 2.2KG Height 515MM Lens F number 2.8 - 25