1
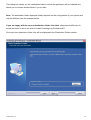
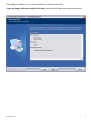
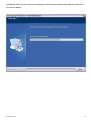
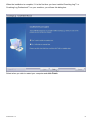
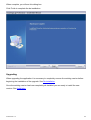
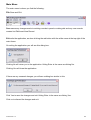
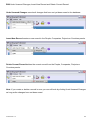
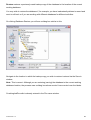
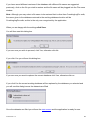
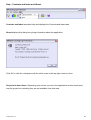
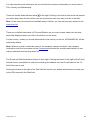
Coaching Log TM Professional v.1.2 Computerised Client Management System For Coaches Quick-Start User Manual The information in this document is subject to change without notice and does not represent a commitment on behalf of Leslie Posner or Pure Coaching. © Leslie Posner 2004 - 2006. All rights reserved. No part of this document may be reproduced, stored or transmitted by any means without written permission from the author. All trademarks and trade names are the properties of their respective owners. Document version 1.0. August 2006. DISCLAIMER. This document is intended as an aid to assist you in your actions with regard to the set-up and use of the Coaching Log™ Professional database version 1.2. We have made every effort to ensure the accuracy of the information contained within this document however, no liability is accepted by Leslie Posner or Pure Coaching for any real or consequential damage or loss of data or information as a result of any actions taken in conjunction with the information contained within this document. Professional v.1.2 i About this document. Objective. The objective of document is to provide assistance to users regarding the installation and use of the Coaching Log™ Professional database. To this end, graphical representations of all steps are presented with supporting textual instructions. Layout. The information in this document includes links giving the reader the possibility to go directly to areas of interest. Getting the most from this document. To get the most from this document, it is suggested you read through it first and get acquainted with the layout and behaviour of the links. This will assist you to easily manage the installation and launch and to find your way round more easily regarding data entry. Professional v.1.2 ii Table Of Contents Installation 1 .NET™ Framework 2 Coaching Log™ 3 De-installing and Upgrading 11 De-installation 11 Upgrading 14 Launching the Application Start Screen Finding Your Way Round 15 16 17 Main Toolbar 17 Main Menu 18 File 18 Save 18 Exit 18 Edit 19 Undo Unsaved Changes 19 Insert New Record 19 Delete Current Record 19 Database Backup 20 Restore 22 Help - Contents and Index and About. Professional v.1.2 20 24 Contents and Index 24 About 24 Greyed out menu items 24 iii Entering Data 25 People 25 Companies 27 My Details 28 Prospects 29 Sessions and Invoices 30 Sessions As Coach/Mentor/Supervisor 30 Coachee/Mentee/Supervisee Invoices 31 Sessions As Coachee/Mentee/Supervisee 32 Coach/Mentor/Supervisor Invoices 33 Training/CPD 34 Projects 35 Drop Down Lists 36 Data Grids Entering Data 37 Date Cells 38 Drop Down List Cells 39 Invoice To: and Invoiced By: Cells 41 Invoice No.: Cells 44 Entering Invoice Data 44 Tying the Invoice to Sessions 46 Notes 49 Deleting Rows Reports 50 51 Sessions Professional v.1.2 37 51 Date Range 52 No Date Range 54 iv Training 55 Personal CPD 56 Personal CPD Cost 58 ICF Credentialing Reports 60 Client Hours 61 Letters of Reference 62 Invoices 63 Coachee/Coach, Mentee/Mentor and Supervisee/Supervisor 64 Single 64 Summary 67 No Date Range 69 Clients and Companies 70 Clients 70 Companies 74 Report Panel Buttons 78 Page Navigation 78 Print 79 Refresh 80 Export 81 Toggle Group Tree 83 Zoom 84 Search Text 85 Report Options 87 Title on Report 87 Address on Report 88 Address on Report – Client Ref. only (Confidentiality) 90 Zip before City 92 Country on Report 93 My Name on Report 94 Professional v.1.2 v Installation Locate the folder in which you saved the downloaded setup executable. Note: If you are installing from CD, locate setup.exe on the CD. All other instructions are the same. Double click the icon adjacent to the filename. This will launch the InstallShield wizard that will guide you through the installation. Professional v.1.2 1 .NET™ Framework Coaching Log Professional™ requires Microsoft® .NET™ 1.1 Framework. If this is not already installed on your machine you will see this dialog box. Click Yes. When you see this dialog box click I agree and then click Install. Once .NET™ installation is complete you will see this dialog box. Click OK. Professional v.1.2 2 Coaching Log™ This takes you to the second part of the installation, the installation of the Coaching Log Professional™ application itself. The next dialog bow you will see is this one. Click Next. Professional v.1.2 3 The next dialog box is the License Agreement. Please read this carefully and only proceed if you accept. Having read the license agreement thoroughly, and only if you accept, click Yes. Professional v.1.2 4 The next dialog box is for you to enter your personal details Note: In order the Next button is activated directly upon entry of the User Name a dash ‘-‘ has been entered by default in the Company Name field. This can be overwritten if you wish to enter your company name. You can install Coaching Log Professional™ for use by all users or only yourself. Note: Any user wishing to use Coaching Log Professional™ must have a user account type of Computer administrator. This application will not function with Limited user account types. If in doubt, check your account type via Control Panel User Accounts. When you have entered your details and selected the user click Next. Professional v.1.2 5 This dialog box shows you the destination folder in which the application will be installed and allows you to choose another folder if you so wish. Note: The destination folder displayed initially depends on the configuration of your system and may be different from the example below. If you are happy with the current destination folder click Next, otherwise click Browse to select the folder in which you wish to install Coaching Log Professional™. Once you have selected a folder, this will be displayed in the Destination Folder window. Professional v.1.2 6 This dialog box allows you to review the details you entered previously. If you are happy with these details click Next, otherwise click Back and correct as required. Professional v.1.2 7 Installation starts and you will see this dialog box with the progress bar indicating the progress of the various stages. Professional v.1.2 8 When the installation is complete, if it is the first time you have installed Coaching Log™ or Coaching Log Professional™ on your machine, you will see this dialog box. Select when you wish to restart your computer and click Finish. Professional v.1.2 9 If you have previously installed Coaching Log™ or Coaching Log Professional™ on your machine you will see this dialog box. Click Finish. Professional v.1.2 10 De-installing and Upgrading De-installation To remove the current version, go to Control Panel, Add or Remove Programs. Once the list is populated, locate Coaching Log/Coaching Log Professional in the list, highlight it by clicking on the name or icon and click the Change/Remove button. Professional v.1.2 11 You will then see this dialog box. Click the ‘Remove’ radio button and click Next You will then see this dialog box. If you are sure you want to completely remove Coaching Log/Coaching Log Professional, click OK Professional v.1.2 12 You will then see this dialog box as the various parts of the application are removed. Professional v.1.2 13 When complete, you will see this dialog box. Click Finish to complete the de-installation. Upgrading When upgrading the application it is necessary to completely remove the existing version before beginning the installation of the upgrade. See De-installation. Once the existing version has been completely de-installed you are ready to install the new version. See Installation Professional v.1.2 14 Launching the Application After installation, Coaching Log Professional™ can be launched via Start/All Programs. The first thing the application does as it starts is to fill the datasets from the database. During this time you will see this dialog box. Professional v.1.2 15 Start Screen Once the datasets have been filled, the application is ready for use and you will see this panel. Professional v.1.2 16 Finding Your Way Round Main Toolbar All areas of the application are accessed via the mail toolbar icons. Moving your mouse over the icons will open a tool tip showing the name of the panel that will be opened when clicking the icon. From left to right these are: Sessions Training People/Prospects Companies Projects Lists My Details Reports Help There are three icons with a downward pointing arrow to their right: Sessions, People and Reports. In the example of the People icon the main icon and downward pointing arrow have separate functions, with the main icon taking you to the People panel and the downward pointing arrow taking you to the Prospects data grid. In the example of the other two icons: Sessions and Reports, the main icon has no function and the downward pointing arrow opens a drop down menu from which you can select your choice. Note: The Sessions menu and Reports menu options regarding Supervision and Mentoring and Reports menu options regarding Company, Client and Contact invoices and are not implemented in this version. Professional v.1.2 17 Main Menu The main menu is where you find the following: File Save and Exit. Save saves any changes made to existing records in panels or data grids and any new records created via Edit Insert New Record. Exit exits the application, as does clicking the red button with the white cross at the top right of the main frame. On exiting the application you will see this dialog box. Clicking No will return you to the application. Hitting Enter is the same as clicking No. Clicking Yes will close the application. If there are any unsaved changes you will see a dialog box similar to this. Click Yes to save the changes and exit. Hitting Enter is the same as clicking Yes. Click no to discard the changes and exit. Professional v.1.2 18 Edit Undo Unsaved Changes, Insert New Record and Delete Current Record. Undo Unsaved Changes cancels all changes that have not yet been saved to the database. Insert New Record creates a new record in the People, Companies, Projects or Countries panels. Delete Current Record deletes the current record from the People, Companies, Projects or Countries panels. Note: If you create or delete a record in error you can roll back by clicking Undo Unsaved Changes as long as the changes have not been saved. Professional v.1.2 19 Database Backup and Restore. Backup makes a backup copy of the current working database to the location you select via this dialog box. On clicking Database Backup you will see a dialog box similar to this. You navigate to the location in which you wish to save the backup copy via the Save in window. It is recommended that you store the backup copy of your working database in a folder that is NOT a sub folder of the folders created by the application during installation, as these folders will be removed during de-installation or re-installation hence you will lose your database backup. The File name is already set to CoachingLogPro.mdb. You can alter the file name if you wish so you can save different versions of the database, say by date, or if you are working with different databases for different activities. The File type is set to Database (.mdb) and should not be altered. When you are happy with the settings click Save. Professional v.1.2 20 If the file name you have set for the backup does not exist in the location you have specified then the backup will be saved and you will see this dialog box If the file name you have set for the backup already exists in the location you have specified then you will see a dialog box similar to this If you a sure that you want to overwrite the existing file click Yes. Otherwise click No and go back to repeat the process. Clicking Yes will replace the existing file with a copy of the current working database. When the backup is complete you will see this dialog box Click OK. Professional v.1.2 21 Restore restores a previously made backup copy of the database to the location of the current working database. You may wish to restore the database if, for example, you have inadvertently deleted a record and want to roll back or if you are working with different databases for different activities. On clicking Database Restore you will see a dialog box similar to this. Navigate to the location in which the backup copy you wish to restore is stored via the Save in window. Note: This is correct. Although you are restoring (saving) the database to the current working database location, the process uses a dialog box where we don’t have control over the labels. CoachingLodPro.mdb is already entered in the File name window. Professional v.1.2 22 If you have saved different versions of the database with different file names as suggested previously, click on the file you wish to restore and the file name will be plugged into the File name window. Note: Although you may select a file name to be restored that is other than CoachingLogPro.mdb, the name given to the database restored to the working database location will be CoachingLogPro.mdb, as this is the only one recognised by the application. When you are happy with the settings click Save. You will then see this dialog box If you are sure you wish to proceed, click Yes, otherwise click No. If you click Yes you will see this dialog box If you are sure you want to replace the current database click Yes, otherwise click no. If you click Yes the current working database will be replaced by the database you selected and you will see this dialog box as the datasets are filled Once the datasets are filled you will see the start screen and the application is ready for use. Professional v.1.2 23 Help - Contents and Index and About. Contents and Index launches Help and displays the Contents and Index tabs. About displays this dialog box giving information about the application Click OK or click the red square with the white cross in the top right corner to close. Greyed out menu items. Depending upon where you are in the application certain menu items may be greyed out indicating they are not available from that area. Professional v.1.2 24 Entering Data Coaching Log Professional™ comes with several dummy records already entered into the database, so you can see what is entered where and generate examples of reports as you find your way round immediately after installation. When you are ready to enter your own information you can either change the information already entered in the dummy records, or delete them and enter your own from scratch. Here we will walk you through the key areas for data entry. People All personal information regarding the people with whom you work, be they Coachees, coaches, clients, prospects, associates, referral partners etc., is entered via the People panel, as are any confidentiality references and the selection of which of the ICF credentialing reports: Client Hours and Letters of Reference, if any, in which you want this person’s details to appear. Professional v.1.2 25 You can enter as much information as you want but the minimum information you must enter is Title, Country and Relationship. There are certain fields with and arrow to the right. Clicking in the field or this arrow will present you with a drop down list from which you can choose the value you want to enter in the field. Note: In the case you cannot find a suitable entry in the list, you can add your own entries to the drop down list. There are no default selections for Title and Relation so you must choose these from the drop down lists displayed when you click in the field or on the arrow. For the country, unless you choose otherwise the first country on the list, AFGHANISTAN, will be entered by default. Note: Where you wish to enter the name of the company a person works for, the company information must first be entered via the Companies panel and the record saved before you can make a selection from the drop down list. The E-mail and Web fields have buttons to their right. Clicking the button to the right of the E-mail field will launch your default e-mail client and plug the address from the E-mail field into the To: field of the new e-mail. Clicking the button to the right of the Web field will launch your default web browser and take you to the URL entered in the Web field. Professional v.1.2 26 Companies This is where you enter all information regarding any companies your Coachees, Coaches, Clients, Associates etc. work for, your own company details and also the details of any training providers you wish to record details of your training with. The minimum information you must enter is Country and, unless you choose otherwise, the first country on the list, AFGHANISTAN, will be entered by default. The Country field has an arrow to the right. Clicking in the field or this arrow will present you with a drop down list from which you can choose the country name you want to enter in the field. The E-mail and Web fields have buttons to their right. Clicking the button to the right of the E-mail field will launch your default e-mail Client and plug the address from the E-mail field into the To: field of the new e-mail. Clicking the button to the right of the Web field will launch your default web browser and take you to the URL entered in the Web field. Professional v.1.2 27 My Details This is where you enter all information regarding yourself. The information in the lower ‘Company’ section of the panel is plugged in when you select your company name from the drop down list and save the record. Note: Before you can select a company name from the drop down list you must first enter the information via the Companies panel and save the record. You can enter as many of these records as you desire, for example, if you have different companies or one company with a number of office locations. The information you enter here will appear on report headers, dependant upon your selection of the various report options. Professional v.1.2 28 Prospects This is where you can record your activities with any prospects prior to them signing up as a Coachee, Client etc. or, in the case you are selecting a Coach, prior to you signing up with them. The information in the top section of the panel is display only and comes from the information you entered in the People panel where you set the relation as Prospect. In this example there is only one record but where there are several records (Prospects) you select the record (Prospect) you wish to enter information for by using the navigation buttons at the bottom of the panel. Once you have navigated to the record for which you want to enter activity details, this information is entered directly into the data grid in the lower half of the panel and is covered in the Data Grids section. Professional v.1.2 29 Sessions and Invoices Sessions As Coach/Mentor/Supervisor This is where you can record the details of all the sessions you have with your Coachees, Mentees and Supervisees. The information in the top section of the panel is display only and comes from the information you entered in the People panel where you set the relation as Coachee. To select the record (Coachee) you wish to enter information for use the navigation buttons at the bottom of the panel. Once you have selected the record for which you want to enter session details, this information is entered directly into the data grid in the lower half of the panel and is covered in the Data Grids section. Professional v.1.2 30 Coachee/Mentee/Supervisee Invoices This is where you can record the details of the invoices you raise for the sessions you have with your Coachees, Mentees and Supervisees. The information in the top section of the panel is display only and comes from the information you entered in the People panel where you set the relation as Coachee. To select the record (Coachee) you wish to enter information for use the navigation buttons at the bottom of the panel. Once you have selected the record for which you want to enter invoice details, this information is entered directly into the data grid in the lower half of the panel and is covered in the Data Grids section. Professional v.1.2 31 Sessions As Coachee/Mentee/Supervisee This is where you can record the details of all the sessions you have with your Coaches, Mentors and Supervisors. The information in the top section of the panel is display only and comes from the information you entered in the People panel where you set the relation as Coach. To select the record (Coach) you wish to enter information for use the navigation buttons at the bottom of the panel. Once you have selected the record for which you want to enter session details, this information is entered directly into the data grid in the lower half of the panel and is covered in the Data Grids section. Professional v.1.2 32 Coach/Mentor/Supervisor Invoices This is where you can record the details of the invoices you receive for the sessions you have with your Coaches, Mentors and Supervisors. The information in the top section of the panel is display only and comes from the information you entered in the People panel where you set the relation as Coach. To select the record (Coach) you wish to enter information for use the navigation buttons at the bottom of the panel. Once you have selected the record for which you want to enter invoice details, this information is entered directly into the data grid in the lower half of the panel and is covered in the Data Grids section. Professional v.1.2 33 Training/CPD This is where you can record the details of all the training and CPD you undertake. The information in the top section of the panel is display only and comes from the information you entered in the Companies panel where you checked the Training Provider checkbox. To select the record (Training Provider) you wish to enter information for use the navigation buttons at the bottom of the panel. Once you have selected the record for which you want to enter session details, this information is entered directly into the data grid in the lower half of the panel and is covered in the Data Grids section. Professional v.1.2 34 Projects This is where you can record the details of any specific projects you may wish to Associate any sessions with in order to add more detail to your records should you wish. The project names entered here can be selected from the drop down list that appears when you click in the Project cell in the Sessions As Coach/Mentor/Supervisor and Sessions As Coachee/Mentee/Supervisee data grids. You select the record (Project) you wish to enter information for by using the navigation buttons at the bottom of the panel. Professional v.1.2 35 Drop Down Lists This is where you can enter any details you wish to see in the drop down lists that appear when you click the buttons on the various panels. Note: To ensure database integrity, it is only possible to add new entries to the lists. It is not possible to alter or delete any entry so, if you make an error, it is not possible to correct it after it has been saved. In view of this, it is recommended that you make a backup copy of your database before adding any entries to these lists. In the event you make a mistake you can roll back simply by restoring the database. To enter data you simply click in the cell in the list in which you want the new data to appear, enter the data and save the record. Professional v.1.2 36 Data Grids On the Prospects, Sessions And Invoices and Training and CPD panels, in order to display the details regarding activities with a prospect, sessions and invoices for a Coachee/Mentee/Supervisee or Coach/Mentor/Supervisor and training/CPD with a training provider in an ‘at a glance’ format, data grids have been used and appear in the lower half of the various panels. The layout of the data grids is similar to that of a spreadsheet as it is comprised of columns and rows, with each row corresponding to a record in the database. Entering Data In order to maintain database integrity a number of the cells in the data grids present the user with calendars or drop down lists from which to select the desired value, similarly to that described previously. With all data grids you can modify the data already entered by clicking on a cell in an existing row and either select a new value from the calendar or drop down list, or enter the new value directly where the cell allows it e.g. session duration, invoice reference number (Ref. No.:), fee and tax amounts, invoice terms, notes etc., or you can create a new record by clicking in a cell in the blank row at the bottom of the data grid. Professional v.1.2 37 Date Cells Clicking in any date cell will open a pop-up calendar. You select the date in the calendar by clicking on it and can scroll through the months by clicking the arrow buttons at the left and right sides of the calendar header. You can scroll quickly through years by clicking the buttons that appear when clicking on the year in the calendar header. Once you click on the date in the calendar, the calendar will disappear and the date will be plugged into the cell you clicked on that opened the calendar. Note: There are some date cells that stay blank once the calendar disappears. The date selected is actually plugged into the cell and will be displayed when you move to the next cell. Professional v.1.2 38 Drop Down List Cells These cells are those where you enter repetitive data e.g. session Type, fee Rate, Currency etc. or where you are required to select from a drop down list of previously entered data e.g. Invoice No. Clicking in any of these cells for the first time will display an empty drop down list box with an arrow button to its right, as shown below. If the drop down list has been displayed previously, the drop down list box will display the first value in the drop down list. Professional v.1.2 39 To select the value to be plugged into the cell, click the arrow button to display the drop down list box and click on the value in the list you want plugged into the cell. The drop down list will disappear leaving the drop down list box with the selected value displayed. The drop down list box will disappear and the selected value will be plugged into the cell when you move to the next cell. Professional v.1.2 40 Invoice To: and Invoiced By: Cells These cells appear in all the Sessions and Invoices ‘Invoices’ data grids and operate similarly to the drop down list cells described earlier in as much as you are required to select the information to be plugged into the cell rather than entering it manually. The difference with these cells is that they first ask whether you are invoicing, or being invoiced by, a company and, as a result of your response, require you to select the company or person you are invoicing, or being invoiced by, from the presented people or company records. Here we will look at the operation of the Invoice To: cell in the Coachee Sessions and Invoices data grid. Clicking in this cell presents you with this dialog box. Professional v.1.2 41 Clicking No takes you to the People panel. Navigate to the record for the person you are raising the invoice for via the navigation buttons at the bottom of the panel and then click OK. You will be returned to the Coachee Sessions and Invoices panel and the person’s last name, as entered in the Last Name field on the People panel, will be plugged into the Invoice To: cell. Professional v.1.2 42 Clicking Yes on this dialog box takes you to the Companies panel. Navigate to the record for the company you are raising the invoice for via the navigation buttons at the bottom of the panel and then click OK. You will be returned to the Coachee Sessions and Invoices panel and the company’s name, as entered in the Name field on the Company panel, will be plugged into the Invoice To: cell. Professional v.1.2 43 Invoice No.: Cells These cells appear in all the Sessions and Invoices ‘Sessions’ data grids and operate similarly to the drop down list cells described earlier in as much as you are required to select the information to be plugged into the cell rather than entering it manually. The operation of these cells is treated separately here as the values appearing in the drop down list are the invoice reference numbers you allocate when entering your invoice data described below. Entering Invoice Data Invoice data is entered via the Sessions and Invoices ‘Invoices’ data grids according whether it is an invoice you are raising for sessions you have had with your Coachee, Mentee or Supervisee or an invoice you have received from your Coach, Mentor or Supervisor for sessions you have had with them. The process is identical except for the name of the invoice date cell that is called Sent for invoices you raise and Received for those you receive. The process for raising an invoice for a Coachee is described below. Professional v.1.2 44 Firstly select the Coachee you wish to enter invoice data for by using the navigation buttons at the bottom of the panel. The minimum amount of data you must enter is: Ref. No., Type, Currency and the Sent date. The Ref. No. cell is a text cell where you can enter information directly and the invoice reference number is any number you wish to assign to your invoice according your internal administration procedures. Type and Currency values are selected from drop down lists and the Sent date is selected from a pop-up calendar as described earlier. # of sessions, Amount, Tax % and Terms are text cells where you can enter information directly. Professional v.1.2 45 Tying the Invoice to Sessions Once you have entered your invoice data and in order the invoice data will appear in the invoice report, it is necessary to tie the invoice to at least one session for this Coachee. Here we have created an invoice reference CE1Inv01 for payment in advance for a series of 4 telephone sessions. Payment has not yet been received. Professional v.1.2 46 To tie this invoice to a session for this Coachee, go to the Coachee Sessions data grid by clicking the Sessions button at the top left of the Coachee Invoices data grid. As this invoice is for sessions yet to be delivered it is necessary to enter data for a new session to tie the invoice to. The minimum amount of data you must enter is: Date and Rate (Rate must be Paid). If the date for the first session of this series of 4 has not yet been fixed simply enter today’s date as this can be altered later. Professional v.1.2 47 Once you have entered your session information click in the Invoice No. cell and select the reference number for the invoice you just created from the drop down list. Now save the record. This invoice will now appear in the invoice reports for this Coachee. To generate an invoice report see Reports Invoices. Professional v.1.2 48 Notes There are several data grids where you will find Notes cells. These cells display the first couple of words of any notes you make in that record so you can see, at a glance, where you have made notes. The notes themselves are entered in a large text field on a separate panel that is accessed either by clicking in the Notes cell in the data grid or by clicking the Notes button above the data grid to the left. Either of these will open a notes field like this. In the above example, notes for sessions with your Coachees, the session date is displayed so you can be sure you are entering notes for the correct session. There is a button to the right of the session date that, when clicked, copies the contents of the notes field to the clipboard, launches your default e-mail Client and creates a new mail addressed to your Coachee into which you can simply paste the notes and click send. Professional v.1.2 49 Deleting Rows To delete a row (record) from the data grid, simply click in the blue oblong to the left of the row you wish to delete. The row is then highlighted as shown below. To delete the selected row simply hit the Delete key on your keyboard and the row will be deleted. Note: The row will only be permanently deleted after you save the record (File Save). If you delete a row by mistake you can restore it simply by clicking Edit Undo Unsaved Changes from the main menu, as long as the record has not already been saved. Professional v.1.2 50 Reports Sessions You can generate session reports By, or for All, Coachee(s), Coach(es), Mentee(s), Mentor(s), Supervisee(s) or Supervisor(s). The By Coachee, By Mentee and By Supervisee reports can be generated with or without session notes. All reports can be limited to a date range or left open reporting all session information. Note: In the example of the By Coachee, Mentee or Supervisee report, the Coachee, Mentee or Supervisee for whom the report will be generated is the one currently selected in the relevant Sessions panel. Here we will generate a Sessions report By Coachee. All other Sessions reports operate in the same way. Professional v.1.2 51 Date Range On selecting the report type you will see a dialog box similar to this, asking you if you wish to select a date range. Clicking Yes will display a panel with two calendars from which you select the start and end dates for the report, in this example 12/8/2005 to 19/8/2005. You set the date in each calendar by clicking on it and can scroll through the months by clicking the arrow buttons at the left and right sides of the calendar header. You can scroll quickly through years by clicking the buttons that appear when clicking on the year in the calendar header. Professional v.1.2 52 When you have selected the dates click OK. The report is generated. The layout of the names and addresses in both the header and detail sections of the report are customisable via Report Options. This will be covered separately later, as will Page Navigation, Print, Refresh, Export, Toggle Group Tree, Zoom and Search Text. Professional v.1.2 53 No Date Range On selecting the report type you will see a dialog box similar to this, asking you if you wish to select a date range. Clicking No will generate the report directly. The layout of the names and addresses in both the header and detail sections of the report are customisable via Report Options. This will be covered separately later as will Page Navigation, Print, Refresh, Export, Toggle Group Tree, Zoom and Search Text. Professional v.1.2 54 Training You can generate reports detailing the training and other development you have undertaken and the cost involved. You control the content of the reports by selecting which details you wish to appear by checking or un-checking the ‘In Report?’ checkbox in the Training and CPD panel data grid. Professional v.1.2 55 Personal CPD This report lists the training and other development you have undertaken grouped by training provider and then by date. It provides details of the number of hours or days of each course, workshop or teleclass etc., the totals by training provider and what qualifications were granted. Professional v.1.2 56 Professional v.1.2 57 Personal CPD Cost This report lists the dates and costs of the training and other development you have undertaken grouped by training provider and then by date. It provides details of the cost of each course, workshop or teleclass etc., currency and totals by training provider. Professional v.1.2 58 Professional v.1.2 59 ICF Credentialing Reports You can simply and easily generate reports detailing the sessions you have had with your Coachees and the letters of reference you have received from them in the format required by ICF for their credentialing process. You control the content of the reports by selecting which Coachee’s details you wish to appear by checking or un-checking the relevant checkboxes at the bottom of the People panel. Professional v.1.2 60 Client Hours This report lists the names, start and end dates of the sessions, the number of hours of Coaching, both paid and pro-bono, and contact information (Phone/email) for the Coachees you selected. These details are sorted by date (ascending). Professional v.1.2 61 Letters of Reference This report lists the names, contact information (Phone/email) and start and end dates of the sessions for the Coachees you selected. These details are sorted by date (ascending). Professional v.1.2 62 Invoices You can generate Single invoices to send to your Coachees, Mentees and Supervisees, or you can generate Summary reports of the invoices you have raised By Coachee, for All Coachees, By Mentee, for All Mentees and By Supervisee or for All Supervisees. You can also generate reports of the invoices you raise for Clients or Companies where your fees are being paid by them rather than the Coachee, Mentee or Supervisee directly. These reports are generated as a Summary but a report for a single session can be generated by limiting the date range. Additionally you can also generate Summary reports of the invoices you receive from your Coaches, Mentors or Supervisors and Companies where the fee is invoiced by a company rather than the Coach, Mentor or Supervisor directly. Note: In the example of the Single invoice and Summary By Coachee, By Mentee and By Supervisee, the Coachee, Mentee or Supervisee for whom the invoice/report will be generated is the one currently selected in the relevant Sessions and Invoices panel. In the case of the Summary reports, both reports can be limited to a date range or left open reporting all raised invoices. Professional v.1.2 63 Coachee/Coach, Mentee/Mentor and Supervisee/Supervisor Single In this example we will look at generating a single invoice for a Coachee though the operation is identical for Mentees and Supervisees. Professional v.1.2 64 When generating a single Coachee invoice you will be requested to select the invoice date via this panel. This date is the date corresponding to the date you entered in the Sent cell on the Coachee Sessions and Invoices panel Coachee Invoices data grid. In this example, 1/8/2005 corresponding to the Sent date for CE1Inv01 as shown above. You set the date in the calendar by clicking on it and can scroll through the months by clicking the arrow buttons at the left and right sides of the calendar header. You can scroll quickly through years by clicking the buttons that appear when clicking on the year in the calendar header. When you have selected the date click OK. The invoice is generated. Professional v.1.2 65 The layout of the names and addresses in both the header and detail sections of the report are customisable via Report Options. This will be covered separately later as will Page Navigation, Print, Refresh, Export, Toggle Group Tree, Zoom and Search Text. Professional v.1.2 66 Summary In this example we will look at generating a Summary invoice for a Coachee though the operation is identical for Mentees, Supervisees, Coaches, Mentors and Supervisors. Client and Company invoices will be treated separately below. When generating a summary of the invoices you have raised either By Coachee or for All Coachees, By Mentee or for All Mentees or By Supervisee or for All Supervisees, in this example By Coachee, you will see a dialog box similar to this asking you if you wish to select a date range. Clicking Yes will display a panel with two calendars from which you select the start and end dates for the report, in this example 1/8/2005 to 29/8/2005. Professional v.1.2 67 You set the date in each calendar by clicking on it and can scroll through the months by clicking the arrow buttons at the left and right sides of the calendar header. You can scroll quickly through years by clicking the buttons that appear when clicking on the year in the calendar header. When you have selected the dates click OK. The summary invoice report is generated. The layout of the names and addresses in both the header and detail sections of the report are customisable via Report Options. This will be covered separately later as will Page Navigation, Print, Refresh, Export, Toggle Group Tree, Zoom and Search Text. Professional v.1.2 68 No Date Range When generating a summary of the invoices you have raised either By Coachee or for All Coachees, By Mentee or for All Mentees or By Supervisee or for All Supervisees, in this example By Coachee, you will see a dialog box similar to this asking you if you wish to select a date range. Clicking No will generate the report directly. Professional v.1.2 69 Clients and Companies These reports are generated as Summary reports but a report for a single session can be generated by limiting the date range. Clients This section enables you to generate reports of invoices you have raised for sessions where a Client is paying your fee rather than the Coachee, Mentee or Supervisee themselves. Reports can be generated By Client or for All Clients. In the case the report is generated By Client, the Client the report will be generated for is the Client currently selected in the People panel. Professional v.1.2 70 When generating a summary of the invoices you have raised either By Client or All Clients, in the above example, By Client, you will see a dialog box similar to this asking you if you wish to select a date range. Clicking Yes will display a panel with two calendars from which you select the start and end dates for the report, in this example 29/8/2005 to 5/9/2005. Clicking No will take you straight to the Reports Dialog box to enter your invoice number and payment terms. Professional v.1.2 71 When generating a report By Client you will see this dialog box allowing you to enter you invoice number and payment terms. This allows you to use the reference numbers in the Sessions and Invoices invoice data grids to identify individual invoices for sessions whilst giving the overall invoice a unique number. Enter your data and click OK. The report will be generated with the invoice number and payment terms set according to the data entered in the above dialog box and the date set according to the system date. Entering -1 in the Payment terms field will result in the Payment Terms on the report being set to Payment received with thanks. Professional v.1.2 72 Clicking Cancel or closing the Reports Dialog box will cause the report to be generated with no invoice number and Payment Terms set to “Net Date of invoice”. If you have already entered data into the Reports Dialog box and generated a report, this data will be retained to save you having to re-enter the same data each time you generate the invoice. To change this data simply enter new data as required. The Reports dialog box will appear empty the first time after starting the application. Generating a report for All Clients will produce a Summary report without invoice number, date or payment terms. This report can be limited by setting a date range. Professional v.1.2 73 Companies This section enables you to generate reports of invoices you have raised for sessions where a Company is paying your fee rather than the Coachee, Mentee or Supervisee themselves. Reports can be generated By Company or for All Companies. In the case the report is generated By Company, the Company the report will be generated for is the Company currently selected in the Companies panel. When generating a summary of the invoices you have raised either By Company or All Companies, in the above example, By Company, you will see a dialog box similar to this asking you if you wish to select a date range. Professional v.1.2 74 Clicking Yes will display a panel with two calendars from which you select the start and end dates for the report, in this example 8/8/2005 to 12/8/2005. Clicking No will take you straight to the Reports Dialog box to enter your invoice number and payment terms. Professional v.1.2 75 When generating a report By Company you will see this dialog box allowing you to enter you invoice number and payment terms. This allows you to use the reference numbers in the Sessions and Invoices invoice data grids to identify individual invoices for sessions whilst giving the overall invoice a unique number. Enter your data and click OK. The report will be generated with the invoice number and payment terms set according to the data entered in the above dialog box and the date set according to the system date. Entering -1 in the Payment terms field will result in the Payment Terms on the report being set to Payment received with thanks. Professional v.1.2 76 Clicking Cancel or closing the Reports Dialog box will cause the report to be generated with no invoice number and Payment Terms set to Net Date of invoice. If you have already entered data into the Reports Dialog box and generated a report, this data will be retained to save you having to re-enter the same data each time you generate the invoice. To change this data simply enter new data as required. The Reports dialog box will appear empty the first time after starting the application. Generating a report for All Clients will produce a Summary report without invoice number, date or payment terms. This report can be limited by setting a date range. Professional v.1.2 77 Report Panel Buttons Page Navigation In the case you generated a report with several pages, you can navigate through the pages by clicking the buttons at the top left of the report panel. Clicking the Goto Page button opens this dialog box Enter the number of the page you want to navigate to and click OK. Professional v.1.2 78 Print You can print your report simply by clicking the Print button. The report will be printed to the printer that is set as the default printer. Professional v.1.2 79 Refresh All reports are generated dynamically from data saved in the database. If the data in a report is not what you require you can simply return to the relevant section, alter the data, save the record and regenerate the report. Refresh is intended to be used to regenerate the report by refreshing it to reflect the new information in the database. However, as the reports in Coaching Log Pro™ rely on various parameters for generation, refresh will ask the user to supply these parameters. As these parameters are not something the user has knowledge of, it is recommended you do not use Refresh but regenerate the report from the reports menu. In the case you do click the Refresh button you will see a dialog box similar to this. If you see this dialog box click Cancel. You will return to the report panel but the report will now be blank. Regenerate the report from the Reports menu. Professional v.1.2 80 Export Reports can be exported as documents of various formats: Adobe Acrobat (*.pdf) Microsoft Excel (*.xls) Microsoft Word (*.doc) Rich Text Format (*.rtf) in order they can be utilised by other applications, for example incorporating into a larger Word document or e-mailing as an attachment. To export a report click the Export Report button. Professional v.1.2 81 You will then see this dialog box. 1. Navigate to the folder to which you wish to export the report via the Save In window. 2. Enter the name you wish to give the report in the File Name window. 3. Select the type of file you wish the report to be exported as from the drop down list in the Save as type window (Adobe Acrobat (*.pdf) is the default selection) and click Save. When the export has been completed you will see this dialog box. Click OK. Professional v.1.2 82 Toggle Group Tree When working with reports that have multiple pages, clicking this button opens a panel to the left of the main panel that contains a tree structure of all the report group headers. You can navigate through the report by clicking on the various group headers in this panel in the same way as you would navigate through a PDF document via the bookmarks. When clicking a header in the group tree panel, the relevant page is displayed in the main panel and the selected group header is highlighted with a red box. Professional v.1.2 83 Zoom The default zoom of the reports is Page Width. Other zoom settings can be selected from the drop down list displayed when clicking the down arrow to the right of the main Zoom button. The zoom setting will return to default on regeneration of the report or generation of a different report. Professional v.1.2 84 Search Text This feature, as the name suggests, allows you to search the report for specific text. Professional v.1.2 85 Clicking the Search Text button displays the Search Text dialog box. Enter the text you wish to search for and click Find Next. If the text you specified is found in the report it is highlighted with a red box. Clicking Find Next again will find the next occurrence of the specified text in the report. Professional v.1.2 86 Report Options The format of the names and addresses in both the report header and detail sections can be customised via the report options. These options are set or un-set by checking and un-checking the relevant checkboxes. Note: When you change an option setting it will take effect the next time you generate a report. All option settings are saved so, once set, they stay set until you change them. Each option is described individually below. Title on Report This option controls whether the title appears before the name either in the header, address sections or, in the case of By Client and By Company Summary reports, in the detail section of the report. In this example the title appears in the address and detail sections but not the header. Professional v.1.2 87 Address on Report Whether the address appears in the header or detail section of the report is controlled in the same way as is the title. In this example it appears in both. Professional v.1.2 88 Professional v.1.2 89 Address on Report – Client Ref. only (Confidentiality) Excepting Client and Company reports, selecting the option ‘Client Ref. only’ replaces the name and address in the address section with the Client reference you entered in the People panel for confidentiality on printed reports. In the case of Client and Company reports, selecting the option ‘Client Ref. only’ replaces the name in the detail section with the Client reference you entered in the People panel for confidentiality on printed reports. The address in the address section remains the full address of the Client or Company If there is no reference associated with the person featured in the details of the report, the Name/Ref field will be blank. Professional v.1.2 90 Professional v.1.2 91 Zip before City This controls whether the postal (ZIP) code appears before or after the city in the addresses either in the header or detail sections. This allows you to correctly display/print addresses where the postal (ZIP) code appears after the city, e.g. UK or before the city e.g. Switzerland. Professional v.1.2 92 Country on Report This option controls whether the country appears in the addresses in either the header or detail section of the report. In this example it appears in both. Professional v.1.2 93 My Name on Report This controls whether your name appears above your address in the header section of the report. In this example it does. Professional v.1.2 94