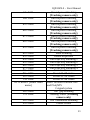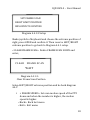
1
IQD10ZS-‐2 High Resolution, Mini Speed Dome CCTV Camera with 10x Optical Zoom User Manual IQD10ZS-‐2 – User Manual Contents 1. 2. 3. 4. 5. Product Introduction ……………………………. 1.1 Features ……………………………………….... 1.2 Function ……………………………………….... 3 Installation …………………………………………….. 8 2.1 Wiring Diagram ……………………………… 2.1.1 Power Supply Connection …….. 2.1.2 Connection of Control Cable …. 2.1.3 Video Connection ………………... 8 8 8 9 Operation …………………………………..…………... 9 Setup of Menu ..………………………………………. 12 4.1 4.2 4.3 4.4 4.5 4.6 4.7 4.8 4.9 3 4 Main Menu …………………………………….. 13 System Information ...……………………… 14 Address Setting ………………………………. 15 Pan Tilt Setting .…………………………….... 16 Trajectory Scan ……………………………… 20 Cruise Setup ……………………..................... 22 Alarm Setup Menu …………………………. 23 Display Setup Menu ..……………………… 24 IR LED Setup Menu …………………………. 25 Trouble Shooting ……………………………………. 27 5.1 5.2 27 28 Trouble Shooting Diagram ….…………... Attention Item .……………………………….. 2 IQD10ZS-‐2 – User Manual 1. Product Introduction 1.1 Features Strong Intelligence Function: • Compatible with PELCO D/P, HIKVISION and DAHUA • Multi-‐protocol. • Recognize 2400, 4800, 9600 Baud Rate. • Automatic recognition for RS 485 control protocol. • Support 3D Positioning Function for the HIKVISION and DAHUA DVR. Strong Horizontal and Vertical Rotation Function: • Max. 360-‐degree/Sec. High-‐speed pan tilt rotation. • Based vector drive technology guarantee the P/T function can be executed at minimum route and make the target distance be more closed. Therefore, it is more true and natural. • Adopt the advance motor ultrafine classification technology, making the minimum rotation speed of pan tilt 0.05 degree/sec. Also makes the video image more accurate and stable under high magnification. Presets, Trajectory Scan, Zones Scan and Continuous Scan • Maximum 256 presets and every preset include magnification of lens and angle position. • It may record and display a 4-‐trajectory scan route and it can include 100 units motion per trajectory. • Set up the left and right border of specified zones pan 3 IQD10ZS-‐2 – User Manual • tilt zoom dome rotate at specified speed. Call the specified special preset can be 360° durative scan. OSD English Menu • Built-‐in OSD and English screen menu allowing the user to modify the info and parameter of the PTZ Dome. • Horizontal/Vertical angle magnification of the lens and presets can be displayed on screen. PTZ Control • Adopt RS485 protocol • 360 degrees horizontal rotation, vertical 90 °rotation. Turn over 180°, continuous monitor, no surveillance blind area. • Horizontal speed 0.05-‐360 degrees, vertical speed 0.05 -‐180 degrees. It can adjust automatically as per lens zoom. 1.2 Function 1 – Setup of address code Any operation commands have the target address code, baud rate and control protocol for related high speed PTZ dome. Single camera can only be committed to commands in conformity with relevant address code, baud rate and control protocol. Our high speed PTZ Dome camera can recognize camera address baud rate and control protocol automatically. 4 IQD10ZS-‐2 – User Manual 2 – Focal length/rotation speed automatic configure technology If the focal length is too long when you touch the PTZ keyboard joystick lightly under the high-‐speed pan tilt rotation, it may let the video image move promptly. This will cause the date to be lost. Our IR High Speed PTZ Dome can adjust the horizontal and vertical speed according to the focal length, making the manual-‐tracking target more convenient. 3 – Turn over automatically User press the joystick of PTZ control keyboard to make the lens tilt down, then turn the lens 90° up after rotating horizontal 180°. Then you can view the back target and achieve 180° continuous surveillance. 4 – Reserve and call preset Preset function can store functions such as pan tilt horizontal angle, slope angle and camera lens focal length into memory. If necessary you can call this parameter and adjust pan tilt and camera lens to this position. User can store and call presets via using PTZ control keyboard and IR controller. The IQD10ZS-2 PTZ Dome has 256 presets. 5 – Lens Control 1)Focal length control User can adjust the range of focal length using PTZ control keyboard or matrix host machine. This will then enable the user to get the complete video or micro image. 5 IQD10ZS-‐2 – User Manual 2)Focus control System will start to focus and zoom by default and then camera lens will focus to center around target view and create a clear image. When you are in control of manual focus, you can to reset auto focus. To do this, just shake joystick of PTZ keyboard. In addition, the user may set a control command or call a preset to reset auto focus. 6 – Iris Control The user can adjust the iris using the PTZ controller keyboard to get the desired illumination of the video. 7 – Night Vision Function (Colour/Black and White) The night vision camera can adjust the CCD illumination automatically according the light exchange under the colour/B/W model. For example, when the light is sufficient during the day, the camera will use colour video. It will transfer to low illumination during the night automatically so that can display clear B/W video. 8 – Auto Cruise The camera can add some presets into auto cruise section and in turn via preset cruise preset sites. Set command of 99 preset or use the idle motion to make the PTZ dome move continuously within certain space of time as per the turn of reserved presets. 6 IQD10ZS-‐2 – User Manual 9 – Trajectory Scanning Trajectory scanning can store operation trajectory via the OSD menu, it can call the reserved scan route via numbers, 84, 85, 86, 87 command or idle motion. 10 – Continuous Scanning Users can set the scan to continuous by setting the command for Number. 98 preset or call it by idle motion. Then, scan circularly in a horizontal position at a desired speed. 11 – Intermittent Scanning Users can set scan to Intermittent by setting the command for Number. 96 preset or call it by idle motion. Then scan circularly at space of time in horizontal position at certain speed. 7 IQD10ZS-‐2 – User Manual 2. 2.1 Installation Instruction Wiring Diagram Power Supply: DC 24V 2000mA Interface Control cable: RS485 Control Video cable: BNC Interface 2.1.1 Power Supply Connection Attention: Please check the voltage rating and electric current is as below, Voltage Rating Range of Voltage Electric Current Rating AC 24V/DC 24V ±5% 2A 2.1.2 Connection of Control Cable PTZ control: Connect RS-‐485 cable to PTZ control keyboard or DVR. If you control more than one camera, the RS-‐485 cable should be set in a parallel position. 8 IQD10ZS-‐2 – User Manual Note: optionally ①The RS-‐485 cable can be connected ②Protocol and baud rate of PTZ control keyboard or DVR can be set optionally. ③Some cameras in CCTV system should set different PTZ dome address. 2.1.3 Video Connection Use the BNC plug to connect the video signal cable. 3. Operation Because of the different system platforms, operation is not completely the same, so you should operate according to user manual. 1) Self-‐check When you turn on the power for PTZ dome, the camera will move in the horizontal and vertical direction. Zoom the lens in and out as far as the camera goes then stop after the motion is achieved. How to control the camera when they rotate in different direction: When you locate a camera, you can control it via the joystick of keyboard. When you move the joystick to be right, the camera will move to right. When you move it in vertical a direction, the camera will move in vertical 9 IQD10ZS-‐2 – User Manual direction. The camera will move in a horizontal and vertical direction after you shake the joystick in diagonal direction. 2) Setup of presets Please set the presets as below, (1) Locate a camera (please see user manual of PTZ keyboard to know details) (2) Operate joystick of keyboard, zoom button, focus button, iris button to adjust video image of camera (3) Press the Arabic numerals button (please input the number of specified preset) +PRESET to store parameter of preset view. Please call presets as below step, (1) Locate a camera. (2) Press Arabic numerals button (please input the number of specified preset) +CALL and the camera will move to preset. Form of preset function Special Preset 95 + CALL XXX + PRESET XXX + CALL 61 + CALL 62 + CALL Function Enter main Menu Reserve Preset XXX Call Preset xxx Run Auto-‐tracking (Tracking camera only) (For Dahua protocol) Tour tracking ( For Dahua protocol) 10 IQD10ZS-‐2 – User Manual 63+ CALL 64+ CALL 65 + CALL 66 + CALL 67 + CALL 68 + CALL 69 + CALL 82 + CALL 83 + CALL 84 + CALL 85 + CALL 86 + CALL 87 + CALL 88 + CALL 89 + CALL 90 + CALL 91+ CALL 96 + PRESET (Under main menu) 96 + CALL 97+ CALL 98 + CALL 99 + CALL Run 63 preset tracking (Tracking camera only) Run 64 preset tracking (Tracking camera only) Run 65 preset tracking (Tracking camera only) Run 66 preset tracking (Tracking camera only) Run 67 preset tracking (Tracking camera only) Run 68 preset tracking (Tracking camera only) Run 69 preset tracking (Tracking camera only) Zone Scanning Delete all presets Call trajectory scanning 1 Call trajectory scanning 2 Call trajectory scanning 3 Call trajectory scanning 4 Preset 1-‐10 cruise Preset 11-‐20 cruise Preset 21-‐30 cruise Preset 31-‐40 cruise Select different camera core and PAL/NTS C signal system 360º gap scanning Tracking cruise (Tracking camera only) 360º continuous scanning Preset Cruise 11 IQD10ZS-‐2 – User Manual 4.0 Setup of Menu When you turn on the power for PTZ dome, the LCD monitor screen will display the OSD Menu as the following; Control protocol: Auto. Serial ports: Auto. Address of PTZ dome 1 The following steps explain how to use the PTZ controller keyboard to control OSD menu. 1) Set No. 95 preset then enter OSD menu. OPEN (Iris on) is the confirmation button, CLOSE (Iris off) is the menu-‐starting button. 2) Enter menu: shake joystick and make the cursor point to the desired menu, then press the OPEN button to the enter menu. 2) Selection of Function: Shake the joystick of keyboard and make the cursor point to the certain function, then press button OPEN to choose. 4) How to choose parameter: shake joystick of keyboard, choose the parameter and press button OPEN to reserve current parameter. 5) How to store setting: press the OPEN button, reserve current setting that is valid under relevant commands. 12 IQD10ZS-‐2 – User Manual 5) How to go back to last menu: press CLOSE button. 7) Exit menu: shake joystick of keyboard and point the curser to option “EXIT”, then press the OPEN button to exit OSD menu. 8) Back to last menu: shake joystick of keyboard and make cursor point to the option “BACK”, then press the OPEN button. Main Menu 4.1 Turn the power on for PTZ Dome, then set the number 95 preset and enter main menu. The screen will display as following; MAIN MENU SYSTEM INFORMATION ADDRESS SETTING MOTION PATTERNS CAMERA CRUISE SETTING ALARM SETTING DISPLAY SET UP SETTING RESTORE FACTORY DEFAULT REBOOT SYSTEM EXIT Diagram 4.1 Main Menu 13 IQD10ZS-‐2 – User Manual Detailed explanation of main menu option • <SYSTEM INFORMATION>: Shows system information • <ADDRESS SETTING>: Select and setup Soft/Hard address and Menu. • <MOTION>: Set menu of presets 11/ 21 • < PATTERNS >: Trajectory scanning menu • < CAMERA>: Lens setting menu • < CRUISE SETTING>: Set presets scanning • < ALARM SETTING>: Set action of alarm • < IR SETTING>: Set menu for IR led • < RESTORE FACTORY DEFAULT >: Restore factory setting • < REBOOT SYSTEM >: Reboot system • < EXIT>: Exit OSD menu 4.2 System Information SYSTEM INFORMATION COM 9600, N, 8,1 ADDRESS 1 SOFTWARE VERSION V5.2 BBACK EXIT Diagram 4.2 System Information Menu 14 IQD10ZS-‐2 – User Manual System information menu: check current information of PTZ Dome. The detailed explanation is as below: • < COM>: Shows baud rate, parity bit, date bit and stop bit. • <ADDRESS>: Shows current Camera ID for PTZ control, 0~255. • < SOFTWARE VERSION >: Shows current software version • < BACK>: Back main menu • < EXIT>: Exit setting of Menu Note: all item of system information menu cannot be modified under this menu. 4.3 Address Setting Address setting menu ADDR SETTING ADDR TYPE HARD ADDR SOFT 25 ADDR HARD 1 BACK EXIT Diagram 4.3: ADDR Setting 15 IQD10ZS-‐2 – User Manual ADDR TYPR: Choose “Addr Type”, then choose address from “Addr Soft”(0-‐255), press button “Exit” and reboot the camera, address was changed to address of “ADDR SOFT”. 4.4 Pan Tilt Setting Pan Tilt setting menu MOTION <SET FRAME SCAN> POWER UP NONE PARK TIME 15s PARK ACTION NONE BACK EXIT Diagram 4.4: Pan Tilt setting menu < SET FRAME SCAN>: setup LEFT/RIGHT extreme position between two presets. Choose < SET FRAME SCAN> to enter: 16 IQD10ZS-‐2 – User Manual FRAME SCAN SET SCAN POSITION Clear FRAME SCAN FRAME SCAN SPEED 16 BACK EXIT Diagram 4.4.1 Set frame Scan < SET FRAME SCAN SCOPE>: setup LEFT/RIGHT extreme position and choose to enter; SET FRAME SCAN LEFT LIMIT POSITION IRIS OPEN TO CONTINUE Diagram 4.4.1.1 Setup Shake joystick of keyboard and choose the extreme position of left, then press OPEN, confirm it and enter below diagram; 17 IQD10ZS-‐2 – User Manual SET FRAME SCAN RIGHT LIMIT POSITION IRIS OPEN TO CONTINE Diagram 4.4.1.2 Setup Shake joystick of keyboard and choose the extreme position of right, press OPEN and confirm it. Then reserve LEFT/RIGHT extreme position to go back to Diagram 4.4.1 setup. < CLEAR FRAME SCAN>: Delete FRAME SCAN SCOPE and enter; CLEAR FRAME SCAN WAIT Diagram 4.4.1.2: Clear Frame Scan Position Setup LEFT/RIGHT extreme position and be back diagram 4.4.1. • < FRAME SPEED>: Set scan motion speed of the PTZ dome and when the number is higher, the motion speed is higher. <Back>: Back last menu <Exit>: Exit menu 18 IQD10ZS-‐2 – User Manual • <POWER UP>: Set menu and set the executed motion before any commands when PTZ dome turn on power. The parameter is as below: NONE: No any motion Preset cruise: Execute presets cruise Continuous scanning: Execute non-‐stop scanning Intermittent scanning: Execute intermittent scanning Zone scanning: Execute zone scanning Preset 1: arrive No.1 preset Preset 8: arrive No.8 preset Trajectory 1: Execute trajectory-‐scanning route 1 Trajectory 2: Execute trajectory-‐scanning route 2 Trajectory 3: Execute trajectory-‐scanning route 3 Trajectory 4: Execute trajectory-‐scanning route 4 • <SET PARKING TIME>: Time setting for executing parking time Parameter range 15s, 1 minute, 2 minutes…59 minutes, 1 hour…12 hours • <SET PARKING ACTION>: Exit menu, within parking time, if the PTZ dome doesn’t receive any commands Parameter explanation of parking action: NONE: No any motion Last motion: Reboot to latest motion automatically. Preset cruise: Execute presets cruise (Will be valid after presets are set.) Continuous scanning: Execute non-stop scanning Intermittent scanning: Execute intermittent scanning Zone scanning: Execute zone scanning Preset 1: arrive No.1 preset 19 IQD10ZS-‐2 – User Manual Preset 8: arrive No.8 preset Trajectory 1: Execute trajectory-scanning route 1 Trajectory 2: Execute trajectory-scanning route 2 Trajectory 3: Execute trajectory-scanning route 3 Trajectory 4: Execute trajectory-scanning route 4 Back: Go back to main menu Exit: Exit menu setting 4.5 Trajectory Scanning Trajectory scanning menu PATTERN PATTERN NUMBER 1 <PROGRAM PATTERN> CLEAR CURRENT PATTERN CLEAR ALL PATTERN BACK EXIT Diagram 4.5 Trajectory scanning menu Trajectory scanning is used to set a clear trajectory-‐scanning route. <PATTERN NUMBER>: Choose trajectory-‐scanning number (range of number is 1~4) <PROGRAM PATTERN>: Set trajectory scanning and enter: 20 IQD10ZS-‐2 – User Manual PROGRAM PATTERN MOVE THE CAMERA TO THE STARTING POSITION “IRIS OPEN” TO CONTINUE Diagram 4.5.1 Edit trajectory scanning route Confirm the trajectory scan start position and enter a figure, see below STORAGE USED <PCT> 1% Shake the joystick on the keyboard and edit the scanning route motion. To start to record the scan route select between motion 1~100. Then press the OPEN button to reserve the setting. Once OPEN has been selected, you will return to the previous screen (Diagram 4.5) • <CLEAR CURRENT PATTERN>: Clear related trajectory scan route • <CLEAR ALL PATTERN>: Clear all trajectory route • <Back>: Be back main menu • <Exit>: Exit menu setting 21 IQD10ZS-‐2 – User Manual 4.6 Cruise Setup Cruise Setup Menu CRUISE SETTING DWELL TIME <SEC> 6 PRESET LIST 1 1 ON 0 OFF 1234567890 <PRESET 1-10> 11111111111 BACK Diagram 4.7 Cruise Setup, Preset Setup Menu Preset cruise can set the lens to execute a preset scanning route automatically by selecting the following options; • DWELL TIME<SECS>: Cruise waiting time between different presets • <PRESET LIST >: Choose the page of cruise preset, there are a total of 30 presets that make cruise, 10 presets per page you can choose that has 3 pages and relevant parameter is 1,2,3, then press button OPEN to confirm. • Confirm the preset of cruise and make cursor point 1234567890 • 111111111 -‐ 1 means choose, 0 means skip • <BACK>: Go back to main menu • <EXIT>: exit menu setting 22 IQD10ZS-‐2 – User Manual 4.7 Alarm Setup Menu Alarm setup menu ALARM SETUP ALARM 1 ACT NONE ALARM 2 ACT NONE ALARM 3 ACT NONE ALARM 4 ACT NONE BACK EXIT • NONE: Not execute any motion • PRESET CRUISE: Execute all presets cruise motion • CONTINUOUS SCANNING: Execute continuous scanning motion • INTERMITTENT SCANNING: Execute intermittent scanning motion • ZONE SCANNING: Execute zone scanning motion • Preset 31 (Only locate alarm setup 1): Arrive NO.31 presets • Preset 32 (Only locate alarm setup 2): Arrive NO.32 presets • Preset 33 (Only locate alarm setup 3): Arrive NO.33 presets • Preset 34 (Only locate alarm setup 4): Arrive NO.34 presets • Trajectory 1:Execute trajectory scanning route 1 • Trajectory 2:Execute trajectory scanning route 2 23 IQD10ZS-‐2 – User Manual • • • • Trajectory 3:Execute trajectory scanning route 3 Trajectory 4:Execute trajectory scanning route 4 <Back>: Back to main menu <Exit>: Exit setup menu 4.8 Display Setup Menu DISPLAY SETUP PRESET LABEL ON ZOOM ON P/T DEG ON BRIGHT DATA OFF IR DATA OFF BACK EXIT Diagram 4.8: Display Setup Menu • <PRESET LABEL>: use to set that when you call presets. If the preset display on the monitor is ON, the preset number will be displayed. OFF means the preset won’t be displayed. • < ZOOM >: Magnification power display. ON means the zoom will be displayed. • < P/T DEG>: Vertical and horizontal angle display. ON means the angle will be displayed. • <BRIGHT DATA>: Light illumination display. ON means illumination is displayed. 24 IQD10ZS-‐2 – User Manual • • • <IR DATA>: IR control data display. ON means IR data is displayed. <BACK>: Go back to main menu <EXIT>: Exit menu setup 4.9 IR LED Setup Menu IR SETTING IR MODE AUTO. IR ON SENS 220 IR OFF SENS 170 IR IRIS MODE 3 BACK EXIT CURRENT VALUE 250 Diagram 4.10: IR LED Setup Menu Use this option control the IR LED levels. • <IR LED CONTROL MODEL>: Use to set control mode of IR LED, such as auto, ON or OFF. • <OPEN IR LED THRESHOLD VALUE>: Use to set threshold value when the IR LED turns on. • <CLOSE IR LED THRESHOLD VALUE>: Use to set threshold value when the IR LED turns off. • <IR LED ILLUMINATION MODEL>: Use to set 25 IQD10ZS-‐2 – User Manual • • • illumination mode of the IR led such as power save mode and manual control mode. < CURRENT THRESHOLD VALUE >: Use to display current threshold value. <BACK>: Go back to main menu. <EXIT>: Exit menu setting. 26 IQD10ZS-‐2 – User Manual 5. Trouble Shooting 5.1 Trouble Shooting Diagram Trouble Possible Reason No action and image when power is on Power cable is connected incorrectly Correct the connection Power is broken Change Bad connection Eliminate connection Out of Incorrect baud rate and control after ID code power up, with image RS485 cable disconnect, short circuit or connect incorrectly Incorrect RS485 cable wiring Video unstable Solution RE-‐set the DIP switch Che3ck RS-‐485 connection cable Check RS-‐485 connection cable RS-‐485 cable is cut off Check RS-‐485 connection cable Video cable has a bad connection Eliminate the bad connection Not enough power going to the camera Change power supply 27 IQD10ZS-‐2 – User Manual 5.2 Attention Item 1. Transportation Do not force, or shake during transportation, storage or installation. 2. Installation Please handle with care, do not press the camera and its parts when you install. Do not turn on the power before you install the dome cover. 3. Power Cable, Video Cable and Control Cable Use the shield wire and do not mix with other cables. 4. Electrical Safety Keep the PTZ dome camera away from high voltage equipment or cable (at least 50 metres), take lightning and surge protection. 5. Clean When you clean the dome cover, please use dry and soft cloth or a neutral cleanser to clean. Don’t use a strong acid-‐based cleanser otherwise risk breaking the cover. 6. The camera must be sealed closely do not spray water or liquid onto parts of the camera as this may cause damage. 28 IQD10ZS-‐2 – User Manual 7. Do not use the PTZ dome camera in extreme temperatures or humidity. The temperature should be -‐25°C~50°C and humidity <90%. 8. Do not install the camera close to the air outlet of an air condition unit. Camera lens will be misty because of water condensation under the below conditions: • Extreme temperature change • A room full of smoke or dust 9. Do not locate the camera towards extremely bright objects such as sunlight or spotlight as this may cause damage to the CCD image sensor. 29