1
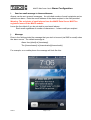
MACE WEBCOMM CARD
ALARM CONFIGURATION
User Guide
DRAFT
Page 1 of 12
MACE WebComm Card:
Alarm Configuration
Introduction
With the introduction of the MACE WebComm card, the MACE FloSeries3 and/or XCi
devices have the ability to upload data to the MACE Data Server on a user-configurable
interval for viewing and retrieval on the MACE website (www.macemeters.com/
www.macusa.com).
With the release of the NEW MACE website in April 2012, the user is able to configure
SMS and email text alarms based on uploaded site data.
Some examples:
1.
An alarm can be configured based on “Flow Rate” to notify the user that a pump has
stopped pumping (when the flow rate is zero).
2.
An alarm can be configured based on “Total” accumulation to notify the user that a
certain amount of water has been pumped.
3.
An alarm can be configured based on “Depth” to notify the user that a river is no
longer deep enough for water to be extracted
4.
An alarm can be configured based on “Rain” accumulation to notify the user that an
amount of rain has fallen.
5.
An alarm can be configured to notify the user that their WebComm card has
“stopped” uploading
Really, the options for alarm configurations are only limited by the sensor/s that the user
has connected to their XCi device.
Warning: As with any cellphone technology, alarms sent from the MACE Data Server
should not be relied upon for “critical” information, particularly in areas with limited
cellphone coverage.
Getting started
This User Guide assumes that a MACE WebComm Card has been installed in a MACE
FloSeries3 or XCi device and has been configured according to the MACE XCI User
Manual available for download from the macemeters.com website.
In order to configure alarms, the device in the field must be commissioned, and at least
one upload must have been received by the MACE Data Server (either from a scheduled
upload or one “forced” by FloCom+). This first upload allows the channel structure to be
assigned by the data server so that the alarm configuration procedure can be followed.
DRAFT
Page 2 of 12
MACE WebComm Card:
Alarm Configuration
Enable alarm usage
1. Login to your www.macemeters.com account.
2. Navigate to the “WebComm settings” tab sheet in “My details”
In this tab sheet, you must:
a)
Enter the SMS phone number at which you wish alarms to be sent.
Warning: You must enter your full phone number including your
country code or SMS alarms WILL NOT work
b)
Enable SMS alarms (if required) by clicking the “Enable” link
c)
Enable Email alarms (if required) by clicking the “Enable” link
3. In order to receive alarms (both SMS and email) you must first buy alarm credits by
clicking on the “Purchase” link and following the directions. If no credit is available on
a user account, alarms will be shown in “Alarm history” as “No credit”. See section
on “Alarm history” for further details.
4. Navigate to the “WebComm” page and the “My Sites” tab sheet will appear listing all
your currently configured WebComm Sites.
5. Open the site for which you wish to configure alarms by clicking the “Site ID” and the
“Site information” page will open.
6. In the “Site details” area of the page click on the “Site alarms” tab sheet
DRAFT
Page 3 of 12
MACE WebComm Card:
Alarm Configuration
Alarm configuration
1. Click on “Add alarm” and a new alarm can be setup.
2. Select the “Alarm type” from the drop-down list and click “Next”:
3. For each alarm type, a form similar to that shown over the page will appear:
a.
Alarm Description:
By default, the description is merely the “Alarm type” transposed. However, this
description can be changed by the user to something more identifiable if desired.
b.
Channel to use for this alarm:
Using the drop-down list of all the channels in your device that are available, select the
channel for which you wish to configure an alarm.
DRAFT
Page 4 of 12
MACE WebComm Card:
c.
Alarm Configuration
Send the alarm when the channel value is above/below:
This is the value of the channel (set point) for which the alarm will be triggered. For
example, if you wish to be notified when the velocity of a stream reaches 1m/s , then this
is the value to enter here.
DRAFT
Page 5 of 12
MACE WebComm Card:
d.
Alarm Configuration
Clear the alarm when the channel value is above/below:
This is the value of the channel for which the alarm will be cleared. For example, if the
stream (mentioned above) triggers an alarm (at 1m/s), then NO further alarms will be sent
for this UNTIL the clear point is reached (say 0.75m/s). After this time, if the stream meets
the alarm conditions again, it will trigger a new alarm. See also point f. below.
e.
Add this value to alarm set point each time the alarm occurs:
For a “Total channel change” alarm, this is the value that will be added to the alarm
trigger point in order to “re-trigger” the alarm. For example, if an irrigation pump has been
started when 0 ML is on the totaliser and you wish to be alarmed whenever there has been
50 ML pumped, the “Send the alarm.....above” should be set at 50 and then the “Add
this value....occurs” should also be set at 50. With this function irrigators can be notified
when to shut off pumps/close gates etc.
f.
After the alarm has been sent disable it for:
When an alarm has been sent, this “Disable” function means that the alarm will not be resent for the period of time selected from the drop-down list. For example, if the
temperature reaches 90 F and you do not wish to be alarmed again for 6 hours , then “6
hours” would be selected from the drop-down list. If the alarm is cleared (via the “Clear”
set point described above) and then re-triggered, an alarm WILL NOT be sent again until
the six hour period is over.
g.
Send an SMS message to these phone numbers:
Alarms can be sent as SMS messages to mobile phones. An unlimited number of phone
number recipients can be added to an alarm. FULL phone numbers including international
country code must be entered in the field provided.
Warning: The recipients of SMS alarms from the MACE Data Server MUST be
registered users of the MACE website.
Leave the form blank if you do not wish to send SMS alarms
h.
Limit SMS message size:
When configuring an alarm, the number of credits used to send the particular alarm can be
ascertained and limited:
Each SMS of 160 characters or less = 1 alarm credit per recipient
Each SMS of 161-306 characters = 2 alarm credits per recipient
Each SMS of 307 - 459 characters = 3 alarm credits per recipient
DRAFT
Page 6 of 12
MACE WebComm Card:
i.
Alarm Configuration
Send an email message to these addresses:
Alarms can be sent as email messages. An unlimited number of email recipients can be
added to an alarm. Enter the email address of the alarm recipient in the field provided
Warning: The recipients of email alarms from the MACE Data Server MUST be
registered users of the MACE website.
Leave the form blank if you do not wish to send email alarms
Each email regardless of number of characters = 1 alarm credit per recipient
j.
Message:
Enter in the field provided the message that you wish to be sent (via SMS or email) when
the alarm occurs. The default message is:
Alarm from [siteid] at [timestamp].
The [channelname] is [channelvalue][channelunits].
For example, on a mobile phone the message will look like this:
DRAFT
Page 7 of 12
MACE WebComm Card:
Alarm Configuration
Warning for users in USA: Users in the USA will receive messages (like the above)
that will give an “Opt-out” option by replying with “STOP”. If this is sent, ALL SMS
alarms for ALL sites on the MACE Data Server will be BLOCKED and SMS alarms
will cease. MACE recommends setting the phone number +18324604711 as a
contact “MACEMETERS” in your cell phone so that you are aware of the SMS origin
and do not reply “STOP” by mistake.
If SMS alarms have been blocked, the user can send a message “SUBSCRIBE” to
the phone number +18324604711 to re-enable.
For example, an email message received will look like this:
4. Once the alarm has been configured click “Save alarm details”.
DRAFT
Page 8 of 12
MACE WebComm Card:
Alarm Configuration
Alarm state
Once alarms have been configured, the alarms will appear on the “Site alarms” tab sheet
with their current “State”.
There are four (4) different alarm states:
a.
Active
The “Active” alarm state occurs when the alarm has been triggered. It will stay in this
state until the alarm is cleared by reaching the “Clear setpoint”. An “Active” alarm will
have the “State” highlighted in a RED box.
b.
Waiting
The “Waiting” alarm state occurs when the alarm trigger point has not yet been met. In
the example above this means that the current temperature is below the “Set point” (21.5
C). When the alarm set point is reached, the alarm state will change to “Active”.
c.
Sleeping
The “Sleeping” alarm state occurs when an alarm has been disabled via the “After ... sent
disable it for” function (Point f. in the section on Alarm Configuration).
d.
Disabled
The “Disabled” alarm state occurs when an alarm has been permanently disabled via the
“Disable this alarm” function available when an alarm is edited. See section on “Edit
alarms” below.
DRAFT
Page 9 of 12
MACE WebComm Card:
Alarm Configuration
Edit alarms
Alarms can be edited after initial configuration by clicking on the hyperlink in the “Alarm
state” field (such as “Active”).
In the “Alarm details” information page, there are four buttons that can be used to:
1. “Remove this alarm” - Will permanently remove the alarm from the site.
2. “Disable this alarm” - Will disable the alarm from the site without removal.
3. “Enable this alarm” - Will enable an alarm that had been disabled by the user.
4. “Edit this alarm” - Allows the alarm values and recipients to be changed if necessary.
5. “Back to alarm list” - Navigates to previous “Site alarms” tab sheet.
DRAFT
Page 10 of 12
MACE WebComm Card:
Alarm Configuration
Alarm history
The “Alarm history” tab sheet provides the user an “audit trail” of the alarms that have
been triggered and their recipients for each “Site”.
Click on the “Timestamp” hyperlink for the alarm of choice and jump to the full details of
the alarm:
DRAFT
Page 11 of 12
MACE WebComm Card:
Alarm Configuration
The “Alarm history” information relates the date/time at which the alarm was set and the
date/time it was reset.
The recipient information tells where the alarm was sent (SMS and/or email) and the
“Status” of the message sent.
NOTE: SMS alarms sent to US recipients are sent to an SMS gateway. A message
that is “received by gateway” has been successfully sent.
DRAFT
Page 12 of 12