1
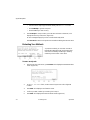
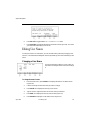
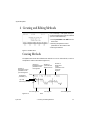
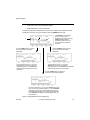
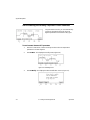
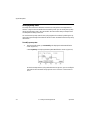
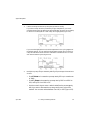
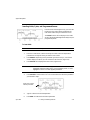
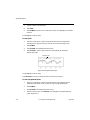
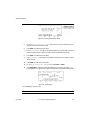
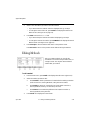
GeneAmp® PCR System 2400 Quick Reference Guide © Copyright 2006, Applied Biosystems All rights reserved. Printed in the United States of America NOTICE TO PURCHASER: PLEASE REFER TO THE GENEAMP® PCR SYSTEM 2400 USER'S MANUAL FOR LIMITED LABEL LICENSE OR DISCLAIMER INFORMATION. The information contained in this document is subject to change without notice. Applied Biosystems makes no warranty of any kind with regard to this material, including, but not limited to the implied warranties of merchantability and fitness for a particular purpose. Applied Biosystems shall not be liable for errors contained herein or for incidental consequential damages in connection with the furnishing, performance, or use of this material. Reproduction or publication of this document in any form or format is prohibited without written permission of Applera Corporation. Applied Biosystems and MicroAmp are registered trademarks of Applera Corporation or its subsidiaries in the U.S. and certain other countries. AmpliTaq, GeneAmp, and AmpliWax are registered trademarks of Roche Molecular Systems, Inc. Applied Biosystems Contents 1 Introduction About This Manual User Attention Words Accessing Functions From the Main Menu Using the Control Panel Using the Keys Selecting a Field Entering Numeric Values A Look at the MicroAmp Disposables Technical Support Contacting Technical Support To Contact Technical Support by E-Mail Hours for Telephone Technical Support To Contact Technical Support by Telephone or Fax To Reach Technical Support Through the Internet To Obtain Documents on Demand 2 Running Methods Selecting a Method Viewing Method Parameters Sorting Methods Searching for Methods by User Name Starting a Run Run Time Screen Profile Viewing Method Information Pausing a Run Stopping a Run Before it Completes Completing a Run Reviewing History of a Run 3 Adding Users Adding a New User Name Entering a User Name April 2001 1-1 1-1 1-1 1-2 1-3 1-4 1-4 1-4 1-5 1-6 1-6 1-6 1-7 1-7 1-11 1-12 2-1 2-1 2-1 2-2 2-3 2-4 2-4 2-5 2-6 2-6 2-7 2-7 3-1 3-1 3-1 i Applied Biosystems Protecting Your Methods Editing User Names Changing a User Name Deleting a User Name 3-2 3-3 3-3 3-4 4 Creating and Editing Methods 4-1 Creating Methods Entering Temperature Control Parameters Modifying Cycles Editing Programmed Pauses Storing Methods Editing Methods Deleting a Method 5 Using Utilities Configuring the Instrument Setting the Time Setting the Date Enabling or Disabling the Optional Printer Turning the Beep On or Off Setting the Pause Time Out Defining the Idle State Setpoint Temperature Defining the Baud Rate for your Printer Port ii 4-1 4-2 4-4 4-14 4-14 4-15 4-16 5-1 5-1 5-2 5-3 5-3 5-4 5-4 5-5 5-5 April 2001 000 I'M INVISIBLE Applied Biosystems 1 Introduction About This Manual IMPORTANT Before using the GeneAmp® PCR System 2400, thoroughly read all the safety information detailed in the Safety and Regulatory Information section in the front of the GeneAmp® PCR System 2400 User’s Manual. This manual contains abbreviated instructions for operating the GeneAmp ® PCR System 2400 thermal cycler. It is not intended for first time users, but for users already familiar with the System 2400. It gives succinct steps for using most of the instrument’s functions. Revision C of this manual documents enhancements made to version 2.0 of the firmware, including programmable up-ramp rates. This manual doesn’t include tutorial information or some of the more detailed information about sample preparation, instrument maintenance, and troubleshooting. This type of information can be found in The GeneAmp® PCR System 2400 User’s Manual. User Attention Words Please note the following user attention words that appear in this manual: April 2001 Note This word is used to call attention to information. IMPORTANT This information is given because it is necessary for correct operation of the instrument. 1 Introduction 1-1 Applied Biosystems Accessing Functions From the Main Menu A few seconds after you turn on the instrument, the Main menu appears. You can access all functions of the System 2400 from the Main menu. If you need to return to the Main menu while using other functions, press F5-Cancel until it appears. 1-2 1 Introduction April 2001 Applied Biosystems Using the Control Panel The System 2400 control panel consists of a display screen and 22 keys. The display screen shows a graphical representation of PCR events before, during, and after a run. You use the keys to enter information into fields on the display screen. IMPORTANT Before running PCR methods, make sure you have properly loaded the sample tray in the System 2400. This ensures proper operation of the heated cover. Display Screen Calculated sample temperature Numeric Keys Highlight Box Soft Keys Stop Key Arrow Keys Enter Key Clear Entry Key Figure 1-1. The System 2400 control panel Note April 2001 If the calculated sample temperature exceeds 50˚C, the word HOT flashes in the upper right corner of the display screen. 1 Introduction 1-3 Applied Biosystems Using the Keys The keys on the control panel have the following functions: Soft Keys (F1-F5) Selects the function specified above the key. The function of each key is defined on the display screen above the key, and is redefined as you view different screens. Stop Key Stops a method while it is running. Arrow Keys Moves the highlight box to different fields on the display screen in the direction of the arrow. Enter Key Enters information typed into a field and advances the highlight box to the next field on a screen. Clear Entry Key (CE) Removes information from a field. Numeric Keys Enters numbers from left to right into a field you highlight. Selecting a Field You use the above keys to edit or perform functions on information in fields. You select a field by moving the highlight box to it. There are two ways to select a field: 1. Use the arrow keys to freely move the highlight box in one of four directions. 2. Press the Enter key and advance the highlight box to the next field. Entering Numeric Values When entering numeric values for temperature control parameters, you do not type decimals or colons. Entered numbers display on the screen from right to left filling across decimal points or colons. For example, to specify 89.0 degrees C, press 8 9 0, then press Enter. Specify all hold times in minutes and seconds, then press Enter. For example, to specify one minute and five seconds, press 1 0 5, then press Enter. 1-4 1 Introduction April 2001 Applied Biosystems A Look at the MicroAmp Disposables The MicroAmp® disposables you can use to prepare samples for the GeneAmp® PCR System 2400 are shown below in Figure 1-2. Cap Installing Tool MicroAmp ®2400 Retainer Eight-strip MicroAmp® Caps MicroAmp® 2400 Full Plate Cover MicroAmp ®2400 Tray Eight-strip MicroAmp® Reaction Tubes. MicroAmp® Reaction Tubes MicroAmp ®2400 Base MicroAmp ® Reaction Tubes with Caps Figure 1-2. MicroAmp disposables for use with the System 2400 For detailed information about the MicroAmp disposables supplied with your instrument, and how to use them for loading and unloading samples, refer to the GeneAmp PCR System 2400 User’s Manual (P/N 0993-6056). April 2001 1 Introduction 1-5 Applied Biosystems Technical Support Contacting Technical Support You can contact Applied Biosystems for technical support by telephone or fax, by e-mail, or through the Internet. You can order Applied Biosystems user documents, MSDSs, certificates of analysis, and other related documents 24 hours a day. In addition, you can download documents in PDF format from the Applied Biosystems Web site (please see the section “To Obtain Documents on Demand” following the telephone information below). To Contact Technical Support by E-Mail Contact technical support by e-mail for help in the following product areas: 1-6 Product Area E-mail address Genetic Analysis (DNA Sequencing) [email protected] Sequence Detection Systems and PCR [email protected] Protein Sequencing, Peptide and DNA Synthesis [email protected] Biochromatography, PerSeptive DNA, PNA and Peptide Synthesis systems, CytoFluor®, FMAT™, Voyager™, and Mariner™ Mass Spectrometers [email protected] LC/MS (Applied Biosystems/MDS Sciex) [email protected] or [email protected] Chemiluminescence (Tropix) [email protected] 1 Introduction April 2001 Applied Biosystems Hours for Telephone Technical Support In the United States and Canada, technical support is available at the following times: Product Hours Chemiluminescence 8:30 a.m. to 5:30 p.m. Eastern Time Framingham support 8:00 a.m. to 6:00 p.m. Eastern Time All Other Products 5:30 a.m. to 5:00 p.m. Pacific Time To Contact Technical Support by Telephone or Fax In North America To contact Applied Biosystems Technical Support, use the telephone or fax numbers given below. (To open a service call for other support needs, or in case of an emergency, dial 1-800-831-6844 and press 1.) Product or Product Area Telephone Dial... Fax Dial... ® 1-800-831-6844, then press 8 1-650-638-5981 1-800-831-6844, 1-650-638-5981 3700 DNA Analyzer DNA Synthesis then press 21 Fluorescent DNA Sequencing 1-800-831-6844, 1-650-638-5981 then press 22 Fluorescent Fragment Analysis (includes GeneScan® applications) Integrated Thermal Cyclers ( ® 877 and Catalyst 800 instruments) 3100 Genetic Analyzer 1-800-831-6844, then press 23 1-650-638-5981 1-800-831-6844, 1-650-638-5981 then press 24 1-800-831-6844, 1-650-638-5981 then press 26 BioInformatics (includes BioLIMS, BioMerge™, and SQL GT™ applications) April 2001 1-800-831-6844, 1-505-982-7690 then press 25 1 Introduction 1-7 Applied Biosystems Product or Product Area Telephone Dial... Fax Dial... Peptide Synthesis (433 and 43X Systems) 1-800-831-6844, then press 31 1-650-638-5981 Protein Sequencing (Procise Protein Sequencing Systems) 1-800-831-6844, 1-650-638-5981 then press 32 PCR and Sequence Detection 1-800-762-4001, then press 1 for PCR, 2 for the 7700 or 5700, 6 for the 6700 or dial 1-800-831-6844, then press 5 1-240-453-4613 Voyager MALDI-TOF Biospectrometry and Mariner ESI-TOF Mass Spectrometry Workstations 1-800-899-5858, then press 13 1-508-383-7855 Biochromatography (BioCAD Workstations and Poros Perfusion Chromatography Products) 1-800-899-5858, then press 14 1-508-383-7855 Expedite Nucleic acid Synthesis Systems 1-800-899-5858, then press 15 1-508-383-7855 Peptide Synthesis (Pioneer and 9050 Plus Peptide Synthesizers) 1-800-899-5858, then press 15 1-508-383-7855 PNA Custom and Synthesis 1-800-899-5858, then press 15 1-508-383-7855 FMAT 8100 HTS System and Cytofluor 4000 Fluorescence Plate Reader 1-800-899-5858, then press 16 1-508-383-7855 Chemiluminescence (Tropix) 1-800-542-2369 (U.S. 1-781-275-8581 only), or 1-781-271-0045 Applied Biosystems/MDS Sciex 1-8 1-800-952-4716 1 Introduction 1-650-638-6223 April 2001 Applied Biosystems Outside North America Telephone Dial... Region Fax Dial... Africa and the Middle East Africa (English Speaking) and West Asia (Fairlands, South Africa) 27 11 478 0411 27 11 478 0349 South Africa (Johannesburg) 27 11 478 0411 27 11 478 0349 Middle Eastern Countries and North Africa (Monza, Italia) 39 (0)39 8389 481 39 (0)39 8389 493 Eastern Asia, China, Oceania Australia (Scoresby, Victoria) 61 3 9730 8600 61 3 9730 8799 China (Beijing) 86 10 64106608 86 10 64106617 Hong Kong 852 2756 6928 852 2756 6968 Korea (Seoul) 82 2 593 6470/6471 82 2 593 6472 Malaysia (Petaling Jaya) 60 3 758 8268 60 3 754 9043 Singapore 65 896 2168 65 896 2147 Taiwan (Taipei Hsien) 886 2 2358 2838 886 2 2358 2839 Thailand (Bangkok) 66 2 719 6405 66 2 319 9788 Austria (Wien) 43 (0)1 867 35 75 0 43 (0)1 867 35 75 11 Belgium 32 (0)2 712 5555 32 (0)2 712 5516 Czech Republic and Slovakia (Praha) 420 2 61 222 164 420 2 61 222 168 Denmark (Naerum) 45 45 58 60 00 45 45 58 60 01 Finland (Espoo) 358 (0)9 251 24 250 358 (0)9 251 24 243 France (Paris) 33 (0)1 69 59 85 85 33 (0)1 69 59 85 00 Germany (Weiterstadt) 49 (0) 6150 101 0 49 (0) 6150 101 101 Hungary (Budapest) 36 (0)1 270 8398 36 (0)1 270 8288 Italy (Milano) 39 (0)39 83891 39 (0)39 838 9492 Norway (Oslo) 47 23 12 06 05 47 23 12 05 75 Poland, Lithuania, Latvia, and Estonia (Warszawa) 48 (22) 866 40 10 48 (22) 866 40 20 Europe April 2001 1 Introduction 1-9 Applied Biosystems Region Telephone Dial... Fax Dial... Portugal (Lisboa) 351 (0)22 605 33 14 351 (0)22 605 33 15 Russia (Moskva) 7 095 935 8888 7 095 564 8787 South East Europe (Zagreb, Croatia) 385 1 34 91 927 385 1 34 91 840 Spain (Tres Cantos) 34 (0)91 806 1210 34 (0)91 806 1206 Sweden (Stockholm) 46 (0)8 619 4400 46 (0)8 619 4401 Switzerland (Rotkreuz) 41 (0)41 799 7777 41 (0)41 790 0676 The Netherlands (Nieuwerkerk a/d IJssel) 31 (0)180 331400 31 (0)180 331409 United Kingdom (Warrington, Cheshire) 44 (0)1925 825650 44 (0)1925 282502 All other countries not listed (Warrington, UK) 44 (0)1925 282481 44 (0)1925 282509 Japan Japan (Hacchobori, Chuo-Ku, Tokyo) 81 3 5566 6230 81 3 5566 6507 Latin America Del.A. Obregon, Mexico 1-10 305-670-4350 1 Introduction 305-670-4349 April 2001 Applied Biosystems To Reach Technical Support Through the Internet We strongly encourage you to visit our Web site for answers to frequently asked questions and for more information about our products. You can also order technical documents or an index of available documents and have them faxed or e-mailed to you through our site. The Applied Biosystems Web site address is http://www.appliedbiosystems.com/techsupp To submit technical questions from North America or Europe: Step Action 1 Access the Applied Biosystems Technical Support Web site. 2 Under the Troubleshooting heading, click Support Request Forms, then select the relevant support region for the product area of interest. 3 Enter the requested information and your question in the displayed form, then click Ask Us RIGHT NOW (blue button with yellow text). 4 Enter the required information in the next form (if you have not already done so), then click Ask Us RIGHT NOW. You will receive an e-mail reply to your question from one of our technical experts within 24 to 48 hours. April 2001 1 Introduction 1-11 Applied Biosystems To Obtain Documents on Demand Free, 24-hour access to Applied Biosystems technical documents, including MSDSs, is available by fax or e-mail or by download from our Web site. To order documents... Then... by index number a. Access the Applied Biosystems Technical Support Web site at http://www.appliedbiosystems.com/techsupp b. Click the Index link for the document type you want, then find the document you want and record the index number. c. Use the index number when requesting documents following the procedures below. by phone for fax delivery a. From the U.S. or Canada, call 1-800-487-6809, or from outside the U.S. and Canada, call 1-858-712-0317. b. Follow the voice instructions to order the documents you want. Note through the Internet for fax or e-mail delivery There is a limit of five documents per request. a. Access the Applied Biosystems Technical Support Web site at http://www.appliedbiosystems.com/techsupp b. Under Resource Libraries, click the type of document you want. c. Enter or select the requested information in the displayed form, then click Search. d. In the displayed search results, select a check box for the method of delivery for each document that matches your criteria, then click Deliver Selected Documents Now (or click the PDF icon for the document to download it immediately). e. Fill in the information form (if you have not previously done so), then click Deliver Selected Documents Now to submit your order. Note There is a limit of five documents per request for fax delivery but no limit on the number of documents you can order for e-mail delivery. 1-12 1 Introduction April 2001 100 I'M INVISIBLE Applied Biosystems 2 Running Methods The GeneAmp®PCR System 2400 runs PCR samples according to stored methods. You can run methods by: 1. Pressing F1-Run from the Main menu (Figure 2-1) 2. Selecting a Method 3. Starting a Run. Figure 2-1. The Main menu Selecting a Method You select a method by moving the highlight box to a method listed on the Stored Methods screen (Figure 2-2). If you need help deciding which method to select you can: view method parameters, sort methods by different categories, or search for a method by user name. Figure 2-2. The Stored Methods screen Viewing Method Parameters Note There are four predefined methods stored under user <<ab>> that you can select and run, or edit, modify, and store under a new name. To view parameters of a method before running: 1. April 2001 From the Main menu, press F1-Run. This displays the Stored Methods screen (Figure 2-2). 2 Running Methods 2-1 Applied Biosystems 2. Press F2-View. This displays all the parameters of a method. After reviewing pre-PCR, PCR and post PCR parameters of a stored method, you can either press F1-Start and start the method, or press F5-Cancel and return to the Stored Methods screen (Figure 2-2). Note You can not edit parameters from the View Method screen. Sorting Methods If you have a large number of stored methods, you can sort them by name, date last used, date stored and size. To sort stored methods by different criteria: 1. From the Stored Methods screen, press F4-Sort. This displays the Sorting Criteria screen. Figure 2-3. The Sorting Criteria screen 2. 3. Use the up and down arrow keys to select the type of sort: • Method Name sorts methods alphabetically. • Date Last Used sorts methods chronologically in descending order by date of use (The last method used is listed first). • Date Stored sorts methods chronologically by date stored (The last method stored is listed first). • Method Size sorts methods in increasing order by the amount of memory used to store each file (The largest size method is listed first). Press F1-Accept to accept a selection. This returns you to the Stored Methods screen where the displayed methods are sorted according to your selection in step 2. Press F5-Cancel to return to the previous screen. 2-2 2 Running Methods April 2001 Applied Biosystems Searching for Methods by User Name You can find any method that has been stored under a user name. To search for methods by different user names: 1. From the Stored Methods screen, press F3-User. This displays the Search for Methods screen. Figure 2-4. The Search for Methods screen All user names that have methods stored under them, display in a 4 x 5 matrix. Note 2. • • You can not add, delete, or modify a user name from this screen. Choose how you want to search for a particular method: List the methods of a particular user a. Use the arrow keys to select the appropriate user name. b. Press F1-Accept to accept a selection. This returns you to the Stored Methods screen which now displays the methods of the user you selected. List all methods currently stored on the instrument • Press F2-All to list all methods currently stored on the instrument. Press F5-Cancel to return to the Main menu. April 2001 2 Running Methods 2-3 Applied Biosystems Starting a Run You can start a run after you select a stored method from the Stored Methods screen (see Figure 2-2). To start a run: 1. From the Main menu, press F1-Run to display stored methods. 2. Use the up and down arrow keys to select the method you want to run. 3. Press F1-Start. This displays the Reaction Volume screen (Figure 2-5). Figure 2-5. The Reaction Volume screen a. If the displayed reaction volume is the same as your reaction volume, go to step 4. b. If the displayed reaction volume differs from your reaction volume, enter the volume of your reactions (5-100 µL) in the Reaction Volume field. To clear an entry, press the CE key. 4. Press F1-Start to start a run. When the heated cover reaches 103˚ C, the Run Time screen displays and the method you selected starts running. Press F5-Cancel to return to the previous screen. Run Time Screen Profile The Run Time screen displays the method currently running. You can chart the progress of a run by viewing the Run Time screen at any time during the run. The Run Time screen displays the executing segment, and the next segment to execute (Figure 2-6). 2-4 2 Running Methods April 2001 Applied Biosystems Horizontal lines flash as Cycles count up when run Calculated sample temperature updated hold times decrement is in PCR segment as run progresses Temperature parameters are displayed above the graph PPr P Ramps flash when system is approaching next temperature value HOT displays when the sample block exceeds 50˚ C Right or left arrows appear on either side of display if method is scrollable in that direction Post-PCR hold times of 99:00 or greater display as ∞ Hold times are displayed below the graph Pre-PCR segment PCR segment Post-PCR segment Figure 2-6. Run Time screen profile From the Run Time screen, you can: • View method information • Pause a run • Stop a run before it completes. Viewing Method Information At any time during a run, you can display information about the method currently running. Figure 2-7. The Method Information screen. To view information about a method during a run: 1. Start a run. 2. Press F4-Info. This displays the Method Information screen(Figure 2-7). Press F4-Return to return to the Run Time screen. April 2001 2 Running Methods 2-5 Applied Biosystems Pausing a Run At any time during a run, you can manually pause a run for a ten minute period of time. Setting the Pause Time Out on page 5-4 describes how to specify a time period for a pause. To Pause a Run: 1. Start a run. 2. From the Run Time screen, press F1-Pause. For the duration of the pause, your samples will remain at the temperature of the instrument when you paused the run. The time remaining in a pause is displayed at the bottom of the screen in minutes:seconds format. It decrements to zero, and the paused run resumes at the point where you paused it. Press F1-Pause again to resume running a method before a pause expires. Stopping a Run Before it Completes The Stop Run screen appears when you stop a run before completion of a method (Figure 2-8). Figure 2-8. The Stop Run screen To stop a run before completion of a method: 1. Press the Stop key. This displays a Stop confirmation screen. The run pauses for the pre-programmed period of time. When the pause time expires, the run will abort. You can resume the run by pressing F1-Resume. 2. Press the Stop key again. This stops a run and displays the Stop Run screen. At this time you can: 2-6 • Press F1-Hist and review the history of the run • Press F5-Exit and return to the Main menu • If you have not yet stored the method that was running, you can press F2-Store. This displays the Store screen. 2 Running Methods April 2001 Applied Biosystems If any errors occur during a run, the message Exception occurred, check history file displays. You can review the history file by pressing F1-Hist (See Reviewing History of a Run below). Completing a Run When a method completes running, the instrument will beep unless you turned off the beep when configuring the instrument. At completion of a run, the Post Run screen displays(Figure 2-9). From the Post Run screen, you can perform the same functions as you can after stopping a run. Figure 2-9. The Post Run Screen Reviewing History of a Run You can review a record of the events and errors that occurred during a run by displaying the History File screen (Figure 2-10). Figure 2-10. The History File screen To review the history of a run: 1. From the Stop screen or the Post Run screen, press F1-Hist to display the History File screen. 2. Press F2-PageUp to page up or F3-PageDn to page down through the record. If the run completes without any errors or exceptions, then the PageUp or PageDn soft keys do not display. April 2001 2 Running Methods 2-7 Applied Biosystems To print the record, press F4-Print. Note You can only print a record if you have installed and configured a printer. Press F5-Cancel to return to the previous screen. 2-8 2 Running Methods April 2001 200 I'M INVISIBLE Applied Biosystems 3 Adding Users The GeneAmp® PCR System 2400 stores methods by user’s names. You can add your name to a list of users by: • Adding a new user name, or • Editing an existing user name. Figure 3-1. The Main menu Adding a New User Name You can add up to 19 different user names to the instrument by: 1. Pressing F5-User from the Main menu 2. Entering a user name 3. Protecting your methods. You can then store methods under user names. Figure 3-2. The User Name screen To add a new user name: 1. From the Main menu, press F5-User. This displays the Select User Name screen. 2. Press F2-New. This displays the User Name screen(Figure 3-2). Entering a User Name To enter a user name: 1. April 2001 In the User Name field, enter a alphanumeric name up to six characters in length: a. Use the arrow keys to select a character in the list shown in the upper right portion of the screen. b. Press Enter to put the character in the field. 3 Adding Users 3-1 Applied Biosystems 2. • Use the numeric keys to type numbers directly into the User Name field. • Press F3-Backsp to go back one space. • Press the CE key to clear an entry. Press F1-Accept to accept a name (you must enter at least one character). This displays the Security Code screen (Figure 3-3). An error message displays if you enter a name that already exists. Press F5-Cancel to return to the previous screen without adding the new user name. Protecting Your Methods To protect a method, you can enter a Personal Identification Number (PIN) and prevent other users from accidentally overwriting or deleting methods you store under a user name. Figure 3-3. Security Code screen To enter a security code: 1. From the Security Code screen, press F3-PIN#. This displays the New PIN Number screen (Figure 3-4). Figure 3-4. The New PIN Number screen 3-2 2. In the New PIN Number field, use the numeric keys to enter a four digit PIN number. 3. Press Enter. This displays a confirmation screen. 4. Confirm your PIN number by re-entering it as in step 2. 5. Press Enter. This displays the Protection Status screen(Figure 3-5). 3 Adding Users April 2001 Applied Biosystems Figure 3-5. The Protection Status screen 6. Press F4-Lock to toggle between a Locked and Unlocked state. 7. Press F1-Accept. This displays the Select User Name screen(Figure 3-6). The name you entered should display on the screen. Editing User Names To add your name to an instrument, you can also edit existing names by changing a user name or, if 19 names have already been entered, by deleting a user name and adding a new name. Changing a User Name If you know the PIN number for a user name, you can use the arrow keys to select a name, and change it. Figure 3-6. The Select User Name screen To change the name of a user: April 2001 1. From the Main menu, press F5-User. This displays the Select User Name screen (Figure 3-6). 2. Use the arrow keys to select the name you want to change. 3. Press F3-Edit. This displays the Security Check screen. 4. Type in the four digit PIN number of the user name you selected. 5. Press Enter. This displays the Security Code screen(Figure 3-3). 6. Press F2-Name to display the User Name screen (Figure 3-2). 3 Adding Users 3-3 Applied Biosystems 7. Press the CE key to clear the previous name. 8. Enter a new user name. 9. Press F1-Accept. This displays the Security Code screen again. You can either protect your method, or press F1-Accept again and accept the new name without a PIN#. This displays the Select User Name screen, showing the changed name. Deleting a User Name If there are not any methods stored in a directory, you can delete the user name from the Select User Name screen. To delete a user name: 1. From the Main menu, Press F5-User. 2. Use the arrow keys to select a user name. 3. Press Enter. 4. Press F4-Delete to delete the name. This removes the name from the Select User Name screen. 3-4 3 Adding Users April 2001 300 I'M INVISIBLE Applied Biosystems 4 Creating and Editing Methods In the GeneAmp® PCR System 2400, you run all PCR samples according to methods you can Create and Edit by: 1. Pressing F2-Create or F3- Edit from the Main menu 2. Entering temperature control parameters on the Create screen 3. Storing the method. Figure 4-1. The Main menu Creating Methods The System 2400 comes with a default PCR method. You can run this method, or use it as a template to create a new method (Figure 4-2). Number of Number of temperature control cycles the PCR parameters in the segment will run PCR segment Number of temperature control parameters in the pre-PCR segment Number of temperature control parameters in the post-PCR segment Temperature parameter (˚C) Up ramp Hold time parameter Pre-PCR segment PCR segment Post-PCR segment Figure 4-2. Create screen default method April 2001 4 Creating and Editing Methods 4-1 Applied Biosystems 1. From the Main menu, press F2 -Create. This displays the Create screen (Figure 43). 2. From the Create screen, you can: Figure 4-3. The Create screen • Press F1-Start and start running the default method • Press F2-Store and store the method under a user name • Press F3-Print and print the method. Note You can only print a record if you have installed and configured a printer when setting up the instrument. • Enter temperature control parameters on the Create screen and create a new method. • Press F4-More to display functions for modifying created methods. The F4-More key only displays when you select a time or temperature parameter. • Press F5-Cancel to return to the previous screen. Left and right arrows display on the Create screen when the method exceeds the screen display. To scroll, you can use the arrow keys, or press the Enter key repeatedly. Entering Temperature Control Parameters When you enter temperature control parameters, you define values for parameters in each of the three segments of a method: pre-PCR, PCR, and post-PCR (Figure 4-2). You enter all temperature control parameters on the Create screen by selecting fields and using the numeric keys to type in values. Pressing Enter accepts a value, and selects fields on the screen. 4-2 4 Creating and Editing Methods April 2001 Applied Biosystems Defining Pre-PCR Holds When you first display the Create screen, the Hld field is highlighted. The Hld field defines the number of holds for the pre-PCR segment of your method. To define pre-PCR holds: 1. In the Hld field, type in the number of pre-PCR holds for your method. 2. Press Enter to select the first pre- PCR temperature parameter. 3. Type in a temperature value between 4.0˚ C and 99.9˚ C. 4. Press Enter to select the first pre- PCR hold time parameter. 5. Type in a hold time value between 00:00 and 98:59 (minutes:seconds). 6. Press Enter. This selects the next temperature parameter. 7. Repeat steps 3 through 6 until you have time and temperature values for each of the pre-PCR hold parameters you defined in step 1. Use the CE key to clear an entry. Press F5-Cancel to return to the Main menu. Defining PCR Parameters The Tmp field on the Create screen defines the number of temperature control parameters in the PCR cycling segment of your method. To define PCR parameters: 1. Select the Tmp field. 2. In the Tmp field, type in the number of temperature control parameters (1-6) for one cycle of your method. Three temperature PCR is the typical setting for most PCR reactions. 3. Press Enter. This selects the Cycles field. In this field you specify the number of times you want the PCR cycling segment of your method to run. April 2001 4. In the Cycles field, type in the number of cycles you want your method to run (2-99). Twenty-five cycles is the default setting. 5. Press Enter. This selects the first PCR temperature parameter. 6. Type in a temperature value between 4.0˚C and 99.9˚ C. 7. Press Enter to select the first PCR hold time parameter. 4 Creating and Editing Methods 4-3 Applied Biosystems 8. Type in a hold time value between 00:00 and 98:59 (minutes:seconds). 9. Press Enter. This selects the next temperature parameter. 10. Repeat steps 6 through 9 until you have time and temperature values for each of the temperature control parameters you defined in step 2. Use the CE key to clear an entry. Press F5-Cancel to return to the Main menu. Defining Post-PCR Holds The Holds field on the Create screen defines the number of temperature control parameters in the post-PCR segment of your method. To define post-PCR holds: 1. Select the Holds field. 2. In the Holds field, type in the number of post-PCR steps for your method. 3. Press Enter to select the first post-PCR temperature parameter. 4. Type in a temperature value between 4.0˚C and 99.9˚ C. 5. Press Enter to select the first post-PCR hold time parameter. 6. Type in a hold time value between 00:00 and 98:59 (minutes:seconds). The hold time ∞ indicates a hold that lasts indefinitely. You can enter a ∞ hold time, by typing a hold time value of 99:00 or greater. 7. Press Enter. This selects the next temperature parameter. 8. Repeat steps 4 through 7until you have time and temperature values for each of the post-PCR hold parameters you defined in step 2. Use the CE key to clear an entry. Press F5-Cancel to return to the Main menu. Modifying Cycles In addition to customizing values for PCR temperature control parameters, you can use the More function on the create screen and access cycle modification functions that allow you to: 4-4 • Auto-increment/decrement time and temperature parameters • Modify up-ramp rates in the cycling segment of a method 4 Creating and Editing Methods April 2001 Applied Biosystems • Insert holds, cycles, and programmed pauses • Delete temperature control parameters. The time or temperature parameter you select on the create screen, determines which modification function you can access when you Press F4-More (Figure 4-4). 2. 1. 3. 1. Press F4-More with a pre-PCR time or temperature parameter highlighted. From the above screen, you can press F2-Insert and insert holds, cycles and programmed pauses, or F3-Delete and delete the selected temperature control parameters. The F4-More soft key displays when you select a time or temperature parameter. Pressing F4-More displays different modification options when you select parameters in different segments. 3. Press F4-More with a post-PCR time or temperature parameter highlighted. From the above screen, you can press F2-Insert and insert holds, cycles and programmed pauses, or F3-Delete and delete the selected temperature control parameters. 2. Press F4-More with a PCR time or temperature parameter highlighted. From the screen above, you can press F2-Insert and insert holds, cycles and programmed pauses, or press F1-Modify and modify cycling by auto-extending/decrementing time and temperature parameters, or by selecting up-ramp rates. Press F3-Delete and delete the selected temperature control parameters. Figure 4-4. Using the More function to modify cycling April 2001 4 Creating and Editing Methods 4-5 Applied Biosystems Auto-incrementing/decrementing Temperature Control Parameters Using the AutoX function, you can automatically increase or decrease the values for any PCR segment parameter a fixed amount every cycle. Figure 4-5. The AutoX screen. To auto-increment/decrement PCR parameters: 1. From the Create screen, use the arrow keys to select a time or temperature parameter in the PCR segment. 2. Press F4-More. This displays the Modify screen(Figure 4-6). Figure 4-6. The Modify screen 3. Press F1-Modify. This displays the Select Modification screen (Figure 4-7). Figure 4-7. The Select Modification Screen 4-6 4 Creating and Editing Methods April 2001 Applied Biosystems 4. Press F1-AutoX. This displays the AutoX screen (Figure 4-8). Figure 4-8. The AutoX screen Note 5. Note 6. If a programmed pause has been inserted, the AutoX screen will display the pause, but you can not modify it from the AutoX screen. Select the PCR time or temperature parameter that you want modified when you run your method. From the AutoX screen, you can not modify the number of parameters in each segment or the number of cycles. Use the numeric keys to type in the fixed amount that you want the value of the parameter to increase or decrease each time your method completes a cycle. Values for times can be between 0:01 and 9:59 (minutes:seconds). Values for temperatures can be between 0.1 and 9.9˚C. 7. Press F2 + to increase the value every cycle. (A plus sign displays in the current field.), or Press F3 — to decrease the value every cycle. (A minus sign displays in the current field.) An asterisk * appears on the AutoX screen and the Modify screen for parameters that will be modified as the method runs. 8. Press F1-Accept to accept all entries on the AutoX screen. Use the CE key to clear an entry. Press F5-Cancel to cancel all entries and return to the previous screen. April 2001 4 Creating and Editing Methods 4-7 Applied Biosystems Modifying Ramp Rates The ramp time is the time it takes the instrument to change from one temperature to another. Using functions accessible from the Modify screen you can modify the up-ramp rate of the instrument; that is, the rate at which the instrument heats your samples from one temperature setting to the next. You can decrease up-ramp rates for the cycling segment of a method, by defining the upramp rate as a percentage of its maximum rate of increase. The default maximum up-ramp rate is 100%. To modify up-ramp rates: 1. From the Modify screen, press F1-Modify. This displays the Select Modification screen (Figure 4-7). 2.Press F2_Ramp. This displays the Ramp Rate Modification screen (Figure 4-9). Figure 4-9. The Ramp Rate Modification screen For the three temperature cycling method shown in Figure 4-9, you can modify the rate at which the instrument ramps up from 72.0°C to 94.0°C or from 55.0°C to 72.0°C. 4-8 4 Creating and Editing Methods April 2001 Applied Biosystems 3. Use the arrow keys to select an up-ramp that you want to modify. If you select a ramp rate value preceded by a higher temperature, you cannot modify the down-ramp rate. Note that ramp modification functions do not display for the F2 or F3 softkeys when a down ramp rate is highlighted (Figure 4-10). Figure 4-10. Selection of a down-ramp rate If you move the highlight box to the third temperature in the cycling segment of the default method, you can modify the highlighted up-ramp rate. The third upramp rate defines the rate at which the instrument increaes from 55°C to 72.0°C each time the method cycles (Figure 4-11). Figure 4-11. Selection of an up-ramp rate 4. Modify the up-ramp rate you selected by defining it as percentage of the maximum of 100%: • Press F2-Faster to increase the up-ramp rate by 10% up to a maximum of 100%. • Press F3_Slower to decrease the up-ramp rate by 10% from 100% to 10%, and by 5% from 10% to 5%. • Use the numeric keys to enter a value that defines the percentage by which you want to decrease the up-ramp rate for each cycle of the method. You can enter values between 5 and 95, or 100 (Figure 4-12). April 2001 4 Creating and Editing Methods 4-9 Applied Biosystems Figure 4-12. Modified up-ramp rate For ramp rates less than 100%, an asterisk * appears next to modified up-ramps. The asterisk remains beneath the modified temperature parameter to remind you that the method has been modified (Figure 4-13). Figure 4-13. Method with modified up-ramp rate 5. Note Press F1_Accept to accept all entries, and return to the previous screen. If you enter a numeric value outside the range of acceptable values, you will receive the following message: Valid range is 5 to 95 and 100. 4-10 4 Creating and Editing Methods April 2001 Applied Biosystems Inserting Holds, Cycles, and Programmed Pauses From the Insert screen(Figure 4-14), you can insert holds and cycles, and program pauses that the instrument inserts into your method as it runs. The Pause function will not display on the Insert screen if the highlighted segment already has a preprogrammed pause. Figure 4-14. Insert screen To insert holds: Note A ∞ hold can only be inserted as the last hold time in a method. 1. From the Create screen, use the arrow keys to a select a time or temperature parameter to the right of where you want to insert a hold. 2. Press F4-More. Depending on the parameter you select in step 1., one of three screens display from which you can access the insert function (Figure 4-4). 3. Press F2-Insert. This displays the Insert screen (Figure 4-14). Note 4. The Pause function will not display on the Insert screen if the highlighted segment already has a pre-programmed pause, or if the highlight box is not on a PCR segment parameter. Press F1-Hold to insert a hold of 4.0˚C for 30 seconds to the left of the parameter you selected in step 1 Holds insert to left of selected parameter Figure 4-15. Inserted hold April 2001 5. Type in a value for the hold temperature. 6. Press Enter. This selects the hold time parameter. 4 Creating and Editing Methods 4-11 Applied Biosystems 7. Type in a value for the hold time. 8. Press Enter. 9. Press F4-More to return to the Create screen, which now displays your modified method. Use the CE key to clear an entry. To insert cycles: 1. From the Create screen, use the arrow keys to select a time or temperature parameter to the right of where you want to insert a hold (See Figure 4-4). 2. Press F4-More. 3. Press F2-Insert. This displays the Insert screen 4. Press F2-Cycle to insert a cycle to the left of the segment you selected in step 1(Figure 4-16). inserted cycle Figure 4-16. Example of Inserted cycle Use the CE key to clear an entry. Press F5-Cancel to cancel your entry and return to the previous screen. To insert a programmed pause: 4-12 1. From the Create screen, use the arrow keys to select a PCR segment time or temperature parameter where you want to insert a programmed pause. 2. Press F4-More. 3. Press F2-Insert. This displays the Insert screen. 4. From the Insert screen, press F3-Pause. This displays the Programmed Pause screen (Figure 4-17). 4 Creating and Editing Methods April 2001 Applied Biosystems Figure 4-17. The Programmed Pause screen 5. In the Start 1st Pause at Cycle field, type in the cycle number where you want the method to first pause(1-98). 6. Press Enter. This selects the next field. 7. In the Pause Every field, type in the pause frequency in cycles (1-98). The pause frequency specifies the number of cycles that will run between each pause. 8. Press Enter. This selects the next field. 9. In the Cycles For field, type in the length of the pause in minutes:seconds (00:0198:59) format. 10. Press Enter. This selects the next field. 11. In the Beep During The Pause? field, press F2-Yes or F3-No. 12. Press F1-Accept to accept the pause information on the screen. The word Pause now displays to the right of the incubation step where you programmed the pause. Figure 4-18. Inserted pause Use the CE key to clear an entry. Note April 2001 Only one pause can be inserted in each cycle. 4 Creating and Editing Methods 4-13 Applied Biosystems Editing Programmed Pauses If you have inserted a programmed pause in your method, you can edit the parameters for the pause at any time. To edit programmed pauses: 1. From the Create screen, use the arrow keys to highlight the word Pause. This displays the F5-Edit soft key. Figure 4-19. Editing programmed pauses 2. Press F5-Edit to access the programmed pause screen(Figure 4-17). From this screen you can change any of the pause parameters. Or, use the arrow keys to select the pause time parameter on the screen, and edit it by entering a different time. Use the CE key to clear an entry. Press F5-Cancel to cancel all entries and return to the previous screen. After you have entered all modifications to the customized method you are creating, you must store the method before running it. Storing Methods Storing a method completes the creation of it. You can store the default method, or modify and then store it. Figure 4-20. The Store screen To store a method: 1. 4-14 From the Create screen, press F2-Store. This displays the Store screen(Figure 4-20). 4 Creating and Editing Methods April 2001 Applied Biosystems 2. 3. 4. Select a user name where you want to store the method. • If you want to store the method under the displayed name, go to step 3. • To change the name of the user, press F2-User. This displays the Select User Name screen (See Figure 3-6 on page 3-3). Press Enter to select the Method field. • If you want to keep the name of the method as displayed, go to step 4. • To change the name of the method, press F3-Method. This displays the Stored Method screen (See Figure 2-2 on page 2-1). Press F1-Accept to store the method and return to the previous screen. Press F5-Cancel to return to the previous screen without storing the method. Editing Methods After you create a method, you can edit the parameters in it and store it by the same name, or change its name. You may also want to delete a method after you create it. Figure 4-21. The Edit screen. To edit a method: 1. From the Main menu, press F3-Edit. This displays the Edit screen (Figure 4-21). 2. Select the method you want to edit: 3. April 2001 a. Press F2-View to view the parameters of a method before making a selection (Refer to Section 2, Running Methods, Viewing Method Parameters). b. Press F3-User to search for a method by user name (Refer to Section 2, Running Methods, Searching for a Method by User Name). c. Press F4-Sort to sort methods by different criteria (Refer to Section 2, Running Methods, Sorting Methods). Press F1-Edit. This displays the Create screen. 4 Creating and Editing Methods 4-15 Applied Biosystems 4. Edit temperature control parameters. Editing temperature control parameters on the Create screen involves the same tasks and uses the same key combinations as creating a method. The same functions for modifying methods are also available (See Creating Methods on page 4-1). 5. Press F2 Store and store the method. Deleting a Method You delete methods from the Delete screen. You access the Delete screen from the Main menu by pressing F4- Util. Figure 4-22. The Delete screen To delete a method: 1. From the Main menu, press F4-Util. This displays the Utilities screen. 2. From the Utilities screen, press F1-Delete to display the Delete screen (Figure 422). 3. Select one of the methods displayed on the screen, or select another method as follows: 4. • Press F2-View to view method parameters (Refer to Section 2, Running Methods, Viewing Method Parameters). • Press F3-User to search for a method by user name (Refer to Section 2, Running Methods, Searching for Methods by User Name). • Press F4-Sort to sort methods by different criteria (Refer to Section 2, Running Methods, Sorting Methods). Press F1-Delete. This displays the Delete Confirmation screen. If the method is protected, enter the four digit PIN number and press F1-Accept when the number is correct. 5. Press F1-Yes to confirm the deletion. This deletes the method and returns you to the Delete screen. Press F5-Cancel at any time during the delete process to return to the previous screen. 4-16 4 Creating and Editing Methods April 2001 400 I'M INVISIBLE Applied Biosystems 5 Using Utilities You can access all utility functions by pressing F4-Util on the Main menu. By using utilities you can: Figure 5-1. The Main menu 1. Delete a method (discussed in the previous section) 2. Configure the instrument 3. Run diagnostic tests (discussed in the User’s Manual) 4. Review the history of the last run (discussed in the previous section). Configuring the Instrument Configuring the instrument involves setting values for operating parameters and enabling or disabling optional features. Figure 5-2. The Utilities screen To configure the instrument: April 2001 1. From the Main menu, press F4-Util. This displays the Utilities screen (Figure 5-2). 2. Press F2-Config. This displays the First Configuration screen (Figure 5-3). 5 Using Utilities 5-1 Applied Biosystems Setting the Time From the First Configuration screen, you can set the current time and date for file memory maintenance, and run time displays, and enable or disable the run time printer and the run time beep. When all the values on the screen are correct, press F1-Accept. Figure 5-3. The First Configuration screen To set the time: 1. Select the Time field. The F2 and F3 soft keys provide a three-way toggle that allows you to define the format of the time in AM, PM, or 24 hour format. Whatever format is displayed for the Time field, the F2 and F3 soft keys define the other two formats. For example: If the Time field is... 24 AM PM Then F2= AM 24 AM Then F3= PM PM 24 2. Press the F2 or F3 soft keys until the format you want for the current time displays in the Time field. 3. Use the numeric keys to type in the hours followed by minutes. 4. Press Enter to accept the entry. CE clears an entry. Press F5-Cancel to cancel all entries and return to the previous screen. 5-2 5 Using Utilities April 2001 Applied Biosystems Setting the Date To set the date: 1. Select the Date field. There are three fields to set in the Date field: the days field, the month field and the year field. The F2 and F3 soft keys provide a three-way toggle that allows you to define the format of the date as D/M/Y (day:month:year), Y/M/D (year:month day), or M/D/Y. For example: If the Date field is... Y/M/D D/M/Y M/D/Y Then F2= D/M/Y Y/M/D D/M/Y Then F3= M/D/Y M/D/Y Y/M/D 2. Press the F2 or F3 soft keys until the format you want for the current date displays in the Date field. 3. Use the numeric keys and type in a number for each of the three fields: days,months, and years, pressing Enter after each entry. The order of these three fields depends on the format you chose in step 2. CE clears an entry. Press F5-Cancel to cancel all entries and return to the previous screen. Enabling or Disabling the Optional Printer Enabling the printer allows you to print method parameters or records of run time events directly from the display screen. The default value for the optional printer is Off. To enable or disable the optional printer: 1. Select the Run Time Printer field. This changes the functions of the F2 and F3 soft keys. 2. Press F2-On to enable the printer or F3-Off to disable it. 3. Press Enter to accept your entry. Press F5-Cancel to cancel all entries and return to the previous screen. April 2001 5 Using Utilities 5-3 Applied Biosystems Turning the Beep On or Off When turned on, the run time beeper beeps during a pause and once at the completion of a run. The default value is Off. To turn the run time beep on or off: 1. Select the Run Time Beep field. This changes the value of the F2 and F3 soft keys. 2. Press F2-On to turn the beeper On or F3-Off to turn it Off. Press F5-Cancel to cancel all entries and return to the previous screen. Setting the Pause Time Out The Pause Time Out field sets the time in minutes:seconds format for the length of a manual pause. You set the Pause Time Out field from the Second Configuration screen. From this screen, you can also define: 1. The idle state setpoint temperature. 2. The printer port. Figure 5-4. The Second Configuration screen To set the pause time out: 1. From the First Configuration screen, press F4-More. This displays the Second Configuration screen(Figure 5-4). 2. Use the numeric keys and type in the minutes followed by the seconds for the Pause Time Out. 3. Press Enter. This accepts your selection and selects the Idle State Set Point field. CE clears an entry. 5-4 5 Using Utilities April 2001 Applied Biosystems Defining the Idle State Setpoint Temperature The idle state setpoint temperature is the temperature the instrument will remain at when powered up and idle. Note After a run completes or is terminated, there is approximately a 30 second delay before the instrument attains the specified idle state temperature. This allows you to stop one method and start another before the instrument temperature changes. To set the idle state setpoint temperature: 1. Select the Idle State Set Point field. 2. Use the numeric keys and type in a temperature between 4.0˚C and 99.9 ˚C. CE clears an entry. 3. Press Enter to accept your entry. Defining the Baud Rate for your Printer Port Define the printer port value in the Baud Rate field. To set the baud rate: April 2001 1. Select the Baud Rate field. 2. Press F2-Up or F3-Down to increase or decrease the baud rates. Available baud rates are 19200, 9600, 4800, 2400, 1200, 600, and 300. 3. Press Enter to accept your entry. 5 Using Utilities 5-5 Applied Biosystems Index the instrument 5-1 control panel display screen 1-3 keys. See keys numeric keys 1-3 using 1-3 cooling 2-5 Create function of 4-1 create screen default method 4-1 customer support. See technical support 1-6 cycles editing parameters 4-16 inserting 4-11, 4-12 A Accept function of 2-2 adding users. See users Arrow keys definition of 1-4 asterisk (*) meaning of 4-7 AutoX function of 4-6 B Backsp function of 3-2 baud rate setting 5-5 beep during a pause 4-13 run time 5-4 turning off 5-4 turning on 5-4 blinking on Run Time screen 2-5 D date C calculated sample temperature. See sample temperature Cancel function of 1-2, 2-2 cap installing tool. See disposables CE. See Clear Entry key Clear Entry key definition of 1-4 Config function of 5-1 configuring April 2001 Index 1 setting 5-3 Delete function of 3-4, 4-16 deleting methods. See methods user names. See user display screen definition of 1-3 disposables cap installing tool 1-5 eight-strip MicroAmp caps 1-5 eight-strip MicroAmp reaction tubes 1-5 MicroAmp 2400 base 1-5 MicroAmp 2400 full plate cover 1-5 MicroAmp 2400 retainer 1-5 MicroAmp 2400 tray 1-5 MicroAmp reaction tubes 1-5 Applied Biosystems MicroAmp reaction tubes with caps 1-5 Hold Documents on Demand 1-12 function of 4-11 hold time auto-incrementing/decrementing 4-6 parameters. See parameter Edit hold times function of 3-3, 4-1, 4-15 display of 2-5 editing holds cycle parameters. See cycles inserting 4-11 methods. See methods HOT indicator 2-5 programmed pauses 4-14 eight-strip MicroAmp caps. See disposables eight-strip MicroAmp reaction tubes. See disposables idle state temperature e-mail, address for technical support 1-6 defining 5-5 Enter key important. See user attention words definition of 1-4 Info entering numeric values 1-4 function of 2-5 erasing Insert methods. See deleting, methods function of 4-11, 4-12 user names. See user, name, deleting Internet address error message 3-2 Documents on Demand 1-12 Exit function of 2-6 keys functions of 1-4 fields. See selecting E I K F H heated cover 2-4 heating 4-1 profile 2-5 help. See technical support 1-7 highlight box definition of 1-3 moving. See selecting Hist function of 2-6, 2-7 history of a run 2-7 2 L list of users 3-1 Lock function of 3-3 locking methods. See methods M Main menu accessing functions from 1-2 Method function of 4-15 Index April 2001 Applied Biosystems methods changing the name of 4-15 default 4-1 deleting 4-16 editing 4-15 locking 3-3 printing. See printing protecting 3-2 running 2-1 scrolling arrows 4-2 searching for 2-3 sorting 2-2 stored 2-1 storing 2-6, 4-14 unlocking 3-3 viewing information about 2-5 viewing parameters 2-1 MicroAmp 2400 base. See disposables MicroAmp 2400 full plate cover. See disposables MicroAmp 2400 retainer. See disposables MicroAmp 2400 tray. See disposables MicroAmp reaction tubes with caps. See disposables MicroAmp reaction tubes. See disposables modifying cycles 4-4 ramp rates 4-8 to 4-10 More function of 4-2 N Name function of 3-3 New function of 3-1 notes. See user attention words Numeric keys definition of 1-4 April 2001 O overwriting of methods 3-2 P parameter hold time definition of 2-4 PCR 4-3 post-PCR 4-4 pre-PCR 4-3 temperature 2-5 definition of 2-4 PCR 4-3 post-PCR 4-4 pre-PCR 4-3 Pause function of 2-6, 4-12 pause time out setting 5-4 pausing a run 2-6 PCR parameters defining. See parameter steps. see steps PIN number definition of 3-2 entering. See security code PIN# function of 3-2 post-PCR parameters defining. See parameter post-PCR extension 4-1, 4-4 predefined methods 2-1 pre-PCR parameters defining. See parameter Index 3 Applied Biosystems steps. see steps pre-PCR denaturation 4-3 Print function of 2-8, 4-2 printer disabling 5-3 enabling 5-3 printer port defining. See baud rate printing methods 4-2 profile 2-5 programmed pauses inserting 4-11, 4-12 programming pauses 4-12 R ramps flashing of 2-5 reaction volume entering a 2-4 Resume function of 2-6 Run function of 2-1, 2-4 run completion of 2-7 pausing. See pausing reviewing history of. See history starting 2-4 stopping. See stopping Run Time screen 2-5 running methods. See methods S sample block 2-5 sample temperature 2-5 4 scrolling 4-2 scrolling methods. See methods searching methods. See methods securing protecting methods. See methods security code entering 3-2 segments inserting cycles into 4-12 PCR 4-1, 4-2 post-PCR 4-1, 4-2 pre-PCR 4-1, 4-2 selecting a cycle modification function 4-5 a method to edit 4-15 a name for storing a method 4-15 fields 1-4, 4-2 methods 2-1 setting baud rate. See baud rate date. See date pause time out. See pause time out temperature control parameters 4-2 the time. See time Soft keys definition of 1-4 Sort function of 2-2, 4-16 sorting methods. See methods Start function of 2-2, 2-4, 4-2 starting a run. See run steps PCR 4-3 pre-PCR 4-3 Stop key Index April 2001 Applied Biosystems definition of 1-4 stopping a run 2-6 Store function of 2-6, 4-2, 4-14, 4-16 storing methods. See methods T technical support 1-6 to 1-12 e-mail address 1-6 Internet address 1-11 regional sales offices 1-9 to 1-10 telephone/fax (North America) 1-7 temperature auto-incrementing/decrementing automatic segment extension 4-6 parameters. See parameter three temperature PCR. Incubation steps. See steps time setting 5-2 Util function of 4-16, 5-1 V View function of 2-2, 4-15 W WWW address Applied Biosystems 1-11 Documents on Demand 1-12 U unlocking methods. See methods User function of 2-3, 3-3, 4-15 user name changing 3-3 deleting 3-4 entering 3-1 new 3-1 user attention words important 1-1 note 1-1 users adding 3-1 April 2001 Index 5 Headquarters 850 Lincoln Centre Drive Foster City, CA 94404 USA Phone: +1 650.638.5800 Toll Free: +1 800.345.5224 Fax: +1 650.638.5884 Worldwide Sales Offices Applied Biosystems vast distribution and service network, composed of highly trained support and applications personnel, reaches into 150 countries on six continents. For international office locations, please call our local office or refer to our web site at www.appliedbiosystems.com. www.appliedbiosystems.com Applera Corporation is committed to providing the world’s leading technology and information for life scientists. Applera Corporation consists of the Applied Biosystems and Celera Genomics businesses. Printed in the USA, 07/2006 Part Number 0993-6057_Rev. D an Applera business