1
The Vista Simple, Powerful, Visual Version 2.1 B Copyright & disclaimer This product is approved for use in Europe and Australia/New Zealand and conforms to the following
standards:
•
European Norms
•
EN55103-1
AS/NZS 4251.1
•
EN55103-2
AS/NZS 4252.1
•
EN60950
Australian / New Zealand Standards
AS/NZS60950
Conformance has been achieved for intended usage in environment E1: Residential.
To ensure continued compliance with EMC Directive 89/336 and the Australian Radio communications Act
1992, use only high quality data cables with continuous shield, and connectors with conductive back shells.
Examples of such cables are: DMX: Belden 8102 (100% Aluminium foil screen, 65% Copper braid)
TIP: This equipment has been tested and found to comply with the limits for a Class B digital device, pursuant
to Part 15 of the FCC Rules. These limits are designed to provide reasonable protection against harmful
interference in a residential installation. This equipment generates, uses and can radiate radio frequency energy
and, if not properly installed and used in accordance with the instructions, may cause harmful interference to
radio communications. However, there is no guarantee that interference will not occur in a particular
installation.
If this equipment does cause harmful interference to radio or television reception, which can be determined by
turning the equipment off and on, the user is encouraged to try to correct the interference by one or more of the
following measures:
•
•
•
reorient or relocate the receiving antenna;
increase the separation between the equipment and receiver;
connect the equipment into an outlet on a different circuit from that to which the receiver is connected;
•
consult the dealer or an experienced radio/television technician for help.
Disclaimer Information contained in this manual is subject to change without notice and does not represent a commitment
on the part of the vendor. Jands Pty Limited shall not be liable for any loss or damage whatsoever arising from
the use of information or any error contained in this manual. It is recommended that all service and repairs on
this product be carried out by Jands Pty Limited or its authorised service agents. Jands Pty Limited cannot
accept any liability whatsoever for any loss or damage caused by service, maintenance or repair by
unauthorised personnel, or by use other than that intended by the manufacturer.
Jands lighting products must only be used for the purpose they were intended by the manufacturer and in
conjunction with the user manual. Disconnect mains power when not in use.
© Copyright JANDS PTY LIMITED 2004 - 2011 All rights reserved
Manufactured in Australia by:
JANDS Pty Limited ACN 001 187 837
Locked Bag 15 (40 Kent Rd) MASCOT NSW 1460 Sydney Australia
Phone: +61-2-9582-0909
Fax:
+61-2-9582-0999
Web:
www.jands.com.au
Contents Contents 1. Welcome to the Vista..............................................................2‐1
What’s different about the Vista? ....................................................................... 2‐1
What things are the same as on other consoles?................................................ 2‐1
About the generic fixture model.......................................................................... 2‐2
Need more information? ..................................................................................... 2‐2
2. Getting started........................................................................2‐1
Setting up the console ......................................................................................... 2‐1
Switching on ......................................................................................................... 2‐2
Creating and loading shows ................................................................................. 2‐4
3. Using the interface..................................................................3‐1
Menu bar.............................................................................................................. 3‐1
Main toolbar......................................................................................................... 3‐1
The Sidebar........................................................................................................... 3‐9
Toolbars.............................................................................................................. 3‐10
4. Patching your rig .....................................................................4‐1
Adding fixtures to the patch ................................................................................ 4‐1
Changing universes .............................................................................................. 4‐4
Re‐arranging fixtures on the patch panel ............................................................ 4‐4
Setting fixture properties..................................................................................... 4‐5
Viewing the patch in different ways .................................................................... 4‐8
Controlling the fixtures ...................................................................................... 4‐10
Cloning fixtures .................................................................................................. 4‐10
Exporting and importing patch information ...................................................... 4‐11
Configuring the DMX & Ethernet Outputs ......................................................... 4‐13
5. The Chooser window ..............................................................5‐1
The Chooser screen.............................................................................................. 5‐1
Arranging fixtures in a layout............................................................................... 5‐2
Using the Programmer Sidebar.......................................................................... 5‐18
The Palette tab ................................................................................................... 5‐18
Using the All panel ............................................................................................. 5‐21
Using the detailed panels................................................................................... 5‐26
The Components tab.......................................................................................... 5‐37
Groups ................................................................................................................ 5‐44
Presets................................................................................................................ 5‐45
Vista User Guide, Version 2 i Contents SmartFX...............................................................................................................5‐49
Extracts ...............................................................................................................5‐50
Using a keypad in the programmer window ......................................................5‐51
The Programmer hardware controls ..................................................................5‐53
6. Working with cuelists ............................................................. 6‐1
Store All ................................................................................................................6‐1
Store Part..............................................................................................................6‐6
Opening a Cuelist in the Editor.............................................................................6‐9
The Timeline window .........................................................................................6‐10
Creating a Move in Black cue .............................................................................6‐18
About the timeline..............................................................................................6‐33
Timeline events ..................................................................................................6‐40
Creating and applying extracts...........................................................................6‐47
Extracts ...............................................................................................................6‐47
Using commands within cuelists ........................................................................6‐48
Updating Presets and Cuelists during playback .................................................6‐50
7. SmartFX.................................................................................. 7‐1
Effect types ...........................................................................................................7‐1
Using effects .........................................................................................................7‐1
Effect controls.......................................................................................................7‐4
Creating an effect from scratch..........................................................................7‐12
Stopping an effect ..............................................................................................7‐13
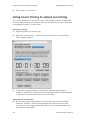
8. Assigning Audio to a Cuelist.................................................... 8‐1
Using Learn Timing to adjust cue timing ..............................................................8‐2
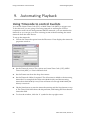
9. Automating Playback.............................................................. 9‐4
Using Timecode to control Cuelists......................................................................9‐4
Using Date and Time to control cuelists...............................................................9‐5
Creating a New Event ...........................................................................................9‐7
10. The Playback Control Window .............................................. 10‐9
Controlling and monitoring playback .................................................................10‐9
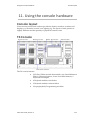
11. Using the console hardware ................................................. 11‐1
Console layout ....................................................................................................11‐1
T4 Console ..........................................................................................................11‐1
T2 Console ..........................................................................................................11‐2
I3 Console ...........................................................................................................11‐2
L5 Console...........................................................................................................11‐2
S3 Control Surface ..............................................................................................11‐2
ii Vista User Guide, Version 2 Contents S1 Control Surface.............................................................................................. 11‐2
M1 Control surface ............................................................................................ 11‐3
Grand Master and DBO ...................................................................................... 11‐3
Function keys ..................................................................................................... 11‐3
The modifier keys............................................................................................... 11‐4
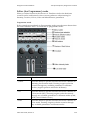
The Super Playback / Programmer controls ...................................................... 11‐4
Playbacks with faders....................................................................................... 11‐11
Playbacks without faders ................................................................................. 11‐12
Page controls.................................................................................................... 11‐12
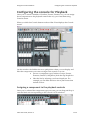
Configuring the console for Playback .............................................................. 11‐13
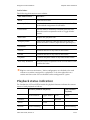
Playback status indication................................................................................ 11‐17
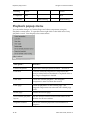
Playback popup menu...................................................................................... 11‐18
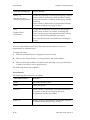
Setting cuelist properties ................................................................................. 11‐19
Group Masters ................................................................................................. 11‐19
Pages ................................................................................................................ 11‐21
Snapshots ......................................................................................................... 11‐22
12. The Output window ..............................................................12‐1
Configuring the Output window ........................................................................ 12‐2
13. The Console control panel.....................................................13‐1
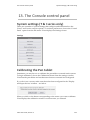
System settings (T & I series only) ..................................................................... 13‐1
Calibrating the Pen tablet .................................................................................. 13‐1
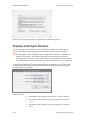
Display and Input Devices .................................................................................. 13‐2
Using the screensaver ........................................................................................ 13‐3
Network preferences ......................................................................................... 13‐4
Date and time..................................................................................................... 13‐5
14. Appendix 1 – menu & toolbar reference ...............................14‐6
Menus................................................................................................................. 14‐6
15. Appendix 2 – installing new software.................................. 15‐18
Installation (T2, T4, I3 & L5 Consoles).............................................................. 15‐18
Installation (Windows XP, Vista & 7)................................................................ 15‐20
Connecting to the console via FTP ................................................................... 15‐20
16. Appendix 3 – creating a bootable USB device...................... 16‐22
17. Appendix 4 – tracking backup ............................................. 17‐25
Setting up ......................................................................................................... 17‐25
Starting Tracking Backup.................................................................................. 17‐27
What happens if the Master fails..................................................................... 17‐28
Backup status ................................................................................................... 17‐29
Vista User Guide, Version 2 iii Contents Troubleshooting ...............................................................................................17‐30
Private IP addresses..........................................................................................17‐30
18. Appendix 5 – using VNC on T & I‐ series consoles................ 18‐31
VNC password...................................................................................................18‐31
Starting VNC......................................................................................................18‐31
Connecting to Vista using a Windows PC .........................................................18‐31
Connecting to Vista using a Mac ......................................................................18‐32
19. Appendix 6, Using midi show control (MSC) to control cues 19‐34
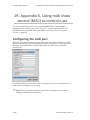
Configuring the midi port .................................................................................19‐34
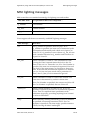
MSC lighting messages .....................................................................................19‐35
20. Appendix 7, Using serial communication to control cuelists 20‐38
Connecting to the serial port............................................................................20‐38
Enabling the serial port ....................................................................................20‐38
Playback commands .........................................................................................20‐39
Setting fixture levels .........................................................................................20‐39
21. Appendix 8 – The Fixture Editor.......................................... 21‐41
The Fixture Type Library Editor ........................................................................21‐41
Creating a Fixture Profile..................................................................................21‐42
Main tab: ..........................................................................................................21‐43
DMX Chart tab: .................................................................................................21‐45
Channels with Custom Ranges .........................................................................21‐66
22. Appendix 9 – Crash Logs ..................................................... 22‐68
Retrieving Software Crash Files from a Console ..............................................22‐68
23. Appendix 10 – the touchpad and the pen tablet ................. 23‐73
Using the touchpad ..........................................................................................23‐73
Working with the grip pen................................................................................23‐74
Tip switch / Pen Tip ..........................................................................................23‐74
Using a pen .......................................................................................................23‐75
Removing and installing the Duo Switch..........................................................23‐78
Precautions on using and handling the Pen‐Tablet..........................................23‐80
24. Appendix 11 – technical details .......................................... 24‐82
Power................................................................................................................24‐82
Service & Maintenance.....................................................................................24‐82
Battery replacement.........................................................................................24‐82
Installation ........................................................................................................24‐83
T4 / T2 / I3 / L5 Shut down ...............................................................................24‐83
iv Vista User Guide, Version 2 Contents General Specifications...................................................................................... 24‐83
25. Index.....................................................................................25‐1
Vista User Guide, Version 2 v Welcome to the Vista What’s different about the Vista? 1. Welcome to the Vista Welcome to the User Guide for the Jands Vista lighting console. This guide is
intended to give you the information you need to get your Vista up and running
as quickly as possible.
Note that this guide will be regularly updated as enhancements are made to the
Vista. A current version of the manual is available at www.jandsvista.com.
What’s different about the Vista? You’ll have noticed that the Vista is a bit different to most other consoles you’ve
used. Instead of a keypad, it uses a pen; instead of relying on you entering
hundreds of key combinations, the Vista lets you do everything visually; instead
of representing your show as numbers, the Vista represents it as events
happening over time.
If you’ve seen any of the digital editing software packages for sound and video
that are available these days, the most different aspect of the Vista, the timeline,
will be instantly familiar to you. If not, don’t worry, once you start using it you’ll
pick it up very quickly.
The Vista is different, but that’s what makes it so much easier to use. Once
you’ve read this guide you’ll have enough of an idea of how this console works
to create your first lightshow.
What things are the same as on other consoles? Apart from the pen and the timeline concept, the Vista contains all the basic
elements of live lighting that you’re familiar with. You’ll find controls for
intensity, colour, beam, gobos and so on; you’ll find libraries of all the
manufacturers’ most popular fixtures to choose from; you’ll find a console that
has the usual faders, buttons and LCD displays.
So don’t worry, the Vista has a lot in common with other consoles – we’ve taken
all the best elements of existing consoles and added a whole new dimension to
them. You’ll soon be right at home with the Vista.
Vista User Guide, Version 2 2‐1 About the generic fixture model Welcome to the Vista About the generic fixture model One thing about the Vista that’s not immediately obvious is the ‘generic fixture
model’. What is it? It’s a part of the software that works in the background and
enables all fixtures, no matter what type or manufacturer to be treated the same
way.
Let’s say you’ve programmed a show using one brand of fixture but need to
replace some of them with a different kind. Normally this would be a major
hassle because you’d have to find a similar fixture then re-program each and
every cue.
With the Vista, you can replace a fixture and you don’t have to do any reprogramming. Why? Because everything you’ve programmed is stored in
generic form rather than as specific DMX channel values. For instance if you’ve
programmed the lights to be Red, the Vista can send that information to any light
and achieve the same colour.
Sure, if you replace a fixture that has colour mixing with a fixture that has a fixed
colour wheel, you won’t expect to get the exact same result, but even in this case,
the Vista will adapt and provide as near a match as the replacement fixture is
capable of.
Need more information? If you have questions about the Vista or you’d like more information, go to our
website at www.jandsvista.com, or call us on +61-2-9582-0909.
2‐2 Vista User Guide, Version 2 Getting started Setting up the console 2. Getting started Setting up the console Power Connect the Vista T, I or S series console to any mains supply between 100 and
240vAC. The Vista M series obtains power via the USB port
External displays You can attach two external displays, including touch screen monitors to the
Vista T series consoles using standard VGA connectors.
Vista I series consoles have connections for one DVI and one VGA monitor. A
DVI – VGA cable can be used if you prefer to use two VGA monitors.
Vista L series consoles have connections for one DVI / HDMI and one DVI /
VGA monitor.
 Vista has been tested with Wacom pen tablet LCDs and
ELO ‘Intellitouch
and Accutouch’ monitors. ELO makes many different touch screen monitors
and not all models may be compatible. Please check for compatibility before
purchasing touch screen monitors for use with your Vista console.
For Vista M and S series control surfaces, monitor configuration will depend on
the configuration of the computer you are using.
Desk Lights You can attach two Littlelite or equivalent desklights to the Vista L and T series
console and one to the I and S series consoles.
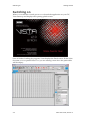
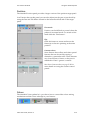
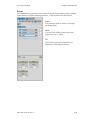
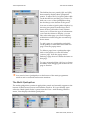
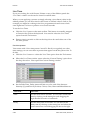
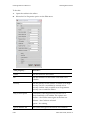
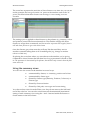
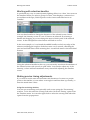
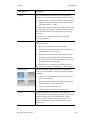
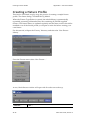
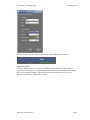
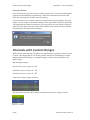
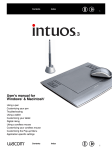
Vista User Guide, Version 2 2‐1 Switching on Getting started Switching on When you switch the console power on or launch the application on your PC,
Vista starts up and displays the opening splash screen:
Once it finishes loading the program, Vista displays the Patch screen. If this is the
first time you’ve opened Vista V2 or you are starting a new show the patch table
will be empty.:
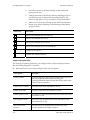
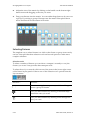
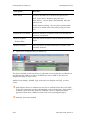
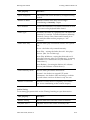
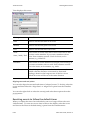
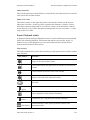
2‐2 Vista User Guide, Version 2 Getting started Switching on This is the Patch window, waiting for you to start creating a new show. To see
the other Vista windows you use the buttons on the toolbar at the top left of the
screen:
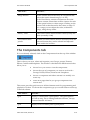
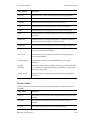
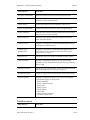
This button…
does this…
displays the Patch window
displays the Console hardware simulation window
displays the Programmer Fixtures window
displays the Programmer Timeline view.
displays the Playback control window
displays the fixture Output window
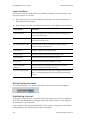
Vista User Guide, Version 2 2‐3 Creating and loading shows Getting started Creating and loading shows Creating a show To create a new show at any time, choose the New Show option from the File
menu.
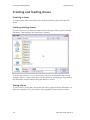
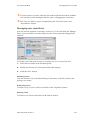
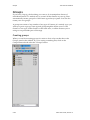
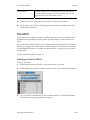
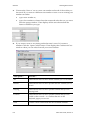
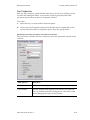
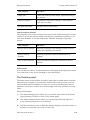
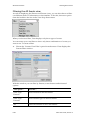
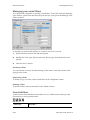
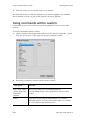
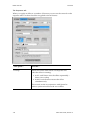
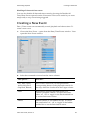
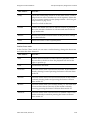
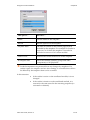
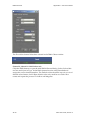
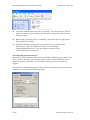
Loading existing shows To load a show you’ve already created, choose the Open Show option from the
File menu. Vista displays the Open Show window:
To load a show archive you’ve previously saved (or transferred to the console
using the export / import function), find the directory containing it, then click on
the filename to select it and hit the Open button to load it.
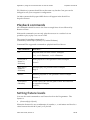
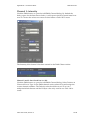
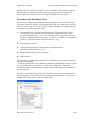
Saving shows To save a show at any time, choose the Save Show option from the File menu. As
with any computer, it’s a good idea to save regularly in case of power failure.
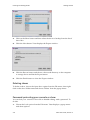
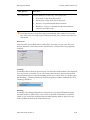
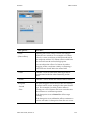
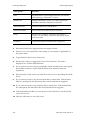
2‐4 Vista User Guide, Version 2 Getting started Creating and loading shows The first time you save a new show, Vista displays the Save As window:
Type a name for the file and then click the Save button. Vista automatically
creates a show folder, with the same name and puts the show file inside it. Once
you’ve named the file, each time you choose the Save option from then on, Vista
overwrites that file with the new details without displaying this window.
Saving copies of shows To save a separate version of a show with a different name, choose the Save
Show As… option from the File menu. You can then give the file another name
and save it in a separate show folder.
Importing show archives You can also open shows you’ve created on a PC or another console onto the
Vista. The shows must be on a CD or any kind of storage device that connects to
the Universal Serial Bus (USB) port (such as a memory stick).
To open a show, attach the USB device or put the CD in the CD drive (if
available) and choose the Import > Show… option from the File menu.
Exporting show archives (backing up) It’s extremely important to make backup copies of your show user data folders.
Like any other computer, the Vista stores your shows on a hard drive, and
although it’s extremely unlikely, if this drive were to fail (e.g. if the console was
dropped) you could lose all the show files stored on it.
For this reason we recommend that you make regular backups of your work,
onto a storage device that you can connect via a USB port.
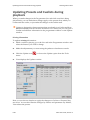
To export a show archive onto an external storage device:
1.
Connect a USB Flash drive or external disk to the USB port.
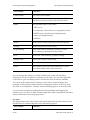
2.
Choose the Export option from the File menu. Vista displays the Export
window:
Vista User Guide, Version 2 2‐5 Creating and loading shows Getting started 3.
Click on the Show button and then select the show to backup from the list of
show files.
4.
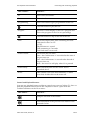
Click the Next button. Vista displays the Export window:
5.
Click the Browse button and choose a drive and directory on the computer
or storage device and hit the Export button.
6.
Click the Finish button to close the Export window.
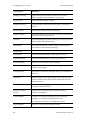
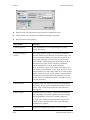
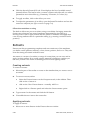
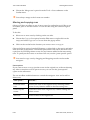
Deleting shows To delete a show, choose the Open show option from the File menu, then rightclick on the show folder name and choose ‘Delete’ from the popup menu.
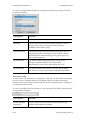
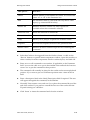
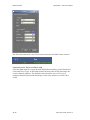
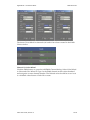
Password‐protecting your console or show You can lock your console or show file or disable editing, with a password. To
do this:
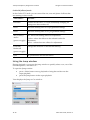
1.
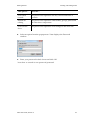
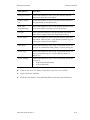
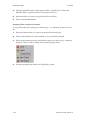
2‐6 Choose the Lock option from the File menu. Vista displays a popup menu
with three options:
Vista User Guide, Version 2 Getting started Creating and loading shows This option…
does this…
Lock entire
console
the password is required to use any console functions or
controls.
Disable all
editing
the password is required to edit cuelists, groups, presets and
all other show components
Lock current
show
the password is required to save changes to the show file
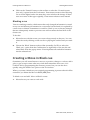
2.
Select an option from the popup menu. Vista displays the Password
window:
3.
Enter your password in both boxes and click ‘OK’
Your show or console is now password protected.
Vista User Guide, Version 2 2‐7 Using the interface Menu bar 3. Using the interface The latest version of Vista features a new simpler layout. No matter whether you
have worked with Vista before or are seeing it for the first time it’s worth taking
some time to get familiar with the new window layout and options.
Menu bar At the top of the window you’ll see the main menu bar. Click on any menu
heading to access Vista’s dialog boxes, submenus and commands.
The main menu bar also shows:
•
the show file name - if Autosave is turned on you’ll see
‘[A]’ after the show name
•
the Grand Master level setting
•
the time.
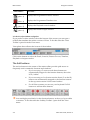
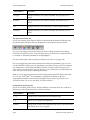
Main toolbar At the top of the window you’ll see the main toolbar which is common to ALL
windows. This toolbar contain the most frequently used buttons and is divided
into three sections. The centre section contains 12 buttons that map to the
Function buttons on Vista consoles and the ‘F’ keys on your keyboard you can be
customized to suit your style of operation.
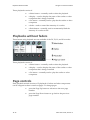
Window navigation You switch between the main windows using the 6 buttons on the top left side of
the main toolbar. You can also switch between windows by selecting the Patch,
Console, Fixture Chooser, Timeline, Playback or Output option from the View
menu.
 Hovering over the icons shows the button name.
This button…
(Alt + 1)
(Alt + 2)
does this…
displays the Patch window
displays the Console hardware simulation window
Vista User Guide, Version 2 3‐1 Main toolbar Using the interface This button…
does this…
displays the Programmer Fixtures window
(Alt + 3)
displays the Programmer Timeline view.
(Alt + 4)
displays the Playback control window
(Alt + 5)
displays the fixture Output window
(Alt + 6)
V1 classic style window navigation If you prefer to select windows from the bottom of the screen you can open a
toolbar that emulates the earlier versions of Vista. To do this select the ‘Vista
Toolbar’ option from the View menu.
Vista places the toolbar at the bottom of the window:
Click on the buttons to select the Patch, Console, Fixture Chooser, Timeline,
Playback or Output window.
The Soft buttons The twelve buttons in the centre of the main toolbar provide quick access to
frequently used commands, functions and windows.
•
If you are using a T series console these buttons are
automatically mapped to the function buttons, above the
LCD / tablet.
•
If you are using an I or S series unit the first 6 (5 on the S3)
buttons are automatically mapped to the function buttons
in the top centre section of the control surface.
•
For all Vista systems you can use your keyboard F1-F12
buttons to activate these buttons.
 You can display text labels, for the function buttons, at the top of your tablet
or monitor. To do this select the ‘Softkey Toolbar’ option from the View
menu.
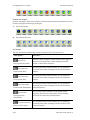
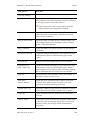
3‐2 Vista User Guide, Version 2 Using the interface Main toolbar Standard buttons When you first start a new show Vista loads the standard set of buttons but you
can customize each and every button, as described below.
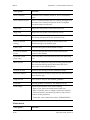
This button…
does this…
Saves the show file to disk
Opens a new Cuelist in the Editor
Opens an existing Cuelist in the Editor
HiLite
Store Part
Store All
Turns on the Editor’s ‘Highlight’ mode. When you are focusing
or testing your fixtures you can use Highlight to bring up the
intensity of each fixture automatically when you select it in the
Fixture Chooser.
displays the Store Part window where you can save the
contents of the editor to any cue in any cuelist. Store part
provides many options and must be used for tracking to
operate correctly. See Store Part on page xxx
displays the Store Look window where you can save the
complete output (the look on stage). Storing this way will
ensure that when you play a Cue back it will appear exactly as
it did when you saved it
Clear all information coming from the Live tab.
Clear
If a Cuelist tab is selected this button closes that tab.
Update
displays the Update window where information coming from
the Editor (the Live tab or any Cuelist tab) can be used to
update one or more Cues and Presets.
Blind
Turns the output from the editor off. In this mode you can still
edit cues but there will be no output sent from the editor to
your fixtures.
Live
displays the Live time window where you can set a fade time
that applies to any selections you make from the editor
palettes or presets.
displays the SmartFX window where you can create and edit
effects. See SmartFX on page 7-1
FX
Vista User Guide, Version 2 3‐3 Main toolbar Using the interface This button…
does this…
Release All
Clicking this button releases all the fixtures from their current
settings as determined by the cuelists that are running and
returns them to their default state.
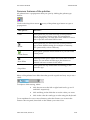
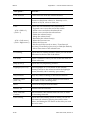
Modified soft buttons The soft buttons provide different functions when you press the Red (Shift),
Green (Alt), Yellow (Control) or Blue (Control+Alt) modifier.
Shift set (Red modifier) Hold down the Red modifier button or the Shift button, on your keyboard, to
access and display the Shift set.
This button…
Next Fixture
Previous
Fixture
does this…
Used to step through fixtures, selects the 1st fixture (or the one
after the current selection) and de-selects the others. Each
subsequent press selects the next fixture. Useful when focusing
fixtures.
Used to step through fixtures, selects the last fixture (or the one
before the current selection) and de-selects the others. Each
subsequent press selects the previous fixture. Useful when
focusing fixtures.
Inverts the fixture selection (i.e. all selected fixtures are deselected and all de-selected fixtures are selected).
Invert
Selects all the active fixtures (i.e. those that have Intensity).
Active
Select all the fixtures that are programmed in the current cue.
Programmed
Selects every fixture.
All
3‐4 Vista User Guide, Version 2 Using the interface This button…
Main toolbar does this…
De-selects all fixtures
De-select all
Vista remembers the last set of fixtures you selected; you use this
button to toggle back to your previous fixture selection.
Previous
selection
Next selection
If you have used the previous selection command this button
will toggle back to the fixture selection you had before pressing
previous selection.
Ignites the lamps in the selected fixtures
Strike
Switches off the lamps in the selected fixtures off.
Douse
Reset
Resets the selected fixtures to their factory default settings. This
is useful if a fixture has a control problem and you need to get it
‘back to normal’.
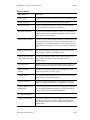
Alt set (Green Modifier) Hold down the Green modifier button or the Alt (Option) button, on your
keyboard, to access and display the Atlt (Option) set.
This button…
does this…
Opens a new Cuelist in the Editor
Open Cuelist
Opens an existing Cuelist in the Editor
New cuelist
Vista User Guide, Version 2 3‐5 Main toolbar This button…
Using the interface does this…
Adds a new cue at the end of the cuelist being edited
Append cue
Inserts a new cue, before the cue that is being edited
Insert before
Adds a new cue after the cue that is being edited.
Insert after
Deletes the selected cue
Delete Cue
Displays the Create Preset window
New Preset
Displays the Create Extract window
New Extract
Displays the Create Snapshot window
New Snapshot
Displays the Create Fixture Group window
New Group
Updates the selected group to include any additional fixtures
that have been selected.
Update Group
Creates a new fixture matrix container in the Fixture Chooser
window
New Matrix
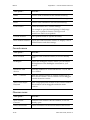
3‐6 Vista User Guide, Version 2 Using the interface Main toolbar Ctrl set (Yellow Modifier) Hold down the Yellow modifier button or the Control button, on your keyboard,
to access and display the Control set.
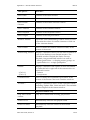
This button…
does this…
Live properties
Opens a Live tab properties window.
Cuelist
properties
Opens the Cuelist properties window.
Insert
Command
Opens the Insert Command window where you can add a
command to the cue you are editing (i.e. to play another cue)
Convert to
release events
Sets the selected events to release the feature.
Merge Cues
Merges the events in2 or more selected cues into a single cue.
Select the cues in the Cue navigator bar.
Show tracked
events
Shows or hides tracked events in the time line. Tracked events
are shown in a lighter, transparent colour and cannot be selected.
Clear Fixtures
Clears all features from the selected fixtures so that they return
to their previous state.
Home Fixtures
Sends the selected fixtures to their Home settings
Block cue
Blocking copies any tracked events into the selected cue and
prevents any future changes, to earlier cues from tracking
through. This means that no matter what changes are made to
other cues in the list, the cue will play back the exact look it had
at the time it was blocked.
See Blocking a cue on page 6-18
Super - Block
cue
If you ‘Super Block’ a cue, when it runs any features, for the
fixtures in the cue, that aren’t included in the cue are
automatically sent to their home value. This means that the cue
will look as it would if no other cuelist was playing.
Un-Block cue
Removes redundant events, from the selected cue. This means
that if the selected cue includes an event that is the exactly the
same as an event that is tracking through from a previous cue,
that event will be removed. Unblocking will not change the cue’s
look.
Vista User Guide, Version 2 3‐7 Main toolbar Using the interface This button…
does this…
Move in Black
Opens the Move in Black window where you can Mark a cue
and add MIB events that pre-set the selected fixtures so that
when they turn on you don’t see them moving, changing colour
etc.
Ctrl + Alt set (Blue Modifier) Hold down the Blue modifier button or the Control & Alt buttons, on your
keyboard, to access and display the Control-Alt set.
This button…
does this…
Show selection
order
Shows selection order numbers on the fixture icons.
Show Tracked
Events
Shows timeline events for tracked fetures.
Cue Only
Editing
Not used
Not used
Set Event
Timing
Opens the event timing window.
Align Start
Aligns the start position of the selected events.
Align End
Aligns the end position of the selected events.
Not used
Not used
Stop FX
Stops all running effects.
Not used
3‐8 Vista User Guide, Version 2 Using the interface The Sidebar Configuring the soft buttons To change the function of a soft button, right click on the button and choose a
command or function from the popup menu. Any command from any menu can
be assigned to the soft button. To change one of the alternate sets hold the Shift,
Alt or Ctrl key while right clicking.
Soft key toolbar The soft buttons correspond to the hardware buttons above the main screen on L
and T series consoles. To make it easier to identify the buttons you can add onscreen labels below the buttons. To do this select the ‘Softkey Toolbar’ option
from the View menu.
Vista places the softkey labels toolbar at the top of the window:
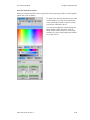
The Sidebar To show or hide the sidebar click on the ‘Sidebar’ button at the top right side of
the main menu bar:
The sidebar provides access to different features, depending on the window you
have open:
•
In the Patch window you use the sidebar to select fixtures
from the library, and configure them.
•
In the Console window you use the sidebar to select
components (i.e. Cuelists, Groups, Presets and more) and
assign them to the Playback sets. You can also assign fader
and button functions to the playback controls.
•
In the Fixture Chooser and Timeline the sidebar contains
the palettes (i.e. Intensity, Position, Colour, Gobo, Beam)
and component panels (i.e. Groups, Presets, Extracts,
Effects and more)
•
There is no sidebar in the Playback Control and Output
windows.
Configuring the sidebar If you prefer the Sidebar can be moved to the left side of all windows. To do this
select the Sidebar, ‘Dock Left’ option from the View menu.
Vista User Guide, Version 2 3‐9 Toolbars Using the interface You can adjust the width of the sidebar by clicking on the window divider and
dragging to the left or right.
Toolbars Most windows have optional toolbars that provide buttons for sets of menu
commands. To show or hide any of the optional toolbars select the ‘Toolbars’
option from the view menu.
Patch window toolbars There are three toolbars available on the Patch window
View toolbar To open or close a toolbar select the ‘Toolbars’ option from the View menu:
This button…
does this…
Table view
Switches the main panel of the Patch window to the standard
Table view.
List view
Switches the main panel of the Patch window to the List view
where the patched fixtures are shown as a list.
DMX view
Switches the main panel of the Patch window to the DMX view
where the output of each channel of each fixtures is shown, on
the patch table.
Fixture Macro toolbar (also available on the Chooser & Timeline window To open or close a toolbar select the ‘Toolbars’ option from the View menu:
3‐10 Vista User Guide, Version 2 Using the interface Toolbars This button…
does this…
Strike
Ignites the lamps in the selected fixtures.
Douse
Switches off the lamps in the selected fixtures off.
Reset
Resets the selected fixtures to their factory default settings.
This is useful if a fixture has a control problem and you need
to get it ‘back to normal’.
Connections toolbar To open or close a toolbar select the ‘Toolbars’ option from the View menu:
This button…
does this…
Connect
Open the DMX Connections window where you can connect
your console’s DMX outputs and any external Ethernet-DMX
interface boxes to the patch universes.
Chooser & Timeline window toolbars There are nine toolbars available on the Editor windows
Update toolbar All the buttons, on this toolbar, are available on the standard soft button set.
However if you have re-configured the soft buttons this toolbar may be useful:
This button…
does this…
Opens a new Cuelist in the Editor
Opens an existing Cuelist in the Editor
Store Part
displays the Store Part window where you can save the
contents of the editor to any cue in any cuelist. Store part
provides many options and must be used for tracking to
operate correctly. See Store Part on page xxx
Vista User Guide, Version 2 3‐11 Toolbars This button…
Store Look
Using the interface does this…
displays the Store Look window where you can save the
complete output (the look on stage). Storing this way will
ensure that when you play a Cue back it will appear exactly as
it did when you saved it
Clear all information coming from the Live tab.
Clear
If a Cuelist tab is selected this button closes that tab.
Update
displays the Update window where information coming from
the Editor (the Live tab or any Cuelist tab) can be used to
update one or more Cues and Presets.
Blind
Turns the output from the editor off. In this mode you can still
edit cues but there will be no output sent from the editor to
your fixtures.
Live
displays the Live time window where you can set a fade time
that applies to any selections you make from the editor
palettes or presets.
Edit toolbar To open or close a toolbar select the ‘Toolbars’ option from the View menu:
This icon…
Ctrl X
Ctrl C
Ctrl V
does this…
Cuts the selected item.
Copies the selected item
Pastes the selected item.
Undo toolbar To open or close a toolbar select the ‘Toolbars’ option from the View menu:
This icon…
3‐12 does this…
Vista User Guide, Version 2 Using the interface This icon…
Ctrl+Z
Ctrl+Y
Toolbars does this…
Undo the last action
Redo the last action
Fixture selection toolbar To open or close a toolbar select the ‘Toolbars’ option from the View menu:
This icon…
does this…
Previous selection
Vista remembers the last set of fixtures you selected;
you use this button to toggle back to your previous
fixture selection.
Next selection
If you have used the previous selection command this
button will toggle back to the fixture selection you had
before pressing previous selection.
Previous Fixture
Next Fixture
De-select all
Used to step through fixtures, selects the last fixture (or
the one before the current selection) and de-selects the
others. Each subsequent press selects the previous
fixture. Useful when focusing fixtures.
Used to step through fixtures, selects the 1st fixture (or
the one after the current selection) and de-selects the
others. Each subsequent press selects the next fixture.
Useful when focusing fixtures.
De-selects all fixtures
Inverts the fixture selection (i.e. all selected fixtures are
de-selected and all de-selected fixtures are selected).
Invert
All
Selects every fixture.
Selects all the active fixtures (i.e. those that have
Intensity).
Active
Vista User Guide, Version 2 3‐13 Toolbars This icon…
Using the interface does this…
Select all the fixtures that are programmed in the
current cue.
Programmed
Command Line toolbar See Using a keypad in the programmer windowon Page 5-51
Fan toolbar The fan toolbar is used to set how Feature values and Event times are spread.
This option…
Linear Fan
Diverged from centre.
Fan from end
does this…
Fanned values radiate in both positive and negative
directions from the base value, starting from the centre
of the fixture selection
The fanned feature values radiate in one direction from
the base value, starting from the first selected fixture.
Linear from Start
Fan from start
The fanned feature values radiate in one direction from
the base value, starting from the last selected fixture.
Linear from End
Fan from centre.
Linear from Extremities
Inverted fan
Diverged from
extremities
Fan from both ends
Linear from Centre
The fanned feature values radiate in one direction from
the base value, starting from the first and last selected
fixtures.
The fanned values radiate in both positive and negative
directions from the base value, starting from the first
and last selected fixture.
The fanned feature values radiate in one direction from
the base value, starting from the centre of the fixture
selection.
 To fan a feature or events, select the fan mode and hold the Yellow modifier
or Control key while setting the feature value or dragging the event bars.
3‐14 Vista User Guide, Version 2 Using the interface Toolbars Components toolbar The components toolbar includes buttons to create new Presets, Groups and
Extracts
This option…
Preset
Group
Extract
Vista User Guide, Version 2 does this…
Opens the create New Preset window.
Opens the create New Group window.
Opens the create New Extract window.
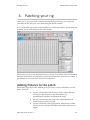
3‐15 Patching your rig Adding fixtures to the patch 4. Patching your rig Once you’ve got your Vista system connected and powered up you can patch
your fixtures the way you want them using the Patch window.
If it’s not already open click on the Patch icon or select the ‘Patch’ option from the
Window menu, Vista displays the Patch screen:
This is where you set up all the fixtures in your rig. You tell the Vista which DMX
channels each fixture is assigned to, and in which universe, and can set a range of
parameters to customise how each fixture operates.
Adding fixtures to the patch The Fixture Type box in the sidebar gives you a few ways to add fixtures to the
patch. You can:
•
choose a fixture from the ‘Factory’ folder, which lists the
most up to date fixtures in the Vista library by
manufacturer and then in alphabetical order.
•
choose a fixture from the ‘User’ list, which includes all
fixtures that you have created.
•
choose a fixture by first typing in the ‘Search’ box to filter
the list down to just those fixtures that match what you’ve
typed.
Vista User Guide, Version 2 4‐1 Adding fixtures to the patch Patching your rig Choosing a fixture from the Factory list To add a fixture from the Factory list:
1.
Click the ‘+’ symbol beside ‘Factory’ in the Fixture Type box. Vista displays
a list of manufacturer’s folders.
2.
Click the ‘+’ symbol beside the name of the manufacturer you want, to
display the list of fixtures in that folder.
3.
Scroll down the list until you find the fixture you want.
Adding the fixture to the patch panel Once you’ve selected the fixture you want, there are two ways to add it to the
patch panel:
•
you can drag and drop one or more fixtures onto a specific
DMX location on the panel, or
•
you can use the Patch tab to place multiple copes of the
fixture onto the patch panel.
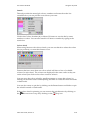
Dragging and dropping individual fixtures To patch fixtures this way, just click on the name of the fixture in the Fixture type
box, type a number in the ‘Quantity’ box and drag the fixture(s) over to the spot
on the patch panel where you want it.
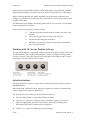
When you ‘drop’ the fixture, Vista fills the required number of DMX channels
with that fixture’s details. This example shows 8 Vari*lite VL2500 spot fixtures
that use 22 DMX channels each, dropped onto channel 1:
Once you’ve dropped a fixture onto the patch panel you can move it around to
any channel by clicking on it and dragging it to a new location.
Vista represents the fixture as a solid coloured bar with an ID number before the
name. The bar covers as many DMX channels as the fixture needs, and some
fixtures will take up more channels than others.
A solid colour shows that this fixture is currently selected. If you click anywhere
else in the patch panel, Vista de-selects the fixture and makes the colour
transparent to show that it’s no longer selected.
4‐2 Vista User Guide, Version 2 Patching your rig Adding fixtures to the patch In our example above the selected fixture is called ‘2 VL2500Sp’. This title
consists of two components:
•
a unique ID number [2], that Vista assigns automatically.
This number identifies the fixture uniquely within the
whole system, across all the universes (i.e. no two fixtures
will ever have the same unique ID number).
•
a name (VL2500Sp)), which you can change if you want in
the Name field on the Properties tab.
Patching multiple fixtures with the Patch box If you prefer using the keyboard to patch your fixtures you can use the Patch tab
in the sidebar.
You use this feature to add multiple instances of a fixture at once. To do this:
1.
Select the fixture you want from the ‘Factory’ or ‘User’ lists in the Fixture
Type box.
2.
In the Quantity field, enter how many of this type of fixture you want to add.
3.
If not already selected, click the Patch tab to display the Patch box:
4.
If you want to give the fixture a different name, type it in the Name field.
5.
If you want to assign a specific set of unique ID numbers to this group of
fixtures, click in the Fixture Number from field and set the unique ID
number (e.g. <44>) you want for the first fixture in the group. If you don’t set
this, Vista assigns the next valid number.
6.
Type a number in the ‘Multi Patch’ box if you want multiple copies to be
patched as one fixture. Use this option, for example, when patching multiple
dimmers as a single fixture.
Vista User Guide, Version 2 4‐3 Changing universes Patching your rig 7.
In the DMX Universe field, Vista automatically displays the number of the
currently selected universe. If you want to add these fixtures to another
universe, enter the universe number.
8.
In the DMX address field, set the number of the DMX channel where you
want this group of fixtures to start. If you’ve already added any fixtures to
this universe, Vista displays the next channel number in sequence.
9.
If you prefer, you can patch fixtures to an ‘absolute address’ For example
typing 513 in the Absolute address field, automatically sets the Universe to 2
and the DMX number to 1. If you’ve already added any fixtures to this
universe, Vista displays the next channel number in sequence.
10.
In the Spacing field, Vista displays the number of channels each instance of
the fixture you’ve selected will take up. If you want to leave empty channels
between each fixture you can increase this number. For example, if a fixture
normally uses twelve channels and you increase this number to 14, Vista
leaves a gap of two channels between each fixture in the group.
11.
When you’ve set all the fields the way you want them, click the Patch button.
Vista adds the group of fixtures to the patch panel.
 If you’ve already added a bunch of fixtures between say, channel 10 and
channel 50, and you add another batch starting at channel 1, Vista fits as
many of them as it can into channels 1 to 9, then ‘flows’ the rest over to
channel 51.
 After you type in the search box you can use the ‘Down Arrow’ button on
your keyboard to move the cursor into the list of fixtures and then tab
through the Quantity and other fields.
Changing universes Each universe can only handle a certain number of fixtures, depending on the
number of DMX channels each fixture needs. To add fixtures to another universe,
click another Universe tab at the top of the patch panel to display the next set of
DMX channels.
Re‐arranging fixtures on the patch panel Moving fixtures around the patch panel Once you’ve added fixtures to the panel you can re-arrange them however you
want. Just select the fixtures you want and drag them to a new channel; when
you drop them on the screen, Vista re-arranges them all from that channel.
4‐4 Vista User Guide, Version 2 Patching your rig Setting fixture properties Note that you can’t place them in such a way that any of the channels will ‘fall
off’ the end of the universe.
Renaming fixtures To rename one or more fixtures select them in the universe panel and choose the
Properties tab in the sidebar:
Enter the name you want to give the selected fixtures in the ‘Name’ field and hit
Enter. Vista renames all the fixtures you had selected.
Renumbering fixtures To change the unique system-wide ID number (e.g. <12>) of a fixture (it is not
possible to renumber more than one fixture at a time):
1.
Select the fixture in the universe panel.
2.
Choose the Properties tab in the sidebar.
3.
In the ID field, enter the new ID number and hit Enter on your keyboard.
Deleting fixtures You can delete fixtures from the patch panel at any time To do this:
1.
Select the fixture in the universe panel.
2.
Select the ‘Delete fixtures’ option from the Patch menu or right click on the
fixture(s) you want to delete and select ‘delete’ from the popup menu.
Setting fixture properties Once you’ve added the fixtures to the patch panel and placed them where you
want them, you can set a number of properties for each fixture using the
Properties and Transforms tabs in the sidebar.
Vista User Guide, Version 2 4‐5 Setting fixture properties Patching your rig To view and set the properties for one or more fixtures, use the pen to select the
fixtures you want on the patch panel. Vista displays the details of those fixtures
in the Properties and Transforms tabs:
 If you select multiple types of fixture, Vista displays the details of the first
type you selected. If the Patch box is currently displayed, press the
Properties tab to display the Properties box.
Properties tab Name
The name you entered or Vista assigned to this fixture when you
dropped it onto to the patch panel. You can edit this here if you
want to.
ID
The unique system-wide ID number assigned to this fixture
when you dropped it onto the patch panel. You can change this
number here if you want to, but note that Vista won’t allow you
to use a number that’s already assigned to another fixture.
Type
This field is not editable. To change the type of fixture without
having to remove it click on the ‘Change Fixture Type’ button
(see Swapping a fixture type).
Notes
This field is used to display notes about the fixture. You can add
whatever you like in this field.
Transforms tab Preheat
A percentage value that sets the voltage the fixture lamp will sit
at until you switch it on. This is useful for lamps such as Par 64s
that take time to switch on from a cold start.
Limit
A percentage value that determines the maximum intensity the
fixture will ever reach. This is useful if you want to prolong
4‐6 Vista User Guide, Version 2 Patching your rig Setting fixture properties lamp life or prevent fixtures from ever reaching full intensity.
Dimmer
Curve
This popup lets you select a dimmer fade curve. The default
option is Linear but you can select one of the available options;
Linear, Damp, Snap Start, Snap end, Square Law, Inverse
Square, Switch, Hot power, Flourescent and Sinus
Preview in
Chooser
Check this box if you’d like the fixture icons, in the chooser, to
display the effects of the Intensity transforms.
Invert pan
Selecting this checkbox reverses the sweep of the pan for this
fixture. This is useful when you’re coordinating the sweep
directions of fixtures hung in different directions.
Invert tilt
Selecting this checkbox reverses the sweep of the tilt for this
fixture. This is useful when you’re coordinating the sweep
directions of fixtures hung in different directions.
Swap
pan/tilt
Selecting this checkbox swaps the pan and tilt controls, so the
fixture will pan when given a tilt command and vice-versa. This
is useful for coordinating the movements of fixtures hung on
vertical trusses or pipes.
Preview
Check this box if you’d like the fixture icons, in the chooser, to
display the effects of the Position transforms.
Advanced transforms The advanced button provides access to more Fixture ‘Transformers’ that allow
you to further customize fixtures. For example the Pan and Tilt Offset parameters
allow you to correct the home position for fixtures that are hung at an angle.
To add a transform click the Advanced button to open the transform window
then click the Add button to choose a transformer.
Vista User Guide, Version 2 4‐7 Viewing the patch in different ways Patching your rig Some of the transformers are also available from the Properties tab as described
above. To choose one of the advanced transformers click on Pan offset or Tilt
Offset.
This option…
does this…
Minimum
Sets the minimum (percentage) value for this feature.
For example setting a value of -25 on Pan means the
fixtures will only pan left ¾ of their normal range
Maximum
Sets the maximum (percentage) value for this
feature. For example setting a value of -25 on Pan
means the fixtures will only pan left ¾ of their
normal range
Offset
Sets the offset angle. For example setting a Pan offset
of 45 would move the fixtures Home position by 45
degrees
Value Curve
This popup lets you select a fade curve. The default
option is Linear but you can select one of the
available options; Linear, Damp, Snap Start, Snap
end, Square Law, Inverse Square, Switch, Hot
power, Flourescent and Sinus
Invert
Preview in Chooser
Check this option to see the effect of the transform
shown on the fixture chooser icons.
Channels tab This is a list of the features and channel numbers of the fixture and which DMX
channel is controlling each feature.
Viewing the patch in different ways Vista gives you three different views of your patch so you can get different types
of information about the patch. To change the view, select the table, List or DMX
option from the View menu or click one of the three corresponding buttons: in
the toolbar.
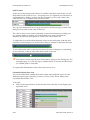
4‐8 Vista User Guide, Version 2 Patching your rig Viewing the patch in different ways Table view The Patch screen defaults to the Table view, as shown earlier in this section. This
is the view you will use most of the time: here you can drag and drop fixtures
into the patch panel for each universe and arrange them the way you want them.
List view If you choose the List option Vista displays the fixtures as a list with columns for
the fixture:
You can choose the columns you want to show or hide by right-clicking in the
header row and choosing the fields you want from the popup menu. You can
also re-arrange the columns by clicking on the column name and dragging it to
the left or right. The default column arrangement is:
Fixture Label (as shown in the chooser window),
ID number
Name
Fixture type
Patch part – for fixtures which re patched in 2 or more parts. For example some
fixtures have a Intensity (Dimmer) part that is patched separately
DMX Universe
DMX Address
If you click on any of the column headings the list will sort by that column. Click
again to change the sort from ascending to descending or vice versa.
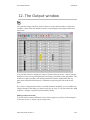
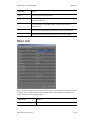
DMX view If you choose the DMX option Vista displays a table view where each cell shows
the DMX channel and its output level:
Vista User Guide, Version 2 4‐9 Controlling the fixtures Patching your rig You use this screen to display the output values of each and every DMX channel.
Each cell displays the channel number and it’s DMX output value. The cells are
clear if there is no output and change to a highlighted box if the output is
adjusted. To display another output simply click on one of the other Universe
tabs at the top of the display.
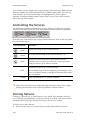
Controlling the fixtures The Patch menu includes commands to control whatever fixtures are currently
selected on the Patch panel there are also buttons for three of these commands:
Note that only some fixture types support these functions; refer to the user guide
for your fixture types.
This command…
does this…
Strike
Ignites the lamps in the selected fixtures.
Douse
Switches off the lamps in the selected fixtures off.
Reset
Resets the selected fixtures to their factory default
settings. This is useful if a fixture has a control problem
and you need to get it ‘back to normal’.
Holds the fixture in it’s current settings.
Park
For example to provide fixed lighting for backstage.. Once
you’ve parked a fixture it will ignore all instructions until
it is un-parked.
Unpark
Sets a parked fixture to operate normally.
 These five commands are available through the Fixture menu and by rightclicking on the fixture icons in the Programmer or Patch window.
Cloning fixtures Cloning is a special way to add fixtures to your patch. This method is useful if
you’ve already programmed your show and want to include some new fixtures
automatically in any Clips, Groups and Presets that you’ve created.
To clone one or more fixtures:
1.
4‐10 Select the fixture(s) you want to clone from the Patch table or list view.
Vista User Guide, Version 2 Patching your rig Exporting and importing patch information 2.
Select the ‘Clone Fixtures’ option from the Patch menu or right-click on the
patched fixture and select Clone from the popup menu. Vista creates a clone
of the selected fixture(s) in the fixture pool at the bottom of the Patch
window
3.
Drag the cloned fixture(s) into the patch table.
 You can change the fixture type of the cloned fixture(s) by selecting the
‘Change Fixture Type’ option from the Patch menu,
Exporting and importing patch information To save time, you can import and export patch information from commaseparated value (.csv) files.
Exporting the patch You can also export a .csv file containing your current show’s patch information.
To do this:
1.
Select the ‘Export Patch file…’ option from the Patch menu. Vista opens the
Export Patch window
2.
Give the file a name. The .csv extension is automatically appended.
3.
Navigate to the directory or folder whee you want to save the file.
4.
Click the Save button to confirm and the new fixtures are added to the patch.
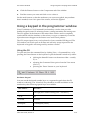
Importing the patch You can also import a .csv file containing your patch information. You can
import a file that you have exported from another show or you can create a file in
a text editor or spreadsheet program. The easiest way to do this is to create a
spreadsheet laid out as follows and save it as a .csv file using the Save as
function.
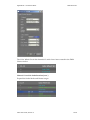
ID
Univ:Adrs
Fixture Type
Fixture Name
1
3:2
Dimmer
Dimmer
36
3:24
Dimmer
Dimmer
41
3:75+3:34
copy_of_Scroller Dimmer
Scrl Dim
42
3:76+3:35
copy_of_Scroller Dimmer
Scrl Dim
101
1:1
Mac 2000 Wash (Colour Wheel) 16 bit
Mc2000Wc
102
1:22
Mac 2000 Wash (Colour Wheel) 16 bit
Mc2000Wc
201
2:1
ColorSpot 700E AT Mode 1
CSp700a1
202
2:37
ColorSpot 700E AT Mode 1
CSp700a1
301
1:221
VL2000 Spot Enhanced 16 bit
V2000Se6
Vista User Guide, Version 2 4‐11 Exporting and importing patch information Patching your rig 302
1:241
VL2000 Spot Enhanced 16 bit
V2000Se6
316
5:1
Color Block 2 Mode 3
ColBk2m3
317
5:17
Color Block 2 Mode 3
ColBk2m3
432
9:1
MediaMaster Layer Full 1.0
MeMaLF10
433
9:44
MediaMaster Layer Full 1.0
MeMaLF10
437
12:22
VL3000 Spot
VL3000Sp
438
12:50
VL3000 Spot
VL3000Sp
In this example the spreadsheet has a header row, which is optional, but shown
here for explanation. The columns are laid out like this:
•
an ID (1), which determines the fixture’s unique ID
•
a Universe : DMX address number (1:1), that sets the
Universe and DMX start address for this fixture
•
a Fixture Type (<VL3000 Spot>), that sets the type of
fixture that will be patched
•
a Fixture Name (<VL3000Sp >), that sets the fixture name.
For two-part fixtures (i.e. fixtures with an external dimmer that is patched
separately) you need to include both parts of the patch included in the
Universe/Address column. The format for the two parts is Control+Intensity.
In the example above, Fixture ID 41 is a Scroller Dimmer with the scroller part
patched to Universe 3 Channel 75 and the Intensity part patched to Universe 3
channel 34.
The ID, Universe:DMX Address information and Fixture Type must be in the .csv
file. If you don’t specify a valid Vista Fixture Type, Vista prompts you to choose
the correct fixture from a list when you import the file. The fixture Name does
not need to match the name used in the Vista library.
4‐12 Vista User Guide, Version 2 Patching your rig Configuring the DMX & Ethernet Outputs Configuring the DMX & Ethernet Outputs V2 Vista does not automatically connect Universes to the DMX outputs on your
console or to external Artnet devices. To make these connections you click the
Connect button on the toolbar to open the DMX Connections screen:
You use this screen to connect to Vista’s DMX outputs, to external Ethernet-DMX
interface boxes and to broadcast Art-net.
Vista consoles provide up to four 512-channel DMX outputs. You can add up to
twelve more outputs by connecting your own external ArtNet or PathPort
devices to the Ethernet port. You can also add DMX outputs to a console or
computer using the Vista USB-DMX cable.
To configure these connections, click the Universes button on the Patch screen
toolbar or select the ‘Connect universes’ option from the Patch menu.
This window shows any devices connected via Ethernet or USB to the console or
PC , and the connection details of the universe. You use it to set up the DMX
connections for each of your universes and to check that they are working
correctly.
 You can also connect more than one output to the same Universe. For
instance you can connect Universe 1 to DMX output 1 and to an Artnet
broadcast device
Vista User Guide, Version 2 4‐13 Configuring the DMX & Ethernet Outputs Patching your rig Connecting Universes to the Console DMX & Ethernet Outputs The DMX connections window lists all the internal DMX connections, USB-DMX,
Ethernet-DMX connection boxes and ArtNet compatible devices attached and
visible to the Vista:
In this example above you can see several entries: four are the T4 console’s
inbuilt DMX connections ; the others are Ether-Lynx (Art-net) DMX outputs
which are on an external interface boxes attached via Ethernet. You may also
have Pathport devices and the Vista USB to DMX cable.
 If you can’t see a device that you’ve attached to the Vista it may still be
possible to connect to it by using the ‘ArtNet Broadcasting’ mode.
To connect a console or control surface DMX output:
1.
Find the row that corresponds to the DMX output .
2.
Click on the box in the ‘DMX Universe’ column and either type a Universe
number or use the up and down arrow buttons to select the Universe you
want.
To connect an external interface box:
1.
Find the row that corresponds to the Interface box output. Some boxes will
have multiple outputs.
2.
Click on the box in the ‘DMX Universe’ column and either type a Universe
number or use the up and down arrow buttons to select the Universe you
want.
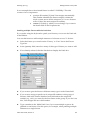
Disconnecting an output To disconnect a DMX output or interface box:
3.
Find the row that corresponds to the DMX output or interface box output.
4.
Click on the box in the ‘DMX Universe’ column and either type ‘0’ or use the
down arrow buttons to select the ‘Not Assigned’ option.
 To change the settings of an interface box you may have to disconnect it and
re-connect it with the new settings.
ArtNet Broadcast Mode Some ArtNet-compatible devices may not appear in the DMX Connections
window. In this case you can set Vista to broadcast ArtNet information without
first establishing communication with the device. You can broadcast to up to four
universes. To do this:
1.
4‐14 Find one of the Art-net Broadcast Device lines, there are four available.
Vista User Guide, Version 2 Patching your rig 2.
Configuring the DMX & Ethernet Outputs Click on the box in the ‘DMX Universe’ column and either type a Universe
number or use the up and down arrow buttons to select the Universe you
want.
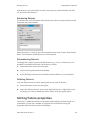
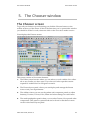
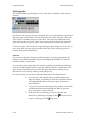
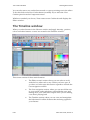
Vista User Guide, Version 2 4‐15 The Chooser window The Chooser screen 5. The Chooser window The Chooser screen To get all your fixtures up and running you click the Chooser button on the
toolbar at the top of the screen. If this is the first time you’ve opened this window
you should be in the Live tab, otherwise click on the Live tab to make it active.
Vista displays the Fixtures screen:
This screen consists of four main elements:
1.
The Editor control section where you can select to work with the Live editor
tab or any Cuelist you have open. If you have a Cuelist open this section
expands to include the Cue navigation controls.
2.
The Fixture layout panel, where you can display and arrange the fixture
icons to suit your requirements.
3.
The sidebar where you can use the palette and component panels to adjust
Intensity, Position, Colour, Gobo, Beam and other settings for each fixture.
4.
The multi-quickpicker panel where you can select Presets, Groups and other
components. This panel is optional and can be closed so that there is more
room for the fixture layout panel.
Vista User Guide, Version 2 5‐1 Arranging fixtures in a layout The Chooser window Arranging fixtures in a layout Vista displays all of the fixtures you added on the Patch screen as icons on the
Fixture layout panel. When you first view this screen, the fixtures are arranged in
numerical order, by unique ID, as a bank of icons.
To re-arrange the fixtures:
1.
Click on the ‘Locked’ button at the bottom of the Chooser window so that it
changes to ‘Unlocked’.
2.
Drag and drop the fixture icons around to new locations on the screen so
that they suit you.
3.
To undo a move press Ctrl + Z or select the undo option from the Edit menu.
4.
When you are finished Click on the ‘Unlocked’ button so that it changes back
to ‘Locked’.
 If you are moving a Group icon, click and hold on it while moving to avoid
selecting and moving the individual fixtures in the group.
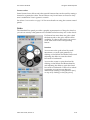
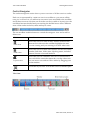
Zooming in and out You can adjust the magnification of the fixture layout panel or the size of
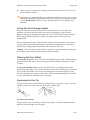
individual fixture and group icons.
To zoom the fixture layout panel in or out click on the magnify icons in the
bottom left corner of the fixture chooser window:
To zoom an individual fixture and group icon, hold down the yellow modifier
button or Control key while licking the icons
This icon…
does this…
zooms in or increases the size of the fixture icons.
zooms out or decreases the size of the fixture icons.
zooms to the icons to the normal scale.
 You can use the ‘Wheel’ on a suitable mouse to zoom the layout or icons.
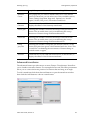
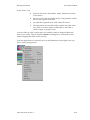
Using different layout views You can create as many different views of your fixtures as you like, each
arranged in its own away. To create a new layout view:
5.
5‐2 Right-click in the fixture chooser window and select the ‘New Layout’ option
from the popup menu. Vista opens the New layout window.
Vista User Guide, Version 2 The Chooser window Arranging fixtures in a layout 6.
Type a name for the layout and click OK. Vista creates a new layout and
adds a corresponding ‘tab’ at the bottom of the layout panel:
7.
Arrange the fixtures as described above.
8.
When you are finished Click on the ‘Unlocked’ button so that it changes back
to ‘Locked’.
To switch between layouts click on the tab you want to use. You can select
fixtures on one tab, switch to another tab and add more fixtures to the selection.
Managing layout views You can add, rename, duplicate or modify a layout view. To do this select the
‘Manage Layouts’ option from the Chooser menu. Vista opens the Layouts
window:
The layout window is divided into three panels:
Layouts The Layouts panel shows all the layouts you have created. You can:
Vista User Guide, Version 2 5‐3 Arranging fixtures in a layout The Chooser window •
Rename a layout by double-clicking on the name and
typing a new one.
•
Change the order of the layout tabs by selecting a layout
and moving it up or down the list using the Move Up,
Move Down, Move to Top and Move to Bottom buttons
•
Add a new Layout by clicking on the Add Layout button
•
Delete a layout by selecting it and clicking on the Delete
Layout button.
This icon…
does this…
<<
Moves the selected layout to the top.
<<
Moves the selected layout up.
>>
Moves the selected layout down.
>>
Moves the selected layout to the bottom.
+
Adds a new Layout
-
Deletes the selected layout..
Layout properties The Layout properties panel let’s you configure how a layout displays names,
IDs and other properties. To do this:
9.
Select the Layout you want to adjust in the Layouts panel:
This option…
does this…
Lock positions
Locks the layout so the fixtures cannot be moved. You
can also lock and unlock a layout using the
Locked/Unlocked button beside the layout tabs in the
Fixture Chooser window
Labels show Names
Sets the fixture icon text labels to show.
Labels show IDs
Sets the fixture icon ID numbers to show.
Labels ignore zoom
The label size remains fixed when the fixture icons are
zoomed in or out.
Notes ignore zoom
The notes size remains fixed when the fixture icons
are zoomed in or out.
Auto-show new
fixtures
Sets the layout to automatically include any new
fixtures added in the Patch window.
5‐4 Vista User Guide, Version 2 The Chooser window Arranging fixtures in a layout This option…
does this…
Snap to Grid
Locks or Unlocks the current layout. Fixture and
Group icons can not be moved when a layout is
locked. But they can be scaled.
Show Gridlines
Display a grid on the Fixture Chooser layout pane
Grid Spacing
Sets the space between the grid lines. The higher the
number the larger the grid spacing.
Save as Default
Saves all options set in the current layout as defaults
for any new layout.
 You can also adjust some of these settings on the ‘Layouts options’ menu
Hiding and ‘un‐hiding’ fixtures and groups You can use the Item Visibility panel to hide any fixtures, fixture types or groups
in a layout. This removes them from the display, but not from the patch.
To hide Fixture or Group icon or Notes:
1.
Select the Layout you want to work with from the list in the Layouts panel.
2.
Click the + symbol beside the Fixtures or Groups or Notes heading in the
Item Visibility section to show all the Fixtures types that you’ve patched, the
Groups that have been created and any Notes.
3.
To hide all Fixture icons of a type, un-tick the checkbox beside that fixture
type, or click the + symbol beside a fixture type to show all the individual
Fixtures of that type.
4.
To hide all Group, un-tick the checkbox beside ‘Groups’, or click the +
symbol to show all the Groups that have been created.
5.
To hide all Notes, un-tick the checkbox beside ‘Notes’, or click the + symbol
to show all the Notes that have been created.
6.
To hide individual Fixtures, Groups or Notes of a type un-tick the checkbox
beside the items(s) you want to hide.
To reveal (unhide) hidden fixtures, tick the checkbox beside the items you want
to reveal.
 You can also hide fixture
and group icons and notes by right-clicking on the
icon(s) or note(s) and selecting Hide from the popup menu..
Vista User Guide, Version 2 5‐5 Arranging fixtures in a layout The Chooser window Layout options The Layout options submenu let’s you quickly configure some commonly used
layout properties. To do this:
1.
Select the Layout you want to adjust by clicking on its tab at the bottom of
the Fixture Chooser panel.
2.
Select ‘Layout options’ from the Chooser menu. Vista displays the submenu:
This option…
does this…
False Intensity
Gives the fixture icon intensity without sending any
level to the fixture(s)
Fixed label size
Keeps the fixture label size the same no matter the
zoom level of the icons.
Show selection order
Sets the icons to show a selection order number
whenever they are selected.
Show grid
Display a grid on the layout pane
Snap to grid
When on fixture icons snap to the grid cells
Show names
Sets the fixture icon text labels to show.
Show IDs
Sets the fixture icon ID numbers to show.
Auto-add new
fixtures
Sets the layout to automatically include any new
fixtures added in the Patch window.
Preview refresh rate
Sets the refresh rate for the icons. Higher refresh rates
and / or large numbers of icons use more processing
power.
Activating layout views
To activate a layout view, click on the tab for the layout you want to display:
Duplicating a layout
To duplicate a layout view, click on the tab for the layout you want to duplicate
then select the Duplicate Layout option from the Chooser menu. Vista displays
the Duplicate Layout window.
Type a name for the layout and click OK. Vista creates a copy layout and adds a
corresponding ‘tab’ at the bottom of the layout panel.
5‐6 Vista User Guide, Version 2 The Chooser window Arranging fixtures in a layout Layout organisation
There are a number of ways to customise layouts and the way the fixture icons
are displayed. To make a change select an option from the Chooser menu.
This option…
does this…
Colours and
Background
(submenu)
Opens a submenu
- Background colour
Opens a colour picker to set the background colour of
the layout panel
- Background image
Opens a window to select an image to use as a
background of the layout panel. An image size of
about 700 x 560px will fill the layout pane
- Erase Background
image
Removes the background image, if you’ve added one.
- Resize Background
Selects the background image which can be moved or
resized by dragging on the bottom right hand corner.
Click outside the background when finished.
- Icon Colour
Opens a window to set the outline colour of the
selected icon(s)
- Gel Colour
Opens a window to set the intensity colour of the
selected icon(s). Useful for simulating the colour filter
on a conventional fixture.
- Set note colour
Opens a window to set the colour of the selected
note(s). Changes the leader and fill colour.
Shrink to fit
Zooms the layout panel to fit all fixtures.
Label position
Moves the icon label to the right, left, top or bottom of
the icon.
Manage Layouts
Opens the Manage Layouts window.
Duplicate Layout
Creates a copy of the current layout and opens a
window where it can be named.
Layouts options
Opens the Layouts options window.
Layout organisation 2
 You can also adjust the layout and icon appearance
by right-clicking on the
layout or icon(s) or note(s) and selecting an option from the popup menu.
Vista User Guide, Version 2 5‐7 Arranging fixtures in a layout The Chooser window This option…
does this…
Manage Layouts
Opens the Layouts window where you can add,
delete, organise and customise your layouts.
New layout
Opens the New layout window.
Duplicate layout
Duplicates the current layout and opens a window to
name it.
Delete layout
Immediately deletes the current layout.
Rename layout
Opens the Rename layout window where you can edit
the name of the current layout.
Rename
Opens the Rename window where you can type a new
name for the selected fixture(s)
Renumber
Opens the Renumber window where you can type a
new name for the selected fixture(s)
Delete item
Hide items
Hides the selected fixture or group icon or note.
Unhide all items
Reveals all hidden items, on the current layout.
Resize items(s)
Allow you to resize the selected matrix
Rotate items
Lets you rotate the fixture icon(s), using an onscreen
handle, to any angle
Label position
Moves the icon label to the right, left, top or bottom of
the icon.
Add note
Adds a text box to the layout panel. If a fixture icon is
selected a leader line will be drawn between the icon
and the text box.
New Fixture Group
Creates a new fixture group containing all the
currently selected fixtures.
Update Fixture
Group
Updates the current group to contain whatever
fixtures are selected.
Create Matrix
Creates a new matrix grid that you can resize by
dragging on the bottom right hand corner.
Tip: Deselect all fixtures to enable this option.
Resize Matrix
5‐8 Allow you to resize the selected matrix
Vista User Guide, Version 2 The Chooser window Arranging fixtures in a layout This option…
does this…
Align
Lets you align a group of fixture icons, to the right,
left, top or bottom of the group.
Distribute
Lets you distribute a group of fixture icons vertically
between the top and bottom fixtures or horizontally
between the furthest left and furthest right fixture in
the selection.
Flip
Swaps the vertical or horizontal position of a group of
fixture icons. The left most fixture will move the right
most and so on.
Arrange in grid
Opens the Grid window to arrange the selected items
in a grid. Items can be arranged into rows and
columns and sorted by ID or selection order
Background colour
Opens a colour picker to set the background colour of
the layout panel
Background image
Opens a window to select an image to use as a
background of the layout panel. An image size of
about 700 x 560px will fill the layout pane
Erase Background
image
Removes the background image, if you’ve added one.
Resize Background
Selects the background image which can be moved or
resized by dragging on the bottom right hand corner.
Click outside the background when finished.
Icon Colour
Opens a window to set the outline colour of the
selected icon(s)
Gel Colour
Opens a window to set the intensity colour of the
selected icon(s). Useful for simulating the colour filter
on a conventional fixture.
Set note colour
Opens a window to set the colour of the selected
note(s). Changes the leader and fill colour.
Vista User Guide, Version 2 5‐9 Arranging fixtures in a layout The Chooser window Adding notes to the layout window You can add text boxes to the fixture window to help identify different fixture
types or areas. Notes can be either attached to an object on the layout, such as a
fixture, or can be independent.
To add a note you do this:
1.
To attach a note to a fixture or group, first select the item. For an
independent note make sure no fixtures or groups are selected.
2.
Right-click in the fixture window and select ‘Add note’ from the popup
menu. Vista creates a note on the layout.
3.
Type a note and then click on the layout background to finish.
To move a note first unlock the layout then click on the text and drag it to a new
location. To edit a note double click on the text and replace or change the text. To
delete a note right-click on the note and select ‘Delete item’ from the popup
menu.
Arranging fixtures in a grid You can arrange fixtures in rows and columns. To do this:
1.
Select the fixtures you want to arrange into a grid
2.
Right-click in the fixture window and select ‘Arrange in grid…’ from the
popup menu. Vista opens the Arrange in Grid window:
5‐10 Vista User Guide, Version 2 The Chooser window Arranging fixtures in a layout This option…
does this…
Rows
Specify the number of rows you want in the grid. If you
enter a value here the number of columns is calculated
automatically.
Columns
Specify the number of columns you want in the grid. If
you enter a value here the number of rows is calculated
automatically.
User ID
Sort the fixtures by ID number
Type / User ID
Sort the fixtures by type name then ID number
Selection Order
Sort the fixtures into the order they have been selected
3.
Click the OK button to arrange the fixtures.
Placing fixtures in a Matrix You can put fixtures in a special ‘Matrix’ container so that they can be controlled
individually or as a whole. When fixtures are placed on a matrix you can:
•
Select the matrix and apply settings to all fixtures within it
•
Select fixtures, in the matrix and apply individual settings
to just the ones you have selected
•
Apply matrix effects that run on the X and Y axis of the
matrix. For example you can have an intensity effect that
runs across the matrix like a sliding door or a colour effect
that runs around the matrix like a clock hand.
•
Apply an animated gif Video effect.
To create a matrix container and place fixtures in it:
1.
Right-click on the fixture layout panel and select the Create Matrix option
from the popup menu. Vista creates a matrix container on the current layout:
Vista User Guide, Version 2 5‐11 Arranging fixtures in a layout The Chooser window 2.
Adjust the size of the matrix by clicking on the handle on the bottom right
hand corner and dragging to the size you want.
3.
Drag your fixtures into the matrix. You can either drag them one by one or as
a group. If you drag a group of fixtures onto the matrix Vista places them
across and then down the matrix in ID order.
Selecting fixtures The simplest way to select fixtures is to click on the fixture or group icons one by
one but Vista provides three selection tools and several options to make more
complex selections.
Selection tools To select a number of fixtures you can draw a ‘marquee’ around (or over) the
fixtures you want. Vista provides three marquee tools.
To select the tool you want by click on one of the icons in the lower right corner
of the fixture layout panel or choose one of the ‘Selection tool’ options from the
Layouts menu:
This icon…
does this…
Draws a rectangular marquee as you click and drag
across a group of fixtures.
Let’s you select fixtures by drawing a freehand shape
around the ones you want.
Let’s you select fixtures by drawing a line through the
ones you want.
5‐12 Vista User Guide, Version 2 The Chooser window Arranging fixtures in a layout Sorting fixtures It’s often important to sort fixtures in a certain order. For example when you are,
storing groups, applying effects fanning parameters or copying and pasting
information from one set of fixtures to another.
Vista lets you show the selection order and quickly sort fixtures based on their
ID, selection order, layout position and more.
Displaying the selection order. To display the selection order, choose the ‘Show selection order’ option from the
Options sub-menu on the Layout menu.
Vista displays the selection order number in a small circle on the top left side of
the fixture icon:
Sorting fixtures You can sort fixtures in a number of ways. To do this, select the fixtures then
click the Sort order dropdown on the main toolbar. Vista displays the Sort popup
window:
This option…
sorts the fixtures in…
Custom Sort
An order you create in the Custom sort window. Custom sort
includes several advanced options as described below.
Selection
the order in which you selected them on the Fixtures chooser
layout.
ID
ID number order.
Vista User Guide, Version 2 5‐13 Arranging fixtures in a layout The Chooser window Random
random order. Each time you de-select and re-select fixtures
they are sorted into another random order.
Position
by columns and rows, from top left to bottom right, based on
their position in the layout window.
Manage Sorts
This option opens the Manage Sorts window where you can
customise and save sorts.
Creating custom sort orders When you select the ‘Custom Sort’ option Vista displays the Custom Sort
window:
You can use this window to create a new sort that includes advanced options for
grouping fixtures together, repeating applied settings and setting the type of fan
shape that will be used when fanning a value across the selected fixtures.
This option…
does this…
Sort Fixtures
by..
sets the basic sort type. The options are as described above –
ID, Selection Random or Position.
Fan Shape
Let’s you store a fan shape that will be recalled when a saved
sort order is selected. See ‘Fan shapes’ on page xxx
Curve
sets the distribution of fixtures, along the fan shape. The
normal setting is ‘Linear’and in this case the fixtures are
evenly distributed. Other curves, such as square and inverse
square will bunch some of the fixtures together and spread
others out.
Sort Direction
Sets the sort order to ascending or descending.
5‐14 Vista User Guide, Version 2 The Chooser window Arranging fixtures in a layout Fixture
Ganging
allow fixtures grouped together, so that if you spread or fan a
feature setting across some fixtures, the settings can be in
blocks and / or repeated throughout the selection. See the
examples below.
Blocking
Let’s you group fixtures in "blocks" of consecutive fixtures.
You can set just one block size, for example 2 or set several
different block sizes (e.g. first block has 4 fixtures, second
block has 6 fixtures and so on).
To set complex blocking separate the block sizes with a /
(forward slash). For example 4/6
Repeat
Ganging
Let’s you repeat feature settings on every 2nd, 3rd, 4th or any
increment of fixtures.
Save as…
Opens the Custom Sort ‘Save as’ window where you can
name and save your custom sort
Selecting Odd and Even numbered fixtures You can select just the odd or even numbered fixtures from the fixtures you have
selected by setting “Sort fixtures by” to ID and "repeat ganging" to 2 in the sort
dialogue. Then, using the next and previous fixture buttons, you can toggle
between controlling the odd and even fixtures.
Custom Ganging examples In these examples, there are 10 colour mixing fixtures selected and colour is
fanned across the fixtures using a Custom sort with the following Ganging
(Blocking and Repeat) settings:
1.
Blocking set to 3, Repeats set to ‘0’ (No repeats)
2.
Blocking set to 3, Repeats set to ‘2’
3.
Blocking set to 1/2/3, Repeats set to ‘0’ (No repeats)
4.
Blocking set to 2/3, Repeats set to 2
Vista User Guide, Version 2 5‐15 Arranging fixtures in a layout The Chooser window Custom Fan shapes In these examples, there are 10 fixtures selected and intensity is fanned across the
fixtures using the following Fan shapes:
1.
Fan from Centre:
2.
Fan from both ends:
Fan shapes The are several fan shapes that can be set and saved in a Custom sort.
This option…
Linear Fan
Diverged from centre.
Fan from end
Linear from Start
Fan from start
Linear from End
Fan from centre.
Linear from Extremities
Inverted fan
Diverged from
extremities
Fan from both ends
Linear from Centre
5‐16 does this…
Fanned values radiate in both positive and negative
directions from the base value, starting from the
centre of the fixture selection
The fanned feature values radiate in one direction
from the base value, starting from the first selected
fixture.
The fanned feature values radiate in one direction
from the base value, starting from the last selected
fixture.
The fanned feature values radiate in one direction
from the base value, starting from the first and last
selected fixtures.
The fanned values radiate in both positive and
negative directions from the base value, starting
from the first and last selected fixture.
The fanned feature values radiate in one direction
from the base value, starting from the centre of the
fixture selection.
Vista User Guide, Version 2 The Chooser window Arranging fixtures in a layout  To fan a feature or events, select the fan mode and hold the Yellow modifier
or Control key while setting the feature value or dragging the event bars.
 The Vista V1 "Mirror" option is replaced by the ‘Fan from Centre’ and
‘Inverted Fan’ shapes.
Managing your saved Sorts You can rename, duplicate or modify a saved sort. To do this select the ‘Manage
Sorts’ option from the Sort order drop down list. Vista opens the Manage Sorts
window:
To modify one of the built in sorts or a custom sort you’ve saved, do this:
1.
Select the Sort name in the left hand panel.
2.
Modify the Fixture sort, Fan options and other settings.
3.
Click the ‘Save’ button.
Renaming a Sort You can rename a sort by double clicking on the name, in the left column, and
typing a new name.
Duplicating a Sort To make a copy of a sort, select it and click on the ‘Duplicate’ button.
Deleting a Sort To delete a sort, select it and click on the ‘Delete’ button.
Vista User Guide, Version 2 5‐17 Using the Programmer Sidebar The Chooser window Using the Programmer Sidebar The Programmer Sidebar has two tabs:
The Palette tab includes panels to control all the main aspects of your lighting
fixtures: intensity, position, colour gobo and beam.
The Components tab includes the items you store such as Groups, Presets,
Extracts and Snapshots along with the in-built effects.
The Palette tab If it’s not already selected, click on the Palette tab in the sidebar
Summary or detailed view You switch between the ‘All’ (or summary) view and the detailed views of the
different control panels using the 7 buttons below the Palette tab.
This button…
does this…
All
displays a combined view of the most commonly used
controls for Intensity, Position, Colour, Gobo and Beam
displays a detailed view of the Intensity controls
displays a detailed view of the Position controls
displays a detailed view of the Colour controls
displays a detailed view of the Gobo controls
displays a detailed view of the Beam controls
Custom
5‐18 displays controls for every feature of the selected fixture(s).
These controls are mainly used to control features that do
not appear on the other panels or to set chanels to values
that are normally not used.
Vista User Guide, Version 2 The Chooser window The Palette tab Common features of the palettes All palettes have a popup menu that you open by clicking the palette type
button:
Click on the drop down arrow
popup menu
on any of the palette type button to open a
This option…
does this…
Clear
This option lets you clear all events for that parameter
type or just some of those events. For example the
Colour popup lets you clear the Colour wheel or Colour
Mix or just the individual CMY events
This option lets you reset all events for that parameter
type to their default setting (for example no intensity,
50% pan and tilt, colour white etc).
Home
This option opens the Preset window so you can create
a new preset.
Create Preset
Clicking on this option opens the Create effect window
where you can select an effect type, the features to
include and enter a name for the effect.
New Effect
This option lets stop effects that are running for that
parameter type
Stop effect
Many of the palettes have slider bars that provide a quick and easy way to set a
value:
To adjust a slider setting, either:
•
click the arrows at the left or right hand end to go to 0%
and 100% respectively
•
click and drag in the slider bar to set the value you want
•
click in the value box and type a value using the keyboard.
To set attributes for one or more fixtures, select the fixtures you want in the
Fixture Chooser panel, then click on the Palette you want to use.
Vista User Guide, Version 2 5‐19 The Palette tab The Chooser window Checking that everything is working One of the first things you’ll probably want to do after setting up your rig and
patching it all in on the Patch screen, is check that everything’s working. The
quickest way to do this is to select the fixtures, one-by-one or in groups on the
Fixture panel, and crank the intensity and colour up a bit.
To do this:
1.
Select the ‘All’ view of the palettes.
2.
Select one or more fixtures in the Fixture panel.
3.
Click the right-arrow icon at the end of the Intensity slider on the intensity
palette.
4.
Click anywhere in the colour palette.
5.
The selected fixtures show that colour at full intensity
 You can also use the encoder wheels to set Intensity, Position, Colour and
any other parameter.
 If you can’t see any output from your fixtures check that the Grand Master is
turned fully clockwise and that the faders on the Superplayback panel are
up.
Highlight and Lowlight When you are focusing or testing your fixtures you can use Highlight feature to
bring up the intensity of each fixture automatically when you select it.
To do this, either:
•
Click the
Highlight button – normally softbutton #4
(F4 on your keyboard or,
•
Select the Highlight option from the Tools menu (Ctrl+H).
You can alter how highlight works by updating the highlight and lowlight
presets. See The Highlight and Lowlight presets on page 5-47.
5‐20 Vista User Guide, Version 2 The Chooser window Using the All panel Using the All panel The All panel has controls for all the most commonly used features of your
fixtures. It provides a quick easy way to set Intensity, Position, Colour, Gobo and
Beam without swapping panels. The same controls plus any advanced ones are
available on the individual feature panels. See page xxx
Intensity In this view the Intensity panel shows the most used intensity features :
In this view:
•
the 10 to 90 buttons sets the intensity of the selected
fixtures to the corresponding percentage value
•
the Intensity slider controls the intensity of the selected
fixtures in a percentile range.
You’ll notice that as you change the intensity settings, the icons on the Fixture
panel change to reflect this.
Position The Position panel gives you control of the direction in which the selected
fixtures are aimed:
To adjust the position, click on the round target symbol and drag it to the spot
you want .
You’ll notice that as you change the position ‘compass’ on the Fixture panel icons
change to reflect this.
Vista User Guide, Version 2 5‐21 Using the All panel The Chooser window Fine Mode Some parameters, such as position, can be difficult to control when the palette is
in normal mode. To switch to fine click on the ‘Fine’ button. Repeat this to turn
fine mode off.
Setting colour The Colour palette provides four buttons so you can choose the way you want to
set your colours:
•
HSV – hue and saturation values
•
Sliders – Cyan, Magenta, Yellow or Red, Green, Blue or
Hue, Saturation, Value sliders
•
Swatch – colours by Lee name and number
•
Colour wheel – for fixtures that have colour wheels.
Hue and Saturation values The HSV tab provides a colour spectrum and a saturation slider:
To pick a hue and its saturation, just click on the shade you want in the spectrum
area, and drag the slider bar below the colour panel to set the saturation level.
Cyan, Magenta and Yellow/Red, Green Blue This tab gives you the option of setting your colour using either CMY or RGB or
HSV values:
Click the relevant ‘slider mode’ button to choose the method you want, then
adjust the sliders to set the colour.
5‐22 Vista User Guide, Version 2 The Chooser window Using the All panel Swatch This tab provides the actual gel colours, numbers and names from the Lee
swatchbook so you can pick the exact colour you want:
Click in the Colour, Number (#) or Name (N) button to sort the list by name
number or colour. You can also search for a name or number by typing in the
search box.
Colour wheel When using fixtures with colour wheels, you can use this tab to select the colour
slot (or position) you want this fixture to use:
Fixtures that have more than one colour wheel will show a line of available
colours for each wheel. The colours are displayed in the same order as they are
on the wheel. Just click on the colour swatch to select it.
You can move the colour wheel by small increments, to create slit colours, by
clicking on the Index button and adjusting the slider to rotate the wheel forwards
or backwards.
You can also rotate or spin the by clicking on the Rotate button and slider to spin
the wheel forwards or backwards:
If the colour wheel is spinning you can reverse the spin direction by clicking on
the
Reverse icon or stop it by clicking on the
Vista User Guide, Version 2 Stop icon.
5‐23 Using the All panel The Chooser window Setting gobo The Gobo summary panel displays icons of the gobos available on the selected
fixtures:
If you have only one type of fixture selected, the icons Vista displays represent all
the gobo types of that fixture. Fixtures that have more than one gobo wheel will
show a line of available gobos for each wheel. The gobos are displayed in the
same order as they are on the wheel. You can select a gobo from one wheel and
leave the other set to open or a gobo from each wheel to combine the patterns.
To choose a gobo, click on the icon representing the gobo shape you want. If you
have more than one type of fixture selected the gobo icons will be greyed out
because their gobos are different..
Rotation You can move the gobo wheel by small increments, to create split patterns, by
clicking on the Wheel and Index buttons and adjusting the slider to rotate the
wheel forwards or backwards.
You can also rotate or spin the Gobo wheel by clicking on the Wheel and Rotate
buttons and adjusting the slider to spin the wheel forwards or backwards. If the
gobo wheel is spinning you can reverse the spin direction by clicking on the
[Reverse Icon] or stop it by clicking on the [Stop icon]
On some fixtures you can rotate the individual gobos. For these fixtures:
•
You can move the selected gobo by small increments, to
align the image, by clicking on the Gobo and Index buttons
and adjusting the slider to rotate the gobo clockwise or
anti-clockwise.
•
You can also spin the selected gobo by clicking on the Gobo
and Rotate buttons and adjusting the slider to spin the
gobo clockwise or anti-clockwise.
•
If the gobo slot is spinning you can reverse the spin
direction by clicking on clicking on the
stop it by clicking on the
5‐24 Reverse icon or
Stop icon.
Vista User Guide, Version 2 The Chooser window Using the All panel Setting beam size and focus The summary Beam panel has two tabs for controlling the most used beam
attributes:
Focus The Focus tab controls the focus and zoom of the selected fixtures:
Use the focus slider to soften or sharpen the beam shape. Use the Zoom slider to
make the beam spread softer or sharper.
Iris The Iris tab controls the beam size (or diameter) of the selected fixtures, if they
have an iris.
Use the iris slider to make the beam size. Use the Zoom slider to make the beam
size smaller or larger.
Vista User Guide, Version 2 5‐25 Using the detailed panels The Chooser window Using the detailed panels Intensity Click on the Intensity button to select the detailed settings panel for all fixture
channels in the Intensity group:
In this view:
•
the 10 to 90 buttons
set the intensity of the
selected fixtures to the
corresponding
percentage value.
•
the end most
percentage buttons set
the level to 0% or
100% while the others
increase or decrease it
in 5% or 10%
increments.
•
the Intensity slider
controls the intensity
of the selected fixtures
in a percentile range
•
if the selected fixtures
have a strobe
capability, the Strobe
slider controls the
speed of the strobe
•
if the selected fixtures
have blackout
shutters, the Opened
and Closed buttons
set the shutter
position.
Custom values Some fixtures have effects and other special features that can be used by setting a
channel to a particular value. These features vary from fixture to fixture so they
aren’t included in Vista’s ‘generic’ controls.
See About Custom values on page 5-35 for more details on using the custom control
panels.
5‐26 Vista User Guide, Version 2 The Chooser window Using the detailed panels Position The detailed Position panel provides a larger version of the position target panel.
You’ll notice that on this panel you can also adjust just the pan or just the tilt by
using the Pan and Tilt sliders located on the bottom and left side of the target
panel.
Fine mode Position, can be difficult to control when the
palette is in normal mode. To switch to fine
mode click the ‘Fine button’.
Flip Click this button to rotate and invert the
fixture(s) so that it is pointing at the same
position.
Custom values Some fixtures have effects and other special
features that can be used by setting a
channel to a particular value. These features
vary from fixture to fixture so they aren’t
included in Vista’s ‘generic’ controls.
See About Custom values on page 5-35 for
more details on using the custom control
panels.
Colour The detailed Colour palette let’s you choose how to control the colour mixing
mechanism and the colour wheel(s) in your fixtures:
Vista User Guide, Version 2 5‐27 Using the detailed panels The Chooser window The buttons, in the middle of the colour panel select the colour mechanism. There
are three options.
•
HSV – hue and saturation values.
•
Lee – Lee colour swatch.
•
Wheel – pick a colour from the fixture’s colour wheel
If a fixture only has a colour mixing mechanism (CMY / RGB) you can choose a
colour from the HSV or Lee swatch section and it will be applied to the mixer
mechanism. The colour wheel section will not be available.
If a fixture has a colour mixing mechanism (CMY / RGB) and a Colour wheel
you can choose a colour from the HSV or Lee swatch section and it will be
applied to the mixer mechanism. You can also choose a colour from the Wheel
section of the colour panel it will be applied to the colour wheel. This means you
can set different colours for the mix mechanism and the wheel.
If a fixture only has a Colour wheel(s) you can choose a colour from the HSV, Lee
or Wheel section of the colour panel it will be applied to the colour wheel. If you
choose colours from the HSV or Lee section the nearest colour on the wheel is
selected.
5‐28 Vista User Guide, Version 2 The Chooser window Using the detailed panels Hue and Saturation values When you select the HSV colour option the colour panel provides a colour picker
panel and a set of sliders:
To pick a hue and its saturation, just click
on the shade you want in the spectrum
area, and drag around to select a colour
and set the saturation level.
You can also adjust the colour using the
three sliders. Click the HSV, CMY or
RGB ‘slider mode’ button to choose the
method you want, then adjust the sliders
to set the colour.
Vista User Guide, Version 2 5‐29 Using the detailed panels The Chooser window Lee Swatch This option provides a list of Lee filters so you can pick a colour by it’s name,
number or swatch.
Click in the Colour, Number (#) or Name (N)
button to sort the list by name number or colour
swatch. You can also search for a name or
number by typing in the search box.
Wheel When using fixtures with a colour wheel(s), this option provides a graphic
representation of the colour wheel so you can see exactly what colours are
available and where they are on the wheel:
If a fixture has more than one colour
wheel the buttons above the colour
wheel will be available. To choose the
colour wheel you want to work with
click on the corresponding button.
You can move the colour wheel by
small increments, to create split
colours, by clicking on the Index button
and adjusting the slider to turn the
wheel forwards or backwards.
You can also rotate or spin the colour
wheel by clicking on the Rotate buttons
and adjusting the slider to spin the
wheel forwards or backwards:
If the colour wheel is spinning you can
reverse the spin direction by clicking
on the [Reverse Icon] or stop it by
clicking on the [Stop icon]
If you have more than one type of
fixture selected, Vista displays a tab for
each fixture type at the top of the
panel. . To choose the fixture type you
want to work with click on the
corresponding tab.
5‐30 Vista User Guide, Version 2 The Chooser window Using the detailed panels Custom values Some fixtures have effects and other special features that can be used by setting a
channel to a particular value. These features vary from fixture to fixture so they
aren’t included in Vista’s ‘generic’ controls.
See About Custom values on page 5-35 for more details on using the custom control
panels.
Gobo The detailed Gobo panel provides a graphic representation of the gobo wheel so
you can see exactly what patterns are available and where they are on the wheel:
If a fixture has more than one gobo wheel
the buttons above the gobo wheel will be
available. To choose the wheel you want to
work with click on the corresponding
button.
Rotation You can move the gobo wheel by small
increments, to create split patterns, by
clicking on the Wheel and Index button and
adjusting the slider to turn the wheel
forwards or backwards.
You can also rotate or spin the wheel by
clicking on the Wheel and Rotate buttons
and adjusting the slider to spin the wheel
forwards or backwards. If the colour wheel
is spinning you can reverse the spin
direction by clicking on the [Reverse Icon]
or stop it by clicking on the [Stop icon]
Vista User Guide, Version 2 5‐31 Using the detailed panels The Chooser window On some fixtures you can rotate the individual gobos. For these fixtures:
•
You can move the selected gobo by small increments, to
align the image, by clicking on the Gobo and Index buttons
and adjusting the slider to rotate the gobo clockwise or
anti-clockwise.
•
You can also spin the selected gobo by clicking on the Gobo
and Rotate buttons and adjusting the slider to spin the
gobo clockwise or anti-clockwise.
•
If the gobo slot is spinning you can reverse the spin
direction by clicking on the [Reverse Icon] or stop it by
clicking on the [Stop icon]
If you have more than one type of fixture selected, Vista displays a tab for each
fixture type at the top of the panel. . To choose the fixture type you want to work
with click on the corresponding tab.
Custom DMX Some fixtures have effects and other special features that can be used by setting a
channel to a particular value. These features vary from fixture to fixture so they
aren’t included in Vista’s ‘generic’ controls.
5‐32 Vista User Guide, Version 2 The Chooser window Using the detailed panels Beam The detailed Beam panel provides sliders for all the beam features and a graphic
representation of frame (shaping shutters) , if the fixtures have this feature:
Focus Use the focus slider to soften or sharpen
the beam shape.
Zoom Use the Zoom slider to make the beam
angle narrower or wider.
Iris The Iris tab controls the beam size (or
diameter) of the selected fixtures.
Vista User Guide, Version 2 5‐33 Using the detailed panels The Chooser window Framing The Frame tab is specifically for fixtures that have beam shaping frames, so you
can shutter-off parts of the beam:
To set the positions you want the frames to
be in on the selected fixtures, click and drag
each frame to the position you want, as
shown in this example:
You can also set the rotation angle of the
shape or continuously rotate the whole
shape using the slider:
•
Index – to turn the
framing shutters to
the preferred angle
click the Index button
and move the slider to
set the position.
•
Rotate – to
continuously rotate
the whole shutter
assembly click the
Rotate button and
move the slider to set
the speed and
direction.
Custom values Some fixtures have effects and other special
features that can be used by setting a
channel to a particular value. These features
vary from fixture to fixture so they aren’t
included in Vista’s ‘generic’ controls.
See About Custom values on page 5-35 for
more details on using the custom control
panels.
Custom The detailed Custom panel provides a separate mini setting panel for every
channel of the selected fixture. The mini panels are arranged in sections
according to their feature type – Intensity, Position, Colour, Gobo, Beam and
Miscellaneous. The ‘Misc’ section contains all the mini control panels for all
channels that don’t belong in the IPCGB feature groups.
Click on any of the Feature type headings to open that section.
5‐34 Vista User Guide, Version 2 The Chooser window Using the detailed panels About Custom values Some fixtures have effects and other special features that can only be used by
setting a channel to a particular value. These features vary from fixture to fixture
so they aren’t included in Vista’s ‘generic’ controls.
For example some fixtures have special settings for the Strobe channel that
provide a random strobe effect. Moving the Vista strobe slider to the left or right
will never set the effect running because the slider only operates in the (generic)
range that sets the strobe to fast or slow.
To access the special channel features you use the small Custom control panels
Custom panels The small custom panels are divided into 3 sections:
•
the top section shows the name of the channel in a colour
coded bar.
•
the centre section shows the channel range. This will
normally be the same as the channel name but will change
if a special range is selected – see below.
•
the bottom section shows the channel value. Normally this
is shown as a DMX value (0-255) but can be changed to a %
value by de-selecting the DMX button.
You can set a custom channel value in three ways:
•
click on the up and down buttons, in the bottom section, to
adjust the value by + or – 1 each time you click a button
•
click in on the value display to highlight it and type a new
value with the keyboard
•
click in on the value display to highlight it and while
holding the pen or mouse button down, not that the cursor
changes to an up/down arrow. Now move the pen or
cursor up or down as though you were adjusting a slider.
Vista User Guide, Version 2 5‐35 Using the detailed panels The Chooser window For many fixtures the Vista library includes information about the value channels
need to be set to for a particular effect. In this case you can click on the custom
panel’s title bar or double-click anywhere on the panel to open the Custom
feature window:
Custom feature window The custom feature window lets you select any special values or a value within a
range that is in the Vista library for the selected fixture:
This field…
does this…
Name
Shows the name of the channel or selected channel
range.
Range Fader (top)
Adjusts the channel value within the selected range if
such a range exists.
Channel Fader (lower)
Adjusts the channel value to any value in the DMX
range – 0-255.
Search
For fixtures with large numbers of custom values (for
example media servers) you can type in this field to
locate a special value or range by name.
Sort
For fixtures with large numbers of custom channels
(for example media servers) you can sort the values
by ID# (usually as the values appear in the fixtures
DMX channel chart) or by Name.
Icon Size
Adjusts the size of the custom value/range selector
buttons in the right hand column.
5‐36 Vista User Guide, Version 2 The Chooser window The Components tab This field…
does this…
Range buttons
In this column there will always be one button that
selects the entire channel range (i.e. 0-255).
If the Vista library includes information about the
fixtures custom values there will be a button for each
of the special values or value ranges. Clicking on the
button will set the channel to that value or range. If
it’s a range you can adjust the value, within that
range, using the top slider.
DMX / Units
This button selects between DMX values (0-255) and
units (normally 0-100)
Associated feature
panels
If there are other features that are associated with the
selected feature,they can be selected and adjusted
from within the window.
The Components tab If it’s not already selected, click on the Components tab at the top of the sidebar:
This is where you store, select and organize your Groups, presets, Extracts,
Effects, Cuelists and Snapshots. The window is divided into different areas that
allow you to:
•
choose how you want to view the components
•
choose the type of component you want to work with –
Groups, Presets, Effects, Extracts and Snapshots
•
choose a component and either activate it or modify it in
some way
•
create new pages that let you group components into
custom sets.
This screen provides quick access to all the elements used for programming and
playback of a show. To choose the component type you use the buttons at the top
of the left column:
This button…
does this…
QP1
displays a multi-panel ‘Quick picker’. The Quick pickers
provide an easy way to arrange and select Presets, Groups,
Extracts SmartFX and more.
QP2
displays a second multi-panel ‘Quick picker’.
Vista User Guide, Version 2 5‐37 The Components tab The Chooser window This button…
does this…
Groups
displays and let’s you select or modify the groups you’ve
saved.
Presets
displays and let’s you select or modify the presets you’ve
saved.
FX
displays and let’s you select any of Vista’s built in effects
Extracts
displays and let’s you select or modify the Extracts. you’ve
saved.
The parameter Filter bar If you are working with Presets, Effects or Extracts the Parameter Filter bar can
be used to filter the items that are displayed or the features that are stored:
If you are recording a Preset the filter bar shows which parameters are being
recorded and which are not. You can click on any of the icons to either include it
or exclude it. Included parameters are highlighted.
For more information about presets and filters see Presets on page 5-45.
If you are applying a item that includes more than one parameter type you can
use the filter bar to filter out any parameters you don’t want to use. For example
you might have a Preset that includes Intensity, Position and Colour but you
only want to use the Colour part. In this case you would click on all the filter bar
icons except Colour before selecting the preset.
When you are applying presets from the Components panel the Preset will fade
in over the ‘Live Time’ . For example you might be working in the Live
programmer tab and want to fade some lights into a colour or position over
several seconds. To do you use the Live Time window:
Components window tools If you are working with Groups, Presets, Effects or Extracts there is a toolbar at
the bottom of the panel that acts on the list of items
This button…
does this…
[+]
Creates a new component of the selected type.
[-]
Allows you to delete a component
Search
typing in the ‘Search’ box filters the list down to just the items
that match what you’ve typed.
5‐38 Vista User Guide, Version 2 The Chooser window The Components tab This button…
does this…
X
Clears the search box.
Quicker Picker panels The Quick Picker panels provide an easy way to select any of the following items
you’ve created:
•
Groups
•
Presets
•
SmartFX (FX templates)
•
Cuelists
•
Extracts
•
Favourites
•
Snapshots.
Vista User Guide, Version 2 5‐39 The Components tab The Chooser window The Sidebar has two panels (QP1 and QP2)
that normally display three quickpicker
panels. To adjust size of a Quick picker click
on the divider bar and drag up or down. To
hide one or two of the Quickpickers drag
the divider(s) to the bottom of the panel.
You can set what a Quick picker displays by
choosing an option from the drop-down
menu at the top left side of each column.
Once you’ve chosen the type of information
you want the column to display, you can
also select what page you want to display
within that column using the second dropdown menu.
To add a page to a quickpicker right click
on the panel you want and select ‘add new
page’ from the popup menu.
To delete a page from a quickpicker right
click on the panel you want and select
‘remove page’ from the popup menu.
Deleting a page does not delete the items on
that page.
To copy an item hold the ‘Alt’ key (or Green
modifier) while dragging the item from one
page to another.
 You can also have Quickpickers at the bottom of the main programmer
window and on external touchscreen monitors.
The Multi Quickpicker The multi-quickpicker contains 4 quickpicker panels and normally appears at the
bottom off the Fixture Chooser and Timeline window. If it’s not already open
select the ‘Multi Quick Picker’ option from the View > Add Floating Window
menu, Vista displays the Multi Quickpicker
5‐40 Vista User Guide, Version 2 The Chooser window The Components tab The Multi Quickpicker is a floating window, it can either be docked inside the
main window or it can float on top of or beside the main window.
To un-dock a floating window, click on the header bar and drag it off the main
window. To dock a floating window drag it inside the fixture layout or timeline
panel and drop it on the left, right. top or bottom of the panel.
The Multi Quickpicker normally display four quickpicker panels. To adjust the
width of a Quick picker click on the divider bar and drag left or right. To hide
one or two of the Quickpickers drag the divider(s) to the right of the panel.
 You can also have Quickpickers on external touchscreen monitors.
Quickpicker popup menu Depending on the component there are various options available on the
Quickpicker context menu. To open this menu right-click on the label area of any
component. Vista displays the context menu:
This option…
does this…
Cuelist Properties
Opens the Cuelist properties window – see below.
Lock item
Locks the selected component. Components that
have be locked will not be altered or replaced when a
new Page or Snapshot is loaded.
Clear item
Clears the selected playback – the assigned
component is removed from the control.
Vista User Guide, Version 2 5‐41 The Components tab The Chooser window This option…
does this…
Clear page
Clears all playbacks on the current page – the
assigned components are removed and a blank page
is left.
Delete page
Deletes the current page.
Set as default playback
layout.
Sets the selected cuelist’s buttons and faders as the
defaults for all new cuelists.
Snapshot enabled
Allows the selected playback to be included in a
snapshot.
Set as default cuelist
configuration
Sets the selected cuelist’s properties as the defaults
for all new cuelists.
Adjust contrast
Adjusts the contrast of the selected LCD window
 You can also play and release cuelists by selecting them (Alt + select to
release) in a Quickpicker that has been configured this way – see below.
Arranging the Quicker Picker panels When you first display a Quick picker panel you’ll see the items are laid out as
buttons in a grid. You can re-arrange the items into a single or multi-column list
and change the how each item is displayed.
To do this click on the
5‐42 settings icon to open the Quickpicker settings window:
Vista User Guide, Version 2 The Chooser window The Components tab This button…
does this…
Icon size
adjusts the size of the icons displayed in the Quickpicker.
Text size
adjusts the amount of space available for the label.
Padding
adjusts the amount of space between the icons.
Icon
click this button to display just an icon for each item.
Label
click this button to display just a text label for each item.
Both
click this button to display both an icon and a text label for
each item.
Multi-list
click this button to arrange the items in a multi column list.
The items are laid out across and then down.
Single list
click this button to arrange the items in a single column list.
Touch screen
click this button to arrange the items in a grid suitable for
use on an external touchscreen.
Icon view
click this button to arrange the items in a compact grid of
icons without labels.
Auto-arrange
Arrange the icons by Name (alphabetically) or by ID
(number)
Cuelist
Playback
When the selection box is ticked, selecting a cuelist will play
it. To release a cuelist hold the green modifier (or press Alt)
and select the cuelist.
Apply to all
click this button to apply these settings to all Quickpicker
windows.
Presets labels When you select some fixtures, the preset labels change to indicate which are
available:
This label…
indicates…
Greyed
this preset does not have any settings stored for the selected
fixtures.
Normal
this preset has settings for some or all of the selected
fixtures.
Ticked
this preset is being used on the selected fixtures.
Vista User Guide, Version 2 5‐43 Groups The Chooser window Groups If you have a big rig, the last thing you want to do is manipulate dozens of
individual fixtures. To make it easy to control all the fixtures in your rig Vista
automatically creates groups for each fixture type that you patch. You can also
create your own groups.
A group can consist of any number of any type of fixtures; it’s entirely up to you
what you put in a group. Some typical groups might be all the even or odd
fixtures of one type, all the fixtures on the back truss, or all the fixtures you’re
using on one particular part of the stage.
Creating groups When you are first creating groups it’s easier to be in a layout that shows the
Groups panel in the sidebar. If you’re seeing something else, click on the
Components tab and select the ‘Groups’ button:
5‐44 Vista User Guide, Version 2 The Chooser window Presets To create a group:
1.
Select the fixtures you want in the group:
2.
Click the [+] Add Group button at the bottom of the Group panel. Vista
opens the Create New Group window:
3.
Type a name for the Group and click OK or press Enter. If you don’t want to
name the Group right away you can accept the suggested name and rename
it later.
You can create as many groups as you want, and you can also create any number
of ‘groups of groups’.
Presets Presets are the ‘building blocks’ that you use to create cuelists. They represent
common sets of attributes that you know you’re going to want to use over and
over again, such as a particular colour (e.g. Red) or position (e.g. on the
drummer).
Presets are useful for two reasons. First with presets you can quickly assign
Intensity, Position, Colour, Gobo, Beam and other values to any number of
fixtures without having to adjust the settings individually for each one. Second if
you store your cues using presets you can quickly update all your programming
without having to edit every cue.
Creating presets To create a preset:
1.
Select one or more fixtures.
2.
Set any of the Intensity, Position, Colour, Gobo, Beam values on the palette
the way you want them.
3.
Then either:
•
Click on any of the palette type button
and select the the ‘Preset’ >
‘Create Preset’ option from the popup menu or,
•
Select the ‘New > +Preset’ option from the Components menu ,or
•
Click on the ‘+ Preset’ button in the Components toolbar. (To open the
Components toolbar choose the Toolbar > Components toolbar from the
View menu.
•
Right-click in a Presets Quickpicker and select the Create preset option.
Vista displays the Create New Preset window:
Vista User Guide, Version 2 5‐45 Presets The Chooser window 4.
Enter a name for the preset in the name box (beside the icon)
5.
Click on the icon and select and different image if required.
6.
Set the Preset store options:
This option…
does this…
Update options
Only applicable if you are updating an existing
Preset. See below
Create default for
fixture
Tick ‘Same Fixture Type’ if you want to be able to
use this preset on any fixture, of the same type, even
if it is not selected when you store the preset. If you
choose this option you’ll see a tick, in the ‘fixture
type column’ beside the fixture that will be used as
the reference for the preset. Click on a different
fixture’s checkbox to use it as the reference.
Tick ‘Ay Fixture Type’ if you want to be able to use
this preset on any fixture, of any type, even if it is not
selected when you store the preset. If you choose this
option you’ll see a tick, in the ‘global’ column beside
the fixture that will be used as the reference for the
preset. Click on a different fixture’s checkbox to use
it as the reference.
Filter Fixtures
Normally only the selected fixtures are included in
the Preset. If you want to include all fixtures, in the
preset, click on the drop down box and select the
‘All’ option
Filter Output
Normally presets store the values hat the fixture(s)
are outputting, no matter whether they are coming
the Programmer or fro any Cue that is playing.
To only store values comig from the Current Cue
[Alex] click on the drop down box and select the
‘Current Cue’ option.
Filter Features
5‐46 Presets are normally per-palette, i.e. you create
Vista User Guide, Version 2 The Chooser window Presets separate presets for intensity, colour, gobo, beam and
miscellaneous features.
However the filter bar lets you include or exclude
any features.
To include a feature click on it’s icon so that it is
highlighted.
To exclude a feature click on it’s icon so that it is not
highlighted.
Preview panel
7.
The bottom panel of the New Preset window shows
a preview of the fixtures you have selected and the
features that will be stored in the preset.
Click the OK button. Vista creates a new Preset that appears in the Presets
panel of the Component Sidebar and in Quickpickers set to show All presets
or ones of the feature type you’ve created.
Updating presets You can use the Programmer to update the information stored in a preset. To do
this:
1.
While a editing the cuelist, select the fixtures you want to change or add to
the preset.
2.
Make the adjustments you want using the palettes.
3.
Right-Click on the preset in the Presets panel or a Quick Picker and select
Update from the popup menu.
4.
Vista displays the Update Preset window where you can .
 You can also update Presets when you Update a cuelist, that’s being played
back.
The Highlight and Lowlight presets There are two special presets, Highlight and Lowlight, that set the behaviour of
fixtures when Highlight mode is on.
•
when you select a fixture it goes to the Highlight preset
•
when you deselect a fixture it goes to the Lowlight preset.
To edit either of these presets you do this:
1.
Set the fixture(s) Intensity, Position, Colour, beam etc.
2.
Right click in the Sidebar, Components, Presets panel and select the ‘Update
Highlight Preset’ or ‘Update Lowlight Preset’.
Vista User Guide, Version 2 5‐47 Presets The Chooser window Live Time If you are working live with Presets, Palettes or any of the Sidebar panels the
‘Live Time’ window can be used to control crossfade time.
When you are applying a presets or simply selecting a (non-linear) value in the
sidebar palettes you can set a time for the Preset or selected value to fade in. For
example you might be working in the Live programmer tab and want to fade
some lights into a colour or position over several seconds.
To set the Live Time:
1.
Click the ‘Live’ button on the main toolbar. This button is normally mapped
to Function Key F10 on the keyboard. You can also select the ‘Live Time
option from the Tools menu.
2.
Enter a time in seconds or click on the drop down box and select one of the
live time presets.
Live time presets Vista comes with 2 Live time presets: 2s and 5s. But if you regularly use other
time settings you can save these as presets that appear on the drop down list. To
do this:
1.
Click the ‘Live’ button or select the ‘Live Time option from the Tools menu.
2.
When the Live Time window opens select the ‘Custom Timing’ option from
the drop down box. Vista opens the Custom Timing window.
3.
Set the Fade Time, Delay time and Fade curve for each of the features:
Intensity (Up and Down) Position, Colour, Gobo, Beam and Miscellaneous.
This field…
Does this…
Time
sets the fade time in seconds. You can also set the fade
time by clicking on the timing bar and dragging the
right handle forwards or backwards
Delay
sets the delay time in seconds. You can also set the
delay time by clicking on the timing bar and when the
cursor turns into a hand dragging the bar to the right.
5‐48 Vista User Guide, Version 2 The Chooser window Fade Curve
SmartFX sets the fade curve. To set the fade curve click on the
icon and select an option from the popup list. See the
glossary for more about fade curves
4.
Click on the ‘Save as’ button and give this Timing preset a name.
5.
Click OK to save. The new Timing preset will now be available on the Live
Timing drop down box.
SmartFX Vista comes with a number of built in effects that you can use to quickly create
dynamic looks including intensity pulses, position shapes, colour chases and
more.
To see the built in effects, click on the Components tab and select the ‘FX’ button.
This lets you apply one of the built in effects with just one click but you can also
use the SmartFX window to modify the built in effect or create your own effects
from scratch.
See the SmartFX window on page 2-2
Applying a built in effect To apply an effect:
1.
In the Fixture chooser window, select the fixtures you want.
2.
Click the FX button on the Components tab. Vista a list of the built in effects:
3.
You can click on the filter bar icons to either include or exclude effects that
include the corresponding parameter types.
Vista User Guide, Version 2 5‐49 Extracts The Chooser window 4.
Click the Stored (Canned) FX tab. Vista displays the list of available stored
(canned) effects. The letters in the ‘content’ column each effect tell you which
parameters are in this effect (e.g. I-Intensity, P-Position, C-Colour, etc).
5.
To apply an effect, click on the effect you want.
6.
To adjust the parameters of an effect, open the SmartFX window and use the
controls to adjust it (see Effect controls on page 7-4).
Effects that modulate or swing The built in effects are pre-set to either swing or modulate. Swinging means the
fixtures move between two sets of attributes determined by the effect (e.g.
moving from to left to right). Effects that are preset to modulate will apply their
own varying attributes about a particular setting (e.g. creating a circle around a
position).
Extracts Extracts are like programming templates and can contain any of the attributes
you define on the palettes: intensity, colour, beam, position, and so on. They also
store the timing associated with the events.
An extract is a section of a cuelist (or range of events) that you can save and reapply in other cuelists. By re-using existing material to build new cuelists you
can save yourself a lot of time re-creating your favourite lighting effects.
Creating extracts To create an extract:
1.
Select the part of the cuelist or events on the timeline that you want to use as
an extract.
2.
To store an extract, either:
•
Select the Extracts button on the Components tab, in the sidebar. Then
click on the + button or
•
click on the ‘New Extract button – normally Alt-F8 or
•
Right-click in a Extracts panel and select the Create extract option.
3.
Type a name for the extract and click the OK button.
4.
Vista adds the new item to the extract list.
Applying extracts To apply an extract:
1.
5‐50 Select one or more fixtures in the Fixture chooser window.
Vista User Guide, Version 2 The Chooser window Using a keypad in the programmer window 2.
Click the Extracts button on the Components tab of the sidebar.
3.
Find the extract you want and click on it to select it.
Set the mask buttons so that the attributes you want are applied. Any attribute
that is masked, even if it is part of the extract, will not be applied.
Using a keypad in the programmer window Vista V2 includes a CLI (Command Line Interface) window that provides
familiar keypad syntax for selecting fixtures, setting intensities and storing cues.
The CLI appears at the bottom of the main editor window and is completely
synchronized with the interface so that when you type a command you see the
equivalent action happen on the fixture icons and control palettes
The CLI accepts input from your keyboard or from a suitable USB keypad. The
CLI window can be left open at all time and will only accept input when the
keyboard or keypad is not being used by another window.
Using the CLI To open and close the command line by clicking View -> Command Line, or by
pressing the Pause button on the keyboard. open the SmartFX window by either:
•
clicking the SmartFX button on the main toolbar – usually
F?, or
•
selecting the Command Line option from the View menu
(Ctrl + ?)
•
pressing the ‘Pause’ button on your keyboard
Hardware Keypad You can use the keyboard number keys or a separate keypad when the CLI
window is showing. The ‘Num lock’ key should be on and in addition to the
number keys the following special keys are available:
This button…
does this…
/
Through (also used in storing cues – see below)
* or @
At
** or @@
At +Full
Backspace
<- Backspace (Clear)
F
Fixture
Vista User Guide, Version 2 5‐51 Using a keypad in the programmer window This button…
does this…
G
Group
S
Store All (Look)
P
Store Part
T
Time
The Chooser window Selecting fixtures in the CLI. For simple fixture selections you can just type the fixtures numbers. However
you can also select Groups and Fixtures by prefacing the ID numbers with a ‘G’
for Group or ‘F’ for fixture.
For example:
•
1 + 5 + 10 Enter selects fixtures 1, 5 and 10
•
G1 + F20 Enter selects all the fixtures in group 1 plus
fixture 20.
•
1 / 10 – 4 / 6 Enter selects fixtures 1, 2, 3, 7, 8, 9 and 10
Selecting fixtures and setting levels in the CLI You can also set levels with the keyboard. To simplify operation Vista
automatically completes some entries.
For fixture ‘through’ selections leaving off the second number means all higher
numbered fixtures will be selected.
For intensities single digits are interpreted as tens (@5 is the same as @ 50).
Number.
Setting ‘though’ levels can also fan intensities.
For example:
5‐52 •
1 / 10 @ 50 Enter selects fixtures 1 through 10 and sets
them to 50%
•
1 / 10 @ @ selects fixtures 1 through 10 and sets them to
100%
•
1 / 3 @ 20 / 100 Enter selects fixtures 1 through 3 and fans
their intensities between 20 and 100% (fixture 1=20%,
fixture 2=60%, and fixture 3=100%)
•
10 > @ 9 Enter selects all fixtures 10 and above and sets
them to 90%
•
1 @ 05 Enter selects fixture 1 and sets it to 5%.
•
1 @ 5 Enter selects fixture 1 and sets it to 50%.
Vista User Guide, Version 2 The Chooser window The Programmer hardware controls Storing with the CLI The Command Line can also be used to store cues and set timing. For example:
For example:
•
S 100 Enter
Store Look Cue 100 to the open or the most recently used
Cuelist.
•
S 2 / 10 Enter
Store Look Cuelist 2 Cue 10
•
S 5 / 8 T 2/3 Enter
Store Look Cuelist 5 Cue 8 with a 2 second Infade and 3
second outfade time
•
P 9 / 1 T 2/3 Enter
Store Part Cuelist 9 Cue 1 with a 2 second Infade and 3
second outfade time.
The Programmer hardware controls With the encoder wheels and associated LCD and buttons on the Vista consoles
you can make more exact adjustments than the on-screen palettes. During
programming you can use them to adjust setting for Intensity, Position, Colour,
Gobo and Miscellaneous parameters
Programmer intensity The overall intensity from the Programmer is controlled by the fader located, on
the left side, below the encoder wheels.
Programmer mode If the controls are not already in Programming mode press the button labelled
‘Menu’ and then select the ‘IPCGB’ button:
Vista switches the controls to programming mode:
Vista User Guide, Version 2 5‐53 The Programmer hardware controls The Chooser window This button…
does this…
I+P
Press this button to put the encoders and lower 6 buttons in
Intensity plus Position mode. Pressing it again cycles the
controls through any available parameters or alternate
modes (Angular position and Strobe & Shutter). Hold the
red modifier (or the shift key) and click to cycle the controls
in reverse.
Col
Press this button to put the encoders and lower 6 buttons in
Colour mode (HSV). Pressing it again cycles the controls
through any available parameters or alternate modes (CMY,
RGB, Frame / Index and Colour swatch). Hold the red
modifier (or the shift key) and click to cycle the controls in
reverse.
Gobo
Press this button to put the encoders and lower 6 buttons in
Gobo mode. Pressing it again cycles the controls through
any available parameters or alternate modes. Hold the red
modifier (or the shift key) and click to cycle the controls in
reverse.
Beam
Press this button to put the encoders and lower 6 buttons in
Beam mode. Pressing it again cycles the controls through
any available parameters or alternate modes. Hold the red
modifier (or the shift key) and click to cycle the controls in
reverse.
Home
Sets the associated parameter to it’s default values. I.E.
would set Intensity to 0.
 Holding the Yellow modifier (or Ctrl key) changes this
button to Clear
5‐54 Vista User Guide, Version 2 The Chooser window The Programmer hardware controls This button…
does this…
Full
Sets the associated parameter to it’s maximum values. I.E.
would set Intensity to 100.
 Press Home and Full together to set the parameter to it’s
mid value.
 Holding the Yellow modifier (or Ctrl key) changes this
button to Half
Encoders
Rotate to set the associated parameter to the required value.
<- Left arrow
Selects the previous Fixture
-> Right arrow
Selects the next fixture
Vista User Guide, Version 2 5‐55 Working with cuelists Store All 6. Working with cuelists Once you’ve set up your patch, arranged your fixtures, assigned them to groups,
and created the presets you want, you’re ready to create a Cuelist.
This is where the Vista differs in a big way from traditional keypad-controlled
lighting consoles, because instead of telling it what you want by entering strings
of numbers, you do it all visually, on a large screen using the pen or mouse and
the hardware controls.
Vista also offers three ways to start a new Cuelist, you can either:
•
Store a cue directly to one of the playback controls with as
few as three button presses. With this method the cuelist is
automatically given a name and number and the cue
you’ve stored is ready to play. Later you can add more
cues to the same cuelist, change fade times and modify
other settings by opening it in the editor
•
Use either of the two Store buttons in the main toolbar to
store directly to a playback or to an existing cuelist. Store
Look is easy to use and automatically sets the most popular
options. Store Part provides access to more advanced
options.
•
Open a new, empty, cuelist in the editor and store one or
more cues to it. With this method you can store and edit as
you go refining the cue fade times and every other aspect
of the cuelist. After you save the cuelist you can switch to
the Console window and drag it onto one of the playback
controls.
Vista is a Tracking Console When you store a cue this way only the settings that are changing are saved in a
cue. For example, if a fixture is set to 50% Intensity in cue 1 and is not changed
until cue 5, there won’t be any Intensity events stored in cues 2-4 for that fixture.
That means if you change the intensity for that fixture in cue 1 will affect the look
of cues 2-4.
The important difference in a tracking system is that if no level is stored no
change will happen.
Store All There are several important features of ‘Store All’:
Vista User Guide, Version 2 6‐1 Store All Working with cuelists •
all the settings that the console is sending to your fixtures
are saved. The settings could be coming from the Live tab
or any other Cuelist being edited, a playback or any other
control on the console.
•
Store All does not save settings for fixture features that are
at their default. For example if a fixture has 100% intensity,
and in colour blue, Store All saves those settings but
doesn’t save anything for Gobo, Position or any other
feature of the light. This means that if you play the cue
back it’s possible that another cue will influence what you
see.
•
when you Store All the default operation is to append a
new cue at the end of the last cuelist you saved to.
•
if you choose to store to an existing cue it will be replaced.
For example if a have a Cuelist with 10 Cues, Store Look
will default to saving to Cue 11. If you choose to save to
Cue 4 whatever was in that cue will be replaced when you
store.
•
if you insert a cue before an existing one it’s settings will
not change the look you’ve have saved in the existing cue.
This is called ‘Cue only’ and means that any settings in the
inserted cue are automatically undone in the following cue.
•
when you Store All directly to a Playback it will
immediately take control of the cue and any setting coming
from the Live tab will be cleared. Because Store All
includes all output of the console, this won’t change
anything the fixtures are doing – just where the control is
coming from.
Storing a look in 3 clicks If you have the Fixture Chooser window open and you are working in the Live
tab you’ve probably already selected some lights, given them Intensity, Colour
and so on. To create a new Cuelist fast, you do this:
1.
click on the ‘Store All’ button or select the Store All option on the Tools
menu. Vista displays the Store All window with all the store options preset
but just leave everything as is for now.
2.
Double-tap on the select button of an empty playback on your console. If you
are using the PC version, switch to the Console window and double click
one the select button there.
6‐2 Vista User Guide, Version 2 Working with cuelists 3.
Store All The new Cuelist is ready to use and you can move the fader to bring the
level down and back up.
 When you Store All this way the console fader is automatically set to be a
Submaster.
Storing a look with options When you want to adjust the timing of a cue or give it a new name or number
before storing you use the Store All window. To do this:
1.
click on the ‘Store All’ button or select the StoreAll option on the Tools
menu. Vista displays the Store All window:
2.
Vista sets the ‘Store to’ cuelist to the cuelist you last saved. If you want to
store to a new cuelist or another cuelist you’ve already started you can
either:
•
type a new number, or
•
type a few numbers or letters from the name and select the cuelist you
want from the popup window. Vista displays all the cuelists that include
the letters or numbers you type:
Vista User Guide, Version 2 6‐3 Store All 3.
4.
Working with cuelists Vista sets the ‘Store to’ cue to a new cue number at the end of the cuelist you
last saved. If you want to a different cue number or store over an existing cue
number can either:
•
type a new number or,
•
type a few numbers or letters from the name and select the cue you want
from the popup window. Vista displays all the cues that include the
letters or numbers you type:
If you want to store to an existing cuelist but aren’t sure of it’s name or
number. Click the ‘Open Cuelist’ button. Vista displays the Cuelist and Cues
window where you can select from all your saved cuelists:
This option…
does this…
All
Filters the browser to show all the cuelists you’ve recorded
Recent
Filters the browser to show just the last few cuelists you’ve
stored.
Playing
Filters the browser to show just the cuelists that you are
playing back.
Console
Filters the browser to show just the cuelists that you are
visible on the console – i.e. cuelists that are on the
playback pages you can see.
New
Creates a New cuelist with the next available number.
6‐4 Vista User Guide, Version 2 Working with cuelists Store All This option…
does this…
Cuelist number
Displays the cuelist number to save. You can enter a new
number in this field.
field
Search (cuelists)
Typing a few letters or numbers in the search box filters
the browser to show just the cuelists that match what you
type.
Select Cue
Displays all the cues already stored in the selected cuelist.
Normally the ‘New Cue’ line will be highlighted
indicating that you will be storing to a new cue at the end
of the cuelist.
To store over an existing cue highlight the one you want.
Inserts a new cue before the line the icon is on.
Search (cues)
5.
Typing a few letters or numbers in the search box filters
the browser to show just the cues that match what you
type.
click on the icon in the ‘Cue Start Mode’ section to set how the cue will start,
the options are:
•
Halt - Press the Go button to play the cue
•
Follow - Play ‘n’ seconds after the previous cue has ended.
•
Start - Play ‘n’ seconds after the previous cue has started.
•
Timecode – Play at the specified Timecode (i.e. 01:02:03:04 would start
the cue when timecode 1 Hour, 2 Minutes, 3 Seconds and 4 Frames is
received)
6.
If you’ve made the cue start mode ‘Follow’ or ‘Start’ enter the time, in
seconds, after the previous cue has ended or started to start this cue.
7.
Set the fade times for the cue. To do this you can either:
•
set the in and out fade time by typing in the time box. For example
typing 2/3 sets the Infade time, for all features to 2 seconds and the
outfade time, for Intensity to 3 seconds or,
•
click on the timing drop down and select from the list of preset times.
For more information on Timing see page xxx or,
•
click on the timing bars and drag them to the fade times you want or,
•
click on the
Vista User Guide, Version 2 expand icon to reveal the detailed timing panel:
6‐5 Store Part Working with cuelists In the detailed view you can set a fade time, delay time and fade curve for each
of the six feature types – Intensity (in and out), Position, Colour, Gobo, Beam and
Miscellaneous channels. To set times either type in the boxes or click on the
timing bars and adjust them. To change the fade curve click on the icon and
select from the popup list
8.
If you’re are storing to a New Cuelist, you can give it a title, in the Cuelist
Name box
9.
If you’re are storing to a New Cue, you can give it a title, in the Cue Name
box.
10.
Click OK to complete the Store Look operation or double-tap on a playback
‘Select’ button to Store the cuelist to that playback.
11.
Check the buttons for the classes or types of events you want Vista to
display.
12.
Type a name for the filter.
13.
Click the ‘Close’ button. Vista adds this filter to the drop-down filter list.
 Hold down the Yellow modifier (Ctrl on a keyboard) on the console and
press the Select button on an empty playback to Store your look and open
the cuelist in the Editor window.
Store Part Store Part is Vista’s advanced recording method. It provides several options, not
available with Store Look.
If you’ve created information in the Live tab of the Editor (or another cuelist),
you can add it or merge it into an existing cuelist, or use it to replace a cue
altogether. You can also start a new cuelist using the Store Part method.
6‐6 Vista User Guide, Version 2 Working with cuelists Store Part To store this way you do this click on the ‘Store Part’ button or select the Store
Part option on the Tools menu. Vista displays the Store Part window:
Selecting the Cuelist to Store to Vista automatically sets the ‘Store to’ cuelist to the last cuelist you saved. If you
want to store to a new cuelist or another cuelist you’ve already started you can
either:
•
click on the ‘New’ button in the cuelist panel to start a new
cuelist.
•
tap on a console playback ‘Select’ button to select the
Cuelist on that playback or,
•
click on the Cuelist you want in cuelist panel, which
displays all your saved items.
To help find a particular cuelist you can filter using the source and search
options:
This option…
does this…
All
Filters the browser to show all the cuelists you’ve recorded
Recent
Filters the browser to show just the last few cuelists you’ve
stored.
Playing
Filters the browser to show just the cuelists that you are
playing back.
Console
Filters the browser to show just the cuelists that you are
visible on the console – i.e. cuelists that are on the
playback pages you can see.
New
Creates a New cuelist with the next available number.
Vista User Guide, Version 2 6‐7 Store Part Working with cuelists This option…
does this…
Search (cuelists)
Typing a few letters or numbers in the search box filters
the browser to show just the cuelists that match what you
type.
Selecting the Cue and store options You can add a new cue, or merge to or replace the contents of an existing cue.
When you first open the Store Part window the Cue ‘Add’ button will be selected
automatically. The Merge and Replace options will not be available unless you
select an existing cue first.
1.
If you are adding a new cue you can either accept the cue number Vista
suggests or type a number in the Cue Number box or click on one of the
insert icons in the list of cues to set the insert location.
- insert cue icon
2.
If you are Merging or Replacing you can either type a number in the Cue
Number box or click on any cue in the cue list panel.
3.
For a new cue enter the cue number and name.
4.
click on the icon in the ‘Cue Start Mode’ section to set how the cue will start,
the options are:
•
Halt - Press the Go button to play the cue
•
Follow - Play ‘n’ seconds after the previous cue has ended.
•
Start - Play ‘n’ seconds after the previous cue has started.
•
Timecode – Play at the specified Timecode (i.e. 01:02:03:04 would start
the cue when timecode 1 Hour, 2 Minutes, 3 Seconds and 4 Frames is
received)
5.
If you’ve made the cue start mode ‘Follow’ or ‘Start’ enter the time, in
seconds, after the previous cue has ended or started to start this cue.
6.
Select the timing option to apply to the cue, the options are:
7.
•
Destination - use the timing of the cue you are saving to
•
Custom - use the timing from the Editor or set it manually.
Select the fixtures to include when storing:
This option…
does this…
All Fixtures
Includes settings for all fixtures with output coming from
the Live tab, or any other cue that’s open in the editor [TBC]
6‐8 Vista User Guide, Version 2 Working with cuelists Opening a Cuelist in the Editor This option…
does this…
Selected Fixtures
Only includes fixtures that are selected in the Live tab or
cue being edited.
8.
Select the parameters to store using the filter bar. Click on any of the
Intensity, Position, Colour, Gobo, Beam or Miscellaneous icons to mask or
un-mask that parameter.
9.
Select the Store Source options.
This option…
does this…
Current
Automatically set to ‘Live’ or the Cuelist being edited
Editor tab
All Output
10.
Select this button to store all information, from both the
editor and any active playbacks.
Select the tracking options
This option…
does this…
Cue only
Click this checkbox to undo any changes in the following
cue. This option will not have any effect if you are storing to
the last cue.
11.
Select the Blocking options.
This option…
does this…
No Blocking
The cue is stored normally
Normal Blocking
Ensures that events that are tracking through to the cue
being stored will not be changed even if they are modified
in the earlier cue(s).
Super Blocking
Not implemented
Opening a Cuelist in the Editor The ‘Store Look’ and ‘Store Part’ methods let you store cues to an existing (or
new) cuelist, without first opening the cuelist in the editor.
Vista User Guide, Version 2 6‐9 The Timeline window Working with cuelists You can also start a new cuelist from scratch or open an existing one in the editor.
To do this click on the New Cuelist button (normally F2) or select the ‘New
Cuelist option from the Components menu.
Whichever method you choose, Vista creates a new Cuelist tab and displays the
Editor window.
The Timeline window When you select fixtures in the Chooser window and apply intensity, position,
colour and other features ‘events’ are created in the Timeline window.
This screen consists of three main elements:
6‐10 •
The Editor control section where you can select to work
with the Live editor tab or any Cuelist you have open. If
you have a Cuelist open this section expands to include the
Cue navigation controls.
•
The Cue navigation section, where you can see all the cues
in your cuelist, make selections, add and delete cues, and
manage how your edits affect output when you are editing
a cue that’s playing back
•
The Timeline section where you can view and manipulate
the fade times for all the features that are being applied to
your fixtures.
Vista User Guide, Version 2 Working with cuelists The Timeline window Cuelist tabs When you first open the Editor’s Chooser or Timeline windows you’ll see the
Live tab – this is the equivalent of want other consoles call the ‘Programmer’ or
‘Editor” . If you open a cuelist or start a new one from scratch, Vista adds a new
tab labelled with the cuelist name.
You can have several cuelists open at once and switch between them by clicking
on the tab you want to work on.
To close and save a Cuelist tab, choose ‘Close Cuelist’ from the Cuelist menu or
click the close icon (X) on the cuelist tab.
 To save a cuelist at any time select the ‘Save Changes to Cuelist’ option (Alt
+ S) from the Components menu.
 When there is information in the Live tab that is affecting the output, a red
clear icon is added to the tab. Click on it to clear the Live tab output.
Playing and moving around a cuelist At the top of the editor timeline and chooser screens there is a set of player
controls:
The buttons work in a similar way to the controls on a CD or DVD player:
This button…
does this...
Jumps to the first cue in a cuelist.
Steps backwards to the previous Cue in a cuelist.
Pauses playback.
Starts playback of the next cue in the cuelist.
Steps forwards to the next Cue in a cuelist.
Jumps to the end of last Cue in a cuelist.
Vista User Guide, Version 2 6‐11 The Timeline window Working with cuelists Cuelist Navigator The cuelist navigation section shows you an overview of all the cues in a cuelist.
Each cue is represented by a mini cue icon in a scrollbar so you can see all the
cues you’ve stored. As you add more cues more icons are added to the scrollbar
and if there are more cues than can fit in the cue tile (or table or layout) view the
scrollabar becomes shaded and you can drag the shaded area to show different
areas of the cuelist in the list, table and layout views.
The cue scrollbar includes buttons to switch the navigator view and to add or
delete cues.
This icon…
does this…
Tiles view
Shows the cues as a series of tiles. If there are more cues
than can fit in this area the scrollbar highlights the area
you are viewing and you can drag it to show other cues.
Table view
Shows the cues as a table with columns for the cue’s name,
number, fade time, follow time, blocking status, included
features, fixture count and SmartFX
Layout view
Shows the cues on a timeline. This view is useful if have
cues with follow times that mean they overlap other cues.
You can move cues and set follow times by dragging cues
on the timeline.
Zooms the layout view to fit all the cues in available space.
Tiles View 6‐12 Vista User Guide, Version 2 Working with cuelists The Timeline window In the ‘Tiles’ view:
•
each cue tile shows the number, name, duration and start
of cue action
•
the cue or cues that are visible in the, in the timeline section
shows with a green underline
•
cues that have played show with a blue fill colour.
•
the selected cue shows with a blue outline and with white
text. Click on a tab to select it, shift-click or ctrl-click to
select a range or group of cues.
You can click on a tile’s start action, cue number, name or duration label and
enter a new value. The cue number cannot be changed to a value that would
mean changing the order of the cue tiles.
You can right-click on a selected cue or in the blank area to the right of the cue
list to open a popup menu:
Vista User Guide, Version 2 6‐13 The Timeline window Working with cuelists With these options you can:
•
open the cue or cuelist properties window
•
set the Cue Follow mode (aka Cue start action) for the
selected cue(s)
•
block, superblock or unblock the selected cue
•
append a cue at the end of the cuelist or insert a new cue
before or after the selected cue or at the playhead position.
•
delete or renumber the selected cue(s)
•
revert (or undo) changes to the selected cue(s)
•
change the start time of the selected cue(s)
•
remove any alias cue links (without deleting any cues or
events)
•
add an audio file
•
cut or copy and paste or paste special (paste with
options).the selected cues
•
change the appearance of the cue tiles by adding or
removing fields
Table View In the ‘Table’ view:
•
each cue shows as a row in a spreadsheet style view
•
the selected cue shows with a blue fill and white text. Click
on a row to select a cue, shift-click or ctrl-click to select a
range or group of cues.
You can double-click on a tile’s cue number, name or duration label and enter a
new value. The cue number cannot be changed to a value that would mean
changing the order of the cue tiles.
Layout View 6‐14 Vista User Guide, Version 2 Working with cuelists The Timeline window In the ‘Layout’ view:
•
the cues are laid out end to end, in timeline view. Cues that
are set to start before the previous cue finishes overlap and
appear on a separate line.
•
the selected cue shows with an outline and white text. Click
on a row to select a cue, shift-click or ctrl-click to select a
range or group of cues.
You can double-click on a tile’s name and enter a new value. To move a cue click
and hold while dragging the cue to the left or right.
Adding and deleting cues A cuelist can contain as many cues as you like. To add a new cue at the end of the
cuelist you are working on you:
•
click on the
scrollbar, or
•
choose the ‘Tools > Cues > Append at end’ option from the
Cuelist menu.
‘New cue’ icon at the end of the cuelist
You can also insert cues before or after an existing cue by first selecting a cue
then clicking and holding the
‘New cue’ icon until the insert popup appears.
The popup provides option to:
•
insert a new cue before the selected cue
•
insert a new cue after the selected cue
•
append a new cue at the end of the cuelist.
These options are also available on the ‘Tools > Cues submenu on the Cuelist
menu.
Deleting cues To delete a cue, first select it then:
•
click on the
scrollbar, or
‘Delete cue’ icon at the end of the cuelist
choose the ‘Delete Cue’ option Tools > Cues submenu on the Cuelist menu.
•
.
Merging cues Sometimes it’s useful to merge the contents of two or more cues. To do this:
1.
Select the cues with the pen or mouse. Shift-click or ctrl-click to extend the
selection.
Vista User Guide, Version 2 6‐15 The Timeline window 2.
Working with cuelists Choose the ‘Merge cues’ option from the Tools > Cues submenu on the
Cuelist menu.
 Cues always merge to the lowest cue number.
Moving and copying cues Often you’ll have an effect in one of more cues of a cuelist that you’d like to use
in another place or another cuelist. You can do this using the cuelist navigator
panel.
To do this:
1.
Select one or more cues by clicking on the cue tiles.
2.
Choose the Copy or Cut option from the Edit menu or right-click on the
cue(s) and select Copy cue or Cut cue from the popup menu
3.
Click on the cue before the location you want to move or copy to
Choose the Paste option from the Edit menu or right-click on the cue(s) and select
Paste from the popup menu. The default paste action will restore the look of the
copied cue by inserting release events for any features added in the intervening
cues. To paste just the events or an alias of the cue, use the ‘paste special’ option.
 You can also copy cues by dragging and dropping cue tiles in the cuelist
navigator.
Paste options If you want to move or copy just the events in the original cue, without releasing
any other events that occur in previous cues you can use the ‘paste special’
option on the edit menu.
The cue scrollbar includes buttons to switch the navigator view and to add or
delete cues.
This option…
does this…
Paste the entire
look.
Restores the look of the original cue by inserting release
events for any features added in the intervening cues..
Paste only the
events
Pastes the events in the original cue, without adding and
release events
Alias cue
Pastes an alias of the original cue.
6‐16 Vista User Guide, Version 2 Working with cuelists The Timeline window Alias cues If you want to use the same cue, in a cuelist, several times you can make an
‘Alias’. This way if you update any one of the associated alias cues they will all
update.
To create an alias cue
1.
Copy the cue by selecting it and choosing the copy option from the edit
menu.
2.
Navigate to the cue before the position you want the new cue to appear.
3.
Choose the Paste special option from the edit menu. Vista opens the Paste
Special window.
4.
Select the Alias cue option and click OK. Vista pastes an Alias cue after the
selected cue.
Alias cue tiles are marked with a small ‘Alias’ icon and you can view the cues
that are aliased to each other in the ‘Aliased cues’ section of the Cue properties
window.
 When two or more cues are aliased to each other any one can be changed
and all the other will also change. There is no ‘master’ cue in an alias set.
Removing the link to an Alias Cue An Alias cue can be changed to normal cue. To do this:
1.
Select the Cue tile to be changed.
2.
Select the ‘Remove Cue Alias’ option from the edit menu, or, right-click’ on
the cue tile ‘Remove Cue Alias’ option from the popup menu
Making changes to a cue without affecting the next cue It’s often useful to make changes to cue without those changes tracking through
to the following cue. For example, you might have a cuelist where the lights
change to colour blue in cue 1 and stay that way until they change to red in cue
10. If you then decide you want them to be yellow in just cue 5 you could make
that change but since there are no colour events in cues 6-9 the lights will stay
yellow when you really want them to revert back to blue in cue 6.
For this situation Vista provides a method to make changes to a cue only. To do
this:
1.
Edit a cuelist and make the changes.
2.
In the timeline select the events – they will normally be highlighted already.
Vista User Guide, Version 2 6‐17 Creating a Move in Black cue 3.
Working with cuelists Click on the ‘Untrack’ button on the toolbar or select the ‘Un-track events
(cue only)’ option from the Tools menu. Vista inserts events in the following
cue to set the lights back to the state they were in before the change. If there
were no events of that type originally, Vista inserts release events instead.
Blocking a cue Vista is a tracking console, which means that only changed information is stored
in any cue and that any information in a cue tracks forward until it is replaced by
a new event or cleared. Sometimes it’s useful to ‘block’ a cue so that any changes
that are subsequently made to previous cues will not affect the final look of the
chosen cue.
To do this:
1.
Select the cue with the events you want to keep exactly as they are. You can
select the cue by clicking on the cue tile or playing the cuelist until you reach
it.
2.
Choose the ‘Block’ button on the toolbar (normally Ctrl F9) or select the
‘Block cue ’ option from the Cuelist menu or right-click on the cue tile and
select Block from the popup menu. Vista duplicates all tracked information
into the selected cue.
Creating a Move in Black cue Sometimes you will want fixtures to move to a position, change to a colour, add a
gobo or get set up in some other way while their intensities are at zero. You
could do this by programming the necessary events, but you can also do it
quickly using the ‘Mark Cue’ option on the Tools menu.
When you create a Mark cue your original programming is preserved and will be
restored if you delete the Move in Black (MIB) later.
To Mark a cue and add ‘Move in Black’ events:
1.
6‐18 Select the cue you want to work with.
Vista User Guide, Version 2 Working with cuelists 2.
Creating a Move in Black cue Choose the ‘Mark Cue’ option on the Tools menu. Vista opens the Move in
Black window:
This screen shows the options available; you use it to set the way Vista stores the
Move in Black event:
This option…
does this…
Move in Black
destination cue
If the ‘Select existing cue’ button is not greyed out you
can click it to select any cue, earlier in the Cuelist, for
the Move in Black events.
If you prefer to create a new cue for the MIB events
select the ‘Insert a new move in black cue’ option.
Move in Black
destination cue
If the ‘Select existing cue’ button is not greyed out you
can click it to select any cue, earlier in the Cuelist, for
the Move in Black events.
If you prefer to create a new cue for the MIB events
select the ‘Insert a new move in black cue’ option.
Cue Details – Name
Sets the name for the new cue that will be created. The
default name is MIB.
Cue Details – Duration
Sets the duration for the new cue.
Vista User Guide, Version 2 6‐19 Creating a Move in Black cue Working with cuelists This option…
does this…
Start action
Sets how the MIB cue is started. the options are:
Halt - Press the Go button to play this cue.
Auto Follow - the cue plays automatically after the
previous cue.
Finish with preceding – the cue plays automatically
and is set to finish at the same time as the previous
cue.
Disable Move in Black
Removes the Move in Black events from the MIB cue
but does not delete it.
Marked Features
Only the selected features will be marked for move in
black.
- Feature filter
Marked Fixtures
3.
Lets you choose to mark all fixtures or just the ones
currently selected.
Click OK to create the Move in Black cue:
The move in black events are shown as 'ghosted' events in the Move in Black cue
and display the "MIB" icon. Move In Black cues show ‘MIB’ in the tiled cue
display and ‘[M]’ in other views.
Marked cues display ‘MARK’ logo in the tiled cue display and ‘[m]’ in other
views.
 Individual events in a marked cue can also be excluded from move in black.
To do this, select the events in the timeline view and select the ‘Ignore Move
In Black’ option from the from the Timeline’ menu or right-click menu.
Ignored events show a MIB icon with a red cross running through it.
 Intensity cannot be marked.
6‐20 Vista User Guide, Version 2 Working with cuelists Creating a Move in Black cue Cue Properties Each cue has a number, name and fade time that you can set by clicking on the
cue tiles and editing the fields. You can also set these properties and other
advanced options more in the Cue Properties window.
To do this:
1.
Select the cue you want in the Cuelist navigator.
2.
Choose the Cue Properties option from the edit menu or right-click on the
cue tile and select the Cue properties option from the popup menu.
Modifying cue name, duration, and end of cue action The cue’s name, number and how it starts are set in the properties section of the
window:
This option…
does this…
Cue name
Sets the name that appears in all windows for this cue
Cue number
Sets the number that appears in all windows for this cue
The cue number cannot be changed to a value that would
mean changing the order of the cue tiles.
Vista User Guide, Version 2 6‐21 Creating a Move in Black cue Working with cuelists This option…
does this…
Follow Time
sets how the cue will start, the options are:
(Cue Start Mode)
(Halt)
Press the Go button to play this cue
(Follow)
Play ‘n’ seconds after the previous cue ends
(Start)
Play ‘n’ seconds after the start of the
previous cue.
(Timecode) Play when the timecode is received.
Follow time
(Timecode)
Sets how long after the start or end of the previous cue
that this cue starts. This field can only be edited when the
cue start mode is set to Follow, Start or Timecode.
Default timing
Sets the timing for all events that have not been manually
adjusted. The popup window lets you select from the
saved timing sets or customise a new one.
Ignore Learn
Timing
Tick this checkbox to ignore this cue when using the
‘Learn Timing’ feature.
Making a cue loop back and repeat previous cues A cue can be set to loop back to a previous cue and to repeat the loop any
number of times. ‘Looping’ is set in the loop section of the window:
This option…
does this…
Loop iterations
Sets how many times the loop will repeat before the cuelist
proceeds normally
Loop to cue
Sets the cue that will play next.
Loop tracking
Sets whether the events stored in the cues after the ‘Loop
to cue’ will track through to the loop cue
6‐22 Vista User Guide, Version 2 Working with cuelists Creating a Move in Black cue This option…
does this…
Loop direction
Sets the direction of the loop. The options are:
•
Forwards - loops from last to first
•
Backwards - loops from last to previous.
•
Bounce - loops backwards then forwards.
•
Random - loops to a random cue between the first
and last cue in the loops
 Cues that are set to loop don’t play automatically, like a chase. If you want
any of the cues in a loop to play without pressing Go you have to set the cue
start mode.
Alias cues Alias cue tiles are marked with a small ‘Alias’ icon and you can view the cues
that are aliased to each other in the ‘Aliased cues’ section of the Cue properties
window:
Tracking Normally features that are stored in any cue track forward until they are replaced
by a new event or cleared. If you only want some events to play in one cue and
not track forward you can turn tracking off for one or more cues. To do this open
the Blocking / Tracking section of the Cue properties window and tick the ‘NonTracking’ checkbox:
Blocking Normally only changed features are stored in any cue and information tracks
forward until it is replaced by a new event or cleared. Sometimes it’s useful to
‘block’ a cue so that any changes that are subsequently made to previous cues
will not affect the final look of the chosen cue.
Vista User Guide, Version 2 6‐23 Creating a Move in Black cue Working with cuelists To view or modify the blocking for a cue open the ‘Blocking’ section of the Cue
properties window:
This option…
does this…
None
The cue is stored normally
Blocking
Ensures that events that are tracking through to the cue
being stored will not be changed even if they are
modified in the earlier cue(s).
Super Blocking
Ensures that events that are tracking through to the cue
being stored will not be changed even if other cuelists,
that include the same feature types are played prior to
this cue being played.
Block Features
Sets which feature types are blocked. Click on the
Intensity, Position, Colour, Gobo, Beam and
Miscellaneous icons to turn that feature on or off.
Block Fixtures
Sets which fixtures are blocked. You can choose either
‘All Fixtures’ or the ones you have selected in the editor.
Free Effects mode In Vista effects can either have a ‘basepoint’ or be ‘free’. A Free effect is designed
to run on top of a feature setting. For example a free circle effect will cause
fixtures to move in a circle around whatever position has been set by another cue
or setting from the console.
To view or modify the Event mode for a cue open the ‘Free effects’ section of the
Cue properties window:
This option…
does this…
Events provide
Basepoint
Events in the cue will be used as a base point for any
baseless effects that are running.
6‐24 Vista User Guide, Version 2 Working with cuelists Creating a Move in Black cue This option…
does this…
Events stop Free
effects
If the cue includes an event that a baseless effect would
act on the effect will be stopped.
Audio Playback To add and play an audio file, when the selected cue plays click on the ‘Audio
Playback’ heading to open that section.
This property…
does this…
Browse
Opens the ‘Select Audio’ window where you can
choose an audio file.
Clear
Removes the audio file from the cuelist
 To add an audio file that plays through all cues use the Cuelist Properties
window.
Cue Defaults If you have a set of Cue properties that you use frequently you can save them as
your ‘Show’ default and they will be used for all future cues. You can also
quickly reset a Cue’s properties to the factory defaults or to your show defaults.
This option…
does this…
Reset to show
defaults
Reset all cue properties to the settings you have saved as
the show defaults (see below).
Reset to factory
defaults
Reset all cue properties to their standard (factory)
settings.
Save as show
defaults
Saves the current cue settings as a default for all new
cues.
Cuelist Properties Each cuelist has a set of properties that control how it plays back and interacts
with other cuelists. You can also set these properties in the Cuelist Properties
window.
Vista User Guide, Version 2 6‐25 Creating a Move in Black cue Working with cuelists To do this:
1.
Open the cuelist in the editor.
2.
Select the Cue Properties option on the Edit menu.
This property…
does this…
Name
Sets the name for this cuelist.
ID
Sets the number for this cuelist. This field is not
editable.
Priority
Sets the priority for the cuelist. A cuelist set to High
priority can’t be overridden by normal or low
priority cuelists. Only a cuelist set to Programmer
priority can override the Editor
Play at end option
Determines what happens after the last cue is
played and fully over-ridden. The options are:
Restart – the Cuelist starts again at the first cue.
Release – the Cuelist is released.
Ignore – do nothing
Ignore Release All
6‐26 The cuelist will ignore the release all command.
Vista User Guide, Version 2 Working with cuelists Creating a Move in Black cue This property…
does this…
Ignore Snapshots
The cuelist will not be affected by a snapshot being
loaded.
Release in Black
Releases cuelists when they are no longer
contributing to intensity output
HTP Enabled
Causes the intensities of a cuelist to activate as soon
as you move the playback fader from 0.
Fader Type
Normally the fader on a playback set will adjust the
Intensity of a cue list. To fade all features (Intensity,
Position, Colour, Gobo, Beam and Custom) in or
out with the slider set this property to “All
Features”
Fader Auto Play
Sets the fader play and release actions. The options
are:
None – the fader only controls intensity.
Auto Play – raising the fader above 0% also plays
the cue. (aka ‘Go on fader up’).
Auto Play & Release – raising the fader above 0%
also plays the cue. (aka ‘Go on fader up’). Lowering
the fader to 0% releases the cue (aka ‘Release on
fader down’).
Auto Release – lowering the fader to 0% releases
the cue (aka ‘Release on fader down’).
Fader Intensity mode
Sets the fader precedence and actions.
Normal – the fader is in normal LTP mode.
Submaster – the fader is HTP and will go on fader
up and release on down if there is only one cue.
Release on Override
Releases a cuelist that is completely over-ridden.
(i.e. is not contributing to the console output.)
Cuelist Timing To set timing properties click on the ‘Timing’ heading to open that section.
This property…
does this…
Release Timing
Sets the fade time when the cuelist is released.
Playback rate %
Playback rate for the cuelist. Normally 100%
Vista User Guide, Version 2 6‐27 Creating a Move in Black cue Working with cuelists Cuelist Timecode To set timecode properties click on the ‘Timecode’ heading to open that section.
This property…
does this…
Mode
Sets how the cuelist responds to timecode input.
Disabled – timecode is ignored.
Enabled – timecode will be followed if the cuelist is
‘Armed’ (see the next property.
Locked – timecode will always be followed
Armed
If the cuelist is set to timecode ‘Enabled’ it will not
respond to timecode until it is armed. To arm the
cuelist either set this property to ‘Armed’ or press
the play button on the cuellist.
Offset
Add the offset time to the cue trigger times. For
example if the offset is 01:00:00:00 (1hr) and a cue
trigger time is 00:00:10:00 (10 secs) the cue will go at
01:00:10:00 (1hr 10secs)
Cuelist Audio Playback To add and play an audio file click on the ‘Audio Playback’ heading to open that
section.
This property…
does this…
Browse
Opens the ‘Select Audio’ window where you can
choose an audio file.
Clear
Removes the audio file from the cuelist
Chase properties To set a cuelist to chase and adjust the chase properties click on the ‘Chase’
heading to open that section.
This property…
does this…
Chase Enabled
Turns chase mode on or off.
Chase direction
Sets the step order for chases. Can be set to
forward, backward, bounce or random.
Chase Tracking
Turns tracking, within the cuelist on or off. For a
chase tracking is normally set to ‘Not Tracking’.
6‐28 Vista User Guide, Version 2 Working with cuelists Creating a Move in Black cue This property…
does this…
Chase rate
Chase rate when in chase mode, expressed as stepsper-minute.
Chase crossfade %
Proportion of time spent fading vs. time spent at
each step of a chase.
Playback rate BPM
Playback rate for the cuelist.
Cuelist property defaults The properties you set for a cuelist can be used as the default settings for all new
cuelists. You can also reset a cuelist to the (factory) standard properties or your
own show defaults. To do this click on the ‘Defaults’ heading to open that
section.
This property…
does this…
Reset to show defaults
Reset all properties to the settings you have saved
as the show defaults (see below).
Reset to factory
defaults
Reset all properties to their standard (factory)
settings.
Save as show defaults
Saves the current settings as a default for all new
cuelists.
Cuelist Notes You can add notes about a cuelist and these will display in the Playback window.
To do this click on the ‘Notes’ heading to open that section.
The Timeline panel The main section of the timeline is used to control the crossfade times for all the
features that you apply to your fixtures. Unlike other consoles where you can
only see these times as numbers, in Vista you can see everything laid out on a
timelines so you know exactly how when changes will occur in relation to each
other.
This panel includes:
1.
The default timing section where you set ‘master’ fade times for all feature
types (Intensity, Position, Colour, Gobo, Beam, Misc).
2.
The detailed timing section where you can set individual fade times for
every feature being used on your fixtures.
3.
The Filter bar that you use to limit the timeline display to just the fixtures or
features or events that you want to work with.
Vista User Guide, Version 2 6‐29 Creating a Move in Black cue Working with cuelists Default times At the top of the timing section there’s a timeline ruler that controls the over all
fade times for all events in a cue – except the ones you explicitly set elsewhere as
explained below. When you first open the Timeline (or Chooser) window the
ruler will be in it’s collapsed form, as shown here:
The ‘up’ time determines how long it will take for all feature types to fade from
their previous value to the value in this cue.
The ‘down’ time is only used for Intensity events where fixtures are fading out
(i.e. getting darker or turning off). It determines how long it will take for
Intensity to fade from their previous value to the value in this cue.
To adjust the up or down fade time click on the on the end point of the bar and
when the cursor changes to a double arrow drag to increase or decrease the time:
To set a delay time click on the bar and when the cursor changes to a hand drag
to move the bar so that it starts after the 0s mark of the cue:
 You can also set the up and down fade time by typing in the Timing box. For
example typing 3 / 4 sets the Up (or infade) time to 3 seconds and the Down
(or outfade) time to 4 seconds.
To expand the default times ruler, click on the arrow icon.
Expanded Default time view You can set individual default fade times, delay times and fade curves for the
different feature types (Intensity, Position, Colour, Gobo, Beam, Misc) in the
expanded default time view.
To do this:
1.
6‐30 Click on the expand arrow at the left end of the ruler bar. Vista displays the
expanded view:
Vista User Guide, Version 2 Working with cuelists Creating a Move in Black cue 2.
To adjust a feature type fade time click on the on the end point of the bar and
when the cursor changes to a double arrow drag to increase or decrease the
time. Or type a value in the corresponding ‘Time’ box.
3.
To adjust a feature type delay time click on the bar and when the cursor
changes to a hand drag to move the bar so that it starts after the )s mark. Or
type a value in the corresponding ‘Delay’ box.
4.
To adjust a feature type fade curve click on the fade icon and select from the
drop down list
This icon…
does this…
Sets the curve to a normal linear fade. The feature fades
evenly from the old setting to the new setting over time.
Linear
The fade is slower at the start
Damp
The feature goes to the end state very quickly.
Snap start
The feature doesn’t change until the very end of the fade
time.
Snap end
The feature starts with a delay, then slides up to the end
state.
Square law
The feature starts quickly and the finishs slowly.
Inverse square la
The feature goes to the end state very quickly.
Switch
The feature goes to the end state very quickly.
Hot power
Flourescent
Vista User Guide, Version 2 6‐31 Creating a Move in Black cue This icon…
Working with cuelists does this…
Sinus
 If you make any adjustment the default time for Position, Colour, Gobo,
Beam or Miscellaneous that feature type will no longer be changed when
you adjust the ‘Up’ fade time in the condensed timeline ruler.
Saving and re‐applying timing configurations When you’ve set up a set of default fade times that you like, you can save it so
you can apply it to other cues.
Saving timing sets To save a default timing set:
1.
Click on the arrow in the timing drop down box:
2.
Click on the ‘Custom Timing’ option. Vista opens the Custom timing
window:
3.
Adjust the feature type fade times using the timing bars or by entering
values in the time and delay boxes.
4.
Click on the ‘Save as’ button
5.
Enter a name for the timing set in the popup box and click OK.
6.
Click OK to close the Custom Timing window.
6‐32 Vista User Guide, Version 2 Working with cuelists About the timeline Applying saved timing configurations To apply a timing set to a cue:
1.
Select the cue.
2.
Select the timing set you want from the Timing drop-down list.
3.
Vista applies the thing set to the cue. This will not change the timing of any
event in the cue that has already adjusted in some way.
Modifying the cue number, name and duration To change cue name, duration, and end of cue action of a cue, in the tiles or
layout view:
1.
Select the cue with the pen or mouse. Shift-click or ctrl-click to extend the
selection.
2.
Double click on number, name or duration field. The field switches to edit
mode:
3.
Enter a new value and press Enter on the keyboard.
About the timeline The Vista uses a ‘timeline’ concept that will be familiar to you if you’ve used any
modern sound or video editing software on a personal computer. When you
store into a cue Vista creates an ‘event’ for each feature of each fixture that you
use in the cue. The events are placed, on the timeline, in the cue you working on
and when you add more cues they strung together in a cuelist.
The idea is simple: you create a series of lighting ‘events’ that occur in sequence
when you hit the ‘Play’ button. With the Vista you can move back and forth
through this piece of time and edit any aspect of the events that occur, in much
the same way as you could drag a tape back and forth across the play head of an
analogue tape deck.
Events on the Timeline The default timing section lets you set the timing for all the fixtures in a cue but
when you want to make timing changes for individual fixtures or events you
work in the timeline panel. When you select a fixture, in the editor and set
Intnsity, Colour or any other feature Vista creates a horizontal ‘event’ bar on the
timeline. These are the commands Vista is sending to your fixtures.
Vista User Guide, Version 2 6‐33 About the timeline Working with cuelists The event bars represent the activities of those fixtures over time. As you can see
in this example, the bars go from the ‘0s’ point on the timeline scale to the ‘2s’
point. This means that these fixtures are moving to a new setting over two
seconds:
The settings you’ve applied to these fixtures on the palettes (e.g. intensity, colour
and position) control the fixtures themselves. The timeline simply tells those
fixtures to accept those commands, and the event bar represents the length of time it
will take those fixtures to get to the desired state.
Once the fixtures get to that state they will stay like that until they receive
another command telling them to do something else (e.g. change to another
colour or fade out).
By placing the event bars where you want them on the timeline you’re giving
commands to those fixtures that tell them how long a parameter will take to fade
in. The parameter is determined by the palettes; the timeline only controls when the fade
starts and ends.
Using the summary views You can view the events on the timeline in several ways:
•
summarised by feature, i.e. intensity, position and colour
•
summarised by fixture type
•
filtered by feature type (Intensity, Position, Colour etc) or
Fixture type
•
filtered by fixture selection
•
filtered by fade path, event type and event timing
You choose these views from the Filter view drop-down menu at the left hand
end of the ruler bar. You can also switch between the minimised/maximized
setting of each summary view using the + and – buttons beside the feature or
fixture names in the left column.
6‐34 Vista User Guide, Version 2 Working with cuelists About the timeline Summary by feature This view shows a set of fixtures by their attributes:
By default, the view shows each bar minimised. To expand each attribute and see
the details, click the ‘+’ symbol beside the attribute name (e.g. ‘colour’). Vista
displays the details of that attribute:
Summary by fixtures The fixture type view shows the same information but sorted by fixture rather
than attribute:
The default fixture view has all the features minimised. To expand each fixture
bar and see the details, click the ‘+’ symbol beside the fixture you want to see.
Vista displays the details of that attribute:
Vista User Guide, Version 2 6‐35 About the timeline Working with cuelists Filtering the All Events view As well as displaying the Feature and Fixture views, you can also choose to filter
out different classes of information on the timeline. To do this, choose an option
from the list below the line in the View drop-down menu:
When you choose a filter, Vista displays only those types of events.
You can create your own filters to show only those combinations of events you
want to see. To create a filter:
1.
Choose the ‘Custom View Filter’ option from the menu. Vista displays the
Custom Filter window:
With this window you can filter by fixtures, event features and advanced
options:
This option…
does this…
View Type
Fixtures
Shows fixtures in the left column
View Type
Features
Shows feature types in the left column
All
Filters the timeline to show All fixtures
6‐36 Vista User Guide, Version 2 Working with cuelists About the timeline This option…
does this…
Selected Fixtures
Filters the timeline to show only the fixtures that are
selected in the Chooser window
In the Current
cue
Filters the timeline to show only the fixtures that have
programming in the current cue.
With New
Programming
Filters the timeline to show only fixtures that have new
have been edited since the cue was last saved.
Groups
Shows just the fixtures, in the groups that are ticked.
This filter is applied after the other Fixture filters.
Event Types
Filters the timeline to show only the feature types that
are ticked. Click on the ‘+’ sign beside a feature type to
select just a subset of that feature.
Fade Path
Filters the timeline to show only events that are (or are
not) set to a particlular fade path (i.e. Linear, Snap, etc)
Event type
Filters the timeline to show only events that are (or are
not) a particlular type (i.e. Preset, Release, Move in
Black, etc)
Event Timing
Filters the timeline to show only events that are (or are
not) set to:
• Follow the default times
• A Zero fade time
2.
Click on the ‘Save As’ button. Vista shows the ‘Save As’ window
3.
Type a name for the filter.
4.
Click the ‘OK’ button. Vista adds this filter to the drop-down filter list.
Vista User Guide, Version 2 6‐37 About the timeline Working with cuelists Managing your saved Filters You can rename, duplicate or modify a saved filter. To do this select the ‘Manage
View Filters’ option from the Filter drop down list. Vista opens the Manage View
Filters window:
To modify one of the built in filters or a custom sort you’ve saved:
1.
Select the Filter name in the left-hand panel.
2.
Modify the View type, Fixture selection, Event types and advanced event
options.
3.
Click the ‘Save’ button.
Renaming a Filter You can rename a sort by double clicking on the name, in the left column, and
typing a new name.
Duplicating a Filter To make a copy of a filter, select it and click on the ‘Duplicate’ button.
Deleting a Filter To delete a filter, select it and click on the ‘Delete’ button.
One click filters At the bottom of the timeline screen there is a set of filter buttons that provide
quick access to four popular filters.
This icon…
6‐38 does this…
Vista User Guide, Version 2 Working with cuelists This icon…
All
Selected
Cue
New
About the timeline does this…
Shows all fixtures in the cuelist
Shows just the selected fixtures.
Shows the fixtures in the current cue. Useful for
removing ‘white space’ in the timeline
Shows just the fixtures with new programming.
Zooming in and out At the bottom of the timeline screen there is a set of zoom buttons that let you
control the size of the events in the timeline.
This icon…
All
Selected
Cue
does this…
Zoom out to show more of the cuelist
Zoom in to show more detail
Zoom to show a single cue
Zoom out to show all cues in the cuelist
New
Auto
Zoom to show the selected cue(s)
Toggles auto zoom on or off. This means that whatever
cue is elected is automatically zoomed to fit the window.
 The zoom options are also available on the View menu.
The Editor Status bar Below the cuelist navigator there’s a status bar that shows details about the
cuelist you are working on and the cue that’s being edited and played:
Vista User Guide, Version 2 6‐39 Timeline events Working with cuelists In the status bar the three fields show:
•
the Cuelist that is open in the editor, this field will
correspond to the selected tab.
•
the Cue that is being edited, this field will correspond to
the cue that you have selected in the Cue navigator bar.
•
the cue, in the cuelist you are working on, that is playing
and contributing to the console’s output.
The buttons on the status bar control how the editor interacts with the console’s
output and playback:
This button…
does this...
Link joins the editor and and any playback (of the cue
being edited) to the cue you're editing.
This means that when you select a cue, in the editor it
will play. Likewise if you play a cue, from the cuelist
being edited it will change the cue selection in the editor.
If you want to edit a cue without seeing it on stage ‘Link’
should be de-selected.
When you turn Link off and select a cue an alert appears
in the status bar to inform you that you are: “Not editing
the stage cue”
Clicking on ‘Sync’ sets the cue showing in the editor to
match the cue being played. Then, as you play other cues
the editor will automatically follow the cue that’s
playing.
However if you select a different cue, in the editor,
playback will not be affected and Sync will automatically
turn off. This means you can make a change to an
upcoming cue without changing the look on stage then
click Sync again to bring the editor in line with the
playback.
The progress indicator When you hit Play, the blue line starts moving from left to right across the event
bars in the timeline panel. This line shows where you are up to in this cue. If you
hit Pause, the line stops wherever it is on the timeline; if you hit Play it starts
from the same spot.
Timeline events You can create any number of cuelists, each of which can consist of any number
of individual lighting events. You can then combine these cuelists and ‘play’
them interactively to produce your overall lightshow.
6‐40 Vista User Guide, Version 2 Working with cuelists Timeline events Adding events to the timeline Whenever you store a cue, using ‘Store Look’ or ‘Store Part’ you create events on
the Cuelist’s timeline. To work with those events and make timing adjustments
you open the cuelist in the editor and select the ‘Timeline’ window.
You can also create a new Cuelist, from scratch, in the editor and work with the
events straight away. To do this:
1.
Click the ‘New’ cuelist
menu.
icon or select the ‘New’ option on the Cuelist
2.
Select the
window.
3.
Choose the fixtures you want (or select a group of fixtures by clicking on one
of the Group icons).
4.
On the Intensity palette, turn up their intensity to a level above zero. You can
also set any of the other features, such as position and colour on the other
palettes if you like.
5.
Select the Timeline
icon on the main toolbar at the top of the screen. Vista
displays the timeline window with the features you used shown in the left
column and the timing events for those features to the right.
icon on the main toolbar to display the Fixture Chooser
About the Event bars The timeline event bars are labelled and include graphics to identify their
function and edit status.
Feature summary event Feature events are coloured to indicate their type (Intensity, Position, Colour,
Gobo, Beam or Miscellaneous).
The event label shows:
•
the number of fixtures the event applies to
•
the fade time.
Feature detail event You can open a feature summary event by clicking on the ‘+’ button, beside the
feature name in the left column.
Vista User Guide, Version 2 6‐41 Timeline events Working with cuelists The event label shows:
•
the event setting. In the example above the event shows the
CMY settings and an icon of the colour. Not all event types
include icons.
•
the fade time.
Snap events Events that are set to a zero second (0s) fade time are shaped like a banner with
an arrow at the left end:
When you select a snap event there is only one selection handle (the aqua
coloured square). When you click on the handle you can drag in either direction
and once the event has a length a second handle will appear.
Changed events Events that you’ve edited, since the cue was last saved, show with a hatched
pattern:
Moving events around Each event has three attributes: a start point, duration and a finish point. The
event bars on the timeline show you where each event starts and finishes and
how long it will take to reach its end point:
To adjust the start or end point of an event, select the event and drag it along the
timeline to the left or right. Note that the grid has an automatic ‘snap-to’ feature
that makes it easy to align start and end points.
To change the duration of an event, click on it and select the ‘handle’ (aqua
square) on the right-hand end and drag it left to shorten the event, or right to
lengthen it.
Note that in the example shown above three separate attributes of the event have
different timings:
6‐42 •
the Intensity event starts at 0s and is complete at 2s
•
the Position event starts at 0s and is complete by 1s
•
the Colour event starts at 0s and is complete at 1.5s
•
the Beam event starts at 0s and is complete at 1.75s.
Vista User Guide, Version 2 Working with cuelists Timeline events Working with selection handles A quick and easy way to create dynamic lighting effects is to ‘skew’ the events on
the timeline. When you select a group of events, Vista displays a selection box
around them with aqua /black squares on the corners and sides known as
‘handles’:
You use these handles to change the duration of the selected events. In this
example, the Intensity events of a set of fixtures are selected. By selecting a
handle and dragging it you can change the start or finish point of the selected
events. In the example above the fixtures will fade in over 1s
In the next example, we’ve selected the middle handle on the lower edge of the
selection and dragged it right to fade the events over 2 seconds, offsetting the
start and end fade times while retaining the 1 second fade time for the individual
fixtures:
Using the selection handles in this way you can utterly transform the attributes of
the selected events with just a few quick clicks. You can also adjust any of the
intensity, colour and beam attributes at any time while adjusting the timeline
events.
Making precise timing adjustments If you want to set the start and end times and durations of events to a precise
point on the timeline you can either zoom right in and line them up visually, or
enter the actual time values.
Using the set timing window You can set event timing and optionally scale events using the ‘Event timing’
window. To do this select the event(s) and select ‘Set Event Timing’ option from
the Timeline menu. You can also right-click on select the event(s) and select this
option from the popup menu.
Vista User Guide, Version 2 6‐43 Timeline events Working with cuelists Vista displays this screen:
This option…
does this…
Start
Select to set the start time of an event
Middle
Select to set the mid point of an event
End
Select to set the end time of an event.
TIme
Enter a time to set the start mid or end of an event to that
position on the timeline. If you enter a number with no
units Vista assumes seconds. Use h for hours, m for
minutes, e.g. 1h2m3.5s
Start / Mid / End
Duration
Enter a time to set the duration (or length) of an event(s). If
you enter a number with no units Vista assumes seconds.
Use h for hours, m for minutes, e.g. 1m2s.
Scale Events
Select this option if you want all selected events to be
scaled when the duration is increased or decreased.
Scaling is based on the longest event. If this box is not
ticked all events will be set to the same duration
Aligning start and end points You can also align the start and end times of selected events. To do this, select the
events and then select the ‘Align Start’ or ‘Align End’ option from the Timeline
menu.
You can also right-click on select the event(s) and select these options from the
popup menu.
Resetting events to follow the default times When you adjust the time of an individual event it no longer follows the cue’s
‘default times’. To reset an event so that it follows the default, select the event
and choose the ‘Reset to default timing’ option from the Timeline menu.
6‐44 Vista User Guide, Version 2 Working with cuelists Timeline events You can also right-click on select the event(s) and select these options from the
popup menu.
Setting the event fade curve Vista automatically selects the most suitable fade curve for each feature type but
you can choose from a set of pre-defined fade path shapes to set how an event
will progress.
Select the ‘Fade Curves’ option from the Timeline menu or right-click on the
event(s) and choose the Fade Curves option to display the fade path options:
The shapes in this menu depict the fade paths you can choose:
This icon…
does this…
Sets the curve to a normal linear fade. The feature fades
evenly from the old setting to the new setting over time.
Linear
Damp
The feature goes to the end state very quickly.
Snap start
The feature doesn’t change until the very end of the fade
time.
Snap end
The feature starts with a delay, then slides up to the end
state.
Square law
The feature starts quickly and the finishs slowly.
Inverse square
Vista User Guide, Version 2 6‐45 Timeline events This icon…
Working with cuelists does this…
The feature goes to the end state very quickly.
Switch
The feature goes to the end state very quickly.
Hot power
Flourescent
Sinus
 Instead of making an event very short, you can just set it to Snap at Start.
Creating Release events Sometimes it’s useful to have a cue release control of a feature. For example a
cuelist might set some lights to point downstage in the first cue but in the second
cue you want the lights to revert to whatever position they were in previously.
To do this you need to store a ‘Release’ event(s) for the fixtures and features you
want to the cue to relinquish control of.
You can also right-click on select the event(s) and select these options from the
popup menu.
Un‐tracking events You can also right-click on select the event(s) and select these options from the
popup menu.
Muting events If you want to temporarily prevent an event from being played back you can
‘mute’ it. To do this select the event(s) and choose the ‘Mute event option from
the Events menu. The event bar will be greyed and when the cue is played the
event will be ignored.
To un-mute an event choose the ‘Unmute’ event option from the Events menu.
You can also right-click on select the event(s) and select these options from the
popup menu.
6‐46 Vista User Guide, Version 2 Working with cuelists Creating and applying extracts Stopping effects overriding an event ‘Baseless’ effects are designed to run on top of a feature setting. For example a
baseless circle effect will cause fixtures to move in a circle around whatever
position is been set in a cue. If you want to stop a baseless effect running on an
event, right click on the event and select the ‘Stop free effects’ option.
Creating and applying extracts Extracts are like programming templates and can contain any of the attributes
you define on the palettes: intensity, colour, beam, position, and so on. They also
store the timing associated with the events.
An extract is a section of a cuelist (or range of events) that you can save and reapply in other cuelists. By re-using existing material to build new cuelists you
can save yourself a lot of time re-creating your favourite lighting effects.
Extracts Extracts are like programming templates and can contain any of the attributes
you define on the palettes: intensity, colour, beam, position, and so on. They also
store the timing associated with the events.
An extract is a section of a cuelist (or range of events) that you can save and reapply in other cuelists. By re-using existing material to build new cuelists you
can save yourself a lot of time re-creating your favourite lighting effects.
Creating extracts To create an extract:
1.
Select the part of the cuelist or events on the timeline that you want to use as
an extract.
2.
To adjust a slider setting, either:
•
Select the Extracts button on the Components tab, in the sidebar. Then
click on the + button or
•
click on the ‘New Extract button – normally Alt-F8.
3.
Type a name for the extract and click the OK button.
4.
Vista adds the new item to the extract list.
Applying extracts To apply an extract:
5.
Select one or more fixtures in the Fixture chooser window.
6.
Click the Extracts button on the Components tab of the sidebar.
Vista User Guide, Version 2 6‐47 Using commands within cuelists 7.
Working with cuelists Find the extract you want and click on it to select it.
Set the mask buttons so that the attributes you want are applied. Any attribute
that is masked, even if it is part of the extract, will not be applied.
Using commands within cuelists Commands let you use a Cuelist to control the playback of one or more other
cuelists.
To insert commands within a cuelist:
1.
Open a cuelist in the programmer and choose the Insert Commands... option
from the Tools menu. Vista opens the Insert Command window:
2.
Select the command to insert from the Action column:
This option…
does this…
Play, Back, Pause,
Assert, Skip Fwd,
Skip Back,
Release,
Acts on the cuelist as if you had pressed the
corresponding button on the playback controls for that
cuelist.
Flash
Equivalent to pressing the flash button on a cuelist’s
playback controls. You must also enter either ‘on’ to flash
or ‘’off’ to flash in the Parameter box.
6‐48 Vista User Guide, Version 2 Working with cuelists Using commands within cuelists This option…
does this…
Inhibit
Inhibits (blinds) or un-inhibits the cuelist. You must enter
either ‘on’ or ‘off’ in the Parameter box.
Rate
The Parameter field is a text field and only allows valid
input (e.g. numerical BPM value).
Release All
Releases All active cuelists. No other options are
available when this command is selected.
Timecode reset
Resets the timecode to 00:00:00:00.
Timecode enable
Sets a cuelist to be activated by Timecode.
Jump
Allows you to Jump to a specific cue within a cuelist.
Snapshot
Activates the snapshot selected in the parameter field.
Release others
Releases all active cuelists except the one containing this
command.
3.
Select the Cuelist to be triggered from the Cuelist column or click on the
‘Browse’ button to open the mini components window. Open this window to
select a cuelist, from the components window cuelists layout, and click OK.
4.
Enter an on or off command or cue number, if applicable, in the Parameter
field. You can also click on a spot in the timeline ruler and tick the ‘Insert at
cursor’ box to put the command at that position.
5.
The command will normally be placed in the cuelist at the current playhead
position. If you want to put it at a different position enter a time in the At
field.
6.
Enter a descriptive label in the Label/Description field if required. This text
will appear alongside the command, in the timeline.
7.
Normally Vista creates a new end cue if you place the command beyond the
end of the cuelist. If you prefer to extend the last cue of the cuelist tick the
'Expand existing cue' checkbox.
8.
Click ‘Insert’ to insert the command and close the window.
Vista User Guide, Version 2 6‐49 Updating Presets and Cuelists during playback Working with cuelists Updating Presets and Cuelists during playback When you make changes in the Programmer Live tab while a cuelist is being
played back, you can make those changes apply to the presets from which you
constructed the cuelist, or just make the changes to the cuelist itself.
 Update is designed to change settings that are already in a Cuelist and does
not automatically add new events or fixtures to a Cuelist, but you can open a
Cuelist and add new information in the programmer window on the Update
window.
Existing information To update existing information:
1.
While a cuelist is playing, go to the Live tab in the Programmer window and
select the fixtures you want to change.
2.
Make the adjustments you want using the palettes or hardware controls.
3.
Click the Update icon
menu.
4.
Vista displays the Update window:
, or choose the Update option from the Tools
Here you can choose whether to apply the changes to Cuelists or Presets if they
are in use. You can also filter the changes by fixtures and parameter. By default,
Vista selects the presets.
6‐50 Vista User Guide, Version 2 Working with cuelists Updating Presets and Cuelists during playback 5.
To make the changes to all Fixtures in the Cuelist or Preset, click the ‘All
fixtures’ button. To make the changes to just the selected fixtures click
‘Selected fixtures’ button.
6.
You can use the parameter filter icons to select or de-select the features you
want to include in the preset - Intensity, Position, Colour, Gobo, Beam and
Misc. For more information about the parameter filter bar refer to Presets on
page 5-45.
7.
To apply the changes to presets, click the checkboxes beside the preset names
in the Presets pane or, click the checkboxes beside the cuelist names in the
Cuelists pane to apply the changes to one or more cuelist rather than to the
presets.
8.
When you’ve defined how you want to apply your changes, click the OK
button to return to the Programmer screen.
Vista User Guide, Version 2 6‐51 SmartFX Effect types 7. SmartFX Effect types Vista provides several effect types:
•
Wave effects where Intensity or Colour or Position or any
other feature of your lights follows a waveform. With this
sort of effect you can create Intensity chases, Position
shapes such as a circle and Colour mix effects including
rainbows and more.
•
Swing effects where Intensity or Colour or Position or any
other feature of your lights crossfade between presets or
other IPCGBM settings.
•
Video effects that use an animated gif to control the
Intensity and Colour of a group of fixtures – usually
arranged in a matrix.
Using effects To run an effect on your fixtures you can either:
•
apply one of Vista’s built in template effect or
•
modify a template effect or
•
create your own effects from scratch, using the SmartFX
window.
Applying a stored template effect To apply an effect:
1.
In the Fixture Chooser window, select the fixtures you want to use.
2.
Click the Components tab in the sidebar and select the FX button. Vista
displays the list of available template effects:
Vista User Guide, Version 2 7‐1 Using effects SmartFX The icon indicates the effect type and letters in the ‘Content’ column show which
features are in this effect:
This icon / letter…
indicates this…
An Intensity effect.
I
A Position effect.
P
A Colour effect.
C
Matrix /
Multi-element
An effect designed to run on a matrix (See creating a
matrix on page [TBC]) or multi-element fixture (a
fixture with more than one light source – for example
a 4 cell ColourBlock.
Multi-feature
(i.e. IPC---)
An effect that includes more than one feature. For
example the ‘BallyColour’ effect .
 If a template effect is greyed out it means that the template cannot be applied
to the fixture type(s) you have selected.
3.
To apply an effect, click on the one you want. The effect you’ve chosen starts
running on the selected fixtures.
4.
To adjust the speed and other settings of an effect, open the SmartFX
window and use the controls to adjust it. See the following section
Using the SmartFX window to modify an effect To adjust the speed and other parameters of an effect, open the SmartFX window
by either:
7‐2 •
clicking the SmartFX button on the main toolbar – usually
F11, or
•
selecting the SmartFX Editor option from the Tools menu
(Ctrl + K).
Vista User Guide, Version 2 SmartFX Using effects The SmartFX has two panes: the effects list, on the left and effect controls on the
right:
The ‘Show effects from…’ pane normally shows the effects that are active (i.e.
running in the Live tab or in a Cuelist).
The Effects list You can filter the list of effects by their source, whether they are active and the
fixtures they are being applied to.
This option…
Source
Popup selector
does this…
The source popup filters the effects list by source:
•
Anywhere includes all effects
•
Selected Cuelist includes just the effects running
on the Selected Playback
•
Editor Cuelist includes effects running in the
Live tab and any Cuelists (tabs) that are open in
the Editor
•
Editor Current Cue includes effects running in
the selected cue in the Cuelist being edited.
Active only
Filters the effects list to only show effects that are
being played – that is the ones you can see on stage.
Selected Fixtures
Filters the effects list to only show effects that are
being run on the selected fixtures.
New Effect
Creates a new effect with your own settings. See
Creating an effect from scratch on page 7-12
Vista User Guide, Version 2 7‐3 Effect controls SmartFX This option…
does this…
Save as template
Click this button to save the effect as a template that
will appear in the Components list and Quickpickers.
When you click on an effect in this list, Vista displays the settings and controls
for this effect in the right hand pane.
Effect controls The SmartFX Control Panel contains:
•
Rate controls that apply to all feature types in your effect.
•
Feature type tab(s) (IPCGBM) with controls for the effect
waveform, size, rate multiplier, and direction
•
A Sequence tab with controls for fixture overlap, sorting,
spread and ganging.
•
An Advanced tab, where you can add additional effects
and synchronise or offset the effect waveforms. This tab is
also used to set how the effect interacts with other cues and
effects during playback
Rate control Effects can include one or more feature types (IPCGBG). The rate controls apply
and are common to all features in the effect.
This option…
does this…
Rate BPM
Sets the base rate at which the effect runs, expressed
in beats-per-minute (BPM).
Rate popup:
This control affects whether the Rate is based on
cycles-per-minute or fixtures-per-minute:
•
per cycle
•
per item
(was per-fixture)
Per-cycle - if the effect is an intensity chase at a Rate
of 20 BPM Per-cycle, then the whole sequence will
repeat 20 times each minute.
Per-item - if the chase is at a Rate of 80BPM Per-item,
then the chase will cover 80 fixtures each minute. The
loop time of a Per-item effect varies with the quantity
of fixtures used, and is slower with more fixtures.
This means the fixture-to-fixture rate (e.g. a flash
rate) will be constant no matter now many fixtures
are used.
Disable / Enable
7‐4 This button disables or enables the selected effect.
Vista User Guide, Version 2 SmartFX Effect controls The Feature tab(s) for ‘Wave’ effects Effects can include one or more feature types (IPCGBG). Vista creates a feature
tab for each type with controls for the effect waveform, size, rate multiplier, and
direction.
Click on the feature tab (i.e. Intensity) to see the controls:
 The feature tab(s) will not appear unless the effect is selected in the left pane.
This option…
does this…
Size
Size affects how much of the effect waveform is
added to the feature. For example if you run an
Intensity wave effect, set to size 50%, on a set of
fixtures they will modulate between 0 and 50%
intensity.
(was Amplitude)
For effects that run on more than one channel (i.e.
Position and Colour mix) there is a separate size
control for each channel
For swing effects there is no size controls since only a
value of 100% will reach the endpoints.
Rate
(was Rate Multiplier)
To maintain synchronization between the features of
an effect you can scale the rate for each feature as a
multiple of the base rate.
To make a feature run slower than the base rate set
the feature rate to lower value (e.g. x½ or x¼ ).To
make a feature run faster than the base rate set the
feature rate to a higher value (e.g. x2 or x4 )
Direction
Vista User Guide, Version 2 Mainly useful for chasing effects, this controls
whether fixtures are sequenced in ascending
(forward), descending (backward) or both directions
(bounce).
7‐5 Effect controls This option…
Base tab
Waveform buttons
SmartFX does this…
This tab shows the available effect waveforms, in
graphical form. To select a waveform click on one of
the buttons.
When multiple waveforms are being used the
buttons show the effect that will be created. For
example
• Position – shows buttons for creating shapes
including a Circle, Square, Can-can, Triangle,
Figure 8, Spiral, Bally Hoo and Spread circle.
• Colour Mix – shows buttons for a Rainbow
wave, RGB, CMY and more
Base tab
Visual editor
Below the waveform buttons, Vista displays a
preview of the waveform(s) in the effect. For position
and colour effects this section also provides size
controls for each of the feature waveforms. For
example a position effect has one waveform
operating on Pan and another on Tilt.
You can change the offset of the waveform(s) by
clicking in the preview window and dragging the
waveform to the left or right.
Customise tab
On this tab you can select the waveform type and the
phase offset of the waveform. For position and
colour effects, that operate on more than one channel
there is also a waveform, rate multiplier and phase
offset control for each channel.
The Feature tab(s) for ‘Swing’ effects For swing effects there are no size controls since only a value of 100% will reach
the endpoints. Likewise there is no direction control because ‘swing’ effects are
designed to bounce between endpoints.
7‐6 Vista User Guide, Version 2 SmartFX Effect controls  The feature tab(s) will not appear unless the effect is selected in the left pane.
This option…
does this…
Stop
Clicking on a ‘Stop’ icon pauses the swing effect so
that you can set a value for the feature. To set a value
choose a preset or set a value in the sidebar palette
windows.
Beats
Sets the number of beats the effect will remain on
each point before fading to the next point.
Feature
shows the type of features included in the swing
points
Value
shows a value or graphical representation of the
setting for the swing point.
Curve
Sets the fade curve to the swing point. See ‘Fade
curves’ on page xxx
Run effect
Click the ‘Run effect’ button to start the swing effect
running if it has been stopped.
Click the + (Plus) button to add a swing point.
Click the - (Minus) button to delete the selected
swing point.
Vista User Guide, Version 2 7‐7 Effect controls SmartFX The Sequence tab When you apply an effect to a number of fixtures you can use the controls on the
sequence tab to set how the effect is applied to those fixtures.
This option…
does this…
Overlap
affects how much each fixture overlaps the next
when the effect is running:
• At 0% each fixture runs the effect sequentially –
there is no overlap
• At 100% each fixture executes the effect
simultaneously.
This control works in conjunction with Spread to
achieve synchronized chases & wave effects.
7‐8 Vista User Guide, Version 2 SmartFX Effect controls This option…
does this…
Spread
Vista dynamically calculates a waveform offset
value for each fixture depending upon this control:
•
Spread = 0% - all fixtures have a uniform offset
•
Spread = 100% each fixture has a unique offset
ranging from 0% to 100%.
Normally this control will be left at 100% unless the
Overlap control is at 100%, otherwise there will be
periods when all fixtures will appear to be doing
nothing.
See below for a simple SmartFX tutorial using
Overlap & Spread.
Sort Fixtures
when an effect runs you can sort the fixtures in a
number of ways:
•
ID sorts the fixtures by number order.
•
Selection sorts based on the order in which you
selected them in the Chooser.
•
Random sorts the fixtures in a random order.
•
Position sorts the fixtures by their position on
the Fixture Chooser layout. Fixtures are sorted
from top left to bottom right.
To reverse the sort order click on the drop down
box and choose either ‘Ascending’ or ‘Descending’
Spread Shape
Curve
Vista User Guide, Version 2 the spread shape buttons control how the effect
runs across the fixtures. There are 4 spread shapes
available:
•
First to last. The effect starts on the first fixture
and runs to the last.
•
Pairs, outside to inside. The effect starts on the
2 end fixtures and into the centre.
•
Last to first. The opposite of 1.
•
Pairs, inside to outside. The opposite of 3.
sets the distribution of fixtures, along the effect
waveform. The normal setting is ‘Linear’and in this
case the fixtures are evenly distributed. Other
curves, such as square and inverse square will
bunch some of the fixtures together and spread
others out.
7‐9 Effect controls SmartFX This option…
does this…
Fixture Ganging
sets how the set of fixtures are grouped together.
‘No Blocking’ indicates that the effect runs across
the fixtures one at a time.
Blocking
Fixtures can be ganged so that two or more fixtures
are doing the same thing. For example:
•
when set to 2, adjacent pairs of fixtures are
ganged together in the effect.
•
when set to 2/1/3 for a set of 12 fixtures they’d
be ganged in a pair, then a single, then threes.
Fixture Ganging
allows non-adjacent fixtures to be ganged together.
Repeats
•
a repeat of 2 sets every third fixture to be doing
the same thing.
•
a repeat of 3 sets every fourth fixture to be
doing the same thing.
The ‘Preview’ panel shows how the fixtures will be
ganged together.
Change Fixture
Selection
click this button to
[TBC]
The Advanced tab This tab is used to:
7‐10 •
synchronise or offset the effect waveforms when there is
more than one feature in an effect – for example an effect
that includes both Intensity and Colour features.
•
set how the effect interacts with other cues and effects
during playback
•
save an effect you’ve modified or created to the list of
template effects.
Vista User Guide, Version 2 SmartFX Effect controls This option…
does this…
Offset
adjusting the Offset value, rolls the waveshape
within its own window. For example a 0% Phase
offset for a sine waveform would start and end at
the midpoint while a 25% Phase offset would have
the sinusoid start & end at the high point.
(Phase offset)
You can adjust the offset of a feature by either
dragging in the waveform window or entering a
value between 0 and 360 in the offset field
+ Add
Click the + icon to add a new effect type that is
synchronised with the other features(s) in this
effect.
- Delete
Click the - icon to delete the selected effect feature.
Basepoint
sets what happens when fixtures that are running
an effect receive a new setting for the same feature
type. For example if a circle position effect is
running on a set of fixture and a cue runs that sets
those fixtures to a different position.
- Bound
- Free
If the basepoint is set to Bound the effect stops
running.
If the basepoint is set to Free the effect continues to
run but will take it’s basepoint from the new event.
Vista User Guide, Version 2 7‐11 Creating an effect from scratch SmartFX This option…
does this…
Sync at Start
sets what happens as this effect starts when another
effect is already running.
Auto-sync the effect starts on the same phase as the
already running effect
Restart the effect always starts at it’s 0 point and so
will always look the same when it starts.
No-sync . [TBC]
Creating an effect from scratch To create your own effect:
1.
In the Programmer Fixture window, select the fixtures you want.
2.
Click the SmartFX button on the main toolbar or choose the ‘SmartFX Editor’
option from the Windows menu. Vista displays the Smart Effects window.
3.
Click the New button, at the bottom of the left pane, to display the Create
Effect window:
4.
Click on one of the effect type buttons. Vista provides several effect types:
•
Wave effects where the setting for Intensity or Colour or Position or any
other feature follows a waveform.
•
Swing effects that that move between two or more presets or IPCGBM
settings
•
Video effects that use an animated gif to control the Intensity and
Colour of a group of fixtures – usually arranged in a matrix.
5.
Choose the Feature type you want to use in the effect (e.g. intensity, or
position or colour)
6.
‘Type a name for your effect in the ‘Name’ box
7.
Click OK display your effect in the SmartFX window:
8.
Adjust the controls in the right hand panel of the window to apply the effects
you want.
Making your effect swing If you chose the ‘Swing’ button in the Create effect window, you have to define
the end points of the effect (i.e. where it starts and where it finishes).
7‐12 Vista User Guide, Version 2 SmartFX Stopping an effect In this case, when you click OK, Vista adds two swing point in the feature tab of
the SmartFX window.
To set values for the two points:
1.
Click the first ‘Stop’ button.
2.
Use either the palettes or the controls to set a value for the feature type you
are using .
3.
Click the second ‘Stop’ button and define its settings in the same way.
4.
Click the ‘Run Effect’ button to start the effect swinging.
Swing effects always have two end points but you can add more, intermediate,
points to build more complex effects. Click on the + button to add another point.
Saving your effect To save an effect you’ve created:
1.
Select the Advanced tab and click on the ‘Save as Template’ button. Vista
displays a small window asking for a name and location for the effect.
2.
Type a name for the effect and choose where to save the effect. You can save
the effect in either the Factory or User or Show folder. Saving the effect in the
Show folder makes it easier to transfer the effect between different consoles.
3.
Click on the OK button. Vista adds your effect to the list of effects. Next time
you click the FX tab on Sidebar, your effect will be in the list.
Stopping an effect There are two ways to stop an effect and have the fixtures revert to their original
or default values for the feature(s) that were running in the effect:
•
you can stop all effects that are running, or
•
you can stop just a particular effect, or
•
you ca stop just particular effect type.
Stopping all effects To stop all the effects that are running on your fixtures.
1.
Select the fixtures that you want to stop the effect running on.
2.
Choose the ‘Stop SmartFX’ option from the Tools menu.
Stopping a particular effect(s) To stop one or more of the the effects that are running on your fixtures.
3.
Select the fixtures that you want to stop the effect running on.
Vista User Guide, Version 2 7‐13 Stopping an effect SmartFX 4.
Click the SmartFX button on the main toolbar – usually F11, or select the
SmartFX Editor option from the Tools menu (Ctrl + K).
5.
Select the effect you want to stop from the list of effects.
6.
Click on the Disable button.
Stopping effect running on a feature To stop effects that are running on a feature type – i.e. Intensity, Postion, Colour
etc.
1.
Select the fixtures that you want to stop the effect running on.
2.
Click on the Palettes tab, in the sidebar, if it’s not already selected.
3.
Click on the feature type icon for the effect type you want to stop – Intensity,
Position, Colour, Gobo or Beam. Vista opens a popup menu:
4.
From the popup menu select the ‘Stop Effect’ option.
7‐14 Vista User Guide, Version 2 Assigning Audio to a Cuelist Stopping an effect 8. Assigning Audio to a Cuelist You can assign an audio track to a cuelist or cue and play it in Vista. This can be
useful if you want to programme for a particular piece of music or dialogue.
To assign an audio file to a Cuelist 1.
With the cuelist open in the editor select the ‘Cuelist properties’ option from
the Edit menu or, right click on the Cuelist icon in a Quick picker and select
the‘Properties’ option from the popup menu. Vista displays the Cuelist
properties window:
2.
If it’s not already open click the arrow to open the Audio Playback’ section.
3.
Click the browse button and navigate to the folder containing your audio
files, select a track and click the Open button. Vista copies the audio file to
the ‘Audio’ folder inside your Vista Data showfile folder.
4.
Click OK to close the Cuelist properties window.
When you play this cuelist Vista plays the selected audio track with it but will
only continue playing for the overall time of the Cuelist. To be able to hear the
entire track you may need to add or lengthen cues.
To assign an audio file to a specific Cue You can also assign audio to a single cue in Vista. This can be useful to play
sound effects or or short pieces of audio. To do this
1.
With the cuelist open in the editor select the Cue then select ‘Cue properties’
option from the Edit menu or, right click on the Cue tile and select the ‘Cue
Properties’ option from the popup menu.
Vista User Guide, Version 2 8‐1 Using Learn Timing to adjust cue timing 2.
Assigning Audio to a Cuelist Follow steps 2 – 4 as above.
Using Learn Timing to adjust cue timing You can programme a Cuelist then use the ‘Learn timing’ window to adjust the
Cue start times based on your actions. This can be useful if you want to fine-tune
Cue timing to an audio or video track.
Using Learn Timing 1.
Open the Cuelist you want to use.
2.
Select the ‘Learn timing…’ option from the Tools menu. Vista opens the
Learn Timing window:
3.
To keep the existing timing for cues tick the ‘maintain Cue Duration’
checkbox. If this box is not ticked all cues (and their events) will be stretched
or shrunk to match the time between cue start times.
Adjusting cues to timecode 4.
8‐2 If you want to learn timing based on a Timecode source tick the ‘Enable
Timecode’ checkbox. Vista will then display the Timecode viewer (and
controls if you are using internal timecode). If you are not using timecode
leave this box unchecked.
Vista User Guide, Version 2 Assigning Audio to a Cuelist Using Learn Timing to adjust cue timing Adjusting cues based on audio or video You can adjust cue timing to match the audio in a cuelist or while you are listing
to or watching a recording. To do this:
5.
Click the skip to start button , in the Learn Timing window, twice to
ensure you are at the start of your first cue
6.
When you are ready click the play button , in the Learn Timing window to
set the start time of the first cue. If you have enabled timecode the timing
field of the first cue will be automatically changed to a timecode type. If you
are not using timecode the start of the first cue will be set to Halt.
7.
Continue to press the play button whenever you want the next cue to start.
All subsequent cues are automatically set to ‘Follow’ mode with their start
time adjusted in relation to the previous cue.
8.
When you are finished click the Done button to close the learn timing
window.
Vista automatically changes the cues start action to ‘Follow’ and adjusts the start
time in relation to the previous cue. To see how your cues will playback in
relation to the timeline and each other, click the ‘View cues in layout mode’
button
 Tip: When you use ‘Learn timing’ with Timecode, Vista sets the first cue to
start at a Timecode and then uses Vista’s internal clock to start the following
cues. If you want every cue to be set to timecode mode you can change all
the Follow cues convert their start times to Timecode. To do this:
1.
Select all the ‘follow’ cues by shift clicking in the cue tile view
2.
Select the ‘cue properties’ option from the Edit menu
3.
If it’s not already open click the triangle button beside the Timing option
4.
Click on the green Follow
Vista User Guide, Version 2 icon and change it to Timecode
8‐3 Using Timecode to control Cuelists Automating Playback 9. Automating Playback Using Timecode to control Cuelists You can use Linear Time Code (LTC) or Midi Time Code (MTC) to trigger cues.
To do this see If you are going to be using timecode to running the Vista in
conjunction with a device that generates SMPTE timecode, you can simulate the
timecode so you can get your show running in time without needing the actual
timecode from the other device.
To set up the timecode:
1.
Choose the Timecode option from the File menu. Vista displays the timecode
properties window:
2.
Set the Timecode source. The options are Linear Time Code (LTC), MIDI
Time Code (MTC) or Vista’s Internal clock
3.
Set the Frame rate from the drop down menu.
4.
Set the Timecode Offset if required. The offset time is added to the incoming
timecode. For example if the offset is 01:00:00:00 (1hr) and the incoming
timecode is 00:00:10:00 (10 secs) Vista will treat it as though 01:00:10:00 (1hr
10secs) is received.
5.
Hit the Start button to start the timecode running and the Stop button to stop
it. The Time Code field shows the elapsed time, and hitting the Reset buttons
clears this field.
6.
To close the window, click the ‘X’ symbol in the top right corner.
9‐4 Vista User Guide, Version 2 Automating Playback Using Date and Time to control cuelists Playback Lag Compensation The Lag compensation field is used to compensate for slow midi data
transmission. If your cues are not running at the expected time you may need to
enter a value in this field. For example entering 0.5s will mean that all your cues
run half a second earlier than programmed.
Timecode dropouts The Freewheeling time field is used to cope with errors in the SMPTE code
coming from an external device such as a Tape player. When Vista encounters a
SMPTE error it will simulate timecode for a period before assuming the timecode
has ended. This field sets the number of seconds Vista will allow to pass while it
simulates SMPTE until it relinquishes control.
Disabling all timecode To disable timecode for all cues, choose the Disable option from the Timecode
source drop down. This can be useful is you want temporarily to stop timecode
from triggering your cuelists.
Using Date and Time to control cuelists You can set Vista to automatically play cuelists, trigger snapshots and more
based on the date and time.
Managing date and time events You can add, delete, edit duplicate or test date and time events. To do this select
the ‘Date and Time events…’ option from the Tools menu. Vista opens the Date
and Time Events window:
This window displays a list of all your Date and Time events.
This option…
does this…
New
Opens the ‘New Date and Time Event’ window
where you can set up an event to be triggered based
on the date and time.
Delete
Deletes the selected event.
Vista User Guide, Version 2 9‐5 Using Date and Time to control cuelists Automating Playback This option…
does this…
Edit
Opens the selected event so that you can modify it’s
settings.
Duplicate
Duplicated the selected event
Test Now
Click this button to test the event, no matter what
the current time is.
Global Enable
You can disable all date and time events by unchecking this box..
Close
Closes the window
Setting up a new date and time event To set up events that will be triggered based on the date and time, choose the
‘Date and Time events …’ option from the Tools menu. Vista opens the Date and
Time Events window
This option…
does this…
New
Opens the ‘New Event’ window where you can set
up an event to be triggered based on the date and
time.
+ Add
Click the + icon to add a new effect type that is
synchronised with the other features(s) in this
effect.
Delete
Deletes the selected event.
Modify
Opens the selected event so that you can modify it’s
settings.
Duplicate
Duplicated the selected event
Checkbox
If the checkbox, beside an event, is NOT ticked the
event will not be activated.
Global Enable
You can disable all date and time events by unchecking this box..
9‐6 Vista User Guide, Version 2 Automating Playback Creating a New Event Disabling all date and time events You can also disable all date and time events by choosing the Disable All
Time/Date Events option from the Vista menu. This can be useful is you want
temporarily to stop events being triggered.
Creating a New Event Date / Time events can automatically control playback and other actions. To
create a new event:
1.
Choose the New Event... option from the Date/Time Events window. Vista
opens the New Event window:
2.
Select the command to insert from the Action column:
This option…
does this…
Play, Back, Pause,
Assert, Skip Fwd,
Skip Back, Release,
Acts on the Cuelist as if you had pressed the
corresponding button on the playback controls for
that clip. Select the Cuelist from the Target column
Flash
Equivalent to pressing the flash button on a
Cuelist’s playback controls. You must also enter
either ‘on’ ‘off’ or ‘toggle’ in the Flash enabled box
to set the flash button action.
Inhibit
Inhibits (blinds) or un-inhibits the clip. You must
also enter either ‘on’ ‘off’ or ‘toggle’ in the Inhibit
enabled box to set the flash button action.
Vista User Guide, Version 2 9‐7 Creating a New Event Automating Playback This option…
does this…
Rate
The Rate field is a percentage field and only allows
valid input (e.g. numerical % value).
Release All
Releases All active Cuelists. No other options are
available when this command is selected.
Timecode reset
Resets the timecode to 00:00:00:00.
Timecode enable
Sets a Cuelist to be activated by Timecode.
Jump
Allows you to Jump to a specific Cue within a
Cuelist. You can select a cue from the popup menu
in the Cue field.
Snapshot
Loads the snapshot selected in the Target box
3.
Select the Cuelist to be triggered from the target column.
4.
Enter an on or off command or rate setting or cue number, if applicable, in
the option field.
5.
Type a label for the Event in Name box.
6.
Set the time of day, to trigger the event, in the Time box. The time is
displayed as a 12 hour AM/PM clock.
7.
If you want an event to repeat periodically, check the Repeat box and specify
the number of times to repeat and the Interval (in minutes), between
repetitions.
8.
Select the days of the week you want the event to run on by ticking the check
boxes.
9.
If you want an event to only be activated after a certain date. Tick the Start
Date box and specify the date when the event should first be triggered.
10.
If you want an event to stop running after a certain date. Tick the End Date
box and specify the date when the event should last be triggered
11.
Tick the Enabled checkbox to activate the event. If this box is not ticked the
event will not run.
12.
Click the OK button to save the event.
9‐8 Vista User Guide, Version 2 The Playback Control Window Controlling and monitoring playback 10. The Playback Control Window Controlling and monitoring playback When you’ve got a full show going it’s likely that you’ll have multiple Cuelists
on the console and being played back.
To see what’s going on at any time, click the Playback Control button on the
main toolbar at the top of the screen. Vista displays the Playback Control
window:
This screen lists all the cuelists that are playing and gives you a handy point from
which to control and edit them. The window is made up of two panes that can be
resized by clicking on the vertical dividing line and dragging the divider to the
left or right.
Cuelist pane The left side of the screen displays a list of all Cuelists and can display up to
twelve columns that show playback status and some Cuelist properties.
Vista User Guide, Version 2 10‐9 Controlling and monitoring playback The Playback Control Window This column…
indicates…
Cuelist Name
The name of the Cuelist.
Current Cue
Shows the current Cue name and number. Cuelists
that have not been run show the first Cue name.
Status
The Playback State of the cuelist
- HTP set on
- On Playback. The Cuelist is on a playback control.
- SMPTE timecode locked (not implemented)
- Audio (not implemented)
- Inhibited
Active
Shows if the Cuelist is playing or has been played.
Priority
Shows the priority of the Cuelist.
Programming
Shows the features (Intensity, Position, Colour,
Gobo, Beam) programmed in this cuelist.
HTP
Shows the ‘HTP Intensity’ property setting.
Release Time
Shows the Cuelist’s release time.
Inhibited
Shows if a Cuelist has been inhibited (made blind).
Notes
This column is for notes and comments. To add a
note click, double click on the notes cell.
You can change the setting of a cell by double click on the cell and either
selecting from a list of options or entering a new value. You can also right-click
on the cell to open an editing window for that cell. Not all cells are editable
You can sort the Cuelist list by clicking on any of the column headings. For
example to show all the Cuelists that are on playback controls, at the top of the
list, click on ‘On Playback’. Click the column heading again to reverse the order.
You can resize columns by clicking between the headings and dragging the
column to suit. To show or hide columns right-click in the Cuelist pane and select
‘Show/Hide fields’ from the popup menu.
Cue pane The right column shows the Cues in the Cuelist selected in the left column and is
divided into six columns that show Cue detail and progress:
This column…
10‐10 indicates…
Vista User Guide, Version 2 The Playback Control Window Controlling and monitoring playback This column…
indicates…
ID
Shows the Cue number
Cue
Shows the Cue name.
Programming
Shows the features types programmed in this cue.
Click this button to play the cue
Progress
Provides a visual display of the Cue’s progress and
Shows the progress of the Cue as a percentage
Click this button to skip to the end of the cue
Time
Shows the elapsed time, time remaining and total
fade time for the Cue. I.E.
1/5 [6]
Elapsed time is 1 second
Time remaining is 5 seconds
Total fade time is 6 seconds
Follow Action
Shows how the cue starts.
Start – the Cuelist starts ‘n’ seconds after the start of
the previous cue
End – the Cuelist starts ‘n’ seconds after the end of
the previous cue
Wait – the next Cue will play when Go is pressed
Follow delay
Shows the delay time for the ‘follow action’
described above.
Notes
This column is for notes and comments. To add a
note click, double click on the notes cell.
Control and Playback buttons You can use playback button toolbar to control one or more Cuelists. To show or
hide the playback buttons choose the ‘Playback Control’ option from the
Toolbars submenu on the View menu :
This button…
does this…
Jumps to the start of the Cuelist
Cues backwards to the previous Cue marker of the
selected Cuelist
Vista User Guide, Version 2 10‐11 Controlling and monitoring playback This button…
The Playback Control Window does this…
Pauses playback of the selected Cuelist(s)
Commences (Go) Playback the selected Cuelist(s)
Cues forwards to the next Cue of the Cuelist
Jumps to the end of the selected Cuelist.
Releases the selected Cuelist – fixtures return to their
previous settings:
Filtering the cuelists If the ‘Only show active cuelists’ button is highlighted only cuelists that are being
played will be shown in the left pane. You can also set the this option on or off
from the View menu.
Auto Scroll If the ‘Auto Scroll’ option is highlighted you the cue panel will scroll to keep the
current cue visible. You can also set the this option on or off from the View menu.
Dragable playhead If the ‘Dragable Playhead’ option is ticked you can control a Cuelist’s playback
by clicking on the Cue progress indicator bars. You can also set the this option on
or off from the View menu
10‐12 Vista User Guide, Version 2 The Playback Control Window Controlling and monitoring playback Click on the > button on the left side, of the bar, to play the Cue, click on the >>
button to go to the end of the Cue or click anywhere in the Cue bar to jump to
that point.
If the ‘Dragable Playhead’ button is highlighted click on it (so it is de-selected) to
prevent accidental triggering of Cue .
Search You can search for a cuelist or cue by clicking on the corresponding search
button. You can also do this by choosing the ‘Search’ option from the View
menu.
Editing in the Playback control window There are two ways you change Cue names, times and end-of-Cue actions from
within the Playback control window. You can:
•
double-click on the Cue Name, Time, At End setting or
Notes field and edit the field directly.
•
right-click on the Cue Name, Time, At End setting or Notes
field and select the ‘Edit field of selected Cue(s)’ option
from the popup window.
To edit a field directly 1.
Double-click on the Cue Name, Time, At End setting or Notes field.
2.
Choose from the list of options or enter a new name, time etc.
3.
Press the Enter key or click away from the field.
To use the Edit field window 1.
Select one or more Cues. You can select a range of Cues by using the shift or
control key.
2.
Right-click in the field that you want to change and select the edit option.
Vista opens the Edit field window.
3.
Enter a new name, time etc.
4.
Click the OK button.
Vista User Guide, Version 2 10‐13 Using the console hardware Console layout 11. Using the console hardware Console layout Vista consoles and control surfaces provide the faders, encoders, switches and
displays you’ll need to control your lighting rig. The layout of each product is
slightly different and the quantity of playback controls varies.
T4 Console The T4 console features:
•
LCD Pen/Tablet module that includes, the Grand Master &
DBO, 12 Function buttons, 2 sets of modifier buttons, a
keyboard & trackpad
•
4 Playback modules with faders
•
2 Playback modules without faders
•
2 Superplayback/Programming modules.
Vista User Guide, Version 2 11‐1 T2 Console Using the console hardware T2 Console The T2 console features:
•
LCD Pen/Tablet module that includes, the Grand Master &
DBO, 12 Function buttons, 2 sets of modifier buttons, a
keyboard & trackpad
•
2 Playback modules with faders
•
1 Playback modules without faders
•
1 Superplayback/Programming modules.
I3 Console The I3 console features:
•
2 Playback modules with faders
•
2 Playback modules without faders
•
1 Superplayback/Programming modules.
L5 Console The L53 console features:
•
LCD Pen/Tablet module that includes, the Grand Master &
DBO, 12 Function buttons, 2 sets of modifier buttons, a
keyboard & trackpad
•
2 Playback modules with faders
•
2 Playback modules without faders
•
1 Superplayback/Programming modules.
S3 Control Surface The S3 control surface features:
•
2 Playback modules with faders
•
2 Playback modules without faders
•
1 Superplayback/Programming modules.
S1 Control Surface The S1 control surface features:
11‐2 •
1 Playback modules with faders
•
1 Superplayback/Programming modules.
Vista User Guide, Version 2 Using the console hardware M1 Control surface M1 Control surface The M1 control surface features:
•
1 Playback modules with faders.
Grand Master and DBO The rotary Grand Master control scales the intensity of all output from the Vista
system.
The Dead Black Out (DBO) button takes all intensity to 0%, while it is held down.
Function keys The function function buttons provide quick access to many commands and
functions. The buttons are user configurable so you can assign functions you use
frequently and have access to function at the press of a button rather than having
to choose the option from a menu or icon.
The number and location of the function buttons varies from console to console:
•
I-series consoles provide six function buttons located at the
top centre of the unit
•
S-series consoles provide five function buttons located at
the top centre of the unit
•
T4 and T2 consoles have 12 buttons located above the main
display
•
I3 consoles have 6 buttons located at the top centre of the
console
•
S3 control surfaces have 5 buttons located at the top centre
of the console
•
S1 control surfaces have 6 buttons located below the GM &
DBO controls
•
M1 control surfaces do not have function buttons.
Your keyboard Function keys ‘F1 – F12’ can be used in place of these buttons. On
the Vista PC version, the Function keys ‘F1 – F5 or F1 – F12’ can be used in place
of these buttons.
To assign a function to one of the buttons:
1.
Click the Console button to display the Console screen. The function keys are
at the top of the Console screen.
2.
Right-click on a button and select a command from the popup menu.
Vista User Guide, Version 2 11‐3 The modifier keys Using the console hardware The modifier keys The LR key (T series consoles only) The LR button changes a pen tablet tap to a right tap. To ‘right-click’ hold this
button down then tap the pen.
The coloured modifier keys The coloured (Red, Yellow, Green, Blue) modifier buttons provide alternate
functions when you press a button on the console while programming and
during playback.
You can also use keyboard equivalents in place of the modifiers:
•
Shift is equivalent to the Red buttton
•
Control is equivalent to the Yellow button
•
Alt is the equivalent of the Green button
•
Control + Alt is the equivalent of the Blue button.
The Super Playback / Programmer controls These controls are used during programming and playback. To switch functions
press the ‘Menu’ button and then select from the three options:
11‐4 •
IPCG – stands for Intensity, Position, Colour, Gobo, Beam
and puts the controls into editing (aka programming)
mode. In this mode the buttons and encoder wheels can be
used to set Intensity levels, Pan Tilt and all the other
features of your fixtures
•
Play – puts the controls into playback mode . In this mode
the controls and buttons provide quick access to the regular
and advanced cuelist playback options.
•
SFX – stands for Smart Effects . This mode let’s you use the
buttons and encoders control the most frequently used
effects settings.
Vista User Guide, Version 2 Using the console hardware The Super Playback / Programmer controls Editor (aka Programmer) mode When you select fixtures in the Chooser or Timeline window the hardware
controls can be used instead or the on screen palettes to adjust setting for
Intensity, Position, Colour, Gobo and Miscellaneous parameters
Programmer mode If the controls are not already in Programming mode press the menu button then
the button labelled ‘IPCG’ to switch into to programmer mode:
This button…
does this…
I /POS
Press this button to put the encoders and lower 6 buttons in
Intensity plus Position mode. Pressing it again cycles the
controls through any available parameters or alternate
modes (Angular position and Strobe & Shutter).
Col
Press this button to put the encoders and lower 6 buttons in
Colour mode (HSV). Pressing it again cycles the controls
through any available parameters or alternate modes (CMY,
RGB, Colour Wheel Colour )
Gobo
Press this button to put the encoders and lower 6 buttons in
Gobo mode. Pressing it again cycles the controls through
any available parameters or alternate modes.
Vista User Guide, Version 2 11‐5 The Super Playback / Programmer controls Using the console hardware This button…
does this…
Beam
Press this button to put the encoders and lower 6 buttons in
Beam mode. Pressing it again cycles the controls through
any available parameters or alternate modes.
Menu
Opens the Super Playback top level menu screen. Double tap
the menu button to switch between Playback and
Programming mode.
Home
Sets the associated feature to its default (or home) value.
(Clear)
Hold the yellow modifier (or Ctrl key) to clear the feature
settings.
Full
Sets the associated feature to its maximum values. I.E. this
would set Intensity to 100.
(Zero)
Hold the yellow modifier (or Ctrl key) to set the feature to its
minimum value.
>>
For Gobo (or Colour) wheel features this button toggles
between the fixtures wheels – i.e. Gobo wheel 1, Gobo wheel
2, etc
Mode
For Gobo wheels that have rotating gobos this button toggles
the rotation encoder between Index and Spin mode.
<>
This button reverses the direction of a spinning colour or
gobo wheel or individual gobo.
Encoders
Rotate to set the associated parameter to the required value.
<- Left arrow
Selects the previous Fixture
-> Right arrow
Selects the next fixture
Super Fine Mode Hold down the Green modifier button or the Alt (Option) button, on your
keyboard, to put the encoders into super-fine mode.
Fixture Selection buttons The left and right arrow buttons located just above the encoder wheels can be
used to select the Previous or Next fixture in a selection.
If there’s no fixtures selected pressing the buttons will cycle through all te
patched fixtures.
11‐6 Vista User Guide, Version 2 Using the console hardware The Super Playback / Programmer controls Editor intensity The overall intensity from the Editor is controlled by the fader located, on the left
side, below the encoder wheels.
Editor ‘Live’ time The fader located, on the right side, below the encoder wheels can be used to
adjust the Live time. At the top (100%) position the Intensity, Position, Colour
and other feature settings fade in over the ‘Live time’ set in the Editor window.
At the bottom (o%) position the feature settings fade in over 0 seconds – i..e they
snap to the new value.
Super Playback mode In playback mode the Super Playback section controls and buttons automatically
link to the selected playback. This means that when you press the ‘Select’ (*)
button on any cuelist playback you can control that cuelist with the faders,
buttons and encoders in this section.
Play controls The faders and buttons, below the encoders provide quick access to all the cuelist
play function.
This button…
does this…
Jumps to the start of the Cuelist
Cues backwards to the previous Cue marker of the selected
Cuelist
Cues forwards to the next Cue of the Cuelist
Jumps to the end of the selected Cuelist.
Not used
upper
Pauses playback of the selected Cuelist(s)
lower
(Left flash)
Commences (Go) Playback the selected cuelist(s)
Flashes intensity of the super playback cuelist to the
maximum value.
Vista User Guide, Version 2 11‐7 The Super Playback / Programmer controls This button…
(Right)
Using the console hardware does this…
Not used
Crossfade
 You can configure these buttons in the Console window. See Assigning a
component to the playback controls on page 11-13
Super Playback mode extended controls If the controls are not already in Playback mode press the menu button then the
button labelled ‘Play’ to switch into to Playback mode. The top row of buttons let
you select from the playback control pages:
This button…
does this…
Control
Selects the normal cuelist play mode controls
Chase
Select the cuelist Chase controls
SmartFX
Selects the cuelist SmartFX controls
Load
Press Load then any key on a normal playback to load that
cuelist into the Superplayback.
Lock
Locks the current cuelist onto the Superplayback. When lock
is selected pressing Select (*) on another playback will not
cjange the Superplayback cuelist.
Menu
Opens the Superplayback top level menu screen. Double tap
the menu button to switch between Playback and
Programming mode.
Cuelist Control (normal) mode In the Cuelist ‘Control’ mode you can control the playback rate and select from
several play options using the bottom row of buttons:
This button…
does this…
Rate
Enables the left encoder for rate control of playback. Turn
the encoder to the left to slow the playback rate and to the
right to speed it up.
100%
Resets the playback rate to normal. At 100% the cuelist plays
back using the fade times set in the cues.
11‐8 Vista User Guide, Version 2 Using the console hardware The Super Playback / Programmer controls This button…
does this…
Jump
Opens the cuelist jump window on the main screen. Used to
jump from one cue to another cue out of sequence. Select the
Cue you want to jump to in the Jump window. See Using the
Jump window on page 11-10
Press Go to fade to that cue.
Shuttle
Enables the middle encoder for manual control of playback.
Move the encoder clockwise to advance and anti-clockwise
to go backwards.
Release
Releases the cuelist. Fixtures return to the previous settings
or to their defaults.
Select
Selects the cuelist on the SuperPlayback.
Cuelist Chase mode In the Cuelist ‘Chase’ mode you can start a cuelist chasing. change the chase rate
and select the chase direction:
This button…
does this…
Rate
Enables the left encoder for rate control of playback. Turn
the encoder to the left to slow the playback rate and to the
right to speed it up.
Sync
Synchronises the chase
Forward
Turns the chase mode on and runs forwards. If the cuelist is
already chasing forward pressing the button will turn chase
mode off.
Reverse
Turns the chase mode on and runs backwards. If the cuelist
is already chasing backward pressing the button will turn
chase mode off.
Bounce
Turns the chase mode on in bounce mode (i.e. run from first
to last cue then last to first cue). If the cuelist is already
bouncing pressing the button will turn chase mode off.
Random
Turns the chase mode on and runs in a random order. If the
cuelist is already in random pressing the button will turn
chase mode off.
Vista User Guide, Version 2 11‐9 The Super Playback / Programmer controls Using the console hardware Cuelist FX (effects) mode In the Cuelist ‘FX’ mode you can control the size, rate and phase of effects that
are running on the console:
This button…
does this…
Encoders
Enables the encoders. To avoid accidentally changing FX
settings turn the encoders off.
Reset
Resets the effect(s) Size to it’s programmed settings
Reset
Resets the effect(s) Rate to it’s programmed settings
All /Cuelist /
Active.
All - selects all running effects for adjustment
(press to toggle)
Cuelist - selects the effects in the selected cuelist for
adjustment
Active - selects the active effects for adjustment
Forward /
Backward
Changes the direction of the selected effect(s)
(press to toggle)
Sync
Re-synchronises the selected effects.
Using the Jump window During playback you can use the jump window to quickly select a cue, out of the
normal sequence, and fade it in.
To open the Jump window:
•
press a Select button on any playback to bring that cuelist onto the
super playback
•
press the Jump button in the super playback
Vista displays the Jump to Cue window:
11‐10 Vista User Guide, Version 2 Using the console hardware Playbacks with faders This option…
does this…
Cuelist
Selects the cuelist to jump to. This field is automatically set
to the cuelist on the superplayback.
Cue
Selects the cue to jump to. To find the cue you want to jump
to type the cue number or a part of the cue name in the
search box, or select the cue from the list
Cue Timing
Crossfades using the new cues fade time
Live Timing
Crossfades using the Live time
Arm & Close
Closes the Jump window with the selected cue ready to play.
Press the Play button to complete the jump.
To complete the Jump and fade in the selected cue, without using the Arm and
Close option;
•
press the keyboard Enter key, or
•
use the Cuelist’s Go button, or
•
click the OK button.
Playbacks with faders Depending on your console type you will have one of more ‘Playback with fader’
sets consisting of 5 playbacks. On the M1 console the playback set does not
include a display.
Vista User Guide, Version 2 11‐11 Playbacks without faders Using the console hardware These playbacks consist of:
•
a Select button – normally used to select the playback
•
a display – used to display the name of the cuelist or other
component that’s being controlled
•
a Go button – normally used to play the the cuelist or other
component
•
a fader – used to control the intensity of a cuelist
•
a flash button – normally used to momentarily flash the
intensity of a cuelist to full.
Playbacks without faders These button-only playback sets are available of the T4, T2, I3, and S3 consoles.
These playbacks consist of:
•
a Select button – normally used to select the playback
•
a display – used to display the name of the cuelist or other
component that’s being controlled
•
a Go button – normally used to play the cuelist or other
component.
Page controls Each playback module consists of 5 playbacks. Cuelists and other components
can be assigned to these controls as pages. To change pages:
11‐12 •
press the Page Up button to advance to the next page
number
•
press the Page Down button to go back to the previous
page number.
Vista User Guide, Version 2 Using the console hardware Configuring the console for Playback Configuring the console for Playback Once you’ve stored a number of Cuelists, Presets, Extracts, etc, you can assign
those components to the playback controls the way you want them using
Console screen.
When you click the Console button on the toolbar Vista displays the Console
screen:
On this window the Sidebar shows a quickpicker where you can display and
filter the components you want to assign to the console. You can:
•
choose a component type (Cuelists, Groups, Presets,
Extracts, Smart FX, Snapshots) from the top dropdown
•
filter the list by selecting a set from dropdown. For
example you can filter the list to show just Presets that
include Colour.
Assigning a component to the playback controls Once you’ve selected the component type you want you can drag and drop it
onto the label area corresponding to the console’s LCD windows:
Vista User Guide, Version 2 11‐13 Configuring the console for Playback Using the console hardware  Tip: You can assign any combination of components to the playback controls
– Cuelists, Groups, Presets, Extract, Effects, Favourites and Snapshots.
Splitting playback controls When a component is assigned to a playback it uses all the controls that are
available – the Go and Choose button plus the fader and flash button if available,
but you can split a playback set to increase the number of components that can be
placed on a page.
To do this, move the cursor to the top of the white label area. When the pointer
changes to a split bar [=], click and drag down:
Playbacks with faders can be split three ways. To do this move the cursor to the
middle of the label area. When the pointer changes to a split bar [=] click and
drag down.
 Tip: You don’t have to split all the playbacks on a page the same way, you
can split on two ways, another three ways and so on.
Expanding playbacks Playbacks can also be extended to provide more physical button controls for
playback of a cuelist. Up to five playbacks in the group can control a cuelist:
To expand a Playback move the cursor to the right side of the label area. When
the pointer changes to a split bar [||] click and drag to the right.
 Tip: You can expand a Playback before or after a Cuelist has been assigned,
but you can only expand into an area that is not occupied by another
component.
11‐14 Vista User Guide, Version 2 Using the console hardware Configuring the console for Playback Configuring the playback buttons and faders Normal, split and expanded playbacks have their buttons and faders set up with
the default configuration. To see how the buttons and faders are configured press
the Help key [!] on T series consoles Ctrl + ? on a PC.
Vista displays the button and fader functions on the LCDs and in the Console
window:
You can assign different actions to these buttons and faders to suit your
requirements or playback style.
To assign an action:
1.
Click the Console button to display the Console screen.
2.
Click on the ‘Cuelist Buttons’ or ‘Cuelist Faders’ tab in sidebar.
3.
Click on the required button or fader action and drag it on top of the button
or fader you want to use for that function.
Some buttons and faders must be used together. For example if you make a fader
a ‘Cross fader’ you should also assign a ‘Toggle Xfader’ button to the button
below the fader. Likewise if you make a fader a ‘Rate fader’ you should also
assign a ‘Toggle rate fader’ button to the button below the fader.
Cuelist buttons The following button actions are available:
This button action …
does this…
Unassigned
The button has no action.
Play
Plays (starts playback of) a cuelist.
Jump
Opens the Jump window. See Using the keyboard to
Jump on page xxx.
Inhibit
Stops the cuelist playback, Intensity is reduced to 0
and all other parameters revert to their previous
setting. Press the button again to enable or re-assert
the cuelist.
Flash
Sets the button to momentarily flash Intensity to full.
This is the default assignment for the square buttons
below the faders.
Flash Submaster
Sets the button to momentarily flash Intensity to full
on a Submaster.
Pause
Pauses playback of a cuelist.
Edit
Opens a Cuelist, for editing, in the Editor window.
Vista User Guide, Version 2 11‐15 Configuring the console for Playback Using the console hardware This button action …
does this…
Skip Forward
Steps forwards to the next Cue of the cuelist.
Release
Releases a cuelist.
Skip Back
Steps backwards to the previous Cue marker of the
selected cuelist.
Skip to End
Jumps to the end of the cuelist.
Select
Selects the cuelist. This is the default assignment for
all * buttons.
Re-assert
Re-asserts a cuelist that has been overridden.
Chase Toggle
Toggles between Chase on and Chase off.
Chase Direction
Cycles between the available chase directions in this
order: Forward, Backward, Bounce, Random.
Chase Forward
Sets the Chase direction to forwards (the normal
setting). N.B. if the chase is already running forwards
the button will toggle between chase off and chase
forwards.
Chase Backward
Sets the Chase direction to backwards (or reverse).
N.B. if the chase is already running backwards the
button will toggle between chase off and chase
backwards.
Chase Bounce
Sets the Chase direction to bounce. N.B. if the chase is
already bouncing the button will toggle between
chase off and chase bounce.
Chase Random
Sets the Chase direction to random. N.B. if the chase
is already set to random the button will toggle
between chase off and chase random.
Skip to Start
Jumps to the start of the cuelist.
Exit Loop
Stops a loop and goes to the next cue.
Sync FX
Sync Chase
11‐16 Vista User Guide, Version 2 Using the console hardware Playback status indication Cuelist faders The following fader actions are available:
This button action …
does this…
Blank
fader has no action.
Intensity Fader
Sets the fader to control the Intensity of a cuelist. This
is the default assignment for all faders.
Cross Fader
Sets the fader to manually crossfade between cues.
Must be used in conjunction with a ‘Toggle Xfader’
button.
Rate Fader
Adjusts the playback rate.
Autoplay Fader
Same as the Intensity fader but also plays the cue
when the fader is raised. (equivalent to pressing Go)
Submaster
FX Size
Controls the size of any effect in the cuelist.
FX rate
Controls the rate of any effect in the cuelist
FX phase
Controls the phase offset of any effect in the cuelist
Auto Play & Release
Must be used in conjunction with a Cross fader. Used
enables the fader.
 Tip: You can save the button / fader configuration as a default to be used
whenever a cuelist is assigned to a playback. To do this right-click on a
cuelist and choose the ‘Save as default cuelist configuration’ option.
Playback status indication For Cuelists the LCD and LEDs inside the playback buttons indicate the current
status of each playback as follows:
Normal (2 Button Playback)
Lower Button
Upper Button
Current
LCD
Button
Inverted
Active
Paused
Split (1 Button
Playback)
Green
Green Flashing
Vista User Guide, Version 2 Green Flashing
11‐17 Playback popup menu Using the console hardware Running
Green
Green
Completed
Red
Red
Overridden
Red Flashing
Red Flashing
Playback popup menu You can make changes to Cuelists Pages and other components using the
Playback context menu. To open this menu right-click on the label area of any
playback control. Vista displays the context menu:
This option…
does this…
Cuelist Properties
Opens the Cuelist properties window – see below.
Lock item
Locks the selected component. Components that
have be locked will not be altered or replaced when a
new Page or Snapshot is loaded.
Clear item
Clears the selected playback – the assigned
component is removed from the control.
Clear page
Clears all playbacks on the current page – the
assigned components are removed and a blank page
is left.
Delete page
Deletes the current page.
Set as default playback
layout.
Sets the selected cuelist’s buttons and faders as the
defaults for all new cuelists.
Snapshot enabled
Allows the selected playback to be included in a
snapshot.
11‐18 Vista User Guide, Version 2 Using the console hardware Setting cuelist properties This option…
does this…
Set as default cuelist
configuration
Sets the selected cuelist’s properties as the defaults
for all new cuelists.
Adjust contrast
Adjusts the contrast of the selected LCD window
Setting cuelist properties To set the cuelist properties, right click on the Cuelist name and the Properties
option from the popup menu. For more information see Cuelist Properties on page
6-25
Group Masters You can assign and Group to a playback. If you assign the group to a playback
set, that includes a fader and flash button, you can use these controls as Group
Master Intensity controls:
The intensity of the group can be controlled in three ways:
With this Group type
you can do this…
Scale ( - )
Reduce the intensity of fixtures in the group. When a
Scale(-) fader is pulled down, while a cuelist is being
played, the intensity of fixtures in that group will be
reduced.
also known as an
Inhibitive or
Subtractive group
master
Vista User Guide, Version 2 When a Scale(-) flash button is pressed the intensity
of fixtures in that group will go to the level
programmed in the active cuelist.
11‐19 Group Masters Using the console hardware With this Group type
you can do this…
Scale ( + )
Increase the intensity of fixtures in the group. When a
Scale(+) fader is pushed up, while a cuelist is being
played, the intensity of fixtures in that group will be
increased.
also known as an
Additive group master
When a Scale(+) flash button is pressed the intensity
of fixtures in that group will go to 100%.
HTP
Highest takes
precedence
Control the the intensity of fixtures in the group on
an HTP basis. If there’s no cuelist, containing the
fixtures in the group, being played the fader will set
the level of the fixtures between 0 and 100%.
This is the default fader and flash button setting for
groups.
You can assign different actions to these buttons and faders to suit your
requirements or playback style.
To assign an action:
1.
Click the Console button to display the Console screen.
2.
Click on the ‘Group Faders’ or ‘Group Buttons’ tab in the sidebar.
3.
Click on the required fader or button action and drag it on top of the button
or fader you want to use for that function.
The following actions are available:
Group Buttons The following fader actions are available:
This button action …
does this…
Blank
The button has no action.
Select
Selects the group.
Flash ( - )
When a Flash(-) flash button is pressed the intensity
of fixtures in that group will go to the level
programmed in the active cuelist.
Flash ( + )
When a Flash(+) flash button is pressed the intensity
of fixtures in that group will go to 100%.
11‐20 Vista User Guide, Version 2 Using the console hardware Pages This button action …
does this…
Flash HTP
Control the the intensity of fixtures in the group on
an HTP basis. If there’s no cuelist, containing the
fixtures in the group, being played the button will set
the level of the fixtures between to 100%.
Highest takes
precedence
Group Fader The following fader actions are available:
This button action …
does this…
Scale ( - )
Reduce the intensity of fixtures in the group. When a
Scale(-) fader is pulled down, while a cue is being
played, the intensity of fixtures in that group will be
reduced.
also known as an
Inhibitive or
Subtractive group
master
Scale ( + )
also known as an
Additive group master
When a Scale(-) flash button is pressed the intensity
of fixtures in that group will go to the level
programmed in the active cuelist.
Increase the intensity of fixtures in the group. When a
Scale(+) fader is pushed up, while a cue is being
played, the intensity of fixtures in that group will be
increased.
When a Scale(+) flash button is pressed the intensity
of fixtures in that group will go to 100%.
HTP
Highest takes
precedence
Control the the intensity of fixtures in the group on
an HTP basis. If there’s no cuelist, containing the
fixtures in the group, being played the fader will set
the level of the fixtures between 0 and 100%.
This is the default fader and flash button setting for
groups.
Pages Each Playback Group can be paged independently of the others, allowing for a
wide variety of console configurations. To change pages, press the Up or Down
arrow buttons located to the right of each playback group. On the console screen
you can also select a page from the popup page selector.
Vista User Guide, Version 2 11‐21 Snapshots Using the console hardware The Page Up and Down buttons work in three ways:
•
press quickly to change the page immediately
•
press and hold, for less than two seconds to display the
current page number, without changing it
•
press and hold, for more than two seconds to scroll the
number.
Locking a playback to prevent changing Playbacks can be Locked to prevent whatever is assigned to that location being
changed when a new page or snapshot is selected.
Components can be locked, so that they are not affected by Page changes or
Snapshots being loaded. To do this right-click on LCD, in the Console window,
and choose the ‘Lock item’ option from the popup menu.
Page Holdover If a cuelist is playing when you change page it is held and that playback does not
load the contents of the new page. The playback that is held will join the new
page when:
•
The cuelist id released or fully over-ridden or
•
You press the page up and down buttons simultaneously
Snapshots Snapshots allow you to store and recall the exact state of the console’s output,
buttons, faders and other controls. They can be used to quickly re-configure the
controls for playback, programming or a mixture of both. For example, you may
have a snapshot set up for each song or part of a show. You might also have a
snapshot for programming with the playback buttons assigned to provide quick
access to Groups, Presets Extracts and Effects.
Snapshots can not only recall Page and Cuelist settings but also the state of the
Cuelist. For example if a Cuelist is active and in Cue 3 when the snapshot is
recorded then the same state can be recalled.
To record a snapshot 1.
Use the console window to assign components and configure the controls
and pages the way you want them to be.
2.
Click the Create Snapshot button (normally Green + F9 or Alt+F9) on the
main toolbar. Or select the ‘New Snapshot option from the Components
menu. Vista displays the Create Snapshot window:
11‐22 Vista User Guide, Version 2 Using the console hardware Snapshots This option…
does this…
Name
Sets the name for the snapshot
Record
Sets the options for the snapshot:
Playback State
The state of cuelists on the current pages will be
included in the snapshot. For example if a Cuelist is
active in Cue 2 when the snapshot is recorded it
will also be active in Cue 2 when recalled.
Fader Levels
Includes the current fader levels in the snapshot.
Workspace state
Saves the contents (cuelists, groups and other
components) of all playbacks.
 Locked components are protected from any changes by snapshots. If a
cuelist is part of a snapshot and it is also running on a module that will not
be affected by the snapshot there can be a conflict.
In this situation:
•
if the cuelist is active on the unaffected module, it is not
changed
•
if the cuelist is inactive on the unaffected module, it is
restored to the state stored in the incoming snapshot (i.e.
activated or released).
Vista User Guide, Version 2 11‐23 Snapshots Using the console hardware Assigning a Snapshot to a Playback You assign Snapshot to a playback button in the Console window.
Recalling a Snapshot To recall a Snapshot, you can:
•
use a playback button that has been set up as a snapshot, or
•
right-click on a snapshot icon and select the ‘Apply’ option
from the popup menu, or
•
click on the snapshot in one of the Quick picker windows
Updating a Snapshot To update a Snapshot:
1.
Make sure the snapshot is active.
2.
Change the assignment and state of components and pages as required.
Right-Click on the snapshot icon, in the Console sidebar or any QuickPicker and
select the Update option from the popup menu. Vista displays the ‘Update
snapshot’ window.
11‐24 Vista User Guide, Version 2 The Output window Snapshots 12. The Output window To open the Output window click on the icon on the main toolbar or select the
‘Output’ option from the Window menu. Vista displays the Output window in
icon view:
You use this screen to display the state of fixtures that are active – that is fixtures
that have one or more parameters that are being controlled by the playbacks. The
window is split vertically with multi-parameter fixtures displayed in the top
pane and conventional fixtures (i.e. dimmers only) being shown in the lower
pane.
If you have a large main screen or external monitors attached, you can add a new
Output window and drag it so that it is always in view. To do this select the ‘Add
window > Output’ option from the Window menu.
Adding output view tabs You can create as many different views of the output as you like, each arranged
in its own away. To create a new output view:
Vista User Guide, Version 2 12‐1 Configuring the Output window The Output window You can create as many different views of your fixtures as you like, each
arranged in its own away. To create a new layout view:
1.
Select the ‘Add view’ option from the View menu. Vista creates a new view
tab at the bottom of the window.
2.
Type a name for the layout and click OK. Vista creates a new layout and
adds a corresponding ‘tab’ at the bottom of the layout panel.
To switch between layouts click on the tab you want to use.
Configuring the Output window The Output window has a popup menu that lets you configure how the Output
information is displayed. Right-click on the screen to show the configuration
options:
This option…
does this…
Text Mode
shows the actual values of the features. If a parameter is
set to a preset value, the name of the preset will be
displayed rather than the value.
Graphic mode
shows a graphic representation of the features.
Source mode
Shows where each feature is coming from. For example
a fixture might have Intensity and Position coming from
a Cuelist and Colour from the Editor Live tab.
Follow Fixture
selection
Shows the selected fixtures at the top of the view
Show all fixtures
Shows all fixtures
12‐2 Vista User Guide, Version 2 The Output window Configuring the Output window This option…
does this…
Add selected
fixtures
Adds the fixtures, selected in the Fixture Chooser, to the
output window
Remove selected
fixtures
Removes the selected fixtures from the output window
Show only selected
fixtures
Filters the window to only show the selected fixtures
Clear view
Clears all fixtures from the output window
More detail
Adds feature value information, in the graphic view
Less detail
Hides feature value information, in the graphic view
Resize all columns
Resizes all columns to their default size
Rename view
Opens the Rename Viw where you can type a new
name for the selected layout view
Remove view
Deletes the selected layout view
The Source view shows the source of control for each of the parameters. For
example if a fixture’s colour settings have come from a cuelist named ‘Rainbow’,
that name will be displayed in the Colour column for that fixture.
Selecting fixtures If you click in the ID or name cell of a fixture in the tracking view window, Vista
selects that fixture or adds it to the existing selection.
Vista User Guide, Version 2 12‐3 The Console control panel System settings (T & I series only) 13. The Console control panel System settings (T & I series only) There are a number of system settings that configure and determine how the
Vista T and I series consoles operate. To set these preferences, choose the ‘Control
Panel’ option from the File menu. Vista displays the Settings screen.
Settings Calibrating the Pen tablet Sometimes you may have to re-calibrate the pen tablet or external touch screens.
To begin calibration, choose the Calibration button from the settings window.
Vista lists the pen tablets and touchscreens that are connected and configured.
If you don’t see a screen, make sure that it has been configured in the ‘Display
and Input devices’ window – see below.
When you click on the button corresponding to the screen you want to calibrate
Vista displays the calibration window on the monitor you selected:
Vista User Guide, Version 2 13‐1 Display and Input Devices The Console control panel Follow the on screen prompts to complete the calibration process.
Display and Input Devices If you are using a S or M series control surface the display and input device
(mouse, pen tablet, etc) settings are controlled by the PC operating system.
 Vista has been tested with Wacom pen tablet LCDs and
ELO ‘Intellitouch’
model 1715 monitor. ELO make many different touch screen monitors
including the ‘AccuTouch’ type which may not be compatible. Please check
for compatibility before purchasing touch screen monitors for use with your
To set the Pen tablets and Touchscreens that are connected to your T or I series
console click the Display and Input Devices button. Vista displays the Display
and Input Devices window:
In this window:
13‐2 •
Screen #0 is the built in Pen tablet on a T series console
•
Screen #1 is the monitor you have connected to monitor
out 1
•
Screen #2 is the monitor you have connected to monitor
out 2
Vista User Guide, Version 2 The Console control panel Using the screensaver To configure the monitors click on the drop down arrow and select the screen
type connected to each output. If your monitor does not appear it may not be
supported.
Using the screensaver If you are using a S or M series control surface the display, screensaver, settings
are controlled by the PC operating system.
To set a screensaver on a T or I series console click the Screen Saver button. Vista
displays the screensaver window:
This option…
does this…
On / Off
Turns the screensaver on or off
Standby
Sets the how long the console must be idle before the
screensaver starts.
Suspend
Not required for LCD type monitors.
Sets the how long the console must be idle before
CRT type monitors go to suspend mode.
Off
Not required for LCD type monitors.
Sets the how long the console must be idle before
CRT type monitors turn off.
Vista User Guide, Version 2 13‐3 Network preferences The Console control panel Network preferences If you are using a S or M series control surface the network settings are controlled
by the PC operating system.
To set the networking preferences, on a T or I series console click the Network
settings button on the Settings screen:
This option…
does this…
Host name
Is used to identify the console when using tracking
backup.
DHCP / Static IP
Sets the console to either obtain an IP address from a
DHCP server or use a Static IP as set below
IP Address
Sets the IP address of the Vista console, e.g.
192.168.0.65
IP Netmask
Sets the subnet mask for the IP address, e.g.
255.255.255.0
Default Gateway
Sets default gateway for the console. Used when the
destination address bis outside the local subnet.
13‐4 Vista User Guide, Version 2 The Console control panel Date and time Date and time Vista displays the time in the title bar of the main windows. If you are using a S
or M series control surface the date and time settings are controlled by the PC
operating system.
To set the date and time, on a T or I series console click the date and time button
on the Settings screen and follow the on screen prompts
Vista User Guide, Version 2 13‐5 Menus Appendix 1 – menu & toolbar reference 14. Appendix 1 – menu & toolbar reference Menus File menu This option…
does this…
New Show
Creates a new show file, opening the Patch window.
Open Show
Opens an existing Show file
Save Show
Saves the current show
Save Show As
Saves the current show with a new name.
Autosave & Backup
Opens the Backup window where you can setup the
Autosave and Tracking backup.
Export
Opens the Export window wehere you can export a
Show Archive File, the user added Fixture Library, the
user created effects, or all show information.
Import
- Show
Open a window to import a Vista show Archive (*.jvz)
- Effects
Opens a window to import a Vista effects file (*.jvfx)
- User data
Opens a window to import a User Data archive
(*.jvud)
User Preferences
Opens the system Settings window where you can
configure naming formats.
Timecode
Opens the Timecode properties window where you
can enable or disable timecode and set thetimecode
source, framerate and offset.
14‐6 Vista User Guide, Version 2 Appendix 1 – menu & toolbar reference This option…
Menus does this…
Lock
- Entire console
Prevents any operation of the console.
- Disable editing
Only allows playback
- Lock current show
Prevents any changes being made to the show file.
Control panel
Opens the system properties window where you can
calibrate the screens, configure displays, network and
date settings on a T or I series console.
(consoles only)
Quit Application
Close the Vista application and exit.
Edit menu This option…
does this…
Select All (Ctrl+A)
Selects every event on the timeline.
Undo (Ctrl+Z)
Cancels your last action.
Redo (Ctrl+Y)
Repeats your last action.
Cut (Ctrl+X)
Cuts the selected objects.
Copy (Ctrl+C)
Copies the selected objects.
Paste (Ctrl+V)
Pastes the selected objects.
Paste Special
Opens the Paste Special window so you can choose
which attributes of the objects you copied to paste.
(Ctrl+Shift+V)
Remove Cue Alias
Removes the alias link from the selected cue.
Delete (Del)
Removes the selected event(s) from the timeline.
Live Properties
Displays the Properties window so you can make
adjustments to the Priority and Stop Effects mode of
the Live tab. (see
Cuelist Properties
Displays the Properties window so you can make
adjustments to the selected cuelist.
Cue Properties
Displays the Properties window so you can make
adjustments to the selected cue.
Vista User Guide, Version 2 14‐7 Menus Appendix 1 – menu & toolbar reference Components menu This option…
does this…
New Cuelist
Opens a new empty cuelist. Switches to the Chooser
window if the Chooser or Timeline is not the top
window.
Open Cuelist
Opens the Select Cuelist window where you can open
an existing cuelist.
Close Cuelist
(Ctrl+W)
Closes the selected cuelist.
Save changes to
Cuelist. (Alt+S)
Saves all changes made to the selected cuelist.
Discard changes to
Cuelist
Removes all changes made since the cuelist was
opened or ‘Save changes’ was selected.
Duplicate Cuelist
Opens the Copy Cuelist As window where you can
save a copy of the selected cuelist with a new name
and number (ID)
New Preset
Opens the Create New Preset window where you can
save a preset.
New Extract
Opens the Create Extract window where you can save
a extract
New Snapshot
Opens the Create Snapshot window where you can
save a snapshot.
New SmartFX
Opens the Create Effect window where you can save
an effect.
New Group
Opens the Create Group window where you can save
a group of fixtures.
Update Group
Opens the Update Group window where you can save
changes to a group.
Tools menu This option…
14‐8 does this…
Vista User Guide, Version 2 Appendix 1 – menu & toolbar reference This option…
Menus does this…
Cue only editing
Move in Black
Opens the Move in Black window. This enables you to
move fixtures when their intensity is at zero so they’re
in the right position when they turn on.
 The fixtures you want to pre-position must be
selected before choosing this command.
Insert Commands
Opens the Macro Properties window. This lets you
add commands, in the cuelist’s timeline to activate
other cuelists or actions.
Date & Time events
Opens the Date and Time Events window where you
can configure actions (for example to play a cuelist)
based on the date and time.
Edit Command
Opens the Macro Properties window for the selected
command.
Block cue (Ctrl + B)
Copies all tracked information to the current cue and
adds release events for other feature types in this
cuelist.
Unblock cue
Removes all events added when a cue is blocked.
Superblock cue
(Ctrl + Shift + B)
Copies all tracked information to the current cue and
adds release events for other feature types. When a
super-blocked cue is run any other cues being playing,
that would affect the look of this cue are released.
Store All
Opens the Store Look window where the contents of
the editor can be saved as a cue.
Store Part
(Shift + Return)
Opens the Store Current Events window where the
contents of the editor can be saved as a cue with
options for tracking, blocking and more.
Update (Ctrl + U)
Opens the Update Dialog window where the contents
of the editor can be used to update a cue or preset.
Clear All
Clears all events from the selected cue or the editor’s
Live tab.
Clear / Close
Clears the Live tab or closes the selected Cuelist. If the
cuelist has unsaved changes opens the CloseCuelist
window where any changes can be committed or
discarded.
Vista User Guide, Version 2 14‐9 Menus Appendix 1 – menu & toolbar reference This option…
does this…
Clear selected
Clears all events from the selected fixtures.
Home selected
Inserts events to send all features of the selected
fixtures to their home values. i.e. Intensity to 0%,
position to 50/50, colour to clear, etc.
Cues
Opens the cues submenu with commands to:
- Append a new cue at the end of the cuelist.
- Insert a new cue before the selected cue.
- Insert a new cue after the selected cue.
- Delete the selected cue(s)
- Merge the selected cues
- Renumber the selected cue(s)
- Select the Previous cue
- Select the Next cue
- Set the cue follow mode to Auto, From Start (of
previous), From End (of previous) or Halt (the default)
- (Ctrl + Shift + I)
- (Ctrl + I)
- (Ctrl + Left arrow)
- (Ctrl + Right arrow)
- Move Start times of the selected cues.
Live timing
Opens the Live Timing window where you can set the
fade time for the Live tab of the editor
Fan mode
Opens a submenu where you can set the fan mode for
fixture selections
Jump (Ctrl+ J)
Opens the cue JumpDialog window.
Highlight (Ctrl + H)
Turns highlight on or off. When on the selected
fixture(s) are set to the values stored in the highlight
preset (normally 100% intensity, open white)
Stop SmartFX
Stops any effects running on the selected fixtures
Smart FX editor
(Ctrl + K)
Opens the SmartFX window where you can creat a
new effect or edit a running effect
Blind
Turns off all output from the editor
Release All
Releases all active cuelists
Arm Timecode
Cuelists
Sets all cuelists, that include timecode cues, to listen
for incoming timecode.
Learn timing
Opens the Learn Timing window where you can set
cue timecode values by playing the cuelist, in the
editor, and hitting the Go button at the time you want
the cue to start.
14‐10 Vista User Guide, Version 2 Appendix 1 – menu & toolbar reference Menus Patch menu This option…
does this…
Show Patch
Switches to the Patch window, if it is not already open.
Delete fixtures
Removes the selected fixtures from the patch.
Rename fixtures
Opens the Rename window where you can enter a
custom name for the selected fixture(s).
Renumber fixtures
Opens the Renumber window where you can change
the ID number for the selected fixture(s). The number
must not be in use already.
Multi-patch fixtures
Creates a copy of the selected fixture, with the same ID
and places it in the dock. The new fixture can then be
dragged to an available address on one of the universe
tabs. Multi patching lets you treat 2 or more fixtures as
one.
Change Fixture type
Opens the Change Fixture type window where you
can change a fixture to a different type.
Change Fixture type
(All of selected type)
Opens the Change Fixture type window where you
can change all fixtures of the selected type to a
different type.
Clone Fixtures
Makes a copy of the selected fixture(s) and places it in
the Fixture pool at the bottom of the Patch window.
Import Fixture
Library
Opens a file browser where you can import a Vista 2
fixture type library archive (.jvft)
Fixture Editor
Opens the Fixture Editor where you can create a new
fixture file or edit an existing one
Import Patch file
Opens the Import Patch file window where you can
select a suitably formatted (.csv) patch file to import.
Import Media Server
thumbnails.
Open the Citp window where you can select a media
server with compatible support for CITP and import
copies of the fixtures media thumbnails.
Use default media
Connect Universes
Vista User Guide, Version 2 Opens the Connect Universes window where you can
connect the Vista universes to DMX outputs, Artnet,
and Pathport devices and the Jands UD512 USB to
DMX cable.
14‐11 Menus Appendix 1 – menu & toolbar reference This option…
does this…
Strike
Sends a strike command to the selected fixture(s).
Douse
Sends a douse command to the selected fixture(s).
Reset
Sends a reset command to the selected fixture(s).
Park Fixtures
Holds the fixture in it’s current settings.
For example to provide fixed lighting for backstage.
Once you’ve parked a fixture it will ignore all
instructions until it is un-parked.
UnPark Fixtures
Sets a parked fixture to operate normally.
Show Parked Fixtures
Opens the Parked Fixtures window to display a list of
parked fixtures and their settings.
Console menu This option…
does this…
Show Console
Switches to the Console window, if it is not already
open.
Desklights
Opens the desklights window where you can adjust
the brightness of the desklights connected to your
console.
Rescan for USB
devices
Scans the USB bus for Vista USB devices – S3, S1, M1,
E2 or UD512
Add …. Console
Adds the selected console or control surface type to
the Console window. These windows can be dragged
outside the main window.
Add Virtual SuperPlayback
Adds a Superplayback module to the console window.
This window can be dragged outside the main
window.
Chooser menu This option…
does this…
Show Fixture
Chooser
Switches to the Fixture Chooser window, if it is not
already open.
Select All Fixtures
Selects all fixtures on the current fixture chooser tab.
14‐12 Vista User Guide, Version 2 Appendix 1 – menu & toolbar reference Menus This option…
does this…
Deselect All Fixtures
Deselects all fixtures across fixture chooser tabs
Invert selection
Deselects all selected fixtures and selects all other
fixtures on the current layout
Select Active
Selects all fixtures whose intensity is above 0%
Select Programmed
Selects all fixtures that have active programming.
Undo selection
Deselects the selected fixtures and selects the fixtures
that were previously selected.
Redo selection
Reselects the fixtures that were selected before an
undo selection action.
Selection Tool
Displays a submenu to select the Rubberband, Lasso
or Dragover selection tool.
Colours and
Background
Displays a submenu to customise the appearance of
the fixture chooser window and icons. See Layout
organisation on Page 5-7
Shrink to fit
Zooms the layout to fit the available window space.
Label Position
Displays a submenu where you can set the label
position, for the selected fixture(s) to the top, bottom,
left or right.
Manage Layouts
Opens the Layouts window where you can customise
the current layout. See Layouts on Page 5-3
Duplicate Layout
Create a copy of the current layout with a new name
Layout options
Displays a submenu where you can choose display
options that apply to all layouts:
- False Intensity
- Show selection order
- Show grid
- Snap to grid
- Show names
- Show IDs
- Auto add new fixtures
- Preview refresh rate
Timeline menu This option…
Vista User Guide, Version 2 does this…
14‐13 Menus Appendix 1 – menu & toolbar reference This option…
does this…
Show Timeline
Switches to the Timeline window, if it is not already
open.
Show tracked events
Shows or hides features that are tracking through from
previous cues. Tracked events are shown as lighter
bars that cannot be selected.
Align start
Aligns the start points of the selected events.
Align end
Aligns the end points of the selected events.
Set Event Timing
Opens the Event Timing window where you can edit
the timing information for the selected event.
Reset to default
timing
Resets the selected event(s) so that it follows the
default timing for its feature type.
Fade Curve
Sets the fade type for the selected event(s).
Convert to Release
Event
Converts the selected event so that it releases the
control of the feature.
UnTrack events
(Cue only)
Undo the effect of the selected events in the following
Cue.
Mute Events
Prevents the selected event(s) from being played back.
The event bar will be greyed and when the cue is
played the event will be ignored.
Unmute Events
Removes the muting from the selected event(s)
Stop Free Effects
Sets the selected event(s) to stop any free effects for the
same feature type.
Snap to Grid
Sets events to snap to the timeline gridlines
Grid Size
Sets the gridline increments. The default is 0.25s
Grid Origin
Sets how the timeline ruler shows timing:
- Start of cue, shows 0s at the start of each cue
- Start of Cuelist, shows a single continuous timeline
- Current Position, sets the 0s position to the current
position of the playhead.
- Timecode, shows timecode values. (HH:MM:SS:Fs)
View menu This option…
14‐14 does this…
Vista User Guide, Version 2 Appendix 1 – menu & toolbar reference Menus This option…
does this…
Show Patch
Switches to the Patch window
Show Console
Switches to the Console window
Show Fixture
Chooser
Switches to the Fixture Chooser window
Show Timeline
Switches to the Timeline window.
Show Playback
Switches to the Playback window
Show Output
Switches to the Output window.
Window Themes
Opens the Vista ThemeDialog window where you can
customise the colour of window elements or load one
of the alternate themes.
Vista Toolbar
Shows or hides the window selection toolbar, at the
bottom of the screen.
Add floating window
Displays a submenu where you can select a window to
open on the desktop or an external monitor. The
available windows include the Patch, Chooser,
Playback, Output and DMX windows as well as:
- Multi Quick Picker – to display presets ,groups, etc
- Quick Picker 1-4 – a single quickpicker.
Sidebar
Displays a submenu with options to show the sidebar
on either the left or right side of the screen and to set
which tab is active:
- Palettes
- Components
- (Ctrl + 1)
- (Ctrl + 2)
Command Line
Shows or hides the Command Line window at the
bottom of the Fixture Chooser & Timeline windows
Toolbars *
Displays a submenu to show or hide optional toolbars
including, Update, Edit, Undo and more. The available
toolbars depend on the current window.
Playback window only
Only show Active
cuelists
Only show cuelists that are being played back.
Follow on Go
Automatically select the last played cuelist.
Follow on Select
Automatically select the cuelist on the selected
playback.
Vista User Guide, Version 2 14‐15 Menus Appendix 1 – menu & toolbar reference This option…
does this…
Search cuelists
Opens a search box so you can find a cuelist by name.
Auto Scroll
Automatically scrolls the list of cues so that the cue
being played is always visible.
Dragable Playhead
Allows the ‘position’ bar to be dragged to play the
cuelist.
Search Cues
Opens a search box so you can find a cue by name.
Toolbars
Shows or Hides optional toolbars
Output window only
Add View
Creates a new output window and adds a selection tab
at the bottom of the window.
Add Intensity View
Creates a new output window, that only shows
Intensity and adds a selection tab at the bottom of the
window.
Load window layout
Opens the Load Output Window to show a saved
window layout.
Save window layout
Saves the current output window layout.
Patch Window Only
Table view
Switches the Patch window to the (default) table view
List view
Switches the Patch window to the list view
DMX view
Switches the Patch window to the DMX view
Absolute Channel
numbers
Displays channel numbers consecutively irrespective
of the universe. For example Universe 2, Channel 1
displays as channel 513
Toolbars
Shows or Hides optional toolbars
Help menu This option…
does this…
About Vista
Displays the Vista version and build information.
View Recent Changes
Opens a window that shows a log of recent changes to
the software.
14‐16 Vista User Guide, Version 2 Appendix 1 – menu & toolbar reference Vista User Guide, Version 2 Menus 14‐17 Installation (T2, T4, I3 & L5 Consoles) Appendix 2 – installing new software 15. Appendix 2 – installing new software Installation (T2, T4, I3 & L5 Consoles) If installing Vista V2 software on a Vista T2, T4 and I3 console for the first time,
the hard-drive in these consoles must be re-imaged from CD or USB stick, using
the Vista V2 Console Image file.
 Installation of this software on a console will erase all saved shows and
other data. You must manually backup or archive all your existing show
data (the contents of the /data/ directory) to an external storage device.
When T2 and T4 consoles start in Vista V2 for the first time the inbuilt Tablet /
LCD and any additional monitors, touch screens or tablets may not be configured
automatically. This may result in incorrect operation of the pen, and an upsidedown display in some consoles. See the Known Issues section of these release
notes for details on how to rectify this.
After installing the Vista V2 Console Image for the first time, subsequent Vista V2
Console Images can be applied with a “Re-use” option, which retains the existing
hard-drive partitions, screen configurations, and User Data files. Also,
application-only update packages can be applied using the Vista V2 Console
Update files, and update package files for Vista 1.13 – if your console is setup for
dual boot.
To install the Vista V2 Console Image: 1.
Download the latest Vista V2 Console Image file and burn it to a CD, or
create a bootable USB drive. Instructions for how to create a bootable USB
drive can be found in Appendix 3 – creating a bootable USB device on Page 1622.
2.
Insert the CD or bootable USB drive and restart the console. Note the BIOS
settings in some older consoles may not have USB enabled as a boot device.
If you have connected your bootable USB drive to your console, but the
console still boots normally, please download the Vista T Series BIOS Restore
Instructions from www.jandsvista.com and verify the BIOS settings are
correct.
3.
When the console is finished booting, the Console Software Installer will
open. Note the Pen will not work during installation; use the touch pad or a
mouse instead.
15‐18 Vista User Guide, Version 2 Appendix 2 – installing new software Installation (T2, T4, I3 & L5 Consoles) 4.
To install the dual boot software make sure that both the Vista1 and Vista2
check boxes are selected and click the Next button. The Confirm Installation
window will open.
5.
Select a Hard Disk to install to in the Target Disk Device box and select ‘Yes’
in the Proceed with Installation box.
6.
Select ‘Initialise’ in the Partitions box, or if Vista V2 has been installed
previously select ‘Re-use’, and click on the ‘Next’ button to start the
installation. Note this will completely erase the hard disk – be sure you have
already backed up any important data.
7.
When the installation is complete, click the ‘Next‘ button
8.
Click the finish button to eject the CD (if present) and shutdown the console.
Remove the USB drive or CD from the console.
9.
When the console has fully shut down, press the Power button to restart the
console.
To install a Vista V2 Console Update package: If Vista V2 has been previously installed on a console, it is possible to apply most
new software updates via a smaller Vista V2 Console Update package. To install
a Vista V2 Console Update, first download the update file onto a USB flash drive,
or FTP the file into the /Vista V2/UserData/Updates directory on the console.
1.
Boot the console into Vista V2.
2.
If updating via USB stick, insert the USB stick into a console USB port.
3.
Select File Quit Application. Wait for the System Settings dialogue to appear.
4.
Click on ‘Apply Update’.
5.
Click ‘Browse’.
6.
If updating by USB, click on the USB flash drive in the list. If the file has been
transferred via ftp, navigate to /Vista V2/UserData/Updates.
7.
Select the desired update file and Click “Open”.
8.
The update package will appear on the left hand side of the dialogue. Click
on the update package. The package contents are now inspected – wait until
the cursor changes back from the hourglass.
9.
Click ‘Apply Update’. The software will now install the update package.
When complete, a new dialogue will appear, warning that the console must
be rebooted for the update to take effect.
10.
Click ‘OK’.
Vista User Guide, Version 2 15‐19 Installation (Windows XP, Vista & 7) 11.
Appendix 2 – installing new software Click ‘Quit’. T series consoles will now power down, while I3 consoles will
reboot.
Unlike Vista 1.13, in Vista V2 there is no simple way to revert an update. If it
becomes necessary to revert to a previous version the console must be re-imaged.
Installation (Windows XP, Vista & 7) The Vista V2 software can be installed on a Windows PC running XP, Vista, or
Windows 7. Both 32 and 64 bit versions of Windows are supported. The
recommended PC specification is an Intel i3 CPU, 2GB RAM, and 500MB disk
space.
 If you want to run Vista 1.13 on the same machine, the 1.13 version must be
Build 5295 or later.
To install Vista V2 Windows Update files on a PC: 1.
Close all open applications on the PC.
2.
Switch off and disconnect all Jands Vista USB devices.
3.
Launch the Vista V2 Windows Installer file. If an earlier version of Vista V2
is already installed on the PC, there’s no need to un-install it - simply install
the new version over the top of the old one.
4.
Click ‘Next’.
5.
A location for the installed files is selected automatically. If required you can
change the location. Click ‘Next’.
6.
A location for the User Data folder (your show files etc) is selected
automatically. If required you can change the location. Click Install.
7.
When the installation is complete, click Finish.
Connecting to the console via FTP You can take advantage of the Vista’s built-in FTP server to move files from a
Mac or PC to the Vista or vice versa using FTP (File Transfer Protocol, a common
method of file transfer).
Hardware setup Connect the console and computer to an Ethernet hub or switch using a standard
Ethernet cable, or connect the two devices to each other using a crossover
Ethernet cable.
15‐20 Vista User Guide, Version 2 Appendix 2 – installing new software Connecting to the console via FTP Vista software setup Open the Network window from the Control panel option on the File menu, and
check the ‘IP Address’ setting. If the IP address is already set, make note of the
address and close the Control panel. If there’s no IP address or it’s set to 0.0.0.0,
you’ll need to assign one. The address is four groups of numbers from 0 to 255,
all connected by periods. Typically, you’ll use an IP addresses starting with
192.168 (e.g., 192.168.0.65).
Computer software setup Check that the computer’s TCP/IP properties are set to a different IP address in
the same subnet (192.168.0.100, for example). The subnet mask should be,
255.255.255.0.
If necessary refer to your computers documentation for how to set the IP address.
Using FTP On the computer start an FTP client such as Filezilla, FTP Commander or
CuteFTP and open a connection to the consoles IP address (192.168.0.65). The
connection requires a username and password as follows:
Username:
Password
byron
byron
If you use a graphical FTP client such as those mentioned above the contents of
the consoles Show Data directory and sub folders will be displayed in a window
such as this:
Files can now be transferred to and from the Vista by dragging them between the
Vista ( ‘remote site’ window) and the PC ( ‘local site’ window).
 If the console is not booting properly it maybe possible to copy files using
this method.
Vista User Guide, Version 2 15‐21 Connecting to the console via FTP Appendix 3 – creating a bootable USB device 16. Appendix 3 – creating a bootable USB device Major upgrades, that require the console’s hard drive to be erased, can be
installed from a suitably formatted USB device. To create a USB FlashDrive that
can be used to reinstall the operating system and Vista software on a T or I series
console follow the steps below.
To use a USB flashdrive to boot the console and re-install the software, the drive
needs to be 512MB or larger and it has to be converted into a Linux system disk.
This procedure will erase all data on the FLASH drive and format it.
Once the FLASH drive has been converted, or if you have the original USB
flashdrive supplied with your I3 you can use it for future updates. In this case
please skip to step 4.
Creating a bootable USB drive To create the drive:
1.
Some FLASH drives come with pre-installed software to help users manage
the files on the drive. Uninstall this software.
2.
Right-click on the USB Flash drive and selecting the “Format” option from
the popup menu. Take care that you have selected the Flash drive. If you
select your computer’s hard disk by mistake, you could erase it completely.
Ensure the File System option is set to FAT32 before clicking the Start button.
3.
Download and install a ISO file extractor programme such as WinRAR.
Winrar is available from http://www.rarlab.com
4.
Download the latest console ISO installer.
5.
Open the console ISO image file with the ISO file extractor.
6.
Extract all of the files and directories within the ISO file to a temporary
directory on your hard drive, for example to c:\temp\iso_extract. After the
files have been extracted the directory should look like this:
16‐22 Vista User Guide, Version 2 Appendix 3 – creating a bootable USB device Connecting to the console via FTP 7.
Close the ISO file extractor.
8.
Using a file manager, navigate to the isolinux directory of the extracted files,
for example navigate to c:\temp\iso_extract\isolinux..
9.
Copy all of the files from the isolinux directory to the “root” of the extracted
files eg from c:\temp\iso_extract\isolinux to c:\temp\iso_extract.
10.
Copy all of the files and directories from the temporary directory eg
c:\temp\iso_extract onto the root of the FLASH drive. Keep all files in the
directories they were installed in. This step takes a significant amount of
time. When the copy is complete, the drive directory should look like this:
Vista User Guide, Version 2 16‐23 Connecting to the console via FTP 11.
Appendix 3 – creating a bootable USB device Note the drive letter assigned to the Flash drive by Windows, e.g. ‘E’. Open a
command prompt and using this drive letter, type the following:
[Flash Drive letter]:syslinux –ma [Flash Drive letter]: –f
Example:
e: <switch to the usb drive letter to run the syslinux program
E:\syslinux –ma E: -f
The FLASH Drive is now ready for use. Don’t forget to eject the drive using the
normal Windows procedure.
Troubleshooting  If you are using Windows 7, please make sure you run the command line
actions as Administrator. To do this:
•
open the command prompt
•
right click on the ‘cmd’ icon
•
select ‘Run as Administrator
 The BIOS settings on older consoles may need to be changed to allow them
to boot from the USB FLASH Drive.
16‐24 Vista User Guide, Version 2 Appendix 4 – tracking backup Setting up 17. Appendix 4 – tracking backup With Vista’s new tracking backup feature you can connect a computer, running
the Vista application, or a second console that synchronises it’s show file and
settings with your main console. If the main console fails for any reason, the
backup system will automatically take control.
The backup system automatically copies the show programming from the main
console and you can start or stop them in any order and at any time.
Setting up To set up a backup system the console(s) and computer(s) have to be physically
connected via their Ethernet ports and their network settings must be configured
correctly.
Connecting the backup To connect the main console or computer and the backup console or computer
you can either:
•
connect from the Ethernet port of the Console(s) and
computer(s) to the Local Area Network (LAN) in your
building, or
•
connect from the Ethernet port of the Console(s) and
computer(s) to a stand alone Router, or
•
connect from the Ethernet port of the Console(s) and
computer(s) to a stand alone Switch or Hub, or
•
connect the Ethernet port of the Console(s) and
computer(s) using a Crossover cable
Configuring the network settings All consoles or computers being used in a tracking backup system need an IP
address on the same subnet as the others. If you are using a LAN or stand-alone
Router a DHCP server will automatically assign Router IP addresses, provided
your console’s or computer’s network interface is set to use DHCP. If you are
using a Switch, Hub or Crossover cable you’ll need to set static IPs on all the
devices in your backup system:
Vista T & I series network settings To configure the network on a T or I series console:
1.
Select the Settings option from the File menu. Vista opens the Settings
window.
Vista User Guide, Version 2 17‐25 Setting up 2.
Appendix 4 – tracking backup Click the Network button. Vista opens the Network window:
This field…
does this…
Hostname
Indicates the consoles network name. You can change this
field to something more meaningful (i.e. ‘T4_main’) but no
two devices, on the network, can have the same hostname.
IP Address
Set this field to DHCP if you are connecting to a LAN or
stand alone router that has a DHCP server.
If there is no DHCP server set this field to a unique Private
IP address. For example: ‘192.168.0.10’
If your backup device is a second console it’s IP must be set
to a different address, in the same range. For example:
‘192.168.0.11’
IP Netmask
Normally this field should be set to 255.255.255.0. If
connecting to a LAN consult your IT department.
Default
gateway
If you are connecting to a LAN consult your IT department.
If you are using a Router with a DHCP server this field
should be set to the IP of the router itself.
If you are connecting with a Switch or Crossover cable or
there is no DHCP server set this field to [TBA].
3.
Click OK to close the network window.
17‐26 Vista User Guide, Version 2 Appendix 4 – tracking backup Starting Tracking Backup Computer network settings Configuration of the network settings on your PC will vary depending on the OS
you are using but what you’ll need to enter is similar to the information detailed
above.
The most important thing is that each console or computer should have a unique
IP and be on the same subnet. If you are using DHCP this will be taken care of
automatically. If you are using static IPs make sure each one is different. For
example if the console or main computer’s IP is 192.168.0.10, your backup device
should be 192.168.0.11 (or any number between 1-254 but not 10).
If you have changed your network settings restart the console or computer and
confirm that the new settings have taken effect.
Starting Tracking Backup To start Tracking Backup do this:
1.
On the main console or computer select the ‘Autosave and Backup’ option
on the File menu. Vista opens the Backup window:
2.
If it’s not already selected click on the ‘Tracking Backup Config’ tab.
3.
All devices in a backup system must have the same ‘Node Group’ name. If
this is the master console make a note of the name (i.e. Byron_625) or change
this field to a name of your choice (i.e. ‘MainStage’). If you change the Node
Group name you will be prompted to restart Vista. If you need to restart’ reopen the Backup window after the restart.
4.
Repeat steps 1 - 3 on the backup console or computer. Remember the Node
Group name must be exactly the same all the devices in your backup system.
5.
Restart the backup system if prompted. It is now ready for use.
Vista User Guide, Version 2 17‐27 What happens if the Master fails 6.
Appendix 4 – tracking backup On the main console or computer click on the ‘Network’ tab. Vista displays a
list of any Vista systems running on the same network. You should see your
backup device and it should have the same Node Group name as the master:
 The console or computer you are working on is marked with an asterisk (*).
7.
Click on the Network Role field of your master console.
8.
Click on the Network Role field of your backup console and select ‘Primary
Slave’ from the popup list. A Primary Slave will take over a show
automatically if the Master fails, whereas a Passive slave will still backup a
master but will not take over a show until you click on the ‘Failover Now’
button on the Failover tab of the Backup window.
9.
When both the master and slave role have been set, click the ‘Apply’ button.
Vista enables the Network Traffic buttons
10.
Click the Network Traffic Enabled ‘On’ button and click ‘Apply’. Vista
transfers the show file to the slave:
11.
Click the OK button to close the Backup window
What happens if the Master fails If the Master fails an alert window appears on the slave console:
17‐28 Vista User Guide, Version 2 Appendix 4 – tracking backup Backup status On the slave console there are two options
1.
Click on the ‘Abort’ button to prevent the slave console from taking over the
show and beginning to output.
2.
Click on the Failover now button to have the slave console take over the
show immediately and begin to output.
If neither button is clicked the slave will take over when the countdown is
finished.
 If you are using the DMX outputs on your Vista console or control surface
you must swap your DMX cables from the master to the backup console in
the event of a failure.
Manually switching to the backup console To manually switch to the slave device click on the ‘Failover Now’ button on the
Failover tab.
Backup status You can check the status of the master and slave in their respective backup
windows. To do this select the status tab in the Backup window:
The master console or computer should show the Local Time Controller and
Local DMX Output being On.
The slave console or computer should show the Local Time Controller and Local
DMX Output being Off – unless the master has failed.
Vista User Guide, Version 2 17‐29 Troubleshooting Appendix 4 – tracking backup Troubleshooting If you cannot see your slave console on the Network tab of the backup window:
1.
Check all your Ethernet cables and connections.
2.
If you are using a computer turn off any firewall or port blocking
application.
3.
Check that the Group name is exactly the same on all devices in your backup
system.
4.
Check that both the master and slave have IP addresses that are on the same
subnet. An IP address consists of four numbers separated by dots (i.e.
192.168.0.1) The numbers for the master and slave should be exactly the
same except for the last number, which must be different and between 1 and
254.
5.
On your Vista T or I series you can check the IP by opening the Settings
Network window from the File menu.
6.
On a Windows PC you can find the IP address from the command prompt
(Start > Run > type: cmd) and type: ipconfig).
7.
On a Mac make sure that only one Network Interface is active. Having both
the wired (Ethernet) and wireless (Airport) interface active may cause
tracking backup to fail.
8.
Check that you can ‘Ping’ from the Master to the Slave and vice versa.
9.
On a Windows PC you can Ping another device from the command prompt
(Start > Run > type: cmd) and type: ping xxx.xxx.xxx.xxx) – where
xxx.xxx.xxx.xxx is the IP number of another device in your system.
10.
Power down and re-start the console(s) and computer(s) you are using.
Private IP addresses Three blocks of the IP address space are reserved for use on private networks
(local area networks). When setting static IPs on a small network it’s best to use
IPs from one of these ranges:
10.0.0.0 - 10.255.255.255
172.16.0.0 - 172.31.255.255
192.168.0.0 - 192.168.255.255
17‐30 Vista User Guide, Version 2 Appendix 5 – using VNC on T & I‐ series consoles VNC password 18. Appendix 5 – using VNC on T & I‐ series consoles VNC password The default password for VNC connections is ‘password’.
Starting VNC To start the VNC server on a Vista T series or I series console:
1.
Restart the console. When the red Boot Menu screen appears press any key
to stop at this window. Then use keyboard arrow keys to select a startup
option. Select ‘VNC’ to start VNC normally or select ‘VNC 1024x768’ to start
VNC and set the screen resolution to 1024x768 pixels.
2.
Vista will automatically start the VNC server.
3.
Vista is now running the VNC server.
Connecting to Vista using a Windows PC The following procedure is for the VNC Viewer application from Real VNC
(http://www.realvnc.com/download.html). Other VNC clients for windows
work in a similar way:
1.
Check that the Vista and your PC are on the same subnet. I.E. if the Vista’s IP
is 192.168.0.68, your PC should be 192.168.0.xxx (where xxx is 1-254 but not
68).
2.
Start the VNC client.
Vista User Guide, Version 2 18‐31 Connecting to Vista using a Mac Appendix 5 – using VNC on T & I‐ series consoles 3.
In the ‘Connections Details’ window click the Options button, then the Misc
tab:
4.
Tick the box marked ‘Shared Connection (do not disconnect other viewers)’.
Click OK to close the options window.
5.
In the ‘Connections Details’ window enter the Vista IP (i.e. 192.168.0.65).
6.
Click OK to open the login window.
7.
Enter your password and click OK (leave the username blank).
You should now be able to control the Vista.
Connecting to Vista using a Mac The following procedure is for the Mac VNCViewer v2.01.
(http://homepage.mac.com/kedoin/VNC/VNCViewer/index.html).
Other VNC clients work in a similar way:
1.
Check that the Vista and your Mac are on the same subnet. I.E. if the Vista’s
IP is 192.168.0.68, your PC should be 192.168.0.xxx (where xxx is 1-254 but
not 68).
2.
Start the VNC client.
18‐32 Vista User Guide, Version 2 Appendix 5 – using VNC on T & I‐ series consoles Connecting to Vista using a Mac 3.
In the ‘Open Display’ window tick the box marked ‘Allow shared desktop’:
4.
In the ‘Hostname: display’ window enter the Vista IP (i.e. 192.168.0.68).
5.
Clear the entry in the box to the right of the IP (or enter 0).
6.
Click OK.. VNC will open the login window.
7.
Enter your password and click OK (leave the username blank).
You should now be able to control the Vista.
Vista User Guide, Version 2 18‐33 Configuring the midi port Appendix 6, Using midi show control (MSC) to control cues 19. Appendix 6, Using midi show control (MSC) to control cues You can activate and control cues by sending Midi Show Control (MSC)
messages via the midi in port on the Vista L, T, I and S series consoles. For
information on using Midi Time Code (MTC) see Using Timecode to control
Cuelists on page 9-4
Configuring the midi port Before you use midi you have to set a ‘device ID’ that Vista will listen on. This
should correspond to the ID the Midi controller is sending on. To set the device
ID select ‘User preferences’ from the File menu and click on the ‘External
Control’ tab.
Set the Midi Show Control Device ID to correspond with your controller or the
midi software package you are using .
 Tip: Tick the ‘Use these settings for new shows’ checkbox to save these
settings as defaults for new shows.
19‐34 Vista User Guide, Version 2 Appendix 6, Using midi show control (MSC) to control cues MSC lighting messages MSC lighting messages Midi controllers use standard terminolgy for lighting cues and cuelists
This MSC term
is equivalent to this Vista component…
Q_number
Cue Number
<Q_list>
Cuelist Number
<Q_path>
Not used
Vista supports all the most commonly used MSC lighting messages.
This message…
does this…
Go
If a Q_number is specified, that cue plays. If no
Q_number is specified, the next cues in numerical order
and numbered identically and which are in Open Cue
Lists GO. If a Q_number is sent without a Q_list, all cues
with a number identical to Q_number and which are in
Open Cue Lists GO.
Go_Jam
Starts a transition or fade to a cue simultaneous with
forcing the Vista’s internal timecode clock to the 'Go
Time' if the cue is a 'Timecode' cue. If no Cue Number is
specified, the next cue in numerical sequence GOes and
the clock of the appropriate Cue List Jams to that cue's
time. If the next cue in numerical sequence is a 'Manual'
cue (i.e. if it has not been stored with a particular 'Go
Time,' the Go/Jam_Clock command is ignored.
Go_Off
Starts a transition or fade of a cue to the off state. The
fade time is determined by cuelist’s release time.
If no Cue Number is specified, the current cue GOes Off.
If a Cue Number is specified, that cue GOes Off.
Timed_Go
Starts a timed transition or fade to a cue. If no Cue
Number is specified, the next cue in numerical sequence
GOes. Time is a standard time specification with
subframes (type {ff}), providing anything from "instant"
to 24 hour transitions.
Stop
Halts currently running transition(s). If no Cue Number
is specified, all running transitions STOP. If a Cue
Number is specified, only that single, specific transition
STOPs, leaving all others unchanged.
Vista User Guide, Version 2 19‐35 MSC lighting messages Appendix 6, Using midi show control (MSC) to control cues This message…
does this…
Resume
Causes Stopped transition(s) to continue running. If no
Cue Number is specified, all Stopped transitions
Resume. If a Cue Number is specified, only that
transition Resumes, leaving all others unchanged.
All_Off
Turns all cuelist intensity output to 0% without changing
any other features. Equivalent to fading the Grand
Master to 0%.
The console status prior to All_Off can be re-established
by using the Restore command. Equivalent to fading the
Grand Master to 0%
Restore
Re-establishes operating status to exactly as it was prior
to ALL_OFF.
Reset
Releases all running cues..
Advanced Midi options You can send a message (for example Go) to several cuelists at once. To do this
you first send an Open message to each of the cuelists. Vista supports the MSC
messages to open and close cuelists.
This message…
does this…
Open_cuelist
OPEN_CUE_LIST
Makes a Cue List available to all other commands and
includes any cues it may contain in the current show.
When OPEN_CUE_LIST is received, the specified Cue
List becomes active and cues in it can be accessed by
normal show requirements. Q_list in Standard Form
must be sent.
If the specified Cue List is already Open or if it does not
exist, no change occurs.
19‐36 Vista User Guide, Version 2 Appendix 6, Using midi show control (MSC) to control cues MSC lighting messages This message…
does this…
Close_cuelist
Makes a Cue List unavailable to all other commands and
excludes any cues it may contain from the current show.
When CLOSE_CUE_LIST is received, the specified Cue
List becomes inactive and cues in it cannot be accessed
by normal show requirements, but the status of the cues
in the list does not change. Q_list in Standard Form must
be sent.
If the specified Cue List is already Closed or if it does not
exist, no change occurs.
Midi Timecode options
You can also control Vista’s internal timecode clock with midi commands.
This message…
does this…
Start_Clock
Starts Vista’s internal timecode clock. If the clock is
already running, no change occurs. If the clock is paused
it continues counting from the time value which it
contained while it was paused.
If Q_list is not sent, the clocks in all Open Cue Lists Start
simultaneously.
If Q_list is sent in Standard Form, only the clock in that
Cue List Starts.
Stop_Clock
Stops Vista’s internal timecode clock. If the clock is
already stopped, no change occurs. While the clock is
stopped, it retains the time value which it contained at
the instant it received the STOP command.
If Q_list is not sent, the clocks in all Open Cue Lists Stop
simultaneously.
If Q_list is sent in Standard Form, only the clock in that
Cue List Stops..
 Vista does not support these commands:
Load, Set, Fire, Standby_Plus, Standby_Minus, Sequence_Plus,
Sequence_Minus, Open_Q_Path, Close_Q_Path
Vista User Guide, Version 2 19‐37 Connecting to the serial port Appendix 7, Using serial communication to control cuelists 20. Appendix 7, Using serial communication to control cuelists You can activate and control cues by sending text commands via the serial port
on a Vista console or PC running the Vista application. Mac users will need a
Keyspan 19H USB to serial converter to receive serial commands.
Connecting to the serial port The cable that connects from the triggering device to the Vista should be a
standard serial cable (also called a null-modem cable, or serial printer cable), not
a serial cable extension. The important feature is that that pin2 at one end needs
to be connected to pin 3 at the other end and vice-versa).
Enabling the serial port The computer or other device sending the commands and the Vista must have
their serial ports set to match each other. To set the Vista serial port select ‘User
preferences’ from the File menu and click on the ‘External Control’ tab. Vista
displays the ‘User preferences’ window:
Vista T, I and L consoles should be set to Serial Port 1, Baud Rate 9600, Data Bits
8, Stop Bits 1, Parity None and Flow Control Xon/Xoff.
20‐38 Vista User Guide, Version 2 Appendix 7, Using serial communication to control cuelists Playback commands PC (Windows) systems should be set the same way but the Com port can be
changed to suit your computer’s configuration
On Mac systems the Keyspan 19HS device will appear in the Serial Port
dropdown menu.
Playback commands All commands should be sent to the Vista as single lines of text followed by
Return or Enter.
With serial commands you can only play the next cue in a cuelist. It is not
possible to play a play a cue out of order.
The syntax for sending commands is:
Command {Cuelist ID} or {Name} or {Cuelist ID:Name}
Command The supported commands to playback and load shows:
This command…
does this…
Go
Plays the next cue in the cuelist. Examples:
Go 1, or Go Dimmers, or Go 1:Dimmers
Pause {ID or
Name or
ID:Name}
Halts playback of the specified Cuelist. Example:
Rego {ID or
Name or
ID:Name}
Resumes play of a paused Cuelist. Example:
Release
Releases playback of the specified Cuelist. Example:
Pause 5
Rego 5
Release 1
Load {show
filename}
Loads a show file. The full path to show showfile must
be specified. Example:
Load C:\
Setting fixture levels You can also send commands to set Fixture levels in the Programmer . The
Syntax is:
•
{fixture id(s)} @ {level}
Where the fixture id is any combination of number, +, > and minus and level is a
value between 0 and 100 or just f (or F) for full.
Vista User Guide, Version 2 20‐39 Setting fixture levels Appendix 7, Using serial communication to control cuelists Examples:
•
1@F - fixture 1 to full
•
1>10-5@ 75 - fixture's 1,2,3,4,6,7,8,9 & 10 to 75%
•
1>10-3>7@f – fixtures 1,2,8,9&10 to 100%
Serial command acknowledgements Vista does not echo characters sent to the serial port but does send
acknowledgements to confirm that commands have been received and either
been accepted or have failed. There are three response types:
Commands that are understood and could be executed. Successful commands return the complete command appended with “OK”. For
example
“go 1:List” it would return “go List:1 OK”.
Commands that are understood but could not be executed. If the command is good but the object of that command is not known an error
message will be returned. For example, if there was no Cuelist 100
“go 100” would return “100 Unknown”.
Invalid Commands If the command is not understand, the message “ ILLEGAL COMMAND” is
returned.
 Make sure that there is an end of line character (return or enter) at the end of
each command.
 Commands and cuelist names are *not* case sensitive.
 Spaces before or after commands and cuelist names do not affect the
behaviour.
20‐40 Vista User Guide, Version 2 Appendix 8 – The Fixture Editor The Fixture Type Library Editor 21. Appendix 8 – The Fixture Editor The Fixture Type Library Editor The new Fixture Type Library Editor is a separate application to the console
software. On a Windows installation it can be found as an alias on the desktop
and can be launched like any other Windows program. On a T-series console it is
launched from the Patch window menu ‘Patch’ by selecting ‘Fixture Editor’.
When launched a window is presented with an expanded directory of all the
JANDS supplied fixtures, listed as manufacturer sub-directories, this is the
factory default directory. Once this directory is collapsed, another directory is
visible, this is the User Fixture Library and will initially be empty.
Fixtures in the Factory directory cannot be modified, however, copies can be
made and these will be placed in the User Fixture Library and are fully editable.
It is recommended that the latest software library be installed and an exhaustive
search of the fixture library be carried out to determine if the fixture required is
not already in the library before writing your own fixture profiles.
Vista User Guide, Version 2 21‐41 Creating a Fixture Profile Appendix 8 – The Fixture Editor Creating a Fixture Profile This section will detail, step by step, the process of creating a sample fixture
profile. The fixture being a VL1100D Iris (I) Model.
When the Fixture Type Editor is opened, the inbuilt library is automatically
expanded, presenting a Manufacturers list containing all JANDS supplied
fixtures. The fixture library is updated regularly and the latest revision should be
installed to see if the fixture profile you require is in the list before writing your
own fixture.
For this tutorial, collapse the ‘Factory’ directory and select the ‘User Fixture
Library’
From the Fixture menu select ‘New Fixture…’
A new, blank fixture window will open with five tabs across the top:
This tab…
21‐42 is for…
Vista User Guide, Version 2 Appendix 8 – The Fixture Editor Main tab: This tab…
is for…
Main
entering general fixture data.
DMX Chart
All DMX channel assignments and channel range values are
entered in this tab
DMX Macros
Notes
History
Control macros, including strike, douse and reset are
entered here.
Personal notes relating to the fixture can be entered here.
A chronological history of the fixture can be kept here.
Main tab: This window is used to enter general information values for your fixture. To add
or edit a value double click in the field and either type directly in the field or
select from the field’s popup menu.
This field…
is for…
Manufacturer
The name of the company that makes the fixture.
Vista User Guide, Version 2 21‐43 Main tab: Appendix 8 – The Fixture Editor This field…
is for…
Full Name
The complete, unabbreviated name as supplied by
the manufacturer.
Short Name
An abbreviated name, of your choice, for the Fixture.
This name will be used in the Chooser window when
‘show Short Name’ is selected.
Fixture Status
Choose from the popup menu to select the
appropriate status of the fixture file.
Beam Type
Choose from the popup menu to select the
appropriate beam type of the fixture.
Frame Type
Choose from the popup menu to select the
appropriate frame type, choose No Frame if the
fixture has no framing mechanism.
Movement Type
Choose from the popup menu to select the
appropriate movement type.
Physical Type
Choose from the popup menu to select the
appropriate physical type.
Light Generation
Choose from the popup menu to select the
appropriate light source.
Maximum Pan Degrees
Enter the maximum pan degrees as supplied by the
manufacturer. This value is required in order for the
flip function to work correctly. This information is
generally not found in the DMX charts for a fixture,
but, is usually found in the manufacturers
specification sheet.
Maximum Tilt Degrees
Enter the maximum tilt degrees as supplied by the
manufacturer. This value is required in order for the
flip function to work correctly. This information is
generally not found in the DMX charts for a fixture,
but, is usually found in the manufacturers
specification sheet.
Element Count
Horizontally
Enter the number of horizontal, individually
controllable elements within the fixture. Used for
single fixtures with multiple elements such as LED
fixtures.
Element Count
Vertically
Enter the number of vertical, individually
controllable elements within the fixture. Used for
single fixtures with multiple elements such as LED
fixtures.
21‐44 Vista User Guide, Version 2 Appendix 8 – The Fixture Editor DMX Chart tab: This field…
is for…
Is a Scroller
Defines whether the fixture is a scroller mechanism.
Patch Part Count
determines how many patchable parts there are for
the fixture. i.e. a par with a colour scoller will have
two parts. One for the par and another for the
scroller.
Uuid
This is a unique identifying number assigned to the
fixture by the fixture editor and cannot be changed.
Compatability Id
This number is for advanced use. When an existing
Factory fixture is duplicated and modified it will
retain programmed attributes of the original (such as
Preset information etc.) so long as this number is not
altered. Once altered the fixture will become an
independent fixture and lose those programmed
attributes.
Revision
A revision number can be added here to keep track
of multiple versions of the same fixture.
Factory Version
This is a factory library version tracking number.
Carallon Version
This version number is supplied by the Carallon
database and is not relevant when writing fixture
profiles.
DMX Chart tab: This icon…
does this…
Opens the Add DMX Channel window
Vista User Guide, Version 2 21‐45 DMX Chart tab: This icon…
Appendix 8 – The Fixture Editor does this…
Adds a DMX range to an existing channel. Inactive until a
channel is created.
Adds a Custom Mode to a channel, used when a feature range
is not mappable to a generic control. i.e. Iris Pulse or Gobo
Shake
Adds a slot to a colour or gobo wheel channel. . Inactive until a
channel is created.
Use this button to delete selected DMX channels, Ranges,
Modes or Slots.
Add DMX Channel window: This field…
is for…
Feature
Class
This determines which control palette the feature
will reside in. Intensity Class reside in the Intensity
palette, Beam in the Beam palette etc.
21‐46 Vista User Guide, Version 2 Appendix 8 – The Fixture Editor DMX Chart tab: This field…
is for…
Feature
Type
This determines which controls on the palette control
which feature. For example one Beam Type may be
Iris and another Zoom. Both features appear on the
Beam contol palette, mapped to their respective
controls.
Feature
Name
This value is automatically set by the software unless
a custom feature is created in which case a user
assigned name must be applied.
DMX Channel
Type
this will detrmin if the feature is 8 bit or 16 bit. The
Fine channel field becomes active if 16 bit is selected
here.
DMX Channel
Channel
Is the Hi byte channel for the feature.
DMX Channel
Fine Channel
Is the Lo byte channel for the feature (if applicable)
DMX Channel
Default Value
This is the default DMX value for home and clear,
ranging from 0-255.
The DMX Chart window is used to enter all channel information for your fixture.
Using the manufacturers DMX specification sheets, a channel list will be built in
here, the channels can then have various attributes set. Addition of range
mapping, slots for colours and gobos, mode settings for channels and any other
information required to operate the fixture.
Using the sample DMX specification for a VL1100D (I) Iris Model fixture this
section will document how to enter data in the DMX tab for it.
Vista User Guide, Version 2 21‐47 DMX Chart tab: Appendix 8 – The Fixture Editor DMX channel specification for a VL1100D (I) Iris Model
21‐48 Vista User Guide, Version 2 Appendix 8 – The Fixture Editor DMX Chart tab: Channel 1: Intensity Click the DMX button to open the Add DMX Channel dialog. By default the
dialog opens for the first time as below, it will open in the last opened state from
now on. Notice the values are correct for this feature. Click OK to create.
The Intensity 8 bit channel 1 has been created in the DMX Chart window.
Channel 2 and 3: Pan Hi and Pan Lo: 16b Click the DMX button to open the Add DMX Channel dialog. Select Position in
Class and Pan in Type. In the DMX channel section select 16 bit and assign the
correct channel numbers. The Default value should be set to 127 as it is a
midpoint default feature and the Hi Byte value only need be set. Click OK to
create.
Vista User Guide, Version 2 21‐49 DMX Chart tab: Appendix 8 – The Fixture Editor The Pan 16 bit channels 2 and 3 have been created in the DMX Chart window.
Channel 4 and 5: Tilt Hi and Tilt Lo: 16b Click the DMX button to open the Add DMX Channel dialog. Select Position in
Class and Tilt in Type. In the DMX channel section select 16 bit and assign the
correct channel numbers. The Default value should be set to 127 as it is a
midpoint default feature and the Hi Byte value only need be set. Click OK to
create.
21‐50 Vista User Guide, Version 2 Appendix 8 – The Fixture Editor DMX Chart tab: The Tilt 16 bit channels 4 and 5 have been created in the DMX Chart window.
Channel 6: Edge Click the DMX button to open the Add DMX Channel dialog. Select Beam in
Class and Focus in Type. In the DMX channel section select Standard and assign
the correct channel number. The Default value should be set to 127 as it is a
midpoint default feature. Click OK to create.
Vista User Guide, Version 2 21‐51 DMX Chart tab: Appendix 8 – The Fixture Editor The Intensity 8 bit channel 6 has been created in the DMX Chart window.
Channel 7: Zoom Click the DMX button to open the Add DMX Channel dialog. Select Beam in
Class and Zoom in Type. In the DMX channel section select Standard and assign
the correct channel number. The Default value should be set to 127 as it is a
midpoint default feature. Click OK to create.
21‐52 Vista User Guide, Version 2 Appendix 8 – The Fixture Editor DMX Chart tab: The Zoom 8 bit channel 7 has been created in the DMX Chart window.
Channel 8: Frost Click the DMX button to open the Add DMX Channel dialog. Select Beam in
Class and Zoom in Type. In the DMX channel section select Standard and assign
the correct channel number. The Default value should be set to 0 as it is a 0
default value feature. Click OK to create.
Vista User Guide, Version 2 21‐53 DMX Chart tab: Appendix 8 – The Fixture Editor The Frost 8 bit channel 8 has been created in the DMX Chart window.
Channel 9, 10 and 11: CMY Colour mix Click the DMX button to open the Add DMX Channel dialog. Select Colour Mix
in Class and Cyan in Type. In the DMX channel section select Standard and
assign the correct channel number. The Default value should be set to 0 as it is a 0
default value feature, the Hi Byte default value only need be set. Click OK to
create and repeat the process for Yellow and Magenta.
21‐54 Vista User Guide, Version 2 Appendix 8 – The Fixture Editor DMX Chart tab: The three Colour Mix 8 bit channels 9,10 and 11 have been created in the DMX
Chart window.
Channel 12: Gobo Wheel Click the DMX button to open the Add DMX Channel dialog. Select Gobo Wheel
in Class and Gobo Wheel in Type. In the DMX channel section select Standard
and assign the correct channel number. The Default value should be set to 0 as it
is a 0 default value feature. Click OK to create.
Vista User Guide, Version 2 21‐55 DMX Chart tab: Appendix 8 – The Fixture Editor The Gobo Wheel 8 bit channel 8 has been created in the DMX Chart window.
Channel 12: Gobo Wheel (cont.) Note there are three items added for this feature unlike previous features that
have one simple range value assigned.
Index Mode: Expand this section and select the range value section as below.
As the specification requires the range for Gobo Wheel Indexing to be 0-127, the
values need changing. On the right hand side of the DMX Chart window in the
DMX range section. Apply the change as seen below and click apply.
21‐56 Vista User Guide, Version 2 Appendix 8 – The Fixture Editor DMX Chart tab: The change to the channel range is reflected in the DMX Range column.
Rotation Mode: Expand this section and select the range value section as below.
As the specification requires the range for Gobo Wheel Rotation is to be 128-255,
only one range of values is required. By default most fixtures have clockwise and
counter clockwise values as well as a stop value. The editor places ranges for
these by default. The mechanism in our fixture only rotates in one direction so
the first thing that is required is to delete the Anti-clockwise range, the Stopped
range can remain and set to 127 if desired. This will make zero rotation on the
controls stop the wheel spinning at the last indexing value.
Select the Anti-clockwise range:
Now click the
button to remove the range.
Channel 12: Gobo Wheel (cont.) As the ranges for Stopped and Clockwise rotation are the same as the
manufacturers specification no other changes are required. The ranges for gobo
wheel rotation are now set.
Wheel Slots: Expand this section and Select it. Notice a single Open slot is loaded
with a range of 0,0.
Use the
button to create as many slots as is required. In this case add
five slots to make a total of six.
Vista User Guide, Version 2 21‐57 DMX Chart tab: Appendix 8 – The Fixture Editor As the Open slot values are already correct, select Slot #2.
Channel 12: Gobo Wheel (cont.) On the right hand side of the DMX Chart window the controls are now available
to add appropriate data with the selected slot.
A Name may be applied, a Slot Type can be set (Gobo or Colour) a Category can
be assigned, Category is useful in remodelling gobo patterns when changing
fixture types, and an image can be set for preview on the console.
21‐58 Vista User Guide, Version 2 Appendix 8 – The Fixture Editor DMX Chart tab: As with other features the DMX Range section is used to set the appropriate
values for the slot, as the specification below indicates, different values are
required to operate the slot in either Indexing or Rotating modes.
Channel 12: Gobo Wheel (cont.) Set the DMX Range values for Slot #2 as shown below, follow the same
procedure for the remaining slots. The correct value for Slot #2 (18 or 146) will
automatically switch between the two values depending on which control is
currently being used on the console, i.e. indexing or rotating.
Vista User Guide, Version 2 21‐59 DMX Chart tab: Appendix 8 – The Fixture Editor Click the Select Image button to open up the Images window, navigate to the
gobos directory and search for the image required, select and open it then name
it in the Name field.
Tip: Switch the window view to Thumbnails for image previews.
Channel 13 and 14: Gobo Rotation Click the DMX button to open the Add DMX Channel dialog. Select Beam in
Class and Gobo Slot Rotation in Type. In the DMX channel section select 16 bit
and assign the correct channel numbers. The Default value should be set to 127 as
it is a midpoint default feature, the Hi Byte default value only need be set. Click
OK to create.
21‐60 Vista User Guide, Version 2 Appendix 8 – The Fixture Editor DMX Chart tab: The Gobo Wheel Slot 16 bit channels 13 and 14 have been created in the DMX
Chart window.
Channel 13 and 14: Gobo Rotation (cont.) Expand the Index Mode and Rotate ranges.
Vista User Guide, Version 2 21‐61 DMX Chart tab: Appendix 8 – The Fixture Editor Select the range to edit and adjust the values on the right hand side of the DMX
Chart window in the DMX range section. As this fixtures rotation Clockwise and
Ant-clockwise are reverse to the default values inserted the ranges need to be
edited. Apply the change as seen below to the Anti-clockwise range and click
apply. Repeat this procedure for the Clockwise range, inserting the correct
values.
Anti-clockwise range values:
Clockwise range values:
As the default value for Stopped is already 127, this need not be adjusted. The
Index Mode values supplied by default are the same as the fixture specification,
so, it too, requires no adjustment.
Channel 15: Iris Click the DMX button to open the Add DMX Channel dialog. Select Beam in
Class and Iris in Type. In the DMX channel section select Standard and assign the
correct channel number. The Default value should be set to 255 as it is a 255
default value feature. Click OK to create.
21‐62 Vista User Guide, Version 2 Appendix 8 – The Fixture Editor DMX Chart tab: The Iris 8 bit channel 15 has been created in the DMX Chart window.
Channel 16,17 and 18: Timing channels These three channels differ from the previous channels created in that they do
not map to generic controls. They will be Custom Feature channels that are
associated with the Class of feature.
For the Focus Time channel 17 (Varilite terminology states Focus is Position) click
the DMX button to open the Add DMX Channel dialog. Select Custom Position
in Class, Custom Position will automatically be assigned to Type and as we are
creating a Custom Feature a feature name needs to be assigned, type in Focus
Time. In the DMX channel section select Standard and assign the correct channel
number. The Default value should be set to 0 as it is a 0 default value feature.
Click OK to create.
Vista User Guide, Version 2 21‐63 DMX Chart tab: Appendix 8 – The Fixture Editor Repeat this process for the remaining channels 17 and 18. Channel 17 will need
Class and Type set to Custom Colour and named Colour Time, channel 18 will
need Class and Type set to Custom Beam and named Beam Time.
Channel 19: Control The Control channel is also created as a Custom feature, The Class needs to be set
as Custom Misc and Name to Control. This will create the channel, values for the
control macros will be set in the DMX Macros tab.
21‐64 Vista User Guide, Version 2 Appendix 8 – The Fixture Editor DMX Chart tab: The Control 8 bit channel 19 has been created in the DMX Chart window.
Channel 19: Control (cont.) To assign control macros, open the DMX Macros tab and enter the relevant
information using the specification from the manufacturer.
Syntax: channel @ value wait milliseconds , next command.
Complex macros Some fixtures require more complex macros for for strike/reset/douse?. For
example a fixture might require; ch1 to 255, ch4 to 17,ch 6 to 1, ch 8 to 0, ch 11 to 0
and ch 15 to 84 and for these channels to be held for 6 seconds, and sent back to
default
In this case each command must state a wait time. The syntax is as follows:
[channel] @ [value] # [wait time in milliseconds]
So for the example above the macro would read as follows:
1@255#0;4@17#0;6@17#0;8@0#0;11@0#0;15@84#6000
That will send the specified values to all channels simultaneously and hold them
for 6 seconds.
Vista User Guide, Version 2 21‐65 Channels with Custom Ranges Appendix 8 – The Fixture Editor Saving the Fixture: Once all channel ranges have been created, spend a few minutes checking them
against the manufacturers specification. Click the OK button then choose OK
from the resulting Save Fixture And Exit dialog.
To use the fixture you will first need to exit the Fixture Library Editor, close the
editor window and a confirmation dilaog will be presented. Click OK, the library
will regenerate the library catalogues to incorporate your new fixture. Please be
patient as this takes some time. Start Vista and the new fixture will be available
for patching in the User Fixture Library.
Channels with Custom Ranges While all the main features of fixtures are represented by generic controls on the
console, the ranges that do not fit the generic model are controlled by Custom
Modes and Custom Ranges. A simple example of this is an Iris channel with
pulse ranges.
Iris: Example ranges:
Iris closed to open: range: 0 – 128
Iris Pulse-1 slow to fast: 129 – 190
Iris Pulse-2 slow to fast: 191 - 255
Create the custom ranges as below:
The Iris Pulse controls will be found inside the Custom Iris widget in Vista:
21‐66 Vista User Guide, Version 2 Appendix 8 – The Fixture Editor Channels with Custom Ranges Double click the widget to open the Custom Feature Browser, in order to access
the custom Pulse range controls:
Vista User Guide, Version 2 21‐67 Retrieving Software Crash Files from a Console Appendix 9 – Crash Logs 22. Appendix 9 – Crash Logs Retrieving Software Crash Files from a Console Although unusual software crashes can occur. If they do it is important that as
much detail as possible is returned to Jands to enable the cause to be determined
and eliminated. In order to simplify this process the console software includes a
means to package all of the necessary files for return to Jands support.
To generate a crash report package on a L5, T2, T4 or I3: 1.
Select File -> Quit Application from the main menu, which will open the
System Settings dialogue.
2.
If a crash has recently occurred the dialogue will have an additional red
button labeled “Export Crash Report”. Click “Export Crash Report”.
3.
Click “Select crash report files”.
4.
There should be at least one file available, but if there’s more select them all
using SHIFT + Click or CTRL + Click.
5.
Click “Open”.
6.
If desired you can type some further information into the comment field to
describe what was being done when the crash occurred eg “I was in the
timeline selection dragging a handle when it crashed”.
7.
Click “Select removable device”.
8.
Select the USB device from the list.
9.
Click “Choose”. The files will be transferred to the USB device.
10.
When it’s finished click “OK”.
11.
Remove the USB memory stick and return the files to Jands via the online
support request page http://www.jandsvista.com/support/supportrequest-form/
12.
Click “Vista 2” to restart the Vista application.
22‐68 Vista User Guide, Version 2 Appendix 9 – Crash Logs Retrieving Software Crash Files from a Console Retrieving Software Crash Files from a Windows PC Please follow the procedure below to configure a Windows PC controlling the
Jands Vista 2 application such that crash dump files may be collected and
subsequently analysed in the event of a Vista crash. This procedure is for
Microsoft Windows operating systems only.
This procedure must be executed before any crash, as files generated without this
application cannot be retrieved or analysed.
Note: Not all crashes will generate a log file. If you experience a crash and no log
file is generated, please report all information you can to us.
There are two different procedures – one for XP and another Microsoft Vista.
Setup Procedure for Windows XP: 1.
In the Start menu's Run box, enter the command "drwtsn32 -i"
2.
A dialog box will appear informing you that Dr. Watson has been installed
as the default debugger. Press OK.
Retrieving Crash Files on Windows XP: 1.
Crash information will be written into the directory "C:\Documents and
Settings\All Users\Application Data\Microsoft\Dr Watson. Should a Vista
crash occur, navigate to this directory.
Vista User Guide, Version 2 22‐69 Retrieving Software Crash Files from a Console Appendix 9 – Crash Logs 2.
Check the modification date of the “user.dmp” and “drwtsn32.txt” files to
make sure that you are looking at the file that corresponds with when the
crash occurred.
3.
Rename the "user.dmp" file to something a more descriptive eg Byron2-06838_20101124_01.dmp".
4.
Send the renamed user.dmp file, an exported copy of the show file,
drwtsn32.txt, and a description of what you were doing to
[email protected], or use the support contact form at
www.jandsvista.com/support.
Reconfiguring drwtsn32 Settings: Running drwtsn32 without any options or switches will bring up a window that
allows various settings to be changed eg the location of the dump files can be
made more easily accessible, or a visual alert letting you know a crash was
logged.
If drwtsn32 is reconfigured, please ensure that the checkboxes and radio buttons
remain set as shown in the following image .
22‐70 Vista User Guide, Version 2 Appendix 9 – Crash Logs Retrieving Software Crash Files from a Console Additionally the number of crashes to save is limited to 10 by default. Once the
limit has been reached, the system will no longer generate new log files. To
ensure that data is collected users should periodically remove log files.
Procedure for Windows Vista: Windows Error Reporting (WER) has been integrated into the Microsoft Vista
operating system. By default, Vista uploads the crash logs to Microsoft, but does
not save a local copy. To save a local copy of the crash logs, the registry must be
reconfigured by following these steps:
1.
Download the file “ActivateCrashDumps.reg” file from the Jands Vista
website http://www.jandsvista.com/ActivateCrashDumps.reg . Some
browsers helpfully add a ".txt" to the filename (which may not be shown if
Windows is hiding file file extensions - see below for details on changing this
behavior). The file must have the file extension ".reg".
2.
Save the file to the PC.
3.
Using Windows Explorer, find the file and double-click on
ActivateCrashdumps.reg to run it.
4.
Respond affirmatively to any prompts.
5.
Reboot the PC.
The next time any application crashes, the crash information will be written into
a folder located inside
"%LOCALAPPDATA%\local\Microsoft\Windows\WER\ReportQueue" (where
%LOCALAPPDATA% is usually "c:\Users\user\AppData"). Check the
modification date of the directory to make sure that the appropriate directory is
being displayed.
Windows Vista hides many directories (and files) from the user by default. This
can be changed in the Control Panel by selecting Folder Options -> View Tab ->
Hidden Files and Folders -> Show Hidden Files).
Vista User Guide, Version 2 22‐71 Retrieving Software Crash Files from a Console Appendix 9 – Crash Logs Each crash will result in a new directory below "ReportQueue". Package up the
entire directory naming each file something more descriptive eg
“Vista_1.13.522X_20090720_01.dmp" along with the show file and a brief
explanation of what was being done, and email them to [email protected].
22‐72 Vista User Guide, Version 2 Appendix 10 – the touchpad and the pen tablet Using the touchpad 23. Appendix 10 – the touchpad and the pen tablet Using the touchpad Like all pointing devices, the touchpad may take a short time to get used to.
However you will soon find that using this device is natural and intuitive.
Simply glide your finger across the surface of the pad to move the cursor and tap
your finger to ‘click’. It's easy!
Click To click, lightly and quickly tap the surface of the pad once. Or, press the left
button once.
To double-click, double tap on the pad or click the left button twice.
Remember, the touchpad responds best to a very firm, crisp tap.
Right Click To right-click for submenus, tap the tap zone in the upper right corner of the
touchpad or click the right button once.
Drag To drag, draw, or highlight, double-tap rapidly and hold your finger down on
the second tap, then glide to move. You may also hold the left button as you
glide your finger.
Vista User Guide, Version 2 23‐73 Working with the grip pen Appendix 10 – the touchpad and the pen tablet Glide Extend To drag further than the pad surface, lift and reposition your finger after
reaching the textured edge. GlideExtend will virtually eliminate the edge of the
pad while you drag. In other words, if you are dragging an item and you hit the
textured edge, GlideExtend will hold the drag for three seconds while you
reposition to complete the drag. To shut off GlideExtend earlier than three
seconds, simply tap or click a button.
Scroll To scroll, place your finger down the right edge of the touchpad and glide up or
down. This feature requires third party software on Macintosh systems (see
Macintosh advanced features section for USB version of Easy Cat).
Working with the grip pen This information is kindly provided by Wacom, the pen tablet manufacturer.
As you work with the pen-tablet, you can rest your hand lightly on the display
screen, just as if it were a drawing board or sheet of paper. Hold the Grip Pen as
you would a pencil. Make sure the side switch is in a convenient location where
you can press it with your thumb or forefinger, but won’t accidentally press it
while drawing.
 The Grip Pen should never be stored in a container where it will rest on its
tip or eraser. When the pen is not in use, place your pen in the pen holder or
lay it flat on your desk.
Tip switch / Pen Tip The pen is activated as soon as it enters proximity, about 5 mm (0.2 in), above the
Interactive Pen Display screen. This allows you to position the screen cursor or
use the DuoSwitch without touching the pen tip to the display screen.
When pressure is applied to the pen tip, the tip switch is turned on and the pen
simulates a mouse button click.
23‐74 Vista User Guide, Version 2 Appendix 10 – the touchpad and the pen tablet Using a pen Eraser To use the eraser, hold the Grip Pen upside down. When the eraser is within
proximity of the active area, the tablet reports the pen coordinates and the
pressure applied to the eraser.
The eraser is not implemented in Version 1 of the Vista software.
DuoSwitch The DuoSwitch can be used to perform the same click and double-click functions
as the tip switch. Toggle the DuoSwitch in either direction to activate the upper
or lower button functions.
 If you do not care to use the side switch, you can remove if by following the
directions in Removing and installing the Duo Switch.
Using a pen Pointing and Selecting Move the Grip Pen above the pen tablet display screen to position the screen
cursor. The cursor jumps to the location where you place the pen (absolute
positioning). Press the pen tip on the display screen to make a selection.
Clicking Tap the display screen once with the pen tip, or touch the pen to the display
screen with enough pressure to generate a mouse click.
Double‐Clicking Press the upper side switch, or quickly tap the display screen twice in the same
place with the pen tip. Double-clicking is easier when the pen is perpendicular to
the tablet screen.
Dragging Select an object, then slide the pen tip across the display screen to move the
object.
Erasing Erasing is not currently supported in the Vista system.
Working with the Pen tablet As you work with the pen tablet, you can rest your hand lightly on the display
screen, just as if it were a drawing board or sheet of paper.
Vista User Guide, Version 2 23‐75 Using a pen Appendix 10 – the touchpad and the pen tablet Because the drawing surface will be a little higher than a normal desk, consider
adjusting the height of you desk or chair to assure comfortable use of the device.
When working with the pen tablet, maintain a good posture at all times and
change your position if you feel any discomfort due to your work position or the
weight of the tablet.
The Interactive Pen Display should be positioned so you can view it comfortably
with a minimum of eyestrain.
Here are some other points to keep in mind:
•
Take short breaks between tasks to stretch and relax your
muscles.
•
Use a gentle grip when working with the pen.
•
Alternate tasks throughout the day.
•
Minimize awkward postures and repetitive movements
that cause discomfort.
Working with On Screen Display Settings The pen tablet display is equipped with an On Screen Display function. The OSD
function enables you to adjust and optimize a variety of display settings at the
touch of a button. The OSD controls are located above the tablet on the T series
consoles and in the armrest of the L series.
Selection buttons Use these buttons to select an option that can then be activated when you press
the Enter button.
After activating a selected option, press the + button to increase a selected item
value, and press the button to decrease it.
The basic process for working with the OSD is as follows:
1.
Press the Menu button to open the OSD main menu.
2.
Use the + or - buttons to select an option. When the option you want to
adjust is highlighted, press the Enter button. The current settings and
adjustment sub-menu for that option will appear.
3.
Use the + or - buttons to adjust the option settings.
23‐76 Vista User Guide, Version 2 Appendix 10 – the touchpad and the pen tablet 4.
Using a pen When you have made your changes, press the Enter button to save. To exit,
press the Menu button.
 All settings are automatically saved when the OSD menu closes. If you make
changes to the display appearance and cannot return to the original settings,
use the Reset Recall option to return The pen tablet to its original factory
defaults.
Caring for the Cintiq pen tablet Keep the Grip Pen and the Cintiq LCD screen surface clean. Dust and dirt
particles can stick to the pen and cause wear to the display screen surface.
Regular cleaning will help prolong the life of your LCD screen surface and pen.
Keep Cintiq and the Grip Pen in a clean, dry place and avoid extremes in
temperature.
Room temperature is best. Cintiq and the Grip Pen are not made to come apart
(except where specifically indicated for removal and replacement of the pen’s
DuoSwitch). Taking apart the product will void your warranty.
Caution - If the pen tip becomes sharp or angular, it may damage the coating on
the display screen. Please replace the pen tip if necessary.
Cleaning the Pen‐Tablet To clean the Grip Pen, use a soft cloth and mild detergent (such as dishwashing
liquid) diluted with water. Do not use paint thinner, benzine, alcohol, or other
solvents.
To clean the display screen, use an anti-static cloth or a slightly damp cloth.
When cleaning, apply only a fixture amount of pressure to the display screen and
do not make the surface wet. Do not use detergent to clean the display screen;
this may damage the coating on the screen. Please note that damage of this kind
is not covered by the manufacturer’s warranty.
Replacing the Pen Tip The pen tip will wear with normal use. When the pen tip gets too short, you can
replace it with one of the extra tips that came with the pen.
To remove the old tip: Clasp it with a pair of tweezers, needle-nosed pliers, or similar instrument and
pull the old tip straight out of the pen.
Vista User Guide, Version 2 23‐77 Removing and installing the Duo Switch Appendix 10 – the touchpad and the pen tablet To insert a new tip: Slide it straight into the barrel of the pen. Firmly push the tip until it stops. The
new tip will slide into the correct position.
If the pen tip wears and becomes angular, it may damage the coating on the Pen
tablet display screen. To avoid this, periodic tip replacement is recommended.
WARNING Prevent children from swallowing the pen tip or side switch. The
pen tip or side switch may accidentally be pulled out if children are biting on
them.
Removing and installing the Duo Switch Some users prefer to remove the DuoSwitch when working with the Grip Pen.
For example, you may want to remove the switch in order to focus on a drawing
and eliminate any accidental clicks that would occur if you unintentionally
pressed on the switch. Note, however, that removing the DuoSwitch also
removes the button functionality it offers. For most users it is unnecessary to
remove the DuoSwitch.
Important: Do not remove the switch by prying it from either end as this may
damage your Pen. NEVER adjust the trimmer capacitor that will be visible when
the switch is removed. When using the pen without the DuoSwitch, always
replace the original rubberized grip with the optional grip in order to protect the
trimmer capacitor.
To remove the DuoSwitch:
1.
Firmly clasp the DuoSwitch in the middle and pull out. Press in on the
rubberized grip in order to better grasp the switch.
2.
Remove the pen tip cone by turning it counterclockwise. Then pull the grip
forward over the pen tip.
3.
Install the optional grip by aligning the pen case rails with the grooves inside
the grip and pushing the grip over the pen tip. Then replace the pen tip cone
by turning it clockwise onto the pen.
23‐78 Vista User Guide, Version 2 Appendix 10 – the touchpad and the pen tablet Removing and installing the Duo Switch To Install the DuoSwitch:
1.
Remove the pen tip cone by turning it counterclockwise. Then pull the grip
forward over the pen tip.
2.
Install the original grip (the one with the DuoSwitch access slot) by aligning
the pen case rails with the grooves inside the grip and pushing the grip over
the pen tip. When properly positioned, the DuoSwitch access hole will reveal
the trimmer capacitor. Then install the pen tip cone by turning it clockwise
onto the pen.
3.
Align the DuoSwitch into place, making sure to match the switch position to
the grip molding. Then gently press in on the DuoSwitch until it snaps into
place.
Vista User Guide, Version 2 23‐79 Precautions on using and handling the Pen‐Tablet Appendix 10 – the touchpad and the pen tablet Precautions on using and handling the Pen‐
Tablet Temperature and Humidity Operating temperature and humidity 5˚ to 35˚C, 20 to 80% RH
Storage temperature and humidity -10˚ to 60˚C, 20 to 90% RH
CAUTION. Do not use or store the pen tablet where:
•
Temperature changes are severe or exceed specifications
(e.g., outdoors or inside a vehicle).
•
The pen tablet and the Grip Pen are exposed to direct
sunlight or heat from an appliance.
•
The pen tablet and the Grip Pen are exposed to water or
any other kind of liquid.
CAUTION. Do not use The pen tablet in a dusty environment; this may damage
the unit
Handling WARNING: If the LCD screen has been damaged, DO NOT touch any liquid
that may be leaking from it; this liquid is an irritant. In case of contact with skin,
eyes, or mouth, rinse immediately with running water for at least 15 minutes or
more. If contact is made with the eyes or mouth, also consult a physician.
WARNING: Prevent children from swallowing the pen tip or side switch. The
pen tip or side switch may accidentally be pulled out if children are biting on
them.
23‐80 Vista User Guide, Version 2 Appendix 10 – the touchpad and the pen tablet Precautions on using and handling the Pen‐Tablet CAUTION: Do not disassemble the Grip Pen. This may cause the device to
malfunction. In this case, Wacom shall have no responsibility to repair or replace
the product.
CAUTION: Do not scratch the display screen. Avoid placing sharp objects on
the display screen surface.
CAUTION: Avoid intensive shock or vibration to the pen tablet or the Grip
Pen. Hitting or dropping the pen tablet display may damage the display screen
or other components.
CAUTION: Do not put heavy articles on the Interactive Pen Display or push
against it with a strong force; this may damage the display screen or bend the
stand.
CAUTION: If the pen tip becomes sharp or angular, it may damage the coating
on the display screen. Please replace the pen tip if necessary.
CAUTION: Do not use any organic solvent (e.g., alcohol) or even mild
detergent to clean the display screen. Use of these cleaners can damage the
coating on the screen. Please note that damage of this kind is not covered by the
manufacturer's warranty.
To clean the display screen, use an anti-static cloth or a slightly damp cloth.
When cleaning, apply only a fixture amount of pressure to the display screen and
do not make the surface wet.
To clean the pen tablet casing or Grip Pen, use a soft cloth with mild detergent
(such as dish washing liquid) diluted with water.
Vista User Guide, Version 2 23‐81 Power Appendix 11 – technical details 24. Appendix 11 – technical details Power T4 / T2 /
I3 / L5
Power Requirements:
E2 / S3
S1
M1
100VAC to 240VAC +/- 10%, 50-60 Hz
USB
powered
Power Consumption:
400 Watts 40 Watts
max
max
2.5 Watts
max
Power Connector:
IEC 3-pin
20 Watts max
USB
Service & Maintenance With care Vista products will require little or no maintenance. However, the
internal battery (in the T and I series only)will need to be replaced on a regular
basis (see the following section).
If the front panel requires cleaning, wipe with a mild detergent on a damp soft
cloth.
The CD drive mechanism battery (in the T4 / T2 console only) is mechanical and
should always be treated with care. Never allow the entry of fluids into the slot.
DO NOT spray liquids onto the front panel.
DO NOT use solvents for cleaning the front panel.
Warning: Do not allow the entry of liquids of any sort into the console chassis.
The T4 / T2 CPU tray should be periodically cleaned to ensure dust does not
build up near the fans.
Battery replacement The Vista T and I series consoles have an internal battery that is used to maintain
system BIOS settings. The battery should last approximately 5 years from the
date the battery was made. If the console reports BIOS check errors, please return
the console to an authorised agent for battery replacement.
24‐82 Vista User Guide, Version 2 Appendix 11 – technical details Installation Installation Vista consoles and control surfaces must be installed in a location that allows
adequate ventilation around the rear of the product. There must be at least
150mm of free space around the rear and sides of the console when in use.
Failure to allow adequate ventilation may result in premature shutdown of the
console.
An external UPS may be connected if mains blackouts are anticipated.
T4 / T2 / I3 / L5 Shut down Always use the correct procedure to shut the console down. Select ‘Shutdown’
from the File menu.
General Specifications Inputs & Outputs Description
DMX 512 (1-4)
Type
5 pin Female AXR
Ethernet
(100BaseT)
RJ-45
SMPTE (Audio)
3 pin Female AXR
MIDI In
5 pin Female DIN
Vista User Guide, Version 2 Pin Outs
1
2
3
4
5
1
2
3
4
5
6
7
8
1
2
3
1
2
3
4
5
Function
Shield
Data –
Data +
Data – (DMX 4 only)
Data + (DMX 4 only)
Transmit +
Transmit –
Receive +
Unused
Unused
Receive –
Unused
Unused
Shield
LTC –
LTC +
NC
Shield
NC
RX+
RXD
24‐83 General Specifications Description
MIDI Thru/Out
COM (RS232)
Trigger In
Trigger Out
Video 1
Video 2
USB
Audio Mic
Audio Out
Audio Line In
24‐84 Appendix 11 – technical details Type
5 pin Female DIN
Pin Outs
1
2
3
4
5
9 pin D
1
2
3
4
5
6
7
8
9
6.5mm Jack Socket
Tip
Sleeve
6.5mm Jack Socket
Tip
Sleeve
15 pin High Density D 1
2
3
4
5
6
7
8
9
10
11
12
13
14
15
Type A
1
2
3
4
3.5mm Jack socket
Tip
Sleeve
3.5mm Jack socket
Tip
Ring
Sleeve
3.5mm Jack socket
Tip
Ring
Sleeve
Function
NC
Shield
NC
TX+
TXD
DCD
RXD
TXD
DTR
Gnd
DSR
RTS
CTS
RI
Trigger In
Ground
Trigger Out
Ground
Red
Green
Blue
NC
Ground
Red Ground
Green Ground
Blue Ground
Vcc
Sync Ground
NC
VD Data
Horizontal sync
Vertical sync
VD Clock
Vcc
Data –
Data +
Ground
Signal
Shield
Left
Right
Shield
Left
Right
Shield
Vista User Guide, Version 2 Appendix 11 – technical details Description
Desk Lamp 1
Desk Lamp 2
Type
Vista User Guide, Version 2 General Specifications Pin Outs
1
2
3
Function
Chassis
Lamp –
12V
24‐85 Index General Specifications 25. Index A
add
cue, 6-15
adding
events to the timeline, 6-41
adjust
timing, 6-44
Advanced Properties, 4-8
alias cues, 6-17
alias cues, 6-23
aligning
start and end points, 6-45
all events view
filtering, 6-36
All panel, 5-22
Alt, 3-4
applying
saved timing, 6-33
applying extracts, 5-52, 6-48
arranging the quickpicker, 5-43
arranging the quickpickers, 5-40
ArtNet
Broadcast Mode, 4-17
compatible devices, 4-16
audio
adjusting cues to, 8-3
Audio, 8-1
audio playback, 6-28
B
backup, 17-27
backups
exporting shows (backing up), 2-5
battery, 24-85
beam, 5-26
setting, 5-26, 5-34
blocking, 6-23
include all tracked events in a cue,
6-18
bootable USB device, 16-24
built in effect
Vista User Guide, Version 2 applying, 5-51
buttons
configuring, 3-9
buttons, 3-2
Shift, Alt, Ctrl, 3-4
C
calibrating the pen, 13-2
changing
a cue, 6-18
universes, 4-5
Channels, 4-10
chase properties, 6-29
checking that your fixtures are
working, 5-21
Chooser menu, 14-14
chooser window, 5-1
matrix, 5-12
sort order, 5-18
cli, 5-53
cloning fixtures, 4-12
CMY, 5-23
colour
setting in detail, 5-29
colour
setting, 5-23
colour wheel, 5-24, 5-31
Command Line Interface, 5-53
commands
within cuelists, 6-49
components
assigning to controls, 11-14
Components tab, 5-38
configurations
saving, 6-32
configuring
the sidebar, 3-9
configuring
buttons, 3-9
connecting to the console via FTP,
15-22
console
25‐1 General Specifications I3, 11-2
M1, 11-3
S1, 11-2
S3, 11-2
T2, 11-2
console
layout, 11-1
setting up, 2-1
T4, 11-1
console
modifier keys, 11-4
console
configuring the console, 11-12
console
configuring the console, 11-13
console
pages, 11-23
console
snapshots, 11-23
console control panel, 13-1
console hardware, 11-1
Console menu, 14-13
console settings, 13-1
control panel
console settings, 13-1
controls
effects, 7-4
crash logs, 22-70
creating
a show, 2-4
extracts, 5-52, 6-48
groups, 5-46
presets, 5-47
release events, 6-47
Ctrl, 3-4
cue
adding and deleting, 6-15
block, 6-18
changing single cues, 6-18
merge, 6-16
move or copy, 6-16
properties, 6-21
cue properties, 6-21
cuelist
adding audio, 8-1
audio, 6-28
block step, 6-18
chases, 6-29
25‐2 Index date & time control, 9-6
default properties, 6-29
editing, 6-10
midi control, 19-36
moving around in, 6-11
moving events around, 6-43
navigator, 6-12
notes, 6-29
opening in the editor, 6-10
playback control window, 10-10
playback rate, 6-28
playing, 6-11
progress indicator, 6-41
properties, 6-26, 11-20
release timing, 6-28
selection handles, 6-43
serial control, 20-40
timecode, 6-28
timeline, 6-34
timeline and, 6-6, 6-10
updating during playback, 6-51
using commands within, 6-49
using timecode, 9-5
view as layout, 6-15
view as table, 6-14
view cue list, 6-13
cuelist defaults, 6-29
cuelist notes, 6-29
Cuelist pane, 10-11
cuelist tabs, 6-11
cuelists, 6-1
cues
adding audio, 8-1
alias, 6-17, 6-23
blocking, 6-23
cue layout view, 6-15
cue list view, 6-13
cue table view, 6-14
custom
gobo, 5-33
setting custom focus & frame
values, 5-35
setting custom values, 5-32
custom values
about, 5-36
customising
control panel, 13-1
Vista User Guide, Version 2 Index D
Date & Time, 9-6
date and time, 13-6
DBO, 11-3
default times, 6-30
delete
cue, 6-15
deleting
fixtures, 4-6
shows, 2-6
desk lights, 2-1
detailed panels, 5-27
disconnecting
an interface box, 4-16
displays
setting up, 13-3
DMXinterface
configuring, 4-15
dousing a fixture, 3-11, 4-12
duplicating
layout views, 5-7
E
edit
cuelist, 6-10
Edit menu, 14-8
editing
in the Playback control window,
10-15
editor status bar, 6-40
effect
applying, 5-51
effects, 5-51, 7-12, 7-13
applying template effects, 5-51, 7-1
controlling, 7-4
list of, 7-3
modifying template effects, 7-3
rate control, 7-4
reviewing, 7-2
saving, 7-13
stopping, 6-47
types, 7-1
using, 7-1
effects window
advanced tab, 7-10
feature tab, 7-5
sequence tab, 7-8
Vista User Guide, Version 2 General Specifications Ethernet-DMX interface
changing settings of, 5-2
configuring, 4-15
connecting, 4-16
disconnecting, 4-16
setting the port, 4-16
event bars, 6-34
about, 6-42
events
aligning start and end points, 6-45
changed, 6-42
fade curve, 6-45
muting, 6-47
release, 6-47
release events, 6-47
reset to default time, 6-45
selection handles, 6-43
snap, 6-42
un-tracking, 6-47
expanding playbacks, 11-15
exporting shows, 2-5
external displays, 2-1
extracts
applying extracts, 5-52, 6-48
creating and applying extracts, 648
creating extracts, 5-52, 6-48
F
fade curve, setting, 6-45
feature
summarise by, 6-35
filters
choosing, 6-36
creating custom filters, 6-36
managing saved, 6-38
one click, 6-39
fine mode, 5-23, 11-7
Fixture, 4-7
Fixture editor, 21-43
Fixture files
editing, 21-43
Fixture Id, 4-8
Fixture Name, 4-7
fixture sort order, 5-18
Fixture Type, 4-7
fixtures
adding to groups, 5-45
25‐3 General Specifications adding to the patch panel, 4-2
arranging fixtures in a layout, 5-2
checking that your fixtures are
working, 5-21
choosing, 4-2
cloning, 4-12
controlling, 4-11
deleting, 4-6
dousing, 3-11, 4-12
Fixtures screen, 5-1
hiding and ‘unhiding’ fixtures, 54, 5-5
import patch from CSV, 4-13
patching, 4-1
properties, 4-7
rearranging on the patch panel, 45
renaming, 4-6
renumbering, 4-6
resetting, 3-11, 4-12
selecting, 5-13, 12-3
sort order, 5-14
sorting, 5-13
striking, 3-11, 4-11
summarise by, 6-36
focus, 5-26
frost, 5-26
FTP, 15-22
connecting via, 15-22
function keys
assigning, 11-3
G
gels
manufacturer, 5-24, 5-31
generic fixture model, 2-2
gobo
setting, 5-25, 5-32
Grand Master, 11-3
groups
adding fixtures to, 5-45
creating, 5-46
H
hardware
programmer controls, 5-55
Help menu, 14-18
hiding
25‐4 Index fixtures, 5-4, 5-5
highlight, 5-21
preset, 5-49
HSV, 5-23, 5-30
hue, 5-23, 5-30
I
importing shows, 2-5
input devices
setting up, 13-3
inputs & outputs, 24-85
installation, 24-85
intensity
setting, 5-22
setting in detail, 5-27
interface, 3-1
Invert pan, 4-8
Invert tilt, 4-8
IP Address, 13-4, 13-5
IP Gateway, 13-6
IP Net mask, 13-5
iris, 5-26
J
jump
using the keyboard, 11-10
K
keypad
in the programmer, 5-53
L
layout
adding notes, 5-10
arranging fixtures in, 5-2
different views, 5-3
layout view
activating, 5-7
arranging, 5-7
duplicating, 5-7
layout window
adding notes to, 5-10
arranging fixtures, 5-11
grid, 5-11
layouts
managing views, 5-3
Vista User Guide, Version 2 Index options, 5-6
organising, 5-7
properties, 5-5
LCDs
screensaver, 13-4
Learn Timing, 8-2
Lee swatchbook, 5-24
Limit, 4-8
list view, 4-10, 4-11
Live Time Window, 5-49
loading
existing shows, 2-4
logs, 22-70
lowlight, 5-21
preset, 5-49
M
manufacturer
gels, 5-24, 5-31
matrix
placing fixtures, 5-12
menu
Chooser menu, 14-14
Console menu, 14-13
Edit menu, 14-8
Help menu, 14-18
Patch menu, 14-12
Session menu, 14-7
Step menu, 14-9
Timeline menu, 14-15
Tools menu, 14-10
View menu, 14-16
menu bar, 3-1
menu reference, 14-7
merge
cue, 6-16
midi control, 19-36
midi show control, 19-37
modifier keys, 11-4
monitoring active cuelists, 10-10
move or copy cues, 6-16
moving
events around, 6-43
fixtures around the patch panel, 45
msc, 19-37
muting
Vista User Guide, Version 2 General Specifications events, 6-47
N
names
renaming fixtures, 4-6
navigating, 3-1
network
preferences, 13-5
notes
adding to the layout window, 5-10
O
Offset, 4-9
output view tabs
adding, 12-1
output window, 12-1
configuring, 12-2
outputs & inputs, 24-85
P
Page controls, 11-13
pages, 11-23
palettes
common features of the palettes,
5-20
summary & detailed views, 5-19
tabs, 5-19
parameters
fine mode, 5-23, 11-7
Park, 4-12, 14-13
password-protecting shows, 2-7
paste options, 6-17
patch
importing a CSV file to, 4-13
viewing in different ways, 4-10
Patch menu, 14-12
patch panel
adding the fixture to the patch
panel, 4-2
moving fixtures around, 4-5
rearranging fixtures on, 4-5
patch window
toolbar, 3-10
patching
adding fixtures to the patch panel,
4-2
adding fixtures to the rig, 4-1
25‐5 General Specifications complete fixture list, 4-2
patching your rig, 4-1
pen, 23-75
calibrating, 13-2
playback
assigning components to controls,
11-14
popup menu, 11-19
status indication, 11-18
playback buttons
assigning functions, 11-16
group masters, 11-20
Playback Control Window, 9-5, 1010
Playback rate %, 6-25, 6-28, 6-29
playbacks
expanding, 11-15
standard and split modes, 11-15
with faders, 11-12
without faders, 11-13
position
setting, 5-22
setting in detail, 5-28
power, 2-1, 2-2, 24-84
preferences
general, 13-1
network, 13-5
Preheat, 4-8
presets
availability, 5-45
presets
labels, 5-45
presets
about, 5-47
presets
creating, 5-47
presets
updating, 5-49
presets
highlight and lowlight, 5-49
presets, updating, 6-51
Priority, 6-25, 6-26, 6-29, 19-38
prism, 5-26
programmer hardware controls, 5-55
programmer, using the keypad, 5-53
progress indicator, 6-41
properties
25‐6 Index cue, 6-21
cuelist, 6-26
fixtures, 4-7
layouts, 5-5
setting cuelist properties, 11-20
Q
quickpicker
arranging, 5-40, 5-43
multi, 5-41
popup menu, 5-42
R
raw
setting raw intensity and position
values, 5-27, 5-28
remote control, 18-33
renaming
fixtures, 4-6
renumbering
fixtures, 4-6
rest
fixtures, 3-11, 4-12
reviewing effects, 7-2
RGB, 5-23
right-click
using the LR button, 11-4
rotation, 5-25, 5-32
S
saturation, 5-23, 5-30
save
filters, 6-38
saving
copies of shows, 2-5
effects, 7-13
password-protecting, 2-7
shows, 2-4
timing configurations, 6-32
screensaver, 13-4
selecting fixtures, 5-13
selection
display order, 5-14
selection handles, 6-43
selection order, 5-14
selection tools, 5-13
serial control, 20-40
Vista User Guide, Version 2 Index service & maintenance, 24-84
Session menu, 14-7
set timing window, using, 6-44
setting
beam, 5-26
colour, 5-23
gobo, 5-25
position, 5-22
setting cuelist properties, 11-20
setting up, 2-1
settings
console, 13-1
control panel, 13-1
Shift, 3-4
show
creating a show, 2-4
deleting, 2-6
exporting shows (backing up), 2-5
importing shows, 2-5
loading existing shows, 2-4
password-protecting, 2-7
saving, 2-4
saving copies of, 2-5
shutdown, 24-85
sidebar, 3-9, 5-18
components tab, 5-38
configuring, 3-9
slider
intensity values, 5-22
setting intensity values in detail,
5-27
smartfx
event mode, 6-24, 6-25
SmartFX, 5-51, 7-1
snapshots, 11-23
soft buttons, 3-2
software updates, 15-19, 16-24
sorting
fixtures, 5-13, 5-14
specifications, 24-85
split modes, 11-15
standard mode, 11-15
status
editor, 6-40
Step menu, 14-9
Step pane, 10-12
stopping
Vista User Guide, Version 2 General Specifications effects, 6-47
store
selecting a cue and store options,
6-8
selecting a cuelist, 6-7
store all, 6-2
store part, 6-6
storing
modulating effects, 5-52
swinging effects, 5-52
striking a fixture, 3-11, 4-11
summary
by feature, 6-35
by fixture type, 6-36
summary views, 6-35
Swap pan/tilt, 4-8
swing
making an effect swing, 7-13
swing effects, 7-7
switching on, 2-2
Symmetrical, 4-9
T
table view, 4-10
technical information, 24-84
template effect
applying, 7-1
modifying, 7-3
the multi quickpicker, 5-41
time and date, 13-6
timecode, 6-22, 6-28, 9-5
adjusting cues to, 8-3
timeline
about, 6-6, 6-10, 6-34
adding events to, 6-41
aligning start and end points, 6-45
cuelist tabs, 6-11
default times, 6-30
event bars, 6-34
fade curve, 6-45
moving events around, 6-43
reset event time, 6-45
zooming in and out, 5-2, 21-52, 2156, 21-57, 21-58
Timeline menu, 14-15
timeline window, 6-10
timing
25‐7 General Specifications applying, 6-33
making precise adjustments, 6-44
using the set timing window, 6-44
Timing
Learn, 8-2
timing configurations
saving, 6-32
toolbar reference, 14-7
toolbars, 3-10
chooser and timeline windows, 311
main, 3-1
patch window, 3-10
Tools menu, 14-10
touchpad, 23-75
track
untracking events, 6-47
tracking backup, 17-27
transformers, 4-8
U
universes
changing, 4-5
update software, 15-19, 16-24
updating
presets, 5-49, 6-51
USB
booting from, 16-24
25‐8 Index USB interfaces, 4-16
using effects, 7-1
V
view
summary, 6-35
the rig, 4-10
using different views, 5-3
View menu, 14-16
viewing
patch in different ways, 4-10
views
list view, 4-10, 4-11
table view, 4-10
vnc, 18-33
W
window basics, 3-1
windows
chooser, 5-1
navigating, 3-1
Z
zoom, 5-26
zoom in and out, 6-39
zooming in and out, 5-2, 21-52, 2156, 21-57, 21-58
Vista User Guide, Version 2