1
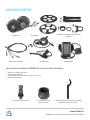
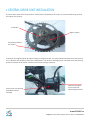
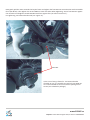
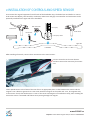
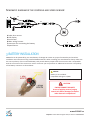
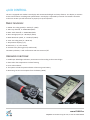
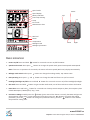
INSTALLATION MANUAL
Mid-Drive Electric Bicycle Kit
EVBIKE-SET-CMS-48
EVBIKE-SET-CMS-36
Thank you for purchasing EVBIKE product and we hope that you will become a happy user.
Carefully read the entire manual prior to installation and first use!
If you find any fact in the manual that would prevent you from using our product, please contact your reseller for
further discussion and keep the original packaging. The reseller will advise you how to proceed properly.
CAUTION
EVBIKE SET IS SOLD AS THE CONVERSION KIT. SAFETY AND COMPLIANCE WITH LEGISLATIVE
REQUIREMENTS OF THE FINAL PRODUCT IS FULLY GUARANTEED BY THE OPERATOR OF A BIKE
OR WHOEVER BUILT AND THAN SOLD THE CONVERSED BIKE. WE RECOMMEND THAT YOU
ENTRUST CONVERSION OF THE BIKE TO AN AUTHORIZED SERVICE CENTER.
PLEASE READ CAREFULLY THIS INSTALLATION MANUAL BEFORE YOU WILL START EVBIKE
CONVERSION.
Note: This user manual was translated from the Czech original.
www.EVBIKE.cz
Importer: Global World Logistic Ltd.,EU-VAT ID: CZ682998344
TABLE OF CONTENTS
1. Central motor installation
2. Installation of LCD display, left brake, accelerator and wheel speed sensor.
3. Battery installation
4. Display control
5. Diagnostic of malfunctions and service
SPECIFICATIONS
EVBIKE-SET-CMS-48
EVBIKE-SET-CMS-36
Motor power:
750W
250W
Motor torque:
steady 70, top 100 Nm
steady 50, top 80 Nm
Designed for battery voltage:
48 V
36 V
Motor weight:
3,8 kg
3,7 kg
Water-Dust protection:
IP65
IP65
Operating temperature range:
-25°C ~ 55°C
-25°C ~ 55°C
Maximum speed:
25 km/h (limiter turned ON)
25 km/h (limiter turned ON)
Driving range:
40 - 80 km*
50 - 100 km*
*depending on pedalling intensity, nature of the terrain and used battery type
www.EVBIKE.cz
Importer: Global World Logistic Ltd.,EU-VAT ID: CZ682998344
PACKAGE CONTENT
Motor unit
Main wiring harness
Chainet and cranks including small
fasteners
Accelerator
LCD display
2x Brake lever
For succesful assembly of EVBIKE, you will also need following:
— ribbons for cables fastening
— screws, nuts, washers
— special bottom bracket tools (see pictures a, b, c)
— basic technical skills
a - Compact Crank Puller
b - Cassette Lockring
Remover Tool
c - bottom bracket tool for easy assembly
of bottom bracket lock rings
www.EVBIKE.cz
Importer: Global World Logistic Ltd.,EU-VAT ID: CZ682998344
1 CENTRAL DRIVE UNIT INSTALLATION
1) Fasten chain wheel onto the main drive. Chain wheel is fastened on the motor, so that the teeth facing toward
the engine (see picture).
5x M5 Nut.
Higher surface.
Teeth facing toward
the engine.
2) Remove the original bottom bracket including cartridge and cups. Use special bottom bracket tools (see pictures
1 a, b). Remove the derailleur, if the bike is fitted with it. The interior thoroughly clean and make sure that nothing
prevents insertion of the motor. Cassette of the motor must go slip freely.
Insert motor into the hole
for bottom bracket
cartridge.
Chain wheel will be
on the right side
(the driving direction)
www.EVBIKE.cz
Importer: Global World Logistic Ltd.,EU-VAT ID: CZ682998344
In the case of using a frame for the bottom bracket of width 73 mm, you
must fill space between the engine and fixing washer using a ring or nuts
(not included in package).
5 mm
OK
WASHER NEEDED
68 mm
75 mm
The surface with teeth of fixing plate towards inside, then fix the plate on drive unit with 2pcs M6 Nuts.
Fixing plate with teeth.
2x M6 Nut.
Teeth of the fixing plate must face
towards the bicycle frame!
www.EVBIKE.cz
Importer: Global World Logistic Ltd.,EU-VAT ID: CZ682998344
Now gently pull the motor towards the bicycle frame and tighten the first M33 nut onto axle tube with reasonable
force (30-40 Nm). Then tighten the second M33 nut onto axle tube. When tightening, secure first M33 nut against
the movement and tighten second M33 Nut with force against first (so called "contra nut") .
For tightening, use bottom bracket tool (see. Figure 1c).
M33 Nut.
In the case of using a frame for the bottom bracket
of width 73 mm, it is possible to install only one M33 nut.
It is recommended to secure nut with a special glue for
screws (not included in package).
www.EVBIKE.cz
Importer: Global World Logistic Ltd.,EU-VAT ID: CZ682998344
Now place the left and right crank (watch the label L and R) and tighten M8 crews with reasonable force (about
35-40 Nm). After tightening, install pedals (watch out for right and left-hand thread).
M8 Nut.
Left Crank.
Right Crank.
M8 Nut.
www.EVBIKE.cz
Importer: Global World Logistic Ltd.,EU-VAT ID: CZ682998344
2 INSTALLATION OF CONTROLS AND SPEED SENSOR
First remove the original equipment from left side of the handlebar. Grip, the brake lever and shifter. In reverse
order mount LCD display, LCD controller, accelerator, brake lever and grip. LCD controller and accelerator can be
optionally installed on the right side of the handlebar.
LCD controller
LCD display
brake lever
brake lever
accelerator
LCD display holder
grip
right side
handlebar
After installing all controls, connect their connectors to the main harness.
Connect controlers to the main harness
and then connect the connector from motor
unit.
Fasten Speed Sensor to the frame of the rear fork in an appropriate place so that between the sensor and the
magnet is not a distance greater than 5 mm. Now install the magnet on the spoke and set it, his magnetic side,
to the sensor. Check, that the distance is 5 mm. If the sensor and magnet are installed correctly, when rotating the
LED on the sensor is activated and flashes when passing through the magnet.
www.EVBIKE.cz
Importer: Global World Logistic Ltd.,EU-VAT ID: CZ682998344
NOTICE
The manufacturer reserves the right
to change shape and appearance of the
sensor. Its functionality will not be
affected. Therefore, the appearance may
differ from those illustrated in this
manual this is not a defect of the product.
Fasten or underlay and make sure, that distance between the magnet
and the sensor is not greater than 5 mm.
Sensor connector connect with output
from the motor unit.
www.EVBIKE.cz
Importer: Global World Logistic Ltd.,EU-VAT ID: CZ682998344
Schematic diagram of the controls and speed sensor:
A
B
E
D
C
A brake lever sensor
B LCD display
C Accelerator
D Main wiring harness
E connector for connecting the battery
F Speed Sensor
F
3 BATTERY INSTALLATION
EVBIKE kit can be powered by your own battery of voltage 24 or 36V. For proper functionality and seamless
installation we recommend using certified EVBIKE batteries. When installing your own batteries always make sure
the correct polarity of the connected battery and provide battery output with the connector that is compatible
with the connector of the motor unit. Such a connector you can purchase as additional accessories. The polarity
of the battery connector is shown below.
NOTICE
Battery is not included.
Compatible voltage is 24/36V.
CAUTION
ENSURE CORRECT POLARITY
In case of polarity reversal, engine
control unit will be damaged, as well as
other electronic components!
www.EVBIKE.cz
Importer: Global World Logistic Ltd.,EU-VAT ID: CZ682998344
4 LCD CONTROLL
The set is equipped with modern LCD display with automatic backlight and many features. The display is resistant
to dust and moisture according IP65 specifications. LCD display is operated by external five buttons controller.
In the next section you will learn how to properly set up and operate.
Basic funcions:
1. SPEED: The riding speed (0 – 99 km/h – MPH).
2. TRIP: Trip distance(0 – 99999.9Km/Mile).
3. ODO: Total distance(0 – 99999.9Km/Mile.
4. AVG: Average speed, 0 – 99.9Km/h (MPH).
5. MAX: Maximum speed , 0 – 99.9Km/h (MPH).
6. Time: The riding time (0 – 99:59:59).
7. Temperature display (°C/F).
8. PAS Level, 0 – 3, 0 for neutral.
9. Assistance for pushing (6 km/h walk mode).
10. Battery indicator; it will not fluctuate with the motor on/off.
Advanced functions:
1. Headlamps & backlight indication, automatic work according to the external light.
2. Show when the temperature is below freezing.
3. Error code indicator.
4. The option to hide the power indicator when using own battery.
5. Measuring current consumption from the battery (Watt).
www.EVBIKE.cz
Importer: Global World Logistic Ltd.,EU-VAT ID: CZ682998344
Speed mode
Speed display
Battery indicator
Low temp warning
Lamp
Error code
Maintenance alert
Power
Left
Up
PAS level
Power
Temperature
Mileage mode
Mileage information
Down
Right
Basic operation:
1. Power On/Off: Press and hold
button for 2 seconds can turn on/off the Meter.
2. Speed mode switch: Short press
button can change the speed mode, Speed->AVG Speed->MAX Speed.
Note: If there is no operation for 5 seconds, the meter will return Speed (Real-Time) display automatically.
3. Mileage mode switch: Short press
button can change the mileage mode, Trip->ODO->Time.
4. PAS operating: Short press
button can change the PAS level from 0 to 3, 0 for neutral.
and
5. Headlight/backlight On/Off: Press and hold
6. 6km walk: Press and hold
button for 2 seconds can turn on/off the headlight/backlight.
button can get into 6km walk mode, out of the mode when release the button.
7. Data clean: Press and hold
button for 2 seconds can cleanup several temporary data, the temporary data
include AVG Speed / MAX Speed / Trip / Time.
8. Parameter settings: Double press the
button (press interval less than 0.3 second), the Meter will get into
the parameter setting state, current parameter flash. Short press the
buttons can switch the setting
parameter, press the
buttons can change the parameter values, press the
button to save and exit
the parameter setting state.
www.EVBIKE.cz
Importer: Global World Logistic Ltd.,EU-VAT ID: CZ682998344
Warning: don't change the following parameters if you are not sure
• The location of speed display symbol Wd, this is the wheel diameter, wrong wheel diameter will cause
speed abnormal.
• The location of speed display symbol bU0, this represent the battery parameter, wrong parameter can
cause battery indication abnormal.
a. Set Kilometer / Mile speed units.
b. Set °C / °F temperature units.
c. Light sensitive (bL0): 0 indicate automatic headlight/backlight OFF, 15 indicate automatic
headlight/backlight ON. 1 indicates the brightest on (auto turn on the backlight at bright environment),
5 indicates the darkest on (auto turn on the backlight at dark environment).
d. Backlight brightness (bL1): Press
button display symbol 1–5 to change the brightness of the backlight.
e. Buzzer(bEP): 0 indicates buzzer off, 1 indicates buzzer on.
f. Auto off delay time (OFf): Press the
delay time (minutes), default value is 5.
button display symbol 1 – 9, represent automatically shutdown
g. Power display (Pod): 0/1, represent whether to show the power indicate on LCD.
h. Maintain reminder (nnA): 0 represent maintain reminding off, 1 represent maintain reminding on.
We recommend leaving the value 0.
i. Wheel diameter (Wd): You can change this parameters as follows, 16/18/20/22/24/26/700C/28/29.
This is represent the wheel diameter, in units of inches. Wrong value will cause incorrect speed measuring!
j. Battery parameter (bU0): Press the
button can change this parameters as follows,
24/36/UbE. This is represent the Battery rated voltage, UbE means user define voltage. Selecting UbE value
affects disconnecting the battery when the voltage drops. Value UbE disables this protection. Incorrect
setting can damage the battery!
k. Setting the speed limit: This setting is for security reasons under the code password. On the screen
labeled (PSd) input the key code "1919". When you enter is automatically displayed menu
labeled (SPL). On this screen set value in the range of 10 - 99 km/h. For legal operation on roads, the bike
motor is disconected after reaching a speed of 25 km/h. So please never set higher value if the bike has
to be operated in accordance with the legislation. Owner of the bike is responsible for proper operation.
On the contrary, for safety reasons, it is possible, for example, set children limit reduced to 10 km/h.
www.EVBIKE.cz
Importer: Global World Logistic Ltd.,EU-VAT ID: CZ682998344
5 ERROR DIAGNOSTICS - TROUBLE SHOOTING
Error Code
Error description
Handle
1
Communication Error
Check cable connection
2
Controller protection
Check three-phase power line. If the problem persists,
consult your dealer, it is a defect in the motor.
3
Three-phase power error
Check three-phase power line connection. If the problem
persists, consult your dealer, it is a defect in the motor.
4
Battery low
Charge the battery. If the problem persists you must
check the battery.
5
Brake error
Release the brake lever or perform check
of the switch functionality.
6
Turn error
Then turn on and off the system again.
7
Speed Hall error
Speed Hall error. If the problem persists, consult your
dealer, it is a defect in the motor.
other
Reserved
6 USAGE
The product can be used in the rain, but should not be exposed to continuous contact with water. If you are driving
in the rain never disconnect connectors and do not use LCD controller. Don’t leave the main unit exposed to direct
sunlight when not riding the bike. Store the product in a dry place with a temperature of 15-25 °C.
Keep product clean. Don’t use thinner, alcohol or benzene. Wash with clean water using a damp cloth.
Do not concentrate on meter while riding. Safety first!
CAUTION
NEVER MANIPULATE THE CHAIN AND CHAINSET IF
BATTERY IS CONNECTED. RISK OF SERIOUSLY INJURY!
BEFORE HANDLING TURN OFF LCD DISPLAY, DISCONNECT
BATTERY AND REMOVE IT OUT OF THE HOLDER.
www.EVBIKE.cz
Importer: Global World Logistic Ltd.,EU-VAT ID: CZ682998344
7 MAINTENANCE
It might seem that the EVBIKE set is almost maintenance free. Main care will definetely require your battery.
Please check separate battery user manual for more infromation. In this manual you can find only basic guidelines
how to use lithium batteries. If you follow this guidelines, you will ensure longer life of your battery.
The following principles apply to most types of lithium batteries.
Proper charging
Lithium cells which contain EVBIKE batteries can be recharged at any level of charge or discharge - these batteries
have no memory effect. We recommend always after the ride, to recharge the battery so you can immediately
enjoy full power and a long driving range. After recharge always unplug the battery from the charger.
Proper discharging
Recharge the battery to full capacity after the the first disconnection of protective controller. Never try to reuse
the battery after protective disconnection! Deep discharge of some cells and their unrepairable damage may
happen! Such battery usage may also cause unbalance of battery cells voltage and decrease their capacity.
In extreme cases, the battery can not be recharged again. This kind of damage can be easily diagnosed and will
result in avoiding your warranty.
Storage
If you do not use the bike for more than 1 hour, always disconnect the battery using its power switch. If you do not
use the bike for more than 24 hours, always remove the battery, recharge it and store in a safe dry place at room
temperature. Beware of short-circuit the battery terminals (contacts) when storing and handling. For long-term
storage, such as off-season, it is also necessary check battery every 14 days (using LEDs) and after 1 month
recharge the battery to its full capacity. If you do not perform this maintenance deep discharge of the battery cells
will occur. This irreparable battery damage is not covered by warranty.
BEFORE THE FIRST RIDE CHECK THE TIGHTNESS OF ALL BOLTS
AND FUNCTIONALITY OF ALL SYSTEMS INCLUDING WHEEL BRAKES.
Declarations of conformity
Global World Logistic Ltd., EU-VAT ID: CZ682998344, as an entity authorized by the producer for EU, thus proclaims
that the device conforms to basic requirements and any other relevant provisions of Decree-Law No 17/2003 Coll.,
as well as the device conforms to basic requirements and any other relevant provisions of Decree-Law No 176/2008
Coll., establishing technical requirements for machinery (MACHINERY DIRECTIVE 2006/42/EC, 2009/127/EC). This
statement is issued on the basis of documents presented by the producer.
www.EVBIKE.cz
Importer: Global World Logistic Ltd.,EU-VAT ID: CZ682998344