1
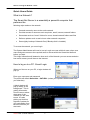
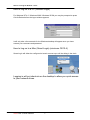
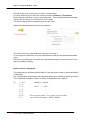
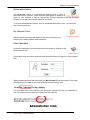
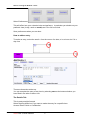
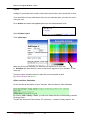
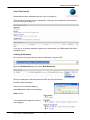
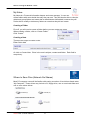
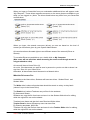
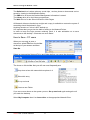
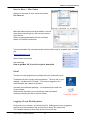
Section 2: Using the Network
Section 2
Using the Network-Users
Quick Users Guide
2-2
What is a Network?
How to Log on to a PC (Smart Login)
How to Log on to a PC (Domain Login)
How to Log on to a Mac (Smart Login)
The Intranet
Passwords
Multimedia Gallery
My Network Files
Web Calendars
Add entry
Layers
User Bookmarks
My Notes
Where to Save Files (Network Shares)
How to Save - PC users
How to Save - Mac users
Email
Logging off and Shutting Down
Smart-Net 2.1 User’s Manual
1
2.2
2.2
2.3
2.3
2.4
2.5
2.7
2.7
2.7
2.8
2.10
2.11
2.12
2.12
2.14
2.15
2.15
2.15
Section 2: Using the Network - Users
Quick Users Guide
What is a Network?
The Smart-Net Server is a essentially a powerful computer that
performs the
following major tasks on the network:
•
Controls access by users to the entire network
•
Provides access to resources such as printer, email, internet, network folders
•
Stores data such as “home” folders for users, shared network folders and files
•
Delivers updates such as anti-virus to other network computers
•
Does nightly backup of Network files (if Backup Unit is installed)
To access the network, you must Login.
The System Administrator will need to ‘set up’ each new user with their own unique user
name and grant access to the required areas or Drives within the Smart-Net Network
before you start.
This Login information will determine how much of the Network you can access and also
how much access you will have to the Internet.
How to log on to a PC -Smart Login
When you first turn on your PC, a login window will
pop up
Enter your username and password.
The profile will default Smart-Net – SATURN (unless your Systems Administrator tells
you otherwise)
A black window will
pop up briefly in the
background. This is
getting information
from the server about
what parts of the
network you are able
to see. It is also
picking up Antivirus
signature updates for
your workstation from
the server before you
start work.
Smart-Net 2.1 User’s Manual
2
Section 2: Using the Network
Smart-Net 2.1 User’s Manual
3
Section 2: Using the Network - Users
How to Log on to a PC (Domain Login)
For Windows NT 4.0 / Windows 2000 / Windows XP/98 you may be prompted to press
Ctrl-Alt-Delete before the logon window appears.
It will only take a few seconds for the Windows desktop will appear once you have
entered your username and password.
How to Log on to a Mac (Smart Login) (minimum OS10.4)
Smart Login will either be configured to launch on start up or will be sitting in the dock.
Logging in will put shortcuts on the desktop to allow you quick access
to your network drives.
Smart-Net 2.1 User’s Manual
4
Section 2: Using the Network
Intranet
Access the Intranet by clicking on your web browser.
Double click on the icon you normally use to access the internet. I.e. Internet Explorer or
Mozilla
An authentication window will pop up asking you for a username and password.
The default page when you go to the internet is either this one. (below) or your own
school intranet page
If there is no link to the Smart-Net Intranet page from your school Intranet, type
smart-html/ after the web address to bring you here.
ie.. intranet.myschool.nz/smart-html/
Smart-Net 2.1 User’s Manual
5
Section 2: Using the Network - Users
All icons in this area require only one click to activate them.
For more detail on any of the icons in this area refer to Section 3. The Intranet
Each Username will have it’s own unique password. This is important because it stops
anyone else accessing your Home drive or your email.
You should change this to something that only you know
Select the change password icon from the Intranet
You need to know your old password to be able to change it.
IF you forget your password, see your Administrator to have a new password allocated
to you.
Enter your new password, then type your new password again to ensure that you have
made no spelling mistakes
How to choose a password
The password you choose should be difficult. But that doesn’t mean it should be difficult
to remember.
Use a combination of lowercase and uppercase letters and numbers to make up a word.
Try to substitute numbers for letters to make your password more difficult.
Eg.
1 = i or l
3=E
4=A
5=S
6=G
7=L
8=B
0=o
D4ff0d1l = daffodil
5m1l3
= smile
There are many others. Try to make up a word using
some of these techniques. KEEP it hidden
Smart-Net 2.1 User’s Manual
6
Section 2: Using the Network
Multimedia Gallery
The Multimedia Gallery is a web-based catalogue that is used to
share documents, pictures, video clips and other types of media to all
users on your network. It has an easy-to-use intuitive interface much like Windows
Explorer to navigate through the hierarchy of folders.
To access the Multimedia Gallery, click on the Multimedia Gallery icon. All users can
view items stored here.
My Network Files
When remotely accessing the Network, this icon will allow you to
access your network shared folders and files.
Web Calendars
Access the calendars from the Smart-Net Home page by clicking on the
Web Calendar icon
If prompted, enter the same username and password that you logged on to the network
with.
When navigating around the calendars, the My Calendar link at the bottom of the page
will always get you back to your own calendar showing todays date.
For a first time user in the calendar area, set up the calendar the way you would like to
use it by clicking on the admin link underneath the calendar
Smart-Net 2.1 User’s Manual
7
Section 2: Using the Network - Users
Select Preferences
This will affect how your calendar looks and performs. In particular you should set your
preferred view (ie day, week or month) and 12 or 24 hour clock.
Save preferences when you are done.
How to add an entry
To make an entry, select the small + from the corner of a date, or in an hour slot if in a
day view
There are three tabs at the top.
You can complete the entry at any time by selecting save at the bottom whether you
have filled in the other 2 tabs or not.
The Details Tab
This is pretty straight forward.
Select the drop down box if you want to make the entry for a specific time.
Access: Either Public or Confidential.
Smart-Net 2.1 User’s Manual
8
Section 2: Using the Network
A confidential entry will not be viewable by any other user* looking at your calendar. It
will show as time blocked out but not specifically what for.
Participants Tab
Select any number of other users to have this entry show on their calendar as well.
Use the Ctrl or Apple key to select individual names.
By clicking on the select option, you can quickly add this event to the calendar of a
group of users
The Repeat Tab
If this event is to happen regularly, select a repeat type
from the drop down box.
Frequency 0 =don’t repeat. 1 = repeat every time. 2 =
repeat every 2nd time etc
If you select to repeat weekly, you must enter a repeat
day.
Eg. This will repeat fortnightly on a Wednesday ‘til the end of the school year.
Smart-Net 2.1 User’s Manual
9
Section 2: Using the Network - Users
Layers
Holidays is a calendar that contains information that all other users would like to have.
If you would like to have these dates show on your calendar then you need to Layer it
over your own.
Go to Admin and select the Layers option from the Administrative tools.
Select Enable Layers
Then add a layer.
Make the source the calendar you want to have layered on to your own
ie. Holidays and then select a colour for the text to appear on your calendar. In this
case red.
There are other calendars that you make like to have layered as well.
Eg. School Events and Sports
Other non-User Calendars
On the tool bar at the bottom of your calendar, there are links to other calendars.
By clicking Hall / Library / Pool you will have instant access to the booking calendar
for these areas.
The ICT link shows all of the schools ICT resources – cameras, Data projector etc..
Smart-Net 2.1 User’s Manual
10
Section 2: Using the Network
User Bookmarks
Bookmarks are web addresses that you wish to go back to.
They are like Favourites on your workstation, only they are not specific to the machine
you are currently working on.
If you log on to another machine anywhere on the network, your Bookmarks will still be
available to you.
Creating a Bookmark
Once you are on a page that you want to bookmark, copy the URL
Open the Bookmarks page and select New Bookmark
Give your bookmark a title and paste the URL into the URL section.
Provide a brief description.
If there is not a suitable category,
select New and create a new category .
Add to finish.
Your bookmark will appear under the
new category.
Smart-Net 2.1 User’s Manual
11
Section 2: Using the Network - Users
My Notes
My Notes is a ‘Personal information keeper and notes manager’. A user can
create folders with notes inside that only they can see. They will also be able to view the
global and group folders and notes that an administrator has added, however they will
not be able to modify or delete any folders or notes that they did not create.
Creating a Folder
First off, you will need to create a folder before you can create any notes.
When creating a folder, click on ‘Create Folder’.
Click ‘Create’.
Creating a Note
There are two ways to create a note:
Either Quick Add
Or click on Create Note. Enter in the note’s subject, content and folder. Each field is
compulsory.
Where to Save Files (Network file Shares)
Most PC computer users will be familiar with seeing a number of local drives listed under
“My Computer”. These drives may include a 3½ floppy drive, one or more hard disks and
one or more cdrom drives.
Smart-Net 2.1 User’s Manual
12
Section 2: Using the Network
When you logon to Smart-Net from your workstation additional drives will appear under
“My Computer”. These drives represent resources on the server that are available to you
while you are logged on. (Note: The drives listed below may differ from your Smart-Net
configuration.)
When you logon, the network resources (drives) you see are based on the level of
access you have been given by your System Administrator.
All users have been allocated rights to see different areas of the network (Drives or
Shares).
To see what Drives are available to you, double click on My Computer
(Mac users will see all drives when accessing the server even though access is
only permitted to a few)
All users will have a Home Drive (H).
As a rule, if the document you want to save is personal or you do not wish to share it at
any time, Save it in your Home Drive.
Otherwise, all documents should be saved to a Network drive.
What the Drives are For:
In addition to the Home drive, Students will have two drives: Student Read and
Student Write.
The Write drive is where all student data should be stored on a day–to–day basis
(unless it is put in the Home Drive)
The Read drive is where Teachers can put files for the students.
Eg Homework Sheets
Students can copy the file from here and save it to the Student Write drive for editing,
while the original file can not be altered.
Teachers have these and also their own Read and Write drives.
Teacher Read is where Officegroup users can save files.
Eg Planning templates, NAGs etc.
Teachers can copy the file from here and save it to the Teacher Write drive for editing,
while the original file can not be altered.
Smart-Net 2.1 User’s Manual
13
Section 2: Using the Network - Users
The Galleries drive is where pictures, sound clips , movies, photos or documents can be
saved for viewing in the Multimedia Gallery.
The SMS drive is where the Student Management information is stored.
The Library drive is for the Library programmes
The Web drive is for the School Intranet or Web Pages
All Network drives are backed up at night and a copy is available to restore the system if
something should be deleted in error.
Anything saved to a C drive is NOT backed up.
It is important that you get into the habit of saving to the Network Drives.
In order to keep the login process relatively quick, it is also advisable not to save
documents to the desktop – shortcuts are much better.
How to Save - PC users
When you are ready to save a
document, select File from the toolbar
at the top of your screen and then
Save As
Select an appropriate Network Drive and folder before you name the document.
The icons on this toolbar that you will use most frequently are:
Drop down a box with network drive options in it
Select this entry
Go up one level
Create a new Folder
If you are unsure where on the system you are, Go up one level again and again until
you reach the desktop.
Select My Computer then Your home drive or the appropriate Network Drive.
Smart-Net 2.1 User’s Manual
14
Section 2: Using the Network
How to Save – Mac Users
When you are ready to save a document select
File, Save As
All of the Network drives will be available in the left
hand panel even though you will not have access
to all of them.
Select an appropriate Network Drive and folder
before you name the document.
The documentation for connecting a Mac without Smart Login is available from our web
site
www.smartcom.co.nz
Select Smart Documents
and download
How to get Mac OS X (or 9) to Login to Smart-Net
Email
There are 2 email programmes included with your Smart-Net set up.
Thunderbird is the In-House email programme. The icon sits on your
desktop. It is Mac and PC friendly. You must be logged on to a
machine within the network to access it.
Overlook is the Webmail package. It is accessed by the mail icon
on the Intranet
Web mail will also allow you to access any new email when
remotely accessing the server (ie from home)
Logging off and Shutting down
At the end of your session, you should Log Off. Walking away from a logged on
machine may allow another user access to your Home drive and email.
The computer should be shut down at the end of each day.
Smart-Net 2.1 User’s Manual
15