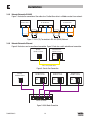
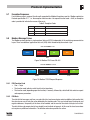
1
Modbus RTU & Modbus TCP/IP Communication
Communications Interface Reference Guide
About These Instructions
This documentation applies to Modbus RTU and Modbus TCP/IP communications for the PositionServo drive
and should be used in conjunction with the PositionServo User Manual (S94P01, S94PM01) that shipped with
the drive. These documents should be read in their entirety as they contain important technical data and
describe the installation and operation of the drive and the applicable option module.
Copyright ©2005 by Lenze AC Tech Corporation.
All rights reserved. No part of this manual may be reproduced or transmitted in any form without written
permission from Lenze AC Tech Corporation. The information and technical data in this manual are subject to
change without notice. Lenze AC Tech Corporation makes no warranty of any kind with respect to this material,
including, but not limited to, the implied warranties of its merchantability and fitness for a given purpose. Lenze
AC Tech Corporation assumes no responsibility for any errors that may appear in this manual and makes no
commitment to update or to keep current the information in this manual.
MotionView®, PositionServo®, and all related indicia are trademarks of Lenze AG.
Modbus® is a registered trademark of ‘Schneider Automation’.
P94MOD01C
2
Contents
1
Safety Information........................................................................................................................ 5
1.1
Warnings, Cautions & Notes............................................................................................. 5
1.2
Reference Documents..................................................................................................... 6
2Introduction.................................................................................................................................. 7
2.1
Fieldbus Overview........................................................................................................... 7
2.2
EIA-485 Module............................................................................................................... 7
2.2.1Specification....................................................................................................... 7
2.2.2 Module Identification Label.................................................................................. 7
2.3
Ethernet Port................................................................................................................... 8
3Installation................................................................................................................................... 9
3.1
Mechanical Installation.................................................................................................... 9
3.2Connectors.................................................................................................................... 10
3.2.1 EIA-485 Module................................................................................................ 10
3.2.2 Ethernet Port..................................................................................................... 10
3.3
Electrical Installation...................................................................................................... 11
3.3.1 Cable Types...................................................................................................... 11
3.3.2 Network Limitations: EIA-485............................................................................ 11
3.3.3 Network Limitations: Ethernet........................................................................... 11
3.3.4 Connections and Shielding: EIA-485.................................................................. 12
3.3.5 Connections and Shielding: Ethernet................................................................. 13
3.3.6 Network Termination: EIA-485.......................................................................... 13
3.3.7 Network Termination: Ethernet.......................................................................... 13
3.3.8 Network Schematic: EIA-485............................................................................. 14
3.3.9 Network Schematic: Ethernet............................................................................ 14
4Commissioning.......................................................................................................................... 15
4.1Overview....................................................................................................................... 15
4.2
Configuring the Network Master/Client........................................................................... 15
4.3
Configuring the PositionServo Slave/Server.................................................................... 17
4.3.1Connecting........................................................................................................ 17
4.3.2 Connect to the Drive with MotionView OnBoard................................................. 17
4.3.3 Modbus RTU Slave Node Settings...................................................................... 18
4.3.4 Modbus TCP/IP Server Node Settings................................................................ 19
4.3.5Re-Initializing.................................................................................................... 21
4.3.6 Non-Communication Based Parameter Settings................................................ 21
4.4
Drive Monitoring............................................................................................................ 22
3
P94MOD01C
Contents
5
4.5
Controlling the Drive...................................................................................................... 22
4.6
Changing Drive Parameters........................................................................................... 22
4.7
EIA-485 (RS485) Parameters......................................................................................... 22
4.8
Ethernet Parameters...................................................................................................... 23
4.9
Negative Number Transmission..................................................................................... 23
Modbus Implementation............................................................................................................. 24
5.1
Supported Function Codes............................................................................................. 24
5.2
Data Format, Size and Memory Area.............................................................................. 24
5.3
Register Numbering....................................................................................................... 25
5.4
Endian Format............................................................................................................... 26
5.5
Registers Access........................................................................................................... 26
5.5.1 Register Reading............................................................................................... 26
5.5.2 Register Writing................................................................................................ 26
5.6
No Response Conditions................................................................................................ 26
5.7
Exception Responses..................................................................................................... 27
5.8
Modbus Message Frame................................................................................................ 27
5.8.1 PDU Function Code............................................................................................ 27
5.8.2 PDU Data.......................................................................................................... 27
5.8.3 ADU for Modbus RTU......................................................................................... 28
5.8.4 ADU for Modbus TCP......................................................................................... 28
6Reference.................................................................................................................................. 29
6.1
PID List with Modbus Values.......................................................................................... 29
P94MOD01C
4
Safety Information
1
Safety Information
1.1
Warnings, Cautions & Notes
General
Some parts of Lenze controllers (frequency inverters, servo inverters, DC controllers) can be live, with the
potential to cause attached motors to move or rotate. Some surfaces can be hot.
Non-authorized removal of the required cover, inappropriate use, and incorrect installation or operation creates
the risk of severe injury to personnel or damage to equipment.
All operations concerning transport, installation, and commissioning as well as maintenance must be carried
out by qualified, skilled personnel (IEC 364 and CENELEC HD 384 or DIN VDE 0100 and IEC report 664 or DIN
VDE 0110 and national regulations for the prevention of accidents must be observed).
According to this basic safety information, qualified skilled personnel are persons who are familiar with the
installation, assembly, commissioning, and operation of the product and who have the qualifications necessary
for their occupation.
Application as directed
Drive controllers are components which are designed for installation in electrical systems or machinery. They
are not to be used as appliances. They are intended exclusively for professional and commercial purposes
according to EN 61000-3-2. The documentation includes information on compliance with the EN 61000-3-2.
When installing the drive controllers in machines, commissioning (i.e. the starting of operation as directed)
is prohibited until it is proven that the machine complies with the regulations of the EC Directive 98/37/EC
(Machinery Directive); EN 60204 must be observed.
Commissioning (i.e. starting of operation as directed) is only allowed when there is compliance with the EMC
Directive (2004/108/EC).
The drive controllers meet the requirements of the Low Voltage Directive 2006/95/EC. The harmonised
standards of the series EN 50178/DIN VDE 0160 apply to the controllers.
The availability of controllers is restricted according to EN 61800-3. These products can cause radio
interference in residential areas.
Installation
Ensure proper handling and avoid excessive mechanical stress. Do not bend any components and do not
change any insulation distances during transport or handling. Do not touch any electronic components and
contacts.
Controllers contain electrostatically sensitive components, which can easily be damaged by inappropriate
handling. Do not damage or destroy any electrical components since this might endanger your health!
Electrical connection
When working on live drive controllers, applicable national regulations for the prevention of accidents (e.g. VBG
4) must be observed.
The electrical installation must be carried out according to the appropriate regulations (e.g. cable cross-sections,
fuses, PE connection). Additional information can be obtained from the national regulation documentation. In
the United States, electrical installation is regulated by the National Electric Code (nec) and NFPA 70 along with
state and local regulations.
5
P94MOD01C
Safety Information
The documentation contains information about installation in compliance with EMC (shielding, grounding, filters
and cables). These notes must also be observed for CE-marked controllers.
The manufacturer of the system or machine is responsible for compliance with the required limit values
demanded by EMC legislation.
Operation
Systems including controllers must be equipped with additional monitoring and protection devices according to
the corresponding standards (e.g. technical equipment, regulations for prevention of accidents, etc.). You are
allowed to adapt the controller to your application as described in the documentation.
DANGER!
• After the controller has been disconnected from the supply voltage, live components and power
connection must not be touched immediately, since capacitors could be charged. Wait at least 60
seconds before servicing the drive Observe all corresponding notes on the controller.
• Do not continuously cycle input power to the controller more than once every three minutes.
• Please close all protective covers and doors during operation.
WARNING!
Network control permits automatic operation of the inverter drive. The system design must incorporate
adequate protection to prevent personnel from accessing moving equipment while power is applied to
the drive system.
Table 1: Pictographs used in These Instructions:
Pictograph Signal Word
DANGER!
1.2
Meaning
Consequence if Ignored
Warning of Hazardous Electrical Reference to an imminent danger that may
Voltage.
result in death or serious personal injury if the
corresponding measures are not taken.
WARNING!
Impending or possible danger to Death or injury
personnel
STOP!
Possible damage to equipment
NOTE
Useful tip: If note is observed, it
will make using the drive easier
Damage to drive system or its surroundings
Reference Documents
• Modbus Application Protocol Specification V1.1
Refer to: http://www.modbus.org/tech.php
• Modbus Over Serial Line Specification & Implementation Guide V1.0.
Refer to: http://www.modbus.org
• PositionServo Programming Manual: PM94P01, PM94M01(MVOB)
Refer to: http://www.lenze-actech.com
NOTE:
The complete list of variables can be found in the PositionServo Programming Manual (PM94P01, PM94M01).
P94MOD01C
6
Introduction
2Introduction
The following information is provided to explain how the PositionServo drive operates on a Modbus network; it
is not intended to explain how Modbus itself works. Therefore, a working knowledge of Modbus is assumed,
as well as familiarity with the operation of the PositionServo drive.
2.1
Fieldbus Overview
Modbus is an internationally accepted asynchronous serial protocol designed for commercial and industrial
automation applications.
The Modbus RTU architecture is based upon a Master-Slave orientation in which the PositionServo drive is
always a slave node. While the Modbus RTU protocol does not specify the physical layer, the most commonly
used is 2-wire EIA-485 (RS485). The PositionServo requires the use of an EIA-485 option module (E94ZARS41)
to be able to connect to such a network and communicate via Modbus RTU.
Modbus TCP/IP uses an Ethernet physical layer and as such peer-to-peer and client-server communication
techniques are possible. However, the PositionServo drive is always a server (slave node).
2.2
EIA-485 Module
2.2.1Specification
• Supported baudrates: 115200bps, 57600bps, 38400bps,19200bps, 9600bps
• Parity modes supported: Even, Odd, None
• Stop bits supported: 2, 1.5, 1
• EIA-485, 2-wire (half duplex)
• Network impedance loading of 1 unit (EIA-485 specification stipulates max of 32 units per network segment)
2.2.2 Module Identification Label
Figure 1 illustrates the labels on the PositionServo EIA-485 (RS485) option module. The PositionServo EIA-485
module is identifiable by:
• One label affixed to the side of the module.
• The TYPE identifier in the center of the label: E94ZARS41
• The port (interface) identifier, P21, on the right hand side of the label.
C
B
TYPE: E94ZARS41BT
ID-NO: 123456789
039080825
E94ZARS41BT000XX1A10
A
Communications
RS485 Module
P21
Made in USA
ED
A: Fieldbus Protocol
B: Model Number
C: Lenze Order Number
D: Firmware Revision
E: Hardware Revision
Figure 1: PositionServo EIA-485 (RS485) Module Label
7
P94MOD01C
Introduction
2.3
Ethernet Port
• Supported baudrates: 100Mbps and 10Mbps
• Supports two simultaneous Modbus TCP/IP connections on port 502
• Complies with IEEE 802.3
• Standard screened RJ45 connector with integrated status LEDs
• On open connections with no activity for more then 75 seconds, the PositionServo Drive sends a TCP keepalive message every 75 seconds to check the connection status.
NOTE:
The PositionServo does not support auto negotiation/cross over. Therefore, unless the connecting
device supports auto negotiation/cross over, a crossover cable will be required for one-to-one
connection.
P94MOD01C
8
Installation
3Installation
Section 3.1 is only applicable to Modbus RTU communication with the EIA-485 (RS485) option module,
E94ZARS41. Modbus TCP/IP communication uses the P2 Ethernet port on the front of the PositionServo.
3.1
Mechanical Installation
1. Ensure that for reasons of safety, the AC supply, DC supply and +24VDC backup supply have been
disconnected before opening the option bay cover.
2. Remove the two COMM module screws that secure Option Bay 1. With a flat head screwdriver, lift the
Option Bay 1 cover plate and remove.
3. Fit the 20-pin header into the module before fitting the module into the drive.
4. Install the EIA-485 (RS485) COMM Module (E94ZARS41) in Option Bay 1.
5. Replace the two COMM module screws (max torque: 0.3Nm/3lb-in) to secure Option Bay 1 in place.
S921
Figure 2: Installation of EIA-485 (RS485) Communications Module
9
P94MOD01C
Installation
3.2Connectors
3.2.1 EIA-485 Module
Table 2 and Figure 3 illustrate the pinout of the PositionServo EIA-485 (RS485) Option Module E94ZARS41. The
3-pin connector provides 2-wire plus isolated ground connection to the network.
Table 2: EIA-485 (RS485) Interface Pin Designation
1
ICOM
Isolated Common
2
TxB (+)
Transmit B (+)
3
TxA (-)
Transmit A (-)
Connector
TXA
3
3
Description
2
TXB
1
ICOM
2
Name
1
Terminal
Figure 3: EIA-485 (RS485) Interface Pin Designation
3.2.2 Ethernet Port
Port P2 on the front of the PositionServo is an RJ45 Standard Ethernet connector that is used to communicate
with a host via Ethernet TCP/IP.
Table 3: P2 Pin Assignments (Communications)
Name
Function
RJ45 Connector
1
+ TX
Transmit Port (+) Data Terminal
P2
2
- TX
Transmit Port (-) Data Terminal
3
+ RX
Receive Port (+) Data Terminal
4
N.C.
5
N.C.
6
- RX
7
N.C.
8
N.C.
ETHERNET
Pin
1
8
Receive Port (-) Data Terminal
The status LEDs integrated in the RJ45 connector indicate link activity and baudrate. The green LED indicates
baudrate and blinks steadily when the drive is running at the network speed (10/100Mbps). The yellow LED
indicates link activity and flashes when the drive is communicating (transmitting/receiving) with the network.
P94MOD01C
10
Installation
3.3
Electrical Installation
3.3.1 Cable Types
Due to the high data rates used on Modbus networks it is paramount that correctly specified quality cable is
used. The use of low quality cable will result in excess signal attenuation and data loss.
For EIA-485 it is recommended to use a good quality shielded twisted pair cable with characteristic impedance
of 120W.
For Ethernet it is recommended that a minimum specification of CAT5e UTP cable (unscreened) is used.
However, for environments that high levels of electrical noise STP (screened) cable is recommended.
3.3.2 Network Limitations: EIA-485
There are several limiting factors that must be taken into consideration when designing a Modbus RTU network,
however, here is a simple checklist:
• Modbus RTU networks are limited to a maximum of 247 nodes.
• Only 32 nodes (based on each node having a load impedance of 1 unit) may be connected on a single
network segment. Certain Modbus EIA-485 masters may only be able to support a fewer number of nodes
(i.e., 8, 16). Refer to the documentation for the Modbus master in use.
• A network may be built up from one or more segments with the use of network repeaters.
• Maximum network segment length is 1200 meters for baudrates up to and including 19200bps. Certain
Modbus masters may be limited to shorter runs. Refer to the documentation for the Modbus master in use.
• Minimum of 1 meter of cable between nodes.
• Use fiber optic segments to:
• Extend networks beyond normal cable limitations.
• Overcome different ground potential problems.
• Overcome very high electromagnetic interference.
• EIA-485 is a linear daisy chain topology. Both ends of the network segment must be terminated by a 120W
±1% resistor.
3.3.3 Network Limitations: Ethernet
There are several limiting factors that must be taken into consideration when designing a Modbus TCP/IP
network, however, here is a simple checklist:
• Modbus TCP/IP networks are limited to a maximum of 255 nodes per subnet (based on a Class C addressing
system).
• Hubs are not recommended for general use as they contribute in creating network data collisions (ports on
a hub do not route data direct to other ports but instead all ports are open to receive data from every port)
and as such will cause additional delays in transmissions while the re-attempts are carried out.
• Switches are the recommended solution for connecting a multi-node network as they route network data
direct from port to port (collisions may occur during network start-up or when a device is connected and
the correct port routing is established) and therefore reduce the possibility of collisions.
• “Office grade” Ethernet equipment does not generally offer the same level of noise immunity or robustness
as “industrial grade” Ethernet equipment.
11
P94MOD01C
Installation
• Maximum cable length for UTP/STP CAT5e cable is typically 100m. For other categories consult the cable
data sheet.
• Use fiber optic segments to:
• Extend networks beyond normal cable limitations.
• Overcome different ground potential problems.
• Overcome very high electromagnetic interference.
• Spurs or T connections are not permitted on an Ethernet cable. To create additional connections an Ethernet
switch must be used.
• The use of wireless networking products for industrial applications is becoming more acceptable, but
extreme care must be taken during the design phase and consultation with an industrial wireless provider
is strongly recommended.
3.3.4 Connections and Shielding: EIA-485
To ensure good system noise immunity all network cables should be correctly grounded:
• Minimum recommendation of grounding is that the network cable is grounded once in every cubical.
• Ideally the network cable should be grounded on or as near to each drive as possible.
• For wiring of cable to the connector plug the unscreened cable cores should be kept as short as possible;
recommended maximum of 20mm.
20 mm
max
Connect to
cubical panel/
earth (PE) as
close to drive
as possible
Figure 4: EIA-485 Connection
P94MOD01C
12
Installation
3.3.5 Connections and Shielding: Ethernet
The use of pre-fabricated cables is recommended as this reduces the chances of connections mistakes and
poor quality connections.
If cable connections are assembled on site then it is strongly recommended that these cables are tested with
a suitable Ethernet cable tester
STP cables are the preferred solution as they provide a screen/shield surrounding the inner cores and have an
integrated screened surround on the RJ45 connector for quick and easy connection.
Figure 5: CAT5e STP Cable
Images ©2000-2009 Belkin International, Inc
3.3.6 Network Termination: EIA-485
In high speed (EIA-485) networks (typically 19.2kbps or higher) it is essential to install the specified termination
resistors, i.e. one at both ends of a network segment. Failure to do so will result in signals being reflected back
along the cable which will cause data corruption. A 120W 1% ¼W resistor should be fitted to both ends of a
network segment across the TxA and TxB lines.
120 Ω
¼W
Connect to
cubical panel/
earth (PE) as
close to drive
as possible
Figure 6: EIA-485 (RS485) Network Termination
3.3.7 Network Termination: Ethernet
Ethernet network cable termination is not required as it is integrated into the circuitry of each device’s RJ45
port.
13
P94MOD01C
Installation
3.3.8 Network Schematic: EIA-485
Figure 7 illustrates the connection of the cables for a PositionServo drive in a Modbus master/slave network.
PLC/PC
Modbus Master
TxA
TxB
PositionServo
RS-485 Module
PositionServo
RS-485 Module
ICOM
TxB
TxA
ICOM
Modbus Network
Modbus Network
Min 1m
Min 1m
TxB
TxA
120Ω
120Ω
Figure 7: 120W (1%) Termination in EIA-485 (RS485) Network
3.3.9 Network Schematic: Ethernet
Figure 8 illustrates a one-to-one ethernet connection. Figure 9 illustrates a multi node ethernet connection.
PositionServo
Modbus Server
PLC/PC
Modbus Client
P2
Cross over patch cable
Figure 8: One-to-One Connection
PLC/PC
Modbus Client
PositionServo
Modbus Server
P2
PositionServo
Modbus Server
P2
Ethernet Switch
Figure 9: Multi Node Connection
P94MOD01C
14
PositionServo
Modbus Server
P2
Commissioning
4Commissioning
4.1Overview
It is assumed that the user has familiarised themselves with how to set parameters using MotionView software.
Refer to the PositionServo with MVOB User Manual (S94PM01) for more details. The details that follow provide
a step-by-step guide to quickly and easily set-up a PositionServo drive to communicate on a Modbus network
4.2
Configuring the Network Master/Client
The method for configuring master/client devices differs greatly between manufacturers. Provided herein is
a very basic, generic guide to setting up a network master/client. Consult the master/client manufacturer for
configuration assistance if required.
1. Launch the Master/client configuration software.
2. Setup the Master/client Modbus port as required. Refer to Table 4.
Table 4: Modbus RTU and Modbus TCP/IP Settings
Modbus RTU Master settings
Node address
Baud rate
Data bits = 8 (for Modbus RTU)
Parity
Stop bits
Flow control
Modbus TCP Client settings
IP Address or DHCP enabled
Subnet mask set as required, i.e. 255.255.255.0
Gateway set as required
Service port = 502
Baud rate set as required, i.e. 100Mbps
3. Add generic Modbus slave/server node to the master/client
4. Set the slave/server node address.
5. Assign the Modbus slave/service registers as required.
NOTE:
In true Modbus, 3X and 4X Registers are numbered starting at 1. This is known as ‘one based’
addressing. However, when transmitted to a slave over the serial link, the actual address transmitted
is one less.
Some Modbus masters will allow for the first register number to be 0. This is known as ‘zero based’
addressing. If this is the case, the Modbus register numbers listed in this manual must be offset by
-1 to properly program a master using ‘zero-based’ addressing.
Refer to Section 6 for a list of the PositionServo Modbus registers.
15
P94MOD01C
Commissioning
Figure 10: Example Modbus Register Assignment
6. Repeat steps 3 to 5 for each required slave/server node
Figure 11: Example Modbus Master/Client Configuration
7. Save the configuration and download to the master/client
P94MOD01C
16
Commissioning
4.3
Configuring the PositionServo Slave/Server
4.3.1Connecting
With the drive power disconnected, install the EIA-485 (RS485) module and connect the network cable as
instructed in the preceeding sections. Ensure the drive Run/Enable terminal is disabled then apply the correct
voltage to the drive (refer to drive’s user manual for voltage supply details).
4.3.2 Connect to the Drive with MotionView OnBoard
Refer to the PositionServo User Manual, section 6.2 for full details on configuring and connecting a drive
via MotionView OnBoard (MVOB) software. Contained herein is a brief description of launching MVOB and
communicating with the drive.
1. Open the PC’s web browser. Enter the drive’s default IP address [192.168.124.120] in the browser’s
Address window.
2. The authentication screen may be displayed if the PC does not have Java RTE version 1.4 or higher. If so,
to remedy this situation, download the latest Java RTE from http://www.java.com.
3. When MotionView has finished installing, a Java icon entitled [MotionView OnBoard] will appear on your
desktop and the MVOB splash screen is displayed. Click [Run] to enter the MotionView program.
4. Once MotionView has launched, verify motor is safe to operate, click [YES, I have] then select [Connect]
from the Main toolbar (top left). The Connection dialog box will appear.
5. Select [Discover] to find the drive(s) on the network available for connection.
[Discover] may fail to find the drive’s IP address on a computer with both a wireless network card and
a wired network card (or a PC with more than one network connection). If this happens, try one of the
following remedies:
Disable the wireless network card and then use [Discover].
Type in the drive’s IP address manually at the box [IP Address].
Then click [Connect]
6. Highlight the drive (or drives) to be connected and click [Connect] in the dialog box.
Figure 12: Connection Box with Discovered Drive
In the lower left of the MotionView display, the Message WIndow will contain the connection status message.
The message “Successfully connected to drive B04402200450_192.168.124.120” indicates that the drive
B04402200450 with IP address 192.168.124.120 is connected.
17
P94MOD01C
Commissioning
4.3.3 Modbus RTU Slave Node Settings
If using the EIA-485 (RS485) module, open MotionView and click on the [Communication] folder. Then select the
[RS485] folder to set/change the RS485 parameters: Configuration, Baud Rate, Parity, Stop Bits and Address.
Figure 14: RS-485 Folder
Configuration: ‘Modbus slave’ = the modbus slave protocol is enabled on the RS485 port.
UPPP = the RS485 uses UPPP (Point-to-Point Protocol).
Baud Rate:
115200bps, 57600bps, 38400bps, 19200bps, 9600bps
Parity:
Even, Odd, None
Stop Bits:
2, 1.5, 1
Address:1-247
Each slave device in the Modbus network must have its own unique network address. The ‘Addr’ submenu on
the drive display and the front panel buttons can be used to set the Modbus network address.
The RS485 default configuration is: UPPP, 19200bps, No Parity, 2 Stop Bits and Address = 1.
TIP - Avoid using address 1. Most Modbus devices ship with a default address of 1. As duplicate addressing
on a Modbus network is not allowed, this can lead to conflicts when replacing and commissioning nodes. To
avoid this it is recommended that you do not set the slave address to 1.
Modbus RTU Folder - Modbus Reply Delay
Modbus Reply Delay is the delay introduced after receiving a Modbus request and before sending a reply. Note
that this delay will always be >= 3.5 characters as required by the Modbus specification. Some Modbus master
devices are slower to respond than others and an increase of the ‘Modbus reply delay’ value may be required
to successfully work with these devices.
P94MOD01C
18
Commissioning
Figure 15: Modbus RTU Folder
4.3.4 Modbus TCP/IP Server Node Settings
The IP address of the PositionServo drive is composed of four sub-octets that are separated by three dots.
Each sub-octet can be configured with a number between 1 and 254. As shipped from the factory the default
IP address of a drive is:
192.168.124.120.
There are two methods of changing the current IP address. An address can be assigned to the drive automatically
(dynamic IP address) when the drive is connected to a DHCP (Dynamic Host Configuration Protocol) enabled
server, or the drive can have an IP address assigned to it manually be the user (static IP address).
4.3.4.1 Obtaining the PositionServo’s Current Ethernet Settings
The current Ethernet setting and IP address of the PositionServo drive can be obtained from the drive display
and keypad. Press the recessed ‘mode’ button ( ) on the display and use the “UP” and “DOWN” buttons (p
q) to access parameters IP_1, IP_2, IP_3 and IP_4. Each of these parameters contain one sub-octet of the full
IP address, for example in the case of the drive default (factory set) address parameters:
IP_1 = 192
IP_2 = 168
IP_3 = 124
IP_4 = 120
By accessing these four parameters the full IP address on the drive can be obtained.
If parameters IP_1, IP_2, IP_3 and IP_4 all contain ‘----‘ rather than a numerical values it means that the drive
has DHCP enabled and the DHCP server is yet to assign the drive its dynamic IP address. As soon as an IP
address is assigned by the server the address assigned will be display by the drive in the above parameters.
See section on obtaining IP addresses through DHCP.
19
P94MOD01C
Commissioning
4.3.4.2 Configuring the IP Address Manually (Static Address)
When connecting directly from PositionServo drive to the PC without a DHCP server or when connecting to a
private network (where all devices have static IP addresses) the IP address of the PositionServo drive will need
to be assigned manually.
To assign the address manually, the drive must have its DHCP mode disabled. This can be done using the
drive keypad and display. Press the recessed ‘mode’ button ( ) on the display and use the “UP” and “DOWN”
buttons (p q) to access parameter ‘DHCP’. Check this parameter is set to a value of ‘0’. If the DHCP parameter
is set to ‘1’ then use the ‘mode’ ( ) and down (q) arrows to set to ‘0’ and then cycle power to the drive in
order for this change to take effect. When DHCP is disabled and power cycled to the drive, it will revert back to
its previous static IP address.
It is most common for the PositionServo drive IP address to be left at its default value (192.168.124.120) and
to configure the PC Ethernet port to communicate on this subnet. If more than one drive needs to be connected
to the PC at any one time then the IP_4 parameter can be accessed via the keypad and changed to provide a
unique IP address on the network for each drive. Note that IP_4 is the only octet that can be changed (IP_1, IP2,
and IP_3 are read-only) and that power must be cycled to the drive for any changes to take effect.
If the PositionServo drive(s) needs to be configured for a specific subnet with different values to default (for
IP_1, IP_2, and IP_3, and IP_4) then this needs to be performed with the MotionView configuration tool.
First establish communications using the default drive address or with an address that was established by
changing IP_4 parameters via the drive keypad. Follow the rest of these instructions in order to establish
communications and launch MotionView using this address. Once within the MotionView software a full IP
address can be assigned.
From the Node tree within MotionView select the [Communications] folder and then the [Ethernet] sub-folder as
shown in Figure 16. The settings reflect those that will appear in the software parameter view window.
Figure 16: Ethernet Folder
The IP address, subnet mask, and default gateway address can all be edited in this screen. If the text in any of
these boxes turns red once it has been entered then this means that the values or format used is invalid and
the values will not be applied.
To enable DHCP, click the box adjacent to [Obtain IP Address using DHCP] to place a check mark in this box R.
P94MOD01C
20
Commissioning
To disable DHCP, click the box again. Power must be cycled for any changes to [Configure IP Address] to take
effect. On changing any ethernet parameter value, the dialog box in Figure 17 will appear. Click [Ok] and cycle
power for changes to take effect.
4.3.4.3 Configuring the IP Address Automatically (Dynamic Address)
When connecting a PositionServo drive onto a network domain with a DHCP enabled server (where all devices
have dynamic IP addresses assigned by the server) the IP address of the PositionServo drive can also be
assigned automatically by the server.
To have the address assigned automatically the drive must have its DHCP mode enabled. This can be done
by using the drive keypad and display. Press the ‘mode’ button on the display and use the “UP” and “DOWN”
buttons to access parameter ‘DHCP’. Check this parameter is set to a value of ‘1’. If the DHCP parameter is set
to ‘0’ then use the ‘mode’ and up arrow to set to ‘1’ and then cycle power to the drive in order for this change
to take effect.
When the PositionServo drive is waiting for an IP address to be assigned to it by the server it will display ‘----‘
in each of the four octet parameters (IP_1, IP_2, IP_3, and IP_4) on its display. Once the address is assigned by
the server it will appear in these parameters. If this parameters continue to display ‘----‘ then it is likely that a
connection between the drive and server has not been established, or the server is not DHCP enabled.
DHCP can be enabled through the MotionView software for convenience should the operator wish to configure the
drive using a manual (static) IP address and switch over to an automatic (dynamic) address once configuration
is complete.
4.3.5Re-Initializing
To activate any changes made the drive has to be reinitialized. Hence the warning within MotionView
Figure 17: REBOOT Message
This can be done by cycling the power to the drive.
4.3.6 Non-Communication Based Parameter Settings
In addition to configuring the Modbus settings and depending upon the application there may be several
drive based parameters that will need to be set using MotionView or an Indexer program or via the Modbus
parameter access channel. Such as:
• PID34 – Drive Mode (VAR_DRIVEMODE)
• PID37 – Reference (VAR_REFERENCE)
• PID29 – Enable switch funtion (VAR_ENABLE_SWITCH_TYPE)
21
P94MOD01C
Commissioning
4.4
Drive Monitoring
The master/client can read the drive parameters as long as Modbus communications are enabled.
NOTE:
The complete list of variables can be found in the PositionServo Programming Manual (PM94P01, PM94M01).
4.5
Controlling the Drive
Controlling the drive over Modbus is essentially identical to controlling the drive from the User’s program. The
list of variables and their functionality is identical for both User’s program and Modbus control. Refer to the
variable list in the PositionServo Programming Manual for the functionality of the drive’s variables.
4.6
Changing Drive Parameters
To change drive parameters, simply write to the appropriate register as listed in the PositionServo Programming
Manual (PM94P01 or PM94M01).
4.7
EIA-485 (RS485) Parameters
Drive variables #172-176 are EIA-485 (RS485) communication programming parameters specifically for
configuration of the EIA-485 interface.
Table 5: EIA-485 (RS485) Variables - Excerpted from PS Variable List
PID
Variable Name
172 VAR_SERIAL_ADDRESS
Type Format EPM Access Description
W
Y
R/W
RS485 drive ID. Range: 0 - 254
Baud rate for Modbus operations:
2 - 9600
5 - 57600
3 - 19200
6 - 115200
4 - 38400
173 VAR_MODBUS_BAUDRATE
W
Y
R/W
174 VAR_MODBUS_DELAY
W
Y
R/W
175 VAR_RS485_CONFIG
W
Y
R/W
W
Y
R/W
VAR_PPP_BAUDRATE
176
P94MOD01C
NOTE: Does NOT apply
to MVOB.
22
Modbus reply delay in mS
Range: 0 - 1000
RS485 configuration:
0 - normal IP over PPP
1 - ModBus
RS232/485 (normal mode) baud rate:
2 - 9600
5 - 57600
3 - 19200
6 - 115200
4 - 38400
Units
mS
Commissioning
4.8
Ethernet Parameters
Drive variables #67-70 are Ethernet communication programming parameters specifically for configuration of
the ethernet interface.
Table 6: Ethernet Variables - Excerpted from PS Variable List
PID
4.9
Variable Name
Type Format EPM Access Description
67
VAR_IP_ADDRESS
W
Y
R/W
68
VAR_IP_MASK
W
Y
R/W
69
VAR_IP_GATEWAY
W
Y
R/W
70
VAR_IP_DHCP
W
Y
R/W
Units
Ethernet IP address. IP address changes at
next boot up. 32 bit value
Ethernet IP NetMask. Mask changes at next
boot up. 32 bit value
Ethernet Gateway IP address. Address
changes at next boot up. 32 bit value
Use DHCP: 0, 1
0 - manual;
1 - use DHCP service
Negative Number Transmission
Drive variables 51, 60, 79, 81 and 90 are signed integer values and could be negative. These registers are sent
over the modbus communications in signed internal units.
Table 7: Signed Integer Variables - Excerpted from PS Variable List
PID
Variable Name
51
VAR_VREG_WINDOW
60
Type Format EPM Access Description
vel
W
Y
R/W
VAR_VLIMIT_ATSPEED
F
Y
R/W
79
VAR_M2SRATIO_MASTER
W
Y
R/W
81
VAR_S2PRATIO_SECOND
W
Y
R/W
90
VAR_AIN1_OFFSET
Y
R/W
23
Units
Gains scaling coefficient
Range: -16 to +4
Target Velocity for At Speed window
Rpm
Range: -10000 - +10000
Master to system ratio.
Master counts range: -32767 - +32767
Value will be applied upon write to PID #80.
Write to this PID followed by writing to
PID#80 to apply new ratio pair
Secondary encoder to prime encoder ratio.
Second counts range: -32767 - +32767
Value will be applied upon write to PID #82.
Write to this PID followed by writing to
PID#82 to apply new ratio pair
Analog input #1 offset. Applied when used
as current/velocity reference
mV
Range: -10,000 to +10,000
P94MOD01C
Protocol Implementation
5
Modbus Implementation
5.1
Supported Function Codes
The Modbus function codes supported by the PositionServo drive are:
03 – Read Holding Register
16 – Preset (write) Multiple Registers
5.2
Data Format, Size and Memory Area
Modbus registers are limited by protocol definition to a length of 16-bits per register. The user must use two
consecutive 16-bit registers to read/write one 32-bit register.
All PositionServo drive parameters are 32-bit in size but can be accessed in 3 different formats:
• IEEE Floating Point (FLOAT or REAL)
• 32-bit integer (DWORD or DINT)
• 16-bit integer (WORD or INT) where by the true 32-bit value consumes two consecutive 16-bit registers
Furthermore, PositionServo parameters exist in each of the 3 formats in both RAM (volatile) and EPM (nonvolatile) areas. Therefore the memory addresses are divided into six ranges according to their format and
memory type as shown in Table 8.
Table 8: Memory Address Ranges
Memory Area Offset
0
512
1024
1556
2068
2304
Type
RAM
RAM
EPM
EPM
RAM
EPM
Format
32-bit INT
Float
32-bit INT
Float
16-bit INT
16-bit INT
The Modbus register address of a drive parameter can be calculated as follows:
ModbusRegister = (2 x PIDNumber) + MemoryOffset + ModbusOffset
Where:
PIDNumber =
PositionServo Parameter Index Number. Refer to section xxxx for a full list.
MemoryOffset = Memory offset as per table 4 above
ModbusOffset = 0 for zero based addressing
1 for traditional Modbus addressing
NOTE: All values in decimal notation
To access the <variable index> as a RAM-integer, use the following formula to calculate this register address
(maximum address allowed is 511):
<register address> = 0 + 2 * <variable index> + 1;
To access the <variable index> as a RAM-float, use the following formula to calculate this register address
(maximum address allowed is 1023):
<register address> = 512 + 2 * <variable index> + 1;
To access the<variable index> as a EPM-integer, use the following formula to calculate this register address
(maximum address allowed is 1535):
<register address> = 1024 + 2 * <variable index> + 1;
P94MOD01C
24
Protocol Implementation
To access the <variable index> as EPM-float, use the following formula to calculate this register address
(maximum address allowed is 2047):
<register address> = 1536 + 2 * <variable index> + 1;
Two special methods are created for those terminals that can ony handle 16-bit registers:
To access the <variable index> as a RAM- 16 bit integer register (the RAM copy of a variable that is represented
as a 16 bit integer) use the following formula to calculate this register address (maximum address allowed is
2303):
<register address> = 2048 + <variable index> + 1;
For these terminals the values are represented only as integers. The variable index is not multiplied by 2
because one variable is mapped to one register only. If the variable, which is represented as a 32 bit value
internally, is out of range (lower than minimum or higher than maximum value for 16 bit integers), then the
return value is truncated to the closest value supported by the 16 bit signed number. The access to a variable
using this register address range will only read/write the RAM copy of a variable.
To access the <variable index> as an EPM -16 bit signed integer register (the EPM copy of a variable that is
represented as a 16 bit integer) use the following formula to calculate this register address (maximum address
allowed is 2560):
<register address> = 2304 + <variable index> + 1;
For these terminals the values are represented only as integers. The variable index is not multiplied by 2
because one variable is mapped to one register only. If the variable, which is represented as a 32 bit value
internally, is out of range (lower than minimum or higher than maximum value for 16 bit integers), then the
return value is truncated to the closest value supported by the 16 bit register. The access to a variable using
this register address range will read only the RAM copy of a variable and write both the RAM and EPM copies
of a variable.
Refer to section 6 for a complete list of Modbus registers for each variable.
5.3
Register Numbering
Modbus registers start at 1 which historically coincided with many older slave devices that often have parameters
starting at address 1. However, the true data addressed within a Modbus telegram starts at address 0. This
means that registers are offset by 1 compared to the true data address transmitted on the network, e.g.
Holding register 40001 is actually accessed as 0000 in the message telegram address field
The conversion from Modbus register number to the Modbus data address field is performed automatically by
the Modbus Master/Client. The PositionServo adheres to the Modbus Standard in that its registers start at 1.
NOTE:
Some Modbus masters will allow for the first register number to be 0. This is known as ‘zero based’
addressing. If this is the case, the Modbus register numbers listed in this manual must be offset by -1 to
properly program a master using ‘zero-based’ addressing.
• Using a master that supports traditional register addressing to access PositionServo
parameter 100 (user variable VAR_V0) as a 16-bit value would use Modbus register 42405
• Using a master that has zero based addressing enabled would use Modbus register 42404
25
P94MOD01C
Protocol Implementation
5.4
Endian Format
Modbus uses “big-endian” representation of the register data. This means that when a numerical value that is
larger than a single byte is transmitted, the MOST significant byte (MSB) is sent first, e.g.
• 16-bit integer value 0x1234 = 2 bytes of 0x12 and 0x34
• 32-bit integer value 0x12345678 = 4 bytes of 0x12, 0x34, 0x56 and 0x78
5.5
Registers Access
• Care should be taken when accessing registers from multiple sources such as multiple clients or the drive
Indexer program as data could be over written or out of sequence
• Writing to the EPM area of memory simultaneously writes to the RAM area too
• Writing to the EPM area of memory should be done conservatively as the EEPROM (EPM) has a typical life
expectancy of 1 million writes
5.5.1 Register Reading
Use the function code “03 (0x03) Read 4X Holding Registers” to read an adjoining block of holding registers in
a remote device.
NOTE:
Do NOT attempt to read any write-only variables. Attempting to read a write-only variable can result
in erroneous data.
5.5.2 Register Writing
No discrete coil access (function code 1) is provided for PositionServo Drive. Use the “16 (0x10) Write Multiple
Registers” function to write binary values. This requires the user programming to pack bits into user registers.
The function code “16 (0x10) Write Multiple Registers” is used to write a block of adjoining registers (1-123,
Master device dependent) in a remote device.
NOTE:
Do NOT attempt to write to any read-only variables. Attempting to write to a read-only variable can
result in drive fault (F41).
5.6
No Response Conditions
The PositionServo Drive will not respond to any message that:
•
contains one or more parity errors
•
has an invalid CRC value
•
was not directed to the drive’s network address
•
is not at least 8 bytes long (minimum required for the supported functions)
•
is more than 18 bytes long (maximum allowed before input buffer overflow occurs)
P94MOD01C
26
Protocol Implementation
5.7
Exception Responses
If an invalid message is received, the drive will respond with a Modbus Exception as per the “Modbus application
Protocol specification V1.1”, i.e. the exception function code = the request function code + 0x80 (an exception
code is provided to indicate the reason of the error).
Table 9: Exception Codes
5.8
Code
V1.1 Specification
Description
0x01
Illegal Function
function not supported by PositionServo
0x02
Illegal data address
requested address is not a valid register address
0x03
Illegal Data Value
set value not valid for specific variable
Modbus Message Frame
The Modbus protocol defines a simple protocol data unit (PDU) independent of the underlying communication
layers. There are additional application data unit (ADU) fields introduced by the network layer.
ADU for Modbus RTU
Address
Function Code
Data
Error
PDU
Figure 18: Modbus RTU Frame EIA-485
ADU for Modbus TCP/IP
Transaction
Protocol Identifier
Length
Unit Identifier
Data
Function Code
MBAP
PDU
Figure 19: Modbus TCP/IP Request/Response
5.8.1 PDU Function Code
• Size = 1 byte
• The function code indicates what kind of action to perform.
• The function code (depending upon the function) is normally followed by a data field that contains request
and response parameters.
5.8.2 PDU Data
The data field of messages sent from a master/client to slave/server device contains additional information that
the slave/server uses to take the action defined by the function code. This can include items like discrete and
register addresses, the quantity of the items to be handled, and the count of the actual data bytes in the field.
The data field may be nonexistent (of zero length) in certain kinds of requests. In this case the slave/server does
not require any additional information. The function code alone specifies the action.
27
P94MOD01C
Protocol Implementation
If no error occurs related to the Modbus function requested in a properly received Modbus ADU, the data field
of a response from a slave/server to a master/client contains the data requested. If an error related to the
Modbus function requested occurs, the field contains an exception code that the server application can use to
determine the next action to be taken.
5.8.3 ADU for Modbus RTU
The ADU for Modbus RTU consists of the Address field, Error Check and the common Modbus PDU.
Address Field
As described in the previous section the valid slave nodes addresses are in the range of 0 – 247 decimal. The
individual slave devices are assigned addresses in the range of 1 to 247. A master addresses a slave by placing
the slave address in the address field of the message. When the slave returns its response, it places its own
address in the response address field to let the master know which slave is responding.
Error Check Field
Error checking field is the result of a Cyclical Redundancy Checking (CRC) calculation that is performed on the
message contents.
The CRC field checks the contents of the entire message. It is applied regardless of any parity checking method
used for the individual characters of the message.
The CRC field contains a 16–bit value implemented as two 8–bit bytes.
The CRC field is appended to the message as the last field in the message. When this is done, the low–order
byte of the field is appended first, followed by the high–order byte. The CRC high–order byte is the last byte to
be sent in the message.
The CRC value is calculated by the sending device, which appends the CRC to the message. The receiving
device recalculates a CRC during receipt of the message, and compares the calculated value to the actual value
it received in the CRC field. If the two values are not equal then it results in an error.
5.8.4 ADU for Modbus TCP
The ADU for Modbus TCP consists of the MBAP Header and the common Modbus PDU.
The MBAP header is 7 bytes long.
The actual IP addressing and message error checking are performed by the Ethernet physical layer, refer to the
ISO 7-layer model and the Modbus-IDA website for further details.
Table 10: MBAP Header
Field
Length (Bytes) Description
Client
Server
Transaction Identifier
2
Identification of a Modbus
Request/Response
transaction
Initialized by the client
Recopied by server from
received request
Protocol Identifier
2
0 = Modbus protocol
Initialized by the client
Recopied by server from
received request
Length
2
Number of following bytes
Initialized by the client
(request)
Initialized by the server
(response)
Unit Identifier
1
Identification of a remote
slave connected on a serial
line or on other buses.
Initialized by the client
Recopied by server from
received request
Table Copyright © 2005-2009 Modbus-IDA from the official Modbus Messaging Implementation Guide V1.0b
P94MOD01C
28
Reference
6Reference
6.1
PID List with Modbus Values
This is a condensed PID List to show the corresponding Modbus 4X Registers for PIDs 1-256. Modbus RTU
can not access beyond PID256. For the complete variable list refer to the PositionServo Programming Manual
(PM94P01 or PM94M01).
These variables can be accessed from the user’s program or any supported communications interface protocol.
From the user program, any variable can be accessed by either its variable name or by its index value (using the
syntax: @<VARINDEX> , where <VARINDEX> is the variable index from the PID List. From the communications
interface any variable can be accessed by its index value.
The column “Type” indicates the type of variable:
mtr
mtn
vel
Motor: denotes a motor value
Motion: writing to an “mtn” variable could cause the start of motion
Velocity: denotes a velocity or velocity scaling value
The column “Format” provides the native format of the variable:
W
F
32 bit integer
float (real)
When setting a variable via an external device the value can be addressed as floating or integer. The value will
automatically adjusted to fit it’s given form.
The column “EPM” shows if a variable has a non-volatile storage space in the EPM memory:
Y
N
Variable has non-volatile storage Space in EPM
Variable does not exist in EPM memory
The user’s program uses a RAM (volatile) ‘copy’ of the variables stored on the EPM. At power up all RAM copies
of the variables are initialized with the EPM values. The EPM’s values are not affected by changing the variables
in the user’s program. When the user’s program reads a variable it always reads from the RAM (volatile) copy
of the variable. Communications Interface functions can change both the volatile and non-volatile copy of the
variable. If the host interface requests a change to the EPM (non-volatile) value, this change is done both in the
user program’s RAM memory as well as in the EPM. Interface functions have the choice of reading from the
RAM (volatile) or from the EPM (non-volatile) copy of the variable.
The column “Access” lists the user’s access rights to a variable:
R
read only
W
write only
R/Wread/write
Writing to an R (read-only) variable or reading from a W (write-only) variable will not work.
The column “Units” shows units of the variable. Units unique to this manual that are used for motion are:
UU
user units
EC
encoder counts
Sseconds
PPS pulses per sample. Sample time is 512ms - servo loop rate
PPSS pulses per sample per sample. Sample time is 512ms - servo loop rate
29
P94MOD01C
Reference
NOTE:
In true Modbus, 3X and 4X Registers are numbered starting at 1. This is known as ‘one based’ addressing.
However, when transmitted to a slave over the serial link, the actual address transmitted is one less.
Some Modbus masters will allow for the first register number to be 0. This is known as ‘zero based’
addressing. If this is the case, the Modbus register numbers listed in this manual must be offset by -1 to
properly program a master using ‘zero-based’ addressing.
Range
Unit
Access
EPM
Format
Description
Type
Index
Name
RAM
Registers
32bit
Integer
Access
4X
Register #
RAM
Register
32bit
Float
Access
4X
Register #
EPM
Reg Copy
32bit
Integer
Access
4X
Register #
EPM
Reg Copy
32bit
Float
Access
4X
Register #
RAM
Register
16bit
Signed
Integer
4X
Register #
EPM
4X
Register #
INT16
1
VAR_IDSTRING
N
R
Drive’s identification string
3
515
1027
1539
2050
2306
2
VAR_NAME
Y
R/W
Drive’s symbolic name
5
517
1029
1541
2051
2307
3
VAR_SERIAL_NUMBER
R
Drive’s serial number
7
519
1031
1543
2052
2308
4
VAR_MEM_INDEX
R/W
Position in RAM file
9
521
1033
1545
2053
2309
5
VAR_MEM_VALUE
R/W
Value to be read or written to the RAM file
11
523
1035
1547
2054
2310
6
VAR_MEM_INDEX_
INCREMENT
R/W
Holds value the MEM_INDEX will modify once
the R/W operation is complete
13
525
1037
1549
2055
2311
7
VAR_VELOCITY_ACTUAL
R
Actual measured motor velocity
NOTE: Only applicable to MVOB drives with
Firmware 4.00 and higher.
15
527
1039
1551
2056
2312
8
VAR_RSVD_2
17
529
1041
1553
2057
2313
9
VAR_DFAULT
R
Drive Default Settings
19
531
1043
1555
2058
2314
10
VAR_M_ID
mtr
Y
R/W*
Motor ID
21
533
1045
1557
2059
2315
11
VAR_M_MODEL
mtr
Y
R/W*
Motor model
23
535
1047
1559
2060
2316
12
VAR_M_VENDOR
mtr
Y
R/W*
Motor vendor
25
537
1049
1561
2061
2317
13
VAR_M_ESET
mtr
Y
R/W*
Motor Feedback Resolver: ‘Positive for CW’
0 - none
1 - Positive for CW
0-1
27
539
1051
1563
2062
2318
14
VAR_M_HALLCODE
mtr
Y
R/W*
Hallcode index
0-5
29
541
1053
1565
2063
2319
15
VAR_M_HOFFSET
mtr
Y
R/W*
Reserved
31
543
1055
1567
2064
2320
16
VAR_M_ZOFFSET
mtr
Y
R/W*
Resolver Offset
33
545
1057
1569
2065
2321
17
VAR_M_ICTRL
mtr
Y
R/W*
Reserved
35
547
1059
1571
2066
2322
18
VAR_M_JM
mtr
Y
R/W*
Motor moment of inertia Jm
0 - 0.1
Kgm2
37
549
1061
1573
2067
2323
19
VAR_M_KE
mtr
Y
R/W*
Motor voltage or back EMF constant Ke
1 - 500
V/Krpm
39
551
1063
1575
2068
2324
20
VAR_M_KT
mtr
Y
R/W*
Motor torque or force constant Kt
0.01 - 10
Nm/A
41
553
1065
1577
2069
2325
21
VAR_M_LS
mtr
Y
R/W*
Motor phase-to-phase inductance Lm
0.1 - 500
mH
43
555
1067
1579
2070
2326
22
VAR_M_RS
mtr
Y
R/W*
Motor phase-to-phase resistance Rm
0.01 - 500
[Ohm]
45
557
1069
1581
2071
2327
23
VAR_M_MAXCURRENT
mtr
Y
R/W*
Motor’s max current(RMS)
0.5 - 50
[A]mp
47
559
1071
1583
2072
2328
24
VAR_M_MAXVELOCITY
mtr
Y
R/W*
Motor’s max velocity
500 - 20000
RPM
49
561
1073
1585
2073
2329
25
VAR_M_NPOLES
mtr
Y
R/W*
Motor’s poles number
2 - 200
51
563
1075
1587
2074
2330
26
VAR_M_ENCODER
mtr
Y
R/W*
Encoder resolution
256 - 65536
* 12/Npoles
PPR
53
565
1077
1589
2075
2331
27
VAR_M_TERMVOLTAGE
mtr
Y
R/W*
Nominal Motor’s terminal voltage
50 - 800
[V]olt
55
567
1079
1591
2076
2332
28
VAR_M_FEEDBACK
mtr
Y
R/W*
Feedback type
1 - Encoder; 2 - Resolver
1-2
57
569
1081
1593
2077
2333
29
VAR_ENABLE_SWITCH_
TYPE
W
Y
R/W
Enable switch function
0 - inhibit only; 1 - Run
0-1
Bit
59
571
1083
1595
2078
2334
30
VAR_CURRENTLIMIT
F
Y
R/W
Current limit
[A]mp
61
573
1085
1597
2079
2335
31
VAR_
PEAKCURRENTLIMIT16
F
Y
R/W
Peak current limit for 16kHz operation
[A]mp
63
575
1087
1599
2080
2336
32
VAR_PEAKCURRENTLIMIT
F
Y
R/W
Peak current limit for 8kHz operation
[A]mp
65
577
1089
1601
2081
2337
33
VAR_PWMFREQUENCY
W
Y
R/W
PWM frequency selection
0 - 16kHz; 1 - 8kHz
67
579
1091
1603
2082
2338
(0 - 32767)
0 - 360
0-1
* These are all R/W variables but they only become active after variable 247 is set.
P94MOD01C
30
Reference
Range
Unit
Access
EPM
Format
Description
Type
Index
Name
RAM
Registers
32bit
Integer
Access
4X
Register #
RAM
Register
32bit
Float
Access
4X
Register #
EPM
Reg Copy
32bit
Integer
Access
4X
Register #
EPM
Reg Copy
32bit
Float
Access
4X
Register #
RAM
Register
16bit
Signed
Integer
4X
Register #
EPM
4X
Register #
69
581
1093
1605
2083
2339
INT16
34
VAR_DRIVEMODE
W
Y
R/W
Drive mode
0 - torque; 1 - velocity ; 2 - position
0-2
35
VAR_CURRENT_SCALE
F
Y
R/W
Analog input #1 current reference scale
Model
Dependent
A/V
71
583
1095
1607
2084
2340
36
VAR_VELOCITY_SCALE
F
Y
R/W
Analog input #1 velocity reference scale
-10000 to
+10000
RPM/V
73
585
1097
1609
2085
2341
37
VAR_REFERENCE
W
Y
R/W
Reference selection
1 - internal source; 0 - external
1-0
75
587
1099
1611
2086
2342
38
VAR_STEPINPUTTYPE
W
Y
R/W
Selects how position reference inputs
operating
0 - Quadrature inputs (A/B)
1 - Step & Direction
0-1
77
589
1101
1613
2087
2343
39
VAR_
MOTORTHERMALPROTECT
W
Y
R/W
Motor thermal protection function
0 - disabled; 1 - enabled
0-1
79
591
1103
1615
2088
2344
40
VAR_
MOTORPTCRESISTANCE
F
Y
R/W
Motor thermal protection PTC cut-off
resistance
81
593
1105
1617
2089
2345
41
VAR_SECONDENCODER
W
Y
R/W
Second encoder
0 - disabled; 1 - enabled
0-1
83
595
1107
1619
2090
2346
42
VAR_REGENDUTY
W
Y
R/W
Regen circuit PWM duty cycle in %
1-100%
85
597
1109
1621
2091
2347
43
VAR_ENCODERREPEATSRC
W
Y
R/W
Selects source for repeat buffers
0 - Model 940 - Encoder Port P4
Model 941 - 2nd Encoder Option Bay
1 - Model 940 - 2nd Encoder Option Bay
Model 941 - Resolver Port P4
0-1
87
599
1111
1623
2092
2348
44
VAR_VP_GAIN
vel
W
Y
R/W
Velocity loop Proportional gain
0 - 32767
89
601
1113
1625
2093
2349
45
VAR_VI_GAIN
vel
W
Y
R/W
Velocity loop Integral gain
0 - 32767
91
603
1115
1627
2094
2350
46
VAR_PP_GAIN
W
Y
R/W
Position loop Proportional gain
0 - 32767
93
605
1117
1629
2095
2351
47
VAR_PI_GAIN
W
Y
R/W
Position loop Integral gain
0 - 16383
95
607
1119
1631
2096
2352
48
VAR_PD_GAIN
W
Y
R/W
Position loop Differential gain
0 - 32767
97
609
1121
1633
2097
2353
49
VAR_PI_LIMIT
W
Y
R/W
Position loop integral gain limit
0 - 20000
99
611
1123
1635
2098
2354
50
VAR_SEI_GAIN
101
613
1125
1637
2099
2355
51
VAR_VREG_WINDOW
52
vel
[Ohm]
%
Not Used
vel
W
Y
R/W
Gains scaling coefficient
-16 to +4
103
615
1127
1639
2100
2356
VAR_ENABLE
W
N
W
Software Enable/Disable
0 - disable; 1 - enable
0-1
105
617
1129
1641
2101
2357
53
VAR_RESET
W
N
W
Drive’s reset (Disables drive, Stops running
program if any, reset active fault)
0 - no action; 1 - reset drive
0-1
107
619
1131
1643
2102
2358
54
VAR_STATUS
W
N
R
Drive’s status register
109
621
1133
1645
2103
2359
55
VAR_BCF_SIZE
W
Y
R
User’s program Byte-code size
111
623
1135
1647
2104
2360
56
VAR_AUTOBOOT
W
Y
R/W
User’s program autostart flag
0 - program started manually (MV or
interface); 1 - program started automatically
after drive booted
0-1
113
625
1137
1649
2105
2361
57
VAR_GROUPID
W
Y
R/W
Network group ID
1 - 32767
115
627
1139
1651
2106
2362
58
VAR_VLIMIT_ZEROSPEED
F
Y
R/W
Zero Speed window
0 - 100
Rpm
117
629
1141
1653
2107
2363
59
VAR_VLIMIT_SPEEDWND
F
Y
R/W
At Speed window
10 - 10000
Rpm
119
631
1143
1655
2108
2364
60
VAR_VLIMIT_ATSPEED
F
Y
R/W
Target Velocity for At Speed window
-10000 +10000
Rpm
121
633
1145
1657
2109
2365
61
VAR_PLIMIT_POSERROR
W
Y
R/W
Position error
1 - 32767
EC
123
635
1147
1659
2110
2366
62
VAR_PLIMIT_ERRORTIME
F
Y
R/W
Position error time (time which position error
has to remain to set-off position error fault)
0.25 - 8000
mS
125
637
1149
1661
2111
2367
63
VAR_PLIMIT_SEPOSERROR
W
Y
R/W
Second encoder Position error
1 - 32767
EC
127
639
1151
1663
2112
2368
64
VAR_PLIMIT_
SEERRORTIME
F
Y
R/W
Second encoder Position error time (time
which position error has to remain to set-off
position error fault)
0.25 - 8000
mS
129
641
1153
1665
2113
2369
65
VAR_INPUTS
W
N
R
Digital inputs states. A1 occupies Bit 0, A2Bit 1 … C4 - bit 11.
131
643
1155
1667
2114
2370
Bytes
31
P94MOD01C
Reference
Range
Unit
Access
EPM
Format
Description
Type
Index
Name
RAM
Register
32bit
Float
Access
4X
Register #
EPM
Reg Copy
32bit
Integer
Access
4X
Register #
EPM
Reg Copy
32bit
Float
Access
4X
Register #
RAM
Register
16bit
Signed
Integer
4X
Register #
EPM
4X
Register #
133
645
1157
1669
2115
2371
INT16
66
VAR_OUTPUT
W
N
R/W
Digital outputs states. Writing to this
variables sets/resets digital outputs except
outputs which have been assigned special
function.
Output 1 Bit 0
Output 2 Bit 1
Output 3 Bit 2
Output 4 Bit 3
67
VAR_IP_ADDRESS
W
Y
R/W
Ethernet IP address. IP address changes at
next boot up. 32 bit value
135
647
1159
1671
2116
2372
68
VAR_IP_MASK
W
Y
R/W
Ethernet IP NetMask. Mask changes at next
boot up. 32 bit value
137
649
1161
1673
2117
2373
69
VAR_IP_GATEWAY
W
Y
R/W
Ethernet Gateway IP address. Address
changes at next boot up. 32 bit value
139
651
1163
1675
2118
2374
70
VAR_IP_DHCP
W
Y
R/W
Use DHCP
0 - manual; 1 - use DHCP service
141
653
1165
1677
2119
2375
71
VAR_AIN1
F
N
R
Analog Input AIN1 current value
[V]olt
143
655
1167
1679
2120
2376
72
VAR_AIN2
F
N
R
Analog Input AIN2 current value
[V]olt
145
657
1169
1681
2121
2377
73
VAR_BUSVOLTAGE
F
N
R
Bus voltage
[V]olt
147
659
1171
1683
2122
2378
74
VAR_HTEMP
F
N
R
Heatsink temperature
0 - for temperatures < 40C and actual heat
sink temperature for temperatures >40 C
0 - actual
heat sink
temperature
[c]
149
661
1173
1685
2123
2379
75
VAR_ENABLE_
ACCELDECEL
vel
Y
R/W
Enable Accel/Decel function for velocity
mode
0 - disable; 1 - enable
0-1
151
663
1175
1687
2124
2380
76
VAR_ACCEL_LIMIT
vel
F
Y
R/W
Accel value for velocity mode
0.1 5000000
Rpm*Sec
153
665
1177
1689
2125
2381
77
VAR_DECEL_LIMIT
vel
F
Y
R/W
Decel value for velocity mode
0.1 5000000
Rpm*Sec
155
667
1179
1691
2126
2382
78
VAR_FAULT_RESET
W
Y
R/W
Reset fault configuration
0 - on activation of Enable/Inhibit input (A3)
1 - on deactivation of Enable/Inhibit input
(A3)
0-1
157
669
1181
1693
2127
2383
79
VAR_M2SRATIO_MASTER
W
Y
R/W
Master to system ratio
Master counts range: -32767 - +32767
-32767 +32767
159
671
1183
1695
2128
2384
80
VAR_M2SRATIO_SYSTEM
W
Y
R/W
Master to system ratio
System counts range: 1 - 32767
1 - 32767
161
673
1185
1697
2129
2385
81
VAR_S2PRATIO_SECOND
W
Y
R/W
Secondary encoder to prime encoder ratio
Second counts range: -32767 - +32767
-32767 +32767
163
675
1187
1699
2130
2386
82
VAR_S2PRATIO_PRIME
W
Y
R/W
Secondary encoder to prime encoder ratio
Prime counts range: 1 - 32767
1 - 32767
165
677
1189
1701
2131
2387
83
VAR_EXSTATUS
W
N
R
Extended status. Lower word copy of DSP
status flags.
167
679
1191
1703
2132
2388
84
VAR_HLS_MODE
W
Y
R/W
Hardware limit switches
0 - not used; 1 - stop and fault; 2 - fault
0-2
169
681
1193
1705
2133
2389
85
VAR_AOUT_FUNCTION
W
Y
R/W
Analog output function range: 0 - 8
0 - Not assigned
1 - Phase Current (RMS)
2 - Phase Current (Peak Value)
3 - Motor Velocity
4 - Phase Current R
5 - Phase Current S
6 - Phase Current T
7 - Iq current
8 - Id current
0-8
171
683
1195
1707
2134
2390
86
VAR_AOUT_VELSCALE
F
Y
R/W
Analog output scale for velocity quantities.
0 - 10
mV/Rpm
173
685
1197
1709
2135
2391
87
VAR_AOUT_CURSCALE
F
Y
R/W
Analog output scale for current related
quantities.
0 - 10
V/A
175
687
1199
1711
2136
2392
88
VAR_AOUT
F
N
W
Analog output value.(Used if VAR #85 is
set to 0)
0 - 10
V
177
689
1201
1713
2137
2393
89
VAR_AIN1_DEADBAND
F
Y
R/W
Analog input #1 dead-band. Applied when
used as current or velocity reference.
0 - 100
mV
179
691
1203
1715
2138
2394
90
VAR_AIN1_OFFSET
Y
R/W
Analog input #1 offset. Applied when used as
current/velocity reference
-10,000 to
+10,000
mV
181
693
1205
1717
2139
2395
P94MOD01C
Output 1 Output 4
RAM
Registers
32bit
Integer
Access
4X
Register #
0-1
32
Reference
Range
Access
EPM
Format
Description
Type
Index
Name
RAM
Registers
32bit
Integer
Access
4X
Register #
RAM
Register
32bit
Float
Access
4X
Register #
EPM
Reg Copy
32bit
Integer
Access
4X
Register #
EPM
Reg Copy
32bit
Float
Access
4X
Register #
RAM
Register
16bit
Signed
Integer
4X
Register #
EPM
4X
Register #
183
695
1207
1719
2140
2396
INT16
91
VAR_SUSPEND_MOTION
W
N
R/W
Suspend motion. Suspends motion produced
by trajectory generator. Current move will be
completed before motion is suspended.
0 - motion suspended; 1 - motion resumed
92
VAR_MOVEP
W
N
W
Target position for absolute move. Writing
value executes Move to position as per
MOVEP statement using current values of
acceleration, deceleration and max velocity.
185
697
1209
1721
2141
2397
W
N
W
Incremental position. Writing value
<0> executes Incremental move as per
MOVED statement using current values of
acceleration, deceleration and max velocity
187
699
1211
1723
2142
2398
mtn
93
VAR_MOVED
mtn
0-1
Unit
94
VAR_MDV_DISTANCE
F
N
W
Distance for MDV move
189
701
1213
1725
2143
2399
95
VAR_MDV_VELOCITY
F
N
W
Velocity for MDV move. Writing to this
variable executes MDV move with Distance
value last written to variable #94
191
703
1215
1727
2144
2400
96
VAR_MOVE_PWI1
W
N
W
Writing value executes Move in positive
direction while input true (active). Value
specifies input #
0 - 3 : A1 -A4
4 - 7 : B1 - B4
8 - 11 : C1 - C4
0 - 11
193
705
1217
1729
2145
2401
W
N
W
Writing value executes Move in positive
direction while input false (not active). Value
specifies input #
0 - 3 : A1 -A4
4 - 7 : B1 - B4
8 - 11 : C1 - C4
0 - 11
195
707
1219
1731
2146
2402
F
N
W
Writing value executes Move negative
direction while input true (active). Value
specifies input #
0 - 3 : A1 -A4
4 - 7 : B1 - B4
8 - 11 : C1 - C4
0 - 11
197
709
1221
1733
2147
2403
F
N
W
Writing value executes Move negative
direction while input false (not active). Value
specifies input #
0 - 3 : A1 -A4
4 - 7 : B1 - B4
8 - 11 : C1 - C4
0 - 11
199
711
1223
1735
2148
2404
mtn
mtn
97
VAR_MOVE_PWI0
mtn
98
VAR_MOVE_NWI1
mtn
99
VAR_MOVE_NWI0
mtn
100
VAR_V0
F
Y
R/W
User variable
201
713
1225
1737
2149
2405
101
VAR_V1
F
Y
R/W
User variable
203
715
1227
1739
2150
2406
102
VAR_V2
F
Y
R/W
User variable
205
717
1229
1741
2151
2407
103
VAR_V3
F
Y
R/W
User variable
207
719
1231
1743
2152
2408
104
VAR_V4
F
Y
R/W
User variable
209
721
1233
1745
2153
2409
105
VAR_V5
F
Y
R/W
User variable
211
723
1235
1747
2154
2410
106
VAR_V6
F
Y
R/W
User variable
213
725
1237
1749
2155
2411
107
VAR_V7
F
Y
R/W
User variable
215
727
1239
1751
2156
2412
108
VAR_V8
F
Y
R/W
User variable
217
729
1241
1753
2157
2413
109
VAR_V9
F
Y
R/W
User variable
219
731
1243
1755
2158
2414
110
VAR_V10
F
Y
R/W
User variable
221
733
1245
1757
2159
2415
111
VAR_V11
F
Y
R/W
User variable
223
735
1247
1759
2160
2416
112
VAR_V12
F
Y
R/W
User variable
225
737
1249
1761
2161
2417
113
VAR_V13
F
Y
R/W
User variable
227
739
1251
1763
2162
2418
114
VAR_V14
F
Y
R/W
User variable
229
741
1253
1765
2163
2419
115
VAR_V15
F
Y
R/W
User variable
231
743
1255
1767
2164
2420
116
VAR_V16
F
Y
R/W
User variable
233
745
1257
1769
2165
2421
117
VAR_V17
F
Y
R/W
User variable
235
747
1259
1771
2166
2422
118
VAR_V18
F
Y
R/W
User variable
237
749
1261
1773
2167
2423
119
VAR_V19
F
Y
R/W
User variable
239
751
1263
1775
2168
2424
120
VAR_V20
F
Y
R/W
User variable
241
753
1265
1777
2169
2425
33
P94MOD01C
Reference
Range
Unit
Access
EPM
Format
Description
Type
Index
Name
RAM
Registers
32bit
Integer
Access
4X
Register #
RAM
Register
32bit
Float
Access
4X
Register #
EPM
Reg Copy
32bit
Integer
Access
4X
Register #
EPM
Reg Copy
32bit
Float
Access
4X
Register #
RAM
Register
16bit
Signed
Integer
4X
Register #
EPM
4X
Register #
INT16
121
VAR_V21
F
Y
R/W
User variable
243
755
1267
1779
2170
2426
122
VAR_V22
F
Y
R/W
User variable
245
757
1269
1781
2171
2427
123
VAR_V23
F
Y
R/W
User variable
247
759
1271
1783
2172
2428
124
VAR_V24
F
Y
R/W
User variable
249
761
1273
1785
2173
2429
125
VAR_V25
F
Y
R/W
User variable
251
763
1275
1787
2174
2430
126
VAR_V26
F
Y
R/W
User variable
253
765
1277
1789
2175
2431
127
VAR_V27
F
Y
R/W
User variable
255
767
1279
1791
2176
2432
128
VAR_V28
F
Y
R/W
User variable
257
769
1281
1793
2177
2433
129
VAR_V29
F
Y
R/W
User variable
259
771
1283
1795
2178
2434
130
VAR_V30
F
Y
R/W
User variable
261
773
1285
1797
2179
2435
131
VAR_V31
F
Y
R/W
User variable
263
775
1287
1799
2180
2436
132
VAR_MOVEDR_DISTANCE
F
N
W
Registered move distance.
Incremental motion as per MOVEDR
statement
UU
265
777
1289
1801
2181
2437
133
VAR_MOVEDR_
DISPLACEMENT
F
N
W
Registered move displacement. Writing to
this variable executes the move MOVEDR
using value set by #132
UU
267
779
1291
1803
2182
2438
134
VAR_MOVEPR_DISTANCE
F
N
W
Registered move distance.
Absolute motion as per MOVEPR statement
UU
269
781
1293
1805
2183
2439
135
VAR_MOVEPR_
DISPLACEMENT
F
N
W
Registered move displacement. Writing to
this variable makes the move MOVEPR using
value set by #134
UU
271
783
1295
1807
2184
2440
mtn
mtn
136
VAR_STOP_MOTION
W
N
W
Stops motion
0 - no action; 1 - stops motion
0-1
273
785
1297
1809
2185
2441
137
VAR_START_PROGRAM
W
N
W
Starts user program
0 - no action; 1 - starts program
0-1
275
787
1299
1811
2186
2442
138
VAR_VEL_MODE_ON
W
N
W
Turns on Profile Velocity for Internal Position
Mode
0 - normal operation; 1 - velocity mode on
0-1
277
789
1301
1813
2187
2443
139
VAR_IREF
F
N
W
Reference: Internal Torque or Velocity Mode
279
791
1303
1815
2188
2444
140
VAR_NV0
F
N
R/W
User defined Network variable
281
793
1305
1817
2189
2445
141
VAR_NV1
F
N
R/W
User defined Network variable
283
795
1307
1819
2190
2446
142
VAR_NV2
F
N
R/W
User defined Network variable
285
797
1309
1821
2191
2447
143
VAR_NV3
F
N
R/W
User defined Network variable
287
799
1311
1823
2192
2448
144
VAR_NV4
F
N
R/W
User defined Network variable
289
801
1313
1825
2193
2449
145
VAR_NV5
F
N
R/W
User defined Network variable
291
803
1315
1827
2194
2450
146
VAR_NV6
F
N
R/W
User defined Network variable
293
805
1317
1829
2195
2451
147
VAR_NV7
F
N
R/W
User defined Network variable
295
807
1319
1831
2196
2452
148
VAR_NV8
F
N
R/W
User defined Network variable
297
809
1321
1833
2197
2453
149
VAR_NV9
F
N
R/W
User defined Network variable
299
811
1323
1835
2198
2454
150
VAR_NV10
F
N
R/W
User defined Network variable
301
813
1325
1837
2199
2455
151
VAR_NV11
F
N
R/W
User defined Network variable
303
815
1327
1839
2200
2456
152
VAR_NV12
F
N
R/W
User defined Network variable
305
817
1329
1841
2201
2457
153
VAR_NV13
F
N
R/W
User defined Network variable
307
819
1331
1843
2202
2458
154
VAR_NV14
F
N
R/W
User defined Network variable
309
821
1333
1845
2203
2459
155
VAR_NV15
F
N
R/W
User defined Network variable
311
823
1335
1847
2204
2460
156
VAR_NV16
F
N
R/W
User defined Network variable
313
825
1337
1849
2205
2461
157
VAR_NV17
F
N
R/W
User defined Network variable
315
827
1339
1851
2206
2462
158
VAR_NV18
F
N
R/W
User defined Network variable
317
829
1341
1853
2207
2463
159
VAR_NV19
F
N
R/W
User defined Network variable
319
831
1343
1855
2208
2464
160
VAR_NV20
F
N
R/W
User defined Network variable
321
833
1345
1857
2209
2465
161
VAR_NV21
F
N
R/W
User defined Network variable
323
835
1347
1859
2210
2466
P94MOD01C
RPS
Amps
34
Reference
Range
Unit
Access
EPM
Format
Description
Type
Index
Name
RAM
Registers
32bit
Integer
Access
4X
Register #
RAM
Register
32bit
Float
Access
4X
Register #
EPM
Reg Copy
32bit
Integer
Access
4X
Register #
EPM
Reg Copy
32bit
Float
Access
4X
Register #
RAM
Register
16bit
Signed
Integer
4X
Register #
EPM
4X
Register #
INT16
162
VAR_NV22
F
N
R/W
User defined Network variable
325
837
1349
1861
2211
2467
163
VAR_NV23
F
N
R/W
User defined Network variable
327
839
1351
1863
2212
2468
164
VAR_NV24
F
N
R/W
User defined Network variable
329
841
1353
1865
2213
2469
165
VAR_NV25
F
N
R/W
User defined Network variable
331
843
1355
1867
2214
2470
166
VAR_NV26
F
N
R/W
User defined Network variable
333
845
1357
1869
2215
2471
167
VAR_NV27
F
N
R/W
User defined Network variable
335
847
1359
1871
2216
2472
168
VAR_NV28
F
N
R/W
User defined Network variable
337
849
1361
1873
2217
2473
169
VAR_NV29
F
N
R/W
User defined Network variable
339
851
1363
1875
2218
2474
170
VAR_NV30
F
N
R/W
User defined Network variable
341
853
1365
1877
2219
2475
171
VAR_NV31
F
N
R/W
User defined Network variable
343
855
1367
1879
2220
2476
172
VAR_SERIAL_ADDRESS
W
Y
R/W
RS485 drive ID
0 - 254
345
857
1369
1881
2221
2477
173
VAR_MODBUS_BAUDRATE
W
Y
R/W
Baud rate for ModBus operations
2 - 9600; 3 - 19200
4 - 38400; 5 - 57600; 6 - 115200
2-6
347
859
1371
1883
2222
2478
174
VAR_MODBUS_DELAY
W
Y
R/W
ModBus reply delay in mS
0 - 1000
349
861
1373
1885
2223
2479
175
VAR_RS485_CONFIG
W
Y
R/W
Rs485 configuration
0 - normal IP over PPP; 1 - ModBus1 19200
0-1
351
863
1375
1887
2224
2480
176
VAR_PPP_BAUDRATE
W
Y
R/W
RS232/485 (normal mode) baud rate
2 - 9600; 3 - 19200
4 - 38400; 5 - 57600; 6 - 115200
2-6
353
865
1377
1889
2225
2481
177
VAR_MOVEPS
F
N
W
Same as variable #92 but using S-curve
acceleration/deceleration
355
867
1379
1891
2226
2482
178
VAR_MOVEDS
F
N
W
Same as variable #93 but using S-curve
acceleration/deceleration
357
869
1381
1893
2227
2483
179
VAR_MDVS_VELOCITY
N
W
Velocity for MDV move using S-curve
accel/deceleration. Writing to this variable
executes MDV move with Distance value
last written to variable #94 (unless motion is
suspended by #91).
359
871
1383
1895
2228
2484
mtn
180
VAR_MAXVEL
F
N
R/W
Max velocity for motion profile
361
873
1385
1897
2229
2485
181
VAR_ACCEL
F
N
R/W
Accel value for indexing
UU/S2
363
875
1387
1899
2230
2486
182
VAR_DECEL
F
N
R/W
Decel value for indexing
UU/S2
365
877
1389
1901
2231
2487
183
VAR_QDECEL
F
N
R/W
Quick decel value
UU/S2
367
879
1391
1903
2232
2488
184
VAR_INPOSLIM
W
N
R/W
Sets window for “In Position” Limits
UU
369
881
1393
1905
2233
2489
185
VAR_VEL
F
N
R/W
Velocity reference for “Profiled” velocity
UU/S
371
883
1395
1907
2234
2490
186
VAR_UNITS
F
Y
R/W
User units
373
885
1397
1909
2235
2491
187
VAR_MECOUNTER
W
N
R/W
A/B inputs reference counter value
Count
375
887
1399
1911
2236
2492
188
VAR_PHCUR
F
N
R
Phase current
A
377
889
1401
1913
2237
2493
189
VAR_POS_PULSES
W
N
R/W
Target position in encoder pulses
EC
379
891
1403
1915
2238
2494
190
VAR_APOS_PULSES
W
N
R/W
Actual position in encoder pulses
EC
381
893
1405
1917
2239
2495
191
VAR_POSERROR_PULSES
W
N
R
Position error in encoder pulses
EC
383
895
1407
1919
2240
2496
192
VAR_CURRENT_VEL_PPS
F
N
R
Set-point (target) velocity in PPS
PPS
385
897
1409
1921
2241
2497
193
VAR_CURRENT_ACCEL_
PPSS
F
N
R
Set-point (target) acceleration (demanded
value)
PPSS
387
899
1411
1923
2242
2498
194
VAR_IN0_DEBOUNCE
W
Y
R/W
Input A1 de-bounce time in mS
0 - 1000
mS
389
901
1413
1925
2243
2499
195
VAR_IN1_DEBOUNCE
W
Y
R/W
Input A2 de-bounce time in mS
0 - 1000
mS
391
903
1415
1927
2244
2500
196
VAR_IN2_DEBOUNCE
W
Y
R/W
Input A3 de-bounce time in mS
0 - 1000
mS
393
905
1417
1929
2245
2501
197
VAR_IN3_DEBOUNCE
W
Y
R/W
Input A4 de-bounce time in mS
0 - 1000
mS
395
907
1419
1931
2246
2502
198
VAR_IN4_DEBOUNCE
W
Y
R/W
Input B1 de-bounce time in mS
0 - 1000
mS
397
909
1421
1933
2247
2503
199
VAR_IN5_DEBOUNCE
W
Y
R/W
Input B2 de-bounce time in mS
0 - 1000
mS
399
911
1423
1935
2248
2504
200
VAR_IN6_DEBOUNCE
W
Y
R/W
Input B3 de-bounce time in mS
0 - 1000
mS
401
913
1425
1937
2249
2505
201
VAR_IN7_DEBOUNCE
W
Y
R/W
Input B4 de-bounce time in mS
0 - 1000
mS
403
915
1427
1939
2250
2506
202
VAR_IN8_DEBOUNCE
W
Y
R/W
Input C1 de-bounce time in mS
0 - 1000
mS
405
917
1429
1941
2251
2507
35
P94MOD01C
Reference
Range
Unit
Access
EPM
Format
Description
Type
Index
Name
RAM
Registers
32bit
Integer
Access
4X
Register #
RAM
Register
32bit
Float
Access
4X
Register #
EPM
Reg Copy
32bit
Integer
Access
4X
Register #
EPM
Reg Copy
32bit
Float
Access
4X
Register #
RAM
Register
16bit
Signed
Integer
4X
Register #
EPM
4X
Register #
INT16
203
VAR_IN9_DEBOUNCE
W
Y
R/W
Input C2 de-bounce time in mS
0 - 1000
mS
407
919
1431
1943
2252
2508
204
VAR_IN10_DEBOUNCE
W
Y
R/W
Input C3 de-bounce time in mS
0 - 1000
mS
409
921
1433
1945
2253
2509
205
VAR_IN11_DEBOUNCE
W
Y
R/W
Input C4 de-bounce time in mS
0 - 1000
mS
411
923
1435
1947
2254
2510
206
VAR_OUT1_FUNCTION
W
Y
R/W
Programmable Output 1 Function
0 - Not Assigned
1 - Zero Speed
2 - In Speed Window
3 - Current Limit
4 - Run time fault
5 - Ready
6 - Brake
7 - In position
0-7
413
925
1437
1949
2255
2511
207
VAR_OUT2_FUNCTION
W
Y
R/W
Programmable Output 2 Function
0-7
415
927
1439
1951
2256
2512
208
VAR_OUT3_FUNCTION
W
Y
R/W
Programmable Output 3 Function
0-7
417
929
1441
1953
2257
2513
209
VAR_OUT4_FUNCTION
W
Y
R/W
Programmable Output 4 Function
0-7
419
931
1443
1955
2258
2514
210
VAR_HALLCODE
W
N
R
Current hall code
Bit 0 - Hall 1
Bit 1 - Hall 2
Bit 2 - Hall 3
421
933
1445
1957
2259
2515
211
VAR_ENCODER
W
N
R
Primary encoder current value
EC
423
935
1447
1959
2260
2516
212
VAR_RPOS_PULSES
W
N
R
Registration position
EC
425
937
1449
1961
2261
2517
213
VAR_RPOS
F
N
R
Registration position
UU
427
939
1451
1963
2262
2518
214
VAR_POS
F
N
R/W
Target position
UU
429
941
1453
1965
2263
2519
215
VAR_APOS
F
N
R/W
Actual position
UU
431
943
1455
1967
2264
2520
216
VAR_POSERROR
W
N
R
Position error
EC
433
945
1457
1969
2265
2521
217
VAR_CURRENT_VEL
F
N
R
Set-point (target) velocity (demanded value)
UU/S
435
947
1459
1971
2266
2522
218
VAR_CURRENT_ACCEL
F
N
R
Set-point (target) acceleration (demanded
value)
UU/S2
437
949
1461
1973
2267
2523
219
VAR_TPOS_ADVANCE
W
N
W
Target position advance. Every write to this
variable adds value to the Target position
summing point. Value gets added once per
write. This variable useful when loop is
driven by Master encoder signals and trying
to correct phase. Value is in encoder counts
EC
439
951
1463
1975
2268
2524
220
VAR_IOINDEX
W
N
R/W
Same as INDEX variable in user’s program.
441
953
1465
1977
2269
2525
221
VAR_PSLIMIT_PULSES
W
Y
R/W
Positive Software limit switch value in
Encoder counts
EC
443
955
1467
1979
2270
2526
222
VAR_NSLIMIT_PULSES
W
Y
R/W
Negative Software limit switch value in
Encoder counts
EC
445
957
1469
1981
2271
2527
223
VAR_ SLS_MODE
W
Y
R/W
Soft limit switch action code:
0 - no action
1- Fault
2- Stop and fault (When loop is driven by
trajectory generator only. With all other
sources same action as 1)”
447
959
1471
1983
2272
2528
224
VAR_PSLIMIT
F
Y
R/W
Same as var 221 but value in User Units
UU
449
961
1473
1985
2273
2529
225
VAR_NSLIMIT
F
Y
R/W
Same as var 222 but value in User Units
UU
451
963
1475
1987
2274
2530
226
VAR_SE_APOS_PULSES
W
N
R
2nd encoder actual position in encoder
counts
EC
453
965
1477
1989
2275
2531
227
VAR_SE_POSERROR_
PULSES
W
N
R
2nd encoder position error in encoder counts
EC
455
967
1479
1991
2276
2532
228
VAR_MODBUS_PARITY
W
Y
R/W
Parity for Modbus Control:
0 - No Parity; 1 - Odd Parity; 2 - Even Parity
0-2
457
969
1481
1993
2277
2533
229
VAR_MODBUS_STOPBITS
W
Y
R/W
Number of Stopbits for Modbus Control
0 - 1.0; 1 - 1.5; 2 - 2.0
0-2
459
971
1483
1995
2278
2534
230
VAR_M_NOMINALVEL
F
Y
R/W
Induction Motor Nominal Velocity
500 - 20000
461
973
1485
1997
2279
2535
231
VAR_M_COSPHI
F
Y
R/W
Induction Motor Cosine Phi
0 - 1.0
463
975
1487
1999
2280
2536
232
VAR_M_BASEFREQUENCY
F
Y
R/W
Induction Motor Base Frequency
0 - 400Hz
465
977
1489
2001
2281
2537
233
VAR_M_SERIES
467
979
1491
2003
2282
2538
P94MOD01C
0-2
Induction Motor Series
36
RPM
Hz
Reference
Range
Unit
Access
EPM
Format
Description
Type
Index
Name
RAM
Registers
32bit
Integer
Access
4X
Register #
RAM
Register
32bit
Float
Access
4X
Register #
EPM
Reg Copy
32bit
Integer
Access
4X
Register #
EPM
Reg Copy
32bit
Float
Access
4X
Register #
RAM
Register
16bit
Signed
Integer
4X
Register #
EPM
4X
Register #
INT16
234
VAR_CAN_BAUD_EPM
W
Y
R/W
CAN Bus Parameter: Baud Rate: 1 - 8
1 - 10k; 2 - 20k; 3 - 50k; 4 - 125k
5 - 250k; 6 - 500k; 7 - 800k; 8 - 1000k
1-8
469
981
1493
2005
2283
2539
235
VAR_CAN_ADDR_EPM
W
Y
R/W
CAN Bus Parameter: Address
1-127
471
983
1495
2007
2284
2540
236
VAR_CAN_OPERMODE_
EPM
W
Y
R/W
CAN Bus Parameter: Boot-up Mode
(Operational State Control)
0 - enters into pre-operational state
1 - enters into operational state
2 - pseudo NMT: sends NMT Start Node
command after delay (set by variable 237)
0-2
473
985
1497
2009
2285
2541
237
VAR_CAN_OPERDELAY_
EPM
W
Y
R/W
CAN Bus Parameter: pseudo NMT mode
delay time in seconds
Refer to
variable 236
475
987
1499
2011
2286
2542
238
VAR_CAN_ENABLE_EPM
W
Y
R/W
CAN Bus Parameter: Mode Control
0 - Disable CAN interface
1 - Enable CAN interface in DS301 mode
2 - Enable CAN interface in DS402 mode
3 - Enable DeviceNet
4 - Enable PROFIBUS DP
0-4
477
989
1501
2013
2287
2543
239
VAR_HOME_ACCEL
F
Y
R/W
Homing Mode: ACCEL rate
010000000.0
UU/sec2
479
991
1503
2015
2288
2544
240
VAR_HOME_OFFSET
F
Y
R/W
Homing Mode: Home Position Offset
-32767 to
+32767
UU
481
993
1505
2017
2289
2545
241
VAR_HOME_OFFSET_
PULSES
W
Y
R/W
Homing Mode: Home Position Offset in
encoder counts
+/2147418112
EC
483
995
1507
2019
2290
2546
242
VAR_HOME_FAST_VEL
F
Y
R/W
Homing Mode: Fast Velocity
-10000 to
+10000
UU/sec
485
997
1509
2021
2291
2547
243
VAR_HOME_SLOW_VEL
F
Y
R/W
Homing Mode: Slow Velocity
-10000 to
+10000
UU/sec
487
999
1511
2023
2292
2548
244
VAR_HOME_METHOD
W
Y
R/W
Homing Mode: Homing Method
1 - 35
489
1001
1513
2025
2293
2549
245
VAR_START_HOMING
W
N
W
Homing Mode: Start Homing
0 - No action; 1 - Start Homing
0-1
491
1003
1515
2027
2294
2550
246
VAR_HOME_SWITCH_
INPUT
W
Y
R/W
Homing Mode: Switch Input Assignment:
0-3: A1-A4
4-7: B1-B4
8-11: C1-C4
0-11
493
1005
1517
2029
2295
2551
247
VAR_M_VALIDATE_
MOTOR
W
N
W
Makes Drive accept Motor’s parameters
0 - No action
1 - Validate Motor Data
0 -1
495
1007
1519
2031
2296
2552
248
VAR_M_I2T
F
Y
R/W
Motor
497
1009
1521
2033
2297
2553
249
VAR_M_EABSOLUTE
F
Y
R/W
Motor
499
1011
1523
2035
2298
2554
250
VAR_M_ABSWAP
F
Y
R/W
Motor Encoder Feedback: B leads A
0 - No Action
1 - B leads A for forward checked (active)
0-1
501
1013
1525
2037
2299
2555
251
VAR_M_HALLS_INVERTED
F
Y
R/W
Motor Encoder Feedback: Halls
0 - No Action
1 - Inverted Halls Box checked (active)
0-1
503
1015
1527
2039
2300
2556
252
RESERVED
Do NOT use
505
1017
1529
2041
2301
2557
253
RESERVED
Do NOT use
507
1019
1531
2043
2302
2558
254
RESERVED
Do NOT use
509
1021
1533
2045
2303
2559
255
RESERVED
Do NOT use
511
1023
1535
2047
2304
2560
256
RESERVED
Do NOT use
513
1025
1537
2049
2305
2561
sec
This is a condensed PID List to show the corresponding Modbus 4X Registers for PIDs 1-256. Modbus RTU
can not access beyond PID256. For the complete variable list refer to the PositionServo Programming Manual
(PM94P01 or PM94M01).
37
P94MOD01C
Lenze AC Tech Corporation
630 Douglas Street • Uxbridge, MA 01569 • USA
Sales: 800 217 9100 • Service: 508 278-9100
www.lenze-actech.com
P94MOD01D