1
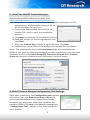
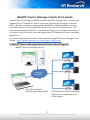
WebDT Device Manager Quick Start Guide
WebDT Device Manager (WDM) enables remote management, control, and
updates for DT Research Cloud Computing Appliances through a network.
With efficient network management capabilities, WDM provides a tool to
remotely control and manage individual or groups of the appliances. The
web-based browser interface is intuitive and easy to use. Follow the steps in
this Quick Start Guide to start managing your DT Research Cloud Computing
Appliances.
For more detailed information, download the WebDT Device Manager User
Guide: http://www.dtresearch.com/support/WDM.htm
111 WebDT Device Manager Network Connection Diagram
WebDT Device Manager Server
Any PC/ Laptop to
remote operating WDM
1
DT Research Cloud Computing
Appliances embedded with
Client Agent
P/N: 28-610-135030 QUICK START GUIDE WebDT Device Manager 2.0
222 Before installing the WebDT Device Manager
Before installing WDM, make sure you have the following:
••Hardware and software requirements as listed below
••Login with an administrator account on your local server on which you
want to install WDM
••Disable the computer anti-virus application; re-enable it again after
installation
••If installing WDM on a computer with a database server, you may need to
input your database account ID and Password (see “Configuration Tool”
chapter in the User Manual for more details)
••Register your DT Research Cloud Computing Appliance on
http://www.dtresearch.com/Industry/products/WDM/registration.html
to get the Serial Number for WDM installation
Note: To register your DT Research devices, you will need the 15-digit
hardware Product Key printed on the sticker attached on your device as
below picture:
or
System Requirements for WDM Server Software Installation
▪▪Hardware Requirements
iii 4GB DDR3 DRAM or above
iiii Intel Core i3 or above
iiiii 100Mbits or above Ethernet
Adapter or above
iiii At least 100GB free
hard drive space (512GB
recommended)
▪▪Software Requirements
iii Windows Server 2008 Standard/
Enterprise Edition, Windows 7 Ultimate,
Redhat Linux Enterprise 4.0 (Linux kernel
2.6 or above)
iiii NTFS server file system
iiiii JRE (Java Runtime Environment) 1.6 or
later
iiii One of these browsers: IE9.0, Firefox,
Safari, and Chrome
Note: The WDM Server system cannot be installed on an Active Directory server.
Note: Domain users can only install WDM to none system volume by logging an
account belongs to local administrator group.
Note: At least 1366X768 16:9/16:10 or higher resolution display is recommended for
operating WDM by browser.
2
333 Install the WebDT Device Manager
Download the WDM software program from
http://www.dtresearch.com/support/WDM.htm
III Select the correct installation file to download according to the OS
environment; WCM installer supports 32-bit,
64-bit Windows OS and Linux
IIII Extract the downloaded file and click the
installer file (.exe) to start the installation
process
IIIIIClick Next to continue the installation process
IIIIRead and accept the license agreement then
click Next
VVV Enter the Product Key as show at right side then click Next
VVVVFollow other instructions in the dialogs to complete the installation
Note: The components listed in Custom Setup page are required to run
WDM. If you want to install the database on other machines or use your own
database, uncheck the Install PostgrSQL Data-base Version 9.0 in Custom
Setup step as seen in below screen. Otherwise, check all items.
444 WebDT Device Manger Configuration Tool Settings
Right after installation, the Configuration tool appears
on screen. Enter the Web Server Port as 80 as the
recommended default port. (If port 80 is already
occupied, you may enter other port numbers; for
example: 8080) Click Save, then Exit the settings (see
“Configuration Tool” chapter in the User Manual for
more details).
3
555 Login to your WDM server
Launch your web browser in any PC or laptop with network connection to
your WDM Server. Enter the IP address with port number to open the login
page.
Example: http:// 192.168.254.145 : 8080
Server IP address Port number (default is 80)
* After logging in to the WDM, you may modify the user ID/password for the
Administrator account.
The default account information: Account: admin, Password: 123456
666 Register the Cloud Computing Appliance
After installing the WDM Server and launching the configuration tool
settings, you can register your Cloud Computing Appliance by the WebDT
Client Agent. Please make sure the Cloud Computing Appliances are
Internet/network enabled via Ethernet or wireless connection.
When you turn on the Cloud Computing Appliances for the first time, the
Client Agent automatically connects to the Server by default if they are in
the same LAN. You can also manually register them:
For Windows Operating System:
III On Windows taskbar, click the Connect icon to launch the registration window
IIII Uncheck Use Autodetect to Connect to Server and enter the Device Server
URL
IIIIIClick the Register button to launch the registration window
IIII Input the required device information to complete the registration
For Linux Operating System:
III On Linux taskbar, click the Connect icon to launch the registration window
IIII Uncheck autodetect, and enter the Server URL and Server Port
IIIIIClick register to complete the registration
For more support, please contact your local reseller.
Or visit DT Research website: http://www.dtresearch.com
Disclaimer: DT Research tries in good faith to make sure that the information displayed is accurate, as
such we are not responsible for typographical errors or technical inaccuracies. This disclaimer in no way
affects the terms of the manufacturer's warranty.
4
DT RESEARCH, INC. |2000 Concourse Drive, San Jose, CA 95131, USA
TEL: +1 (408) 934 -6220|FAX: +1 (408) 934-6222|WEB: www.dtresearch.com|Email: [email protected]