1
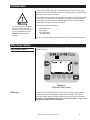
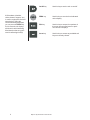
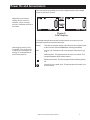
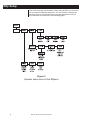
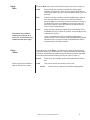
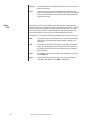
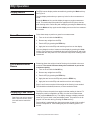
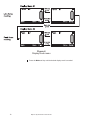
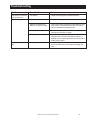
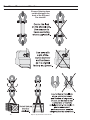
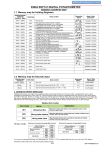
EDjunior Dynamometer
User’s Manual
Weigh Bar ® is a registered trademark of Weigh-Tronix Inc.
2
05/16/06 EDJR_U.P65 PN 29810-0017D e1 Printed in USA
EDjunior Dynamometer User’s Manual
Table of Contents
Table of Contents ........................................................................................................................ 3
Introduction ................................................................................................................................. 5
EDjr Description .......................................................................................................................... 5
EDjr Front Panel ................................................................................................................... 5
Power On and Annunciators ........................................................................................................ 7
EDjr Setup ................................................................................................................................. 7
EDjr Operation ........................................................................................................................... 11
Display Modes .................................................................................................................... 11
Force Measurement ............................................................................................................ 11
Force Measurement Rezero ............................................................................................... 11
Displaying Peak Force ........................................................................................................ 11
Troubleshooting ......................................................................................................................... 13
Safe Operation .......................................................................................................................... 14
Weigh and Force Measurement Practice .................................................................................. 15
Load Centering ................................................................................................................... 15
Alignment ............................................................................................................................ 15
Proper Pin Fit ...................................................................................................................... 15
Torque and Bending ........................................................................................................... 15
Certified Gear...................................................................................................................... 15
Good Force Measurement Practice .................................................................................... 16
EDjunior Dynamometer User’s Manual
3
4
EDjunior Dynamometer User’s Manual
Introduction
The EDjuniorTM (EDjr) electronic dynamometer from Dillon is a force measurement load sensor and digital readout in one instrument. The EDjr can be
used to measure tension or weight.
This manual covers the setup and operation of the EDjr. General information
is covered in the right column of each page with major sections separated
by the black bar shown above. Subheads appear in the left column along
with any special notes, cautions or warnings.
If you overload this dynamometer you could suffer severe
injuries or death. The total load
on the dynamometer should
NEVER exceed the rated
capacity.
This manual covers the following:
• EDjr Description
• EDjr Setup
• EDjr Operation
• Troubleshooting
Be sure to read the safety precautions found in the Safe Operation section.
EDjr Description
EDjr Front Panel
The EDjr comes in several weight capacities. All have the same front panel,
shown in Figure 1.
Figure 1
EDjunior front panel
EDjr Keys
There are four “hard” keys and four “soft” keys. The hard keys are permanently labeled and the soft keys are just below the display. The soft key
functions change and the key label appears above each key on the display.
Sometimes the individual soft keys are referred to as the F1, F2, F3 and
F4 keys as numbered from left to right.
EDjunior Dynamometer User’s Manual
5
If lift hardware (shackles,
chains, beams, hoppers, etc.)
is used to support the load and
zeroed prior to lifting the
current load being displayed,
you can press the ZERO key
for five seconds, the display
will show the total load being
lifted based on the zero point
used in calibrating the EDjr.
6
On/Off key
Use this key to turn the unit on and off.
ZERO key
Use this key to zero the force indicated
on the display.
ESC key
Use this key to escape from portions of
the menu structure and return to previous choices or displays.
Arrow key
Use this key to access any available soft
keys not currently viewed.
EDjunior Dynamometer User’s Manual
Power On and Annunciators
When you power up the EDjr you will see a display similar to the example
shown on the left in Figure 2.
Depending on permission
settings and/or revision of
firmware, various soft keys
may be in a different location or
not visible.
Figure 2
Initial displays
The display sample above shows several symbols you may see on your
display but usually not all at the same time.
lbf and kgf are units of force,
not weight. They will be close
to their mass counterparts, lb
and kg, for most applications
and at most locations.
Force
This tells you that the display is showing live force measurement
at the moment. Will show Peak when viewing Peak Mode.
lbf
Current unit of measure is lbf in this example. May also be kgf
or N.
~
Motion symbol. This appears when the force is in motion. This
symbol disappears when motion ceases.
Battery annunciator. This shows approximate remaining battery
life.
P
Capture of a new peak value. This annunciator will remain lit for
a few seconds.
EDjunior Dynamometer User’s Manual
7
EDjr Setup
One of the first things you should do to begin using the EDjr is to set it up to
suit your specific needs and equipment. You can access the Setup menu,
shown in Figure 3, using the soft keys. Press the appropriate soft key to
accomplish the functions listed on the following pages.
Figure 3
Operator setup menu for the EDjunior
8
EDjunior Dynamometer User’s Manual
Setup
Misc
Press the Misc key to access the following soft key set (refer to Figure 3):
Flash
Press this soft key to enable or disable the “display flash”
feedback. If enabled, the press of a key causes the display to
momentarily flash to give you a visual feedback that the key was
activated.
Zero
Press this soft key to enable or disable the Zero key’s ability to
also clear the Peak force value. If you enable this function,
press the Zero key to clear the Peak force and zero the load. If
you disable the function, the Zero key will only zero the load.
Peak force remains in effect and will only be cleared with the
Clear function during operation.
Contr
Press this key to adjust the contrast of the LCD display. Press
the Down soft key to lighten the contrast. Press the Up soft key
to darken the contrast.
Sometimes the individual
soft keys are referred to as
the F1, F2, F3 and F4 keys as
numbered from left to right.
Setup
About
Dillon suggests that calibration
data be recorded and saved.
There is a keypad shortcut for increasing and decreasing
contrast. While in normal display mode press Arrow key and F2
simultaneously to increase contrast. Press Arrow key and F1
simultaneously to decrease contrast.
The next soft key is the About. The About menu shows an assortment of
information about your Dillon instrument. This can be handy for maintaining
calibration, troubleshooting or determining if the firmware can be upgraded.
Press this and access the following soft key set (refer to Figure 3):
Device
Press this to see software revision and dynamometer information.
Calib
This soft key access the following soft key set:
Points
Press this key to display the calibration loading points.
EDjunior Dynamometer User’s Manual
9
O.Load
Lists the number of overloads that have occurred since the unit
was manufactured.
Zero
Lists the current zero point compared to the calibration zero
point. If the zero point has moved significantly, this may indicate
a serious overload has occurred and the instrument should be
returned for service.
The Test functions can help service technicians remotely diagnose your
Dillon instrument by showing information on key internal functions. Typically
these menus will have significance only to trained technicians . You may
look at these menus without technical guidance, but the information may
have little meaning, or an error may be reported that may not exist.
Setup
Test
Press this key to access several items described below (refer to Figure 3):
10
Batt
Press this key to perform a battery test. This shows the battery
level in A-D counts and approximate voltage. Voltage is not
calibrated.
A-D
Press this key to test the A-D section of the EDjr. You need to
apply force to change the counts and test the unit. The A-D is
the electronics portion that converts analog load cell signal to
digital numbers.
Disp.
Press this key to perform a display test. Stop the test by pressing the ESC key.
Keys
Press this key to perform key tests. Any key pressed will be
reflected in the display. Press ESC to end the test.
EDjunior Dynamometer User’s Manual
EDjr Operation
Display Modes
The EDjr has two display modes accessible by pressing the Mode soft key.
See Figure 4.
The first display mode when you power up is the live force measurement
mode.
Press the Mode soft key and the display changes to peak measurement
mode. This mode shows the peak force applied to the EDjr since the last
peak clearing action. Delete the peak reading by pressing the Clear soft key.
Press the Mode soft key again and the display returns to the force measurement mode.
Force Measurement
Follow these steps to perform a gross force measurement.
1. Turn on the unit with the On/Off key.
2. Remove any weight from the EDjr.
3. Zero the EDjr by pressing the ZERO key.
4. Apply the force to the EDjr and read the gross force on the display.
You can change the units of measure of the display by pressing the Units
soft key. Zero reference is maintained after instrument power off and will be
recalled with the next power-on. Zero reference may be lost if battery power
is removed.
Force Measurement
Rezero
Rezeroing allows the weight or load of fixturing to be invisible to the measurement. The zeroed load must always be considered as part of the
maximum capacity.
1. Turn on the unit with the On/Off key.
2. Remove any weight from the EDjr.
3. Zero the EDjr by pressing the ZERO key.
4. Apply the tare force to the EDjr and press the ZERO key.
5. Apply the force to the EDjr and read the net force on the display.
Steps 2 and 3 are not required if the weight of the fixturing is not needed.
This should be maintained, however, to know cumulative loads.
Displaying Peak Force
Peak force can only be reset to
zero if live force is zero. Peak
force will reset to match live
force.
The EDjr will store the peak force applied until that reading is cleared. To
display the peak force applied to an EDjr, from the force measurement
mode, press the Mode soft key. The display changes to display mode #2
shown in Figure 4 which is the peak display mode. The peak force is displayed. You can clear this by pressing the Clear soft key.
Peak reading is maintained after instrument power off and will be recalled
with the next power-on. Peak reading may be lost if battery power is removed.
EDjunior Dynamometer User’s Manual
11
Figure 4
Display mode menu
Press the Mode soft key until the desired display mode is reached.
12
EDjunior Dynamometer User’s Manual
Troubleshooting
Problem
Possible Cause
Solution
EDjr powers on momentarily and turns off
Low battery
Replace with high quality alkaline batteries
EDjr does not power on
Low battery
Replace with high quality alkaline batteries
Batteries installed backwards or no spring contact
Insure that positive terminals of both batteries (nub)
face inward – towards the black cap. Check that
spring is attached to the battery cap.
Software reset
Remove battery cap & reinstall after one minute.
Attempt to turn power on again.
Display contrast too light
Hold the Arrow key down while pressing the F2 key
several times to increase the display contrast. If
nothing occurs, release both keys. Press the power
button and try again.
Display contrast too dark
Hold the Right Arrow key down while pressing the
F1 key several times to decrease the display contrast.
Display is completely
dark
EDjunior Dynamometer User’s Manual
13
Safe Operation
Keep all the following in mind as you use the EDjr dynamometer.
If you overload this dynamometer you could suffer severe
injuries or death. The total load
on the dynamometer should
NEVER exceed the rated
capacity.
The system capacity is equal to the rating of the dynamometers. The
shackle rating should not be used to determine lift capacity of the system.
Any zeroed deadload must be considered as part
of the ultimate load.
Although this instrument has a substantial overload protection rating, the
instrument should not be used above the rated capacity. Doing so can
significantly impact fatigue life of the instrument and cause premature and
abrupt failure. If a higher capacity reading is needed, Dillon insists that a
larger instrument be used.
Safety is always a concern in overhead lifting and tensioning applications.
To limit your liability always insist upon factory supplied shackles and pins
and factory tested and certified safe optional equipment. All DILLON products are designed to meet the published Safe Working Load (SWL) and
Ultimate Safety Factor (USF) standards of the United States Military.
Do not grind, stamp or deform the metal on the dynamometer body in any
way.
Any significant damage or deformation to the loading element is cause for
evaluation by Dillon, particularly in the element side members to the right
and left of the display.
Relieve all torsional and off axis loads.
Apply load in the center of the shackle bow with this instrument.
Off center loading results in substandard performance.
Instrument requires time to stabilize when changing temperatures.
Use only the hardware supplied with this instrument. If no hardware was
supplied, insure that the mating pin and shackle bow is equivalent to the
hardware used at calibration. Otherwise substandard performance can
result.
Dillon recommends only using qualified rigging hardware and cannot
be responsible for unapproved hardware.
This instrument is not designed for the following:
• Applications that see rapid, dramatic temperature swings or thermal
shock. Wide variation in readings can occur.
• Environments with high electromagnetic fields such as cranes employing electromagnets to lift metal. These induce trace voltages that are
picked up within the load cell lead wiring and appear as inaccurate
loads.
• Intrinsically safe environments. This unit has not been Factory Mutual
tested.
14
EDjunior Dynamometer User’s Manual
Weighing and Force Measurement Practice
The basis for all electronic force measurement or weighing is measurement
of stress in a loadcell body. To obtain optimal results it is necessary to
establish a few basic rules, otherwise the effect may be a nonlinear or nonrepeatable response. Read and follow these tips and see the illustrations on
the next page.
Load Centering
For accurate performance the force acting on the unit must be in line with
the unit.
Alignment
Insure shackles are oriented parallel with the instrument. Apply load in the
center of the shackle bow.
Proper Pin Fit
A proper fitting pin is important in order to generate an even stress distribution and avoid yield stresses. To achieve published accuracy you must use
the shackle pins provided by Dillon.
Torque and Bending
Torque and bending should be avoided. Use swivels on the lifting wire for
anti-torque and avoid side forces.
Certified Gear
Certified shackles and lifting gear should always be used in accordance to
local laws and federal legislation. Insure all hardware, fittings and line used
to sustain the load are properly sized and rated for the installation. Have the
system evaluated by a qualified engineer if any question or uncertainty
exists.
EDjunior Dynamometer User’s Manual
15
Good Force Measurement Practice
Be sure fixturing does
not bind between the
body of the EDjr and
the shackle!
16
EDjunior Dynamometer User’s Manual
EDjunior Dynamometer User’s Manual
17
18
EDjunior Dynamometer User’s Manual
EDjunior Dynamometer User’s Manual
19
Dillon
A division of Weigh-Tronix Inc.
1000 Armstrong Dr.
Fairmont, MN 56031 USA
Telephone: 507-238-4461
Facsimile: 507-238-8258
e-mail: [email protected]
www.dillon-force.com
Force Measurement Products & Systems