1
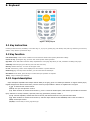
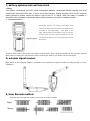
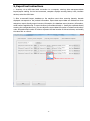
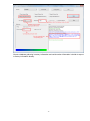
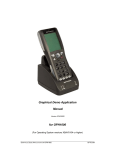
T5 Elite Data Collector
User Manual
REV 2.1
1
Copyright
This handbook contains information and content to illustrate the current situation, not guaranteed
meaning, including but not limited to, any implied warranties or merchantability warranty, or fitness
for a particular purpose; product kind prevail, are the contents of this manual may be associated with
physical differences, are subject to change without notice.
This manual contains exclusive information protected by copyright law, all rights reserved. In addition
to copyright law allows some otherwise without Shen NETCOM electronics limited written consent may
not photocopy, make, modify or translate part or all of the contents. Control programs section of this
product are protected by copyright laws, all rights reserved, shall not be violated.
All other brand names mentioned in this manual and product names are the trade names, service
marks or registered trademarks of the company.
2
Chapter I
Product Parts List
NAME
quantity
unit
T5 Data acquisition device hosts
1
Set
Base station (some models optional)
1
Set
Data cable
1
Piece
Warranty card
1
Piece
User manual
1
Piece
Note
Certain features in this device depend on the device specific configuration, please purchase when
comparison configuration model, the use of this product. On the features and functionality of the
device described in the user manual and instructions, as well as other information are current and valid
information, and all information is accurate at the time of printing. Shen Zhen NETCOM electronics
limited reserves the right to correct or change information and descriptions in this manual right,
without prior notice and does not assume any responsibility. The products described in this manual,
may be stored in semiconductor memories or other media on the company or the third party
copyrighted software. Legal protection in China and other countries and third-party software vendors
of the company exclusive rights for copyrighted software, including distribution, copying of
copyrighted software. Therefore in the context of legal provisions is not allowed to modify the
software in any way, design, distribution, or copying.
3
Chapter II
Product description appearance
A, part names and functions
1 , Indicator
2 , LCD monitor
3 And the power on key
4 , Digital key + Function keys + Trigger
key
5 , Laser warning signs
6 Location, stickers
7 , Beep-hole
8 And the battery compartment latch
9 And the battery compartment
(underneath the battery cover)
10 And lanyard hook
11 , Scan window
12 , Communication interface
Indicates the status of the operation.
Display a variety of implementation.
Control power supply.
A total of 23 Key for power control, and perform other
operations.
2 Types of laser warning signs.
Marking products.
Buzzer sound.
Lock the main battery in the battery compartment.
Put the main battery.
Wandai installed hooks.
Launch reading barcode laser window.
To communicate with your computer, or extended system.
4
B. Keyboard
Figure 1 T5 key layout
2.1 Key instruction
Counting a total of 24 key. Including: 0-9 number key, F1, F2, F3, F4, opening key, scan button, ESC, ENT key, delete key, turn the key
and the # key and the up and down keys。
2.2 Key function
0-9 number keys: used to enter numbers for menu function selection and system parameters settings.
Power on key: pressing this key, you hear "tick" sound system switch operation.
Up/down: menu and feature selection state, implement the menu page flip. When you edit, realization of editing text jumps.
SCAN key: barcode input, press the key auto scan bar code entry.
ESC key: Returns the keys. To return to the upper menu.
F1~F4: function key, used to enter displayed on the interface or specific features.
Delete key (←): clear key. Enter the State, you can cancel the last valid input.
ENT button: Enter State, press this key to confirm the input operation is complete.
# Key: # key to switch input methods.
2.2.1 Input description
Input description compatible with T9 input method. While you're typing, press # to switch input methods. To support Chinese pinyin,
English and uppercase and lowercase letters, numeric entries. Input punctuation is Chinese or English mode 1 key input.
【←】
:To delete the last entered content
【ENT】
:Sure you enter phonetic words or
【1】
:When numbers are entered as the number 1, press 1 to enter the decimal point; when another input method for character
input, click Enter a comma, semicolon, space bar, minus sign, parentheses, decimal, number 1
【2-9】
:Phonetic alphabets, numbers that can be entered, and activates when the word, select the Enter Word
【0】
:When numbers are entered as the number 0, and other input methods for the SPACEBAR, click to enter the number 0
【# 】
:Switch input method
【▼/▲】
:Choose Ruby or terms, page down/up
5
C, battery systems and real time clock
1.Battery:
This collector recommends dual AA/5, Ni-MH rechargeable batteries, rechargeable battery recycling. First three
charging time required for more than 12 hours, and to fully discharge. Regular charging time is 8 hours. Improper
battery placement method causes the machine will not turn on or charge. When the battery is installed, in
accordance with the battery compartment battery polarity marked on the base of installed correctly.
2.Disassemble battery:
Removable battery: the battery latch Note: slide
latch to the left to open the latch, and sliding buckle
is locked to the right battery. Slide latch to the
right, should not force the battery cover on the box,
or it will crush the latch! Open the battery lock, you
can detach the battery cover so that you can remove
the battery;
3. Built-in clock: date of the device has a built-in clock function. When using the machine for the first time, required
after power on setting the date and time. After removing the battery you need to set the time again.
D, wireless signal receiver
Base station as the following diagram, connected to the computer through the USB port, Plug and play, no driver
installation.
E, Scan Barcode method
Scanning laser the right way and the wrong way to read bar codes:
Right:
Wrong:
6
Chapter III
application and software operating
instructions
1, Application Instruction
T5 Counting machine is mainly for small and medium enterprises, company, store, shop, warehouse barcodes, such as
an information-gathering tool. Business features include: serial number management, inventory management, data
acquisition, terminal management, barcode detection, cable, wireless barcode scanning bar codes, browse data,
calculator. Basic functions: a barcode can identify common. Export formats: TXT, and EXCEL.
7
3, main menu introduction
3.2
3.1 Starting up window
Main Menu
Menu
1.
2.
3.
4.
5.
6.
10:52
2011-02-24
Welcome to Longsys!
www.longsys.cn
10:52
Simple Inventory
Date Collection
Scanner
List Managment
Setting
Others
ESC
Note: 1. Select the numeric keys to enter the
appropriate functionality.
T5 V2.3.328
Go
Instructions: 1. turn on the main interface,
press the right key to begin to enter the main
menu interface.
8
4, Function instruction
4.1.1 Simple Inventory
4.1 Simple Inventory
House1
1.Inventory
2.Inventory List
3.Wireless Export
4.Date Clear
Direct counting is a single barcode and quantity of statistics,
record collecting time, product information will not be displayed
above the machine counted. Direct inventory build up 100
warehouses.
Menu
13:32
Menu
13:32
1.New House
2.House List
3.House Delete
4.Generate Txt
5.Setting
ESC
13:32
Inventory
Barcode(S):69107053053459
manually enter up to 10 characters, 20 characters, or scan a bar code warehouse
Quantity:6
Rec Total:9
Total Number:23
Date/Time:
2013/11/11 13:32:37
name entered. Warehouse name entered after you press the Enter key after
ESC
ESC
Notes: 1. directly on the interface, such as the inventory management menu, press
the corresponding number key to enter a submenu submenu. "New warehouse" to
123
Qty
entering the inventory interface directly as indicated in 4.1.1. 2. "the list of
Instructions: 1. direct counting on interface such as, counting interface can
warehouses," query all warehouse information, displayed under the warehouse
directly display the barcode number, total number of bar codes, counting total
inventory barcode number and count the total number. Press the F1 key to modify
number of counting time. Quantity counted right-you can enter and select to
the warehouse name, press F4 and then scan or manually enter the warehouse can
add or overwrite an existing number. 2. "inventory list" query inventory
access the corresponding warehouse inventory interface directly, such as the figure
information, display inventory barcode and quantity counted. Press the right
on the right. 3. "delete the warehouse," individual deletes all data warehouse.
key to search bar displays. 3. the "export data wireless" link wireless base
Press F4 to search the warehouse that you want to delete. 4. the "generate export
station to your computer, open the PC-side text, number of machines scan a bar
files" will all the warehouse inventory barcode number and generate txt text
code and wireless transmission to a computer terminal. 4. "counting empty"
documents directly through u-disk mode to copy backup computer. 5. "inventory
current warehousing all inventory information below empty.
settings" settings for scanning the bar code number is increased directly after 1.
9
4.2 Data Collection
Menu
4.2.1 Date Collection--List
Menu
10:52
10:52
1.New List
2.View List
3.List Delete
4.Attribute Setting
5.Switch
6.Generate Txt
Default for New list
List1
1.Date Collection
2.Collection List
3.Wireless Export
4.Attribute Setting
5.Switch
6.Data clear
ESC
ESC
Description: 1. the "new documents" you can manually enter up to 10
Notes: 1. "serial number acquisition" is as follows in Figure
characters, 20 characters, enter a document name or scan the barcode.
4.3.2 shows. 2. "Serial number acquisition list" displays
Warehouse name entered after you press the Enter key after entering the
collection of product bar codes. Press the right key to
serial number capture interface, as shown in 4.3.1. 2. the "document list"
collecting bar code scan query information, as shown in
query all documents information page, showing total inventory bar code
Figure 4.3.2. 3. "Data export" documents capture bar code
under the document. Press the F1 key to modify the documents name,
serial number via the base station receiver wireless
press F4 to scan or manually enter document name after entering the
transmission to a computer terminal. 4. the "property
corresponding documents, namely serial acquisition interface. 3.
name" 5 user customizable settings property name,
"documents removed" a single delete all data warehouse. Press F4 to
displayed below the barcode serial number acquisition
search the warehouse that you want to delete. 4. "set the default property
when, as in Figure 4.3.2 brands, styles, colors, and so on. 5.
name" default property name for all new documents be property names.
"Anti-weight code switch settings" switch, the same bar
Can set up to 5 properties fields. 5. "anti-weight code switch settings
code can only be recorded once; close switch, the same bar
default" default anti-weight code switches, anti-weight codes valid for all
code allows the entry several times. 6. "Data cleansing"
new documents. 6. the "generate export files" all documents collect serial
clear note all of the following data collection.
number barcode and directly generate txt text documents through u-disk
mode to copy backup computer.
10
4.2.2 Data Collection
4.2.2.1 Collection List
10:52
12
1.356409045134204
2.6978475734482
3.6987428372303
4.6982234124323
5.6987883423746
6.6912367542343
7.6956432312775
Brand:HTC
Style:G7
Color:white
Place of production:Taiwan
ESC
▲
123 ▼
10:52
List
Barcode:356409045134204
Enter
ESC
Notes: 1. "serial number collection" bar bar, press the
▼Search
SCAN key scan barcode (barcode all of the following
properties can be used to scan the bar code input). 2.
List
bar codes the following properties can be entered
1/10
2013/11/10 12:24:50
Barcode:356409045134204
Brand:HTC
Style:G7
Color:white
Place of production:Taiwan
manually or scan, you can also enter from the
dictionary. To move the cursor from column properties,
press the F3 key to dictionary appears, up and down
keys to select a preset field, press the Confirm button
you choose the corresponding Dictionary field.
ESC
10:52
▲
▼
Delete
Notes: 1. "serial number acquisition list" shows the
product serial number barcode and properties collection.
Press the right key to scan the barcode barcode query
collected information, press the up and down keys to
select view different product information, right click to
delete the current page information.
11
4.3 Scanner
Menu
4.3.1 Wireless bargun
10:52
10:52
Wireless bargun
1.Wireless bargun
2.Wire bargun
Barcode(S): 6987654356754
To Send Num:0
Sent Num:13
ESC
Notes: 1. "wireless bar code gun" is as follows in Figure
[F1]View
4.4.1. 2. "wired barcode gun" is as follows in Figure 4.4.2.
ESC
123
Enter
Instructions: 1. connect the base station to a computer,
open text, the input settings for the English input
method, scan a bar code, through the bar code on the
base station to the text. Number has been sent to sent to
the base station on the success of the bar code number.
Each time you enter the interface, the number 0 has
been sent, waiting to be sent the barcode number refers
not to send. Waiting to be sent the barcode can press the
F1 key to browse.
12
4.4 List Managment
4.3.2 Wire bargun
Menu
Scanner
10:52
1.List Import/Export
2.List Clear
10:52
Connected Working…
Barcode(S)
ESC
ESC
123
Notes: 1. "import/export data" import/export data format or
Instructions: 1. connect the USB data cable, and after
Excel tables to txt text. Import data for product information,
entering the wired barcode scanning functionality,
inventory search by scanning bar codes can be corresponding
interface prompts work correctly. 2. open the computer
product
files, the input settings for the English input method, press
information, inventory information, databases, inventory
the SCAN key scan a bar code, that is being scanned
information, serial number acquisition list. 2. "delete data"
barcode entered at the cursor display, enter barcode
enter a password into the delete data interface to remove
automatically skips upon completion, to continue
direct counting data, inventory data, delete the database,
rescanning the barcode input.
delete all delete product information serial number
specification.
Exporting
directly
for
documents. Note: deleted data cannot be recovered.
13
product
4.5
Setting
4.5.1 System Setting
The password for setting is 112233.
Setting
Setting
10:52
1.Barcode Setting
2.Export Format
3.Timeout Setting
4.DateTime Setting
5.Language Setting
6.System Unlock
7.Spec Disp Setting
8.Spec Editable
9.Display Contrast
1.System Info
2.System Setting
3.Inventory Setting
4.Wireless Setting
5.Spec Setting
6.Dict setting
7.U Disk
8.App Update
9.Recover Setting
ESC
10:52
ESC
▼
▼
Notes:
Description:
1. "the bar code setup" as described in 4.6.1.1 on the right.
1. the "system information" shows the host firmware version, application and device
2. the "export settings" Please refer to the figure on the right 4.6.1.2.
serial number. 2. the "system settings" system setup in Figure 4.6.1.
3. the "timeout" setting the host timed out enter the standby time.
3. "inventory settings" is as follows in Figure 4.6.2. 4. the "wireless settings" to set up
4. "time settings" sets the host time year month day minutes.
a wireless base station channel (frequency of 0~5), set the address (channel 0~255),
5. "language settings" sets the display language for the machine type is
base-station frequency after the replacement, need to reset the base station
divided into Chinese Simplified and English.
frequencies, wireless channel with native be paired if the addresses are the same.
6. "the system to unlock the" lock hosts API data interface.
After Setup is complete the wireless parameters, connection to the base station,
7. "hide specification set" set hide portions of the specification display. Press
wirelessly send a test, paired successfully completed sending data. 5. "specification
the F2 key to select open or closed specifications showed that Spec with *
setting" manually setting the specifications, setting is successful, add new product
before opening.
specification correspond to input information will be displayed. 6. "the dictionary
8. "the product specifications you can edit settings" when setting up database
set" set fixed field, input specifications you can press F3 to call. 7. the "USB mode"
inventory interface, can modify the specification or description options. Press
machine over a USB connection to your computer, read the txt data generated native
F2 key to select Enable or disable specification shows that Spec with * before
machine, for example, the inventory directly, databases, inventory, serial number
opening.
acquisition lists. 8. "the update" host firmware update. 9. "restore factory settings"
empty host all the data and settings and restore the factory default settings.
14
4.5.1.1 Barcode Setting
Srtting
4.5.1.2 Export Format
Setting
10:52
10:52
1.Decoder Setting
2.Decode Option
3.Invalid Bar Length
1.DirectCheck Format
2.DB Check Format
3.SerialData Format
4.WirelessGun Format
ESC
ESC
▼
Decoder
Setting
10:52
▼
10:52
*code128
*Code39
*Code93
*Code11
*EAN
*CodeBar
*MSI
*D2/5
*I2/5
*M2/5
[F2]Switch Decoder
Prefix:
Suffix:
Separa:
Ending:
Export 0 quantity: 1
Export Spec: 1
ESC
Cancel
▲
▼
123
Enter
Instructions:
Notes:
1. leading export settings barcode, bar code, separator, terminator suffix, export
1. "encoding type set" set the switch decoder type, for some types of
volume to 0 bar code specifications, export commodities. Leading bar code and
barcode decoding.
suffix settings 4 characters, separator, and terminator setting is 2 characters, set
2. the "decode options configuration" setting the bar code
character type is ASCII code value and/,/,/symbols (TAB, carriage return, line keys).
verification, UPCA bar code and 0, ASCII39 model.
Character input method: English letter input mode, press the number 1 key.
3. "effective length bar code configuration" capture bar code length,
2. set whether to export the barcode barcode number is 0, setting of 1 indicates that
display automatically intercepting scan a bar code on the host.
the export, set to 0 means that no export. 3. database export settings are exported
product specifications, set to 1 means that the export, set to 0 means that no
export, such as up and down. These settings are mainly for the production of local
and wireless data format of the exported file is valid.
15
4.6
4.5.2 Inventory Setting
Setting
Menu
10:52
Setting
10:52
1.Barcode Detect
2.Calc
1.Float Support
ESC
Others
▼
ESC
Notes:
10:52
1.Enable input float
Enable
disable
1. "barcode check" test bar code length and type. 4.7.1 as
Note: When you enter a decimal
allows automatic scanning will be
forced to close an option
following figure.
shown in the following figure.
2. the "Calculator" ordinary calculator, 4.7.2 as shown in the
Keynum to switch
Exit
Notes:
1. "the number of decimals supported" sets whether the machine
supports counted quantity as decimal fractions. When the decimals are
allowed, and will be forced to shut down after you scan a bar code
inventory number plus 1 function. After you scan a bar code, and
manually enter a decimal number, and then select Add or overwrite.
4
16
4.6.2 Calculators
4.6.1 Barcode Detect
Calc
Detect
10:52
10:52
150
Barcode(S): 6910705305345
Barcode type:
EAN-13
Barcode length:
13
ESC
*
2
=
300
=
300
Scan
Notes:
ESC
1. "barcode check" display scan bar code information,
123
ENT
Instructions:
display the barcode type and length.
1. Enter the calculator functions, "+", "-", "x" and "÷"
correspond to the F1, F2, F3, F4 on the keyboard function
keys, "=" enter key on your keyboard.
2. The calculator calculates the maximum number of digits
as the number of 8-bit, over 8-bit number using scientific
notation.
17
5, Export tool instructions
1. Inventory via a USB data cable connection to a computer, entering data management-data
import/export--waiting for the host command, computer displays counting letters, tools, interface
devices, select the 60M letter.
2. After a successful import, database on the machine count when scanning barcode, barcode
displayed corresponds to the product information. Export data export data are divided into three
categories: export directly export inventory information, the database export inventory information,
serial number acquisition list. To export inventory information directly: 1. modify the exported directly
counting the configuration form, you can adjust the export data the number of columns and column
order. Properties total number of columns represent the total number of derived columns, and modify
the value click on refresh.
18
Export a database gathering inventory information and serial number information is similar to export
inventory information directly.
19