1
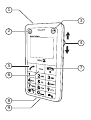
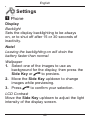
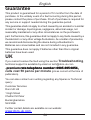
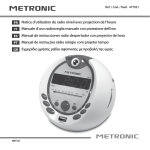
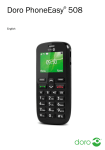
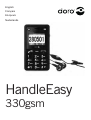
English
Français
ελληνικά
Nederlands
HandleEasy
330gsm
1
3
2
4
5
6
8
9
7
English
1
2
3
4
5
Alarm Call Key
Torch Key
FM Radio Key
Side Key
Call Key q
Français
1 Touche Appel
d´urgence
2 Touche Torche
3 Touche Radio FM
4 Molette latérale
5 Touche Appel q
ελληνικά
1 Πλήκτρο κλήσης
ειδοποίησης
2 Πλήκτρο φακού
3 Πλήκτρο Ράδιο
FM
4 Πλευρικό πλήκτρο
5 Πλήκτρο κλήσης q
6
7
8
9
Return/Menu Key
End Key L
Charging socket
Headset socket
6 Touche Retour/
Menu
7 Touche Fin
d’appel L
8 Prise pour chargeur
9 Prise pour casque
6 Πλήκτρο Επιστροφή/
Μενού
7 Πλήκτρο
τερματισμού L
8 Φις φόρτισης
9 Υποδοχή
ακουστικών
English
Installation
Note!
Always turn off the telephone before removing
the battery cover.
Battery cover
To remove the battery cover, press carefully
on the cover and slide it downwards.
To replace the battery cover, slide it from
below and up along the telephone.
Installation/removal of SIM card
Make sure that the SIM card’s contacts are
facing inwards and that the cut-off corner is
pointing upwards. Take care not to scratch or
bend the contacts on the SIM card.
English
If the SIM card is missing, damaged or
incorrectly inserted, No SIM Card will be
shown in the display.
Installation/removal of battery
Place the top of the battery in the battery slot
with the battery contacts facing the contacts
in the slot, then press carefully on the bottom
of the battery until it locks in place.
To remove the battery, carefully press and
lift the bottom of the battery in the “fingershaped” groove.
Charging
Connect the mains adapter to the wall socket
and to the socket on the telephone. Charging
is completed when a full battery symbol and
the text Full Charged are displayed.
Charge the telephone for 12 hours the first
time. After that, it takes approximately 5 hours
to fully charge the battery.
English
Battery
Full battery capacity will not be reached until
the battery has been charged 4–5 times.
Batteries degrade over time, which means
that call time and standby time will normally
decrease with regular use.
The automatic charging mechanism prevents
the batteries from being overcharged or
damaged due to prolonged charging.
When the battery is running low,
is
displayed and a warning signal is heard.
Warning!
Only use batteries, charger and
accessories that have been approved for
use with this particular model. Connecting
other accessories may be dangerous
and may invalidate the telephone’s type
approval and guarantee.
Connection to a USB port on a computer
may damage the telephone and/or the
computer.
English
Display symbols
Phone Book
Signal level
New SMS
Calls
Roaming
Text message
Headset connected
Keypad locked
Alarm
Alarm active
Ring signal only
Conversion
Vibration + ring
Profiles
Vibration only
Battery level
Calculator
FM Radio
Settings
English
Operation
Activating the telephone
To turn the telephone on/off, press and hold
L for three seconds.
If the SIM card is locked with a PIN code
(Personal Identification Number), the display
shows Insert PIN1: . Enter your PIN code and
confirm with q to unlock the SIM card.
Note!
Most network operators allow the emergency
number 112 to be called without unlocking the
SIM card.
If you enter the wrong PIN code, the display
will show Insert PIN1 (#): , where # is the
number of attempts left.
When no more attempts remain, you need the
PUK code (Personal Unblocking Key) supplied
with your SIM card to unlock the card and
supply a new PIN code.
English
Enter the PUK code, confirm with q, then
enter a new PIN code and confirm it.
If PIN and PUK codes were not supplied with
the SIM card, contact your network operator.
Phone code
The telephone can be password-protected
for additional security. Enter Phone code
will then be displayed on activation (after
unlocking the SIM card).
Enter the Phone code and press q to
unlock.
Note!
The default Phone code is "0000". See the
Settings/Security menu on how to change the
Phone code.
English
Making a call
1. Enter the number with the keypad. Skip
backwards with .
2. Press q to dial. A signal will be heard
as the number is dialled.
3. Press L to end the call.
Note!
When making international calls, press *
twice for the international prefix "+".
Dialling with the phonebook
1. Press L to show the phone book.
2. Scroll the list by sliding the Side key
up/down, or press a keypad key to jump to
the entries beginning with that character.
3. Press q to dial the selected contact.
4. Press L to end the call.
Receiving a call
1. Press q to answer, or L to reject the
call without answering.
2. Press L to end the call.
English
SMS text messages
If a new SMS message has been received,
New Message is displayed and a signal is
played. Press q to open the inbox.
% is displayed at the top of the screen when
you have unread messages in the inbox. A
flashing % means that the inbox is full. Delete
some messages to free up memory.
See the Text messages menu for further
instructions on how to read, write, send and
save or delete text messages.
Using the keypad
The numerical keypad is also used for typing.
Press each key repeatedly to scroll between
characters and numbers.
Press # to toggle between upper/lower case
and numbers.
Press * for punctuation marks or special
characters.
Press
to erase the last entered character.
English
Note!
When the display is in sleep mode the first
keypress will only activate the display.
Keylock
The Keylock locks the keypad to avoid
accidental use of the keys.
To lock the Keylock, press and hold *.
To unlock, press
then *.
Incoming calls can be answered by pressing
q even if the Keylock is locked. When the
call is ended or rejected by pressing L , the
Keylock is locked again.
The emergency number 112 and the Alarm
Call Key can be used without unlocking the
Keylock.
Volume control
The volume can be adjusted during a call by
moving the Side Key up/down.
English
Headset
When a headset is connected,
is shown
on the display and the telephone’s internal
microphone is automatically disconnected.
With the included headset incoming calls
can be answered by pressing the headset
answering button for 1 second.
Warning!
Using a headset on high volume can
damage your hearing. Adjust the sound
volume carefully when using a headset.
10
English
Key functions
Call Key q
Used for answering and initiating calls, and for
confirming menu choices and settings.
Pressing q in standby mode will display the
Call List:
Outgoing call (blue arrow)
!
Incoming call (green arrow)
Missed call (red exclamation mark)
Pressing q while talking will display the call
option list:
Handsfree
Activates the Speakerphone function.
Mute
Switches the microphone on/off
Disconnect
Disconnects the call (same as L)
11
English
End Key L
Used for ending or rejecting calls, to cancel
the current menu option and/or to return to
standby mode.
Pressing L in standby mode will display
the Phone Book.
Pressing and holding L for three seconds
will switch the phone on/off.
Return/Menu Key
Pressing
in standby mode will display the
menu. It is then used to return to the previous
mode or menu level.
Pressing
while typing will delete the
previous character.
Pressing
hold.
while talking will put the call in
12
English
Side Key
The Side Key is a 3-way key that can both be
pressed and moved up/down.
In menus, moving the Side Key up/down
will scroll through menus, lists and settings.
Pressing the key will usually confirm a
selection or move to the next menu level.
In standby mode, either moving or pressing
the Side Key will activate the display.
While talking, pressing the Side Key will
activate the speakerphone function, and
moving it up/down will adjust the sound
volume.
Torch Key
Press and hold to switch the torch on/off.
FM Radio Key
Press to switch the FM Radio on/off when the
headset is connected. If already on, pressing
the key will display the FM radio menu.
13
Alarm Call Key
English
The Alarm Call Key is a speed dialling key
for calling an emergency number.
Pressing the Alarm Call Key for 1 second will
automatically dial the programmed number
even if the Keylock is active.
Note!
The Alarm Call Key number has to be
programmed by the user before use.
* Key
Press and hold * to activate the keypad lock
l.
When typing, * is used to enter punctuation
marks or special characters.
# Key
Press and hold # to change user profile.
When typing, # is used to change between
upper/lower case and numbers.
14
English
Menu
Press
to bring up the main menu.
Move the Side Key up/down to scroll between
menus and press the Side Key or q to
make selections. Use the Side Key or the
numerical keypad to navigate within menus
and sub-menus.
Press
to go back to the previous level, or
L to close all menus and return to standby
mode.
Phone Book
Profiles
Calls
Calculator
Text message
FM Radio
Alarm
Settings
Conversion
15
English
Phone Book
1 Browse
Displays all saved contacts. Select an entry
and press the Side Key to bring up the
contacts sub-menu, or press q to call.
Details/edit
Edit the name, group and telephone number
for each entry.
Delete
Deletes the entry from the memory.
Send message to
Opens a text message window. Type your
message, then press q to bring up choices
for sending and/or saving the message.
Copy to SIM phonebook (phone contacts)
Press q to copy the selected entry to the
SIM card.
Copy to Phone (SIM card contacts)
Press q to copy the selected entry to the
phone memory.
16
English
Send number
Sends the details for the selected entry as an
SMS message. Press q to view the details,
then press q again to bring up choices for
sending and/or saving the message.
Group browse
Browse the numbers belonging to a group.
Create
Adds a new contact (see below)
2 Create
Adds a new contact.
1. Select "Name?" and press the Side Key.
2. Use the keypad to enter a name or
description for the new contact. Press #
to toggle between upper/lower case and
numbers. Press * for punctuation marks
or special characters. Press
to back
up/erase.
3. Press q to confirm.
4. Select <Common> and press the Side
Key. Select a group for the new contact
and press q to confirm.
17
English
5. Select "No?" and press the Side Key.
6. Enter the number for the contact, including
the area code. Press * twice to insert the
international prefix "+" if needed.
7. Press q twice to save the new contact.
3 Storage Status
Shows the number of stored contacts on the
SIM card and in the phone memory
4 Abbreviated dial
Phonebook contacts can be assigned to one
of the number keys 2 – 9 for speed dialling.
1. Scroll to one of the assignable keys in the
list.
2. Press the Side Key twice to set or change
the key assignment. The phonebook will
now open.
3. Select a contact from the phonebook and
press the Side Key to assign it to the
selected speed dialling key.
18
English
5 Copy
From SIM card to phone
Press q to copy all contacts on the SIM
card to the phone memory.
From phone to SIM card
Press q to copy all contacts in the phone
memory to the SIM card.
6 Delete All Entries
Delete all ME entries
Press q to delete all contacts from the
phone memory.
Delete all SIM entries
Press q to delete all contacts from the SIM
card.
Note!
The phone can store 100 entries. The memory
capacity of the SIM card depends on the type
of card used.
19
English
7 SDN Phonebook
The SDN (Service Dialling Number)
Phonebook contains phone numbers for the
network operator's services.
SDN Phonebook entries are stored on the
SIM card and cannot be changed or deleted.
Move the Side Key up/down to scroll to the
desired entry, then press q for options:
Details
Press q to show details for the selected
entry.
Call
Press q to call the selected entry.
Note!
SDN is not used by all network operators.
20
English
Calls
1/ 2/ 3 Incoming/Outgoing/Missed call
The 10 most recent incoming, outgoing or
missed calls are saved in the call memory.
Outgoing call (blue arrow)
!
Incoming call (green arrow)
Missed call (red exclamation mark)
1. Move the Side Key up/down to select a
call from the list.
2. Press q to call directly, or press the
Side Key for options (see below), then
q to confirm.
Call
Calls the selected number.
Edit before dial
Gives the opportunity to edit the number
before calling.
21
English
Send message to
Opens a text message window for replying to
the caller. Type your message, then press q
to bring up choices for saving and/or sending
the message.
Delete
Press q twice to delete the call.
Save number
Creates a new contact for the number (see
Phone Book).
Delete all
Press q twice to delete all saved calls.
22
English
4 Call Duration
Contains call time logs.
Outgoing Duration
The total duration of all outgoing calls.
Incoming Duration
The total duration of all incoming calls.
Last Call Duration
The duration of the most recent incoming or
outgoing call.
Press q to reset the time logs to 0.
23
English
Text message
1 Read message
1. Move the Side Key up/down to scroll
through received messages.
2. Press q to read the selected message.
3. Press q again to bring up more options:
Text reply
Opens a new text message window. Type
your message, then press q to view the
saving options:
Only send
Sends the message without saving it.
Only save
Saves the message in the Draftbox.
Send and save
Sends the message and saves it in the
Outbox.
Select one of the alternatives above, then
press q to send the reply.
24
English
Forward/Edit
Review the message and edit it if needed,
then press q to view the saving options
(see page 23).
Select one of the alternatives, then press q
once to enter a number manually or twice to
open the phonebook.
After entering/selecting a number, press q
twice to view the sending options:
Send message to
Press q to send the message to the
recipient(s).
Insert more DA
To add multiple recipients: enter another
number, then press q twice to return to the
sending options. Repeat if needed.
Dial back
Press q to dial the number of the sender
directly.
25
English
Extract number
Displays any telephone numbers contained
in the message as well as the number of the
sender.
1. Move the Side Key up/down to scroll
through the displayed numbers.
2. Press q to call the number or press
the Side Key to save the number in a
phonebook entry (see Phone Book).
Delete
Press q twice to delete the message.
2 Write message
Opens a text message window.
Type your message, then press q to view
the saving options (see page 23).
Select one of the alternatives, then press q
once to enter a number manually or twice to
open the phonebook.
After entering or selecting a recipient number,
press q twice to view the sending options
(see page 24).
26
English
3 Outbox
Contains saved sent messages.
Move the Side Key up/down to scroll through
the list of messages, then press q once
to review the message, and once more for
options:
Forward/Edit
Review the message and edit it if needed,
then press q to view the saving options
(see page 23).
Select one of the alternatives, then press q
once to enter a number manually or twice to
open the phonebook.
After entering or selecting a recipient number,
press q twice to view the sending options
(see page 24).
Delete
Press q twice to delete the message.
27
English
4 Draftbox
Contains saved unsent messages.
Move the Side Key up/down to scroll through
the list of messages, then press q once
to review the message, and once more for
options:
Forward/Edit
Review the message and edit it if needed,
then press q to view the saving options
(see page 23).
Select one of the alternatives, then press q
once to enter a number manually or twice to
open the phonebook.
After entering or selecting a recipient number,
press q twice to view the sending options
(see page 24).
Delete
Press q twice to delete the message.
28
English
5 Voice mail
Voice mail messages are stored on the
network. You call the network Voice Mailbox
number to listen to your messages.
Listen to voice mail messages
Calls the Voice Mailbox number to retreive
messages.
Voice mailbox number
Enter the Voice Mailbox number and confirm
with q.
Note!
The number to the voice mail is provided by the
network operator.
The Voice Mailbox can now be speed-dialled
by pressing and holding 1.
29
English
6 Message Setup
Service Center
This number must be entered and saved to
be able to use the SMS function. The number
can be obtained from the network operator.
Storage Media
SIM preferred
Messages are stored on the SIM card.
Phone preferred
Messages are stored in the phone memory.
Storage Status
Shows the number of saved messages on the
SIM card and in the phone memory.
30
English
7 Delete all
Delete all messages
Deletes all saved messages from the Inbox,
Outbox and Draftbox.
Delete inbox messages
Deletes all messages from the Inbox.
Delete outbox messages
Deletes all messages from the Outbox.
Delete draftbox messages
Deletes all messages from the Draftbox.
31
English
Alarm
Move the Side Key up/down to select Alarm
1, 2 or 3, then press q.
To set the alarm:
Select On and press q.
1. Enter the time for the alarm, then press
q for options:
2. For a single occurence, select One shot
alarm and press q to save the alarm.
For a repeated alarm, select Weekly
alarm and press q.
Scroll through the list of weekdays and
press the Side Key to mark each weekday
that the alarm should be active on.
Press q to save the alarm.
To disable the alarm:
Select Off and press q.
Note!
The alarm function works even if the telephone
is switched off.
32
English
Conversion
The phone has a conversion tool for Currency,
Area, Energy, Length, Mass, Power, Pressure,
Temperature, Time, Velocity and Volume.
1. Select Type and press q.
2. Select Convert type and press q.
3. Scroll to the desired conversion type and
confirm by pressing q.
4. Select the first Unit: entry and press q.
5. Select Choose unit and and press q.
6. Scroll to the desired unit you want to
convert from and press q.
7. Scroll down to the second Unit: entry and
press q.
8. Select Choose unit and and press q.
9. Scroll to the desired unit you want to
convert to and press q.
10.Scroll down to Input: and enter the
value you want to convert. The result is
immediately visible in Res.: .
33
English
Profiles
The phone has 5 user profiles with different
settings for call and alert signals. The profiles
are preset in the factory but can be modified
to suit individual needs.
Move the Side Key up/down to scroll through
the list of user profiles and press q to select
a profile .
1 Set as default
Set this profile to be loaded as default when
the phone is switched on.
2 Personalize
Change settings for the selected profile:
Call alert
Ring tone
Move the Side Key up/down to scroll through
the different ring tones and press q to
select a ring tone.
34
English
Ringing volume
Move the Side Key up/down to change the
sound volume of the ring signal. Release the
key or press
to return to the menu.
Call alert
Choose between Ring only, Vibrate only, or
Ring & Vibrate.
Confirm by pressing q .
SMS alert
Set the alert signal for incoming SMS
messages. Same functions and settings as
Call Alert.
Key sound
Volume 2
Loud beep on key press
Volume 1
Muted beep on key press
Off
No key sound
35
English
System alert
Enable/disable the sound alert for system
messages.
Alert On/Off
Enable/disable the telephone on/off melody.
3 Reset
Resets the selected profile to the factory
setting.
4 Title
Enter a new name for the selected profile and
confirm with q.
36
English
Calculator
The Calculator can perform basic math
operations.
1. Enter the first number using the number
keys 0 – 9. Use # to enter decimal
points.
2. Move the Side Key up/down or press *
to select an operation ( + - * / ), then
press the Side Key to confirm.
3. Enter the next number.
4. Repeat step 2–3 as necessary, or press
q to calculate the result.
5. Press
to clear the result and exit to the
menu.
37
English
FM Radio
Note!
The FM Radio and its settings are only
available when a headset is connected.
The FM Radio menu can also be reached by
pressing
when the radio is active.
Move the Side Key up/down to search for
radio stations, or press number keys 1 – 9
to select previously saved channels
(see Save channel below).
Press q to view the FM Radio options:
Off
Disables the FM radio.
Automatic Searching
Move the Side Key up/down to automatically
search for transmitting radio stations. The
display shows
while searching.
38
English
Manual Searching
Move the Side Key up/down to change the
frequency in 0.1 MHz steps.
Adjust Volume
Move the Side Key up/down to adjust the
sound volume.
Save Channel
1. Move the Side Key up/down to select one
of the 9 available channel presets.
2. Press q to save the currently tuned
station to the selected channel.
39
English
Settings
1 Phone
Display
Backlight
Sets the display backlighting to be always
on, or to shut off after 15 or 30 seconds of
inactivity.
Note!
Leaving the backlighting on will drain the
battery faster than normal.
Wallpaper
1. Select one of the images to use as
background for the display, then press the
Side Key or q to preview.
2. Move the Side Key up/down to change
images while previewing.
3. Press q to confirm your selection.
LCD Contrast
Move the Side Key up/down to adjust the light
intensity of the display screen.
40
English
Greeting Message
Enable/disable and edit the greeting message.
Language
Sets the menu language of the phone.
Automatic means that the language will
change depending on the network operator's
geographical location.
Date/Time Display
Enable/disable the time and date on the
display.
Clock
Date & Time Settings
Enter the time and date using the number
keys. Confirm with q.
Date Display Format
Select your desired format for displaying the
date (day-month-year etc.).
Date Separator
Select a separator sign (dot, slash, or none)
for date presentation.
Time Display Format
Select 12 hour or 24 hour time format.
41
English
Note!
If the battery is removed the stored time and
date will be displayed the next time the phone
is switched on.
Own number
Three telephone numbers related to the
owner/user can be entered here.
Keylock
The automatic Keylock function can be set to
be disabled, or activated after 30 Seconds or
60 Seconds of inactivity in standby mode.
Factory Default
Resets the telephone to the factory settings.
Note!
The phone lock password is required to access
the Factory Default setting. The default phone
lock password is "0000".
Note!
The Emergency number for the Alarm Call
Key has to be reprogrammed after a Factory
Default reset. Phone book entries and SMS
messages are not affected.
42
English
2 Alarm Call Setting
Alarm number
Enter the phone number to be dialled by the
Alarm Call Key and press q to confirm.
Delay setting
Sets the time delay before the Alarm number
is dialled after pressing the Alarm Call Key.
Select 3 Seconds, 5 Seconds or 8 Seconds
and press q to confirm.
3 Call
CLIR
Prevents the phone number from being
displayed on the recipients phone.
Contact your network operator for more
information about this service.
Auto redial
When enabled, the phone will automatically
redial the number 10 times after a busy signal
or unanswered call.
43
English
Any key answer
When enabled any key, except L and ,
can be pressed to answer an incoming call.
4 Network
Note!
These functions have to be supported by the
network and subscribed by the user. For more
information contact your network operator.
Call Waiting
An alert tone will be heard if there is an
incoming call while talking. Press q to
put the current call on hold and answer the
incoming call.
The following options can be selected:
Interrogate
Displays if the service is active or not.
Activate
Enables the function.
Deactivate
Disables the function.
44
English
Call Forwarding
Incoming calls can be diverted to another
phone number.
Unconditional Divert
Diverts all incoming calls to the other number.
Divert When Busy
Diverts incoming calls if the line is busy.
No Answer Divert
Diverts incoming calls if unanswered.
No Service Divert
Diverts incoming calls if the phone is out of
service.
The following settings can be selected for
each Call Forwarding function:
Interrogate
Displays if the service is active or not.
Activate
Enables the function.
Deactivate
Disables the function
45
English
Restrict calls
To increase security the phone can be
restricted to disallow certain types of calls.
Note!
To activate these functions a Restrict Calls
password is needed. Contact your network
operator to get the Restrict Calls password.
Note!
The emergency number 112 can be called
regardless of these restrictions.
All Outgoing Calls
User can answer incoming calls but not dial
out.
All Int’l Calls
User can not call international or long distance
phone numbers.
Int’l Except To Home
User can not call international or long distance
phone numbers except to the own region.
All Incoming Calls
User can dial out but not receive incoming
calls.
46
English
Incoming While Roam
User can not receive incoming calls while
roaming (operating in other networks).
The following options can be selected for the
Restrict Calls functions:
Interrogate
Displays if the service is active or not.
Activate
Enables the function.
Deactivate
Disables the function.
Network Select Mode
Automatic selection
Network is selected automatically according to
the SIM card's information.
Manual selection
Network is selected from a list by the user.
47
English
5 Security
The SIM card is protected with a PIN code
(Personal Identification Number). The Phone
can be set to ask for the PIN code on startup.
Power On PIN1
ON
Enabled, PIN code required when phone is
switched on.
OFF
Disabled, no PIN code required.
Change PIN1
To change the PIN code, enter a new PIN
code and confirm with q.
Change PIN2
Some SIM cards can have dual PIN codes. If
your network operator supports this function,
the second PIN code can be set here.
48
English
Phone code
The telephone can be password-protected for
additional security.
ON
Verify when power-on
Phone code required when the phone is
switched on.
OFF
Phone code disabled.
Change Phone code
To change the Phone code, enter a new code
and confirm with q.
Note!
The default Phone code is "0000".
49
English
Troubleshooting
Phone cannot be switched on
1. Battery charge low
Connect the power adapter and charge
the battery for 12 hours.
2. Battery incorrectly installed
Check the installation of the battery.
Failure to charge the battery
1. Battery or charger damaged
Check the battery and charger.
2. Battery recharged in temperatures below
10° C or above 55° C
Improve the charging environment.
2. Charger incorrectly connected to phone or
power socket
Check the charger connections.
50
English
Standby time decreases
1. Battery charge capacity too low
Install a new battery.
2. Too far from network transmitting tower
Searching the network demands a lot of
power. Find a place with stronger signal
or turn off the phone temporarily in areas
with weak signal.
Failure to place or receive calls
1. Restricted calls function activated
Deactivate the Restricted calls function.
If this does not solve the problem, contact
the network operator.
PIN code not accepted
1. Wrong PIN code entered too many times
Enter the PUK code to change the PIN
code, or contact the network operator.
51
English
”No SIM card” indication
1. SIM card damaged
Check the condition of the SIM card. If
the card is damaged, contact the network
operator.
2. SIM card incorrectly installed
Check the SIM card installation.
3. SIM card dirty or damp
Wipe the metal surface of the SIM card
with a clean cloth.
Failure to connect to network
1. SIM card invalid
Contact the SIM card provider.
2. No coverage of GSM service
Contact the network operator.
3. Signal too weak
See ”Weak signal” below.
52
Weak signal
English
1. Too far from network transmitting tower.
Try again from another location.
2. Network congestion.
Try calling at a later time.
Echo or degraded sound quality
1. Regional problem caused by a bad
network relay.
Hang up and redial as this may switch to
another network relay.
Failure to add a contact
1. Phonebook memory full
Delete contacts to free up memory.
Failure to set a function
1. Network operator does not support the
function or the user has not ordered the
service
Contact the network operator.
53
English
Care and Maintenance
Your unit is a technically advanced product and should be treated with
the greatest care. By following the advice below, you can ensure that
the guarantee will cover any damage.
•
Protect the unit from moisture. Rain/snowfall, moisture and all
types of liquid can contain substances that corrode the electronic
circuits. If the unit gets wet, you should remove the battery and
allow the unit to dry completely before you replace it.
•
Do not use or keep the unit in dusty, dirty environments. The
unit’s moving parts and electronic components can be damaged.
•
Do not keep the unit in warm places. High temperatures can
reduce the life span for electronic equipment, damage batteries
and distort or melt certain plastics.
•
Do not keep the unit in cold places. When the unit warms up to
normal temperature, condensation can form on the inside which
can damage the electronic circuits.
•
Do not try to open the unit in any other way than that which is
indicated here.
•
Do not drop the unit. Do not knock or shake it either. If it is
treated roughly the circuits and precision mechanics can be
broken.
•
Do not use strong chemicals to clean the unit.
•
Use the charger indoors.
The advice above applies to the unit, battery, charger or other
accessories. If the telephone is not working as it should, please
contact the place of purchase for service. Don’t forget the receipt or a
copy of the invoice.
54
English
Further safety information
The unit and the accessories can contain small parts. Keep them out
of the reach of small children.
Operating environment
Remember to follow any particular rules that may apply wherever
you happen to be, and always turn off the unit whenever its use is
forbidden, or it can cause interference or danger. Only use the unit
in its normal user position. This unit complies with guidelines for
radiation when it is used either in a normal position against your ear,
or when it is at least 2.2 cm (7/8 inch) from your body. If the unit is
carried close to your body in a case, belt holder or other holder these
should not contain any metal, and the product should be placed at the
distance from your body specified above. Make sure that the distance
instructions above are followed until the transfer is complete. Parts of
the unit are magnetic. The unit can attract metal objects. Do not keep
credit cards or other magnetic media near the unit, as information
stored on them can be erased.
Medical units
The use of equipment that transmits radio signals, e.g. mobile phones,
can interfere with insufficiently protected medical apparatus. Consult
a doctor or the manufacturer of the apparatus to determine if it has
adequate protection against external radio signals, or if you have
any questions. If notices have been put up at health care facilities
instructing you to turn off the unit while you are there, you should
comply. Hospitals and other health care facilities sometimes use
equipment that can be sensitive to external radio signals.
55
English
Pacemaker
Pacemaker manufacturers recommend a distance of at least 15 cm
(6 inches) between a mobile phone and a pacemaker to avoid the risk
of interference with the pacemaker. These recommendations are in
accordance with independent research and recommendations from
Wireless Technology Research. People with pacemakers should:
•
always keep the unit at a distance of at least 15 cm from the
pacemaker
•
not carry the unit in a breast-pocket
•
hold the unit against the ear on the opposite side from the
pacemaker to reduce the risk of interference.
If you suspect that there is a risk of interference, turn off the unit and
move it further away.
Hearing aids
Some digital wireless units can cause interference to some hearing
aids. Using the Doro HearPlus eh346m EarHook can eliminate this for
hearing aids with a ‘T’ position. If any other interference occurs, please
contact your operator.
Vehicles
Radio signals can affect electronic systems in motor vehicles (e.g.
electronic fuel injection, ABS brakes, automatic cruise control, air
bag systems) that have been incorrectly installed or are inadequately
protected. Contact the manufacturer or its representative for more
information about your vehicle or any additional equipment.
56
English
Do not keep or transport flammable liquids, gases or explosives
together with the unit or its accessories. For vehicles equipped with air
bags: Remember that air bags fill with air with considerable force.
Do not place objects, including fixed or portable radio equipment in
the area above the airbag or the area where it might expand. Serious
injuries may be caused if the mobile phone equipment is incorrectly
installed and the airbag fills with air.
It is forbidden to use the unit whilst flying. Turn off the unit before you
board a plane. Using wireless telecom units inside a plane can involve
risks for air safety and interfere with telecommunications. It can also
be illegal.
Areas with explosion risk
Always turn off the unit when you are in an area where there is a risk of
explosion and follow all signs and instructions. An explosion risk exists
in places that include areas where you are normally requested to turn
off your car engine. Within such an area, sparks can cause explosion
or fire which can lead to personal injuries, even death. Turn off the
unit at filling stations i.e. near petrol pumps and garages. Follow the
restrictions that are in force on the use of radio equipment near places
where fuel is stored and sold, chemical factories and places where
blasting is in progress. Areas with risk for explosion are often - but not
always - clearly marked. This also applies to below decks on ships; the
transport or storage of chemicals; vehicles that use liquid fuel (such
as propane or butane); areas where the air contains chemicals or
particles, such as grain, dust or metal powder.
57
English
Emergency calls
Important! Mobile phones such as this unit use radio signals, the
mobile phone network, the terrestrial network and user-programmed
functions. This means that connection in all circumstances cannot be
guaranteed. Therefore you should never rely solely on a mobile phone
for very important calls such as medical emergencies.
Specific Absorption Rate (SAR)
This device meets applicable international safety requirements for
exposure to radio waves. This telephone measures ��������������
0.3 W/kg (GSM
900MHz), 0.2 W/kg (DCS 1800MHz)���������������������������������
(measured over 10g tissue). The
max. limit according to WHO is 2W/kg (measured over 10g tissue).
Declaration of conformity
Doro hereby declares that the Doro HandleEasy 330gsm conforms to
the essential requirements and other relevant regulations contained in
the Directives 1999/5/EC (R&TTE) and 2002/95/EC (RoHS).
A copy of the Declaration of Conformity can be found at
www.doro.com/dofc
Specifications
Network: GSM 900/DCS1800 Dual Band
Size: 105 mm x 55 mm x 16 mm
Weight: 70 g (excl. battery)
Battery: 3.7V/900 mAh Li-ion battery
58
English
Guarantee
This product is guaranteed for a period of 12 months from the date of
purchase. In the unlikely event of a fault occurring during this period,
please contact the place of purchase. Proof of purchase is required for
any service or support needed during the guarantee period.
This guarantee shall not apply to a fault caused by an accident or a similar
incident or damage, liquid ingress, negligence, abnormal usage, not
reasonably maintained or any other circumstances on the purchaser's
part. Furthermore, this guarantee shall not apply to any faults caused by a
thunderstorm or any other voltage fluctuations. As a matter of precaution,
we recommend disconnecting the device during a thunderstorm.
Batteries are consumables and are not included in any guarantee.
This guarantee does not apply if batteries other than Doro original
batteries have been used.
UK
If you cannot resolve the fault using the section Troubleshooting,
technical support is available by email on [email protected]
-����������������������������������������������
premium���������������������������������������
rate telephone number: 0905 895 0854,
calls cost 50 pence per minute (prices correct at the time of
publication).
You can also contact us in writing regarding any Spares or Technical
query:
Customer Services
Doro UK Ltd
1 High Street
Chalfont St Peter
Buckinghamshire
SL9 9QE
Further contact details are available on our website:
www.doro-uk.com.
59
English
French
Greek
Dutch
Version 1.0