1
smar - GenBroker
First in Fieldbus
USER’S MANUAL
GenBroker
MAY / 06
GenBroker
VERSION 8
TM
FOUNDATION
P V I E WG B K M E
www.smar.com
Specifications and information are subject to change without notice.
Up-to-date address information is available on our website.
web: www.smar.com/contactus.asp
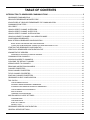
Table of Contents
TABLE OF CONTENTS
INTRODUCTION TO GENBROKER COMMUNICATIONS ............................................................................ 5
GENBROKER FUNDAMENTALS .................................................................................................................................5
GENCLIENT/GENBROKER ARCHITECTURE.............................................................................................................5
ADVANTAGES OF GENCLIENT/GENBROKER TCP COMMUNICATION .................................................................5
COMMUNICATION TYPES...........................................................................................................................................6
OPC DIRECT.................................................................................................................................................................6
USING A DIRECT CHANNEL OVER DCOM................................................................................................................6
USING A DIRECT CHANNEL OVER TCP/IP ...............................................................................................................7
USING A DIRECT CHANNEL OVER SOAP/XML ........................................................................................................7
USING AN INDIRECT CHANNEL VIA A MEDIATOR NODE .......................................................................................8
CONFIGURING GENBROKER .....................................................................................................................................8
BASIC STEPS IN GENBROKER CONFIGURATION ...................................................................................................9
BASIC STEPS FOR SERVER SIDE CONFIGURATION...................................................................................................... 10
CLIENT SIDE CONFIGURATION: VIEWING THE PUBLISHED DISPLAY FILE ................................................................. 10
STARTING THE GENBROKER CONFIGURATOR....................................................................................................10
CREATING A GENBROKER CONFIGURATION FILE ..............................................................................................11
ADMINISTRATIVE SERVERS ....................................................................................................................................12
ASSIGNING A LOCATION TO REMOTE SERVERS........................................................................................................... 12
COMMUNICATION CHANNELS.................................................................................................................................12
ASSIGNING NODES TO CHANNELS ........................................................................................................................13
CHOOSING THE DEFAULT CHANNEL .....................................................................................................................13
ADDING NODES TO CHANNELS ..............................................................................................................................14
REMOVING NODES FROM CHANNELS...................................................................................................................15
CHANNEL PROPERTIES ...........................................................................................................................................15
DCOM CHANNEL PROPERTIES ...............................................................................................................................16
TCP/IP CHANNEL PROPERTIES...............................................................................................................................16
SOAP/XML CHANNEL PROPERTIES........................................................................................................................17
GENBROKER CLIENT CONFIGURATION ................................................................................................................19
TAG SYNTAX ..............................................................................................................................................................19
TAG EXTENSION SYNTAX ................................................................................................................................................. 20
PROPERTY NAMES DEFINED BY GENBROKER .............................................................................................................. 21
ATTRIBUTES DATTRIBUTES DEFINED BY GENBROKER ............................................................................................... 21
TAG EXTENSION SYNTAX EXAMPLES ............................................................................................................................. 22
XML DA SYNTAX ................................................................................................................................................................. 22
LANGUAGE ALIAS DELIMITERS ........................................................................................................................................ 22
MISCELLANEOUS CLIENT SETTINGS .....................................................................................................................23
VCRWORX NODE................................................................................................................................................................ 23
TAG RETRY RATE............................................................................................................................................................... 23
SYNC CALL TIMEOUT......................................................................................................................................................... 23
DEFAULT HOST .................................................................................................................................................................. 24
GENBROKER SERVER CONFIGURATION ..............................................................................................................24
GENERAL SERVER SETTINGS.................................................................................................................................25
III
GenBroker – User’s Manual
ENABLE OPC OVER TCP/IP COMMUNICATIONS............................................................................................................. 25
ENABLE OPC OVER SOAP/XML COMMUNICATIONS ...................................................................................................... 27
ENABLE OPC OVER DCOM COMMUNICATIONS ............................................................................................................. 27
SECURITY...................................................................................................................................................................27
GENBROKER READ ONLY ACCESS ................................................................................................................................. 27
RESTRICTED FUNCTIONALITY ......................................................................................................................................... 27
CLIENT IDS .................................................................................................................................................................28
REQUIRE CLIENT IDS......................................................................................................................................................... 28
GENBROKER COMMON PROPERTIES ...................................................................................................................28
OPC ENGINE ..............................................................................................................................................................29
OPC VERSIONS .................................................................................................................................................................. 29
OPC DA GROUP NAMES .................................................................................................................................................... 29
MISCELLANEOUS ............................................................................................................................................................... 30
OPTIMIZATION ...........................................................................................................................................................30
WORK PERIOD LIMITS ....................................................................................................................................................... 30
OPC ITEM CACHE............................................................................................................................................................... 31
ATTRIBUTE ENUMERATION .............................................................................................................................................. 31
CONNECTION PARAMETERS...................................................................................................................................31
CONNECTION CONTROL AND CALLBACKS..................................................................................................................... 32
STARTING GENBROKER SERVER ..........................................................................................................................33
TOOLBAR....................................................................................................................................................................33
MENUS........................................................................................................................................................................34
FILE MENU........................................................................................................................................................................... 34
VIEW MENU ......................................................................................................................................................................... 34
HELP MENU......................................................................................................................................................................... 34
ACTIVATING THE GENBROKER CONFIGURATION FILE.......................................................................................34
SPECIFYING THE ACTIVE GENBROKER CONFIGURATION FILE .................................................................................. 35
EXAMPLE CONFIGURATIONS ..................................................................................................................................35
EXAMPLE 1: COMMUNICATION USING OPC OVER TCP/IP DIRECT.............................................................................. 36
EXAMPLE 2: OPC OVER TCP/IP AND OPC OVER DCOM ................................................................................................ 36
EXAMPLE 3: OPC DIRECT, OPC OVER TCP/IP, AND OPC OVER DCOM ....................................................................... 37
EXAMPLE 4: COMMUNICATION USING A MEDIATOR NODE .......................................................................................... 38
EXAMPLE 5: OPC DIRECT, OPC OVER SOAP/XML, AND OPC OVER DCOM ................................................................ 38
WEBHMI CLIENT CONFIGURATION.........................................................................................................................39
WEBHMI CLIENT/SERVER ARCHITECTURE .................................................................................................................... 39
CONFIGURING GENBROKER FOR THE CLIENT SIDE..................................................................................................... 40
RETRIEVING A GENBROKER CONFIGURATION FILE FROM A WEB PAGE .................................................................. 40
EDITING THE DEFAULT CONFIGURATION FILE .............................................................................................................. 40
CREATING A NEW GENBROKER CONFIGURATION FILE ............................................................................................... 41
GENCLIENTWRAPPER OLE AUTOMATION INTERFACE.......................................................................................41
GENCLIENTWRAPPER METHODS...........................................................................................................................41
GENCLIENTWRAPPER PROPERTIES .....................................................................................................................43
IV
Introduction to GenBroker Communications
INTRODUCTION TO GENBROKER
COMMUNICATIONS
DCOM is the method of communication for ProcessView. There are, however, certain disadvantages
to using DCOM. To overcome DCOM timeout problems, for example, it was necessary to eliminate
Windows callbacks and reduce the number of different function calls over Windows DCOM
communications.
DCOM's major disadvantages are:
•
Its complex settings often make its configuration ineffective when the client is remote.
•
It does not work well across NT domains.
•
Its connection over slow and unreliable networks (e.g., the Internet) is practically impossible.
•
It is not easy to configure to pass through firewalls.
In response to these difficulties, Smar has enhanced ProcessView with GenBroker, a proven, highspeed communications utility. Employing a network of applications, GenBroker uses TCP/IP and
SOAP/XML channels to achieve real-time and secure communications between Web browser clients
and WebHMI servers. Everything except the method of communication remains the same as before.
GenBroker Fundamentals
The basic philosophy of GenBroker communications lies in its use of reliable Request / Response
protocols: The client sends requests, and the servers reply to them. GenBroker applies to all
ProcessView applications.
For example, a thin client sends out a request over the Internet to the WebHMI server. The thin
client uses GenBroker to transmit the request. The WebHMI server's response to the request is also
returned via GenBroker. But if the thin client's request requires a response from a remote server in a
local area network (LAN), WebHMI could be configured to use DCOM. The machine will use DCOM
to return the response to the WebHMI server, which will use GenBroker to relay the response to the
thin client.
GenBroker technology has been incorporated to make the setup of Internet and intranet
communications easier. In addition, GenBroker provides easier Internet connectivity and operation
with firewalls and routers.
GenBroker enables you to designate which method is to be used for networked communications, as
well as to define a central License and/or Security server for a networked set of workstations.
GenClient/GenBroker Architecture
The GenClient/GenBroker architecture consists of two main parts: GenClient.dll and GenBroker.exe.
The GenClient.dll resides on the client side. It can communicate directly with OPC servers (using the
traditional DCOM method), or it can establish a connection with GenBroker, which then
communicates with the OPC servers on behalf of the client. Unlike DCOM, GenBroker can
communicate over the Internet.
Advantages of GenClient/GenBroker TCP Communication
GenClient/GenBroker TCP communication has the following advantages:
•
It works well within, across, and in the absence of NT domains.
•
It works well on slow and/or unreliable networks (e.g., the Internet).
•
The client side works well behind a firewall.
5
GenBroker – User’s Manual
Communication Types
GenBroker uses the following basic methods of networked communications:
•
OPC direct channel
•
Direct channel over DCOM
•
Direct channel over TCP/IP
•
Direct channel over SOAP/XML
•
Indirect channel via a mediator node
Most channels, either direct or indirect, translate the OPC COM calls into one of two protocols and
transmit them to the remote node, where GenBroker can execute them. (The OPC Direct channel is
the only exception; it uses OPC calls.) Protocols that every channel can use for these transmissions
are:
•
DCOM: Suitable for local networks enabled with DCOM. Not recommended for Internet use.
•
TCP/IP: Communicates over intranet/Internet through routers and firewalls.
•
SOAP/XML: Communicates over intranet/Internet through routers and firewalls.
NOTE
In order to use SOAP/XML channels in GenBroker, you must first install Microsoft Internet
Information Server (IIS) on the GenBroker Server node.
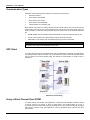
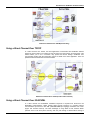
OPC Direct
In an OPC direct channel, the client applications, such as GraphWorX, TrendWorX, and AlarmWorX,
communicate directly with OPC servers. As, shown below, this method uses standard fast DCOM
over an intranet or local area network (LAN). This method of communication is similar to that of
OLExpress.
OPC Direct (Intranet Only)
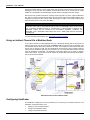
Using a Direct Channel Over DCOM
In a direct channel over DCOM, client applications communicate with GenBroker software located
on remote nodes on an intranet or LAN, as shown below. This method allows you to set a
connection retry period and timeout settings. GenBroker then communicates (locally) with the target
OPC servers on behalf of the client application. There are predefined direct channels that users
cannot delete.
6
Introduction to GenBroker Communications
OPC Direct Channel Over DCOM (Intranet Only)
Using a Direct Channel Over TCP/IP
In a direct channel over TCP/IP, the client applications communicate with GenBroker software
located on remote nodes on an intranet or LAN as well as over the Internet, as shown below. This
method allows you to set a connection retry period and timeout settings. GenBroker then
communicates (locally) with the target OPC servers on behalf of the client application. There are
predefined direct channels that users cannot delete.
OPC Direct Channel Over TCP/IP (Intranet and/or Internet)
Using a Direct Channel Over SOAP/XML
In a direct channel over SOAP/XML, GenBroker responds to requests from clients that use
SOAP/XML communications. SOAP (Simple Object Access Protocol) is a powerful Internet
communications protocol that uses XML (eXtensible Markup Language) transmitted over HTTP
(Hyper Text Transfer Protocol). The main advantage of using SOAP is that, because SOAP
operates at the HTTP level (above TCP/IP), data can pass through a firewall without having to
7
GenBroker – User’s Manual
change the firewall settings. In other words, SOAP uses the same protocol that we usually use to get
Web pages. HTTP uses port 80 to establish communication with a server, and this port is usually
enabled on most firewalls. The disadvantage of SOAP is that it is slightly slower than TCP/IP.
XML has become a preferred format for encoding and moving data in an open, system-independent
way. XML is a highly structured text format that is both machine- and human-readable. XML is often
transported via HTTP just like ordinary HTML Web pages, but XML is also easily transported via
other Internet protocols, such as FTP and SMTP.
NOTE
In order to use SOAP/XML channels in GenBroker, you must first install Microsoft Internet
Information Server (IIS) on the GenBroker Server node. The SOAP/XML server can be running
only on Windows NT-based systems (i.e. Windows NT 4.0, Windows 2000, or Windows XP).
SOAP/XML support files are included in the ProcessView installation. GenBroker over
SOAP/XML uses a SOAP/XML ISAPI listener that uses a WSDL (Web Services Description
Language) file.
For more information about SOAP, go to http://msdn.microsoft.com/Soap.
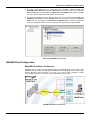
Using an Indirect Channel Via a Mediator Node
In an indirect channel, the client applications do not communicate directly with the final node, but
instead communicate over the Internet with a mediator node. As shown below, the mediator node
communicates with the final node on behalf of the client. The mediator can communicate with OPC
servers over the intranet or LAN. The client applications cannot have any direct connection with the
node where the GenBroker utility they use is located. You can create and delete indirect channels
using the GenBroker Configurator. The GenBroker Configurator allows you to specify a mediator
node for the channel. If you want to route all requests for nonspecified nodes through this mediator,
then set the channel as default.
OPC Indirect Channel Via a Mediator Node
Configuring GenBroker
The GenBroker Configurator is a tool that enables you to customize your network architecture. The
GenBroker Configurator allows you to:
8
•
Specify the communication method.
•
Configure the GenBroker Client.
•
Configure the GenBroker Server.
Introduction to GenBroker Communications
•
Assign nodes to direct channels.
•
Assign mediator nodes for indirect channels.
•
Specify the default channel.
•
Add and remove nodes or IP addresses.
•
Configure channel properties.
•
Specify the location of primary and redundant remote servers.
The configuration settings are saved in a GenBroker configuration (.gbx) file. You can store multiple
configuration files. Configuration files tell GenBroker Server how to communicate when it interacts
with various clients.
NOTE
The .gbx configuration file is the preferred format introduced in ProcessView version 7.x and
used in subsequent versions. The .gbc format used in ProcessView 6.x and prior versions only
contained primary nodes of security and licensing servers as well as definitions of channels,
while the .gbx format contains the primary and secondary nodes for all kinds of Smar servers.
The .gbx file is stored in XML, while the .gbc is binary. Unlike a .gbc file,.a gbx file contains all
options formerly stored in the system registry. This allows WebHMI clients to download the
options defined on the WebHMI Server. In addition, .gbx contains definitions for the new
features, such as shortcuts. The .gbc file is used for backward compatibility with version 6.x. It is
recommended that you use the .gbx format in version 7.x and version 8.x.
NOTE
GenBroker has already been configured prior to installation. Configure (or reconfigure)
GenBroker only if you wish, for example, to change servers.
GenBroker is configured for both the client side and the server side. For WebHMI, the GenBroker
configuration (.gbx) file used by the client resides on the server side. Once the client connects to the
server, the file is downloaded from the server. ProcessView clients have their own .gbx file. Note
that a GenBroker Server does not need to be a GenBroker client or a Web server.
NOTE
For information about WebHMI client configuration, please see the WebHMI help documentation.
Basic Steps in GenBroker Configuration
An example of a basic GenBroker configuration includes a server node connected to three PCs on a
network that are connected to the Internet, as shown in the figure below.
PC1 - Server Node: This PC has WebHMI, ProcessView (with the Security Server), and the
ProcessView License Utility installed.
PC2 and PC3 - Client Nodes: These PCs have Microsoft Internet Explorer installed.
Basic Network Configuration
Basic Steps for Server Side Configuration
9
GenBroker – User’s Manual
On the server node (PC1):
1. Create a display in GraphWorX.
2.
Save the display and then publish the display to the Web server using the Web Publishing
Wizard.
3.
Configure GenBroker Server using the GenBroker Configurator, using the OPC over TCP/IP
direct channel (to enable communication over the Internet) as the default channel. Save the
GenBroker configuration (.gbx) file.
4.
Activate GenBroker on the server node using the ProcessView Tray in ProcessView.
NOTE
You may also want to configure the Security Server on the server node using the Security
Configurator. You need to specify the location of the Security Server and the License Server in
the GenBroker Configurator.
Client Side Configuration: Viewing the Published Display File
Once GenBroker is running, you can view the GraphWorX display that you have published to the
Web server from any client Web browser:
1. On the client machine (PC2 or PC3), open the Web browser (e.g. Microsoft Internet Explorer).
2.
Enter the URL for the published GraphWorX display in the Address field of the Web browser
window, and then click Go.
3.
The Web page is downloaded from the Web server across the Internet and appears in the
client's Web browser window.
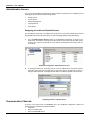
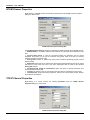
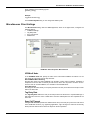
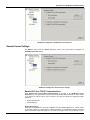
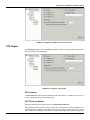
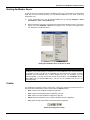
Starting the GenBroker Configurator
To start the GenBroker Configurator:
1. From the Windows Start menu, select Programs > Smar ProcessView > Tools > GenBroker
Configurator.
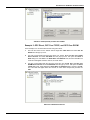
2. This opens the GenBroker Configurator startup dialog box, as shown in the figure below. Since
GenBroker needs some information about the network (it needs to know how to communicate
with particular nodes), you should specify an active GenBroker configuration file. The GenBroker
configuration file is stored in an XML format in a .gbx file. The GenBroker configuration file
specified as the Active Configuration is the default configuration used for GenBroker
communications. To specify an Active Configuration, click the ... button to select a .gbx file.
Then click the Edit button. To create a new configuration, click the Edit button.
NOTE
If no active configuration file is specified, OPC Direct communication is used for all nodes. In this
case, GenBroker communication behaves the same way (for OPC Data Access, Security, and
Licensing, applications using other subsystems may work a little bit differently) as OPC
communication, except it does not pick up the servers' location from the system registry (as
mentioned above). Instead it assumes the servers are local.
You can also specify an Alternate Configuration file for GenBroker Server by checking the check box
and clicking the ... button to select a .gbx file.
10
Introduction to GenBroker Communications
GenBroker Configurator Startup
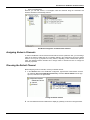
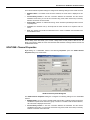
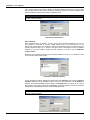
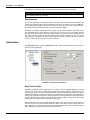
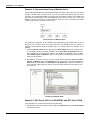
3. Clicking the Edit button opens the GenBroker Configurator, as shown in the figure below. The
screen consists of a split window with a tree control view in the left-hand pane and a
configuration view in the right-hand pane. The Configurator provides a standard format for the
configuration. The Configurator also includes a toolbar and menus with several command
functions. The Configurator properties are described in detail in the sections below.
GenBroker Configurator
NOTE
In order for clients to communicate with the GenBroker Server, you must set GenBroker active
on the server node using ProcessView Tray. For more information, please see "Starting
GenBroker Server."
Creating a GenBroker Configuration File
To create a new GenBroker configuration file, select New from the File menu in the GenBroker
Configurator. Save the new .gbx file by selecting Save from the File menu.
11
GenBroker – User’s Manual
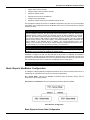
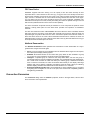
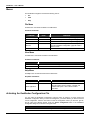
Administrative Servers
You can use the GenBroker Configurator to assign locations (node names or IP addresses) to the
following primary and redundant (secondary) servers:
•
Security Server
•
License Server
•
Global Aliasing Server
•
Language Server
•
Event Server
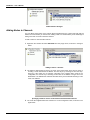
Assigning a Location to Remote Servers
You can assign a node name or IP address to a remote server. Your system will then know where to
get information about security and licensing, as well as language aliasing and global aliasing.
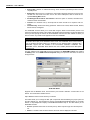
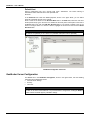
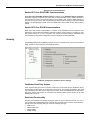
1.
Go to the Administrative Servers section in the GenBroker Configurator, as shown in the
figure below. This lists the server types and the location of the Primary and Secondary nodes
for each type of server. By default, the local machine is assigned as the Primary node for
each server.
GenBroker Configurator: Administrative Servers
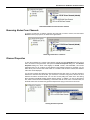
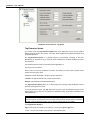
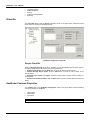
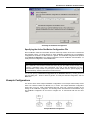
2.
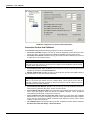
To change the Primary or Secondary node for a server, double-click on the server and then
select the node(s) from the drop-down lists (or type in the name or IP address), as shown in
the figure below. Click OK. The assigned node name or IP address appears in the server list.
Assigning a Node to a Remote Server
Communication Channels
As shown in the figure below, the Channels tree in the GenBroker Configurator contains four
predefined sets of channels that cannot be deleted:
•
OPC direct
•
OPC over TCP/IP direct
•
OPC over SOAP/XML direct
12
Introduction to GenBroker Communications
•
OPC over DCOM direct
However, you can add, remove, or reconfigure nodes and channels using the commands and
functions described in the following sections.
GenBroker Configurator: Communication Channels
Assigning Nodes to Channels
In order for GenBroker to know which channel should be used for a particular node, you must assign
nodes to the channel. Nodes that are not explicitly defined in the configuration will use the default
channel. You may set up properties for every channel, depending on the communication protocol
used. The following sections describe how to assign nodes to channels and how to change the
channels' properties.
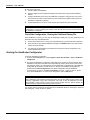
Choosing the Default Channel
Before assigning nodes to channels, choose your default channel:
1. In the Channels tree in the GenBroker Configurator, right-click the communication channel
(for example, OPC over TCP/IP Direct Channels), and select Set As Default from the popup menu, as shown in the figure below.
Setting the Default Channel
2. The new default channel is indicated in the display by "(default)," as shown in the figure below.
13
GenBroker – User’s Manual
Default Channel Changed
Adding Nodes to Channels
You can define which nodes on the network will be accessed from the current node that uses the
method of communication you have chosen. Adding nodes to a channel allows you the advantage of
having more than one node in that direct channel.
To add a node to a communication channel:
1. Right-click the channel and select Add Node from the pop-up menu, as shown in the figure
below.
Adding a Node to a Channel
2. The Select a Node dialog box opens, as shown in the figure below. There are two ways of
choosing a node name and/or IP address. The first way is by choosing one from the dropdown list. If the nodes are not currently connected to the computer being used for the
configuration, the second way of choosing a node name or IP address is to type one in the
Node Name or IP Address field. Click the OK button when you have finished choosing a node
name or IP address.
Specifying a Node to Access Via the Selected Communication Channel
3. The node name appears below the Channel icon on the Configurator screen, as shown in the
figure below.
14
Introduction to GenBroker Communications
Node Name Added to Communication Channel
Removing Nodes From Channels
To remove a node from a channel, right-click the node that you wish to remove, and then select
Remove from the pop-up menu, as shown in the figure below.
Removing a Node From a Channel
Channel Properties
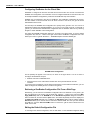
To view the properties for a channel, right-click the channel and select Properties from the pop-up
menu, as shown in the figure below. This opens the Channel Properties dialog box. The Channel
Properties dialog box, which varies slightly for DCOM, TCP/IP, and SOAP/XML, has several
parameters that you can configure for the selected communication method. For example, you can
define which port is used for the TCP/IP traffic. If a mediator node has been selected, the mediator
node name is also displayed.
You can also configure the settings for retrieving data from the OPC server. In case the connection
between the client and the server fails, you can set the connection retry period, which is the time
between successive connection trials. You can also set the polling rate, which is the time during
which GenClient periodically flushes internal request queues. In addition, you can set the timeout
rate, which is the time limit for establishing a connection with the server. If the connection fails, the
client will wait for the connection retry period to elapse before trying to reconnect to the server.
Viewing Channel Properties
15
GenBroker – User’s Manual
DCOM Channel Properties
Right-clicking on a DCOM channel and selecting Properties opens the DCOM Channel Properties
dialog box, shown below.
DCOM Channel Properties Dialog Box
The DCOM Channel Properties dialog box configures the following settings for the DCOM channel:
• Mediator Node: If a mediator node has been selected, the node name will be displayed in this
field.
• Connect Retry Period: In case the connection between the GenClient and the remote
GenBroker server fails, you can set the connection retry period, which is the time (in seconds)
between successive connection trials.
• Polling Rate: Number of milliseconds during which GenClient periodically flushes internal
request queues.
• Repeat Call: When this box is checked, the client keeps requesting data from the server until all
data from the server have been sent to the client. Subsequent calls are made at the specified
Polling Rate interval.
• Use Background Thread for Transmission: When this option is checked, GenClient uses
another thread to transmit data.
• Timeout: The maximum time (in seconds) that the client waits for a response from the server.
• Thread Priority: Performance-tuning parameter. Select from Lowest, Below Normal, Normal,
Above Normal, and Highest.
TCP/IP Channel Properties
Right-clicking on a TCP/IP channel and selecting Properties opens the TCP/IP Channel
Properties dialog box, shown below.
TCP/IP Channel Properties Dialog Box
16
Introduction to GenBroker Communications
The TCP/IP Channel Properties dialog box configures the following settings for the TCP/IP channel:
•
Mediator Node: If a mediator node has been selected, the node name is displayed in this
field.
•
Connect Retry Period: In case the connection between the GenClient and the remote
GenBroker server fails, you can set the connection retry period, which is the time (in seconds)
between successive connection trials.
•
Polling Rate: Number of milliseconds during which GenClient periodically flushes internal
request queues.
•
Timeout: The maximum time (in seconds) that the client will wait for a response from the
server.
•
Port: The TCP/IP port number that GenClient tries in order to establish communication with
the GenBroker server.
NOTE
The Port number is 38080. (In ProcessView Version 6.1, the port number was 8080.)
The No Delay check box allows you to control a delay before a short packet of data is sent. No
Delay is checked by default to ensure the smoothest data interface exchange between clients and
the GenBroker Server.
SOAP/XML Channel Properties
Right-clicking on a SOAP/XML channel and selecting Properties opens the SOAP Channel
Properties dialog box, shown below.
SOAP Channel Properties Dialog Box
The SOAP Channel Properties dialog box configures the following settings for the SOAP/XML
channel:
•
Mediator Node: You can create a special SOAP channel with a mediator node through which
GenBroker requests will be routed to a group of nodes. If a mediator node has been selected,
the node name is displayed in this field.
•
Connect Retry Period: In case the connection between the GenClient and the remote
GenBroker server fails, you can set the connection retry period, which is the time (in seconds)
between successive connection trials.
17
GenBroker – User’s Manual
•
Polling Rate: Number of milliseconds during which GenClient periodically flushes internal
request queues.
•
Repeat Call: When this box is checked, the client keeps requesting data from the server until
all data from the server have been sent to the client. Subsequent calls are made at the
specified Polling Rate interval.
•
Use Background Thread for Transmission: When this option is checked, GenClient uses
another thread to transmit data.
•
Timeout: The maximum time (in seconds) that the client will wait for a response from the
server.
Thread Priority: Performance-tuning parameter. Select from Lowest, Below Normal, Normal,
Above Normal, and Highest.
•
The SOAP/XML channel allows you to send data using the SOAP communication protocol. The
channel's properties are similar to the TCP/IP and DCOM channel properties. The primary difference
is that you must specify the listener for the SOAP/XML channel in the URL address to which you
want to connect. Any SOAP server application must have a listener.
NOTE
In order to use SOAP/XML channels in GenBroker, you must first install Microsoft Internet
Information Server (IIS) on the GenBroker Server node. The SOAP/XML server can be running
only on Windows NT-based systems (i.e. Windows NT 4.0, Windows 2000, or Windows XP).
SOAP/XML support files are included in the ProcessView installation. GenBroker over
SOAP/XML uses a SOAP/XML ISAPI listener that uses a WSDL (Web Services Description
Language) file.
The URL address for the SOAP/XML channel is specified in the SOAP/XML Listener field. Clicking
the Modify button on the SOAP Channel Properties dialog box opens the URL editor, as shown in
the figure below.
SOAP URL Editor
Suppose that the Mediator Node, Virtual Directory and Listener determine a whole URL for the
listener. The whole listener address is then:
http://<Mediator Node>/<Virtual directory>/<Listener>
This editor allows you to change the URL path components while maintaining the proper syntax for
the URL address (e.g. http://soapserver.company.com/GenBroker/GenBroker.WSDL for the ISAPI
listener or http://soapserver.company.com/GenBroker/GenBroker.asp for the ASP listener) of the
SOAP/XML channel:
18
•
Service: Specifies either HTTP or HTTPS (secure). Select a protocol type from the drop-down
list.
•
Node: If a mediator node has been selected, the node name is displayed in this field.
Introduction to GenBroker Communications
•
Port: SOAP uses port 80 by default.
•
Directory: Specifies the virtual directory on the mediator node through which the SOAP/XML
channel is routed.
•
Listener: Select a protocol type from the drop-down list (e.g. GenBroker.WSDL or
GenBroker.asp).
•
User: Specifies a user name needed to access the URL.
•
Password: Specifies a password needed to access the URL.
•
URL: Displays the full URL path with proper syntax.
For more information about SOAP, go to http://msdn.microsoft.com/Soap.
GenBroker Client Configuration
The Client tree in the GenBroker Configurator, shown in the figure below, sets the following
parameters for clients:
•
Tag Syntax
•
Miscellaneous
•
Shortcuts
NOTE
Clicking the Default button restores all default property installation settings
GenBroker Configurator: GenBroker Client Properties
Tag Syntax
The Tag Syntax dialog under the Client properties, shown in the figure below, configures the
following settings:
•
Tag Extension Syntax
•
XML DA Syntax
•
Language Alias Delimiters
19
GenBroker – User’s Manual
GenBroker Client Properties: Tag Syntax
Tag Extension Syntax
The controls under the Tag Extension Syntax field of the Client tree can be used to redefine
default separators for OPC item names. The section below explains the Tag Extension Syntax using
the default separators.
The Tag Extension Syntax is a powerful feature of ProcessView. According to the OPC
Specification, an OPC item or tag on a specific server is identified by an ItemID. ItemIDs can contain
any characters.
The standard syntax for a tag in ProcessView client applications is:
[\\<node>\]<server>\<itemid>
where <node> is a name or IP address of a node in the network. The node name is optional. When
omitted, the local node is used.
<server> is a class ID (CLSID) or ProgID of an OPC DA Server.
<itemid> is an OPC ItemID; this may contain any characters.
Example: \\PC1\Smar.Simulator\SimulatePLC.Sine
The Tag Extension Syntax allows you to specify tags more precisely, telling GenBroker to parse
the value incoming from the server.
To use the extension syntax, type tag: before the tag name. Then the separators defined in this
property page may be used. You may modify the separators if they conflict with the ItemIDs of the
used OPC Server.
NOTE
The Access Path Separator (::) and Property Separator (-->) could also be used with the
previous versions of ProcessView, but they might conflict with some servers' item IDs. Now these
are part of the Tag Extension Syntax, and you have to explicitly use tag: to use them.
The Tag Extension Syntax is:
tag:[\\<node>\]<server>\<itemid>[::<accpath>][- -><prop>][<idx>][#<attr>][@<rate>]
<node>, <server> and <itemid> is the same as in the standard syntax.
20
Introduction to GenBroker Communications
<accpath> is an optional access path string. This can be used (according to the OPC Specification)
to give the server a "hint“ how to get the OPC item specified by its <itemid>.
<prop> is a property ID as defined in the OPC 2.0 Specification. When specified, GenBroker uses
the server’s function IOPCItemProperties::LookupItemIDs() to get the property value. Note that not
all OPC 2.0 compliant servers support this function, so the usage is limited. Besides specifying the
property ID, it is possible to specify a property name listed below.
<idx> is an index or indexes (separated by commas) for an array. If the specified OPC item is of an
array type, this allows for accessing one of its elements. The element is read-only. The indexes
should be enclosed in brackets ([ and ]) and separated by commas (,).
<attr> specifies an attribute that should be returned instead of the item value. In OPC, values
always come with a quality value and timestamp. The attributes defined here are derived from these
values. The supported are attributes listed below. Unlike properties (see <prop> above), this option
works with any OPC server, even OPC 1.0. The attributes are read-only.
<rate> specifies a scan rate for the given item. Usually the scan rate is defined for a group of items,
e.g. in GraphWorX it is defined for the whole display. This option can override the display scan rate
for one particular item. The scan rate is in milliseconds.
Requested Type Separator
Each tag has its native data type, known as the canonical data type. OPC servers return values of
this canonical data type, if the client does not explicitly request another type. Some applications (e.g.
GraphWorX) allow for specifying the requested data type. Other applications may use this feature,
and make the requested data type part of the tag name (using the extended tag syntax). The
requested data type may be added on the very end of the tag name and separated by the separator
specified here.
Example: tag:Smar.Simulator\SimulatePLC.Sine|R4
Options in the tag name can be combined, but they must be used in the order indicated above.
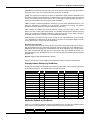
Property Names Defined by GenBroker
Property names supported by GenBroker are listed in the table below. Their meaning is defined in
the OPC Specification 2.0. The property names are equal to their IDs.
A
t
t
r
i
b
u
t
e
s
PROPERTY NAME
ID
PROPERTY NAME
ID
PROPERTY NAME
ID
DataType
Value
Quality
Timestamp
AccessRights
ScanRate
EUUnits
Description
HighEU
LowEU
HighIR
LowIR
CloseLabel
1
2
3
4
5
6
100
101
102
103
104
105
106
OpenLabel
TimeZone
DefDisplay
FgColor
BkColor
Blink
BMPFile
SoundFile
HTMLFile
AVIFile
CondStatus
AlQuickHelp
AlAreaList
107
108
200
201
202
203
204
205
206
207
300
301
302
AlPrimArea
CondLogic
LimExceeded
Deadband
HiHiLimit
HiLimit
LoLimit
LoLoLimit
ROCLimit
DevLimit
ItemID
Name
UsageCnt
303
304
305
306
307
308
309
310
311
312
5000
5001
5002
D
Attributes Defined by GenBroker
When any of the following attributes is defined, GenBroker returns the value of the attribute rather
than the value of the specified item. Possible attributes are listed in the table below.
ATTRIBUTE
DATA TYPE
quality
INTEGER
MEANING
Quality of the item – see OPC Specification for more details.
21
GenBroker – User’s Manual
ATTRIBUTE
DATA TYPE
valid
BOOLEAN
timestamp
qualgood
DATE/TIME
BOOLEAN
MEANING
Flag if the item value is valid. True for GOOD and UNCERTAIN
qualities and for BAD quality with LAST KNOWN VALUE
substatus.
Time of the last change of the item value.
True when the item value has GOOD quality, False otherwise.
Tag Extension Syntax Examples
The following examples show how the Tag Extension Syntax is used.
\\PC1\Smar.Simulator\SimulatePLC.Sine::Path1
Requests tag ”SimulatePLC.Sine::Path1“ on Smar.Simulator located on PC1.
tag:\\PC1\Smar.Simulator\SimulatePLC.Sine::Path1
Requests tag ”SimulatePLC.Sine“ on Smar.Simulator located on PC1. Uses access “Path1.“ Note
that it is necessary to explicitly switch on the OPC Item Extension Syntax by placing tag: at the
beginning of the string.
tag:\\PC1\Smar.Simulator\SimulatePLC.Sine-->Description
tag:\\PC1\ Smar.Simulator\SimulatePLC.Sine-->101
Both request the Description property of tag ”SimulatePLC.Sine“ on Smar.Simulator located on PC1.
This particular example would not work, because Smar.Simulator does not support the
IOPCItemProperties::LookupItemIDs() function necessary for proper function. OPC Servers based
on OPC ToolWorX 3.0 do support this function.
tag:\\PC1\ Smar.Simulator\SimulatePLC.SineArray[ 3 ]
Requests tag ”SimulatePLC.SineArray“ on Smar.Simulator located on PC1. This tag is supposed to
be an array. GenBroker then extracts the third element of the array.
tag:\\PC1\ Smar.Simulator\SimulatePLC.Sine#qualgood
Requests tag ”SimulatePLC.Sine“ on Smar.Simulator located on PC1. GenBroker then uses its
quality and tests if it is good. If so, GenBroker returns TRUE, otherwise it returns FALSE.
tag:\\PC1\ Smar.Simulator\SimulatePLC.Sine#qualgood@1000
Same as before, but requests the tag ”SimulatePLC.Sine“ on the scan rate of 1000 milliseconds, not
regarding the display setting (in GraphWorX).
tag:\\PC1\ Smar.Simulator\SimulatePLC.Sine@1000#qualgood
This would not work; the options must be ordered properly.
XML DA Syntax
URL/Item Separator
An XML DA OPC server is defined by its URL
(e.g.”http://opcfoundation.org/XmlDaSampleServer/Da30Service.asmx”). An item on the server is
defined by its name (e.g. “Dynamic/Analog Types/Double”). When ProcessView applications refer to
an item on an XML DA OPC server, they use one string, which consists of the server’s URL and the
item name separated with a separator specified here (e.g.
“http://opcfoundation.org/XmlDaSampleServer/Da30Service.asmx# Dynamic/Analog
Types/Double”).
Item Path Separator
A client application may specify an optional item path, separated by the characters specified here.
Language Alias Delimiters
By default, language aliases use the following syntax:
/+language_alias_name+/
Example:
x=/+WaterSystem+/
In the Begin Symbol and End Symbol fields, you can change these default delimeters (i.e. /+ for
the beginning and +/ for the end).
22
Introduction to GenBroker Communications
Some variables use the following syntax:
{{variable_name}}
Example:
x={{gfwsim.random.long}}
In the Variable Symbol field, you can change this default syntax.
Miscellaneous Client Settings
The Miscellaneous dialog under the Client properties, shown in the figure below, configures the
following settings:
•
VCRWorX Settings
•
Tag Retry Rate
•
Sync Call Timeout
•
Default Host
GenBroker Client Properties: Miscellaneous
VCRWorX Node
In the VCRWorX Node field, specify the name of the node where VCRWorX is located. You can
also select the node name from the drop-down list.
Hide VCRWorX When Browsing
Checking this check box hides VCRWorX from browsing. Under normal conditions, VCRWorX is
transparent to the user. But it is actually an OPC server, and a user may want to access it as such.
Then the user can unhide VCRWorX, so it is visible in the Unified Browser.
Client Side Cache
Checking this check box allows you to specify the amount of time (in minutes and seconds) to cache
data on the client side.
Tag Retry Rate
The Tag Retry Rate defines the rate (in seconds) at which the client tries to request failed tags or
OPC data items from the server. Failed alarm and event subscriptions are also requested at the
same rate.
Sync Call Timeout
The Sync Call Timeout specifies the default timeout rate (in seconds) for synchronous calls. Some
of the GenBroker functions (e.g. registering applications, login and logout to and from the Security
Server) fail if the relevant server does not respond in the time specified.
23
GenBroker – User’s Manual
Default Host
Points in applications may use a special node name: “defaulthost”. The nodes referring to
"defaulthost" will be redirected to the node specified here.
Shortcuts
In the Shortcuts tree under the Client properties, shown in the figure below, you can define
shortcuts to particular servers on the network:
Enter a name for the shortcut in the Shortcut Name field. In the Node field, select the node from
the drop-down list (or type in the name or IP address for the node). Enter a description of the node in
the Server field. Then click the Add New Shortcut button. The shortcut is added to the list, as
shown in the figure below. To remove a shortcut, highlight the shortcut and then click the Delete
Shortcut button.
NOTE
There may be a shortcut for a node (server is not specified), or for a server (on any node, when
the node is not specified), or for a server on a particular node (when both are specified).
GenBroker Configurator: Shortcuts
GenBroker Server Configuration
The Server tree in the GenBroker Configurator, shown in the figure below, sets the following
parameters for the GenBroker Server:
•
General Server Settings
•
Security
•
Client IDs
NOTE
It is recommended that you accept the default Server settings. Change the settings only if you do
not wish to use some of the interfaces or if you should wish to change them. Clicking the Default
button restores all default property installation settings
24
Introduction to GenBroker Communications
GenBroker Configurator: GenBroker Server Properties
General Server Settings
The General dialog under the Server properties, shown in the figure below, configures the
GenBroker Channels settings.
GenBroker Configurator: General Server Settings
Enable OPC Over TCP/IP Communications
When Enable OPC Over TCP/IP Communications is checked in the GenBroker Server
Properties, the client applications communicate with GenBroker software located on remote nodes
on an intranet or LAN as well as over the Internet. You have two options for configuring TCP/IP
interfaces:
•
Bind to All Interfaces
•
Special Settings
Bind to All Interfaces
When Bind to All Interfaces is selected, GenBroker uses all available interfaces (i.e. network cards)
on the local machine for communication. Clicking Properties on the GenBroker Server Properties
opens the Interface Properties dialog box, as shown in the figure below. The IP Address is set to
25
GenBroker – User’s Manual
<All>, and the interface Port number is 38080. The No Delay check box allows you to control a delay
before a short packet of data is sent. No Delay is checked by default to ensure the smoothest data
interface exchange between clients and the GenBroker Server.
NOTE
In ProcessView Version 7.x, the Port number changed to 38080. (In ProcessView Version 6.1,
the port number was 8080.)
Properties For All Interfaces
Special Settings
When Special Settings is selected, you can specify which interfaces GenBroker will use for
communication. For example, if you have multiple network cards on the local machine, you can
select which network card to use. Clicking Properties on the GenBroker Server Properties opens the
TCP/IP Interfaces dialog box, as shown in the figure below. This dialog box lists all available
interfaces on the local machine. Simply check the interfaces you want to use for GenBroker
communications.
By default, the IP address for the local host "loop back" interface is 127.0.0.1. This interface is used
to test TCP/IP communications locally.
Properties For Specific Interfaces
To edit an interface's settings, highlight the interface and click Properties. This opens the Interface
Properties dialog box for the selected interface, as shown in the figure below. The IP Address is
specified, and the interface Port number is 38080. The No Delay check box allows you to control a
delay before a short packet of data is sent. No Delay is checked by default to ensure the smoothest
data interface exchange between clients and the GenBroker Server.
NOTE
In ProcessView Version 7.x, the Port number changed to 38080. (In ProcessView Version 6.1,
the port number was 8080.)
26
Introduction to GenBroker Communications
Properties For Selected Interface
Enable OPC Over SOAP/XML Communications
When OPC Over SOAP/XML Communications is enabled on the GenBroker Server Properties,
GenBroker responds to requests from clients that use the SOAP/XML protocol. SOAP uses XML to
communicate over HTTP. The main advantage of using SOAP is that, because SOAP operates on
the HTTP level (over TCP/IP), data can pass through a firewall without having to change the firewall
settings. The disadvantage of SOAP is that it is slightly slower than TCP/IP. SOAP uses port 80 by
default.
Enable OPC Over DCOM Communications
When OPC Over DCOM Communications is enabled on the GenBroker Server Properties, client
applications communicate with GenBroker software located on remote nodes on an intranet or LAN.
This method allows you to set a connection retry period and timeout settings. GenBroker then
communicates (locally) with the target OPC servers on behalf of the client application.
Security
The Security dialog under the Server properties, shown in the figure below, can be used to limit the
ability of clients to access data from the GenBroker Server.
GenBroker Configurator: GenBroker Access Settings
GenBroker Read Only Access
When the Read Only check box is checked, clients that communicate with the GenBroker Server
cannot perform write requests to an OPC Data Access server. For example, GraphWorX could read
a process point's value but could not respond to the value. Alarm acknowledgement for OPC Alarm
and Event servers and insertion of annotations into Historical Data Access servers can be also
disabled with this option.
Restricted Functionality
Checking the Restricted Functionality check box limits the type of data that clients may use to
communicate with the GenBroker Server. Click the Set Functions button to set the client restrictions.
Specify which of the following data types to limit by checking each type.
•
Data Access
•
Alarms and Events
•
Historical Data
•
Global Aliasing
27
GenBroker – User’s Manual
•
•
•
•
•
Language Aliasing
Multimedia Alarms
Security
Licensing and Registration
Browsing
Client IDs
The Client IDs dialog under the Server properties, shown in the figure below, determines which
client nodes can access the GenBroker Server.
GenBroker Configurator: Client IDs
Require Client IDs
When the Require Client IDs check box is checked, you can allow/disallow specific client nodes to
access the GenBroker Server based on the following categories:
• Restrict Client Nodes: Click the Add button to choose an allowed or denied node.
• Allowed Security Server Nodes: Click the Add button to choose a node to allow as the
Security Server.
• Required Client Version (or higher): Check the check boxes to specify version numbers or
build numbers.
• Allowed License Server Nodes: Click the Add button to choose a node to allow as the License
Server.
GenBroker Common Properties
The Common tree in the GenBroker Configurator, shown in the figure below, sets the following
common properties for GenBroker:
•
•
•
OPC Engine
Optimization
Connection
NOTE
Clicking the Default button restores all default property installation settings.
28
Introduction to GenBroker Communications
GenBroker Configurator: GenBroker Common Properties
OPC Engine
The OPC Engine dialog under the Common properties, shown in the figure below, sets the OPC
server connection control parameters.
GenBroker Configurator: OPC Engine
OPC Versions
The OPC Versions section tells the GenClient which OPC version it is allowed to use. Select a
version of OPC Data Access. Check all that apply.
OPC DA Group Names
Specify an OPC Data Access group name in the Group Name Format field.
When GenClient creates an OPC group on a DA server, it may specify its name depending on the
format defined here. Asterisks (*) are replaced by the group numbers, so each group has a unique
name. If there are no asterisks in the format, the group number is appended. When no group name
29
GenBroker – User’s Manual
is specified here, GenClient does not specify the names and lets the server create them.
NOTE
The group names are not needed for normal operation. Some servers may require them for
some specific purposes (e.g. security).
Miscellaneous
A server may get stuck or so slow that it would not be able to process requests from GenBroker, but
it still may be considered alive. Then the requests to the server are stored in a queue in GenBroker.
The Request Queue Length Limit defines the maximum size of the queue. It is a good practice to
have the queue greater than the number of points on the largest display.
GenBroker now supports optional OPC item caching. You can specify a time the cache will keep an
item requested. When a client releases an OPC item (e.g. a tag), the item is not actually removed
from the server but instead is moved into the item cache. Then, when the client requests the same
item again, the item is retrieved from the cache instead of being released from the OPC server
again. However, if Refresh From Device (rather than from cache) is checked, the item is retrieved
from the i/o device to which the OPC server is connected.
Optimization
The Optimization dialog under the Common properties, shown in the figure below, sets the serverclient connection parameters.
GenBroker Configurator: Optimization
Work Period Limits
GenBroker periodically collects requests from the clients. It uses an adaptive algorithm to set the
collection rate, but the rate (in milliseconds) is always within ranges defined in Work Period Limits.
The longer the period, the more requests GenBroker may collect. Requests collected in one period
are processed together, which is more efficient than processing them separately. Also the longer the
period is, the longer the clients have to wait for responses on the requests. So a short period means
quicker responses but less efficient processing of the requests. With a longer period, the DCOM
calls may be more efficient, but the response delay is longer.
When GenBroker is idle, it may prepare updates in advance. As a result, it will send more updates to
the client, so it will run more smoothly. But it also means more traffic over the network and more
CPU utilization. Turn this behavior on with the Smoother Updates drop-down list. Prefetch Queue
Max Length limits the number of updates prepared in advance.
30
Introduction to GenBroker Communications
OPC Item Cache
GenBroker supports OPC item caching. You can specify a time the cache will keep an item
requested. When a client releases an OPC item (e.g. a tag), the item is not actually removed from
the server but instead is moved into the item cache. Then, when the client requests the same item
again, the item is retrieved from the cache instead of being released from the OPC server again.
You can define how long OPC items should be stored in the cache. Optionally, GenBroker may
deactivate the items put in the cache, thereby decreasing the number of updates coming in from the
OPC servers (otherwise the items in the cache are also updated).
The cache mechanism is optional and may be switched on or off. It improves the speed of screen
switching. Caching takes place for both OPC Direct operation and operation via GenBroker
channels.
The OPC Item Cache check box enables/disables the cache. When the cache is enabled, released
OPC items are then put into the cache rather than removed from the server. When the items are
requested again, they will be taken from the cache. Cache Size specifies the maximum number of
items that will be stored in the cache. When Deactivate Cached Items is checked, the items are
deactivated when put into the cache. Remove Items Older Than (X) Seconds defines how long (in
seconds) the items should be kept in the cache.
Attribute Enumeration
The Attribute Enumeration section specifies how enumeration is made. Enumeration is a way to
get OPC items‘ ranges and access rights:
•
•
•
•
None: Turns enumeration off so the attributes are not obtained. When ranges are not required,
this could improve display switching speed.
Standard: Enumerates all items in the current OPC group. When an item is added to a group
(e.g. an item in a pop-up window), the whole group is enumerated again.
Intelligent: A separate group is created for the newly added items, and the new group is
enumerated and then removed. Intelligent enumeration only enumerates the newly added items,
but it needs some overhead to create and destroy the auxiliary group. Standard enumeration
does not have this overhead, but it also enumerates items already on the display. With large
displays with pop-up windows, intelligent enumeration should be faster. When just switching
between displays, standard enumeration will be faster because of no overhead.
Enumerate Attributes One By One: Forces GenBroker to ask for attributes one by one rather
than getting them all together in one call. In the past, some servers had compatibility problems
with gathering all attributes.
Connection Parameters
The Connection dialog under the Common properties, shown in the figure below, sets the OPC
server connection control parameters.
31
GenBroker – User’s Manual
GenBroker Configurator: Connection Control Parameters
Connection Control and Callbacks
The Connection dialog define the following parameters for server crash detection:
•
Connection Test Rate: Defines, how often (in seconds) GenBroker should check if the OPC
servers are "alive." The test is performed by calling the GetStatus() function of the servers.
•
Connection Test Timeout: Specifies how long (in seconds) the call to GetStatus() may take for
an OPC server to be considered "alive."
NOTE
Both the Connection Test Rate and Connection Test Timeout values can be set differently for
local and remote OPC servers. A remote server is actually local for GenBroker located remotely,
but on the same node as the server.
•
Connect Retry Period: When GenBroker cannot connect to a server, it will retry after the time
specified (in seconds) in Connect Retry Period.
• Minimal Callback Rate: Specifies how often (in seconds) OPC servers should update values to
be considered alive. A value of 0 switches this test off.
NOTE
Not sending updates is OK for a server when its values are constant. But with Forced Refresh
Rate on, the server must refresh even the constant values. These options can be used for
detecting a situation, when the connection to the server works fine, but the callback connection
(from the server to the client) has failed.
•
•
•
•
32
Force Callbacks with Refresh: Specifies if and how often (in seconds) GenBroker should force
OPC servers to refresh the data values. A value of 0 turns this off.
Force Callbacks with Async Read: Forces GenClient to periodically asynchronously read one
item in each OPC group to check the state of the callback connection. This is a preferred
method before forced refresh. A value of 0 turns this off.
Force Callbacks with OPC 3.0 Keep Alive Calls: Switches on using Keep Alive callbacks
defined in OPC 3.0. A server conforming to OPC DA 3.0 may periodically send empty callbacks
so the client can check that the callback connection is OK without the need to read or refresh
anything. A value of 0 turns this off.
On Callback Failure: Tells GenClient what to do when a callback connection failure is detected:
Re-advise, Re-create OPC Group, or Re-Create Server.
Introduction to GenBroker Communications
Starting GenBroker Server
In order for clients to communicate with the GenBroker Server (e.g. to download and view published
HTML files on the client Web browser), you must activate GenBroker on the server node using
ProcessView Tray:
1.
Launch ProcessView Tray from the Windows Start menu by selecting Programs > Smar
ProcessView > Tools > ProcessView Tray.
2.
When ProcessView Tray opens, the triangle icon appears in the Windows tool tray. Click on the
triangle and select GenBroker > Start from the pop-up menu, as shown in the figure below.
This activates the GenBroker Server.
Starting the GenBroker Server on the Server Node
NOTE
ProcessView Tray cannot run when the license is located on a remote machine and the
GenBroker on the remote machine is enabled. Even if the GenBroker on the remote machine is
not enabled, you will not be able to run GenBroker from ProcessView Tray. Instead of running
GenBroker from ProcessView Tray, in these situations you can run GenBroker from the
command prompt. You have to know the full path for the location of the GenBroker.exe file.
Select Run from the Windows Start menu, and then run the GenBroker.exe file from the
command prompt.
Toolbar
The GenBroker Configurator toolbar, shown below, contains the following command functions. For
more information about these functions, please refer to the Menus section.
•
New: Creates a new GenBroker configuration (.gbx) file.
•
Open: Opens an existing GenBroker configuration (.gbx) file.
•
Save: Saves the current GenBroker configuration (.gbx) file.
•
About: Opens the About Box, which contains information about the application.
•
Help: Opens the help documentation associated with this application.
GenBroker Configurator Toolbar
33
GenBroker – User’s Manual
Menus
The GenBroker Configurator contains the following menus:
•
File
•
View
•
Help
File Menu
The File menu commands are listed in the table below.
File Menu Commands
COMMAND
New
Open
Save
SHORTCUT
KEYS
CTRL+N
CTRL+O
CTRL+S
Save As
Exit
FUNCTION
Creates a new GenBroker configuration (.gbx) file.
Opens an existing GenBroker configuration (.gbx) file.
Saves the current GenBroker configuration (.gbx) file.
Opens the Save As dialog box, which allows you to
save the GenBroker configuration (.gbx) file under a
different name.
Closes the GenBroker Configurator.
View Menu
The View menu commands are listed in the table below.
View Menu Commands
COMMAND
Toolbar
Status Bar
FUNCTION
Hides/shows the GenBroker Configurator toolbar.
Hides/shows the status bar.
Help Menu
The Help menu commands are listed in the table below.
Help Menu Commands
COMMAND
Help Topics
SHORTCUT KEY
F1
About Application
FUNCTION
Launches the online help for the Configurator.
Launches the About Box, which contains information
about the product version number, copyright, and
available disk space. It also contains contact
information.
Activating the GenBroker Configuration File
You can make the GenBroker configuration (.gbx) file active by saving it or simply closing the
GenBroker Configurator. When you close the Configurator, you will be asked if you want to save the
current configuration. Click the Yes button to save the configuration. When you save the .gbx file,
the file name and pathway appear under the Active Configuration field in the GenBroker
Configurator dialog box, as shown in the figure below.
NOTE
You must restart GenBroker and all client applications for the changes to take effect.
34
Introduction to GenBroker Communications
Activating the GenBroker Configuration
Specifying the Active GenBroker Configuration File
Since GenBroker needs some information about the network (it needs to know how to communicate
with particular nodes), you should specify an active GenBroker configuration file. The GenBroker
configuration file is stored in an XML format in a .gbx file. The GenBroker configuration file specified
as the Active Configuration is the default configuration used for GenBroker communications. To
modify the active configuration, click the Edit button.
NOTE
If no active configuration file is specified, OPC Direct communication is used for all nodes. In this
case, GenBroker communication behaves the same way (for OPC Data Access, Security, and
Licensing, applications using other subsystems may work a little bit differently) as OPC
communication, except it does not pick up the servers' location from the system registry (as
mentioned above). Instead it assumes the servers are local.
You can also specify an Alternate Configuration file for GenBroker Server by checking the check
box and clicking the ... button to select a .gbx file. To modify the alternate configuration, click the
Edit button.
Example Configurations
This section shows some example GenBroker configurations for the sample network setup shown
below. The network includes five different PCs, or nodes. The example GenBroker configuration
shown here is for PC1, which communicates with PC2, PC3, PC4, and PC5 according to the
settings in the GenBroker Configurator. The following section demonstrates several different ways
the GenBroker Configurator can be used to configure PC1 to communicate with the four other
nodes.
Example Network Configuration
35
GenBroker – User’s Manual
Example 1: Communication Using OPC Over TCP/IP Direct
In this example, PC1 communicates with PC2, PC3, PC4, and PC5 using only OPC over TCP/IP
direct channels. Right-click OPC over TCP/IP Direct Channels and select Set As Default from the
pop-up menu, as shown below. All nodes being requested by the client programs (e.g.
ProcessView, WebHMI browsers, DataWorX, etc.) will communicate OPC data over a TCP/IP
channel.
OPC Over TCP/IP Direct Channel
Example 2: OPC Over TCP/IP and OPC Over DCOM
In this example, PC1 communicates with PC2 and PC3 using an OPC over TCP/IP direct channel.
36
1.
First set OPC over TCP/IP as the default channel. Right-click OPC over TCP/IP Direct
Channels and select Set as Default from the pop-up menu.
2.
PC1 also communicates with PC4 and PC5 using an OPC over DCOM direct channel.
Because OPC over TCP/IP is the default method of communication, you must now specify
which nodes will communicate using OPC over DCOM. Right-click OPC over DCOM Direct
Channels and select Add Node from the pop-up menu. This opens the Select a Node
dialog box. Enter PC4 in the Node Name or IP Address field, and then click OK. The node
name will appear below the channel, as shown below. Repeat this procedure for PC5.
Introduction to GenBroker Communications
OPC Over TCP/IP (Default) and OPC Over DCOM
Example 3: OPC Direct, OPC Over TCP/IP, and OPC Over DCOM
In this example, PC1 communicates with PC2 using OPC direct.
1.
First set OPC direct as the default channel. Right-click OPC Direct and select Set As
Default from the pop-up menu.
2.
PC1 also communicates with PC3 using OPC over TCP/IP. Right-click OPC over TCP/IP
Direct Channels and select Add Node from the pop-up menu. This opens the Select a
Node dialog box. Enter PC3 in the Node Name or IP Address field, and then click OK. The
node name will appear below the channel, as shown below.
3.
PC1 also communicates with PC4 and PC5 using OPC over DCOM. Right-click OPC over
DCOM Direct Channels and select Add Node from the pop-up menu. This opens the Select
a Node dialog box. Enter PC4 in the Node Name or IP Address field, and then click OK.
The node name will appear below the channel, as shown below. Repeat this procedure for
PC5.
OPC Over TCP/IP Direct Channel
37
GenBroker – User’s Manual
Example 4: Communication Using a Mediator Node
This example demonstrates how communication between PC1 and the other four PCs can be routed
through a mediator node, as shown below. PC1 will not communicate directly with the remote
computers, but it instead will establish a connection with the mediator computer. This mediator will
then route the communications to the final destinations (in this case PC2, PC3, PC4, or PC5). The
mediator node may be located on a remote computer, which can only be reached through a RAS
(remote access service) connection or the Internet.
Communication via Mediator Node
The GenBroker configuration on the mediator node determines how the mediator will connect to
PC2, PC3, PC4, and PC5. This may use OPC Direct, OPC over DCOM, or OPC over TCP/IP. To
configure communication through the mediator node on a TCP/IP channel, for example, do the
following:
1. Click the Add TCP Channel button. This opens the Select a Node dialog box. Specify a name
for the mediator node (for example, "Mediator") in the Node Name or IP Address field, and
then click OK. The new channel will appear in the GenBroker Configurator screen as OPC
over TCP/IP Channel via Mediator, and the new mediator node will appear below the new
channel, as shown below.
2. Now add PC2, PC3, PC4, and PC5 to the new TCP/IP channel. Right-click OPC over TCP/IP
Channel via Mediator and select Add Node from the pop-up menu. This opens the Select a
Node dialog box. Enter PC2 in the Node Name or IP Address field, and then click OK. The
node name will appear below the channel, as shown below. Repeat this procedure for PC3,
PC4, and PC5.
Configuring a Mediator Node
Example 5: OPC Direct, OPC Over SOAP/XML, and OPC Over DCOM
In this example, PC1 communicates with PC2 using OPC direct.
1. First set OPC direct as the default channel. Right-click OPC Direct and select Set As Default
from the pop-up menu.
38
Introduction to GenBroker Communications
2. PC1 also communicates with PC3 using OPC over SOAP/XML. Right-click OPC over
SOAP/XML Direct Channels and select Add Node from the pop-up menu. This opens the
Select a Node dialog box. Enter PC3 in the Node Name or IP Address field, and then click OK.
The node name will appear below the channel, as shown below.
3. PC1 also communicates with PC4 and PC5 using OPC over DCOM. Right-click OPC over
DCOM Direct Channels and select Add Node from the pop-up menu. This opens the Select a
Node dialog box. Enter PC4 in the Node Name or IP Address field, and then click OK. The
node name will appear below the channel, as shown below. Repeat this procedure for PC5.
OPC Over SOAP/XML Direct Channel
WebHMI Client Configuration
WebHMI Client/Server Architecture
GenBroker acts as a bridge that links WebHMI clients to the WebHMI server over the Internet. The
WebHMI clients are used to view Web pages downloaded from the WebHMI server through a Web
browser (Microsoft Internet Explorer). As shown in the figure below, GenBroker enables
communication between the Web clients and the WebHMI server over TCP/IP.
WebHMI Client/Server Architecture
39
GenBroker – User’s Manual
Configuring GenBroker for the Client Side
GenBroker is configured for both the client side and the server side. Here we are concerned with
WebHMI client configuration. For information on how to configure GenBroker for the server side, and
for example GenBroker configurations, please see the GenBroker Help documentation.
WebHMI uses a configuration (.gbx) file for GenBroker. The GenBroker configuration file used by
the client resides on the server side. Once the client connects to the server, the .gbx file will be
downloaded from the server.
The first step in the WebHMI client configuration is to specify which .gbx file to use. You can use a
default file provided in the WebHMI installation, or you can you can create a new file. To work with a
.gbx file, you must start the WebHMI client configuration from the Windows Start menu by selecting
Programs > Smar WebHMI > Client Configuration.
This opens the WebHMI Configurator dialog box, as shown in the figure below. To use the default
configuration file, click the ... button to the right of the Edit the GenBroker Configuration field. This
allows you to select a .gbx file. Browse to "…WebHMI\Samples" and select Default.gbx.
WebHMI Client Configuration
The file pathway will appear in the text box, as shown in the figure above. You do not have to
reconfigure the default file except to:
•
Redirect channels of a WebHMI server.
•
Add a channel for a new node whose resident OPC server provides data to client PC
browsers.
If you want to set up a different or more advanced client/server communication architecture, you can
either reconfigure the “default.gbx” file or create a new .gbx file.
Retrieving a GenBroker Configuration File From a Web Page
Alternatively, you can search for a GenBroker configuration file in an HTML file. In many cases, .gbx
files are referenced in the source code of HTML files. Click the ... button to the right of the Web
Page (HTML File) field on the WebHMI tab of the GenBroker Properties dialog box. Browse to
select an HTML file, and then click the Open button. The HTML file pathway will now be displayed in
the Web Page (HTML File) text box. In addition, the Edit Source button will be enabled. Clicking
Edit Source allows you to view the source code for the selected HTML file. Once you have selected
the HTML file, click the Get From HTML button to retrieve the .gbx file that is referenced in the
HTML source code.
Editing the Default Configuration File
To reconfigure the default configuration, click the Edit button on the WebHMI Configurator dialog
40
Introduction to GenBroker Communications
box. This opens the GenBroker Configurator, as shown in the figure below. In the example, the IP
address "99.99.99.99" is the default mediator node and is the node assigned to the Security Server
and the License Server. You can add, remove, or reconfigure nodes using the commands and
functions described in the sections above.
Editing the Default GenBroker Configuration
Creating a New GenBroker Configuration File
To create a new GenBroker configuration file, select New from the File menu in the GenBroker
Configurator. Save the new .gbx file by selecting Save from the File menu. You can add and
configure nodes using the commands and functions described in the GenBroker Help
documentation. To view the GenBroker Help, select Help Topics from the Help menu.
GenClientWrapper OLE Automation Interface
The GenClientWrapper provides an OLE automation interface that allows you to manipulate
GenBroker as it is running. The interface is available to all programming languages that support
COM, including Visual Basic (VB), Visual Basic for Applications (VBA), and Microsoft Visual C++.
To access the Automation interface from VB and VBA, GenClientWrapper must be made available
by choosing the GenClientWrapper Type Library from the references list in the VB or VBA
development environment and selecting GenClientWrapper from the list of available libraries.
The description of every property or method in this reference is followed by the code example for
typical use of that property or method. The example code is written in Visual Basic for Applications
(VBA) language.
GenClientWrapper Methods
Function GetLoggedInUsers()
Description
Returns array of names of the users currently logged in to ProcessView
Example
Dim genclient As New GENCLIENTWRAPPERLib.Client
users = genclient.GetLoggedInUsers()
For Each user In users
MsgBox user + " is logged in"
Next user
Function GetPointProperty(bstrPointName As String, nPropertyID As GC_POINT_PROPERTY)
41
GenBroker – User’s Manual
Description
Returns a specified property of a specified point. See OPC Properties defined in OPC Spec for more
information.
Example
Dim genclient As New GENCLIENTWRAPPERLib.Client
accessrights
=
genclient.GetPointProperty("Smar.Simulator\SimulatePLC.Sine",
GC_PROPERTY_ACCESSRIGHTS)
If (accessrights < 2) Then MsgBox "not writeable"
Function RequestDataPoint(bstrName As String, lScanRate As Long, lRequestType As Long) As
DataPoint
Description
Creates a DataPoint object that represents an item on an OPC DA Server.
Example
Dim genclient As New GENCLIENTWRAPPERLib.Client
Dim point As GENCLIENTWRAPPERLib.DataPoint
Set point = genclient.RequestDataPoint("Smar.Simulator\SimulatePLC.Sine", 50, 0)
If (point Is Nothing) Then MsgBox "error creating point"
Function RequestSecurityPoint(SecType As GC_SECURITY_POINT_TYPE, bstrName As String,
nFunctionID As Long) As SecurityPoint
Description
Creates a SecurityPoint object that represents an item on Smar Security Server. It can be used to
find out if an action, OPC Tag or a file is enabled/disabled for the user currently logged in.
Example
Dim genclient As New GENCLIENTWRAPPERLib.Client
Dim point As GENCLIENTWRAPPERLib.SecurityPoint
Set point = genclient.RequestSecurityPoint(GC_SECURITY_FILENAME, "Display1.gdf", 0)
If (point Is Nothing) Then MsgBox "error creating point"
Sub ShowStatistics()
Description
Displays runtime statistics.
Example
Dim genclient As New GENCLIENTWRAPPERLib.Client
Call genclient.ShowStatistics
Sub GetValueEtc(Value, [Quality], [Timestamp], [TimestampMilliseconds])
Description
Member function of DataPoint object. Returns current value, quality and timestamp.
Example
Dim point As GENCLIENTWRAPPERLib.DataPoint
Call point.GetValueEtc(Value, Quality, TimeStamp)
MsgBox "Current Value: " + Str(Value)
Sub SyncWrite(newVal, [MillisecondsTimeout As Long = -1])
Description
Synchronously writes a value to a DataPoint
Example
Dim point As GENCLIENTWRAPPERLib.DataPoint
Call point.SyncWrite(123, 10000)
42
Introduction to GenBroker Communications
GenClientWrapper Properties
Property Quality As GC_DATA_POINT_QUALITY
Description
Property of DataPoint object. Contains the OPC quality of the relevant OPC Item.
Example
Dim point As GENCLIENTWRAPPERLib.DataPoint
Set point = genclient.RequestDataPoint("Smar.Simulator\SimulatePLC.Sine", 50, 0)
If (point.Quality = GC_QUALITY_GOOD) Then MsgBox "The point's value is valid"
Property State As GC_POINT_STATE
Description
Property of both DataPoint and SecurityPoint objects. Contains the state of the object. Points should
not be used until their state is known.
Example
Private Declare Sub Sleep Lib "kernel32" (ByVal dwMilliseconds As Long)
Dim point As GENCLIENTWRAPPERLib.DataPoint
Set point = genclient.RequestDataPoint("Smar.Simulator\SimulatePLC.Sine", 50, 0)
While (point.State = GC_POINT_UNKNOWN)
Sleep (100) 'wait until the point state is known
Wend
Property Timestamp([pvMilliseconds]) As Date
Description
Property of DataPoint object. Contains current timestamp (time of the last update).
Example
MsgBox "Last update at: " + Str(point.TimeStamp)
Property Value As Variant
Description
Property of DataPoint object. Contains current value of the point. This property is writeable. Writing
to it starts an asynchronous write operation.
Example
MsgBox "Point value is: " + Str(point.Value)
Property WritesPending As Long
Description
Property of DataPoint object. Contains number of pending write operations. The write operation can
be invoked by writing to the Value property.
Example
While (point.WritesPending > 0)
Sleep (100) 'wait for the writes to finish
Wend
Property Enabled As Long
Description
Property of SecurityPoint object. Indicates if security for the object represented by the SecurityPoint
is enabled or disabled for the user currently logged in.
Example
Dim secpoint As GENCLIENTWRAPPERLib.SecurityPoint
Set secpoint = genclient.RequestSecurityPoint(GC_SECURITY_FILENAME, "Display1.gdf", 0)
If Not secpoint.Enabled Then MsgBox "Access to Display1 is disabled"
43
GenBroker – User’s Manual
44