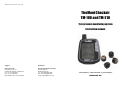
1
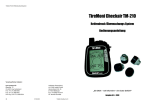
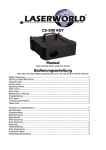
TireMoni TM-100 Tyre presure control system
TireMoni Checkair
TM-100 and TM-210
Tyre pressure monitoring system
Instruction manual
Supplier:
Distributor:
tpm-systems AG
Romanshornerstr. 117
CH-8280 Kreuzlingen, Switzerland
Fon: +41 (71) 698 6480
Fax: +41 (71) 698 6481
HRA Thurgau: CH-170.3.028.628-4
tpm UG (haftungsbeschränkt)
Gewerbepark 26
D-86687 Kaisheim
Fon: +49 (9099) 966 4966
Fax: +49 (9099) 966 4969
email: [email protected]
"At one glance – fully informed – a good feeling!"
Revision v2.09 – 2011
TireMoni TM-100 Tyre pressure monitoring system
Table of contents
TABLE OF CONTENTS
IMPORTANT SAFETY INSTRUCTIONS
PREVENTIVE MEASURES
MAIN FUNCTIONS OF TIREMONI CHECKAIR
PROPERTIES OF TIREMONI CHECKAIR
1 Installation
2 Operational concept
3 Reliable and robust
OPERATING ELEMENTS OF DISPLAY UNIT
DESCRIPTION OF THE GRAPHICAL USER INTERFACE
STARTING UP
System diagram
Installation
Installation instructions
Installing the display unit
Installation of the pressure sensors
Inserting batteries into the sensor
Anti-theft protection for sensor (optional)
Installing the display unit at the front screen or dashboard
INSTRUCTIONS FOR USE
1 Basic display unit functions
Position of operating elements
2 Screen content and basic functions
3 Advanced settings
SYSTEM OPERATION
1 Initialisation
2 Main screen
3 Power-save mode (sleep mode)
4 Abnormal tyre pressure or temperature
Tyre pressure below lower warning threshold
Tyre pressure above upper warning threshold
Tyre temperature above upper temperature warning threshold
Display unit: Battery becoming exhausted
Sensor: Battery becoming exhausted
5 Description of alerts and displays
ADDITIONAL INFORMATION
INSTRUCTIONS IN CASE OF ERROR
PACKAGE CONTENTS
SPECIFICATIONS TM-100
SPECIFICATIONS TM-210
DECLARATION OF CONFORMITY
CONDITIONS OF WARRANTY
WEEE – DISPOSING OF ELECTRICAL INSTRUMENTS
2
23.02.2011
Declaration of Conformity
2
3
4
4
5
6
6
6
7
8
9
9
9
9
9
12
13
14
17
20
20
20
20
24
25
25
25
26
26
26
27
27
28
28
29
30
30
32
34
34
35
35
35
TireMoni manual v2.09
This product is in its construction and in its operating characteristic conforming to the applicable
European directives as well as additional national requirements.
The conformity has been proven.
The declaration of conformity can be obtained with:
tpm UG, Gewerbepark 26, D-86687 Kaisheim or with the responsible importer.
Conditions of Warranty
In accordance with legal rules this instrument is subject to a warranty period of 24 months from
date of order. A copy of the sales slip is sufficient proof of purchase in case of a complaint under
warranty. Damages that can be ascribed to wear, transport, overloading, neclecting the operating
manual or inappropriate handling will not be covered under this warranty. The same holds for
expendables, e.g. batteries. The manufacturer is not liable for indirect consequences and
damages. The warranty period is not extended or renewed by any possible repairs. Claims under
this warranty are only accepted if the instrument is returned complete and free of charge to the
dealer, distributor or manufacturer.
WEEE – Disposing of Electrical Instruments
Instruments that are marked with the marking shown, must not be disposed of in
household waste. You are obliged to dispose of such electronic instruments separately.
Please consult your local authority about the possibilities of suitable disposal. With the
separate disposal you are returning obsolete devices to a suitable form of recycling. This
way you are helping to avoid potentially hazardous substances to contaminate our environment.
Tiremoni manual v2.09
23.02.2011
35
TireMoni TM-100 Tyre pressure monitoring system
TireMoni TM-100 Tyre pressure monitoring system
Specifications TM-100
Sensor specification
Frequency
Measuring range
Precision
Operating voltage
Operating
temperature
Reserve energy
Dimensions
Weight
433,92 MHz
0 - 4 bar (0 .. 60 psi)
Pressure ± 0,07 bar (1 psi)
3V DC
-40 °C ... 85 °C
Important safety instructions
!!! Before starting the tyre pressure monitoring system, for your own safety, please
imperatively read and observe these important safety instructions!!!
Temperature ±2 °C
Monitor installation:
• Attach the LCD monitor (display unit) at a place not interfering with the driver's field of
vision.
• Make sure to position the LCD monitor in such a way that it cannot fall down during the
ride.
• Mind your driving safety when reading the pressure / temperature values from the LCD
monitor.
• Do not attempt to disassemble or repair any parts of the system by yourself. Any failure to
comply will immediately and irrevocably result in losing the manufacturer warranty.
1 - 4 years (or approx. 50´000 km)
Diameter 20.5 mm X Height 20 mm
10 g (±1)
Specifications of display unit
Frequency
433.92 MHz
Reserve voltage
3V DC
Reserve energy
1 –2 years (or approx. 25´000 km)
Operating
-20°C ... 85°C
temperature
Dimensions
Width 75 mm X Height 91 mm X Depth 22 mm
Weight
100 g
Sensor installation:
• Road traffic regulations require that no parts protrude beyond the rim contour. For this
reason, please assemble the sensors on short valves in such way only that the sensor
stays within the rim contour! For safety reasons, it is prohibited to run the system with the
sensors protruding from the rim contour. Disregarding of this provision will automatically
void your operating license!
• It is recommended to install sensors on suitable metal valves which are screwed in place:
Suitable length so that the sensor does not protrude from the rim and suitable valve type
so that the forces are held by the valve case and not the gasket (e.g. Valve series ASC
made by Alligator) see http://shop.tiremoni.com .
• It is recommended to have the first time installation done by a professional.
• Check the tightness of the sensors after installation, by pouring some water across the
valves and then checking for any discharge of air bubbles.
• It is recommended to install sensors using a suitable anti-corrosion spray or copper paste
to prevent corrosion from moist and salt.
• It is recommended to rebalance the tyres subsequent to sensor installation.
• When the LCD monitor is not operated, please immediately remove the sensors!
In case the sensors remain installed while the LCD monitor is out of operation, you are
compromising your own safety, and the system function can no longer be guaranteed!
Specifications TM-210
Sensor specification
Frequency
Measuring range
Precision
Operating voltage
Operating
temperature
Reserve energy
Dimensions
Weight
433,92 MHz
0 - 11 bar (0 .. 160 psi)
Pressure ± 0,14 bar (2 psi)
3V DC
-40 °C ... 85 °C
Temperature ±2 °C
1 - 4 years (or approx. 50´000 km)
Diameter 20.5 mm X Height 20 mm
10 g (±1)
Specifications of display unit
Frequency
433.92 MHz
Reserve voltage
3V DC
Reserve energy
1 –2 years (or approx. 25´000 km)
Operating
-20°C ... 85°C
temperature
Dimensions
Width 75 mm X Height 91 mm X Depth 22 mm
Weight
100 g
34
23.02.2011
International:
Deutsch:
TireMoni TM-100 / TM-210 User Handbuch: www.tiremoni.de/Downloads.html
English:
TireMoni TM-100 / TM-210 User Manual: www.tiremoni.eu/Downloads.html
Francais:
TireMoni TM-100 / TM-210 Manuel d’Utilisation: www.tiremoni.fr/Downloads.html
Italiano:
TireMoni TM-100 / TM-210 Istruzione d’Uso: www.tiremoni.it/Downloads.html
Nederlandse: TireMoni TM-100 / TM-210 Gebruikers Handboek: www.tiremoni.nl/Downloads.html
TireMoni manual v2.09
Tiremoni manual v2.09
23.02.2011
3
TireMoni TM-100 Tyre pressure monitoring system
TireMoni TM-100 Tyre pressure monitoring system
Preventive measures
Please select the position of the display unit during installation in such way not to affect the
driver in any way.
1st1 Make sure that the display unit is firmly attached at the front screen or dashboard.
1st2 When reading the display unit, please remember not to neglect safe driving.
2nd Make sure that the display unit can receive signals from all the tyre pressure sensors.
3rd TireMoni WTPMS comes with a unique anti-theft protection; its sensors may be installed
with or without this feature (optional).
4th Make sure to mount the sensors hermetically sealed. If necessary, please check the
tightness by pouring some water across the valve (check for bubbling).
5th Install sensors using anti corrosion installation spray or copper paste to prevent corrosion
from moist and salt.
6th In any case of pressure drop, please stop immediately and determine the cause of error.
7th The display unit automatically establishes connections in the entire system, as soon as the
vehicle gets started. It is normal that the individual pressure values are not immediately
updated when the pressure inside the respectivetyres has not changed.
8th TireMoni WTPMS possesses some mechanism to avoid any interference from other signal
sources.
9th The tyre temperature may vary either upwards or downwards, depending on the many
different influence factors (i.e. ambient temperature, travelling speed, solar radiation); rising
temperatures cause an increased tyre pressure, whereas the pressure will fall when the
temperature is falling.
10th The tyre pressure is getting lower over the years due to diffusion; this phenomenon is not
due to, but merely displayed by TireMoni. In any case, TireMoni only shows the tyre
pressure, which is actually available.
11th Should you have any questions or issues with reference to your TireMoni product, which are
not being responded to in this manual, please contact your nearest TireMoni distributor or
check out our website www.tiremoni.com/FAQ.html.
Display mounting
frame
1 pc.
Plate with vacuum
cup
1 pc.
Adhesive plate
1 pc.
Cigarette lighter
cable
1 pc.
1st
Main functions of TireMoni Checkair
The tyre pressure control system (RDKS or TPMS) is an efficient and cost-effective response to
many current safety issues related to motor vehicles. Using a tyre pressure monitoring system
avoids driving with too little air pressure available in the tyre, and helps reducing fuel consumption.
These are your benefits:
• Improved ride qualities and enhanced handling
The air pressure represents an essential element influencing the road performance of
your vehicle.
• Reduces the risk of blowouts
Selecting the appropriate tyre pressure is critical to safe driving, especially during
passenger accommodation or when carrying hazardous material.
• No more need for manually checking the tyre pressure
With multi-wheel vehicles, much time is required for carrying out the manual tyre
pressure control. Monitoring the tyre pressure during the ride manually is not possible
at all. At anytime, TireMoni provides you with a unambigous image of the current tyre
condition.
4
23.02.2011
TireMoni manual v2.09
Tiremoni manual v2.09
23.02.2011
33
TireMoni TM-100 Tyre pressure monitoring system
TireMoni TM-100 Tyre pressure monitoring system
•
Package Contents
•
Description
Image
Quantity
TireMoni display
unit
1 pc.
•
•
•
Checkair pressure
sensor
4 pc.
CR1632
Lithium battery
4 pc.
AAA-1.5V battery
2 pc.
Avoids high running cost
Due to the consistent radio design and the external sensors, only little expenditure is
required for installation. The running costs are minimised by using replaceable
batteries.
Reduced down times
The real-time monitoring continuously delivers the values for tyre pressure and
temperature; this helps avoiding unexpected break-downs due to defective tyre
pressures and temperatures.
Reduces fuel consumption
Per each pressure drop of 0.2 bars, the fuel consumption is increased by 1%, which
makes the tyre pressure an essential factor in terms of fuel consumption.
Extends the tyre life
As shown by research findings, already when driving at an air pressure lower than
20% below the set value, the tyre life is reduced by up to 50%. For an optimum
utilisation of the available tyre life, the correct tyre pressure thus represents a
precondition (please observe your vehicle manufacturer’s requirements to determine
the correct tyre pressure)
Increases profitability
The result of all the advantages given is: Monitoring the tyre pressure using the
TireMoni tyre pressure monitoring system offers more benefits to you than you may
expect at first glance.
Properties of TireMoni Checkair
TireMoni WTPMS (Wireless Tire Pressure Monitoring System) – is an effective tool for achieving
maximum service life and improved operational safety – the new WTPMS standard - TireMoni
tyre pressure control
Manual
Anti-theft
protection
32
23.02.2011
Socket wrench
1 pc.
1 pc.
Anti-theft rings
4 pc.
Socket screws
4 pc.
TireMoni manual v2.09
Technologically, TireMoni is the leading solution in the field of radio tyre pressure monitoring for
light to and heavy commercial vehicles and recreation vehicles. By constantly enhancing the
design and manufacturing technologies, TireMoni helps improving safe driving while reducing
operational cost; as a secondary effect, the environment gets relieved due to reduced fuel and
tyre consumption. The most important milestone when developing TireMoni WTPMS was
introducing the highly integrated valve cap sensor. This extremely low-weight and compact sensor
was especially designed as to allowing a simple and quick installation. This means: Neglecting
tyre maintenance to the detriment of safety is now a thing of the past. Using radio technology, the
tyre pressure can be read from the user-friendly full graphic LCD anytime you like.
TireMoni WTPMS is available in different configurations, which cover all the combinations of
commercial vehicles, such as transporters, motor homes, caravan (trailers), buses, agricultural
commercial vehicles etc.
Tiremoni manual v2.09
23.02.2011
5
TireMoni TM-100 Tyre pressure monitoring system
1
Installation
•
•
•
•
•
2
Do it yourself (D.I.Y.): TireMoni can be installed in a very short time. It is
recommended to have the first time installation done by a professional.
Please note: Sensors should be installed on metal valves of suitable length. Sensors
must not protrude from the rim contour.
Wireless Design - Installation without laying cables: The radio communication
between the sensors, relays and the display unit makes installation fast and easy.
Battery-operated: The display unit, the relays and the sensors are run by batteries.
The charging condition of all the batteries can be read from the display unit.
Low-weight and compact sensor: The sensors are very small and low-weight, and
they have specific highly integrated electronics.
Operational concept
•
•
•
•
3
Graphical user interface: Plain full graphic display providing you with a quick capture
of the tyre condition.
Real-time: High-precision monitoring of the pressure and temperature in real-time;
precision better than 0.1 bars.
Adjustable: Upper and lower warning thresholds for pressure and upper threshold for
temperature can be adjusted by the user.
Warnings: Any abnormal tyre condition (pressure or temperature) can be easily read
from the large 3.5" LED monitor and gets signaled by beeps.
Reliable and robust
•
•
•
•
•
•
6
TireMoni TM-100 Tyre pressure monitoring system
Anti-theft protection for the sensor: The pressure sensors can be protected against
unscrewing using a fixing stop.
In any case of loss or damaging, replacement sensors are available, so that the down
times for the system stay minimal.
Safe radio communication ensured due to specific signal processing
Strict live tests proving its reliability.
The sensors have a pressure measuring range of 4 bar (60 psi – TM-100) or 12 bar
(160 psi – TM-210)
Corrosion protection: The sensor housing has a rust-proofing coating, which is used
for extending the sensor operating time. We additionally recommend mounting using a
suitable installation spray.
23.02.2011
TireMoni manual v2.09
A. Make sure that the display unit can receive signals from the sensor. The distance
between the display unit and the sensor may be up to 20 meters; however, the actual
range of coverage may be lower due to interferences.
B. Make sure that the relays are fitted with batteries.
C. Make sure that the batteries have been inserted with the correct polarity.
D. Please check whether the battery is discharged. The battery may be dead after a longer
service life, and we recommend you to replace it.
E. Please make sure that you did not confuse your sensor with another system. Each
sensor has its own ID number, and the display unit can only detect and receive the
sensors it is associated with and will not accept any other ID numbers.
F. Please remove the sensor battery and put it back in place after a short while (approx. 30
seconds); this will restart the sensor and sign it on in the system.
G. In case the present information should not provide further assistance to you, please
contact your TireMoni distributor or our TireMoni support team:
www.tiremoni.com/FAQ.html
3. Display unit will not quit beeping
When the display unit has been operated using almost discharged batteries over a longer
period, it is possible that the device gets into an undefined state and will not quit beeping. In
this case, please replace the batteries, switch off the device and switch it on again after a
short while. It should then function normally again.
4. Display becoming dark
When the temperature (i. e. by solar radiation) rises above 85°C, it is normal for the LCD
display to become dark (black). When the temperature is falling, the display gets back to its
normal condition.
5. When the temperature falls below –25°C, the response time of the indicators may increase;
and the display will respond at a slower rate as usually.
6. Display unit in sleep mode
When the vehicle is parked (or run vibration-free over a longer period of time), the display unit
may pass into the sleep mode in order to save electricity. When touching the device or
pressing any control knob, it will be re-enabled immediately.
7. Please make sure that the front screen is clean and flat at the very location you wish to mount
the display unit; otherwise, the vacuum cup may not adhere properly and cause the device to
come off.
8. The tyre pressure varies depending on different influencing factors:
The tyre temperature is one of the main factors: Per 10 °C temperature rise, the pressure
rises by approx. 0.25 bars (based upon a room temperature of 25°C).
Tiremoni manual v2.09
23.02.2011
31
TireMoni TM-100 Tyre pressure monitoring system
TireMoni TM-100 Tyre pressure monitoring system
Additional information
Operating elements of display unit
Under normal conditions, the sensor batteries can be used for approx. 1 - 2 years (the operating
time may be reduced due to high driving performances). When the battery capacity is getting low,
this information is displayed on the screen. Please replace the battery with a new CR1632 lithium
battery.
Mute
Temperature
Antenna
Notes about the battery
• Please store any batteries beyond children's reach. In case of swallowing a battery, please
consult a physician as quickly as possible.
• Clean the batteries before inserting them using a dry cloth to ensure a good contact.
• Please observe the correct polarity when inserting the batteries (+ away from the sensor, towards the sensor).
• Do not hold the battery with metallic tweezers or tongs; this may produce short circuits and
destroy the battery.
• The battery may explode when handled improperly.
• Do not recharge, disassemble or burn batteries.
Backlight
Threading receving
the construction frame
On-off
switch
LCD
display
Fixing hook slot
Battery cover
Terminal for cigarette lighter
cable
Instructions in case of error
The checklist to follow should help you identifying and resolving any possible problems arising.
Please review the installation and operating guidelines before turning to this checklist.
Front view
Rear view
Description of construction frame
1. Displays disappear from / are not shown in the display
A. Make sure that the device is switched on.
B. Make sure that batteries have been inserted.
C. Make sure that the battery capacity is sufficiently high.
D. Make sure that the batteries have been inserted with correct polarity.
E. When using the cigarette lighter cable, please make sure that it has been plugged.
F. Please check whether the battery is discharged. The battery may be dead after a longer
service life, and we recommend replacing it.
G. Please check whether the system is in sleep mode; the system automatically passes into
the sleep mode for electricity-saving reasons if no activity has been detected for more
than 10 minutes. However, you can re-enable the system by slightly striking against or
pressing one of the control knobs.
In case the present information should not provide further assistance to you, please contact your
TireMoni distributor or our TireMoni support team: www.tiremoni.com/FAQ.html
Fixing screw
Mounting frame
Angle adjustment
Tilt mount
2. No connection between the sensors and the display unit. The status is displayed as shown
below, and the respective pressure values related have gone; instead, ‚---‚ is displayed.
Mounting plate
Mounting frame
30
23.02.2011
TireMoni manual v2.09
Tiremoni manual v2.09
23.02.2011
7
TireMoni TM-100 Tyre pressure monitoring system
TireMoni TM-100 Tyre pressure monitoring system
Sensor description
The sensor consists of two parts: sensor cap and sensor housing. The execution as a valve cap
allows quick and easy installation, without requiring any technical knowledge
5
N°
1
Definition
Switching on
Purpose
Advising that the system is
now switched on
Status
A beep and switching on the
backlight
2
Pressure below the
lower warning threshold
To serve as warning that the
pressure is too low
3
Pressure continues to
fall by 0.1 bars
Three beeps ten time in a
row and switching on the
backlight during three
seconds
Three beeps ten time in a
row and switching on the
backlight during three
seconds
Three beeps ten time in a
row and switching on the
backlight during three
seconds
Three beeps ten time In a
row and switching on the
backlight during three
seconds
Three beeps ten time In a
row and switching on the
backlight during three
seconds
One beep and switching on
the backlight during one
second
One beep
Battery cap sensor
Threading to be screwed on the
valve
4
Description of the graphical user interface
Sensor status:
: Status updated
Without icon: Status not updated
Temperature unit
°C: Celsius
°F: Farenheit
Battery display:
Without icon: Battery OK
: Battery empty
Battery condition
Mute: (without icon) Sound on
Device mute
Without icon: Battery OK
: Battery empty
Pressure unit:
KPA
PSI
bars
kg/cm2
Wheel position:
8
Front left (F.L)
Front right (F.R)
Rear left (R.L)
Rear right (R.R)
23.02.2011
Status:
not flashing: Device is starting
flashing: normal operation
Pressure-Temperature display:
Value for pressure or temperature
: Pressure too low
: Pressure too high
: Temp. too low
TireMoni manual v2.09
Description of alerts and displays
When the pressure is below
the lower warning threshold,
there will be a new warning
per 0.1 bars as a reminder
Pressure is above the
To serve as a warning that the
upper warning threshold pressure is too high
5
Pressure keeps on
rising by 0.1 bar above
the warning threshold
6
When the temperature
is above the warning
threshold
7
Main screen displayed
System starting sequence
completed
8
Back from the
electricity-saving mode
Advising that the system is
now enabled
9
Resetting to factory
settings
Learning mode
Advising that the adjustment is
now completed
Advising that the replacement
sensor has now been taught in
Advising that the settings now
have been completed
10
11
Back to main screen
after completing the
adjustment mode
Tiremoni manual v2.09
When the pressure is above
the upper warning threshold,
there will be a new warning
per 0.1 bars as a reminder
To serve as a warning that the
temperature is too high
23.02.2011
Two beeps and switching on
the backlight
One beep
One beep
29
TireMoni TM-100 Tyre pressure monitoring system
TireMoni TM-100 Tyre pressure monitoring system
Starting up
Display unit: Battery becoming exhausted
The battery in the sensor is consumed by daily use. When the capacity falls below a certain value,
this condition becomes displayed to inform that new batteries shall be used. The symbol is given
in the figure below.
System diagram
Optional
TireMoni
Checkair
Please replace the battery in the display unit once the corresponding message appears to make
sure that the system is functioning properly.
Installation
Sensor: Battery becoming exhausted
The battery in the sensor is consumed by daily use. When the capacity falls below a certain value,
this condition becomes displayed to inform that new batteries shall be used. The symbol is given
in the figure below.
The display unit can either be operated using batteries or the cigarette lighter cable. In the
following, we will first describe the battery-operation option. Please observe the following steps for
starting the relays, display unit and sensors:
Installation instructions
1. Insert the batteries into the display unit
2. Switch on the display unit
3. Insert the batteries into the sensors
4. Screw the sensors instead of the valve caps onto the corresponding wheels
Installing the display unit
Battery-operation
A.Unpack the batteries provided
In this example Rear Left (R.L.)
Please change the battery in the sensor as soon this becomes displayed to make sure that the
system is functioning properly.
28
23.02.2011
TireMoni manual v2.09
Tiremoni manual v2.09
23.02.2011
9
TireMoni TM-100 Tyre pressure monitoring system
TireMoni TM-100 Tyre pressure monitoring system
B.Open the battery compartment
Tyre pressure above upper warning threshold
To do so, please press the lock downwards, as shown in the figure, and open
the compartment
If the tyre pressure rises above the set upper warning threshold (default setting: 5.2 bars), the
display unit beeps ten times and switches on the backlight during three seconds. The pressure
value and ‚HiP’ appear alternately. This is represented in the figure to follow: The pressure of the
wheel rear left is too high.
Flashing
C.Insert the batteries
Insert the batteries with their negative pole pointing at the resort and then
gently press the battery into position, until it is fully contained in the
compartment.
In this example Rear Left (R.L)
If the pressure continues to rise, the display unit gives a warning every time the pressure rises by
another 0.1 bars. These warnings will stop as soon as the pressure (i.e. by venting air) is again
below the set warning threshold.
Attention: If the warning is given, you should first assess the situation to ensure safe stopping;
only then, you should check the tyres as quickly as possible.
Tyre temperature above upper temperature warning threshold
When the temperature rises above the set upper warning threshold (default setting: 70°C), the
display unit beeps ten times showing the alert 'HiT' at the wheel position concerned. This is shown
in the figure to follow: The temperature of the wheel rear left is too high.
Note: When inserting, please observe the correct polarity
Flashing
In this example Rear Left (R.L.)
If the temperature continues to rise, the display unit gives a warning every time the temperature
rises by another 1°C. The warning stops as soon as the temperature falls again below the set
warning threshold.
Attention: If the warning is given, you should first assess the situation to ensure safe stopping;
only then, you should check the tyre thoroughly.
10
23.02.2011
TireMoni manual v2.09
Tiremoni manual v2.09
23.02.2011
27
TireMoni TM-100 Tyre pressure monitoring system
3
TireMoni TM-100 Tyre pressure monitoring system
D.Close the compartment
Power-save mode (sleep mode)
Press the compartment to the device until it engages.
For an optimum utilisation of the battery capacity, the system (display unit and sensors) has an
intelligent energy management; the display and sensors automatically pass into the sleep mode
when no activity is detected for more than 10 minutes. In this mode, the display is switched off to
save electricity. When any kind of movement becomes available (i.e. by opening a door or
pressing a button), the display unit is immediately re-enabled. The display then looks like below,
since the measuring values have not been updated yet.
When there is no activity
for more than 10 minutes
E.Switch on the display unit
Put the switch to the 'On' position, as shown in the figure. The display unit gets
started and receives the signals from the sensors.
4
Abnormal tyre pressure or temperature
Tyre pressure below lower warning threshold
When the tyre pressure is below the lower warning threshold (default setting: 3.1 bars), the
display unit beeps ten times, and the related tyre symbol shows ‚LoP’ alternately with the pressure
value, to indicate the low pressure value. This is represented in the figure to follow: The tyre
pressure of the wheel rear left is too low.
Flashing
The display unit beeps once and shows the last received (before the sleep mode)
pressure values.
The figure to follow shows the condition available after starting up:
In this example Rear Left (R.L.)
If the pressure continues to fall, the display unit gives a warning every time the pressure falls by
another 0.1 bars. The warnings will stop as soon as the pressure (i.e. by refilling) is again above
the set warning threshold.
Attention: If the warning is given, you should first assess the situation to ensure safe stopping;
only then, you should check the tyres as quickly as possible.
26
23.02.2011
TireMoni manual v2.09
Tiremoni manual v2.09
23.02.2011
11
TireMoni TM-100 Tyre pressure monitoring system
TireMoni TM-100 Tyre pressure monitoring system
Note:
1. When the batteries are becoming exhausted, the charging condition is displayed as
described further down.
2. Before taking the next step, the display unit needs to be switched on.
3. Please observe the correct polarity when inserting the batteries.
4. The system was designed to allow easy handling. There is no need for switching off the
display unit. It is even recommended to always keep the display unit switched on. If not used,
the device automatically passes into a sleep mode for saving electricity.
System operation
1
Initialisation
During the initialisation phase, the display unit first establishes the contact to the sensors and then
displays information after starting up.
Installation of the pressure sensors
The sensors are consecutively numbered, and each sensor has its respective position it needs to
be mounted to. Depending on the number of wheels monitored, every single sensor number
corresponds to another wheel position. When inserting the batteries, please make sure not to
confuse the sensor caps. The relays sensor allocation table informs you at what wheel position
the different sensors are to be mounted. Please find the allocation table below:
2
Main screen
After starting up, the system displays the main screen. Most of the time, your system will stay in
this display mode, and show the most recent values for tyre pressure and temperature. A beep
tells the driver that the system is in operation.
F.L. stands for Front Left
F.R. stands for Front Right
R.L. stands for Rear Left
R.R. stands for Rear Right
Flashing
Note:
When inserting the batteries, please observe the correct polarity.
Do not confuse the sensors’ sensor caps.
As soon as the batteries are becoming dead, the battery condition gets displayed.
Main screen
12
23.02.2011
TireMoni manual v2.09
Tiremoni manual v2.09
23.02.2011
25
TireMoni TM-100 Tyre pressure monitoring system
3
TireMoni TM-100 Tyre pressure monitoring system
Advanced settings
Inserting batteries into the sensor
+
•
A. Unscrew sensor caps
Resetting to factory settings
At times, it is necessary to reset the device to factory settings. This function allows setting all
warning thresholds to default settings.
Before switching on the display, please press the ‚temperature’ button and switch it on while
keeping the button pressed. The reset is acknowledged by the system through two beeps.
+
•
Learning mode
B. Insert lithium battery and observe correct polarity (see figure).
If one of the sensors in the system needs to be replaced with a replacement sensor, this function
is required. Each original sensor has its own ID number, and no setting is required at this point.
However, if the original sensor is lost or broken, it needs to be replaced with a replacement
sensor; only replacement sensors can be taught using this procedure, this will not work with
original sensors. Replacement sensors are available with your distributor or directly at
www.tiremoni.com.
Before switching on the display unit, please press the button
and then, keeping pressing
the button, switch on the device
. This causes the device to pass into the “learning mode” and to display “LEN”.
The display unit now receives signals of the related sensor and then indicates the pressure value.
After inserting the battery, first '0.00' becomes displayed, since the sensor has not been mounted
yet. The display content is as represented below:
Please now insert the battery into the replacement sensor. At completion of the learning
procedure, the display unit will again beep.
Flashing
In this example R.L. (Rear Left)
In this example, the sensor is shown R.L. (Rear Left)
Note:
After removing the battery, please allow the sensor to be battery-free for at least 10 seconds
before re-inserting the battery. Otherwise, the sensor may not start properly.
Note: This function requires a teachable replacement sensor; the procedure will not work with an
original sensor. Should you attempt this using an original sensor, all that would happen is
hearing three beeps for 30 seconds.
24
23.02.2011
TireMoni manual v2.09
Tiremoni manual v2.09
23.02.2011
13
TireMoni TM-100 Tyre pressure monitoring system
TireMoni TM-100 Tyre pressure monitoring system
C. Screw the sensor cap back on
•
Temperature
After pressing the 'Temperature' button, all tyre temperatures are displayed during three
seconds. Afterwards, the display returns to the main screen.
Consult the allocation table (p. 12) to check whether each sensor is mounted at its proper
wheel, and please make sure not to confuse the sensor caps. Both the sensor cap and the
sensor itself are labelled with the position marking.
•
Sensor position Front Left (F.L.)
Backlight
For reading the device in the dark, the backlight can be switched on using this button. The
backlight is turned off automatically after three seconds.
Anti-theft protection for sensor (optional)
With our anti-theft protection, the sensors cannot be screwed off. The user can decide whether to
have this feature installed or not.
14
23.02.2011
TireMoni manual v2.09
Tiremoni manual v2.09
23.02.2011
23
TireMoni TM-100 Tyre pressure monitoring system
TireMoni TM-100 Tyre pressure monitoring system
Slide the anti-theft protection onto the valve.
B. Press longer than 5 seconds:
When pressing this button longer than 5 seconds, the device passes into the mode for
adjusting the measuring units and warning thresholds. This is described hereinafter:
The symbols
are used to select the measuring units and to increase or decrease the values for the
warning thresholds.
Pressing the ‚Mute’ button will take you to the next adjustment point respectively.
After completing all settings, the display unit passes into normal operation by emitting a
short beep.
The available measuring units for the pressure are: PSI、KPA、BAR、kg/cm2 .
The available measuring units for the temperature are: degrees Celsius (°C) and
Fahrenheit (°F).
A.
Put the sensor on the valve. Do not apply too much force when tightening.
The current pressure value is now displayed
Adjust pressure display
units
Adjust temperature display
units
Adjust lower
warning
theshold
Adjust warning threshold for
temperature
22
Adjust upper pressure
warning threshold
23.02.2011
In this example Rear Left (R.L.)
TireMoni manual v2.09
Tiremoni manual v2.09
23.02.2011
15
TireMoni TM-100 Tyre pressure monitoring system
TireMoni TM-100 Tyre pressure monitoring system
B. Please arrange the anti-theft protection in such way that the ring is engaging in the
sensor bottom.
Mute (press shortly once)
Measuring units and warning thresholds (press long)
A. Press shortly:
When the tyre pressure or the temperature comes into an abnormal state, the driver hears
beeps. When pressing the 'Mute' button, the acoustic warning is switched off, and only the
warnings in the display are visible. When pressing the 'Mute' button once more, the beeps
are re-enabled.
16
C.
Screw the socket screw onto the threading to be used for attaching the anti-theft
protection. The sensor is now protected against screwing off.
(Do not over-tighten to avoid any valve damage.)
D.
After installing all four sensors, please use some water to check for any leakage in the
sensors and valves (by pouring some water across the valve and checking for air
bubbling).
E.
It is up to the user whether to have the anti-theft protection installed or not. In the
negative case, the steps A, C and D can be skipped.
23.02.2011
TireMoni manual v2.09
Tiremoni manual v2.09
23.02.2011
21
TireMoni TM-100 Tyre pressure monitoring system
TireMoni TM-100 Tyre pressure monitoring system
Installing the display unit at the front screen or dashboard
Instructions for use
Installing the mounting frame
1
Basic display unit functions
The package comes with two mounting frame holders. Please select the option which best suits
your needs and screw it onto the mounting frame.
Position of operating elements
Mute / Set measuring units /
Set warning thresholds
Temperature
Antenna
Backlight
On-off switch
LCD
display
A. Adhesive plate
2
B. Mounting frame w. vacuum cup
Screen content and basic functions
Attaching the mounting frame at the display unit
A.First hook in the mounting frame at the display unit
Power Switch
Switch on the display unit as indicated above. The device gets started and will display the last
measured values before receiving data from the sensors.
Main screen
(This is an example; the actual pressure values and configuration may differ.)
20
23.02.2011
TireMoni manual v2.09
Tiremoni manual v2.09
23.02.2011
17
TireMoni TM-100 Tyre pressure monitoring system
TireMoni TM-100 Tyre pressure monitoring system
B.Then firmly tighten the screw
Note:
• Do not spill any liquids across the display unit.
• For attaching the device, a flat and clean is surface is required.
• When cleaning, please avoid touching the screen surface. Hold the display unit at its
housing only.
• The display unit should be mounted in an upright position. A position pointing upwards
may cause failures.
Optional: Cigarette lighter cable
Another operating option is using the cigarette lighter cable terminal; in this case, no batteries are
required.
A.Cigarette lighter cable terminal in the display unit
C.Adjust the display angle using both joints to best suit your needs
B.Plug cigarette lighter cable
D.Attach the display unit at the front screen or dashboard.
18
23.02.2011
TireMoni manual v2.09
Tiremoni manual v2.09
23.02.2011
19