1
•
Table of Contents
•
Death in Doom fane .... .. ..... .... ..... .. .. .. ... .. ... ..... ... ... ....... ... .. .. ... ..... ... 1
Getting Started ........ .... ... .. .... ....... .... ... .... ....... .... .. .... ...... .... .... ... ... 1
MAIN MENU OPTIONS ...................................... ...........2
GAME CON1ROLS .... .... ... ... .. .. .. .. .......... .. . ..... ..... .... .... ..2
ARTHUR'S MAGICAL CYPHER ....... .... ......... ......... .... ....2
Playing Demon Stalkers .................. ...... .... .... .... ........ ... ......... .... ... 3
HEALTH ....... ... .. .... ...... .... ...... ... .... .... ......... .... ... ......... .. .3
ATTRIBUTES ..... .... .. .................. ........ .... ... ....... .. ... .. ... .. .3
ITEMS .... ... .. .. ... ..... ... ..... .. ............ ..... .. ... ..... .. .... .. .... ... .. .3
MONSTERS ...... ... ................. .... .......... .... ... ..... ..... ....... . .3
THE DUNGEON ... .. ................. ..... .... ...... ..... ... ... ... .. .. .. ...3
The Construction Set (Editor) ..... ....... .. .... .. .. ... .. ... .. .. .. ..... ...... . ....... .4
OPTIONS ..... .... .. .... .... .... ..... ... .. .... .. .... ..... ...... .. ..... .... .... .5
CLEAR ..... ...... ........ ... .. ..... ...... .. .... ... .. .... .... ..... .. .... . ... .. ..6
VIEW ..... ...... .. .... ......... ...... .... ... ..... ...... .......... ........ ... ....6
DISK ..... ....... . ....... ............ .... ..... ..... ..... .......... ... .... .... .... 6
OBJECTS DISPLAY ... ............ .. .............. ........... ... .... ... .. .6
EDITING WINDOW .. ..... .... ........ .. .. .. ... .. ... ........ ... ..... .... ... 6
LOCATOR BOX .. .... ...... ... .. .. .. .... .... ........ ..... ... .. .. ... . ... ....6
Using the Construction Set (Editor) ..... ... .... .. ... ... ......... .. .. . .... ..... ... ..7
CHOOSING A SECTION TO EDIT .............. ............ ........ .7
PLACING WALLS .. ........... .... .......................... ....... .. ..... 7
PLACING OBJECTS ..... .. .... .... ... .... ..... .......... .. .. ... ... ... .. .. 7
CHARACTER PLACEMENT ... ... ... ....... .... ....... .... ... .... ....7
EDITOR ICONS AND KEYBOARD SHORTCUTS .. .... ... .. .. 9
ADDITIONAL KEY COMMANDS ... ...... ... .... .. .. .. .. ..... ... .. .9
OBJECTS .... .. .. .. ... ... .. ... ........ .... ..... ... .. .... .... .... ... ... ... ... ...9
Tips for Advanced Demon Stalkers ..... ...... ..... .. .... .. ...... ..... .. . ........... 12
PLAYING THE GAME ...... .. .... ... ...... .. ........... .. .... ......... .. 12
DUNGEON CONS1RUCTION .... .. ........... ..... ..... .... .. ..... .. . 12
Death in Doomfane
Danger and death threaten your kingdom in the form of Calvrak, a vicious, hideously evil, and
remarkably ugly entity. Calvrak was awakened from its stasis during the construction of the
one hundred level dungeon it now inhabits. You drew the short straw-now it is your job to
find Calvrak and destroy it. Use the many clues and hints you'll find in the dungeon to
accomplish your task.
Each level is fraught with traps, treasures and, as you would expect, dangerous monsters.
Explore the dungeon alone or with a partner. Each player is equipped with the latest in
crossbow technology. Your weapons are always loaded and ready to fire a bolt. Now if you're
ready to hack and slay, greedily collect treasure, and generally wreak some serious havoc-read
on!
Getting Started
Before starting Demon Stalkers, you should make a backup copy of your scenario disk. You
can play Demon Stalkers from the original scenario disk, but this is not recommended. Use the
following steps to copy your disk:
1 . Remove all cartridges and disconnect any printers or modems.
2. Tum on your computer, monitor and disk drive. C128 users enter C64 mode.
3 . IMPORT ANT: Place a write-protect tab over the notch on your original scenario disk
before you copy the disk.
4 • You will need a blank disk to copy your scenario disk. Ins.ert the program side of your disk
and type LOAD "COPY" ,8,1 to use the copy/formatting program included on your
disk. Do not use Fast Load™ to copy your disk.
5. The PROGRAM MASTER disk is side 2 of your game disk, the ORIGINAL SCENARIO
disk is side 1 of your game disk, and the SCENARIO COPY disk is your blank disk.
Follow the prompts until your copy is complete.
·
NOTE: Do not tum off your disk drive at any point during the game as this will erase certain
vital information stored in the drive RAM.
When your backup is complete, you're ready to start the game. Use the following steps:
1 . Tum off the computer and remove all cartridges. Disconnect any printers or modems.
2 • Insert the Demon Stalkers program master disk in the drive. When asked to insert your
scenario disk, insert the copy of your scenario disk. Always play from a copy of the
scenario disk.
3 . Plug joystick into port 2 to play a single-player game. Use both ports for a two-"player
game.
•
•
4. Tum on your computer. C128 users enter C64 mode.
5. Type LOAD "EA" ,8,1 and press RETURN.
6 . Hit any key during the title screen to exit to the Main Menu.
MAIN MENU OPTIONS
Use the function keys to choose the following options from the Main Menu:
F 1 One player game.
F 3 Two player game, in which both players are in the dungeon at the same time. The second
player uses a joystick in port 1.
F 5 Enters the construction set (editor) where you can 'create and modify your own game levels.
F 7 Loads a previously saved game from a scenario disk.
GAME CONTROLS
Commodore key
Magic spell key for player 1. Activates a death scroll (see
"Objects" in the Construction Set section) held by the player.
CRSR up/down
Magic spell key for player 2. See above.
Controls player movement. Player one uses a joystick in port 2.
Joystick
Use another joystick in port 1 for two-player games.
Joystick Button
Fires your crossbow.
Pauses game (press again to resume play) and provides the following
s
options:
Fl
Surrender. The first time you choose this option on any level, all
the doors on that level disappear. A second use of this option
restarts the character at the beginning of that level. Using this
option causes a decrease in strength, armor and magic points.
Quit the current game and return to the Main Menu.
F3
Saves the game to your scenario disk so you can continue later at the
FS
beginning of the same level. Note: You can only save one game
per disk.
See the Construction Set section for editor keyboard shortcuts.
ARTHUR'S MAGICAL CYPHER
You must use Arthur's Magical Cypher to find the password that will allow you access to lower
levels. Line up the first word on the outer wheel with the second word on the inner wheel.
Type in the password that appears in the third, innermost window on the wheel.
•
•
Playing Demon Stalkers
The following sections describe the various game aspects:
HEALTH
This is the most important value in the game. Health indicates how much more damage you
can sustain before dying. Unless you have a Staff of Life (see Construction Set section),
you die and the game ends when your health reaches zero. (In a two-player game, the player who
is left can continue playing.) Replenish your health by picking up food. Some foods increase
your health more than others. Some food is poisoned, so eat cautiously. Being hit by any
monster or by a mage's fireball decreases your health. Also beware of the deadly Slow Death
curse, explained later.
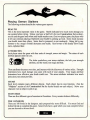
ATTRIBUTES
Each player starts the game with four units of strength, armor and magic. The status of each
attribute appears under its icon.
~-T
The helm symbolizes your armor attribute, the belt your strength
attribute, and the wand your magic attribute.
These attributes decrease over time, and increase with the discovery of various relics. Strength
determines how much damage you cause with each of your attacks. Your magic attribute
determines how effective your death scrolls are. The armor attribute indicates how much
protection your armor provides.
ITEMS
Each level contains many different objects. Each object has its own function . (See the
"Objects" section of the Construction Set for further details on each object.) Move your
character over an object to pkk it up.
MONSTERS
There are five different types of monsters in Doomfane. Every monster behaves differently.
THE DUNGEON
There are 100 levels in the dungeon, each progressively more difficult. You must find and
defeat Calvrak to complete the game. Some levels have a goal which you must complete before
you can descend to the next level.
•
three
•
Before you descend the chute to the lOOth level, save level 99 to your scenario disk. You cannot
save on the lowest level. You may ascend stairs. The level to which you return will be as you
left it, except that monsters (but not their vortexes) are regenerated, and broken walls are
restored.
Hints for beginners: On level one, if you wander around long enough you will find the
stairs leading down; but to assist adventurers new to the dungeon, we have built the walls in the
shape of arrows. Follow these arrows to find the down stairs. On level two, don't shoot the
snappers. To complete level two you must use every set of stairs on levels one and two. This
is a sample of the multi-level puzzles unique to Demon Stalkers.
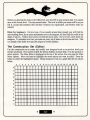
The Construction Set (Editor)
Use the cons):ruction set to create and modify new dungeon levels or to preview levels you
havei;i't yet played. (You cannot modify the Demon Stalkers scenario disk.) Use the joystick to
select options. The Main Menu is displayed at the top of the screen. See next page for Main
Menu options. Move the hand to highlight the menu option you want to select. Press the
button to select the highlighted option. Design dungeon levels on a graph like the one shown
below.
0
2
3
4
5
6
7
8
9
10
11 1 2 1 3 1 4 1 5 1 6 1 7 18 1 9 20
0
2
3
4
5
6
7
8
9
10
11
•
•
OPTIONS
Colours
Changes screen colors. Hold down the button and move the
joystick right or left to scroll through the color choices. Release
the button to make selection.
Tiles
Alters the pattern of the floor. Hold down the button and move
the joystick left or right to scroll through the pattern choices.
Release the button to make selection.
Level Title
Names the levels you create.
Monster 1 or 2 Selects and sets the characteristics of the two types of monsters
chosen for that level. To select, hold the button down and move
the joystick left or right.
Speed
Slow, medium or fast.
Damage
1-14 points of damage inflicted per hit. Monster color
changes to reflect the monster's ferocity, from white monsters
(easy) to dark blue monsters (look out!).
Health
The amount of damage this monster can endure before it is
killed. This can range from 4-48 points.
Type
Rats, mad mages, ghosts, dervishes or snappers. (See
"Vortex" in the "Objects" section for more information on
madmages.)
Set Goal
(Optional.) Select a goal for each level. If a goal is set, you must
complete it before you can descend to the next level. Define the
goal to find all of one or more of the following: artifacts,
amulets, chests, relics or scrolls.
Random Items Randomly replaces objects with blank spaces or monsters, and
replaces monsters with blank spaces, during play.
Wrap Around
Allows you to leave from one side of the level, and re-enter
·
through the opposite side.
Editor Sound
Tums on/off the audible signals you hear whenever you change or
·
place items.
Play Level
Play test the level. Your character starts the level in whichever
square was last in the editing window. Return to the editor by
pressing S to open the Pause Menu, then press F3 to abort the
game, and then select F5 to re-enter the editor.
Play Game
Starts the game.
•
five
•
CLEAR
Restore
Preserve
Clear
Removes the changes you've made since you loaded or last used
the Preserve option. Any changes made since preserving will be
lost.
Preserves the current state of the level. Restore does not affect
changes that have been preserved. Levels being edited are
automatically preserved when you load a new level from disk or
use the Clear function .
Clears all objects from the level.
VIEW
Allows you to view the entire level. Move the joystick to view different sections of the level.
DISK
Set Level
Save Level
Load Level
Format Disk
Type in the level number you want to edit.
Saves the current level to the formatted disk (up to 99 different
levels may be saved on a single diskette).
Loads the level number entered in the Set Level option.
Formats a disk on which you can save the levels you create. You
must use the format disk command to save any levels you create
and modify-you cannot save these levels on your scenario disk.
OBJECTS DISPLAY
The left side of the Construction Set screen shows icons of the various objects you can place in
the level.
EDITING WINDOW
To the right of the Objects Display is the Editing Window. Use this window to place objects
and walls, and to move from one section to another. The section you are editing is outlined by
the blinking box. Place walls to correspond with the edges of the blinking box .
LOCATOR BOX
Under the Editing Window is the Locater Box. The black dot inside the Locater Box represents
your position within the level. The X and Y values are your coordinates. X ranges from 0-20
(horizontal) and Y ranges from 0-11 (vertical).
•
six
•
Using the Construction Set (Editor)
Use the Options Menu to choose the general parameters of the level. Then use the following
instructions to place objects and walls:
CHOOSING A SECTION TO EDIT
1. Use the joystick to move the hand near the Editing Window. Place the hand just outside
the blinking box to avoid altering the placement of an object inside the box.
2 . Hold down the button.
3 . Move the joystick toward the section you want to edit.
4. Release the button when you arrive at the section.you want to edit.
PLACING WALLS
1 . Choose a section to edit.
2 . Move the hand to touch the edge of the blinking box where you want to place a wall. The
edge changes color.
3 . Hold down the button until the hand changes color.
4 Keep the button depressed and move the joystick left or right to scroll through the various
wall choices: blank, solid wall, breakable wall, door, or one-way doors.
5 . Release the button to select a wall style.
PLACING OBJECTS
Joystick:
1. Choose a section to edit.
2. Move the hand to the center of the blinking box.
3. Hold down the button until the hand changes color.
4. Keep the button depressed. Move the joystick left or right to scroll through
the various objects to be placed. Release the button to make your selection.
Keyboard: 1. Choose a section to edit.
2. Press the key that corresponds to the object you want to place. (See
following page.)
CHARACTER PLACEMENT
The program uses a predetermined set of rules to set the character's starting position in a
dungeon. You should take these rules into consideration when designing your own levels.
1 . If characters exit a level by going down stairs, they will start on the next level at a position
based on one of the following criteria:
•
seven
•
A) Up stairs directly below the exit point of the last level.
B) The first set of Up stairs found on the new level, searching from the upper-left
2.
3.
4.
5.
comer of the level to the lower-right comer.
C) A blank square directly below the exit point of the last level.
D) The first blank square found on the new level, searching from the upper-left comer
of the level to the lower-right comer.
E) If the program can't find a suitable starting point, it will load the next level and
attempt to find a starting point there.
If characters exit a level by going up stairs, the above criteria also apply, but A and B will
search for down stairs instead of up.
If characters go down pits, then the program uses criteria C, D, and E.
The starting position for level I is location X-19, Y-1.
When playtesting a level, the program will attempt to start your characters at the location
shown in the editor window at the time you left the editor.
•
eight
•
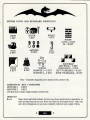
EDITOR ICONS AND KEYBOARD SHORTCUTS
•
CHEST
1 KEY
~
~-i 9
~II
CHlITE
AKEY
~
AMULETS
WKEY
FOOD
QKEY
~
SCROLL
3 KEY
RELICS
2 KEY
•
BELL
S KEY
;
STAIRS
DOWN- Z KEY
UP- XKEY
KEY
E KEY
~rL\.
Oo
Os0 0
OoQe
0
0
DIAGONALS
LEFT SOLID- C KEY
RIGHT SOLID- V KEY
LEFT VULNERABLE- B KEY
RIGHT VULNERABLE- N KEY
VORTEX
MONSTER 1- D KEY
MONSTER 2- F KEY
Note: Vulnerable diagonals can be destroyed by crossbow fire.
ADDITIONAL KEY COMMANDS
MONSIBR 1
G KEY
MONSIBR 2
H KEY
Use these keys to place single monsters on the level.
OBJECTS
Keys
Opens doors and locked chests. All two-way doors require keys to open them, so
carry as many keys as you can. (One-way doors do not require keys.) Once you
use a key it disappears, so you must constantly replenish your supply of keys.
•
nine
•
Food
Increases (or decreases, in the case of poisoned food) health points. Available
food types are banquet, elf cakes, bread and water, and poison.
Monster 1 The first monster you selected from the OPTIONS menu. Select monster 1 or
Monster 2 to place individual monsters in the level.
Monster 2 The other monster you selected from the OPTIONS menu.
Sewer
The source of all rats except those placed individually under the Monster 1/
Monster 2 options. You cannot destroy sewers.
Vortex
The source of all the non-rat monsters except those placed individually under the
Monsterl\Monster 2 options. You can destroy vortexes with crossbow fire or a
death spell. When you choose a mage vortex you must also set the frequency
with which Fanatical Mad Mages emerge from the vortex. Choose from 0 to 7
(never to nearly always). Fanatical Mad Mages are the deadliest monster type.
Relics
Helm of Defense
Warrior's Belt
Magician's Wand
Increases your Armor attribute.
Increases your Strength attribute.
Increases your Magic attribute.
Scrolls
Scrolls A, B and C
Displays the text you entered while in the construction set
mode. They have no magical properties. You may have 3
different text scrolls per level. Each scroll may contain up
to two lines of text.
Destroys monsters and vortexes.
Continues to drain health points until you leave the level.
Doubles all scores you receive during the next thirty
seconds of play.
Opens all two way doors on the level.
Death Scroll
Slow Death Curse
Score Bonus
Open all Doors
Amulets
Note: an amulet's effect lasts less than thirty seconds.
Wall Walking
Lets players pass through walls.
Invisibility
Become invisible to all monsters.
Extra Speed
Run faster.
Paralysis
Paralyzes the player .
•
•
Bells
Note: A bell's magical effect lasts less than thirty seconds.
Time Stop
Stops all monsters and vortexes.
Confusion
Makes all monsters wander around aimlessly.
Summoning
Draws all monsters towards the bell.
Fear
Causes all monsters to run away from you.
Enrage
Causes all monsters to move faster.
Chests
Locked
Treasure
Scroll
Relics
Key
Amulet
Food
Artifacts
Sword of Slaying
Magic Shield
Ring of Willpower
Staff of Life
Requires a key to open. Use this option in addition to any
other options.
Contains gold and jewels.
Contains the scroll ·you select.
Contains the relic you select.
Contains a key.
Contains the amulet you select.
Contains the type of food you select.
Adds two to your strength attribute and raises your
minimum strength to six.
Adds two to your armor attribute and raises your minimum
armour attribute to six.
Adds two points to your magical attribute and raises your
minimum magic attribute to six. Protects you from being
taken over by Calvrak's will on the lOOth level. (If you are
taken over, your joystick will not respond properly to your
commands)
Resurrects any player once. The staff automatically
resurrects the dead player and disappears. Only one.Staff of
Life can be carried by a player at a time.
•
eleven
•
Tips for Advanced Demon Stalkers
PLAYING THE GAME
Parts of Arthur's journal are found on some levels of the dungeon. This journal contains
important clues about Doomfane. You can gain extra health points by correctly answering
questions about Arthur's quest.
Quickly pass by or over sewers. They cannot be destroyed by crossbow fire or death spells.
In two player games, stand and shoot side by side whenever the corridors are wide enough.
Don't wake snappers! Most levels can be completed without disturbing them.
Kill monsters first. Then go for the treasure. If the treasure is trapped with an amulet of
paralysis, you will be glad you did.
Use.your death scroll immediately when you see dervishes approaching. These monsters
will steal it anyway ... use it or lose it.
In two-player games, each player should specialize. Let player one pick up all the belts and
helms and do most of the fighting. Player two can grab all the wands and scrolls to
become a powerful magic user.
Slow Death scrolls drain your health until you exit the level. If you pick one up, get out
of there fast.
Some items keep ghosts imprisoned. Watch what you grab when ghosts are around.
The darker the monster, the more damage it can do. Don't go wading into hordes of dark
bluemages!
DUNGEON CONSTRUCTION
Place some fast dervishes near the entrance to a level if you want your player to start the
level without keys or scrolls.
Create some panic. Give a player a Slow Death curse on a level with a hidden goal.
Create more panic. With the right combination of colors and tiles, you can place an
invisible vortex.
Put mages behind vulnerable ,walls and give your players a sporting chance to get past- if
they move fast enough!
Don't always go for the hack and slay approach. Too many monsters just make a level
tedious. Invent a good satisfying puzzle, with fewer (maybe nastier) monsters.
Use the Preserve and Restore functions as you edit to keep a copy of your level in memory,
so you can undo changes that you don't like.
•
twelve
•
LIMITED WARRANTY
Limited Warranty. Electronic Arts ("EA") provides to the original purchaser of the computer software product, for a
period of ninety (90) days from the date of original purchase (the "Warranty Period"), the following limited warranties:
Media : EA warrants that, under normal use, the magnetic media and the packaging provided with it are
free from defects in materials and workmanship.
Software : EA warrants that the software, as originally purchased, will perform ·substantially in
conformance with the specifications set forth in the packaging and in the user manual.
Warranty Information . If you are having any problems with the product, we are happy to help. Please address all
correspondence to Electronic Arts, 1820 Gateway Drive, San Mateo, California 94404. Or call us at (415) 572-ARTS.
Warranty Claims. To make a warranty claim under this limited warranty, please return the product to the point of
purchase, accompanied by proof of purchase, a statement of the defect, and your name and return address. To replace
defective media after expiration of the Warranty Period, send the product, in protective packaging, postage prepaid, to
Electronic Arts, at the above address, enclosing proof of purchase, a statement of the defect, your name and return
address, and a check for $7.50. EA or its authorized dealer will, at its option, repair or replace the product, and return it to
you, postage prepaid, or issue you with a credit equal to the purchase price. THE FOREGOING STATES THE
PURCHASER'S SOLE AND EXCLUSIVE REMEDY FOR ANY BREACH OF WARRANTY WITH RESPECT TO THE
SOFTWARE PRODUCT.
Warranty Exclusions. EA EXPRESSLY DISCLAIMS ANY IMPLIED WARRANTIES WITH RESPECT TO THE MEDIA
AND THE SOFTWARE, INCLUDING WARRANTIES OF MERCHANTABILITY OR FITNESS FOR A PARTICULAR PURPOSE.
ANY WARRANTIES IMPLIED BY LAW ARE LIMITED IN DURATION TO THE WARRANTY PERIOD. SOME STATES DO NOT
ALLOW LIMITATIONS ON THE DURATION OF AN IMPLIED WARRANTY, SO THE ABOVE LIMITATION MAY NOT APPLY
TO YOU. THIS WARRANTY GIVES YOU SPECIFIC LEGAL RIGHTS. YOU MAY ALSO HAVE OTHER RIGHTS WHICH
VARY FROM STATE TO STATE.
LIMITATIONS ON DAMAGES
EA SHALL NOT IN ANY CASE BE LIABLE FOR INCIDENTAL, CONSEQUENTIAL OR OTHER INDIRECT DAMAGES
ARISING FROM ANY CLAIM UNDER THIS AGREEMENT, EVEN IF EA OR ITS AGENTS HAVE BEEN ADVISED OF THE
POSSIBLITY OF SUCH DAMAGES. SOME STATES DO NOT ALLOW THE EXCLUSION OR LIMITATION OF INCIDENTAL
OR CONSEQUENTIAL DAMAGES, SO THE ABOVE LIMITATION OR EXCLUSION MAY NOT APPLY TO YOU.
NOTICE
r
ELECTRONIC ARTS RESERVES THE RIGHT TO MAKE IMPROVEMENTS IN THE PRODUCT DESCRIBED IN THIS
MANUAL AT ANY TIME AND WITHOUT NOTICE.
THIS MANUAL, AND THE SOFTWARE DESCRIBED IN THIS MANUAL, IS COPYRIGHTED. ALL RIGHTS ARE RESERVED .
NO PART OF THIS MANUAL OR THE DESCRIBED SOFTWARE MAY BE COPIED, REPRODUCED, TRANSLATED OR
REDUCED TO ANY ELECTRONIC MEDIUM OR MACHINE-READABLE FORM WITHOUT THE PRIOR WRITTEN CONSENT
OF ELECTRONIC ARTS, 1820 GATEWAY DRIVE, SAN MATEO, CALIFORNIA 94404.
ELECTRONIC ARTS MAKES NO WARRANTIES, EXPRESS OR IMPLIED, WITH RESPECT TO THIS MANUAL, ITS
QUALITY, MERCHANTABILITY OR FITNESS FOR ANY PARTICULAR PURPOSE. THIS MANUAL IS PROVIDED "AS IS."
ELECTRONIC ARTS MAKES CERTAIN LIMITED WARRANTIES WITH REGARD TO THE SOFTWARE AND THE MEDIA FOR
THE SOFTWARE. PLEASE SEE THE ELECTRONIC ARTS LIM ITED WARRANTY ENCLOSED WITH THIS PRODUCT.
SOFTWARE © 1987 MICRO FORTE. ALL RIGHTS RESERVED .
MANUAL BYT. L. THOMPSON, DAVID K. SIMERLY AND TIM LITTLE
© 1987 ELECTRONIC ARTS. ALL RIGHTS RESERVED .
Fast Load'M is a trademark of Epyx, Inc.
ELECTRONIC ARTS ®
1820 Gateway Drive, San Mateo, CA 94404
144105 Commodore