1
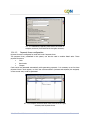
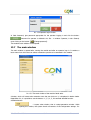
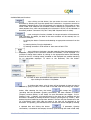
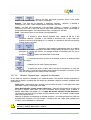
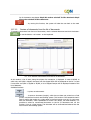
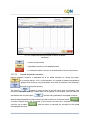
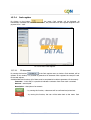
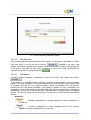
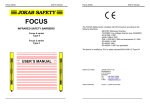
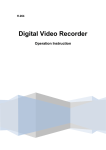
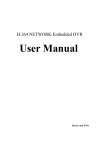
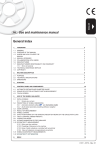
Manual
for CDN XL System User
Module: Retail Sales
Version 6.0
Table of contents
13
Retail sales............................................................................................................. 13.3
13.1 General description of the module......................................................................... 13.3
13.2 Available operations............................................................................................... 13.3
13.3 Interface ................................................................................................................ 13.3
13.4 Module configuration: Retail sales......................................................................... 13.4
13.4.1 Configuration settings in the rights structure center...................................................... 13.4
13.4.1.1 Settings in tab: Retail......................................................................................... 13.4
13.4.1.2 Payment forms configuration............................................................................... 13.5
13.4.2 Settings on document definition - receipt .................................................................... 13.6
13.5 Running of module................................................................................................. 13.6
13.6 Operator logging in ................................................................................................ 13.6
13.7 The main window................................................................................................... 13.7
13.7.1 Sales....................................................................................................................... 13.8
13.7.1.1 Configuration settings control.............................................................................. 13.8
13.7.1.2 Receipt/invoice generation (sales window)............................................................ 13.9
13.7.1.3 Generation of receipt which generates deposit document. .................................... 13.12
13.7.1.4 Window: Payment form – payment for document ................................................ 13.13
13.7.1.5 List of contractors............................................................................................ 13.14
13.7.2 Documents ............................................................................................................ 13.16
13.7.2.1 List of documents ............................................................................................ 13.16
13.7.2.2 Preview of documents from the list of documents................................................ 13.17
13.7.2.3 R and IR document correction........................................................................... 13.18
13.7.3 Deposits ................................................................................................................ 13.19
13.7.3.1 List of deposit documents ................................................................................. 13.19
13.7.3.2 Deposit document edited on the list of deposit documents ................................... 13.20
13.7.3.3 Deposit document correction............................................................................. 13.21
13.7.4 Cash register.......................................................................................................... 13.22
13.7.4.1 PP document................................................................................................... 13.22
13.7.4.2
13.7.4.3
13.7.4.4
13.7.4.5
WP document.................................................................................................. 13.23
Statements ..................................................................................................... 13.23
Closing of day ................................................................................................. 13.24
Drawer ........................................................................................................... 13.25
13.8 Closing of the module .......................................................................................... 13.25
Module: Retail Sales
13.2
Version 6.0
13
Retail sales
13.1 General description of the module
This module is used for registration of the basic sales transactions and related cash transactions. Its
functionality enables an operator with limited permissions to perform activities of a seller.
It has a simple interface, intuitive support from the keyboard or through touch screen.
Attention: To be able to use the functionalities of the retail sales, it is necessary to check a
separate option in dongle (license option).
13.2 Available operations
Module: Retail sales, enables to perform the following operations:
Sales (basic operations)
•
Issuing of a receipt or an invoice (as receipt clip) with payment registration
•
Taking receipt of payment proof (PP), registration of withdrawal proof (WP), without
settlement
Cash register
•
Displaying/printing out of daily amounts statement for an/a operator/workstation
•
Closing of a cash report
•
Preview of issued documents
Operations on issued documents
•
•
•
•
Reprinting out of a document
Issuing of a quantitative adjustment to receipt
Issuing of an invoice to a receipt (clip)
Issuing of an invoice (adjustments clip) to receipt adjustment
•
Entering of a receipt into the fiscal controls and auditing system
•
Adding of contractors
Others
•
•
•
Changing of operator
Printing out of a fiscal daily report and periodical report
On each list in this module (e.g. on the list of items), an obligatory filter is included. It
was created on the same list in module: Sales.
13.3 Interface
This module has a simple interface, intuitive support from the keyboard or through the touch screen.
Keyboard support is enabled by the hot keys. The functions of the hot keys correspond to the buttons
available in the interface. Description of a hot key is available on each button. By using a given hot
key, the same result will be received as by clicking a given button.
The button <tab> from the keyboard enables to toggle back and forth between particular fields and
the shortcut <ctrl+enter> allows to confirm each dialog box.
Module: Retail Sales
13.3
Version 6.0
13.4 Module configuration: Retail sales
Determination of configuration set-ups: Retail sales takes place in the following places in the system:
Company structure center (from the level of the rights structure), in tab: General general settings of parameters regarding this module
•
Company structure center (from the level of the rights structure), in tab: Payment forms
– settings referring to the forms of payments used in this module
•
Document definition – parameters, which are particularly essential for this module, are
those which allow to perform operations on documents generated in this module and
parameter available in receipt document definition – Generate deposit documents
automatically (for more information see chapter: 13.4.2 Settings on document definition
- receipt).
•
ATTENTION: Documents generation method, calculation of prices etc. depend also on other
configuration set-ups which are available on documents definitions and defined for the
entire CDN XL system. They have been described in other parts of the User's Manual.
13.4.1
Configuration settings in the rights structure center
Configuration settings, which are set in window: Company structure center (from the level of the
rights structure), are adjusted to the entire center in which retail sales will be carried out (that is, in
which the module: Retail sales, will be used). Those settings are defined in tab: General and in tab:
Payment forms.
The window: Company structure center from the level of the rights structure, is launched in module:
Administrator, in the window: Company structure (tab: Rights structure). For more information about
this window see the manual for module: Administrator. The present manual provides description of
only those parameters which refer directly to module: Retail sales.
13.4.1.1
Settings in tab: Retail
Available parameters:
Default group of contractors – in this field, it is possible to indicate a group of contractors
to which the contractors, added in module: Retail sales, will be entered.
Quantity confirmation – this parameter affects a method by which an item will be entered
on the list of goods for sale. If checked, upon given an item code, the cursor will be placed in
field: Quantity. If unchecked, upon entering and confirming an item, it will be immediately
entered on the list.
Print receipt – the receipts in module: Retail sales, are automatically printed on a fiscal
printer. If, apart from the fiscal printouts, the User needs printouts of those documents made
also on a “regular” printer, this parameter must be checked.
Display documents from the last – it specifies which documents (from determined number
of days) will be displayed on the list of document and deposit documents.
Module: Retail Sales
13.4
Version 6.0
Pic. 13.1 Parameters regarding retail sale in the center of
company structure (from the level of the rights structure).
13.4.1.2
Payment forms configuration
Payment forms are configured for retail sale in tab: Payment forms.
The payment forms, predefined in the system, can also be used in module: Retail sales. Those
payment forms are:
•
•
•
Cash
Bank cards
Cheque
Cash entries are generated automatically while generating payments. It is necessary to set for those
payment forms a cash register, to which the cash transactions (revenue and expense) are assigned,
so that a cash entry could be generated.
Pic. 13.2 Company structure center from the level of the rights
structure, tab: Payment forms.
Module: Retail Sales
13.5
Version 6.0
Payment form edition – in this window, it is possible to assign a register and to indicate a payment
form which can be used in module: Retail sales. To open this window, mark an appropriate item in
tab and click the button:
[Change].
Pic. 13.3 Payment form edition.
In this window, the following fields regarding retail sales are contained:
Cash register – in this field, the user indicates a previously defined cash register. A cash
truncation of revenue and expense type must be assigned to this register. The transactions can
be selected from the drop-down list box.
Available in retail – if checked, indicated payment form can be used in module: Retail sales.
After the appropriate values are have been entered, the changes must be saved by clicking the
button:
13.4.2
[Save changes].
Settings on document definition - receipt
The receipts, generated in module: Retail sales, can generate deposit documents. A deposit document
will be generated, if:
•
•
deposit scheme is assigned to an item entered on receipt,
parameter: Generate deposit documents automatically, is checked on receipt document
definition. This parameter can be found in tab: Parameters.
13.5 Running of module
To launch this module, select a shortcut: Retail sales, from the menu: Start>All programs>CDNXL.
After the program is launched, an operator login window will be opened. If CDN XL start panel (socalled shell) is already opened on a workstation on which the module must be launched, upon running
the application from the menu: Start, the main window of the module: Retail sales, will be directly
opened.
13.6 Operator logging in
Operator login window is opened:
•
•
while running the module and
while changing an operator in the opened module.
Module: Retail Sales
13.6
Version 6.0
Pic. 13.4 Operator login window.
In field: Password, give password appropriate for the operator logging in and click the button:
. Password for operator is defined in his file – in window: Operator, in tab: General,
upon clicking on the button:
[Change password].
The module's main window will be opened.
13.7 The main window
The main window is opened after running the module and after an operator logs in. It contains a
basic menu from which the user selects transactions possible to be executed in this module.
Pic. 13.5 The main window of the module: Retail sales.
A button, which will cause action execution once the user clicks on it, is displayed in darker shade.
Regardless of is, it is possible to use the buttons: 1, 2, 3, 4, 5, 6 to activate selected function.
Available buttons:
- it opens sales window, that is receipt generation window. While
opening this window, the system checks correctness of the configuration settings. For
Module: Retail Sales
13.7
Version 6.0
more information about the configuration settings control see chapter: 13.7.1.2
Receipt/invoice generation (sales window).
- it opens a list of receipts, receipts clips and their adjustments.
- it opens a list of deposit documents.
- it opens operator login window enabling another operator to log in
on a given workstation (for more information see chapter: 13.6 Błąd! Nie można
odnaleźć źródła odwołania.).
- it opens a window with options for cash register which enable to
issue PP, WP documents, statements, daily reports. For information see chapter:
- it ends running of the application.
13.7.1
Sales
The sales window is launched by selecting in the main window the function:
.
Upon clicking on that button, the system checks correctness of the configuration settings. If all
settings are correct, the sales window – Receipt will be opened.
13.7.1.1
Configuration settings control
When the receipt window is being opened (the button:
in the main menu), the
basic configuration settings are controlled. If one of the settings is incorrect, an appropriate message
will be displayed and the window will not be opened. Once all set-ups are correctly configured, it will
be possible to issue a receipt. Below are the messages and the reasons for which they are displayed.
Message displaying window (incorrect
configuration settings)
Message
Available payment forms have not been
determined
None of the predefined payment forms is available
for module: Retail sales
Support of deposit is kept active but the
operator has no right to issue the appropriate
documents
Automatic generation of deposit for receipt is kept
active but the operator has no right to edit and
confirm DR document
Operator is not authorized to issue the receipts
No default cash register for payment form
“Cash”
None revenue transaction has been assigned
to the cash register
No default cash register for payment form
“Cheque”
Module: Retail Sales
No right to deal with receipt or to confirm it
Payment form “Cash” is available for retail sales
module but a cash register has not been assigned to
it
Payment form “Cash” is available for retail sales
module, cash register has been assigned to it but
revenue transaction has not been assigned
Payment form “Cheque” is available for retail sales
module but the cash register has not been assigned
to it
13.8
Version 6.0
None revenue transaction has been assigned
to the cash register for payment form
“Cheque”
Creation of payment through receipt has been
de-activated in configuration
13.7.1.2
Payment form “Cheque” is available for retail sales
module, cash register has been assigned to it, but
revenue transaction has not been assigned
Receipt does not generate payments
Receipt/invoice generation (sales window)
Pic. 13.6 Sales window – issuing of receipt/invoice.
In sales window, the user enters the elements of a future document, that is the data of the main
contractor (PURCHASER) and a target contractor (RECIPIENT), name and price of an item and
discount (on particular items and for the entire document). Before entering the item, it is necessary to
determine if the document being issued will be a receipt, an invoice or a clip to the receipt. To select
document type, click the appropriate button:
or
. By clicking the button:
INVOICE <F11>, an invoice or a clip to receipts will be generated, depending on the configuration
settings, that is on the parameter: SI or IR which is checked in window: Company structure edition, in
tab: Retail.
Attention: Document type should be selected before entering an item on this document. By
selecting one of the available options, the other option will be disabled and it will become
unavailable. The only way to change type of document, after an item has been entered, is
by canceling the document (by using the function:
Module: Retail Sales
13.9
).
Version 6.0
Available fields and functions:
- upon clicking on that button, the user enters the main contractor on a
document by selecting him from the opened list of contractors. A contractor can also be
selected by pressing the key F3 on the keyboard or by entering his ITIN number or short
name in field: ITIN. Selection of a contractor results in selecting of a payment form – the
same payment form, which was assigned to the contractor in his file, will be indicated on
document (window: Contractor’s file, tab: Trade, field: Payment forms for sales).
- upon running this function, the data of a target contractor will be entered in
field: Customer. By default, the data of the main contractor will be entered, but it is
possible to change it:
•
•
•
by clicking the button: Customer and selecting an appropriate contractor from the
list or
by pressing the key F4 on the keyboard or
by entering contractor’s ITIN number or short name in field: ITIN.
- upon clicking on the button, the data regarding Sales Representative and a
Supervisor, assigned to the contractor selected on document, will be displayed. It is
possible to change those entities by clicking on the appropriate buttons and selecting
them from the list. A limiting locator, available on the displayed lists, enables searching
for an appropriate employee. To return to the document, click the button:
.
Pic. 13.7 Date of sales representative and supervisor displayed
upon clicking on the button: F10/Header.
- by clicking that button, a list of items will be displayed. An item can also be
selected by giving its code or its EAN code in the field aside and clicking the <Enter>
button. After selecting the item, the button:
will change into:
(providing that the parameter: Quantity confirmation, has been checked in window:
Company structure edition, in tab: Retail; for more information see chapter: 13.4.1.1
Settings in tab: ). Quantity, price and discount for the item can be modified until the
document is accepted (by clicking the button: Accept or pressing the key <Enter>). After
determining those measures, accept item selection. The item will then be entered on the
list of document items. Both code and name of the item will be displayed on the
document. The quantity, price and discount for the item can still be changed by marking
a selected item and clicking the button:
. If parameter: Quantity
confirmation, is checked in the company structure, upon entering item code in field: Add,
Module: Retail Sales
13.10
Version 6.0
the information about quantity of available resources will be displayed. That information
is refreshed while changing quantity of the item which must be entered on document
(the information is displayed in field in which item quantity is indicated).
- by clicking that button, an item will be entered on the list by loading its data
from the collector. While loading the data, the weight codes are being handled (in
accordance with systems coding the items with changeable quantity).
- by running this function, it is possible to modify the prices, quantities and
discount for an item marked on the list.
- it deletes a marked item from document.
- it displays the history of item, that is the last 10 transactions, in which the
item was used. If contractor has already been entered on document, the history of item
in the context of that contractor will be displayed.
- it opens a window: Search items, which enables to searching for items on
receipt. This function is very useful when there are many items on the list.
- it enables to determine a global discount for a document (after confirming
the document, the discount will be calculated on all its items).
- the effect of pressing this button is essential depending on how advanced is
the progress of document generation:
•
•
by clicking that button before entering the goods on a document, the generated
document will be of invoice type (clip to receipts). Document type must be
selected before the first item is enters on the document.
by clicking that button after the goods are entered on a document, a window:
Payment form, will be opened. In this window, a payment for the document being
issued is effected. For more information about this window see chapter: Błąd! Nie
można odnaleźć źródła odwołania. Błąd! Nie można odnaleźć źródła
odwołania.. Once the payment is confirmed, a receipt will be printed out – R
document (on fiscal printer). A system document (on a “regular” printer) will be
printed only if the parameter: Print receipt, has been checked in the company
structure edition.
Attention: If contractor does not have an ITIN number, it will not be possible to confirm an
invoice, unless he is a VAT payer.
- the effect of pressing this button is essential depending on how advanced is
the progress of document generation:
•
by clicking that button before entering the goods on a document, the generated
document will be of receipt type. Document type must be selected before the first
item is enters on the document
Module: Retail Sales
13.11
Version 6.0
•
by clicking that button after the goods are entered on a document, just like upon
clicking on the button:
, a window: Payment form, will be opened. In this
window, a payment for the document being issued is effected. Once the payment
is confirmed, a receipt will be printed out – R document (on fiscal printer). A
system document (on a “regular” printer) will be printed only if the parameter:
Print receipt, has been checked in the company structure edition.
Quantity – quantity of an item is always given in basic units, preserving the conversion factor
with auxiliary units. In this module, sale in full packaging is forced.
Price – the price is given in accordance with the rules applicable in the system – it is given
always in the system currency (PLN). VAT is always calculated on gross.
- by clicking this button, the sales window will be closed and the user will go
back to the main menu. Upon entering a contractor or an item on the list of receipt items, the
button: Quit, will be changed into:
.
- by clicking that button, the document will be cancelled, that is all entered
items will be deleted (contractor and items).
13.7.1.3
Generation of receipt which generates deposit document.
If an item with assigned deposit scheme (in item card, in tab: Packaging) has been entered on receipt
and the parameter: Generate deposit document automatically, is checked on the receipt document
definition, then upon entering the data on the receipt and clicking on the button:
, a window: Deposit document, will be opened.
or
Pic. 13.8 Deposit document generated out of receipt.
Available fields and functions:
Module: Retail Sales
13.12
Version 6.0
;
- data of the main and target contractor select in the receipt
window. In deposit document, this data is not editable.
Deposit – this field will be displayed, if parameter: Deposits - payment, is checked in
contractor's file, in tab: Trade. Deposit value is displayed in this field.
Items – this field will be displayed, if the parameter: Deposits – payment, is checked in
contractor’s file, in tab: Trade. The value of other items than deposits, which are included on
receipt generated together with a deposit document, is displayed in this field.
Total – total value of items on the receipt (including deposits).
- it enables to edit a deposit document item marked on the list. If the
parameter: Deposits – payment, is not checked in contractor’s file, in tab: Trade, only
quantity of the item can be edited. If it is checked, it is possible to edit both the quantity
and the prices of the item.
;
- the button: Add, enables to add deposit items on a deposit
document. If an item of the deposit document is being edited, the button: Accept, will be
displayed. By running this function, the changes entered in the edited (with the use of
the button:
) deposit document item will be saved.
- by clicking that button, an item will be entered on the list by loading its data
from the collector.
- it deletes an item from a deposit document.
- it displays the history of item, that is the last 10 transactions, in which the
item was used. If contractor has already been entered on document, the history of the
item will be displayed in the context of that contractor.
13.7.1.4
Window: Payment form – payment for document
In this field, the payment is effected for an issued document. The payment includes receivable for
goods and for deposit, providing that the receipt has generated a deposit document. Available fields
and functions:
Total gross – total amount due, resulting from the values of items, if such values have been
generated – deposit, is displayed in this field.
Cash, Bank transfer, Credit, Cheque, Bank card – these are the payment forms which can
be used in module: Retail sales. For more information about payment forms, available in
module: Retail sales, see chapter: 13.4.1.2 Błąd! Nie można odnaleźć źródła odwołania..
The amounts paid with the use of each of those payment forms, are entered in fields located
next to the payment forms.
Selection of payment form depends on selected contractor – the same payment form, that was
assigned to the contractor in his file (window: Contractor's file, tab: Trade, field: Payment form
for sales), will be indicated for a document.
Attention: If receipt is issued, the payment form: Transfer (providing that it has been
defined for module: Retail sales) is inactive.
Module: Retail Sales
13.13
Version 6.0
Customer pays – amount paid by the customer. If that amount is higher than the value
entered in field: Total gross, then upon leaving this field (with the button <Enter> or <Tab>
from the keyboard), the difference will be automatically calculated and it will be displayed in
window: Change.
Due date – this field will be displayed when bank transfer is defined as one of the payment
forms possible to be used in module: Retail sales and it is active. A due date for this payment is
specified in this field. By default, the system date is entered, but it is possible to modify it.
- it confirms the payment proof and runs printing of:
receipt on fiscal printer (if the button:
window: Receipt).
•
, was previously pressed in
receipt on fiscal printer and clip to the receipt – R document on a “regular” printer
•
(if the button:
, was previously pressed in window: Receipt).
- by clicking this button, the user will go back to the previous window (or to
receipt window, or to deposit window – if the receipt generates a deposit document).
Pic. 13.9 Payment for document – window: Payment forms.
13.7.1.5
List of contractors
The list of contractors is opened upon clicking on the button:
A limiting locator, available
on the list in column: Short name, enables to search for an appropriate contractor.
Information about contractors is displayed on the list in the following columns:
•
•
Short name
ITIN
Module: Retail Sales
13.14
Version 6.0
•
•
Name
City
•
Street
•
ITIN
Contractor can be searched by:
•
•
Short name
Address
On this list, it is also possible to run the following functions:
- it opens a window: New customer and enables to register a contractor.
- it enables to edit contractor’s data displayed in window: Customer. The
fields, available in this window, are the same as those in window: New customer.
Pic. 13.10 Contractor registration window.
In this window, the date identifying a contractor, is entered. To save the new customer, it is
necessary to complete the fields: Short name, Name and City.
In field: Person, it is possible to register a particular person from contractor’s side. Usually, this will be
a person receiving an invoice. For the person, entered in this field, a separate file will be created
(available in module: Sales>Contractor’s file, tab: Persons). For that person, the parameter: Person
authorized to take receipt of VAT invoice, will be checked by default. That person will at the same
time receive the status of a default person.
After the zip code is entered, the field: City, will be automatically completed (on the basis of the list
defined in window: List of zip codes, in module: Sales).
After the appropriate data has been entered, save it by clicking the button:
Module: Retail Sales
13.15
.
Version 6.0
If the user goes back to the list of contractors, the cursor will be placed on the newly added
contractor.
13.7.2
Documents
13.7.2.1
List of documents
The window: List of documents, is opened by clicking in the main window the button:
.
Pic. 13.11 List of documents in module: Retail sales.
In this window, the following documents are displayed: R, IR, RA, IAR, SI, CSI. Those are the
documents issued both in module: Retail sales and in the main commercial module: Sales. The
documents are displayed by date specified in the Company structure, in tab: General, in field: Display
documents from the last … days.
Available fields and functions:
- by running this function, the cursor is placed in field: Document, in which it
is possible to define a filer searching for documents with an indicated symbol. The
documents can be searched by:
•
•
•
document number,
short name/Contractor's ITIN number,
contractor’s address.
- it previews a document marked on the list. It is possible to enter the edited
document to the fiscal control and auditing system and to print it out. It is also possible
to make out an adjustment to it. For more information about a document edited on the
Module: Retail Sales
13.16
Version 6.0
list of documents see chapter: Błąd! Nie można odnaleźć źródła odwołania. Błąd!
Nie można odnaleźć źródła odwołania..
- by running this function, the system will take the user back to the main
menu.
13.7.2.2
Preview of documents from the list of documents
To preview a document from the list of documents, mark a selected document and click the button:
or use the buttons <ctrl+enter> on the keyboard.
Pic. 13.12 Preview of documents from the list of documents.
In this window, a list of items, being the subject of a transaction, is displayed. In case of IR/IAR, to
which only one R/RA is clipped, the items from the clipped R/RA will be displayed on the list. In case
if more than one R/RA is clipped to IR/IAR, a list of clipped receipts will be displayed instead of the
list of elements.
Available functions:
- it prints out a document.
- it enters a document (receipt), which has not been yet printed on a fiscal
printer, into the fiscal controls and auditing system. This function is also essential when it
fails to confirm the receipt (e.g. when paper in the fiscal printer runs out). In such case,
after the drawback, which disenabled to confirm the receipt, has been deleted, it is
possible to select an unconfirmed document on the list of documents and run the
function: Print on a fiscal printer. The document will be confirmed and entered into the
fiscal controls and auditing system.
Module: Retail Sales
13.17
Version 6.0
- this function is active, if an opened document is in buffer. It effects payment for
the document.
- this function is active, if an opened document is in buffer. It edits the document.
If a value or quantity is changed on the document, it is possible only to confirm such
document - it will not be possible to cancel the changes.
- if IR documents have not been issued to a receipt, by running this function
such document will be generated. It is also possible to generate receipt corrections clip
to receipt correction (if RC is being edited).
- it generates correction to an edited document. For more information about
correction generated to R and IR see chapter: Błąd! Nie można odnaleźć źródła
odwołania. Błąd! Nie można odnaleźć źródła odwołania..
- by clicking this button, the user will be taken back to the list of documents.
13.7.2.3
R and IR document correction
R and IR document correction is issued from the source document which is opened on the list of
documents. It is possible to generate only a quantitative correction.
If IR document is being corrected, RC documents are generated and clipped to an invoice to receipt
correction (IRC). In such situation, both RC and IRC documents will be printed out.
Layout of the window: R and IR document correction is similar to the source document window
(chapter: Błąd! Nie można odnaleźć źródła odwołania. Błąd! Nie można odnaleźć źródła
odwołania.), but it is not possible to select the buttons:
Module: Retail Sales
13.18
and
.
Version 6.0
Pic. 13.13 IR document correction.
A list of items is displayed on a document in multiselect mode which enables to deleted one item out
of many or many items at the same time.
After modification, the correction document must be confirmed by running the function:
.A
window: Payment forms, will be opened. In this window, the return for a customer is confirmed. To
confirm the return, in window: Payment forms, click the button:
. IRC or RC document
(depending on which document: IR or R, is generated) will be printed and saved on the list of
documents.
13.7.3
13.7.3.1
Deposits
List of deposit documents
A window: List of deposit documents, is run by clicking in the main window, a button:
.
In this window, there are deposit documents (DR and DERC) generated in CDN XL system. They are
displayed by date determined in the company structure center, in tab: General, in field: Display
documents from the last … days.
Available fields and functions:
Module: Retail Sales
13.19
Version 6.0
- by running this function, the cursor is placed in field: Document, in which it
is possible to define a filer searching for documents with an indicated symbol. The
documents can be searched by:
short name/Contractor's ITIN number,
•
contractor’s address.
•
- it previews a document marked on the list. The edited document can be
entered to the fiscal control and auditing system and printed out. It is also possible to
make out a correction to it. For more information about a document edited on the list of
documents see chapter: Błąd! Nie można odnaleźć źródła odwołania. Błąd! Nie
można odnaleźć źródła odwołania..
- by running this function, the system will take the user back to the main
menu.
13.7.3.2
Deposit document edited on the list of deposit documents
To preview a deposit document from the list of documents, mark a selected document and click the
button:
or use the buttons <ctrl+enter> on the keyboard.
Available fields and functions:
Document number – number of an edited deposit document.
Date of issue – document date of issue.
Issuing operator - operator who generated a deposit document.
ITIN, Name, Short name, Address – contractor data.
Total - deposit document value.
Module: Retail Sales
13.20
Version 6.0
Pic. 13.14 Deposit document previewed on the list of deposit
documents.
- it prints out a document.
- it generates correction to the edited document.
- by clicking this button, the user will be taken back to the list of documents.
13.7.3.3
Deposit document correction
Deposit document correction is generated out of an edited document by clicking the button:
or by pressing the key <F12> on the keyboard. It is possible to generate a quantitative
correction. To generate such correction, mark a document which must be corrected, click the button:
and enter an appropriate quantity.
The function:
, enables to search quickly for an item which must be corrected. Upon
clicking on that button, a window: Search items, will be opened. In this window, enter the code of a
merchandise and click the button:
. The item being searched will be marked on the list.
After the appropriate data has been entered, save the correction by clicking the button:
.
A window: Payment forms, will be opened. In this window, the return for a customer is confirmed
(with the use of button:
and displayed on the list.
Module: Retail Sales
). After the return is confirmed, the correction will be printed
13.21
Version 6.0
13.7.4
Cash register
By clicking on the button:
, the menu: Cash register, will be displayed. All
transactions, executed from the level of this menu, are performed on a cash register assigned to the
payment form – cash.
Pic. 13.15 Menu: Cash register.
13.7.4.1
PP document
By running the function:
in the Cash register menu, a window: Cash received, will be
opened. In this window, it is possible to generate a PP document which registers the receipt of cash
to the cash register.
Available fields and functions (all of them must be completed to be able to generate a PP document):
Customer – in this field, it is possible to indicate a contractor from whom cash is received.
Amount – amount paid.
Description – description of an amount.
- by running this function, a document will be confirmed and printed out.
register.
Module: Retail Sales
- by running this function, the user will be taken back to the menu: Cash
13.22
Version 6.0
Pic. 13.16 PP document generation window.
13.7.4.2
WP document
WP document generates payment from the cash register. The document is generated in window:
Cash paid, which is run with the use of function:
, available in the menu: Cash
register. The functions, available in this window, are the same as those in window: Cash received, but
in the window: Cash paid, the user selects a customer to whom cash is paid. The document is
confirmed and printed by running the function:
13.7.4.3
.
Statements
A window: Amounts statement, is displayed by running in the menu: Cash register, the function:
.
In this window, it is possible to display a report for a currently logged in operator or for all operators
logged in at a given workstation. The report presents the sum of all payments on documents issued
by a logged in operator (or from a given workstation), divided into payment forms. The amounts,
resulting from the cash entries generated by the logged in operator (or from a workstation) are
presented in column: Cash register (for payment forms which generate cash entries). A statement is
generated on a current day. It is possible to print a displayed report. A periodical report is a separate
function. This report is printed out on a fiscal printer. This function is run with the use of the following
buttons:
Repost for:
- it displays a statement for an operator logged in at a given workstation for a
current day.
- it displays a statement for a given workstation (that is for all operators
logged in at a given workstation) for a current day.
Module: Retail Sales
13.23
Version 6.0
- it prints out a displayed statement (for operator or for workstation – by
previously selected option).
- it prints out the statement on a fiscal printer.
13.7.4.4
Closing of day
In window: Closing of day, a statement for payment forms – cash, is displayed at the end of a day.
The window is displayed by running from the menu: Cash register, the function:
.
Pic. 13.17 Closing of day.
Available fields and functions:
Initial balance – initial balance of a report on report opening day (that is on a day on which
the first document was issued). The amount, equaled the closing balance of the previous
report, is displayed in this field.
Revenues – revenues for a given report since it was opened.
Expenses – expenses from a given report since it was opened.
Closing balance – closing balance of the report including the initial balance, revenues and
expenses.
WP amount – amount due from the cash register on which a WP document will be generated
(upon confirmation of the closing day). If the amount due is lower than the closing balance, the
rest will be the initial balance of a new report.
- it confirms confirmation of the day closing. As a result of this, the cash
reports (opened by issuing of the first document on a given day), will be closed. Upon
confirmation, WP document will be generated and printed.
Module: Retail Sales
13.24
Version 6.0
- it prints out a daily report on a fiscal printer.
register.
13.7.4.5
- by running this function, the user will be taken back to the menu: Cash
Drawer
By running the function:
, a drawer of the cash register, will be opened.
13.8 Closing of the module
To close the module: Retail sales, the function:
selected.
Module: Retail Sales
, available in the main menu, must be
13.25
Version 6.0
Table of pictures
Pic. 13.1 Parameters regarding retail sale in the center of company structure (from the level of the
rights structure)................................................................................................................... 13.5
Pic. 13.2 Company structure center from the level of the rights structure, tab: Payment forms. .... 13.5
Pic. 13.3 Payment form edition.............................................................................................. 13.6
Pic. 13.4 Operator login window. ........................................................................................... 13.7
Pic. 13.5 The main window of the module: Retail sales............................................................. 13.7
Pic. 13.6 Sales window – issuing of receipt/invoice. ................................................................. 13.9
Pic. 13.7 Date of sales representative and supervisor displayed upon clicking on the button:
F10/Header....................................................................................................................... 13.10
Pic. 13.8 Deposit document generated out of receipt. ............................................................ 13.12
Pic. 13.9 Payment for document – window: Payment forms. ................................................... 13.14
Pic. 13.10 Contractor registration window. ............................................................................ 13.15
Pic. 13.11 List of documents in module: Retail sales............................................................... 13.16
Pic. 13.12 Preview of documents from the list of documents. .................................................. 13.17
Pic. 13.13 IR document correction. ...................................................................................... 13.19
Pic. 13.14 Deposit document previewed on the list of deposit documents. ................................ 13.21
Pic. 13.15 Menu: Cash register. ........................................................................................... 13.22
Pic. 13.16 PP document generation window. ......................................................................... 13.23
Pic. 13.17 Closing of day..................................................................................................... 13.24
Module: Retail Sales
13.26
Version 6.0