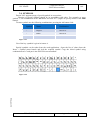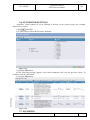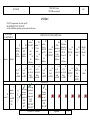
1
А-112078 пм
SC “Concern Rosenergoatom” property. It is forbidden without the preliminary written sanction of the
proprietor to reproduce, to translate, to change in any form or partially, to submit to other organizations
or persons in temporary or constant use, to disclose or to use data in commercial interests of persons or
organizations not bound with obligations with the proprietor.
STATE ATOMIC ENERGY CORPORATION “ROSATOM”
JOINT STOCK COMPANY
NIZHNY NOVGOROD ENGINEERING COMPANY
“АTOMENERGOPROEKT”
(JSC NIAEP)
VVER-TOI
UNCEM User Manual
TOI-MP0315-ADB0001
Revision А01
2012
STATE ATOMIC ENERGY CORPORATION “ROSATOM”
JOINT STOCK COMPANY
NIZHNY NOVGOROD ENGINEERING COMPANY
“АTOMENERGOPROEKT”
(JSC NIAEP)
VVER-TOI
UNCEM User Manual
TOI-MP0315-ADB0001
А-112078 пм
Revision А01
First deputy director
Ivanov Y.А.
Deputy chief engineer
Kuznetzov A.K.
Chief project engineer
Troshin A.N.
2012
Continuation sheet
VVER-TOI
UNCEM User Manual
TOI-MP0315-ADB0001
Revision А01
Head of Procurement and Supplies Information
Support department
Head of catalogues management department
А-112078 пм
Normative supervisor
Uvarov I.D.
Korytov M.Y.
Chadaev A.I.
JSC NIAEP
VVER-NOI Project
UNCEM user manual
А01
CONTENT
А-112078 пм
1 INTRODUCTION………..………………………………………………………………………..6
2 GENERAL INFORMATION….………………………………………………………………….7
2.1. System requirements…….………………………………………………………………7
2.1.1. Troubleshooting………………………………………………………………..7
2.2. Home page…………………………………………………………………………….....9
2.3. Information entry into the Catalogue………………………………………………..…10
2.4. Symbols………………………………………………………………………………..11
3 USER INTERFACE ………………………………………………………………………….....12
3.1. Toolbars………………………………………………………………………………...12
3.2. History viewer……………………………………………………………………….....15
3.3. Table view settings……………………………………………………………………..15
3.3.1. User's view creation…………………………………………………………..16
3.3.2. View removing……………………………………………………………….16
3.3.3. View editing……………………………………………………………..…...16
3.4. Objects comparison………………………………………………………………….....18
3.5. Multisorting…………………………………………………………………………….18
3.6. Autofilter settings…………………………………………………………………...….19
3.7. Favorites………………………………………………………………………………..19
3.7.1. Adding objects in to the Favorites……………………………………….......19
3.7.2. Viewing objects in the Favorites……………………………………………..20
3.7.3. Removing objects from the favorites ………………………………………..21
3.7.4. Removing sections from the Favorites ………………………………….......21
3.8. Interface language switch……………………………………………………….…..…22
3.8.1. Internet Explorer……………………………………………………………...22
3.8.2. Mozilla Firefox……………………………………………………………….22
3.8.3. Service notification language switch………………………………………...23
3.9. Navigation……………………………………………………………………………...23
4 REGISTRATION OF SUPPLIERS…………………………………………………………..….24
4.1. Registration of suppliers in Enovia system…………………………………………….24
4.1.1. Step 1: Terms of service……………………………………………………...24
4.1.2. Step 2: Information about the counterpart (company)…….……….………..24
4.1.3. Step 3: Assortment manufactured………………………………………..….26
4.1.4.Step 4: Documents confirming the right for representation
of interests ………………………………………………………………………….….…..26
4.1.5. Step 5: Assortment delivered…………………………………………….….26
4.1.6. Step 6: Top-stone of registration …………………………………………....26
5 COMPANY PROFILE………………………………………………………………..…………28
5.1.Company addresses………………………………………………………………...…...31
5.2. Bank details……………………………………………………………………….…....30
5.2.1. Creating, editing, removing bank details……………………………………..30
5.3. Contacts……………………………………………………………………………..…30
5.3.1. Creating, editing, removing contacts..30
5.4. Manufacturers……………………………………………………………………….….31
5.4.1. Creating a manufacturer……………………………………………………...31
5.5. Documents……………………………………………………………………………..32
5.5.1. Adding documents…………………………………………………………..32
5.5.2. Uploading documents……………………………………………………….32
TOI-MP0315-ADB0001
Approach
3
А-112078 пм
JSC NIAEP
VVER-NOI Project
UNCEM user manual
А01
5.5.3. Removing documents……………………………………………………..32
5.6. Assortment………………………………………………………………………….33
5.6.1. Adding assortment………………………………………………………..33
5.6.2. Adding a request…………………………………………………………..33
5.6.3. Removing assortment link ………………………………………………..34
5.7. Users………………………………………………………………………………...34
5.8. Views………………………………………………………………………………..34
5.8.1. Adding views……………………………………………………………...34
5.8.2. Removing views…………………………………………………………..35
5.8.3. Setting up the main view………………………………………………....35
5.9. HISTORY…………………………………………………………………………...35
6 ENTRY OF DOCUMENTS …………………………………………………………………...36
6.1.Library "Documentation"…………………………….………………………………..36
6.2. Creating documents in the Catalogue………………………………………………..36
6.2.1 Creating documents…………………………………………………………36
6.2.2. Creating Document in Equipment Card ……………………………….…28
6.2.3. Attaching Document to Cards (in Document)…………………………….39
6.2.4. Attaching Document to Cards (in Card)…………………………………..39
6.2.5. Attaching Document to Other Cards (in Card)…………………………….39
6.3.
Cards linked to document……………………………………………………..…...40
6.4.
Removing documents………………………………………………………………40
6.4.1. Removing Document from Card (in Card)………………………………....40
6.4.2. Removing Document from Card (in Document)………………………...….41
6.4.3. Editing Document Attributes …………………………………………….…41
6.5.
Working with document files………………………………………………..……...41
6.5.1. Updating Attached Files ………………………………………………….41
6.5.2. Adding files…………………………………………………………….….41
6.5.3. Removing files……………………………………………………………...42
6.6.
3D model upload requirements………………………………………………….….42
6.6.1. General Requirements for Models ………………………………………….42
6.6.2. Design 3D Model Upload Requirements ……………………………..……42
7 WORKING WITH EQUIMENT CARD…………………………………………………………44
7.1.
Searching for equipment card template ……………………………………….….44
7.1.1. Selecting a Terminal Element in the Classifier ……………………….…..44
7.2.
Creating equipment cards………………………………………………………....45
7.3.
Editing cards………………………………………………………………………46
7.3.1. Adding Reference Attribute Value ……………………………………….47
7.3.2. Adding Attribute with a Range of Values ………………………………...48
7.4.
Import Equipment Card from Excel ………………………………………………49
7.4.1. Creating a Template ……………………………………………….………49
7.4.2. Import from Excel …………………………………………………………50
7.5.
Export equipment cards to exel …………………………………………………….51
7.6.
Attaching documents……………………………………………………………….52
7.7.
Duplication of equipment card ………………………………………………...…...53
7.8.
Status of Equipment Cards ………………………………………………………...54
7.9.
Viewing created cards ………………………………………………………………54
8 DLL-Symbols…………………………………………………………………………………55
8.1.
Working with DLL-Symbols……………………………………………….……….55
8.1.1. Creating a DLL -Symbol…………………………………………………...55
8.1.2. Editing DLL Symbol in a Card ……………………………………..……..55
8.1.3. Editing DLL Symbol through DLL Library ……………………….………56
TOI-MP0315-ADB0001
Approach
4
JSC NIAEP
VVER-NOI Project
UNCEM user manual
А01
А-112078 пм
8.1.4. Removing DLL Symbol in a Card ………………………………….56
8.1.5. Removing DLL Symbol through DLL Library …………………………56
8.2.
Working with Excel………………………………………………………………56
8.2.1. Downloading Cards for dll Types to Excel …………………………………56
8.2.2. Uploading Cards with dll Types from Excel ……………………………….58
8.2.3. Downloading dll Symbol Attributes to Excel ……………………………..58
8.2.4. Uploading dll Symbol Attributes from Excel ……………………………..60
9 SEARCHING……………………………………………………………………………....…62
9.1.
General search…………………………………………………………………..…..62
9.2.
Quick keyword-based searching for a template …………………………..………..65
9.3.
Quick keyword-based searching for a card ………………………………….…….66
9.4.
Quick search within a template …………………………………………………….68
9.5.
Quick search by "My cards filter ………………………………………………..…71
10 WORK WITH REQUESTS…………………………………………………………………72
11 WORK WITH FORUMS ……………………………………………………………….……75
Annex А …………………………………………………………………………………….….…77
Annex Б ……………………………………………………………………………………..… ...78
Annex В …………………………………………………………………………………… ..…80
Annex Г ………………………………………………………………………………………..…88
TOI-MP0315-ADB0001
TOI-MP0315-ADB0001
Approach
5
JSC NIAEP
VVER-NOI Project
UNCEM user manual
А01
1 INTRODUCTION
Unified Nuclear Catalogue of Equipment and Materials (UNCEM) used for NPP designing,
construction and operation (hereafter Catalogue) is aimed to provide operative and trustworthy
information about the actual market of equipment and materials for nuclear power plants and to
allow operational planning and management of equipment & materials deliveries during the whole
NPP life cycle.
The catalogue is a simple and effective way to systematize information of the Suppliers of
NPP equipment, necessary during the whole NPP life cycle, and to keep it in the common place.
А-112078 пм
The Catalogue users are:
Engineering companies – companies using catalogue data for NPP designing and
construction;
Suppliers of NPP materials and equipment – companies entering data of delivered
equipment into the Catalogue;
NPP operator – a company receiving data of purchased and delivered equipment and
materials from the Catalogue;
Verifier – a company (JSC NIAEP) verifying reliability of data entered into the Catalogue by
equipment suppliers.
Operating environment of the Catalogue is Enovia V6 (DASSAULT SYSTEMES).
In the Catalogue equipment and materials are divided into classes and subclasses. An
equipment card template is the classifier terminal element. Basing on this template an equipment
card, describing the particular unit of equipment and material delivered by suppliers, is created.
TOI-MP0315-ADB0001
Approach
6
JSC NIAEP
VVER-NOI Project
UNCEM user manual
А01
2 GENERAL INFORMATION
2.1. SYSTEM REQUIREMENTS
For correct mapping of the Catalogue content it is necessary to use the browser Internet
Explorer 8, or Firefox 3.6 (it is possible to use later versions of Internet Explorer and Firefox, but
thus operation correctness is not guaranteed). In a browser pop-up windows should be authorised.
For correct files importing and exporting it is necessary to use MS Excel 2003 (correctness is
not guaranteed when using the other versions).
For operation of 3DAutoVue with 3D models it is required to set up Java SE 6 Update 14 (JRE
1.6.0_14).
JRE 1.6.0_14 are components of the Java Virtual Machine necessary for Java-applications, in
this case - 3DAutoVue.
It’s possible to download the required JRE version by the following reference:
http://www.oracle.com/technetwork/java/javasebusiness/downloads/java-archive-downloadsjavase6-419409.html#jre-6u14-oth-JPR «jre-6u14-windows-i586» for 32 bit version or «jre-6u14windows-x64» for 64 bit version.
System requirements are described in details in Annexes 3 and 4: ENOVIA requirements to the
client-end V6 and Oracle AutoVue requirements to the client-end.
For additional information contact system administrators or support service of your organization.
2.1.1. Troubleshooting
Error “Parameter is incorrect”
During operation in Internet Explorer browser a message to add-in «MSXML 5.0» for the
given website or an error “Parameter is incorrect” may appear under location bar:
А-112078 пм
Figure 2.1.1.1
TOI-MP0315-ADB0001
Approach
7
JSC NIAEP
VVER-NOI Project
UNCEM user manual
А01
This add-in should be set up in the all websites for error elimination and correct mapping of the
Catalogue. Click the add-in message and tick “Set up in all websites” from the list.
Figure 2.1.1.2
А-112078 пм
File path window is not popped up.
While loading files from the Catalogue into Internet Explorer browser the window for file path
selection is not popped up.
In particular, the given error is observed during company registration or cards uploading in
Excel.
To eliminate this error it’s necessary to set up as follows: Service > Browser options > tab
“Safety” > Other > Automatic enquiry for file download: On.
.
TOI-MP0315-ADB0001
Approach
8
JSC NIAEP
VVER-NOI Project
UNCEM user manual
А01
Figure 2.1.1.3
2.2. HOME PAGE
А-112078 пм
To start working with the Catalogue it’s necessary to pass to the Catalogue home page and to
fill fields "Username" and "Password" with a login and a password received by results of
registration. Then click the “Log-in” button. "
Figure 2.2.1
TOI-MP0315-ADB0001
Approach
9
JSC NIAEP
VVER-NOI Project
UNCEM user manual
А01
2.3. INFORMATION ENTRY INTO THE CATALOGUE
Content of the Catalogues is distributed by libraries. These libraries provide safety and
effective storage and management of equipment & material information and access to it.
Libraries provide the following procedures:
searching under standard characteristics of an object and additional inquiries;
Digital signature. The authorized users can sign or approve documents and other files which
usually require autographic signature;
The e-mail dispatch enabling to receive notices on the events connected to the Catalogue
management.
The Catalogue contains the following libraries for Suppliers:
Basic catalogue structure;
Documents;
Enquiries.
Libraries display frame:
Figure 2.3.
Templates of cards, basing on which equipment & material information is input, as well as
all equipment & material cards filled by Supplier are kept in the library “Base catalogue structure”.
Using its login and password Supplier can view and edit only the Supplier entered equipment cards.
Files with engineering specifications input by the Supplier for official confirmation of the
entered equipment & material information are kept in the library “Documents”. Using its login and
password Supplier can view and edit only the Supplier entered files.
А-112078 пм
Library “Enquiries” contains enquiries of Suppliers for creation of additional cards templates in
case of their misbooking in the current version of the Catalogue or for updating already existing
cards.
TOI-MP0315-ADB0001
Approach
10
VVER-NOI Project
UNCEM user manual
JSC NIAEP
А01
2.4. SYMBOLS
Enovia 2012 supports usage of special symbols in text options.
Entering of special symbols should be in accordance with codes. For example, to enter
symbol ±, use combination of the Alt button and code 0177 (digits are put by means of the Num
button).
To enter symbols use the following combinations: pressing the Alt button click:
Symbol
Name
Combination
°
Degree
Alt+0176
²
Ratio
Alt+0178
±
Plus-minus
Alt+0177
Figure 2.4.1.
List of the key symbols is given in Annex A.
Special symbols can be taken from the word-application. Open the list of values from the
Insert > Symbol menu branch and tick the required symbol. Copy the ticked symbol using
combination ctrl+C and put it into ENOVIA screen attribute.
А-112078 пм
Figure 2.4.2.
TOI-MP0315-ADB0001
Approach
11
VVER-NOI Project
UNCEM user manual
JSC NIAEP
А01
3 USER INTERFACE
3.1. TOOLBARS
Library screen:
Library content (dropdown list)
Main toolbar
Object toolbar
Client area
Figure 3.1.1.
Main toolbar:
Logname
Actions
Log-out
DS
Search
Home page
А-112078 пм
Figure 3.1.2
The main toolbar contains the following menus:
- My Enovia – menu of general functions;
- Libraries – libraries menu;
- FWD/BWD – navigational menu enabling to view 10 most often attended pages;
- Actions – actions menu, new object creation;
- Service – Tool menu;
- Search – search menu;
- Home page button;
TOI-MP0315-ADB0001
Approach
12
JSC NIAEP
VVER-NOI Project
UNCEM user manual
А01
- Log-out – button to log out of the system;
- Logname – name of a user logged in to the
system.
My Enovia contains:
- My Enovia – provides access to the functions
that are common for all applications.
Libraries contain:
- Libraries;
Folders;
- Document Libraries:
My documents;
For Edit – documents which User (Supplier)
edits;
Disposed – your disposed documents;
- My downloads – downloaded documents;
- Access-request
– access request for
documents;
- My cards – Cards created by User;
А-112078 пм
Service contains:
Service – toolbar includes:
- Browser ;
- Settings – User's settings enabling to set up
interface language, home page, time zone;
- Edit Profile – revision of profile data.
- Change password – to change password;
- History Viewer – list of the last 50 viewed
pages of the current session;
- Icon Mail – internal e-mail enabling to send
and receive messages from other users and notifying
system;
- О Enovia.
Indicators contain:
- General reports:
Life-cycle report;
Report on quantity of objects;
Report on quantity of status objects over time;
Report on quantity of objects over time;
- Indicators bar;
Administration:
- Background tasks;
- update cache;
Note: functionalities of tabs can slightly differ in dependence on user's access privileges.
TOI-MP0315-ADB0001
Approach
13
VVER-NOI Project
UNCEM user manual
JSC NIAEP
А01
Object (card template) toolbar:
Import / export menu
Actions
Selected element categories
Search
Figure 3.1.5.
Link URL
Check
Autofilter
Multi-sorting
Favorites menu
Objects comparison
View menu
Up/down
Printable version
Reference
Figure 3.1.6.
А-112078 пм
Categories – Categories menu;
Actions – menu of available operations;
Import / export – import and export of objects from / into Excel, see Import of equipment &
material cards from Excel forms, Export of equipment & material cards into Excel forms.
Search – Search for objects within selected template/ section, see Fast search within template.
Favorites – fast addition of elements into the folder Favorites.
View – settings of the current table, see Settings of the current table.
Autofilter – settings of current page filter, see Autofilter settings.
Check – checking of the selected objectпроверка выбранного объекта.
Objects comparison – comparison of attributes of two objects, see Objects comparison.
Printable version – printable version of the current page.
Multi-sorting – columns sorting by the given attributes, see Multi-sorting.
Reference – help topics.
Up/down – mass rolling of the objects up/down, see Statuses of equipment/material card.
TOI-MP0315-ADB0001
Approach
14
JSC NIAEP
VVER-NOI Project
UNCEM user manual
А01
3.2. HISTORY VIEWER
The history allows getting immediate access to the earlier open pages (the last 50 open pages).
Select Service > History viewer on the main toolbar..
Figure 3.2.1.
On the given page it is possible to follow links of the pages opened earlier as well as to add the
given links in bookmarks/Favotites.
3.3. TABLE VIEW SETTINGS
“View” menu enables to set up user’s view of the table, to add new columns.
.
А-112078 пм
Figure 3.3.1.
TOI-MP0315-ADB0001
Approach
15
JSC NIAEP
VVER-NOI Project
UNCEM user manual
А01
3.3.1. User’s view creation
Open the View menu
on the toolbar of the related object category (reference guide,
section of the reference guide, documents, classifier, templates, cards).
Tick the required columns from the list of values (LOV) and add then into the field “Visible
columns”, or delete unnecessary columns from the list of visible ones using buttons
.
If needed, change sequence of attribute columns using buttons
.
Enter view name in the System name field and click the OK button.
Figure 3.3.1.1.
3.3.2. View removing
1) Tick the view you want to remove.
2) Follow the menu brunch View > Remove the current view.
3.3.3. View editing
А-112078 пм
1) Tick the view you want to edit.
2) Follow the menu branch View > Edit the current view.
TOI-MP0315-ADB0001
Approach
16
JSC NIAEP
VVER-NOI Project
UNCEM user manual
А01
3.4. OBJECTS COMPARISON
This option enables to compare attributes of several objects regarding to the other object.
1) Open the template.
2) Tick the cards to be compared.
3) Click
Compare.
4) In the new window select an object- base for comparison and click the Next button.
Figure 3.4.1
А-112078 пм
5) Select view type.
6) Tick attributes for comparison and click the Next button.
Figure 3.4.2.
TOI-MP0315-ADB0001
Approach
17
JSC NIAEP
VVER-NOI Project
UNCEM user manual
А01
7) Attributes that not coincide with attributes of the object-base are red colored.
Figure 3.4.3.
8) It’s possible to click the Back button and change the view or attributes of comparison.
3.5. MULTI-SORTING
This option allows sorting of objects by several columns simultaneously.
Open the template (or section of documents).
А-112078 пм
Click
Multisorting.
In the new window select columns for sorting and click the OK button.
Figure 3.5.1.
TOI-MP0315-ADB0001
Approach
18
JSC NIAEP
VVER-NOI Project
UNCEM user manual
А01
3.6. AUTOFILTER SETTINGS
“Autofilter” menu enables to set up filtering of objects on the concrete page (for example,
documents or cards).
1) Tick
Autofilter.
2) To filter objects select the necessary attributes.
Figure 3.6.1.
А-112078 пм
3) Click the OK button.
4) The following message appears: New filter parameters will reset the previous values. To
continue click the OK button.
5) Click the ОК button.
Figure 3.6.2.
3.7. FAVORITES
TOI-MP0315-ADB0001
Approach
19
JSC NIAEP
VVER-NOI Project
UNCEM user manual
А01
To obtain quick access to the often used objects it is necessary to upload them into the
Favorites folder.
3.7.1. Adding objects in to the Favorites
1) Open library/ template/ /reference guide.
2) Tick the required objects to be added into the Favorites (templates, cards, documents,
reference guides).
3) Click
(the right arrow) and follow the menu branch New section / Add to Favorites.
4) Fill in the fields with:
a. name of new section for object addition or select the name from the LOV.
b. description, if needed.
Figure 3.7.1.1.
5) Click the OK button, the following message appears:
Selected element(s) added.
Then click the OK button.
3.7.2. Viewing objects in the Favorites
А-112078 пм
1) Follow the menu branch My Enovia -> Favourites.
Figure 3.7.2.1.
TOI-MP0315-ADB0001
Approach
20
JSC NIAEP
VVER-NOI Project
UNCEM user manual
А01
2) Select the required section. All elements added to this section are available.
Figure 3.7.2.2.
3.7.3. Removing objects from the Favorites
1) Open the required section.
2) Tick the elements to be removed.
3) Follow the menu branch Actions >Remove. The given procedure removes elements only
from the Favorites but not from the database.
3.7.4. Removing sections from the Favorites
А-112078 пм
1) Open
> Favorites.
2) Tick the section to be removed.
3) Click the Remove button.
4) Select the removing scope:
- Only section (Only section of the Favorites is removed, all elements, it contains, remain in the
database).
--
Figure3.7.4.1.
- Section and all its elements (Note! Section and all its elements are removed from the database).
TOI-MP0315-ADB0001
Approach
21
JSC NIAEP
VVER-NOI Project
UNCEM user manual
А01
3.8. INTERFACE LANGUAGE SWITCH
To switch interface language it is necessary to change browser language:
- For Internet Explorer
- For Mozilla Firefox
- Service notification language switch
3.8.1. Internet Explorer
1) Follow the branch Service > Browser options > Languages.
2) Add the English language in the list and shift it up to the top of the list.
3) Click the ОК button.
4) Click F5 (Update) to apply changes.
Note!
ENOVIA correctly supports two languages: English [en] and Russian [ru].
Figure 3.8.1.1.
When using language settings Russian/Russia [ru-RU], English/USA [en-us], etc. errors in
ENOVIA application are probable.
А-112078 пм
3.8.2. Mozilla Firefox
1) Open Settings.
2) Click the Select button in the Content tab of the Languages field.
3) Add the English language and shift it up to the top of the list.
4) Click the ОК button.
5) Click F5 (Update) to apply changes.
TOI-MP0315-ADB0001
Approach
22
JSC NIAEP
VVER-NOI Project
UNCEM user manual
А01
Figure 3.8.2.1.
Note!
ENOVIA correctly supports two languages: English [en] and Russian [ru].
When using language settings Russian/Russia [ru-RU], English/USA [en-us], etc. errors in
ENOVIA application are probable.
3.8.3. Service notification language switch
1) Follow the branch Service > Settings;
2) Set up language by default > English > OK.
3) Click the Log-out checkbox on the main toolbar and log in to the system again.
3.9. NAVIGATION
To use elements of the Catalogue use the navigation toolbar: follow the related link to open the
required element.
А-112078 пм
Figure 3.9.1.
TOI-MP0315-ADB0001
Approach
23
JSC NIAEP
VVER-NOI Project
UNCEM user manual
А01
4 REGISTRATION OF SUPPLIERS
4.1. REGISTRATION OF SUPPLIERS IN ENOVIA SYSTEM:
For correct registration it is necessary to review the brief description of each step and to prepare
the required documents.
Procedure of registration contains 6 steps:
- Step 1: Terms of service
- Step 2: Information about the counterpart (company) and documents confirming the legal
status
- Step 3: Assortment manufactured (filled by manufacturer)
- Step 4: Documents confirming the right for representation of interests
- Step 5: Assortment delivered
- Step 6: Top-stone of registration
4.1.1. Step 1: Terms of service.
It is necessary to review the given Terms and to check the box “I accept the terms of service”.
The given Terms of services should be printed out and signed by the head of the company. Then the
signed agreement should be sent by e- mail to JSC NIAEP addressed to the appointed expert and/or
addressed to UNCEM e-mail ([email protected] <mailto:[email protected]>
А-112078 пм
4.1.2. Step 2: Information about the counterpart (company).
Figure 4.1.2.1.
TOI-MP0315-ADB0001
Approach
24
JSC NIAEP
VVER-NOI Project
UNCEM user manual
А01
Figure 4.1.2.2.
А-112078 пм
The given window represents profile of the company. The fields marked by red italic as well as
fields in tables are obligatory to be filled in.
In the Company denomination fields symbols «» should be used (symbols “” or ″ are prohibited
to be used).
If your company is a manufacturer of products (used at the designing stage and delivered to
NPPs) it is necessary to select check box in the Manufacturer field.
When check box in the Password field is selected, you receive notification that you have been
successfully registered containing your personal login and password.
When check box in the Responsible for provisioning, then a user for the given contact will be
automatically created after registration.
At this step you are obliged to upload documents confirming the legal status of your company
in the Catalogue. The following documents are to be uploaded:
- Certificate of State Registration of the Legal Entity
- Tax registration certificate
There is a possibility to attach additional package of letters. For example, an excerpt from the
Unified State Register of Legal Entities and etc.
Acceptable formats of the uploaded files are TIFF and PDF.
4.1.3. Step 3: Assortment manufactured.
The given window appears only for the companies which have selected check box in the
Manufacturer field at the second step.
At the given step it is required to specify templates of equipment manufactured by your
company as well as the terms of listing this equipment in the Catalogue. Then the schedule should
be printed and signed by the head of the company. The signed schedule should be sent by e-mail by
TOI-MP0315-ADB0001
Approach
25
JSC NIAEP
VVER-NOI Project
UNCEM user manual
А01
e- mail to JSC NIAEP addressed to the appointed expert and/or addressed to UNCEM e-mail
([email protected] <mailto:[email protected]>).
If an template for equipment manufactured by your company is not available, then it is
necessary to leave the remark with brief description of the required equipment. The given remark is
a request for template creation and the expert, responsible for template creation, will contact with
you.
4.1.4. Step 4: Documents confirming the right for representation of
interests.
At the given step the status of the company in relation to the Manufacturer (Trading house,
Distributor; Complex supplier) is specified. If your company is a Manufacturer then you can skip
the given stage pressing the Next button.
Listing the company it is necessary:
1) To specify business partner relationship type.
2) To select a Manufacturer from the LOV by the company identification or ITPN..
If the required company is not listed it is necessary to fill the profile in the name of the
company (step 2 form, in this case the fields obligatory to be filled are marked by red italic). Then
select the required company from the LOV.
3) To attach the document confirming the present status, for example Agency contract,
Procurement contract and etc.
4) It is required to indicate valid date of the document. Acceptable formats of the uploaded files
are TIFF and PDF.
4.1.5. Step 5: Assortment delivered.
А-112078 пм
If your company is a Manufacturer and at the same time is able to deliver equipment
manufactured by other factories, then at the given Step it is necessary to specify templates for
equipment delivered but not manufactured by your company.
If your company is a Trading house, a Distributor or a Complex supplier, then at the given step
it is necessary to compile the schedule of entering information in the Catalogue with templates and
terms. Then the schedule should be printed and signed by the head of the company. The signed
schedule should be sent by e-mail by e- mail to JSC NIAEP addressed to the appointed expert
and/or addressed to UNCEM e-mail ([email protected] ).
If an template for equipment manufactured by your company is not available, then it is
necessary to leave the remark with brief description of the required equipment. The given remark is
a request for template creation and the expert, responsible for template creation, will contact with
you.
4.1.6. Stem 6: Top-stone of registration.
At the given step it’s possible to print the filled forms. For this purpose click the button Print
the compiled documents.
At the end of this step the following documents compiled in course of registration are sent to
the appointed e-mail address::
- Terms of service (Step 1)
TOI-MP0315-ADB0001
Approach
26
JSC NIAEP
VVER-NOI Project
UNCEM user manual
А01
- Manufactured assortment (Step 3)
- Delivered assortment (Step 5)
At the end of registration information will be sent to the JSC NIAEP administrators for
verification.
To finish registration answer the anti-spam question and click the Register button.
А-112078 пм
Figure 4.1.6.1.
TOI-MP0315-ADB0001
Approach
27
JSC NIAEP
VVER-NOI Project
UNCEM user manual
А01
5 COMPANY PROFILE
Information about the company given at registration is verified by the JSC NIAEP specialists.
In case of successful verification the company is activated and receives a login and a password for
authorized work with the Catalogue.
It’s possible to edit information about your company by means of the edit function following
the branch Service > My Company.
А-112078 пм
Figure 5.1.
Company category menu contains:
- Company addresses
- Bank details
- Contact Persons
- Manufacturers
- Documents
- Assortment
- Users
- Views
- History
TOI-MP0315-ADB0001
Approach
28
JSC NIAEP
VVER-NOI Project
UNCEM user manual
А01
5.1. COMPANY ADRESSES
The Company addresses window contains list of addresses of a company with identification of
their types (mail, actual, legal).
Figure 5.1.1.
To create, edit, remove address:
1) Follow the branch Service > My company.
2) Select the Addresses tab in the Categories menu.
3) Click the Create button on the toolbar (to edit/remove address click the Edit/Remove buttons
respectively).
4) Fill in the fields:
a. type the address.
b. tick type of address: mail, actual, legal.
Figure 5.1.2.
А-112078 пм
5) Click the OK button.
TOI-MP0315-ADB0001
Approach
29
JSC NIAEP
VVER-NOI Project
UNCEM user manual
А01
5.2. BANK DETAILS
The bank details window contains bank requisites of a company.
5.2.1. Creationg, editing and removing bank details
1) Follow the branch Service > My company.
2) Select the Bank details tab in the Categories menu.
3) Click the Create button on the toolbar (to edit/remove address click the Edit/Remove buttons
respectively).
4) Fill in the fields.
5) Click the OK button.
Figure 5.2.1.1.
5.3. CONTACTS
The Contacts window contains the list of Company persons to
contact with..
5.3.1. Creating, editing and removing contacts
А-112078 пм
1) Follow the branch Service > My company.
2) Select the Contacts tab in the Categories menu.
3) Click the Create button on the toolbar (to edit/remove address
click the Edit/Remove buttons respectively).
4) Fill in the fields.
5) Click the OK button.
Figure 5.3.1.1.
5.4. MANUFACTURERS
The Manufacturers window contains information about manufacturers which interests the given
company represents.
TOI-MP0315-ADB0001
Approach
30
JSC NIAEP
VVER-NOI Project
UNCEM user manual
А01
Figure 5.4.1.
5.4.1. Creating a manufacturer
1) Follow the branch Service > My company.
2) ) Select the Manufacturers tab in the Categories menu.
3) Click the Create button on the toolbar.
4) Fill in the fields.
a. Select the company status in relation to the Manufacturer (Trading house, Distributor;
Complex supplier).
b. Select a manufacturer from the LOV. If the required manufacturer is not listed, then it is
necessary to fill in its profile.
c. attach the document confirming the present status, for example Agency contract,
Procurement contract and etc.
Figure 5.4.1.1.
5) Click the Safe button.
5.5. DOCUMENTS
The Documents window contains documents confirming legal state of the company.
For files editing see section Work with document files.
А-112078 пм
5.5.1. Adding documents
1) Upload the required document in the Documents library in section “Registration document”
(see section Creating documents).
2) Follow the branch Service >My company.
3) Select the Documents tab in the Categories menu.
4) Click the Add button.
5) Input search criteria and click the Search button.
6) Tick the document and click the OK button.
TOI-MP0315-ADB0001
Approach
31
JSC NIAEP
VVER-NOI Project
UNCEM user manual
А01
Figure 5.5.1.1.
5.5.2. Uploading documents
Documents are saved on the local computer..
1) Follow the branch Service >My company.
2) Select the Documents tab in the Categories menu.
3) Select the document from the LOV.
4) Click the Upload button.
5.5.3. Removing documents
1) Follow the branch Service >My company.
2) Select the Documents tab in the Categories menu.
3) Select the document from the LOV.
4) Click the Remove button.
5.6. ASSORTMENT
А-112078 пм
See Step 5: Assortment delivered.
Figure 5.6.1.
5.6.1. Adding assortment
The given function enables to specify assortment of production delivered by your company (
(templates of the Catalogue base structure).
1) Follow the branch Service >My company.
2) Select the Assortment tab in the Categories menu.
TOI-MP0315-ADB0001
Approach
32
JSC NIAEP
VVER-NOI Project
UNCEM user manual
А01
3) Click the Add button.
4) Fill in the fields and click the OK button.
Figure 5.6.1.1.
5.6.2. Adding request
1) Create a request in the Request library (see section Work with requests).
2) Follow the branch Service >My company.
3) Select the Assortment tab in the Categories menu.
4) Click the Add button.
5) Fill in the fields and click the OK button.
Figure 5.6.2.1.
А-112078 пм
5.6.3. Removing assortment
The given function allows removing assortment of production from the list of products
delivered by your company.
1) Follow the branch Service >My company.
3) Select the Assortment tab in the Categories menu.
3) Select assortment from the LOV.
4) Click the Remove button.
TOI-MP0315-ADB0001
Approach
33
JSC NIAEP
VVER-NOI Project
UNCEM user manual
А01
5.7. USERS
The Users window contains the list of users of the given company.
Following the user’s link it’s possible to edit its profile.
Figure 5.7.1.
5.8. VIEWS
Views are displayed in the company profile. The Corporate Identity should be uploaded in the
present section.
5.8.1. Adding views
1) Follow the branch Service >My company.
2) Select the Views tab in the Categories menu.
3) Click the Add button.
4)Select files using the Browse button and then click OK.
5.8.2. Removing views
1) Follow the branch Service >My company.
2) Select the Views tab in the Categories menu.
3) Select the view.
4) Click the Remove button.
5.8.3. Setting up the main view
А-112078 пм
1) Follow the branch Service >My company.
2) Select the Views tab in the Categories menu.
3) Select the view.
4) Click the Main view button.
TOI-MP0315-ADB0001
Approach
34
JSC NIAEP
VVER-NOI Project
UNCEM user manual
А01
5.9. HISTORY
In the History window all information on actions related to the given object (company).
А-112078 пм
Figure5.9.1.
TOI-MP0315-ADB0001
Approach
35
JSC NIAEP
VVER-NOI Project
UNCEM user manual
А01
6 ENTRY OF DOCUMENTS
6.1. LIBRARY “DOCUMENTATION”
The “Documentation” library is intended to manage documents. This library is classified
according to document types.
For verification it is obligatory to fill in the following types:
- Specifications on the equipment entered into the Catalogue (Documentation confirming the
declared characteristics);
- Licenses to design and manufacture equipment for NPPs (Conditions and terms of license
validity are to be enclosed);
- Certificates of conformance (Certificates of conformance, Certification Center’s letter on
optional certification of products);
- Product manual (Instruction manuals);
- 3D-models (see item 5.6. of this manual);
(Important! The name of the file entered into the documentation library should indicate the
document type and the product to which the document is related: Specs 37-053-05015348-2008
Check valve).
For complete and detailed information on the equipment items placed into the Catalogue the
following document types can be filled in:
- Standards and codes (GOST, OST, Building Codes etc.);
- Letters of authority and agreements (partnership, representation of interests etc.);
- Product data sheet;
- Specifications of finished products;
- Operating, storage, preservation and de-preservation guidelines etc.;
- Title documents and financial documents (charter, extract from the Unified State Register of
Legal Entities, balance sheet etc.);
- Miscellaneous (electronic catalogue of equipment etc.).
The documents and data provided by suppliers are needed to verify the equipment card, to
optimize designer’s choice and to resolve questions arising during equipment operation and service
at NPP.
6.2. CREATING DOCUMENTS IN THE CATALOGUE
6.2.1. Creating documents
А-112078 пм
Take the following steps to create documents in the Catalogue:
1) Log in the Catalogue;
2) Go to the “Documentation” library;
3) Select the section corresponding to the document type to be added:
Figure 6.2.1.1.
TOI-MP0315-ADB0001
Approach
36
JSC NIAEP
VVER-NOI Project
UNCEM user manual
А01
4) Create document.
Figure 6.2.1.2.
5) Fill in the required fields in the opened window:
А-112078 пм
Figure 6.2.1.3.
a. System name – system document name – generated automatically.
b. Type – type of the created document, defined automatically and corresponds to the section in
which the document is created.
c. Life cycle – document life cycle, Protected document is set by default.
d. Name – document name.
e. Description – document description. To make search for documents easier it is recommended
to give the company name in the description.
6) Click Next.
7) Click Browse.
TOI-MP0315-ADB0001
Approach
37
JSC NIAEP
VVER-NOI Project
UNCEM user manual
А01
Figure 6.2.1.4.
8) Tick a file. The file format shall match the document section, in case of a different format the
following message will be displayed showing the allowable formats:
Figure 6.2.1.5.
9) If necessary fill in the “Comments” field.
10) If several files need to be attached, then repeat steps 8-9.
11) Click OK.
А-112078 пм
6.2.2. Creating Documents in Equipment Card
In this type of creation the document is attached from the very start to the card from which it
has been created.
Steps to be taken to create a new a document in an equipment card:
1) Find and open an equipment card.
2) Go to the “Documentation” tab.
3) Follow the branch Actions → Create new.
4) Next do steps described in the Create Document.
After a document has been added, it can be attached to several cards, see Attach document to
cards (steps 3-5).
In case of any questions when using this functionality contact your account consultant in JSC
NIAEP.
6.2.3. Attaching Document to Cards (in Document)
1) Откройте требуемый документ в библиотеке «Документы».
TOI-MP0315-ADB0001
Approach
38
JSC NIAEP
VVER-NOI Project
UNCEM user manual
А01
2) Follow the branch Actions → Attach or go to the category Attached to cards and on the
toolbar click the Attach button to card.
3) Select Find Cards for Attachment.
4) In the screen displayed define search parameters
5) In search results select the necessary cards and click Attach on the toolbar.
6.2.4. Attaching Documents to Cards (in Card)
1) Open a card.
2) Go to the Documentation tab of the card.
3) Follow the branch Actions → Attach Existing.
4) Enter criteria in the search box and click Find.
5) Tick the relevant documents and click Select.
6.2.5. Attaching Documents to Other Cards (in Card)
Steps to be taken to attach several documents already existing in one card to several other
cards.
1) Open the card to which the necessary document is attached.
2) Go to the “Documentation” tab.
3) Tick the documents for attachment. To select all the documents, at first, expand the structure,
then select all the documents putting a tick in the field “Name”.
Figure 6.2.5.1.
А-112078 пм
4) On the toolbar click Actions → Attach to card.
5) Next see Attach Document to Cards (in Document) (steps 3-5).
TOI-MP0315-ADB0001
Approach
39
JSC NIAEP
VVER-NOI Project
UNCEM user manual
А01
6.3. CARDS LINKED TO DOCUMENT
View all the cards linked to the document:
1) Open a document.
2) Follow the branch Category -> Attached to cards.
Figure 6.3.1.
6.4. REMOVING DOCUMENTS
6.4.1. Removing Documents from Card (in Card)
А-112078 пм
1) Откройте карточку.
2) Перейдите во вкладку «Документы».
3) 1) Open a card.
2) Go to the “Documentation” tab.
3) Tick documents for removal. To select all the documents, at first, expand the structure, then
select all the documents putting a tick in the field “Name”.
Figure 6.4.1.1.
4) Follow the branch Actions → Remove.
TOI-MP0315-ADB0001
Approach
40
VVER-NOI Project
UNCEM user manual
JSC NIAEP
А01
6.4.2. Removing Document from Card (in Document)
1) Open a document.
2) Follow the branch Category → Attached to cards.
3) Select the necessary cards.
4) Click Remove.
In case of any questions when using this functionality contact your account consultant in JSC
NIAEP.
6.4.3. Editing Document Attributes
1) Open the needed document.
2) On the toolbar select Actions →Modify.
3) Edit the necessary fields.
4) Click OK.
6.5. WORKING WITH DOCUMENT FILES
6.5.1. Updating Attached Files
1) Open a document by clicking the document name or open it in a new window by clicking the
button
.
2) Click the button
(Check out) in the column Actions.
Figure 6.5.1.1.
А-112078 пм
3) Open the file and edit it.
4) In the column Actions hit the button
5) Select the file in the new window.
6) Enter comments if necessary.
TOI-MP0315-ADB0001
(Update files).
Approach
41
JSC NIAEP
VVER-NOI Project
UNCEM user manual
А01
Figure 6.5.1.2.
7) Click Done.
6.5.2. Adding files
1) Open a document.
2) On the toolbar select Actions →Add.
3) Select files using the Browse button.
4) Click Done.
6.5.3. Removing files
1) Open a document.
2) Tick files to be deleted.
3) On the toolbar select Actions →Delete Version/Delete All Versions.
4) The following message will be displayed: You are going to delete the selected files from the
document. You will not be able to access the deleted files. Hit OK button to continue. Hit Cancel
button to cancel.
5) Click Done.
6.6. 3D MODEL UPLOAD REQUIREMENTS
Design 3D model is a “light” model showing an external view, overall dimensions, installation
and connection sizes, used in computer-aided design, not more than 5 Mb.
Detail design 3D model is a detailed 3D model showing all major parts of equipment
assembled on NPP site offering virtual assembly/disassembly option and also view options to be
used during installation, operation, maintenance and decommissioning, less than 100 MB.
6.6.1. General Requirements for Models
- Individual 3D models should be created for every model and standard size of equipment.
- Detail design 3D model is developed on request of JSC NIAEP Verification Center.
А-112078 пм
6.6.2. Design 3D Model Upload Requirements
1) A model shall be formatted as .sat;
2) The file size shall not exceed 5 Mb;
3) A model shall be an integrated whole and shall not have components (it shall be a 3D unit);
4) The 3D model file name shall be as follows: equipment design version as per Specifications,
written in Latin letters. For example, for adsorber UPA 047.00.00.000 the file name will be as
“Filter adsorber_UPA 047.00.00.000.sat”.
5) Model scale shall be 1:1;
6) Requirements for model building:
- The zero point shall belong to a model;
TOI-MP0315-ADB0001
Approach
42
VVER-NOI Project
UNCEM user manual
JSC NIAEP
А01
Figure 6.6.2.1.
- An equipment model shall contain the following:
- overall dimensions;
- mounting sizes (sizes for mounting – hole diameters, position of holes in frames, supports
etc.);
- connection sizes – showing pipeline and vent connections, gauge connections, pads, flanges,
connections of electric cables, sleeves etc.
- support and frame sizes.
- If equipment is supplied together with counter flanges, flanges shall be shown in the design
3D model.
- Shipping plugs are not shown in the design 3D model.
7) If equipment requires maintenance area, this area shall be shown in the form of a frame
model in a separate sat file. The zero point in the sat-file for maintenance area and in the sat-file for
design 3D model shall match. The sat-file name for maintenance area shall be as follows:
“Equipment design version as per specifications, written in Latin letters ZONA OBSLUG”.
For example, for adsorber UPA 047.00.00.000 the file name shall be “Filter an adsorber_UPA
047.00.00.000_ ZONA OBSLUG.sat”.
List of tools to generate .sat formatted 3D models.
Export to format
Tool
Format
AutoCAD
.dwg
.sat
Inventor
.ipt
.sat
Компас
.m3d
.sat
SolidWorks
.sldprt
.sat
Pro/ENGINEER
.drw
.sat
А-112078 пм
ACIS
TOI-MP0315-ADB0001
Approach
43
JSC NIAEP
VVER-NOI Project
UNCEM user manual
А01
7 WORKING WITH EQUIPMENT CARD
The library “Catalogue Basic Structure” is intended to manage equipment classes, sub-classes
and cards.
Every terminal element of all the branches of the equipment and materials classifier has a
unique equipment card template with its own group of general and type attributes. Equipment is
classified against its functional purpose and design which helps to avoid double entry of equipment
into the Catalogue and to optimize the database. The number of classification levels has been
optimized to make the Catalogue structure and its use simpler and easier.
7.1. SEARCHING FOR EQUIPMENT CARD TEMPLATE
There are two ways to search for templates in order to create and search for an equipment card:
- quick keyword-based searching for a template (see 7.2);
- selecting a terminal element in the classifier.
7.1.1. Selecting a Terminal Element in the Classifier
Library→Catalogue basic structure.
Move in the classifier and select the necessary equipment template:
А-112078 пм
Figure 7.1.1.
TOI-MP0315-ADB0001
Approach
44
JSC NIAEP
VVER-NOI Project
UNCEM user manual
А01
7.2. CREATING EQUIPMENT CARD
1) Select a terminal branch in the classifier.
2) Next follow the branch Actions →Create Equipment Card.
3) Enter header and General characteristics in the Create Equipment Card screen:
Figure 7.2.1.
А-112078 пм
Enovia limits the number of characters to be entered in different fields.
4) Click Done.
After card is created it is necessary to edit attributes:
Figure 7.2.2.
TOI-MP0315-ADB0001
Approach
45
JSC NIAEP
VVER-NOI Project
UNCEM user manual
А01
1) Go to tab with attributes and click Modify.
2) Fill in necessary fields:
Figure 7.2.3.
a. Select reference attributes by using
button;
b. In the reference data selection window select the necessary item and click the OK button;
3) Click OK.
So a new equipment card is created with Draft status.
The card has the following tabs with attributes:
- System;
- Documents;
- General product data;
- Financial attributes;
- Operation attributes;
- Type – a tab (a group of attributes) with a name for this template;
- General (all).
7.3. EDITING CARD
А-112078 пм
- Add reference attribute value
- Add attribute with a range of values
TOI-MP0315-ADB0001
Approach
46
JSC NIAEP
VVER-NOI Project
UNCEM user manual
А01
7.3.1. Adding Reference Attribute Value
1) Open a card.
2) Go to tab with attributes (tab name matches name of attribute group to which a new attribute
has been added).
Figure 7.3.1.1.
3) On the toolbar click Modify.
А-112078 пм
4) Find the added attribute from the list and click
5) Select needed item from the list (put a tick).
6) Click the Select button:
.
Figure 7.3.1.2.
7) Click Choose to save changes.
TOI-MP0315-ADB0001
Approach
47
VVER-NOI Project
UNCEM user manual
JSC NIAEP
А01
When clicking the link the referenced object will be displayed in a new window:
Figure 7.3.1.3.
7.3.2. Adding Attribute with a Range of Values
1) Open a card in the template where an attribute with a range of values has been added.
2) Go to tab with attributes (tab name matches name of attribute group where an attribute has
been added).
3) On the toolbar click Modify.
4) Select the added attribute from the list and enter a value following these rules:
a. 3 dots … separate max and min attribute values.
b. Min attribute value shall be entered in the left while max value – in the right. If this rule is
not met then the following message will be displayed: “Error in range”. Make sure that range is
correctly entered. To save changes enter valid value of attribute.
c. Min and max value can be represented either by a number or by a formula. Value is
calculated as per formula when the attribute is saved. In case of error the user receives an error
message.
d. To enter attribute with a range of values the following math characters and functions are
available:
А-112078 пм
Character
+
/
*
()
sqrt
^
sin
cos
tan
atan
asin
Description
Addition
Deduction
Division
Multiplication
Expression defining a calculation sequence
Square root
Exponentiation (e.g. “10^7” raising 10 to the power of 7)
Sine
Cosine
Tangent
Hyberbolic tangent
TOI-MP0315-ADB0001
Approach
48
JSC NIAEP
VVER-NOI Project
UNCEM user manual
А01
acos
Sample of attributes with a range of values:
Value
ENOVIA
entry
Attribute name
Value to be entered
Bore diameter with tolerance
151^+0.4
151…151+0,4
45 ± 5
45-5…45+5
0.5…30
0,5…30
Fluid temperature range
-100…250
-100…250
Volumetric activity range
Voltage control range
1.0*10^7...1.0*10^2
±12
1*10^7…1*10^2
-12…+12
Closing time
Time setting control range (for time
relay)
in
Figure 7.3.2.1.
5) Click OK to save changes.
А-112078 пм
7.4. Import Equipment Card from Excel
Excel tables is generated with card attributes, table sheets correspond to card attribute group
tabs.
Data entry sequence using Excel tables:
- Create template
- Import from Excel
7.4.1. Creating a Template
1) Go to card template in the classifier.
TOI-MP0315-ADB0001
Approach
49
JSC NIAEP
VVER-NOI Project
UNCEM user manual
А01
2) On the toolbar select Import/Export →Export to Excel. Click Export to Excel (Admin) to
create a template with administrator’s rights and to import objects.
Figure 7.4.1.1.
3) Click Create Template.
4) Save template to your machine. Excel template will contain all attributes linked to this
template in the classifier.
5) Fill in Excel template:
a. In order to define referenced attributes go to relevant field and click
button and select
attribute.
b. Use button
in the measurement unit field to select measurement unit.
c. Select card user-owner in the column “Supplier Login” when creating a template with
administrator rights, through Export to Excel (Admin).
7.4.2. Import from Excel
А-112078 пм
1) In card template from which Excel template has been generated, on the menu or toolbar,
select Import/Excel → Import from Excel if you enter template with card owner selected.
2) Select file for import and click Upload.
3) Next→Start Import. Check “Edit Objects” if you modify any existing cards in the database,
otherwise, the system will create new cards.
Information on how import is running will be displayed on this screen. Click More button,
complete lists of processed cards will be displayed. Click Details button to hide the list.
Figure 7.4.2.1.
TOI-MP0315-ADB0001
Approach
50
JSC NIAEP
VVER-NOI Project
UNCEM user manual
А01
4) To generate import status report click Create Report on the bottom of the screen. A file will
download to be opened in Excel.
Figure 7.4.2.2.
7.5. EXPORT EQUIPMENT CARDS TO EXCEL
А-112078 пм
Steps to export equipment cards.
1) Go to card template in the classifier.
2) On the menu/toolbar select Import/Export →Export to Excel (or Export to Excel (Admin) to
export cards with checked owner). If several cards need to be exported, check them before going to
Import/Export →Export to Excel (Excel file will be created for checked cards).
Figure 7.5.1.
3) Next→Start Export.
Information on how export is running will be displayed on this screen. Click More button, a
complete list of processed cards will be displayed. Click Details button to hide the list.
TOI-MP0315-ADB0001
Approach
51
JSC NIAEP
VVER-NOI Project
UNCEM user manual
А01
Figure 7.5.2.
During export a file will be generated to be opened in Excel after every 300 processed cards.
Thus, one can go through information on the cards that have already been processed without
waiting for completion of export.
4) After export is completed you can edit the file to continue with import (see Import from
Excel) after saving the file to your machine.
7.6. ATTACHING DOCUMENTS
А-112078 пм
Request to add an equipment card into the catalogue shall have reference to Specifications,
GOST standards, OST standards or other normative document that contain description (list of
characteristics) of this equipment. Documents that have been entered into the Catalogue earlier are
attached in “Documentation” tab.
Figure 7.6.1.
All possible sections from the document library are shown in the Documentation tab.
The following icons may be shown depending on whether a section is obligatory or optional for
cards and documents are attached or not:
TOI-MP0315-ADB0001
Approach
52
JSC NIAEP
VVER-NOI Project
UNCEM user manual
А01
The section is obligatory. The card has document attached
The section is obligatory. The card has no document attached
The section is optional. The card has document attached
The section is optional. The card has no document attached
Sections “Obligatory for cards” are highlighted with red color (see the above figure).
Attention! For approval of an equipment card it is necessary to enter documents into all the
obligatory sections prior to sending the card to the verification center for checking.
To see list of documents attached to a card expand relevant sections in the list (with
icons
Use
or
).
button to open a document in a new window.
А-112078 пм
When opening sections of documents the button
will open a section of documents from
Documentation library in a new window. This new window will contain all the documents included
in this section of the library, without filtering by card.
Figure 7.6.2.
There are several ways to attach documents to a card:
- Create document in a card
- Attach document to card (in a card)
- Attach document to cards (in document)
TOI-MP0315-ADB0001
Approach
53
JSC NIAEP
VVER-NOI Project
UNCEM user manual
А01
7.7. DUPLICATION OF EQUIPMENT CARD
If there are equipment items with many similar characteristics one can save time when entering
information on equipment by copying an equipment card. The card duplicate will have identical
attributes but will automatically acquire a new system name.
1) Open a template and mark the card to create a duplicate.
2) Follow the branch Actions →Duplicate the marked card.
3) Information on the item to be duplicated will be displayed in a new window.
4) Click Create.
5) Open created card and edit necessary attributes using the Modify command.
7.8. Status of Equipment Cards
Four statuses are available to manage life cycle of equipment card, each with different access
levels. To manage status it is necessary to open an equipment card and go to the life cycle category:
select Categories →Life Cycle on the object properties panel.
- - Draft Status
The Draft status is automatically assigned to an equipment card after its creation. Changes
can be entered only into the card with draft status.
To have a filled card for review the draft status should be changed into Under Check status
(click the Upgrade button in the Life Cycle card category).
- Under Check Status
For the Verification Center to review a card Supplier shall assign “Under Check” status to
the card. An equipment card with the Under Check status is locked against changes. To make
changes the user can switch Under Check status with Draft status.
- Approved Status
Now the Verification center checks data in a card. In case of no comments on the card, the
Verification center assigns the Approved status. From the moment the Approved status is assigned
the user cannot enter changes into the card and change the status.
If an equipment card does not meet the verification criteria then the verifier gives back the
Draft status to the card, and after revision the Under Check status needs to be set again.
If it is necessary to make changes then a request should be made to the Verification center
asking for change in the status from Approved into Draft.
- Archive Status
Equipment cards which have not been worked with for over a year get the Archive status.
To view results of the check and comments one should go to the Approval tab in the Life Cycle
window.
А-112078 пм
7.9. VIEWING CREATED CARDS
To view all the created cards the following can be used:
- Quick search by using My cards filter;
- Quick search for a card by keyword;
- Quick search in a template;
- Selecting a terminal element in the classifier.
TOI-MP0315-ADB0001
Approach
54
VVER-NOI Project
UNCEM user manual
JSC NIAEP
А01
8 DLL- SYMBOLS
8.1. WORKING WITH DLL SYMBOLS
8.1.1. Creating a dll Symbol
1) Open the necessary equipment card.
2) Open the Geometry tab (or menu Categories →Geometric date).
3) On the toolbar click Create dll symbol.
4) Using the button
in the opened window in the DLL Type line select dll type and click
OK.
Note: once created the type of dll symbol cannot be changed.
Figure 8.1.1.1.
5) The value “HBC_Dll_Symbol” (dll symbol) shall be selected in the Life Cycle line.
6) Click OK.
7) In the new window of a created dll symbol click Modify and edit attribute values (see
section Edit Card).
8) Click OK.
Note: Each card shall have only one dll symbol.
8.1.2. Editing DLL Symbol in a Card
А-112078 пм
1) Go to dll type.
2) Categories Cards open dll symbol.
3) On the toolbar click Modify.
4) Edit attribute values and click OK.
8.1.3. Editing DLL Symbol through DLL Library
1) Go to dll type.
2) Categories Cards open dll symbol.
TOI-MP0315-ADB0001
Approach
55
JSC NIAEP
VVER-NOI Project
UNCEM user manual
А01
3) On the toolbar click Modify.
4) Edit attribute values and click OK.
8.1.4. Delete DLL Symbol in a Card
Open the necessary card.
2) Open the Geometry tab (or menu Categories → Geometry).
3) Select dll symbol.
4) On the toolbar select Delete.
8.1.5. Delete DLL Symbol through DLL Library
1) Open a dll type in the library of unified 3D models.
2) Select a dll symbol.
3) On the toolbar select Delete.
8.2. WORKING WITH EXCEL
- Download cards for dll types to Excel
- Upload cards with dll types from Excel
- Download dll symbol attributes to Excel
- Upload dll symbol from Excel
8.2.1. Downloading Cards for dll Types to Excel
А-112078 пм
Create dll symbols for cards in Excel.
1) Go to a terminal template in the classifier.
2) On the toolbar select Import/Export Excel →Download Cards for dll Types to Excel.
Note: the file will contain cards of this template with no dll symbol assigned.
If cards are checked in the box then an Excel file will be created only for the cards selected.
Figure 8.2.1.1.
This window will show how download is running. Click More button to open a full list of
processed cards. Click Details to hide the list.
TOI-MP0315-ADB0001
Approach
56
JSC NIAEP
VVER-NOI Project
UNCEM user manual
А01
Figure 8.2.1.2.
During download, after every 300 cards are processed, a file will be created to be opened in
Excel. Thus, information of the cards which have been already processed can be viewed and edited
without waiting for completion of export.
3) At the bottom of the window click Create Report to generate a download report. A file will
download to be opened in Excel.
4) Edit the file in Excel:
In the column DLL Type click button
and select available dll type.
Note: once created dll symbol cannot be changed.
System name of dll symbols is automatically generated.
Figure 8.2.1.3.
А-112078 пм
5) Save the file to your machine.
8.2.2. Uploading Cards with dll Types from Excel
Upload cards from Excel with automatic creation of dll symbols.
1) Go to a necessary template in the classifier.
2) On the toolbar select Import/Export Excel →Upload card with dll type from Excel.
3) Select a file and click Upload.
TOI-MP0315-ADB0001
Approach
57
JSC NIAEP
VVER-NOI Project
UNCEM user manual
А01
Figure 8.2.2.1.
This window will show how upload is running. Click More button to open a full list of
processed cards. Click Details to hide the list.
4) At the bottom of the window click Create Report to generate an upload report. A file will
download to be opened in Excel.
5) Click OK.
Note: Every card shall have only one dll symbol. If a file with dll types for cards that
already have a dll symbol assigned is uploaded a warning will be displayed in the upload report.
8.2.3. Downloading dll Symbol Attributes to Excel
А-112078 пм
View and edit dll symbol attributes in Excel.
1) Go to dll type.
2) On the toolbar click Download dll symbol attributes to Excel. If cards are checked in the
box then an Excel file will be created only for the cards selected.
Figure 8.2.3.1.
TOI-MP0315-ADB0001
Approach
58
JSC NIAEP
VVER-NOI Project
UNCEM user manual
А01
This window will show how download is running. Click More button to open a full list of
processed cards. Click Details to hide the list.
Figure 8.2.3.2.
А-112078 пм
During download, after every 300 dll symbols are processed, a file will be created to be
opened in Excel. Thus, information of the symbols which have been already processed can be
viewed and edited without waiting for completion of export.
3) At the bottom of the window click Create Report to generate a download report. A file
will download to be opened in Excel.
Figure 8.2.3.3.
TOI-MP0315-ADB0001
Approach
59
JSC NIAEP
VVER-NOI Project
UNCEM user manual
А01
4) If necessary, edit the file in Excel:
Each equipment card corresponds to one line in the table. In every line there is a field with
dll type name, next there are fields in the line for entry of attribute values.
a. To enter reference attributes go to the necessary field and click the button
to select
an attribute.
b. Use the button
at the measurement unit field to select a measurement unit.
Figure 8.2.3.4.
5) Save the file to your machine.
8.2.4. Uploading dll Symbol Attributes from Excel
Upload edited dll symbol attributes from Excel.
1) Go to a dll type in the dll library.
2) On the toolbar click Upload dll symbol attributes from Excel.
If attribute values do not match attribute data type format in the ENOVIA, a warning will be
displayed in the upload report.
Figure 8.2.4.1.
А-112078 пм
This window will show how upload is running. Click More button to open a full list of
processed dll symbols. Click Details to hide the list.
3) At the bottom of the window click Create Report to generate an upload report. A file will
download to be opened in Excel.
4) Click Done.
TOI-MP0315-ADB0001
Approach
60
VVER-NOI Project
UNCEM user manual
JSC NIAEP
А01
9 SEARCHING
-
This section contains:
General search
Quick keyword-based searching for a template
Quick keyword-based searching for a card
Quick search in a template
Quick search by “My cards” filter
9.1. GENERAL SEARCHING
Enovia V6 provides “General search menu” for quick search of available equipment cards,
Catalogue documents and other needed data.
For global search throughout the entire Catalogue open search window using the button
on the main toolbar or the button
to the right and select Search from the drop-down list.
Figure 9.1.1.
А-112078 пм
The following figure shows a search window:
Figure 9.1.2.
TOI-MP0315-ADB0001
Approach
61
JSC NIAEP
VVER-NOI Project
UNCEM user manual
А01
The main search parameters are:
- Type – object type;
- Owner – object owner;
- Unique name – object name;
- Description – object description;
- Status – object status.
Let’s take an example of search for an equipment card which has been entered into the
Catalogue. To search for an equipment card the “Equipment Card type should be checked in the
dropdown window as shown in the figure (to activate the drop down menu left click the entry field
or click the button with three dots to the right of the entry field):
Figure 9.1.3.
А-112078 пм
Next name of the owner of the equipment card should be specified. In the dropdown
window of the Owner field a login is entered in the User name line, under which the personal
account can be accessed (in test case it is Everything). The * symbol is entered before and after the
user’s name. In this case search will offer variants containing the search word. If the * symbol is not
used then complete match will be looked for. It works for any type of information. It is also
necessary to observe the case.
TOI-MP0315-ADB0001
Approach
62
JSC NIAEP
VVER-NOI Project
UNCEM user manual
А01
Figure 9.1.4.
А-112078 пм
After the user’s name is entered click the Search button. Select the necessary variant offered
by search and click Select.
Figure 9.1.5
The name of the needed card should be entered into the System name field. As mentioned
above, if the exact card name is known then it should be entered without using the * symbol, if only
a part of the card name is known, then it should be entered with the * symbol at the beginning and
TOI-MP0315-ADB0001
Approach
63
JSC NIAEP
VVER-NOI Project
UNCEM user manual
А01
the end of the search word. Description of equipment in the card or a phrase or a word from it can
be entered in the Description field.
The card status shall be entered into the Status field. An equipment card has only four
statuses:
Draft;
Under Check;
Approved о;
Archive.
After the mentioned fields are filled in click the Search button in the upper right corner of
the search window. After search is completed the bottom of the page displays the results. Below
there is a figure showing an example of a window with filled in fields and search results:
Figure 9.1.6.
А-112078 пм
If the System name, Description and Status fields are not filled in, then after clicking the
Search button all the equipment cards created by the user will be found.
In a similar way documents added to the Catalogue can be searched for. For this select the
check box of the Document type in the dropdown window of the Type field:
Figure 9.1.7.
TOI-MP0315-ADB0001
Approach
64
JSC NIAEP
VVER-NOI Project
UNCEM user manual
А01
9.2. QUICK KEYWORD-BASED SEARCHING FOR A TEMPLATE
1) On the main toolbar in the Search menu
2) Fill in search criteria.
select Find Templates.
Figure 9.2.1.
3) To search by supplementary attributes click Advanced Search at the bottom of the page.
4) Click Search.
Figure 9.2.2.
5) Use the link to open and view the template.
6) Also use links to the libraries and templates in the Classification column.
А-112078 пм
9.3. QUICK KEYWORD-BASED SEARCHING FOR A CARD
1) On the main toolbar in the Search menu Search
→ Find cards.
2) Enter search criteria:
First, select a search template in the Search Within field, then fill in the rest of the fields.
Note: it is not recommended to select the root template of the Catalogue Basic Structure
catalogue.
TOI-MP0315-ADB0001
Approach
65
JSC NIAEP
VVER-NOI Project
UNCEM user manual
А01
Figure 9.3.1.
А-112078 пм
a. If necessary, fill in search criteria for supplementary attributes.
Figure 9.3.2.
3) Click Search.
TOI-MP0315-ADB0001
Approach
66
JSC NIAEP
VVER-NOI Project
UNCEM user manual
А01
Figure 9.3.3.
4) Use the link to the card to open and view it.
5) Also use links to the libraries and templates in the Classification column.
9.4. QUICK SEARCH WITHIN A TEMPLATE
In this type of search you can search for an equipment card by attributes assigned to a
specific template in which you do the search.
If search is done not in a terminal template of the catalogue then to search by attributes
assigned to child templates, click Advanced Search at the bottom of the Search page.
Note: Within Search should be run in the root template of the catalogue.
1) Open a template to search for a card.
2) On the toolbar of the template click “Search within”.
3) Enter search criteria:
Figure 9.4.1.
А-112078 пм
a. If necessary, fill in search criteria for supplementary attributes:
TOI-MP0315-ADB0001
Approach
67
JSC NIAEP
VVER-NOI Project
UNCEM user manual
А01
Figure 9.4.2.
b. For each attribute that you want to include in search criteria, select an operator and enter
values to run search.
i. Select operator.
For text attributes:
Begin with. The system will look for attributes in which information begins with the
text you specified.
End with. The system will look for attributes in which information ends with the text
you specified.
А-112078 пм
With. The system will look for attributes containing the text you specified.
Exact match. The system will look for attributes in which information exactly
matches the text you specified.
Without. The system will look for attributes without the text you specified.
Match. The system will look for attributes in which information matches with the
text you specified.
For numeric attributes: not less, not more, not equal, equal, less than, more than,
within (two numbers separated with a space).
For date/time attributes: date, earlier, later.
ii Enter search conditions in the Enter Value field or in the Select Value field:
- If a search range has been defined for the attribute, the Enter Value field will show a
dropdown list.
- If measurement units have been defined for the attribute, a dropdown list will be shown
next to the text field. You can search for any value/unit regardless of the actually used units.
- Click the calendar symbol to select a date.
- If the “within” operator is selected for numeric attributes, search will be done within the
range specified in the Enter Value field (for example, if within 130 1400 is set then the search
results will show values from 130 to 1400 included).
TOI-MP0315-ADB0001
Approach
68
JSC NIAEP
VVER-NOI Project
UNCEM user manual
А01
4) Click Search.
Figure 9.4.3.
5) Use the card link to open and view it.
6) Also use links to the libraries and templates in the Classification column.
9.5. QUICK SEARCH BY “MY CARDS” FILTER
А-112078 пм
The My Cards window displays all equipment cards created under this account.
Follow the branch Libraries menu →My Cards.
Figure 9.5.1.
Use the card link to open and view it. Also use links to the libraries and templates in
the Classification column.
TOI-MP0315-ADB0001
Approach
69
JSC NIAEP
VVER-NOI Project
UNCEM user manual
А01
10 WORK WITH REQUESTS
The library “Requests” enables to create enquires and trace their statuses. The library
contains requests for addition of new classes, templates for equipment and users. In case the
counterpart fails to find the necessary class of equipment, organization of the manufacturer, or he
supposes that the present template requires completion, it is necessary to create a request for
addition or change of this position in the catalogue. Request for creation of new templates or change
of the old ones are in the “Equipment cards” branch , requests for addition of new organizations are
located in the “Directories” branch.
Creation of a request:
1) 1Select “Equipment cards “or “Reference guides” in the tree structure.
2) Select “Create an request” on the toolbar.
3) Fill the request.
a. Name: type the request name.
b. Life cycle: an request
c. Description: describe the request
Figure 10.1
А-112078 пм
4) Add documents to the request:
Figure 10.2.
d) Click the Browse button;
e) Select a file;
TOI-MP0315-ADB0001
Approach
70
JSC NIAEP
VVER-NOI Project
UNCEM user manual
А01
f) Press OK.
The following documents can serve an attached document for the request “Equipment
Card”: Specifications, Operation manual or any other document which content enables to consider
technical characteristics of the given equipment.
As an attached document for the request “Reference guides” it is necessary to enclose a filled blank
analogous to the one filled at registration (Anniual B)
The request is created with the status “Drafts”.
Note! To get an answer for the created request it is necessary to select “Life Cycle” and click
“Up”.
The request acquires the status “Ready for Checking” i.e. the created request is ready to be
used. Verifier checks the request for presence of necessary information and attached documentation.
If the request complies with the necessary requirements, it acquires the status “Under
development”, otherwise it acquires the status “”Draft” with a verifier corresponding commentary.
All the commentaries are created in the “Forum” category.
А-112078 пм
Figure 10.3.
The status “Under Development”. The verification centre creates a template according to the
present documentation.
Important! Request in the status “Under Development” is not considered by the verifier!
The “Archive” status acquire the requests considered and those located in the catalogue. The
exact name of a template is indicated in the catalogue.
Requests created at registration are in «Requests at registration» branch. The verifier checks
the request and appropriates it the status “Archive” with the corresponding commentaries. If the
commentaries require documents for a more detailed processing of the request, a request in the
branch «Equipment cards» is created. The further work with the request is done according to the
scenario outlined before.
All the requests with the status “Archive” are transferred to the branch «Archive». Besides,
the requests with the status “Draft” inactive for more than 1 month are also transferred to the branch
“Archive”.
To change the filled gaps in the request select Actions > Update the filled Information.
TOI-MP0315-ADB0001
Approach
71
JSC NIAEP
VVER-NOI Project
UNCEM user manual
А01
Figure 10.4.
А-112078 пм
Revision, updating or removal of files from the request is done on analogy with the
procedure with documents (Work with document files).
If any questions occur it is necessary to create Forum in the request, see section Work with
requests.
TOI-MP0315-ADB0001
Approach
72
JSC NIAEP
VVER-NOI Project
UNCEM user manual
А01
11 WORK WITH FORUMS
The category “Forums» enables to create topics and discuss acute issues both with the
verifier and other system users. Discussions may be created for libraries, classes, subclasses and for
single final elements.
Forum creation:
1) Select an equipment class or a card in the classifier, where it is necessary to create a
forum.
2) Follow the branch Categories > Discussions.
Figure 11.1.
А-112078 пм
3) In the Discussion window on the toolbar click the Create New button .
4) Enter the Subject of discussion and a message in the opened window, click Done.
Figure 11.2.
TOI-MP0315-ADB0001
Approach
73
JSC NIAEP
VVER-NOI Project
UNCEM user manual
А01
To add a new message in the current Forum click “Public Answer” on the toolbar. Type a
message and click OK.
А-112078 пм
Figure 11.3.
TOI-MP0315-ADB0001
Approach
74
VVER-NOI Project
UNCEM user manual
JSC NIAEP
А01
ANNEX А
Table 1. Key symbols
Symbol code (Alt + X)
0149
0176
0177
0215
0216
0178
0179
А-112078 пм
Symbol
•
°
±
×
Ø
²
³
TOI-MP0315-ADB0001
Approach
75
VVER-NOI Project
UNCEM user manual
JSC NIAEP
А01
ANNEX B
Table 2. Company information (Russian company)
Full
ownership1
identification
and
type
of
Name
English name
Country
Organization type (Select the needed
one, remove all the rest)
Full organization identification and
type of ownership
Short company identification
Manufacturer;
Distributor;
Trading house;
Complex supplier
А-112078 пм
Company requisites
TRN
TRRC
RCEO-based TRRC
RCEO
Contacts
E-mail
Telephone number
Fax
Web-site
Addresses
Juridical
Actual
postal
Contact persons
Director
Surname, name
Telephone number
E-mail address
Chief Accountant
Surname, name
Telephone number
E-mail address
Bank details
Bank identification
City
Settlement account
Correspondent account
BIC
1
Lines in bold type are obligatory for filling
TOI-MP0315-ADB0001
Approach
76
JSC NIAEP
VVER-NOI Project
UNCEM user manual
А01
А-112078 пм
Table 3. Company information (Foreign company)
Full identification and type of
Full organization name and type of
ownership
ownership
Identification
Short organization identification
English identification
Country
Organization type (Select the needed
Manufacturer;
one, remove all the rest)
Distributor;
Trading house;
Complex supplier
Company requisites
ITPN
Incorporation country
Act on the basis of
Registered in
Under identification/ register number
Contacts
E-mail
Telephone number
Fax
Web-site
Addresses
Juridical
actual
e-mail
Contact persons
Director
Surname, name
Telephone number
E-mail
Chief Accountant
Surname, name
Telephone number
E-mail
Bank details
Bank identification
City
Settlement account
Correspondent account
BIC
TOI-MP0315-ADB0001
Approach
77
VVER-NOI Project
UNCEM user manual
JSC NIAEP
А01
ANNEX C
ENOVIA requirements for client partV6
REQUIREMENTS TO CLIENTS
On the established operating systems and used browsers
PLATFORM
COMPONENT
OPERATING SYSTEM (HARDWARE)
W
Wi
indows ndows XP
XP SP3
SP2
32-bit
64-bit
Edition
Edition
Vendor
Product
x
86-32
Intel
or AMD
x8
6-64
Intel
or AMD
Wi
ndows
Vista SP1
32
-bit
and
64
-bit
Editions
Wi
ndows 7
32-bit
and
64
-bit
Edition
x8
x8
6-32
or x86-64
Intel
or AMD
6-32
or x86-64
Intel
or AMD
Wi
ndows
Server
2008 SP1
or SP2
64
-bit
Edition
Wi
ndows
Server
2008 R2
x8
x8
6-64
Intel
or AMD
6-64
Intel
or AMD
Re
d Hat
Enterprise
Linux 5.2
32-bit
or 64-bit
Editions
Su
SE Linux
Enterprise
Server 10
SP2 32bit or 64bit
Edition
x8
x8
6-32
or x86-64
Intel
or AMD
6-32
or x86-64
Intel
or AMD
AI
X 6.1
TL02 64bit
64
-bit
POWER
5, 6, 7
I
nternet
Explorer
M
7
icrosoft
/Sun JRE
6 (32bit)
А-112078 пм
BROWSERS
Following
Following
products
products
are not
are not
supported:
supported:
ADS
ADS
ARN
ARN
ARP ARP
ARP
LES LHC
TOI-MP0315-ADB0001
Fo
llowing
products
are not
supported:
ADS
ARN ARP
Approach
78
64
-bit
Solaris 10
5/08
64
-bit
SPARC or
x86
Intel or
AMD
MacOS
10.5
MacOS
10.6
x8
6 Intel
VVER-NOI Project
UNCEM user manual
JSC NIAEP
А01
LPI LPQ
LPX LRA
PQC QIC
Following
products
Following
are not
Fo
Fo
Fo
products supported:
llowing
llowing
llowing
are not
ADS
products
products
products
supported:
ARN
are not
are not
are not
ADS
ARP ARP
supported: supported:
supported:
ARN
LES LHC
ADS
ADS
ADS
ARP
LPI LPQ
ARN ARP ARN ARP
LPX LRA
PQC QIC
I
nternet
Explorer
M
8
icrosoft
/Sun JRE
6 (32bit)
O
pen
Source
irefox
3.6
/
Sun JRE
6 (32bit)
А-112078 пм
F
Fol
lowing
products
are not
Fo
supported:
llowing
ARN ARP
products
ARP BYR
are not
CMC CPC
supported:
CPX CPA
ADS
CST LBC
ARN ARP
LES LHC
LPI LPQ
LPX LRA
PQC QIC
Following
products
Fo
Following
are not
Fo
Fo
Fo
llowing
products supported:
llowing
llowing
llowing
products
are not
ADS
products
products
products
are not
supported:
ARN
are not
are not
are not
supported:
ADS
ARP ARP
supported: supported:
supported:
ADS
ARN
LES LHC
ADS
ADS
ADS
ARN
ARP
LPI LPQ
ARN ARP ARN ARP
ARP
LPX LRA
PQC QIC
TOI-MP0315-ADB0001
Approach
79
VVER-NOI Project
UNCEM user manual
JSC NIAEP
А01
QUT SRC
SUP SRR
Fo
llowing
products
are not
supported:
ADS
ARN
ARP
F
O
pen
Source
irefox
3.0.x
/Sun JRE
6
F
O
pen
Source
Fo
llowing
products
are not
supported:
ADS
ARN ARP
irefox
3.5 (64bit)/IBM
JRE
6SR7
PLATFORM
COMPONENT
Product
W
Wi
indows
ndows XP
XP SP3
SP2
32-bit
64-bit
Edition
Edition
А-112078 пм
Vendor
OPERATING SYSTEM (HARDWARE)
x
x8
Wi
ndows
Vista SP1
32bit
and
64bit
Editions
x8
Wi
ndows 7
32-bit
and
64
-bit
Edition
Wi
ndows
Server
2008 SP1
or SP2
64
-bit
Edition
x8
x8
TOI-MP0315-ADB0001
Wi
ndows
Server
2008 R2
Re
d Hat
Enterprise
Linux 5.2
32-bit
or 64-bit
Editions
Su
SE Linux
Enterprise
Server 10
SP2 32-bit
or 64-bit
Edition
AI
X 6.1
TL02 64bit
-bit
Solaris 10
5/08
x8
x8
x8
64
64
Approach
80
64
MacOS
10.5
MacOS
10.6
x8
VVER-NOI Project
UNCEM user manual
JSC NIAEP
86-32
Intel
or AMD
6-64
Intel
or AMD
6-32
or x86-64
Intel
or AMD
6-32
or x86-64
Intel
or AMD
6-64
Intel
or AMD
6-64
Intel
or AMD
6-32
or x86-64
Intel
or AMD
А01
6-32
or x86-64
Intel
or AMD
-bit
POWER
5, 6, 7
BROWSERS
Following
products
are not
supported:
Following
ADS ARN
products
ARP ARP
are not
LES LHC
supported:
LPI LPQ
ADS ARN
LPX LRA
ARP
PQC QIC
I
nternet
Explorer
M
8
icrosoft
/Sun JRE
6 (32bit)
O
А-112078 пм
I
nternet
Explorer
M
7
icrosoft
/Sun JRE
6 (32bit)
Fo
llowing
products
are not
supported:
ADS
ARN
ARP
Following
products
Fo
Fo
Following
are not
Fo
llowing
llowing
products supported:
llowing
products
products
are not
ADS ARN products
are not
are not
supported: ARP ARP
are not
supported: supported:
ADS ARN LES LHC supported:
ADS
ADS
ARP
LPI LPQ
ADS
ARN
ARN
LPX LRA
ARP
ARP
PQC QIC
F
TOI-MP0315-ADB0001
Approach
81
-bit
SPARC or
x86
Intel or
AMD
6 Intel
VVER-NOI Project
UNCEM user manual
JSC NIAEP
pen
Source
irefox
3.6
/
Sun JRE
6 (32bit)
Following Following
Fo
Fo
Fo
Fol
products
products
llowing
llowing
llowing
lowing
are not
are not
products
products
products
products
supported: supported:
are not
are not
are not
are not
ADS ARN ADS ARN supported: supported: supported: supported:
ARP
ARP ARP
ADS
ADS
ADS
ADS ARN
LES LHC
ARN
ARN
ARP
LPI LPQ
ARP
ARP
LPX LRA
PQC QIC
pen
Source
А-112078 пм
O
irefox
3.0.x
/Sun JRE
6
F
irefox
3.5 (64bit)/IBM
JRE
6SR7
Fo
Fo
llowing
llowing
products
products
are not
are not
supported: supported:
ADS
ARN ARP
ARN
ARP BYR
ARP
CMC
CPC CPX
CPA CST
LBC LES
LHC LPI
LPQ LPX
LRA PQC
QIC QUT
SRC SUP
SRR
Fol
lowing
products
are not
supported:
ADS ARN
ARP
F
O
pen
Source
А01
TOI-MP0315-ADB0001
Approach
Fo
llowing
products
are not
supported:
ADS
82
VVER-NOI Project
UNCEM user manual
JSC NIAEP
А01
ARN
ARP
А-112078 пм
Attention!
For using 3DAutoVue programme with 3D models it is necessary to set up software product Java SE 6 Update 14 (JRE 1.6.0_14). JRE 1.6.0_14 are
components of the Java Virtual Machine necessary for Java-applications, in this case - 3DAutoVue.
It’s possible to download the required JRE version by the following reference:
http://www.oracle.com/technetwork/java/javasebusiness/downloads/java-archive-downloads-javase6-419409.html#jre-6u14-oth-JPR
«jre-6u14-windows-i586» for Windows. To set up the software product JRE 1.6.0_14 address to system administrators or to the support service of your
company.
Used abbreviation:
ADS –
ENOVIA Collaboration for Adobe Creative Suite
ARN –
ENOVIA Apparel Accelerator for Sourcing Partners
ARP – ENOVIA Apparel Accelerator for Sourcing and Production
BYR –
ENOVIA Buyer Analytics
CMC –
ENOVIA X-BOM Component Reuse for CES V5
CPC – ENOVIA Component Central
CPX – ENOVIA Component Experience
CPA – ENOVIA Librarian for CES V5
CST – ENOVIA X-BOM Cost Analytics
LBC – ENOVIA Library Central
LES – ENOVIA Life Sciences Accelerator for Engineering Design
LHC –
ENOVIA Life Sciences Accelerator for Change Control
LPI – ENOVIA Life Sciences Accelerator for New Product
LPQ – ENOVIA Life Sciences Accelerator for Product Quality
LPX – ENOVIA Life Sciences Accelerator for New Product Experience
LRA – ENOVIA Life Sciences Accelerator for Regulatory Affairs
PQC – ENOVIA Product Quality Central
QIC – ENOVIA Quality Improvement Central
Platform support policy
TOI-MP0315-ADB0001
Approach
83
VVER-NOI Project
UNCEM user manual
JSC NIAEP
А01
А-112078 пм
Support Policy for Operating Systems
Windows Client
Windows XP 32-bit SP3 is a Qualified platform.
Windows XP 64-bit SP2 is a Qualified platform
Windows Vista 64-bit SP1 is a Qualified platform
Windows Vista 64-bit SP2 is a Compatible platform
Windows 7 32-bit is a Validated platform
Windows 7 64-bit is a Validated platform
Windows Server
Windows Server 2008 SP1 is a Validated platform
Windows Server 2008 SP2 is a Qualified platform
Windows Server 2008 R2 is a Validated platform
Red Hat Enterprise Linux
Red Hat Enterprise Linux 5.2 is a Qualified platform
Red hat Enterprise Linux 5.x, with x > 2 are Compatible platforms
SuSE Linux Enterprise Server
SuSE Linux Enterprise Server 10 SP2 is a qualified platform
SuSE Linux Enterprise Server 10 SPx, with x > 2, are Compatible platforms
AIX
AIX 6.1 TL2 is a Qualified platform
AIX 6.1 TLx, with x > 2, are Compatible platform
Using LPAR is a Qualified configuration
Solaris
Solaris 10 5/08 SPARC is a Qualified platform
Solaris 10 5/08 x86 is a Qualified platform
Support Policy for Browsers
Microsoft Internet Explorer 7 is a Qualified platform
Microsoft Internet Explorer 8 is a Validated platform
Firefox 3.6 is a Qualified platform
Support Policy for Java
On Windows, Solaris and Linux
Java 6 Update 10 is a Qualified platform (except for Internet Explorer 8 : Java 6 Update 14).
TOI-MP0315-ADB0001
Approach
84
VVER-NOI Project
UNCEM user manual
JSC NIAEP
А01
А-112078 пм
Java 6 Update x, with x > 10 is a Compatible platform (except for Internet Explorer 8 : Java 6 Update x, with x>14).
On AIX
Java 6 SR7 is a Qualified platform.
Java 6 SR x, with x > 7 is a Compatible platform.
TOI-MP0315-ADB0001
Approach
85
VVER-NOI Project
UNCEM user manual
JSC NIAEP
А01
ANNEX D
Oracle AutoVue requirements to the client- end of
Oracle AutoVue. REQUIREMENTS TO CLIENT
Platform
. Components
Operating systems
Windo
ws 32-bit
Браузер
RedHa
Ubunt
t
Enterprise
u 8.04
Linux 5
Apple
Solari
MAC OS X
s 10 5/08
10.5
Microsoft
Internet
Explorer (6.0,
7.0, and 8.0) –
32-bit only
FireFox
3.0
Safari
4.0
А-112078 пм
Версии Java:
- J2SE 5.0 update 19
- J2SE 6.0 update 14
- JRE 1.4.2 update 19
TOI-MP0315-ADB0001
Approach
86
VVER-NOI Project
UNCEM user manual
JSC NIAEP
А01
ELIMINATION OF ERRORS AT WORK WITH AUTOVUE
Attention!
The following actions should be taken by system administrators, or under control of a
system administrator of your organization.
А-112078 пм
Figure 1
If in course of 3D-model uploading the model image is not loaded on the client's computer
as it is shown in Figure 1, it is necessary to do the following actions:
1) Remove all the java versions if there are any (use the administrаtor’s account).
2) Set up the required java version (for Windows J2SE 6.0 update 14)
2) In environment variables check the way to the installed java in environment variable Path
(see figure 2), if it differs from the way, indicated in 1.2, it is necessary to change the way.
TOI-MP0315-ADB0001
Approach
87
VVER-NOI Project
UNCEM user manual
JSC NIAEP
А01
А-112078 пм
Figure. 2
TOI-MP0315-ADB0001
Approach
88
VVER-NOI Project
UNCEM user manual
JSC NIAEP
А01
Attention!
The following actions are not recommended to take!
This solution does not require Java resetting, but cannot be suitable for all PC.
If Java version set up on PC differs from that indicated in AutoVue requirements (see Oracle
Auto Vue. REQUIREMENTS TO CLIENT) to view 3D models using AutoVue, follow the branch
Security parameter->Mixed Code = Disable verification n the Java console (Start ->Control panel >Java) in the Advanced tab (see Fig. 3).
After changes in the Java consol it is necessary to restart the browser.
А-112078 пм
Figure.3
TOI-MP0315-ADB0001
Approach
89
VVER-NOI Project
UNCEM user manual
JSC NIAEP
А01
LIST OF ADOPTED ABBREVIATIONS
– Nuclear Plant
– Nuclear Power Plant
– Water pressurized reactor
– typical optimized informative-advanced project based on VVER technology
– State Corporation
– State Standard of RF
– common information space
– Unified Nuclear Catalogue of Equipment and Materials
– Unified System of Design Documentation
– International Organization for standardization
– Normative-Technical Documentation
– Open Joint-Stock Company
– General provisions for security of atomic power stations
– article of supply
– specifications (technical conditions)
А-112078 пм
NP
NPP
VVER
VVER-TOI
SC
GOST
CIS
UNCEM
USDD
ISO
NTD
OJSC
OPB
AS
TU
TOI-MP0315-ADB0001
Approach
90
VVER-NOI Project
UNCEM user manual
JSC NIAEP
А01
LIST OF CHANGES REGISTRATION
Incoming
Total
№
№ of
number of document attached Signature Date
lists in
docum.
documents
and date
А-112078 пм
Revision
Number of sheets
Revised Replaced New Annulled
TOI-MP0315-ADB0001
Approach
91