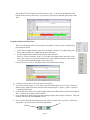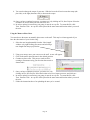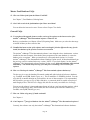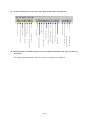
1
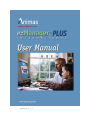
Version 6.1.1
Page 1
Technical Help for ezManager in NZ
0508 634 103 during regular business hours
Monday - Friday 8.30am - 5.00pm
Technical Help for ezManager
In Canada, please call 1-866-406-4844 Monday through Friday, during regular business hours
US eastern time.
In the United Kingdom and Ireland, please call (free phone) 0800 055 6606 Monday through
Friday, during regular business hours US eastern time.
For all other countries, please call your local distributor.
For pump questions, call your local distributor for assistance.
Page 2
Introduction
Thank you for ordering the Animas® ezManager® Plus International software. Animas is committed to
making diabetes management easier for you. We rely heavily on input from people with diabetes and
healthcare professionals to design our insulin pumps and insulin infusion sets. We also heard from many
people with diabetes who wanted an easier way to track BG readings, insulin intake and count
carbohydrates. The Animas® ezManager® Plus International software was designed to make it easy for
you to track all records necessary for successful management of diabetes.
The Animas® ezManager® Plus International software is more than just a carb counter. It’s a
comprehensive software program designed to help you better manage your diabetes – and communicate
more effectively with your healthcare team. The PC (personal computer) application offers expanded
functions including storing longer-term records, trending, charting, entering, viewing data, and printing
and emailing that data to your healthcare team.
The Animas® ezManager® Plus International software further enhances your diabetes self management
plan with expanded reporting capabilities and the ability to download records from selected BG (blood
glucose) meters and selected Animas® insulin pumps*. Data from selected BG meters and your pump are
all downloaded into the Animas® ezManager® Plus International software. At the click of a mouse, you
can view all of your diabetes data and view or print a variety of easy to read reports. The Animas®
ezManager® Plus International software can also be used to upload* personal settings on selected
Animas® insulin pumps.
All instructions in this User Manual apply the Animas® ezManager® Plus International software
version 6.0.1 or above, unless otherwise noted.
Note: All blood glucose units shown in screen shots in this user guide are mg/dL. For information
on how to change your blood glucose units to mmol/L, please refer to page 12.
Please visit our website www.animascorp.com to browse a complete list of our products and services or
email us with your feedback at [email protected].
WARNING: The Animas® ezManager® Plus International software is not intended for use in the
treatment of extreme high or low blood glucose. Follow your physician/healthcare team’s
recommendation for treatment of extreme high or low blood glucose.
Indications for Use
The Animas® ezManager® Plus International software is indicated for use as an accessory to Animas®
insulin pumps and specified commercially available blood glucose meters. The software supports
diabetes management by the patient and/or health care professional by allowing for the review, analysis
and evaluation of insulin delivery and blood glucose history information.
The Animas® ezManager® Plus International software will also download information from Animas®
insulin pumps and commercially available blood glucose meters.
*Download and upload features not available on all Animas® insulin pump models. See specific chapters
for details.
Page 3
Page 4
Table of Contents
Chapter 1 System and Software Requirements...............................................................................7
Chapter 2 Installation......................................................................................................................9
Part A: Installing to your PC (desktop) from CD-ROM............................................................ 9
Chapter 3 Configuring Your PC (desktop application) ................................................................11
Chapter 4 Using the Animas® ezManager® Plus International software on Your PC (desktop)..13
Part A:
Part B:
Part C:
Part D:
File Menu..................................................................................................................... 13
Logs Menu ................................................................................................................... 13
Reports Menu............................................................................................................... 22
Tools Menu.................................................................................................................. 26
Chapter 5 Downloading Data from Your Animas® IR 1000, IR 1200 or 2020 Insulin Pump ....29
Chapter 6 Downloading Data from Your BG Meter ....................................................................31
Chapter 7 Uploading Data to Your IR 1200 or 2020 Pump .........................................................33
Chapter 8 Frequently Asked Questions (FAQs) ...........................................................................47
Glossary .........................................................................................................................................51
Page 5
Page 6
Chapter 1 System and Software Requirements
Desktop (PC) Application (MS WINDOWS®)
System:
•
IBM-compatible PC running Windows® 2000 or XP
•
One available USB or Serial port
•
40 MB free hard disk space
•
Minimum 64 MB RAM for Windows (128 MB recommended)
•
Animas® IR Accessory Kit for the Animas® ezManager® Plus International software**
(necessary only if you plan to download your insulin pump – the Animas® IR Accessory Kit sold
separately) **Note: Download can only occur with the Animas® IR Accessory Kit.
•
Download cables for your BG meter(s) (necessary only if you plan to download your BG meter –
cables available from your BG meter manufacturer)
Page 7
Page 8
Chapter 2 Installation
Part A: Installing to your PC (desktop) from CD-ROM
NOTE: You need to be logged in as a user that has Administrator rights on your computer
when installing or registering the Animas® ezManager® Plus International software. The
software can be run by any user after it has been installed. If you are running the software as
a standard user (not an administrator), some information is not saved from one session to
another (such as last BG meter downloaded, last insulin pump downloaded, the settings for
mg/dL or mmol/L, etc.), but the program will still be completely operational. Check your PC
instructions to determine if you are set up as an administrator.
Installing from CD-ROM
1. Insert the the Animas® ezManager® Plus International
software CD into your CD-ROM drive and close the
CD-ROM drive.
2. You should see "Welcome to ezManager Plus Setup
Wizard" form, click the Next button.
3. At the "License Agreement" form, click “I accept the
agreement” after you have read the Agreement. Click
the Next button.
4. At the "Select Destination Location" form, click the
Next button, unless you wish to change the default
(C:\EZMPI ).
5. At the “ezManager Plus Database Update” form, read
all information and select the desired option. (If this is
your first installation, you will not see this prompt.)
6. At the ACTiSYS Infrared Wireless Adapter installation form, follow the instructions and
click Next to install the ACTiSYS driver.
7. At the "Select Start Menu Folder" form, click Next, unless you wish to change the location on
your Start Menu.
8. At the “Select Additional Tasks” form, click Next to create a desktop icon.
9. At the "Ready to Install" form, click the Install button.
10. Click the Finish button. The installer will then open up View ezManual.pdf, the license
agreement, README.rtf, in MS Word. After reading, this can be closed.
11. On the Animas® ezManager® window, click on File | Exit.
12. It is recommended that you restart your computer. After restart, the Animas® ezManager®
Plus International software is installed.
Note: If the ACTiSYS Infrared Wireless Adapter is moved to another port on the computer, a
New Hardware Found message may be displayed.
Page 9
Page 10
Chapter 3 Configuring Your PC (desktop application)
1. Select Account (on your PC)
Double click the Animas® ezManager® Plus International software desktop icon shown here.
From the Account Selector window, select the account.
Create and select account.
a) Select New from Account Selector
window.
b) The Creating New Users window appears.
Enter information in fields of User Info
window.
c) Click Save.
d) Highlight your new account from the
Account Selector window and click
Select.
Page 11
2. From the Animas® ezManager® Plus International software main screen, go to
File | Settings
The BG Units box is where you can select the unit of measurement. They can be either mg/dL or
mmol/L. These can be changed at any time.
Note: All blood glucose units shown in screen shots in this user guide are mg/dL.
The Day Intervals box is where you can define the meal to which each part of the day should correspond
in the graphs. For instance, you can say that any measurement between 6:00 and 9:00 should be recorded
as Breakfast and that any measurement between 9:00 and noon is Lunch, etc. You can adjust this for any
meal simply by looking at the two fields to the right of it, one slightly higher and the other slightly lower.
The top value is the start and the bottom is the end. Click the up or down arrow to the right of each field
to adjust them. Only 24 hour time format may be used to adjust these fields. These definitions show up
only in the reports.
The BG Intervals box is used in the BG section of the Distribution Report (pie chart) to define the BG
intervals (and the percentage of measurements in each). There are a total of 6 intervals, which can be
adjusted by scrolling the arrows to the right of them. After you have reviewed for accuracy, click Save to
save that entry or click Cancel if you do not wish to save this information.
The Trend % box is used to set the upper and lower range for the Trends Analysis Report. For example,
if you set the Trend % to ten percent, the values in the upper and lower ten percent will be shown in
different colors on the Trends Analysis Report.
Page 12
Chapter 4 Using the Animas® ezManager® Plus International
software on Your PC (desktop)
Part A: File Menu
From the Animas® ezManager® Plus International software main screen, select the File
Menu
By clicking on the file menu from the Animas® ezManager® Plus International software main
screen, you can enter settings, select different user accounts (if multiple users are on PC) and
access your printer settings.
Part B: Logs Menu
From the Animas® ezManager® Plus International software main screen, select the Logs
Menu
Select one of the Logs described below
Activity Log
From the toolbar, click on Logs | Activity (or click on the shortcut icon on the task bar – (See
FAQ #19). The Activity Log window will pop up showing activities entered for the date range
indicated (default date range is the last seven days). Check the date range to be sure your desired
activity date is included.
To enter an activity, click New Entry.
The Activity window pops up. From this window
you can:
specify the date and time to record the
activity
specify total calories burned
specify the duration of your exercise
Use the up/down arrows to specify duration. Total calories burned can be entered in the Total
field. Click Save when finished.
The date range automatically defaults to show the last seven days. Date range can be adjusted
(for viewing, printing or exporting) by selecting a different start and end date. This will not
modify the database in any way.
To edit an activity, select the target row. Click Erase Entry and click Yes to confirm. Add a new
entry as outlined above.
To delete an activity, select the target row. Click Erase Entry and click Yes to confirm.
Page 13
To see more detailed information, double click the target row or select the target row and click
Show Entry. After you have reviewed for accuracy, click Close.
To print or export your logs, click the Print Log button on the Activity Log screen. This will
open the Report Preview: Print Activity Log screen. From this screen, the Activity Log may be
printed, exported as a file, or saved as a text file.
Printing a Log
“Printer” is the default selection in the drop down menu.
To print this Log, click on the Printer icon.
The Print Activity Log window is displayed. Report Completed Normally will appear in the
window when all lines of the report have been processed. Press OK to confirm.
Creating a text file for the Log
To create a text file, select Text file from the drop down menu.
Select the destination to save the file from the destination drop down menu. Click Save.
Click on the printer icon to create your text file.
The Print Activity Log window is displayed. Report Completed Normally will appear in the
window when all lines of the report have been processed. Press OK to confirm.
When you close the Report Preview window, a confirmation box is displayed. Press Yes to
confirm.
Exporting Logs
See this chapter, Exporting Logs.
Note: The time format will be shown according to how you have it set on your PC. In this
example, 12 hour time format is used.
Page 14
BG Log
From the toolbar, click on Logs | BG (or click on the shortcut icon on the task bar). The BG Log
window will pop up.
To enter a BG event, click New Entry. BG Entry window will pop up. Specify the date, time,
and BG value. Review the BG entry for accuracy and click Save when finished.
The date range automatically defaults to show the last seven days. Date range can be adjusted
(for viewing, printing or exporting) by selecting a different start and end date. This will not
modify the database in any way.
To delete an entry, select the target row. Click Erase Entry and click Yes to confirm.
To edit an entry, select the target row. Click Erase Entry and click Yes to confirm. Add a new
entry as outlined above.
To see more detailed information, double click the target row or select the target row and click
Show Entry. After you have reviewed the information, click Close.
To print or export, click the Print Log button on the BG Log screen and follow the steps for
printing and exporting in the Activity Log section of this User Manual.
Page 15
Bolus Log
From the toolbar, click on Logs | Bolus (or click on the shortcut icon on the task bar). The Bolus
Log window will pop up.
The date range automatically defaults to show the last seven days. Date range can be adjusted
(for viewing, printing or exporting) by selecting a different start and end date. This will not
modify the database in any way.
The Animas® 2020 downloads the bolus type, date, time and insulin units. For Combo, ezCarb
(Combo with and without BG Correction), the duration is also downloaded. See the chart below
for other information that is downloaded with each bolus type.
Animas® 2020 Bolus
Type
Normal
I:C
Carbs
ISF
BG
Actual
BG
Target
BG
Range
IOB
IOB
Dur.
x
x
x
x
x
x
x
x
x
IOB
Value
x
Audio
x
Combo
x
ezCarb (Normal w/o
BG Correction)
ezCarb (Normal w/ BG
Correction)
ezCarb (Combo w/o
BG Correction)
ezCarb (Combo w/ BG
Correction)
ezBG
x
x
x
x
x
x
x
x
x
x
x
x
x
x
x
x
x
x
x
x
x
x
x
x
x
x
To see more detailed information on a particular entry, select the item from the list and then
double click it or click the Show Entry button. After you have reviewed the information, click
Close.
To print or export, click the Print Log button on the BG Log screen and follow the steps for
printing and exporting in the Activity Log section of this User Manual.
Page 16
Note: If a bolus is given with ezCarb and a portion of the bolus is for ezBG, the Bolus Type
column will show Carb/ezBG. The total bolus amount will be shown in the Units column.
Meals Log
In order to manually enter meal log entries, you have to
create a Master Food database. See next section, Creating a
Master Food Database.
From the toolbar, click on Logs | Meals (or click on
the shortcut icon on the task bar). Meals Log
window will pop up.
To enter new meal information, click New Entry.
The Meal Entry window will pop up. From this
window, you can:
Specify the date
Specify the time
Specify the meal type (drop down box)
To add items to a meal, click the Add Entry button.
The Master Food DB window will pop up.
All foods in the database are listed
alphabetically. Select desired food item.
If you have created a Master Food DB, you
can search the food items by partial
matching. Type some text into the Find all
items containing box in the Master Food DB
window and click Find. Your matches will
show up in the food list. Select desired food
item. Follow steps below to add items to a
meal.
Page 17
a) Click Add Item to Meal.
b) Meal Item window pops up. Enter serving size
using up/down arrows to adjust multiplier field.
For example, if you adjust the multiplier to 0.5,
half the serving size will be used to calculate meal
nutrient totals.
c) Click Add.
d) If you wish to add more items to meal, repeat these steps. When all entries for
meal are complete and accuracy of your entries double-checked, click Save.
To add a new item into the Food DB (and into your meal),
click Add Item to Food DB. Type in the name of the food,
serving size, and the nutritional information that corresponds
to that serving. After double-checking that your entries are
accurate, click Add. The entries will be automatically added
to the database and can be added to your meal entry by
clicking Add Item to Meal and clicking Add.
To add an additional serving size to an existing food item in
the food database, click the row of the target item/name, then
click Add Serving to FoodDB in the Master Food DB window.
This will pop up a window labeled Add Item to Food DB. The
field next to “name” should match the name of the food that
you’re trying to add additional serving sizes. Simply type the
serving size into the field and the nutritional information.
Click Add when you’re finished.
Foods with more than one serving size option will display the various serving sizes in the
Serving box on the right in the Master Food DB window. If the food selected has more
than one serving size option, all will be displayed. Select the desired serving size and
click Add Item to Meal.
The date range automatically defaults to show the last seven days. Date range can be adjusted
(for viewing, printing or exporting) by selecting a different start and end date. This will not
modify the database in any way.
To see more detailed information on a particular entry, select the item from the list and then
double click it or click the Show Entry button.
To delete a meal entry from the log, select the target row. Click the Erase Entry button and click
Yes to confirm.
To print or export, click the Print Log button on the Meal Log screen and follow the steps for
printing and exporting in the Activity Log section of this User Manual.
Creating a Master Food Database
A Master Food database is only necessary if you intend to enter meal log items manually.
If you wish to create a Pump Food database, see Chapter 7, Food Database.
To add entries to the Master Food Database, you can follow the steps above or you can
go to Tools | Reference DB | Food DB, and follow the steps above.
Page 18
Notes Log
From the toolbar, click on Logs | Notes (or click
on the shortcut icon on the task bar.) Notes Log
window will pop up.
To enter a new Note, click New Entry. The Note
window will pop up. Specify the date, time and
desired note. Click Save when finished.
The date range automatically defaults to show the
last seven days. Date range can be adjusted (for viewing, printing or exporting) by selecting a
different start and end date. This will not modify the database in any way.
To see more detailed information on a particular entry, select the item from the list and then
double click it or click the Show Entry button.
To delete a Notes entry, select the target row. Click the Erase Entry button and click Yes to
confirm.
To print or export, click the Print Log button on the Notes Log screen and follow the steps for
printing and exporting in the Activity Log section of this User Manual.
Pump Settings Log
This log shows your basal programs and pump settings as programmed on your Animas® insulin
pump when you download the information. Logs are designated by pump serial number.
If you are not using a downloadable Animas® insulin pump, you can enter your basal program
information via this log on the desktop. (Pump settings cannot be entered manually.)
To enter basal information via your PC: From the Logs menu, select Pump Settings (or click on
the shortcut icon on the task bar). The Pump Settings Log window will pop up. Select New
Entry.
Page 19
To enter basal information, click on New Entry, click add, enter your Rate and Starting Time
information into the Program Segment Info screen. Click Save when you are finished.
To see more detailed information on a particular entry, select the item from the list on the Pump
Settings Log screen and then double click it or click the Show Entry button.
To delete an entry, select the target row. Click the Erase Entry button and click Yes to confirm.
To print or export, click the Print Log button on the Pump Settings screen and follow the steps for
printing and exporting in the Activity Log section of this User Manual.
To make manual changes to an existing log more easily (i.e., if you just want to change a couple
of basal segments), select Clone Entry from the Pump Settings Log window. This will pop up
your current settings and you can change the segments you wish, instead of re-entering all of the
segments of your basal programs.
To print your Pump Settings Report, click on the printer icon. The report below will be
generated.
Pump Settings Report
This report shows your basal programs and
pump settings as programmed on your
Animas® insulin pump when you download
the information.
The active basal program is designated.
Page 20
Pump Daily Totals
This report shows your daily basal programs and pump totals as
reported on your Animas® insulin pump when you download
the information.
To print or export, click the Print Log button on the Pump
Daily Totals Log screen and follow the steps for printing and
exporting in the Activity Log section of this User Manual.
To erase an entry, select the target row. Click the Erase Entry
button and click Yes to confirm.
Pump Basal Log
This report shows your basal programs and as reported on your
Animas® insulin pump when you download the information.
To print or export, click the Print Log button on the Pump
Basal Totals Log screen and follow the steps for printing and
exporting in the Activity Log section of this User Manual.
To erase an entry, select the target row. Click the Erase Entry
button and click Yes to confirm.
Exporting Logs (to Excel and other spreadsheet applications)
Note: You can export any of your logs to a text (ASCII) file that Excel and other spreadsheet applications
can read.
From the toolbar, click on Logs and select the log you wish to export.
Specify the date range.
Once you’ve chosen what you want to display, click the Print Log button.
This will bring up a report preview screen (from which you can print if you choose).
In the preview screen, you will see a drop down menu with the word Printer selected. To
export to file, select Export Data. In the box to the right, choose the path and filename
under which you wish to save the document. Click Save in the Export Report As
window. Click the printer icon or File | Print. Doing this will actually write/save the file
in the application you’ve chosen, rather than printing a hard copy. See next two steps for
printing a hard copy.
Close the Report Preview window. When the box pops up asking if you would like to
save new report settings, click Yes if you would like to save.
Open the file (from wherever you saved it) in Microsoft® Excel (or whatever tool you
prefer). If prompted about the delimiters used, then choose Delimited, click next, select
Tab, and click Finish. Print, if desired, as you normally would.
NOTE: When data is sent from one file type to another,extra characters appear in the
document If they show up, they will be displayed after your saved data, at the end of the
document. Use the appropriate edit/delete options for the program you are using to erase
them.
Page 21
Part C: Reports Menu
From the main screen, click on Reports (or click on the shortcut icon on the task bar
for the desired report)
Select one of the reports described below
Follow the screen prompts to generate the reports
Daily Report (Charts and Tabular Report)
This report summarizes the data for one day. Insulin,
BG and Carbohydrate charts are presented. All the
associated data (notes, meal info, BG levels, insulin
intake, activity, basal program, etc.) is presented in
tabular format.
Note: The pump stores basal delivery changes
only in Basal History. The Basal Log on the Daily
Report shows basal delivery changes only. If you
have only one basal rate set and the delivery has not
changed due to suspend, temp basal, or another rate,
etc. no basal delivery change records will be stored
or will be shown except the first delivery on the date
your basal started.
Example: On Tuesday you set your single basal rate
to 0.025 U/hr. If you download your pump for Tuesday's date, the 0.025 U/hr basal delivery will
be stored and will be shown on the report. However, if you download your pump for
Wednesday's date (or other dates thereafter) and the basal delivery has not changed, no basal
records will be stored in the pump or shown on the report.
When no basal is being delivered, the Basal History Record will show 0 units delivered. This can
happen for the following reasons:
Cartridge change
Battery change
Suspend
Alarm
Basal segment set to 0
Basal edit screen accessed
Prime menu accessed
Loss of prime
For information on basal insulin totals that have been delivered for a specific date or date range,
see the Distribution Report or the Insulin Daily Totals Report. These reports show the total basal
insulin that has been delivered for the date(s) you select. Total basal insulin that has been
delivered can be viewed directly on your pump display by going to the Total Daily Dose History
on your pump.
Page 22
Multiple Daily Reports (Charts and Tabular Report)
This report is the same as the Daily Report, except that you can select a date range of
reports to be printed at once.
Log Book (Tabular Report)
This report shows the data in a tabular format
similar to the logbook. You will have the option to
select the type of information you want to include:
BG values, insulin intake and/or carbohydrate
intake. The report contains 25 columns, one for
each hour of the day and one for the day total. For
each column, if multiple records are present, the
average value for BG is shown and the totals are
shown for insulin and carbohydrate intake. In order
to fit the data in the given area, the numbers are
rounded to the closest integer (i.e. 1.49 becomes 1
while 1.5 becomes 2). The insulin intake for each of
the 24 hours of the day is represented with one
decimal digit while all the others and the daily
totals/averages are represented as integers.
Extended boluses will be recorded as a single entry,
recorded at the time of completion.
Trend Analysis (Bar Chart)
This report shows trends in BG values, insulin intake or
carbohydrate intake. The report can be generated for the time of
day, or day of the week. The report will calculate the minimum
and maximum values for each interval and each data type and will
present it in three bar graphs. You can set the upper and lower
percentage as desired from the settings screen. See Chapter 3 for
more information.
Page 23
Distribution Report (Pie Chart)
This report shows the data distribution for
BG values, carbohydrate intake and insulin
intake. The BG values distribution is
charted using the intervals from the settings.
The carbohydrate distribution is charted
using the time of day settings. The insulin
intake distribution is charted using the type
of intake (bolus, basal, injection, etc.).
Note: Insulin pie chart will only show
bolus information with a manual entry.
After your pump is downloaded, Basal and
bolus information will both be shown.
Note: Animas® IR 1200 & 2020 Combo
Bolus amounts (both Normal and
Extended) will be displayed on this report
as Extended.
BG Chart Report (Line Chart)
This report shows the BG values and the average
value of BG measurements based on time of day or
day of week settings.
BG Distribution (Pie Chart)
This report shows the data distribution for BG values
during the different time of day settings or day of
week. The BG value distribution is charted using the
intervals from the settings.
Page 24
Insulin Daily Totals
This report shows your daily totals as downloaded
from your Animas® insulin pump. Basal Daily Total,
Bolus Daily Total and the Total Daily Amount are
graphed for the selected period of time.
Statistics (Tabular Report)
This report analyzes the BG measurement, insulin
intake and carbohydrate intake, providing useful
statistical information such as average number of
entries per time period (time of day or day of week),
minimal and maximal values, average values and
standard deviation. The “Totals” column contains
information for the entire time period under
consideration.
Report Printer
This screen allows you to select all the reports
you want to print and their specific settings. Select
multiple reports by clicking them. A black border
indicates you have selected the report. Use the check
boxes to customize the information that you would like to
include in each report: BG Readings, Carbohydrates,
Insulin. Use the round buttons to select how the report
displays the information, either by Time of Day or Day or
Week. Select the desired Start and End Date. Click Show
Report to display a preview of the reports. Click the
Printer icon to print the reports or Close to exit.
Page 25
Part D: Tools Menu
From the main screen, click on Tools (or click on the shortcut icon on the task bar
for the desired Tool)
Download
From this menu, you can download your Animas® insulin pump and download a selected BG
meter.
Pump Extras
From this menu, you can access upload of pumps.
Data Exchange (Exporting from/Importing to the software)
The export/import feature is intended to compress and encrypt data into a small file that is easy
to email and/or takes up very little storage on your hard drive.
This function is typically used a) so that you can easily email the records to your healthcare team
and b) so that you can back up the records.
Note: Exported records can only be viewed once they are imported into the software. The
export/import feature is intended to compress and encrypt data into a small file that is easy to
email and/or takes up very little storage on your PC.
Exporting data (to be reopened with the software)
The Animas® ezManager® Plus International software logs can be exported into one highly
compressed and encrypted file. To use the export feature:
1. From the toolbar, click on Tools | Export (or click on the shortcut icon on the task bar).
2. The Export Interval window pops up. Specify the Start and Stop date of the days that you
wish to export. Click Save.
3. The File/Save window will pop up. Specify a location to save the file. Click Save.
4. The File Password window will pop up. Specify your desired password in both password
fields or opt not to use one by choosing No Password. (Note: If you forget your
password, the file cannot be recovered.) Click “Accept Password.”
5. The resulting file name will have an .ezm extension, i.e., if you entered “july” as the file
name, the file name will be “july.ezm”. You can copy this file anywhere you want and/or
email it.
Page 26
Importing data
1. From the toolbar, go to Tools | Import (or click on the shortcut icon on the task bar).
2. Double click on the file you wish to import (the file that you previously exported). The
Animas® ezManager® Plus International software files can be identified by the .ezm
extension.
3. In the File Password window, enter your password in both password fields (if you did not
use one, click No Password).
4. At the Warning that says “Importing data from <yourname>, click Yes. If it is not the
correct name, click No and repeat the steps above after selecting the correct file.
Exporting Logs (to Excel and other spreadsheet applications)
See Chapter 4, Part B, Exporting Logs
Import BG
This feature enables you to import BG readings that may be stored in a “comma separated values”
file (CSV) into the software. See Chapter 6 for instructions.
Purging data
Note: The software provides a function to manually erase all logs older than a specified date, if
you need to free up a lot of space on your PC. Most people should rarely (if ever) need this
feature because the software stores a lot of data in relatively little space. However, if you still
wish to purge data:
1. From the toolbar, click on Tools | Purge DB.
2. The Purge ezManager Plus DB window pops up. Click the down arrow in the date’s drop
down menu and select a day. All records prior to this date will be erased.
3. Click Purge.
4. Click Yes.
User Settings
This function enables you to:
Define user name as it will appear on printed reports
Enter patient information such as date of birth (DOB) in MM/DD/YYYY format of
patient
Enter your I:C ratios
Click Save or Cancel.
Reference DB
This feature contains the Master Food Database. See Chapter 4, Creating the Master Food Database.
Page 27
Page 28
Chapter 5 Downloading Data from Your Animas® IR 1000, IR
1200 or 2020 Insulin Pump
By using your Animas® IR Accessory Kit (sold separately) and the software, you can download the
following information from your Animas® insulin pump:
Daily totals from history
Alarm history
Bolus history
Basal programs
Pump Settings
ezTip: Before downloading data from any device, check that time and date are set the same on all
the devices you are using, including ALL of your BG meters, your Animas® IR 1000, IR 1200 or
2020 pump andyour PC.
Note: Before downloading your pump information, your Animas® IR Accessory Kit for the Animas®
ezManager®Plus International software must be set up/installed. See instructions included with your
Animas® IR Accessory Kit.
ezTip: If you are running Windows® XP Pro with Service Pack (SP2), click on
Start | Settings | Control Panel. Double click on the Wireless Link icon. Click
on the Infrared tab and make sure all options are unchecked. Click on the
Image Transfer tab and make sure all options are unchecked. Click OK.
Instructions for downloading data from the Animas® insulin pump to the Animas® ezManager®
Plus International software
Go to the Animas® ezManager® Plus International software menu and click on the following:
Tools | Download | Animas Pump (or click the shortcut icon on the taskbar)
Make sure that you have properly installed your serial interface (or USB) adapter (“dongle”).
The dongle and instructions are included with your Animas® IR Accessory Kit (sold separately)
for the Animas® ezManager® Plus International software.
Disconnect infusion set from your body, following instructions from infusion set manufacturer.
Awaken and program the pump to Suspend mode. Remove from holster, leather case, clip, or
fashion cover, if using.
NOTE: While pump is in Suspend mode and/or disconnected from your body, insulin
delivery is stopped. Follow your physician/healthcare providers’ guidelines for blood
glucose monitoring while pump delivery is stopped.
Follow instructions included with your Animas® IR Accessory Kit on how to position your pump
with the dongle.
Page 29
From the drop down menu, select the model of the pump you wish to download (Animas® IR
1000, IR 12XX or 2020) (see image below). If you have an Animas® IR 1200, select Animas® IR
12XX from the drop down menu.
Click on Download button. An information screen will be displayed, click OK to continue.
The program will identify the serial port where the dongle is connected and start downloading the
data.
After a complete (successful) download, the data will
be stored in the logs as follows:
o Alarm history will be stored in the Notes log
o Basal history will be stored in the Pump Basal
log
o Bolus history will be stored in the Bolus log
o Daily totals will be stored in the Pump Daily
Totals log
o Prime history will be stored in the Notes log
o Pump settings will be stored in the Pump Settings log
o Suspend history will be stored in the Notes log
o Duplicate records will be ignored
When you download your pump, you will not see the current day’s insulin delivery, as this record
is not yet complete.
Program pump to resume delivery.
Important: Before reconnecting infusion set to your body, follow infusion set and pump
manufacturer’s instructions for reconnecting set.
Page 30
Chapter 6 Downloading Data from Your BG Meter
You can import BG measurements from your BG meter if your meter is one of the models listed in the
BG Meter Download drop-down box. In order to download data from your BG meter you will need a
download cable to connect the meter to your computer. The BG meter manufacturers provide these
cables. Please contact your BG meter manufacturer to obtain one.
BG Meters compatible with the Animas® ezManager® Plus International software:
Lifescan: FastTake®, InDuo System®,
OneTouch II®/Basic®/Profile®/Ultra/UtlraSmart®, SureStep®
Bayer: Ascensia Breeze®, DEX®, DEX2®, Elite XL®, Contour®
Visit our website for a complete list of compatible BG meters.
ezTip: Before downloading data from any device, check that time and date are set the same on all
the devices you are using, including ALL of your BG meters, your Animas® pump and your PC.
Instructions for downloading data from your BG meter into the Animas® ezManager® Plus
International software
Go to the Animas® ezManager® Plus International software menu, click on the following:
Tools | Download | BG Meter (or click the shortcut icon on the task bar)
Make sure that you have properly installed your BG meter download cable.
Select the manufacturer/model of your BG meter from the drop down menu.
Click on Download button.
The program will identify the serial port where the BG Meter is connected and start downloading
the data.
There has to be a match between the manufacturer/model you selected and your meter in order to
complete the download.
After a complete (successful) download, the data is stored in the BG log and various Reports.
Duplicate records will be ignored.
ezTip: When importing a BG file into the software, the file is limited to a maximum of 500
records. Each record consists of a date, time and BG reading.
Page 31
OPTIONAL: Importing BG Data from a “comma separated values” file (CSV)
You can import BG measurements from a “comma separated values” file (CSV) into the software. The
file has to have one of the following formats:
Date (MM/DD/YYYY), Time, BG
or
Date (MM/DD/YYYY) Time, BG (no comma between the Date and Time)
From the toolbar, click on Tools and select Import BG.
Click Yes on the window describing the process.
Select the format in which the data is stored in your file from the drop down menu and click
Import Data.
Select the file in which the data is stored and click Open.
After a complete (successful) reading of the file, the data will be stored in the BG log.
Duplicate records will be ignored.
Page 32
Chapter 7 Uploading Data to Your IR 1200 or 2020 Pump (the
Animas® ezManager® Plus International software version 4.0.0 and higher)
By using your Animas® IR Accessory Kit (sold separately) and the software, you can upload a variety of
information to your Animas® IR 1200 or Animas® 2020 pump (see table below).
Pump Model
Personal Info
(Status Screen 7)
Pump Settings
Food Database
Tunes
Animas® IR 1200
Yes
No
No
No
Animas® 2020
No
Yes
500 items
Yes
ezTip: Before uploading data, check that time and date are set correctly on your pump.
Note: Before uploading information to your pump, your Animas® IR Accessory Kit for the Animas®
ezManager® Plus International software must be set up/installed. See instructions included with your
Animas® IR Accessory Kit.
ezTip: If you are running Windows® XP Pro with Service Pack (SP2), click on
Start | Settings | Control Panel. Double click on the Wireless Link icon. Click
on the Infrared tab and make sure all options are unchecked. Click on the
Image Transfer tab and make sure all options are unchecked. Click OK.
1. Make sure that you have properly installed your serial interface adapter (“dongle”). The dongle
and instructions are included with your Animas® IR Accessory Kit for the Animas® ezManager®
Plus International software. (Sold separately for Animas® IR 1000, IR 1200 pump models and
2020 pump models.)
2. Disconnect infusion set from your body, following instructions from infusion set manufacturer.
Awaken and program the pump to Suspend mode. Remove from holster, leather case, clip, or
fashion cover, if using.
NOTE: While pump is in Suspend mode and/or disconnected from your body, insulin
delivery is stopped. Follow your physician/healthcare providers’ guidelines for blood
glucose monitoring while pump delivery is stopped.
3. Align the dongle with the IR window (framed in blue) on the back of the pump. Follow the
instructions included with your Animas® IR Accessory Kit for the Animas® ezManager® Plus
International software.
Page 33
Animas® IR 1200 ONLY (See next section for Animas® 2020)
Status Screen 7, Personal Information
Note: This is the only upload feature available with the Animas® IR 1200.
Go to the Animas® ezManager® Plus International software desktop menu and click on the following:
Tools | Pump Extras | Personal Info – IR 1200
Follow the instructions that appear in red on the Animas® ezManager® Plus International software
screen.
From the Personal Info Setup window, click on Start IR.
An confirmation box will appear reminding you to suspend your
pump but do not let it go to sleep. Click the OK button to continue.
The program will identify the serial port where the dongle is
connected. When the serial number and model of your pump are
displayed at the bottom of the Animas® ezManager® Plus
International software window, this means the PC and pump are
ready to “talk” to each other. A status message also tells you if your
PC is “connected” to your pump.
Click inside the boxes and type the personal information you desire.
Click on Upload settings to pump. When the upload is complete, the
screen will display a message of confirmation.
Check your pump to be sure the information you entered is accurate.
Animas® 2020
Pump Setup
Accessing Pump Setup Window
Go to the Animas® ezManager® Plus International software desktop menu and click on the following:
Tools | Pump Extras | Pump Setup
Follow the instructions that appear in red on the Animas® ezManager® Plus International software
screen.
From the Pump Setup window, click on Start IR.
A confirmation box will appear reminding you to suspend your pump but not let it go to sleep.
Click the OK button to continue.
The program will identify the serial port where the dongle is connected. When the serial number
and model of your pump are displayed at the bottom of the Animas® ezManager® Plus
International software window, this means the PC and pump are ready to “talk” to each other. A
status message also tells you if your PC is “connected” to your pump.
To save or upload these settings, please see the section entitled “Saving & Uploading Your
Settings.”
Page 34
Info, Sound and Time Format Tab (Animas® 2020 only)
NOTE: The active basal program tab is highlighted.
From the Pump Setup window, click on the Info, Sound and Time Format tab.
Click inside the boxes or use the drop down boxes and enter the settings you desire.
To save or upload these settings, please see the section entitled “Saving & Uploading Your
Settings.”
Basal Programs (Animas® 2020 only)
From the Pump Setup window, click on the Basal tab. (If your pump is set up to display 4 basal
programs, select the desired Basal program.) Enter the name you would like displayed for the
selected basal program. Enter the times and amounts for each basal segment. Changes will
appear in yellow. Repeat for remaining Basal Programs.
To save or upload these settings, please see the section entitled “Saving & Uploading Your
Settings.”
Page 35
Advanced Settings (Animas® 2020 only)
From the Pump Setup window, click on the Advanced Settings tab. Click inside the boxes or
use the drop down boxes and enter the settings you desire. Any changes will be highlighted in
yellow. Please note, “Personal Information (Status Screen 7) is not available for edit.
To save or upload these settings, please see the section entitled “Saving & Uploading Your
Settings.”
CarbSmart/ezBG (Animas® 2020 Only)
From the Pump Setup window, click on the CarbSmart/ezBG tab. This menu allows you to
change the I:C Settings for the ezCarb feature, ISF Settings, BG Target +/- Settings, and Insulin
on Board Settings. Choose the times from the drop down menus and enter the desired amounts for
each setting.
Page 36
Saving & Uploading Your Settings (Animas® 2020 only)
Please note: Your PC must be connected to your pump in order to open & save pump settings.
It is strongly recommended that you save your pump settings. Click the Save Settings icon at
the top right of the window. A pop up box will appear asking if you want to save these pump
settings to file. Click Yes.
Name the file and save it in your desired location.
After you have saved your pump settings, you can open the file at a later date to make changes.
Click on the Open Settings icon at the top right of the window.
A pop up box will appear warning that you will lose all changes you have made (unless you’ve
saved them to a file as outlined above) and asks for confirmation to load data from a file. If you
would like to open an existing file, click Yes. If you would like to continue working in the Pump
Setup window, click No.
After you have completed your changes, click on Upload settings to pump. When the upload is
complete, the screen will display a message of confirmation and ask if you would like to save the
settings to a file for backup.
It is strongly recommended that you save your settings. Click Yes and save the settings as a file in
your desired location as outlined above.
Check your pump to be sure the information you entered is accurate.
Printing Pump Setup Info (Animas® 2020 only)
Click on the Print button at the top right of the Pump Setup window.
Page 37
Food Database (Animas® 2020 only)
Overview
With this feature, you create and save a new food database to upload to your pump.
Accessing Pump Food DB Window
Go to the Animas® ezManager® Plus International software desktop menu and click on the following:
Tools | Pump Extras | Manage Food DB
The Pump Food DB window is displayed.
To create a new database, click on the New Database icon at
the top right of the Pump Food DB window.
Note: If you are working in a pump food database and
you then click the icon to Create a New Database, you
will overwrite the database you are working in. If
you’re working with more than one pump food
database, always save them as separate files and do
not create a new database while working in an
existing one.
Adding Items from Master Food DB
If you have created a Master Food Database, you can
select food entries to add to your pump food database.
See Chapter 4, Creating a Master Food Database, for
more information.
NOTE: The Animas® 2020 can store up to 500 food
items.
From the Pump Food DB window, click Add item
from DB. The Master Food DB window is
displayed. All items in the Food Database are shown,
in alphabetical order.
To search by key word, enter the word in the Find all
items containing field and click Find.
Click on the food item to add to your pump food database.
Click Add Item to Pump DB. The Item Name window is
displayed and saved to the Favorites category. This window
allows you to abbreviate the item name and serving size as
desired. Food Item names are limited to 12 characters,
including spaces, on the pump display. Serving size is limited
to 8 characters. Abbreviate the Item Name and Serving Size
as desired. You cannot change the nutritional values, so the
serving size must not be changed, it should just be
abbreviated. Click Add.
Page 38
ezTip: Food Item names are limited to 12 characters on the pump display. Serving size is limited to
8 characters on the pump display. You cannot change nutritional values, so the serving size cannot
be changed, either. The purpose of this step is to be sure you use abbreviated Item Names and
Serving Sizes that will make sense to you once they are loaded on the pump.
Repeat for remaining food items.
Adding foods that are not in the Master Food Database
From the Pump Food DB window, click on Add Custom to Favorites. The Pump Custom
Food Item window is displayed. Enter the name, serving size and nutritional information for
your custom food item. Click Add.
Your custom item will be added and will be saved in your Pump Food DB.
When finished creating your Pump Food Database, click Close. The Pump Food DB window is
displayed. Click on the category to which you’ve just added your food item. Your item(s) will
be displayed. Review the items for accuracy.
Saving Your Pump Food Database
With the food database displayed in the
Pump Food DB window, click on the Save
Database icon at the top right of the window.
A warning window will appear, click Yes to
continue. Select a location and save your pump
food database as you normally would save a file.
Remember, in order to view any Animas®
ezManager® Plus International software files,
you must first open the software. The Animas®
ezManager® Plus International software files
cannot be opened with any other program.
To open a Pump Food Database you have
created and saved, click on the Open Database icon at the top right of the window. Select the
Pump Food Database from its saved location.
Note: If you have begun creating a Pump Food Database and you then open a saved food
database, the file you open will overwrite the database you are working in. If you’re working
with more than one pump food database, always save them as separate files and do not open a
second pump database while working in an existing one.
Page 39
Uploading Pump Food Database to Your Pump
After you have saved your Food DB, click on Start IR from the Pump Food DB window. If you
have not saved your Food DB and a connection is lost while uploading the DB, your Food DB
will be lost and you must create a new one. To save the Food DB, click on the
Save Database icon in the top right of the Food DB window.
A confirmation box will appear twice reminding you to disconnect from and suspend your pump
but not let it go to sleep. Click the OK button each time to continue.
NOTE: You must keep the pump in front of the dongle until you receive a confirmation pop
up box. If the pump is moved from the dongle, the connection will be lost and you will have to
begin the process again.
The program will identify the serial port where the dongle is connected. When the serial number
and model of your pump are displayed at the bottom of the Animas® ezManager® Plus
International software window, this means the PC and pump are ready to “talk” to each other. A
status message also tells you if your PC is “connected” to your pump.
Open the pump database you have created and saved (or skip to the next step if it is already saved
and open). It will be displayed in the Pump Food DB window.
Click on Upload Food DB to pump. The warning
screen shown here will appear, reminding you that
uploading a food database to your pump will delete
any foods currently stored on your pump. Clicking
More Info will show you quick tips to be sure you’ve
saved both the new database you’ve created and the
database that’s currently stored on your pump. Also
see this chapter, Saving Your Pump Food Database,
for instructions on saving your food database.
Clicking Upload will upload this food database to your pump and delete any foods currently
stored on your pump. When the upload is complete, the screen will display a message of
confirmation.
Clicking Cancel will return you to the Pump Food DB screen so you can save your currently
displayed food database and then download and save the food database currently stored on your
pump.
When the upload is complete, the screen will display a message of
confirmation. Depending upon how many items you’ve entered into your
pump food database, this could take several minutes. You can see items
being uploaded at the top of the screen. Click Yes to backup (save) the
food database. Click Stop IR, then Close to return to the main screen.
Check your pump to be sure the information you entered is accurate.
Page 40
Deleting Items
With the food database displayed in the Pump Food DB window, click on either Delete All
Visible Items or select the item(s) you wish to delete and click on Delete Selected Item(s). Your
selected items will be deleted from the pump food database. This feature only deletes items you
have in the currently displayed Pump Food Database; items are not deleted from the Master Food
Database or from any other saved food databases you may have.
Changing an Item
With the food database displayed in the Pump Food DB window, click on the item you wish
to change. Click Delete Selected Item(s). Click either Add Item from DB or Add Custom to
Favorites and change the information as desired. See following sections for additional
information.
Downloading the Food DB from pump
From the Pump Food DB window, click on Start IR.
A confirmation box will appear twice reminding you to suspend your pump but do not let it go to
sleep. Click the OK button to continue.
The program will identify the serial port where the dongle is connected. When the serial number
and model of your pump are displayed at the bottom of the Animas® ezManager® Plus
International software window, this means the PC and pump are ready to “talk” to each other. A
status message also tells you if your PC is “connected” to your pump.
Click on Download Food DB from pump. The food items currently loaded on your pump will
be displayed. Depending upon how many food items are stored on the pump, this could take
several minutes. You can see items being downloaded at the top of the Animas® ezManager®
Plus International software screen. Save this food database as a file before continuing. See
Saving Your Pump Food Database section above for instructions.
ezTip: Once you’ve downloaded the Food DB from your pump to your PC, you should save the
file. See Saving Your Pump Food Database in this section.
ezTip: Once you’ve downloaded the Food DB from your pump to your PC and saved it as a file,
you can click Stop IR. This allows you to resume pump delivery, reconnect the pump to your
body and work in the food database on your PC without having your pump and PC “talking” to
each other.
Page 41
Printing Food Database
Click on the Print button at the top right of the window. The food database currently displayed
on your screen will be printed.
Uploading Tunes (Animas® 2020)
Overview
With this feature, you can add tunes to play as your initial audible notification of some Alerts,
Reminders, Warnings and Alarms. You can either select from popular tunes stored in the My
Computer | Local Disk (C:) | EZM | Extras | Samples folder that was loaded when you installed
the Animas® ezManager® Plus International software on your PC or you can create a tune using
the Animas® Custom Composer program. When you installed the software on your PC, the
Animas® Custom Composer was automatically installed. Look for the Animas® Custom
Composer desktop icon and double click on it to open the program. See instructions below for
using the Animas® Custom Composer.
Note: The tune will play once only (your initial notification) and then resumes the pump’s usual,
progressive audible/vibe notification. If the condition is not confirmed/action taken, the pump
safety system progresses to high volume and vibrate mode within one hour for warnings and
alarms. Not all audible alerts can be uploaded with a tune. The following Alerts, Reminders,
Warnings and Alarms will play a tune as the initial notification:
Alerts
Low BG
High BG
1-Weekday must be active to change basal display
Basal Edit Not Saved
Reminders
All Reminders (2-time of day, 1-Check BG)
Alarms
Empty Cartridge
Occlusion Detected
AutoOFF
Warnings
Suspended
Exceeds Max Basal
Exceeds Max Bolus
Exceeds Max Daily
Low Cartridge
Bolus canceled by user button press
Low Battery
No Prime
Battery change requires Prime/Rewind
Accessing Tune Upload Window
Go to the Animas® ezManager® Plus International software desktop menu and click on the following:
Tools | Pump Extras | Upload Tunes
From the Tunes Upload window, click on Start IR.
A confirmation box will appear twice reminding you to suspend your pump but not let it go to
sleep. Click the OK button each time to continue.
The program will identify the serial port where the dongle is connected. When the serial number
and model of your pump are displayed at the bottom of the Animas® ezManager® Plus
International software window, this means the PC and pump are ready to “talk” to each other. A
status message also tells you if your PC is “connected” to your pump.
Adding Tunes
From the Tunes Upload window, select the desired sound category.
Page 42
Click on Open Tune File. Open the Samples folder and select from one of the sample tunes or
select the desired tune file you have created and saved.
Click on Play Tune if you wish to review the tune file.
Click on Upload Tune. A dialogue box will appear asking you to confirm the sound category
you’ve selected to upload your tune.
When the upload is complete, the screen will display a message of confirmation. Repeat for
remaining sound categories, if desired.
Removing Tunes
You can remove tunes from your pump if you prefer the factory default sounds.
From the Tunes Upload window, click on Start IR, if your pump and PC aren’t already
connected.
Follow the instructions that appear on the Animas® ezManager® Plus International software
screen.
A confirmation box will appear reminding you to suspend your pump but do not let it go to sleep.
Click the OK button to continue.
The program will identify the serial port where the dongle is connected. When the serial number
and model of your pump are displayed at the bottom of the window, this means the PC and pump
are ready to “talk” to each other. A status message also tells you if your PC is “connected” to
your pump.
From the Tunes Upload window, select the desired sound category.
The currently loaded tune file will be displayed.
Click Remove Tune. A confirmation window will appear,
click Yes to continue.
When the tune has been removed, the screen will display a
message of confirmation. Repeat for remaining sound
categories, if desired. Removing a tune sets your sounds
back to the factory default sound.
Using the Animas® Custom Composer
To access the Animas® Custom Composer, click the Custom Composer Link.
Custom Composer
The Animas® Custom Composer allows you to create a custom tune for your pump. These tunes
can be used for some alerts, reminders, warnings and alarms on your pump. The Animas®
Custom Composer is used in conjunction with the Animas® ezManager® Plus International
software and your Animas® 2020. Your pump can play up to 30 notes (including pauses).
Page 43
The Animas® Custom Composer can be used in two ways. You can use the keyboard at the
bottom of the screen to select notes, or you can use your mouse to manually place notes on the
staff.
Using the Keyboard to Place Notes
The keys at the bottom of the screen represent a keyboard. You can create a unique tune by
playing this keyboard.
1. Select the note length manually from the “Note length” window or by right clicking your
mouse and selecting a note length from the pop up window.
2. Use the keyboard at the bottom of the screen to select the notes.
There are 3 Octave selections. Octave 3 is in yellow and contains music notes low on the
music scale. Octave 4 is in red and contains notes in the middle of the music scale. Octave
5 is in green and contains notes high on the music scale.
3. Once you click on a note, it will appear on the staff and the note will play.
4. Continue to select notes to create the tune of your choice.
5. You can also insert a pause, or “rest” after a note. The default pause is the ¼ pause. To insert a
different pause, right click on the staff and select from full pause, ½ pause, ¼ pause, ⅛ pause or
1
/16 pause from the menu.
6. If you would like to delete a note, either right click and select Delete Note or click on Edit, Delete
Note. The last note (or pause) will be deleted.
7. If you would like to delete all of your notes and begin again, click on Edit, Clear Score. This will
clear the staff and your tune will not be saved.
8. Once you have finished placing the notes on the staff, you can listen to your tune. Click on the
Play button. To stop the tune, click on the Stop button.
Page 44
9. You can also change the tempo of your tune. Slide the bar to the left to increase the tempo (the
plus side), or the right (the minus side) to decrease the tempo.
10. Once you have completed your tune, you must save it by clicking on File, Save Project. Select the
location to be saved, name your tune, and click save.
11. In order to upload your tune into your pump, it must be an .etp file. To create this file, click
Tune, Generate Tune. An .etp file will be placed in the same name and location where you saved
the tune.
Using the Mouse to Place Notes
You can also use the mouse to manually place notes on the staff. This may be a faster approach if you
have the sheet music of your favorite song.
1. Select the note length manually from the “Note length”
window or by right clicking your mouse and selecting a
note length from the pop up window.
2. Using your mouse, move your cursor over the staff. A note will appear.
3. Click on the staff to place the note in the desired position.
4. Continue to place notes. This process works well for
creating a custom tune using your favorite sheet music as
shown below.
5. Once you have completed your tune, you must save it by
clicking on File, Save Project. Select the location to be saved, name your tune, and click save.
6. In order to upload your tune into your pump, it must be an .etp file. To create this file, click
Tune, Generate Tune. An .etp file will be placed in the same name and location where you saved
the tune.
7. Follow the instructions above for uploading the tune you’ve created.
Page 45
Page 46
Chapter 8 Frequently Asked Questions (FAQs)
Upload FAQs
1. When I try to upload my pump, I receive an error message that says “This pump model is not
compatible with this operation. Please check the the Animas® ezManager® Plus International
software User Guide.”
Click OK and then click Close. Be sure that you are following the correct steps for your pump. If
you are uploading an Animas® IR 1200, go to Tools | Pump Extras | Personal Info – IR 1200. If you
are uploading an Animas® 2020, go to Tools | Pump Extras | Pump Setup.
2. When I try to upload information to my pump, an error message tells me “ERROR: Could not find
pump. Try again?”
The dongle has lost its connection to your pump. Click OK. Align the dongle with the IR window
on the back of your pump. Be sure the pump is not asleep and click Start IR. Keep the dongle and
pump aligned the entire time you are working in Pump Extras.
3. When I try to upload my pump, an error message tells me “Error during download: E0600.”
Your pump must be in Suspend mode in order upload information. Refer to your pump’s User
Guide for instructions to Suspend your pump.
4. When I try to upload my pump, the Status is SEARCHING but never connects.
Ensure that all other devices are disconnected from the PC and that HotSync® is disabled. Click
Stop IR and then click Close. Be sure that you are following the correct steps for your pump. If
you are uploading an Animas® IR 1200, go to Tools | Pump Extras | Personal Info – IR 1200. If you
are uploading an Animas® 2020, go to Tools | Pump Extras | Pump Setup.
5. When I try to upload a tune, I cannot click on Upload Tune.
In order to upload a tune, a connection must be established between the dongle and the pump. Align
the dongle with the IR window, put the pump in Suspend and make sure the pump is not asleep.
Click on Start IR. Once the pump is connected, you can click on Upload Tune.
Page 47
Download FAQs
6. When I try to download my BG meter, I receive an error message that says the PC cannot locate the
device to be downloaded.
a. Make sure that HotSync® Manager is NOT running. If you see the HotSync® icon at the bottom
right of your PC screen, right click on it and select Exit.
b. Make sure that your BG meter cable is securely inserted in your meter and check that the cable is
securely connected to the serial port on your PC.
c. Make sure that you selected the correct BG meter type from the drop down menu on the
download screen of the software.
7. When I try to download my pump, I receive an error message that says the PC cannot locate the
device to be downloaded.
a. Make sure you have followed the instructions completely. A restart of your computer is needed in
order to obtain all necessary components for the download feature.
b. Make sure your Animas® insulin pump is in the Suspend mode.
c. Make sure that HotSync® Manager is NOT running. If you see the HotSync® icon at the bottom
right of your PC screen, right click on it and select Exit.
d. Make sure that your IR adapter “dongle” is securely connected to the serial port on your PC.
e. Make sure the light (depending on model) is flashing on your IR adapter “dongle.” If it is not,
refer to the instructions that came with your Animas® IR Accessory Kit.
8. When I download my BG meter, it appears that information is being downloaded but when I try to
view it on the software, no information shows up.
Check the date on your BG meter to be sure it is current and matches your pump and PC. It may be
that the information has been downloaded but if the date on the meter is not current, the records will
download and be stored according to the date on the meter. If the date and time on your meter are not
current, change them immediately to match your PC and Animas® IR 1000, IR 1200 or 2020 insulin
pump. Once the dates/times are all correctly set, your records will download correctly.
9. When I download my pump, it appears that information is being downloaded but when I try to view
it on the Animas® ezManager® Plus International software, no information shows up.
Check the date on your pump to be sure it is current and matches your BG meter and PC. It may be
that the information has been downloaded but if the date on the pump is not current, the records will
download and be stored according to the date on the pump. If the date and time on your meter are not
current, change them immediately to match your PC and pump. Once the dates/times are all correctly
set, your records will download correctly.
10. I connected a Animas® 2020 pump by mistake. I hit stop IR, and when connected to Animas® IR
1200, the personal info fields are disabled. How do I fix this?
You must close the Pump Download screen before changing pump models. The personal info fields
will then be enabled.
11. I have another device that uses a serial or USB port. How do I close the HotSync® Manager?
To close the HotSync® Manager, right click on the icon in the bottom right corner of your PC screen
and select Exit.
Page 48
Master Food Database FAQs
12. How can I delete foods from the Master Food DB?
See Chapter 7, Food Database, Deleting Items.
13. Can I edit records in the food database after I have saved them?
You can delete the item and re-enter. Please refer to Chapter 7 for details.
General FAQs
14. I’ve purchased the upgrade from an earlier version of the software to the latest version of the
Animas® ezManager® Plus International software. What do I do?
Back up your database (see Chapter 4, Part D, Exporting Data). Make sure you select the date range
to include all data you have stored to date.
15. I installed the latest version of the software and even though I picked a different directory for the
install, the database of the previous version was overwritten.
The Animas® ezManager® Plus International software is not designed to have simultaneous versions
installed on the same computer. Since both of these programs use the same database, it causes the
database to be overwritten. When you install a new version and check Options 1 or 2 on the
Animas® ezManager® Plus International software Database Update screen, all downloaded data from
the previous version is retained in the new version. NOTE: If you check Option 3 on the Animas®
ezManager® Plus International software Database Update screen, all downloaded data will be deleted
immediately. You should always back up your data prior to installing a new version of the
software.
16. How can I back up the Animas® ezManager® Plus International software database(s)?
The best way is to copy the database file named ezmdpi.mdb (this includes all reference databases,
e.g., FoodDB, ActivityDB, Insulin Types, etc.). This is installed to C:\EZMPI by default. You can
copy this file to another location on your hard drive in case of data corruption. It is recommended
that if possible, you copy to CD, zip disk, flash drive, or a network which is capable of back up of
multi-megabyte files. DO NOT use a floppy disk; this file can easily exceed the size of a floppy.
You can use the software’s import and export feature to back up your logs and other settings, which
will fit on a single floppy disk. HOWEVER, this does not back up the reference databases (e.g.,
FoodDB, ActivityDB, InsulinTypes, etc.).
17. How can I delete a log entry if I made a mistake?
See Chapter 4.
18. Can I import a 3rd party food database into the Animas® ezManager® Plus International software?
Currently, the software uses only the Animas® ezManager® Plus International software databases.
Page 49
Notes Log
Bolus Log
Page 50
Distribution Report
Logbook
Daily Report
We suggest printing/emailing a Notes Log report to accompany your Logbook.
BG Meter Download
Insulin Pump Download
Export Data
Reports Printer
Statistics
Import Data
Insulin Daily Totals
BG Distribution Report
BG Chart
Trends Analysis
Multiple Daily Reports
Daily Totals Log
Pump Settings Log
Meals Log
BG Log
Activity Log
19. Are there shortcut icons I can use for some of the PC functions on the software?
20. The logbook does not indicate if there is a note to explain an unusual record. How do I show my
doctor this?
Glossary
ASCII- American Standard Code for Information Interchange- A standard for assigning numerical values
to the set of letters in the Roman alphabet and typographic characters.
BG meter download cable- A cord that plugs into a computer on one end and a blood glucose meter on
the other end. It is used to send information from the meter to the computer.
comma separated values file- A file format used as a portable representation of a database. Each line is
one entry or record and the fields in a record are separated by commas.
delimiter- A character or sequence of characters marking the beginning or end of a unit of data.
desktop- The area of the screen in where icons and windows appear.
dialog box- A window that appears on a computer screen, presenting information or requesting input.
dongle, adapter dongle- An electronic device that must be attached to a computer in order for it to use
protected software. Used to link information to your pump from your computer and vice versa.
download- To transfer data or programs from a pump or a meter to a computer.
export- To send data from one program to another.
hardware- A computer and the associated physical equipment directly involved in the performance of
data-processing or communications functions.
I:C- (Insulin to Carb ratio)- The grams of carbohydrate covered by one unit of insulin. For example: A
ratio of 1:15 would mean that for every 15 grams of carbohydrate, the patient would need to inject 1 unit
of insulin.
import- To receive data into one program from another.
install- To connect or set in position and prepare for use.
IR, infrared- Lying outside the visible spectrum at its red end. This type of light is used in the dongle to
communicate between the pump and the computer.
PC personal computer- A computer built for use by an individual, as in an office or at home or school.
serial port- A connector on a computer to which you can attach a serial line connected to
peripherals which communicate using a serial (bit-stream) protocol.
sleep mode- When your pump display screen has timed out.
software- Written programs or procedures or associated documentation pertaining to the operation of a
computer system.
standard deviation- A statistic used as a measure of the variation in a distribution.
status message- A message at the bottom of a window that tells the user whether or not a link has been
made between the pump and computer.
system tray- A bar at the bottom of the computer which displays icons for various computer programs.
toolbar- A row of icons on a computer screen that activate commands or functions when clicked.
upload- To transfer a file or program from a computer to a pump.
USB port- A connector on a computer to which you can attach your peripherals.
Page 51
Page 52
Index
meals log, 17
multiple daily reports, 23
notes log, 30
notes log, 19
personal information, 34
print a log, 14
print log, 21
pump basal log, 21
pump daily totals, 21
pump settings, 36
pump settings log, 19
pump settings report, 20
pump setup, 34
purge data, 27
remove tunes, 43
report printer, 25
reports menu, 22
save pump food database, 39
select account-pc, 11
settings, 12
shortcut icons, 50
statistics, 25
status screen 7, 34
system and software requirements, 7
tools menu, 26
trend analysis, 23
tune upload, 42
unusual record, 50
upgrade from ezmanager to ezmanager plus,
49
upload data to pump, 33
upload pump food database to pump, 40
uploading tunes, 42
use ezmanager plus on pc, 13
user settings, 27
activity log, 13
add tunes, 42
adding foods not in master food db, 39
adding items from master food db, 38
back up databases, 49
basal programs, 35, 36
bg chart report, 24
bg distribution, 24
bg log, 15
bolus log, 30
bolus log, 16
configure your pc, 11
create a master food database, 18
create text file, 14
custom composer, 43
daily report, 22
data exchange, 26
delete items from pump food database, 41
distribution report, 24
download data from bg meter, 31
download data from pump, 29
edit records, 49
error message, 48
export logs, 21
exporting data, 26
file menu, 13
food database, 38
frequently asked questions, 47
hotsync, 48
importing data, 27
info, sound and time format tab, 35
install from cd-rom, 9
install on pc, 9
insulin daily totals, 25
log book, 23
logs menu, 13
Page 53
Page 54
Page 55
Distributed in Canada by:
200 Whitehall Drive
Markham, ON
L3R 0T5
Tel: 1-866-406-4844
Fax: 1-866-406-4033
Email: [email protected]
MediMark® Europe Sarl, 11, rue Emile
Zola. BP 2332
F-38033 Grenoble Cedex 2. France
TEL +33 (0) 4 76 86 43 22
FAX +33 (0) 4 76 17 19 82
Email: [email protected]
Manufactured by:
200 Lawrence Drive
West Chester, PA 19380
Telephone: 610-644-8990
www.animascorp.com
ezManager® Plus International software Info: Call your local distributor.
Covered by U.S. patent 7,179,226
© Copyright Animas Corporation 2007
Page 56
P/N 410-108-00 Rev A 2007/11