1
Designing of a semi-automation tool for
wireless LAN interoperability testing
Jukka Issakainen
Master’s thesis
December 2013
Degree Programme in Computer Science
ABSTRACT
Tampereen ammattikorkeakoulu
Tampere University of Applied Sciences
Degree Programme in Computer Science
JUKKA ISSAKAINEN:
Designing of a semi-automation tool for wireless LAN interoperability testing
Master's thesis 52 pages, appendices 96 pages
December 2013
Interoperability testing for devices using wireless local area networks may require a
complex test environment consisting of several Access Points and authentication servers. These entities are used to verify the correct operation of a device under test.
Each entity has several settings for various authentication types and encryptions. There
is no global standard for remote (or local) user interface to enable machine-to-machine
automation for changing the settings. When user has to manually setup each feature, it
is prone to errors. These erroneous situations may slow down the actual testing and
therefore create pressure for the schedules.
By creating a user interface based on radio-buttons it is possible to reduce the complexity of setting up the test environment to an acceptable level. The user interface takes care
of powering up the desired Access Point, communicates with it and restores the desired
setup and, if needed, sets the definitions for authentication servers. Focus can be set to
actual interoperability testing instead of setting up the test environment.
A clear reduction of errors caused by faulty setups of the test environment was achieved
when the user interface was taken into use. Also reliability and repeatability of testing
got better.
This thesis focuses on describing the functionality and the structure of the WLAN verification Wizard user interface -tool. Actual interoperability testing of wireless local area
networks is out of scope due to non-disclosure agreements.
Key words: interoperability testing, wireless LAN, Access Point, settings
3
CONTENTS
1 INTRODUCTION ..................................................................................................... 11
2 WI-FI ALLIANCE .................................................................................................... 12
2.1 Introduction ........................................................................................................ 12
2.2 Wireless Local Area Network Access Point ...................................................... 12
2.3 Authentication methods, Personal ..................................................................... 13
2.4 Authentication methods, Enterprise ................................................................... 14
3 TASK AT HAND ...................................................................................................... 16
3.1 Background ........................................................................................................ 16
3.2 Interoperability testing ....................................................................................... 16
4 GETTING STARTED ............................................................................................... 17
4.1 The starting point ............................................................................................... 17
4.2 AutoIt ................................................................................................................. 19
4.3 Other considerations .......................................................................................... 19
5 WLAN VERIFICATION WIZARD ......................................................................... 21
5.1 The User Interface ............................................................................................. 21
5.2 Functionality ...................................................................................................... 23
5.3 Connectivity ....................................................................................................... 24
6 PROGRAM OPERATION........................................................................................ 26
6.1 Program initialization ........................................................................................ 26
6.2 AP initialization ................................................................................................. 27
6.3 The Capability-matrix ........................................................................................ 31
6.4 RADIUS initialization ....................................................................................... 32
7 AP CONFIGURATION CHANGE .......................................................................... 34
7.1 AP configuration change in details .................................................................... 38
7.1.1 Controlling the AP with RestoreAP.exe ................................................. 38
7.1.2 Done Setups -log ..................................................................................... 41
7.2 RADIUS authentication ..................................................................................... 41
7.3 RADIUS-proxy .................................................................................................. 43
7.4 Changing the RADIUS authentication methods ................................................ 44
7.4.1 Netsh ....................................................................................................... 45
7.4.2 PsExec ..................................................................................................... 47
7.5 Ending the program ........................................................................................... 49
8 DISCUSSION ........................................................................................................... 50
9 REFERENCES .......................................................................................................... 52
APPENDICES ................................................................................................................ 53
Appendix 1. Requirement documentation for semi-automation tool ........................ 53
4
Appendix 2. Architecture Specification for the semi-automation tool.................... 101
Appendix 3. Source code for the main program ..................................................... 113
Appendix 4. Source code for RestoreAP.exe .......................................................... 129
Appendix 5. WLAN Verification Wizard.ini -file .................................................. 140
Appendix 6. AccessPointInfo.ini -file ..................................................................... 141
Appendix 7. RADIUSSetupInfo.ini -file ................................................................. 147
5
ABBREVIATIONS AND TERMS
AAA
Authentication, Authorization and Accounting, a synonym
for RADIUS.
ACS
Access Control Server, a product from Cisco Systems Corporation, providing RADIUS functionality.
AP
Access Point, commonly used term for devices connecting
wireless devices to wired network. In this context refers to
Wireless Local Area Network Access Points.
APC
American Power Conversion, a company by Schneider Electric, a manufacturer of uninterruptible power supplies (UPS)
and surge protection products.
ASCII
American Standard Code for Information Interchange, defines character encoding.
AutoIt
A freeware BASIC-like scripting language designed for automating the Windows GUI and general scripting.
BASIC
Acronym for Beginner's All-purpose Symbolic Instruction
Code.
C++
A programming language developed by Bjarne Stroustrup
starting in 1979 at Bell Labs.
CCMP/AES
Counter Mode with Cipher Block Chaining Message Authentication Code Protocol/Advanced Encryption Standard, a
security protocol used in the IEEE 802.11 wireless networking standard.
Ciphering
An algorithm for performing encryption or decryption—a
series of well-defined steps that can be followed as a procedure.
EAP
Extensible
Authentication
Protocol,
an
authentication
framework providing for the transport and usage of keying
material and parameters generated by EAP methods.
EAP-AKA
Extensible Authentication Protocol/Authentication and Key
Agreement, a method for authenticating user in 3G network
by using 3G-SIM, de-fined in RFC 4187.
6
EAP-LEAP
Extensible Authentication Protocol/Lightweight Extensible
Authentication Protocol, based on PEAP but with lighter security, defined by Cisco Systems.
EAP-PEAP
Extensible Authentication Protocol/Protected Extensible
Authentication Protocol, defined by Microsoft, Cisco Systems and RSA Security.
EAP-SIM
Extensible Authentication Protocol/Subscriber Identification
Module, a method for authenticating user in 2G network by
using GSM-SIM, defined by Nokia/Haverinen et al, IETF
RFC 4186.
EAP-TLS
Extensible Authentication Protocol/Transport Layer Security, based on X.509 certificate, defined by Microsoft, IETF
RFC 2716.
EAP-TTLS
Extensible Authentication Protocol/Tunnelled Transport
Layer Security, based on security certificate but information
is transferred inside a secured tunnel, defined by Funk Software/Juniper and Certicom corporations.
ETSI
The European Telecommunications Standards Institute, produces globally-applicable standards for Information and
Communications Technologies.
FSF
Free Software Foundation, a non-profit organization founded
by Richard Stallman on 4 October 1985 to support the free
software movement, promoting the universal freedom to create, distribute and modify computer software, with the organization's preference for software being distributed under
copyleft ("share alike") term.
GIMP
GNU Image Manipulation Program, an image retouching
and editing tool released under the LGPLv3 and later versions as free and open-source software.
GNU
Recursive acronym for “GNU is Not Unix”, a free, Unix-like
operating system for computers containing no Unix-code.
GSM
Global System for Mobile Communications is a standard set
developed by the ETSI to describe protocols for second generation (2G) digital cellular networks used by mobile
phones.
7
GTK+
GIMP Toolkit, a cross-platform widget toolkit for creating
graphical user interfaces.
HTTP
Hypertext Transfer Protocol.
IAS
Internet Authentication Server, part of Microsoft Windows
Server, a product from Microsoft Corporation, provides
RADIUS functionality.
IEEE
Institute of Electrical and Electronics Engineers, publishes
nearly a third of the world’s technical literature in electrical
engineering, computer science, and electronics.
IEEE 802.11
Standard for Information technology, Telecommunications
and information exchange between systems local and metropolitan area network.
IEEE 802.11i
Amendment to IEEE 802.11 defining security mechanisms
for IEEE 802.11.
IETF
Internet Engineering Task Force, an international community
of network designers, operators, vendors, and researchers
concerned with the evolution of the Internet architecture and
the smooth operation of the Internet.
INI-file
Initialization file. The INI-file format is an informal standard
for configuration files for some platforms or software. INIfiles are simple text files with a basic structure composed of
"sections" and "properties".
IP
Acronym for TCP/IP.
ISM
License-free radio spectrum intended for Industrial, Scientific and Medical usage.
ITU
International Telecommunication Union, United Nations
specialized agency for information and communication technologies.
ITU-T
One of the three sectors (divisions or units) of the ITU coordinating standards for telecommunications.
LAN
Local Area Network, computers connected in the same physical or logical entity wired means.
LGPL
The GNU Lesser General Public License (formerly the GNU
Library General Public License) is a free software license
published by the Free Software Foundation (FSF). The
8
LGPL allows developers and companies to use and integrate
LGPL software into their own (even proprietary) software
without being required (by the terms of a strong copyleft) to
release the source code of their own software parts.
Netsh
A tool for an administrator to use to configure and monitor
Windows-based computers at a command prompt.
PDU
Power Distribution Unit, controllable via LAN or serial cable.
Ping
A computer network administration utility used to test the
reachability of a host on an Internet Protocol (IP) network
and to measure the round-trip time for messages sent from
the originating host to a destination computer. The name
comes from active sonar terminology which sends a pulse of
sound and listens for the echo to detect objects underwater.
PKI
A set of hardware, software, people, policies, and procedures
needed to create, manage, distribute, use, store, and revoke
digital certificates.
Plink
PuTTY Link, command-line version of PuTTY.
PMI
Privilege Management Infrastructure, a process of managing
user authorizations based on the ITU-T Recommendation
X.509.
Proxy
An intermediary element for clients to use resources on remote servers. In this context proxy directs requests to correct
authentication server.
PsExec
A command-line remote administration tool allowing remote
execution of processes on other systems. Originally developed by Mark Russinovich of Sysinternals -corporation.
PuTTY
SSH and Telnet client, developed originally by Simon Tatham for the Windows platform.
Qt
Platform independent graphical user interface and program
development environment.
RADIUS
Remote Authentication Dial In User Service, a service which
authenticates users, computers, client software allowing usage of resources.
9
RFC
Request for Comments, in this context refers to IETF's recommendations which are widely adopted to use but not yet
set as official standards.
RPC
Remote Procedure Call, an inter-process communication
enabling a program to execute a process, procedure or subroutine in another computer.
SCIntilla
A free source code editing component for Windows and
GTK+ developed by SCIntilla project.
SciTE
A SCIntilla based Text Editor.
SIM
Subscriber Identification Module, an integrated circuit securely storing international mobile subscriber identity and
the related key to authenticate user on network.
SOHO-mode
Small Office, Home Office; WFA commercial term for personal authentication
SSH
Secure Shell, cryptographic network protocol for secure data
communication, remote shell services or command execution
and other secure network services between two networked
computers.
TCP/IP
Transmission Control Protocol / Internet Protocol; TCP/IP
provides end-to-end connectivity specifying how data should
be formatted, addressed, transmitted, routed and received at
the destination.
Telnet
Network protocol used on the Internet or local area networks
to provide a bidirectional interactive text-oriented communication facility using a virtual terminal connection.
Tftp
Trivial File Transfer Protocol, a file transfer protocol generally used for automated transfer of configuration or boot files
between machines in a local environment.
TKIP
Temporary Key Integrity Protocol, a security protocol used
in the IEEE 802.11 wireless networking standard.
UNIX
A multitasking, multi-user computer operating system that
exists in many variants.
UMTS
Universal Mobile Telecommunications System, a third generation (3G) mobile cellular system for networks based on
the GSM standard.
10
WEP
Wired Equivalent Privacy, a security protocol to authenticate
user in the IEEE 802.11 wireless networking standard, usually 64bit (WEP64) or 128bit (WEP128).
WFA
Wi-Fi Alliance, a non-profit organization coordinating certification and development of Wlan-related issues.
Wi-Fi
Wireless Fidelity, a trademark for Wi-Fi Alliance, used as a
synonym for Wireless LAN Local Area Network.
Wlan
Wireless Local Area Network, computers connected in the
same physical or logical entity using wireless means. In this
context refers to IEEE 802.11 wireless networking standard.
WPA
Wi-Fi Protected Access, authentication method using TKIP
ciphering.
WPA2
Wi-Fi Protected Access 2, authentication method using
CCMP/AES ciphering.
X.509
An ITU-T standard for a public key infrastructure (PKI) and
Privilege Management Infrastructure (PMI). X.509 specifies
standard formats for public key certificates, certificate revocation lists, attribute certificates, and a certification path validation algorithm.
11
1
INTRODUCTION
When a data communication product is being developed it is very important to take into
account also other devices available on the market.
Product development cycles have been shortened massively due to market pressure.
Therefore it is quite common to find products on the market which are not manufactured
by the specifications or which are not certified. Some of these certifications are not
mandatory and therefore it is tempting to leave out those money and time consuming
testing sessions.
Certification testing focuses on testing whether a device fulfills the requirements mandated by the certification body. It does not take into account how a device functions
with other devices. Therefore interoperability testing has become a natural addition to
testing scope for companies manufacturing data communications equipment.
Interoperability testing uses end-user perspective and takes into account most relevant
use cases for the device. Testing is usually performed against other devices available in
the market.
Wireless LAN interoperability testing for cellular phones contains many aspects ranging
from Access Pont selection to encryption and authentication methods. The number of
possible selections grows large and adds complexity to test environment setup.
A complex test environment is prone to human-induced errors when setting up testing
systems. These errors may cause abnormal behavior of the whole system and create
unexpected delays to testing schedule.
By letting a computer to take care of setting up the test environment can human errors
be avoided and testing can focus on finding possible errors on the tested device.
Due to corporate-specific nature of the interoperability testing environment there were
no products available in the market which could be used right away or even with some
modification. It became necessary to create a tool for this specific use.
12
2
2.1
WI-FI ALLIANCE
Introduction
One example of these non-mandatory or regulatory certifications is the Certification for
Wireless Local Area Networks (WLAN) maintained by Wi-Fi Alliance (WFA) (Wi-Fi
Alliance 2013). It is a non-profit organization coordinating WLAN development and
certification. It was found in 1999 and founding members 3Com, Aironet, Intersil, Lucent Technologies, Nokia and Symbol Technologies. Nowadays WFA consists of over
400 member companies.
WFA develops and maintains test plans for their member companies to certify their
products. Common test plans are mainly developed for certifying pc-centric devices,
and therefore member companies can create their own test plans. These companyspecific test plans require approval from technical department of WFA.
2.2
Wireless Local Area Network Access Point
Wireless Local Area Network Access Point (AP) is a device connecting wireless client
devices to existing wired network. There are many different brands and models available and their availability varies also geographically. Local laws and regulations have an
effect on the product availability not to mention about local teleoperators who may have
proprietary rights to certain products.
The basic functionality of an AP is defined by the chipset it is using. Also antenna design and AP’s host software have an effect. The number of chipset vendors is limited
and therefore it is possible to get good market coverage for testing. The basic functionality of the chipset remains approximately the same regardless the AP manufacturer.
WFA certification testing uses only a few APs which are not available publicly. It focuses on throughput measurements. All encryption types and authentication methods
suitable to certifying product are also tested.
13
2.3
Authentication methods, Personal
WFA uses terms “Personal” and “Enterprise”. The term “Personal” in this context
means the authentication does not require an authentication server and/or encryption
certificate whereas “Enterprise” applies those. Table 1 describes the authentication
methods defined for Personal use with APs.
Table 1: Personal authentication methods
Method name
Protection type
Open Network
no encryption
Wired Equivalent Privacy (WEP) password containing 10 hexadecimal characters
64-bit
(removed from current certification requirements)
WEP 128-bit
password containing 26 hexadecimal characters
(removed from current certification requirements)
Wi-Fi Protected Access (WPA) password containing 8 - 63 printable ASCIIPersonal
characters using TKIP-encryption for each packet
transmission between the client and Access Point
(removed from current certification requirements)
Wi-Fi Protected Access II password containing 8 - 63 printable ASCII(WPA2) Personal
characters using CCMP/AES–encryption for each
packet transmission between the client and Access
Point
Both WEP-encryptions are removed from certification requirements due to their vulnerability to attacks. Also WPA is removed, as it was a temporary replacement of WEP
offering much higher degree of security. It contained almost the full IEEE802.11i standard but lacked a strong message integrity check algorithm thus enabling retrieving
the key stream for short packets and use those for re-keying and spoofing.
Even though WEP/WPA -encryptions were removed from certification plans those can
still be found in almost all APs despite their security vulnerabilities. Current certification requirements mandates WPA2-encryption which is considered to be safe and it
contains full support for IEEE802.11i -standard.
14
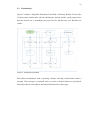
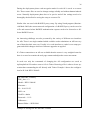
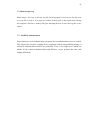
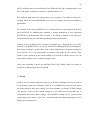
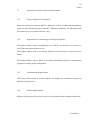
Figure 1 shows the principle of a successful Personal authentication. The AP makes the
decision whether the client may access resources via it.
Figure 1: Personal authentication principle
Personal authentication is seen adequate for home and small office use due to its minimal hardware requirements. For additional security and access control manageability
Enterprise authentication is used.
2.4
Authentication methods, Enterprise
For Enterprise usage mere password-based authentication is not seen as secure-enough
method and therefore Extensible Authentication Scheme is used. It adds to security by
implementing certificate-based authentication using Extensible Authentication Protocol
(EAP). When Enterprise authentication is used an authentication server is required. It
adds more complexity to the environment but also more security, when implemented
properly.
No single server product can handle all possible certificate-based methods. Therefore
there are multitudes of products available on the market. Most common ones are Mi-
15
crosoft Server 2003 (Internet Authentication Server, IAS)/2008/2008 R2/2010, Cisco
ACS and FreeRADIUS. Quite often these authentication servers are referred as RADIUS (Remote Authentication Dial In User Service). Sometimes also abbreviation AAA
(Authentication, Authorization and Accounting) is used. Most common EAP-methods
are described in Table 2.
Table 2: Common EAP-methods
EAP-method
EAP-TLS
EAP-PEAP
EAP-TTLS
EAP-LEAP
EAP-SIM
EAP-AKA
Description
Transport Layer Security, developed by Microsoft, IETF RFC 2716
Protected Extensible Authentication Protocol v0 and v1, developed by
Microsoft, Cisco and RSA Security
Tunnelled Transport Layer Security, developed by Funk Software and
Certicom
Lightweight Extensible Authentication Protocol, developed by Cisco
Method for GSM Subscriber Identification Module, developed by
Nokia/Haverinen et al, RFC 4186
Method for UMTS Authentication and Key Agreement, RFC 4187
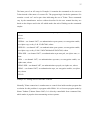
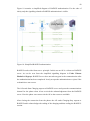
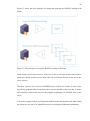
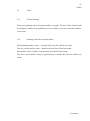
Figure 2 shows the principle of an Enterprise authentication. The most notable difference when comparing to Personal authentication is the role of an AP. In the Enterprise
authentication it acts only as an intermediary directing the authentication requests to
authentication server, which makes the decision whether the client may access the network resources via AP or not.
Figure 2: Enterprise authentication principle
16
3
3.1
TASK AT HAND
Background
Common practice and reality has proven the following: device certification does not
guarantee interoperability with the devices already on the market. Most important reasons being:
- Certification definitions are not 100% applicable to every situation, but leave room for
interpretations in some cases
- Not all companies certify their products
Therefore testing the corporate product with as many products on the market as possible
is the only viable solution to guarantee reasonable degree of interoperability.
3.2
Interoperability testing
Interoperability testing is one of the most mundane tasks when new data communications products are being developed. Regardless the technology a reasonable level of
interoperability has to be achieved and maintained before the product can enter to market.
The actual testing has to consider the requirements of the needed certifications and take
into account other manufacturer’s devices which may, or not, function as specified. In
addition human behaviour has to be accounted for i.e. how people will use the product.
17
4
4.1
GETTING STARTED
The starting point
Interoperability testing for wireless LAN -enabled Nokia phones had to be taken care of.
Very soon it was discovered each AP has their own user interface, different types of
settings and no common interface to handle administrative tasks and change settings. In
practice every AP is its own individual unit and needs to be setup accordingly.
Due to other engagements external workforce had to be used for actual testing every
now and then. Sometimes they did not necessary had the experience of setting up various APs and/or had too busy schedules for the testing. This resulted many hectic error
hunting sessions and wasted time.
A slight relief was discovered as most of the APs support saving the active settings to a
backup file. It can be imported back to AP to change e.g. encryption method. Despite of
this time-saving feature some problems remained: sometimes a wrong file was imported
due to misunderstandings or not seeing the whole picture of the scope for testing.
A quick search did not return any products already in the market which could be used
either off-the-shelf or with some modification. There were some programs which could
be partially used, for example PCAnywhere, but they lacked some capabilities and had a
price tag which could not be justified by very strict budget limitations.
These small setbacks induced a thought of a self-made user interface, which would hide
the complexity of setting up the environment. Setup may contain not only the AP settings but also RADIUS-settings depending on selected authentication method.
A self-guiding graphical user interface or front-end started to form. Windows operating
systems environment was chosen as most of the computers, tools and measurement
equipment were using it. The actual tool would combine a user interface and various
data communications subsystems to be able to control the whole setup from a console.
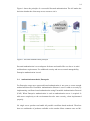
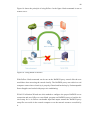
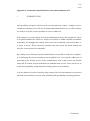
18
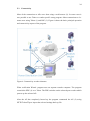
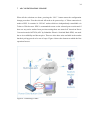
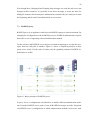
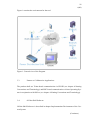
Figure 3 shows the environment for which the tool is designed for. It comprises of a
laboratory network to which all the elements are connected to either directly or via LAN
or WAN.
Figure 3: Interoperability test network
The first assumption was to use some commonly known programming language like
C++, but soon it was discovered programming skills were not up-to-date. Next to consider was Qt due to its popularity by the time of the development but it also proved to
be too hard to learn within usable timeframe. After some searching a BASIC-like scripting language called AutoIt (Bennet Jonathan & AutoIt Consulting Ltd. 2013) was
found.
19
4.2
AutoIt
After a few try outs AutoIt Scripting language was decided to take into use. It is free,
BASIC-like scripting language and has pre-defined controls like buttons, radio-buttons,
lists and alike for Windows operating systems. It can simulate and automate button
presses, mouse movements and windows controls manipulation. With it was fairly simple to create a user interface and compile a royalty-free executable file.
Other valid properties were fairly large base of supported Windows versions (2000 / XP
/ Windows Server 2003 / Vista / Windows Server 2008 / Windows 7), quite large and
active community on support forum and a dedicated editor, based on SciTE with some
modifications. Also memory consumption was very modest and during week-long idle
tests it remained stable indicating no memory leaks.
Normally script created with AutoIt works with checking the controls (buttons, selection windows and others) inside a loop. When the number of controls is over 10 response time of the script goes beyond acceptable. Luckily AutoIt supports also eventbased actions based on sending messages.
When a control is manipulated (button pressed, selection made) it returns a code unique
for that particular control to main loop. This code is sent as a message to a desired function which does its job and returns a value. This “On Event” -mode enables very decent
response times and keeps CPU utilization at modest levels.
4.3
Other considerations
User interface language selection was naturally English, as it is the de-facto language of
the trade. Comments were added directly to the source code to make the code selfcommentary so it would be easier to debug if something goes wrong or needs to be
changed.
No actual design documentation was created during the implementation as this was a
tool for own use. Look and feel of the program evolved quite fast to what it is now containing only the bare essential elements to do the job.
20
For Master’s Thesis Requirement documentation (Appendix 1: Requirement documentation for semi-automation tool) and System Architecture Specification (Appendix 2:
Architecture Specification for the semi-automation tool) were created. The Requirement
Specification is based on Volere Requirements Specification Template, Edition 15 March 2010 by James & Suzanne Robertson, principals of the Atlantic Systems Guild
(Atlantic Systems Guild Limited 2013):
The template may not be sold, or used for commercial gain or purposes other than as a
basis for a requirements specification without prior written permission. The Template
may be modified or copied and used for your requirements work, provided you include
the following copyright notice in any document that uses any part of this template:
We acknowledge that this document uses material from the Volere Requirements Specification Template, copyright © 1995 – 2010 the Atlantic Systems Guild Limited.
21
5
5.1
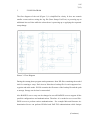
WLAN VERIFICATION WIZARD
The User Interface
The first versions of the user interface contained only the necessary components: AP -,
encryption-, authentication- and RADIUS- selections as well as GO- and Exit –buttons.
After some feedback a logging window was added. It contains information of which
setups have been completed. Next item to add was PDU control program as a separate
executable to manually power-up the APs. Eventually PDU control program was integrated to main user interface to minimize the number of open programs on the desktop
of the console.
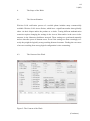
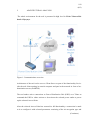
Start-up situation of the tool can be seen in Figure 4. User can make various selections,
which have logic behind: if some selection is not viable or not supported that selection
is greyed out.
Figure 4: The User Interface
22
User can select the radio type (Section 802-mode: normal 802.11 b/g, 802.11n in 2.4
GHz or 802.11n in 5GHz), air encryption type (Section Air Encryption: none, WEP,
PSK or Enterprise), desired AP (Section Access Point: up to 16 different ones, dynamic
list), possible EAP-type (Section EAP-Type) and RADIUS-server (Section RADIUS
server).
User interface also contains manual controls for PDU (Section Access Point Power
Control), which can be operated individually regardless the main program. In previous
versions it was a separate program but added into main view after receiving constructive
feedback from other users.
A button with text “Do Not Worry!” is a reset-button for PDU if for some reason power
needs to be cut down immediately from all outlets (inspired by Douglas Adams’ masterpiece “The Hitchhiker’s Guide to the Galaxy”).
In the bottom of the screen is a list view (Section Done Setups). It contains timestamp
and all the selections made for a setup. It also contains a free-text editable field for own
textual comments. This list is also a log file from which can be checked which setups
have been completed. Log file is saved when program exits but intermittent saves can
be done any time by pressing “Save Setups” –button or the log can be cleared by pressing “Clear Setups” –button.
23
5.2
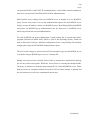
Functionality
Figure 5 contains a simplified flowchart of the Wlan verification Wizard. For the sake
of clarity some smaller tasks, like the checking for opened window (is the opened window the desired one or something else) were left out. All the basic core functions are
visible.
Figure 5: Simplified flowchart
Each object manipulation, such as pressing a button, selecting a radio-button creates a
message. This message is examined and as a result a desired function is performed.
Each object has its own address and functionality based on object type.
24
5.3
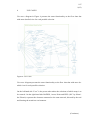
Connectivity
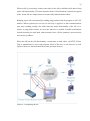
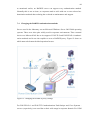
Most of the connections to APs were done using a web-browser (2). In some cases it
was possible to use Telnet or vendor-specific setup program. Other connections to elements were using Telnet (1) and RPC (3). Figure 6 shows the basic principal operation
and connectivity aspects of the program.
Figure 6: Connectivity to other elements
Wlan verification Wizard -program runs on separate console computer. The program
controls the PDU (1) over Telnet. The PDU switches on the selected power outlet which
powers up the selected AP.
After the AP has completely booted up the program commands the AP (2) using
HTTP/Telnet/Tftp to import the selected settings back up file.
25
When settings restore is completed on the AP the program contacts the RADIUS-proxy
(3) using PsExec- and Netsh-programs and network configuration files created during
the deployment phase and configures it for possible RADIUS authentication.
When these steps are completed phone can connect to the AP, authenticate against the
RADIUS-server and perform the needed test round. These functionalities are described
more thoroughly later on.
Changing the test setup requires 1 – 3 steps depending on what will be adjusted. If only
the air encryption mode is changed within the selected AP then only step 2 is needed, as
the AP is powered up already. If another AP is selected but no Enterprise authentication
is selected then steps 1 and 2 are needed. If another AP is selected and Enterprise authentication is used then all 3 steps are needed.
26
6
PROGRAM OPERATION
6.1
Program initialization
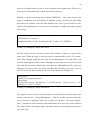
When the program starts all start up settings are read from VerificationWizard.ini -file.
A sample file can be found in Example 1. Ini -file type was chosen for this task due to
its easy modifiability. It is a simple text file and editable with any text editor which can
produce pure ASCII-text. It also can contain comments and keywords for creating sections for different parts of the setup. Any line beginning with a semicolon is considered
as a comment. Keywords are separated from normal text with square brackets “[ ]”. Any
parameter after the brackets belongs to that specific section.
; WLAN VerificationWizard.ini
; Contains settings and variables
;
; Author: Jukka Issakainen
;
[AP]
APSetupInfo = APSetupInfo.ini
[EAP]
Types = TLS/PEAPv0, PEAPv1, TTLS, SIM, AKA
[Misc]
; These are just informational texts to show on screen, after AP-setup is completed
SSID = QAS_Verification
WEP64_Key = 1234567890, Key 2 (10 HEX digits)
WEP128_Key = 1234567890abcdef1234567890, Key 2 (26 HEX digits)
WPA(2)-PSK_Key = 12345678
TestUser = testi
TestUser_PWD = *****
TestUser_Logon_Domain = WLAN-AUTH20
[RADIUS]
RadiusSetupInfo = RadiusSetupInfo.ini
Example 1: VerificationWizard.ini –file
27
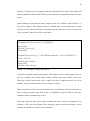
In the beginning a single file was considered to be sufficient but was soon found out
there were so many parameters it would be simpler to separate AP and RADIUS settings to their own files (APSetupInfo.ini and RadiusSetupInfo.ini in the example).
Figure 7 illustrates the division of ini-files. The VeificationWizard.ini - file contains
entries which define the file name for AP and RADIUS initialization files.
Figure 7: Ini-files division
6.2
AP initialization
Capabilities of installed APs are read from APSetupInfo.ini -file as defined in Verification Wizard.ini -file. These capabilities are recorded to APSetupInfo.ini-file when a new
28
AP is added to the system. Also restore-files containing the correct encryption methods
are created when new AP is added. Following a shortened sample in Example 2 of
APSetupInfo.ini –file. The first part containing a semicolon in front of the line is a
comment and help text for editing the file.
; Access Point Info file
; Contains settings and variables
; Author: Jukka Issakainen
; PDU_Port =
Physical AC outlet # in APC Switched Rack PDU
; Model =
Info abt AP model, not used, but clarifies ini-file
; Firmware =
Info abt Firmware
; IP =
IP-address of AP
; SSH = yes/no
If AP is capable of SSH
; 802.11n_2 =
If AP supports 802.1n 2.4GHz mode, prefix for setupfile
; 802.11n_5 =
If AP supports 802.1n 5GHz mode, prefix for setupfile
; UserID =
User name of AP administrative account
; Password = Password of AP administrative account
; GoRestore =
Path to config restore page inside Access Point, if exists
; RestoreFolder =
Folder used to store config-files; empty folder, if
Telnet/SSH is used
; Open =
Open, no wep-key etc
; 802.1x=
802.1x with dynamic wep-key 128-bit and RADIUS
; WEP128 =
wep-key 128-bit, no RADIUS
; WPA-PSK =
WiFi Protected Access, Pre Shared Key using TKIP +
AES (a.k.a mixed WPA SOHO-mode), no RADIUS
; WPA =
WiFi Protected Access, RADIUS for EAP-types using
TKIP + AES (a.k.a mixed WPA Enterprise-mode)
; WPA2-PSK =
WiFi Protected Access 2, Pre Shared Key using AES, no
RADIUS
; WPA2 =
WiFi Protected Access 2, RADIUS for EAP-types using
AES
; LEAP =
Cisco specific mode
Example 2: APSetupInfo.ini –file
29
Example 3 shows the usage of keyword [AP]. It describes the names of APs which are
available for testing and displayed in the main user interface, available encryption
modes used for restore-file, path to root folder of restore files and Wlan modes available.
[AP]
Models = A-Link WNAP, Apple Airport Extreme, Cisco 1231, Belkin N1 Vision,
Buffalo
WZR-AG300NH,
D-Link
DIR-655,
Linksys
WRT54GS,
Linksys
WRT350N, Linksys WRT610N, Netwjork 54Mbps, Thomson 585, Telewell TWEA515, ZyXEL NBG-415N, ZyXel P-661HW-D1
RestoreModes = Open, WEP128, WPA-PSK, WPA2-PSK, WPA, WPA2, 802.1x
RestorePath = D:\Jukan\automation\AP_Setups
802Modes = 802.11 b/g, 802.11n (2.4GHz), 802.11n (5GHz)
Example 3: APSetupInfo.ini -file
Example 4 shows the usage of keyword [PDU] describing the PDU parameters which
are used when powering up or down an AP.
[PDU]
; PDU_Enabled = Yes or No
; New interface after FW upgrade 2.70 or newer: <password><space>-c
PDU_Enabled = yes
PDU_IP = 10.10.32.17
PDU_User = wizard
PDU_Pwd = *******
Example 4: APSetupInfo.ini –file
Example 5 shows how keyword [ap name] (A-Link WNAP in this example) is used to
describe the PDU port, AP Model, firmware version, IP-address, whether the selected
AP is capable for SSH, prefix to be used for 2.4GHz or 5GHz restore files, administrative user name and password, the shortest path to restore page, the folder into which
restore files are stored (relative to RestorePath -root folder) and file names of the sup-
30
ported modes. If some entry is empty then the feature is either not supported or deliberately not used.
[A-Link WNAP]
PDU_Port = 16
Model = WL524
Firmware = e2.04
IP = 10.10.32.151
SSH = no
802.11n_2 = WNAP_N2_
802.11n_5 = WNAP_N5_
UserID = admin
Password = *****
GoRestore = /saveconf.asp
RestoreFolder = \A-LinkWNAP
Open = A-Link_Open.dat
802.1x =
WEP64 =
WEP128 = A-Link_WEP128.dat
WPA-PSK = A-Link_wpa-psk_mixed.dat
WPA = A-Link_WPA_enterprise_mixed.dat
WPA2-PSK =
WPA2 = A-Link_WPA2_enterprise.dat
LEAP =
Example 5: APSetupInfo.ini –file
As this program was to be used in laboratory residing in employer’s premises with strict
access control means for both physical entrance and for data communications it was
decided not use encryption to protect these settings. Would such a need to emerge, it
would have been fairly simple to apply encryption either to the console computer itself
or just for data files. For more info see Appendix 6. AccessPointInfo.ini -file
31
6.3
The Capability-matrix
The [AP] -section is a basis for a capability matrix for selected AP. If some encryption
or authentication type is not supported with that particular AP then it will not be selectable but dimmed. Similar procedure is also used when other selections are made: the
program enables or disables selections which are not supported by selected combination. This functionality greatly reduces errors as the end-user cannot make a conflicting
selection.
The following code in Example 6 reads AP’s capabilities to a two-dimensional array
which is used every time when end-user makes a selection (802 -mode, Air encryption,
Access Point, RADIUS Server) and validates it.
Dim $asApCapa[$iNumOfAP][$iNumOfAir + 2] ; +2 for 802.1n -modes
For $i = 1 To $asListAP[0]
$asApCapa[$i][0] = $asListAP[$i] ; AP name for column #0
For $j = 1 To $asListAir[0]
$asApCapa[0][$j] = $asListAir[$j]
$asApCapa[$i][$j] = StringStripWS(IniRead($sLocalPath
& $sApIniFile, $asListAP[$i], $asListAir[$j], "NotFound"), 8)
Next
$asApCapa[0][$j] = ".1n prefix 2.4GHz"
$asApCapa[$i][$j] = StringStripWS(IniRead($sLocalPath & $sApIniFile, $asListAP[$i], "802.1n_2", "NotFound"), 8) ; 2.4 GHz 802.1n -mode prefix
$asApCapa[0][$j + 1] = ".1n prefix 5GHz"
$asApCapa[$i][$j + 1] = StringStripWS(IniRead($sLocalPath &
$sApIni-File, $asListAP[$i], "802.1n_5", "NotFound"), 8) ; 5 GHz 802.1n -mode
prefix
Next
Example 6: ReadCapabilities
The above Example 6 also shows how variables are named. AutoIt uses a dollar-sign ($)
in front of all variables. In addition it was decided to use naming convention, which
itself would give information of what kind of variable is in question. ”$asApCapa”
32
means an array of strings (”$as” = array string). ”ApCapa” is an abbreviation of Access
Point Capabilities, ”iNumOfAP” means an integer variable (”$i” = integer) and
”NumOfAP” means “Number of Access points”. AutoIt itself does not force to use this
kind of naming convention but it has proven to clarify variable naming.
6.4
RADIUS initialization
As with AP initialization, RADIUS capabilities are read from the initialization file to a
capability matrix. This matrix is used, as with AP-case, to rule out invalid selections.
This approach reduces errors which are caused by incompatible authentication methods
and therefore saves time when the end user does not have to debug the erroneous situation.
As with AP setup file comments are used to inform the user of how the parameters have
to be applied. To shorten the example comments were left out. For more info see Appendix 7. RADIUSSetupInfo.ini -file. The following Example 7 shows how RADIUSparameters are used. [RADIUS]-section contains common parameters for the program
operation.
[RADIUS]
RestorePath = D:\wlan\ap_setups\radius
RadiusProxy = 10.10.32.10
Username = wizard
UserPwd = *****
; Proxy address is needed for psexec, which will run e.g. netsh exec ias.set on remote
Servers = Microsoft IAS, Juniper Odyssey, Cisco ACS, FreeRADIUS, Nokia Test
Network
; RADIUS *.set files are created with NETSH-cmd. It dumps current IAS-setting
; to a file, which can be restored to instantly change authentication settings
; To record current settings enter to command prompt: netsh aaaa dump > filename.set
; To Restore saved settings enter to command prompt: netsh exec filename.set
Example 7: RadiusSetupInfo.ini
33
[Microsoft IAS] -section is presented in Example 8. It contains all the needed info to
perform a change. This server is also used as the RADIUS-proxy-server directing the
authentication requests to the selected RADIUS server. Change of RADIUS server can
occur if another method of Enterprise authentication is required. As can be seen from
the following Example 8 Microsoft IAS supports only EAP-TLS and EAP-PEAPv0
authentication methods. If anything else is needed then proxy settings must be changed
to divert the authentication requests to a suitable RADIUS-server.
[Microsoft IAS]
IP = 10.10.32.20
Port = 1812
RestoreFile = ias.set
TLS/PEAPv0 = yes
PEAPv1 = no
TTLS = no
PureTTLS = no
LEAP = no
SIM = no
AKA = no
Example 8: RadiusSetupInfo.ini
34
7
AP CONFIGURATION CHANGE
When all the selections are done, pressing the “GO!” –button starts the configuration
change procedure. First the selected AP needs to be powered up. A Telnet-connection is
made to PDU. It contains 16 230VAC outlets which are independently controllable via
Telnet or Web-browser. PDU is commanded to turn on the selected power outlet and if
there are any active outlets from previous testing those are turned off. American Power
Conversion model AP7950 (APC by Schneider Electric: Switched Rack PDU) was used
due to its availability and decent price. There are also other units available in the market
but their pricing proved to be out of scope. Figure 8 shows the element to which the first
operation focuses.
Figure 8: Connecting to PDU
35
When an AP is powered up it takes some time for the AP to initialize itself and to bring
up the full functionality. This time depends on the AP itself and the selected encryption
mode. Some APs are simply faster to become fully functional than others.
Bringing up an AP is monitored by sending ping-packets from the program to AP’s IPaddress. When responses are received a wait loop is applied, as data communications
port starts working usually a bit earlier than the actual functionality of the AP. If response to ping-packet returns an error the end-user is notified. Possible notifications
include checking for cable fault, other network errors, off-line situation, correct network
and correct ip-address.
When the AP has the full functionality a connection is made either via HTTP, Telnet,
Tftp or manufacturer’s own setup program. Most of the cases a web browser is used.
Figure 9 shows to which element the second operation focuses.
Figure 9: Configuring the AP
36
During the deployment phase each encryption mode for each AP is saved to a restore
file. These restore files are used to change settings reliably and without human-induced
errors. Naturally deployment phase has to be precise and all the settings need to be
thoroughly checked before saving the setup to a restore file.
Similar idea was used with RADIUS-proxy setup. By using Netsh-program (Russinovich Mark 2008) the current network configuration of a RADIUS-proxy can be saved to
a file and restored when RADIUS authentication requests need to be diverted to a different RADIUS-server.
An interesting challenge was also presented by the variety of different user interfaces
for APs. There is no single standard which could be used to administer an AP but every
one of them has their own way. Usually it is a web-interface to vendor’s own setup program and which changes when new firmware upgrades are applied.
If a Telnet-connection to an AP was available then the restore is very straight forward as
there is no need to examine the web page content and adjust the cursor movement.
In such case only the commands of changing the AP configuration are saved to
ApSetupInfo.ini file and are sent to AP via Telnet. Restoring a file is often a slower operation than commanding the AP directly with Telnet. Example 9 shows the configuration for D-Link DWL-2200AP.
[D-Link DWL-2200AP]
PDU_Port = 13
Model = DWL-2200AP
Firmware =
IP = 10.10.32.153
SSH = no
UserID = admin
Password = *****
GoRestore =
RestoreFolder = \DWL2200
Example 9: Settings for D-Link DWL-2200AP
37
The latter part of an AP setup in Example 10 contains the commands to be sent over
Telnet instead of the name of a restore file. The program logic checks the parameter if it
contains a word “set” and a space thus indicating the use of Telnet. These commands
vary by the manufacturer and are seldom described in the user manual but they are
based on the chipset used in the AP which makes the task of finding out the commands
simpler.
Open = set channel 2457, set authentication open-system, set encryption disable,
reboot
802.1x =
WEP64 = set channel 2457, set authentication open-system, set encryption enable,
set cipher wep, set key 2 40 1234567890, reboot
WEP128 = set channel 2457, set authentication open-system, set encryption enable,
set cipher wep, set key 2 104 1234567890abcdef1234567890, reboot
WPA-PSK = set channel 2457, set authentication wpa-auto-psk, set cipher auto, reboot
WPA = set channel 2457, set authentication wpa-auto, set encryption enable, set
cipher auto, reboot
WPA2-PSK = set channel 2457, set authentication wpa-psk, set cipher aes, reboot
WPA2 = set channel 2457, set authentication wpa, set encryption enable, set cipher
aes, reboot
LEAP =
Example 10: Settings for D-Link DWL-2200AP
Normally Telnet-connection is cumbersome to control from inside another program but
a solution for this problem is a program called Plink. It is a freeware program made by
Simon Tatham (Tatham Simon 2005). It is directly controllable from command line,
which makes it popular when automating various systems.
38
7.1
AP configuration change in details
Although AutoIt enables direct screen object manipulation it was found easier to use the
browser delivering the commands. Microsoft Internet Explorer was chosen due to its
availability with the base operating system of the console computer.
Depending on AP’s implementation screen objects may be very hard to find programmatically and they might change every time a firmware update is applied to an AP. Also
some AP implementations hide the component class or instance id. Therefore tabulations were used to move the cursor in the AP web page and Enter-button pressed programmatically simulating a user without a mouse would have done.
All encryption modes are each saved in restore files using a descriptive name for it
like”A_Link_WEP128.dat”. From the name it is quite clear to see that particular file is
for A-Link AP and it is using 128-bit WEP encryption.
Manipulation of the APs has been separated from the main program to its own program
called”RestoreAP.exe”. It used to be a part of the main program but when the number of
APs grew larger, it was clearer to separate it as an individual program.
7.1.1 Controlling the AP with RestoreAP.exe
RestoreAP opens the administrative page of the AP with a browser using the shortest
path -method. All APs contain an input field for restoring a settings backup file. Input
field is selected programmatically and the path and the file name are fed to it.
Shortest path -method is simply a path to AP’s restore page added to AP’s IP-address.
The shortest path is defined in GoRestore-parameter residing in the ini-file defined by
the ApSetupInfo-parameter in the VerificationWizard.ini -file.
When the browser has started up, contacted the AP and opened the restore page, program sends enough tabulation key presses for cursor to land on restore file input field.
Then the file name and path are submitted to the field, tabulation key sent to move the
39
cursor to Ok-button and key press is sent to emulate mouse button click. Then AP restores the file and restarts after a while with the desired setup.
Example 11 shows how setting up of Linksys WRT54GS – AP is done. It shows the
usage of component class and instance id methods. Linksys proved to be quite stable
and caused no problems even the both methods were used. It was decided to leave
Linksys AP manipulation as is to serve also as an example, whether any change requests
may emerge.
Case $sSelectedAp = "LinksysWRT54GS" ;
WinWaitActive("Connect")
Send($sUserID & "{TAB}" & $sPassword & "{TAB 2}" & "{ENTER}")
Example 11: Setting up Linksys WRT54GS
First the script waits for a browser window with a header “Connect” to open and become active. When the page is active the cursor is automatically on AP’s User name field. Then program sends the user name of the administrative user ($sUserID, read
from the ApSetupInfo.ini-file), sends a tabulation to move the cursor to next text field,
and sends the password ($sPassword, read from the ApSetupInfo.ini-file). Next two
tabulations are sent to move the cursor on OK-button and Enter -key press is sent to
enter the user name and password to AP. The setup continues in Example 12.
Sleep(2000)
WinWait("Config Management")
Sleep(2000)
ControlClick("Config Management","","[CLASS:Internet
STANCE:1]","left",1,373,300);
Explorer_Server;
IN-
Example 12: Setting up Linksys WRT54GS
The program waits for two seconds and starts to monitor when the AP has opened the
window with the title “Config Management”. After the window has been detected a
two second wait is applied to ensure AP is fully up to the pace. “Left mouse button click” -command is used with object class and instance id to move the cursor to Restore
File -input field by emulating a mouse movement and user pressing the left mouse button on the field.
40
Example 13 shows how the program sends the path and the file name to the input field
and two tabulations followed by Enter key press follows to command the AP to start the
restore.
After sending the path and file name program waits for a window with a header “restore.cgi” to appear. This window becomes available after a successful restore. As the
restore process is time and resource consuming from the AP point of view a wait period
of five seconds is applied for AP to settle down.
Sleep(2000)
Send($sRestoreFile & "{TAB 2}" & "{ENTER}")
Sleep(2000)
Winwait("restore.cgi")
Sleep(5000)
ControlClick("restore.cgi","","[CLASS:InternetExplorer_Server;INSTANCE:1]",
"left",1,391,237)
WinWait("Basic Setup")
Sleep(3000)
WinClose("Basic Setup")
Example 13: Setting up Linksys WRT54GS
Using direct window control manipulation “OK”-button is pressed and program starts to
wait for a window with “Basic Setup”-header, which is the main window of this AP.
When the window has become active a short wait time is applied to allow the AP to
stabilize. After the wait time the browser window is closed.
These wait times had to be used as sometimes AP’s performance varied. It was better to
have too long wait times than none at all. If commands were given with too fast pace
sometimes some command may be lost.
When the setup has been successfully finished date, time selected configuration are
written to a list view at the bottom of the program’s main screen (Done Setups). It also
contains an editable text field for own comments.
41
7.1.2 Done Setups -log
Done Setups - list view is also the log file for the program. User can save the list view
as a text file or clear it, if no logs are needed. If the log file is not saved when closing
the program a File Save -dialog will open allowing the user to save the log file or discard it.
7.2
RADIUS authentication
When Enterprise level authentication is required also an authentication server is needed.
This simple fact becomes a slightly more complicated when interoperability testing of
enterprise authentications needs to be performed. There is no single server which can
handle all the required authentications and different servers perform the same task
slightly differently.
42
Figure 10 contains a simplified diagram of RADIUS authentication. For the sake of
clarity only the signalling related to RADIUS authentication is visible.
Figure 10: Simplified RADIUS authentication
RADIUS works with client-server -principle. In this case an AP is a client to a RADIUS
server. As can be seen from the simplified signalling diagram in Virhe. Viitteen
lähdettä ei löytynyt. RADIUS server does not take any part in the communication after
the authentication has been completed. It only accepts the authentication or rejects if the
credentials are not correct.
The AP sends Start-Charging request to RADIUS server and opens the communications
channel for the phone when it has received the acknowledgement from the RADIUS
server. Now the phone can connect via the AP to the resources available.
After closing the connection from the phone the AP sends Charging-Stop request to
RADIUS and it acknowledges the ending of the charging and thus ending the RADIUSsession.
43
Even though these Charging-Start/Charging-Stop messages are used, the end-user is not
charged in these scenarios. It is possible to use these messages to create the basis for
billing the customer but in enterprise authentication scenarios they are used just to mark
the beginning and the end of an authenticated access session.
7.3
RADIUS-proxy
RADIUS-proxy is an appliance which directs RADIUS requests to other destination. By
changing the configuration of the RADIUS-proxy are RADIUS authentication requests
directed to a server supporting selected authentication method.
For the end-user and RADIUS server the proxy remains transparent as it relays the messages from one end point to another. Figure 11 shows a simplified principle on how
proxy server works. For the sake of clarity only the signalling related to RADIUS authentication is visible.
Figure 11: Basic principle of RADIUS proxy
In proxy server’s configuration is defined how to handle different authentication methods. From the RADIUS server point of view all RADIUS messages are alike. It depends
on RADIUS server’s configuration of which authentication method can be used. And,
44
as mentioned earlier, no RADIUS server can support every authentication method.
Normally this is not an issue, as corporates tend to stick with one or two selected authentication methods thus reducing the overhead on maintenance and support.
7.4
Changing the RADIUS authentication methods
Servers used in the laboratory ran on Microsoft Windows Server 2003/2008 operating
systems. Those were also quite widely used in corporate environments. Thus a natural
choice was Microsoft IAS due to its support of EAP-TLS and EAP-PEAP v0 authentication methods and it was also capable to act as a RADIUS-proxy. Figure 12 shows to
which network element the third operation focuses.
Figure 12: Changing the RADIUS-proxy settings
For EAP-PEAP v1 and EAP-TTLS authentications Funk/Juniper and Cisco Systems servers (respectively) were used due to their wide usage in corporate domain. For GSM
45
and 3G cellular network sim-card based EAP-SIM and EAP-AKA authentications were
done with Nokia’s cellular test network’s authentication server.
If an authentication method is changed from one to another it is possible to end up in a
situation where the selected RADIUS server does not support the selected authentication method.
For example if the current RADIUS server is Microsoft IAS, which supports EAP-TLS
and EAP-PEAP v0 -authentication methods, it cannot authenticate a user requesting
EAP-PEAP v1 authentication. This scenario is not likely to happen in the enterprise
environment but can exist with interoperability testing environments.
Problem is how to change server settings in managed way. Changing the server functionality from RADIUS server to a proxy and back or changing the proxied authentication request routing is usually done with a small administrative program running on
server console. It is a bit cumbersome to automate and cannot be run remotely. This
posed a serious problem in the interoperability test network as all the servers were far
away and no console access could be arranged easily.
After some searching an article by Mr Daniel Petri (Petri Daniel 2009) was found. It
described a small program known as Netsh.
7.4.1 Netsh
Netsh is not very commonly known property of Windows although it has been a part of
the operating system since Windows 2000. It is a command-line program with which
can many things be done quite simply. One of its strengths is to change TCP/IP-settings
very quickly. It can save the current settings to a file which can be imported back to
environment and restore those settings. Also RADIUS settings can be exported with
“netsh dump aaaa >name_of_the_file” -command and restored thus changing the RADIUS-proxy configuration.
46
Figure 13 shows the basic principle of saving and restoring the RADIUS settings with
Netsh.
Figure 13: The principle of saving the RADIUS settings with Netsh
Netsh requires local console access. If the servers are on a remote location there will be
problems with the console access unless WLAN Verification Wizard is not run on the
server console.
Therefore a process level access to RADIUS-proxy needs to be created. It can be done
by utilizing programs like PcAnywhere but it was not suitable in this case due to financial restrictions and for the need of the program requiring to be installed also on the
server.
A freeware program PsExec by Winternals/Mark Russinovich (Russinovich Mark 2004)
was chosen to use due to its capabilities and not requiring any additional installations.
47
7.4.2
PsExec
PsExec is a Telnet-like command-line program which enables to execute processes on
another computer. It handles the input and output streams and can direct those to another location.
PsExec starts an executable on a remote system and controls the input and output
streams of the executable's process so that you can interact with the executable from the
local system. PsExec does so by extracting from its executable image an embedded
Windows service named Psexesvc and copying it to the Admin$ share of the remote
system. PsExec then uses the Windows Service Control Manager API, which has a remote interface, to start the Psexesvc service on the remote system. (Mark Russinovich,
Windows IT Pro 2004.)
The Psexesvc service creates a named pipe, psexecsvc, to which PsExec connects and
sends commands that tell the service on the remote system which executable to launch
and which options you've specified. If you specify the -d (don't wait) switch, the service
exits after starting the executable; otherwise, the service waits for the executable to terminate, then sends the exit code back to PsExec for it to print on the local console.
(Mark Russinovich, Windows IT Pro 2004.)
48
Figure 14 shows the principle of using PsExec. In the figure Netsh-command is run on
remote server.
Figure 14: Using Netsh via PsExec
With PsExec Netsh-command can be run on the RADIUS-proxy console like the user
would have been accessing the console locally. The RADIUS-proxy can reside in a real
computer centre where electricity is properly filtered and backed up by Uninterruptable
Power Supplies and cooled with proper air conditioning.
WLAN Verification Wizard uses this method to configure the proper RADIUS server
connection and uses PsExec to start Netsh -program on RADIUS-proxy to load the desired setup for it. As PsExec can handle input and output streams the RADIUS-proxy
setup files can reside in the console computer or on the network resource accessible by
it.
49
While the AP is rebooting and RestoreAP.exe has completed its task the RADIUSproxy is configured to direct authentication requests to the selected RADIUS server.
After all processes are completed date, time, AP name, authentication type and possible
RADIUS-server are written in log (Done Setups) and program returns to wait for next
selection from end-user. If needed, user can also write short comments directly to Done
Setups.
Now the testing environment is fully configured with the desired air encryption –mode
and possible authentication and interoperability testing can start.
7.5
Ending the program
User can exit the program either by pressing the “Exit”-button, by clicking the red “X”sign on the upper right-hand corner or by pressing Alt-F4 -command when the program
window is active.
If the Done Setups -log is not saved after the latest change, a File Save -dialog opens to
prompt the user to save the log file. It can be saved locally or to any network resource to
which the console computer has access to. User has also a possibility to cancel the save
procedure and it is confirmed with a pop-up window to prevent the accidental loss of
the log file.
50
8
DISCUSSION
The tool described was created as an interim solution to tackle the problems encountered while setting up the testing environment for interoperability testing. The certification body, Wi-Fi Alliance (WFA) was creating their own solution to manage various
setups in the laboratory environment for device certification purposes. As their solution
was still in development and the company needed a quick solution to cut down the time
consumed by setting up the testing environment this tool, WLAN verification Wizard,
was created.
It served the purpose and did its job. It was never meant to be anything more than an
interim tool while waiting for the actual release of a professional configuration management tool from the certification body.
This tool was created with minimum budget and due to its nature it requires quite much
preparation work in the form of setting up access points and taking a backup of verified
encryption configuration.
There is no common interface which could be used with all access points. Some access
points support Telnet-based administration and others do not. As new access points are
added to the setup a new function has to be created for the tool taking care of the access
point user interface manipulation unless the access point supports Telnet. Also when a
new firmware for an access point is introduced its functionality needs to be checked as
there can be some alterations when comparing to previous version.
Due to schedule pressures and the nature of the program the user interface remained
very much tool-like. There are a couple of rare error situations in the program logic but
those can be dealt with. Ironing out the last bugs would have taken too long when comparing to benefit.
Based on feedback received from the users’ further development ideas consisted of implementing “Replay”-functionality. It would have enabled to re-run already done setups.
There was also discussion to embed a special control program to device under test,
which would have enabled getting the internal status the device and controlling the in-
51
ternal setup of the device. Then it would have been fairly simple to build fully automated system for endurance and long term testing.
A setup-file editor was also discussed as the ini-files contain a lot of crucial information
which has to be correct in order the whole setup to work.
Unfortunately these development ideas were never saw the daylight due to reorganisations in the company.
It was very interesting and challenging to create a tool for clear need: by reducing enduser induced setup mistakes with APs and RADIUS-servers, delays and unnecessary
error hunting could be avoided. All the testing activity could focus on finding the real
errors on tested devices. It simplified the test setup and users were satisfied when they
did not have to memorize all the different settings.
As a bonus from the Thesis point of view I got to learn a new programming language,
had to think about usability, and got to think how to do programming under the pressure
from multiple other projects and their deadlines.
AutoIt has proven to be quite feasible development environment and easy to learn. It is
also quick to use when prototyping various things and it has proven to be robust enough
to create some other small tools for laboratory usage.
WLAN Verification Wizard was in production use for several years and the last version
was in production use for over one year.
52
9
REFERENCES
1. Adams Douglas, Hitchhiker’s Guide to the Galaxy,
http://en.wikipedia.org/wiki/The_Hitchhiker%27s_Guide_to_the_Galaxy
2. APC by Schneider Electric: Switched Rack PDU. Read 2006 - 2013.
http://www.apc.com/products/resource/include/techspec_index.cfm?base_sku=A
P7950
3. Atlantic Systems Guild Ltd. 2013. Volere Requirements Specification Template.
Read 2013. http://www.volere.co.uk/index.htm
4. Bennet Jonathan & AutoIt Consulting Ltd. 2013. AutoIt: automation and scripting language. Read 2005 - 2013. http://www.autoitscript.com/site/autoit/
5. Petri Daniel. 2009. Configure TCP/IP from the Command Prompt. Read 2009 2013. http://www.petri.co.il/configure_tcp_ip_from_cmd.htm
6. Russinovich Mark. 2004. PsExec, updated 2013. Read 2006 - 2013.
http://technet.microsoft.com/en-us/sysinternals/bb897553
7. Russinovich Mark, Windows IT Pro. 2004. PsExec: Execute processes on a remote system and redirect output to the local system. Read 2006 - 2013.
http://windowsitpro.com/systems-management/psexec
8. Tatham Simon. 2005. Using the command line connection tool Plink. Read 2006
- 2013. http://the.earth.li/~sgtatham/putty/0.58/htmldoc/Chapter7.html
9. Wi-Fi Alliance. 2013. Organization. Read 2005 - 2013. http://www.wifi.org/organization.php
53
3(48)
APPENDICES
Appendix 1. Requirement documentation for semi-automation tool
1.
The Purpose of the Project
Testing is an invaluable tool for any project, if it is done properly. Repeatability, result
documentation and error-free execution are key issues to professional-grade testing.
When testing environment has many variables likelihood for end-user configuration
error increases when schedules are tight and additional work force is needed.
The scope of this project is to reduce end-user configuration errors by eliminating manual settings to test environment. It will shorten the test cycle and provide more clear
visibility to real errors found in tested product.
This project will produce a small application which takes care of Wireless LAN Access
Point settings on behalf of the user. It will be an interim solution until the Certification
Body (WFA) releases their solution.
1.1.
Goals of the Project
The goal for the Project is to reduce test environment configuration errors by offering a
semi-automatic configuration application.
1.2.
Motivation
When test environment is known and stable the real errors of tested product can be
found.
1.3.
Measurement
Shortened testing time from five (5) work days to three (3).
(Continues)
54
4(48)
2.
The Stakeholders
2.1.
The Client
The client is the test-environment user.
2.2.
The Customer
The customer is the Head of Test Laboratory accepting the product.
2.3.
Other Stakeholders
Other stakeholders may include Error Managers and Test Managers of the tested product (depending on project).
2.4.
The Hands-On Users of the Product
The users of the products are the users of the test-environment. They must have an adequate knowledge of the following:
-
Tracing and capability to take relevant log files
-
Knowledge of Wireless LAN authentication methods
-
Knowledge if TCP/IP, including routing
2.5.
Personas
Personas are not applicable due to the nature of the Product.
(Continues)
55
5(48)
2.6.
Priorities Assigned to Users
All users are Key users, as the number of users of the Product is very limited.
2.7.
User Participation
All users are required to report any anomalies found using the product.
2.8.
Maintenance Users and Service Technicians
All users are able to request new devices to be added to the test environment. Maintenance of the test environment and the Product are done by undersigned.
3.
Mandated Constraints
3.1.
Solution Constraints
The product shall use TCP/IP v4 network in the laboratory environment.
3.2.
Implementation Environment of the Current System
Base Operating System shall be Microsoft Windows XP/7. The Product shall be a
stand-alone application running on Personal Computer using Intel X86-based architecture. Networking infrastructure shall be based on IPv4 using switched networking infrastructure inside Corporation’s Laboratory Network infrastructure. Server Operating System shall be Microsoft Windows Server 2003 – 2008 (Microsoft RADIUS Server),
OpenSUSE (FreeRADIUS) and Cisco IOS (Cisco IAS). Remote controlled power outlet
is American Power Corporation AP7950.
(Continues)
56
6(48)
Figure 1 contains the environment for the tool.
Figure 1: General view of the Program
3.3.
Partner or Collaborative Applications
The product shall use Telnet-based communication via PLINK (see chapter 4 Naming
Conventions and Terminology) and RPC-based communication via host Operating System in conjunction with PsExec (see chapter 4 Naming Conventions and Terminology).
3.4.
Off-the-Shelf Software
Off-the-Shelf Software is described in chapter Implementation Environment of the Current System.
(Continues)
57
7(48)
3.5.
Anticipated Workplace Environment
The product will be used in laboratory environment inside Corporate’s facilities. Laboratory shall have adequate means of electricity, network connectivity, air-conditioning
and access control. User shall have a place for a Personal Computer in which the product is installed.
3.6.
Schedule Constraints
The production version of the product shall be ready for project’s test round. Exact date
cannot be disclosed due to security classification of testing.
3.7.
Budget Constraints
Budget is set to be minimal. No additional resources are permitted for programming
work. Re-use of existing hardware is required.
(Continues)
58
8(48)
4.
Naming Conventions and Terminology
4.1.
Definitions of All Terms, Including Acronyms, Used in the Project
IEEE
Institute of Electrical and Electronics Engineers, publishes
nearly a third of the world’s technical literature in electrical
engineering, computer science, and electronics.
IEEE 802.11
Standard for Information technology, Telecommunications
and information exchange between systems Local and metropolitan area network.
IEEE 802.11i
Amendment to IEEE 802.11 defining security mechanisms
for IEEE 802.11.
ETSI
The European Telecommunications Standards Institute; produces globally-applicable standards for Information and
Communications Technologies.
ITU-T
One of the three sectors (divisions or units) of the International Telecommunication Union (ITU) coordinating standards for telecommunications.
LAN
Local Area Network, computers connected in the same physical or logical entity using cabling.
Wlan
Wireless Local Area Network, computers connected in the
same physical or logical entity using wireless means. In this
context refers to IEEE 802.11 wireless networking standard.
WFA
Wi-Fi Alliance, a non-profit organization coordinating certification and development of Wlan-related issues.
Wi-Fi
Wireless Fidelity, a trademark for Wi-Fi Alliance, used as a
synonym for Wireless Local Area Network.
RADIUS
Remote Authentication Dial In User Service, a service which
authenticates users, computers, client software allowing usage of resources.
AAA
Authentication, Authorization and Accounting, a synonym
for RADIUS.
(Continues)
59
9(48)
ISM
License-free radio spectrum intended for Industrial, Scientific and Medical usage.
WEP
Wired Equivalent Privacy, a security protocol to authenticate
user in the IEEE 802.11 wireless networking standard, usually 64bit (WEP64) or 128bit (WEP128).
TKIP
Temporary Key Integrity Protocol, a security protocol used
in the IEEE 802.11 wireless networking standard.
CCMP/AES
Counter Mode with Cipher Block Chaining Message Authentication Code Protocol/Advanced Encryption Standard, a
security protocol used in the IEEE 802.11 wireless networking standard.
Ciphering
An algorithm for performing encryption or decryption—a
series of well-defined steps that can be followed as a procedure.
WPA
Wi-Fi Protected Access, authentication method using TKIP
ciphering.
WPA2
Wi-Fi Protected Access 2, authentication method using
CCMP/AES ciphering.
EAP
Extensible
Authentication
Protocol,
an
authentication
framework providing for the transport and usage of keying
material and parameters generated by EAP methods.
IETF
Internet Engineering Task Force, an international community
of network designers, operators, vendors, and researchers
concerned with the evolution of the Internet architecture and
the smooth operation of the Internet.
RFC
Request for Comments, in this context refers to IETF's recommendations which are widely adopted to use but not yet
set as official standards. Working Standards.
IAS
Internet Authentication Server, part of Microsoft Windows
Server, a product from Microsoft Corporation, provides
RADIUS functionality (among others).
ACS
Access Control Server, a product from Cisco Systems Corporation, provides RADIUS functionality (among others).
(Continues)
60
10(48)
GSM
Global System for Mobile Communications is a standard set
developed by the ETSI to describe protocols for second generation (2G) digital cellular networks used by mobile
phones.
SIM
Subscriber Identification Module, an integrated circuit securely storing international mobile subscriber identity and
the related key to authenticate user on network.
UMTS
Universal Mobile Telecommunications System, a third generation (3G) mobile cellular system for networks based on
the GSM standard.
PKI
A set of hardware, software, people, policies, and procedures
needed to create, manage, distribute, use, store, and revoke
digital certificates.
PMI
A process of managing user authorisations based on the ITUT Recommendation X.509
X.509
An ITU-T standard for a public key infrastructure (PKI) and
Privilege Management Infrastructure (PMI). X.509 specifies
standard formats for public key certificates, certificate revocation lists, attribute certificates, and a certification path validation algorithm.
Certificate-based EAP methods:
EAP-TLS
Extensible Authentication Protocol/Transport Layer Security, based on X.509 certificate, defined by Microsoft, IETF
RFC 2716
EAP-PEAP
Extensible Authentication Protocol/Protected Extensible
Authentication Protocol, based on xxx, defined by Microsoft,
Cisco Systems and RSA Security.
EAP-TTLS
Extensible Authentication Protocol/Tunnelled Transport
Layer Security, based on security certificate but information
is transferred inside secured tunnel, defined by Funk Software/Juniper and Certicom corporations.
(Continues)
61
11(48)
EAP-LEAP
Extensible Authentication Protocol/Lightweight Extensible
Authentication Protocol, based on PEAP but with lighter security, defined by Cisco Systems.
EAP-SIM
Extensible Authentication Protocol/Subscriber Identification
Module, a method for authenticating user in 2G network by
using GSM-SIM, defined by Nokia/Haverinen et al, RFC
4186
EAP-AKA
Extensible Authentication Protocol/Authentication and Key
Agreement, a method for authenticating user in 3G network
by using 3G-SIM, defined in RFC 4187
AutoIt
Automation and scripting language
BASIC
Acronym for Beginner's All-purpose Symbolic Instruction
Code.
DUT
Acronym for Device Under Test.
SSH
Cryptographic network protocol for secure data communication, remote shell services or command execution and other
secure network services between two networked computers.
PuTTY
A SSH and telnet client, developed originally by Simon Tatham for the Windows platform.
Plink
PuTTY Link, Command-line version of PuTTY
APC
American Power Conversion, a company by Schneider Electric, a manufacturer of uninterruptible power supplies (UPS)
and surge protection products.
PDU
Power Distribution Unit, controllable via Lan or serial cable.
Telnet
Network protocol used on the Internet or local area networks
to provide a bidirectional interactive text-oriented communication facility using a virtual terminal connection.
TCP/IP
Transmission Control Protocol / Internet Protocol; TCP/IP
provides end-to-end connectivity specifying how data should
be formatted, addressed, transmitted, routed and received at
the destination.
IP
Acronym for TCP/IP
(Continues)
62
12(48)
Ini-file
Initializion file; The INI file format is an informal standard
for configuration files for some platforms or software. INI
files are simple text files with a basic structure composed of
"sections" and "properties".
Ping
A computer network administration utility used to test the
reachability of a host on an Internet Protocol (IP) network
and to measure the round-trip time for messages sent from
the originating host to a destination computer. The name
comes from active sonar terminology which sends a pulse of
sound and listens for the echo to detect objects underwater.
Netsh
A tool an administrator can use to configure and monitor
Windows-based computers at a command prompt.
PsExec
A command line based remote administration tool and allows for the remote execution of processes on other systems.
Originally developed by Mark Russinovich of Sysinternals.
(Continues)
63
13(48)
5.
Relevant Facts and Assumptions
5.1.
Relevant Facts
Due to budget constraints the product has to be royalty-free. Timing is important. No
additional resources are allocated therefore it is not possible to learn new programming
skills in time. Selected programming environment is AutoIt, a free BASIC-like scripting
language, which can be compiled to royalty-free executable.
5.2.
Business Rules
Not applicable.
5.3.
Assumptions
As Wireless LAN Access Points evolve their User Interface might change causing
changes to product. New emerging Wireless LAN Access Points may introduce new
ways for interfacing the user in which case has to be taken into consideration whether
the market share of the Wireless LAN Access Point is globally significant justifying the
additional work for new interface. The product’s life-span is restricted until a viable
solution from the certification bodies will be ready and implemented.
(Continues)
64
14(48)
6.
The Scope of the Work
6.1.
The Current Situation
Wireless LAN verification process of a mobile phone includes many commercially
available Wireless LAN Access Points, which have a significant market share globally
either via their chipset and/or the product as a whole. Testing different authentication
scenarios requires changing the settings in the Access Point and/or in the server infrastructure in the laboratory backbone network. These settings are performed manually
and are therefore prone to human errors. Even if the settings are done seemingly correctly they might be logically wrong resulting distorted outcome. Finding the root cause
of an error resulting from wrong logical configuration is time consuming.
6.2
The Context of the Work
Figure 2: The Context of the Work
(Continues)
65
15(48)
Context of the work is to create a user interface with radio buttons. Logic running in the
background prevents user making invalid choices by disabling conflicting selections.
6.3
Work Partitioning
Table 1: Work Partitioning
Number
1
Event Name
802-mode
Input and Output
Network mode (in)
2
Access Point
3
Air Encryption
4
EAP-type
5
RADIUS server
Access point selection (in)
Air-encryption
mode (in)
EAP-type selection
(in)
RADIUS selection
(in)
6
Go!
7
Power Up AP
8
9
Continue (in)
Command
PDU
(out)
WLAN AP alive
Access point ready
for config (in)
Load AP configura- Send config path
tion
(out)
10
AP Config ready
Access point config status (in)
RADIUS ready for
config (in)
11
RADIUS alive
12
Load RADIUS con- Send config path
figuration
(out)
13
14
RADIUS
Config RADIUS
config
ready
status (in)
Save Setups
Save Setups (in)
15
16
Clear Setups
Write log
17
Exit
Clear Setups (in)
Record selections
(out)
Exit (in)
Summary
2.4GHz or 5GHz
network selection
Selection of desired
Access Point
Selection of required
encryption
Selection of desired
EAP-type
Selection of RADIUS server supporting
selected authentication method
If user is happy, continue with settings
Power up selected
Access Point
Enable Access Point
for configuration
Loads
pre-defined
configuration to Access Point
Access point ready
for action
RADIUS
server
ready for configuration
Loads
pre-defined
configuration
to
RADIUS server
RADIUS
server
ready for action
Saves done setups to
a log file
Clears done setups
Record made selections with timestamp
Close all connections
and shut down
(Continues)
66
16(48)
18
19
6.4.
1.
Do Not Worry!
Reset (in/out)
Panic button to reset
everything back to
defaults and power
down PDU
Access Point Power Change
selected Changes
selected
Control -button
AP power state (in) Access Point PDU
state
Specifying a Business Use Case (BUC)
802-mode: user needs to select which WLAN network is
used (2.4GHz for 802.11 b/g or .n or 5GHz for 802.11n).
2.
Access Point: user selects desired Access Point for testing.
3.
Air Encryption: user selects desired air encryption mode for
testing.
4.
EAP-type: user selects the desired authentication method for
testing.
5.
RADIUS server: user selects the desired RADIUS-server
performing authentication.
6.
Go!: when user is satisfied with made selections continue
with setup.
7.
Power Up AP: Send power up command to PDU and turn
selected AC outlet on (and possible previous off).
8.
WLAN AP alive: Access point is responding to PING-events
correctly and is ready to input new setup.
9.
Load AP configuration: Send path and file name of selected
setup to Access Point and commit.
10.
AP Config ready: After successful configuration download
Access Point confirms successful configuration change and
responds to PING-events correctly.
11.
RADIUS alive: RADIUS server is responding to PINGevents correctly.
12.
Load RADIUS configuration: send selected RADIUS configuration command to RADIUS.
(Continues)
67
17(48)
13.
RADIUS Config ready: RADIUS server is responding to
PING-events correctly after configuration change.
14.
Save Setups: user presses Save setups -button triggering log
file save dialog.
15.
Clear Setups: user presses Clear Setup -button to clear Done
Setups -dialog.
16.
Write log: write the selected configuration to Done Setups dialog on display field with timestamp.
17.
Exit: User ends the program.
18.
Do Not Worry!: A panic button: close all communication
and reset everything back to defaults, including PDU.
19.
Access Point Power Control –button: user presses Access
Point’s PDU-button to change the power status (on/off). Can
be used to load next configuration to next Access Point while
previous one is used for testing.
(Continues)
68
18(48)
7.
Business Data Model and Data Dictionary
7.1.
Data Model
Figure 3 shows the most important use cases.
Figure 3: Use Cases
See Section 6 The Scope of the Work for more information.
(Continues)
69
19(48)
7.2.
Data Dictionary
Table 2: Data dictionary
Variables
Name
$sIniFile
$sVersion
$sDefaultGrey
$sDefaultGreen
$iAllPortsOff
$iNumOfPduPorts
$iNumOfAP
$iNumOfAir
$iNumOfEAP
$iNumOfRAD
$sSelected802
$sSelectedAir
$sSelectedAp
$sSelectedEap
$sSelectedRad
$sPrevious802
$sPreviousAir
$sPreviousAp
$sPreviousEap
$sPreviousRad
$iCurrentLvItem
$iFirstLvItem
$tTextToSave
$iIsListSaved
$iPort
$sRestoreFile
$iPlinkHandle
$sRadiusRestorePath
$sRadiusProxy
$sRadiusRestoreFile
$iRadiusSetStatus
$sErrorItem
$sOnColor
$sOffColor
$PduPrevState
$PduActionPhrase
$iMsgBoxTimeOut
$iWatchDog
$DEBUG_List_Event_Arra
ys
Content
Name of the initialization file
Version number to be displayed
RGB map of default grey color
RGB map of default green color
Address for all APC ports
Amount of PDU ports
Number of selected Access Points
Number of selected air encryption
Number of selected
Number of selected
Selected 802.11 -mode
Selected air encryption
Selected Access Point
Selected eap-method
Selected RADIUS server
Previous selected 802.11-mode
Previous selected air encryption
Previous selected Access Point
Previous selected eap-method
Previous selected RADIUS
Current ListView item in Done Setups
First ListView item in Done Setups
Text from Done Setups to be saved
Boolean is Done Setups saved
PDU port number
pre-defined setup file name
Process handle number for PLINK
comms
Path to RADIUS pre-defined setup files
Path to RADIUS proxy
Name of the pre-defined RADIUS setup
Status of RADIUS setup
Error string
RGB map for “On”-state
RGB map for “On”-state
State of previous PDU port
Command string to PDU
Timeout counter in seconds
Watchdog timer to update PDU button
states
Cmd-line variable for debug purposes,
prints out event arrays to txt-file in local
path
Type
String
String
String
String
Integer
Integer
Integer
Integer
Integer
Integer
String
String
String
String
String
String
String
String
String
String
Integer
Integer
String
Boolean
Integer
String
Integer
String
String
String
Integer
String
String
String
String
String
Integer
Integer
Integer
(Continues)
70
20(48)
$DEBUG_iAccessPointOff
$DEBUG_iRadiusOff
$sLocalPath
$sApIniFile
$sRadiusIniFile
$asList802Mode
$asListAir
$asListAP
$sAPRestorePath
$sPDU_Enabled
$sPDU_IP
$sPDU_User
$sPDU_Pwd
$aAPs_and_Ports
$aUsedPduPorts
$asApCapa
$asListEap
$asListRADIUS
$asRadCapa
$iRadioGrpTop
$iRadioGrpWidth
$iGrpSeparator
$iRadioBtnSeparator
$iRadioBtnTop
$iRadioBtnLeftFromGrp
$iRadioBtnHeight
$iRadioTxtWidth
$i802GrpTop
$i802GrpLeft
$i802GrpHeight
$i802Left
$iAirGrpTop
Cmd-line variable for debug purposes,
prints out setup string to be sent out to
Access Point
Cmd-line variable for debug purposes,
prints out setup string to be sent out to
RADIUS server
Location of the program
Name of the Access Point ini-file
Name of the RADIUS ini-file
Array of 802-modes
Integer
Integer
String
String
String
String
ray
Array of air encryption -modes
String
ray
Array of Access Points
String
ray
Path to Access Point pre-defined setup String
files
PDU enabled
String
PDU IP-address
String
PDU user name
String
PDU password
String
Array of Access Points, their assigned Integer
port numbers and statuses
ray
Array of used port addresses
Integer
ray
Array of Access Points and their capa- String
bilities
ray
Array of available EAP-methods
String
ray
Array of available RADIUS servers
String
ray
Array of RADIUS servers and their String
capabilities
ray
Location of Radio button group left Integer
uppermost corner
Radio button group width
Integer
Separator width between groups
Integer
Separator width between radio buttons
Integer
Location of the first radio button, top
Integer
Location of the radio button relative to Integer
group, left
Height of radio button
Integer
Radio button text field width
Integer
802-mode group location
Integer
Location of 802-mode group relative to Integer
program window, left
Height of the group
Integer
802-mode radio button location relative Integer
to its group
Air encryption group location
Integer
ArArAr-
ArArArArArAr-
(Continues)
71
21(48)
$iAirGrpLeft
$iAirGrpHeight
$iAirLeft
$iApGrpTop
$iApGrpLeft
$iApGrpHeight
$iApLeft
$iEapGrpTop
$iEapGrpLeft
$iEapGrpHeight
$iEapLeft
$iRadGrpTop
$iRadGrpLeft
$iRadGrpHeight
$iRadLeft
$iListViewHeight
$iListViewWidth
$iMainHeight
$iMainWidth
$ai802Event
$aiAirEvent
$aiApEvent
$aiEapEvent
$aiRadEvent
$aiPowerEvent
$GUI_EVENT_CLOS
E
$GUI_EVENT_MINI
MIZE
$GUI_EVENT_MAXI
MIZE
$GUI_EVENT_REST
ORE
$GUI_DOCKAUTO
$GUI_CHECKED
Location of Air encryption group relative to program window, left
Height of the group
Access point radio button location relative to its group
Access point group location
Location of Access point group relative
to program window, left
Height of the group
Access point radio button location relative to its group
EAP-type group location
Location of EAP-type group relative to
program window, left
Height of the group
EAP-type radio button location relative
to its group
RADIUS server group location
Location of RADIUS server group relative to program window, left
Height of the group
RADIUS server radio button location
relative to its group
Done Setups -list view height
Done Setups -list view width
Height of the main program
Width of the main program
Array of event numbers for 802-group
Integer
Integer
Integer
Integer
Integer
Integer
Integer
Integer
Integer
Integer
Integer
Integer
Integer
Integer
Integer
Main display event handlers
Integer
Integer
Integer
Integer
Integer
ray
Integer
ray
Integer
ray
Integer
ray
Integer
ray
Integer
ray
String
Main display event handlers
String
Main display event handlers
String
Main display event handlers
String
Array of event numbers for Air encryption -group
Array of event numbers for Access
point -group
Array of event numbers for EAP-type group
Array of event numbers for RADIUS
server -group
Array of event numbers for PDU-group
ArArArArArAr-
Resize automatically according to win- String
dow size
Radio button state, only one can be ena- String
(Continues)
72
22(48)
$GUI_UNCHECKED
$GUI_DISABLE
$GUI_ENABLE
Functions
Name
_Debug_Events()
_APC_GetState()
_NButton()
_AirButton()
_ApButton()
_EapButton()
_RadiusButton()
_AllPortsOff()
_PduButton()
_ConnectToAPC()
_TogglePduBtnState($i
CtrlId)
_TogglePDU($Port,
$PduAction)
_PDU_Control($Port,
$PduAction)
Btn_Save_ListClick()
bled inside a group
Radio button state, only one can be ena- String
bled inside a group
Radio button in use, based on capability String
matrix of selections
Radio button not in use, based on capa- String
bility matrix of selections
Content
Collect data from all event arrays and
save it to text file
Read port states from APC, gets called
from main loop and after GO
802-mode button selected
Air encryption button selected
Access point button selected
EAP-type button selected
Radius button selected
Turn off all PDU ports
PDU button selected
Connection to PDU via PLINK
check the state of pressed button and
change it
toggles the state of selected pdu port
Type
out
Port# On/Off as parameters
in/ out
format: time | date | 802-mode | Air | AP
| EAP | Radius @CRLF
_ButtonGoClick()
Start all configurations
MainClose()
Shut down
MainMaximize()
Stub for operating system window handling
MainMinimize()
Stub for operating system window handling
MainRestore()
Stub for operating system window handling
_ToggleApState($iEve Event number as input
nt)
; if input is in range 4 - 6 = 802button
; if input is in range 9 - 15 = AirButton
_ToggleEapState($sEa if enable, need to check if air enterprise
pState)
& which radius, use enable also selectively (which radius -> may disable)
_ToggleRadiusState($s if enable, need to check eap-mode & if
RadiusState)
air = enterprise
_SaveTxt($tTextToSav Save Done Setups List view to a text
e, $sSaveFile)
file
_RestoreAP()
load selected Access Point configuration
_CheckPduComms($sP Check if PDU is alive
out
out
out
out
out
out
out
out
out
in/ out
in/ out
out
out
out
out
out
out
in/ out
in/ out
in/ out
in/ out
out
in/ out
(Continues)
73
23(48)
DU_IP)
_SetRadius()
_UpdateListView()
_ClearListView()
load selected RADIUS configuration
Update Done Setups with selected setup
Clear Done Setups list view
out
out
out
8.
The Scope of the Product
8.1.
Product Boundary
The Product shall be only interim solution for test usage until a viable solution will be
ready from the Certification Body.
8.2.
Product Use Case Table
Number
PUC Name
1
802-mode
2
Access Point
3
Air Encryption
4
EAP-type
5
RADIUS server
6
Go!
7
Power Up AP
8
9
10
Actors
Input
and
Output
Network mode
(in)
Access point
selection (in)
Air-encryption
mode (in)
EAP-type selection (in)
RADIUS selection (in)
Test
neer
Test
neer
Test
neer
Test
neer
Test
neer
engi-
Test
neer
engi- Continue (in)
engiengiengiengi-
Client com- Command
puter
PDU (out)
WLAN AP alive Access Point Access point
ready for config (in)
Load AP configu- Client com- Send
config
ration
puter
path (out)
AP Config ready
Access Point Access
config
(in)
point
status
Summary
2.4GHz or 5GHz
network selection
Selection of desired Access Point
Selection of required encryption
Selection of desired EAP-type
Selection of RADIUS server supporting selected
authentication
method
If user is happy,
continue
with
settings
Power up selected
Access Point
Enable
Access
Point for configuration
Loads pre-defined
configuration to
Access Point
Access
point
ready for action
(Continues)
74
24(48)
11
RADIUS alive
12
Load
RADIUS Client comconfiguration
puter
13
RADIUS Config RADIUS
ready
server
Save Setups
Test
engineer
Clear Setups
Test
engineer
Write log
Client computer
14
15
16
RADIUS
server
17
Exit
Test
neer
engi-
18
Check log on Exit Client computer
19
Do Not Worry!
Test
neer
engi-
Access
Point Test
Power Control - neer
button
Table 3: Product Use Case table
engi-
20
8.3.
RADIUS ready RADIUS server
for config (in)
ready for configuration
Send
config Loads pre-defined
path (out)
configuration to
RADIUS server
RADIUS con- RADIUS server
fig status (in)
ready for action
Save
Setups Saves done setups
(in)
to a log file
Clear
Setups Clears done set(in)
ups
Record selec- Record made setions (out)
lections
with
timestamp
Exit (in)
Close all connections and shut
down
Save Log (out) Checks whether
the log is already
saved
Reset (in/out)
Panic button to
reset everything
back to defaults
and power down
PDU
Change select- Changes selected
ed AP power Access Point PDU
state (in)
state
Individual Product Use Cases
1. 802-mode
User needs to select which WLAN network is used (2.4GHz
for 802.11 b/g or .n or 5GHz for 802.11n). The program will
take care of disabling conflicting settings based on each Access Point’s properties in compatibility matrix.
2. Access Point
User selects desired Access Point for testing. The program
will take care of disabling conflicting settings based on each
Access Point’s properties in compatibility matrix.
(Continues)
75
25(48)
3. Air Encryption
User selects desired air encryption mode for testing. The
program will take care of disabling conflicting settings based
on each Access Point’s properties in compatibility matrix.
4. EAP-type
User selects the desired authentication method for testing.
The program will take care of disabling conflicting settings
based on each Access Point’s and RADIUS-server’s properties in compatibility matrix.
5. RADIUS server
User selects the desired RADIUS-server performing authentication. The program will take care of disabling conflicting
settings based on each Access Point’s and RADIUS-server’s
properties in compatibility matrix.
6. Go!
When user is satisfied with made selections continue with
setup.
7. Power Up AP
Send power up command to PDU and turn selected AC outlet on (and possible previous off).
8. WLAN AP alive
Access point is responding to PING-events correctly and is
ready to input new setup.
9. Load AP configuration Send path and file name of selected setup to Access Point
and commit.
10. AP Config ready
After successful configuration download Access Point confirms successful configuration change and responds to
PING-events correctly.
11. RADIUS alive
RADIUS server is responding to PING-events correctly.
12. Load RADIUS configuration Send selected RADIUS configuration command to
RADIUS.
13. RADIUS Config ready RADIUS server is responding to PING-events correctly after
configuration change.
14. Save Setups
User presses Save setups -button triggering log file save dialog.
15. Clear Setups
User presses Clear Setup -button to clear Done Setups dialog.
16. Write log
Write the selected configuration to Done Setups -dialog on
display field with timestamp. Allow also free text field for
user comments.
(Continues)
76
26(48)
17. Exit
User ends the program.
18. Check log on Exit
When exiting the program user is prompted to save the log
from Done Setups -dialog display field if not yet saved.
19. Do Not Worry!
A panic button: close all communication and reset everything back to defaults, including PDU.
9.
Functional and Data Requirements
9.1.
Functional Requirements
Requirement: (ID)
1
Requirement type:
Functional
Event/BUC/PUC:
Wizard must open with default settings.
Description:
Each time the application is started user is presented with
same default settings options.
Rationale:
Each test has to be started with default options to prevent
undesired settings.
Originator:
Jis
Fit criterion:
User is able to begin testing always from known situation.
Customer satisfaction:
5
Customer dissatisfaction: 5
Priority:
High
Conflicts:
None
Supporting material:
Glossary, DUT- dependent Test Plan
History:
May 2013, Modified Aug 2013
Requirement: (ID)
2
Requirement type:
Functional
Event/BUC/PUC:
User must not be able to select invalid options for selected
Access Point.
Description:
User may not be able to select invalid options for selected
Access Point.
Rationale:
To avoid impossible or unsupported configuration upload to
Access Point. Also to reduce testing errors.
(Continues)
77
27(48)
Originator:
Jis
Fit criterion:
User is always presented only with those selections which
apply for selected Access Point.
Customer satisfaction:
5
Customer dissatisfaction: 5
Priority:
High
Conflicts:
None
Supporting material:
Glossary, DUT- dependent Test Plan
History:
May 2013, Modified Aug 2013
Requirement: (ID)
3
Requirement type:
Functional
Event/BUC/PUC:
Wizard must prevent the selection of invalid network options.
Wizard must prevent the selection of invalid network options.
Description:
Wizard uses Access Point capability matrix to prevent wrong
network selections automatically.
Rationale:
To reduce testing errors by not allowing selecting improper
network.
Originator:
Jis
Fit criterion:
User is always presented with valid network selection options.
Customer satisfaction:
5
Customer dissatisfaction: 5
Priority:
High
Conflicts:
None
Supporting material:
Glossary, DUT- dependent Test Plan
History:
May 2013, Modified Aug 2013
Requirement: (ID)
4
Requirement type:
Functional
Event/BUC/PUC:
User must be able to toggle manually the power state of any
attached Access Point.
(Continues)
78
28(48)
Description:
Power Controller -module has push buttons for each individual power port with status indication (Green = on, Grey =
off, Disabled = not connected)
Rationale:
Each power outlet must be also individually controllable.
While test is running other Access Point can be setup or intentional network loss may be tested.
Originator:
Jis
Fit criterion:
User can control each connected Access Point also manually
overriding the Power Controller -module.
Customer satisfaction:
5
Customer dissatisfaction: 5
Priority:
High
Conflicts:
None
Supporting material:
Glossary, DUT- dependent Test Plan
History:
May 2013, Modified Aug 2013
Requirement: (ID)
5
Requirement type:
Functional
Event/BUC/PUC:
Power Controller must have a Main switch (Panic-button).
Description:
Clearly marked ("Do Not Worry") button on main screen.
Rationale:
If all power outlets are needed to be shutdown at once, this
button is pressed.
Originator:
Jis
Fit criterion:
User is able to cut the power from all outlets with a single
click.
Customer satisfaction:
5
Customer dissatisfaction: 5
Priority:
High
Conflicts:
None
Supporting material:
Glossary, DUT- dependent Test Plan
History:
May 2013, Modified Aug 2013
Requirement: (ID)
6
Requirement type:
Functional
Event/BUC/PUC:
User selections must be possible to save to a text file.
(Continues)
79
29(48)
Description:
Selections are written into "Done Setups" -window and can
be saved for later use or log.
Rationale:
Tested setups with time stamps are recorded as a log file.
Originator:
Jis
Fit criterion:
User can save done test to a text file and write also additional
info, if needed. Can be used as log file.
Customer satisfaction:
5
Customer dissatisfaction: 5
Priority:
High
Conflicts:
None
Supporting material:
Glossary, DUT- dependent Test Plan
History:
May 2013, Modified Aug 2013
Requirement: (ID)
7
Requirement type:
Functional
Event/BUC/PUC:
User actions (Done Setups) must have info on made selections, including time and date stamp.
Description:
User selections are written into "Done Setups" -window and
contain all made selections before running the setup.
Rationale:
It is crucial to have exact info on which selections are fed
into which Access Point and when.
Originator:
Jis
Fit criterion:
User has a clear log of actions.
Customer satisfaction:
5
Customer dissatisfaction: 5
Priority:
High
Conflicts:
None
Supporting material:
Glossary, DUT- dependent Test Plan
History:
May 2013, Modified Aug 2013
Requirement: (ID)
8
Requirement type:
Functional
Event/BUC/PUC:
User selections must be able to clear before run attempt.
Description:
"Clear"-button is on the main user interface.
(Continues)
80
30(48)
Rationale:
If user changes his mind Clear-button can be used to erase
made selections thus returning to initial state.
Originator:
Jis
Fit criterion:
User has an option to cancel made decisions and start over
without restarting the whole system.
Customer satisfaction:
5
Customer dissatisfaction: 5
Priority:
High
Conflicts:
None
Supporting material:
Glossary, DUT- dependent Test Plan
History:
May 2013, Modified Aug 2013
Requirement: (ID)
9
Requirement type:
Functional
Event/BUC/PUC:
Wizard must notify user of possible communication errors.
Description:
Wizard will notify user of possible network problems like
disconnected cable.
Rationale:
If user is not notified of a networking problem time is wasted
while waiting the setup upload to complete.
Originator:
Jis
Fit criterion:
User gets a notification of possible networking error and
may be able to correct the problem.
Customer satisfaction:
5
Customer dissatisfaction: 5
Priority:
High
Conflicts:
None
Supporting material:
Glossary, DUT- dependent Test Plan
History:
May 2013, Modified Aug 2013
Requirement: (ID)
10
Requirement type:
Functional
Event/BUC/PUC:
When exiting user must be notified if "Done Setups" are not
saved.
Description:
User is presented a File Save -dialog, if the log file is not
saved while ending the Wizard.
(Continues)
81
31(48)
Rationale:
Log file can be lost unless it is saved. It contains vital information of tests.
Originator:
Jis
Fit criterion:
User has the option to save the log file when exiting.
Customer satisfaction:
5
Customer dissatisfaction: 5
Priority:
High
Conflicts:
None
Supporting material:
Glossary, DUT- dependent Test Plan
History:
May 2013, Modified Aug 2013
9.2.
Data Requirements
Requirement: (ID)
11
Requirement type:
Data
Event/BUC/PUC:
All data and log files shall be in textual format.
Description:
All data and log files shall be possible to open with a text
editor program.
Rationale:
Due to the nature of the product no database is used. Flat
files.
Originator:
Jis
Fit criterion:
User has the option to save the log file when exiting.
Customer satisfaction:
5
Customer dissatisfaction: 5
Priority:
Medium
Conflicts:
None
Supporting material:
Glossary, DUT- dependent Test Plan
History:
May 2013, Modified Aug 2013
(Continues)
82
32(48)
10.
Look and Feel Requirements (Non-functional Requirements)
10.1.
Appearance Requirements
Not applicable
10.2.
Style Requirements
Not applicable
(Continues)
83
33(48)
11.
Usability and Humanity Requirements
11.1.
Ease of Use Requirements
The Product shall be usable without any written instructions. Users are required to have
skills of how to setup the testing environment.
11.2.
Personalization and Internationalization Requirements
Used language shall be English and no other options shall be available. Personalization
is kept at minimum level due to the nature of the Program.
11.3.
Learning Requirements
Users must have prior knowledge of setting up the test environment. The Program shall
present a large number of options to choose from for the user. The program shall disable
options which are not valid for selected configuration.
11.4.
Understandability and Politeness Requirements
Not applicable.
11.5.
Accessibility Requirements
Not applicable.
(Continues)
84
34(48)
12.
Performance Requirements
12.1.
Speed and Latency Requirements
Not applicable.
12.2.
Safety-Critical Requirements
Not applicable.
12.3.
Precision or Accuracy Requirements
Not applicable.
12.4.
Reliability and Availability Requirements
Not applicable.
12.5.
Robustness or Fault-Tolerance Requirements
Not applicable.
12.6.
Capacity Requirements
Not applicable.
12.7.
Scalability or Extensibility Requirements
(Continues)
85
35(48)
Administrative personnel can add more test Access Points to laboratory setup by filling
out the initialization file for the particular Access Point and performing all configuration
backups to a file. Path and file name must be recorded at initialization file along with
the displayed name of the Access Point.
12.8.
Longevity Requirements
The program shall operate on minimum maintenance budget until a solution from the
certification body will become available.
(Continues)
86
36(48)
13.
Operational and Environmental Requirements
13.1.
Expected Physical Environment
Expected working environment shall be a laboratory with air-conditioning and adequate
means for data communications to company’s laboratory backbone. The laboratory shall
have means for access control 24 hours / day.
13.2.
Requirements for Interfacing with Adjacent Systems
The product shall be able to communicate over TCP/IP v4 networks to test bench Access Points and authentication servers.
The Product shall be able to use Internet Explorer for interfacing to test bench Access
Points.
The Product shall be able to utilize Access Point manufacturer-specific communication
program for setting up the configuration.
13.3.
Productization Requirements
The Product shall remain as interim solution for helping out verification testing and
shall not be productized.
13.4.
Release Requirements
Releases shall be provided on-need –basis. No pre-defined release schedule shall be set.
(Continues)
87
37(48)
14.
Maintainability and Support Requirements
14.1.
Maintenance Requirements
The administrator shall be able to modify the Program’s available options depending on
the test laboratory’s setup and available Access Points. Otherwise the program shall be
provided “as-is”.
14.2.
Supportability Requirements
Due to budget constraints no support personnel shall be dedicated for the Program.
14.3.
Adaptability Requirements
Not applicable.
(Continues)
88
38(48)
15.
Security Requirements
15.1.
Access Requirements
The laboratory space shall have adequate means of access control. The computer hosting the Program shall have access control via user login. All users with proper credentials to the laboratory environment shall have rights to operate the Program.
15.2.
Integrity Requirements
Not applicable.
15.3.
Privacy Requirements
The program shall not collect any user-related data.
15.4.
Audit Requirements
Not applicable.
15.5.
Immunity Requirements
The computer hosting the Program shall have anti-virus program and firewall setup according to the Company’s rules for laboratory equipment.
(Continues)
89
39(48)
16.
Cultural and Political Requirements
16.1.
Cultural Requirements
Not applicable.
16.2.
Political Requirements
Not applicable.
(Continues)
90
40(48)
17.
Legal Requirements
17.1.
Compliance Requirements
Not applicable.
17.2.
Standards Requirements
Not applicable.
(Continues)
91
41(48)
18.
Open Issues
Setup Runner for replaying the completed setup has been discussed. Due to time- and
budget constraints it has been left out.
A Setup wizard has been discussed as an alternative to textual initialization file editing.
Due to time- and budget constraints it has been left out.
(Continues)
92
42(48)
19.
Off-the-Shelf Solutions
19.1.
Ready-Made Products
None available at time being.
19.2.
Reusable Components
None available at time being.
19.3.
Products That Can Be Copied
None available at time being.
(Continues)
93
43(48)
20.
New Problems
20.1.
Effects on the Current Environment
Setting up a new Access Point very carefully is mandatory. All desired configurations
must be saved on a back-file which is used to configure the Access Point via the Program. Supported functionality of a new Access Point must be inserted to initialization
file.
20.2.
Effects on the Installed Systems
Users shall have a new option to power up the selected Access Point using the Program.
20.3.
Potential User Problems
If setting up a new Access Point to the test environment is not done correctly a test
round may fail or produce errors.
If a new brand of Access Point is introduced, which does not support set up via Telnet it
may require creating a new method for accessing it. This may consist of using manufacturer’s own setup program or other means which requires the Program’s interaction with
the Access Point to be studied and implemented.
20.4.
Limitations in the Anticipated Implementation Environment That May
Inhibit the New Product
Unforeseen updates to Internet Explorer introducing changed User Interface, which may
require setting up the Program’s interaction with the new browser.
(Continues)
94
44(48)
Design changes with the Access Point’s user interface, which may require changes to
the Program’s interaction with the Access Point.
20.5.
Follow-Up Problems
As the scope of the Program is an interim release until a sustainable solution from the
certification body is available it is not likely any follow-up is required.
(Continues)
95
45(48)
21.
Tasks
21.1.
Project Planning
The project planning and development shall be very agile. The users of the Product shall
be brought up with the new capabilities or Access Points every time when there shall be
a test round.
21.2.
Planning of the Development Phases
Initial planning shall be ready – 2 months before the first official test round.
First test version shall be ready -1 month before the first official test round.
Intermediate releases shall be created based on feedback from testing.
The final version shall be ready in approximately 6 months after the first official test
round.
(Continues)
96
46(48)
22.
Migration to the New Product
22.1.
Requirements for Migration to the New Product
Not applicable.
22.2.
Data That Has to Be Modified or Translated for the New System
Not applicable.
(Continues)
97
47(48)
23.
Risks
Excessive schedule pressure may delay the Product releases.
Low productivity related to learning curve of new programming skills related to interfacing components may delay the Product releases.
(Continues)
98
48(48)
24.
Costs
No additional costs are allowed for the Program.
(Continues)
99
49(48)
25.
User Documentation and Training
25.1.
User Documentation Requirements
Not applicable.
25.2.
Training Requirements
All users of the Program shall receive hands-on training. No other method shall be
available.
(Continues)
100
50(48)
26.
Waiting Room
Initialization data editor, an interface for initialization data to make sure all necessary
fields are filled. Put waiting due to resourcing constraints.
Setup Re-Runner, a tool to replay the completed test. Put waiting due to resourcing constraints.
101
3(12)
Appendix 2. Architecture Specification for the semi-automation tool
1
INTRODUCTION
Interoperability testing for wireless local area networks may require a complex test environment consisting of several Access Points and authentication servers. These entities
are used to verify the correct operation of a device under test.
Each entity has several settings for various authentication types and encryptions. There
is no global standard for remote (or local) user interface to enable machine-to-machine
automation for changing the settings. When user has to manually setup each feature, it
is prone to errors. These erroneous situations may slow down the actual testing and
therefore create pressure for schedules.
By creating a user interface based on radio-buttons it is possible to reduce the complexity of setting up the test environment to an acceptable level. User interface takes care of
powering up the desired Access Point, communicates with it and restores the desired
setup and, if needed, sets the definitions for authentication servers. Focus can be set to
actual interoperability testing instead of setting up the test environment.
A clear reduction of errors caused by faulty setups of the test environment was achieved
when the user interface was used. Also reliability and repeatability of testing got better.
(Continues)
102
4(12)
2
ARCHITECTURAL ANALYSIS
The whole environment for the tool is presented in high level in Virhe. Viitteen lähdettä ei löytynyt..
Figure 1: Communications overview
Architecture of the tool can be seen as Client-Server as part of the functionality lies inside the tool client running in console computer and part in the network in form of authentication servers (RADIUS).
The tool makes active connections to Power Distribution Unit (PDU) over Telnet to
command the PDU to either activate or de-activate the selected power outlet to power
up the selected Access Point.
After the selected Access Point has restored its full functionality a connection is made
to it to configure it with selected parameters consisting of the air encryption type and
(Continues)
103
5(12)
possible authentication. Connection may happen either with a Browser, Telnet, Tftp or
manufacturer’s own setup program controlled by the tool
If authentication is used the RADIUS-Proxy is configured to direct the RADIUS authentication messages to the correct RADIUS-server.
The user interface is presented in Virhe. Viitteen lähdettä ei löytynyt..
Figure 2: User Interface
The tool is a user interface with some logic behind. It is trying to simplify and speed up
the testing environment configuration task.
The program itself consists of many controls (radio-buttons, push-buttons) which, when
manipulated, dispatch an event containing a message specific to the control. The main
program catches the event, analyses the message and dispatches the message to appropriate function, which returns a value string. These strings are combined and they form
a path and file name to desired restore file.
(Continues)
104
6(12)
(Continues)
105
7(12)
3
FLOW DIAGRAM
The flow diagram of the tool (Figure 3) is simplified for clarity. It does not contain
smaller events such as saving the log file (Done Setups ListView) or powering up an
additional Access Point while the selected one is powering up or applying the requested
setup change.
Picture 3: Flow Diagram
During the startup phase program reads parameters from INI-files containing the needed
info for restoring a setup. Each Access Point has a backup file for each supported encryption and radio mode. INI-file contains the file name of the backup file and the path
to storage. Storage can be local or networked.
Also RADIUS server setup can be changed as not all RADIUS servers support all the
possible configurations and authentications. Therefore it is needed to use several RADIUS servers to perform various authentications. For example Microsoft Internet Authentication Server can perform PEAPv0 and EAP-TLS authentications while Juniper
(Continues)
106
8(12)
can perform PEAPv1 and EAP-TTLS authentications. And cellular network authentication server can perform EAP-SIM and EAP-AKA authentications.
Most feasible way to change from one RADIUS server to another is to use RADIUSproxy. For the tool point of view al the authentication requests for the RADIUS server
will go to same IP-address, in this case RADIUS-proxy. By defining different RADIUS
end points for RADIUS-proxy authentication can be directed to a RADIUS server
which can perform the selected authentication.
For each RADIUS end point configuration a setup backup file is created with Netshprogram (Russinovich Mark 2008), which is part of the Operating System. Netsh can
then be directed to load up a different configuration from a setup backup file and thus
changing the end point for RADIUS authentication request.
The tool creates strings to selected Access Point encryption type and if RADIUS server
is needed a string to RADIUS-proxy server’s backup file.
During restore process the selected Access Point is instructed to download the backup
file for the selected encryption. While the Access Point is restoring the backup RADIUS-proxy is instructed to load the setup backup file for selected RADIUS server. When
both processes are completed without errors the ListView (Done Setups) is updated and
the tool returns to wait for new commands from the user.
(Continues)
107
9(12)
4
USE CASES
Use cases -diagram in Figure 4 presents the same functionality as the flow chart but
with more detailed view for each possible selection.
Figure 4: Use Cases
Use cases -diagram presents the same functionality as the flow chart but with more detailed view for each possible selection.
On the left-hand side “User” is the person who makes the selections of which setup is to
be restored. On the right-hand side RADIUS, Access Point and PDU (APC by Schneider Electric) represent the elements connected to the same network, directed by the tool
and forming the actual test environment.
(Continues)
108
10(12)
As an example the most complex function of the tool, Setup Access Point is presented
next in flow chart (Figure 5).
Picture 5: SetupAP -process Flow Diagram
Functionality is quite straight forward. As the user presses Go-button on user interface
SetupAP-process starts. It first collects the user selections (radio-mode, air encryption,
Access Point name, and possible EAP-type and RADIUS server). Then the power state
of the selected Access Point is checked. If the Access Point is not yet powered up process commands the attached power distribution unit to turn on the outlet to which the
Access Point is connected. Then some time is given to Access Point to properly boot up
and settle. If any other Access Point was powered up e.g. for the previous test it is
turned off.
When the Access Point is powered up user still has the possibility to cancel the setup
and return to main user interface to make some adjustment to selections.
(Continues)
109
11(12)
4.1
Setting up the selected Access Point
The user interface commands a separate program, RestoreAP, which gets the path and
the restore file name as input and returns the state of setup after its run. This program is
a small tool created during the development and it mimics the user by sending keyboard
commands to Access Point’s web user interface. This is also a piece of software which
requires lots of updates if a new Access Point is added to the testing environment. There
is no common interface which could be used for administering all Access Points. Some
Access Points support Telnet connection which makes interfacing them very easy; just
by inputting commands over Telnet to Access Point command line interface everything
can be changed quickly without any concern about changing web user interface. During
the initial setup for an Access Point a shortest path to restore function is found out. Most
of the times it is simply another web page in the Access Point.
A web browser is opened and the address of the Access Point is inserted to browser.
After the setup page has been opened the tool logs in as an administrative user having
rights to perform a setup change. The program navigates inside Access Point web pages
by examining the page header. They always contain information on which page the user
is. This is also true when the Access Point is using framesets in the user interface creating a web page containing several other web pages.
Next the address to the page containing the restore function is opened. RestoreAP inserts the path and file name to dialog box for restore and selects OK-button to start the
restore. Possible confirmation prompts are handled the same way.
After the Access Point has completed the restore successfully it informs the user with
some textual information, which is captured and returned by RestoreAP to the main
program indicating a successful restore. Usually at this point the Access Point boots up
in order to get the new encryption into effect. If the change is small reboot may not be
required.
(Continues)
110
12(12)
5
FUTURE PERSPECTIVES
The tool described here was created as an interim solution to tackle the problems encountered while setting up the testing environment. The certification body, Wi-Fi Alliance (WFA) was creating their own solution to manage various setups in the laboratory
environment for device certification purposes. As their solution was still in development
and my company needed a quick solution to cut down the time consumed by setting up
the testing environment this tool, WLAN verification Wizard, was created. It served the
purpose and did its job. It was never meant to be anything more than an interim tool
while waiting for the actual release of a professional configuration management tool
from the certification body.
This tool was created with minimum budget and due to its nature it requires quite much
preparation work in the form of setting up Access Points and taking a backup of verified
encryption configuration.
There is no common interface which could be used with all Access Points. Some Access
Points support Telnet-based administration and others do not. As new Access Points are
added to the setup a new function has to be created for the tool taking care of the Access
Point user interface manipulation unless the Access Point supports Telnet. Also when a
new firmware for an Access Point is introduced its functionality needs to be checked as
there can be some alterations when comparing to previous version.
As this tool was created to overcome a very specific issue, cutting down the time needed for setting up Access Points in laboratory environment, it was never seen as a possible sellable product. Therefore no continuity or dedicated support plan was ever done.
Business value of this tool comes from reduced time for setting up the test environment
and from ensured settings for the selected authentication or authorization. User does not
have to worry whether the possible error is caused by the test environment due to wrong
settings. Error hunting efforts can be directed to actual device-under-test.
(Continues)
111
13(12)
6
MORE INFORMATION
General information of wireless LAN can be found from the web site of Wi-Fi Alliance:
http://www.wi-fi.org/. Pages also contain general information about certification programs. This info can be found at http://www.wi-fi.org/certification/programs
More specific info on wireless LAN certification testing cannot be disclosed public and
it is restricted to member companies of Wi-Fi Alliance only.
Information
of
the
language
used
can
be
found
from
AutoIt
website
http://www.autoitscript.com/site/autoit/ and related Forum and Blog pages accessible
from the main web site.
(Continues)
112
14(12)
6
REFERENCES
1.
APC by Schneider Electric: Switched Rack PDU. Read 2006/2011.
http://www.apc.com/products/resource/include/techspec_index.cfm?base_sku=AP7950
2.
Bennet Jonathan & AutoIt Consulting Ltd. 2013. AutoIt: automation and
scripting language. Read 2005/2011/2013. http://www.autoitscript.com/site/autoit/
3.
Petri Daniel. 2009. Configure TCP/IP from the Command Prompt. Read
2009/2011/2013. http://www.petri.co.il/configure_tcp_ip_from_cmd.htm
4.
Russinovich Mark. 2008, updated 2013. PsExcec. Read 2008/2011.
http://technet.microsoft.com/en-us/sysinternals/bb897553
5.
Tatham Simon. 2005. Using the command line connection tool Plink.
Read 2006/2011. http://the.earth.li/~sgtatham/putty/0.58/htmldoc/Chapter7.html
6.
Wi-Fi
Alliance.
2013.
http://www.wi-fi.org/organization.php
Organization.
Read
1.9.2011/2011/2013.
113
3(16)
Appendix 3. Source code for the main program
#Region ;**** Directives created by AutoIt3Wrapper_GUI ****
#AutoIt3Wrapper_outfile=Wizard_802.11n_RestoreAP_as_exec_testversion.exe
#EndRegion ;**** Directives created by AutoIt3Wrapper_GUI ****
;===============================================================================
; Program Name: VerificationWizard 802.1n -version
; Description:
Load pre-defined WLAN settings to Access Points and select RADIUS-server according to the user
;
choices
; Parameter(s): radius, ap, all: for debug; disables related function or both
; Requirement(s):
; Return Value(s): Selected AirEncryption, Access Point, EAP-type, RADIUS-server and possible WireShark / Ethereal-log
; Author(s):
Jukka Issakainen, Nokia TP/SP/CM/QA Services
;===============================================================================
#include <ButtonConstants.au3>
#include <GUIConstantsEx.au3>
#include <ListViewConstants.au3>
#include <StaticConstants.au3>
#include <WindowsConstants.au3>
#include <Array.au3>
#include <Constants.au3>
;#Include <WinAPI.au3> ; _WinAPI_SetSysColors($vElements, $vColors) for PDU buttons?
Opt("GUIOnEventMode", 1)
Const $sIniFile = "VerificationWizard.ini"
$sVersion = "VerificationWizard: Restore AP & Radius as exec & new APC IF, 27.4.2009"
;Const $sDefaultGrey = 0xc2c0c8; harder than you think....
$sDefaultGrey = 0xD4D0C8
Const $sDefaultGreen = 0x00ff00
Const $iAllPortsOff = "all" ; address for all APC ports
Const $iNumOfPduPorts = 16
Global $iNumOfAP, $iNumOfAir, $iNumOfEAP, $iNumOfRAD, $sTextOfButton
Global $sSelected802, $sSelectedAir, $sSelectedAp, $sSelectedEap, $sSelectedRad, $sPrevious802, $sPreviousAir,
$sPreviousAp, $sPreviousEap, $sPreviousRad
Global $iCurrentLvItem, $iFirstLvItem, $tTextToSave, $iIsListSaved
Global $Port, $sRestoreFile, $iPlinkHandle
Global $sRadiusRestorePath, $sRadiusProxy, $sRadiusRestoreFile, $iRadiusSetStatus, $sErrorItem
;Const $COLOR_BTNFACE = 15
$sOnColor = 0x00ff00
$sOffColor = $sDefaultGrey
$PduPrevState = "off"
$PduActionPhrase = ""
$iMsgBoxTimeOut = 3
$iWatchDog = 0
$iIsListSaved = 0 ; ListView not saved
#Region - Debug helpers
$DEBUG_List_Event_Arrays = 0 ; If = 1, txt-file will be written to @scriptdir & exit
$DEBUG_iAccessPointOff = 0
$DEBUG_iRadiusOff = 0
#EndRegion - Debug helpers
#Region - INI-file
$sLocalPath = @ScriptDir & "\" ; Add trailing backslash
$sApIniFile = IniRead($sLocalPath & $sIniFile, "AP", "APSetupInfo", "NotFound") ; Read the name of APinifile
from Wizard.ini
$sRadiusIniFile = IniRead($sLocalPath & $sIniFile, "RADIUS", "RadiusSetupInfo", "NotFound"); Read the name of
Radiusinifile from Wizard.ini
#EndRegion - INI-file
#Region - Install helperfiles
FileInstall("psexec.exe", $sLocalPath)
(Continues)
114
4(16)
#EndRegion - Install helperfiles
#Region - Read from INI-file
$asList802Mode = StringSplit(StringStripWS(IniRead($sLocalPath & $sApIniFile, "AP", "802Modes", "NotFound"), 1), ",") ; 802.11 b/g, 802.11n (2.4GHz), 802.11n (5GHz)
$iNumOf802Mode = $asList802Mode[0] + 1
$asListAir = StringSplit(StringStripWS(IniRead($sLocalPath & $sApIniFile, "AP", "RestoreModes", "NotFound"),
1), ",") ; Open, WEP128, WPA-PSK, WPA2-PSK, WPA, WPA2, 802.1x
$iNumOfAir = $asListAir[0] + 1
$asListAP = StringSplit(StringStripWS(IniRead($sLocalPath & $sApIniFile, "AP", "Models", "NotFound"), 1), ",");
Read from VerificationWizard.ini
$iNumOfAP = $asListAP[0] + 1;13+1 ; Read from INI-file
;_ArrayDisplay($asListAP)
$sAPRestorePath = IniRead($sLocalPath & $sApIniFile, "AP", "RestorePath", "NotFound"); Read from ApINI-file,
not anymore VerificationWizard.ini
If StringRight($sAPRestorePath, 1) = "\" Then; check for trailing backslash in
StringTrimRight($sAPRestorePath, 1); Remove trailing backslash, as it is used in APs RestoreFolder (ini-file)
EndIf
$sPDU_Enabled = StringUpper(StringStripWS(IniRead($sLocalPath & $sApIniFile, "PDU", "PDU_Enabled", "NotFound"), 8)); is PDU around Yes/No
If $sPDU_Enabled = "YES" Then
$sPDU_IP = StringStripWS(IniRead($sLocalPath & $sApIniFile, "PDU", "PDU_IP", "NotFound"), 8)
$sPDU_User = IniRead($sLocalPath & $sApIniFile, "PDU", "PDU_User", "NotFound")
$sPDU_Pwd = IniRead($sLocalPath & $sApIniFile, "PDU", "PDU_Pwd", "NotFound")
EndIf
$iPDU_Previous = 0 ; Initial value for PDU Port
#Region - Define APC PDU
Dim $aAPs_and_Ports[$iNumOfPduPorts + 1][4]
Dim $aUsedPduPorts[$iNumOfPduPorts + 1]; just in case, mark all used ports to this table
; $aAPs_and_Ports[$i][0] = AP_Name, $aAPs_and_Ports[$i][1] = Port, $aAPs_and_Ports[$i][2] = Button
@GUI_CTRLID; $aAPs_and_Ports[$i][3] = Button State; NOTE APC PDU has 16 ports
For $i = 1 to $asListAP[0]
$iPdu_Port = StringStripWS(IniRead($sLocalPath & $sApIniFile, $asListAP[$i], "PDU_Port", "NotFound"), 1)
$aAPs_and_Ports[$iPdu_Port][0] = $asListAP[$i]
$aAPs_and_Ports[$iPdu_Port][1] = $iPdu_Port
$aAPs_and_Ports[$iPdu_Port][3] = "off" ; Default Port State
;$sAPs_and_Ports = $sAPs_and_Ports & @CRLF & $aAPs_and_Ports[$i][0] & " Port = " & $aAPs_and_Ports[$i][1]
Next
;_ArrayDisplay($aAPs_and_Ports)
#EndRegion - Define APC PDU
#Region - Read Access Point capabilities from INI-file, if a file name is available = AP is capable of that mode,
$asApCapa[][]
Dim $asApCapa[$iNumOfAP][$iNumOfAir + 2] ; +2 for 802.1n -modes
For $i = 1 To $asListAP[0]
$asApCapa[$i][0] = $asListAP[$i] ; AP name for column #0
For $j = 1 To $asListAir[0]
$asApCapa[0][$j] = $asListAir[$j]
$asApCapa[$i][$j] = StringStripWS(IniRead($sLocalPath & $sApIniFile, $asListAP[$i], $asListAir[$j], "NotFound"), 8)
Next
$asApCapa[0][$j] = ".1n prefix 2.4GHz"
$asApCapa[$i][$j] = StringStripWS(IniRead($sLocalPath & $sApIniFile, $asListAP[$i], "802.1n_2", "NotFound"),
8) ; 2.4 GHz 802.1n -mode prefix
$asApCapa[0][$j + 1] = ".1n prefix 5GHz"
$asApCapa[$i][$j + 1] = StringStripWS(IniRead($sLocalPath & $sApIniFile, $asListAP[$i], "802.1n_5", "NotFound"), 8) ; 5 GHz 802.1n -mode prefix
Next
;_ArrayDisplay($asApCapa)
(Continues)
115
5(16)
#EndRegion - Read Access Point capabilities from INI-file, if a file name is available = AP is capable of that mode,
$asApCapa[][]
$asListEap = StringSplit(StringStripWS(IniRead($sLocalPath & $sIniFile, "EAP", "Types", "NotFound"), 8), ",");
Read from VerificationWizard.ini
$iNumOfEAP = $asListEap[0] + 1 ;$iNumOfEAP = 5 ; tls/peapv0, ttls, peapv1, sim, aka
$asListRADIUS = StringSplit(StringStripWS(IniRead($sLocalPath & $sRadiusIniFile, "RADIUS", "Servers", "NotFound"), 1), ","); Read from VerificationWizard.ini
$iNumOfRAD = $asListRADIUS[0] + 1
#Region - Read RADIUS server capabilities from INI-file, $asRadCapa[][]
Dim $asRadCapa[$iNumOfRAD][$iNumOfEAP]
For $i = 1 To $asListRADIUS[0]
$asRadCapa[$i][0] = $asListRADIUS[$i] ; name of Radius server for column #0
For $j = 1 To $asListEap[0]
$asRadCapa[0][$j] = $asListEap[$j] ; insert EAP-type to top column, easier to read
$asRadCapa[$i][$j] = StringStripWS(IniRead($sLocalPath & $sRadiusIniFile, $asListRADIUS[$i], $asListEap[$j],
"NotFound"), 8) ; Read server's support for EAP-types from RadiusSetupInfo.ini
Next
Next
;_ArrayDisplay($asRadCapa)
#EndRegion - Read RADIUS server capabilities from INI-file, $asRadCapa[][]
#EndRegion - Read from INI-file
#Region - Screen component variables
$iRadioGrpTop = 10
$iRadioGrpWidth = 140
$iGrpSeparator = 20
$iRadioBtnSeparator = 25
$iRadioBtnTop = $iRadioGrpTop + $iGrpSeparator ; 33
$iRadioBtnLeftFromGrp = 10
$iRadioBtnHeight = $iGrpSeparator;17
$iRadioTxtWidth = $iRadioGrpWidth - 2 * $iRadioBtnLeftFromGrp;130
$i802GrpTop = $iRadioGrpTop ; New group above Air
$i802GrpLeft = 10
$i802GrpHeight = $asList802Mode[0] * $iRadioBtnSeparator + $iRadioBtnTop
$i802Left = $i802GrpLeft + $iRadioBtnLeftFromGrp
$iAirGrpTop = $iRadioGrpTop + $i802GrpHeight + $iGrpSeparator
$iAirGrpLeft = $i802GrpLeft ; 8 !New group above Air
$iAirGrpHeight = $asListAir[0] * $iRadioBtnSeparator + $iRadioBtnTop
$iAirLeft = $iAirGrpLeft + $iRadioBtnLeftFromGrp ; 8+10
$iApGrpTop = $iRadioGrpTop
$iApGrpLeft = $i802GrpLeft + $iRadioGrpWidth + $iGrpSeparator ; 8+145+20= 173
$iApGrpHeight = $asListAP[0] * $iRadioBtnSeparator + $iRadioBtnTop
$iApLeft = $iApGrpLeft + $iRadioBtnLeftFromGrp;166 173+10 = 183
$iEapGrpTop = $iRadioGrpTop
$iEapGrpLeft = $iApGrpLeft + $iRadioGrpWidth + $iGrpSeparator ; 173+145+20=338
$iEapGrpHeight = $asListEap[0] * $iRadioBtnSeparator + $iRadioBtnTop
$iEapLeft = $iEapGrpLeft + $iRadioBtnLeftFromGrp;342 338+10=348
$iRadGrpTop = $iRadioGrpTop
$iRadGrpLeft = $iEapGrpLeft + $iRadioGrpWidth + $iGrpSeparator ; 338+145+20=503 $asListRADIUS
$iRadGrpHeight = $asListRADIUS[0] * $iRadioBtnSeparator + $iRadioBtnTop
$iRadLeft = $iRadGrpLeft + $iRadioBtnLeftFromGrp;510 503+10=513
$iListViewHeight = 132
$iListViewWidth = 615
(Continues)
116
6(16)
If $asListAP[0] > 12 Then
$iMainHeight = $iRadioGrpTop + $iGrpSeparator + $iNumOfAP * $iRadioBtnSeparator + $iGrpSeparator +
$iListViewHeight + $iGrpSeparator
Else
$iMainHeight = 580
EndIf
$iMainWidth = 790
$iListViewTop = $iMainHeight - $iRadioGrpTop - $iGrpSeparator - $iListViewHeight - $iGrpSeparator
#EndRegion - Screen component variables
Global
$ai802Event[$iNumOf802Mode],
$aiAirEvent[$iNumOfAir],
$aiApEvent[$iNumOfAP],
$aiEapEvent[$iNumOfEAP], $aiRadEvent[$iNumOfRAD], $aiPowerEvent[$iNumOfPduPorts + 1]
#Region
###
START
Koda
versio\wizard_on_event_mode\main.kxf
GUI
section
###
Form=c:\data\automation\802.1n-
;$Main = GUICreate($sVersion & " Main Width= " & $iMainWidth & " Main Height = " & $iMainHeight, $iMainWidth, $iMainHeight, 97, 45, BitOR($WS_OVERLAPPEDWINDOW, $WS_CLIPSIBLINGS)) ; 817, 587, 97, 45
$Main = GUICreate($sVersion , $iMainWidth, $iMainHeight, 97, 45, BitOR($WS_OVERLAPPEDWINDOW,
$WS_CLIPSIBLINGS)) ; 817, 587, 97, 45
GUISetOnEvent($GUI_EVENT_CLOSE, "MainClose")
GUISetOnEvent($GUI_EVENT_MINIMIZE, "MainMinimize")
GUISetOnEvent($GUI_EVENT_MAXIMIZE, "MainMaximize")
GUISetOnEvent($GUI_EVENT_RESTORE, "MainRestore")
;GUICtrlCreateGroup("", -99, -99, 1, 1)
#Region - Create 802 Group Buttons
; $asList802Mode, $iNumOf802Mode
$Group_802 = GUICtrlCreateGroup(" 802-Mode ", $i802GrpLeft, $i802GrpTop, $iRadioGrpWidth,
$i802GrpHeight)
For $i = 1 To $asList802Mode[0]
$ai802Event[$i] = GUICtrlCreateRadio($asList802Mode[$i], $i802Left, $iGrpSeparator + $i802GrpTop + ($i - 1) *
$iRadioBtnSeparator, $iRadioTxtWidth, $iRadioBtnHeight)
GUICtrlSetResizing(-1, $GUI_DOCKAUTO) ; Resize automatically according to window size
GUICtrlSetOnEvent(-1, "_NButton") ; default value
Next
GUICtrlSetState($ai802Event[1], $GUI_CHECKED) ; 1st selection as default
$sSelected802 = 1
$sPrevious802 = 1
GUICtrlCreateGroup("", -99, -99, 1, 1)
;_ArrayDisplay($ai802Event)
;_ArrayDisplay($asList802Mode)
#EndRegion - Create 802 Group Buttons
#Region - Create Air Encryption Buttons
$Group_Air = GUICtrlCreateGroup(" Air Encryption ", $iAirGrpLeft, $iAirGrpTop, $iRadioGrpWidth, $iAirGrpHeight);209)
For $i = 1 To $asListAir[0]
$aiAirEvent[$i] = GUICtrlCreateRadio($asListAir[$i], $iAirLeft, $iGrpSeparator + $iAirGrpTop + ($i - 1) * $iRadioBtnSeparator, $iRadioTxtWidth, $iRadioBtnHeight)
GUICtrlSetResizing(-1, $GUI_DOCKAUTO) ; Resize automatically according to window size
GUICtrlSetOnEvent(-1, "_AirButton")
Next
GUICtrlSetState($aiAirEvent[1], $GUI_CHECKED); 1st selection as default
$sSelectedAir = 1
$sPreviousAir = 1
GUICtrlCreateGroup("", -99, -99, 1, 1)
;_ArrayDisplay($aiAirEvent)
;_ArrayDisplay($asListAir)
#EndRegion - Create Air Encryption Buttons
#Region - Create AP Buttons
$Group_AP = GUICtrlCreateGroup(" Access Point ", $iApGrpLeft, $iApGrpTop, $iRadioGrpWidth, $iApGrpHeight) ; 152, 8, 153, 369
(Continues)
117
7(16)
For $i = 1 To $asListAP[0];$iNumOfAP -1
$aiApEvent[$i] = GUICtrlCreateRadio($asListAP[$i], $iApLeft, $iRadioBtnTop + ($i - 1) * $iRadioBtnSeparator,
$iRadioTxtWidth, $iRadioBtnHeight)
GUICtrlSetResizing(-1, $GUI_DOCKAUTO) ; Resize automatically according to window size
GUICtrlSetOnEvent(-1, "_ApButton")
Next
GUICtrlSetState($aiApEvent[1], $GUI_CHECKED); 1st selection as default
$sSelectedAp = 1
$sPreviousAp = 1
GUICtrlCreateGroup("", -99, -99, 1, 1)
;_ArrayDisplay($aiApEvent)
;_ArrayDisplay($asListAP)
#EndRegion - Create AP Buttons
#Region - Create EAP Buttons
$Group_EAP = GUICtrlCreateGroup(" EAP-Type", $iEapGrpLeft, $iEapGrpTop, $iRadioGrpWidth, $iEapGrpHeight) ; 328, 8, 145, 185
For $i = 1 To $asListEap[0]
$aiEapEvent[$i] = GUICtrlCreateRadio($asListEap[$i], $iEapLeft, $iRadioBtnTop + ($i - 1) * $iRadioBtnSeparator,
$iRadioTxtWidth, $iRadioBtnHeight)
GUICtrlSetResizing(-1, $GUI_DOCKAUTO) ; Resize automatically according to window size
GUICtrlSetOnEvent(-1, "_EapButton")
GUICtrlSetState(-1, $GUI_DISABLE); Startup situation
Next
GUICtrlSetState($aiEapEvent[1], $GUI_CHECKED); 1st selection as default
$sSelectedEap = 1
$sPreviousEap = 1
GUICtrlCreateGroup("", -99, -99, 1, 1)
;_ArrayDisplay($aiEapEvent)
;_ArrayDisplay($asListEap)
#EndRegion - Create EAP Buttons
#Region - Create RADIUS Buttons
$Group_RADIUS = GUICtrlCreateGroup(" RADIUS server ", $iRadGrpLeft, $iRadGrpTop, $iRadioGrpWidth,
$iRadGrpHeight) ; 496, 8, 145, 185
For $i = 1 To $asListRADIUS[0]
$aiRadEvent[$i] = GUICtrlCreateRadio($asListRADIUS[$i], $iRadLeft, $iRadioBtnTop + ($i - 1) * $iRadioBtnSeparator, $iRadioTxtWidth, $iRadioBtnHeight)
GUICtrlSetResizing(-1, $GUI_DOCKAUTO) ; Resize automatically according to window size
GUICtrlSetOnEvent(-1, "_RadiusButton")
GUICtrlSetState(-1, $GUI_DISABLE); Startup situation
Next
GUICtrlSetState($aiRadEvent[1], $GUI_CHECKED); 1st selection as default
$sSelectedRad = 1
$sPreviousRad = 1
GUICtrlCreateGroup("", -99, -99, 1, 1)
;_ArrayDisplay($aiRadEvent)
;_ArrayDisplay($asListRADIUS)
#EndRegion - Create RADIUS Buttons
#Region - Create Go/Exit
$iGoBtnLeft = $iRadGrpLeft + $iRadioGrpWidth + $iGrpSeparator
$iGoBtnTop = $iRadioGrpTop + $iGrpSeparator - 10
$iGoHeight = 3 * $iGrpSeparator ; 60
$iGoWidth = 6 * $iGrpSeparator ; 120
$ButtonGo = GUICtrlCreateButton("Go!", $iGoBtnLeft, $iGoBtnTop, $iGoWidth, $iGoHeight, 0) ; 664, 24, 120, 73,
0 left, top, width, height
GUICtrlSetResizing(-1, $GUI_DOCKAUTO) ; Resize automatically according to window size
GUICtrlSetOnEvent(-1, "_ButtonGoClick")
$ButtonExit = GUICtrlCreateButton("Exit", $iGoBtnLeft, $iGoBtnTop + $iGoHeight + $iGrpSeparator, $iGoWidth,
$iGoHeight, 0) ; 664, 112, 120, 73, 0
GUICtrlSetResizing(-1, $GUI_DOCKAUTO) ; Resize automatically according to window size
GUICtrlSetOnEvent(-1, "MainClose")
#EndRegion - Create Go/Exit
(Continues)
118
8(16)
#Region - Create Setups ListView & Buttons
$Group_Setups = GUICtrlCreateGroup("Done Setups", $i802GrpLeft, $iListViewTop, $iMainWidth - 2 * $iRadioGrpTop, $iListViewHeight + 2 * $iGrpSeparator - 5) ; 16, 392, 785, 169 left top width height
$ListView1 = GUICtrlCreateListView("Time | Date | 802-mode | Air | Access Point | EAP-type | Radius", $iAirGrpLeft + $iRadioBtnLeftFromGrp, $iListViewTop + $iGrpSeparator, $iListViewWidth, $iListViewHeight) ; 32,
416, 601, 132
GUICtrlSetResizing(-1, $GUI_DOCKAUTO) ; Resize automatically according to window size
GUICtrlSetOnEvent(-1, "ListView1Click")
$Btn_Save_List = GUICtrlCreateButton("Save Setups", $iGoBtnLeft, $iListViewTop + $iGrpSeparator, $iGoWidth,
$iGoHeight, 0) ; 666, 422, 120, 49, 0
GUICtrlSetResizing(-1, $GUI_DOCKAUTO) ; Resize automatically according to window size
GUICtrlSetOnEvent(-1, "Btn_Save_ListClick")
$Btn_Clear_List = GUICtrlCreateButton("Clear Setups", $iGoBtnLeft, $iListViewTop + $iGrpSeparator + $iGoHeight + $iGrpSeparator - 10, $iGoWidth, $iGoHeight, 0) ; 666, 492, 120, 49, 0
GUICtrlSetResizing(-1, $GUI_DOCKAUTO) ; Resize automatically according to window size
GUICtrlSetOnEvent(-1, "_ClearListView")
GUICtrlCreateGroup("", -99, -99, 1, 1)
#EndRegion - Create Setups ListView & Buttons
;#cs
#Region - Create Power Control Buttons
$k = 0
$iPwrBtnTop = 232
$iPwrBtnWidth = 73
$iPwrBtnHeight = 33
$iApcGrpWidth = 450 ;
$iApcGrpHeight = 169
$iSeparator = $iGrpSeparator / 2 ; default 20
$iButtonsInRow = 4
$iButtonRows = 4
$PduPrevState = ""
$PduActionPhrase = ""
$iButtonWidth = ($iApcGrpWidth - 2 * $iSeparator) / $iButtonsInRow; 110
$iButtonHeight = ($iApcGrpHeight - 3 * $iSeparator - $iApcGrpHeight / 4) / $iButtonsInRow; 30
$iPanicButtonWidth = $iApcGrpWidth - 2 * $iSeparator; $iButtonRows * $iButtonWidth
$iPanicButtonHeight = 2 * $iButtonHeight
$sfont = "Ariel"
$iDefaultFontSize = $iPwrBtnWidth / 11
$_AP_Control = GUICtrlCreateGroup(" Access Point Power Control", 328, 208, $iApcGrpWidth, $iApcGrpHeight);
328, 208, 473, 169
$APC_Btn_AllOff = GUICtrlCreateButton("Do Not Worry!", $iGoBtnLeft, 232, 120, 130, 0) ; 664, 232, 120, 129, 0
name, left, top, width, height
GUICtrlSetResizing(-1, $GUI_DOCKAUTO) ; Resize automatically according to window size
GUICtrlSetOnEvent(-1, "_AllPortsOff")
; $aAPs_and_Ports[$i][0] = AP_Name, $aAPs_and_Ports[$i][1] = Port, $aAPs_and_Ports[$i][2] = Button
@GUI_CTRLID; $aAPs_and_Ports[$i][3] = Button State; NOTE APC PDU has 16 ports
For $i = 1 To $iButtonsInRow ; PduBtnCtrlId goes to $aAPs_and_Ports[$i][2]
For $j = 1 To $iButtonRows
$aUsedPduPorts[$k + $j] = GUICtrlCreateButton("Free, Port # ", $iEapLeft + ($j - 1) * $iPwrBtnWidth, $iPwrBtnTop + ($i - 1) * $iPwrBtnHeight, $iPwrBtnWidth, $iPwrBtnHeight, $BS_MULTILINE)
GUICtrlSetResizing(-1, $GUI_DOCKAUTO) ; Resize automatically according to window size
GUICtrlSetFont(-1, $iDefaultFontSize, 700, 1, $sfont)
GUICtrlSetOnEvent(-1, "_PduButton")
Next
$k = $k + 4
Next
For $i = 1 To $iNumOfPduPorts
If $aAPs_and_Ports[$i][0] = "" Then
GUICtrlSetState($aUsedPduPorts[$i],$GUI_DISABLE)
Else
$aAPs_and_Ports[$i][2] = $aUsedPduPorts[$i]
GUICtrlSetData($aAPs_and_Ports[$i][2], $aAPs_and_Ports[$i][0]) ; Put the correct name to correct port#
EndIf
Next
(Continues)
119
9(16)
;_ArrayDisplay($aAPs_and_Ports)
GUICtrlCreateGroup("", -99, -99, 1, 1)
#EndRegion - Create Power Control Buttons
;#ce
If $DEBUG_List_Event_Arrays Then ; create a file of all event arrays
_Debug_Events()
EndIf
$iFirstLvItem = 0 ; reset ListView items
GUISetState(@SW_SHOW)
#EndRegion ### END Koda GUI section ###
_APC_GetState()
While 1
Sleep(1000)
$iWatchDog = $iWatchDog + 1
If $iWatchDog = 60 Then ; Simple timer just to update PDU button states
$iWatchDog = 0
_APC_GetState()
EndIf
WEnd
#Region - N Button Clicked
Func _NButton()
$sPrevious802 = $sSelected802
$sSelected802 = @GUI_CtrlId ; if selected >4 then we are in .1n -mode
_ToggleApState(@GUI_CtrlId) ; if n-mode -> dim all but n-aps, else enable all, $asApCapa
EndFunc ;==>_NButton
#EndRegion - N Button Clicked
#Region - Air Encryption Button Clicked - functions
Func _AirButton()
$sPreviousAir = $sSelectedAir
$sSelectedAir = @GUI_CtrlId
$iIndex = _ArraySearch($aiAirEvent, $sSelectedAir)
If $iIndex > 4 Then ; Enterprise authentication, enable EAP & Radius
_ToggleEapState($GUI_ENABLE)
_ToggleRadiusState($GUI_ENABLE)
;If $iIndex = 7 Then ; 802.1x
;_ToggleApState($iIndex) ; send
;EndIf
Else ; Personal authentication, disable EAP & Radius
_ToggleEapState($GUI_DISABLE)
_ToggleRadiusState($GUI_DISABLE)
EndIf
_ToggleApState(@GUI_CtrlId) ;
EndFunc ;==>_AirButton
#EndRegion - Air Encryption Button Clicked - functions
#Region - Access Point Clicked -functions
Func _ApButton()
$sSelectedAp = @GUI_CtrlId
EndFunc ;==>_ApButton
#EndRegion - Access Point Clicked -functions
#Region - EAP Button Clicked - functions
Func _EapButton()
$sSelectedEap = @GUI_CtrlId
_ToggleRadiusState($GUI_ENABLE)
EndFunc ;==>_EapButton
(Continues)
120
10(16)
#EndRegion - EAP Button Clicked - functions
#Region - RADIUS Button Clicked - functions
Func _RadiusButton()
$sSelectedRad = @GUI_CtrlId
_ToggleEapState($GUI_ENABLE)
EndFunc ;==>_RadiusButton
#EndRegion - RADIUS Button Clicked - functions
#Region - APC Button Clicked - functions
Func _AllPortsOff()
For $i = 1 to $iNumOfPduPorts
GUICtrlSetBkColor($aAPs_and_Ports[$i][2],$sOffColor) ; Grey
$aAPs_and_Ports[$i][3] = "off"
Next
_TogglePDU($iAllPortsOff, "off") ; Direct cut to the source... :-)
EndFunc ; ==> _AllPortsOff()
Func _PduButton()
_TogglePduBtnState(@GUI_CtrlId)
EndFunc ;==>_PduButton
Func _ConnectToAPC() ; Return $iPlinkHandle if connect succesful, 0 if NOK
$IsPduOnLine = Ping($sPDU_IP, 500); wait 500ms
If $IsPduOnLine = 0 Or @error Then ; = "Off" Then
$sPDU_Enabled = "No"
Return 0
Else
$sPDU_Enabled = "YES"
$iPlinkHandle = Run(@ComSpec & ' /c ' & $sLocalPath & 'plink.exe -telnet ' & $sPDU_IP, '', @SW_HIDE,
7);$STDERR_CHILD + $STDOUT_CHILD) ;
Sleep(2000)
While Not ProcessExists($iPlinkHandle) ; just in case someone has logged in to cmd-interface at the same moment
MsgBox(48, "Communication Error to APC PDU", "Command Line Interface is reserved for someone else..." &
@CRLF & @CRLF & "Will try again after 10 secs...", $iMsgBoxTimeOut)
Sleep(10000)
$iPlinkHandle = Run(@ComSpec & ' /c ' & $sLocalPath & 'plink.exe -telnet ' & $sPDU_IP, '', @SW_HIDE,
7);$STDERR_CHILD + $STDOUT_CHILD) ;
Sleep(2000)
WEnd
While 1 ;waits for "User"
$text = StdoutRead($iPlinkHandle)
$oktogo = StringRegExp($text, ".*User*")
If $oktogo = 1 Then ExitLoop
WEnd
StdinWrite($iPlinkHandle, $sPDU_User & @CR)
While 1 ;waits for "password"
$text = StdoutRead($iPlinkHandle)
$oktogo = StringRegExp($text, ".*Password.*")
If $oktogo = 1 Then ExitLoop
WEnd
StdinWrite($iPlinkHandle, $sPDU_Pwd & @CR)
Sleep(500)
Return $iPlinkHandle
EndIf
EndFunc ;==>_ConnectToAPC()
Func _TogglePduBtnState($iCtrlId)
; check the state of pressed button and change it
; initially try to read from PDU the start up state or if not too time consuming every time button is pressed...
; @GUI_CTRLID replaced with $iCtrlId
; $aAPs_and_Ports[$i][0] = AP_Name, $aAPs_and_Ports[$i][1] = Port, $aAPs_and_Ports[$i][2] = Button
@GUI_CTRLID; $aAPs_and_Ports[$i][3] = Button State
(Continues)
121
11(16)
For $i = 1 To $iNumOfPduPorts
If $iCtrlId = $aAPs_and_Ports[$i][2] Then ; $iCtrlId = $aAPs_and_Ports[$i][2]
If $aAPs_and_Ports[$i][3] = "Off" Then
GUICtrlSetBkColor($iCtrlId, $sOnColor) ; Green
$aAPs_and_Ports[$i][3] = "On"
Else
GUICtrlSetBkColor($iCtrlId, $sOffColor) ; Grey
$aAPs_and_Ports[$i][3] = "Off"
EndIf
_TogglePdu($aAPs_and_Ports[$i][1], $aAPs_and_Ports[$i][3])
EndIf
Next
EndFunc ;==>_TogglePduBtnState
Func _TogglePDU($Port, $PduAction)
If _ConnectToAPC() = 0 Then
; = "Off" Then
MsgBox(0, "TogglePDU", "$PduPrevState = " & $PduPrevState & @CRLF & "$PduAction = " & $PduAction &
@CRLF & "$Port = " & $Port & @CRLF & "PDU error = " & @error,$iMsgBoxTimeOut)
Else
StdinWrite($iPlinkHandle,$PduAction & " " & $Port & @CR) ; e.g. on 10, off 10, off all
Sleep(500)
While 1 ;waits for "APC>" confirmation
$text = StdoutRead($iPlinkHandle)
$oktogo = StringRegExp($text,".*APC>*")
If $oktogo = 1 Then ExitLoop
Wend
sleep(500)
StdinWrite($iPlinkHandle,"Bye" & @CR) ; 4- Logout
EndIf
Sleep(500)
ProcessClose("PLINK.EXE") ; just in case Plink gets to hang
$PduPrevState = $PduAction
EndFunc ; ==> Func _TogglePDU($iPort, $PduAction)
Func _APC_GetState() ; Read port states from APC, gets called from main loop and after GO
If _ConnectToAPC() = 0 Then
; = "Off" Then
MsgBox(0, "APC_GetState", "PDU Off-line", $iMsgBoxTimeOut)
Else
Sleep(500)
;#cs
While 1 ; After this loop $line contains what we want
$line = StdoutRead($iPlinkHandle)
$oktogo = StringRegExp($line,".*>*")
If $oktogo = 1 Then ExitLoop
Wend
;#ce
;MsgBox(0, "Lopputulos:", $line)
StdinWrite($iPlinkHandle,"bye" & @CR)
Sleep(500)
$APC_Out = StringSplit($line, @CR, 0)
;_ArrayDisplay($APC_Out, "APC_OUT Arrayna")
;#cs
$k = 0
While 1 ; After this loop $line contains what we want
$oktogo = StringRegExp($APC_Out[$k],"1:")
If $oktogo = 1 Then ExitLoop ; now we know from which index the actual data begins, should be [10] with the new
version of APC fw
$k = $k +1
Wend
;MsgBox(0, "$k", $k)
;#ce
; $aAPs_and_Ports[$i][0] = AP_Name, $aAPs_and_Ports[$i][1] = Port, $aAPs_and_Ports[$i][2] = Button
@GUI_CTRLID; $aAPs_and_Ports[$i][3] = Button State; NOTE APC PDU has 16 ports
For $l = $k To $APC_Out[0] -2; If String contains "N" as 9th char from left-> Port is ON
(Continues)
122
12(16)
If StringInStr(StringLeft($APC_Out[$l],10), "ON") Then ; $l -10 contains the port number
GUICtrlSetBkColor($aAPs_and_Ports[$l - $k +1][2],$sOnColor) ; Green
$aAPs_and_Ports[$l - $k +1][3] = "On"
Else
GUICtrlSetBkColor($aAPs_and_Ports[$l - $k +1][2],$sOffColor) ; Grey
$aAPs_and_Ports[$l - $k +1][3] = "Off"
EndIf
Next
EndIf ; ==> $IsPduOnLine
;_ArrayDisplay($APC_Out, "Porttien tila")
EndFunc ; ==>_APC_GetState()
Func _PDU_Control($Port, $PduAction); Port# On/Off as parameters
$PduPrevState = $PduAction
If $PduAction = "On" Then
;$PduAction = 1 ; 1 = Immediate On
$PduActionPhrase = "Immediate On"
Else
;$PduAction = 2 ; Immediate Off
$PduActionPhrase = "Immediate Off"
EndIf
$iPlinkHandle = _ConnectToAPC()
If $iPlinkHandle Then
StdinWrite($iPlinkHandle, $PduAction & " " & $Port & @CR) ; 1- Immediate On, 2- Immediate Off
Sleep(500)
StdinWrite($iPlinkHandle, "Bye" & @CR) ; 4- Logout
EndIf
EndFunc ;==>_PDU_Control
#EndRegion - APC Button Clicked - functions
#Region - Main Window Button Clicked - functions
;Func Btn_Clear_ListClick()
;EndFunc
Func Btn_Save_ListClick() ; format: time | date | 802-mode | Air | AP | EAP | Radius @CRLF
$tTextToSave = ""
$sSaveFile = "Done Setups.txt"
For $i = 1 To $iCurrentLvItem - $iFirstLvItem + 1
$tTextToSave = $tTextToSave & @CRLF & StringTrimRight(GUICtrlRead($iFirstLvItem + $i - 1), 1)
$tTextToSave = StringReplace($tTextToSave, "|", ",", 0); create comma-delimed list
Next
$iIsListSaved = _SaveTxt($tTextToSave, $sSaveFile) ; returns 0 or 1
EndFunc ;==>Btn_Save_ListClick
Func _ButtonGoClick()
For $i = 1 To $asList802Mode[0]
If GUICtrlGetState($ai802Event[$i]) = $GUI_ENABLE + $GUI_SHOW And GUICtrlRead($ai802Event[$i]) =
$GUI_CHECKED Then
$sSelected802 = $asList802Mode[$i]
EndIf
Next
For $i = 1 To $asListAir[0]
If GUICtrlGetState($aiAirEvent[$i]) = $GUI_ENABLE + $GUI_SHOW And GUICtrlRead($aiAirEvent[$i]) =
$GUI_CHECKED Then
$sSelectedAir = $asListAir[$i]
EndIf
Next
For $i = 1 To $asListAP[0]
If GUICtrlGetState($aiApEvent[$i]) = $GUI_ENABLE + $GUI_SHOW And GUICtrlRead($aiApEvent[$i]) =
$GUI_CHECKED Then
$sSelectedAp = $asListAP[$i]
EndIf
(Continues)
123
13(16)
Next
#cs
For $i = 1 To $iNumOfPduPorts ; select correct APs Power button and PDU port, 3.4.2009
If $sSelectedAp = $aAPs_and_Ports[$i][0] Then
$iCtrlId = $aAPs_and_Ports[$i][2]
$iPDU_Port = $aAPs_and_Ports[$i][1]
EndIf
Next
#ce
$sSelectedEap = "None"
For $i = 1 To $asListEap[0]
If GUICtrlGetState($aiEapEvent[$i]) = $GUI_ENABLE + $GUI_SHOW And GUICtrlRead($aiEapEvent[$i]) =
$GUI_CHECKED Then
$sSelectedEap = $asListEap[$i]
EndIf
Next
$sSelectedRad = "None"
For $i = 1 To $asListRADIUS[0]
If GUICtrlGetState($aiRadEvent[$i]) = $GUI_ENABLE + $GUI_SHOW And GUICtrlRead($aiRadEvent[$i]) =
$GUI_CHECKED Then
$sSelectedRad = $asListRADIUS[$i]
EndIf
Next
$sPDU_Enabled = _CheckPduComms($sPDU_IP) ; added 8.3.2009
If $sPDU_Enabled = "YES" Then ;
$iMsgBoxAnswer = MsgBox(33, "Final confirmation...", "You happy with your selections?")
$iPDU_Port = IniRead($sLocalPath & $sApIniFile, $sSelectedAp, "PDU_Port", "NotFound") ; Get correct port from
ApIni-file
$apip = IniRead($sLocalPath & $sApIniFile, $sSelectedAp, "IP", "NotFound")
; $aAPs_and_Ports[$i][0] = AP_Name, $aAPs_and_Ports[$i][1] = Port, $aAPs_and_Ports[$i][2] = Button
@GUI_CTRLID; $aAPs_and_Ports[$i][3] = Button State
If $iPDU_Previous <> $iPDU_Port Then
;Else ; if same AP is used again, no need to shut it down
If $iPDU_Previous <> 0 Then ; $iPDU_Previous = 0 in startup
;_PDU_Control($iPDU_Previous, "Off") ;
_TogglePdu($iPDU_Previous, "Off")
;_TogglePduBtnState($iCtrlId);
EndIf
;_PDU_Control($iPDU_Port, "On") ;
_TogglePdu($iPDU_Port, "On")
$iPDU_Previous = $iPDU_Port
_APC_GetState()
ProgressOn("Booting up... " & $sSelectedAp, "Please wait...", $sSelectedAp & " is booting up...")
$i = 1
Do
$iIsApOnLine = Ping($apip, 5000) ; returns 0, when not online, when online returns roundtrip time
$i = $i + 1
ProgressSet($i * 10, "Booting...")
If $i = 8 Then
$i = 1
EndIf
Until $iIsApOnLine Or $i = 7
ProgressSet(90, "Hold on...", "Almost there, please be patient...")
For $j = 1 To 10
Sleep(1000) ; 10 sec delay may need to be adjusted due to slow boot of some APs
ProgressSet(90 + $j & "Hold on...", 10 - $j & " secs to go...", "Almost there, please be patient...")
Next
ProgressOff()
EndIf
If Not Ping($apip, 4000) Then
MsgBox(33, "Access Point " & $sSelectedAp, "Access Point " & $sSelectedAp & " in Port: " & $iPDU_Port &
@CRLF & @CRLF & "is not responding. Please check cabling etc.")
EndIf
Else
; Prompt user to switch on AP if PDU is not used
(Continues)
124
14(16)
$iMsgBoxAnswer = MsgBox(33, "One more thing...", "Before continuing, make sure Access Point" & @CRLF &
@CRLF & $sSelectedAp & @CRLF & @CRLF & "is powered and functional")
EndIf ; $sPDU_Enabled
; continue setting up AP
Select
Case $iMsgBoxAnswer = 1
$iRestoreApCounterValue = _RestoreAP() ; _RestoreAP() returns zero, if NOK
If $iRestoreApCounterValue > 0 Then; returns something, when ok, zero if failure
_SetRadius()
_UpdateListView()
;MsgBox(0, "$iRestoreApCounterValue", "$iRestoreApCounterValue = " & $iRestoreApCounterValue)
EndIf
Case $iMsgBoxAnswer = 2 ;Cancel, dang... Back to square 1 with previously selected options
EndSelect ;MsgBox
EndFunc ;==>_ButtonGoClick
Func MainClose()
If $iIsListSaved = 0 Then
Btn_Save_ListClick()
EndIf
_AllPortsOff()
Exit
EndFunc ;==>MainClose
#EndRegion - Main Window Button Clicked - functions
Func _ToggleApState($iEvent) ; Event number as input
; if input is in range 4 - 6 = 802button
; if input is in range 9 - 15 = AirButton
$iSetAp = 0
$iIndex = _ArraySearch($ai802Event, $iEvent);, 0, 0, 0, 1)
If @error Then ; not in $ai802Event, but in $aiAirEvent, do capa check for aps
$iIndex = _ArraySearch($aiAirEvent, $iEvent); $asListAir[0]
$sPreviousAp = 0
If $sSelected802 > 4 Then ; if > 4 then in 802.1n mode
Else
For $i = 1 To $asListAP[0] ;To 1 Step -1
;MsgBox(0, "$asApCapa[$i][$iIndex]", $asApCapa[$i][$iIndex],2)
;#cs
If StringStripWS($asApCapa[$i][$iIndex], 8) = "" Then ; if selected air-mode is not supported by the ap -> disable
GUICtrlSetState($aiApEvent[$i], $GUI_DISABLE) ; if disable AND selected, move selection to next available (or
first available)
If GUICtrlRead($aiApEvent[$i]) = $GUI_CHECKED Then
GUICtrlSetState($aiApEvent[$i], $GUI_UNCHECKED)
$sPreviousAp = $i
EndIf
Else ; air-mode supported by AP
GUICtrlSetState($aiApEvent[$i], $GUI_ENABLE) ; + $GUI_CHECKED)
;MsgBox(0, "$asListAP", $asListAP[$i] & " = " & GUICtrlRead($aiApEvent[$i]),1)
EndIf
Next
For $i = 1 To $asListAP[0]
If GUICtrlRead($aiApEvent[$i]) = $GUI_CHECKED Then ; check if any checked
$iSetAp = $i
EndIf
Next
If $iSetAp = 0 Then
For $i = $asListAP[0] To 1 Step -1
If GUICtrlGetState($aiApEvent[$i]) = $GUI_ENABLE + $GUI_SHOW Then; 80 = 64 + 16
GUICtrlSetState($aiApEvent[$i], $GUI_CHECKED)
EndIf
Next
EndIf
EndIf
Else ; Found in $ai802Event
;#cs
If $iIndex > 1 Then
;MsgBox(0, "$ai802Event", "802.11n-mode, enable only 802.11n capable APs",2)
For $i = 1 To $asListAP[0]
(Continues)
125
15(16)
;MsgBox(0,"$asApCapa[$i][$asListAir[0]+1", $asApCapa[$i][$asListAir[0]+1])
If StringStripWS($asApCapa[$i][$asListAir[0] + 1], 8) = "" Or StringStripWS($asApCapa[$i][$asListAir[0] + 2], 8)
= "" Then ; If 802.1x prefix not found, then disable
GUICtrlSetState($aiApEvent[$i], $GUI_DISABLE + $GUI_UNCHECKED)
Else
GUICtrlSetState($aiApEvent[$i], $GUI_ENABLE)
EndIf
Next
For $i = 1 To $asListAP[0]
If GUICtrlRead($aiApEvent[$i]) = $GUI_CHECKED Then ; check if any checked
$iSetAp = $i
EndIf
Next
If $iSetAp = 0 Then
For $i = $asListAP[0] To 1 Step -1
If GUICtrlGetState($aiApEvent[$i]) = $GUI_ENABLE + $GUI_SHOW Then; 80 = 64 + 16
GUICtrlSetState($aiApEvent[$i], $GUI_CHECKED)
EndIf
Next
EndIf
Else
;MsgBox(0, "$ai802Event", "B/G-mode, enable all APs, unless some EAP prevents",2)
For $i = 1 To $asListAP[0] ; if b/g pressed -> enable
GUICtrlSetState($aiApEvent[$i], $GUI_ENABLE)
Next
EndIf
;#ce
EndIf
EndFunc ;==>_ToggleApState
Func _ToggleEapState($sEapState) ; if enable, need to check if air enterprise & which radius, use enable also selectively (which radius -> may disable)
For $i = 1 To $asListEap[0]
GUICtrlSetState($aiEapEvent[$i], $sEapState)
Next
EndFunc ;==>_ToggleEapState
Func _ToggleRadiusState($sRadiusState) ; if enable, need to check eap-mode & if air = enterprise
;#cs
If $sRadiusState = $GUI_ENABLE Then
For $i = 1 To $asListEap[0] ; read which eap selected
If GUICtrlRead($aiEapEvent[$i]) = $GUI_CHECKED Then
$sSelectedEap = $i ; find selected eap
EndIf
Next
$sSelectedRad = 0
For $j = 1 To $asListRADIUS[0]
If StringUpper($asRadCapa[$j][$sSelectedEap]) = "YES" Then
GUICtrlSetState($aiRadEvent[$j], $sRadiusState)
If $sSelectedRad = 0 Then
GUICtrlSetState($aiRadEvent[$j], $GUI_CHECKED) ; check first matching
$sSelectedRad = $j
EndIf
Else ; disable radius, if eap-type not supported
GUICtrlSetState($aiRadEvent[$j], $GUI_DISABLE)
If GUICtrlRead($aiRadEvent[$j]) = $GUI_CHECKED Then
GUICtrlSetState($aiRadEvent[$j], $GUI_UNCHECKED)
$sPreviousRad = $j
EndIf
EndIf
Next
Else
For $j = 1 To $asListRADIUS[0]
GUICtrlSetState($aiRadEvent[$j], $sRadiusState)
Next
EndIf
(Continues)
126
16(16)
EndFunc ;==>_ToggleRadiusState
Func _Debug_Events()
Global $tEventArrays ; 802
$tEventArrays = "$ai802Event" & @CRLF
For $i = 0 To $iNumOf802Mode - 1
$tEventArrays = $tEventArrays & "[" & $i & "]" & "|" & $ai802Event[$i] & @CRLF
Next
$tEventArrays = $tEventArrays & @CRLF & "$asList802Mode" & @CRLF
For $i = 0 To $iNumOf802Mode - 1
$tEventArrays = $tEventArrays & "[" & $i & "]" & "|" & $asList802Mode[$i] & @CRLF
Next
; Air
$tEventArrays = $tEventArrays & @CRLF & "$aiAirEvent" & @CRLF
For $i = 0 To $iNumOfAir - 1
$tEventArrays = $tEventArrays & "[" & $i & "]" & "|" & $aiAirEvent[$i] & @CRLF
Next
$tEventArrays = $tEventArrays & @CRLF & "$asListAir" & @CRLF
For $i = 0 To $iNumOfAir - 1
$tEventArrays = $tEventArrays & "[" & $i & "]" & "|" & $asListAir[$i] & @CRLF
Next
; AP
$tEventArrays = $tEventArrays & @CRLF & "$aiApEvent" & @CRLF
For $i = 0 To $iNumOfAP - 1
$tEventArrays = $tEventArrays & "[" & $i & "]" & "|" & $aiApEvent[$i] & @CRLF
Next
$tEventArrays = $tEventArrays & @CRLF & "$asListAP" & @CRLF
For $i = 0 To $iNumOfAP - 1
$tEventArrays = $tEventArrays & "[" & $i & "]" & "|" & $asListAP[$i] & @CRLF
Next
; EAP
$tEventArrays = $tEventArrays & @CRLF & "$aiEapEvent" & @CRLF
For $i = 0 To $iNumOfEAP - 1
$tEventArrays = $tEventArrays & "[" & $i & "]" & "|" & $aiEapEvent[$i] & @CRLF
Next
$tEventArrays = $tEventArrays & @CRLF & "$asListEap" & @CRLF
For $i = 0 To $iNumOfEAP - 1
$tEventArrays = $tEventArrays & "[" & $i & "]" & "|" & $asListEap[$i] & @CRLF
Next
; Radius
$tEventArrays = $tEventArrays & @CRLF & "$aiRadEvent" & @CRLF
For $i = 0 To $iNumOfRAD - 1
$tEventArrays = $tEventArrays & "[" & $i & "]" & "|" & $aiRadEvent[$i] & @CRLF
Next
$tEventArrays = $tEventArrays & @CRLF & "$asListRADIUS" & @CRLF
For $i = 0 To $iNumOfRAD - 1
$tEventArrays = $tEventArrays & "[" & $i & "]" & "|" & $asListRADIUS[$i] & @CRLF
Next
; PDU Ports
$tEventArrays = $tEventArrays & @CRLF & "$aAPs_and_Ports[$i][2]" & @CRLF
For $i = 0 To $iNumOfPduPorts
$tEventArrays = $tEventArrays & "[" & $i & "]" & "|" & $aAPs_and_Ports[$i][2] & @CRLF
Next
$tEventArrays = $tEventArrays & @CRLF & "$aAPs_and_Ports[$i][3] Note Array Size" & @CRLF ;
$asApcPorts[][]
For $i = 0 To $iNumOfPduPorts
$tEventArrays = $tEventArrays & "[" & $i & "]" & "|" & $aAPs_and_Ports[$i][0] & " | " & $aAPs_and_Ports[$i][3]
& @CRLF
Next
_SaveTxt($tEventArrays, "EventArrays.txt")
Exit
EndFunc ;==>_Debug_Events
Func _SaveTxt($tTextToSave, $sSaveFile)
$sListFileName = FileSaveDialog("Save ", @ScriptDir, "Text Documents (*.txt)", 16, $sSaveFile)
; option 16 = dialog remains until valid path/file selected & prompts for overwrite, if file exists
If @error Then
MsgBox(48, "Save File", "Save cancelled!")
Return 0 ; return $iIsListSaved
Else
(Continues)
127
17(16)
$file = FileOpen($sListFileName, 2) ; Check if file opened for writing OK
If $file = -1 Then
MsgBox(48, "Error", "Unable to open file.")
Exit
EndIf
FileWrite($file, $tTextToSave)
FileClose($file)
Return 1 ; return $iIsListSaved
EndIf
EndFunc ; ==> _SaveTxt()
Func _RestoreAP() ; returns 0 if failure
If StringInStr($sSelected802, "5") Then ; 5GHZ 802.11n
$s802Prefix = StringStripWS(IniRead($sLocalPath & $sApIniFile, $sSelectedAp, "802.11n_5", "Not Found"), 8) ;
Read 802.11n 5GHz file prefix from ini-file
Else
If StringInStr($sSelected802, "b/g") Then
$s802Prefix = ""
Else
$s802Prefix = StringStripWS(IniRead($sLocalPath & $sApIniFile, $sSelectedAp, "802.11n_2", "Not Found"), 8) ;
Read 802.11n 2.4GHz file prefix from ini-file
EndIf
EndIf
$sRestoreFile = $s802Prefix & StringStripWS(IniRead($sLocalPath & $sApIniFile, $sSelectedAp, $sSelectedAir,
"Not Found"), 8) ; read file name from ini-file and add 802.11n prefix, if needed
While ProcessExists("RestoreAp.exe") ;terminate old hanging processes
ProcessClose("RestoreAp.exe")
WEnd
$iPidRestoreAp = Run(@ComSpec & " /c " & 'RestoreAp.exe ' & $sSelectedAp & ' ' & $sRestoreFile, @ScriptDir,
@SW_HIDE, $STDOUT_CHILD)
Sleep(2000)
$iRestoreApCounter = 0
While ProcessExists($iPidRestoreAp)
;GUICtrlSetData($iCurrentLvItem,StdoutRead($iPidRestoreAp))
Sleep(1000)
$iRestoreApCounter = $iRestoreApCounter + 1
If $iRestoreApCounter = 180 Then ; if restore process gets hang, then kill it
ProcessClose($iPidRestoreAp)
$iRestoreApCounter = 0
ExitLoop
EndIf
End
Return ($iRestoreApCounter)
EndFunc ;==>_RestoreAP
Func _CheckPduComms($sPDU_IP)
If Not Ping($sPDU_IP, 3000) Then
Return ("No")
Else
Return ("YES")
EndIf
EndFunc ;==>_CheckPduComms
Func _SetRadius()
MsgBox(0, "SetRadius", "Set RADIUS to " & $sSelectedRad, 2)
If ShellExecuteWait("SetRadius ", $sSelectedRad, $sLocalPath) Then
$iTime = @HOUR & ":" & @MIN & " |" & @MDAY & "." & @MON & " " & @YEAR
$sErrorItem = "Error in Radius-setup: " & $iTime & "|" & $sSelected802 & "|" & $sSelectedAir & "|" & $sSelectedAp & "|" & $sSelectedEap & "|" & $sSelectedRad ; collect setup & time to oneliner
$iErrorFile = FileOpen("Wizard-error.txt",1)
FileWrite($iErrorFile, $sErrorItem)
FileClose($iErrorFile)
MsgBox(16, "Error in RADIUS Setup", "Radius error has occurred!")
EndIf
EndFunc ;==>_SetRadius
(Continues)
128
18(16)
Func _UpdateListView()
;$ListView1
$iUpdateListViewOK = 0
$iTime = @HOUR & ":" & @MIN & " |" & @MDAY & "." & @MON & " " & @YEAR
$sListViewItem = $iTime & "|" & $sSelected802 & "|" & $sSelectedAir & "|" & $sSelectedAp &
"|" & $sSelectedEap & "|" & $sSelectedRad ; collect setup & time to oneliner
;$iUpdateListViewOK = _GUICtrlListViewInsertItem($ListView1, 0, $sListViewItem) ; insert
new item to top of ListView
;MsgBox(0, "$sListViewItem", $sListViewItem)
$iCurrentLvItem = GUICtrlCreateListViewItem($sListViewItem, $ListView1) ; insert new item to
end of ListView
If $iFirstLvItem = 0 Then
$iFirstLvItem = $iCurrentLvItem
EndIf
If $iCurrentLvItem <> 0 Then ; if not error
$iUpdateListViewOK = 1
$iIsListSaved = 0
Else
$iUpdateListViewOK = 0
EndIf
EndFunc ;==>_UpdateListView
129
3(10)
Appendix 4. Source code for RestoreAP.exe
#Region ;**** Directives created by AutoIt3Wrapper_GUI ****
#AutoIt3Wrapper_outfile=RestoreAP.exe
#EndRegion ;**** Directives created by AutoIt3Wrapper_GUI ****
; RestoreAp($sAP,$sRestoreFile)
; Uses AP-INI -file, returns nothing
; AP ini-file can be found from VerificationWizard.ini
; [AP]
; APSetupInfo = APSetupInfo.ini
; Jukka Issakainen, Quality Assurance Services
#include <Constants.au3>
#include <array.au3>
#include<ie.au3>
Global $sAP, $sRestoreFile
Const $sIniFile = "VerificationWizard.ini"
Opt("SendkeyDelay",20)
$DEBUG_iAccessPointOff = 0
$DEBUG_iRadiusOff = 0
$sLocalPath = @ScriptDir & "\" ; Add trailing backslash
$sApIniFile = IniRead($sLocalPath & $sIniFile, "AP", "APSetupInfo", "NotFound") ; Read the name of APinifile
from Wizard.ini
$sAPRestorePath = IniRead($sLocalPath & $sApIniFile, "AP", "RestorePath", "NotFound"); Read from ApINI-file,
not anymore VerificationWizard.ini
FileInstall("3cserver.exe", $sLocalPath); Install TFTP Server
FileInstall("3cserver.ini", $sLocalPath)
FileInstall("plink.exe", $sLocalPath) ; Install PLINK.EXE
If $cmdline[0] > 0 Then ; Selected AP and restorefile as input, main prg takes care of matching selected mode to
restorefile
$sSelectedAp = ""
$iEndOfInput = $cmdline[0]
For $i = 1 to $iEndOfInput -1
$sSelectedAp = $sSelectedAp & $cmdline[$i] & " "
Next
$sRestoreFile = $cmdline[$iEndOfInput]
;MsgBox(0, "Parametrit", "$sSelectedAp = " & $sSelectedAp & @CRLF & "$sRestoreFile = " & $sRestoreFile)
AutoItSetOption("WinTitleMatchMode", 2) ; set title matching to sub-string, no need for whole title
;IniRead ( "filename", "section", "key", "default" )
(Continues)
130
4(10)
$sAPRestoreFolder = $sAPRestorePath & IniRead($sLocalPath & $sApIniFile, $sSelectedAp, "RestoreFolder",
"NotFound")
$aTelnetParam = StringSplit($sRestoreFile, ",") ; This function reads from $sRestoreFile separated parameters by
comma, if Telnet > only one parameter = restorefile
AutoItSetOption("WinTitleMatchMode", 2) ; set title matching to sub-string, no need for whole title
;_ArrayDisplay($aTelnetParam, "$aTelnetParam")
$sAP_IP = IniRead($sLocalPath & $sApIniFile, $sSelectedAp, "IP", "NotFound")
$sGoRestore = IniRead($sLocalPath & $sApIniFile, $sSelectedAp, "GoRestore", "NotFound")
$sUserID = IniRead($sLocalPath & $sApIniFile, $sSelectedAp, "UserID", "NotFound")
$sPassword = IniRead($sLocalPath & $sApIniFile, $sSelectedAp, "Password", "NotFound")
If $sAP_IP = "Not Found" Or $sGoRestore = "Not Found" Or $sUserID = "Not Found" Or $sPassword = "Not
Found" Or $sAPRestoreFolder = "Not Found" Or $sRestoreFile = "Not Found" Then
MsgBox(0, "Error", "Parameter not found, check " & $sApIniFile & " -file!" & @CRLF & @CRLF & "Access Point
" & $sSelectedAp & " might not support selected mode")
EndIf
If StringRight($sAPRestoreFolder, 1) <> "\" Then; Check that path contains a backslash
$sAPRestoreFolder = $sAPRestoreFolder & "\"
EndIf
$sRestoreFile = $sAPRestoreFolder & $sRestoreFile ; combine path & restorefile
;
MsgBox(0, "AccessPoint Setup values", "$AP= " & $sSelectedAp & @CRLF & "$sAP_IP= " &
$sAP_IP & $sGoRestore & @CRLF & "$sUserID= " & $sUserID & @CRLF & "$sPassword =" & $sPassword &
@CRLF & "$sRestoreFile =" & $sRestoreFile)
If $DEBUG_iAccessPointOff = 0 Then ; $DEBUG_iAccessPointOff = 1 for debugging
$iIsApOnLine = Ping($sAP_IP, 4000) ;
If $iIsApOnLine Then ; Is AP online?
If $DEBUG_iRadiusOff = 0 Then ; if not in any debugmode, then set Progressbar
ProgressOn("Access Point Configuration Restore", "Please wait...", "0 percent", -1, -1, 16) ; 16 = window can be
moved
AdlibEnable("_ProgressBar", 500) ; Call _ProgressBar every 500ms
EndIf ; set ProgressBar
If $aTelnetParam[0] = 1 And $aTelnetParam[1] <> "set" And Not StringInStr($sSelectedAp, "Apple") Then ; wep
interface used, if not telnet or SSH or Apple (-> Airport.exe)
;;ShellExecute("iexplore.exe", $sAP_IP & $sGoRestore)
$oIE =_IECreate($sAP_IP & $sGoRestore)
Sleep(3000)
$sSelectedAp = StringStripWS($sSelectedAp, 8) ; to strip all WhiteSpaces away from AP name to avoid any misconfig
; A-Link WNAP, Apple Airport Extreme, Cisco 1231, Belkin N1 Vision, Buffalo WZR-AG300NH, D-Link DIR655, Linksys WRT54GS, Linksys WRT350N, Linksys WRT610N, Netwjork 54Mbps, Thomson 585, Telewell TWEA515, ZyXEL NBG-415N, ZyXel P-661HW-D1
(Continues)
131
5(10)
;#cs
Select
Case $sSelectedAp = "A-LinkWNAP";
;;WinWaitActive("Connect")
$oIE =_IEAttach("Connect","DialogBox")
$oDoc = _IEDocGetObj($oIE)
;Send($sUserID & "{TAB}" & $sPassword & "{TAB 2}" & "{ENTER}")
;;WinWaitActive("Save/Reload")
$oIE =_IEAttach("Save/Reload","Title")
Sleep(3000); [CLASS:Internet Explorer_Server; INSTANCE:1]
;Send("{TAB 9}")
ControlClick("Save/Reload","","[CLASS:Internet Explorer_Server; INSTANCE:1]","left",1,220,164);
Sleep(1000)
Send($sRestoreFile & "{TAB 2}" & "{ENTER}")
Sleep(3000)
WinWaitActive($sAP_IP)
Sleep(1000)
Send("{TAB 8}" & "{ENTER}")
WinWaitActive("Save/Reload Setting")
WinClose("Save/Reload Setting")
Case $sSelectedAp = "Cisco1231"
;
ConsoleWrite('@@ (927) :(' & @MIN & ':' & @SEC & ') In Cisco1231')
Send($sUserID & "{TAB}" & $sPassword & "{ENTER}")
Sleep(2000)
WinWaitActive("System Software - System Configuration")
Sleep(7000)
Send("+{TAB 10}" & $sAPRestoreFolder & $sRestoreFile & "+{TAB}{enter}") ; insert filename & go to "Load" button
WinWaitActive("Microsoft")
Send("{enter}")
Sleep(10000) ; wait for boot count-down timer
WinWaitNotActive("System Restarting Now") ; wait for Cisco to boot-up
IsOffLine($sAP_IP) ; Wait until AP comes back online
Sleep(5000) ; Wait for other processes to startup in AP
$iPing = Ping($sAP_IP)
While @error = 1 ; host is offline
Sleep(1000)
$iPing = Ping($sAP_IP)
WEnd
;_CloseOpenWindow("System Software - System Configuration")
WinWaitActive("Cisco")
WinClose("Cisco") ; Close Browser after restore
;WinWaitClose("Cisco") ; Wait for browser to close before continuing
(Continues)
132
6(10)
;ConsoleWrite('@@ (950) :(' & @MIN & ':' & @SEC & ') Exit Cisco1231')
;#ce
Case $sSelectedAp = "BelkinN1Vision";
WinWaitActive("Login")
Sleep(3000)
Send("{TAB 2}" & "{ENTER}")
WinWaitActive("Restore")
Sleep(3000) ;
ControlClick("Restore","","[CLASS:Internet Explorer_Server; INSTANCE:1]","left",1,370,184) ;
; Uses ControlClick Coordinates to navigate to input field
Sleep(1000)
Send($sRestoreFile & "{TAB 2}" & "{ENTER}")
WinWaitActive("Explorer","continue")
Send("{ENTER}")
WinWaitActive("Explorer", "90") ; 90s info window
Send("{ENTER}")
WinWaitActive("Setup Home")
WinClose("Setup Home")
Case $sSelectedAp = "BuffaloWZR-AG300NH";
WinWaitActive("Connect")
Send($sUserID & "{TAB}" & $sPassword & "{TAB 2}" & "{ENTER}")
WinWaitActive("AirStation Settings")
Sleep(10000)
ControlClick("AirStation Settings","","[CLASS:Internet Explorer_Server; INSTANCE:1]","left",1,357,323)
Sleep(1000)
Send($sRestoreFile & "{TAB 2}" & "{ENTER}")
Sleep(120000) ; estimated boot time 80s
WinClose("AirStation Settings")
Case $sSelectedAp ="D-LinkDIR-655" ;
WinWaitActive("Login")
Sleep(2000)
ControlClick("Login","","[CLASS:Internet Explorer_Server; INSTANCE:1]","left",1,580,237); Click Login-button
Sleep(2000)
WinWaitActive("Setup / Internet")
Sleep(2000)
Send("{TAB}" & $sAP_IP & $sGoRestore & "{ENTER}")
WinWaitActive("Tools / System")
Sleep(2000)
ControlClick("Tools / System","","[CLASS:Internet Explorer_Server; INSTANCE:1]","left",1,350,395);
Sleep(1000)
Send($sRestoreFile & "{TAB 2}" & "{ENTER}")
Sleep(10000)
;MsgBox(0,"WinGetTitle(Restore Success)",WinGetTitle("Restore Success"),2)
If WinGetTitle("Restore Success") Then
(Continues)
133
7(10)
ControlClick("Restore Success","","[CLASS:Internet Explorer_Server; INSTANCE:1]","left",1,156,222);
Else
WinWaitActive("Tools / System")
Sleep(3000)
ControlClick("Tools / System","","[CLASS:Internet Explorer_Server; INSTANCE:1]","left",1,410,552); Reboot the
system
Sleep(2000)
WinWaitActive("Internet Explorer")
Sleep(1000)
Send("{ENTER}")
EndIf
WinWaitActive("Login")
WinClose("Login")
Case $sSelectedAp = "LinksysWRT54GS" ;
WinWaitActive("Connect")
Send($sUserID & "{TAB}" & $sPassword & "{TAB 2}" & "{ENTER}")
Sleep(2000)
WinWait("Config Management")
Sleep(2000)
ControlClick("Config Management","","[CLASS:Internet Explorer_Server; INSTANCE:1]","left",1,373,300);
Sleep(1000)
Send($sRestoreFile & "{TAB 2}" & "{ENTER}")
Sleep(3000)
Winwait("restore.cgi")
Sleep(5000)
ControlClick("restore.cgi","","[CLASS:Internet Explorer_Server; INSTANCE:1]","left",1,391,237); Succesful OKbtn
WinWait("Basic Setup")
Sleep(3000)
WinClose("Basic Setup")
Case $sSelectedAp = "LinksysWRT350N";
Send($sUserID & "{TAB}" & $sPassword & "{TAB 2}" & "{ENTER}")
WinWaitActive("Management") ; wait for this window become active
Sleep(3000)
Send("+{TAB 11}" & $sRestoreFile); error unmatched <PID>
Sleep(1000)
Send("+{TAB}" & "{ENTER}")
WinWaitActive("Internet Explorer") ; Confirmation window
Send("{ENTER}") ; close
WinWaitActive("Basic Setup")
WinClose("Basic Setup")
Case $sSelectedAp = "LinksysWRT610N" ;
Send($sUserID & "{TAB}" & $sPassword & "{TAB 2}" & "{ENTER}")
(Continues)
134
8(10)
WinWaitActive("Restore Configurations") ; wait for this window become active
Sleep(3000)
Send("{TAB 8}" & $sRestoreFile & "{TAB 2}" & "{ENTER}") ; go to file field, input file and got to Restore
WinWaitActive("restore.cgi")
Sleep(3000)
Send("{TAB 8}" & "{ENTER}")
WinWaitActive("Internet Explorer") ; do you want to close the the tab
Sleep(3000)
Send("{ENTER}") ; close
Case $sSelectedAp = "Netwjork54Mbps" ; Netwjork uses 3Com TFTP-server for restore, it MUST be located in
Script-dir
ProcessClose("3CServer.exe") ; just in case....
WinWaitActive("Connect")
Send($sUserID & "{TAB}" & $sPassword & "{TAB 2}" & "{ENTER}")
Sleep(3000)
;ShellExecute($sAPRestoreFolder & "3CServer.exe","","","",@SW_HIDE)
ShellExecute($sLocalPath & "3CServer.exe","","","",@SW_HIDE)
WinWaitActive("3CServer")
Sleep(3000)
WinActivate("System |")
Sleep(2000)
FileCopy($sRestoreFile,$sAPRestoreFolder & "backup.bin",1) ; overwrite with no questions
; easier to do like this, as file input field is length-limited
ControlClick("System |","","[CLASS:Internet Explorer_Server; INSTANCE:1]","left",1,325,170); TFTP-server's IP
Sleep(2000)
Send("{BS 20}")
Sleep(1000)
Send(@IPAddress1)
Sleep(1000)
ControlClick("System |","","[CLASS:Internet Explorer_Server; INSTANCE:1]","left",1,108,225); Click restorebutton
WinWaitActive("Internet Explorer")
Send("{ENTER}")
While Not StringInStr(ControlGetText("System |","","[CLASS:Edit; Instance:1]"),"system_reboot.asp") ; wait for
Reboot-button
Sleep(1000)
WEnd
Sleep(3000)
ControlClick("System |","","[CLASS:Internet Explorer_Server; INSTANCE:1]","left",1,156,142); press Rebootbutton
WinWaitActive("Internet Explorer")
Send("{ENTER}")
WinWaitActive("54M")
WinClose("54M")
ProcessClose("3CServer.exe") ; then no "Are you sure window"
(Continues)
135
9(10)
Case $sSelectedAp = "Thomson585" ;
WinWaitActive("Restore")
Sleep(3000)
ControlClick("Restore","","[CLASS:Internet Explorer_Server; INSTANCE:1]","left",1,580,585);
Send($sRestoreFile & "{TAB 2}" & "{ENTER}")
WinWaitActive("Internet Explorer")
Send("{ENTER}")
WinWaitActive("Home")
Sleep(3000)
WinClose("Home")
Case $sSelectedAp = "TelewellTW-EA515" ;
WinWaitActive("Connect")
Send($sUserID & "{TAB}" & $sPassword & "{TAB 2}" & "{ENTER}")
WinWaitActive("config/index.html")
Sleep(2000)
ControlClick("config/index.html","","[CLASS:Internet Explorer_Server; INSTANCE:1]","left",1,300,300);
Sleep(1000)
Send($sRestoreFile & "{TAB 2}" & "{ENTER}")
Sleep(3000)
While Not WinGetTitle("3G/ADSL2+")
Sleep(10000)
;MsgBox(0, "WinGetTitle",WingetTitle("3G/ADSL2+"),2)
WEnd
WinClose("3G/ADSL2+")
Case $sSelectedAp = "ZyXELNBG-415N" ;
WinWaitActive("Login")
Sleep(2000)
Send($sPassword & "{TAB 2}" & "{ENTER}")
WinWaitActive("Router Configuration")
Sleep(2000);
Send("{TAB}" & $sAP_IP & $sGoRestore & "{enter}")
WinWaitActive("TOOLS / System")
Sleep(2000) ;
ControlClick("TOOLS / System","","[CLASS:Internet Explorer_Server; INSTANCE:1]","left",1,284,306)
;Send("{TAB 9}" & $sRestoreFile & "{TAB 2}" & "{ENTER}")
Send($sRestoreFile & "{TAB 2}" & "{ENTER}")
WinWaitActive("Success")
Send("{TAB 8}" & "{ENTER}")
WinWaitActive("Internet Explorer")
Send("{ENTER}")
WinWaitActive("Login")
WinClose("Login")
(Continues)
136
10(10)
Case $sSelectedAp = "ZyXelP-661HW-D1" ;
WinWaitActive("Welcome")
Sleep(2000)
Send($sPassword & "{TAB}" & "{ENTER}")
WinWaitActive("Welcome")
Sleep(5000);
Send("{TAB}" & $sAP_IP & $sGoRestore & "{ENTER}")
Sleep(2000)
ControlClick("Welcome","","[CLASS:Internet Explorer_Server; INSTANCE:1]","left",1,160,214)
Sleep(5000)
Send("{TAB 11}" & $sRestoreFile & "{TAB 2}" & "{ENTER}")
While Not StringInStr(ControlGetText(".::","", "[CLASS:Edit; INSTANCE:1]"), "home.html")
Sleep(10000)
;MsgBox(0,"ControlGetText",ControlGetText(".::","", "[CLASS:Edit; INSTANCE:1]"),2)
WEnd
WinClose(".::")
EndSelect
Else ; telnet or SSH ; on first round SSH-fingerprint needs to be cached; using Plink for automated conns
If StringInStr($sSelectedAp, "Apple") Then ; WORKS!!! 8.4.2009
$sSelectedAp = "AppleAirportExtreme"
ProcessClose("APUtil.exe") ; Close AirPort Utility, if found running
; GoRestore contains Path & filename, in this case "C:\Program Files\Airport\APUtil.exe"
ShellExecute($sGoRestore)
WinWaitActive("AirPort Utility")
Sleep(2000)
ControlClick("AirPort Utility","","[CLASS:Button;Instance:3]")
Sleep(5000)
; Check here, if password has been remembered
If WinGetTitle("Enter Password") Then
ControlSend("Enter Password","","[CLASS:Edit;Instance:1]", $sPassword)
Sleep(1000)
ControlClick("Enter Password","","[CLASS:Button;Instance:1]","left",1) ;
EndIf
WinWaitActive("AirPort Utility")
Sleep(2000)
Send("!f") ; Send Control -I for Import
Sleep(1000)
Send("i")
WinWaitActive("Open")
Sleep(2000)
ControlSend("Open","","[CLASS:Edit;Instance:1]", $sRestoreFile) ; insert filename to inputfield
Sleep(1000)
ControlClick("Open","","[CLASS:Button;Instance:2]","left",1) ; Click Open button
WinWaitActive("Import")
(Continues)
137
11(10)
Sleep(1000)
ControlClick("Import","","[CLASS:Button;Instance:1]","left",1) ; Click OK
WinWaitActive("AirPort Utility")
Sleep(1000)
ControlClick("AirPort Utility","","[CLASS:Button;Instance:7]","left",1) ; Click Update button
WinWaitClose("Writing to the Apple") ; wait until restore completed
Sleep(3000)
WinWaitClose("Reading") ; wait until utility reads from AP the status
WinWaitActive("AirPort Utility")
Sleep(3000)
$sStatus = ControlGetText("AirPort Utility","","[CLASS:Static;Instance:6]")
If $sStatus = "Normal" Then
ProcessClose("APUtil.exe")
Else
MsgBox(0, "ERROR has occurred", "Something wrong, AP status = " & $sStatus)
EndIf
Else
Send("#r") ; Windows Run-key
WinWaitActive("Run")
If IniRead($sLocalPath & $sApIniFile, $sSelectedAp, "SSH", "NotFound") = "Yes" Then ; SSH or Telnet?
Send($sLocalPath & "plink -ssh " & $sAP_IP & "{enter}") ;
Else ; Telnet
Send($sLocalPath & "plink -telnet " & $sAP_IP & "{enter}") ;
EndIf ; SSH or Telnet?
WinActivate("Plink", "")
Sleep(1000)
Send($sUserID & "{enter}")
Sleep(1000)
Send($sPassword & "{enter}")
Sleep(1000)
Send("{enter}") ; jostain syystä tuli yksi '+'-merkki cmdriville, tää tuntui auttavan
;_AP_Login($sUserID, $sPassword)
Sleep(1000)
For $i = 1 To $aTelnetParam[0] ; loop until all parameters from INI-file are sent, $aTelnetParam[0] contains # of
parameters
;MsgBox(0, "$aTelnetParam", $aTelnetParam[$i])
Send(StringStripWS($aTelnetParam[$i], 3), 1) ; jos pisti samalle riville {enterin}, niin '+'-merkki lähti hitoille esim
(WPA+WPA2)-PSK
Send("{enter}")
Sleep(1000)
Next
Sleep(1000)
EndIf; Apple of Telnet
EndIf ; web interface used, if not telnet or SSH or Apple
Else ; Is AP online?
If @error = 0 Then $problem = "Network Errors Occured "
(Continues)
138
12(10)
If @error = 1 Then $problem = "Host is Off-Line "
If
@error
=
2
Then
$problem
=
"Host
is
Unreachable
(Continues)
"
139
13(10)
If @error = 3 Then $problem = "Incorrect Destination "
If @error = 4 Then $problem = "Network Errors Occured "
If $iIsApOnLine = "NotFound" Then $problem = "Error in INI-file"
MsgBox(48, "Problem occurred !!!", "Selected Access Point does not respond." & @CRLF & @CRLF & "Error is: "
& @error & " = " & $problem & @CRLF & @CRLF & "Check your AP selection...")
$iApPIDReturn = 0 ; error occurred
EndIf ; Is AP online?
Else; $DEBUG_iAccessPointOff = 1 for debugging
MsgBox(0, "AccessPoint DEBUG: Setup values", "$AP= " & $sSelectedAp & @CRLF & "$sAP_IP= " & $sAP_IP
& @CRLF & "$sGoRestore = " & $sGoRestore & @CRLF & "$sUserID= " & $sUserID & @CRLF & "$sPassword
=" & $sPassword & @CRLF & "$sAPRestoreFolder =" & $sAPRestoreFolder & @CRLF & "$sRestoreFile =" &
$sRestoreFile)
EndIf ; $DEBUG_iAccessPointOff = 1
Else
MsgBox(16, "Error occurred", "No input from Wizard, exiting",2)
Exit
EndIf
140
Appendix 5. WLAN Verification Wizard.ini -file
; WLAN VerificationWizard.ini
; Contains settings and variables
;
; Author: Jukka Issakainen
;
[AP]
APSetupInfo = APSetupInfo.ini
[EAP]
;Types = TLS/PEAPv0, PEAPv1, TTLS-EAP-MSChapv2, TTLS-MSChapV2, LEAP, SIM, AKA
;Types = TLS/PEAPv0, PEAPv1, TTLS-EAP-MSChapv2, TTLS-MSChapV2, LEAP, SIM
Types = TLS/PEAPv0, PEAPv1, TTLS, SIM, AKA
[Misc]
; these are just informational texts to show on screen, after AP-setup is completed
SSID = ***** ; removed
WEP64_Key = 1234567890, Key 2 (10 HEX digits)
WEP128_Key = 1234567890abcdef1234567890, Key 2 (26 HEX digits)
WPA(2)-PSK_Key = 12345678
TestUser = testi
TestUser_PWD = ****** ; removed
TestUser_Logon_Domain = ******* ; removed
[RADIUS]
RadiusSetupInfo = RadiusSetupInfo.ini
141
4(6)
Appendix 6. AccessPointInfo.ini -file
; Access Point Info file
; Contains settings and variables
;
; Author: Jukka Issakainen
;
; PDU_Port =
Physical AC outlet # in APC Switched Rack PDU
; Model =
Info abt AP model, not used, but clarifies ini-file
; Firmware =
Info abt Firmware, not yet used
; IP =
IP-address of AP
; SSH = yes/no
If AP is capable of SSH
; 802.11n_2 =
If AP supports 802.1n 2.4GHz mode, prefix for setupfile (e.g. WNAP_N2.4_)
; 802.11n_5 =
If AP supports 802.1n 5GHz mode, prefix for setupfile (e.g. WNAP_N5_
; UserID =
User name of AP administrative account
; Password =
Password of AP administrative account
; GoRestore =
Path to config restore page inside Access Point, if exists
; RestoreFolder = Folder used to store config-files, empty folder, if Telnet/SSH is used
; Open =
Open, no wep-key etc
; 802.1x=
802.1x with dynamic wep-key 128-bit and RADIUS
; WEP128 =
wep-key 128-bit, no RADIUS
; WPA-PSK =
WiFi Protected Access, Pre Shared Key using TKIP + AES (a.k.a mixed WPA
SOHO-mode), no RADIUS
; WPA =
WiFi Protected Access, RADIUS for EAP-types using TKIP + AES (a.k.a mixed
WPA Enterprise-mode)
; WPA2-PSK =
WiFi Protected Access 2, Pre Shared Key using AES, no RADIUS
; WPA2 =
WiFi Protected Access 2, RADIUS for EAP-types using AES
; LEAP =
Cisco specific mode
[AP]
Models = A-Link WNAP, Apple Airport Extreme, Cisco 1231, Belkin N1 Vision, Buffalo WZR-AG300NH, D-Link
DIR-655, Linksys WRT54GS, Linksys WRT350N, Linksys WRT610N, Netwjork 54Mbps, Thomson 585, Telewell
TW-EA515, ZyXEL NBG-415N, ZyXel P-661HW-D1
RestoreModes = Open, WEP128, WPA-PSK, WPA2-PSK, WPA, WPA2, 802.1x
RestorePath = D:\Jukan\automation\AP_Setups
802Modes = 802.11 b/g, 802.11n (2.4GHz), 802.11n (5GHz)
[PDU]
; PDU_Enabled = Yes or No
; New interface after FW upgrade 2.70 or newer: <password><space>-c
PDU_Enabled = yes
PDU_IP = 10.10.32.17
PDU_User = wizard
PDU_Pwd = *****
;#################################AP SETUP starts #############################################
[A-Link WNAP]
PDU_Port = 16
Model = WL524
Firmware = e2.04
IP = 10.10.32.151
SSH = no
802.11n_2 = WNAP_N2_
802.11n_5 = WNAP_N5_
UserID = admin
Password = *****
GoRestore = /saveconf.asp
RestoreFolder = \A-LinkWNAP
Open = A-Link_Open.dat
802.1x =
WEP64 =
WEP128 = A-Link_WEP128.dat
WPA-PSK = A-Link_wpa-psk_mixed.dat
WPA = A-Link_WPA_enterprise_mixed.dat
WPA2-PSK =
WPA2 = A-Link_WPA2_enterprise.dat
LEAP =
(Continues)
142
5(6)
[Apple Airport Extreme]
PDU_Port = 15
Model = 123
Firmware = 123
IP = 10.10.32.152
SSH = no
802.11n_2 = Apple_N2_
802.11n_5 = Apple_N5_
UserID =
Password = *****
GoRestore = "C:\Program Files\Airport\APUtil.exe"
RestoreFolder = \Apple
Open = Apple_Open.baseconfig
802.1x =
WEP64 =
WEP128 =
WPA-PSK = Apple_wpa-psk_mixed.baseconfig
WPA = Apple_wpa_mixed.baseconfig
WPA2-PSK = Apple_wpa2-psk.baseconfig
WPA2 = Apple_wpa2.baseconfig
LEAP =
[Belkin N1 Vision]
PDU_Port = 14
Model = DIR-655
Firmware = F5D8232-4_WW_1.00.15
IP = 10.10.32.153
SSH = no
802.11n_2 = Belkin_N2_
802.11n_5 = Belkin_N5_
UserID = admin
Password = *****
GoRestore = /setup.cgi?next_file=ut_prev.html
RestoreFolder = \BelkinN1Vision
Open = BelkinN1Vision_Open.conf
802.1x=
WEP64 =
WEP128 = BelkinN1Vision_WEP128.conf
WPA-PSK = BelkinN1Vision_wpa-psk_mixed.conf
WPA =
WPA2-PSK = BelkinN1Vision_wpa2-psk.conf
WPA2 =
LEAP =
[Buffalo WZR-AG300NH]
PDU_Port = 13
Model = WZR-AG300NH
Firmware = 1.49
IP = 10.10.32.154
SSH = no
802.11n_2 = Buffalo_N2_
802.11n_5 = Buffalo_N5_
UserID = root
Password = *****
GoRestore = /cgi-bin/cgi?req=tfr&id=47
RestoreFolder = \BuffaloWZR
Open = BuffaloWZR_Open.bin
802.1x=
WEP64 =
WEP128 = BuffaloWZR_WEP128.bin
WPA-PSK = BuffaloWZR_wpa-psk_mixed.bin
WPA =
WPA2-PSK = BuffaloWZR_wpa2-psk.bin
WPA2 =
LEAP =
[Cisco 1231]
PDU_Port = 12
(Continues)
143
6(6)
Model = Air 1231G-K9
Firmware = 12.3(8)JEA
IP = 10.10.32.150
SSH = no
802.11n_2 =
802.11n_5 =
UserID = Cisco
Password = *****
GoRestore = /ap_system-sw_sysconfig.shtml
RestoreFolder = \Cisco1231
Open = Cisco1231_Open.txt
802.1x= Cisco1231_8021x.txt
WEP64 = Cisco1231_WEP64.txt
WEP128 = Cisco1231_WEP128.txt
WPA-PSK = Cisco1231_WPA-PSK_mixed.txt
WPA = Cisco1231_WPA_mixed.txt
WPA2-PSK = Cisco1231_WPA2-PSK.txt
WPA2 = Cisco1231_WPA2.txt
LEAP = Cisco1231_WPA2_Funk.txt
[D-Link DIR-655]
PDU_Port = 11
Model = DIR-655
Firmware = 1.21EU
IP = 10.10.32.162
SSH = no
802.11n_2 = DIR655_N2_
802.11n_5 = DIR655_N5_
UserID = admin
Password = *****
GoRestore = /Tools/System.shtml
RestoreFolder = \DIR-655
Open = DIR-655_Open.gws.htm
802.1x=
WEP64 = DIR-655_WEP64.gws.htm
WEP128 = DIR-655_WEP128.gws.htm
WPA-PSK = DIR-655_WPA-PSK_mixed.gws.htm
WPA = DIR-655_WPA_mixed.gws.htm
WPA2-PSK = DIR-655_WPA2-PSK.gws.htm
WPA2 = DIR-655_WPA2.gws.htm
LEAP =
[Linksys WRT54GS]
PDU_Port = 9
Model = WRT54GS
Firmware = 4.71.1
IP = 10.10.32.155
SSH = no
802.11n_2 =
802.11n_5 =
UserID =
Password = *****
GoRestore = /Backup_Restore.asp
RestoreFolder = \wrt54gs
Open = WRT54GS_Open.cfg
802.1x=
WEP64 =
WEP128 = WRT54GS_WEP128.cfg
WPA-PSK = WRT54GS_WPA2-psk_mixed.cfg
WPA = WRT54GS_WPA2_mixed.cfg
WPA2-PSK = WRT54GS_WPA2-psk.cfg
WPA2 = WRT54GS_WPA2.cfg
LEAP =
[Linksys WRT350N]
PDU_Port = 8
Model = WRT350N
(Continues)
144
7(6)
Firmware = 2.00.19
IP = 10.10.32.163
SSH = no
802.11n_2 = WRT350_N2_
802.11n_5 = WRT350_N5_
UserID = admin
Password = *****
GoRestore = /setup.cgi?next_file=Administration.htm
RestoreFolder = \WRT350Nv2
Open = WRT350v2_open.cfg
802.1x=
WEP64 =
WEP128 = WRT350v2_WEP128_key1.cfg
WPA-PSK = WRT350v2_wpa-psk_mixed.cfg
WPA = WRT350v2_wpa.cfg
WPA2-PSK = WRT350v2_wpa2-psk.cfg
WPA2 = WRT350v2_wpa2.cfg
LEAP =
[Linksys WRT610N]
PDU_Port = 7
Model = WRT610N
Firmware = 1.00.02.10
IP = 10.10.32.156
SSH = no
802.11n_2 = WRT610_N2_
802.11n_5 = WRT610_N5_
UserID = admin
Password = *****
GoRestore = /Restore.asp
RestoreFolder = \WRT610N
Open = WRT610NV1_open.cfg
802.1x=
WEP64 =
WEP128 = WRT610NV1_WEP128.cfg
WPA-PSK = WRT610NV1_WPA-psk_mixed.cfg
WPA = WRT610NV1_WPA_mixed.cfg
WPA2-PSK = WRT610NV1_WPA2-psk.cfg
WPA2 = WRT610NV1_WPA2.cfg
LEAP =
[Netwjork 54Mbps]
; Netwjork uses 3ComTFTP-server for setup backup/restore,
; which MUST be located in Script-dir
PDU_Port = 6
Model = 54Mbps
Firmware = default
IP = 10.10.32.157
SSH = no
802.11n_2 =
802.11n_5 =
UserID = admin
Password = *****
GoRestore = /system_backup.asp
RestoreFolder = \Netwjork
Open = Netwjork_open.bin
802.1x=
WEP64 =
WEP128 = Netwjork_WEP128.bin
WPA-PSK = Netwjork_wpapsk.bin
WPA =
WPA2-PSK = Netwjork_wpa2psk.bin
WPA2 =
LEAP =
(Continues)
145
8(6)
[Telewell TW-EA515]
PDU_Port = 5
Model = TW-EA515
Firmware = 5.53.S3.ds36
IP = 10.10.32.160
SSH = no
802.11n_2 =
802.11n_5 =
UserID = admin
Password = *****
GoRestore = /config
RestoreFolder = \TelewellEA515
Open = TelewellEA515_open.icf
802.1x=
WEP64 =
WEP128 = TelewellEA515_WEP128.icf
WPA-PSK = TelewellEA515_wpa-psk.icf
WPA =
WPA2-PSK = TelewellEA515_wpa2-psk.icf
WPA2 =
LEAP =
[Thomson 585]
PDU_Port = 4
Model = ST780
Firmware = 6.2.16.3
IP = 10.10.32.158
SSH = no
802.11n_2 =
802.11n_5 =
UserID = Administrator
Password = *****
GoRestore = /cgi/b/bandr/?be=0&l0=0&l1=1&tid=BACKUP_RESTORE
RestoreFolder = \Thomson585
Open = Thomson_585_Open.ini
802.1x=
WEP64 =
WEP128 = Thomson_585_WEP128.ini
WPA-PSK = Thomson_585_wpa-psk_mixed.ini
WPA =
WPA2-PSK = Thomson_585_wpa2-psk.ini
WPA2 =
LEAP =
[ZyXEL NBG-415N]
PDU_Port = 2
Model = NBG-415N
Firmware = 3.60(ZP.2)C0
IP = 10.10.32.164
SSH = no
802.11n_2 = Zyxel_N2_
802.11n_5 = Zyxel_N5_
UserID =
Password = *****
GoRestore = /Tools_System.html
RestoreFolder = \ZyXel415N
Open = Zyxel415N_Open.gws
802.1x=
WEP64 =
WEP128 = Zyxel415N_WEP128.gws
WPA-PSK = Zyxel415N_wpa-psk_mixed.gws
WPA = Zyxel415N_wpa_mixed.gws
WPA2-PSK = Zyxel415N_wpa2-psk.gws
WPA2 = Zyxel415N_wpa2.gws
LEAP =
[ZyXel P-661HW-D1]
PDU_Port
=
1
(Continues)
146
9(6)
Model = P-661HW-D1 Firmware = 3.40(AHQ.0)
IP = 10.10.32.161
SSH = no
802.11n_2 =
802.11n_5 =
UserID =
Password = *****
GoRestore = /RestoreCfg.html
RestoreFolder = \ZyXel661
Open = P-661HW-D1_Open
802.1x=
WEP64 =
WEP128 = P-661HW-D1_WEP128
WPA-PSK = P-661HW-D1_WPA-PSK_mixed
WPA = P-661HW-D1_WPA_mixed
WPA2-PSK = P-661HW-D1_WPA2-PSK
WPA2 = P-661HW-D1_WPA2
LEAP =
;#################################AP SETUP ends #############################################
147
1(2)
Appendix 7. RADIUSSetupInfo.ini -file
; RADIUS Setup Info -file
; Contains settings and variables
;
; Author: Jukka Issakainen
;
; NOTE! RADIUS' names in brackets '[]' MUST be same as in 'Servers' -line!!!
;
;
; Parameters used: (Check EAP-types, MUST be same as in VerificationWizard.ini -file)
; IP = server's IP-address
; Port = used RADIUS-port
; RestoreFile = Nestsh dumpfile name
; TLS/PEAPv0 = yes/no
; PEAPv1 = yes/no
; TTLS = yes/no
; PureTTLS = yes/no <- not currently used
; LEAP = yes/no <- not currently used
; SIM = yes/no
; AKA = yes/no
; KOE = yes/no <- for testing purposes
[RADIUS]
RestorePath = D:\wlan\ap_setups\radius
RadiusProxy = 10.10.32.10
Username = wizard
UserPwd = *****
; Proxy address is needed for psexec, which will run e.g. netsh exec ias.set on remote
Servers = Microsoft IAS, Juniper Odyssey, Cisco ACS, FreeRADIUS, Nokia Test Network
;#################################RADIUS SETUP starts #########################################;
; RADIUS *.set files are created with NETSH-command. It dumps current IAS-setting to a file, which can be replayed
; to instantly change authentication settings
;
; To record current settings enter to command prompt: netsh aaaa dump > filename.set
; To Replay saved settings enter to command prompt: netsh exec filename.set
;
[Microsoft IAS]
IP = 10.10.32.20
Port = 1812
RestoreFile = ias.set
TLS/PEAPv0 = yes
PEAPv1 = no
TTLS = no
PureTTLS = no
LEAP = no
SIM = no
AKA = no
KOE = no
[Juniper Odyssey]
IP = 10.10.32.50
Port = 1814
RestoreFile = juniper.set
TLS/PEAPv0 = yes
PEAPv1 = yes
TTLS
=
yes
(Continues)
148
2 (2)
PureTTLS = yes
LEAP = yes
SIM = no
AKA = no
KOE = no
[FreeRADIUS]
IP = 10.10.32.13
Port = 1814
RestoreFile = freeradius.set
TLS/PEAPv0 = no
PEAPv1 = yes
TTLS = yes
PureTTLS = yes
LEAP = no
SIM = yes
AKA = no
KOE = no
[Cisco ACS]
IP = 10.10.32.50
Port = 1812
RestoreFile = acs.set
TLS/PEAPv0 = yes
PEAPv1 = yes
TTLS = no
PureTTLS = no
LEAP = yes
SIM = no
AKA = no
KOE = no
[Nokia Test Network]
RestoreFile = NTN.set
TLS/PEAPv0 = no
PEAPv1 = no
TTLS = no
PureTTLS = no
LEAP = no
SIM = yes
AKA = yes
KOE = no
;#################################RADIUS SETUP ends #########################################;