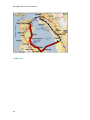
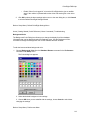
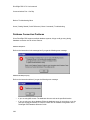
1
DriveRight Fleet Management Software Version 3.7.2 User’s Manual Rev. H (5/30/2007) Product Number: 8186 Davis Instruments Part Number: 7395.194 Davis Instruments Corp. 2007. All rights reserved. This product complies with the essential protection requirements of the EC EMC Directive 89/226/EC. DriveRight is a registered trademark of Davis Instruments Corp. CarChip is a trademark of Davis Instruments Corp. Windows is a trademark of Microsoft Corporation. 3465 Diablo Avenue, Hayward, CA 94545-2778 U.S.A. 510-732-9229 • Fax: 510-732-9188 E-mail: [email protected] • www.davisnet.com Table Of Contents DriveRight FMS Help....................................................................................................................... 1 Welcome to DriveRight Fleet Management Software.................................................................. 1 Getting Started ............................................................................................................................. 1 Getting Started Menu ............................................................................................................... 1 Introduction to DriveRight FMS ................................................................................................ 2 What's New for DriveRight FMS 3.7.2...................................................................................... 2 Prior Release Notes ................................................................................................................. 3 Architecture .............................................................................................................................. 8 Database Selection Guidelines ................................................................................................ 9 Converting 2.04-2.06/2.6.1 Database to DriveRight FMS Format ......................................... 10 Setup Overview ...................................................................................................................... 12 Tool Bar .................................................................................................................................. 14 Quick Reference ........................................................................................................................ 16 FMS Quick Reference ............................................................................................................ 16 Data Management.................................................................................................................. 16 CarChip Quick Reference ...................................................................................................... 23 DriveRight Quick Reference................................................................................................... 27 Mapping Quick Reference Menu............................................................................................ 37 How to Create Maps............................................................................................................... 51 Wireless Quick Reference Menu............................................................................................ 57 Menu Commands....................................................................................................................... 69 Menu Commands Menu ......................................................................................................... 69 File Menu................................................................................................................................ 70 Setup Menu ............................................................................................................................ 87 DriveRight Menu................................................................................................................... 129 CarChip Menu ...................................................................................................................... 166 SmartCard Menu .................................................................................................................. 188 Wireless Menu...................................................................................................................... 205 Database Menu .................................................................................................................... 219 Reports Menu ....................................................................................................................... 296 i DriveRight FMS 3.7.2 User's manual Mapping Menu...................................................................................................................... 321 Help Menu ............................................................................................................................ 326 Troubleshooting ....................................................................................................................... 327 Troubleshooting Menu.......................................................................................................... 327 Device Communication Problems ........................................................................................ 327 Database Connection Problems .......................................................................................... 328 Wireless Device Communication Problems ......................................................................... 329 SmartCard Desktop Reader Device Communication Problems .......................................... 336 Miscellaneous Problems ...................................................................................................... 343 Contacting Davis Instruments .............................................................................................. 344 Miscellaneous Information ....................................................................................................... 345 Copyrights ............................................................................................................................ 345 Index ............................................................................................................................................ 349 ii DriveRight FMS Help Welcome to DriveRight Fleet Management Software Click on the topics below for help using DriveRight® Fleet Management Software (FMS) version 3.7.2: Getting Started - How to get your DriveRight software rolling. Quick Reference - Basic info and quick links for routine tasks. Menu Commands - Everything you can do in DriveRight FMS. Troubleshooting - Help when you have problems. Home | Getting Started | Quick Reference | Menu Commands | Troubleshooting May 30, 2007 Getting Started Getting Started Menu The following help topics will help you getting started with DriveRight Fleet Management Software. Introduction to FMS What's New for DriveRight FMS 3.7.2 Release Notes for Versions 3.7.1, 3.7, 3.6, 3.5, 3.4, 3.3, 3.2, 3.1, and 3.0 Architecture Database Selection Guidelines Converting VMS 2.04-2.06 Data for FMS Setup Overview Tool Bar Back to Home Home | Getting Started | Quick Reference | Menu Commands | Troubleshooting 1 DriveRight FMS 3.7.2 User's manual Introduction to DriveRight FMS The DriveRight Fleet Management Software (FMS) allows you to store, view, and manipulate DriveRight data on your Windows-compatible computer. More specifically, FMS provides tools for acquiring, sorting, tracking, analyzing and printing data, and viewing and printing reports for a number of individual DriveRight consoles at a number of different locations. DriveRight FMS features include: • Tracking drivers, vehicles, locations, and service • Viewing, graphing, printing and saving "accident log" information • Multiple user levels • Ability to download DriveRight information via the optional SmartCard System • Ability to download DriveRight information via the optional Wireless Download System • Tamper logs • Sorting data and creating reports according to user-defined selection criteria • Summarize data by day and by trip • Integrated Microsoft MapPoint support for mapping of GPS data • Compare vehicles, drivers, or groups of drivers • FTP Export / FTP Import data • Palm download support See also: Architecture Copyrights Back to Getting Started Home | Getting Started | Quick Reference | Menu Commands | Troubleshooting What's New for DriveRight FMS 3.7.2 DriveRight Fleet Management Software version 3.7.2 includes the following changes: • Fixed an issue regarding the PIN code transferred by the SmartCard Reader not being recognized by the DriveRight Device. • Duplicate database record error issue was resolved. Back to Getting Started 2 DriveRight FMS Help Home | Getting Started | Quick Reference | Menu Commands | Troubleshooting Prior Release Notes DriveRight Fleet Management Software 3.7.1 Release Notes DriveRight Fleet Management Software version 3.7.1 includes the following changes: • Password encryption has been added for better security. • The ability to add multiple Super Users to the database added. Open the Update User Privileges dialog box or Add New User dialog box to add or edit Users and change the User Type. • The Driver Safety Score and Excessive Speed Report changed to accurately calculate when Km/hr is selected as the unit of measure in the Units dialog box. • The CarChip database table automatically updates if any changes, such as Alarm and LED state, have been made by the user in FMS. • The ACS SmartCard Desktop Reader Proprietary Driver is the only driver to be used with FMS. The ACS Proprietary Driver installation process has now been simplified. If the PC/SC driver was installed, it must be removed and the ACS Proprietary Driver must be installed. • Database configuration process has been improved to enforce database security and avoid object ownership problems in MS SqlServer database. DriveRight Fleet Management Software 3.7 Release Notes DriveRight Fleet Management Software version 3.7 includes the following changes: • • DriveRight Wireless Download System functionality is added to FMS. The Wireless Menu contains commands for configuring wireless devices, controlling the wireless communication and downloading features for the Wireless Download System. These new features, along with the Base Station (# 8130), Wireless On-Board Module (# 8129), and the Configuration Cable for Wireless On-Board Module (# 8131) give your fleet the ability to download data directly from the DriveRight devices to FMS without physically removing the DriveRight devices from the vehicle. The data moves wirelessly from the vehicle to the FMS database. The features that are added to support wireless download are: o Wireless Menu - The Wireless Menu, in conjunction with the Wireless On-Board Module (#8129), Base Station for Wireless Download System (#8130), and the Configuration Cable for Wireless On-Board Module (#8131) allows you to create a wireless connection between your fleet vehicles and the FMS software. o Manual Wireless Download Icon added to FMS toolbar. o Wireless Devices database table, Edit Base Station, Edit Wireless On-Board Module, and Select Wireless Device Fields to Print added to the Database Menu. o Wireless Download Status Report added to the Reports Menu. FTP Export dialog box now include the Wireless Download database table in the list of possible database tables that you can export. 3 DriveRight FMS 3.7.2 User's manual • Add Users dialog box now permits user accessibility definitions for the DriveRight\Wireless Download System, CarChip and SmartCard Devices. • Improved many features regarding the FMS database installation and configuration. See The Database Selection Guide for more information and for the installation procedures regarding these new improvements. The database improvements are: o Fixed a previous issue with the User's PC name being used as a server alias name in the SQLServer database configuration process. o Stored procedures for installing and configuring the Oracle database are now integrated into the FMS installation process. There is no need to create the stored procedures manually unless FMS encounters problems when creating them. o Database migration from a previous release to the current release has now become a seamless feature. In previous releases, after FMS was upgraded, the connection with the database had to be re-established. Now, FMS automatically uses the previously configured database. • Data validation added to make sure that the ID numbers assigned to each CarChip and DriveRight are unique. • The Pin Code and the Driver Logout time can now be transferred to the DriveRight via the SmartCard. • The Current Location is now displayed in the FMS title bar. DriveRight Fleet Management Software 3.6 Release Notes DriveRight Fleet Management Software version 3.6 includes the following changes: • Disable Console Login feature added to the Security Settings tab in the Review DriveRight Security Settings dialog box, DriveRight Device Settings dialog box, and the Default DriveRight Settings dialog box. The Disable Console Login feature disables the Login feature on a DriveRight console if a SmartCard Reader is present. This feature is available for DriveRight 600E devices only. • Disable Console Login column added to the DriveRight database table. The Disable Console Login column displays the Console Login status of each DriveRight in the database. • Disable Console Login added to DriveRight database table Print dialog box. • Set Odometer has been disabled for the DriveRight 600E device only. DriveRight Fleet Management Software 3.5 Release Notes DriveRight Fleet Management Software version 3.5 includes the following changes: • The current selected location is now displayed on the title bar of FMS. This allows you to know which location's data is currently being viewed through any window or table in the FMS software. • Three new options in Database Menu: Readiness Code Database, Trouble Code Database, and Batch Editing. • 4 The Readiness Code Database allows you to view all the monitored readiness codes and the status of each code if you use the CarChip Fleet device. DriveRight FMS Help • The Trouble Code Database allows you to review any trouble code records recorded in a vehicle using the CarChip Fleet device. • The Batch Editing feature allows you to re-assign drivers or adjust speeds displayed in all the tables in the database of various trips. • The CarChip database table has changed to display the interval the CarChip device now logs speed measurements. • Miscellaneous Settings has been added to the Add CarChip Wizard and to the CarChip Settings dialog box. Miscellaneous Settings allows you to control the settings for extra features on the CarChip, such Alarm and LED. The CarChip Settings dialog box also allows you to chose the update interval the CarChip device now records speed. Previously, the Vehicle Speed and Update Interval boxes were defaults and could not be user defined. Now, the Interval at which vehicle speed is sampled can be selected. • A new option was added to the Download Options dialog box that allows you to specify the number of hours of GPS data you want the DriveRight device to store. • Fixed a previous issue with the DriveRight and FMS software not recording a second trip that happens within the same minute as a previous trip. The DriveRight device and FMS software now display all trips, even those having the same starting times. • New database stored procedures have been added. If the software is accessing a database run on a MS SQL Server or Oracle server, some specialized installation may be required. See The Database Selection Guide for more information and complete instructions. DriveRight Fleet Management Software 3.4 Release Notes DriveRight Fleet Management Software version 3.4 includes the following changes: • New option in Setup Menu: Corporate Structure. The Corporate Structure option allows you to create a hierarchical representation of fleets and how they are distributed company wide. This feature is used in conjunction with the Driver Safety Score Report in the Reports Menu. • A new option in the Drive Safety Score Report: Specify Drivers with Mileage option, which displays all drivers with mileage for the specified time period. • The Serial Port options for both DriveRight and CarChip changed to Communication Port in the Setup Menu, with added USB support. • USB support for Fleet CarChips added. DriveRight Fleet Management Software 3.3 Release Notes DriveRight Fleet Management Software version 3.3 includes the following changes: • The Inclusion of using an on-board and desktop reader and SmartCard system to transfer data from the DriveRight 600 unit to a computer. This added feature has created the following changes to the FMS software. o New menu option in the Setup Menu: SmartCard Reader. Lets you select the SmartCard reader type. The SmartCard Reader requires USB driver installation before the SmartCard Reader can be determined and set up. o New menu: SmartCard Menu. The SmartCard menu contains several menu options for setting up, monitoring, and maintaining all the SmartCards and DriveRights using the SmartCard System. The SmartCard menu options are: 5 DriveRight FMS 3.7.2 User's manual • Download - Downloads information stored on a card to a selected base from a SmartCard Reader. Setup Card - Allows you to select user and vehicle information for a card. Transfer to DriveRight - Uses the card to transfer settings and information to a DriveRight or multiple DriveRight devices. Clear Transfer Data - Clears the settings and data that sets the DriveRight Erase - Erases all data stored on the SmartCard GPS Settings included in the DriveRight Settings dialog box in the Setup, DriveRight and SmartCard menus. Allows you to turn the GPS logging and subsequent mapping feature on. Works only with DriveRight 600 units with GPS modules DriveRight Fleet Management Software 3.2 Release Notes DriveRight Fleet Management Software version 3.2 includes the following changes: • Automated mapping of GPS data. • New Report: Driver Safety Score Summary. The Drive Safety Score Summary report calculates driver scores and average scores for each month for a 3, 6, or 12 month time period. Each driver’s score is calculated for each selected month and displayed in an excel file. The data generated by this report is saved in the Safety Score table in the FMS database. You can sort this report by end date score, report average scores, or driver name and can choose to group the drivers by their location if multiple locations are selected. • New database table: Safety Score. This table is generated by the Driver Safety Score Summary Report. • Driver Safety Score Report replaces Driver Performance Score Report. • Driver Safety Score Report Formula replaces Driver Performance Score Formula. • Exclusive Driver option added to the Vehicles Table. Selecting this option will cause all trip data to be assigned to the default driver even if other drivers are listed in the data. • The Tamper Log Report now displays the time between unplugging from a vehicle and downloading a DriveRight as well as the time between downloading a DriveRight and reconnecting it to a vehicle. DriveRight Fleet Management Software 3.1 Release Notes The most important change in DriveRight Fleet Management Software version 3.1 is support for the CarChip Fleet device. DriveRight FMS 3.1 also includes two new reports. CarChip Fleet Support • Download CarChip Fleet data into the DriveRight FMS database. • Store trip info, accident logs, and tamper logs. • View and set CarChip Fleet configuration in both the device and FMS database. Note: DriveRight FMS 3.1 does not store engine data and diagnostic trouble logs in the database. This information can be downloaded and viewed using the CarChip software included on your DriveRight FMS 3.1 CD. 6 DriveRight FMS Help New Reports • Time Over Speed Limit Exception Report • Days Since Last Download Report DriveRight Fleet Management Software 3.0 Release Notes DriveRight 3.0 is a total redesign of the earlier versions of the software. We designed and developed the software with an aim to provide: • Robust database server support, to be able to handle large data. • Flexibility to configure and connect to more than one DataBase Management System (DBMS). • Better Reports for both viewing and printing. • Improved Database Browser. • Better organization of data coming from different locations. • Improved user interface. Important Features in DriveRight 3.0 • Flexible Database support for almost any relational database which supports SQL language, and has a OBDC driver. • Supports the following relational database servers: MySQL, Microsoft SQL Server and Oracle. • Free support for MS Access and MSDE, which are ideal for small fleets with a single user. • A location field was added to the database tables to facilitate “rolling up” data which makes it possible to manage data from many locations in one database. • FTP export and import data through the internet making it easier to move data from one location to another. • Automatic backup and “zipping” of data with the option of keeping a fixed number of months in the database to help speed up operations. • The “Add DriveRight” wizard makes adding a DriveRight to the program simpler and less prone to mistakes. • Elimination of redundant reports and the addition of several new reports. • Reorganized reports menu with several new and redesigned reports. • Improved viewing and printing of reports. • New “usage” report to help trace night and weekend driving. • Improved exception reports for Excessive Speed, Hard Braking, and Night Driving. • A “Relationship” report that shows a list of all DriveRights, which vehicles they are assigned to, along with a default driver if one has been assigned. 7 DriveRight FMS 3.7.2 User's manual • Improved browser with user-configurable colors, fonts, and field widths. • Simplified filter support to make it easier to select what you want. • Use of standard calendar control for specifying dates. • Email support for all Excel generated reports. • Supports Palm PDA download of DriveRight consoles. Operational differences between DriveRight 3.0 and earlier versions The operation of DriveRight 3.0 is very similar to 2.x, but there are some fundamental changes that you should be aware of. • In 2.x the vehicle table contained all the information about a particular DriveRight, in addition to information on the vehicle. However, in 3.0 a new table was introduced, the DriveRights table, which stores DriveRight console information. Vehicle information is stored in the vehicle table, and DriveRight information is stored in the new DriveRights table. In 3.0 , a DriveRight must be “assigned” to a vehicle. When your old data is converted, for each vehicle in 2.x a new DriveRight and vehicle is created in the 3.0 database. Note: A DriveRight is identified using it’s DriveRight ID, and a particular vehicle is identified using it’s Vehicle ID. Note: A “relationship” report was added to the program to help clarify the relationship between vehicles, DriveRights, and drivers. • The “Set DriveRight” option in 2.06/2.6.1 appears as “View/Set” in the “DriveRight/DriveRight Settings” menu. Unlike 2.06/2.6.1, when changes are made to a DriveRight using this option, they are also stored in the DriveRight table. • Adding a new DriveRight to the program can now be done more easily using the Add New DriveRight wizard which steps you through the process and helps clarify where you stand with respect to the calibration of the DriveRight. • You will also notice that every table now has a “location” field. The location field was added to facilitate “rolling up” of data from many locations so they can be managed in one database. Back to Getting Started Home | Getting Started | Quick Reference | Menu Commands | Troubleshooting Architecture DriveRight Fleet Management Software (FMS) architecture allows the software to be connected to any of the Database Servers we support. The communication between DriveRight FMS and Database is done through an OBDC connection by means of an OBDC driver. Currently DriveRight FMS supports MS Access, My SQL, MSDE, SQL Server and Oracle databases. Other databases may be added in the future. The following figure illustrates how DriveRight FMS connects to the back-end Database Server. 8 DriveRight FMS Help Note: DriveRight can only be connected to one database at a time. When DriveRight FMS is opened for the first time, the user is prompted to select the database type to be used for this installation. Based on the user's selection, a connection is established to one of the OBDC drivers. The database type is stored in the configuration file. See also: Database Selection Guidelines Setup Overview Back to Getting Started Home | Getting Started | Quick Reference | Menu Commands | Troubleshooting Database Selection Guidelines Please refer to the DriveRight FMS Database Selection Guide for information on choosing and installing a database for your installation. We included a printed copy of the Database Selection Guide with your DriveRight FMS as well as a PDF version that can be found in the DriveRight 9 DriveRight FMS 3.7.2 User's manual FMS program folder. The Database Selection Guide can also be downloaded from the Automotive Support section of our website: DriveRight FMS Database Selection Guide. DriveRight Fleet Management Software (FMS) supports the following databases. Single-User Databases: o MS Access (Microsoft Access) o MSDE (Microsoft Desktop/Data Engine) Multi-User Databases: o MySQL o MS SQL Server (Microsoft SQL Server) o Oracle See also: Architecture Setup Overview Back to Getting Started Home | Getting Started | Quick Reference | Menu Commands | Troubleshooting Converting 2.04-2.06/2.6.1 Database to DriveRight FMS Format A separate conversion utility, OldToNew, has been included with the DriveRight FMS software to allow the conversion of existing DriveRight 2.04, 2.05, 2.06 and 2.6.1 database files for use with DriveRight FMS. Note: This conversion utility can only be used with databases created by DriveRight 2.04, 2.05, 2.06 or 2.6.1. If you are using an earlier version of the DriveRight software you must first upgrade to one of the supported versions. Use the following procedure to convert your existing DriveRight database for use with DriveRight FMS: 1. Install and run DriveRight FMS before you convert your data to the new format. 2. Verify the current location in DriveRight FMS using the Current Location command in the Setup Menu. This location information will be associated with all the 2.x data when converted into the new database format. 10 DriveRight FMS Help 3. To import data to a new location, select the Company Locations command in the Database Menu in DriveRight FMS, then click the Add New button in the Company Locations browse window. 4. Go to Startup>Programs>DriveRight and run OldToNew. 5. To import data, select the location from the drop down list. 6. Click the Browse button to select the DriveRight 2.x tables directory (By default it is C:\Program Files\DriveRight Software\tables). 7. Click the Convert button to start the conversion. Once the data is converted you will see a success message. Note: The conversion process can take a long time depending on the size of your 2.x database. You can interrupt the conversion at any time by clicking the stop button, but this is not recommended. 8. All the 2.x data has been converted into the new database format for DriveRight FMS. 9. Go to DriveRight FMS and view various tables using the Database Menu commands to make sure the data has been converted properly. Back to Getting Started 11 DriveRight FMS 3.7.2 User's manual Home | Getting Started | Quick Reference | Menu Commands | Troubleshooting Setup Overview The initial setup of your DriveRight FMS consists of the following operations: 1. Select and Install Database Before you run the software for the very first time you will need to select the database to be used with DriveRight FMS. Refer to the Database Selection Guide for information on choosing and installing a database. If you select either MS Access or MSDE, DriveRight FMS will install the necessary components during the FMS installation. If you select MySQL, MS SQL Server, or Oracle, you will need to install and configure the database before installing DriveRight FMS. Database Selection Guidelines 2. Install DriveRight FMS Insert the DriveRight FMS CD and follow instructions. 3. Initial Program Configuration when you first run DriveRight FMS. Refer to the DriveRight FMS Getting Started Guide for initial program configuration information. 4. Install the drivers for accessories you want to use. Install drivers for the SmartCard Desktop Reader and wireless devices if you want to use them. Refer to the DriveRight FMS Getting Started Guide for instructions on installing the accessory drivers. See Wireless Device Communication Problems for help with installing or re-installing your wireless device driver. See SmartCard Reader Device Communication Problems for help with installing or re-installing your SmartCard Desktop Reader Device driver. 5. Converting DriveRight 2.04, 2.05 & 2.06 Databases If you have a DriveRight database created using version 2.04, 2.05, or 2.06 of the DriveRight Vehicle Management Software, it needs to be converted for use with DriveRight FMS: Convert Database 6. DriveRight FMS Software Setup Check the following configuration preferences and make any necessary changes: Set Units - Select your unit preferences for the data displayed in the dialog boxes, database browser, and reports. Backup Options - Allows you to set the number of months of data to keep in the current database. Download Options - Use this option to synchronize the DriveRight device date and time with your computer after each download. Also, if a downloaded device is either a 500 or 12 DriveRight FMS Help 600 or 600E model, you can choose how the software will treat the Driver ID. Once set, this preference will be uniform for all devices. 7. Set Default DriveRight Settings Wizard The values entered in this setup are used as default settings when you add new DriveRight devices to the database. You can set DriveRight default values using the Default DriveRight Settings Wizard in the Setup Menu. Check the default settings to make sure they suit your application. 8. Set Default CarChip Settings The values entered in this setup are used as default settings when you add new CarChip devices to the database. You can set CarChip default values using the Default CarChip Settings command in the Setup Menu. Check the default settings to make sure they suit your application. Note: If you are using both DriveRight and CarChip devices in your fleet, be sure to set the Safety Settings uniformly for both types of devices. 9. Select the Serial Port and Test Communications o Use the Serial Port - DriveRight command in the Setup Menu to select the serial port used to connect to a DriveRight device. o Use the Serial Port - CarChip command in the Setup Menu to select the serial port used to connect to a CarChip device. o Use the Auto Detect feature in the Serial Port dialog box to test communications. 10. CarChip / DriveRight Considerations o If both a CarChip device and DriveRight console are installed in the same vehicle, you will need to create duplicate entries in the DriveRight FMS databases for the vehicle and driver. Otherwise you will see duplicate trip data in your DriveRight FMS reports. o If you have multiple serial ports, you can connect CarChip to one serial port and DriveRight to another. If you do not have multiple serial ports we recommend you buy a serial switch box to switch between the two devices or a serial extension cord to make plugging and unplugging the download cables more convenient. 11. Building Your Database Tables • o When you add a DriveRight you will need to assign a default vehicle. When you add a vehicle you will need to assign a default driver. So, it is most efficient to add the drivers first, the vehicles second and the DriveRights third. o First, add all drivers. o Second, add all vehicles. o Third, add all DriveRights. When you add a CarChip you will need to assign it to either a vehicle or a driver. If you assign CarChip to a vehicle, all the downloaded data is assigned to the default driver of that vehicle. If you assign CarChip to a driver, all the downloaded data is assigned to that driver and the vehicle will be unallocated. 13 DriveRight FMS 3.7.2 User's manual o If a CarChip will only be used in one vehicle, assign it to that vehicle. o If a CarChip will be used by only one driver, assign it to that driver. A CarChip assigned to a driver can be used in multiple vehicles. 12. Using the Software You are now ready to start using DriveRight FMS. Back to Getting Started Home | Getting Started | Quick Reference | Menu Commands | Troubleshooting Tool Bar To get information about an FMS menu or tool bar icon, click on the command or icon in the illustration: Note: To see the full toolbar, expand the Online Help window to full screen. List of Toolbar Icons Database Icons View Trips Database View DriveRight Database View CarChip Database View Drivers Database View Vehicles Database Add Device Icons Add New DriveRight Wizard 14 DriveRight FMS Help Add New CarChip Wizard Report Icons Driver Safety Score Report Trip Summary Report Usage Report Odometer Report Accident Log Report File Menu Command Icons Print Print Preview Clear Screen Data Download/Export Icons Download DriveRight Download CarChip Download Palm Export GPS Data to Mapping Software Manual Wireless Download Help Icon Help Topics Back to Getting Started 15 DriveRight FMS 3.7.2 User's manual Home | Getting Started | Quick Reference | Menu Commands | Troubleshooting Quick Reference FMS Quick Reference Get More Information About: Data Management CarChip DriveRight Mapping The Wireless Download System Back to Home Home | Getting Started | Quick Reference | Menu Commands | Troubleshooting Data Management Data Management Reference Menu Database Backup Considerations Active Database Size Recommendations Backup Restore Export Menu Import Menu Back to Quick Reference Menu Home | Getting Started | Quick Reference | Menu Commands | Troubleshooting Database Backup Considerations If you have GPS-enabled DriveRights, you will rapidly accumulate a large amount of data in the GPS Table due to the frequency of GPS logging. 16 DriveRight FMS Help To avoid the database from becoming unmanageable, you can export the GPS Table alone more frequently than your normal backup interval, and delete the GPS data by using the Maintenance command. By doing this you still have trips data for your reports while at the same time limiting the database size. Example: 1. Set the Backup Options (Preferences command in the Setup Menu) to select the number of months you want to keep active in the database. 2. Suppose that you have some DriveRights with GPS data enabled. Your GPS Table will grow much more rapidly than the Trips Table. But you still want to keep the last three (3) months of trip data for reporting purposes. 3. Since DriveRight FMS does not support Backup of individual database tables, you can use the Export command to create individual backups of the GPS Table. 4. Refer to the Database Size Recommendations Table to determine how frequently you should Export the GPS Table. Once you determine the export frequency, you will need to manually repeat this process. 5. In this example, you want to keep one month of GPS data active in the database. 6. Go to the Export GPS command. 7. Enter a file name for the GPS export data similar to this: gps_10_apr_2003.txt. Note: Be careful about naming the GPS export file so that you don't lose previously exported data. 9. Go to the Database > Maintenance > GPS command and delete all GPS data older than your export frequency from Step 5. In this example it is one month. See also: Active Database Size Recommendations Preferences: Backup Options Export Menu Maintenance Back to Quick Reference Menu Home | Getting Started | Quick Reference | Menu Commands | Troubleshooting Active Database Size Recommendations 17 DriveRight FMS 3.7.2 User's manual The following recommendations are based on tests and calculations made with these assumptions: o 10 trips per day per vehicle o Trip duration: 1 hour (10 hours driving time per day per vehicle) o GPS data logged every 10 seconds Note: If your fleet size exceeds the scenarios shown below, we recommend that you use a multiuser database. Note: For multi-user databases, theoretically there is no fleet size limit. Still, we recommend that you backup data once a month, keeping only the amount of data required for reporting purposes in the active database, typically 3-6 months. Recommendations Table Scenario Number of Vehicles Amount of Active Data in Database Remarks and Recommendations 25 Up to 1 year Backup data once a month for application performance. Using backup options you can set maximum of 1 year of data in the active database 50 Up to 9 months Backup data once a month for application performance. Using backup options you can set maximum of 9 months of data in the active database 100 Up to 6 months Backup data once a month for application performance. Using backup options you can set maximum of 6 months of data in the active database MSDE with GPS 5 Up to 1 month Backup data every month for application performance. Using backup options you can set maximum of 1 months of data in the active database MS Access with GPS 10 Up to 1 month Backup data every month for application performance. Using backup options you can set maximum of 1 months of data in the active database No GPS See also: Active Database Size Recommendations Preferences: Backup Options 18 DriveRight FMS Help Back to Quick Reference Menu Home | Getting Started | Quick Reference | Menu Commands | Troubleshooting Backup The Backup command is used to archive old data as a zip file. The backup files are stored in the Backup sub-directory in the DriveRight FMS install directory. The Backup sub-directory is created the first time you back up your data. The backup zip files are named based on the start and end dates chosen for the backup. For example, if you pick the dates between March 6, 2003 and March 27, 2003, the backup file will be named 6March2003_27March2003.zip. You can configure how much data to keep active after a backup by setting up your Preferences: Backup Options in the Setup menu. Limiting the amount of data in the active database helps prevent the database from growing into an unmanageable size. To backup data: 1. Click Backup in the File menu. The Backup Files To dialog box is displayed. 2. From the Backup Files To dialog box select the folder where the backup file will be written. The Backup Options dialog box is displayed. Note: The Backup Options dialog box will not be displayed the first time you back up DriveRight data. 19 DriveRight FMS 3.7.2 User's manual 3. In the Backup Options dialog box check your last backup date and specify whether to backup the whole database or only those records falling within a specified time period. The start date will always be initialized to the last backup date. 4. Click OK to initiate the backup or click Cancel to exit the dialog box without backing up your database. 5. When the backup is finished, click OK to return to the program. See Also: Restore Preferences: Backup Options Back to File Menu Home | Getting Started | Quick Reference | Menu Commands | Troubleshooting Restore The Restore command is used to get a previously Backed up data back into the active database. In this process you can pick one or more tables to be restored. To restore data: 1. Click Restore in the File menu. The Restore Files From dialog box is displayed. 20 DriveRight FMS Help 2. From the Restored Files From dialog box select a single zip file to restore, and then click Restore. DriveRight FMS unzips the file and displays all the tables in the dialog, and displays the following dialog box: Note: You can only restore one .zip file at a time. Note: The backup file filename is based on the start and end dates chosen for the backup. 3. You can either restore all the database tables or restore individual database tables. Click Yes in the dialog box to restore all the tables. Click No to restore selected database tables. 4. If you are restoring selected database tables, select each table to be restored. Hold down the Control key on your keyboard to select multiple tables. When you have finished making your selection, click Restore to restore the tables or click Cancel to exit without restoring the tables. 21 DriveRight FMS 3.7.2 User's manual 5. When the files have been restored, click OK to return to the program. See Also: Backup Back to File Menu Home | Getting Started | Quick Reference | Menu Commands | Troubleshooting Export Menu Use the export menu options to export DriveRight FMS data. FTP Export - Use the FTP Export command to export database data to a remote site. Export GPS to Mapping Software - Use the Export GPS to Mapping Software command to export GPS data in a format designed to be imported into mapping software. Export Accidents to Mapping Software - Use the Export Accidents to Mapping Software command to export accident GPS data in a format designed to be imported into mapping software. 22 DriveRight FMS Help Other Export Commands - Use the other export commands to export the indicated type of data in a tab-delimited text file. Back to File Menu Home | Getting Started | Quick Reference | Menu Commands | Troubleshooting Import Menu Use the Import Menu options to import DriveRight database data into DriveRight. Import: FTP Import Import: Import Data From Back to File Menu Home | Getting Started | Quick Reference | Menu Commands | Troubleshooting CarChip Quick Reference CarChip Quick Reference CarChip Considerations Adding Drivers, Vehicles and CarChips CarChip Considerations CarChip Settings Downloading CarChip Downloading CarChip Guidelines Download CarChip Back to Quick Reference Menu Home | Getting Started | Quick Reference | Menu Commands | Troubleshooting 23 DriveRight FMS 3.7.2 User's manual Adding Drivers, Vehicles and CarChips Please refer to the following guidelines when adding new drivers, vehicles, and CarChips devices. • A CarChip device must be assigned to either a vehicle or a driver. • Unlike DriveRight devices, a CarChip device can be easily switched from vehicle to vehicle, as long as all the vehicles provide a supported OBDII port. • If a CarChip is assigned to a vehicle, the default driver of that vehicle will appear as the driver on all downloaded data from that CarChip. • If a CarChip is assigned to a driver, then all data downloaded from that CarChip will be associated with that driver and the vehicle will be listed as UNKNOWN VEHICLE. • If you just want to add a CarChip and you don’t yet have a vehicle or driver to assign, you can select "UNKNOWN VEHICLE". • Based on your specific situation, you should carefully consider the options before assigning a CarChip to either a vehicle or driver. • The Add New CarChip command opens a wizard that will guide you through the process of adding CarChips. It will also allow you to add drivers and vehicles if they are not already in the database. Back to Quick Reference Menu Home | Getting Started | Quick Reference | Menu Commands | Troubleshooting CarChip Considerations o If both a CarChip device and DriveRight console are installed in the same vehicle, you will need to create two entries for the driver and two entries for the vehicle in the DriveRight FMS database. Otherwise you will see duplicate trip data in your DriveRight FMS reports. o If you have multiple serial ports, you can connect CarChip to one serial port and DriveRight to another. If you do not have multiple serial ports we recommend you buy a serial switch box to switch between the two devices or a serial extension cord to make plugging and unplugging the download cables more convenient. o If you are using both CarChip and DriveRight devices, make sure both types of devices use the same safety settings. • 24 Speed Band 3 in CarChip should match Speed Limit in DriveRight. DriveRight FMS Help o • Hard Braking in CarChip should match Decel Limit in DriveRight. • Hard Acceleration in CarChip should match Accel Limit in DriveRight. Unlike DriveRight, a CarChip can be assigned either to a vehicle or to a driver. Back to Quick Reference Menu Home | Getting Started | Quick Reference | Menu Commands | Troubleshooting CarChip Settings Use the CarChip Settings command in the CarChip Menu to quickly view all CarChip settings, to add a CarChip to the database or to edit CarChip settings. 1. Select CarChip Settings from the CarChip Menu. The CarChip Device Settings dialog box is displayed. 2. Make any desired changes. For more information on the CarChip settings, click on the links below: CarChip ID Hard Braking, Acceleration and Speed Bands Choose Parameters 25 DriveRight FMS 3.7.2 User's manual Note: If you change the vehicle assigned to a CarChip, the vehicle table will also be changed to reflect the new assignment. Note: If you assign a vehicle to a CarChip that had been previously assigned to a DriveRight device, the vehicle assignment for that DriveRight will be changed to "UNASSIGNED VEHICLE". 3. If necessary, click Defaults to change the CarChip Hard Braking, Acceleration, Speed Bands, and Engine Parameters to the DriveRight FMS CarChip default settings. 4. Click OK to save the changes or click Cancel to exit without saving. Back to CarChip Menu Home | Getting Started | Quick Reference | Menu Commands | Troubleshooting Downloading CarChip Guidelines You cannot download a CarChip device if any of the following conditions exist: • CarChip not present in the database. • CarChip not assigned to a Vehicle or to a Driver. • Unless every thing is configured properly, you cannot download from the device. Back to Quick Reference Menu Home | Getting Started | Quick Reference | Menu Commands | Troubleshooting Download CarChip Use this command to download data from your CarChip data logger into your computer. To download CarChip data: 1. Connect your CarChip device to your computer. 26 DriveRight FMS Help 2. Choose Download CarChip from the CarChip menu. The Downloading Data dialog box appears. 2. The dialog box disappears when the download is complete. 3. Choose Cancel only if you wish to abort the download before it is finished. See also: Downloading CarChip Guidelines Back to CarChip Menu Home | Getting Started | Quick Reference | Menu Commands | Troubleshooting DriveRight Quick Reference DriveRight Quick Reference DriveRight Configuration Adding Drivers, Vehicles and DriveRights DriveRight Settings Verify DriveRight Calibration Setup GPS Downloading DriveRight Downloading Requirements Download DriveRight Download Palm Back to Quick Reference Menu Home | Getting Started | Quick Reference | Menu Commands | Troubleshooting 27 DriveRight FMS 3.7.2 User's manual Adding Drivers, Vehicles and DriveRights Please refer to the following guidelines when adding new drivers, vehicles, and DriveRight devices. • The Add New DriveRight command opens a wizard that will guide you through the process of adding DriveRights. It will also allow you to add drivers and vehicles if they are not already in the database. • If you are adding a new driver, vehicle, and DriveRight, you should add the driver first, the vehicle second, and the DriveRight last. • If you just want to add a vehicle and you don’t yet have a driver to assign, you can select "UNALLOCATED DRIVER". • If you just want to add a DriveRight and you don’t yet have a vehicle to assign, you can select "UNKNOWN VEHICLE". Important: If you selected either a UNALLOCATED DRIVER or UNKNOWN VEHICLE, you should change them to real entries before actually using the DriveRight in the field and downloading it. Otherwise, the data will be assigned to the wrong entities and will affect the results when you run Reports, etc. See also: Add New DriveRight Back to Quick Reference Menu Home | Getting Started | Quick Reference | Menu Commands | Troubleshooting DriveRight Settings The following commands allow you to view and or change the settings on a DriveRight device: View/Set Restore Setup GPS Verify DriveRight Calibration Back to DriveRight Menu Home | Getting Started | Quick Reference | Menu Commands | Troubleshooting 28 DriveRight FMS Help DriveRight Settings: Verify DriveRight Calibration The Calibrate DriveRight dialog box allows you to verify DriveRight calibration settings. • The Calibration Setting Dialog box shows two installation methods. VSS (vehicle speed sensor) installation and Reed Switch. To verify the DriveRight console calibration: 1. Click on DriveRight Settings from the DriveRight Menu. 2. Select Verify DriveRight Calibration from the drop-down menu. A DriveRight Calibration Message dialog box is displayed. 3. Click OK, Set or Cancel to continue, depending on the displayed message. The Calibrate DriveRight dialog box is displayed. 3. If the DriveRight is using a reed switch for the speed sensor, make sure the Installation Method indicates Reed Switch. o Reed Switch: If the DriveRight device has been previously calibrated in the vehicle or through the software, then DriveRight FMS automatically calculates the Calibration number for your vehicle. We strongly recommend that you do not change these values. The PPR for a reed switch is always “1”. 4. If the DriveRight is using the vehicle's VSS for the speed sensor, make sure the Installation Method indicates VSS. o VSS: If the DriveRight device has been previously calibrated in the vehicle or through the software, then DriveRight FMS automatically calculates the VSS PPM (Pulses Per Mile), PPR (pulses per reading) and Calibration number for your vehicle. Otherwise you must specify the PPM for your vehicle. Depending 29 DriveRight FMS 3.7.2 User's manual on your selection, software calculates the PPR (pulses per reading) and calibration values and fills the edit boxes with them. 5. If you are using the VSS, you can adjust the pulses per mile (PPM) from the drop down list or enter the PPM in the edit box if necessary. We recommend that you not change these settings if the DriveRight has been previously calibrated. 6. Click OK to save changes to the calibration, or click cancel to exit without saving changes. Back to DriveRight Menu | DriveRight Settings Home | Getting Started | Quick Reference | Menu Commands | Troubleshooting DriveRight Settings: Setup GPS Use this command to view and/or modify the GPS settings on a DriveRight device. Note: This command only works with the DriveRight 600. To setup GPS logging: 1. Select DriveRight Settings from the DriveRight Menu. 2. Select Setup GPS from the DriveRight Settings drop down list. The Setup GPS Logging Interval dialog box is displayed. 3. 30 Set GPS Logging to On, Off, or DriveRight Speed Only. o Select On to enable GPS logging. o Select Off to disable GPS logging. DriveRight FMS Help o Select DriveRight Speed Only to log the DriveRight speed without the GPS coordinates. No GPS unit is required to enable this option. 4. Enter the desired logging interval and indicate a time unit of either seconds (Sec) or minutes (Min). Logging Hours indicates how much data can be stored at the selected interval. 5. Click Set to save the changes or click Cancel to exit without changing the settings Back to DriveRight Menu | DriveRight Settings Home | Getting Started | Quick Reference | Menu Commands | Troubleshooting Downloading Requirements You cannot download a DriveRight if any of the following conditions exist: • DriveRight not present in the database. • DriveRight not assigned to a Vehicle. Note: The same conditions also apply to Host Mode and Palm Download. Back to Quick Reference Menu Home | Getting Started | Quick Reference | Menu Commands | Troubleshooting Download DriveRight The Download DriveRight command transfers trip data from the connected DriveRight device to the DriveRight database. To download your DriveRight: 1. Connect your DriveRight console to your computer and make sure the DriveRight is "awake". Press the MODE key if there is nothing on the LCD display. 2. Select Download DriveRight in the DriveRight Menu. The following Download Status box is displayed: Note: You will see the Cancel button only if you are downloading a DriveRight 600. 31 DriveRight FMS 3.7.2 User's manual 3. You may lose GPS data for earlier trips if the DriveRight console is not downloaded for an extended period of time. In this case you will see a warning message similar to this: 4. If the calibration in the DriveRight console does not match the calibration in the database, you will see a warning message similar to this: 5. 32 When the data has finished downloading the following dialog box is displayed: DriveRight FMS Help 6. Press Enter or click OK to continue. See also: Downloading DriveRight Guidelines Back to DriveRight Menu Home | Getting Started | Quick Reference | Menu Commands | Troubleshooting Download Palm Versions of DriveRight FMS 3.0 and later offer a feature to download data from multiple DriveRight devices from a Palm device. You will need the DriveRight Palm Download Kit, #8181, in order to use this command. Note: To download a DriveRight console data into the software using Palm Download, the DriveRight should be present in the database. If you try to download a DriveRight which is not present in the database, you will get an error message. To download your Palm: 1. Select Download Palm in the DriveRight Menu. 2. The first time you download a Palm, the following dialog box is displayed. Select the directory which contains your Palm backup databases and click OK. 33 DriveRight FMS 3.7.2 User's manual 3. Each time after the first time, when you use the Download Palm command, the following dialog box appears showing the selected Palm backup directory. 4. Click Browse to select a different backup directory, click OK to use this displayed directory, or click Cancel to exit. 5. 34 If you click OK, the Download Status dialog box is displayed. DriveRight FMS Help 6. When the data has finished downloading the Palm Download, Download Successful dialog box is displayed: 7. Click OK to continue. Back to DriveRight Menu Home | Getting Started | Quick Reference | Menu Commands | Troubleshooting Database Menu Use the Database Menu options to open individual database tables. In the database table you can view and print records. You can also add, edit or delete records. Caution: Take extra care before deleting Company Location, DriveRight, CarChip, Driver or Vehicle records. The following Database Menu options are available: Company Locations DriveRights CarChips Wireless Devices Driver Groups Drivers Fleets Vehicles Trips Accident Logs Tamper Logs Trip Addresses Days 35 DriveRight FMS 3.7.2 User's manual Download Dates GPS Odometer Logs Safety Score Trouble Codes Readiness Codes Maintenance Back to Menu Commands Home | Getting Started | Quick Reference | Menu Commands | Troubleshooting Reports Menu DriveRight can produce a number of useful reports. The reports can be displayed on the screen or printed. The following reports are available: Accident Log Report Driver Safety Score Driver Safety Score Summary Exception Reports Database Reports Usage Report Trip Summary Report Tamper Logs Report Odometer Report Relationship Report Days Since Last Download Wireless Download Status Report 36 DriveRight FMS Help Back to Menu Commands Menu Home | Getting Started | Quick Reference | Menu Commands | Troubleshooting Mapping Quick Reference Menu Mapping Quick Reference Menu GPS Mapping How to Create Maps How to View Maps Mapping Menu DriveRight FMS Mapping Requirements Back to FMS Quick Reference Menu | Mapping Menu Home | Getting Started | Quick Reference | Menu Commands | Troubleshooting How to View Maps How to View Maps Viewing Trip Maps Viewing Day Maps Viewing Accident Log Maps Back to FMS Quick Reference | Mapping Quick Reference Home | Getting Started | Quick Reference | Menu Commands | Troubleshooting Viewing Trip Maps The following topics will help you view and understand Trip Maps. Trip Map Features Map Navigation Viewing GPS Plot Information Back to Mapping Quick Reference Menu | How to View Maps Home | Getting Started | Quick Reference | Menu Commands | Troubleshooting 37 DriveRight FMS 3.7.2 User's manual Viewing Day Maps The following topics will help you view and understand Day Maps: Day Map Features Map Navigation Viewing GPS Plot Information Back to Mapping Quick Reference Menu | How to View Maps Home | Getting Started | Quick Reference | Menu Commands | Troubleshooting Viewing Accident Log Maps The following topics will help you view and understand Accident Log Maps: Accident Log Map Features Map Navigation Viewing GPS Plot Information Back to Mapping Quick Reference Menu | How to View Maps Home | Getting Started | Quick Reference | Menu Commands | Troubleshooting Viewing GPS Plot Information Each push-pin symbol used to plot a trip represents a DriveRight GPS record. You can display the GPS data for one of the plot points by: 1. Click the push-pin. 2. A information box opens for the symbol displaying the GPS coordinates, DriveRight ID, GPS date and time, day of the week, and driver ID. To modify the GPS data display: 1. Place the cursor inside the plot symbol legend window 2. Select the Properties right-click mouse command 3. Click on the Balloon tab at the top right of Properties dialog box. All the available GPS data parameters are listed in the dialog box. 4. Check a parameter to include it in the displayed plot information 5. Removing a check will remove that parameter from the summary. 38 DriveRight FMS Help Back to Mapping Quick Reference Menu Home | Getting Started | Quick Reference | Menu Commands | Troubleshooting Mapping Menu Note: DriveRight FMS Mapping requires Microsoft MapPoint. The following commands are available in the Mapping Menu: Open Map Save Map E-Mail Map MapPoint Version Set Speed Range See also: Mapping Quick Reference Menu DriveRight FMS Mapping Requirements Back to Menu Commands Home | Getting Started | Quick Reference | Menu Commands | Troubleshooting DriveRight FMS Mapping Requirements The following equipment and software are required to use DriveRight FMS mapping functions: • DriveRight 600 • DriveRight GPS Module • Microsoft MapPoint 2002 or MapPoint 2004 • In addition to the DriveRight FMS 3.2 system requirements, Microsoft recommends a minimum of 64 MB of memory to run MapPoint. • MS MapPoint or MapPoint Control run-time must be installed on the computer running the DriveRight FMS. Back to Mapping Quick Reference Menu 39 DriveRight FMS 3.7.2 User's manual Home | Getting Started | Quick Reference | Menu Commands | Troubleshooting Accident Log Map Features An Accident Log Map consists of the following key elements: Title Bar The title bar at the top of the map window shows the type of map, the company location, DriveRight ID, driver name, and date of the trip. Overview Map The overview map shows the general area of the map and is located on the left side of the window just below the title bar. Legend • A legend of map symbols is located just below the Overview Map. • Each Accident Log pushpin represents an Accident Log record. Map Window The Accident Log Report map puts an accident pushpin on the location of each accident in the Accident Lob Report. • 40 To see a summary of the accident information, click an accident log pushpin. DriveRight FMS Help . • To see a Trip Map of the trip in which an accident occurred, double-click the accident pushpin. Refer to Viewing Trip Maps for information on viewing the Accident Trip Map. Full Map View 41 DriveRight FMS 3.7.2 User's manual Back to Mapping Quick Reference Menu | Mapping Menu Home | Getting Started | Quick Reference | Menu Commands | Troubleshooting Day Map Features A Day Map consists of the following key elements: Title Bar The title bar at the top of the map window shows the type of map, the company location, DriveRight ID, driver name, and date of the trip. Overview Map 42 DriveRight FMS Help The overview map shows the general area of the map and is located on the left side of the window just below the title bar. Legend • A legend of map symbols is located just below the Overview Map. • Each pushpin in the Day Map indicates a GPS record. A different pushpin color identifies each trip taken on the selected day. • You can create a single trip map for any trip in a Day Map by double-clicking a pushpin from that trip. See Viewing Trip Maps for more info on viewing a single trip map. • Double-clicking on a pushpin in the mapped trip will return the map to the normal Day Map showing multiple trips. Map Window The Day Map plots all of the trips taken by a vehicle on the selected day. A different color Day Map pushpin is used for each trip From inside the map window you can move the area shown in the window, zoom a selected area, zoom in and out, and view GPS data. 43 DriveRight FMS 3.7.2 User's manual Full Map View 44 DriveRight FMS Help Back to Mapping Quick Reference Menu | Mapping Menu Home | Getting Started | Quick Reference | Menu Commands | Troubleshooting Trip Map Features A Trip Map consists of the following key elements: Title Bar The title bar at the top of the map window shows the type of map, the company location, DriveRight ID, driver name, and date of the trip. 45 DriveRight FMS 3.7.2 User's manual Overview Map The overview map shows the general area of the map and is located on the left side of the window just below the title bar. Legend • A legend of map symbols is located just below the Overview Map. • A realistic looking pushpin indicates the starting and stopping points in a Trip Map. • Round pushpins indicate the GPS plot points in a trip. • When viewing a trip map, the round pushpin colors indicate vehicle speed. • Use the Set Speed Ranges command in the Mapping Menu to set the number of speed ranges and the speeds included in each range. • When viewing multiple trips, the colors identify different trips. Map Window 46 DriveRight FMS Help The Trip map window plots the GPS record to show where the vehicle went, when the trip started and stopped, and indicating vehicle speed over the course of the trip. From inside the map window you can navigate around the map's location, zoom in and out, and view data for individual GPS records. Full Map View 47 DriveRight FMS 3.7.2 User's manual Back to Mapping Quick Reference Menu | Mapping Menu Home | Getting Started | Quick Reference | Menu Commands | Troubleshooting Map Navigation Use the following techniques to move and adjust the map view: Navigating the Map Window Navigating the Overview Map Zooming a Selected Map Area Zooming In and Out Back to Mapping Menu | Mapping Quick Reference | How to View Maps 48 DriveRight FMS Help Home | Getting Started | Quick Reference | Menu Commands | Troubleshooting Navigating the Map Window To move the mapped area from inside the map window: 1. Move the mouse pointer to the edge of the map window in the direction you want to move. 2. The mouse pointer changes to a large arrow. 3. Click and hold the mouse button to scroll the map in the direction of the arrow. 4. Move the mouse pointer closer to the center of the map to slow the movement of the map or farther from the center to speed it up. 5. To stop moving the map, release the mouse button. Note: You can drag the pointer around the map pane to change the direction in which the map moves as long as the pointer looks like the large arrow. You can pan 360 degrees east or west but not north or south. See also: Zooming a Selected Map Area Zooming In and Out Back to Mapping Menu | Mapping Quick Reference | How to View Maps Home | Getting Started | Quick Reference | Menu Commands | Troubleshooting 49 DriveRight FMS 3.7.2 User's manual Navigating the Overview Map To move the mapped area from inside the overview map: Note: The area of the main map view is outlined in blue on the overview map. 1. To move the main map, place the cursor over the blue circle in the overview map. 2. When the cursor changes into four arrows pointing in four directions, press the left mouse key and drag the blue circle to the desired area. The area of the main map moves with the blue circle. Back to Mapping Menu | Mapping Quick Reference | How to View Maps Home | Getting Started | Quick Reference | Menu Commands | Troubleshooting Zooming In and Out To zoom in or out: 1. Place the cursor over the map window, making sure it isn't directly over any of the map symbols. 2. Click the right mouse button to open the right-click menu. 3. Place the cursor over the Zoom command, then click on the desired zoom option: In, Out, or To Selection. Back to Mapping Menu | Mapping Quick Reference | How to View Maps Home | Getting Started | Quick Reference | Menu Commands | Troubleshooting Zooming a Selected Map Area To zoom in to a selected area of a map: 50 DriveRight FMS Help 1. In the map window, position your mouse pointer at the upper-left corner of the area you want to enlarge. 2. Drag the pointer diagonally until you've drawn a box around the area you want to enlarge. 3. To quit drawing, release the mouse button. 4. If the box you've drawn isn't quite where you want it, click outside the box to make it disappear, and then redraw it. 5. Click inside the box to enlarge the selected area. Back to Mapping Menu | Mapping Quick Reference | How to View Maps Home | Getting Started | Quick Reference | Menu Commands | Troubleshooting How to Create Maps How to Create Maps DriveRight FMS can create three different maps from your GPS data. You can also export GPS data for use in third-party mapping software such as MS MapPoint. Creating a Trip Map Creating a Day Map Creating an Accident Log Map Export: GPS to Mapping Software Export: Accidents to Mapping Software Import GPS Data Into MapPoint Back to FMS Quick Reference | Mapping Quick Reference Home | Getting Started | Quick Reference | Menu Commands | Troubleshooting Creating a Trip Map Click the Map button the Trips browse window to create a map from a trip record. To create a Trip Map: 1. Select the Trips command in the Database menu. The Filter For Trips dialog box is displayed. 2. Select your desired Trips filter options. 3. Click OK to show the Trips browse window. 51 DriveRight FMS 3.7.2 User's manual 4. Highlight a trip record then click Map to generate a Trip Mapping Report for that trip. The map is displayed in the DriveRight FMS program window. See also: Viewing Trip Maps Map Navigation Viewing GPS Plot Information Back to Mapping Overview Home | Getting Started | Quick Reference | Menu Commands | Troubleshooting Creating a Day Map Click the Map button the Days browse window to create a map for all trips taken on the same day. To create a Day Map: 1. Click Days in the Database menu. The Filter for Days is displayed. 2. Select your desired filter options. 3. Click OK to show the Days browse window. 2. Click Map to generate the Day Mapping Report. The report is displayed in the DriveRight FMS program window. See also: Viewing Day Maps Map Navigation Back to Mapping Overview Home | Getting Started | Quick Reference | Menu Commands | Troubleshooting Creating an Accident Log Map You can create an Accident Log Report Map by selecting the Output to: Map or Output to: Both Map and Excel options when you create the Accident Log Report. To create a Accident Log Map: 52 DriveRight FMS Help 1. Select the Accident Log command in the Reports menu. The Filter for Accident Logs is displayed. 2. Select the desired Accident Log filter options, being sure to select Map or Both Map and Excel for the report output. 3. Click OK to create the Accident Log Mapping Report. See also: Viewing Accident Log Maps Back to Mapping Overview Home | Getting Started | Quick Reference | Menu Commands | Troubleshooting Export: GPS to Mapping Software To export GPS data: 1. Select Export in the File Menu. 2. Select GPS to Mapping Software in the drop-down Export menu. The GPS Fields dialog box is displayed. 3. Click Select All to check all fields. Click Clear All to clear all fields. Click in the box for each field to toggle the check on and off. Note: Only the checked GPS fields will be exported. These key fields should always be selected: GPS DateTime, Speed, High Speed, Latitude and Longitude. 4. Click OK in the GPS Fields box to continue, click Cancel to exit. If you click OK, the Export GPS To dialog box is displayed. 53 DriveRight FMS 3.7.2 User's manual 3. The default file name is GPS.TXT and the default directory is the DriveRight FMS install directory. You can edit or change the file name directly in the text box. You can also change the directory in which the exported GPS data file will be saved. 4. Click Set Filter to narrow the selection of GPS data to be exported. 5. Click Browse to view the GPS data before you export it. 6. Click OK when you are ready to export the GPS data or click Cancel to exit without exporting data. If you click OK, the exported GPS data will be saved in a file ready to be imported into your mapping software. See also: Import GPS Data Into MapPoint Back to File Menu | Export Menu Home | Getting Started | Quick Reference | Menu Commands | Troubleshooting Export: Accidents to Mapping Software To export accident log data: 1. Select Accident to Mapping Software from the Export command in the File Menu. The Export Accidentlogs To dialog box is displayed. 54 DriveRight FMS Help 2. Select the file directory in which to save the accident log files. 3. Verify the file name for the accident log file. You can edit the name in the dialog box if desired. 4. Click Export to create the accident log data file or click Cancel to exit. If you click OK, the exported Accident Log data will be saved in a file ready to be imported into your mapping software. To import data into MapPoint: 1. Start the MapPoint application. 2. Select Import Data Wizard from the Data menu. 3. Using the File dialog box find select the ACCIDENTLOGS.TXT file and click on Open. 4. "Tab" should be selected to separate the data. Click Next. 5. All the fields you exported will appear in the next dialog. Column headings are included and should be detected by the program. All the columns should have <Other Data> as their data type except Lat and Long. Check to make sure the Lat and Long were detected correctly. If they are not, correct them. Click Finish. 6. Select Multiple Symbol and click Next. These instructions show you how to color code accident log points by speed at T0. T0 is the middle point of the accident log. 7. In "Select the data filed or column to map" list, select time_TO. In "Divide the data you chose above by" list, select <None>. In "Show the data by" list, select Latitude & Longitude. Click Next. 8. Enter the speed divisions you want to use and the color for each division. 9. Click Finish to plot the points. 55 DriveRight FMS 3.7.2 User's manual 10. In the left frame, right click on "time_T0 by Latitude & Longitude". Select "Properties". Open the Balloon tab and select time_T0, accidentDateTime and any other fields you want to view. 11. Zoom in enough to see individual points, right click on a point, and pick "Show Information", to look at data for that particular point. 12. MapPoint allows you to navigate around on the map pretty well. Some useful keystrokes are ‘+’ to zoom in and ‘-‘ to zoom out. Also, you can draw a box around an area and then click in it to zoom into it. You can scroll the map using your mouse by just positioning the mouse cursor on the side of the map you want to scroll into. Back to File Menu | Export Menu Home | Getting Started | Quick Reference | Menu Commands | Troubleshooting Import GPS Data Into MapPoint Exported GPS Data can be easily importing into MS MapPoint using the MapPoint Import Data Wizard. To import GPS data into MapPoint: 1. Start the MapPoint application. 2. Select Import Data Wizard from the Data menu. 3. Using the File dialog box find select the GPS.TXT file and click Open. 4. "Tab" should be selected to separate the data. Click Next. 5. All exported fields appear in the next dialog box. Column headings are included and should be detected by the program. All the columns should have <Other Data> as their data type except Latitude and Longitude. Check to make sure the Latitude and Longitude were detected correctly. If they are not, correct them. Click Finish. 6. Select Multiple Symbol and click Next. These instructions show you how to color code accident log points by speed at T0. T0 is the middle point of the accident log. 7. In "Select the data filed or column to map" list, select highSpeed. In "Divide the data you chose above by" list, select <None>. In "Show the data by" list, select Latitude & Longitude. Click Next. 8. Enter the speed divisions you want to use and the color for each division. 9. Click Finish to plot the points. 10. In the left frame, right click highSpeed by Latitude & Longitude. Select Properties. Open the Balloon tab and select gpsDateTime, highSpeed and any other fields you want to view. 11. Zoom in enough to see individual points, right click on a point, and select Show Information, to look at data for that particular point. 12. MapPoint allows you to navigate around on the map pretty well. Some useful keystrokes are ‘+’ to zoom in and ‘-‘ to zoom out. Also, you can draw a box around an area and then click in it to zoom into it. You can scroll the map using your mouse by just positioning the mouse cursor on the side of the map you want to scroll into. 56 DriveRight FMS Help See also: Export: GPS to Mapping Software Back to File Menu | Export Menu Home | Getting Started | Quick Reference | Menu Commands | Troubleshooting Wireless Quick Reference Menu Wireless Quick Reference Menu The Wireless Menu lets you configure the wireless devices in your Wireless Download System, perform wireless scans and downloads, and upgrade wireless device firmware. The following quick reference menu helps you get started using the Wireless Download System. How to Add a Base Station How to Add a Wireless On-Board Module How to Select an Operating Region How to Scan for Wireless On-Board Modules How to Set Up an Automatic Wireless Download How to Start a Manual Wireless Download How to Upgrade Firmware Back to FMS Quick Reference Menu | Wireless Menu Home | Getting Started | Quick Reference | Menu Commands | Troubleshooting How to Add a Base Station The Add New Base Station dialog box configures the Base Station to wirelessly communicate with Wireless On-Board Modules and allows you to assign a position to it that makes it easily identifiable throughout FMS. To add a new Base Station: 1. Connect your Base Station to the computer's USB port. 2. Select Add New Base Station from the Wireless Menu. If this is the first time a Base Station or Wireless On-Board Module has been added to FMS, the Select Operating Region dialog box displays. 57 DriveRight FMS 3.7.2 User's manual 3. Select among the three choices displayed: North America, Europe, or Other. The operating region determines the power level of the wireless devices. Select Europe if the power levels of the wireless devices must not exceed CE certification requirements of less than 10 dBm. Select North America if the power levels of the wireless devices must not exceed FCC or IC certification requirements of less than 30 dBm. Select Other if the operating region is not North America or Europe. 4. Click OK to save the operating region information or click Cancel to exit without saving. The Add New Base Station dialog box displays. The dialog box displays the location and the Position text field. If the Base Station belongs to a different location, select the correct location from the Current Location dialog box before adding the Base Station. 5. Enter a position description in the Position text box. The maximum number of characters for the Position text box is 32. 6. Click Add to add the new Base Station or Cancel to exit the dialog box without saving the new Base Station. If you clicked Add, a dialog box is displayed to confirm that the Base Station has been added to FMS. 58 DriveRight FMS Help 7. Click OK to exit the dialog box. Back to FMS Quick Reference Menu | Wireless Quick Reference Menu Home | Getting Started | Quick Reference | Menu Commands | Troubleshooting How to Add a Wireless On-Board Module To add a new Wireless On-Board Module: 1. Use the Configuration Cable to connect the Wireless On-Board Module to your computer. 2. Select Add New Wireless On-Board Module from the Wireless Menu. If this is the first time a Base Station or Wireless On-Board Module has been added to FMS, the Select Operating Region dialog box displays. 3. Select among the three choices displayed: North America, Europe, or Other. The operating region determines the power level of the wireless devices. Select Europe if the power levels of the wireless devices must not exceed CE certification requirements of less than 10 dBm. Select North America if the power levels of the wireless devices must not exceed FCC or IC certification requirements of less than 30 dBm. Select Other if the operating region is not North America or Europe. Once an operating region has been selected, the Add New Wireless On-Board Module dialog box displays. 59 DriveRight FMS 3.7.2 User's manual The dialog box displays the location the Wireless On-Board Module belongs to and the Vehicle ID/Lic. Plate drop-down list box. 4. Select a Vehicle ID or license plate number from the Vehicle ID/Lic Plate drop-down list box, or select Automatic. Selecting a Vehicle ID or License plate from the drop down list assigns the Wireless On-Board Module to that vehicle. Click Browse to display the Vehicles database table. Review the full list of available vehicles to better determine the vehicle that gets assigned to the Wireless On-Board Module. Select Automatic if you do not want to select a vehicle at this time. The next time either Scan Wireless On-Board Modules or Start Manual Wireless Download is selected, or an Automatic Wireless Download has occurred, the correct Vehicle ID will be assigned to the Wireless On-Board Module based on the vehicle information stored on the DriveRight device. 5. Click Add to add the new Wireless On-Board Module or Cancel to exit the dialog box without saving the new Wireless On-Board Module. If you clicked Add, the New Wireless On-Board Module dialog box displays, confirming that the Wireless On-Board Module has been added to FMS and is configured for use with your wireless fleet. 6. Click OK to exit the dialog box. Once the Wireless On-Board Module has been added to the FMS database, it can be installed in its assigned vehicle or any vehicle in your fleet if you selected Automatic in the Vehicle ID/Lic Plate drop-down list box. See the DriveRight GPS/Wireless System Installation Manual for more information on its installation and proper usage. Note: The Wireless On-Board Module should only be installed to its assigned vehicle unless Automatic is selected when adding the module. Back to FMS Quick Reference Menu | Wireless Quick Reference Menu Home | Getting Started | Quick Reference | Menu Commands | Troubleshooting 60 DriveRight FMS Help How to Scan for Wireless On-Board Modules The Scan Wireless On-Board Modules dialog box uses the Base Station(s) to scan all of the Wireless On-Board Modules in the current location and displays the wireless communication status of each Wireless On-Board Module. Note: At the top of each hour, the Wireless On-Board Module is turned off by the DriveRight Device for two minutes. This is done to allow the DriveRight to turn on the GPS module to refresh the satellite position periodically. This occurs eve without a GPS module being physically connected to your DriveRight device. FMS will not be able to communicate with the Wireless OnBoard Module(s) during this time. 1. Select Scan Wireless On-Board Modules from the Wireless Menu. The Scan Wireless On-Board Modules displays a list of all the Wireless On-Board Modules in your database associated with the currently selected location. 2. Click Start to scan all of the Wireless On-Board Modules. As the Base Station scans for the Wireless On-Board Modules, the status of each of the modules displays under the Status column. 61 DriveRight FMS 3.7.2 User's manual The color box provides a visual representation of the status for each of the Wireless On-Board Modules in the database. The color is updated throughout the scan process. The Status column on the right hand side of the dialog box also documents the status for each module. The possible statuses are: Not Yet - The Base Station has not yet scanned for the Wireless On-Board Module. Searching for Vehicle - The Base Station is currently searching for the Wireless OnBoard module. Successful - The Base Station has successfully found and communicated with Wireless On-Board Module. Failed - The Base Station has not successfully communicated with or found errors in communicating with the Wireless On-Board Module. The scan will continue to search for the "Failed" Wireless On-Board Modules until the maximum of 10 retries has been reached. The following is a status list that corresponds to the red color box: 62 Vehicle ID Mismatch - The Wireless On-Board Module is not installed in the assigned vehicle. To correct this problem, select the Wireless On-Board Module's record in the Wireless Devices database table and click Edit. The Edit Wireless On-Board Module dialog box displays information about the On-Board Module. Change the Vehicle ID field of the Wireless On-Board Module to Automatic to allow FMS to find the Vehicle's ID automatically. You can also install the Wireless On-Board Module into the assigned vehicle. DriveRight Not Assigned - The DriveRight has not been assigned to a vehicle or the DriveRight has not been added to the FMS database. Add the DriveRight and assign it to the corresponding vehicle. This status also occurs when there is an error communicating with the DriveRight device. See Wireless Device Communication Problems for more information. DriveRight FMS Help Vehicle Not Found - The Vehicle and Wireless On-Board Module are not within range of the Base Station. 3. Click Stop to abort the scan before it is completed or click Close to close the dialog box once the scan has completed. Please note that if you stop scanning before it completes the scan, the last vehicle it scans automatically contains a failed status. Note: Since it is not required to select a vehicle when adding a new Wireless On-Board Module, Unknown is displayed under the Vehicle ID column to indicate that a vehicle has not been assigned to a Wireless On-Board Module. If the Wireless On-Board Module is connected to a vehicle that is not currently in the database, you need to add both the vehicle and DriveRight to the database in order for FMS to download successfully. Back to FMS Quick Reference Menu | Wireless Quick Reference Menu Home | Getting Started | Quick Reference | Menu Commands | Troubleshooting How to Set Up an Automatic Wireless Download The Setup Automatic Wireless Download dialog box lets you select when to automatically download some or all vehicles that are wirelessly connected to FMS. Note: FMS has to be running for the Automatic Wireless Download to occur. 1. Select Setup Automatic Wireless Download from the Wireless Menu. The Setup Automatic Wireless Download dialog box lets you select the vehicles you want to automatically download daily. By default, a vehicle associated with a newly added Wireless On-Board Module is automatically place in the Vehicles in Download Queue list. This also applies to "Unknown" vehicles. 63 DriveRight FMS 3.7.2 User's manual The Available Vehicles list shows all available vehicles for the current location. The Vehicles in the Download Queue list shows the vehicles selected for automatic wireless download. 2. Click >>, All>>, <<, or All<< to move the vehicles between these two lists. 3. Enter the time FMS will begin the automatic download process in the Start Time box or click the Up or Down arrow buttons to change the start time. The default time is 6:00 PM. 4. Enter the amount of time you would like FMS to search for the selected vehicles in the Duration box or click the Up or Down arrow buttons to increment or decrement the hours. The duration allows you to prolong the time for retries when the Wireless OnBoard Modules are not immediately available for download, because they are either out of range or currently powered off. 5. Check the Include Weekend box to automatically download all seven days of the week. "Weekend" is defined in the Usage Report Formula dialog box. If the start time selected in this dialog box falls within the "weekend" time frame selected in the Usage Report Formula dialog box, download will not take place during the day or days included in the "weekend" definition unless the Include Weekend box is checked. 6. Click OK to save the automatic wireless download settings and prepare FMS to automatically download the Wireless On-Board Modules or click Cancel to exit without saving. Note: Since it is not required to select a vehicle when adding a new Wireless On-Board Module, Unknown is displayed under the Vehicle ID column to indicate that a vehicle has not been assigned to the Wireless On-Board Module. If the Wireless On-Board Module is connected to a vehicle that is not currently in the database, you need to add both the vehicle and DriveRight to the database in order for FMS to download successfully. 64 DriveRight FMS Help Note: Only one wireless download process is allowed at a time. If an automatic download is scheduled during a manual download, the automatic download will be delayed until the manual download is completed. If the duration period for the Automatic Download has expired before the manual download has finished, Automatic Download will not take place for that day. Back to FMS Quick Reference Menu | Wireless Quick Reference Menu Home | Getting Started | Quick Reference | Menu Commands | Troubleshooting How to Start a Manual Wireless Download Different from the Automatic Wireless Download, The Start Manual Wireless Download dialog box lets you select some or all vehicles in your fleet to wirelessly download immediately once you press Start Download. 1. Select Start Manual Wireless Download from the Wireless Menu or click the Manual Wireless Download Icon from the toolbar. The Start Manual Wireless Download dialog box lets you select the vehicles you want to download at this time. The Available Vehicles list shows all available vehicles for the displayed location. The Vehicles in the Download Queue list shows the vehicles selected for manual wireless download. 2. Click >>, All>>, <<, or All<< to move the vehicles between these two lists. 3. Enter the amount of time you would like FMS to search for the selected vehicles in the Duration box or click the Up or Down arrow buttons to increment or decrement the hours. The duration allows you to prolong the time for retries when the Wireless OnBoard Modules are not immediately available for download, because they are either out of range or currently powered off. 65 DriveRight FMS 3.7.2 User's manual 4. Click Start Download to start the download or click Cancel to cancel the manual download. The Wireless Download Status dialog box displays when you click Start Download. Note: Since it is not required to select a vehicle when adding a new Wireless On-Board Module, Unknown is displayed under the Vehicle ID column to indicate that a vehicle has not been assigned to the Wireless On-Board Module. If the Wireless On-Board Module is connected to a vehicle that is not currently in the database, you need to add both the vehicle and DriveRight to the database for FMS to download through the Wireless On-Board Module successfully. Note: Only one wireless download process is allowed at a time. If you select Start Manual Wireless Download from the Wireless Menu while an automatic wireless download is in progress or the Wireless Download Status dialog box is currently displaying, the Do You Want to Suspend Automatic Wireless Download dialog box displays. If you click Yes, the Automatic Download will be suspended until the manual download is completed. If the duration period for the Automatic Download expires before the manual download has finished, the Automatic Download will not take place for that day. Back to FMS Quick Reference Menu | Wireless Quick Reference Menu Home | Getting Started | Quick Reference | Menu Commands | Troubleshooting How to Select an Operating Region The Select Operating Region dialog box lets you select an operating region to the wireless device(s). Selecting a region adjusts the operating legal power of the wireless device(s). 1. Select Select Operating Region from the Wireless Menu. The Select Operating Region dialog box displays. The Select Operating Region dialog box displays automatically the first time you select Add New Base Station, Add New Wireless On-Board Module, or Upgrade Firmware from the Wireless Menu. The same operating region selection applies to all wireless devices added to the database. 66 DriveRight FMS Help 2. Select among the three choices displayed: North America, Europe, or Other. The operating region determines the power level of the wireless devices. Select Europe if the power levels of the wireless devices must not exceed CE certification requirements of less than 10 dBm. Select North America if the power levels of the wireless devices must not exceed FCC or IC certification requirements of less than 30 dBm. Select Other if the operating region is not North America or Europe. 3. Click OK to save the operating region information or click Cancel to exit without saving. Note: Changing the operating region at any time only affects the settings of the subsequently added wireless devices, not the ones that have been previously added to the system. To reconfigure the setting for previously added devices, remove the wireless device(s) from the Wireless Devices database table in the Database menu, reconnect the device(s), change the operating region for the device(s), then add the wireless device(s) back into the database. Back to FMS Quick Reference Menu | Wireless Quick Reference Menu Home | Getting Started | Quick Reference | Menu Commands | Troubleshooting How to Upgrade Firmware The Upgrade Firmware dialog box lets you update the firmware for both the wireless Base Station and Wireless On-Board Modules. Note: To upgrade the firmware, connect the wireless device(s) to the USB port(s) of the computer. Both the Wireless On-Board Module and the Base Station share the same firmware. To upgrade the firmware: 1. Select Upgrade Firmware from the Wireless Menu. If this is the first time any wireless device has been connected to FMS, the Select Operating Region dialog box displays. 67 DriveRight FMS 3.7.2 User's manual 2. Select among the three choices displayed: North America, Europe, or Other. The operating region determines the power level of the wireless devices. Select Europe if the power levels of the wireless devices must not exceed CE certification requirements of less than 10 dBm. Select North America if the power levels of the wireless devices must not exceed FCC or IC certification requirements of less than 30 dBm. Select Other if the operating region is not North America or Europe. Once an operating region has been selected, the Upgrade Firmware dialog box displays. 3. Select a wireless device that you would like to upgrade from the Select Device to Upgrade drop-down list. The device is listed either as Base Station or Wireless On-Board Module. If you have multiple Base Stations connected, select the Base Station by its position. 4. Click Upgrade if the Current Firmware Version is not the same as the Latest Firmware Version to upgrade the device firmware. A dialog box is displayed to confirm that the firmware has been upgraded successfully: 68 DriveRight FMS Help 5. Click OK to exit the dialog box. 6. Click Refresh if you have connected another device to your computer. The Select Device to Upgrade drop-down list refreshes to include the newly connected device(s). 7. Click Close once you are finished upgrading all the wireless devices. Back to FMS Quick Reference Menu | Wireless Quick Reference Menu Home | Getting Started | Quick Reference | Menu Commands | Troubleshooting Menu Commands Menu Commands Menu The following commands are available in the Main Menu: File Menu Setup Menu DriveRight Menu CarChip Menu SmartCard Menu Wireless Menu Database Menu Reports Menu Mapping Menu Help Menu Back to Home Home | Getting Started | Quick Reference | Menu Commands | Troubleshooting 69 DriveRight FMS 3.7.2 User's manual File Menu File Menu The following commands are available in the File Menu: Backup Restore Import Export Print Print Preview Print Setup Clear Screen Exit Back to Menu Commands Home | Getting Started | Quick Reference | Menu Commands | Troubleshooting Backup The Backup command is used to archive old data as a zip file. The backup files are stored in the Backup sub-directory in the DriveRight FMS install directory. The Backup sub-directory is created the first time you back up your data. The backup zip files are named based on the start and end dates chosen for the backup. For example, if you pick the dates between March 6, 2003 and March 27, 2003, the backup file will be named 6March2003_27March2003.zip. You can configure how much data to keep active after a backup by setting up your Preferences: Backup Options in the Setup menu. Limiting the amount of data in the active database helps prevent the database from growing into an unmanageable size. To backup data: 1. Click Backup in the File menu. The Backup Files To dialog box is displayed. 70 DriveRight FMS Help 2. From the Backup Files To dialog box select the folder where the backup file will be written. The Backup Options dialog box is displayed. Note: The Backup Options dialog box will not be displayed the first time you back up DriveRight data. 3. In the Backup Options dialog box check your last backup date and specify whether to backup the whole database or only those records falling within a specified time period. The start date will always be initialized to the last backup date. 4. Click OK to initiate the backup or click Cancel to exit the dialog box without backing up your database. 5. When the backup is finished, click OK to return to the program. 71 DriveRight FMS 3.7.2 User's manual See Also: Restore Preferences: Backup Options Back to File Menu Home | Getting Started | Quick Reference | Menu Commands | Troubleshooting Restore The Restore command is used to get a previously Backed up data back into the active database. In this process you can pick one or more tables to be restored. To restore data: 1. Click Restore in the File menu. The Restore Files From dialog box is displayed. 2. From the Restored Files From dialog box select a single zip file to restore, and then click Restore. DriveRight FMS unzips the file and displays all the tables in the dialog, and displays the following dialog box: 72 DriveRight FMS Help Note: You can only restore one .zip file at a time. Note: The backup file filename is based on the start and end dates chosen for the backup. 3. You can either restore all the database tables or restore individual database tables. Click Yes in the dialog box to restore all the tables. Click No to restore selected database tables. 4. If you are restoring selected database tables, select each table to be restored. Hold down the Control key on your keyboard to select multiple tables. When you have finished making your selection, click Restore to restore the tables or click Cancel to exit without restoring the tables. 5. When the files have been restored, click OK to return to the program. See Also: Backup Back to File Menu 73 DriveRight FMS 3.7.2 User's manual Home | Getting Started | Quick Reference | Menu Commands | Troubleshooting Import Menu Import Menu Use the Import Menu options to import DriveRight database data into DriveRight. Import: FTP Import Import: Import Data From Back to File Menu Home | Getting Started | Quick Reference | Menu Commands | Troubleshooting Import: FTP Import FTP (File Transfer Protocol) Import allows you to import DriveRight data from a remote site. Use this procedure for FTP Import only. Use the Import: Other Import Commands procedure for all other import commands. Note: Before you start this operation, contact your systems administrator for your FTP account information. To use FTP Import: 1. Select Import from the File Menu. 2. Select FTP Import from the Import drop-down menu. The FTP Import dialog box is displayed. 74 DriveRight FMS Help 3. In the FTP HostName edit box, type the name of the FTP server that you want to import the database tables from. eg: toolbox.davisnet.com 4. In order to access the FTP site you must have a user account on the FTP site. Enter your user name and password in the edit boxes. 5. In the Remote Path edit box, you can enter a specific directory path in the FTP server. 6. Default port for the FTP site is 21. Use the default port unless the FTP site listens on a different port. 7. Default connection to the FTP site is active mode. Some FTP sites allow only passive mode connections.(check the passive mode check box in that case). For details, contact your system administrator. 8. Click Import. The following FTP Import dialog box displays, which displays the directories and files located at the specified location on the FTP server. 75 DriveRight FMS 3.7.2 User's manual 9. Locate and select the sub-directory named for the DriveRight FMS location from which you want to import the database tables. Click Import to open the directory. 10. Locate and select the zip file containing the database tables you wish to import. Click Import to import the tables. 11. When the files have been successfully imported, click OK to return to the program. Note: You can quit at anytime during importing by clicking the Cancel button. See also: Import: Other Import Commands Back to File Menu | Import Menu Home | Getting Started | Quick Reference | Menu Commands | Troubleshooting Import: Import Data From Use the Import tables command to import individual DriveRight Tables into your database. This is the procedure for all import commands except FTP Import. To import data: 76 DriveRight FMS Help 1. Select Import in the File Menu. 2. Select the table you wish to import (Drivers, Vehicles, Trips, etc.) from the list. 3. When the Import dialog box displays, go to the directory where the file to be imported are located. Select the file to be imported and click Import to import the data or click Cancel to exit without importing. See also Import: FTP Import Back to File Menu | Import Menu Home | Getting Started | Quick Reference | Menu Commands | Troubleshooting Export Menu Export Menu Use the export menu options to export DriveRight FMS data. FTP Export - Use the FTP Export command to export database data to a remote site. 77 DriveRight FMS 3.7.2 User's manual Export GPS to Mapping Software - Use the Export GPS to Mapping Software command to export GPS data in a format designed to be imported into mapping software. Export Accidents to Mapping Software - Use the Export Accidents to Mapping Software command to export accident GPS data in a format designed to be imported into mapping software. Other Export Commands - Use the other export commands to export the indicated type of data in a tab-delimited text file. Back to File Menu Home | Getting Started | Quick Reference | Menu Commands | Troubleshooting Export: FTP Export FTP (File Transfer Protocol) Export shows all the available database tables that you want to export to the FTP site. By default all tables are selected. You can un-check the tables that you don’t want to export. Note: Before you start this operation, contact your systems administrator for your FTP account information. Steps to follow: 1. Select Export in the File Menu. 2. Select the FTP Export from the menu list. The FTP Export dialog box is displayed. 78 DriveRight FMS Help 3. In the FTP Host Name box, type the name of the FTP server that you want to export the database tables. 4. Enter your user name and password in the appropriate boxes. To access the FTP site you must have a user account on the FTP site. 5. Enter a specific directory path in the FTP server to which to export your files in the Remote Path box 6. Enter a port number in the Port box. The default port for the FTP site is 21. Use the default port unless the FTP site listens on a different port. 7. Click Use Passive Mode if the FTP site uses passive mode. The default connection to the FTP site is active mode. Some FTP sites allow only passive mode connections. Check the Passive Mode check box in that case. For details, contact your system administrator. 8. Select the database tables to be exported by clicking the box for each table. Click a second time to de-select the table. 9. Select the Export data between box to specify the time interval you want to export. The default start date for the interval is the last date of export. The default end date is the current date. You can change the start and end dates as required. If you have exported data previously, the last date of export is displayed in the dialog box. 10. Click Export once you are done with the above steps or click Cancel to exit without exporting data. The program creates a sub-directory with your current location name on the FTP 79 DriveRight FMS 3.7.2 User's manual site, if it doesn't already exist, and then exports a ZIP file to the sub-directory. The default name for the export ZIP file is "day" + "month" + "year".zip (20jan2003.zip). Back to File Menu | Export Menu Home | Getting Started | Quick Reference | Menu Commands | Troubleshooting Export: GPS to Mapping Software To export GPS data: 1. Select Export in the File Menu. 2. Select GPS to Mapping Software in the drop-down Export menu. The GPS Fields dialog box is displayed. 3. Click Select All to check all fields. Click Clear All to clear all fields. Click in the box for each field to toggle the check on and off. Note: Only the checked GPS fields will be exported. These key fields should always be selected: GPS DateTime, Speed, High Speed, Latitude and Longitude. 4. Click OK in the GPS Fields box to continue, click Cancel to exit. If you click OK, the Export GPS To dialog box is displayed. 80 DriveRight FMS Help 3. The default file name is GPS.TXT and the default directory is the DriveRight FMS install directory. You can edit or change the file name directly in the text box. You can also change the directory in which the exported GPS data file will be saved. 4. Click Set Filter to narrow the selection of GPS data to be exported. 5. Click Browse to view the GPS data before you export it. 6. Click OK when you are ready to export the GPS data or click Cancel to exit without exporting data. If you click OK, the exported GPS data will be saved in a file ready to be imported into your mapping software. See also: Import GPS Data Into MapPoint Back to File Menu | Export Menu Home | Getting Started | Quick Reference | Menu Commands | Troubleshooting Export: Accidents to Mapping Software To export accident log data: 1. Select Accident to Mapping Software from the Export command in the File Menu. The Export Accidentlogs To dialog box is displayed. 81 DriveRight FMS 3.7.2 User's manual 2. Select the file directory in which to save the accident log files. 3. Verify the file name for the accident log file. You can edit the name in the dialog box if desired. 4. Click Export to create the accident log data file or click Cancel to exit. If you click OK, the exported Accident Log data will be saved in a file ready to be imported into your mapping software. To import data into MapPoint: 1. Start the MapPoint application. 2. Select Import Data Wizard from the Data menu. 3. Using the File dialog box find select the ACCIDENTLOGS.TXT file and click on Open. 4. "Tab" should be selected to separate the data. Click Next. 5. All the fields you exported will appear in the next dialog. Column headings are included and should be detected by the program. All the columns should have <Other Data> as their data type except Lat and Long. Check to make sure the Lat and Long were detected correctly. If they are not, correct them. Click Finish. 6. Select Multiple Symbol and click Next. These instructions show you how to color code accident log points by speed at T0. T0 is the middle point of the accident log. 7. In "Select the data filed or column to map" list, select time_TO. In "Divide the data you chose above by" list, select <None>. In "Show the data by" list, select Latitude & Longitude. Click Next. 8. Enter the speed divisions you want to use and the color for each division. 9. Click Finish to plot the points. 82 DriveRight FMS Help 10. In the left frame, right click on "time_T0 by Latitude & Longitude". Select "Properties". Open the Balloon tab and select time_T0, accidentDateTime and any other fields you want to view. 11. Zoom in enough to see individual points, right click on a point, and pick "Show Information", to look at data for that particular point. 12. MapPoint allows you to navigate around on the map pretty well. Some useful keystrokes are ‘+’ to zoom in and ‘-‘ to zoom out. Also, you can draw a box around an area and then click in it to zoom into it. You can scroll the map using your mouse by just positioning the mouse cursor on the side of the map you want to scroll into. Back to File Menu | Export Menu Home | Getting Started | Quick Reference | Menu Commands | Troubleshooting Export: Export Data To Use the Export "data type" command to export the data in the database to a file. The exported files are in a tab-delimited text file format and can be used to exchange information within your company, with your clients, etc. To export data: 1. Select Export in the File Menu. 2. Select the data type you wish to export (Drivers, Vehicles, Trips, Costs, etc.) from the drop-down menu. The Export "data type" To window is displayed. The Export Trips To window is shown here as an example. 3. Create a name for the file you wish to export on the Export File Name box (for example: Trips.txt). 83 DriveRight FMS 3.7.2 User's manual 4. Use the browse function in the Export Data Type To dialog box to select a destination where you wish to place the file. 5. In some cases, you can use the Set Filter option to more specifically specify the data to be exported (for example: export only information related to one driver, or a group, or a period of time, etc.). 6. Ivied the file before exporting by clicking Browse . This will give you the opportunity to view the selected records that will be exported. 7. If the data is correct, you can click Export to create the export data file. Back to File Menu | Export Menu Home | Getting Started | Quick Reference | Menu Commands | Troubleshooting Print Use the Print command to print a DriveRight report that is displayed on your screen. To print: 1. Click Print in the File menu. The print dialog box appears. 2. Select your desired print options. 3. Click OK to print or click Cancel to exit the dialog box without printing. Note: The Print command is only enabled when a report is being displayed. Back to File Menu Home | Getting Started | Quick Reference | Menu Commands | Troubleshooting Print Preview To preview a print job: 1. On the File menu, click Print Preview. 2. Use the buttons on the toolbar to look over the page or make adjustments before printing. Back to File Menu Home | Getting Started | Quick Reference | Menu Commands | Troubleshooting 84 DriveRight FMS Help Print Setup To setup your print options: 1. On the File menu, click Print Setup. 2. Select your desired print options. 3. Click OK to save the settings or click Cancel to exit the dialog box without saving. Back to File Menu Home | Getting Started | Quick Reference | Menu Commands | Troubleshooting Clear Screen Use the Clear Screen command to clear reports from the main program window. To clear the screen: 1. Click Clear Screen in the File menu. The main program window is cleared. 2. You can also use the Clear Screen icon to clear the screen: Back to File Menu Home | Getting Started | Quick Reference | Menu Commands | Troubleshooting Exit Use the Exit command to close the DriveRight software. To exit the software: 1. Click Exit in the File menu. The software quits. Back to File Menu 85 DriveRight FMS 3.7.2 User's manual Home | Getting Started | Quick Reference | Menu Commands | Troubleshooting Other File Menu Information Filter for GPS When you are exporting GPS data to mapping software, you can use the Filter command to export only data for a specific driver, a specific DriveRight console, or for a specific time interval. To filter GPS export data: 1. Click Set Filter in the Export GPS To dialog box. The Filter for GPS dialog box appears. 2. Verify the Company Location. Use the Current Location command in the Setup Menu to change the location if necessary. 3. To export data for all drivers and DriveRights, click the Browse All radio button. 4. To export GPS records for a specific driver, click Driver Name and select the driver from the list. 5. To export GPS records for a specific DriveRight, click DriveRight ID and select the DriveRight from the list. 6. To export GPS records for a specific time interval, check GPS Between. Edit the Start Date & Time and the End Date & Time as desired. 7. To export GPS records with a high speed over a specified speed, enter a speed in the High Speed >= text box. 8. Click OK to set the filter or click Cancel to exit without changing the filter. The Export GPS To dialog box is displayed. 86 DriveRight FMS Help Back to File Menu | Export Menu | Export: GPS to Mapping Software Home | Getting Started | Quick Reference | Menu Commands | Troubleshooting Setup Menu Setup Menu The following commands are available in the Setup Menu: Current Location Users Preferences Host Mode Communications Port - DriveRight Communications Port - CarChip SmartCard Reader Default DriveRight Settings Default CarChip Settings Digital Input Labels Corporate Structure Back to Menu Commands Home | Getting Started | Quick Reference | Menu Commands | Troubleshooting Current Location All data is organized according to location. All information is stored as part of the Current Location. Set the Current Location value properly for proper data storage. Once current location name is set, the corresponding location ID is stored in all the downloads. All operations like database browsing, reporting, etc, are performed with respect to the current location. To change the current location: 87 DriveRight FMS 3.7.2 User's manual 1. Select Current Location command in the Setup Menu. The Set Current Location dialog box is displayed: 2. Select the desired location from the drop-down list. 3. Click Set to change the location or click Cancel to exit without changing the current location. Note: A new location can be added by going to Database->Company Locations, and clicking Add New in the Browser. Back to Setup Menu Home | Getting Started | Quick Reference | Menu Commands | Troubleshooting Users Users Menu The Users Menu commands allow you to log in and to change your password. If you are the Super User you can also browse the list of registered users. Login Browse/Add Users Change Password Back to Setup Menu Home | Getting Started | Quick Reference | Menu Commands | Troubleshooting Users: Login The Users Login command allows you to change the User without exiting the program. You must be a registered user to access program functions. 88 DriveRight FMS Help To change the current user: 1. Select Login from the Users sub-menu in the Setup Menu. The Login dialog box is displayed. 2. Enter your User Name and Password. 3. user. Click OK to log in, or click Cancel to exit the dialog box without changing the current Back to Setup Menu | Users Menu Home | Getting Started | Quick Reference | Menu Commands | Troubleshooting Users: Browse/Add The Users Browse/Add command opens the Users browse window showing you a list of all registered users, including their passwords. From this window you can add new users or edit the privileges of existing users. Note: You must be logged in as the Super User to access this command. To open the Users browse window: 1. Select Browse/Add from the Users command in the Setup Menu. The Users browse window is displayed. 2. Click on Add New to add a new user. 3. To change a user's settings, click on the user in the browse window and then click on Edit. 4. To delete a user, click on the user in the browse window and then click Delete. 5. To print the browse window, click Print. 6. Click Close to exit the window, or click on the close icon in the upper right corner of the window. 89 DriveRight FMS 3.7.2 User's manual See also: Add New User Edit User Back to Setup Menu | Users Menu Home | Getting Started | Quick Reference | Menu Commands | Troubleshooting Users: Change Password The Users Change Password command allows you to change your DriveRight password. To change your password: 1. Select Change Password from the Users command in the Setup Menu. The New Password dialog box is displayed. 2. Enter your new password, then retype your new password. 3. If the retyped password doesn't match, you will be prompted to check the retyped password. Note: In order to change your password the new password and the retyped new password must match exactly. 4. Click OK to change your password or click Cancel to exit the dialog box without changing your password. Back to Setup Menu | Users Menu Home | Getting Started | Quick Reference | Menu Commands | Troubleshooting 90 DriveRight FMS Help Users: Edit Use the Edit command to change user information. User information includes the user name, password and the user's access privileges to functions and data in the software. To edit user information: 1. Select Browse/Add Users from the Users command in the Setup Menu. The Users browse window is displayed. 2. Click Edit located in the lower left corner of the window. The Update User Privileges dialog box is displayed. 3. Configure the desired access privileges for the user. The User Type allows you to make the user a Normal User or a Super User. The DriveRight/CarChip/SmartCard Access Options allow you to limit a user's access to DriveRight, CarChip, and SmartCard. The Application Options allow you to limit a user's access to individual program functions. The Database Table Access Options allow you to limit a user's access to the DriveRight database. 4. Click All Rights to grant all privileges to the user. You can then selectively remove unwanted privileges from the user. 5. Click Clear Rights to remove all privileges from the new user. You can then selectively add desired privileges to the user. 91 DriveRight FMS 3.7.2 User's manual 6. Click Add to add the new user or click Cancel to exit without updating the user information. See also: Users: Browse/Add Users Users: Add New Back to Setup Menu | Users Menu Home | Getting Started | Quick Reference | Menu Commands | Troubleshooting Preferences Menu Preferences Menu You can set the following program preferences in DriveRight FMS: Units Backup Options Download Options Database Browser Back to Setup Menu Home | Getting Started | Quick Reference | Menu Commands | Troubleshooting Preferences: Units The Units dialog box allows you to select the units used for distance and speed and also control the display of the time and date. To set units: 1. Choose Units from the Preferences command in the Setup menu. The Units dialog box appears. 92 DriveRight FMS Help 2. Select the desired distance/speed, date, and time options. 3. Choose OK when you are satisfied with the settings, choose Cancel to exit without changing the settings. Back to Setup Menu | Preferences Menu Home | Getting Started | Quick Reference | Menu Commands | Troubleshooting Preferences: Backup Options Use the Backup Options command to set the number of months of records to keep in the database after every backup. Refer to Active Database Size Recommendations and Database Backup Considerations for more information. To set your download options: 1. Choose Backup Options from the Preferences command in the Setup menu. The Backup Options dialog box displays. 93 DriveRight FMS 3.7.2 User's manual 2. Check the Keep X months of records active in the database after every backup box then select the number of months from the drop down list to keep the selected number of months active in the database after a backup. All data recorded before the specified period of time will be removed from the active database. 3. Click OK to accept backup options or click Cancel to exit the dialog box without saving the changes. See also: Database Backup Considerations Active Database Size Recommendations Back to Setup Menu | Preferences Menu Home | Getting Started | Quick Reference | Menu Commands | Troubleshooting Preferences: Download Options Use the Download Options command to set up the automatic synchronization of the DriveRight's clock after each download and to determine how the software will handle the Driver ID set in the Trip 500AL and DriveRight 600 consoles. To set your download options: 1. Choose Download Options from the Preferences command in the Setup menu. The Download Options dialog box appears. 2. Select Synchronize time and date after every download to have your DriveRight unit's clock automatically reset to match your computer after each download. Note: If you choose this option, all DriveRight consoles included remote units downloaded through host mode will be reset to the computer’s time and date, even if the remote DriveRight is in a different time zone. 3. If you are using DriveRight Trip 500AL or DriveRight 600 consoles, set the DriverID as either the Location ID or the Driver ID. 94 DriveRight FMS Help 4. Select Include last hours of speed and GPS logging to determine number of hours of speed data the recorded by the CarChip that the FMS software keeps. To save database space, CarChip uses the default setting of 1 hour and saves the last hour of GPS and Speed Interval data that gets displayed in the GPS database table. Select this check box and enter the number of hours of speed and GPS logging data you want to keep. Note: The maximum number of hours of speed and GPS logging information that can be downloaded and stored is 9 hours. To minimize download times and limit the amount of database server space used, it is recommended that the default of one hour be used. Note that by increasing the number of hours of speed and GPS logging information that is kept increases the amount of time it takes to download information from the CarChip to the software. 5. Click OK to save the changes, click Cancel to exit without saving. Back to Setup Menu | Preferences Menu Home | Getting Started | Quick Reference | Menu Commands | Troubleshooting Preferences: Database Browser Use the Database Browser commands to change the text font and color and the background color used in the Browser windows. Text Font and Color Background Color Back to Setup Menu | Preferences Menu Home | Getting Started | Quick Reference | Menu Commands | Troubleshooting Host Mode Host Mode Menu Host Mode allows drivers to dial in remotely and download their DriveRight using a modem. Host Mode On Host Mode Setup Remote Modem Setup Back to Setup Menu 95 DriveRight FMS 3.7.2 User's manual Home | Getting Started | Quick Reference | Menu Commands | Troubleshooting Host Mode On This is the mode that your modem should be in when someone wants to call in from outside to transfer data from one or more DriveRight devices. A dialog box appears indicating that the modem is being initialized. After the initialization has been completed successfully, the other party can call in. When the Host Mode is on, all other software operation are suspended. Tip: It’s a good idea to set a schedule for remote drivers to call into the Host computer. For example, setting the rules to call outside business hours, then leaving the computer in Host Mode as the last task of the day will give drivers flexibility to call in. Alternatively, one computer can be dedicated as the Host, and data can be exported from it periodically to another computer where analysis and reporting are performed. • The user connects his modem to the DriveRight (showing the CURRENT screen) using the remote download Kit (item #8188, purchased separately). • The host mode is a well-protected function. You can only communicate as long as a DriveRight is connected to your PC. In all other cases, communication is lost. • For details on how to install a remote modem to enable it to participate in the Host Mode, please consult the instructions accompanying the Remote Download Kit. • The History Window displays status information for downloaded DriveRights. • Hang Up: Generally, you will not need this button because the software will hang up automatically. However, if necessary you can manually hang up the phone using this button. • Reinitialize Modem: Resets the modem initialization. • Exit Host Mode: Exit host mode and resume normal program operation. See also: Host Mode Menu Host Mode Setup Host Mode: Remote Modem Setup Back to Setup Menu | Host Mode Menu Home | Getting Started | Quick Reference | Menu Commands | Troubleshooting Host Mode Setup Host Mode Setup allows you to configure your computer’s modem to accept calls. 96 DriveRight FMS Help To be able to communicate with the DriveRight and transfer data over a modem, the communications port should be defined for your modem. Furthermore, set the modem of your PC to Auto-Answer when there is a call. Refer to your modem manual for Auto-Answer. • Select the COM Port that your modem is connected too. • The default initialization strings are "AT E1 Q0 &B1 &N0 V1" and "ATS0=3" for string 1 and string 2. • Click Detect Modem to detect the serial port to which the modem is connected. • If you are going to download just DriveRight 500 AL and earlier models just check that box. See description below for explanation as to why this is necessary. Note: Because the DriveRight 500 and earlier versions of DriveRight communicate at 2400 baud and the DriveRight 600 communicates at 19,200 baud, you must configure your computer to communicate with either the DriveRight 600 or with earlier models. See also: Host Mode On Host Mode: Remote Modem Setup Back to Setup Menu | Host Mode Menu Home | Getting Started | Quick Reference | Menu Commands | Troubleshooting Remote Modem Setup - Using Hyper Terminal 97 DriveRight FMS 3.7.2 User's manual The external modem at the site where the DriveRight is connected is called the "remote" modem. The DriveRight owner, when he wants to download his information, connects the DriveRight to this modem using the interface box and modem adapter included in the Remote Modem Kit. He then turns the modem on, and it will dial the host computer and the download will be initiated. However, before the modem will dial up the host computer and download correctly it must be set up correctly. The following instructions explain how to do this manually for a US Robotics Courier V. Everything modem and the Windows 95 accessory program Hyper Terminal. In addition, the setups for US Robotics 56K Fax Ext are included. Unfortunately, not all modems have the same command set or act the same way on power up. If you are using a modem other than the one described, read the instructions below and then refer to your specific modem documentation to determine if your modem can be used. Note: When you are asked to type a command, do not type the quotes. Type all commands in upper case. 1. Take the modem out of the box and check that the DIP switches are set in the following way: Switch Number: 1 2 3 4 5 6 7 8 9 10 Switch Setting: 0 0 0 1 1 0 0 1 0 0 Note: 0 is short for OFF and 1 is short for ON. These DIP switches only apply to the US Robotics Courier V. Everything modem. 2. Using the Remote Modem Kit, connect the remote modem to a known serial port, and then turn the modem on. Make sure you use the gray phone cable included in the kit to go from your serial port to the modem. The black phone cable included in the DriveRight Software kit will not work for a modem. 3. Run the Hyper Terminal program. You can find the program in the Start menu under Programs/Accessories/Hyper Terminal. Click on one of the phones in the program group to start the program. 4. Select "Properties" from he File menu and make sure you have the correct serial port selected. If you are not sure, you will have to use trial and error. In most cases "Direct to COM1" or "Direct to COM2" should work. The File/Save As command can be used to save these settings under a name of your choice. You then can click on the phone with this name to start Hyper Terminal next time. 5. Type the letters "AT" and press enter. If you get an OK back, you are communicating with the modem. If you do not, type the following commands. "ATE1V1Q" and press Enter You should now be able to type "AT" and press enter and receive an OK back. You should also be able to see the "A" and the "T" when you type them. If the above test fails, check your connections and then try another COM port by changing your selection in the Properties option in the File menu. 6. Enter the following commands to program the modem. You should receive an "OK" after each one of the commands below unless stated otherwise. "ATS13=16" and press Enter Now, you will program the phone number to be dialed. In the example below, the host computer is connected to 780-6455. 98 DriveRight FMS Help "AT&Z0=780-6455" and press Enter Now the modem will dial this number when it is turned on. "AT&W" and press Enter This setup is now saved in non-volatile memory which is loaded when the modem is turned on. "AT&M4" and press Enter This tells the modem to use a standard error detection protocol which should be used to insure the data transfer is done error free. "ATE0Q1" and press Enter You will not receive an "OK" after this command. "Q1" tells the modem to operate in "quiet" mode. This is necessary so the DriveRight does not interpret any responses from the modem as commands. Note also, command will no longer be echoed. If you type AT Enter, you will see nothing; however, this is what we want and why we waited to do this on the last step. 7. Exit Hyper Terminal: You are now ready to test your programming. If you have two separate phone lines and the DriveRight software you can completely test your setup. Plug in a working phone line to the remote modem and the "correct" phone line into your computers internal or external modem. The "correct" line is the one belonging to the number you programmed in step 5. Run the DriveRight software and put it in "host" mode by selecting "Host Mode On" in the Setup/Host Mode menu. Connect the DriveRight to be downloaded to the external modem through the interface box and the black cable, not the gray cable you used to program the modem. Turn the modem off and then back on again. The modem should dial the host, the computer should answer the call and download the data. The DriveRight owner knows the download is completed when the CD light goes off. Under any circumstances, the download should be completed in no more than 5 minutes. Below are the modem configurations for the US Robotics modems used during testing. FIELD MODEM: For DriveRight 500 make sure &N3 (if DriveRight 600 not selected in Host Mode Setup &N0 will also work.) For DriveRight 600 make sure &N0 or &N10. USRobotics Courier V.Everything Settings... B0 C1 E0 F1 M1 Q1 V1 X1 BAUD=19200 PARITY=N WORDLEN=8 DIAL=TONE ON HOOK TIMER &A1 &B0 &C1 &D2 &G0 &H0 &I0 &K1 &L0 &M4 &N3 &P0 &R1 &S0 &T5 &U0 &X0 &Y1 %N6 #CID=0 S00=000 S01=000 S02=043 S03=013 S04=010 S05=008 S06=002 S07=060 S08=002 S09=006 S10=014 S11=070 S12=050 S13=016 S14=001 S15=000 S16=000 S17=000 S18=000 S19=000 S20=000 S21=010 S22=017 S23=019 99 DriveRight FMS 3.7.2 User's manual S24=150 S25=005 S26=001 S27=000 S28=008 S29=020 S30=000 S31=000 S32=009 S33=000 S34=000 S35=000 S36=000 S37=000 S38=000 S39=000 S40=000 S41=000 S42=126 S43=200 S44=015 S45=000 S46=000 S47=000 S48=000 S49=000 S50=000 S51=000 S52=000 S53=000 S54=064 S55=000 S56=000 S57=000 S58=000 S59=000 S60=000 S61=000 S62=000 S63=000 S64=000 S65=000 S66=000 S67=000 S68=000 S69=000 S70=000 LAST DIALED #: T293-3529 Switch 4,5, and 8 ON all others off. FIELD MODEM: For DriveRight 500 make sure &N3. For DriveRight 600 make sure &N0 or &N10. U.S. Robotics 56K FAX EXT Settings... B0 E0 F1 M1 Q1 V1 X1 Y0 BAUD=19200 PARITY=N WORDLEN=8 DIAL=TONE ON HOOK CID=0 &A1 &B0 &C1 &D2 &G0 &H0 &I0 &K1 &M4 &N10 &P0 &R1 &S0 &T5 &U0 &Y1 S00=004 S01=000 S02=043 S03=013 S04=010 S05=008 S06=004 S07=060 S08=002 S09=006 S10=014 S11=070 S12=050 S13=016 S15=000 S16=000 S18=000 S19=000 S21=010 S22=017 S23=019 S25=005 S27=000 S28=008 S29=020 S30=000 S31=128 S32=002 S33=000 S34=000 S35=000 S36=014 S38=000 S39=000 S40=001 S41=000 S42=000 LAST DIALED #: T2933529 SWITCH 4,8 ON all others OFF. HOST MODEM: U.S. Robotics 56K FAX EXT Settings... B0 E1 F1 M1 Q0 V1 X1 Y0 BAUD=19200 PARITY=N WORDLEN=8 DIAL=TONE ON HOOK CID=0 &A1 &B1 &C1 &D2 &G0 &H0 &I0 &K1 &M4 &N0 &P0 &R1 &S0 &T5 &U0 &Y1 100 DriveRight FMS Help S00=004 S01=000 S02=043 S03=013 S04=010 S05=008 S06=004 S07=060 S08=002 S09=006 S10=014 S11=070 S12=050 S13=000 S15=000 S16=000 S18=000 S19=000 S21=010 S22=017 S23=019 S25=005 S27=000 S28=008 S29=020 S30=000 S31=128 S32=002 S33=000 S34=000 S35=000 S36=014 S38=000 S39=000 S40=001 S41=000 S42=000 LAST DIALED #: SWITCH 3,8 ON all others OFF. DriveRight Software Host Mode Setup Inititialization String 1: AT E1 Q0 &B1 &N0 V1 Inititialization String 2: ATS0=3 See also: Host Mode On Host Mode Setup Back to Setup Menu | Host Mode Menu Home | Getting Started | Quick Reference | Menu Commands | Troubleshooting Communications Port - DriveRight Settings Use the Communications Port - DriveRight Settings command to select the communications port used to connect a DriveRight device to your computer. To select a communications port: 1. Select the Communications Port - DriveRight command in the Setup Menu. The Communications Port Settings dialog box is displayed: 101 DriveRight FMS 3.7.2 User's manual 2. Select the communications port from the list provided. DriveRight FMS supports COM1 through COM8. 3. If you are not sure which communication port you are using, connect your DriveRight to your computer: o Press the Mode button on the DriveRight if necessary to make sure the device is on. o Click Auto Detect o If the DriveRight is found by the software, the following message is displayed and the correct communications port is selected in the dialog box. 4. Click OK to save the serial port selection or click Cancel to exit the dialog box without changing the port. Note: If you are working on a network, ask the network administrator to assist you in selecting the correct communications port. Back to Setup Menu Home | Getting Started | Quick Reference | Menu Commands | Troubleshooting Communications Port - CarChip Settings Use the Communications Port - CarChip Settings command to select the communications port used to connect a CarChip device to your computer. 102 DriveRight FMS Help To select a Communications port: 1. Choose the Communications Port - CarChip from the Setup Menu. The Communications Port Settings dialog box is displayed: 2. Select USB if using a USB connection or the correct COM port for the serial port connection from the list provided. DriveRight FMS supports USB and COM1 through COM8. 3. If you are not sure which communications port you are using, connect your CarChip to your computer, click the Auto Detect button. If the CarChip is found by the software, the following message is displayed and the correct communications port is selected in the dialog box. 4. Click OK to save the communications port selection or click Cancel to exit the dialog box without changing the communications port information. Note: If you are working on a network, ask the network administrator to assist you in selecting the correct communications port. Back to Setup Menu Home | Getting Started | Quick Reference | Menu Commands | Troubleshooting Default DriveRight Settings Menu Default DriveRight Settings Menu Use the Default DriveRight Settings Wizard to create default device settings which are used by all new DriveRights added to the system. Use the View/Set command to review or edit the default settings. 103 DriveRight FMS 3.7.2 User's manual View/Set Setup Wizard Back to Setup Menu Home | Getting Started | Quick Reference | Menu Commands | Troubleshooting Default DriveRight Settings Wizard The values entered in this setup are used as default settings when you add new DriveRight devices to the database. If you click this menu option , a dialog box pops up that contains a brief description about the Default DriveRight Settings Wizard. To edit the Default DriveRight Settings: 1. Select Default DriveRight Settings in the Setup Menu. 2. Select Setup Wizard from the list of commands. The Default DriveRight Wizard dialog box is displayed. 3. If you select OK, the Default DriveRight Settings Wizard takes you through the dialog boxes listed below: 104 • Unit Settings: Select the date, time and unit modes and click OK. • Safety Settings: Enter the speed, acceleration and deceleration limits and click OK. • Timer Settings:Enter the trip stop time and driver log out time and click OK. • Alarm Settings: Select the alarm mode. Warn if not logged in is an option. DriveRight FMS Help • Security Settings: Enter the security code (PIN code). Tamper indicator is an option. Disable Console Login is also an option. • GPS Settings: Create default GPS settings that can be used by all the vehicles in your fleet. 4. Once you are finished with the above five dialog boxes, a tab control dialog box appears with all the above six dialog boxes. You can navigate through them, change any of the settings, and save the settings by clicking OK. Back to Setup Menu | Default DriveRight Settings Menu Home | Getting Started | Quick Reference | Menu Commands | Troubleshooting Default DriveRight Settings View/Set Default DriveRight Settings View/Set Use the Default DriveRight Settings View/Set command to view or edit the DriveRight FMS default DriveRight console settings.. To view or edit the Default DriveRight Settings: 1. Select Default DriveRight Settings in the Setup Menu. 2. Select View/Set from the list of commands. The Default DriveRight Settings dialog box is displayed. 105 DriveRight FMS 3.7.2 User's manual 3. Select a tab to view or edit the following default settings: • Unit Settings: Select the date, time and unit modes and click OK. • Safety Settings: Enter the speed, acceleration and deceleration limits and click OK. • Timer Settings:Enter the trip stop time and driver log out time and click OK. • Alarm Settings: Select the alarm mode. Warn if not logged in is an option. • Security Settings: Enter the security code (PIN code). Tamper indicator is an option. • GPS Settings: Turn the GPS logging and subsequent mapping feature on and off and select mapping features. Works only with DriveRight 600 units with GPS modules. 4. When your are finished, click OK to save any changes or click Cancel to exit without saving changes. Back to Setup Menu | Default DriveRight Settings Menu Home | Getting Started | Quick Reference | Menu Commands | Troubleshooting Unit Settings 106 DriveRight FMS Help Use this command to create default unit settings that can be used by all the vehicles in your fleet. To set default unit settings: 1. Select View/Set from the Default DriveRight Settings submenu from the Setup menu. The Unit Settings tab in the Default DriveRight Settings dialog box is displayed. 3. Edit the unit settings for your fleet. o Date Mode settings control the way month, day, and year are displayed. o Time Mode settings control the time of day display. o Distance Unit settings allows you to select miles and miles per hour or kilometers and kilometers per hour as your speed and distance units. 4. Click OK to save the settings, click Cancel to exit without saving the settings, or click on another tab to make additional changes to the DriveRight default settings. See also: Safety Settings Timer Settings Alarm Settings Security Settings GPS Settings 107 DriveRight FMS 3.7.2 User's manual Back to Setup Menu | Default DriveRight Settings | Default DriveRight Settings - View/Set Home | Getting Started | Quick Reference | Menu Commands | Troubleshooting Safety Settings Use this command to create default DriveRight safety settings. To set default safety settings: 1. Select View/Set from the Default DriveRight Settings submenu from the Setup menu The Default DriveRight Settings dialog box is displayed. 2. Select the Safety Settings tab near the top of the dialog box. The safety options are displayed. 4. Set the Speed Limit, which is the maximum allowable vehicle speed. 5. Set the Accel Limit, which is the maximum allowable rate of acceleration. 6. Set the Decel Limit, which is the maximum allowable rate of deceleration. 7. Click OK to save the settings, click Cancel to exit without saving the settings, or click on another tab to make additional changes to the DriveRight default settings. See also: Unit Settings 108 DriveRight FMS Help Timer Settings Alarm Settings Security Settings GPS Settings Back to Setup Menu | Default DriveRight Settings | Default DriveRight Settings - View/Set Home | Getting Started | Quick Reference | Menu Commands | Troubleshooting Timer Settings Use this command to create default timer settings that can be used by all the vehicles in your fleet. To set Fleet default timer settings: 1. Select View/Set from the Default DriveRight Settings submenu from the Setup menu. The Default DriveRight Settings dialog box is displayed. 2. Select the Timer Settings tab near the top of the dialog box. The timer options are displayed. 3. Set the trip stop time in minutes. The trip stop time is the number of minutes that elapse after a vehicle stops before the DriveRight stops recording trip data. 109 DriveRight FMS 3.7.2 User's manual 4. Set the Driver ID Logout Time in minutes. Use a logout time of "0" to never log out the driver. The Driver ID Logout Time is the number of minutes that elapse after a vehicle stops before the driver is logged out of the DriveRight. 5. Click OK to save the settings, click Cancel to exit without saving the settings, or click on another tab to make additional changes to the DriveRight default settings. See also: Unit Settings Safety Settings Alarm Settings Security Settings GPS Settings Back to Setup Menu | Default DriveRight Settings | Default DriveRight Settings - View/Set Home | Getting Started | Quick Reference | Menu Commands | Troubleshooting Alarm Settings Use this command to create default alarm settings that can be used by all the vehicles in your fleet. The alarm settings control the audible alarms used to indicate when the safety settings thresholds are exceeded. To set default alarm settings for all DriveRight devices: 1. Select View/Set from the Default DriveRight Settings submenu in the Setup Menu. The Default DriveRight Settings dialog box is displayed. 2. Select the Alarm Settings tab near the top of the dialog box. The Alarm settings options are displayed. 110 DriveRight FMS Help 4. Set the Alarm Mode to On or Off. This controls audible alarm reporting by the DriveRight device. 5. Enable "Warn if not Logged in" to have the DriveRight device give an audible alarm if the vehicle is operated without the driver first entering his or her driver code. 6. Click OK to save the Alarm Settings, click Cancel to exit without saving the settings, or click on another tab to make additional changes to the DriveRight default settings. See also: Unit Settings Safety Settings Timer Settings Security Settings GPS Settings Back to Setup Menu | Default DriveRight Settings | Default DriveRight Settings - View/Set Home | Getting Started | Quick Reference | Menu Commands | Troubleshooting Security Settings Use this command to create default DriveRight security settings. 111 DriveRight FMS 3.7.2 User's manual To set default security settings: 1. Select View/Set from the Default DriveRight Settings submenu from the Setup menu The Default DriveRight Settings dialog box is displayed. 2. Select the Security Settings tab near the top of the dialog box. The security options are displayed. 3. Set the Pin Code, which is required to set the calibration and alarm settings on the DriveRight device. 4. If desired, you can enable the tamper indicator. If enabled, the tamper indicator on the DriveRight LCD screen will be displayed when a tamper event has been detected. 5. If desired, you can disable Login from the console so that a driver can log into the device using only the SmartCard. Check the Disable Login on Console box to disable console Login. This application is available for DriveRight 600E devices only. 6. Click OK to save the settings, click Cancel to exit without saving the settings, or click on another tab to make additional changes to the DriveRight settings. 7. Unit Settings Security Settings Timer Settings Alarm Settings GPS Settings Back to Setup Menu | Default DriveRight Settings | Default DriveRight Settings - View/Set 112 DriveRight FMS Help Home | Getting Started | Quick Reference | Menu Commands | Troubleshooting GPS Settings - Default DriveRight Settings Use this command to create default GPS settings that can be used by all the vehicles in your fleet. Note: Even if this feature is toggled on an off, it will only work with corresponding DriveRight 600 units with GPS modules. To set default GPS Logging settings: 1. Select View/Set from the Default DriveRight Settings submenu from the Setup menu The Default DriveRight Settings dialog box is displayed. 2. Select the GPS Settings tab near the top of the dialog box. The GPS options are displayed. 3. Select On to turn the GPS logging feature on for all the units with a GPS module. Select Off to turn off the GPS feature for all DriveRight Devices. Select DriveRight Speed Only to log and track only the DriveRight Speed. This feature logs and tracks only the DriveRight speed for DriveRight 600 devices that are not assembled with a GPS module. 4. If On or the DriveRight Speed only button has been selected, select the Logging interval time and corresponding time unit in the Log Data Every text field. The amount of logging hours this used for this feature are displayed in Logging Hours. 5. Click OK to save the settings, click Cancel to exit without saving the settings, or click on another tab to make additional changes to the DriveRight default settings. See Also: Unit Settings 113 DriveRight FMS 3.7.2 User's manual Safety Settings Timer Settings Alarm Settings Security Settings Back to Setup Menu | Default DriveRight Settings | Default DriveRight Settings - View/Set Home | Getting Started | Quick Reference | Menu Commands | Troubleshooting Default CarChip Settings Use the Default CarChip Settings command to view or edit the DriveRight FMS defaults for the CarChip device settings.. To view or edit the Default CarChip Settings: 1. Select Default CarChip Settings in the Setup Menu. The Default CarChip Settings dialog box is displayed. 2. You can edit the settings for Hard Braking, Acceleration, Speed Bands, and Engine Parameters. • 114 The CarChip settings for Hard Braking Threshold, Hard Acceleration Threshold, and Speed Band 3 are equivalent to the DriveRight settings for Decel Limit, Accel Limit, and Speed Limit. DriveRight FMS Help • Set the Hard Braking Threshold to equal the Decel Limit used by DriveRight Devices. • Set the Hard Acceleration Threshold to equal the Accel Limit used by DriveRight Devices. • Set Speed Band 3 to equal the Speed Limit used by DriveRight Devices. 3. When your are finished, click OK to save any changes or click Cancel to exit without saving changes. Back to Setup Menu Home | Getting Started | Quick Reference | Menu Commands | Troubleshooting Digital Input labels You can identify the two digital inputs signals available on a DriveRight 600 using this dialog box. Digital inputs are any variable from the vehicle that produces a high and a low voltage input. The DriveRight device records these high and low voltage differences for the inputs that you select. These digital inputs get incorporated into various database displays and reports throughout the software, such as the Accident Log Report, the Trip Database and the GPS database. To change the digital input labels: 1. Click Digital Input Labels in the Setup menu. The Digital Input Labels dialog box is displayed. 2. Edit the labels used for digital input 1 and digital input 2. The following is a list of possible labels used as digital inputs: • Seat belts • Headlights • Braking • Lights 115 DriveRight FMS 3.7.2 User's manual • Windshield wipers Note: Depending on the selected digital input, extra setup between the DriveRight and the vehicle may need to happen to monitor these digital inputs correctly. For Example: To make "Seat belts" a digital input, locate a wire bundle underneath the driver's set, pick a wire from the bundle and test it's voltage during buckling and buckling. Do this until you find the wire that goes from 0 to 12 volts when buckling and buckling and connect it to the green wire of the adapter cable supplied with the DriveRight. Connecting other aspects of your vehicle to be monitored by the DriveRight system varies. 3. Click OK to save the changes or click Cancel to exit without saving the changes. Back to Setup Menu Home | Getting Started | Quick Reference | Menu Commands | Troubleshooting Corporate Structure The Corporate Structure dialog box allows you to set up reporting structure for all the locations listed in a database. The resulting location structure can be used as a tool for displaying the Driver Safety Score Report, breaking up driver and fleet information based on locations and the reporting structure. To create and edit the corporate reporting structure: 1. Select Corporate Structure from the Setup menu. The Corporate Structure dialog box is displayed. 116 DriveRight FMS Help 2. Use the location combo boxes to create or edit the corporate location structure. Select a location from the Available Locations in Database box and click the >> button to move the Location to into the Corporate Structure box. If a selected location is a root location, meaning it is as the top of the corporate structure, Select the Root Location check box. To assign a location under a location, highlight the location with a higher hierarchical title in the Corporate Structure box, select a location from the Available Locations In Database box and click the >> button. The selected location displays underneath the highlighted location. To remove a location, or hierarchy of locations, select a location and click the << button. This removes the location from the corporate structure. If there are gaps or unknown reporting structures in certain structure hierarchies, the NULL location may be used. For example, if a location reports indirectly, or through unknown paths to higher hierarchical location, the NULL location can be used to signify the unknown path or location. 117 DriveRight FMS 3.7.2 User's manual 3. Complete your corporate structure and click OK to save the corporate information, or Cancel to exit without saving the information. Back to Setup Menu Home | Getting Started | Quick Reference | Menu Commands | Troubleshooting Miscellaneous Setup Menu Information Alarm Settings The Alarm Settings stand-alone dialog box is opened by using the Setup Wizard in the Default DriveRight Settings submenu located under the Setup Menu. Use this dialog box to change default alarm settings for DriveRight devices. 1. Edit the default alarm settings as desired: o 118 Set the Alarm Mode to On or Off. This controls audible alarm reporting by the DriveRight device. DriveRight FMS Help o Enable "Warn if not Logged in" to have the DriveRight device give an audible alarm if the vehicle is operated without the driver first entering his or her driver code. 2. Click OK to select the alarm settings and move on to the next dialog box, or click Cancel to exit the Default DriveRight Settings Wizard. Back to Setup Menu | Default DriveRight Settings Menu Home | Getting Started | Quick Reference | Menu Commands | Troubleshooting Background Color The Background Color Dialog box allows you to change the display for all the database information that can be displayed under the Database menu. Use the Background Color command to change the background color for the database browser windows. To edit the browser window background color: 1. Choose Background Color from the Database Browser command in the Preferences command in the Setup menu. The Color dialog box appears. 2. Select the desired background color settings. 3. Choose OK when you are satisfied with the settings, choose Cancel to exit without changing the settings. Back to Setup Menu | Preferences Menu 119 DriveRight FMS 3.7.2 User's manual Home | Getting Started | Quick Reference | Menu Commands | Troubleshooting Background Color The Background Color Dialog box allows you to change the display for all the database information that can be displayed under the Database menu. Use the Background Color command to change the background color for the database browser windows. To edit the browser window background color: 1. Choose Background Color from the Database Browser command in the Preferences command in the Setup menu. The Color dialog box appears. 2. Select the desired background color settings. 3. Choose OK when you are satisfied with the settings, choose Cancel to exit without changing the settings. Back to Setup Menu | Preferences Menu Home | Getting Started | Quick Reference | Menu Commands | Troubleshooting Security Settings Use this Security Settings dialog box as part of Default DriveRight Settings Wizard in the Setup Menu to change default security settings for DriveRight devices. 120 DriveRight FMS Help 1. Set the Pin Code, which is required to set the calibration and alarm settings on the DriveRight device. 2. If desired, you can enable the tamper indicator. If enabled, the tamper indicator on the DriveRight LCD screen will be displayed when a tamper event has been detected. 3. If desired, you can disable Login from the console so that a driver can log into the device using only the SmartCard. Check the Disable Login on Console box to disable console Login. This application is available for DriveRight 600E devices only. 4. Click OK to select the security settings and move on to the next dialog box, or click Cancel to exit the Default DriveRight Settings Wizard. Back to Setup Menu | Default DriveRight Settings Menu Home | Getting Started | Quick Reference | Menu Commands | Troubleshooting SmartCard Reader The SmartCard Reader dialog box lets you test the SmartCard Desktop Reader used to read, download and setup the SmartCards used as part of the DriveRight system for transferring data from the DriveRight back your computer. Note: In order to setup up and test your SmartCard reader, you must install the necessary drivers included with the DriveRight FMS software first. See the FMS Getting Started Guide for more information. To test your SmartCard Desktop Reader device: 121 DriveRight FMS 3.7.2 User's manual 1. Connect your SmartCard Desktop Reader to your computer and insert a SmartCard into the SmartCard Desktop Reader. 2. Select SmartCard Reader from the Setup menu. The SmartCard Reader Setup dialog box is displayed. If the SmartCard Driver is installed properly, "ACS ACR38USB" displays in the Card Reader text box. 3. Click Test Reader to verify that the SmartCard Reader is successfully reading and transmitting the data back to your computer. If the test is successful, the following dialog box is displayed. 4. Click OK and click OK again in the SmartCard Reader Setup dialog box to accept the reader settings. Back to Setup Menu Home | Getting Started | Quick Reference | Menu Commands | Troubleshooting Text Font and Color Use this command to change the font and color used to display data in browse windows. To edit the text font and color: 1. Choose Text Font and Color from the Database Browser command in the Preferences command in the Setup menu. The Text Font and Color dialog box appears. 122 DriveRight FMS Help 2. Select the desired font and color settings. 3. Choose OK when you are satisfied with the settings, choose Cancel to exit without changing the settings. Back to Setup Menu | Preferences Menu Home | Getting Started | Quick Reference | Menu Commands | Troubleshooting Safety Settings Use this dialog box to change default safety settings for DriveRight devices. 123 DriveRight FMS 3.7.2 User's manual 1. Edit the default safety settings as desired: o Set the Speed Limit, which is the maximum allowable vehicle speed. o Set the Accel Limit, which is the maximum allowable rate of acceleration. o Set the Decel Limit, which is the maximum allowable rate of deceleration. 2. Click OK to select the safety settings and move on to the next dialog box, or click Cancel to exit the Default DriveRight Settings Wizard. Back to Setup Menu | Default DriveRight Settings Menu Home | Getting Started | Quick Reference | Menu Commands | Troubleshooting Timer Settings Use this dialog box to change default timer settings for DriveRight devices. 124 DriveRight FMS Help 1. Edit the default timer settings as desired: o Set the trip stop time in minutes. The trip stop time is the number of minutes that elapse after a vehicle stops before the DriveRight stops recording trip data. o Set the Driver ID Logout Time in minutes. Use a logout time of "0" to never log out the driver. The Driver ID Logout Time is the number of minutes that elapse after a vehicle stops before the driver is logged out of the DriveRight. 2. Click OK to select the timer settings and move on to the next dialog box, or click Cancel to exit the Default DriveRight Settings Wizard. Back to Setup Menu | Default DriveRight Settings Menu Home | Getting Started | Quick Reference | Menu Commands | Troubleshooting Default Unit Settings Use this dialog box to change default unit settings for DriveRight devices. This Unit Settings stand-alone dialog box is the first dialog box to display when you select Setup Wizard from the Default DriveRight Settings in the Setup menu. 125 DriveRight FMS 3.7.2 User's manual 1. Edit the default unit settings as desired: o Date Mode settings control the way month, day, and year are displayed. o Time Mode settings control the time of day display. o Distance Unit settings allows you to select miles and miles per hour or kilometers and kilometers per hour as your speed and distance units. 2. Click OK to select the unit settings and move on to the next dialog box, or click Cancel to exit the Default DriveRight Settings Wizard. Back to Setup Menu | Default DriveRight Settings Menu Home | Getting Started | Quick Reference | Menu Commands | Troubleshooting Users: Add New 126 DriveRight FMS Help When your add a new user to DriveRight FMS, you assign the user name, password, and access privileges. Note: When adding the first user to the database, the first user is automatically a super user. To add a new user: 1. Select Browse/Add Users from the Users sub-menu in the Setup Menu. The Users database table is displayed. 2. Click Add New located in the lower left corner of the window. The Add New User dialog box is displayed. When the first user is added, that user automatically becomes a Super User and the Add Super User dialog box is displayed, giving the new user full access to FMS. 127 DriveRight FMS 3.7.2 User's manual 3. Enter the User Name and Password. The password is case sensitive and should be 4 to 12 characters long. 4. Configure the desired access privileges for the new user. The User Type allows you to make the new user a Normal User or a Super User. The DriveRight/CarChip/SmartCard Access Options allow you to limit a user's access to DriveRight, CarChip, and SmartCard. The Application Options allow you to limit a user's access to individual program functions. The Database Table Access Options allow you to limit a user's access to the DriveRight database. 5. Click All Rights to grant all privileges to the new user. You can then selectively remove unwanted privileges from the new user before adding the user to the database. 6. Click Clear Rights to remove all privileges from the new user. You can then selectively add desired privileges to the user before adding the user to the database. 7. Click Add to add the new user or click Cancel to exit without adding the user. See also: Users: Browse/Add Users Users: Edit 128 DriveRight FMS Help Back to Setup Menu | Users Menu Home | Getting Started | Quick Reference | Menu Commands | Troubleshooting DriveRight Menu DriveRight Menu Use DriveRight Menu commands for functions that require direct communications with the DriveRight console. Note: The DriveRight must be connected to your computer with the LCD display on and in the CURRENT mode in order to access the DriveRight Menu commands. The following DriveRight Menu commands are available: Add New DriveRight DriveRight Settings Download DriveRight Download Palm Read Accident Log Read Tamper Log Set Time and Date Set Odometer Set Service Alarms Set Drivers List Clear DriveRight Back to Menu Commands Home | Getting Started | Quick Reference | Menu Commands | Troubleshooting Add DriveRight Wizard DriveRight FMS includes an Add DriveRight Wizard to simplify adding DriveRight devices, Vehicles, and Drivers to the database. To add a new DriveRight device: 129 DriveRight FMS 3.7.2 User's manual 1. Select Add New DriveRight from the DriveRight Menu. The Add DriveRight Wizard Start dialog box is displayed. Note: The new DriveRight device must be connected to your computer and be turned on before you can add it to the DriveRight FMS database. 2. Click Next to continue or click Cancel to exit the Add DriveRight Wizard. o 3. Click Next to continue or click Cancel to exit the Add DriveRight Wizard. o 130 If you click Next, the Add DriveRight Wizard - DriveRight ID dialog box is displayed. If you click Next, the Add DriveRight - Assign to Vehicle dialog box is displayed. DriveRight FMS Help 4. Click OK to continue, or click Cancel to exit the Add DriveRight Wizard. 5. If you click OK, the Add DriveRight Settings dialog box is displayed. The Add DriveRight Settings Dialog allows you to review all of the settings for the new DriveRight, including those settings that are set by the DriveRight defaults. 6. When you are satisfied it is set up correctly, select Set to save the settings. Select Cancel to exit the setup dialog and abandon the DriveRight settings. Note: If you cancel the setup, you will lose the DriveRight settings but any vehicles or drivers you added to the database will remain. Back to DriveRight Menu 131 DriveRight FMS 3.7.2 User's manual Home | Getting Started | Quick Reference | Menu Commands | Troubleshooting DriveRight Settings The following commands allow you to view and or change the settings on a DriveRight device: View/Set Restore Setup GPS Verify DriveRight Calibration Back to DriveRight Menu Home | Getting Started | Quick Reference | Menu Commands | Troubleshooting Download DriveRight The Download DriveRight command transfers trip data from the connected DriveRight device to the DriveRight database. To download your DriveRight: 1. Connect your DriveRight console to your computer and make sure the DriveRight is "awake". Press the MODE key if there is nothing on the LCD display. 2. Select Download DriveRight in the DriveRight Menu. The following Download Status box is displayed: Note: You will see the Cancel button only if you are downloading a DriveRight 600. 132 DriveRight FMS Help 3. You may lose GPS data for earlier trips if the DriveRight console is not downloaded for an extended period of time. In this case you will see a warning message similar to this: 4. If the calibration in the DriveRight console does not match the calibration in the database, you will see a warning message similar to this: 5. When the data has finished downloading the following dialog box is displayed: 133 DriveRight FMS 3.7.2 User's manual 6. Press Enter or click OK to continue. See also: Downloading DriveRight Guidelines Back to DriveRight Menu Home | Getting Started | Quick Reference | Menu Commands | Troubleshooting Download Palm Versions of DriveRight FMS 3.0 and later offer a feature to download data from multiple DriveRight devices from a Palm device. You will need the DriveRight Palm Download Kit, #8181, in order to use this command. Note: To download a DriveRight console data into the software using Palm Download, the DriveRight should be present in the database. If you try to download a DriveRight which is not present in the database, you will get an error message. To download your Palm: 1. Select Download Palm in the DriveRight Menu. 2. The first time you download a Palm, the following dialog box is displayed. Select the directory which contains your Palm backup databases and click OK. 134 DriveRight FMS Help 3. Each time after the first time, when you use the Download Palm command, the following dialog box appears showing the selected Palm backup directory. 4. Click Browse to select a different backup directory, click OK to use this displayed directory, or click Cancel to exit. 5. If you click OK, the Download Status dialog box is displayed. 135 DriveRight FMS 3.7.2 User's manual 6. When the data has finished downloading the Palm Download, Download Successful dialog box is displayed: 7. Click OK to continue. Back to DriveRight Menu Home | Getting Started | Quick Reference | Menu Commands | Troubleshooting Read Accident Log The Read Accident Log command will download accident log data from the connected DriveRight device, convert it to a text file, and display it using MS Notepad. To read the accident log: 1. Select Read Accident Log in the DriveRight Menu. The accident log is displayed. See also: Accident Log Back to DriveRight Menu Home | Getting Started | Quick Reference | Menu Commands | Troubleshooting Read Tamper Log The Read Tamper Log command will download Tamper Log data from the connected DriveRight device, convert it to a text file, and display it using MS Notepad. The Tamper Log holds the times and dates when the driver disconnected the DriveRight or tried to change the DriveRight Settings. Note: There must be a Settings PIN-Code in the unit to enable the logging of disconnect times. 136 DriveRight FMS Help To read the tamper log: 1. Select Read Tamper Log in the DriveRight Menu. The tamper log is displayed. See also: Tamper Log Back to DriveRight Menu Home | Getting Started | Quick Reference | Menu Commands | Troubleshooting Set Time and Date Use this command to set the time and date on a DriveRight device. To set the time and date on a DriveRight: 1. Select Set Time and Date from the DriveRight Menu. The Set Time and Date dialog box is displayed. 2. Set the Date by either clicking the month, day or year in the edit box and entering the new information, or by clicking on the down arrow and selecting the date from the drop-down calendar. 137 DriveRight FMS 3.7.2 User's manual 3. Set the time by clicking on the hour, minute or second in the edit box and entering the new time. You can also adjust the time settings up and down using the up and down arrows in the edit box. 4. Click Set to change the time and date on the DriveRight unit or click Cancel to exit the dialog box without changing the settings. Back to DriveRight Menu Home | Getting Started | Quick Reference | Menu Commands | Troubleshooting Set Odometer Use this command to set the vehicle odometer reading in a DriveRight device. Note: The Odometer can not be set for DriveRight 600E devices. An error displays if Set Odometer is selected when a DriveRight 600E device is connected to the computer. To set the odometer in a DriveRight: 1. Select Set Odometer from the DriveRight Menu. The Set Odometer dialog box is displayed showing the current odometer reading. 2. You can now edit the vehicle's odometer reading. 3. Click on OK to update the odometer reading on the DriveRight unit or click on Cancel to exit the dialog box without changing the settings. Note: When you set the odometer DriveRight FMS updates the current odometer value of the vehicle assigned to this DriveRight and also adds a new entry in the Odometer Logs Table. Back to DriveRight Menu Home | Getting Started | Quick Reference | Menu Commands | Troubleshooting Set Service Alarms Note: Available for the DriveRight Trip 500 AL only. Each vehicle needs a service check from time to time. With the Set Service Alarms option you can specify the Odometer Readings on which the vehicle should go in for service. After defining a Service Schedule you can assign it to a vehicle and load it into the DriveRight Trip 500AL using 138 DriveRight FMS Help the Set Service Alarms command in the DriveRight menu. As soon as any defined odometer readings are reached, a warning signal is activated in the vehicle indicating the driver to bring his vehicle in for a service check, or call his service center for an appointment. To set a service alarm: 1. Select Set Service Alarms from the DriveRight Menu. The Set Service Alarms dialog box is displayed. 2. Enter the odometer reading for a service alarm. 3. Click Add>> to add the service alarm for that odometer reading. 4. Click on an odometer reading to highlight it, then click Delete to remove a specific service alarm. 5. Click Clear All to remove all service alarms. 6. Click Set to Device to update the service alarm settings on the DriveRight unit or click on Cancel to exit the dialog box without changing the settings. Back to DriveRight Menu Home | Getting Started | Quick Reference | Menu Commands | Troubleshooting 139 DriveRight FMS 3.7.2 User's manual Set Drivers List The DriveRight 600 or later device provides a security feature which lets the operator set up to 100 drivers’ codes into the device to have access. To set the drivers list: 1. Select Set Drivers List from the DriveRight Menu. The Set Drivers List dialog box is displayed. Drivers already assigned to this DriveRight are displayed in the right column. Drivers not assigned to this DriveRight are displayed in the left column. 2. Click on a driver's name to select the driver, the click on the right arrows >> to move the driver to the to set in DriveRight list. 3. To remove a driver from the to set in DriveRight list, click on a driver's name to select the driver, then click on the left arrows << to move the driver off the DriveRight list. 4. Click Set to Device to update the drivers list on the DriveRight unit or click Cancel to exit the dialog box without changing the drivers list. 5. If you click Set to Device, the following dialog box displays if the action is successful. Click OK or press Enter to continue. 140 DriveRight FMS Help Back to DriveRight Menu Home | Getting Started | Quick Reference | Menu Commands | Troubleshooting Clear DriveRight The Clear DriveRight command clears all trip data in the connected DriveRight. To Clear your DriveRight: 1. Select Clear DriveRight in the DriveRight Menu. The following DriveRight dialog box is displayed: 2. Click Yes to clear the DriveRight device, click No to cancel the command. Back to DriveRight Menu Home | Getting Started | Quick Reference | Menu Commands | Troubleshooting DriveRight Menu Information Accident Log The Accident Log consists of the following: • A log report of the last 10 seconds (20 seconds for the DriveRight Trip 500AL and DriveRight 600, and DriveRight 600E) prior to a deceleration violation, whereby the actual speed of the vehicle during each of these prior seconds is indicated. Date and time of the occurrence are also logged. This information will be retained until another deceleration violation occurs in the 130AL and Trip Computer, since they store only one Accident Log. 141 DriveRight FMS 3.7.2 User's manual The Trip 500AL will hold the last 5 of these events. The DriveRight 600 and 600E will hold the last 10 of these events. • The DriveRight device also retains the information on the last 10 seconds of speed before the last stop in the 130AL and Trip Computer, and last 20 seconds in the Trip 500AL. Every time the vehicle stops, the data in this section is renewed. • The DriveRight 600 and 600E will also store information for the 20 seconds after the violation. Back to DriveRight Menu Home | Getting Started | Quick Reference | Menu Commands | Troubleshooting Add DriveRight Wizard - Assign to Vehicle You must assign the DriveRight when you are adding it to the database. Assign DriveRight to Vehicle Guidelines: 142 • Both the default vehicle and driver must be in the database before you can successfully add a DriveRight. • If no vehicles have been added to the database yet, you will be allowed to add a vehicle in the next dialog box. • If there are no drivers in the database, you will also be allowed to add a driver when adding the vehicle. • If the vehicle for this DriveRight already exists in the database, highlight the vehicle in the browse window and click Select. DriveRight FMS Help To Assign DriveRight to Vehicle: 1. Click OK to assign the DriveRight to a vehicle or press Cancel to exit the Add DriveRight Wizard. 2. If you click OK, the Vehicles browse window is displayed, which shows all the vehicles in the database. 3. Click on the vehicle you want to assign to the new DriveRight. 4. Click the Select button in the bottom of the window to assign the vehicle or click Cancel to exit the Add DriveRight Wizard. 5. The following dialog box is displayed: 6. Click Yes to continue installing the DriveRight with the selected vehicle or click on No to select a different vehicle. See Also: Add New DriveRight Add DriveRight Wizard - DriveRight ID Back to DriveRight Menu | Add New DriveRight Wizard Home | Getting Started | Quick Reference | Menu Commands | Troubleshooting Add DriveRight Wizard - DriveRight Already Exists You are trying to add a DriveRight device to the database that is already in the database. 143 DriveRight FMS 3.7.2 User's manual You can: 1. Check "Add as a new DriveRight" to add this DriveRight using a new DriveRight ID number. 2. Check "Add using same DriveRight ID" to add this DriveRight using it's existing ID number. 3. Click Next after you have selected one of the two options, or click Cancel to exit the Add DriveRight Wizard. Back to DriveRight Menu | Add New DriveRight Wizard Home | Getting Started | Quick Reference | Menu Commands | Troubleshooting Add DriveRight Wizard - DriveRight ID A DriveRight ID must be assigned to the new DriveRight device. The DriveRight ID dialog box shows the ID assigned to the DriveRight. 1. You can change the assigned ID by clicking inside the text box and editing the number. 2. Click Browse DriveRights to view DriveRight IDs in use at the current location. 3. Click Next to begin adding a new DriveRight to the database. 144 DriveRight FMS Help If no vehicles have been added to the database yet, add a vehicle in the next dialog box. If there are no drivers in the database, add a driver when adding the vehicle. Both the default vehicle and driver must be in the database before you can successfully add a DriveRight. If the vehicle for this DriveRight already exists in the database, select it from the Vehicle Browse window. Back to DriveRight Menu | Add New DriveRight Wizard Home | Getting Started | Quick Reference | Menu Commands | Troubleshooting Add DriveRight Wizard - Start 1. Make sure the new DriveRight device is connected to your computer and turned on before proceeding. 2. To skip this message in the future, check the "Don't show this dialog again" box. 3. Click Next to continue or click Cancel to exit the Add DriveRight Wizard. 145 DriveRight FMS 3.7.2 User's manual See Also: Add New DriveRight Add DriveRight Wizard - DriveRight ID Add DriveRight Wizard - Assign to Vehicle Back to DriveRight Menu | Add New DriveRight Wizard Home | Getting Started | Quick Reference | Menu Commands | Troubleshooting DriveRight Settings: Alarm Settings You can view or edit the following DriveRight alarm settings: o Set the Alarm Mode to On or Off. This controls audible alarm reporting by the DriveRight device. o Enable "Warn if not Logged in" to have the DriveRight device give an audible alarm if the vehicle is operated without the driver first entering his or her driver code. See also: Alarm Settings Back to View/Set Home | Getting Started | Quick Reference | Menu Commands | Troubleshooting DriveRight Settings: Calibration You can view or edit the following DriveRight Calibration settings: 146 DriveRight FMS Help o Click Reed Switch if the DriveRight is using a reed switch for the speed sensor. If the DriveRight device has already been calibrated in the vehicle, then the software automatically calculates the VSS PPM (Pulses Per Mile), PPR (pulses per reading) and Calibration number for your vehicle. Do not change these values. The PPR for a reed switch is always “1”. o Click VSS if the DriveRight is using the vehicle's VSS for the speed sensor. If the DriveRight device has already been calibrated in the vehicle, then software automatically calculates the VSS PPM (Pulses Per Mile), PPR (pulses per reading) and Calibration number for your vehicle. Otherwise you must specify the PPM for your vehicle. Depending on your selection, software calculates the PPR (pulses per reading) and calibration values and fills the edit boxes with them. o If you are using the VSS, select the pulses per mile (PPM) from the drop down list or enter the PPM in the edit box. o You can use the Calibration Number to set or adjust the DriveRight's calibration. See also: Software Calibration Procedure Back to View/Set Home | Getting Started | Quick Reference | Menu Commands | Troubleshooting DriveRight Settings: Identification You can view or edit the following DriveRight identification settings: 147 DriveRight FMS 3.7.2 User's manual o DriveRight ID o Vehicle ID See also: Add DriveRight Wizard - DriveRight ID Add DriveRight Wizard - Assign to Vehicle Back to View/Set Home | Getting Started | Quick Reference | Menu Commands | Troubleshooting DriveRight Settings: Safety Settings You can view or edit the following DriveRight identification settings: o Speed Limit o Acceleration Limit o Deceleration Limit See also: Safety Settings Back to View/Set Home | Getting Started | Quick Reference | Menu Commands | Troubleshooting DriveRight Settings: Security Settings You can view or edit the following DriveRight identification settings: 148 DriveRight FMS Help 1. Set the Pin Code, which is required to set the calibration and alarm settings on the DriveRight device. 2. If desired, you can enable the tamper indicator. If enabled, the tamper indicator on the DriveRight LCD screen will be displayed when a tamper event has been detected. 3. If desired, you can disable Login from the console so that a driver can log into the device using only the SmartCard. Check the Disable Login on Console box to disable console Login. This application is available for DriveRight 600E devices only. See also: Security Settings Back to View/Set Home | Getting Started | Quick Reference | Menu Commands | Troubleshooting DriveRight Settings: Timer Settings You can view or edit the following DriveRight identification settings: o Trip Stop Time o Driver ID Logout Time See also: Timer Settings Back to View/Set Home | Getting Started | Quick Reference | Menu Commands | Troubleshooting 149 DriveRight FMS 3.7.2 User's manual DriveRight Settings: Units You can change the following DriveRight unit settings: o Date Mode settings allow you to select either a Month-Day-Year or Day-MonthYear display for the date. o Time Mode settings allow you to select either 12-hour time with am and pm or 24-hour time for the time display. o Distance Unit settings allows you to select miles and miles per hour or kilometers and kilometers per hour as your speed and distance units. Back to View/Set Home | Getting Started | Quick Reference | Menu Commands | Troubleshooting DriveRight Settings: Restore Use this command to update the DriveRight device using settings stored in the database: 1. Select DriveRight Settings from the DriveRight Menu. 2. Select Restore from the DriveRight Settings drop down list. The Restore DriveRight Settings dialog box is displayed. Note: If the DriveRight has already been configured the software will automatically display the existing settings. 150 DriveRight FMS Help 3. Select the desired DriveRight ID and driver name from the drop down lists. Note: The software will only display DriveRight ID's for DriveRight's of the same type. If a DriveRight 600 is connected to your computer, you will only see ID numbers for other DriveRight 600 devices. 4. Click Restore to save the selected settings to the DriveRight unit, or click Cancel to exit without changing the settings. Back to DriveRight Menu | DriveRight Settings Home | Getting Started | Quick Reference | Menu Commands | Troubleshooting Review DriveRight Alarm Settings Use this dialog box to verify the DriveRight alarm settings: 151 DriveRight FMS 3.7.2 User's manual 1. Click Alarm On or Alarm Off to turn the DriveRight device's audible alarm on or off. With the alarm On, the DriveRight will beep every time one of the safety settings is exceeded. 2. Click Warn if not Logged in to cause an audible DriveRight alarm if the driver does not log in at the beginning of a trip. 3. Click Set to save the settings on the DriveRight unit or click Cancel to exit without saving the settings. See Also: Add DriveRight Wizard - Calibrate DriveRight Review Settings for New DriveRight Back to DriveRight Menu | Add New DriveRight | Review Settings for New DriveRight Home | Getting Started | Quick Reference | Menu Commands | Troubleshooting Review DriveRight Calibration Use this dialog box to verify the DriveRight calibration settings: 152 DriveRight FMS Help 1. Verify the DriveRight calibration settings are correct. You can edit them in this dialog box if desired. 2. Click Set to save the settings on the DriveRight unit or click Cancel to exit without saving the settings. See Also: Review Settings for New DriveRight Back to DriveRight Menu | Add New DriveRight | Review Settings for New DriveRight Home | Getting Started | Quick Reference | Menu Commands | Troubleshooting Review DriveRight Security Settings Use this dialog box to verify the DriveRight GPS settings: 153 DriveRight FMS 3.7.2 User's manual 1. Review the GPS settings and make any necessary adjustments. 2. Click Set to save the settings on the DriveRight unit or click Cancel to exit without saving the settings. See Also: Add DriveRight Wizard - Calibrate DriveRight Review Settings for New DriveRight Back to DriveRight Menu | Add New DriveRight | Review Settings for New DriveRight Home | Getting Started | Quick Reference | Menu Commands | Troubleshooting Review DriveRight Identification Use this dialog box to verify the DriveRight ID information: 154 DriveRight FMS Help 1. To change the DriveRight ID number, enter a new number in the edit box. 2. Click on a tab to review other parts of the DriveRight setup. 3. Click Set to save the settings on the DriveRight unit or click Cancel to exit without saving the settings. See Also: Review Settings for New DriveRight Back to DriveRight Menu | Add New DriveRight | Review Settings for New DriveRight Home | Getting Started | Quick Reference | Menu Commands | Troubleshooting Review DriveRight Safety Settings Use this dialog box to verify the DriveRight safety settings: 155 DriveRight FMS 3.7.2 User's manual 1. Review the safety settings and make any necessary adjustments. 2. Click a tab to review other settings, click Set to save the settings on the DriveRight unit or click Cancel to exit without saving the settings. See Also: Review Settings for New DriveRight Back to DriveRight Menu | Add New DriveRight | Review Settings for New DriveRight Home | Getting Started | Quick Reference | Menu Commands | Troubleshooting Review DriveRight Security Settings Use this dialog box to verify the DriveRight security settings: 156 DriveRight FMS Help 1. Review the security settings and make any necessary adjustments. 2. Click Set to save the settings on the DriveRight unit or click Cancel to exit without saving the settings. See Also: Add DriveRight Wizard - Calibrate DriveRight Review Settings for New DriveRight Back to DriveRight Menu | Add New DriveRight | Review Settings for New DriveRight Home | Getting Started | Quick Reference | Menu Commands | Troubleshooting Review DriveRight Timer Settings Use this dialog box to verify the DriveRight timer settings: 157 DriveRight FMS 3.7.2 User's manual 1. Review the timer settings and make any necessary adjustments. 2. Click Set to save the settings on the DriveRight unit or click Cancel to exit without saving the settings. See Also: Add DriveRight Wizard - Calibrate DriveRight Review Settings for New DriveRight Back to DriveRight Menu | Add New DriveRight | Review Settings for New DriveRight Home | Getting Started | Quick Reference | Menu Commands | Troubleshooting Review DriveRight Unit Settings Use this dialog box to verify the DriveRight unit settings: 158 DriveRight FMS Help 1. Review the unit settings and make any necessary adjustments. 2. Click Set to save the settings on the DriveRight unit or click Cancel to exit without saving the settings. See Also: Add DriveRight Wizard - Calibrate DriveRight Review Settings for New DriveRight Back to DriveRight Menu | Add New DriveRight | Review Settings for New DriveRight Home | Getting Started | Quick Reference | Menu Commands | Troubleshooting Review Settings for New DriveRight You've reached the last part of the Add DriveRight Wizard. The Add DriveRight Settings Dialog allows you to review all of the settings for the new DriveRight device, including those settings that are part of the DriveRight default settings. 159 DriveRight FMS 3.7.2 User's manual 1. Click on the tabs located near the top of the dialog box to review the DriveRight's settings. The following tabs are available: • Identification • Calibration • Units • Safety Settings • Timer Settings • Alarm Settings • Security Settings • GPS Settings 2. When you are satisfied it is set up correctly, select Set to save the settings. Select Cancel to exit the setup dialog and abandon the DriveRight settings. See Also: Add New DriveRight Add DriveRight Wizard - DriveRight ID Add DriveRight Wizard - Calibrate DriveRight Default DriveRight Setup Back to DriveRight Menu | Add New DriveRight Wizard 160 DriveRight FMS Help Home | Getting Started | Quick Reference | Menu Commands | Troubleshooting DriveRight Settings: Setup GPS Use this command to view and/or modify the GPS settings on a DriveRight device. Note: This command only works with the DriveRight 600. To setup GPS logging: 1. Select DriveRight Settings from the DriveRight Menu. 2. Select Setup GPS from the DriveRight Settings drop down list. The Setup GPS Logging Interval dialog box is displayed. 3. Set GPS Logging to On, Off, or DriveRight Speed Only. o Select On to enable GPS logging. o Select Off to disable GPS logging. o Select DriveRight Speed Only to log the DriveRight speed without the GPS coordinates. No GPS unit is required to enable this option. 4. Enter the desired logging interval and indicate a time unit of either seconds (Sec) or minutes (Min). Logging Hours indicates how much data can be stored at the selected interval. 5. Click Set to save the changes or click Cancel to exit without changing the settings Back to DriveRight Menu | DriveRight Settings Home | Getting Started | Quick Reference | Menu Commands | Troubleshooting Software Calibration Procedure You can calibrate your DriveRight console using the following procedures. Perform the initial calibration procedure first, then perform the final calibration procedure. 161 DriveRight FMS 3.7.2 User's manual Initial Calibration Procedure Follow these steps in the indicated order: 1. Determine the initial calibration number by multiplying the perimeter of the wheel with 314.685 (perimeter measured in centimeters) or with 799.3 (perimeter measured in inches). 2. If the vehicle has rear-wheel drive, the outcome of the multiplication should be divided by the differential transmission (usually a number around 4). 3. Connect the DriveRight and activate the device by pressing the Mode button. The display should be in the CURRENT mode. 4. Go to Setup > Vehicles > Add/Remove/Update... 5. Go to the vehicle using this DriveRight. If the correct vehicle is not in the list, you add it. 6. Click on the Read button (on the right hand side of the screen). The settings of the DriveRight will be taken over by the software. 7. Type the calibration number in the appropriate field (no decimals!) 8. Click on the Set button (on the right hand side of the screen). The settings with the new calibration number are written to the DriveRight. Final Calibration Procedure Follow these steps in the indicated order: 1. Mount the DriveRight in the vehicle and write down the start date and current odometers. 2. Let the driver use the DriveRight for 1 week (at least 40 miles/50 km). 3. Dismount the DriveRight and write down the odometers. 4. Start the software and select DriveRight > Download DriveRight. The data are downloaded and placed in the database. 5. Select Reports > Trip... and specify the following filter: Date>=[startdate] : Use the correct date format Vehicle: Select the vehicle using this DriveRight. 6. Write down the number of miles/kilometers driven as indicated at the bottom of the report. 7. Go to Setup > Vehicles > Add/Remove/Update... 8. Go to the appropriate vehicle and click on the Read button. 9. Calculate the new calibration number. New calibration number = ( (Distance measured by vehicle) / (Distance measured by DriveRight) ) X Current Calibration Number 10. Type the new calibration number. 11. Click on the Set button. 162 DriveRight FMS Help Back to DriveRight Menu | DriveRight Settings Home | Getting Started | Quick Reference | Menu Commands | Troubleshooting Tamper Log The Tamper Log holds the times and dates when the driver disconnected the DriveRight or tried to change the DriveRight Settings. The Tamper Log consists of the following: • In the case of the Trip 500AL and the DriveRight 600, 10 tamper attempts are logged, to record instances of disconnecting a DriveRight, or entering an incorrect Settings PINcode. In all other units only the first tamper time is logged. Note: There must be a Settings PIN-Code in the unit to enable the logging of disconnect times. Back to DriveRight Menu Home | Getting Started | Quick Reference | Menu Commands | Troubleshooting DriveRight Settings: Verify DriveRight Calibration The Calibrate DriveRight dialog box allows you to verify DriveRight calibration settings. • The Calibration Setting Dialog box shows two installation methods. VSS (vehicle speed sensor) installation and Reed Switch. To verify the DriveRight console calibration: 1. Click on DriveRight Settings from the DriveRight Menu. 2. Select Verify DriveRight Calibration from the drop-down menu. A DriveRight Calibration Message dialog box is displayed. 3. Click OK, Set or Cancel to continue, depending on the displayed message. The Calibrate DriveRight dialog box is displayed. 163 DriveRight FMS 3.7.2 User's manual 3. If the DriveRight is using a reed switch for the speed sensor, make sure the Installation Method indicates Reed Switch. o Reed Switch: If the DriveRight device has been previously calibrated in the vehicle or through the software, then DriveRight FMS automatically calculates the Calibration number for your vehicle. We strongly recommend that you do not change these values. The PPR for a reed switch is always “1”. 4. If the DriveRight is using the vehicle's VSS for the speed sensor, make sure the Installation Method indicates VSS. o VSS: If the DriveRight device has been previously calibrated in the vehicle or through the software, then DriveRight FMS automatically calculates the VSS PPM (Pulses Per Mile), PPR (pulses per reading) and Calibration number for your vehicle. Otherwise you must specify the PPM for your vehicle. Depending on your selection, software calculates the PPR (pulses per reading) and calibration values and fills the edit boxes with them. 5. If you are using the VSS, you can adjust the pulses per mile (PPM) from the drop down list or enter the PPM in the edit box if necessary. We recommend that you not change these settings if the DriveRight has been previously calibrated. 6. Click OK to save changes to the calibration, or click cancel to exit without saving changes. Back to DriveRight Menu | DriveRight Settings Home | Getting Started | Quick Reference | Menu Commands | Troubleshooting 164 DriveRight FMS Help DriveRight Settings: View/Set Use this command to view and/or modify the DriveRight device settings for the connected DriveRight device: 1. Select DriveRight Settings from the DriveRight Menu. 2. Select View/Set from the DriveRight Settings drop down list. The DriveRight Device Settings dialog box is displayed. 3. Make any desired changes. For more information on the DriveRight settings, click on the links below: Identification Calibration Units Safety Settings Timer Settings Alarm Settings Security Settings Note: If you assign a vehicle to a DriveRight that had been previously assigned to a CarChip device, the vehicle assignment for that CarChip will be changed to "UNASSIGNED VEHICLE". 165 DriveRight FMS 3.7.2 User's manual 4. Click Set to save the changes or click Close to exit without saving. Back to DriveRight Menu | DriveRight Settings Home | Getting Started | Quick Reference | Menu Commands | Troubleshooting CarChip Menu CarChip Menu Use CarChip Menu commands for functions that require direct communications with the CarChip device. Note: The CarChip device must be connected to your computer in order to access the CarChip Menu commands. The following CarChip Menu commands are available: Add New CarChip CarChip Settings Download CarChip Set Time and Date Set CarChip LED State Display CarChip Memory Show CarChip Info Clear CarChip Memory Back to Menu Commands Menu Home | Getting Started | Quick Reference | Menu Commands | Troubleshooting Add CarChip Wizard DriveRight FMS includes an Add CarChip Wizard to simplify adding CarChip devices to the database. Click on the links provided for each of the Add CarChip Wizard dialog boxes to see more detailed information. 166 DriveRight FMS Help To add a new CarChip device: 1. Select Add New CarChip from the CarChip Menu. The Add CarChip Wizard - Start dialog box is displayed. Note: The new CarChip device must be connected to your computer in order to add it to the DriveRight FMS database. 2. Click Next to continue or click Cancel to exit the Add CarChip Wizard. o 3. If you click Next, the Add CarChip Wizard - CarChip ID dialog box is displayed. Click Next to continue or click Cancel to exit the Add CarChip Wizard. o If you click Next, the Add CarChip Wizard - Assign dialog box is displayed. Note: CarChip should be assigned to either a vehicle or driver. If it is assigned to a vehicle, the default driver of that vehicle appears on all the data downloaded. If a CarChip is assigned to a driver, then all data downloaded from that CarChip will be associated with that driver and the vehicle will be listed as UNKNOWN VEHICLE. This is useful if the driver uses multiple vehicles with the same CarChip. Based on your particular case, you should carefully choose between assigning a CarChip to a vehicle or a driver. 167 DriveRight FMS 3.7.2 User's manual 4. After assigning the CarChip to either a vehicle or to a driver, Click Next to continue or click Cancel to exit the Add CarChip Wizard. If you are assigning the CarChip to a vehicle, the Vehicles database table is displayed. Click on a vehicle record in the database table to highlight it, then click Select to assign the CarChip to the selected vehicle. If you are assigning the CarChip to a driver, the Drivers database table is displayed. Click on a driver record in the database table to highlight it, then click Select to assign the CarChip to the selected driver. 168 DriveRight FMS Help 5. After selecting a vehicle or driver from their respective database tables, the CarChip dialog box is displayed. Click Yes to continue or click No to return to the database table and make another selection. 6. If the settings in the CarChip you are adding are different from the default CarChip settings in the database, The CarChip Default Settings dialog box is displayed. Click Yes to configure the CarChip with the default settings or click No to use the existing CarChip Settings. 7. The Add CarChip Wizard - Safety Settings dialog box is displayed. This shows the CarChip's speed band, braking, and acceleration thresholds. 169 DriveRight FMS 3.7.2 User's manual 8. When you are satisfied with the safety settings, click on Next to continue or click Cancel to exit the Add CarChip Wizard. 9. The Add CarChip Wizard - Parameters dialog box is displayed. This shows the engine and vehicle performance parameters that CarChip logs and the sample interval rates for each parameter. 10. When you are satisfied with the parameter settings, click Next to continue or click Cancel to exit the Add CarChip Wizard. 11. The Miscellaneous Settings dialog box is displayed. Enable or disable extra CarChip features, such as Alarm and LED Status using this dialog box. The Alarm feature only works with CarChip Fleet with Alarm (# 8245). Enabling this feature for a CarChip Fleet without alarm will not work. 170 DriveRight FMS Help 12. The Review Settings For New CarChip dialog box is displayed. This dialog box allows you to review the identification, safety, and parameter and miscellaneous settings for the new CarChip one last time before you add it to the database. 13. When you are satisfied with the CarChip settings, click Set to add the CarChip to the database and to update the CarChip device settings. Select Cancel to exit the Add CarChip Wizard without adding the CarChip to the database or updating the CarChip device settings. 14. When the CarChip has been successfully added to the database and the CarChip settings have been updated you will see the following Setup Result dialog box. 15. Click OK to continue. 171 DriveRight FMS 3.7.2 User's manual Back to CarChip Menu Home | Getting Started | Quick Reference | Menu Commands | Troubleshooting CarChip Settings Use the CarChip Settings command in the CarChip Menu to quickly view all CarChip settings, to add a CarChip to the database or to edit CarChip settings. 1. Select CarChip Settings from the CarChip Menu. The CarChip Device Settings dialog box is displayed. 2. Make any desired changes. For more information on the CarChip settings, click on the links below: CarChip ID Hard Braking, Acceleration and Speed Bands Choose Parameters Note: If you change the vehicle assigned to a CarChip, the vehicle table will also be changed to reflect the new assignment. Note: If you assign a vehicle to a CarChip that had been previously assigned to a DriveRight device, the vehicle assignment for that DriveRight will be changed to "UNASSIGNED VEHICLE". 172 DriveRight FMS Help 3. If necessary, click Defaults to change the CarChip Hard Braking, Acceleration, Speed Bands, and Engine Parameters to the DriveRight FMS CarChip default settings. 4. Click OK to save the changes or click Cancel to exit without saving. Back to CarChip Menu Home | Getting Started | Quick Reference | Menu Commands | Troubleshooting Download CarChip Use this command to download data from your CarChip data logger into your computer. To download CarChip data: 1. Connect your CarChip device to your computer. 2. Choose Download CarChip from the CarChip menu. The Downloading Data dialog box appears. 2. The dialog box disappears when the download is complete. 3. Choose Cancel only if you wish to abort the download before it is finished. See also: Downloading CarChip Guidelines Back to CarChip Menu 173 DriveRight FMS 3.7.2 User's manual Home | Getting Started | Quick Reference | Menu Commands | Troubleshooting Set Time and Date Use this command to set the time and date on a CarChip device. To set the time and date on a CarChip: 1. Select Set Time and Date from the CarChip Menu. The Set Time and Date dialog box is displayed. The dialog box shows your computer's current time and date. 2. Set the date by either clicking the month, day or year in the edit box and entering the new information, or by clicking on the down arrow and selecting the date from the drop-down calendar. 3. Set the time by clicking on the hour, minute or second in the edit box and entering the new time. You can also adjust the time settings up and down using the up and down arrows in the edit box. 4. Click Set to change the time and date on the CarChip device or click on Cancel to exit the dialog box without changing the settings. Back to CarChip Menu Home | Getting Started | Quick Reference | Menu Commands | Troubleshooting LED Status Use the CarChip LED Status command to view or change the CarChip LED status configuration. 174 DriveRight FMS Help To change the CarChip Status LED: 1. Choose Set CarChip LED State in the CarChip Menu. The CarChip LED Status dialog box is displayed showing the current state. 2. Click Enable if you wish to turn on the CarChip Status LED. 3. Click Disable if you wish to turn off the CarChip Status LED. 4. Click Set to configure the Status LED with the current setting or click Cancel to exit. Back to CarChip Menu Home | Getting Started | Quick Reference | Menu Commands | Troubleshooting CarChip Alarm Use the CarChip Alarm command to view or change the CarChip Alarm status. To change the CarChip Alarm status: 1. Select Set CarChip Alarm in the CarChip Menu. The CarChip Alarm dialog box is displayed showing the current state. 175 DriveRight FMS 3.7.2 User's manual 2. Click Enable if you wish to turn on the CarChip Alarm. 3. Click Disable if you wish to turn off the CarChip Alarm. 4. Click Set to configure the alarm with the current setting or click Cancel to exit. Back to CarChip Menu Home | Getting Started | Quick Reference | Menu Commands | Troubleshooting Reset Check Engine Light Use the CarChip Reset Check Engine Light command to turn the CarChip Reset Check Engine Light feature on and off. Arming this feature resets the check engine light in the vehicle the CarChip is used in. Disarming this feature means that the CarChip does not reset the check engine light. To change the CarChip Reset Check Engine Light status: 1. Select Reset Check Engine Light in the CarChip Menu. The dialog box is displayed showing the current state. 2. Click Arm if you wish to turn on the CarChip Alarm. Click Disarm if you wish to turn off the CarChip Alarm. 3. 176 Click Set to configure the alarm with the current setting or click Cancel to exit. DriveRight FMS Help Back to CarChip Menu Home | Getting Started | Quick Reference | Menu Commands | Troubleshooting Display CarChip Memory Use this command to show memory usage by the CarChip device. 1. Choose Display CarChip Memory from the CarChip menu. The CarChip Memory dialog box appears. 2. Click OK to close the dialog box. o The amount of memory is displayed in kilobytes as well as the percentage of the available memory used. o "Used" shows the amount of memory occupied by data. o "Free" shows amount of memory available for new data. o "Total" shows the total amount of memory in the data logger. Back to CarChip Menu Home | Getting Started | Quick Reference | Menu Commands | Troubleshooting Show CarChip Info Use this command to show the firmware, bootware, and hardware version information for the currently connected CarChip device. 177 DriveRight FMS 3.7.2 User's manual 1. Choose Show CarChip Info from the CarChip menu. The CarChip Identity Info dialog box appears. 2. Click OK to close the dialog box. Back to CarChip Menu Home | Getting Started | Quick Reference | Menu Commands | Troubleshooting Clear CarChip Memory The Clear CarChip Memory command clears all trip data in the connected CarChip. To clear CarChip memory: 1. Select Clear CarChip Memory in the CarChip Menu. The following CarChip dialog box is displayed: 2. Click Yes to clear the CarChip device, click No to cancel the command. Back to CarChip Menu Home | Getting Started | Quick Reference | Menu Commands | Troubleshooting 178 DriveRight FMS Help CarChip Settings Add CarChip Wizard - Assign CarChip should be assigned to either a vehicle or driver. If it is assigned to a vehicle, the default driver of that vehicle appears on all the data downloaded. If it is assigned to a driver, all the data has vehicle as "UNKNOWN VEHICLE". This is useful if the driver uses multiple vehicles with the same CarChip. Based on your particular situation, you should carefully choose between assigning a CarChip to a vehicle or a driver. 1. Assign the CarChip to either a vehicle or to a driver by clicking the appropriate radio button. 2. Click Next to continue or click Cancel to exit the Add CarChip Wizard. o If you are assigning the CarChip to a vehicle, the Vehicles browse window is displayed. Click on a vehicle in the browse window to highlight it, then click Select button to assign the CarChip to the selected vehicle. o After selecting a vehicle from the browse window, the CarChip dialog box is displayed. Click Yes to continue or click No to return to the Vehicles browse window and make another selection. Back to CarChip Menu | Add New CarChip Home | Getting Started | Quick Reference | Menu Commands | Troubleshooting CarChip Identification Settings Each new CarChip device must be assigned an ID number. 179 DriveRight FMS 3.7.2 User's manual 1. The CarChip ID dialog box shows the ID assigned to the CarChip device. 2. • You can change the assigned ID by clicking inside the text box and editing the number. • Click on Browse CarChips to view CarChip ID's in use at the current location. • Click next to continue adding the new CarChip to the database or click Cancel to exit. Click Next to continue adding the new CarChip to the database or click Cancel to exit. Back to CarChip Menu | Add New CarChip Home | Getting Started | Quick Reference | Menu Commands | Troubleshooting Add CarChip Wizard - Miscellaneous Settings Use the Add CarChip Wizard - Miscellaneous Settings dialog box to set the CarChip's LED and Alarm settings. 180 DriveRight FMS Help 1. Select Enable or Disable for the Alarm or LED Status Features. 2. Click OK to save the Miscellaneous settings or click Cancel to exit without saving the settings in the Add CarChip Wizard. Note: The Alarm setting only works with the Fleet CarChip with Alarm. Enabling this feature on a CarChip that does not have an alarm does not provide any alarm capabilities for that CarChip. Back to CarChip Menu | Add New CarChip Home | Getting Started | Quick Reference | Menu Commands | Troubleshooting Add CarChip Wizard - Parameters Use the Add CarChip Wizard - Parameters dialog box to select up to four optional vehicle data parameters to be logged in addition to vehicle speed. 1. Select the vehicle data parameters you wish to log. 2. Set the time interval for each parameter. Supported time intervals range from 1 seconds to 60 seconds. 181 DriveRight FMS 3.7.2 User's manual 3. When you are satisfied with the parameter settings, click on Next to continue. Otherwise click Cancel to exit the Add CarChip Wizard. See also: List of Data Parameters Back to CarChip Menu | Add New CarChip Home | Getting Started | Quick Reference | Menu Commands | Troubleshooting Add CarChip Wizard - Safety Settings Use the Add CarChip Wizard - Safety Settings dialog box to set speed, braking and acceleration thresholds for the CarChip device. 1. Change the speed band ranges by inserting new speeds in the To text box. This is the upper limit of the band. The speeds listed in the From text box automatically change for the next speed band. 2. Set the Hard Braking Threshold. The Hard Braking Threshold is used as the decel limit in DriveRight FMS. 3. Set the Hard Acceleration Threshold. The Hard Acceleration Threshold is used as the accel limit in DriveRight FMS. Note: If you are using CarChip and DriveRight devices, make sure both types of devices use the same safety settings. 182 DriveRight FMS Help 5. When you are satisfied with the safety settings, click on Next to continue. Otherwise click Cancel to exit the Add CarChip Wizard. Back to CarChip Menu | Add New CarChip Home | Getting Started | Quick Reference | Menu Commands | Troubleshooting Add CarChip Wizard - Start 1. Make sure the new CarChip Fleet device is connected to your computer before proceeding. 2. To skip this message in the future, check the "Don't show this dialog again" box. 3. Click Next to continue or click Cancel to exit. 183 DriveRight FMS 3.7.2 User's manual Back to CarChip Menu | Add CarChip Wizard Home | Getting Started | Quick Reference | Menu Commands | Troubleshooting List of Data Parameters The following vehicle data parameters can be logged by the CarChip data logger: 184 • Vehicle Speed • Engine Speed • Throttle Position • Coolant Temperature • Engine Load • Intake Manifold Pressure • Air Flow Rate • Intake Air Temperature • Timing Advance • Fuel Pressure • Fuel System Status • Short Term Fuel Trim (B1) • Short Term Fuel Trim (B2) • Long Term Fuel Trim (B1) • Long Term Fuel Trim (B2) • O2 Sensor Voltage (B1, S1) • O2 Sensor Voltage (B1, S2) • O2 Sensor Voltage (B1, S3) • O2 Sensor Voltage (B1, S4) • O2 Sensor Voltage (B2, S1) • O2 Sensor Voltage (B2, S2) • O2 Sensor Voltage (B2, S3) • O2 Sensor Voltage (B2, S4) • Battery Voltage DriveRight FMS Help Home | Getting Started | Quick Reference | Menu Commands | Troubleshooting Review CarChip Identification Settings The Review Settings for New CarChip dialog box displays at the end of the process for adding a new CarChip. Use the Review Settings for New CarChip dialog box Identification tab to review the CarChip ID assigned to the CarChip device. The Identification tab shows the ID assigned to the CarChip device. 1. Review the identification information displayed. 2. Click Set to save the Identification Settings, click Cancel to exit without saving the settings, or click on another tab to make additional changes to the DriveRight default settings. Back to CarChip Menu Home | Getting Started | Quick Reference | Menu Commands | Troubleshooting Review CarChip Miscellaneous Settings The Review Settings for New CarChip dialog box displays at the end of the process for adding a new CarChip. Use the Review Settings for New CarChip dialog box Miscellaneous Settings tab to review the Alarm and LED Status of the CarChip. The Miscellaneous Settings tab displays the Alarm and LED status. 185 DriveRight FMS 3.7.2 User's manual 1. Review the Alarm and LED statuses previously set. 2. Click Set to save the Miscellaneous Settings, click Cancel to exit without saving the settings, or click on another tab to make additional changes to the CarChip default settings. Back to CarChip Menu Home | Getting Started | Quick Reference | Menu Commands | Troubleshooting Review CarChip Parameter Settings The Review Settings for New CarChip dialog box displays at the end of the process for adding a new CarChip. Use the Parameter Settings tab in the dialog box to review the parameter settings for the CarChip. 1. Review the selections made for the vehicle data parameter settings. 186 DriveRight FMS Help 2. Click Set to save the parameter settings, click Cancel to exit without saving the settings, or click on another tab to make additional changes to the DriveRight default settings. See also: List of Data Parameters Back to CarChip Menu Home | Getting Started | Quick Reference | Menu Commands | Troubleshooting Review CarChip Safety Settings The Review Settings for New CarChip dialog box displays at the end of the process for adding a new CarChip. Use the Safety Settings tab in the dialog box to review the speed band and braking threshold changes to the CarChip device. 187 DriveRight FMS 3.7.2 User's manual 1. Review the Speed Band ranges and Braking Thresholds previously set. 2. Click Set to save the Safety Settings, click Cancel to exit without saving the settings, or click on another tab to make additional changes to the CarChip default settings. Back to CarChip Menu Home | Getting Started | Quick Reference | Menu Commands | Troubleshooting SmartCard Menu SmartCard Menu Use SmartCard Menu commands for functions dealing directly with the SmartCard device or the DriveRight devices in your fleet that are part of the SmartCard System.. Note: The SmartCard Reader must be connected and a valid SmartCard (meaning a card you wish to set up or an existing card you wish to download) must be connected to your computer to access SmartCard Menu commands. The following DriveRight Menu commands are available: SmartCard Download SmartCard Setup Card Transfer to DriveRight Clear Transfer Data SmartCard Erase 188 DriveRight FMS Help Back to Menu Commands Home | Getting Started | Quick Reference | Menu Commands | Troubleshooting SmartCard Download The SmartCard Download command allows you to download data from a SmartCard containing data. To use this function: 1. Insert the card you which to download into the Desktop Reader. Note: If you have not already done so, test the connection between the SmartCard Desktop Reader by using the SmartCard Reader command in the Setup Menu. 2. Select Download from the SmartCard menu. The information in the card is automatically downloaded into the database for the assigned user and DriveRight, location, etc. During the download process, the software could display any of the following status messages or error messages. They include: • Data not properly downloaded from card. • Vehicle not assigned to the corresponding DriveRight device • If device settings don't match with the settings in the database. • If the card is pulled out in the middle of downloading. Note: The FMS software always prompts the user to download trip data before it will allow other information to be transferred onto the card. This ensures that the trip data is safely logged in the database. Adding items to transfer back to the DriveRight will overwrite trip data. Once download is complete, the dialog box closes. 189 DriveRight FMS 3.7.2 User's manual Back to SmartCard Menu | Menu Commands Home | Getting Started | Quick Reference | Menu Commands | Troubleshooting Setup Card The Setup Card command in the SmartCard menu allows you to program new unused SmartCards with Driver and DriveRight information. To setup a new SmartCard: 1. Insert a new unused card into the Desktop Reader. 2. Select Setup Card from the SmartCard menu. The Setup Card dialog box is displayed. 3. Select the Driver Card radio button if this card will be assigned to an individual driver or select Fleet Card if this card controls settings for all of your fleet. 4. Select the driver name the card is assigned to, or select Unknown Driver (none) if all drivers in your fleet have privileges to the same card. If a starter interrupter is put in place with the SmartCard System, this means the user having the proper DriveRight ID assigned to the driver card will allow that driver to start the vehicle. 190 DriveRight FMS Help 5. Enter the Auto Logout Time for this card. This is the time span in which this card will automatically log itself out of a DriveRight System if the vehicle has not been started. 6. Select up to 5 vehicles the assigned driver has access to using this card from the Vehicles in the Database combo box and click >>. The selected vehicles display in the Authorized Vehicles list. If you wish to take off a vehicle from the Authorized Vehicles list, select the vehicle name and click <<. 7. Click Set to program the new SmartCard with this information or click cancel to exit without saving the new information to the SmartCard. Back to SmartCard Menu | Menu Commands Home | Getting Started | Quick Reference | Menu Commands | Troubleshooting SmartCard Transfer to DriveRight SmartCard Transfer to DriveRight Use the Transfer to DriveRight menu to assign a SmartCard information to transfer to a DriveRight device, such as driver identification, clock adjustment information, and driver lists. The commands available in the Transfer to DriveRight menu are: Settings Driver List Clock Adjustment Back to SmartCard Menu Home | Getting Started | Quick Reference | Menu Commands | Troubleshooting Transfer to DriveRight Settings Transfer to DriveRight Settings Use the Transfer to DriveRight Settings command to edit and transfer settings to a selected DriveRight Device via the SmartCard system. To view or edit the DriveRight Settings that can be transferred to the DriveRight via the SmartCard: 1. Select Transfer to DriveRight in the SmartCard Menu. 2. Select Settings from the list of commands. The Review Settings for SmartCard dialog box is displayed. 191 DriveRight FMS 3.7.2 User's manual 3. Select a tab to view or edit the following default settings: • Identification Settings: Select the DriveRight ID and Driver associated with the card. • Calibration Settings: Select calibration settings that the DriveRight device should use. • Unit Settings: Select the date, time and unit modes and click OK. • Safety Settings: Enter the speed, acceleration and deceleration limits and click OK. • Timer Settings:Enter the trip stop time and driver log out time and click OK. • Alarm Settings: Select the alarm mode. Warn if not logged in is an option. • Security Settings: Enter the security code (PIN code). Tamper indicator is an option. • GPS Settings: Turn the GPS logging and subsequent mapping feature on and off and select mapping features. Works only with DriveRight 600 and 600E units with GPS modules. 4. When your are finished, click OK to save any changes or click Cancel to exit without saving changes. Back to Transfer to DriveRight | SmartCard Menu Home | Getting Started | Quick Reference | Menu Commands | Troubleshooting Identification Settings - SmartCard 192 DriveRight FMS Help Use this command to identify the DriveRight device receiving the new settings from the SmartCard. The Identifcation settings control which DriveRight device gets the modifications assigned in the Review Settings for SmartCard dialog box. To select the identification settings: 1. Select Transfer to DriveRight from the SmartCard Menu. 2. Select Settings from the Transfer to DriveRight submenu. The Review Settings for SmartCard dialog box is displayed. The Identification Tab is the default tab that is displayed upon opening the dialog box. 3. Select the DriveRight device, ID, vehicle ID and default driver the device will be programmed to recieve. 4. Click Set to save the Identification Settings, click Cancel to exit without saving the settings, or click on another tab to make additional changes to the DriveRight default settings. See also: Calibration Settings Unit Settings Safety Settings Timer Settings Alarm Settings Security Settings GPS Settings Back to Transfer to DriveRight | SmartCard Menu 193 DriveRight FMS 3.7.2 User's manual Home | Getting Started | Quick Reference | Menu Commands | Troubleshooting Calibration Settings - SmartCard Use this command to modify and edit the calibration settings for a specified DriveRight device. The calibration settings control how the DriveRight device is calibrated and monitoring the selected vehicle. To select the calibration settings: 1. Select Transfer to DriveRight from the SmartCard Menu. 2. Select Settings from the Transfer to DriveRight submenu. The Review Settings for SmartCard dialog box is displayed. 3. Select the Calibration Settings tab near the top of the dialog box. The calibration settings options are displayed. 4. Describe the installation method or the type of connections/hookups used to connect the device to the vehicle in the Installation Method group box. 5. Click Set to save the calibration settings, click Cancel to exit without saving the settings, or click on another tab to make additional changes to the DriveRight default settings. See also: Identification Settings Unit Settings Safety Settings Timer Settings Alarm Settings Security Settings 194 DriveRight FMS Help GPS Settings Back to Transfer to DriveRight | SmartCard Menu Home | Getting Started | Quick Reference | Menu Commands | Troubleshooting Unit Settings - SmartCard Use this command to create default unit settings that can be used by all the vehicles in your fleet. To set default unit settings: 1. Select Transfer to DriveRight from the SmartCard Menu. 2. Select Settings from the Transfer to DriveRight submenu. The Review Settings for SmartCard dialog box is displayed. 3. Select the Unit Settings tab near the top of the dialog box. 4. Edit the unit settings for your fleet. o Date Mode settings control the way month, day, and year are displayed. o Time Mode settings control the time of day display. o Distance Unit settings allows you to select miles and miles per hour or kilometers and kilometers per hour as your speed and distance units. 5. Click Set to save the settings, click Cancel to exit without saving the settings, or click on another tab to make additional changes to the DriveRight default settings. See also: 195 DriveRight FMS 3.7.2 User's manual Identification Settings Calibration Settings Safety Settings Timer Settings Alarm Settings Security Settings GPS Settings Back to Transfer to DriveRight | SmartCard Menu Home | Getting Started | Quick Reference | Menu Commands | Troubleshooting Safety Settings - SmartCard Use this command to create safety settings for the specified DriveRight. To set safety settings: 1. Select Transfer to DriveRight from the SmartCard Menu. 2. Select Settings from the Transfer to DriveRight submenu. The Review Settings for SmartCard dialog box is displayed. 3. Select the Safety Tab near the top of the dialog box. 4. 196 Set the Speed Limit, which is the maximum allowable vehicle speed. DriveRight FMS Help 5. Set the Accel Limit, which is the maximum allowable rate of acceleration. 6. Set the Decel Limit, which is the maximum allowable rate of deceleration. 7. Click Set to save the settings, click Cancel to exit without saving the settings, or click on another tab to make additional changes to the settings. See Also: Identification Settings Calibration Settings Unit Settings Timer Settings Alarm Settings Security Settings GPS Settings Back to Transfer to DriveRight | SmartCard Menu Home | Getting Started | Quick Reference | Menu Commands | Troubleshooting Timer Settings - SmartCard Use this command to create timer settings used by the DriveRight devices controlled by the current SmartCard. To set timer settings: 1. Select Transfer to DriveRight from the SmartCard Menu. 2. Select Settings from the Transfer to DriveRight submenu. The Review Settings for SmartCard dialog box is displayed. 197 DriveRight FMS 3.7.2 User's manual 3. Select the Timer Settings tab near the top of the dialog box. 4. Set the trip stop time in minutes. The trip stop time is the number of minutes that elapse after a vehicle stops before the DriveRight stops recording trip data. 5. Set the Driver ID Logout Time in minutes. Use a logout time of "0" to never log out the driver. The Driver ID Logout Time is the number of minutes that elapse after a vehicle stops before the driver is logged out of the DriveRight. 6. Click Set to save the settings, click Cancel to exit without saving the settings, or click on another tab to make additional changes to the DriveRight default settings. See Also: Identification Settings Calibration Settings Unit Settings Safety Settings Alarm Settings Security Settings GPS Settings Back to Transfer to DriveRight | SmartCard Menu Home | Getting Started | Quick Reference | Menu Commands | Troubleshooting Alarm Settings - SmartCard 198 DriveRight FMS Help Use this command to create default alarm settings for a specified DriveRight device. The alarm settings control the audible alarms used to indicate when the safety settings thresholds are exceeded. To set default alarm settings: 1. Select Transfer to DriveRight from the SmartCard Menu. 2. Select Settings from the Transfer to DriveRight submenu. The Review Settings for SmartCard dialog box is displayed. 3. Select the Alarm Settings tab near the top of the dialog box. The alarm settings options are displayed. 4. Set the Alarm Mode to On or Off. This controls audible alarm reporting by the DriveRight device. 5. Enable "Warn if not Logged in" to have the DriveRight device give an audible alarm if the vehicle is operated without the driver first entering his or her driver code. 6. Click Set to save the alarm settings, click Cancel to exit without saving the settings, or click on another tab to make additional changes to the DriveRight default settings. See also: Identification Settings Calibration Settings Unit Settings Safety Settings Timer Settings Security Settings 199 DriveRight FMS 3.7.2 User's manual GPS Settings Back to Transfer to DriveRight | SmartCard Menu Home | Getting Started | Quick Reference | Menu Commands | Troubleshooting Security Settings - SmartCard Use this command to create security settings for the specified DriveRight. To set security settings: To select the identification settings: 1. Select Transfer to DriveRight from the SmartCard Menu. 2. Select Settings from the Transfer to DriveRight submenu. The Review Settings for SmartCard dialog box is displayed. 3. Select the Security Settings Tab near the top of the dialog box. 4. Set the Pin Code, which is required to set the calibration and alarm settings on the DriveRight device. 5. If desired, you can enable the tamper indicator. If enabled, the tamper indicator on the DriveRight LCD screen will be displayed when a tamper event has been detected. 6. If desired, you can disable Login from the console so that a driver can log into the device using only the SmartCard. Check the Disable Login on Console box to disable console Login. This application is available for DriveRight 600E devices only. 7. Click Set to save the settings, click Cancel to exit without saving the settings, or click on another tab to make additional changes to the DriveRight settings. 200 DriveRight FMS Help See Also: Identification Settings Calibration Settings Unit Settings Safety Settings Timer Settings Alarm Settings GPS Settings Back to Transfer to DriveRight | SmartCard Menu Home | Getting Started | Quick Reference | Menu Commands | Troubleshooting GPS Settings - SmartCard Use this command to view and edit the GPS settings that can be used by the specified vehicle. Note: Even if this feature is toggled on an off, it will only work with corresponding DriveRight 600 units with GPS modules. To set GPS logging settings: 1. Select Transfer to DriveRight from the SmartCard Menu. 2. Select Settings from the Transfer to DriveRight submenu. The Review Settings for SmartCard dialog box is displayed. 3. Select the GPS Settings tab near the top of the dialog box. The GPS settings options are displayed. 201 DriveRight FMS 3.7.2 User's manual 4. Click On to turn the GPS logging feature on for all the units with a GPS module. Select Off to turn off the GPS feature for all DriveRight Devices. Select DriveRight Speed Only to log and track only the DriveRight Speed. This feature logs and tracks only the DriveRight speed for DriveRight 600 devices that are not assembled with a GPS module. 5. If On or the DriveRight Speed only button has been selected, select the Logging interval time and corresponding time unit in the Log Data Every text field. The amount of logging hours this used for this feature are displayed in Logging Hours. 6. Click Set to save the settings, click Cancel to exit without saving the settings, or click on another tab to make additional changes to the DriveRight default settings. See also: Identification Settings Calibration Settings Unit Settings Safety Settings Timer Settings Alarm Settings Security Settings Back to Transfer to DriveRight | SmartCard Menu Home | Getting Started | Quick Reference | Menu Commands | Troubleshooting Drivers List 202 DriveRight FMS Help The Drivers List dialog box allows you to set the user identifications assigned to the SmartCard currently inserted on the desktop reader. Note: The Drivers List dialog box should not be used in conjunction with DriveRight 500 devices. This feature is compatible with DriveRight 600 devices and allows you to select up to 100 drivers per device. To access the Drivers List: 1. Select Transfer to DriveRight from the SmartCard Menu. 2. Select Drivers List from the Transfer to DriveRight submenu. The Set Drivers List dialog box is displayed. 3. Select the driver name/identification number the card is assigned to, and/or select Unknown Driver (none) if all drivers in your fleet have privileges to the same card, and click the >> button. The selected drivers display in the Drivers List (to set in SmartCard) combo box. If you wish to take off a driver from this list, select the driver name and click the << button. 4. Click Set to SmartCard to program the new SmartCard with this information or click Cancel to exit without saving the new information to the SmartCard. Back to Transfer to DriveRight | SmartCard Menu 203 DriveRight FMS 3.7.2 User's manual Home | Getting Started | Quick Reference | Menu Commands | Troubleshooting Clock Adjustment The Clock Adjustment dialog box allows you to set control clock changes to the DriveRight using the SmartCard.. To adjust the DriveRight clock: 1. Select Transfer to DriveRight from the SmartCard Menu. 2. Select Clock Adjustment from the Transfer to DriveRight submenu. The Clock Adjustment dialog box is displayed. 3. Click the + Hour button set the DriveRight clock1 hour ahead, the - Hour set the clock back an hour. Use the Add and Subtract buttons to add or subtract a specified number of minutes from the DriveRight clock time. 4. Click OK to save the new clock settings, or Cancel to exit the Clock Adjustment dialog box without saving. Back to Transfer to DriveRight | SmartCard Menu Home | Getting Started | Quick Reference | Menu Commands | Troubleshooting SmartCard Clear Transfer Data The Clear Transfer Data dialog box allows you to clear all of the settings and transfer information you stored on the SmartCard. To clear the transfer data: 1. Select Clear Transfer Data from the SmartCard Menu. The Clear Transfer Data dialog box is displayed: 204 DriveRight FMS Help 2. Click Yes to clear the transfer data or No to exit the dialog box without clearing the data. Back to SmartCard Menu | Menu Commands Home | Getting Started | Quick Reference | Menu Commands | Troubleshooting SmartCard Erase The Erase dialog box allows you to erase all the stored information on your SmartCard. To erase the SmartCard: 1. Select Erase from the SmartCard Menu. The Erase dialog box is displayed: 2. Click Yes to erase the SmartCard or No to exit the dialog box without erasing the SmartCard. Back to SmartCard Menu | Menu Commands Home | Getting Started | Quick Reference | Menu Commands | Troubleshooting Wireless Menu Wireless Menu The Wireless Menu contains commands for configuring wireless devices, controlling the wireless communication and downloading features for the Wireless Download System. These new features, along with the Base Station (# 8130), Wireless On-Board Module (# 8129), and the Configuration Cable for Wireless On-Board Module (# 8131) give your fleet the ability to download data directly from the DriveRight devices to FMS without physically removing the DriveRight devices from the vehicle. The data moves wirelessly from the vehicle to FMS. 205 DriveRight FMS 3.7.2 User's manual Note: Before using the Wireless Download feature, the Base Station(s) and Wireless On-Board Module(s) must be configured using FMS. See the Base Station Installation Manual and Configuration Cable for Wireless On-Board Module Installation Manual for more information. The following Wireless Menu commands are available: Add New Base Station Add New Wireless On-Board Module Scan Wireless On-Board Modules Setup Automatic Wireless Download Start Manual Wireless Download Upgrade Firmware Select Operating Region Back to Menu Commands Home | Getting Started | Quick Reference | Menu Commands | Troubleshooting Add New Base Station The Add New Base Station dialog box configures the Base Station to wirelessly communicate with Wireless On-Board Modules and allows you to assign a position to it that makes it easily identifiable throughout FMS. To add a new Base Station: 1. Connect your Base Station to the computer's USB port. 2. Select Add New Base Station from the Wireless Menu. If this is the first time a Base Station or Wireless On-Board Module has been added to FMS, the Select Operating Region dialog box displays. 3. Select among the three choices displayed: North America, Europe, or Other. The operating region determines the power level of the wireless devices. Select Europe if the power levels of the wireless devices must not exceed CE certification requirements of less than 10 dBm. Select North America if the power levels of the wireless devices must 206 DriveRight FMS Help not exceed FCC or IC certification requirements of less than 30 dBm. Select Other if the operating region is not North America or Europe. 4. Click OK to save the operating region information or click Cancel to exit without saving. The Add New Base Station dialog box displays. The dialog box displays the location and the Position text field. If the Base Station belongs to a different location, select the correct location from the Current Location dialog box before adding the Base Station. 5. Enter a position description in the Position text box. The maximum number of characters for the Position text box is 32. 6. Click Add to add the new Base Station or Cancel to exit the dialog box without saving the new Base Station. If you clicked Add, a dialog box is displayed to confirm that the Base Station has been added to FMS. 7. Click OK to exit the dialog box. See Also: How to Add a Base Station Back to Wireless Menu Home | Getting Started | Quick Reference | Menu Commands | Troubleshooting Add New Wireless On-Board Module 207 DriveRight FMS 3.7.2 User's manual To add a new Wireless On-Board Module: 1. Use the Configuration Cable to connect the Wireless On-Board Module to your computer. 2. Select Add New Wireless On-Board Module from the Wireless Menu. If this is the first time a Base Station or Wireless On-Board Module has been added to FMS, the Select Operating Region dialog box displays. 3. Select among the three choices displayed: North America, Europe, or Other. The operating region determines the power level of the wireless devices. Select Europe if the power levels of the wireless devices must not exceed CE certification requirements of less than 10 dBm. Select North America if the power levels of the wireless devices must not exceed FCC or IC certification requirements of less than 30 dBm. Select Other if the operating region is not North America or Europe. Once an operating region has been selected, the Add New Wireless On-Board Module dialog box displays. The dialog box displays the location the Wireless On-Board Module belongs to and the Vehicle ID/Lic. Plate drop-down list box. 4. Select a Vehicle ID or license plate number from the Vehicle ID/Lic Plate drop-down list box, or select Automatic. Selecting a Vehicle ID or License plate from the drop down list assigns the Wireless On-Board Module to that vehicle. Click Browse to display the Vehicles database table. Review the full list of available vehicles to better determine the vehicle that gets assigned to the Wireless On-Board Module. Select Automatic if you do not want to select a vehicle at this time. The next time either Scan Wireless On-Board Modules or Start Manual Wireless Download is selected, or an Automatic Wireless Download has occurred, the correct Vehicle ID will be assigned to the Wireless On-Board Module based on the vehicle information stored on the DriveRight device. 208 DriveRight FMS Help 5. Click Add to add the new Wireless On-Board Module or Cancel to exit the dialog box without saving the new Wireless On-Board Module. If you clicked Add, the New Wireless On-Board Module dialog box displays, confirming that the Wireless On-Board Module has been added to the FMS database and is configured for use with your wireless fleet. 6. Click OK to exit the dialog box. Once the Wireless On-Board Module has been added to the FMS database, it can be installed in its assigned vehicle or any vehicle in your fleet if you selected Automatic in the Vehicle ID/Lic Plate drop-down list box. See the DriveRight GPS/Wireless System Installation Manual for more information on its installation and proper usage. Note: The Wireless On-Board Module should only be installed to its assigned vehicle unless Automatic is selected when adding the module. Back to Wireless Menu Home | Getting Started | Quick Reference | Menu Commands | Troubleshooting Scan Wireless On-Board Modules The Scan Wireless On-Board Modules dialog box uses the Base Station(s) to scan all of the Wireless On-Board Modules in the current location and displays the wireless communication status of each Wireless On-Board Module. Note: At the top of each hour, the Wireless On-Board Module is turned off by the DriveRight Device for two minutes. This is done to allow the DriveRight to turn on the GPS module to refresh the satellite position periodically. This occurs even without a GPS module being physically connected to your DriveRight device. FMS will not be able to communicate with the Wireless OnBoard Module(s) during this time. 1. Select Scan Wireless On-Board Modules from the Wireless Menu. The Scan Wireless On-Board Modules displays a list of all the Wireless On-Board Modules in your database associated with the currently selected location. 209 DriveRight FMS 3.7.2 User's manual 2. Click Start to scan all of the Wireless On-Board Modules. As the Base Station scans for the Wireless On-Board Modules, the status of each of the modules displays under the Status column. The color box provides a visual representation of the status for each of the Wireless On-Board Modules in the database. The color is updated throughout the scan process. The Status column on the right hand side of the dialog box also documents the status for each module. The possible statuses are: 210 DriveRight FMS Help Not Yet - The Base Station has not yet scanned for the Wireless On-Board Module. Searching for Vehicle - The Base Station is currently searching for the Wireless OnBoard module. Successful - The Base Station has successfully found and communicated with Wireless On-Board Module. Failed - The Base Station has not successfully communicated with or found errors in communicating with the Wireless On-Board Module. The scan will continue to search for the "Failed" Wireless On-Board Modules until the maximum of 10 retries has been reached. The following is a status list that corresponds to the red color box: Vehicle ID Mismatch - The Wireless On-Board Module is not installed in the assigned vehicle. To correct this problem, select the Wireless On-Board Module's record in the Wireless Devices database table and click Edit. The Edit Wireless On-Board Module dialog box displays information about the On-Board Module. Change the Vehicle ID field of the Wireless On-Board Module to Automatic to allow FMS to find the Vehicle's ID automatically. You can also install the Wireless On-Board Module into the assigned vehicle. DriveRight Not Assigned - The DriveRight has not been assigned to a vehicle or the DriveRight has not been added to the FMS database. Add the DriveRight and assign it to the corresponding vehicle. This status also occurs when there is an error communicating with the DriveRight device. See Wireless Device Communication Problems for more information. Vehicle Not Found - The Vehicle and Wireless On-Board Module are not within range of the Base Station. 3. Click Stop to abort the scan before it is completed or click Close to close the dialog box once the scan has completed. Please note that if you stop scanning before it completes the scan, the last vehicle it scans automatically contains a failed status. Note: Since it is not required to select a vehicle when adding a new Wireless On-Board Module, Unknown is displayed under the Vehicle ID column to indicate that a vehicle has not been assigned to a Wireless On-Board Module. If the Wireless On-Board Module is connected to a vehicle that is not currently in the database, you need to add both the vehicle and DriveRight to the database in order for FMS to download successfully. Back to Wireless Menu Home | Getting Started | Quick Reference | Menu Commands | Troubleshooting Setup Automatic Wireless Download The Setup Automatic Wireless Download dialog box lets you select when to automatically download some or all vehicles that are wirelessly connected to FMS. Note: FMS has to be running for the Automatic Wireless Download to occur. 1. Select Setup Automatic Wireless Download from the Wireless Menu. The Setup Automatic Wireless Download dialog box lets you select the vehicles you want to automatically download daily. By default, a vehicle associated with a newly added Wireless On-Board Module is 211 DriveRight FMS 3.7.2 User's manual automatically placed in the Vehicles in Download Queue list. This also applies to "Unknown" vehicles. The Available Vehicles list shows all available vehicles for the current location. The Vehicles in the Download Queue list shows the vehicles selected for automatic wireless download. 2. Click >>, All>>, <<, or All<< to move the vehicles between these two lists. 3. Enter the time FMS will begin the automatic download process in the Start Time box or click the Up or Down arrow buttons to change the start time. The default time is 6:00 PM. 4. Enter the amount of time you would like FMS to search for the selected vehicles in the Duration box or click the Up or Down arrow buttons to increment or decrement the hours. The duration allows you to prolong the time for retries when the Wireless OnBoard Modules are not immediately available for download, because they are either out of range or currently powered off. 5. Check the Include Weekend box to automatically download all seven days of the week. "Weekend" is defined in the Usage Report Formula dialog box. If the start time selected in this dialog box falls within the "weekend" time frame selected in the Usage Report Formula dialog box, download will not take place during the day or days included in the "weekend" definition unless the Include Weekend box is checked. 6. Click OK to save the automatic wireless download settings and prepare FMS to automatically download the Wireless On-Board Modules or click Cancel to exit without saving. Note: Since it is not required to select a vehicle when adding a new Wireless On-Board Module, Unknown is displayed under the Vehicle ID column to indicate that a vehicle has not been assigned to the Wireless On-Board Module. If the Wireless On-Board Module is connected to a 212 DriveRight FMS Help vehicle that is not currently in the database, you need to add both the vehicle and DriveRight to the database in order for FMS to download successfully. Note: Only one wireless download process is allowed at a time. If an automatic download is scheduled during a manual download, the automatic download will be delayed until the manual download is completed. If the duration period for the Automatic Download has expired before the manual download has finished, Automatic Download will not take place for that day. Back to Wireless Menu Home | Getting Started | Quick Reference | Menu Commands | Troubleshooting Start Manual Wireless Download Different from the Automatic Wireless Download, The Start Manual Wireless Download dialog box lets you select some or all vehicles in your fleet to wirelessly download immediately once you press Start Download. 1. Select Start Manual Wireless Download from the Wireless Menu or click the Manual Wireless Download Icon from the toolbar. The Start Manual Wireless Download dialog box lets you select the vehicles you want to download at this time. The Available Vehicles list shows all available vehicles for the displayed location. The Vehicles in the Download Queue list shows the vehicles selected for manual wireless download. 2. Click >>, All>>, <<, or All<< to move the vehicles between these two lists. 3. Enter the amount of time you would like FMS to search for the selected vehicles in the Duration box or click the Up or Down arrow buttons to increment or decrement the hours. The duration allows you to prolong the time for retries when the Wireless On- 213 DriveRight FMS 3.7.2 User's manual Board Modules are not immediately available for download, because they are either out of range or currently powered off. 4. Click Start Download to start the download or click Cancel to cancel the manual download. The Wireless Download Status dialog box displays when you click Start Download. Note: Since it is not required to select a vehicle when adding a new Wireless On-Board Module, Unknown is displayed under the Vehicle ID column to indicate that a vehicle has not been assigned to the Wireless On-Board Module. If the Wireless On-Board Module is connected to a vehicle that is not currently in the database, you need to add both the vehicle and DriveRight to the database for FMS to download through the Wireless On-Board Module successfully. Note: Only one wireless download process is allowed at a time. If you select Start Manual Wireless Download from the Wireless Menu while an automatic wireless download is in progress or the Wireless Download Status dialog box is currently displaying, the Do You Want to Suspend Automatic Wireless Download dialog box displays. If you click Yes, the Automatic Download will be suspended until the manual download is completed. If the duration period for the Automatic Download expires before the manual download has finished, Automatic Download will not take place for that day. Back to Wireless Menu Home | Getting Started | Quick Reference | Menu Commands | Troubleshooting Wireless Download Status The Wireless Download Status dialog box displays when the time set in the Automatic Wireless Download dialog box has occurred or when you click Start Download in Start Manual Wireless Download dialog box. Note: At the top of each hour, the Wireless On-Board Module is turned off by the DriveRight Device for two minutes, in order for the GPS module to connect with satellites. During this time, FMS will not be able to communicate with the Wireless On-Board Module(s), even if GPS is not included in your system. The Wireless Download Status dialog box displays the progress and status of the vehicles you selected to download. 214 DriveRight FMS Help The Wireless Download Status dialog box displays a table with all the vehicles selected for download and their download status, as well as their assigned vehicle and driver information. The color box provides a visual representation of the status for each of the Wireless On-Board Modules in the download list. The color is updated throughout the download process. The Status column on the right hand side of the dialog box also documents the status for each module. The possible statuses are: Not Yet - The Base Station has not yet scanned for the Wireless On-Board Module. Searching for Vehicle - The Base Station is currently searching for the Wireless OnBoard Module. In Progress - The Base Station is currently downloading DriveRight data through the Wireless On-Board Module. Successful - The Base Station has successfully found and downloaded the Wireless On-Board Module. Failed - The Base Station has not successfully communicated with or found errors in communicating with the Wireless On-Board Module. The download will continue to retry for the failed vehicles until the duration period you selected in the Setup Automatic Wireless Download or Start Manual Wireless Download dialog box has elapsed. The following is a status list that corresponds to the red color box: 215 DriveRight FMS 3.7.2 User's manual Vehicle ID Mismatch - The Wireless On-Board Module is not installed in the assigned vehicle. To correct this problem, select the Wireless On-Board Module's record in the Wireless Devices database table and click Edit. The Edit Wireless On-Board Module dialog box displays information about the On-Board Module. Change the Vehicle ID field of the Wireless On-Board Module to Automatic to allow FMS to find the Vehicle's ID automatically. You can also install the Wireless On-Board Module into the assigned vehicle. DriveRight Not Assigned - The DriveRight has not been assigned to a vehicle or the DriveRight has not been added to the FMS database. Add the DriveRight and assign it to the corresponding vehicle. This status also occurs when there is an error communicating with the DriveRight device. See Wireless Device Communication Problems for more information. Vehicle Not Found - The vehicle and Wireless On-Board Module are not within range of the Base Station. Set Clock Failed - The wireless download was completed successfully, but FMS failed to reset the DriveRight's clock. If the Synchronize time and date after every download box is checked in the Download Options dialog box, FMS synchronizes the DriveRight's internal time and date clock with the computer's clock after every download is completed. Note: If there is a problem in synchronizing your DriveRight's clock, manually make sure the DriveRight clock is still correct, otherwise subsequent data logging may have incorrect time stamps. Click Abort Download to stop the wireless download before it is completed or click Close to close the dialog box once the download has completed. Please note that if you abort the download before it completes the download, the last vehicle it scans will automatically contain a failed status. Note: Since it is not required to select a vehicle when adding a new Wireless On-Board Module, Unknown is displayed under the Vehicle ID column to indicate that a vehicle has not been assigned to the Wireless On-Board Module. If the Wireless On-Board Module is connected to a vehicle that is not currently in the database, you need to add both the vehicle and DriveRight to the database in order for FMS to download successfully. Back to Wireless Menu Home | Getting Started | Quick Reference | Menu Commands | Troubleshooting Upgrade Firmware The Upgrade Firmware dialog box lets you update the firmware for both the wireless Base Station and Wireless On-Board Modules. Note: To upgrade the firmware, connect the wireless device(s) to the USB port(s) of the computer. Both the Wireless On-Board Module and the Base Station share the same firmware. To upgrade the firmware: 1. Select Upgrade Firmware from the Wireless Menu. If this is the first time any wireless device has been connected to FMS, the Select Operating Region dialog box displays. 216 DriveRight FMS Help 2. Select among the three choices displayed: North America, Europe, or Other. The operating region determines the power level of the wireless devices. Select Europe if the power levels of the wireless devices must not exceed CE certification requirements of less than 10 dBm. Select North America if the power levels of the wireless devices must not exceed FCC or IC certification requirements of less than 30 dBm. Select Other if the operating region is not North America or Europe. 3. Once an operating region has been selected, the Upgrade Firmware dialog box displays. 4. Select a wireless device that you would like to upgrade from the Select Device to Upgrade drop-down list. The device is listed either as Base Station or Wireless On-Board Module. If you have multiple Base Stations connected, select the Base Station by its position. 5. Click Upgrade if the Current Firmware Version is not the same as the Latest Firmware Version to upgrade the device firmware. A dialog box is displayed to confirm that the firmware has been upgraded successfully: 217 DriveRight FMS 3.7.2 User's manual 6. Click OK to exit the dialog box. 7. Click Refresh if you have connected another device to your computer. The Select Device to Upgrade drop-down list refreshes to include the newly connected device(s). 8. Click Close once you are finished upgrading all the wireless devices. Back to Wireless Menu Home | Getting Started | Quick Reference | Menu Commands | Troubleshooting Select Operating Region The Select Operating Region dialog box lets you select an operating region to the wireless device(s). Selecting a region adjusts the operating legal power of the wireless device(s). 1. Select Select Operating Region from the Wireless Menu. The Select Operating Region dialog box displays. The Select Operating Region dialog box displays automatically the first time you select Add New Base Station, Add New Wireless On-Board Module, or Upgrade Firmware from the Wireless Menu. The same operating region selection applies to all wireless devices added to the database. 2. Select among the three choices displayed: North America, Europe, or Other. The operating region determines the power level of the wireless devices. Select Europe if the power levels of the wireless devices must not exceed CE certification requirements of less than 10 dBm. Select North America if the power levels of the wireless devices must not exceed FCC or IC certification requirements of less than 30 dBm. Select Other if the operating region is not North America or Europe. 218 DriveRight FMS Help 3. Click OK to save the operating region information or click Cancel to exit without saving. Note: Changing the operating region at any time only affects the settings of the subsequently added wireless devices, not the ones that have been previously added to the system. To reconfigure the setting for previously added devices, remove the wireless device(s) from the Wireless Devices database table in the Database menu, reconnect the device(s), change the operating region for the device(s), then add the wireless device(s) back into the database. Back to Wireless Menu Home | Getting Started | Quick Reference | Menu Commands | Troubleshooting Database Menu Database Menu Use the Database Menu options to open individual database tables. In the database table you can view and print records. You can also add, edit or delete records. Caution: Take extra care before deleting Company Location, DriveRight, CarChip, Driver or Vehicle records. The following Database Menu options are available: Company Locations DriveRights CarChips Wireless Devices Driver Groups Drivers Fleets Vehicles Trips Accident Logs Tamper Logs Trip Addresses Days Download Dates GPS Odometer Logs 219 DriveRight FMS 3.7.2 User's manual Safety Score Trouble Codes Readiness Codes Maintenance Back to Menu Commands Home | Getting Started | Quick Reference | Menu Commands | Troubleshooting Company Locations Use this command to view and edit data for company locations. Caution: We strongly advise against changing a location name if you use FTP Export/FTP Import, since location name plays a very important role in these operations. If you do any kind of centralized data collection do not alter location name. To view or edit data for company locations: 1. Select Company Locations from the Database menu. The Company Locations database table is displayed. 2. Click the Add New button to add a new company location. 3. Highlight a record in the database table and click Edit, or double-click a record to update the company location information. 4. Highlight a record in the database table and click Delete to delete that record. 5. Click Close to exit the database table. 6. Click Print to print the database table. See also: Add Company Location Update Company Location Back to Database Menu Home | Getting Started | Quick Reference | Menu Commands | Troubleshooting DriveRights 220 DriveRight FMS Help Use DriveRights to view or edit data for installed DriveRight devices. Note: You can only change the assigned vehicle when editing a DriveRight record. To view or edit DriveRight data: 1. Select DriveRights in the Database menu. The DriveRights database table is displayed. 2. Click the Add New button to add a new DriveRight to the database. This button starts the Add New DriveRight Wizard. 3. Highlight a record in the database table and click Edit, or double-click a record to edit the information for a specific DriveRight device. 4. Highlight a record in the database table and click Delete to delete that record. 5. Click Close to exit the database table. 6. Click Print to print the database table. See also: Edit DriveRight Setup Print DriveRights Add New DriveRight Wizard Back to Database Menu Home | Getting Started | Quick Reference | Menu Commands | Troubleshooting CarChips Use CarChips to view or edit data for installed CarChip devices. Note: You can only change the assigned vehicle or the assigned driver when editing a CarChip record in the database table. To view or edit CarChip data: 1. Select CarChip from the Database menu. The CarChip database table is displayed. 2. Click Add New to add a new CarChip to the database. This button starts the Add New CarChip Wizard. 3. Highlight a record in the database table and click Edit, or double-click a record to edit the information for a specific CarChip device. 4. Highlight a record in the database table and click Delete to delete that record. 5. Click Close to exit the database table. 6. Click Print to print the database table. See also: 221 DriveRight FMS 3.7.2 User's manual Edit CarChip Setup Add New CarChip Back to Database Menu Home | Getting Started | Quick Reference | Menu Commands | Troubleshooting Driver Groups Use Driver Groups in the Database menu to view or edit driver group data. To view or edit driver group data: 1. Select Driver Groups in the Database menu. The Driver Groups database table is displayed. 2. Click Add New to add a new driver group to the database. 3. Highlight a record in the database table and click Edit, or double-click a record to edit the record. 4. Highlight a record in the database table and click Delete to delete that record. 5. Click Close to exit the database table. 6. Click Print to print the database table. See also: Add Drivers Group Edit Drivers Group Back to Database Menu Home | Getting Started | Quick Reference | Menu Commands | Troubleshooting Wireless Devices Use Wireless Devices to view or edit data for the wireless device(s) in your fleet. To view or edit wireless device information: 1. Select Wireless Devices from the Database menu. The Wireless Devices database table is displayed. 222 DriveRight FMS Help 2. Highlight a record in the database table and click Edit. The Edit Base Station or Edit Wireless On-Board Module dialog box displays. 3. Highlight a record in the database table and click Delete to delete that record. 4. Click Close to exit the database table. 5. Click Print to print the database table. Back to Database Menu Home | Getting Started | Quick Reference | Menu Commands | Troubleshooting Drivers Use Drivers in the Database menu to view or edit driver data. To view or edit driver data: 1. Select Drivers in the Database menu. The Drivers database table is displayed. 2. Click the Add New button to add a new driver to the database. 3. Highlight a record in the database table and click Edit, or double-click a record to edit the record. 4. Highlight a record in the database table and click Delete to delete that record. 5. Click Close to exit the database table. 6. Click Print to print the database table. See also: Add Driver Edit Driver Print Drivers Back to Database Menu Home | Getting Started | Quick Reference | Menu Commands | Troubleshooting Fleets Use Fleets from the Database menu to view or edit fleet data. To view or edit fleet data: 223 DriveRight FMS 3.7.2 User's manual 1. Select Fleets from the Database menu. The Fleets database table is displayed. 2. Click the Add New button to add a new fleet to the database. 3. Highlight a record in the database table and click Edit, or double-click a record to edit the record. 4. Highlight a record in the database table and click Delete to delete that record. 5. Click Close to exit the database table. 6. Click Print to print the database table. See also: Add Fleets Edit Fleets Back to Database Menu Home | Getting Started | Quick Reference | Menu Commands | Troubleshooting Vehicles Use Vehicles from the Database menu to view or edit vehicle data. To view or edit vehicle data: 1. Select Vehicles from the Database menu. The Vehicles database table is displayed. 2. Click the Add New button to add a new vehicle to the database. 3. Highlight a record in the database table and click Edit, or double-click a record to edit the record. 4. Highlight a record in the database table and click Delete to delete that record. 5. Click Close to exit the database table. 6. Click Print to print the database table. See also: Add Vehicle Edit Vehicle Print Vehicles Back to Database Menu 224 DriveRight FMS Help Home | Getting Started | Quick Reference | Menu Commands | Troubleshooting Trips Use Trips from the Database menu to view, edit, or map trip data. To view or edit trip data: 1. Select Trips from the Database menu. The Filter For Trips dialog box is displayed. 2. Select your desired filter options. 3. Click OK to show the Trips database table or click Cancel to exit the dialog box without opening the database table. 4. Click Add New to create a new record. 5. Click Set Filter to change the filter for the displayed records. 6. Highlight a trip record and click Edit to view or edit that record in the Update window. 7. Highlight a trip record and click Delete to delete the record. 8. Click Close to exit the database table. 9. Click Print to print the database table. 10. Highlight a trip record then click Export GPS to export GPS data from that trip, or, press Control-D to export GPS data for the entire day of the currently selected record. 11. Highlight a trip record then click Map to generate a Trip Mapping Report for that trip, or, press Control-D to generate a Day Mapping Report showing all trips taken the same day as the selected trip. See also: Filter for Trips Add Trip Edit Trip Print Trips Export: GPS to Mapping Software Trip Mapping Report Back to Database Menu Home | Getting Started | Quick Reference | Menu Commands | Troubleshooting Accident Logs Use the Accident Logs command in the Database menu to open the Accident Logs database table. 225 DriveRight FMS 3.7.2 User's manual To open the Accident Logs database table: 1. Select the Accident Logs command in the Database menu. The Filter For Accident Logs dialog box is displayed. 2. Select your desired filter options. 3. Click OK to show the Accident Log database table or click Cancel to exit the dialog box without opening the database table. 4. Click Set Filter to change the filter for the displayed accident logs. 5. Highlight a specific accident record and click Edit to view that record in the Update Accident Log window. 6. Highlight a specific accident record and click Delete to delete a specific accident log record. 7. Click Close to exit the database table. 8. Click Print to print the database table. Back to Database Menu Home | Getting Started | Quick Reference | Menu Commands | Troubleshooting Tamper Logs Use Tamper Logs from the Database menu to view tamper log data. To view the Tamper Log data: 1. Select Tamper Logs from the Database menu. The Filter For Tamper Logs dialog box is displayed. 2. Select your desired filter options. 3. Click OK to show the Tamper Logs database table or click Cancel to exit the dialog box without opening the database table. 4. Click Set Filter to change the filter for the displayed records. 5. Highlight a specific record and click Edit to view that record in the Update window. Note: You cannot edit tamper log data. 6. Highlight a specific record and click Delete to delete that record. 7. Click Close to exit the database table. 8. Click Print to print the database table. 226 DriveRight FMS Help See also: Filter for Tamper Logs Edit Tamper Log Back to Database Menu Home | Getting Started | Quick Reference | Menu Commands | Troubleshooting Trip Addresses Use Trip Addresses from the Database menu to view or edit trip address data. To view or edit trip address data: 1. Select Trip Addresses from the Database menu. The Trip Addresses database table is displayed. 2. Click the Add New button to add a new trip address to the database. 3. Highlight a record in the database table and click Edit, or double-click a record to edit the record. 4. Highlight a record in the database table and click Delete to delete that record. 5. Click Close to exit the database table. 6. Click Print to print the database table. See also: Add Trip Address Edit Trip Address Back to Database Menu Home | Getting Started | Quick Reference | Menu Commands | Troubleshooting Days Use Days in the Database menu to view or edit day data. Day data summarizes vehicle information by day. As the day data is composed from the trip database in the case of Trip Computer, Trip 500AL or DriveRight 600, you cannot add any data in this dialog box. While downloading data from a DriveRight, the day data will be processed and placed into the database. 227 DriveRight FMS 3.7.2 User's manual To view or edit the day data: 1. Select Days in the Database menu. The Filter For Days dialog box is displayed. 2. Select your desired filter options. 3. Click OK to show the Days database table or click Cancel to exit the dialog box without opening the database table. 4. Click Set Filter to change the filter for the displayed records. 5. Highlight a specific record and click Edit to view that record in the Update window. 6. Highlight a specific record and click Delete to delete that record. 7. Click Close to exit the database table. 8. Click Print to print the database table. 9. day. Highlight a trip record then click Export GPS to export GPS data for trips taken on that 10. Highlight a trip record then click Map to create a Day Map for trips taken on that day. See also: Filter for Days Edit Days Print Days Export: GPS to Mapping Software Creating a Day Map Back to Database Menu Home | Getting Started | Quick Reference | Menu Commands | Troubleshooting Download Dates Use Download Dates in the Database menu to view or edit the download dates data. To view or edit the download dates data: 1. Select Download Dates from the Database menu. The Filter For Download Dates dialog box is displayed. 2. 228 Select your desired filter options. DriveRight FMS Help 3. Click OK to show the Download Dates browse window or click Cancel to exit the dialog box without opening the browse window. 4. Click Add New to create a new record. 5. Click Set Filter to change the filter for the displayed records. 6. Highlight a specific record and click Edit to view that record in the Update window. 7. Highlight a specific record and click Delete to delete that record. 8. Click Close to exit the database table. 9. Click Print to print the database table. Back to Database Menu Home | Getting Started | Quick Reference | Menu Commands | Troubleshooting GPS Use GPS from the Database menu to view or edit GPS data. To view or edit GPS data: 1. Select GPS from the Database menu. The Filter For GPS dialog box is displayed. 2. Select your desired filter options. 3. Click OK to show the GPS database table or click Cancel to exit the dialog box. 4. Click Set Filter to change the filter for the displayed records. 5. Highlight a specific record and click Edit to view the selected record. 6. Highlight a specific record and click Delete to delete that record. 7. Click Close to exit the database table. 8. Click Print to print the database table. See also: Filter for GPS Edit GPS Print GPS Back to Database Menu 229 DriveRight FMS 3.7.2 User's manual Home | Getting Started | Quick Reference | Menu Commands | Troubleshooting Odometer Logs Use the Odometer Logs command in the Database menu to view or edit odometer log data. To view or edit odometer log data: 1. Select Odometer Logs from the Database menu. The Filter For Odometer Logs dialog box is displayed. 2. Select your desired filter options. 3. Click OK to show the Odometer Logs database table or click Cancel to exit the dialog box without opening the database table. 4. Click Set Filter to change the filter for the displayed records. 5. Highlight a specific record and click Edit to edit the selected record. 6. Highlight a specific record and click Delete to delete that record. 7. Click Close to exit the database table. 8. Click Print to print the database table. See also: Filter for Odometer Logs Edit Odometer Log Back to Database Menu Home | Getting Started | Quick Reference | Menu Commands | Troubleshooting Safety Score Use Safety Score from the Database menu to view Safety Score data or to edit a driver's exempt status for a given month. To display the Safety Score database table: 1. Select Safety Score in the Database menu. The Filter For Safety Score dialog box is displayed. 2. Select your desired filter options. 3. Click OK to show the Safety Score database table or click Cancel to exit the dialog box without opening the database table. 4. 230 Click Set Filter to change the filter for the displayed records. DriveRight FMS Help 5. Highlight a specific record and click Edit to edit the selected record. 6. Highlight a specific record and click Delete to delete that record. 7. Click Close to exit the database table. 8. Click Print to print the database table. See also: Filter For Safety Score Edit Safety Score Back to Database Menu Home | Getting Started | Quick Reference | Menu Commands | Troubleshooting Trouble Codes Use Trouble Codes from the Database menu to view any trouble codes logged by a CarChip. Note: The Trouble Code database table and resulting data is only logged by a CarChip device. To view the Trouble Code data: 1. Select Trouble Codes from the Database menu. The Filter For Trouble Codes dialog box is displayed. 2. Select your desired filter options. 3. Click OK to view the Trouble Code database table or click Cancel to exit the dialog box without opening the database table. The Trouble Code database table displays the Trouble Code, description and a sample of the engine reading taken at the time the trouble code was recorded. 231 DriveRight FMS 3.7.2 User's manual 4. Click Set Filter to change the filter for the displayed record or highlight a specific record and click Edit to view that record. Note: You cannot edit trouble code records but you can view the individual record's detailed information. 5. Highlight a specific record and click Delete to delete that record. 6. Click Close to exit the database table. 7. Click Print to print the database table. See also: Filter for Trouble Codes Edit Trouble Code Record Back to Database Menu Home | Getting Started | Quick Reference | Menu Commands | Troubleshooting Readiness Codes Use Readiness Codes from the Database menu to view the readiness codes logged by a CarChip. A readiness code is used to indicate whether or not monitored emissions control systems have been tested by the OBDII system. Each emissions control system has its own monitor and related code. Some emission control components are tested continuously 232 DriveRight FMS Help throughout a trip and others are tested intermittently when predetermined operating conditions are met. Note: The Readiness Code database table and resulting data is only logged by a CarChip device at the beginning of a trip. The readiness code database displays readiness codes from the last recorded trip for every CarChip and assigned vehicle in the database. One readiness code record is available for each assigned vehicle. To view the Readiness Code data: 1. Select Readiness Codes from the Database menu. The Filter For Readiness Codes dialog box is displayed. 2. Select your desired filter options. 3. Click OK to view the Readiness Code database table or click Cancel to exit the dialog box without opening the database table. The Readiness Code database table displays the eleven possible readiness codes, whether or not the readiness code is supported for the vehicle and if the readiness monitor completed or did not complete a test at the time the readiness code monitors were recorded (usually at time of vehicle start-up) for each of the available readiness codes. The monitored readiness codes are: Catalyst Heated Catalyst Evaporative System Secondary Air System A/C System Refrigerant Oxygen Sensor Oxygen Sensor Header EGR System Misfire Fuel System Comprehensive Component Not all eleven monitors displayed on the list may be supported, or monitored by your vehicle's systems. If "Not Supported" displays in the supported column, it simply means that the monitor does not exist or is not be monitored by your vehicle. See your vehicle's manual or supporting documentation for emission monitors that your vehicle does support. The Status column displays "Complete" or "Not Complete" for the readiness codes that are supported in your vehicle and "--" for all the readiness codes that are not supported. A "Complete" means a test of that emissions monitor was completed at the time of CarChip recorded the readiness codes. A "Not Complete" could mean that the OBD system has not yet completed testing of that component or system or that a component failure may exist, but has not been identified because system testing has not been complete. Most states allow for two unset readiness codes during OBD or smog check testing. If three or more unset, non-continuous codes are present, vehicle may be deemed as "Unable to complete OBD Testing". See your state's rules and regulations for more details. 233 DriveRight FMS 3.7.2 User's manual 4. Click Set Filter to change the filter for the displayed record or highlight a specific record and click Edit to view that record. Note: You cannot edit trouble code records but you can view the individual record's detailed information. 5. Highlight a specific record and click Delete to delete that record. 6. Click Close to exit the database table. 7. Click Print to print the database table. See also: Filter for Readiness Codes Edit Readiness Code Record Back to Database Menu Home | Getting Started | Quick Reference | Menu Commands | Troubleshooting Maintenance Use Maintenance sub-menu under the Database menu to perform data maintenance procedures, such as deleting records or batch editing records in the database. 234 DriveRight FMS Help Select Delete Data from the Maintenance sub-menu to delete selected records for record types displayed in the drop down list. The record types for deletion are: o Trips o Accident Logs o Tamper Logs o Days o Download Dates o GPS o Odometer Logs Select Batch Editing from the Maintenance sub-menu to reassign certain database records to another driver or to re-calibrate speed readings for certain vehicles or drivers. Back to Database Menu Home | Getting Started | Quick Reference | Menu Commands | Troubleshooting Database Information Add Company Location Use the Add New command to create a new company location in the database. To add a new company location: 1. Select Company Locations from the Database menu. The company locations database table is displayed. 2. Click the Add New button to add a new company location. 3. The next available ID will be automatically assigned. Edit the location ID if desired. 4. Enter the location name. 5. Enter the location address. 235 DriveRight FMS 3.7.2 User's manual 6. Click OK to save the new company location or click Cancel to exit without adding a new station. See also: Update Company Location Back to Database Menu | Company Locations Home | Getting Started | Quick Reference | Menu Commands | Troubleshooting Add Download Dates Use the Add New command to add a record to the Download Dates database. To add a new download date: 1. Select Download Dates from the Database menu. The Filter for Download Dates dialog box is displayed. 2. Click OK to display the Download Dates database table. 3. Click Add New to add a download date record. The Add Download Dates dialog box is displayed. 3. Enter the new record information. 4. Click OK to save the new record or click Cancel to exit without adding a new record. The new record displays in the Download Dates database table if OK is clicked. See also: Edit Download Date 236 DriveRight FMS Help Back to Database Menu | Download Dates Home | Getting Started | Quick Reference | Menu Commands | Troubleshooting Add Driver Use the Add New command in the Drivers browser to add a new driver to the database. To add a new driver: 1. Select Drivers from the Database menu. The Drivers database table is displayed. 2. Click Add New to add a new driver. The Add Driver dialog box is displayed. 3. Enter the new record information. 4. Click OK to save the new record or click Cancel to exit without adding a new record. The new record displays in the Download Dates database table if OK is clicked. See also: 237 DriveRight FMS 3.7.2 User's manual Edit Driver Back to Database Menu | Drivers Home | Getting Started | Quick Reference | Menu Commands | Troubleshooting Add Drivers Group Use the Add New command in the Driver Groups browser to add a new drivers group to the database. To add a new drivers group: 1. Select Driver Groups in the Database menu. The Driver Groups database table is displayed. 2. Click Add New to add a new drivers group. The Add Drivers Group dialog box is displayed. 3. Enter the new record information. 4. Click OK to save the new record or click Cancel to exit without adding a new record. The new record displays in the Download Dates database table if OK is clicked. See also: Edit Drivers Group Back to Database Menu | Driver Groups 238 DriveRight FMS Help Home | Getting Started | Quick Reference | Menu Commands | Troubleshooting Add Email Entry Use Add New command in the Email List browser to add a new entry to the list. To add a new email list entry: 1. Select Email List in the Database menu. The Email List database table is displayed. 2. Click Add New to add a new entry. The Add Email Entry dialog box is displayed. 3. Enter the name, email address, any remarks you wish to add to this entry, and then select the reports to be sent to this entry. 4. Click OK to save the new record or click Cancel to exit without adding a new record. Back to Database Menu | Email List Home | Getting Started | Quick Reference | Menu Commands | Troubleshooting Add Fleets Use the Add New command in the Fleets browser to add a new fleet to the database. 239 DriveRight FMS 3.7.2 User's manual To add a new fleet: 1. Select Fleets from the Database menu. The Fleets database table is displayed. 2. Click Add New button to add a new fleet. The Add Fleets dialog box is displayed. 3. Enter the new record information. 4. Click OK to save the new record or click Cancel to exit without adding a new record. See also: Edit Fleets Back to Database Menu | Fleets Home | Getting Started | Quick Reference | Menu Commands | Troubleshooting Add Trip Use the Add New command in the Trips browser to add a new trip to the database. To add a new trip: 1. Select Trips from the Database menu. The Filter for Trips dialog box is displayed. 2. After selecting your filter options, click OK to display the Trips database table. 3. Click Add New button to add a new trip. The Add Trips dialog box is displayed. 240 DriveRight FMS Help 4. Enter the new record information. 5. Click OK to save the new record or click Cancel to exit without adding a new record. See also: Filter for Trips Database Edit Trip Back to Database Menu | Trips Home | Getting Started | Quick Reference | Menu Commands | Troubleshooting Add Trip Address Use the Add New command in the Trip Addresses browser to add a new trip address to the database. To add a new trip address: 241 DriveRight FMS 3.7.2 User's manual 1. Select Trip Addresses from the Database menu. The Trip Addresses database table is displayed. 2. Click Add New to add a new trip address. The Add Trip Addresses dialog box is displayed. 3. Enter the new record information. 4. Click OK to save the new record or click Cancel to exit without adding a new record. See also: Edit Trip Address Back to Database Menu | Trip Addresses Home | Getting Started | Quick Reference | Menu Commands | Troubleshooting Add Vehicle 242 DriveRight FMS Help Use Add New in the Vehicle database table to add a new vehicle to the database. To add a new vehicle: 1. Select Vehicle from the Database menu. The Vehicle database table is displayed. 2. Click Add New to add a new vehicle. The Add Vehicles dialog box is displayed. 3. Enter the new vehicle information. Note: You do not need to assign the vehicle to a DriveRight console at this point. You will assign the vehicle in the Add New DriveRight Wizard. 4. Click OK to save the record or click Cancel to exit without saving. See also: Edit Vehicle 243 DriveRight FMS 3.7.2 User's manual Back to Database Menu | Vehicles Home | Getting Started | Quick Reference | Menu Commands | Troubleshooting Batch Editing Select Batch Editing from the Maintenance sub-menu under the Database menu to edit records from the database based on driver or speed information. To edit certain database records from the database: 1. Select Batch Editing from the Maintenance sub-menu under the Database menu. The Batch Editing dialog box is displayed. 2. Enter any driver changes or vehicle speed adjustments in the Reassign Driver tab or Vehicle Speed Adjustment tab. 3. Click OK to change all the affected records in the database with these new parameters or click Cancel to exit without changing data. If you click OK to change the affected records, the Successfully Updated Database Tables dialog box is displayed. 4. Click OK to accept the new changes. All the databases change to display the new information set in this dialog box. Back to Database Menu Home | Getting Started | Quick Reference | Menu Commands | Troubleshooting Batch Editing: Reassign Driver Select the Reassign Driver tab in the Batch Editing dialog box allows you to assign certain trips from one driver to another and change all the database tables to reflect the new driver changes. To change certain database records from one driver to another driver in the database: 1. Select Batch Editing from the Maintenance sub-menu under the Database menu. The Batch Editing dialog box is displayed. The Reassign Driver tab is the default tab displayed when the Batch Editing dialog box is displayed. 244 DriveRight FMS Help 2. Select the driver name that you want to change in the From Driver drop down list. 3. Select the driver name that you want to replace the driver with in the To Driver drop down list. 4. In the Trips Between selection box, select a Start Date and End Date for a specific time period. 5. Click OK to change all the records listing the first driver in the database so that these records for the selected time period now list the second driver selected, or click Cancel to exit without changing data. If you click OK to change the affected records, the Successfully Updated Database Tables dialog box is displayed. 6. Click OK to accept the new changes. All the databases change to display the new information set in this dialog box. Back to Batch Editing | Database Menu Home | Getting Started | Quick Reference | Menu Commands | Troubleshooting Batch Editing: Reassign Driver Select The Reassign Driver tab in the Batch Editing dialog box allows you to assign certain trips from one driver to another and change all the database tables to reflect the new driver changes. To change certain database records from one driver to another driver in the database: 245 DriveRight FMS 3.7.2 User's manual 1. Select Batch Editing from the Maintenance sub-menu under the Database menu. The Batch Editing dialog box is displayed. Click the Vehicle Speed Adjustment tab. 2. Select the All Drivers, Driver Names, All Vehicles, or Vehicle ID/License Number radio button. If you select Driver Names, select the driver or drivers whose records need speed adjustments in the field selection box underneath Driver Name. If you select Vehicle ID / License Number, select the Vehicle ID or IDs whose record need speed adjustments in the field selection box underneath Vehicle ID/License Number. 3. In the Trips Between selection box, select a Start Date and End Date for a specific time period. 4. In the If speed >= text box, enter a vehicle speed (miles/hr) that you would like to change. This means that speeds at or above this level will be changed to level stated in the next box for the driver(s) or vehicle(s) you selected. 5. In the change it to text box, enter the vehicle speed (miles/hr) all values should be changed to. Note: The If speed >= box must have a value greater than the change it to box to created changes to the records in the database. Note: You must enter speed parameters to successfully save speed adjustments to the driver(s) or vehicle(s) selected. 1. Click OK to change all the affected records to the new adjusted speed, or click Cancel to exit without changing data. If you click OK to change the affected records, the Successfully Updated Database Tables dialog box is displayed. 246 DriveRight FMS Help 2. Click OK to accept the new changes. All the databases change to display the new information set in this dialog box. Back to Batch Editing | Database Menu Home | Getting Started | Quick Reference | Menu Commands | Troubleshooting Delete Data Select Delete Data from Maintenance sub-menu under the Database menu to delete records from the database. Although there are several opportunities to delete data in other parts of the program, this option is meant to delete large portions of data at once. Use this option carefully. Note: Before the data is deleted, you will be prompted to confirm the deletion. To delete data from the database: 1. Select Delete Data from the Maintenance sub-menu under the Database menu. 2. From the drop-down list, select the database table you wish to delete records from. A Delete Filter dialog box is displayed for record type. o Trips o Accident Logs o Tamper Logs o Days o Download Dates o GPS o Odometer Logs 3. Enter the filter information for the records to be deleted. 4. Click OK to delete the selected records or click Cancel to exit without deleting records. If you click OK to delete data, you will be prompted to confirm the deletion. 5. To confirm the deletion, click Yes in the message box or click No to cancel and return to the delete filter dialog box. Back to Database Menu Home | Getting Started | Quick Reference | Menu Commands | Troubleshooting Edit Accident Log Use Edit in the Accident Log database table to edit an accident log record. To edit an accident log record: 247 DriveRight FMS 3.7.2 User's manual 1. Select Accident Logs from the Database menu. The Filter for Accident Logs dialog box is displayed. 2. After selecting your filter options, click OK to display the Accident Logs database table. 3. Click on a record to select it. The selected record is highlighted. 4. Click Edit to edit the selected record. The Edit Accident Log dialog box is displayed. 5. Enter the Reason for Log if desired. No other part of the accident log record can be edited. 6. Click OK to save the changes or click Cancel to exit without saving. Back to Database Menu | Accident Logs Home | Getting Started | Quick Reference | Menu Commands | Troubleshooting Edit Base Station The Edit Base Station dialog box displays when a Base Station record is highlighted and the Edit button is clicked from the Wireless Devices database table. To Edit a Base Station: 248 DriveRight FMS Help 1. Highlight a Base Station record in the Wireless Devices database table and click Edit. The Edit Base Station dialog box displays. The dialog box displays the location, serial number and the position of the selected Base Station. 2. Enter a position description in the Position text box if it is necessary to change it here. The maximum number of characters for the Position text box is 32. 3. Click OK to save the changes or Cancel to exit the dialog box without saving. Back to Database Menu | Wireless Devices Home | Getting Started | Quick Reference | Menu Commands | Troubleshooting Edit CarChip Setup Use Edit in the CarChip database table to view or edit the CarChip device settings in the database. Note: The only settings you can edit from this dialog box are the Vehicle ID or Driver ID. Use the CarChip Settings Command in the CarChip menu to edit other CarChip device settings. To edit CarChip settings: 1. Select CarChips from the Database menu. The CarChips database table is displayed. 2. Click on a record to select it. The selected record is highlighted. 3. Click the Edit button to edit the selected record. The Edit CarChip Setup dialog box is displayed. 249 DriveRight FMS 3.7.2 User's manual 4. You can change the Vehicle ID or Driver Name by selecting a new ID or name from the drop-down list, if desired. 5. Click OK to save the changes or click Cancel to exit without saving. See also: Add New CarChip Back to Database Menu | CarChips Home | Getting Started | Quick Reference | Menu Commands | Troubleshooting Edit Company Location Use Edit to change the information of an existing company location in the database. To edit a company location: 1. Select Company Locations from the Database menu. The Company Locations database table is displayed. 2. Click on a record to select it. The selected record is highlighted. 3. Click the Edit button to edit the selected record. The Edit Company Location dialog box is displayed. 250 DriveRight FMS Help 4. Edit the location name and address as desired. The location ID can not be edited. 5. Click OK to save the changes or click Cancel to exit without saving. See also: Add Company Location Back to Database Menu | Company Locations Home | Getting Started | Quick Reference | Menu Commands | Troubleshooting Edit Days Use Edit in the Days database table to edit a days record. To edit a days record: 1. Select Days from the Database menu. The Filter for Days dialog box is displayed. 2. After selecting your filter options, click OK to display the Days database table. 3. Click on a record to select it. The selected record is highlighted. 4. Click Edit button to edit the selected record. The Edit Days dialog box is displayed. 251 DriveRight FMS 3.7.2 User's manual 5. Enter the new record information. 6. Click OK to save the changes or click Cancel to exit without saving. Back to Database Menu | Days Home | Getting Started | Quick Reference | Menu Commands | Troubleshooting Edit Download Date Use Edit in the Download Dates database table to edit a download date record. To edit a download date record: 1. Select Download Dates from the Database menu. The Filter for Download Dates dialog box is displayed. 2. After selecting your filter options, click OK to display the Download Dates database table. 3. Click a record to select it. The selected record is highlighted. 4. Click the Edit button to edit the selected record. The Edit Download Dates dialog box is displayed. 252 DriveRight FMS Help 5. Edit the record as desired. 6. Click OK to save the changes or click Cancel to exit without saving. See also: Add Download Dates Back to Database Menu | Download Dates Home | Getting Started | Quick Reference | Menu Commands | Troubleshooting Edit DriveRight Setup Use Edit from the DriveRights database table to view or edit the DriveRight console settings in the database. Note: The only setting you can edit from this dialog box is the Vehicle ID. Use the DriveRight Settings Command in the DriveRight menu to edit other DriveRight console settings. To edit DriveRight settings: 1. Select DriveRights in the Database menu. The DriveRights database table is displayed. 2. Click on a record to select it. The selected record is highlighted. 3. Click Edit to edit the selected record. The Edit DriveRight Setup dialog box is displayed. 253 DriveRight FMS 3.7.2 User's manual 4. You can change the Vehicle ID by selecting a new ID from the drop-down list, if desired. 5. Click OK to save the changes or click Cancel to exit without saving. See also: Add New DriveRight Back to Database Menu | DriveRights Home | Getting Started | Quick Reference | Menu Commands | Troubleshooting Edit Driver Use Edit from the Drivers database table to edit a driver record. To edit a driver record: 1. Select Drivers from the Database menu. The Drivers database table is displayed. 2. Click on a record to select it. The selected record is highlighted. 3. Click Edit to edit the selected record. The Edit Driver dialog box is displayed. 254 DriveRight FMS Help 4. Edit the record as desired. 5. Click OK to save the changes or click Cancel to exit without saving. See also: Add Driver Back to Database Menu | Drivers Home | Getting Started | Quick Reference | Menu Commands | Troubleshooting Edit Drivers Group Use Edit from the Driver Groups database table to edit a drivers group record in the database. To edit a drivers group record: 1. Select Driver Groups from the Database menu. The Driver Groups database table is displayed. 255 DriveRight FMS 3.7.2 User's manual 2. Click on a record to select it. The selected record is highlighted. 3. Click Edit to edit the selected record. The Edit Drivers Group dialog box is displayed. 4. Edit the record as desired. 5. Click OK to save the changes or click Cancel to exit without saving. See also: Add Drivers Group Back to Database Menu | Driver Groups Home | Getting Started | Quick Reference | Menu Commands | Troubleshooting Edit Email Entry Use Edit in the Email List database table to edit an email list record To edit an email list record: 1. Select Email List from the Database menu. The Email List database table is displayed. 2. Click on a record to select it. The selected record is highlighted.. 3. Click Edit to edit the selected record. The Edit Email List dialog box is displayed. 256 DriveRight FMS Help 4. Edit the record as desired. 5. Click OK to save the changes or click Cancel to exit without saving. See also: Add Email Entry Back to Database Menu | Email List Home | Getting Started | Quick Reference | Menu Commands | Troubleshooting Edit Fleets Use Edit in the Fleets database table to edit a fleet record. To edit a fleet record: 1. Select Fleets from the Database menu. The Fleets database table is displayed. 2. Click on a record to select it. The selected record is highlighted. 3. Click Edit to edit the selected record. The Edit Fleets dialog box is displayed. 257 DriveRight FMS 3.7.2 User's manual 4. Edit the Fleet Name as desired. 5. Click OK to save the changes or click Cancel to exit without saving. See also: Add Fleets Back to Database Menu | Fleets Home | Getting Started | Quick Reference | Menu Commands | Troubleshooting Edit GPS Use Edit from the GPS database table to view a GPS record. Note: GPS records cannot be edited. To view a GPS record: 1. Select GPS from the Database menu. The Filter for GPS dialog box is displayed. 2. After selecting your filter options, click OK to display the GPS database table. 3. Click on a record to select it. The selected record is highlighted. 4. Click Edit to view the selected record. The Edit GPS dialog box is displayed. 258 DriveRight FMS Help 5. Click OK or Cancel to exit. Back to Database Menu | GPS Home | Getting Started | Quick Reference | Menu Commands | Troubleshooting Edit Odometer Log Use Edit in the Odometer Logs database table to edit an odometer log record. To edit an odometer log record: 1. Select Odometer Logs from the Database menu. The Filter for Odometer Logs dialog box is displayed. 2. After selecting your filter options, click OK to display the Odometer Logs database table. 3. Click on a record to select it for editing. The selected record is highlighted. 4. Click Edit to edit the selected record. The Edit Odometer Log dialog box is displayed. 259 DriveRight FMS 3.7.2 User's manual 5. Edit the record as desired. 6. Click OK to save the changes or click Cancel to exit without saving. Note: For DriveRight 600E devices, no Odometer records exist to be edited. Back to Database Menu | Odometer Logs Home | Getting Started | Quick Reference | Menu Commands | Troubleshooting Edit Readiness Code Record Use Edit in the Readiness Code database table to view whether or not the readiness code is supported for the vehicle and if the monitor completed or did not complete a text of a monitor for each of the available readiness codes. A readiness code is used to indicate whether or not monitored emissions control systems have been tested by the OBDII system. Each emissions control system has its own monitor and related code. Some emission control components are tested continuously throughout a trip and others are tested intermittently when predetermined operating conditions are met. Note: The Readiness Code database table and resulting data is only logged by a CarChip device at the beginning of a trip. The readiness code database displays readiness codes from the last recorded trip for every CarChip and assigned vehicle in the database. One readiness code record is available for each assigned vehicle. To view a readiness code record: 1. Select Readiness Code from the Database menu. The Filter for Readiness Codes dialog box is displayed. 2. After selecting your filter options, click OK to display the Readiness Codes database table 3. Click on a record to select it for editing. The selected record is highlighted. 4. Click Edit to display the selected record. The Edit Readiness Code dialog box is displayed. 260 DriveRight FMS Help The Readiness Code dialog box displays the eleven possible readiness codes, whether or not the readiness code is supported for the vehicle and if the monitor completed a test or did not complete a test of its systems at the time the codes were recorded (usually at time of vehicle start-up) for each of the available readiness codes. The readiness codes monitored are: Catalyst Heated Catalyst Evaporative System Secondary Air System A/C System Refrigerant Oxygen Sensor Oxygen Sensor Header EGR System Misfire Fuel System Comprehensive Component Not all eleven monitors displayed on the list may be supported, or monitored by your vehicle's systems. If "Not Supported" displays in the supported column, it simply means that the monitor does not exist or is not be monitored by your vehicle. See your vehicle's manual or supporting documentation for emission monitors that your vehicle does support. The Status column displays "Complete" or "Not Complete" for the readiness codes that are supported in your vehicle and "--" for all the readiness codes that are not supported. A "Complete" means a test of that emissions monitor was completed at the time of CarChip recorded the readiness codes. A "Not Complete" could mean that the OBDII system has not yet completed testing of that component or system or that a component failure may 261 DriveRight FMS 3.7.2 User's manual exist, but has not been identified because system testing has not been complete. Most states allow for two unset readiness codes during OBD or smog check testing. If three or more unset, non-continuous codes are present, vehicle may be deemed as "Unable to complete OBD Testing". See your state's rules and regulations for more details. 5. Click OK to exit. Back to Database Menu | Readiness Codes Home | Getting Started | Quick Reference | Menu Commands | Troubleshooting Edit Readiness Code Record Use Edit in the Readiness Code database table to view whether or not the readiness code is supported for the vehicle and if the monitor completed or did not complete a text of a monitor for each of the available readiness codes. A readiness code is used to indicate whether or not monitored emissions control systems have been tested by the OBDII system. Each emissions control system has its own monitor and related code. Some emission control components are tested continuously throughout a trip and others are tested intermittently when predetermined operating conditions are met. Note: The Readiness Code database table and resulting data is only logged by a CarChip device at the beginning of a trip. The readiness code database displays readiness codes from the last recorded trip for every CarChip and assigned vehicle in the database. One readiness code record is available for each assigned vehicle. To view a readiness code record: 1. Select Readiness Code from the Database menu. The Filter for Readiness Codes dialog box is displayed. 2. After selecting your filter options, click OK to display the Readiness Codes database table 3. Click on a record to select it for editing. The selected record is highlighted. 4. Click Edit to display the selected record. The Edit Readiness Code dialog box is displayed. 262 DriveRight FMS Help The Readiness Code dialog box displays the eleven possible readiness codes, whether or not the readiness code is supported for the vehicle and if the monitor completed a test or did not complete a test of its systems at the time the codes were recorded (usually at time of vehicle start-up) for each of the available readiness codes. The readiness codes monitored are: Catalyst Heated Catalyst Evaporative System Secondary Air System A/C System Refrigerant Oxygen Sensor Oxygen Sensor Header EGR System Misfire Fuel System Comprehensive Component Not all eleven monitors displayed on the list may be supported, or monitored by your vehicle's systems. If "Not Supported" displays in the supported column, it simply means that the monitor does not exist or is not be monitored by your vehicle. See your vehicle's manual or supporting documentation for emission monitors that your vehicle does support. The Status column displays "Complete" or "Not Complete" for the readiness codes that are supported in your vehicle and "--" for all the readiness codes that are not supported. A "Complete" means a test of that emissions monitor was completed at the time of CarChip recorded the readiness codes. A "Not Complete" could mean that the OBDII system has not yet completed testing of that component or system or that a component failure may 263 DriveRight FMS 3.7.2 User's manual exist, but has not been identified because system testing has not been complete. Most states allow for two unset readiness codes during OBD or smog check testing. If three or more unset, non-continuous codes are present, vehicle may be deemed as "Unable to complete OBD Testing". See your state's rules and regulations for more details. 5. Click OK to exit. Back to Database Menu | Readiness Codes Home | Getting Started | Quick Reference | Menu Commands | Troubleshooting Edit Safety Score Use Edit in the Safety Score database table to view a Safety Score record or to edit a driver's exempt status. The exempt status allows you to exclude a driver's safety score for a given month from the Driver Safety Score Summary Report. To view a Safety Score record: 1. Select Safety Score from the Database menu. The Filter For Safety Score dialog box is displayed. 2. After selecting your filter options, click OK to display the Safety Score database table. 3. Click on a record to select it for editing. The record is highlighted. 4. Click Edit to edit the selected record. The Edit Safety Score dialog box is displayed. 5. You can edit the driver's exempt status for the selected month. Click Exempt to exclude that month's score from future Driver Safety Score Summary Reports or click Not Exempt to include that month's score in the summary report. 264 DriveRight FMS Help 6. Click OK to save the record or click Cancel to exit without saving. See also: Driver Safety Score Summary Back to Database Menu | Safety Score Home | Getting Started | Quick Reference | Menu Commands | Troubleshooting Edit Tamper Log Use Edit in the Tamper Log database table to view a tamper log record. Note: Tamper Log records cannot be edited. To view a tamper log record: 1. Select Tamper Logs from the Database menu. The Filter for Tamper Logs dialog box is displayed. 2. After selecting your filter options, click OK to display the Tamper Logs database table 3. Click on a record to select it for editing. The selected record is highlighted. 4. Click Edit to display the selected record. The Edit Tamper Log dialog box is displayed. 5. Click OK or Cancel to exit. Back to Database Menu | Tamper Logs Home | Getting Started | Quick Reference | Menu Commands | Troubleshooting 265 DriveRight FMS 3.7.2 User's manual Edit Trip Use the Edit command in the Trips browse window to edit a trip record. To edit a trip record: 1. Select Trips from the Database menu. The Filter for Trips dialog box is displayed. 2. After selecting your filter options, click OK to display the Trips browse window. 3. Click on a record to select it for editing. The record is highlighted. 4. Click Edit to edit the selected record. The Edit Trip dialog box is displayed. 5. Edit the record information as desired 6. Click OK to save the record or click Cancel to exit without saving. See also: Add Trip 266 DriveRight FMS Help Back to Database Menu | Trips Home | Getting Started | Quick Reference | Menu Commands | Troubleshooting Edit Trip Address Use Edit in the Trips database table to edit a trip address record. To edit a trip address record: 1. Select Trip Address in the Database menu. The Trip Addresses database table is displayed. 2. Click on a record to select it for editing. The selected record is highlighted. 3. Click Edit to edit the selected record. The Edit Trip Addresses dialog box is displayed. 4. Edit the record as desired. 267 DriveRight FMS 3.7.2 User's manual 5. Click OK to save the record or click Cancel to exit without saving. See also: Add Trip Address Back to Database Menu | Trip Addresses Home | Getting Started | Quick Reference | Menu Commands | Troubleshooting Edit Trouble Code Record Use Edit in the in the Trouble Code database table to view a specific trouble code record from the database. Note: The trouble code record cannot be edited or changed. To view a trouble code record: 1. Select Trouble Code from the Database menu. The Filter for Trouble Codes dialog box is displayed. 2. After selecting your filter options, click OK to display the Trouble Codes database table 3. Click on a record to select it for editing. The selected record is highlighted. 4. Click Edit to display the selected record. The Edit Trouble Code dialog box is displayed, with all of the engine status and fuel parameters that were recorded at the time the Trouble Code was logged. 268 DriveRight FMS Help 5. Click OK to exit. Back to Database Menu | Trouble Codes Home | Getting Started | Quick Reference | Menu Commands | Troubleshooting Edit Vehicle Use Edit in the Vehicles database table to edit a vehicle record. To edit a vehicle record: 1. Select Vehicles in the Database menu. The Vehicles database table is displayed. 2. Click on a record to select it for editing. The selected record is highlighted. 3. Click Edit to edit the selected record. The Edit Vehicle dialog box is displayed. 269 DriveRight FMS 3.7.2 User's manual 4. Edit the record as desired. 5. If you are changing the Default Driver to a new driver, you can click Add Driver to add a new driver the to database. 6. Check the box for Exclusive Driver to assign all trips for this vehicle to the default driver, even if there are other driver ID codes in the trip data. 7. Click OK to save the changes or click Cancel to exit without saving. See also: Add Vehicle Back to Database Menu | Vehicles Home | Getting Started | Quick Reference | Menu Commands | Troubleshooting 270 DriveRight FMS Help Edit Wireless On-Board Module The Edit Wireless On-Board Module dialog box displays when a Wireless On-Board Module record is highlighted and the Edit button is clicked from the Wireless Devices database table. To Edit a Wireless On-Board Module: 1. Highlight a Wireless On-Board Module record in the Wireless Devices database table and click Edit. The Edit Wireless On-Board Module dialog box displays. The dialog box displays the location, serial number and the Vehicle ID the Wireless OnBoard Module was assigned. 2. Select a Vehicle ID or License Plate Number from the Vehicle ID/Lic. Plate drop-down list to change the vehicle ID or click Browse to view the Vehicles Database Table. Select Automatic if you do not want to select a vehicle at this time. The next time either Scan Wireless On-Board Modules or Start Manual Wireless Download is selected, or an Automatic Wireless Download has occurred, the correct Vehicle ID will be assigned to the Wireless On-Board Module based on the vehicle information stored on the DriveRight device. 3. Check the Include in Automatic Download Queue if you wish to include this Wireless On-Board Module in the next automatic download. 4. Click OK to save the changes or Cancel to exit the dialog box without saving. Back to Database Menu | Wireless Devices Home | Getting Started | Quick Reference | Menu Commands | Troubleshooting Email List Use Email List in the Database menu to view or edit email recipients. 271 DriveRight FMS 3.7.2 User's manual To view or edit the email list: 1. Select Email List from the Database menu. The Email List database table is displayed. 2. Click the Add New button to add a person to the list. 3. Highlight a record in the database table and click Edit, or double-click a record to edit the record. 4. Highlight a record in the database table and click Delete to delete that record. 5. Click Close to exit the database table. 6. Click Print to print the database table. See also: Add Email Entry Edit Email Entry Back to Database Menu Home | Getting Started | Quick Reference | Menu Commands | Troubleshooting Filter For Deleting Accident Logs Use this filter to select Accident Log data to be deleted. To select Accident Log data for deletion: 1. Select Maintenance from the Database menu. 2. Select Delete Data from the Maintenance sub-menu and then select Accident Log in the drop-down menu. The Filter For Deleting Accident Log dialog box is displayed. 272 DriveRight FMS Help 3. Select one of three options: Click the Delete All to delete all records. Click Driver Name and select a driver from the drop-down list to delete the records for a specific driver. Click DriveRight ID and select an ID from the drop-down list to delete the records for a specific DriveRight. 4. Check Accident Logs Between and select a Start Date and End Date to delete records from a specific time period. 5. Click OK to delete the selected records or click Cancel to exit the dialog box. Back to Database Menu | Maintenance Home | Getting Started | Quick Reference | Menu Commands | Troubleshooting Filter For Deleting Days Use this filter to select Days Table records to be deleted. To delete Days Table records: 1. Select Maintenance from the Database menu. 2. Select Delete Data and then select Days in the drop-down menu. The Filter For Deleting Days dialog box is displayed. 273 DriveRight FMS 3.7.2 User's manual 2. Select one of three options: Click Delete All to select all records for deletion. Click Driver Name and select a driver from the drop-down list to select the records for a specific driver for deletion. Click DriveRight ID and select an ID from the drop-down list to select the records for a specific DriveRight for deletion. 3. Check Days Between and select a Start Date and End Date to select records from a specific time period for deletion. 4. To select for deletion only records with a high speed over a specified speed, enter a speed in the High Speed >= text box. 5. Click OK to delete the selected records or click Cancel to exit. If you click OK, a confirmation dialog box appears. 6. Click Yes to confirm deletion or click no to cancel the deletion. Back to Database Menu | Maintenance Home | Getting Started |Quick Reference | Menu Commands | Troubleshooting Filter For Deleting Download Dates Use this filter to select Download Dates records for deletion. To select Download Dates data for deletion: 274 DriveRight FMS Help 1. Select Maintenance from the Database menu. 2. Select Delete Data and then select Download Dates in the drop-down menu. The Filter For Deleting Download Dates dialog box is displayed. 2. Select one of three options: Click Delete All to delete all records. Click Driver Name and select a driver from the drop-down list to delete the records for a specific driver. Click DriveRight ID and select an ID from the drop-down list to delete the records for a specific DriveRight. 3. Check Download Dates Between and select a Start Date and End Date to delete records for a specific time period. 4. Click OK to delete the selected records or click Cancel to exit the dialog box. Back to Database Menu | Maintenance Home | Getting Started | Quick Reference | Menu Commands | Troubleshooting Filter For Deleting GPS Use this filter to select GPS data to be deleted. To select GPS data for deletion: 1. Select Maintenance from the Database menu. 275 DriveRight FMS 3.7.2 User's manual 2. Select Delete Data and then select GPS in the drop-down menu. The Filter For Deleting GPS dialog box is displayed. 2. Select one of three options: Click Delete All to delete all records. Click Driver Name and select a driver from the drop-down list to delete the records for a specific driver. Click DriveRight ID and select an ID from the drop-down list to delete the records for a specific DriveRight. 3. Check GPS Between and select a Start Date and End Date to delete records from a specific time period. 4. To delete records with a high speed over a specified speed, enter a speed in the High Speed >= text box. 5. Click OK to delete the selected records or click Cancel to exit the dialog box. Back to Database Menu | Maintenance Home | Getting Started | Quick Reference | Menu Commands | Troubleshooting Filter For Deleting Odometer Logs Use this filter to select Odometer Log data to be deleted. To select odometer log data for deletion: 276 DriveRight FMS Help 1. Select Maintenance from the Database menu. 2. Select Delete Data and then select Odometer Logs in the drop-down menu. The Filter For Deleting Odometer Logs dialog box is displayed. 2. Select one of three options: Click Delete All to delete all records. Click Driver Name and select a driver from the drop-down list to delete the records for a specific driver. Click DriveRight ID and select an ID from the drop-down list to delete the records for a specific DriveRight. 3. Click OK to delete the selected records or click Cancel to exit the dialog box. Back to Database Menu | Maintenance Home | Getting Started | Quick Reference | Menu Commands | Troubleshooting Filter For Deleting Tamper Logs Use this filter to select Tamper Log data to be deleted. To select tamper log data for deletion: 1. Select Maintenance from the Database menu. 2. Select Delete Data and then select Tamper Logs from the drop-down menu. The Filter For Deleting Tamper Logs dialog box is displayed. 277 DriveRight FMS 3.7.2 User's manual 3. Select one of four options: Click the Delete All to delete all records. Click Driver Name and select a driver from the drop-down list to delete the records for a specific driver. Click DriveRight ID and select an ID from the drop-down list to delete the records for a specific DriveRight. Click Veh ID/Lic and select an ID from the drop-down list to delete the records for a specific vehicle. 4. Check Tamper Logs Between and select a Start Date and End Date to delete records from a specific time period. 5. Click OK to delete the selected records or click Cancel to exit the dialog box. Back to Database Menu | Maintenance Home | Getting Started | Quick Reference | Menu Commands | Troubleshooting Filter For Deleting Trips Use this filter to select trip records for deletion. To select trip data for deletion: 1. Select Maintenance from the Database menu. 2. Select Delete Data and then select Trips in the drop-down menu. The Filter For Deleting Trips dialog box is displayed. 278 DriveRight FMS Help 3. Select one of four options: Click the Delete All to delete all records. Click Driver Name and select a driver from the drop-down list to delete the records for a specific driver. Click DriveRight ID and select an ID from the drop-down list to delete the records for a specific DriveRight. Click Veh ID/Lic and select an ID from the drop-down list to delete the records for a specific vehicle. 4. Check Trips Between and select a Start Date and End Date to delete records from a specific time period. 5. To delete records with a high speed over a specified speed, enter a speed in the High Speed >= text box. 6. Click OK to delete the selected records or click Cancel to exit the dialog box. Back to Database Menu | Maintenance Home | Getting Started | Quick Reference | Menu Commands | Troubleshooting Filter For Readiness Codes The Readiness Codes Filter dialog box is displayed when you select Readiness Codes from the Database menu. The Readiness Code filter allows you to select readiness code data in the Readiness Codes database table for selected vehicle or CarChip IDs based on the options you choose in the filter dialog box. 279 DriveRight FMS 3.7.2 User's manual Note: This dialog box works in correlation with CarChip only. The DriveRight device does not record trouble codes. If the Readiness Code Filter dialog box and resulting database are used in conjunction with data from a DriveRight device, the Readiness Code database will not display any readiness code records. To filter readiness code data: 1. Select Readiness Code from the Database menu. The Filter For Readiness Codes dialog box is displayed. 2. Click the Browse All to select all available readiness code records, or select a CarChip ID from the CarChip ID list box, or a Vehicle ID from the Vehicle ID/ License list box. 3. Select Trips Between and select the start and end dates to select records for a specific time period, if necessary. 4. Click OK to set the filter or click Cancel to exit the dialog box. Back to Database Menu | Trouble Codes Home | Getting Started | Quick Reference | Menu Commands | Troubleshooting Filter For Safety Score The Safety Score Filter dialog box is displayed when you select Safety Score from the Database menu or when you select Set Filter when you are exporting safety score data. The Safety Score Filter allows you to select Safety Score data based on the options you choose in the filter dialog box. 280 DriveRight FMS Help To filter Safety Score data: 1. Select Safety Score from the Database menu. The Filter For Safety Score dialog box is displayed. 2. Select one of two options: Click the Browse All to select all records. Click Driver Names and select one or more drivers from the list to select the records for a one or more drivers. 3. Check Scores Between and select a Start Date and End Date to select records for a specific time period. 4. Click OK to set the filter or click Cancel to exit the dialog box. Back to Database Menu | Safety Score Home | Getting Started | Quick Reference | Menu Commands | Troubleshooting Filter For Trouble Codes The Trouble Codes Filter dialog box is displayed when you select Trouble Codes from the Database menu. The Trouble Code filter allows you to select trouble code data to be displayed in the Trouble Code Database for selected vehicle or CarChip IDs based on the options you choose in the filter dialog box. Note: This dialog box works in correlation with CarChip only. The DriveRight device does not record trouble codes. If the Trouble Code Filter dialog box and resulting database are used in 281 DriveRight FMS 3.7.2 User's manual conjunction with data from a DriveRight device, the Trouble Code database will not display any trouble code records. To filter Trouble Code data: 1. Select Trouble Code from the Database menu. The Filter For Trouble Codes dialog box is displayed. 2. Click the Browse All to select all available trouble code records, or select a CarChip ID from the CarChip ID list box, or a Vehicle ID from the Vehicle ID/ License list box. 3. Select Trips Between and select the start and end dates to select records for a specific time period, if necessary. 4. Click OK to set the filter or click Cancel to exit the dialog box. Back to Database Menu | Trouble Codes Home | Getting Started | Quick Reference | Menu Commands | Troubleshooting Filter for Accident Logs The Filter For Accident Logs dialog box is displayed when you select Accident Logs from the Database menu or when you select Set Filter when you are exporting data. The accident log filter allows you to select data based on the options you choose in the filter dialog box. 282 DriveRight FMS Help To filter accident log data: 1. Select Accident Logs from the Database menu. The Filter For Accident Logs dialog box is displayed. 2. Select one of three options: Click the Browse All radio button to select all records. Click Driver Name and select a driver from the drop-down list to select the records for a specific driver. Click DriveRight ID and select an ID from the drop-down list to select the records for a specific DriveRight. 3. Check Accident Logs Between and select a Start Date and End Date to select records for a specific time period. 4. Click OK to set the filter or click Cancel to exit the dialog box. Back to Database Menu | Accident Logs Home | Getting Started | Quick Reference | Menu Commands | Troubleshooting Filter for Days The Filter For Days dialog box is displayed when you select Days from the Database menu or when you select Set Filter when you are exporting data. The days filter allows you to select data based on the options you choose in the filter dialog box. To filter days data: 283 DriveRight FMS 3.7.2 User's manual 1. Select Days from the Database menu. The Filter For Days dialog box is displayed. 2. Select one of three options: Click Browse All to select all records. Click Driver Name and select a driver from the drop-down list to select the records for a specific driver. Click DriveRight ID and select an ID from the drop-down list to select the records for a specific DriveRight. 3. Check Days Between and select a Start Date and End Date to select records for a specific time period. 4. To select records with a high speed over a specified speed, enter a speed in the High Speed >= text box. 5. Click OK to set the filter or click Cancel to exit the dialog box. Back to Database Menu | Days Home | Getting Started | Quick Reference | Menu Commands | Troubleshooting Filter for Download Dates The Filter For Download Dates dialog box is displayed when you select Download Dates from the Database menu or when you select Set Filter when you are exporting data. The Download Dates filter allows you to select data based on the options you choose in the filter dialog box. To filter Download Dates data: 284 DriveRight FMS Help 1. Select Download Dates from the Database menu. The Filter For Download Dates dialog box is displayed. 2. Select one of three options: Click the Browse All to select all records. Click Driver Name and select a driver from the drop-down list to select the records for a specific driver. Click DriveRight ID and select an ID from the drop-down list to select the records for a specific DriveRight. 3. Check Download Dates Between and select a Start Date and End Date to select records for a specific time period. 4. Click OK to set the filter or click Cancel to exit the dialog box. Back to Database Menu | Download Dates Home | Getting Started | Quick Reference | Menu Commands | Troubleshooting Filter for GPS The Filter For GPS dialog box is displayed when you select GPS from the Database menu or when you select Set Filter when you are exporting data. The GPS filter allows you to select data based on the options you choose in the filter dialog box. To filter GPS data: 1. Select GPS from the Database menu. The Filter For GPS dialog box is displayed. 285 DriveRight FMS 3.7.2 User's manual 2. Select one of three options: Click the Browse All to select all records. Click Driver Name and select a driver from the drop-down list to select the records for a specific driver. Click DriveRight ID and select an ID from the drop-down list to select the records for a specific DriveRight. 3. Check GPS Between and select a Start Date and End Date to select records for a specific time period. 4. To select records with a high speed over a specified speed, enter a speed in the High Speed >= text box. 5. Click OK to set the filter or click Cancel to exit the dialog box. Back to Database Menu | GPS Home | Getting Started | Quick Reference | Menu Commands | Troubleshooting Filter for Odometer Logs The Filter For Odometer Logs dialog box is displayed when you select Odometer Logs from the Database menu or when you select Set Filter when you are exporting data. The odometer logs filter allows you to select data based on the options you choose in the filter dialog box. To filter odometer log data: 286 DriveRight FMS Help 1. Select Odometer Logs from the Database menu. The Filter For Odometer Logs dialog box is displayed. 2. Select one of three options: Click Browse All to select all records. Click Driver Name and select a driver from the drop-down list to select the records for a specific driver. Click DriveRight ID and select an ID from the drop-down list to select the records for a specific DriveRight. 3. Click OK to set the filter or click Cancel to exit the dialog box. Back to Database Menu | Odometer Logs Home | Getting Started | Quick Reference | Menu Commands | Troubleshooting Filter for Tamper Logs The Tamper Logs Filter dialog box is displayed when you select Tamper Logs in the Database menu or when you select Set Filter when you are exporting data.. The tamper logs filter allows you to select tamper log records based on the options you choose in the filter dialog box. To filter tamper log data: 1. Select Tamper Logs from the Database menu. The Filter For Tamper Logs dialog box is displayed. 287 DriveRight FMS 3.7.2 User's manual 2. Select one of three options: Click the Browse All to select all records. Click Driver Name and select a driver from the drop-down list to select the records for a specific driver. Click DriveRight ID and select an ID from the drop-down list to select the records for a specific DriveRight. 3. Check Tamper Logs Between and select a Start Date and End Date to select records from a specific time period. 4. Click OK to set the filter or click Cancel to exit the dialog box without opening the browser window. Back to Database Menu | Tamper Logs Home | Getting Started | Quick Reference | Menu Commands | Troubleshooting Filter for Trips The Trips Filter dialog box is displayed when you select Trips from the Database menu or when you select Set Filter when you are exporting data. The trips filter allows you to select trip data based on the options you choose in the filter dialog box. To filter trip data: 1. Select Trips from the Database menu. The Filter For Trips dialog box is displayed. 288 DriveRight FMS Help 2. Select one of four options: Click Browse All to select all records. Click Driver Name and select a driver from the drop-down list to select the records for a specific driver. Click DriveRight ID and select an ID from the drop-down list to select the records for a specific DriveRight. Click Veh ID/Lic and select an ID from the drop-down list to select the records for a specific vehicle. 3. Check Trips Between and select a Start Date and End Date to select records for a specific time period. 4. To select records with a high speed over a specified speed, enter a speed in the High Speed >= text box. 5. Click OK to set the filter or click Cancel to exit the dialog box. Back to Database Menu | Trips | Trip Mapping Report Home | Getting Started | Quick Reference | Menu Commands | Troubleshooting Print Days Use the Print command in the Days browser to print days records. 289 DriveRight FMS 3.7.2 User's manual To print days records: 1. Select Days from the Database menu. The Filter for Days dialog box is displayed. 2. After selecting your filter options, click OK to display the Days database table. 3. Click Print. The Select Days Fields to Print dialog box is displayed. To print all fields in the records, leave the Print All Fields box checked. To print selected fields, check the Select fields to print box, then check each of the fields to be printed. 4. Click Clear All to de-select all fields, or click Set All to select all fields. 5. Click OK to print or click Cancel to exit without printing. Back to Database Menu | Days 290 DriveRight FMS Help Home | Getting Started | Quick Reference | Menu Commands | Troubleshooting Print DriveRights Use Print in the DriveRights database table to print DriveRight records. To print DriveRight records: 1. Select DriveRights from the Database menu. The DriveRights database table is displayed. 2. Click Print. The Select DriveRights Fields to Print dialog box is displayed. 3. To print all fields in the records, leave the Print All Fields box checked. 4. To print selected fields, check the Select fields to print box, then check each of the fields to be printed. 5. You can click Clear All to de-select all fields, or click Set All to select all fields. 6. Click OK to print or click Cancel to exit without printing. 291 DriveRight FMS 3.7.2 User's manual Back to Database Menu | DriveRights Home | Getting Started | Quick Reference | Menu Commands | Troubleshooting Print Drivers Use Print from the Drivers database table to print driver records. To print driver records: 1. Select Drivers from the Database menu. The Drivers database table is displayed. 2. Click Print. The Select Drivers Fields to Print dialog box is displayed. 4. To print all fields in the records, leave the Print All Fields box checked. 5. To print selected fields, check the Select fields to print box, then check each of the fields to be printed. 6. You can click Clear All to de-select all fields, or click Set All to select all fields. 7. Click OK to print or click Cancel to exit without printing. Back to Database Menu | Drivers Home | Getting Started | Quick Reference | Menu Commands | Troubleshooting 292 DriveRight FMS Help Print GPS Use Print in the GPS database table to print GPS records. To print GPS records: 1. Select GPS from the Database menu. The Filter for GPS dialog box is displayed. 2. After selecting your filter options, click OK to display the GPS database table. 3. Click Print. The Select GPS Fields to Print dialog box is displayed. 4. To print all fields in the records, leave the Print All Fields box checked. 5. To print selected fields, check the Select fields to print box, then check each of the fields to be printed. 6. You can click Clear All to de-select all fields, or click Set All to select all fields. 7. Click OK to print or click Cancel to exit without printing. Back to Database Menu | GPS Home | Getting Started | Quick Reference | Menu Commands | Troubleshooting Print Trip Records Use Print from the Trips database table to print trip records. 293 DriveRight FMS 3.7.2 User's manual To print trip records: 1. Select Trips from the Database menu. The Filter for Trips database table is displayed. 2. After selecting your filter options, click OK to display the Trips database table. 3. Click Print. The Select Trips Fields to Print dialog box is displayed. 4. To print all fields in the records, leave the Print All Fields box checked. 5. To print selected fields, check the Select fields to print box, then check each of the fields to be printed. 6. You can click Clear All to de-select all fields, or click Set All to select all fields. 7. Click OK to print or click Cancel to exit without printing. Back to Database Menu | Trips Home | Getting Started | Quick Reference | Menu Commands | Troubleshooting 294 DriveRight FMS Help Print Vehicles Use the Print command in the Vehicles database table to print vehicle records. To print vehicle records: 1. Select Vehicles from the Database menu. The Vehicles database table is displayed. 2. Click Print. The Select Vehicles Fields to Print dialog box is displayed. 3. To print all fields in the records, leave the Print All Fields box checked. 4. To print selected fields, check the Select fields to print box, then check each of the fields to be printed. 5. You can click Clear All to de-select all fields, or click Set All to select all fields. 6. Click OK to print or click Cancel to exit without printing. Back to Database Menu | Vehicles Home | Getting Started | Quick Reference | Menu Commands | Troubleshooting 295 DriveRight FMS 3.7.2 User's manual Print Wireless Devices Use Print command in the Wireless Devices database table to print records for wireless devices. To print days records: 1. Select Wireless Devices from the Database menu. The Wireless Devices database table displays. 2. Click Print. The Select Wireless Devices Fields to Print dialog box is displayed. To print all fields in the records, leave the Print All Fields box checked. To print selected fields, check the Select fields to print box, then check each of the fields to be printed. 4. Click Clear All to de-select all fields, or click Set All to select all fields. 5. Click OK to print or click Cancel to exit without printing. Back to Database Menu | Wireless Devices Home | Getting Started | Quick Reference | Menu Commands | Troubleshooting Reports Menu Reports Menu DriveRight can produce a number of useful reports. The reports can be displayed on the screen or printed. 296 DriveRight FMS Help The following reports are available: Accident Log Report Driver Safety Score Driver Safety Score Summary Exception Reports Database Reports Usage Report Trip Summary Report Tamper Logs Report Odometer Report Relationship Report Days Since Last Download Wireless Download Status Report Back to Menu Commands Menu Home | Getting Started | Quick Reference | Menu Commands | Troubleshooting Accident Log Report The Accident Log report allows you to view, print, export or map the contents of the Accident Log. To create an Accident Log Report: 1. Select Accident Log Report from the Reports Menu. The Accident Report dialog box is displayed. 297 DriveRight FMS 3.7.2 User's manual 2. Verify the Company Location. Use the Current Location command in the Setup Menu to change the location if necessary. 3. Select the DriveRight ID to be used in the report. 4. Select the Start Date and the End Date for the accident logs to be listed in the report. 5. Select the type of output for the report: Excel, Report Viewer, Map, or both Map and Excel. 6. Click OK to create the report or click Cancel to exit the dialog box. See also: Mapping Quick Reference Menu Back to Reports Menu Home | Getting Started | Quick Reference | Menu Commands | Troubleshooting Driver Safety Score Report The Driver Safety Score report allows you to customize, view, print, email, or export the Driver Safety Score. To create the Driver Safety Score Report: 1. Select Driver Safety Score Report from the Reports Menu. The Driver Safety Score dialog box is displayed. 298 DriveRight FMS Help 2. Click on the company locations to be used in the report. The selected locations are highlighted. 3. Select the Start Date and the End Date for the driver safety data to be included in the report. 4. Use the "Compare with last ___ months" text box to enter the number of months back from the start date that you want to include in the calculation of the "cumulative" score. The cumulative score will be calculated from the start date minus X months up to and including the end date. 5. Use the Sort by options to sort the output by current score, cumulative score, or the driver's name. If you sort by current score and choose "Use Color", the coloring is done based on the current score. If you sort by cumulative score, the coloring is done based on cumulative score. If you sort by driver's name, coloring is done based on the current score. 6. Select the type of output for the report: Excel, Report Viewer, or Email. Click Use Color to enable color printing. 7. Check Group By Location to group together the scores for each location. Check Drivers With Mileage Only to display only drivers with trips/mileage listed to their identification. Check Corporate Report to generate the Driver Safety Score Report based on the corporate hierarchy structure created in the Corporate Structure dialog box. 8. Click on the Formula button to view or change the Driver Safety Score parameters. 9. Click OK to create the report or click Cancel to exit the dialog box. See also: Driver Safety Score Formula 299 DriveRight FMS 3.7.2 User's manual Output to Excel Output to Email Back to Reports Menu Home | Getting Started | Quick Reference | Menu Commands | Troubleshooting Driver Safety Score Summary Report The Driver Safety Score Summary command creates a Driver Safety Score Summary Report based on the Safety Score Reports stored in the Safety Score Table. To create the Driver Safety Score Summary Report: 1. Select Driver Safety Score Summary Report from the Reports Menu. The Driver Safety Score Summary dialog box is displayed. 2. Click on the company locations to be used in the report. The selected locations are highlighted. 3. Select the Duration of the report. This is the number of months to be included in the report. 300 DriveRight FMS Help 4. Select the End Date for the report. FMS will calculate the Start Date based on the Duration and End Date. 5. Use the Sort by options to sort the output by current score, report average, or the driver's name. If you sort by current score and choose "Use Color", the coloring is done based on the current score. If you sort by report average, the coloring is done based on report average score. If you sort by driver's name, coloring is done based on the current score. 6. Select the type of output for the report: Excel, Report Viewer, or Email. Click Use Color to enable color printing. 7. Check "Group By Location" to group together the scores for each location. 8. Check "Recalc data for all months" to have the monthly scores recalculated for this report. 9. Click the Formula button to view or change the Driver Safety Score parameters. 10. Click OK to create the report or click Cancel to exit the dialog box. See also: Driver Safety Score Formula Output to Excel Output to Email Back to Reports Menu Home | Getting Started | Quick Reference | Menu Commands | Troubleshooting Exception Reports Exception Reports Exception Reports can be printed for Vehicles, Drivers, and Trip Addresses. Excessive Speed Report Night Driving Report Hard Braking Report Time Over Speed Back to Reports Menu Home | Getting Started | Quick Reference | Menu Commands | Troubleshooting 301 DriveRight FMS 3.7.2 User's manual Excessive Speed Report Use the Excessive Speed Report to identify drivers that exceed a set speed. To create an Excessive Speed Report: 1. Select Excessive Speed Report from the Exception Reports submenu in the Reports Menu. The Excessive Speed Report dialog box is displayed. 2. Verify the Company Location. Use the Current Location command in the Setup Menu to change the location if necessary. 3. Select the Sort By criteria by clicking next to either Driver Name or Date. 4. Select All Drivers to print the report for all drivers, or select Driver Names to create the report for specific drivers. 5. 302 If you are creating the report for specific drivers, select the driver's name in the list. o Click once to select the name and click a second time to clear the name. o Multiple drivers can be selected for the report. DriveRight FMS Help 6. Check "Show Most Recent Dates First" to list trips from the most recent trip to the oldest. If this box isn't checked the trips will be listed from the oldest trip to the most recent. 7. Select Trips Between to create a report that only lists trips taken between specific dates. If you select Trips Between, then indicate the Start Date and End Date for the reported trips. 8. Enter the Top Speed in the edit box. Trips with speeds in excess of the top speed will be listed in the report. 9. Click OK to create the report or click Cancel to exit the dialog box. 10. You can clear the report using the Clear Screen command in the File Menu or by clicking on the Clear Screen icon: . Back to Reports Menu | Exception Reports Home | Getting Started | Quick Reference | Menu Commands | Troubleshooting Night Driving Report Use the Night Driving Report to list trips that occur during user-defined nighttime hours. Use this report to track unauthorized night driving. To create a Night Driving Report: 1. Select Night Driving from the Exception Reports submenu in the Reports Menu. The Night Driving Report dialog box is displayed. 303 DriveRight FMS 3.7.2 User's manual 2. Verify the Company Location. Use the Current Location command in the Setup Menu to change the location if necessary. 3. Select the Sorting criteria by clicking next to either Driver Name or Date. 4. Check "Show Most Recent Dates First" to list trips from the most recent trip to the oldest. If this box isn't checked the trips will be listed from the oldest trip to the most recent. 5. Select All Drivers to print the report for all drivers, or select Driver Names to create the report for specific drivers. 6. If you are creating the report for specific drivers, click on the drivers name in the list. o Click once to select the name and click a second time to clear the name. o Multiple drivers can be selected for the report. 6. In the Define Night box enter the night times for the report. Night will begin at the After time. Night will end at the Before time. 7. In the Choose Limit box you can configure the report to list trips with at least the minimum amount of night driving time that you specify for a single trip, or you can choose to list trips for drivers with at least the minimum amount of total night driving time during the chosen date interval. 8. In the Choose Interval box, set the start and end dates for the trips to be included in the report. 9. Click OK to create the report or click Cancel to exit the dialog box. 10. You can clear the report using the Clear Screen command in the File Menu or by clicking on the Clear Screen icon: . Back to Reports Menu | Exception Reports Home | Getting Started | Quick Reference | Menu Commands | Troubleshooting Hard Braking Report Use the Hard Braking Report to identify drivers that use the brakes excessively. To create a Hard Braking Report: 1. Select Hard Braking from the Exception Reports submenu in the Reports Menu. The Hard Braking Report dialog box is displayed. 304 DriveRight FMS Help 2. Verify the Company Location. Use the Current Location command in the Setup Menu to change the location if necessary. 3. Select the Sort By criteria from the drop-down list: Driver name, Date, Decel count and Decel count rate. 4. Select All Drivers to print the report for all drivers, or select Driver Names to create the report for specific drivers. 5. If you selected Driver Names, click on the names of drivers to be included in the report. o Click once to select the name. You can click a second time to clear the name. o Multiple drivers can be selected for the report. 6. Check "Show Most Recent Dates First" to list trips from the most recent trip to the oldest. If this box isn't checked the trips will be listed from the oldest trip to the most recent. 7. In the Choose Limit box you can configure the report to include all trips with at least the indicated number of deceleration counts or you can include the trips for all drivers that exceed the minimum number of deceleration counts during the chosen date interval. 8. In the Choose Interval box, set the start and end dates for the trips to be included in the report. 9. Click OK to create the report or click Cancel to exit the dialog box. 10. You can clear the report using the Clear Screen command in the File Menu or by clicking on the Clear Screen icon: . 305 DriveRight FMS 3.7.2 User's manual Back to Reports Menu | Exception Reports Home | Getting Started | Quick Reference | Menu Commands | Troubleshooting Time Over Speed Use the Time Over Speed Report to identify drivers that speed excessively. To create a Time Over Speed Report: 1. Select Time Over Speed from the Exception Reports submenu in the Reports Menu. The Time Over Speed Report dialog box is displayed. 2. Verify the Company Location. Use the Current Location command in the Setup Menu to change the location if necessary. 3. Select the Sort By criteria from the drop-down list: Driver name, Date, Time over speed and % of time over speed.. 4. Select All Drivers to print the report for all drivers, or select Driver Names to create the report for specific drivers. 5. If you selected Driver Names, click on the names of drivers to be included in the report. o Click once to select the name. You can click a second time to clear the name. o Multiple drivers can be selected for the report. 6. In the Choose Interval box, set the start and end dates for the trips to be included in the report. 7. Check "Show Most Recent Dates First" to list trips from the most recent trip to the oldest. If this box isn't checked the trips will be listed from the oldest trip to the most recent. 306 DriveRight FMS Help 8. In the Choose Limit box, configure the report to include all single trips with at least the amount of time over the speed limit or you can configure the report to show total time over the speed limit.. 9. Click OK to create the report or click Cancel to exit the dialog box. 10. You can clear the report using the Clear Screen command in the File Menu or by clicking on the Clear Screen icon: . Back to Reports Menu | Exception Reports Home | Getting Started | Quick Reference | Menu Commands | Troubleshooting Database Reports Database Reports Database Reports can be printed for Vehicles, Drivers, and Trip Addresses. Vehicles Report Trip Addresses Report Drivers Report Back to Reports Menu Home | Getting Started | Quick Reference | Menu Commands | Troubleshooting Vehicles Report To print a Vehicles Report: 1. Select Vehicles Report from the Database command in the Reports Menu. The Vehicles Report dialog box is displayed. 307 DriveRight FMS 3.7.2 User's manual 2. Verify the Company Location. Use Current Location in the Setup Menu to change the location if necessary. 3. Select the Sorting criteria by clicking next to the desired parameter. 4. Select View for to display vehicles from a specific fleet or of a specific type. 5. Click OK to create the report or click Cancel to exit the dialog box. 6. You can clear the report using the Clear Screen command in the File Menu or by clicking on the Clear Screen icon: . Back to Reports Menu | Database Reports Home | Getting Started | Quick Reference | Menu Commands | Troubleshooting Trip Addresses Report The Trip Addressees Report displays a list of the trip addresses in your database. To view the Trip Addresses Report: 1. Select Trip Addresses Report from the Database submenu in the Reports Menu. The Trip Addresses Report is displayed. 2. You can clear the report using the Clear Screen command in the File Menu or by clicking on the Clear Screen icon: 308 . DriveRight FMS Help Back to Reports Menu Home | Getting Started | Quick Reference | Menu Commands | Troubleshooting Drivers Report To print a Drivers Report: 1. Select Drivers Report from the Database submenu in the Reports Menu. The Drivers Report dialog box is displayed. 2. Verify the Company Location. Use the Current Location command in the Setup Menu to change the location if necessary. 3. Select the sorting criteria by clicking next to the desired parameter. 4. Select View by to display drivers from a specific group. 5. Click OK to create the report or click Cancel to exit the dialog box. 6. You can clear the report using the Clear Screen command in the File Menu or by clicking on the Clear Screen icon: . Back to Reports Menu | Database Reports Home | Getting Started | Quick Reference | Menu Commands | Troubleshooting Usage Report The Usage Report provides a quick and easy-to-read summary of driver or vehicle mileage. To create a Usage Report: 309 DriveRight FMS 3.7.2 User's manual 1. Select Usage Report from the Reports Menu. The Usage Report dialog box is displayed. 2. Verify the Company Location. Use the Current Location command in the Setup Menu to change the location if necessary. 3. Select the criteria for sorting the report from the Sorting By drop-down list. 4. Select All Drivers to print the report for all drivers, or select Driver Names to create the report for specific drivers. 5. If you are creating a report for specific drivers, click on the drivers name in the list. o Click once to select the driver and click a second time to de-select the driver. o Multiple drivers can be selected for the report. 6. Select All Vehicles to print the report for all vehicles, or select Veh ID/ Lic. No to create the report for specific vehicles. 7. If you are creating a report for specific vehicles, click on the vehicles ID in the list. o Click once to select the vehicle and click a second time to de-select the vehicle. o Multiple vehicles can be selected for the report. 9. Check "Show Mileage By Trip Type" to include a breakdown of the trip mileage by type of trip. DriveRight supports the following trip types: business, personal, commute and other. 310 DriveRight FMS Help 10. To specify a start date and end date for the report, check Trips Between and then enter the starting and ending dates. 11. Select the type of output for the report: Excel, Report Viewer, or Email. 12. Click on the Formula button to set or change the time definitions for night and weekend driving. 13. Click OK to create the report or click Cancel to exit the dialog box. See also: Usage Report Formula Back to Reports Menu Home | Getting Started | Quick Reference | Menu Commands | Troubleshooting Trip Summary Report The Trip Summary Report provides a quick and easy-to-read summary of trips taken by either drivers or vehicles. The report also calculates the total trip time and distance for each driver. To create a Trip Summary Report: 1. Select Trip Summary Report from the Reports Menu. The Trip Summary Report dialog box is displayed. 311 DriveRight FMS 3.7.2 User's manual 2. Verify the Company Location. Use the Current Location command in the Setup Menu to change the location if necessary. 3. Select the Sorting criteria from the drop-down list. 4. Select All Drivers to print the report for all drivers, or select Driver Names to create the report for specific drivers. 5. If you are creating a report for specific drivers, click on the drivers name in the list. o Click once to select the drive and click a second time to de-select the driver. o Multiple drivers can be selected for the report. 6. Select All Vehicles to print the report for all vehicles, or select Veh ID/ Lic. No to create the report for specific vehicles. 7. If you are creating a report for specific vehicles, click on the vehicles ID in the list. o Click once to select the vehicle and click a second time to de-select the vehicle. o Multiple vehicles can be selected for the report. 9. Check "Show Most Recent Dates First" to list trips from the most recent trip to the oldest. If this box isn't checked the trips will be listed from the oldest trip to the most recent. 10. To specify a start date and end date for the report, check Trips Between and then enter the starting and ending dates. 11. 312 Click OK to create the report or click Cancel to exit the dialog box. DriveRight FMS Help 12. You can clear the report using the Clear Screen command in the File Menu or by clicking on the Clear Screen icon: . Back to Reports Menu Home | Getting Started | Quick Reference | Menu Commands | Troubleshooting Tamper Logs Report The Tamper Logs Report allows you to view the tamper logs for the selected drivers. The report is displayed by the DriveRight FMS Report Viewer. To view the Tamper Logs Report: 1. Select Tamper Logs Report from the Reports Menu. The Tamper Logs Report dialog box is displayed. 2. Verify the Company Location. Use the Current Location command in the Setup Menu to change the location if necessary. 3. Select the Sort by criteria by clicking next to either Driver Name or Date. 313 DriveRight FMS 3.7.2 User's manual 4. Check "Show Most Recent Dates First" to list trips from the most recent trip to the oldest. If this box isn't checked the trips will be listed from the oldest trip to the most recent. 5. Check All Drivers to create an Tamper Logs Report for all drivers in the database. 6. Check Driver Names to create an Tamper Logs Report for specific drivers in the database. 7. If you are creating the report for specific drivers, select the driver name from the list. o Click once to select a driver. Click a second time to de-select. o Multiple drivers can be selected for the report. 8. Select Tamper Logs Between to create a report that only lists Tamper Logs recorded between specific dates. If you select Tamper Logs Between, then indicate the Start Date and End Date for the report. 9. Enter the maximum allowable time between unplugging the DriveRight and downloading. The report will include all include all times the limit was exceeded. 10. Enter the maximum allowable time between downloading the DriveRight and reconnecting to the vehicle. The report will include all include all times the limit was exceeded. 11. Click OK to create the report or click Cancel to exit the dialog box. 12. You can clear the report using the Clear Screen command in the File Menu or by clicking on the Clear Screen icon: . Back to Reports Menu Home | Getting Started | Quick Reference | Menu Commands | Troubleshooting Relationship Report The Relationship Report displays the vehicle and default driver assigned to each of the DriveRight devices in your database. To view the Relationship Report: 1. Select Relationship Report from the Reports Menu. The report is displayed using the DriveRight FMS Report Viewer. 2. You can clear the report using the Clear Screen command in the File Menu or by clicking on the Clear Screen icon: Back to Reports Menu 314 . DriveRight FMS Help Home | Getting Started | Quick Reference | Menu Commands | Troubleshooting Odometer Report The Odometer Report allows you to view the odometer reading for vehicles in the database, as well as the number of days since the last download for that vehicle and the date the last odometer adjustment was made. A report option allows you to included the default driver for each vehicle listed in the report. To view the Odometer Report: 1. Select Odometer Report from the Reports Menu. The Odometer Report dialog box is displayed. 2. Verify the Company Location. Use the Current Location command in the Setup Menu to change the location if necessary. 3. Check All Vehicles to create an Odometer Report for all vehicles in the database. 4. Check Veh ID/Lic. No to create an Odometer Report for specific vehicles in the database. 5. 6. If you are creating the report for specific vehicles, select the vehicle's ID from the list. o Click once to select the vehicle and click a second time to clear the vehicle. o Multiple vehicles can be selected for the report. Select the Sort By criteria from the drop-down list: Vehicle ID, License or Odometer. 7. Check Show Default Driver if you want the name of the default driver for each vehicle included in the report. 8. Click OK to create the report or click Cancel to exit the dialog box. 315 DriveRight FMS 3.7.2 User's manual 9. o If you click OK, the report is displayed using the Report Viewer. o You can print the report using the Print command in the File Menu. You can clear the report using the Clear Screen command in the File Menu or by clicking on the Clear Screen icon: . Back to Reports Menu Home | Getting Started | Quick Reference | Menu Commands | Troubleshooting Other Reports Menu Information Days Since Last Download The Days Since Last Download Report allows you to quickly see the number of days that have elapsed since a DriveRight or CarChip device has been downloaded into the DriveRight FMS database. The report is sorted by the number of days since the last download. Devices with the most number of days since the last download are listed first. To create the Days Since Last Download Report: 1. Select Days Since Last Download from the Reports Menu. The Days Since Last Download Report dialog box is displayed. 2. Select All Locations to create a report for all DriveRight and CarChip devices in all locations in your database, or select Location Names to create a report for specific locations, then select the locations from the list. 3. 316 • Click once to select a location and click a second time to clear the location from the report. • Multiple locations can be selected for this report. Click OK to create the report or click Cancel to exit. DriveRight FMS Help o If you click OK, the report is displayed using the Report Viewer. 4. To print the report, use the Print command in the File Menu. 5. To clear the report from the screen, use the Clear Screen command in the File Menu or click on the Clear Screen icon: . Back to Reports Menu Home | Getting Started | Quick Reference | Menu Commands | Troubleshooting Driver Safety Score Formula Use this dialog box to edit the parameters used in the Driver Safety Score: To modify the Driver Safety Score parameters: 1. Select Driver Safety Score Report from the Reports Menu. The Driver Safety Score dialog box is displayed. 2. Click Formula in the lower right corner of the Driver Safety Score dialog box. The Score Parameters dialog box is displayed. 317 DriveRight FMS 3.7.2 User's manual 3. Edit the parameters as desired: • Maximum Download Days - This parameter represents the maximum number of days between downloads, during the selected score date range. • Current Location Default Settings - Shows the default setting values for the current location. Note that even if multiple locations are selected for the report, this section of the dialog box always shows setting for the current location. • Coloring cut-off - Represents the score cut-off for Excel output. • Scoring Options Use DriveRight Console Method: Calculates Driver Safety Score using formula used in the DriveRight console. Otherwise the default method is used. Allow For Scores Below Zero: Check this if you need to see score values which are below zero. If this is unchecked, all scores below zero are set to zero. Use Heavy Vehicle Values: Check this option, if your fleet has a mix of heavy and light vehicles and you need to use different 'Score Thresholds' for Heavy and Light vehicles. If you uncheck this option, the Heavy column of 'Score Thresholds' section is disabled, and the values showed in Light column are used for calculating scores. Use Vehicle Speed Threshold: If this option is selected, instead of using the same vehicle speed limit for vehicles, the report is calculated by looking at individual vehicle speed limits. 4. Click Defaults at any time to restore the default parameters. 5. Click OK to save the changes or click Cancel to exit the dialog box without saving any changes. Back to Reports Menu | Driver Safety Score Home | Getting Started | Quick Reference | Menu Commands | Troubleshooting Output to Email When you select Output to Email, the report data is first exported to Excel which automatically creates an Outlook email massage with the report data. • If you have HTML enabled in Outlook, the report will be placed in the body of the message. • If HTML is not enabled then Excel attaches the report to an Outlook message. • Requires MS Outlook. The email feature will not work with other email software. See also: Output to Report Viewer Output to Excel 318 DriveRight FMS Help Back to Reports Menu Home | Getting Started | Quick Reference | Menu Commands | Troubleshooting Output to Excel When you select Output to Excel, the report data is formatted into a tab-delimited text file. DriveRight FMS then automatically opens MS Excel and loads the report data, which is then displayed on your computer in Excel. Notes about displaying reports in Excel: • The first time this option is used you may wish to disable the virus macro checking of Excel 97 or later to avoid having to answer these dialogs each time. • In Excel you will find two worksheets, one with the scores, and the second containing the formula used. • The report formats the date with two-digit years. Because Excel displays dates using the format chosen in your Windows settings, you may need to modify the Windows date setting. To do this, click the Start button, then Control Panel, then Regional Settings, then Date, and specify the Short date style: M/d/yy.. See also: Output to Report Viewer Output to Email Back to Reports Menu Home | Getting Started | Quick Reference | Menu Commands | Troubleshooting Output to Report Viewer The DriveRight FMS Report Viewer is used to display reports in the main program window. • Reports displayed using the Report Viewer can be printed by clicking Print in the File Menu. • You can clear the report selecting Clear Screen in the File Menu or by clicking the Clear Screen icon: . See also: Output to Excel Output to Email 319 DriveRight FMS 3.7.2 User's manual Back to Reports Menu Home | Getting Started | Quick Reference | Menu Commands | Troubleshooting Usage Report Formula The Usage Report Formula allows you to define night driving based on the time of day. You can define weekend driving based on day of the week and the time of day. To change the Usage Report formula: 1. Select Usage Report from the Report Menu. 2. Click Formula from the Usage Report dialog box. The Usage Report Formula dialog box displays. 3. You can change the times used to define when Night begins and end in the formula by entering the new time directly in the After and Before edit boxes or by selecting the hour, minute, second or AM / PM positions and using the up and down scroll arrows to change the setting. 4. Change the days of the week used to define weekend driving by selecting the day of the week and time you want the weekend to start in the From box and the day of the week and time you want the weekend to end in the To box. 5. Click OK to save the formula or click Cancel to exit the dialog box without saving the formula. Note: The days and times selected here will effect the days and times Automatic Wireless Download occurs if the Include Weekend box is unchecked in the Setup Automatic Wireless Download dialog box. See also: Usage Report Back to Reports Menu | Usage Report 320 DriveRight FMS Help Home | Getting Started | Quick Reference | Menu Commands | Troubleshooting Wireless Download Status Report The Wireless Download Status Report allows you to view the wireless download status for all the vehicles wirelessly linked to FMS. The report is displayed in the DriveRight FMS Report Viewer. To view the Wireless Download Status Report: 1. Select Wireless Download Status from the Reports Menu. The Wireless Download Status Report dialog box is displayed. 2. Select the company locations in the Select Locations box. 3. Select an option in the Sort By box by clicking the radio button next to the option. The sort options are Vehicle ID, Driver Name, Last Download Status, and Days Since Last Download. 4. Click OK to create the report or click Cancel to exit the dialog box. 5. You can clear the report by selecting Clear Screen in the File Menu or by clicking the Clear Screen icon: Back to Reports Menu Home | Getting Started | Quick Reference | Menu Commands | Troubleshooting Mapping Menu Mapping Menu Note: DriveRight FMS Mapping requires Microsoft MapPoint. The following commands are available in the Mapping Menu: Open Map 321 DriveRight FMS 3.7.2 User's manual Save Map E-Mail Map MapPoint Version Set Speed Range See also: Mapping Quick Reference Menu DriveRight FMS Mapping Requirements Back to Menu Commands Home | Getting Started | Quick Reference | Menu Commands | Troubleshooting Open Map Use the Open Map command to view a previously saved DriveRight GPS map. To open a map: 1. Select Open Map in the Mapping menu. The Open dialog box is displayed. 2. Click the map file you wish to view and then click Open, or just double-click the file to open it. The map is opened in the FMS window. 322 DriveRight FMS Help 3. Click the Clear Screen Icon File Menu Clear Screen command. to remove the map from the FMS window, or use the See Also: Viewing Maps Back to Mapping Menu Home | Getting Started | Quick Reference | Menu Commands | Troubleshooting Save Map Use the Save Map command to save a DriveRight GPS map. To save a map: 1. Select Save Map in the Mapping menu. The Save As dialog box is displayed. 2. Enter the file name for the map file then click Save to save the map or click Cancel to exit the dialog box without saving the map. Note: The Maps directory is located in the DriveRight FMS program folder. See Also: Viewing a Map 323 DriveRight FMS 3.7.2 User's manual Back to Mapping Menu Home | Getting Started | Quick Reference | Menu Commands | Troubleshooting E-Mail Map Use the E-Mail Map command to e-mail a DriveRight GPS map. Note: DriveRight FMS can only e-mail the map currently displayed in the program window. Requires MS Outlook. To e-mail a map: 1. Select E-Mail Map in the Mapping menu. DriveRight FMS opens a new mail message window in MS Outlook with the map included as an attachment. 2. Address the message and edit the subject and content as you desire. 3. Click Send to send the message or close the message window to cancel the e-mail . See also: Viewing Maps Back to Mapping Menu Home | Getting Started | Quick Reference | Menu Commands | Troubleshooting MapPoint Version Use the MapPoint Version command to select either MapPoint North American or MapPoint Europe. To select your MapPoint version: 1. Select MapPoint Version from the Mapping menu. The MapPoint dialog box is displayed. 324 DriveRight FMS Help 2. Click MapPoint version you are using to select it. 3. Click OK to change the MapPoint version or click Cancel to exit the dialog box without changing the MapPoint version. Back to Mapping Menu Home | Getting Started | Quick Reference | Menu Commands | Troubleshooting Set Speed Ranges You set up to 8 speed ranges to identify vehicle speed in DriveRight FMS mapping reports. To set the speed ranges: 1. Click Set Speed Ranges in the Mapping menu. The Set Speed Ranges dialog box is displayed. 325 DriveRight FMS 3.7.2 User's manual 2. Select the number of speed ranges to be used in mapping reports. Each range will be represented by a push-pin of the indicated color when a map is created. 3. Edit the "To" column to adjust the speeds indicated for each range. 4. Click OK to save the changes or click Cancel to exit without saving the changes. See also: Mapping Overview Back to Mapping Menu Home | Getting Started | Quick Reference | Menu Commands | Troubleshooting Help Menu The following commands are available in the Help Menu: • Help Topics Opens the Help Topics window showing the Contents, Index, and Search options. • About DriveRight FMS Displays the program version information, the database type, and the copyright information. 326 DriveRight FMS Help Back to Menu Commands Home | Getting Started | Quick Reference | Menu Commands | Troubleshooting Troubleshooting Troubleshooting Menu If you encounter problems installing or using DriveRight FMS, please contact Davis Instruments Technical Support. Note: If you encounter any type of problems, the errors are logged in the log file eventLog.txt, present in DriveRight FMS install directory. The following DriveRight FMS troubleshooting help is available: Device Communication Problems Database Connection Problems Wireless Device Communication Problems SmartCard Desktop Reader Device Communication Problems Miscellaneous Problems Contacting Davis Instruments Back to Home Home | Getting Started | Quick Reference | Menu Commands | Troubleshooting Device Communication Problems Take the following steps if the software does not communicate with a DriveRight or CarChip device: 1. DriveRight devices only - Check to make sure the DriveRight console is in the CURRENT mode instead of in sleep mode. If the LCD screen is blank, the console is in sleep mode. Press the MODE key to put the console in active mode.. 2. Check that the correct Serial Port is selected. 3. If you have other programs running which use the serial port, such as the Palm HotSync Manager and the CarChip software, close those programs and try again. 4. Check if the hardware is ok and that you have a working communication port. If necessary, contact your PC supplier. See also: Communications Port - DriveRight 327 DriveRight FMS 3.7.2 User's manual Communications Port - CarChip Back to Troubleshooting Menu Home | Getting Started | Quick Reference | Menu Commands | Troubleshooting Database Connection Problems Since DriveRight FMS supports multiple database systems, things could go wrong during database connection due to various reasons. Database Setup Error Refer to the instructions in the message box if you get the following error message: Database Not Setup Properly Refer to the instructions below if you get the following error message: 328 o If you are using MS Access: The database does not exist at the specified location. o If you are using any other database: Either the database server is not running, or you do not have enough permissions to connect. Please refer to database configuration in the DriveRight FMS Database Selection Guide. DriveRight FMS Help Back to Troubleshooting Menu Home | Getting Started | Quick Reference | Menu Commands | Troubleshooting Wireless Device Communication Problems Make sure the Base Station is connected to the USB port of the computer and the bottom LED is green. Otherwise, contact Davis Instruments technical support. Driver Installed successfully but is not communicating with the Wireless Device 1. Ensure that the Wireless Device driver is correctly installed from the CD. Go to the Device Manager on your computer and view the Universal Serial Bus Controllers list. Left click on the controller labelled USB Serial Converter and select Properties from the menu. If this controller is not listed, see the FMS Getting Started Guide for instructions on installing the Wireless Device Drivers. There may be multiple "USB Serial Converter" drivers listed depending on the number of wireless devices connected to the computer. The Device Properties dialog box displays. The Device Type displayed should be "Universal Serial Bus Controllers" and the Manufacturer displayed should be "FTDI". 329 DriveRight FMS 3.7.2 User's manual 2. Select the Advanced Tab. In the Configuration box, make sure the Load VCP check box is unchecked. 330 DriveRight FMS Help 3. Select the Driver Tab. If the Driver Date is anything other than 5/19/2006, reinstall the Wireless Device Driver by clicking Update Device Driver. A Found New Hardware dialog box should display through your operating system. If the dialog box does not display, check the connection between the hardware and your computer, or see your operating system’s documentation for more information. If the dialog box still does not display, contact Davis Technical Support for help with this problem. 331 DriveRight FMS 3.7.2 User's manual 332 DriveRight FMS Help 4. Click the No, not at this time field and click Next. It is important that you do not allow your operating system to automatically check the web for drivers because it could install versions of drivers that may have compatibility issues with the accessory or FMS. The second dialog box displays. 5. Click Install from a list or specific location and click Next. The Please Choose Your Search and Installation Options dialog box displays. 333 DriveRight FMS 3.7.2 User's manual 6. Click Search for the best driver in these locations and select the check box Include this location in the search. 7. Click Browse. 8. Navigate to the DriveRight directory. A list of subfolders displays. When DriveRight FMS is installed, the drivers for the wireless devices are stored under the DriveRight directory so that they can be installed at any time wireless devices are introduced into FMS. The wireless device drivers are located in the "FTDI Drivers" subfolder. 334 DriveRight FMS Help 9. Select the "FTDI Drivers" folder and click OK. 10. Install the driver only once, even if installing both the Base Station and the Configuration Cable. The driver works seamlessly with both. 11. Once the installation is complete, click Finish. 12. Test the communication between FMS and the Base Station by Starting a Wireless Scan or Manually Downloading Wireless On-Board Modules. The bottom LED on the Base Station should flash orange if it is communicating successfully with the computer. If FMS is still having trouble communicating with the Base Station, contact Davis Instruments Technical support. Base Station Drivers added successfully, still not finding vehicles The Base Station can only communicate with the Wireless On-Board Module(s) that belong to the same location it was assigned. Check the assigned location for the Base Station and Wireless On-Board Modules in the Wireless Devices database table. If they do not share the same location, delete the device(s) and re-add them, assigning them all to the correct location. Guidelines for setting up Wireless Devices Use the following guidelines to ensure good communication between the Base Station and the Wireless On-Board Modules in the field. • The path between them should be line-of-sight, and not through walls or trees, or around corners. • The distance between the Wireless On-Board Module and the base station should be 600ft (200m) or less. 335 DriveRight FMS 3.7.2 User's manual • With the wire tail up, the Wireless On-Board Module should be mounted high on the vehicle windshield and oriented as shown in the GPS/Wireless Interface System Installation Manual. • The Base Station should be mounted in a high location with its antenna pointing straight up. • The Base Station should be mounted away from any other radio transmitters or microwave ovens. Guidelines for Advanced Extending Communication Range • Install more than one Base Station to cover a wider area. • Due to the limited USB cable length, use a 3rd party device to extend distance between the Base Station and the computer. Refer to the Base Station Installation Manual for more information. • Using non-metallic and weather-proof housing in which to store the Base Station(s) outside. • Place the Base Station antenna outside where it is visible to the vehicles and use a short antenna connection cable. Back to Troubleshooting Menu Home | Getting Started | Quick Reference | Menu Commands | Troubleshooting SmartCard Desktop Reader Device Communication Problems Installing Drivers for the SmartCard Desktop Reader The DriveRight SmartCard Desktop Reader (# 8108) works with the DriveRight SmartCard System to upload data from a DriveRight 600 or 600E to a computer running DriveRight FMS version 3.3 or later. The SmartCard Desktop Reader connects to a computer via a USB port. USB drivers must be installed for the SmartCard Desktop Reader to properly communicate with DriveRight FMS. This can be done during DriveRight FMS installation or at any time a SmartCard Desktop Reader is present for set up. A SmartCard Desktop Reader must be available, so it can be configured during driver installation. Note: The following installation was completed in a Windows XP operating system. The process may vary depending on your operating system. 1. Navigate to the DriveRight directory via MicroSoft Windows Explorer or some other means. A list of subfolders displays. 2. Select SmartCard USB Drivers. Double-click ACS Setup.exe The Installation Wizard starts. If the PC/SC driver was previously installed, the Information dialog box displays. It should be removed before installing the ACS Proprietary Driver. 336 DriveRight FMS Help I 3. Unplug the SmartCard Desktop Reader before installing the driver. 4. Click Install. The Information dialog box displays, alerting you that the driver is being installed. 5. Plug in the accessory to an available USB Port and click OK. A Found New Hardware dialog box should display through your operating system. If the dialog box does not display, check the connection between the hardware and your computer, or see your operating system’s documentation for more information. If the dialog box still does not display, contact Davis Technical Support for help with this problem. 337 DriveRight FMS 3.7.2 User's manual 6. Click the No, not at this time field and click Next. It is important that you do not allow your operating system to automatically check the web for drivers because it could install versions of drivers that may have compatibility issues with the accessory or FMS. The second dialog box displays. 338 DriveRight FMS Help 7. Click Install the Software Automatically and click Next. The Hardware Installation dialog box displays. 8. Click Continue Anyway. The new drivers install automatically. 9. Click Finish once the installation is complete. Once the installation is complete, ACR38 USB Smart Card Reader (Proprietary Mode) should display in the Device Manager under the Universal Serial Bus Controllers list. FMS can now properly recognize the SmartCard Desktop Reader and the correct driver displays in the SmartCard Reader Setup dialog box. 339 DriveRight FMS 3.7.2 User's manual Removing PC/SC Drivers for SmartCard Desktop Reader There are two sets of ACS SmartCard Desktop Reader drivers available for use with the SmartCard Desktop Reader: The PC/SC Driver and the ACS Proprietary Driver. FMS uses the Proprietary Driver to communicate with the SmartCard Desktop Reader. Since the PC/SC Driver and the Proprietary Driver are not compatible, the PC/SC driver must be uninstalled. The PC/SC Driver may install automatically by your computer if the SmartCard Desktop Reader was installed before DriveRight FMS has been installed. To avoid this, do not plug in the SmartCard Desktop Reader before DriveRight FMS has been installed. Note: The following instructions are based on procedures needed in a Windows XP operating system. The process may vary depending on your operating system. To verify if the PC/SC SmartCard Driver was installed: 1. In Windows XP, open the Control Panel. 2. Double-click System. The System Properties dialog box displays. 3. Click the Hardware tab and then click Device Manager. The Device Manager dialog box displays. If the PC/SC driver has been installed, the ACR38 SmartCard Reader driver is displayed under Smart card readers. This driver will not appear anywhere in DriveRight FMS if it is installed. 340 DriveRight FMS Help To uninstall the PC/SC driver: The SmartCard Desktop Reader must be plugged in before the driver can be removed. 1. In Windows Explorer or similar browser window, navigate to the DriveRight directory or the DriveRight FMS installation CD and the folder SmartCard USB Drivers. 2. Double-click ACS Setup.exe to run the ACS Driver setup program. The Information dialog box displays if the driver was previously installed. 341 DriveRight FMS 3.7.2 User's manual 3. Click OK. The ACR38 Proprietary Driver Installation Wizard dialog box displays. 4. Click Uninstall to remove the driver. When the program finishes removing the driver, the Confirm dialog box displays. 5. Unplug the SmartCard driver from the computer and click Yes. 6. After your computer restarts, follow the steps for installing the SmartCard Proprietary Driver. Once the installation is complete, ACR38 USB Smart Card Reader (Proprietary Mode) should display in the Device Manager under the Universal Serial Bus 342 DriveRight FMS Help Controllers list. FMS can now properly recognize the SmartCard Desktop Reader and the correct driver displays in the SmartCard Reader Setup dialog box. Back to Troubleshooting Menu Home | Getting Started | Quick Reference | Menu Commands | Troubleshooting Miscellaneous Problems If you selected the wrong database type during the initial program configuration, you can manually reset the database type in the config.txt file and then start over all again. 1. If DriveRight FMS is open, close it. 2. First locate the configuration file config.txt present in DriveRight FMS install directory. 3. Open the file (it should come up in MS Notepad), and you’ll see the following text near the beginning of the file: ############################################## # this variable represents the database type 343 DriveRight FMS 3.7.2 User's manual # used to store the data # 0- represents Database connection is not yet configured # 1- represents MS Access # 2- represents MySQL # 3- represents Oracle # 4- represents MSDE/MS SQL ############################################## DATABASE_TYPE=2 4. Edit the last line, and replace the number by 0 (zero, not capital O). After you edit the variable, the text in the file looks like this: DATABASE_TYPE=0 5. Save the file and close MS Notepad. 6. Run DriveRight FMS again and you will prompted to select the database type. If you need assistance, refer to the database installation instructions in the DriveRight FMS Database Selection Guide. Back to Troubleshooting Menu Home | Getting Started | Quick Reference | Menu Commands | Troubleshooting Contacting Davis Instruments You may contact Davis Instruments for technical support or product information using any of the methods shown below. Technical Support Our Technical Support Team is available Monday through Friday, 7:00 a.m. to 5:30 p.m. Pacific Time. Or use our website, fax, fax-back, or e-mail any time day or night. Phone Technical Support: 510-732-7814 Fax Technical Support: 510-670-0589 E-Mail Technical Support Automotive Support Web Site The Automotive Support section of our web site is your source for DriveRight FAQs, instruction manuals, software downloads, and spec sheets. 344 DriveRight FMS Help Other Ways to Contact Davis Instruments Sales (US & Canada): 800-678-3669 Sales (Outside the US & Canada): 510-732-9229 Fax: 510-670-0589 E-Mail to our Customer Service Department: [email protected] E-Mail comments or general information to [email protected] Davis Instruments Web Site Visit the Davis instruments web site to find additional products Back to Menu Commands | Troubleshooting Menu Home | Getting Started | Quick Reference | Menu Commands | Troubleshooting Miscellaneous Information Copyrights Copyright Notice The zipping and unzipping of files during backup/restore, FTP export/import are done using the following utility DLLs: ZIPDLL.DLL and UNZDLL.DLL. COPYRIGHT STATEMENT FOLLOWS THIS LINE DriveRight Fleet Management Software Copyright IMPORTANT! READ CAREFULLY:This software license agreement is a legal agreement between you (either an individual or an entity) and Davis Instruments Corporation (DAVIS). If you do not agree to the terms of this agreement, promptly return the software packet and the accompanying items to the place you obtained them for a full refund. GRANT OF LICENSE. The enclosed software is copyrighted material. This license agreement permits you to use one copy of the Davis Instruments software included in this package (the SOFTWARE) on a single computer. The SOFTWARE is in use on a computer when it is loaded into temporary memory (i.e., RAM) or installed into permanent memory (e.g., a hard disk) of that computer. Note the following conditions to this agreement. 1. You may not install the software on a network, unless the software is used on only one computer or a separate license is obtained for each additional computer on which the software is used. However, you may install the software on a network for the sole purpose of distribution to additional computers, provided you have a license for each additional computer. Contact Davis Instruments for clarification about licenses. 345 DriveRight FMS 3.7.2 User's manual 2. You may not make changes, decompile, or reverse engineer the software. 3. You may not rent, lease, or loan the SOFTWARE, but you may transfer the SOFTWARE, accompanying DAVIS hardware, and user documentation on a permanent basis provided you retain no copies and the recipient agrees to the terms of this Agreement. If the SOFTWARE is an update or has been updated, any transfer must include the most recent update and all prior versions. DAVIS reserves the right to terminate this license if there is a violation or default of this agreement. At that time, all copies of the software and documentation must be returned to DAVIS and the customer will be liable to DAVIS for all damages suffered as a result of that violation or default. LIMITED WARRANTY DAVIS warrants to the original end user of the SOFTWARE that the SOFTWARE will operate in conformity with the documentation for such software. DAVIS warrants that (a) the SOFTWARE will perform substantially in accordance with the accompanying documentation for a period of one (1) year from the date of receipt and (b) any DAVIS hardware accompanying the SOFTWARE will be free from defects in material and workmanship under normal use and service for a period of one (1) year from the date of receipt. All implied warranties on the SOFTWARE and hardware are limited to one (1) year. This warranty will be void if the software has been modified, tampered with, or improperly used. This warranty will be effective only if the Registration Card included with the product is returned to DAVIS. To the maximum extent permitted by applicable law, DAVIS disclaims all other warranties, either express or implied, including, but not limited to implied warranties of merchantability and fitness for a particular purpose, with regard to the SOFTWARE, the documentation, and the accompanying hardware. To the maximum extent permitted by applicable law, in no event shall DAVIS be liable for any damages whatsoever (including without limitation, direct or indirect damages for personal injury, loss of business profits, business interruption, loss of business information, or other pecuniary loss) arising out of the use or inability to use this product, even if DAVIS has been advised of the possibility of such damages. In any case, DAVIS' entire liability under any provision of this agreement shall be limited to the amount actually paid by you for the SOFTWARE and/or hardware. Some states do not allow limitations on how long an implied warranty lasts, or the exclusion or limitation of incidental or consequential damages, so the above limitations may not apply to you. This warranty gives you specific legal rights. You may have other rights, which vary from state to state. May 23, 2007 Info-ZIP Copyright This is version 2002-Feb-16 of the Info-ZIP copyright and license. The definitive version of this document should be available at ftp://ftp.info-zip.org/pub/infozip/license.html indefinitely. Copyright (c) 1990-2002 Info-ZIP. All rights reserved. For the purposes of this copyright and license, "Info-ZIP" is defined as the following set of individuals: Mark Adler, John Bush, Karl Davis, Harald Denker, Jean-Michel Dubois, Jean-loup Gailly, Hunter Goatley, Ian Gorman, Chris Herborth, Dirk Haase, Greg Hartwig, Robert Heath, Jonathan 346 DriveRight FMS Help Hudson, Paul Kienitz, David Kirschbaum, Johnny Lee, Onno van der Linden, Igor Mandrichenko, Steve P. Miller, Sergio Monesi, Keith Owens, George Petrov, Greg Roelofs, Kai Uwe Rommel, Steve Salisbury, Dave Smith, Christian Spieler, Antoine Verheijen, Paul von Behren, Rich Wales, Mike White This software is provided "as is," without warranty of any kind, express or implied. In no event shall Info-ZIP or its contributors be held liable for any direct, indirect, incidental, special or consequential damages arising out of the use of or inability to use this software. Permission is granted to anyone to use this software for any purpose, including commercial applications, and to alter it and redistribute it freely, subject to the following restrictions: Redistributions of source code must retain the above copyright notice, definition, disclaimer, and this list of conditions. Redistributions in binary form (compiled executables) must reproduce the above copyright notice, definition, disclaimer, and this list of conditions in documentation and/or other materials provided with the distribution. The sole exception to this condition is redistribution of a standard UnZipSFX binary as part of a self-extracting archive; that is permitted without inclusion of this license, as long as the normal UnZipSFX banner has not been removed from the binary or disabled. Altered versions--including, but not limited to, ports to new operating systems, existing ports with new graphical interfaces, and dynamic, shared, or static library versions--must be plainly marked as such and must not be misrepresented as being the original source. Such altered versions also must not be misrepresented as being Info-ZIP releases--including, but not limited to, labeling of the altered versions with the names "Info-ZIP" (or any variation thereof, including, but not limited to, different capitalizations), "Pocket UnZip," "WiZ" or "MacZip" without the explicit permission of Info-ZIP. Such altered versions are further prohibited from misrepresentative use of the Zip-Bugs or Info-ZIP e-mail addresses or of the Info-ZIP URL(s). Info-ZIP retains the right to use the names "Info-ZIP," "Zip," "UnZip," "UnZipSFX," "WiZ," "Pocket UnZip," "Pocket Zip," and "MacZip" for its own source and binary releases. END OF COPYRIGHT STATEMENTS 347 Index A Add New DriveRight Wizard ........... 129, 248 Accel Limit ...............................................108 Add New Users ....................................... 126 Acceleration .............................................123 Add New Wireless On-Board Module59, 210 Acceleration Limit ....................................148 Add New Wireless On-Board Module dialog box................................................. 59, 210 Accident Date Time .............................54, 81 Accident Log Database table...................252 Accident Log Maintenance ......................239 Accident Logs ....................................35, 223 Accident Maps .......................38, 40, 52, 327 Accident Report dialog box......................302 Active Database Size Recommendations .18 Add CarChip Wizard167, 181, 183, 184, 185 Add Company Location ...........................239 Add Company Location Dialog Box.........239 Add Download Dates...............................240 Add Download Dates dialog box .............240 Add Driver................................................241 Add Driver dialog box ..............................241 Add DriveRight Wizard .. 129, 142, 143, 144, 145, 159 Add Trip .................................................. 245 Add Trip Address .................................... 246 Add Trip Addresses dialog box............... 246 Add Trips dialog box ............................... 245 Add User Privileges dialog box............... 126 Add Vehicle............................................. 248 Adding CarChips................................. 24, 25 Adding DriveRights ................................... 28 Adding Drivers .................................... 24, 28 Adding Vehicles .................................. 24, 28 Adjust DriveRight Calibration.................. 146 Agreement .............................................. 351 Air Flow Rate .......................................... 186 Alarm Mode..................................... 118, 146 Alarm Settings......................... 118, 146, 201 Add DriveRight Wizard DriveRight ID......144 Architecture................................................. 8 Add Drivers Group ...................................242 Assign DriveRight to Vehicle .................. 142 Add Drivers Group dialog box .................242 Assign to Vehicle .................................... 142 Add Email Entry .......................................243 Auto Detect ............................................. 102 Add Fleets................................................244 Automatic Wireless Download .......... 63, 215 Add Fleets dialog box ..............................244 B Add New Base Station.......................57, 209 Background Color ..................... 95, 119, 120 Add New Base Station dialog box .....57, 209 Backup ................................................ 19, 70 Add New CarChip ............................167, 181 Backup Considerations............................. 17 Add New DriveRight ........................104, 248 Backup Files ....................................... 19, 70 349 DriveRight FMS 3.7.2 User's manual Backup Files To dialog box .................19, 70 CarChip Wizard....................................... 182 Backup Options .............................19, 70, 93 CarChips ................................... 35, 223, 254 Backup Options dialog box..................19, 70 CarChips Database................................. 225 Base Station ..................... 57, 209, 253, 334 CarChips Database table........................ 254 Batch Editing....................................249, 250 Change Battery Voltage ........................................186 DriveRight............................................ 113 Browser....................................................248 Change ..................................................... 88 C Change ................................................... 113 Calibrate DriveRight dialog box .........29, 163 Change Accident Log Report.................. 302 Calibration..................................29, 146, 163 Change Background Color ............. 119, 120 Calibration Setting dialog box............29, 163 Change Current Location.......................... 87 Calibration Settings .................................196 Change Database Browser commands .... 95 CarChip 23, 25, 27, 114, 167, 173, 181, 182, 185, 187 Change DriveRight Security Settings ..... 111 CarChip Alarm .........................................177 CarChip Alarm Dialog Box.......................177 CarChip command...................................102 CarChip Considerations ......................23, 25 CarChip device ..................................27, 180 CarChip Device Settings ...................25, 173 CarChip Identification Settings ................181 CarChip LED............................................176 CarChip LED Status Dialog Box..............176 CarChip Memory dialog...........................178 Change Password..................................... 90 Change Safety Settings .......................... 108 Change Usage Report ............................ 325 Change User Login ................................... 88 Check Accident Logs Between ....... 277, 287 Check Days Between ..... 265, 267, 278, 288 Check Download Dates Between ... 279, 289 Check GPS Between ...................... 280, 290 Check Tamper Logs Between ................ 282 Check Trips Between.............................. 283 Choose Background Color.............. 119, 120 CarChip Menu.... 25, 27, 166, 167, 173, 175, 176, 177, 178, 179, 180 Choose Interval....................................... 310 CarChip Miscellaneous Settings..............182 Choose Text Font ................................... 122 CarChip Quick Reference..........................23 Clear ....................................................... 141 CarChip Reset Check Engine Light Dialog Box .......................................................178 Clear DriveRight...................................... 141 CarChip Settings....... 25, 167, 173, 179, 180 CarChip Settings Command....................254 CarChip Status LED ................................176 350 Clear Screen ............................................. 85 Clear Transfer Data ................................ 207 Clock Adjustment .................................... 207 Color ....................................................... 122 Index Color dialog box.......................................122 Create Outlook email .............................. 323 COM Port...................................................97 Create Trip Summary Report.................. 316 Commands Menu ......................................69 Create Usage Report.............................. 315 Communication Problems .......................332 Create Vehicle Report ............................ 313 Communications Port ..........................96, 97 Creating a Day Map .................................. 52 Communications Port DriveRight Settings .............................................................101 Creating a Trip Map .................................. 51 Creating an Accident Map ........................ 52 Communications Port DriveRight Settings dialog box.............................................101 Creating Maps................................... 51, 329 Communications Port Settings ................101 Current Location ....................................... 87 Company Location..... 35, 86, 223, 224, 239, 255, 302 Customer Service Department ............... 350 Company Locations.........................117, 239 Company Locations Database ................224 Connect .....................................................97 Contact Davis Instruments ......................350 Contacting................................................350 Converting 2.x versions of DriveRight .......10 Converting DriveRight FMS.......................10 Coolant Temperature...............................186 Copyright Notice ......................................351 Copyrights................................................351 Corporate Structure .................................117 Corporate Structure Setup.......................117 Corporate Structure Setup dialog box .....117 Create Accident Log Report ....................302 Create Default DriveRight Settings Wizard .............................................................103 Create Driver Performance Score Report .....................................................303, 305 D Data .......................................................... 16 Data Management Reference Menu......... 16 Data Parameters............................. 186, 188 Database......... 8, 27, 87, 248, 272, 312, 321 Database Backup...................................... 17 Database Browser .................................... 95 Database Browser commands.................. 95 Database Connection Problems ............. 333 Database Menu 35, 223, 224, 225, 226, 227, 228, 229, 230, 231, 232, 233, 234, 235, 237, 239, 240, 241, 242, 244, 245, 246, 248, 249, 250, 252, 254, 255, 256, 257, 258, 259, 260, 261, 262, 263, 264, 265, 267, 269, 270, 271, 272, 273, 274, 277, 284, 285, 286, 287, 288, 290, 291, 292, 293, 294, 296, 297, 298, 300, 301 Database Report..................................... 312 Database Selection Guidelines................... 9 Database Servers ....................................... 8 Create Excessive Speed Report .............307 Database table224, 225, 226, 227, 231, 232, 235, 237, 239, 249, 250, 252, 265, 267, 273, 284 Create Hard Braking Report ....................310 Database type............................................. 8 Create Night Driving Report ....................308 Database->Company Locations ............... 87 Create Odometer Report .........................320 Date ........................................ 137, 257, 279 351 DriveRight FMS 3.7.2 User's manual Date dialog...............................................137 Default Unit Settings ............... 106, 125, 150 Date Dialog Box.......................................175 Define Night ............................................ 308 Davis Instruments ....................................350 Delete Accident Logs.............................. 277 Davis Instruments Corporation ................351 Delete All................................................. 278 Davis Instruments Technical Support......332 Delete Data ..................................... 252, 277 Day Maps...............................38, 42, 52, 327 Delete Days ............................................ 278 Days Delete Download Dates dialog box......... 279 Filter .....................................................288 Deleting Days.......................................... 278 Days.......................... 35, 223, 231, 256, 278 Deleting GPS .......................................... 280 Days.........................................................288 Deleting Odometer Logs......................... 281 Days.........................................................294 Deleting Odometer Logs dialog box ....... 281 Days Between..................................278, 288 Deleting Tamper Logs ............................ 282 Days Database Table ..............................231 Deleting Trips.......................................... 283 Days Fields ..............................................294 Detect Modem........................................... 96 Days Maintenance ...................................239 Device ....................................................... 27 Days Since Last Download......................321 Device Communication........................... 332 Days Since Last Download Report..........321 Device Communication Problems........... 332 Decel........................................................123 Digital Input labels................................... 115 Deceleration Limit ....................................148 Digital Input Labels dialog box................ 115 Default CarChip Settings .........................114 Display CarChip Memory........................ 178 Default DriveRight Settings .............104, 105 Display Tamper Log................................ 270 Default DriveRight Settings dialog box....105 Distance Unit................................... 106, 150 Default DriveRight Settings For Fleet ......110 Download ............................................ 27, 28 Default DriveRight Settings For Fleet dialog .....................................................106, 111 Download CarChip...................... 23, 27, 175 Default DriveRight Settings For Fleet dialog box ...............................................108, 109 Default DriveRight Settings Menu ...........103 Default DriveRight Settings View/Set ......105 Download Date dialog box...................... 257 Download Dates....... 35, 223, 232, 240, 257, 279, 289 Download Dates Database Table ........... 232 Download Dates Maintenance................ 239 Default DriveRight Settings Wizard 103, 104, 118, 123, 124, 125 Download DriveRight .......... 28, 32, 132, 162 Default DriveRight Wizard dialog box......104 Download Options..................................... 94 Default Software Method .........................303 Download Options dialog box ................... 94 352 Index Download Palm..................................33, 134 Download Status................................32, 132 Downloading ..............................................23 Downloading CarChip................................32 Downloading CarChip Guidelines..............32 Downloading Data dialog...................27, 175 Downloading Requirements ......................32 Driver .......................... 27, 95, 227, 259, 297 Driver Database table..............................227 Driver Groups ................... 35, 223, 226, 260 Driver Groups Database table .................226 Driver ID Logout Time .....................124, 149 Driver Name...............................................86 Driver Performance Score .......303, 305, 322 Driver Performance Score dialog box ....303, 305, 322 Driver Performance Score Formula.........322 DriveRight Fleet Management Software Copyright ............................................. 351 DriveRight FMS 3.7.1 ................................. 2 DriveRight FMS Report Viewer....... 319, 324 DriveRight ID..... 86, 143, 144, 147, 154, 302 DriveRight Identification Settings............ 147 DriveRight ID's ........................................ 144 DriveRight list.......................................... 140 DriveRight menu .... 29, 31, 32, 33, 111, 113, 129, 132, 134, 136, 137, 138, 140, 141, 142, 144, 146, 150, 161, 163, 165, 258 DriveRight Palm Download Kit.......... 33, 134 DriveRight Quick Reference ..................... 28 DriveRight Safety Settings...................... 148 DriveRight Security Settings ................... 148 DriveRight Set Date ................................ 137 DriveRight Set Time................................ 137 Driver Performance Score Report ...303, 305 DriveRight Settings .... 29, 31, 106, 108, 109, 111, 113, 132, 136, 146, 147, 148, 149, 150, 161, 163, 165 Driver Reports..........................................312 DriveRight Settings Command ............... 258 DriveRight 1, 23, 28, 29, 35, 74, 92, 95, 132, 140, 141, 145, 146, 147, 148, 149, 154, 155, 156, 157, 158, 163, 223, 224, 248, 296 DriveRight Accident Log ..................136, 141 DriveRight Already Exists ........................143 DriveRight Calibration..............................146 DriveRight Calibration Message dialog ....29, 163 DriveRight Tables ..................................... 76 DriveRight Timer Settings....................... 149 DriveRight Unit Settings.......................... 150 DriveRights ............................................. 296 DriveRights Fields................................... 296 Drivers............................................... 35, 223 Drivers Fields .......................................... 297 DriveRight Configuration ...........................28 Drivers List ...................................... 140, 206 DriveRight Database table.......................224 Drivers Report......................................... 314 DriveRight Default Settings .....................120 Drivers Report dialog box ....................... 314 DriveRight Device Settings dialog box ....165 E DriveRight Fleet Management Software .....1 Edit Accident Log .................................... 252 Edit Base Station .................................... 253 353 DriveRight FMS 3.7.2 User's manual Edit CarChip Setup ..................................254 Edit Trouble Code ................................... 273 Edit CarChip Setup dialog box ................254 Edit Trouble Code dialog box ................. 273 Edit command............................................91 Edit User ................................................... 91 Edit Company Location ...........................255 Edit User Info dialog box........................... 91 Edit Company Location dialog box ..........255 Edit Vehicle ..................................... 228, 274 Edit Days .................................................256 Edit Vehicle dialog box ........................... 274 Edit Days dialog box................................256 Edit Wireless On-Board Module ............. 276 Edit Default DriveRight Settings ..............105 Email ....................................................... 277 Edit Download Date.................................257 Email Entry...................................... 243, 261 Edit Download Date dialog box ...............257 Email Entry dialog box ............................ 243 Edit Driver ................................................259 Email List ................................ 243, 261, 277 Edit Driver dialog box ..............................259 Email List dialog...................................... 261 Edit DriveRight.........................................224 Email List dialog box............................... 261 Edit DriveRight Setup ..............................258 Email Maps ............................................. 329 Edit DriveRight Setup dialog box.............258 Email Output ........................................... 323 Edit Drivers Group ...........................226, 260 End Date ........................................... 86, 302 Edit Drivers Group dialog box..................260 Engine Load............................................ 186 Edit Email Entry .......................................261 Enter Top Speed..................................... 307 Edit Email Entry dialog box......................261 Erase....................................................... 208 Edit Fleets........................................227, 262 Excel Edit Fleets dialog box ..............................262 Output.................................................. 324 Edit GPS ..........................................233, 263 Excel ....................................................... 324 Edit GPS dialog box ................................263 Excel 97 .................................................. 324 Edit Odometer Log ..........................234, 264 Exception Reports... 306, 307, 308, 310, 311 Edit Odometer Log dialog box .................264 Excessive Speed .................................... 307 Edit Readiness Codes .....................265, 267 Excessive Speed Report ........................ 307 Edit Tamper Log ..............................230, 270 Excessive Speed Report dialog box ....... 307 Edit Tamper Log dialog box.....................270 Exit .................................................... 85, 248 Edit Trip ...........................................229, 271 Exit Host Mode.......................................... 96 Edit Trip Address .....................................272 Exit Hyper Terminal .................................. 97 Edit Trip Addresses dialog.......................272 Export Accident logs To dialog box .... 54, 81 Edit Trip dialog box..................................271 Export Accidents ................................. 23, 77 354 Index Export button .............................................83 Filter for Readiness Codes ..................... 284 Export Commands .....................................83 Filter for Readiness Codes dialog box.... 284 Export File Name .......................................83 Filter for Safety Score ............................. 285 Export GPS..................... 23, 53, 77, 80, 229 Filter for Safety Score dialog box............ 285 Export GPS To dialog box .............53, 80, 86 Filter For Tamper Logs dialog box.......... 292 Export menu ............................23, 53, 77, 80 Filter For Trips......................................... 293 Exporting........................... 53, 54, 80, 81, 83 Filter For Trips dialog box ....................... 293 F Filter for Trouble Codes .......................... 286 FIELD MODEM..........................................97 Filter for Wireless Download Status Report dialog box ............................................ 326 File Menu . 19, 21, 53, 54, 56, 70, 72, 74, 76, 78, 80, 81, 83, 84, 85, 97 Final Calibration Procedure .................... 162 Filter Download........................................289 Fleets ................ 35, 109, 223, 227, 244, 262 Filter For Accident Logs dialog ................287 FMS ...................................................... 1, 16 Filter For Days dialog box........................288 FMS Menu Commands............................. 14 Filter For Deleting Accident Log dialog box .............................................................277 FMS Quick Reference .............................. 16 Filter For Deleting Accident Logs ............277 Filter For Deleting Days dialog box .........278 Filter For Deleting Download Dates.........279 FTP ..................................................... 74, 78 FTP Export.................................... 23, 77, 78 FTP Export dialog box .............................. 78 FTP Host Name ........................................ 78 Filter For Deleting Download Dates dialog box .......................................................279 FTP Import ................................................ 74 Filter For Deleting GPS dialog box ..........280 FTP Import dialog box .............................. 74 Filter For Deleting Odometer Logs dialog box .......................................................281 FTP site............................................... 74, 78 Filter For Deleting Tamper Logs..............282 Filter For Deleting Tamper Logs dialog ...282 Fuel Pressure.......................................... 186 Fuel System Status................................. 186 G Filter For Deleting Tamper Logs dialog box .............................................................282 Getting Started............................................ 1 Filter For Deleting Trips ...........................283 GPS 18, 31, 35, 53, 54, 80, 81, 86, 161, 223, 229, 233, 263, 280, 298 Filter For Deleting Trips dialog box..........283 Filter For Download Dates dialog box .....289 Filter for GPS ...........................................290 Filter For GPS dialog box ........................290 GPS dialog box ............................... 280, 290 GPS Fields dialog box ........................ 53, 80 GPS Logging..................................... 31, 161 GPS Maintenance................................... 239 Filter For Odometer Logs dialog box .......291 355 DriveRight FMS 3.7.2 User's manual GPS Plot Information...................38, 56, 327 L GPS Settings ...................................113, 204 Location ID................................ 94, 239, 255 GPS to Mapping Software ...................53, 80 locations.................................................. 117 Guidelines............................................27, 32 Logging Interval ................................ 31, 161 H Login ......................................................... 88 Hard Braking............................................310 Login dialog box........................................ 88 Hard Braking Report................................310 Logout ..................................................... 124 Hard Braking Report dialog box ..............310 Long Term Fuel Trim .............................. 186 Help Menu ...............................................331 M Help Topics..............................................331 Main Menu ................................................ 69 Help Topics window.................................331 Maintenance .. 239, 249, 250, 252, 277, 278, 279, 280, 281, 282, 283 Host ...............................................94, 95, 97 Host Mode ...............................94, 95, 96, 97 Host Mode Menu .......................................95 Manual Wireless Download .............. 65, 217 Map Window ............................................. 49 Host Mode On......................................96, 97 Mapping Menu37, 38, 39, 40, 42, 45, 48, 49, 50, 51, 52, 56, 326, 327, 328, 329, 330 Host Mode Setup .................................96, 97 Mapping Requirements............................. 39 HOST MODEM ..........................................97 Mapping Software ............................... 53, 80 How To menu ............................................16 MapPoint Version.................................... 329 Hyper Terminal ..........................................97 Menu I Menu Commands Menu............ 37, 39, 69 Icons ..........................................................14 Menu ......................................................... 16 Identification.............................................187 Menu ....................................................... 117 Identification Settings ..............147, 187, 195 Microsoft Access......................................... 9 Import Data From.......................................76 Microsoft Desktop/Data Engine .................. 9 Import dialog box .......................................76 Microsoft SQL Server ................................. 9 Import Menu.........................................23, 74 Miscellaneous Problems......................... 349 Importing GPS Plot Information.................56 Miscellaneous Settings ................... 182, 187 Index ........................................................331 Modify Driver Performance Score........... 322 Initial Calibration Procedure ....................162 MS Access .............................................. 8, 9 Intake Air Temperature............................186 MS Excel................................................. 324 Intake Manifold Pressure.........................186 MS SQL Server........................................... 9 Introduction ..................................................2 356 Index MSDE ......................................................8, 9 Output ..................................................... 324 Multi-User Databases ..................................9 Output to Excel ....................................... 324 My SQL........................................................8 Overview map ..................................... 48, 50 MySQL.........................................................9 P N Palm.................................................. 33, 134 Navigating Maps ............. 37, 48, 50, 51, 329 Palm Download................................. 33, 134 Need ........................................................248 Parameter Settings ................................. 188 New CarChip dialog.................................187 Parameters ............................. 183, 314, 322 New Password dialog box .........................90 Parameters dialog box............................ 322 New Wireless On-Board Module .......59, 210 Parameters Settings ............................... 183 Night Driving ............................................308 Password .............................. 88, 89, 90, 126 Night Driving Report ................................308 Pin Code ................................................. 111 Night Driving Report dialog box...............308 PIN-code ................................................. 148 O Plot Information................................... 38, 56 O2 Sensor Voltage ..................................186 Preferences............................. 92, 93, 94, 95 OBDC ..........................................................8 Preferences Menu..................................... 92 Odometer........................ 234, 264, 281, 320 Print........... 84, 294, 296, 297, 298, 300, 301 Odometer Logs . 35, 223, 234, 264, 281, 291 Print All Fields . 294, 296, 297, 298, 300, 301 Odometer Logs Maintenance ..................239 Print button.............................................. 296 Odometer Logs Table..............................138 Print Days ............................................... 294 Odometer Readings ........................138, 320 Print dialog box ....................................... 297 Odometer Report .....................................320 Print DriveRights ..................................... 296 Odometer Report dialog box ...................320 Print DriveRights dialog box ................... 296 Opening Maps .........................................327 Print Drivers ............................................ 297 Operating Region...............................66, 222 Print Drivers dialog box........................... 297 Options ........... 18, 24, 25, 28, 126, 294, 301 Print GPS ................................................ 298 Oracle ......................................................8, 9 Print GPS dialog box .............................. 298 Other Import Commands ...........................76 Print Preview............................................. 84 Outlook email...........................................323 Print Setup ................................................ 85 Output Print Trip Records ................................... 298 Excel ....................................................324 Print Trip Records dialog box ................. 298 Report Viewer ......................................324 Print Vehicles .......................................... 300 357 DriveRight FMS 3.7.2 User's manual Print Vehicles dialog box .........................300 Restore DriveRight Settings dialog......... 150 Prior Release Notes ....................................3 Restore Files....................................... 21, 72 R Restore Files From dialog................... 21, 72 Read Accident Log ..........................136, 141 Restore Files From dialog box............ 21, 72 Read Tamper Log............................136, 163 Review Readiness Code Filter .............237, 265, 267 View/Set command ............................. 103 Readiness Codes ..... 35, 223, 237, 265, 267 Review .................................................... 103 Readiness Codes dialog box...................284 Review Alarm Settings............................ 151 Readiness Codes Filter ...........................284 Review Calibration Settings.................... 152 Reassign Driver .......................................249 Review CarChip Identification Settings .. 187 Record .............................. 35, 223, 231, 248 Review CarChip Parameter Settings ...... 188 Reinitialize Modem ....................................96 Review CarChip Safety Settings............. 189 Relationship Report .................................319 Review CarChip Settings Miscellaneous 187 Release Notes .............................................3 Review DriveRight Alarm Settings.......... 151 Remote Download Kit................................96 Review DriveRight Calibration ................ 152 Remote Modem Kit ....................................97 Review DriveRight Calibration Settings.. 152 Remote Modem Setup...............................97 Review DriveRight GPS.......................... 153 Report Review DriveRight GPS Settings............ 153 Outlook.................................................323 Review DriveRight Identification ............. 154 Report ....... 36, 118, 301, 311, 312, 313, 321 Review DriveRight Identification Settings154 Report ......................................................323 Review DriveRight Safety ....................... 155 Report ......................................................324 Review DriveRight Safety Settings ......... 155 Report ......................................................324 Review DriveRight Security .................... 156 Report Viewer Review DriveRight Security Settings ...... 156 Output ..................................................324 Report Viewer ..........................................324 Reports Menu .. 36, 301, 302, 303, 305, 306, 307, 308, 310, 311, 313, 314, 315, 316, 318, 319, 320, 321, 322, 323, 324, 325, 326 Review DriveRight Settings ... 151, 152, 153, 154, 155, 156, 157, 158 Review DriveRight Timer ........................ 157 Review DriveRight Timer Settings .......... 157 Review DriveRight Unit Settings............. 158 Reset Check Engine Light .......................178 Review DriveRight Units ......................... 158 Restore ....................................................150 Review GPS Settings ............................. 153 Restore DriveRight Settings ....................150 Review Identification Settings................. 154 358 Index Review Safety Settings............................155 Select Drivers Fields ............................... 297 Review Security Settings.........................156 Select Drivers Report.............................. 314 Review Settings ...... 151, 159, 187, 188, 189 Select Excessive Speed Report ............. 307 Review Settings for New DriveRight........159 Select Fleet Defaults............................... 106 Review Timer Settings.....................157, 158 Select Fleets ........................................... 262 Review Unit Settings ...............................158 Select GPS ................................. 53, 80, 263 Root Location...........................................117 Select GPS Fields................................... 298 S Select Night Driving ................................ 308 Safety Score ............. 35, 223, 234, 269, 285 Select Odometer Logs ............................ 264 Safety Score Summary Reports ..............269 Select Odometer Report ......................... 320 Safety Settings........ 108, 148, 184, 189, 199 Select Operating Region................... 66, 222 Save Map.................................................328 Select Operating Region dialog box . 66, 222 Scan Wireless On-Board Modules ....61, 212 Select Read Tamper Log........................ 136 Scan Wireless On-Board Modules dialog box .................................................61, 212 Select Relationship Report ..................... 319 Score Parameters dialog box ..................322 Search .....................................................331 Seconds...................................................175 Security PIN Code ...................................120 Security Settings......................120, 148, 203 Select Accident Log Report .....................302 Select Accident Logs ...............................252 Select Change Password ..........................90 Select Days Fields...................................294 Select Default DriveRight Settings ..104, 105 Select Download Dates ...........................279 Select Download DriveRight..............32, 132 Select Driver Performance Score Report .............................................303, 305, 322 Select DriveRight Settings......106, 108, 110, 113, 165 Select DriveRights Fields ........................296 Select Drivers ..........................................259 Select Set Odometer .............................. 138 Select Set Service Alarms ...................... 138 Select Set Time....................................... 137 Select Setup Wizard ............................... 104 Select Tamper Logs........................ 282, 292 Select Tamper Logs Report.................... 318 Select Trip Summary Report .................. 316 Select Trips Fields .................................. 298 Select Usage Report............................... 325 Select Vehicles Fields............................. 300 Select Vehicles Report ........................... 313 Selected Map Area ............................. 50, 51 Serial Port Settings dialog ...................... 102 Service Schedule .................................... 138 Set CarChip Alarm .................................. 177 Set CarChip Date.................................... 175 Set CarChip Time ................................... 175 Set Current Location dialog box ............... 87 359 DriveRight FMS 3.7.2 User's manual Set Date...................................................175 SmartCard Download ..................... 191, 341 Set DriveRight Settings ...........................165 SmartCard Erase .................................... 208 Set Drivers List ........................................140 SmartCard Menu.... 190, 191, 192, 193, 195, 196, 197, 199, 200, 201, 203, 204, 206, 207, 208, 341 Set Drivers List dialog box.......................140 Set GPS Logging ...............................31, 161 Set Odometer ..........................................138 SmartCard Reader. 121, 190, 191, 192, 193, 195, 196, 197, 199, 200, 201, 203, 204, 206, 207, 208, 341 Set Odometer dialog box.........................138 SmartCard Reader Communication........ 341 Set Service Alarms ..................................138 Set Service Alarms dialog .......................138 SmartCard Reader Communication Problems ............................................. 341 Set Service Alarms dialog box.................138 SmartCard Reader Setup ............... 121, 192 Set Speed Ranges ..................................330 Software Calibration Procedure.............. 162 Set Time ..................................................137 Software Problems.................................. 333 Set Timer Settings ...................................109 Speed...................................................... 186 Set Unit Settings ......................................106 Speed Limit ............................................. 148 Settings....................................................159 SQL............................................................. 8 Setup . 87, 88, 89, 90, 91, 92, 93, 94, 95, 96, 97, 102, 105, 106, 108, 109, 111, 115, 119, 120, 122, 123, 124, 125, 126 SQL Server ................................................. 8 Setup Automatic Wireless Download 63, 215 Setup Automatic Wireless Download dialog box .................................................63, 215 Setup GPS.........................................31, 161 Setup GPS Logging Interval dialog box ...31, 161 Setup Menu ... 87, 88, 89, 90, 91, 92, 93, 94, 95, 96, 97, 101, 102, 104, 105, 106, 108, 109, 111, 115, 117, 119, 120, 121, 122, 123, 124, 125, 126, 192, 193, 207 Setup Overview .........................................12 Setup/Host Mode menu.............................97 Short Term Fuel Trim ..............................186 Show CarChip Info ..................................179 Single-User Databases................................9 SmartCard ..... 121, 190, 192, 193, 195, 196, 197, 199, 200, 201, 203, 204, 206, 207 360 Start ................................................ 145, 185 Start Manual Wireless Download...... 65, 217 Start Manual Wireless Download dialog box ...................................................... 65, 217 Super User.......................................... 88, 89 Synchronization ........................................ 94 T Tables ............................................... 35, 223 Tamper Light ON .................................... 148 Tamper Log..... 136, 163, 230, 270, 282, 292 Tamper Log Maintenance....................... 239 Tamper Logs Report............................... 318 Tamper Logs Report dialog box ............. 318 Technical Support ................................... 350 Text Font................................................. 122 Throttle Position ...................................... 186 Index Time Over Speed.....................................311 Troubleshooting ...................................... 332 Timer Settings..........................124, 149, 200 Troubleshooting ...................................... 333 Timing Advance .......................................186 Troubleshooting ...................................... 349 Toolbar.......................................................14 U Toolbar Icons .............................................14 Unit Preferences ....................................... 92 Transfer .....................................................96 Unit Settings............................ 106, 150, 197 Transfer Protocol .................................74, 78 Units dialog box ........................................ 92 Transfer To DriveRight .. 193, 195, 196, 197, 199, 200, 201, 203, 204, 206, 207 Update User Privileges ............................. 91 Update User Privileges dialog box............ 91 Transfer To DriveRight Clock Adjustment .............................................................207 Upgrade Base Station Firmware....... 67, 220 Transfer To DriveRight Drivers List .........206 Upgrade Firmware ............................ 67, 220 Transfer To DriveRight Settings .....193, 195, 196, 197, 199, 200, 201, 203, 204, 206, 207 Upgrade Wireless Device Firmware . 67, 220 Trip.................................. 229, 231, 246, 298 Trip Addressees.......................................313 Trip Addresses.......... 35, 223, 231, 246, 272 Trip Addresses Report.....................312, 313 Trip Maintenance .....................................239 Trip Map Features .....................................45 Trip Maps...............................38, 45, 51, 327 Trip records..................... 229, 271, 283, 298 Trip Stop Time .................................124, 149 Trip Summary Report ..............................316 Trip Summary Report dialog box.............316 Trips...................................................35, 223 Trips Fields ..............................................298 Trouble Codes .......... 35, 223, 235, 273, 286 Trouble Codes Database Table.......235, 273 Trouble Codes Dialog Box...............235, 286 Troubleshooting Menu ....................................................332 Upgrade Wireless On-Board Module Firmware ....................................... 67, 220 Usage Report change................................................. 325 create .................................................. 315 Usage Report.......................................... 315 Usage Report.......................................... 325 Usage Report dialog box ................ 315, 325 Usage Report Formula ........................... 325 Usage Report Formula dialog box .......... 325 Use CarChip Menu ................................. 166 Use DriveRight Menu.............................. 129 User Name.................................. 88, 91, 126 User Privileges dialog ............................. 126 User Privileges dialog box ...................... 126 Users............................... 88, 89, 90, 91, 126 Users Browse/Add .................................... 89 Users Change Password .......................... 90 Users Login............................................... 88 Users Menu............................................... 88 361 DriveRight FMS 3.7.2 User's manual Using the DriveRight Menu......................129 Viewing GPS Plot Information .................. 38 V Viewing Maps. 37, 38, 40, 42, 45, 48, 49, 50, 51, 52, 327, 329 Vehicle .............................. 27, 228, 248, 300 Vehicle Browse window...........228, 248, 300 Vehicle ID ................................................147 Vehicle Report .........................................312 Vehicle Speed Adjustment ......................250 Vehicles .............................................35, 223 Vehicles Fields.........................................300 Vehicles Report .......................................313 Vehicles Report dialog box......................313 Verify DriveRight Calibration .............29, 163 View CarChip ID's....................................181 View DriveRight Settings .........................165 View GPS ................................................263 View Odometer Report ............................320 W Welcome ..................................................... 1 What's New ................................................. 2 Wireless Device Communication ............ 334 Wireless Device Database.............. 253, 276 Wireless Device Fields ........................... 301 Wireless Device Operating Region... 66, 222 Wireless Devices ............................ 301, 334 Wireless Devices Database.................... 226 Wireless Download ........................... 63, 215 Wireless Download Status.............. 218, 326 Wireless Download Status dialog box .... 218 Wireless Download Status Report .......... 326 View Relationship Report ........................319 Wireless Menu ... 57, 61, 63, 65, 66, 67, 208, 209, 212, 215, 217, 218, 220, 222 View Tamper Logs Report.......................318 Wireless On-Board Module59, 210, 276, 334 View Timer Settings.................................109 Wireless Quick Reference Menu .............. 57 View Trip Addresses Report....................313 Z View Unit Settings....................................106 Zooming In and Out .................................. 50 View/Set...................................103, 105, 165 Zooming Map Areas ........................... 50, 51 362