1
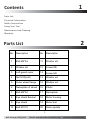
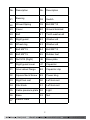
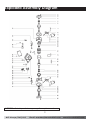
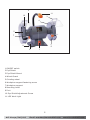
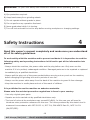
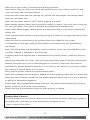
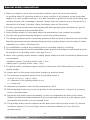
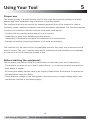
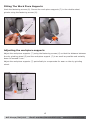
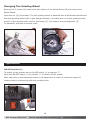
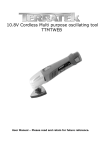
TBG150E
6” HEAVY DUTY
BENCH GRINDER
WITH LED WORKLIGHT
ACL Group (Intl) Ltd
Email: [email protected]
www.terratekintl.com
User Manual — Please read and retain for future reference
1
Contents
Parts List
Technical Information
Safety Instructions
Using Your Tool
Maintenance And Cleaning
Warranty
2
Parts List
No.
Description
No.
Description
1
Bolt M5*45
11
Washer ø5
2
Washer ø5
12
Screw M5
3
Left guard cover
13
Screw M4
4
Nut M12(Left)
14
Washer ø4
5
Outer wheel flange
15
Washer ø4
6
Nameplate of wheel
16
Stator
7
Bolt M5*40
17
Nameplate
8
Eye shield Bracket
18
Motor housing
9
Eye shield
19
Motor bolt
10
Bolt M15*5
20
Rotor spindle
1
ACL Group (Intl) Ltd
Email: [email protected]
www.terratekintl.com
No.
Description
No.
Description
21
Bearing
38
Switch
22
Waved Spring
39
Bolt M4*10
23
Cover
40
Ground terminal
24
Bolt
41
Tooth washer ø4
25
Right guard
42
Washer ø8
26
Wheel ring
43
Washer ø8
27
Bolt M5*15
44
Bolt M8*12
28
Bolt M5*15
45
Rubber feet
29
Nut M12 (Right)
46
Base plate
30
Right guard cover
47
Capacitor
31
Inner wheel flange
48
Capacitor clip
32
Square Neck Screw
49
Power blug
33
Right tool rest
50
Left tool rest
34
Star Knob
51
Left tool rest
35
Cable pressure plate 52
36
Base
37
Switch Plate
Light
53
Nut
2
ACL Group (Intl) Ltd
Email: [email protected]
www.terratekintl.com
Exploded Assembly Diagram
NOTICE: Actual product may vary from pictures shown.
3
ACL Group (Intl) Ltd
Email: [email protected]
www.terratekintl.com
2
11
10
3
4
5
7
9
6
8
1
1 ON/OFF switch
2 Eye Shield
3 Eye Shield Mount
4 Wheel Guard
5 Grinding wheel
6 Workpiece support fastening screw
7 Workpiece support
8 Mounting holes
9 Foot
10 Eye Shield Adjustment Screw
11 LED Work Light
4
ACL Group (Intl) Ltd
Email: [email protected]
www.terratekintl.com
3
dĞĐŚŶŝĐĂů/ŶĨŽƌŵĂƟŽŶ
Bench Grinder
Model: TGB150E
Rated voltage: 230 V ~ 50 Hz
Power rating: 200 W S2 30 min
Idle speed n0: 2950 min-1
Grinding wheel diameter: 150 mm
Grinding wheel thickness: 20 mm
Grinding wheel hole diameter: 12.7 mm
Weight N.W./G.W.: 10.5 /11.5 kgs
Protection category: I
Load factor:
A load factor of S2 30 min (intermittent periodic duty) means that you may operate the motor
continuously at its nominal power level (200 W) for no longer than the time stipulated on the
specifications label (30 minutes ON period). If you fail to observe this time limit the motor will
overheat. During the OFF period the motor will cool again to its starting temperature.
Noise emission levels
The noise emitted by this saw is measured in accordance with EN ISO 3744; EN ISO 11201.
The noise at the workplace may exceed 85 db (A). The user will require noise protection
measures if this is the case. (Wear ear-muffs!)
No-Load operation
Sound pressure level LpA 63 dB(A)
Sound power level LWA 76 dB(A)
Uncertainty K: 3dB(A)
5
ACL Group (Intl) Ltd
Email: [email protected]
www.terratekintl.com
Read this entire manual before using this product.
Failure to do so can result in serious injury. Save this manual
for future reference.
Copyright© 2013 by ACL Group (Intl) Ltd. All rights reserved. This manual or any artwork
contained herein must not be reproduced in any shape or form without the express written
consent of ACL Group (Intl) Ltd. Diagrams within this manual may not be drawn
proportionally. Due to continuing improvements, actual product may differ slightly from the
product described herein.
6
ACL Group (Intl) Ltd
Email: [email protected]
www.terratekintl.com
Read and Keep This Manual
Please read carefully all instructions within this manual. Failure to follow all safety warnings can
result in serious personal injury. The term “Power Tool” in all of the following warnings refers to
your mains operated (corded) or battery operated (cordless) power tool
/ŵƉŽƌƚĂŶƚ^&dz/ŶĨŽƌŵĂƟŽŶ
This symbol is to warn you of potential personal injury
hazards. Please read carefully the notes along side this warning
to avoid possible injury or death.
General Safety Rules
WARNING!
Read all instructions. Failure to follow all instructions listed
below may result in electric shock, fire and/or serious injury. The term “power tool” in all
of the warnings listed refers to corded or cordless power tools.
Work area safety
Keep work area clean and well lit. Cluttered or dark areas invite accidents.
Do not operate power tools in explosive atmospheres, such as in the presence of flammable
liquids, gases or dust. Power tools create sparks which may ignite the dust or fumes.
Keep children and bystanders away while operating a power tool. Distractions can cause you
to lose control.
7
ACL Group (Intl) Ltd
Email: [email protected]
www.terratekintl.com
Electrical safety
Before use, ensure that the power outlet you are using matches the plug on your power tool
and that the voltage of the outlet matches that of your power tool.
Only use grounded extension cords with power tools fitted with proper plugs and if using
outdoors ensure any extension cord is suitable for outdoor use.
Always try to avoid body contact with grounded surfaces, such as radiators, cooking ranges
and any other fixed appliance with metal surfaces.
Do not expose your power tool to wet or damp conditions and NEVER use in rain.
Check regularly the power cord of your machine and any extension cord that you are using
for damage.
Do not carry or pull the machine with the power cord.
Ensure the cord is clear from hot surfaces, oil or sharp objects.
Personal safety
Never use your power tool whilst under the influence of alcohol, drugs or medication.
Tiredness can often cause accidents, stay alert.
Never use your power tool without the correct guards in place.
Always use ANSI approved eye protection and dust mask. Non slip safety shoes and hearing
protectors should be worn at all times when using your power tool.
Ensure any dust collecting device supplied with your power tool is connected correctly before
use.
Ensure all loose clothing, long hair or jewelry is kept clear of the power tool.
Before plugging your power tool into the power outlet ensure the power tool is in the OFF
position.
Check that wrenches or adjusting keys have been removed. Any wrench or key left attached
to a moving part can result in injury.
Power tool use and care.
Keep your power tool clean and well serviced at all times.
Never adjust or service any power tool before disconnecting from the mains electricity supply.
Always use the correct tool for the job.
Never force the tool to work harder than it is designed to do.
Never use your power tool with broken parts such as switches, guide fences or leg stands.
ALWAYS keep your power tools away from children.
Keep cutting tools sharp to ensure less stress on the motor.
Only have your power tool serviced by a qualified repair agent using manufacturers
recommended parts.
8
ACL Group (Intl) Ltd
Email: [email protected]
www.terratekintl.com
WARNING: For your own safety read Instruction Manual before operating your tool.
A) Eye protection required.
B) Keep hands away from grinding wheels.
C) Do not operate without guards in place.
D) Do not perform any operation freehand.
E) Never grab wheel while it is turning.
F) Turn off tool and wait for tool to stop before moving workpiece or changing settings.
4
^ĂĨĞƚLJ/ŶƐƚƌƵĐƟŽŶƐ
Read this owner's manual completely and make sure you understand
all of its safety guidelines.
To work safely with this machine and to prevent accidents it is imperative to read the
following safety and operating instructions in full and to put all the information into
practice.
- Always check the machine, the power cable and the plug before use. Only ever use the
machine if it is in perfect, undamaged condition. Damaged parts are to be repaired or replaced
immediately by a qualified electrician.
- Always pull the plug out of the power socket before carrying out any work on the machine,
before changing the grinding tool and in periods of non-use.
- Always run the power cable away from the back of the machine to guard it from damage.
- Keep the machine in a safe place and out of the reach of children.
It is prohibited to use the machine on asbestos materials.
Please note the accident prevention regulations in force in your country.
- Use only original spare parts.
- Repairs are to be carried out by qualified electricians only.
- The level of noise at the workplace may exceed 85 dB(A). In this case you will need to
introduce noise protection measures for the user. The noise produced by this electric tool is
measured in accordance with IEC 59 CO 11, IEC 704, DIN 45635 Part 21, NFS 31-031
(84/537/EEC).
09
ACL Group (Intl) Ltd
Email: [email protected]
www.terratekintl.com
- Make sure of your footing. Avoid abnormal working positions.
- Keep electric tools out of the rain. Never use electric tools in wet or damp conditions, and
never use them near flammable liquids.
- Keep the power cable safe from damage. Oil, solvent and sharp edges can damage cables.
- Keep your workplace tidy.
- Make sure the power switch is "OFF" before plugging into outlet.
- Wear suitable clothing. Never wear loose-fitting clothes or jewelry. Use a hair-net on long hair.
- For your own safety, use only the manufacturers accessories and attachments.
- Always wear safety goggles, safety gloves and hearing protection on grinding, brushing and
cutting jobs.
- Check that the speed marked on the grinding wheel is the same as or higher than the grinders
rated speed.
- Make sure that the dimensions of the grinding wheel are suitable for the grinder.
- It is essential to store and handle grinding wheels in accordance with the manufacturers
instructions.
- Each time before using a grinding wheel, check it carefully. Never use a grinding wheel which
is broken, cracked or damaged in any other way.
- If backing layers are supplied with or stipulated for the grinding wheels, make sure they are
used.
- Before beginning with your work, make sure that the grinding wheel is correctly mounted and
secured. Allow the tool to run in a safe position for 5 minutes in idle mode. Stop the tool
immediately if notable vibrations develop or if you discover any defects. In this case, examine
the machine to find the cause of the trouble.
- Never use the grinder without the supplied wheel guard.
- Never use a separate reducer sleeve or adapter to mount grinding wheels with too large a hole.
- Make sure that no danger results from any sparks produced during use, e.g. injury to persons
or ignition of flammable substances.
- Always wear safety goggles and hearing protection. Use other personal safety items such as
gloves, an apron and a helmet when necessary.
- Please note that the workpiece will get hot when grinding or cutting.
Caution! Risk of burns!
Allow the workpiece to cool. Some materials become glowing hot when subjected to grinding.
On lengthy jobs, interrupt your work and allow the workpiece to cool.
- Use no coolant of any kind.
10
ACL Group (Intl) Ltd
Email: [email protected]
www.terratekintl.com
Special safety instructions
1. Before you begin to work with the grinding machine, carry out an acoustic test on
its grinding wheel (if a grinding wheel is in good condition it will produce a clear tone when
tapped, e.g. with a plastic hammer). It is also important to perform this test when fitting new
grinding wheels (risk of damage in transit). Always have the machine run in idle mode for a
test period of at least 5 minutes. Leave the danger zone for this period.
2. Use only grinding wheels which are marked with data specifying the manufacturer, type of
bonding, dimensions and permissible RPM.
3. Keep grinding wheels in a dry place where the temperature is as constant as possible.
4. Use only the supplied clamping flanges to mount the grinding wheels.
5. The clamping flanges used to mount the grinding wheels must be of identical size and format.
Backing layers between the clamping flange and the grinding wheel must be made of elastic
materials, e.g. rubber, soft board, etc.
6. It is prohibited to enlarge the mounting hole in a grinding wheel by re-drilling.
7. The workpiece supports and the adjustable upper guards must always be positioned as close
as possible to the grinding wheel (max. gap 2 mm).
8. Never use a grinding wheel without a safety guard. Make sure that the following distances are
not exceeded:
-
workpiece support / grinding wheel: max. 2 mm
-
safety guard / grinding wheel: max. 2 mm
9. The guard holder, workpiece support and Eye shield must all be fitted before you use the
double grinder.
10. Always pull out the power plug before changing a grinding wheel.
11. The maximum peripheral speed of the dry grinding wheel is:
m/s=(d x 3,14 x n) / (60 x 1000)
d = diameter of the grinding wheel in mm
n = motor rpm
12. Maximum permissible motor housing temperature: 80°C
13. Before starting work firmly screw the grinder to the workbench etc. using the 4 mounting
holes in the base plate.
14. Adjust the Eye shield mount periodically in order to compensate the wear of the wheel.
Please note that the distance between the Eye shield and the wheel is to be kept as small
as possible and should in no case exceed 2 mm.
15. The grinding wheel must be replaced at the latest when the Eye shield mount (3) and the
workpiece support (7) can no longer be set a maximum distance of 2 mm from the
grinding wheel.
11
ACL Group (Intl) Ltd
Email: [email protected]
www.terratekintl.com
Power Extension Cords
When using any extension cord the machine will suffer a power reduction due to the drop in
voltage caused by the length of the cord. This can be partially offset by selecting extension
cords with lower gauge wire.
Check all extension cords for damage before use.
Avoid sharp objects.
Do not position the cord where it could be subject to traffic passing over it.
Symbols
IMPORTANT: Some of the following symbols may be used on your tool.
V…………………………volts
A…………………………amperes
Hz……………………….hertz
~…………………….….alternating current
…/m……………….....revolutions per minute
.....................class II construction (double insulated)
Kg………………………..kilograms
n0………………………..No load speed
……………….….....Conforms to European Harmonised New Approach Directives
DC ………………..…….Direct Current
Unpacking
Carefully remove the product and any accessories from the box. Make sure that all items listed
in the packing list are included.
In The Box
A) Bench grinder
B) Eye shields
C) Workpiece supports
D) Manual
12
ACL Group (Intl) Ltd
Email: [email protected]
www.terratekintl.com
5
Using Your Tool
Proper use
The double grinder is a multi-function tool for the rough and precision grinding of metals,
plastics and other materials using a selection of grinding wheels.
The machine must only be used for its intended purpose! Even if the machine is used as
intended, certain residual risk factors cannot be completely eliminated. The following hazards
may arise in connection with the machine construction and layout:
- Contact with the grinding wheel where it is not covered.
- Catapulting of parts from damaged grinding wheels.
- Catapulting of workpieces and parts of workpieces from the machine.
- Damage to hearing if hearing protection is not used as necessary.
The machine is to be used only for its prescribed purpose. Any other use is deemed to be a
case of misuse. The user / operator and not the manufacturer will be liable for any damage
or injuries of any kind caused as a result of this.
Before starting the equipment
Pull the power plug before doing any maintenance or assembly work on the equipment.
- The machine must be set up so that it stands firmly, i.e. it must be securely screwed to a
work bench or similar.
- All covers and safety devices have to be properly fitted before the machine is switched on.
- Grinding wheel must turn freely.
- Check that the voltage on the rating plate is the same as your supply voltage before you
connect the machine to the power supply.
13
ACL Group (Intl) Ltd
Email: [email protected]
www.terratekintl.com
Fitting The Eye Shields
Fit the Eye shield (2) to the wheel safety guards using the Eye shield adjustment screw (10).
10
2
Adjusting The Eye Shield
Adjust the Eye Shield Mount (3) using the adjustment screw (10) so that the distance between
the dry grinding wheel (5) and the Eye Shield Mount (3) is as small as possible and DOES NOT
exceed 2 mm. Adjust the Eye Shield Mount (3) periodically to compensate for wear on the
wheel.
2
3
10
Max 2mm
5
14
ACL Group (Intl) Ltd
Email: [email protected]
www.terratekintl.com
Fitting The Work Piece Supports
Undo the fastening screws (6). Secure the work piece supports (7) to the double wheel
grinder using the fastening screws (6).
8
7
6
6
Adjusting the workpiece supports
Adjust the workpiece supports (7) using the fastening screws (6) so that the distance between
the dry grinding wheel (5) and the workpiece support (7) is as small as possible and certainly
does not exceed 2 mm.
Adjust the workpiece supports (7) periodically to compensate for wear on the dry grinding
wheel.
5
Max 2mm
7
15
ACL Group (Intl) Ltd
Email: [email protected]
www.terratekintl.com
Changing The Grinding Wheel
Remove the 3 screws (A) holding the side section of the Wheel Guard (B) and remove the
Wheel Guard.
Undo the nut (D) (Important: The left grinding wheel is fastened with a left-handed thread and
the right grinding wheel with a right-handed thread), by holding the nut of the grinding wheel
mount on the opposite side, remove the flange (C), and replace the grindingwheel (5).
To assemble, proceed in reverse order.
D
A
A
B
5
C
A
Operation
ON/OFF switch (1)
To switch on the grinder set the On/Off switch (1) to position "I".
Move the ON/OFF switch (1) to position “0” to switch off the grinder.
After switching on the equipment wait for the equipment to reach its maximum speed of
rotation before commencing with the grinding work.
7
6
16
ACL Group (Intl) Ltd
Email: [email protected]
www.terratekintl.com
Grinding
We recommend that you use the fine-grained grinding wheel for fine grinding work and
the coarse-grained grinding wheel for coarse grinding work.
Place the work piece onto the work piece support (7) and slowly guide the work piece towards
the grinding wheel (5) at the desired angle to the point where the work piece and grinding wheel
make contact.
Move the work piece slightly back and forth to produce an optimal grinding result. This way the
grinding wheel (5) is evenly worn. Allow the work piece to cool between grinding.
6
Maintenance And Cleaning
Warning:
Always pull out the mains power plug before starting any cleaning work.
Cleaning
Keep all safety devices, air vents and the motor housing free of dirt and dust as far as possible.
Wipe the equipment with a clean cloth or blow it with compressed air at low pressure.
We recommend that you clean the device immediately after each time you have finished using it.
Clean the equipment regularly with a moist cloth and some soft soap. Do not use cleaning
agents or solvents; these could attack the plastic parts of the equipment. Ensure that no water
can seeps into the device.
Maintenance
There are no parts inside the equipment which require additional maintenance.
Disposal
Power tools, accessories and packaging should be sorted for environmentally-friendly recycling.
Only for EC countries:
Do not dispose of power tools into household waste!
According to the European Directive 2002/96/EC on waste electrical and
electronic equipment and its incorporation into national right, products
that are no longer suitable for use must beseparately collected and sent
for recovery in an environmentally-friendly manner.
17
ACL Group (Intl) Ltd
Email: [email protected]
www.terratekintl.com
ĞĐůĂƌĂƟŽŶŽĨŽŶĨŽƌŵŝƚLJ
We ACL Group (Intl.) Ltd, England DN6 8LZ declare that the Bench grinder has been
manufactured according to our full quality assurance procedures.
The declaration is to certify that it conforms to CE, EMC, LVD, MD and RoHS directives:
EN55014-1/A1: 2009
EN55014-2/A2: 2008
EN61000-3-2/ A2: 2009
EN61000-3-3: 2008
All provisions of Annex 1 of Council Directive 2004/108/EC – EMC directive
EN61029-1/A11: 2010
EN61029-2-4: 2011
All provisions of Annex 1 of Council Directive 2006/42/EC – the Machinery Directive,
the low Voltage Directive
RoHs 2011/65/EU
2011/65/EU
Mr. Alan Garnett, UK QA Manager
Environmental Protection
RECYCLING: WASTE ELECTRICAL PRODUCTS SHOULD NOT BE DISPOSED OF WITH
HOUSEHOLD WASTE. PLEASE RECYCLE WHERE FACILITIES EXIST. CHECK WITH YOUR LOCAL
AUTHORITY OR RETAILER FOR RECYCLING ADVICE.
18
ACL Group (Intl) Ltd
Email: [email protected]
www.terratekintl.com
7
Warranty
Please read the following carefully
ACL Group (Intl) Ltd. and/or it’s distributor has provided the parts list and assembly diagram
as a reference tool only. Neither ACL Group (Intl). Ltd. or its distributor makes any
representation or warranty of any kind to the buyer that he or she is qualified to do any repairs
or replace any parts of this product. ACL Group (Intl) Ltd. and its distributor expressly state
that all repairs or parts replacement should be done by certified or licensed technicians. The
buyer assumes all risk and liability arising out of his or her repairs or parts replacement to
the original product.
12 Months Limited Warranty
If within 12 months from the date of purchase you experience any problems with your product,
please return the product to its distributor/dealer for repair or replacement. This warranty
DOES NOT COVER normal wear, or any damage as a result of accidents, misuse, abuse or
negligence.
19
ACL Group (Intl) Ltd
Email: [email protected]
www.terratekintl.com
ACL Group (Intl) Ltd
Email: [email protected]
www.terratekintl.com