1
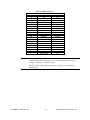
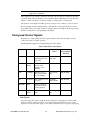
CM110HR
VGA + Flat Panel utilityModule
User’s Manual
ISO9001 and AS9100 Certified
BDM-610020020
Rev. B
CM110HR
VGA + Flat Panel utilityModule
User’s Manual
RTD Embedded Technologies, INC.
103 Innovation Blvd.
State College, PA 16803-0906
Phone: +1-814-234-8087
FAX: +1-814-234-5218
E-mail
[email protected]
[email protected]
web site
http://www.rtd.com
Revision History
97.03.28
2003.04.11
Rev. A
Rev. B
Initial release.
Updated for new software
New Manual Naming Method
Physical specifications updated to show extended temperature support, HR designation added.
Figures 1, 2, and 3 updated to more closely reflect board layout.
Software sections of manual updated to reflect new utilities and companion CD.
Published by:
RTD Embedded Technologies, Inc.
103 Innovation Blvd.
State College, PA 16803-0906
Copyright 2004 by RTD Embedded Technologies, Inc.
All rights reserved
Printed in U.S.A.
The RTD Logo is a registered trademark of RTD Embedded Technologies. cpuModule and utilityModule are
trademarks of RTD Embedded Technologies. PhoenixPICO and PheonixPICO BIOS are trademarks of Phoenix
Technologies Ltd. PS/2, PC/XT, PC/AT and IBM are trademarks of International Business Machines Inc. MSDOS, Windows, Windows 95, Windows 98 and Windows NT are trademarks of Microsoft Corp. PC/104 is a
registered trademark of PC/104 Consortium. All other trademarks appearing in this document are the property of
their respective owners.
Table of Contents
CHAPTER 1
INTRODUCTION............................................................................................................................9
CM110HR VGA UTILITYMODULE .............................................................................................................................9
Features.................................................................................................................................................................9
Connectors...........................................................................................................................................................10
Recommended Cables..........................................................................................................................................10
General Specifications.........................................................................................................................................10
CHAPTER 2
CONFIGURING THE UTILITYMODULE ...............................................................................11
JUMPERS ...................................................................................................................................................................11
Default Jumper Settings......................................................................................................................................11
Locations .............................................................................................................................................................12
Descriptions.........................................................................................................................................................13
SOLDER JUMPERS .....................................................................................................................................................14
Default Settings....................................................................................................................................................14
Locations ........................................................................................................................................................................... 15
Descriptions.........................................................................................................................................................15
BIAS-VOLTAGE ADJUSTMENT...................................................................................................................................16
Adjustment Procedure .........................................................................................................................................16
CHAPTER 3
INSTALLING THE UTILITYMODULE....................................................................................18
RECOMMENDED PROCEDURE ...................................................................................................................................18
CHAPTER 4
CONNECTING THE UTILITYMODULE .................................................................................20
FINDING PIN 1 OF CONNECTORS ...............................................................................................................................20
Locations .............................................................................................................................................................20
VGA VIDEO, CN4 ....................................................................................................................................................21
FLAT PANEL POWER, CN6........................................................................................................................................24
POWERDOWN CONTROL, CN7 ..................................................................................................................................25
POWER CONNECTOR, CN8 .......................................................................................................................................25
PC/104 BUS CONNECTORS, CN9 AND CN10............................................................................................................26
CHAPTER 5
USING THE UTILITYMODULE................................................................................................28
VIDEO .......................................................................................................................................................................28
Chips & Technologies Documentation.............................................................................................................................. 28
INCLUDED SOFTWARE ..............................................................................................................................................29
Utilities ................................................................................................................................................................29
VGA BIOS Files...................................................................................................................................................29
VGA User BIOS Programmer (112_USER.EXE) ................................................................................................30
VGA BIOS Modification Utilities ........................................................................................................................30
POWER PROTECTION CIRCUITRY ..............................................................................................................................31
Module Power-Supply Protection ..................................................................................................................................... 31
Flat-Panel Power-Supply Protection ................................................................................................................................. 31
CHAPTER 6
INTERFACING FLAT PANELS .................................................................................................33
SELECTING A FLAT PANEL ........................................................................................................................................33
Abbreviated List of Supported Panels .................................................................................................................33
Active Color (TFT)............................................................................................................................................................ 33
Passive Color (STN).......................................................................................................................................................... 34
Monochrome ..................................................................................................................................................................... 34
Plasma ............................................................................................................................................................................... 34
Electroluminescent (EL).................................................................................................................................................... 34
WIRING TO THE FLAT PANEL ....................................................................................................................................35
Power Signals .................................................................................................................................................................... 35
POWER SEQUENCING ................................................................................................................................................35
USING ON-BOARD POWER SWITCHING .....................................................................................................................35
USING EXTERNAL POWER SWITCHING ......................................................................................................................35
TIMING AND CONTROL SIGNALS ...............................................................................................................................36
Data Signals....................................................................................................................................................................... 36
PROGRAMMING THE USER BIOS ..............................................................................................................................37
SWITCHING BETWEEN CRT AND FLAT PANEL MODES .............................................................................................37
CHAPTER 7
POWER MANAGEMENT ...........................................................................................................39
MODES .....................................................................................................................................................................39
Panel Off..............................................................................................................................................................39
Standby ................................................................................................................................................................39
SIGNALS ...................................................................................................................................................................39
ACTI ....................................................................................................................................................................39
STANDBY* ..........................................................................................................................................................39
CHAPTER 8
RETURN POLICY AND WARRANTY......................................................................................41
RETURN POLICY .......................................................................................................................................................41
LIMITED WARRANTY ................................................................................................................................................42
Table of Tables
TABLE 1 DEFAULT JUMPER SETTINGS ..........................................................................................................................11
TABLE 2 JUMPER DESCRIPTIONS ...............................................................................................................................13
TABLE 3 DEFAULT SOLDER JUMPER SETTINGS ........................................................................................................14
TABLE 4 SOLDER JUMPER DESCRIPTIONS .................................................................................................................15
TABLE 5 CONNECTORS ...............................................................................................................................................21
TABLE 6 VIDEO CONNECTOR .....................................................................................................................................21
TABLE 7 FLAT PANEL CONNECTOR ...........................................................................................................................23
TABLE 8 FLAT PANEL POWER CONNECTOR..............................................................................................................24
TABLE 9 POWERDOWN CONTROL CONNECTOR ........................................................................................................25
TABLE 10 POWER CONNECTOR .................................................................................................................................25
TABLE 11 XT BUS CONNECTOR .................................................................................................................................26
TABLE 12 AT BUS CONNECTOR .................................................................................................................................27
TABLE 13 FLAT PANEL CONTROL SIGNALS ..............................................................................................................36
Table of Figures
FIGURE 1 JUMPER LOCATIONS ......................................................................................................................................12
FIGURE 2 SOLDER JUMPER LOCATIONS.....................................................................................................................15
FIGURE 3 CONNECTOR LOCATIONS ...........................................................................................................................20
Chapter 1 INTRODUCTION
This manual gives information on the CM110HR VGA + Flat Panel utilityModule. This module
supports VGA video using analog CRTs and Flat Panels including LCD, Plasma, and EL.
CM110HR VGA utilityModule
The CM110HR VGA utilityModule provides VGA video and flat panel support for RTD
Embedded Technologies, Inc. cpuModules and other standard PC/104 processor modules. Its
video and Flat Panel features are identical to the CM112HR, but it does not include the floppy and
hard drive interfaces of the CM112HR.
Features
The following are major features of the CM110HR utilityModule.
Chips and Technologies 65545 VGA controller
•
32-bit Hardware graphics-accelerator
•
Linear memory addressing
•
Hardware cursor
VGA CRT interface
•
Maximum 640 x 480 resolution
•
Up to 16 colors
Advanced Flat-panel interface
•
Supports passive and active color, monochrome, EL and plasma displays
•
Power switching and sequencing
•
Variable bias-voltage supply
•
Simultaneous CRT and Flat Panel operation
High-performance memories
•
1MB of 32-bit-wide display memory
•
512KB Frame buffer
•
Flash-Programmable User Video BIOS
Low power-consumption
•
2W typical from single +5V power supply
•
Panel-off and Standby modes (1.5W and 0.5W)
CM110HR VGA utilityModule
9
RTD Embedded Technologies, Inc.
Software Included
•
VGA and Flat Panel Utilities
•
BIOS versions for Flat Panels
Connectors
Connectors provided are:
•
•
•
•
•
•
•
CN4: VGA monitor
CN5: Flat Panel
CN6: Flat Panel Power
CN7: Powerdown Control
CN8: Power Connector
CN9: PC/104 Bus (XT)
CN10: PC/104 Bus (AT)
Recommended Cables
To allow maximum flexibility, cables are not included with the CM110HR. We offer a readymade cable kit for the module which may be purchased separately:
CM110HR uses cable kit XK-CM14, which contains:
•
VGA monitor cable (DIL10 to DSUB15)
General Specifications
•
•
•
•
•
•
•
Dimensions: 3.8 x 3.9 x 0.6" (97 x 100 x 16 mm)
Weight (mass): 3.0 ounces (85 grams)
8-layer PCB
Operating conditions:
temperature: -40 to +85 degrees C
relative humidity: 0 - 90%, non-condensing
Storage temperature: -55 to +125 degrees C
CM110HR VGA utilityModule
10
RTD Embedded Technologies, Inc.
Chapter 2 CONFIGURING THE UTILITYMODULE
The following sections contain information on configuring the utilityModule.
Please read this entire section before attempting to use the utilityModule!
Jumpers
Jumpers configure the following functions:
•
Interrupt line IRQ9 enable
•
Flat Panel options
Default Jumper Settings
The utilityModule is delivered from the factory configured according to the following table.
Default Jumper Settings
Jumper
JP3
JP4
JP5
JP6
JP7
Setting
2-3
1-2
1-2
1-2
1-2
Function
IRQ9 disabled
Factory VGA BIOS enabled
User BIOS programming disabled
+12V Backlight supply
M signal to Blank*/DE pin
Table 1 Default Jumper Settings
For most applications, you will not have to change these settings. If you do, refer to the following
pages for details.
CM110HR VGA utilityModule
11
RTD Embedded Technologies, Inc.
Locations
The figure below shows jumper locations.
Figure 1 Jumper Locations
CM110HR VGA utilityModule
12
RTD Embedded Technologies, Inc.
Descriptions
The following table describes the functions of the jumpers.
Jumper
JP3
JP 4
JP 5
Use
Enables or disables interrupt line IRQ9 from the VGA
controller to the bus. IRQ9 is not normally used by the
VGA controller.
1-2:
IRQ9 Enabled
2-3:
IRQ9 Disabled
Default: 2-3, IRQ9 Disabled
Selects which VGA BIOS is used.
1-2: Factory BIOS
2-3: User BIOS
Default: 1-2, Factory BIOS
Enables or disables programming of the User VGA BIOS.
CAUTION: Ensure memory range C800-CFFFh is not in
use before placing this jumper in position 2-3.
1-2: Disables User BIOS programming.
2-3: Enables User BIOS programming.
JP 6
JP 7
Default: 1-2, User BIOS programming disabled.
Selects the power supply voltage which is switched to the
Vbkl (backlight) pin of the Flat Panel interface.
1-2: +12V Backlight supply
2-3: +5V Backlight supply
Default: 1-2, +12V supply
Selects the signal output on the Blank*/DE pin of the Flat
Panel connector.
1-2: M signal to Blank*/DE pin
2-3: LP signal to Blank*/DE pin
Default: 1-2, M signal to Blank*/DE pin
Table 2 Jumper Descriptions
CM110HR VGA utilityModule
13
RTD Embedded Technologies, Inc.
Solder Jumpers
Solder jumpers are used to configure less-frequently-changed options. These are:
•
Flat Panel bias-voltage-supply source
Default Settings
The utilityModule is delivered from the factory configured according to the following table.
Default Solder Jumper Settings
Jumper
JS3
Setting
1-2
JS5
JS6
JS7
JS8
1-2
Open
1-2
Open
Function
Flat-Panel bias voltage generated from
+5V bus
Factory Use Only
Factory Use Only
Factory Use Only
Factory Use Only
Table 3 Default Solder Jumper Settings
For most applications, you will not have to change these settings. If you do, refer to the following
pages for details.
CM110HR VGA utilityModule
14
RTD Embedded Technologies, Inc.
Locations
The figure below shows solder-jumper locations.
Figure 2 Solder Jumper locations
Descriptions
The following table describes the functions of the solder jumpers.
Jumper
JS3
JS5
JS6
JS7
JS8
Default
1-2
1-2
Open
1-2
Open
Use
Selects the source of power for the DC-DC converter
which generates Flat Panel bias-voltages.
1-2: +5Vdc from PC/104 bus
2-3: +12Vdc from PC/104 bus
Factory use only.
Factory use only.
Factory use only.
Factory use only.
Table 4 Solder Jumper Descriptions
CM110HR VGA utilityModule
15
RTD Embedded Technologies, Inc.
Bias-Voltage Adjustment
If you are using a Flat Panel Display which requires a positive or negative bias voltage, you can
use potentiometer R16 to adjust the bias voltages.
Bias voltages are output on CN5 pins 3 (Vee+) and 4 (Vee-). We strongly recommend you follow
the procedure below when adjusting the bias voltages.
For details on the use of the bias-voltage supply, refer to the section on Interfacing a Flat Panel
Display.
CAUTION: The module is not intended to simultaneously supply both positive and negative bias
voltages. Attempting to do so could overload the supply and result in damage.
CAUTION: The bias supplies produce voltages which can very easily damage other components
of the module. Use extreme care when connecting to CN5 to measure the bias
voltages. If you short bias voltage to surrounding pins the module will be damaged
and this damage is not covered by the warranty.
Adjustment Procedure
To minimize risk of damage to your Flat Panel, we suggest you adjust the bias voltages using this
procedure:
•
From the flat-panel datasheet, determine the approximate bias voltage required.
•
Connect a voltmeter between the bias voltage pin and ground.
•
Turn on the system.
•
Adjust the bias supply to approximately the desired voltage.
•
Turn off the system.
•
From the panel datasheet, determine the approximate current the panel will draw from the bias
supply.
•
Select a load resistor which will draw that current at the desired voltage.
•
Connect the load resistor between the bias voltage pin and ground.
•
Turn on the system.
•
Verify the bias voltage, adjusting again if necessary.
•
Turn off the system.
You can now connect your flat panel display.
CAUTION: Although potentiometer R16 adjusts both positive (Vee+) and negative (Vee-) bias
supplies, the two output voltages will not necessarily be equal in magnitude. Do not
adjust one output voltage by measuring the other.
CM110HR VGA utilityModule
16
RTD Embedded Technologies, Inc.
NOTE:
CM110HR VGA utilityModule
The output of the bias voltage supply cannot be adjusted below 12 volts when solder
jumper JS3 is in position 2-3.
17
RTD Embedded Technologies, Inc.
Chapter 3 INSTALLING THE UTILITYMODULE
Since the utilityModule uses a PC/104 stackthrough bus, the only hardware installation you will do
is placing the module to the PC/104 stack. To do this, you will connect the PC/104 bus connector
with the matching connector of another module.
Recommended Procedure
We recommend you follow the procedure below to ensure that stacking of the modules does not
damage connectors or electronics.
•
Turn off power to the PC/104 system or stack.
•
Select and install standoffs to properly position the utilityModule on the PC/104 stack.
•
Touch a grounded metal part of the stack to discharge any buildup of static electricity.
•
Remove the utilityModule from its anti-static bag.
•
Check that keying pins in the PC/104 bus connector are properly positioned.
•
Check the stacking order: make sure an XT bus card will not be placed between two AT bus
cards, or it will interrupt the AT bus signals.
•
Hold the utilityModule by its edges and orient it so the bus connector pins line up with the
matching connector on the stack.
•
Gently and evenly press the utilityModule onto the PC/104 stack.
CAUTION: Do not force the module onto the stack! Wiggling the module or applying too much
force may damage it. If the module does not readily press into place, remove it, check
for bent pins or out-of-place keying pins, and try again.
CM110HR VGA utilityModule
18
RTD Embedded Technologies, Inc.
CM110HR VGA utilityModule
19
RTD Embedded Technologies, Inc.
Chapter 4 CONNECTING THE UTILITYMODULE
The following sections describe connectors of the utilityModule.
Finding Pin 1 of Connectors
Pin 1 of connectors is indicated by a white area silk-screened on the PC board. It is also indicated
by a square solder pad visible on the bottom of the PC board.
Locations
The figure below shows connector locations.
Figure 3 Connector Locations
CM110HR VGA utilityModule
20
RTD Embedded Technologies, Inc.
Connectors
Connector
CN4
CN5
CN6
CN7
CN8
CN9
CN10
Function
VGA monitor
Flat Panel
Flat Panel Power
Powerdown control
Power connector
PC/104 XT Bus
PC/104 AT Bus
Size
10 pin
40 pin
10 pin
4 pin
10 pin
64 pin
40 pin
Table 5 Connectors
VGA Video, CN4
CN4 is a 10-pin DIL connector which provides standard signals to connect an analog VGA video
monitor. The pinout of this connector is shown below:
If you are using our cable kit, you can simply connect the video cable in this kit between connector
CN4 and your VGA monitor.
VGA Video Connector, CN4
Signal
Function
DIL Pin
DB15 Pin
1
2
3
4
5
6
7
8
9
10
-
VSYNC
Vertical sync
14
HSYNC
Horizontal sync
13
4
RED
Red signal
1
12
GREEN
Green signal
2
11
BLUE
Blue signal
3
AGND
Analog Ground
6
AGND
Analog Ground
7,8
GND
Digital Ground
10
GND
Digital Ground
5
Table 6 Video Connector
Shown another way, the pinout of this connector (facing the pins) is:
CM110HR VGA utilityModule
1
VSYNC
HSYNC
2
3
-
RED
4
5
-
GREEN
6
7
-
BLUE
8
9
AGND
GND
10
21
RTD Embedded Technologies, Inc.
Note:
In our XK-CM14 cable kit, not all ground pins of the DB15 VGA connector are
wired to the utilityModule. In a very few cases, a particular monitor will require all
ground pins to be connected. In these cases, it will be necessary to use a cable with
all ground signals connected to the utilityModule.
Note:
High-resolution video uses very high-speed signals. For optimum video performance,
you should:
- use a short video cable between the module and VGA connector
- provide a low-impedance ground between your system and the VGA connector
CM110HR VGA utilityModule
22
RTD Embedded Technologies, Inc.
Flat Panel Interface, CN5
CN5 is a 40-pin DIL connector which provides signals to connect Flat Panel displays. Please refer
to the chapter on Flat Panel Displays for more details. The pinout of this connector is shown
below:
Table 7 Flat Panel Connector
Flat Panel Interface Connector, CN5
Function
Pin
Signal
1
2
3
4
5
6
7
8
9
10
11
12
13
14
15
16
17
18
19
20
21
22
23
24
25
26
27
28
29
30
31
32
33
34
35
36
37
38
39
40
VDDSW
VBKLSW
Vee(+)
Vee(-)
ENABKL
GND
M
Blank*/DE
GND
LP
FLM
GND
SHFCLK
GND
PNL0
PNL1
PNL2
PNL3
PNL4
PNL5
PNL6
PNL7
PNL8
PNL9
PNL10
PNL11
PNL12
PNL13
PNL14
PNL15
GND
PNL16
PNL17
PNL18
PNL19
PNL20
PNL21
PNL22
PNL23
GND
CM110HR VGA utilityModule
Note
Switched Panel Vdd
Switched Backlight supply
Positive Panel Bias
Negative Panel Bias
Backlight Enable signal
Modulation clock
Blank/Display enable
1
2
2
3
Latch pulse
First line marker
Shift clock
Panel 0
Panel 1
Panel 2
Panel 3
Panel 4
Panel 5
Panel 6
Panel 7
Panel 8
Panel 9
Panel 10
Panel 11
Panel 12
Panel 13
Panel 14
Panel 15
Panel 16
Panel 17
Panel 18
Panel 19
Panel 20
Panel 21
Panel 22
Panel 23
23
RTD Embedded Technologies, Inc.
Notes:
1) VBKLSW can provide switched +5Vdc or +12Vdc, as selected by jumper JP5.
2) The magnitude of bias voltages Vee(+) and Vee(-) are adjusted by trimpot R16.
3) The Blank*/DE pin may be connected to either M or LP signals from the VGA
controller by positioning jumper JP7.
For more information, refer to the section on Configuring the utilityModule.
Flat Panel Power, CN6
CN6 is a 10-pin DIL connector which provides power and control signals which may be used when
interfacing a Flat Panel display. The pinout of this connector is shown below:
Flat Panel Power Connector, CN6
Signal
Function
DIL Pin
1
2
3
4
5
6
7
8
9
10
ENAVDD
ENABKL
ENAVEE
GND
+5Vdc
+5Vdc
GND
GND
+12Vdc
-12Vdc
in/out
Enable Panel Vdd
Enable Panel Vbkl
Enable Panel Vee
Ground
Power supply
Power supply
Ground
Ground
Power supply
Power supply
out
out
out
-
Table 8 Flat Panel Power Connector
Shown another way, the pinout of this connector (facing the pins) is:
Note:
CM110HR VGA utilityModule
1
ENAVDD
ENABKL
2
3
ENAVEE
GND
4
5
+5V
+5V
6
7
GND
GND
8
9
+12V
-12V
10
The +12V and -12V pins are connected to the PC/104 bus and power supply
connector. These voltages are not generated on the utilityModule.
24
RTD Embedded Technologies, Inc.
Powerdown Control, CN7
A location is provided for connector CN7, which is a 4-pin connector providing access to
powerdown control signals of the VGA controller. These signals are described in the section on
Power Management.
The right-angle header for CN7 is not factory installed.
The pinout of this connector (facing the pins) is shown below:
1
STANDBY*
GND
2
3
ACTI
GND
4
Table 9 Powerdown Control Connector
Note:
The STANDBY* signal is pulled high by a 10k ohm resistor.
Power Connector, CN8
CN8 is an 8-pin connector which can be used to connect power to the utilityModule. The signals
on this connector are directly connected to corresponding power signals on the PC/104 bus
connectors.
The pinout of this connector (facing the pins) is shown below:
7
5
3
1
GND
NC
NC
GND
+5
-12
+12
+5
8
6
4
2
Table 10 Power Connector
Note:
Power wiring to the utilityModule must be sufficiently heavy to supply needed
current without excessive voltage drop, or erratic operation may occur.
We strongly recommend you connect bypass capacitors as close as possible to this
power connector. A 0.1uF ceramic and 470uF electrolytic capacitor in parallel are
usually sufficient.
CM110HR VGA utilityModule
25
RTD Embedded Technologies, Inc.
PC/104 Bus Connectors, CN9 and CN10
Connectors CN9 and CN10 provide PC/104 bus connections. CN9 carries XT bus signals, and
CN10 carries additional signals for the AT bus. The signals on CN9 and CN10 conform to the
IEEE P966 standard for the PC/104 bus.
The following tables list the connector pinouts:
Table 11 XT Bus Connector
Pin
1
2
3
4
5
6
7
8
9
10
11
12
13
14
15
16
17
18
19
20
21
22
23
24
25
26
27
28
29
30
31
32
CM110HR VGA utilityModule
PC/104 XT Bus Connector, CN9
Row A
Row B
IOCHCHK*
SD7
SD6
SD5
SD4
SD3
SD2
SD1
SD0
IOCHRDY
AEN
SA19
SA18
SA17
SA16
SA15
SA14
SA13
SA12
SA11
SA10
SA9
SA8
SA7
SA6
SA5
SA4
SA3
SA2
SA1
SA0
0V
26
0V
RESETDRV
+5V
IRQ9
-5V
DRQ2
-12V
ENDXFR*
+12V
(KEYING PIN)
SMEMW*
SMEMR*
IOW*
IOR*
DACK3
DRQ3
DACK1*
DRQ1
REFRESH
SYSCLK
IRQ7
IRQ6
IRQ5
IRQ4
IRQ3
DACK2*
TC
BALE
+5V
OSC
0V
0V
RTD Embedded Technologies, Inc.
Table 12 AT Bus Connector
Pin
0
1
2
3
4
5
6
7
8
9
10
11
12
13
14
15
16
17
18
19
Note:
PC/104 AT Bus Connector, CN10
Row C
Row D
0V
SBHE*
LA23
LA22
LA21
LA20
LA19
LA18
LA17
MEMR*
MEMW*
SD8
SD9
SD10
SD11
SD12
SD13
SD14
SD15
(KEYING PIN)
0V
MEMCS16*
IOCS16*
IRQ10
IRQ11
IRQ12
IRQ15
IRQ14
DACK0*
DRQ0
DACK5*
DRQ5
DACK6*
DRQ6
DACK7*
DRQ7
+5V
MASTER*
0V
0V
Two locations on the bus have mechanical keying pins to help prevent misconnection
of the PC/104 bus. These keying pins are a part of the PC/104 standard, and we
strongly recommend you leave them in place.
If you have other modules without keying pins, we suggest you modify them to
include keying.
CM110HR VGA utilityModule
27
RTD Embedded Technologies, Inc.
Chapter 5 USING THE UTILITYMODULE
Video
The video interface of the utilityModule appears as a standard VGA card. It will support interlaced
and non-interlaced analog RGB VGA monitors, but does not support digital RGB monitors.
The module supports the following general video modes:
• VGA
• EGA
• CGA
• MCGA
• Monochrome
For a complete list of supported video modes, please refer to the Chip and Technologies 65545
datasheet (see the following section).
To use certain features of the video controller, you may need to use utility programs included on
floppy disk. Refer to the following sections for information on these utilities.
Chips & Technologies Documentation
Due to the complexity of the Chips & Technologies 65545 VGA controller chip, it is impossible
for us to reproduce all programming information in this manual. If you will be doing in-depth
programming of the VGA controller, we suggest you obtain the 65545 datasheet from the
manufacturer.
The 65545 datasheet is available on-line in electronic format as an Adobe Acrobat (.PDF) file on
the Asiliant Technologies website:
www.asiliant.com
You may also contact:
Asiliant Technologies
256 East Gish Road
San Jose, California 95112
Or by phone/fax:
Telephone: 408-467-0755
Fax: 408-467-0750
CM110HR VGA utilityModule
28
RTD Embedded Technologies, Inc.
Included Software
The CM110HR ships with several software utilities and sample VGA BIOS files. This software is
provided on CD with the board. Newer versions of the utilities may be available from the RTD
web site at http://www.rtd.com, or the Asiliant web site at http://www.asiliant.com.
Utilities
•
CHIPSEXT and CHIPSVGA are Windows utilities to view/edit registers in the 65545.
•
CT.COM is a DOS command-line utility to switch the VGA controller to CRT mode.
•
DEBUGVGA is DOS a utility that reads, writes, dumps and loads registers, sets VGA BIOS
modes and computes CRT timings for the current mode.
•
FP.COM is a DOS command-line utility to switch the VGA controller to flat panel mode.
•
MODETEST is a DOS diagnostic to set and display information for each video mode.
•
SM.COM is a DOS utility that switches the VGA controller to simultaneous CRT and Flat
Panel mode
VGA BIOS Files
If you are using Flat Panel displays, you may need these files, which are versions of the video
BIOS. Each one supports a different Flat Panel or class of Flat Panels. Refer to the section on
Interfacing Flat Panels for more information on using these files.
Additional BIOS versions for other displays will be made available on our website and from
factory technical support.
•
18BTFT.DAT - 640x480 Color TFT 18-Bit Interface
•
1K768TFT.DAT - 1024x768 Color TFT (Sharp LQ10dx01)
•
800STN.DAT - 800x600 Color STN
•
800TFT.DAT - 800x600 Color TFT
•
ELDD640.DAT - 640x480 EL DD (Sharp LJ64H052)
•
HTCTFT.DAT - 640x480 Color TFT (Hitachi 26DS2, Hitachi TX26D02VC2AA)
•
MONODD.DAT - 640x480 Dual Scan Monochrome (Sharp LM64P80)
•
MONODDEX.DAT - 640x480 Dual Scan Monochrome using external buffer (Sharp
LM64P80)
•
MONODDNA.DAT - 640x480 Dual Scan Monochrome using external buffer & No
Accelerator (Sharp LM64P80)
•
STN4BIT.DAT - 640x480 4-Bit Pack STN Color (Sanyo LCM5327-24NAK, LM-CK33-3322NEZ, LCM 5330)
•
STNDD.DAT - 640x480 Color STN DD -8/16 Bit Interface (Sharp LM64C08)
CM110HR VGA utilityModule
29
RTD Embedded Technologies, Inc.
•
STNDD1DR.DAT - 640x480 Color STN DD -8/16 Bit Interface (Sharp LM64C08) for 1DRAM Memory Configuration.
•
STNDDEX.DAT - 640x480 Color STN DD -8/16 Bit Interface using external buffer (Sharp
LM64C08) for 2-DRAM Memory Configuration.
•
STNDDNA.DAT - 640x480 Color STN DD -8/16 Bit Interface using external buffer & No
Accelerator (Sharp LM64C08)
•
STNE4BIT.DAT - 640x480 4-Bit Extended Pack STN Color (Sharp LM64C031)
•
TFTCLR.DAT - 640x480 Color TFT With Display Enable (Sharp LQ9D011, Toshiba
LTM09C015-1)
VGA User BIOS Programmer (112_USER.EXE)
This utility program is used to program the User portion of the video BIOS to support various Flat
Panels. The utilityModule is supplied from the factory with the Factory video BIOS programmed
with a settings identical to MONODDEX.DAT and the User video BIOS programmed with
STNDDEX.DAT (see above). To use a different Flat Panel type, you will need to reprogram the
User video BIOS using this utility.
The procedure is:
•
Select the BIOS file you wish to program into the User BIOS.
•
Make certain no hardware or software is using address range C8000h to CFFFFh.
•
Make sure shadowing of address range C8000h to CFFFFh is disabled in Setup.
•
Make sure EMM386 or other memory managers are not using address range C8000h to
CFFFFh.
•
Set jumper JP4 to boot using the Factory BIOS.
•
Set jumper JP5 to disable User BIOS programming.
•
Boot the system.
•
Run 112_USER.EXE and follow the directions displayed.
Once you have reprogrammed the User BIOS, move jumper JP4 to select whether the
utilityModule boots using the Factory BIOS or User BIOS.
VGA BIOS Modification Utilities
Depending on the application, it may be necessary to make a custom version of the VGA BIOS.
The most common reason to make a custom VGA BIOS is to support a non-standard flat panel
type.
Asiliant provides a BIOS modification program (BMP), to generate custom VGA BIOSes. The
BMP is included on the companion CD for the board. For detailed information on using the BMP,
refer to the documentation provided with the program. Once you have created a custom VGA
BIOS, you can program it onto the board using 112_USER.EXE.
CM110HR VGA utilityModule
30
RTD Embedded Technologies, Inc.
Power Protection Circuitry
To reduce the risk of damage due to power-supply problems, the utilityModule includes several
protective components.
Module Power-Supply Protection
The utilityModule includes components to help prevent damage due to problems with the +5Vdc
power supply from the PC/104 bus or power-supply connector. Protection is provided for:
• Over-current
• Reversed polarity
• Excessive voltage
This protection is only for the utilityModule, and will not protect other devices in a PC/104 stack
or any of the Flat Panel power supplies.
The protective fuse is replaceable and is available from electronics suppliers. Its description and
part number are:
Littelfuse Nano2 SMF 2.0 amp, R451-002
Caution:
Replace fuses only with parts of identical current and voltage rating.
Flat-Panel Power-Supply Protection
The Flat-Panel power supplies of the utilityModule are protected against overcurrent by the
following devices:
Vbkl:
fuse F2, 2A rating, Littelfuse ALF SMF, R418-002
Vdd:
fuse F3, 2A rating, Littelfuse ALF SMF, R418-002
We suggest you return the utilityModule to the factory for replacement of these components, as
they are surface-mounted to the board.
Caution:
RTD Embedded Technologies, Inc. cannot be responsible for damage resulting from
attempts to replace these components.
Caution:
Replace fuses only with parts of identical current and voltage rating.
CM110HR VGA utilityModule
31
RTD Embedded Technologies, Inc.
CM110HR VGA utilityModule
32
RTD Embedded Technologies, Inc.
Chapter 6 INTERFACING
FLAT PANELS
The utilityModule can display VGA graphics data on a CRT video monitor, Flat Panel display, or
even simultaneously on both a CRT and a Flat Panel.
The utilityModule can be programmed to work with virtually any Flat Panel display in the
following classes:
•
Active Color TFT (Thin-Film-Transistor) LCD
•
Passive Color STN (Super-Twist Nematic) LCD
•
Monochrome LCD
•
Monochrome EL (electroluminescent)
•
Monochrome Plasma
To use the utilityModule with a Flat Panel, you will need to do these things:
•
Select a Flat Panel which is compatible with the module.
•
Correctly wire the Flat Panel to the module.
•
Correctly program the USER BIOS to support the Flat Panel.
The following sections will guide you through these steps.
Selecting a Flat Panel
Caution:
Flat Panel displays are expensive and delicate devices. RTD Embedded
Technologies, Inc. cannot be responsible for damage to a display caused by
misconnection, misuse, or misapplication of our product. Please use extreme care and
good engineering practice when connecting a Flat Panel to the utilityModule.
The Chips & Technologies 65545 VGA controller chip can support a tremendous variety of flat
panels, but you will find it easiest to use a panel which has been tested with the chipset.
Abbreviated List of Supported Panels
Some of the panels known to work with the 65545 VGA controller are:
Active Color (TFT)
•
Hitachi TM26D50VC2AA 640x480
•
Sharp LQ9D011 640x480
•
Sharp LQ10D311 640x480
•
Sharp LQ10DX01 1024x768
•
Toshiba LTM-09C015-1 640x480
CM110HR VGA utilityModule
33
RTD Embedded Technologies, Inc.
Passive Color (STN)
•
Sanyo LM-CK53-22NEZ 640x480
•
Sanyo LCM5327-24NAK 640x480
•
Sanyo LCM5331-22NTK 640x480
•
Sharp LM64C031 640x480
•
Sharp LM64C08P 640x480
•
Kyocera KCL6448 640x480
•
Hitachi LMG9720XUFC 640x480
•
Hitachi LMG9721XUFC 640x480
•
Toshiba TLX-8062S-C3X 640x480
•
Optrex DMF-50351NC-FW 640x480
Monochrome
•
Epson EG-9005F-LS 640x480
•
Epson ECM-A9071 1024x768
•
Citizen G6481L-FF 640x480
•
Sharp LM64P80 640x480
•
Sanyo LCM-6494-24NTK 640x480
•
Sanyo LCM-5491-24NAK 1024x768
•
Hitachi LMG5364XUFC 640x480
•
Matsushita S804 640x480
Plasma
Electroluminescent (EL)
•
Sharp LJ64ZU50 640x480
Other panels are frequently added. To obtain the most current panel list, contact our website:
www.rtd.com
A panel list is maintained under the CM112HR and CM110HR utilityModules.
We strongly recommend you use a panel in these lists. If you do not, you will need to determine
wiring connections and register settings yourself. We suggest you start by trying to match the
CM110HR VGA utilityModule
34
RTD Embedded Technologies, Inc.
unlisted panel to a similar one in our listings. You may then need to change parameter settings of
the video chipset for proper operation.
Wiring to the Flat Panel
Connections between a Flat Panel and the utilityModule consist of three types of signals:
•
Power signals
•
Timing and control signals
•
Data signals
These signals types are briefly described below.
Power Signals
Most Flat Panels require several power supply voltages. Almost all panels require a +5Vdc logic
supply. Most LCD panels also require a bias voltage supply, which can be a positive or negative
voltage, usually in the range of 12 to 36Vdc. If the panel uses a backlight, a +12Vdc supply is also
usually required.
Power Sequencing
The order in which power is applied to a flat panel display is usually very important. Improperly
switching power to the panel may even result in damage to the display. For this reason, the
utilityModule includes switching circuitry which can be programmed to properly sequence
supplies to most Flat Panels.
Using On-board Power Switching
If the power supply needs of your Flat Panel are within the utilityModule capabilities listed below,
you can use the on-board power switching circuitry.
Vdd:
+5Vdc, 2A maximum
Vee:
-36Vdc to +36Vdc, adjustable
Vbkl:
+5Vdc or +12Vdc (selectable by JS3), 2A maximum
If your Flat Panel will not operate within these limits, you will need to implement external power
switching. Please read the following section.
Using External Power Switching
If you need voltages or currents which exceed those available on the utilityModule, you must
implement your own power switching circuitry. You may be able to control your switching
circuitry with control signals of the utilityModule. These signals are:
•
•
•
CM110HR VGA utilityModule
ENAVEE
ENBKL
ENVDD
- Bias-voltage-supply control signal
- Backlight-supply control signal
- Logic-supply control signal
35
RTD Embedded Technologies, Inc.
Caution:
These signals are not power supplies for a Flat Panel! Do not connect them to power
supply pins of a Flat Panel.
These signals are logic outputs controlled by the VGA controller. They are switched on and off in
a sequence which can be programmed to be compatible with most Flat Panels. You may use these
signals to control relay drivers or transistor switches to switch power to your flat panel.
The signals are active-high, meet TTL logic levels, and can source or sink up to 8 mA of current.
Before designing external switching circuitry, verify that the control signals listed above can be
programmed to the power-supply sequence you require. Refer to the Chips & Technologies 65545
datasheet for information on programming of the signals.
Timing and Control Signals
Flat panels also require timing and control signals which clock data into the display logic and
control other aspects of display operation.
The utilityModule supplies the following timing and control signals:
Table 13 Flat Panel Control Signals
Signal
Name
Purpose
Other Common
Names
Alternate
Programmable
Functions
SHFCLK
Shift clock
Shifts (clocks)
individual pixel data
into panel.
CL2, VDCLK,
XCK, CP2
FLM
First Line
Marker
Indicates start of new
screen of data.
Similar to video
VSYNC.
LFS, YD, S
LP
Latch Pulse
Indicates end of a
line of data. Similar
to video HSYNC.
CL1, LLCLK,
CP1
DE, BLANK*
M
Modulation
AC modulation clock
for panel
ACDCLK,
MOD, MCLK
DE, BLANK*
BLANK*
Blank
Disables display of
data while each line
is being updated.
DE
Display
Enable
Enables display of
data.
DISP, Display
Off*
Data Signals
All panels require data signals, though the number required by each panel type will vary. Each
pixel (dot) displayed on the panel has its color and/or brightness determine by a group of data
signals. For a color panel, three groups of data signals are usually used: a red group, a green group,
CM110HR VGA utilityModule
36
RTD Embedded Technologies, Inc.
and a blue group. The overall color or brightness of each pixel is determined by the settings of the
data signals within the groups.
For dual scan panels, the data signals are also divided into upper and lower groups. On each pixel
clock, an upper pixel is loaded from the upper data signals, and a lower pixel is simultaneously
loaded from the lower data signals.
Programming the User BIOS
The memory device which contains the video BIOS has two portions, a Factory BIOS and a User
BIOS. You may reprogram the User BIOS portion to support various Flat Panels. This is done
using the utility 112_USER.EXE, which is described in the chapter Using the utilityModule.
Once you have programmed the User BIOS, you can set jumper JP4 to boot from the User BIOS
or from the Factory BIOS. If you find that the User BIOS does not work, position jumper JP4 to
boot with the Factory BIOS, returning to a known state.
Caution:
Do not attempt to reprogram the Factory portion of the video BIOS! Doing so may
leave the utilityModule inoperative.
Switching Between CRT and Flat Panel Modes
At power-up, the utilityModule defaults to VGA video mode. It may be switched to Flat-Panel
mode or simultaneous CRT/Flat Panel mode by using three batch files supplied on the Flat Panel
Support disk:
FP.COM
- Switches to Flat Panel mode
CT.COM
- Switches to CRT mode
SM.COM
- Switches to simultaneous CRT and Flat Panel mode
You may automatically switch to one of these modes by including the appropriate file on your boot
drive and calling it from the autoexec.bat file of the boot drive.
CM110HR VGA utilityModule
37
RTD Embedded Technologies, Inc.
CM110HR VGA utilityModule
38
RTD Embedded Technologies, Inc.
Chapter 7 POWER
MANAGEMENT
Modes
The VGA controller provides two power-saving modes, Panel Off and Standby. For complete
details of Power-saving modes, please refer to the Chips & Technologies 65545 datasheet.
Panel Off
In the (somewhat mis-named) Panel Off mode, the controller turns off both the Flat Panel and CRT
interfaces. The VGA controller core remains active so the cpu can access I/O registers and read
and write VGA memory. In this mode, the video clock can be reduced to a much lower frequency
to save power.
Panel Off mode is entered via software only. This is done by programming Extended Register
XR52 bit 3 to a '1'.
Standby
In Standby mode, the VGA controller halts all cpu, memory, and display activities. The controller
then places the video DRAM into self-refresh mode, which means the controller clock can be
stopped. Because the controller is fully static, all register contents are maintained.
Standby mode may be entered by hardware or software. Forcing the STANDBY* pin of CN7 low
places the controller in Standby mode, as does programming Extended Register XR52 bit 4 to a '1'.
Note:
Chips and Technologies warns that proper procedure must be followed before
entering and after exiting Standby mode, or intermittent failures may occur. Refer to
their Application Note AN87, titled "65535/540/545 Suspend/Resume Procedure",
for more information on the procedure.
Signals
Two signals are provided for power management. These signals, ACTI and STANDBY*, are
available on connector CN7.
ACTI
The ACTI signal is an active-high output from the VGA controller. It goes active on every valid
read or write of VGA memory or the VGA I/O space. This signal may be monitored by power
control circuitry and used to indicate when the VGA interface is inactive.
The VGA controller may also monitor this signal internally and use an internal timer to place itself
in a power-saving mode. Refer to Extended Register XR5C in the 65545 datasheet.
STANDBY*
The STANDBY* signal is an active-low input to the VGA controller. It is pulled high on the
module by a 10k resistor. It may be driven by external circuitry to place the VGA controller into
Standby mode.
CM110HR VGA utilityModule
39
RTD Embedded Technologies, Inc.
CM110HR VGA utilityModule
40
RTD Embedded Technologies, Inc.
Chapter 8 RETURN
POLICY AND WARRANTY
Return Policy
If you wish to return a product to the factory for service, please follow this procedure:
Read the Limited Warranty to familiarize yourself with our warranty policy.
Contact the factory for a Return Merchandise Authorization (RMA) number.
Please have the following available:
•
•
•
Complete board name
Board serial number
A detailed description of the board’s behavior
List the name of a contact person, familiar with technical details of the problem or situation, along
with their phone and fax numbers, address, and e-mail address (if available).
List your shipping address!!
Indicate the shipping method you would like used to return the product to you.
We will not ship by next-day service without your pre-approval.
Carefully package the product, using proper anti-static packaging.
Write the RMA number in large (1") letters on the outside of the package.
Return the package to:
RTD Embedded Technologies, Inc.
103 Innovation Blvd.
State College PA 16803-0906
USA
CM110HR VGA utilityModule
41
RTD Embedded Technologies, Inc.
Limited Warranty
RTD Embedded Technologies, Inc. warrants the hardware and software products it manufactures and
produces to be free from defects in materials and workmanship for one year following the date of shipment
from RTD Embedded Technologies, INC. This warranty is limited to the original purchaser of product and
is not transferable.
During the one year warranty period, RTD Embedded Technologies will repair or replace, at its option, any
defective products or parts at no additional charge, provided that the product is returned, shipping prepaid,
to RTD Embedded Technologies. All replaced parts and products become the property of RTD Embedded
Technologies. Before returning any product for repair, customers are required to contact the factory for an
RMA number.
THIS LIMITED WARRANTY DOES NOT EXTEND TO ANY PRODUCTS WHICH HAVE BEEN
DAMAGED AS A RESULT OF ACCIDENT, MISUSE, ABUSE (such as: use of incorrect input voltages,
improper or insufficient ventilation, failure to follow the operating instructions that are provided by RTD
Embedded Technologies, "acts of God" or other contingencies beyond the control of RTD Embedded
Technologies), OR AS A RESULT OF SERVICE OR MODIFICATION BY ANYONE OTHER THAN
RTD Embedded Technologies. EXCEPT AS EXPRESSLY SET FORTH ABOVE, NO OTHER
WARRANTIES ARE EXPRESSED OR IMPLIED, INCLUDING, BUT NOT LIMITED TO, ANY
IMPLIED WARRANTIES OF MERCHANTABILITY AND FITNESS FOR A PARTICULAR
PURPOSE, AND RTD Embedded Technologies EXPRESSLY DISCLAIMS ALL WARRANTIES NOT
STATED HEREIN. ALL IMPLIED WARRANTIES, INCLUDING IMPLIED WARRANTIES FOR
MECHANTABILITY AND FITNESS FOR A PARTICULAR PURPOSE, ARE LIMITED TO THE
DURATION OF THIS WARRANTY. IN THE EVENT THE PRODUCT IS NOT FREE FROM
DEFECTS AS WARRANTED ABOVE, THE PURCHASER'S SOLE REMEDY SHALL BE REPAIR OR
REPLACEMENT AS PROVIDED ABOVE. UNDER NO CIRCUMSTANCES WILL RTD Embedded
Technologies BE LIABLE TO THE PURCHASER OR ANY USER FOR ANY DAMAGES,
INCLUDING ANY INCIDENTAL OR CONSEQUENTIAL DAMAGES, EXPENSES, LOST PROFITS,
LOST SAVINGS, OR OTHER DAMAGES ARISING OUT OF THE USE OR INABILITY TO USE THE
PRODUCT.
SOME STATES DO NOT ALLOW THE EXCLUSION OR LIMITATION OF INCIDENTAL OR
CONSEQUENTIAL DAMAGES FOR CONSUMER PRODUCTS, AND SOME STATES DO NOT
ALLOW LIMITATIONS ON HOW LONG AN IMPLIED WARRANTY LASTS, SO THE ABOVE
LIMITATIONS OR EXCLUSIONS MAY NOT APPLY TO YOU.
THIS WARRANTY GIVES YOU SPECIFIC LEGAL RIGHTS, AND YOU MAY ALSO HAVE OTHER
RIGHTS WHICH VARY FROM STATE TO STATE.
CM110HR VGA utilityModule
42
RTD Embedded Technologies, Inc.
RTD Embedded Technologies, Inc.
103 Innovation Blvd.
State College PA 16803-0906
USA
Our website: www.rtd.com
CM110HR VGA utilityModule
43
RTD Embedded Technologies, Inc.