1
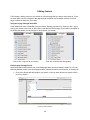
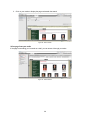
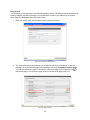
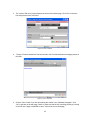
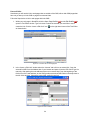
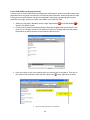
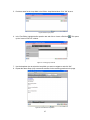
Table of Contents
Introduction ............................................................................................................................................. 2
College of Southern Maryland Web Page Owner Responsibilities......................................................... 3
Web Page Maintenance Plan Template................................................................................................ 5
Getting Started ........................................................................................................................................ 6
Logging into CMS Server ..................................................................................................................... 6
Using Help ........................................................................................................................................... 7
Using OpenText ...................................................................................................................................... 8
Homepage ........................................................................................................................................... 8
SmartEdit ........................................................................................................................................... 11
Asset Manager ................................................................................................................................... 12
Tasks ................................................................................................................................................. 14
Search ............................................................................................................................................... 14
Adding New Content .............................................................................................................................. 16
Editing Content ...................................................................................................................................... 28
Adding Other Content ............................................................................................................................ 31
Linking ............................................................................................................................................... 31
Using the Asset Manager ................................................................................................................... 38
Publishing.............................................................................................................................................. 54
Appendix A: Glossary of Terms ............................................................................................................. 57
Appendix B: Content Classes ................................................................................................................ 60
Appendix C: Using the Text Editor ......................................................................................................... 65
Introduction
An up-to-date and consistent web presence is an integral part of the College of Southern Maryland.
Excluding the faculty who maintain their individual web pages, there are more than 80 distributed content
owners across CSM who share the responsibility of maintaining more than 10,000 web pages. These
content owners are, for the most part, not trained web designers or programmers and generally take on
the responsibility of updating content in addition to their other regular duties. The increase in the number
of HTML pages and documents on the CSM web site over time has introduced creation and maintenance
issues. A content based management system helps in providing a structural layout for web content within
CSM’s web presence, enabling layout and branding consistency.
A web content management system (CMS) is a tool that helps streamline the creation, organization, and
management of web content by separating the editable content from the layout of that content. This
allows people without knowledge of HTML to create new pages and edit content without involving a web
developer. In addition, it ensures that the look and feel of all CSM sites remain consistent, helping
promote a positive user experience.
Open Text Web Solutions
The College of Southern Maryland has chosen Open Text Content Management Server as its content
based management system. Open Text offers features such as document management, centralized
management of content, decentralized content creation, separation of content and layout, link
management, workflow management, integration of media, publishing interface to multiple servers, and
user and access rights management.
This User Manual outlines CSM web page owner and editor responsibilities in regard to their web pages.
It provides instruction on how to create, edit, and publish web pages and how to manage images and
documents within the Open Text Content Management System.
2
College of Southern Maryland Web Page Owner Responsibilities
Goals and Objectives
The College of Southern Maryland web presence is an integral part of the College’s communications
system, providing information about the College, its mission and services, its faculty and students, and its
events and programs to viewers worldwide. In accordance with its mission, the College encourages the
use of the web by its students, faculty, and staff by offering services online and providing easy Internet
access.
Page Owners
Before a web page is approved for linking from the institutional pages, the group represented must select
an individual (called a page owner) who is responsible for maintaining its information. The page owners
will be the contact for that group or department. Page Owners are responsible for creating and
maintaining their information, receiving appropriate approvals for information to be posted, answering
questions, and updating their information to ensure its accuracy.
Page owners are responsible for maintaining and updating their sites on a timely basis in coordination
with the webmaster. At minimum, to be linked to College of Southern Maryland institutional pages,
sites must:
•
•
•
identify College of Southern Maryland on each site’s homepage and provide a link back to the
College of Southern Maryland home page;
identify the department or organization unit publishing the page;
provide contact information for the department or organizational unit, including postal address,
phone numbers, and email address; and
These responsibilities apply to all constituent College of Southern Maryland sites, regardless of where
they are housed. Sites bearing “under construction” notices will not be linked to College of Southern
Maryland institutional pages.
Failure to maintain information in a timely manner may result in the removal of links to the group’s pages
from the institutional pages, and/or removal of the group’s files from the College of Southern Maryland
web server.
Access Privileges
Page Owners will assign web Page Editors and ensure they use approved templates, providing clear
identification on each page of the source of information, contacts for more information, and links back to
the department home page and CSM home page.
Page Owners will monitor access privileges to their portion of the CSM web site for page editing purposes
to:
•
•
•
•
Ensure all web Page Editors are trained in accordance with policies
Request access for new page editors from the CSM webmaster, in accordance with security
request procedures
Inform the CSM webmaster when someone no longer needs access
Responsible Computing
Groups or individuals are responsible for the information they publish. All College web pages must
comply with the “Usage of Computing Resources Policies,” PRE:1405. Information providers are
expected to read and adhere to these policies. Sites failing to comply with these policies will be removed.
3
Web Site Monitoring
Monitor your web site by checking web pages periodically and when page editors make changes, to
ensure information is up-to-date and links are working. Ensure the accuracy and credibility of your content
as well as maintain layout continuity across your web site pages.
Review and Approval of Content
Updates to the CSM web site use a workflow and approval process. Be sure to adopt this process and
use it to ensure your content, layout and flow of web pages is consistent with site procedures and
guidelines.
Accessibility/Section 508/Americans with Disabilities Act
The College of Southern Maryland is committed to providing equal access to web-based information in
accordance with Section 508 of the Rehabilitation Act of 1973 and the Americans with Disabilities Act.
This ensures that College web pages will be readable by users with a wide range of disabilities. Web
pages associated with administration and services, academic instruction, departmental programs, and
College-sanctioned groups and activities should conform to the web accessibility principles. Page Owners
are responsible for ensuring compliance with ADA requirements with assistance from the CSM
webmaster. This can be accomplished by contacting the webmaster to obtain an understanding of web
ADA requirements and gaining an understanding through training and instruction. It rests upon the page
owner to ensure they request assistance with meeting ADA and Section 508 requirements.
Copyright Infringement
Do not place any materials owned by others, i.e., copyrighted works, on your web page(s) without the
written expressed consent of the copyright owner. Assume materials you find on the web are copyrighted
unless a disclaimer or waiver is expressly stated. You may include quotations of a few words provided
you identify the author and the work from which the quotation is taken. Credit sources appropriately to
avoid confusion with copyright and ownership.
4
Web Page Maintenance Plan Template
Adapt this template to meet the maintenance needs of your pages. This template can be downloaded
from http://info.csmd.edu/cms.
Content-Based Tasks
Who
Performs
Technical Tasks
Who
Performs
Tasks to be performed as needed
Editor
• Update news and events
• Coding as needed
• Add new publications
• Update contacts and
organization information
• Update other content as
directed by site owner
Tasks to be completed the first week of every month
CSM web
development
team
Editor
• Review spelling on technical
• Fix HTML syntax & Section 508
terms
issues; be sure standards are
followed
• Review, update, and optimize
old content
• Be sure special elements
(scripts, multimedia, forms, etc.)
• Add new content (and
work
optimize)
• Ask search engine specialist to
• Edit content
reindex any major new sections
• Check contacts listed on site
of content
(incl. Webmaster) to be sure
they are still correct
Tasks to be completed every quarter
CSM web
development
team
Editor
• Update broken links
• Review statistics for technical
problems
• Review statistics to learn what
pages are popular; update
home page or features as
needed, based on this info
Tasks to be completed every 12 months
CSM web
development
team
• Review content on every Web
page
• Schedule reviews for technical
content
• Review special elements to
decide if they are still
necessary
• Review major content sections
to decide which are still
necessary; decide if need new
content sections
CSM web
development
team
Owner &
Editor
• Decide if redesign is necessary
(from a technical standpoint)
• Clean up directory (remove
orphan files, etc.)
5
Getting Started
Logging into CMS Server
1. Direct your browser to: https://cms.hawk.csmd.edu/.
Figure 1: Open Text Web Solutions Login Page
2. Log in to the CMS using your network username and password.
Figure 2: Login fields
6
3. Once you have logged into the CMS Server, navigate to the top right most section and select the
project named “CSMD” using the “Select Project” drop-down.
Figure 3: Choosing your project
When you log in for the first time, you will be not be able to view any of the options in the top most menu
until you select the CSMD Project. The bottom left of the screen will indicate your username, project, and
language.
Using Help
Find a link to Open Text Online Help in the top right corner of the interface.
Figure 4: Using Help
Figure 5: Open Text Online Help
You can find extensive information about the functionalities of the Open Text user interface here.
However, you are unlikely to find the answer to a question that is specific to the CSM implementation.
Please refer to this manual for answers to CSM specific questions.
7
Using OpenText
Top Menu
The top menu contains the main navigation menu tabs for the CMS Server. The tabs present in the Top
Menu are:
Homepage: Links to the home page menu where you can configure your workspace.
SmartEdit: User interface where you can make changes to a web page.
Asset Manager: Provides an easy way of editing and managing digital files such as images and pdfs in
the CMS.
Tasks: Tasks is another way of obtaining the options where you can perform the most common tasks.
Search: A search tool for navigating through the CMS system using various criteria.
Figure 6: Top right menu
Homepage
Configuring the Homepage
The Homepage is a configurable dashboard where you can perform some of the most common tasks
such as managing documents that have been changed and making edits to content in pages that have
been through workflow. You have the ability to choose items that are relevant plus arrange the order in
which they appear on their screen.
Your Homepage can be configured using the “Configure Homepage” button on the right hand side of the
screen.
Figure 7: Configure homepage
8
Widgets
Widget boxes can be used to configure the Homepage according to your preferences. This is a drag and
drop feature where you drag and drop the widgets that they would like to be displayed on the homepage.
Figure 8: Create Widgets interface
The widget box consists of the following options:
Tasks: With the Tasks widget, you can view your tasks within the project. Drop the task box widget on
the homepage and personalize it according to your preferences. Provide a title, description, and task type
using the dropdown menu for the sections.
Page Preview: Use this option to obtain a preview of the pages in a particular project.
Delivery server: This option is similar to the “page preview” option where you can preview the pages in a
project. This option is not available in our implementation.
Page Search: Search the system for web pages or content. (e.g.: Recently modified pages, my recently
created pages, etc.)
Web Page: Similar to the “page preview” option where you can preview a particular page, but in this case
you need to provide the URL of the page you would like to preview.
9
Edit Settings
You control the look and feel of the homepage using this option. The Edit Settings option allows you to
change the number of columns on the homepage. You can also restore the homepage back to the default
setting using this option.
Figure 9: Edit Settings interface
Rearrange Widgets
The Rearrange Widgets panel contains the widgets that could not be automatically arranged within the
Homepage when the layout was changed.
Figure 10: Rearrange Widgets interface
10
SmartEdit
SmartEdit is a What You See is What You Get (or WYSIWYG) interface. This means you can create and
modify content while working in an environment that looks like your webpage.
Structural Area
The project's navigation structure is displayed in the structural area. When the user is in SmartEdit, a tree
structure view of the website can be seen on the left. This provides the ability to navigate to the required
page you are looking for.
Figure 11: SmartEdit Structural Area
Editing Area
In SmartEdit, project pages are displayed in the editing area. The RedDots control access to certain
portions of the site and allow access to elements that can be edited. Most RedDots are labeled with a
function. The RedDots open items for editing, not the labels.
Figure 12: SmartEdit Editing Area
11
Asset Manager
The Asset Manager provides an easy way of editing and managing digital files in the CMS. Assets such
as Images, PDF documents and media files are stored in Asset Manager. Click on the “Asset Manager”
tab to view the Asset Folders present in your section. If you cannot view the folders click “Switch Folder”
option (shown below) to view folders you have rights to. Presently there are two standard folders that are
set up in the Asset Manager under each section - “images” and “pdf”. Assets should always be imported
into their respective folders; images should be only imported to the “images” folder and pdf documents
should only be imported into “pdf” folder.
Click the “images “or the “pdf” folder to view all the files present in these individual folders. Presently,
there are two options to view the Assets in the CMS -- List View and Thumbnail View.
Figure 13: Asset Manager
12
Click the “List” view to provide a list of all the Assets.
Figure 14: List View of Assets
Click “Thumbnail” to view thumbnails of the assets.
Figure 15: Thumbnail View of Assets
13
Tasks
The Tasks section is another way to obtain frequently used options to perform common tasks. From the
Task tab, you can see pages saved as draft, pages in your workflow, pages waiting for correction and
submittal, and pages waiting for release.
Figure 16: Tasks interface
Search
The Search function allows you to search for specific pages in the project. You also have the ability to
create custom saved searches for future use. Such custom searches could include a subsection of your
site.
To create a search, click on “Search” in the task bar then “Edit Search”.
Figure 17: Editing a search
You can search by different criteria (Headline, Content, Page ID, Content class, Creation date,
Modification date, Original author, Last editor, keyword, Special pages) and include more than one
criterion in your search.
14
Figure 18: Choosing criteria
Click on the red X next to a criterion to delete it from your search.
Figure 19: Search criteria
15
Adding New Content
Finding your page
The first step in adding content to your section is to find the page that you want to add content to. Pages
are created by the CSM webmaster and will be either linked in your lefthand navigation or freestanding to
be linked elsewhere. If you know where your page is, you can navigate to it in SmartEdit.
1. Click on SmartEdit. In the lefthand file menu, find your section. Expand your section by clicking on
the + sign in front of your section name. Click on the first link under that and the first page of your
section will appear in the editing area where you can navigate to other parts of your section.
Click on the + sign next to your section
Then click on the first link that appears
Adding content to a Web Page
Creating a content section in the middle column
1. Once you’ve found your page in SmartEdit, click on the Edit Page Columns RedDot
left hand side of your screen. This opens the page for editing.
Figure 20: Adding content with SmartEdit
16
on the top
When you click on the Edit Page Columns RedDot
, your edit columns RedDots
appear.
Figure 21: Edit columns RedDots – three column
If the page is a 3-Column template design, then it is divided into three columns labeled with Edit Left
Column, Edit Center Column and Edit Right Column. And in the case of a 2-Column template design the
page is divided into only two columns named Edit Left Column and Edit Right Column.
Figure 22: Edit columns RedDots – two column
17
Content can be added to these sections by clicking on their respective RedDots.
3-Column Template
2-Column Template
2. Click on the Edit Center Column RedDot
. The following screen appears.
Figure 23: Edit link element interface
18
Create and Connect Page
Allows you to connect to the Content Classes that
are available for your section.
Edit Page Order
Used to rearrange the Content Classes in the page
to obtain a layout similar to the present live web
page.
Connect Existing Page
Allows you to connect to an existing page in the
CMS system. This option provides search criteria
where you can search for a specific page in the
CMS. Any of the search features such as Content,
Headline, Page ID, Content Class, Creation Date
etc can be used to lookup pages in the CMS.
Remove Items from List
Allow you to remove the items/ content sections
present in a page.
3. Click Create and Connect Page.
The List of Content Classes shows the content class types that are available for the section you are
editing. See the Content Class Appendix for more information on content classes.
19
4. Choose the type of content class you’d like to add to your page.
Figure 24: List of content classes available for center column
5. Edit your headline to be informative about the type of content you intend to enter.
Figure 25: Default title of page
Figure 26: Edit title
20
6. Now your page is created and you can enter content.
Figure 27: Page with created page section
Creating a section in the right column
1. Click the Edit Right Column RedDot
to create a page in the right column.
Figure 28: Edit page columns RedDots
2. Choose a content class from the list of content classes screen. Notice that these content classes
are not the same as the ones available for the middle column. Content classes are defined for
each area of the page. Samples of each content class are provided in the appendix.
21
Figure 29: Content classes available for right column
3. As before, label your page meaningfully.
Figure 30: Default headline for page
Figure 31: Edit the headline
4. Page is inserted in the right column and is ready for editing.
22
Figure 32: Right column with page to edit
Using the Page Menu
The Page Menu is the menu on the right hand side of the screen that is visible on the page when in the
SmartEdit mode. Click on Display Panels to show the panels. This Menu is only visible when in edit mode
for a page.
Figure 33: Display Panels
Page Menu options
Content Class Button: Provides a list of content classes that are present in
the system and the content classes within those folders. Allows for selection of
the content classes that you would like to include on the page.
Page Search: Option to search through the “Recently Created Pages” or
“Recently Modified Pages”.
Clipboard: Used to place the page in the clipboard so that it can be used
elsewhere in the CMS.
23
Figure 34: Content Classes Page Menu Option
You can also Create and Connect pages by dragging a content class from the Content Modules Page
Menu to the Edit Column RedDot .
Figure 35: Insert pages by dragging content class
24
How to use the Clipboard
The clipboard can be used to link to pages in other sections of the CMS using the drop and drag feature
explained below.
1.
Find and the section you would like to copy. Right-click on the Edit RedDot
Shortcut in Clipboard.
and select Create
Figure 36: Creating a shortcut in the clipboard
2.
3.
After placing the page in the clipboard, navigate to the web page into which you would like to
insert the page.
Open the Clipboard and drag and drop the shortcut onto the Edit Column RedDot
that you’d
like to add it to.
Figure 37: Linking to shortcut in clipboard
25
Entering Content
After your page sections have been created, you are ready to enter your content.
1. Click on the Open Page RedDot
of the section you’d like to add content to and then click on
the Edit RedDot . This launches the Text Editor.
Figure 38: Text Editor
2. Enter your content here and click ok to save and close the text editor. Clicking Save will save but
not quit out of text editor.
You can also directly edit on the page by pressing the CTRL key on the keyboard while clicking the Edit
RedDot
. After editing, click the Save Element RedDot
to save your changes. Refer to the Keyboard
Shortcuts job aid for guidance on using DirectEdit.
Figure 39: Edit directly in SmartEdit by pressing CTRL and clicking on the Edit RedDot
26
Reorder pages
After creating your pages, edit the order you’d like them to appear on the page. Click the Edit Column
RedDot
then Edit Page Order. Select the page you’d like to move and use the up and down arrows to
reorder.
Figure 40: Edit page order interface
27
Editing Content
The first step in adding content to your section is to find the page that you want to add content to. There
are three ways to do this: navigate to the page through SmartEdit, use the Search function to find the
page, or select the page from your tasks.
Navigate to page through SmartEdit
In the lefthand file menu in SmartEdit, find your section. Expand your section by clicking on the + sign in
front of your section name. Click on the first link under that and the first page of your section will appear in
the editing area where you can navigate to other parts of your section.
Click on the + sign next to your section
Then click on the first link that appears
Find the page through Search
OpenText’s search feature allows you to find CSM pages that have been created in OpenText. You can
search by different criteria, such as the page headline, selected words from the body text, or the page ID.
1. Click on the Search tab and configure your search. Once you have defined your search criteria,
click “Run Search.”
Figure 41: Search interface
28
2. Click on your results to display the page underneath the search.
Figure 42: Search results
Select page from your tasks
If the page is something you’ve saved as a draft, you can access it through your tasks.
Figure 43: Tasks interface
29
Editing content
1. Once you have found the page you need to edit, click on the Open Page RedDot
onthe Edit RedDot
to launch the text editor.
then click
Figure 44: Text editor
2. Enter your content here and click ok to save and close the text editor. Clicking Save will save but
not quit out of the text editor.
You can also directly edit on the page by pressing the CTRL key on the keyboard while clicking the Edit
RedDot
. Click the Save Element RedDot
to save your changes. Refer to the Keyboard Shortcuts
job aid for guidance on using DirectEdit.
Figure 45: Edit directly in SmartEdit by pressing CTRL and clicking on the Edit RedDot
30
Adding Other Content
Linking
Internal Links
Links to other sections or web pages within the CMS should always be linked within the CMS system.
This is particularly useful when a web page is moved from its original location. If the web pages are linked
internally, the CMS will update links automatically.
Follow the Steps below to link to web pages within the CMS.
1. Within your web page in SmartEdit, click the Open Page RedDot
then the Edit RedDot
open the Text Editor window. Type in the text or select the text that you would like to use to
create the link. Click the “Insert or Edit Link” icon
as shown below.
to
on the right hand corner of the Text Editor
Figure 46: Text editor
2. The “Insert or Edit Link” window will pop up. Select the “Page” option to search for the page you
would like to link to in the CMS. Click “Select” to open the “Page Search” window.
Figure 47: Insert or edit link
31
Using Search
You can search for the web page in the CMS using different criteria. The different search options include
Content, Headline, and hits for the page. You can add other criteria to your search such as Content
Class, Page ID, Modification Date, and Creation Date.
1. Enter your criteria, then click the “Start” button to search for results.
Figure 48: Page search with headline
2. The “Search Result” window provides a list of pages as the result of the search. To link to a
webpage, not to the individual page on the webpage, look for the Foundation Content Class.
You can also preview the page to make sure it is the correct page.Click the preview icon
preview the page. If it is the correct page, click on the name of the page to link to it.
Figure 49: Search results
32
to
3. The “Insert or Edit Link” window displays the name of the chosen page. Click “OK” to insert the
link and get back to the Text Editor.
Figure 50: Insert or edit link
4.
The text “Financial Assistance” has been linked to the Financial Assistance homepage present in
the CMS.
Figure 51: Link in text editor
5. Click the “Save” button if you are done editing the content in the “Standard Paragraph”. Click
“OK” to get back to the web page. Check to make sure that the link is working properly by clicking
on the link in the page in SmartEdit to see if it links to the correct web page.
33
External Links
Sometimes you will need to link to web pages that are outside of the CMS, either older CSM pages that
have not yet been put in the CMS or pages from external sites.
Follow the Steps below to link to web pages within the CMS.
1. Within your web page in SmartEdit, click the Open Page RedDot
then the Edit RedDot
open the Text Editor window. Type in the text or select the text that you would like to use to
create the link. Click the “Insert or Edit Link” icon
as shown below.
to
on the right hand corner of the Text Editor
Figure 52: Text editor with link text highlighted
2. In the “Insert or Edit Link” window select the “Internet” tab to link to an external link. Copy the
external link URL from the Address bar of your browser and paste it into the URL field or type it in
manually. After pasting the web address make sure to remove http:// from the beginning of the
field in front of the web address, as the CMS provides customized URL fields in the drop-down to
the left of this text box. Choose the correct URL prefix for your link.
Figure 53: Insert or edit link
34
3. The ToolTip field is optional, but you can provide a Tooltip for the web viewer. For third party links
that are not owned by College of Southern Maryland, the Editor should set the Target as “_blank”.
When the Target field is “_blank”, the link will open in a new window in the browser. If the drop
down list for the “Target:” does not work, highlight the mouse pointer in the field and use the down
keyboard arrow to change the values in the Target field.
Figure 54: Creating an external link
4. After completing all required fields, click “OK” to get back to the Text Editor. Click the “Save”
button if you are done editing. Click “OK” to get back to your CMS web page.
5. Check to make sure that the link is working properly by clicking on the link to see if it links to the
correct web page.
35
Create links within a web page (anchors)
Links that refer to content within the same web page are called anchors. Anchors are widely used on web
pages that have a long page of content such as Frequently Asked Questions. Anchors help the end users
to navigate to the correct question that they are interested in rather than going through the long list of
questions on the page. Anchors are called “Jump Marks” in the OpenText CMS.
1. Within your web page in SmartEdit, click the Open Page RedDot
then the Edit RedDot
to
open the Text Editor window.
2. First we need to create the Anchors that when clicked will navigate to the correct section of the
page. For an FAQ page, create a list of questions at the top of the page and below that provide
the questions as well as answers for the questions listed on the top.
3. Place your cursor in front of the question where you want the user to navigate to. Then click on
the “Insert or Edit Jump Mark” option that has a pencil icon
4.
on the right side of the editor.
Figure 55: Creating anchors in the Text Editor
36
5. Provide a name for the Jump Mark in the Define Jump Mark window. Click “OK” to save.
Figure 56: Define jump mark
6. In the Text Editor, highlight the first question text and click on “Insert or Edit Link”
up the “Insert or Edit Link” window.
. This opens
Figure 57: Inserting jump mark link
7. Use the dropdown box to select the Jump Mark you want to navigate to and click “OK”.
8. Repeat the above Steps (4-8) to create the anchors for the remaining questions in the page.
Figure 58: Text linked to Jump Mark
37
Using the Asset Manager
The Asset Manager provides an easy way of editing and managing digital files in the CMS. Assets such
as images, PDF documents and media files are stored in Asset Manager. Presently there are two
standard folders that are setup in the Asset Manager under each section - “images” and “pdf”. Assets
should always be imported into their respective folders; images should be only imported to the “images”
folder and documents should only be imported into “pdf” folder.
Files have to be imported only once into Asset Manager usually from the H: drive. (A user can browse to
any location where the image is located. This can be either your local machine or any other network
drives such as I:, Q: etc.).
1. Click on the “Asset Manager” tab to view the Asset Folders present in your section. If you cannot
view the folders click “Switch Folder” option (shown below) to view folders you have rights to.
Click the “images “or the “pdf” folders to view all the files present in these individual folders.
Presently, there are two options to view the Assets in the CMS- List View and Thumbnail View.
Figure 59: Asset Manager interface
38
2. Click the “List” view to provide a list of all the Assets.
Figure 60: List view of assets
3. Click “Thumbnail” to view thumbnails of the assets.
Figure 61: Thumbnail view of assets
39
Uploading new assets to the Asset Manager
1. Select Asset Manager from the Task bar
2. Select Switch Folder then select the folder into which you’d like to add files.
Figure 62: Folders in Asset Manager
3. Choose “Select Asset from Local File System”
Figure 63: Choose Select from Local File System
4. On the Transfer Local File dialog window, select “Browse” and browse to the file on your
computer (or other local file system). Select the file you’d like to upload.
Figure 64: Transfer Local File dialogue box
40
5. Enter a description of the file.
Figure 65: Attributes dialogue box
6. The file should now appear in your section’s Asset Manager. When you select the file name,
information about that file should appear on the right side of the screen. If you don’t see the file
information, select “Refresh Thumbnail and File Information” on the lower right to display the file
information.
Delete unused files in Asset Manager
1. Select Asset Manager from the Task bar
2. Select Switch Folder then select the folder from which you’d like to delete files.
3. Click on the name of the file that you want to delete, then select “Delete File”:
Figure 66: Delete files in Asset Manager
41
Inserting and Editing Assets into Pages
Images, PDF documents and media such as audio files, video files, flash etc. are generally referred to as
Assets in the CMS. Images can be added only through the Standard Paragraph element of the Content
Classes present in the CMS.
Inserting an image
1. In the page you’d like to edit, click the “Edit Paragraph” RedDot
window.
2. Click the “Insert Image or Edit Image Properties” icon
(icon which has mountains and sun in it).
to open the Text Editor
on the right most corner of the window
Figure 67: Text Editor - Insert Image
3.
“Insert Image or Edit Image Properties” window pops up. Select the Asset tab and click the
“Select” option.
Figure 68: Insert image or edit image properties dialogue box
42
4. Choose “Select Asset” if the asset is already in Asset Manager.
Figure 69: Upload or choose file dialogue box
5. Select the appropriate division from the list and click “OK”.
Figure 70: Choose folder from list
43
6. This brings up the Asset Manager interface to select the appropriate file from the folders. (If you
don’t find the folders here click “Switch Folder”.) Click on the “images” folder.
Figure 71: Asset Manager interface
7. Select the Asset by clicking on the name of image that you would to like to insert into the web
page. You can preview the Asset before connecting to the page by clicking on the Asset itself.
Click OK.
Figure 72: Select an asset
44
8. Enter alternative text and choose your alignment.
Figure 73: Edit image properties
9. Click OK to insert image into text editor.
Figure 74: Image inserted into text editor
45
Inserting PDFs
1. In the page you’d like to edit, click the “Edit Paragraph” RedDot
to open the “Text Editor”.
2. Select the text you would like to link, and click the “Insert or Edit Link” icon
right most corner of the Text Editor.
Figure 75: Text editor - insert link
3. Select the “Asset” tab and click the “Select” option.
Figure 76: Insert or edit link dialogue box
46
(globe icon) in the
4. Choose “Select Asset” if the asset is already in Asset Manager.
Figure 77: Upload or choose file dialogue box
5. Select the appropriate division from the List and click “OK”.
Figure 78: Select folder from list
47
6. This brings up the Asset Manager interface to select the appropriate file from the folders. (If you
don’t find the folders here click the “Switch Folder” option in the right corner.) Click on the “pdf”
folder.
Figure 79: Asset Manager interface
7. Select the Asset by clicking on the name of pdf that you would to like to insert into the web page
and click OK.
Figure 80: Select PDF file in Asset Manager
48
Figure 81: Linked text in text editor
Uploading and Inserting Assets
If you have not previously uploaded your assets using the Asset Manager, you can do this as you are
inserting an asset into your content. This process provides an interface, which is similar to Windows
Explorer, used to navigate to files on your local machine. Click the browser button and then navigate to
the location of the Asset. (usually the H: drive)
1. While in the text editor, place your cursor where you would like to insert an image and click the
“Insert Image or Edit Image Properties” icon
on the right most corner of the window. To link to
a PDF, select the text you would like to link and click the “Insert or Edit Link” icon
2. Choose the Asset tab and click “Select”.
Figure 82: Insert image or edit image properties dialogue box
49
.
3. Click Select File from Local File System
Figure 83: Upload or choose file dialogue box
4. Browse to the asset you’d like to upload and click Upload.
Figure 84: Browse to local file
5. Select the “image” folder if the Asset is an image. In the case of a PDF document, select the “pdf”
folder under your appropriate section. Make sure that you don’t upload the Assets into the wrong
folder.
Figure 85: Select correct folder
50
6. After selecting the appropriate folder, click “OK” to continue. An “Attribute” window is provided to
insert the “alt” tag for the Asset that is being uploaded. Provide a logical and unique Alternative
Text representation, or “alt” tag, for the Asset.
Figure 86: Alt text attributes dialogue box
7. Again enter your alternative text in the next screen. The “alt” attribute for an image is an ADA
requirement for the college and is mandatory. Be descriptive with your alternate text, but limit to
50 characters or less. (You can retype the same alt tag that is provided in the previous step.)
Figure 87: Insert or edit image properties dialogue box
51
8. In the case of the PDF documents, the “Insert or Edit Link” window opens up with the PDF
selected. For the PDF link you can provide a “ToolTip” which is optional. The ToolTip would show
up when the end user hovers over the link.
Figure 88: Insert or edit link dialogue box
9. Click “OK” to get back to the “Text Editor” to find the image on the web page or your content
linked to the PDF.
Figure 89: Photograph inserted in text editor
52
Figure 90: Linked text in text editor
53
Publishing
Workflow
Any business process related to web content management needs to go through a set series of steps or
approvals. This process is called a workflow and actions such as pages for release, deleting pages, and
publishing pages need to go through this business approval process. Once it is implemented, Web Page
Owners will approve their editor’s work before it is published on the live web server. If any changes are
made that are rejected by the Web Page Owner, it will be sent back to the Web Page Editor for correction
and further changes.
This workflow is not yet implemented in the CMS at College of Southern Maryland. Until it is, both Web
Page Editors and Web Page Owners can publish pages and both follow the same process.
Publishing
Release page
Releasing a page makes it available to other users within the CMS. If you do not release a page after
editing and saving, if another user tries to access it, they will get a message that the page is still in draft.
All pages should be released after you are done editing, even if you do not intend to publish immediately,
so that others may access it.
1. After making your changes to the page, right-click in the area where you did your changes. Make
sure that the page is open by clicking on the open page RedDot . Click on “Release Page”
Figure 91: Releasing a page
54
Publishing pages
1. Make sure the page is open by clicking on the open page RedDot
area. Click “Publish”.
Figure 92: Publishing a page
55
. Right click in the page
2. Check “Publish all following pages” and choose your email address if you’d like an email sent to
you when publishing is complete. “English” and “HTML” should also be checked. Do not check
the second box, “Publish related pages”.
Figure 93: Publication settings
56
Appendix A: Glossary of Terms
Content Class
A content class is the blueprint or building block for creating web pages. It describes the
placeholders/elements for both the structure and content for a web page or a section of a web page.
Content classes are templates that contain information regarding design, layout, and properties for the
contents that belong to a web page. It is just a template and does not contain content of its own.
Page
An instance of a Content Class is called a page that contains a unique set of contents. Pages depend on
the specification of the content classes that were used to create them. Any number of pages can be
created using the same Content Classes. A single web page can contain any number of different Content
Classes.
Template
A Template contains the HTML markup that describes the layout of pages within the CMS. Pages are
created based on templates and the changes in the layout of a page can be made in the template
whereas the page content remains the same. A Content Class can have multiple templates which define
the way in which the content is laid out. (e.g.: HTML, Print version.)
Clipboard
The clipboard can be used to reference pages to perform common tasks in the CMS. The Clipboard in
SmartEdit lets you connect pages with structural elements using the drag-and-drop operation. You can also
jump directly to the pages in the Clipboard.
Connect to Existing Page
You can reuse existing pages by connecting them to the links in other parts of the project structure.
Containers
This is a structural placeholder/element that can contain multiple pages.
Content Element
The placeholder/element that contains static elements such as text, headlines, and images are
collectively known as Content Elements.
Create and Connect Page
Create a new page and connect it to a page in the project structure.
Direct Edit
Direct Edit is an option where you can edit the content directly in the page by clicking on the RedDot and
holding the CTRL Key. This can also be used on an individual placeholder/element, but is only available
on certain Content Classes.
Disconnecting a page
This feature removes the page from a link but does not delete it completely from the CMS.
57
Drop Zone
Drop Zone is indicated by a red square for a placeholder where a user can drag and drop a file for editing
content into a placeholder/element. This is only visible when a drag and drop feature is enabled on the
placeholder/element.
Edit Elements via Form
Interactive feature that can be used to change all the elements in a page at the same time using a formbased approach.
Favorites
Favorites can be used to store some of the frequently used pages, content classes, and structural
elements.
Headline
The headline is a non-unique identifier for each page. This can also be used as content in a page or can
be typically found in elements such as the title or header tags, but is not always used in a Content Class.
Main Link
Pages in the CMS can be linked in multiple places, but the first link element where a page is usually
linked is called its Main Link. The main link determines the order in which pages are published in the CMS
system.
Online Help
Online help provides the ability to obtain online help regarding the features of the CMS.
Page Lock
Pages are locked to indicate that the current page is being edited by some other user to avoid conflicts.
Page Preview
This gives the ability to view a page as if it was published on the college web site.
Pages Saved as Draft
Pages are incomplete or current working versions of a page; they should be submitted to workflow after
editing to be approved and published.
Pages Waiting for Correction
Pages that have been rejected during workflow and require further editing before they are released for
publishing.
Pages Waiting for Release
Pages waiting in the workflow process for approval by the appropriate Web Page Owner.
Project
A CMS can have multiple projects at the same time. Individual projects consist of content classes,
images, content, structural elements and settings that administer the project.
58
Publishing Job
Automated publishing of pages can be controlled through publishing jobs. This process can be done
manually, or using a scheduled time structure.
Released Pages
Pages that have been released in the workflow that are ready to be published.
Smart Drop
Using this feature content can be dragged and dropped into the content element that the user is working
on. This feature is enabled on individual standard field, text and headline placeholders. A square drop
zone next to the element’s Red Dot indicates the availability of Smart Drop for that placeholder.
Start Page
The first page that a user can view when logged into SmartEdit.
Target Container
Target containers are primary content areas where users can populate the container with data or add
links to it depending on the type of placeholder.
Text Editor
Text Editor enables editing of large blocks of text content in a page.
Unlinked Pages
Pages that have not been connected to other pages in the tree structure.
59
Appendix B: Content Classes
A brief description of the various Content Classes that can be used in 3-Column Template and 2Column Template for adding/editing content to a web page is provided in this section.
3-Column & 2-Column Template Content Classes
These content classes are used in both 2- and 3-column templates.
Contact Us
A Content Class for the “Contact Us” section in the left navigation for every webpage. It consists of a
Headline and editable text.
H2
Standard H2 editable headline element. This Content Class that does not contain any body text. Added in
sections where we require only a H2 headline. Enter the Heading Level 2 that will display on the page in
the Edit Headline dialog box.
H3
Standard H3 editable headline element. This Content Class does not contain any body text. Enter the
Heading Level 3 that will display on the page in the Edit Headline dialog box.
H2 Image left, Body Right
Standard H2 Headline, a left aligned image and body text that is aligned at the right of the image. All
three elements present in this Content Class are editable.
60
H3 Nav Centered
Standard editable H3 centered headline which can be used on the dark green background for either the
left or right navigation columns. Enter the Heading Level 3 that will display on the page in the Edit
Headline dialog box.
Standard Paragraph
This is the most versatile Content Class that can be used for adding content to a web page. This is just a
standard text paragraph for adding text elements to a page.
Standard H2 Paragraph
This consists of a standard H2 headline and a text body. Both the elements present in this Content Class
are editable.
61
Standard H3 Paragraph
This Content Class contains a standard H3 headline and a text body. Both the elements present in this
Content Class are editable.
Contact Our School Certifying Official
This Content Class is similar to the Contact Us Content Class, the only difference being the title of the
headline.
62
3-Column Template Content Classes
This section describes specific Content Classes that are only assigned to third column (Right Column) in
3-Column Template design.
H3 Important Dates LtGreen
This Content Class has an editable H3 headline and standard body text paragraph.
H3 Important Dates DK Green
This Content Class is similar to the “H3 Important Dates Lt Green” content class with two exceptions; the
background in this Content Class is dark green and the standard body text paragraph is optional. (If you
just need the H3 you can make use of this Content Class as the body text is optional.)
Photobox H3 Paragraph [Asset Mngr]
This is one of the new Content Classes that you can be used to insert a Photobox in the right column
(third column). This Content Class has three sub elements- optional H3 headline, optional body text
paragraph and a mandatory image element. This Content Class makes use of the Asset Manager to
insert the Photobox images in the right column. The image has to be resized to the correct dimensions if
necessary when used in this Content Class.
63
Standard Paragraph Lt Green
Standard Paragraph Lt Green Content Class is used to insert text paragraphs into the right column that
has a light green background. The default background for the right column is dark green, so you can use
this Content Class to insert text paragraphs that have light green background.
64
Appendix C: Using the Text Editor
The text editor is very similar to word processing software you are probably familiar with.
1.
2.
3.
4.
Use the Text Editor to create, edit, or insert text from the Windows clipboard.
Click Save to save content in the Text Editor without closing it.
Click OK to save your changes and close the Text Editor.
Click to Cancel to abandon all changes that have not been previously saved.
65
Text Editor Toolbar and Functions
Icon
Action
Shortcut
Undo last action
Icon
Action
Shortcut
CTRL+Z
Clear
formatting
CTRL+SPACE
Redo last undo
CTRL+Y
Switch text
direction
Select all
CTRL+A
Numbered list
CTRL+SHIFT+O
Bulleted list
CTRL+SHIFT+U
CTRL+SHIFT+M
Spell check
Copy
CTRL+C
Decrease
indent
Paste
CTRL+V
Increase indent CTRL +M
Paste from
MSWord
CTRL+ALT+V
Left align
Paste as text
CTRL+SHIFT+V
Center
CTRL +E
Insert horizontal
line
Right align
CTRL +R
Insert symbol
Justify
CTRL +J
Paragraph style
CTRL+SHIFT+N
CSS style
Insert table
Insert or edit
jump mark
CTRL +G
Bold
CTRL+B
Administer
jump marks
CTRL +SHIFT+G
Italics
CTRL+I
Insert or edit
link
CTRL +L
Remove link
CTRL +SHIFT+L
Strikethrough
Superscript
CTRL+SHIFT+K
Subscript
CTRL+SHIFT+J
66
Insert image or
edit image
CTRL +SHIFT+I
properties


![[ol-rs-ha6]-en - Sonic Electronix](http://vs1.manualzilla.com/store/data/005843713_1-a0736ea4d1b526b61217546e349ee9ef-150x150.png)