1
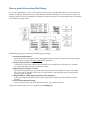
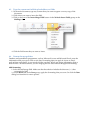
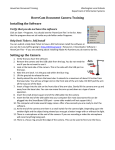
User Manual
Mail Merge
Version: 1.0
Mail Merge
Date: 27-08-2013
How to print letters using Mail Merge
You can use Mail Merge to create a series of documents, such as a standard letter that you want to send to a
number of students. Every document contains the same kind of information, but the content is unique. For
example, each letter can be customized to address the student by name. The unique information in each letter
is retrieved from a data source.
1
2
3
4
5
The Mail Merge process consists of the following overall steps:
1. Set up the main document.
The main document contains the text and graphics that are the same for each version of the merged
document, for example, the return address in a form letter.
2. Connect the document to a data source.
A data source is a file that contains the information to be merged into a document, for example
the names and addresses of the recipients of a letter.
3. Refine the list of recipients or items.
Microsoft Word generates a copy of the main document for each recipient, or item, in your data
file. If you want to generate copies only for certain items in your data file, you can choose which
items (records) to include.
4. Add placeholders, called mail merge fields, to the document.
When you perform the mail merge, the mail merge fields are filled with information from your
data file.
5. Preview and complete the merge.
You can preview each copy of the document before you print the whole set.
To perform a mail merge, you use commands on the Mailings tab.
1
Set up the main document
1. Start Word.
A blank document opens by default. Leave it open. If you close it, the commands in the next
step are not available.
2. Open the letter you want to send.
3. On the Mailings tab, in the Start Mail Merge group, click Start Mail Merge.
4. Click Letters.
2
Connect the document to a data source
To merge information into your main document, you have to connect the document to a data
source or a data file. This might be a table in a Word document, an Excel database or an Access
database, or your Outlook Contacts. If you do not yet have a data file, you can create one during
the mail merge process.
Important: If you use an existing list, make sure that it contains the required information, including
all columns and rows. You can make some changes during the merge, but you cannot open your
data source separately during the merge. The merge process is easier if your data source is ready
before you connect to it.
Choose a data file:
1. On the Mailings tab, in the Start Mail Merge group, click Select Recipients.
2. Do one of the following:
Use Outlook Contacts.
If you want to use your Contacts list in Microsoft Outlook, click
Select from Outlook Contacts.
Use an existing data source file.
If you want to use a Microsoft Office Excel worksheet, a Microsoft Office Access
database, or another type of data file, click Use Existing List, and then locate the file
in the Select Data Source dialog box.
For Excel, you can select data from any worksheet or named range within a
workbook. For Access, you can select data from any table or query that is defined
in the database.
3
Refine the list of recipients or items
When you connect to a certain data file, you might not want to merge information from all
the records (or rows) in that data file into your main document.
If you plan to use your entire list, you can skip ahead to the next step.
To narrow the list of recipients or to use a subset of the items in your data file, do the following:
1. On the Mailings tab, in the Start Mail Merge group, click Edit Recipient List.
The Mail Merge Recipients dialog box will appear:
2. In the Mail Merge Recipients dialog box, do any of the following:
Select individual records
This method is most useful if your list is short. Select the check boxes next to the
recipients you want to include, and clear the check boxes next to the recipients you
want to exclude.
If you only want to include a few records in your merge, you can clear the check box
in the header row and then select only those records that you want. Similarly, if you
want to include most of the list, select the check box in the header row, and then clear
the check boxes for the records that you don’t want to include.
Sort records
Click the column heading of the item that you want to sort by. The list sorts in ascending
alphabetical order (from A to Z). Click the column heading again to sort the list in
descending alphabetical order (Z to A).
If you want more complex sorting, click Sort under Refine recipient list and choose
your sorting preferences on the Sort Records tab of the Filter and Sort dialog box. For
example, you can use this type of sorting if you want recipient addresses to be
alphabetized by last name within each postal code and the postal codes listed in
numerical order.
Filter records
This is useful if the list contains records that you know you don’t want to see or
include in the merge. After you filter the list, you can use the check boxes to
include and exclude records.
To filter records, do the following:
1. Under Refine recipient list, click Filter.
2. On the Filter Records tab of the Filter and Sort dialog box, choose the
criteria you want to use for the filter.
For example, if you want to generate letters for addresses that list Leiden as the City,
click on City in the Field list, and Equal to in the Comparison list, and then enter
Leiden in the Compare to list.
3. To refine the filter further, click And or Or, and then specify more criteria.
For example, to generate letters only for businesses in Rotterdam, you would filter on
records whose City field contains Rotterdam and whose Company Name field is not
blank. If you use Or instead of And in this filter, your mail merge will include all
Rotterdam addresses as well as all addresses that include a company name, regardless of
city.
Add recipients
To add recipients to the list, do the following:
1. Under Data source, click the name of your data file.
2. Click Edit.
3. In the Edit Data Source dialog box, click New Entry, and then
type the information for that recipient.
Tip: Depending on the type of data source you use, some processes might not be
available. If possible, make sure that your data file is complete before you connect it
to your main document.
4
Add placeholders, called mail merge fields, to the document
After you connect your main document to a data file, you are ready to type the text of the document
and add placeholders that indicate where the unique information will appear in each copy of the
document.
4.1 What happens when you merge?
When you merge, information from the first row in the data file replaces the fields in your
main document to create the first merged document. Information from the second row in the
data file replaces the fields to create the second merged document and so on.
4.2 Working with fields: Examples
You can add any column heading from your data file to the main document as a field. This gives
you flexibility when you design form letters or other merged documents.
For example: Suppose you are creating a letter to notify local businesses that they have been selected
for inclusion in your annual city guide. If your data file contains a Company column with the name
of each business that you want to contact, you can insert the «Company» field instead of typing the
name of each individual company.
You can combine fields and separate them by punctuation marks. For example, to create an address,
you can set up the fields in your main document like this:
«First Name» «Last Name»
«Street»
«Postal code» «City»
4.3 Type the content and add the placeholders, or fields
1. In the main document, type any content that you want to appear on every copy of the
document.
2. Click where you want to insert the field.
3. Click on the text of the Insert Merge Field button in the Write & Insert Fields group on the
Mailings tab.
4. Click the field name that you want to insert.
4.4 Format the merged data
Database and spreadsheet programmes, such as Microsoft Access and Microsoft Excel, store the
information that you type in cells as raw data. Formatting that you apply in Access or Excel,
such as fonts and colours, is not stored with the raw data. When you merge information from a
data file into a Word document, you are merging the raw data without the applied formatting.
Add formatting
1. Select the mail merge field. Make sure that the selection includes the chevrons (« ») that
surround the field.
2. On the Home tab in the Font group, apply the formatting that you want. Or click the Font
dialog box launcher for more options.
5
Complete the merge and print the documents
After you add fields to your main document, you are ready to preview the merge results. Once you
are satisfied with the preview, you can complete the merge.
5.1 Preview the merge
You can preview your merged documents and make changes before you actually complete the
merge.
To preview, do any of the following in the Preview Results group of the Mailings tab:
Click Preview Results.
Page through each merged document by using the Next Record and Previous Record
buttons in the Preview Results group.
Preview a specific document by clicking Find Recipient.
5.2 Complete the merge
You can print the merged documents or modify them individually. You can print or change all or
just a subset of the documents.
Print the merged documents
1. On the Mailings tab, in the Finish group, click Finish & Merge, and then click Print
Documents.
2. Choose whether to print the whole set of documents, only the copy that’s currently visible, or
a subset of the set, which you specify by record number.
9
5.3
Change individual copies of the document
1. On the Mailings tab, in the Finish group, click Finish & Merge, and then click Edit
Individual Documents.
2. Choose whether you want to edit the whole set of documents, only the copy that is currently
visible, or a subset of the set, which you specify by record number. Word saves the copies
that you want to edit to a single file, with a page break between each copy of the document.
After you finish editing the new document, you can print the documents by clicking Print on the
File tab and then clicking the Print button.
5.4 Save the main document
Merged documents are saved separately from the main document. It is a good idea to save the main
document itself if you plan to use it for another mail merge.
When you save the main document, you also save its connection to the data file. The next time that
you open the main document, you are prompted to choose whether you want the information
from the data file to be merged again into the main document.
If you click Yes, the document opens with information from the first record
merged in.
If you click No, the connection between the main document and the data file is broken.
The main document becomes a standard Word document. Fields are replaced with the
unique information from the first record.
10