1
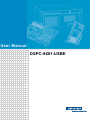
User Manual
DSPC-8601-USBE
Copyright
The documentation and the software included with this product are copyrighted 2012
by Advantech Co., Ltd. All rights are reserved. Advantech Co., Ltd. reserves the right
to make improvements in the products described in this manual at any time without
notice. No part of this manual may be reproduced, copied, translated or transmitted
in any form or by any means without the prior written permission of Advantech Co.,
Ltd. Information provided in this manual is intended to be accurate and reliable. However, Advantech Co., Ltd. assumes no responsibility for its use, nor for any infringements of the rights of third parties, which may result from its use.
Acknowledgements
Intel and Pentium are trademarks of Intel Corporation.
Microsoft Windows and MS-DOS are registered trademarks of Microsoft Corp.
All other product names or trademarks are properties of their respective owners.
DSPC-8601 User Manual
Part No. 2002860100
Edition 1
Printed in Taiwan
April 2012
ii
Contents
Chapter
Chapter
Chapter
Chapter
Chapter
Chapter
1
Overview...............................................1
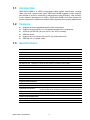
1.1
1.2
1.3
1.4
1.5
1.6
Introduction ............................................................................................... 2
Features .................................................................................................... 2
Specifications ............................................................................................ 2
Block Diagram........................................................................................... 3
Typical Application .................................................................................... 3
HW Introduction ........................................................................................ 4
1.6.1 Dimension ..................................................................................... 4
Figure 1.1 Top View of DSPC-8601-USBE ................................. 4
Figure 1.2 Side View of DSPC-8601-USBE ................................ 4
Figure 1.3 Bottom View of DSPC-8601-USBE ............................ 4
1.6.2 Connectors.................................................................................... 5
Figure 1.4 Connector of DSPC-8601-USBE................................ 5
2
Installation............................................7
2.1
2.2
Min. System Requirements ....................................................................... 8
Hardware Installation ................................................................................ 8
2.2.1 System Setup................................................................................ 8
Figure 2.1 All connectors of DSPC-8601-USBE.......................... 8
3
Software Installation ...........................9
3.1
3.2
3.3
SDK and Driver Installation ..................................................................... 10
Driver Installation Manually ..................................................................... 15
Application Installation ............................................................................ 21
4
Startup ................................................23
4.1
4.2
Main Application...................................................................................... 24
Firmware Upgrade Utility......................................................................... 25
5
Configuration .....................................27
5.1
Configuration........................................................................................... 28
6
Software Development Kit ................29
6.1
6.2
6.3
6.4
Introduction ............................................................................................. 30
Object Mode............................................................................................ 30
API Mode ................................................................................................ 31
APIs and Interface................................................................................... 32
iii
DSPC-8601 User Manual
DSPC-8601 User Manual
iv
Chapter
1
Overview
1
1.1 Introduction
DSPC-8601-USBE is an USB 2.0 high-speed video capture module with 1 analog
video input and 1 stereo audio input. DSPC-8601-USBE supports H.264 compression formats up to full D1 resolution at real-time frame rate (30/25fps). With an easyto-use software development kit (SDK), DSPC-8601-USBE is an ideal solution for
system integrators to implement versatile video capturing and encoding applications.
1.2 Features
Supports on-board hardware-based H.264 compression
Supports on-board PCM / G.711 hardware-based audio compression
30/25 fps (NTSC/PAL) at up to full D1 (720 x576) recording
USB bus power
Supports up to 8 devices with one PC (by setting device ID)
SDK with VC++ sample codes
1.3 Specifications
Video Input
Channels
1
Video inputs
Composite for NTSC/PAL
Compression
H.264 / RAW
Dual Streams
Yes
Frame Rate
Up to 30 fps @NTSC / 25 fps @ PAL (adjustable)
Bit Rate Control Supports constant bit rate (CBR) & variable bit rate (VBR)
OSD
Text OSD
Connector
BNC, male / 1.0 Vp-p, 75 ohms
Audio Input
Channels
1 x stereo line-in
Sampling Rates Up to 16 bit, 48 KHz, stereo
Compression
PCM / G.711
Connector
Phone jack, female
Physical Characteristics
Host Interface
USB 2.0 High Speed
Power input
USB bus power
Operating Temperature
0 ~ 70° C (32 ~ 158° F)
(needs air flow when operating temperature over 60° C/140° F)
Board Dimensions
70 x 38 mm (2.75” x 1.49”)
Safety
CE / FCC
Software Development Kit
Operating System Supported Windows XP / XPe / Vista / 7
Direct X Required
DSPC-8601 User Manual
Version 9 or above
2
Chapter 1
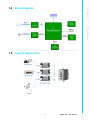
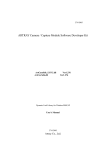
1.4 Block Diagram
Overview
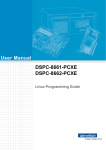
1.5 Typical Application
3
DSPC-8601 User Manual
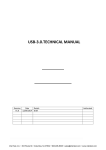
1.6 HW Introduction
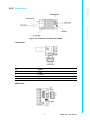
1.6.1 Dimension
Below is the HW dimension.
Unit: mm.
Figure 1.1 Top View of DSPC-8601-USBE
Figure 1.2 Side View of DSPC-8601-USBE
Figure 1.3 Bottom View of DSPC-8601-USBE
DSPC-8601 User Manual
4
Chapter 1
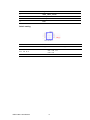
1.6.2 Connectors
Loop header
Pin
Signal
1
CVBS
2
AUDIO_L
3
AUDIO_R
4
GND
USB header
5
DSPC-8601 User Manual
Overview
Figure 1.4 Connector of DSPC-8601-USBE
Pin
Signal
1
USB0_VBUS_CONN
2
USB0_DN
3
USB0_DP
4
GND
Switch setting
SW1
TARGET
Default
OFF (1)
DEVICE ID
8-1 7-2 6-3
USB ID 5-4
DSPC-8601 User Manual
ON (0)
000 011 110
001 100 111
010 101
Device Mode
6
Host Mode
Chapter
2
Installation
2
2.1 Min. System Requirements
One X86 personal computer with:
Intel Pentium 4 CPU
512 MB RAM
500MB HDD
One USB 2.0 port.
Operating Systems - Windows XP or above
2.2 Hardware Installation
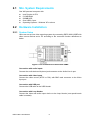
2.2.1 System Setup
Users can set up one video capturing system by connecting DSPC-8601-USBE with
video source devices and a PC according to the connector function definitions as
below.
Figure 2.1 All connectors of DSPC-8601-USBE
Connection with audio inputs
Connect the audio device with phone jack connector to the Audio Line-In port.
Connection with video inputs
Connect the video source (NTSC or PAL) with BNC male connector to the Video
Input port.
Connection with USB port
Connect the USB cable to the USB Header.
Connection with Loop Header
Connect the video and audio output device to the Loop Header (one special-made
cable is needed).
DSPC-8601 User Manual
8
Chapter
3
3
Software Installation
3.1 SDK and Driver Installation
DSPC-8601-USBE provides a Software Development Kit (SDK) for application development. Only a DLL version is provided in this SDK currently.
When this device is used under Microsoft Windows XP OS, the device driver needs
to be upgraded. Otherwise, some functions will not work correctly. If this device is
used under later versions like Windows Vista, Windows 7, then there is no need to
install the device driver.
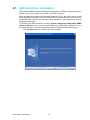
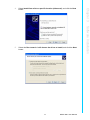
To install the he SDK and driver correctly, please connect the DSPC-8601-USBE
device to PC first. Then execute the file “Advantech_DSPC8601_Install.exe” to run
the setup program. Follow the instructions below to install the SDK step-by-step.
1. Click the Next button to continue the setup program.
DSPC-8601 User Manual
10
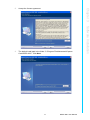
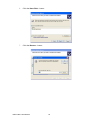
Accept the license agreement.
3.
The default install path is the folder “C:\Program Files\Advantech\Capture
Card\DSPC-8601”. Click Next.
Chapter 3
2.
DSPC-8601 User Manual
Software Installation
11
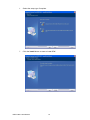
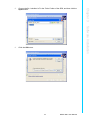
4.
Select the setup type Complete.
5.
Click the Install button to start to install SDK.
DSPC-8601 User Manual
12
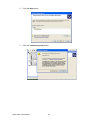
7.
Click the Finish button to finish the SDK and driver installation.
13
DSPC-8601 User Manual
Software Installation
After the SDK has installed, the driver install will continue. Just ignore the Windows warnings and click the button Continue Anyway to continue to install the
device driver.
Chapter 3
6.
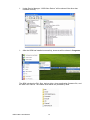
8.
Under Device Manager, “USB Video Device” will be shown if the driver has
installed correctly.
9.
After the SDK has installed successfully, shortcuts will be shown in Programs.
The SDK includes the DLL files, device driver, demo application, firmware file, and
the SDK user manual. The folders listed below are provided by SDK.
DSPC-8601 User Manual
14
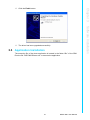
3.2 Driver Installation Manually
The setup program “Advantech_DSPC8601_Install.exe” will install the device driver
automatically. The user can also install the device driver manually. This section will
describe how to install the device driver manually.
When the device is used under Microsoft Windows XP, the device driver must be
upgraded. Otherwise, some functions will not work correctly. The user can follow the
steps below to upgrade the device driver manually.
1.
Right click the My Computer icon, then choose the Manage command.
15
DSPC-8601 User Manual
Software Installation
Bin - Include the execution file of the demo application, SDK DLL files, and the
firmware update utility
Driver - the device driver
DSPC8601Demo - the sample code of the demo application developed by
Microsoft Visual C++ 2008. The user can refer to the code for developing the
application
Firmware - the firmware file, the user can use the program
“DSPC8601FWUpdate.exe” to update the firmware
Include - the header files of the SDK
Lib - the lib files of the SDK
Manual - SDK user manual
Relnotes.txt - show the modification for each version of SDK
Chapter 3
2.
Choose Device Manager. Right-click USB Video Device, and choose Update
Driver.
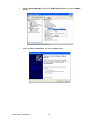
3.
Select the No, not this time, and click the Next button.
DSPC-8601 User Manual
16
5.
Select the Don’t search. I will choose the driver to install, and click the Next
button.
17
DSPC-8601 User Manual
Software Installation
Select Install from a list or specific location (Advanced), and click the Next
button.
Chapter 3
4.
6.
Click the Have Disk... button.
7.
Click the Browse... button.
DSPC-8601 User Manual
18
9.
Click the OK button.
Software Installation
Choose the file “usbvideo.inf” in the “Driver” folder of the SDK, and then click the
Open button.
Chapter 3
8.
19
DSPC-8601 User Manual
10. Click the Next button.
11. Click the Continue Anyway button.
DSPC-8601 User Manual
20
Chapter 3
12. Click the Finish button.
3.3 Application Installation
The execution file of the demo application is located in the folder “Bin” of the SDK.
Run the file “DSPC8601Demo.exe” to execute the application.
21
DSPC-8601 User Manual
Software Installation
13. The driver has been upgraded successfully.
DSPC-8601 User Manual
22
Chapter
4
Startup
4
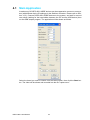
4.1 Main Application
A maximum of 8 DSPC-8601-USBE devices can be supported to connect to one system (with different device ID settings via the Switcher connector. Please refer to Section 1.6.2). Connect DSPC-8601-USBE devices to the system, and wait for around
one minute (waiting for the hand-shake between the PC and the USB device) then
run the SDK sample program. The application will be shown as follows.
Select the board you want to control from the board option, then click the Start button. The video will be shown and recorded into the file “capture.mov”.
DSPC-8601 User Manual
24
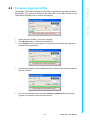
The program “DSPC8601FWUpdate” is an utility to upgrade the firmware into DSPC8601-USBE. This program is located in the folder “Bin” of the SDK. Please run the
“DSPC8601FWUpdate.exe” to execute the program.
Chapter 4
4.2 Firmware Upgrade Utility
Startup
1.
2.
3.
Select the board number you want to upgrade.
Click Browse button to select the firmware file.
Click Update button to start upgrade. A progress bar will show the progress of
firmware data transmission.
4.
After data transmission, don’t unplug the device. Wait until the firmware upgrade
has fully finished.
5.
Once the system shows the message Firmware update done! the firmware
upgrade is completed. Now reboot the device.
25
DSPC-8601 User Manual
DSPC-8601 User Manual
26
Chapter
5
Configuration
5
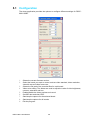
5.1 Configuration
The demo application provides the options to configure different settings for DSPC8601-USBE.
1.
2.
3.
4.
5.
6.
7.
8.
9.
Shows the current firmware version.
Select the board you want to control, and set video standard, video resolution,
video bit rate and video frame rate.
Shows the file path of the recorded files for each board.
Video color setting. The sliders are used to adjust the value of video brightness,
contract, saturation and hue.
Enable/disable the video preview and record.
Set OSD text and clear OSD.
Start/stop the capture for the selected board.
Start/stop the capture for all boards.
Exit the program.
DSPC-8601 User Manual
28
Chapter
6
6
Software Development
Kit
6.1 Introduction
The SDK supports two modes, Object mode and API mode, and users can choose
either one for the SDK. Both modes are described below. For detailed information for
the SDK, please refer to the manual installed with the SDK.
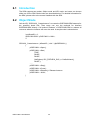
6.2 Object Mode
Call the API “DSPC8601_CreateInstance” to create the IDSPC8601SDK instance for
the specified board first. Then users can use the methods for interface
IDSPC8601SDK directly. Call method “Release” of IDSPC8601SDK to release all
resources when the instance will never be used. A sample code is shown below.
int nBoardID = 0;
IDSPC8601SDK * pDSPC8601 = NULL;
if
SPC8601_CreateInstance ( nBoardID, ( void ** )&pDSPC8601 ) )
{
pDSPC8601->Open();
pDSPC8601->Start(
TRUE,
FALSE,
FALSE,
GetDlgItem( IDC_PREVIEW_DLG )-> GetSafeHwnd(),
FALSE );
......
pDSPC8601->Stop();
pDSPC8601->Close();
pDSPC8601->Release();// Release instance
pDSPC8601 = NULL;
}
DSPC-8601 User Manual
30
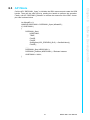
Call the API “DSPC8601_Open” to initialize the SDK resources and create the SDK
handle. Then call the other APIs by sending the handle to perform the operation.
Finally, call API “DSPC8601_Release” to release the resources of the SDK. A sample code is shown below.
31
DSPC-8601 User Manual
Software Development Kit
int nBoardID = 0;
HANDLE hDSPC8601 = DSPC8601_Open( nBoardID );
if ( hDSPC8601 )
{
DSPC8601_Start(
hDSPC8601,
TRUE,
FALSE,
FALSE,
GetDlgItem( IDC_PREVIEW_DLG )-> GetSafeHwnd(),
FALSE );
......
DSPC8601_Stop( hDSPC8601 );
DSPC8601_Release( hDSPC8601 );// Release instance
hDSPC8601 = NULL;
}
Chapter 6
6.3 API Mode
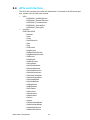
6.4 APIs and Interface
The APIs and interface of the SDK are listed below. For details of the APIs and Interface, please refer the SDK user manual.
1. APIs
- DSPC8601_GetSDKVersion
- DSPC8601_GetNoOfDevices
- DSPC8601_CreateInstance
- DSPC8601_GetLastError
- DSPC8601_SetLogFile
2. Interface
IDSPC8601SDK
- Release
- Open
- Close
- GetFWVersion
- Start
- Stop
- SetPreview
- StopPreview
- SetRawVideoPreview
- StopRawVideoPreview
- SetRecord
- StopRecord
- IsVideoPresent
- GetCapState
- GetVideoStandard
- SetVideoStandard
- GetVideoResolution
- SetVideoResolution
- GetVideoFrameRate
- SetVideoFrameRate
- GetVideoBitRate
- SetVideoBitRate
- GetBrightness
- SetBrightness
- GetContrast
- SetContrast
- GetSaturation
- SetSaturation
- GetHue
- SetHue
- GetDeInterlaceMode
- SetDeInterlaceMode
- GetNoiseReduction
- SetNoiseReduction
DSPC-8601 User Manual
32
Chapter 6
- GetAudioFormat
- SetAudioFormat
- GetAudioChannel
- SetAudioChannel
- GetAudioSamplingRate
- SetAudioSamplingRate
- SetOSD
- ClearOSD
- StartMotionDetection
- StopMotionDetection
- GetStatistics
- SetNewFrameCallback
- SetRawVideoFrameCallback
- SetFrameDecodedCallback
- SetMotionDetectionCallback
Software Development Kit
33
DSPC-8601 User Manual
www.advantech.com
Please verify specifications before quoting. This guide is intended for reference
purposes only.
All product specifications are subject to change without notice.
No part of this publication may be reproduced in any form or by any means,
electronic, photocopying, recording or otherwise, without prior written permission of the publisher.
All brand and product names are trademarks or registered trademarks of their
respective companies.
© Advantech Co., Ltd. 2012