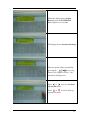
1
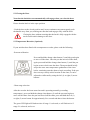
LAB 85 VERTICAL
UPRIGHT LOW/ULTRA LOW FREEZERS
PRIME AND MERIT SERIES
-40ºC
GA/AA/DA 039 P/M GA/AA/DA 050 P/M
GA/AA/DA 061 P/M GA/AA/DA 073 P/M
-86ºC
GV/AV/DV 039 P /M GV/AV/DV/050 P/M
GV/AV/DV/061 P/M GV/AV/DV/073 P/M
User Manual
Note:ELCOLD reserves the right to modify any
parts of this manual without prior notice.
- No part of this manual may be reproduced in any form, or translated into other
languages, without the expressed written permission of Elcold.
- Contact Elcold if any points in this manual are not clear.
ii
Dear Customer.
Thank you for choosing our product. You have purchased one of the
finest, state of the art, ultra low freezers available.
Our freezers tolerate voltage fluctuations, high ambient
temperatures, heavy traffic in and out of the freezer, and are
designed to perform in demanding environments.
Both low and high cascade compressors feature a high compression
rate, low noise and vibration, ensuring ultra quiet running. (Below
57 dBa). The compressors high efficiency: horsepower ratio
provides the maximum gas displacement / hp, ensuring maximum
refrigeration efficiency at low energy consumption. Our
compressors are industrial grade units which, like the refrigerants,
are available all over the world, reducing your dependency on
proprietary products, reducing your maintenance costs.
Our freezers comply with CE and UL safety and performance
standards and only CFC/HCFC-free refrigerants are used.
Our freezers are backed by a full range of accessories and inventory
systems to suit all your requirements.
iii
Contents
1. General Safety Precautions ........................................................................................ 1
2. Safety ......................................................................................................................... 3
2.1 Environmental Conditions ............................................................................... 3
2.2 Initial Loading .................................................................................................. 3
3. Unpacking .................................................................................................................. 4
4. Installation.................................................................................................................. 4
4.1 Positioning ....................................................................................................... 4
4.2 Leveling ........................................................................................................... 4
4.3 Cleaning ........................................................................................................... 5
4.4 Electrical Connections ..................................................................................... 5
5 Operation..................................................................................................................... 5
5.1 Opening the Door ............................................................................................. 5
5.2 Closing the Door .............................................................................................. 6
5.3 Temperature Recorder (Optional) .................................................................... 6
6. Operation.................................................................................................................... 8
6.1 Prime Series Control Panel .............................................................................. 8
6.2 Merit Series Control Panel ............................................................................. 13
6.3 Start Up .......................................................................................................... 15
7. Maintenance ............................................................................................................. 17
7.1 Rechargeable Battery ..................................................................................... 17
7.2 Condenser Maintenance ................................................................................. 18
7.3 Gasket Maintenance ....................................................................................... 18
7.4 Defrosting ...................................................................................................... 18
7.5 Cleaning ......................................................................................................... 19
8. Troubleshooting ....................................................................................................... 20
9. Appendices ............................................................................................................... 21
Alarm Error Codes ............................................................................................... 21
Power Consumption/ Heat Generation ................................................................ 22
LCO2 Backup System .......................................................................................... 23
iv
1. General Safety Precautions
This
his manual contains important safety advice and should be read before
operating the freezer to prevent possible injury.
injury
Precautions are illustrated in the following way:
WARNING/CAUTION
WARNING/CAUTION
Failure to observe WARNING
WAR
signs could result in a hazard to personnel
personnel,
possibly resulting in serious injury.
Failure to observe CAUTION signs could result in injury to personnel and
damage to the product and property.
Please keep this manual in a place accessible to users of this product.
Electrical Housing Label
This label is found on the box cover housing high
voltage electrical components.
The cover should only be removed by a qualified
engineer, or service personnel.
l
Use this product only in the way described in the product
literature and the manual.
l
Do not modify system components. Before use, check
heck that the
product has not been altered in any way.
l
Your unit must be properly grounded in compliance with local
electrical conventions.
co
l
Do not use the unit outdoors.
l
Only qualified engineers or service personnel should
should install the
unit.
l
Install the unit on a sturdy,
sturdy level floor.
l
Do not install the unit in a humid place or a place where is likely to
be splashed by water. The units should be installed in a dry, well
ventilated
ed place.
1
l
Do not install the unit in a flammable or volatile location.
l
Do not install the unit where acid or corrosive gases are present.
l
Do not store volatile, flammable or corrosive substances inside the
unit.
l
Disconnect the power source to the unit prior to any repair or
maintenance.
l
Do disassemble, repair, or modify the unit yourself.
l
Ensure that the unit is standing straight and is not touching other
equipment. Ensure that there is good air circulation around the
unit. This is essential for proper performance of the unit. A space
of 70mm should surround the unit on all sides.
l
Connect the unit to a power source as printed on the data plate
located on the lower right side of the unit.
l
When removing the plug from the power supply outlet, grip the
power supply plug, not the cord. Disconnect the power plug before
moving the unit.
l
Do not damage or break the power supply plug or cord.
l
Wear gloves when you remove frozen items from the freezer.
l
Disconnect the power plug when the unit is not used for a long
time.
l
Do not tilt the unit while moving it.
l
Do not make holes in the cabinet walls to install attachments.
l
Do not defrost the inside walls with a knife or any sharp object.
2
2. Safety
The refrigeration system is designed to maintain ultra-low temperatures in +32oC
ambient environments.
This unit is not a “rapid-freeze” device. Freezing large quantities or
liquid, or high-water content items will raise the chamber temperature
and will cause the compressors to operate for a prolonged period of
time. Improper use of the freezer may jeopardize safety or cause
damage to the compressors.
Avoid opening the door for extended time periods.
2.1 Environmental Conditions
This equipment is designed to operate in the following conditions:
- Indoor use;
- Ambient temperature between +15°C and +32oC;
- Main supply voltage fluctuation not to exceed +10% to -10% of normal voltage.
2.2 Init. Loading ( NOT valid for freezers working at -86 deg incl AVO5OM)
When loading the unit with pre-frozen materials, the operating temperature
set point should not be set lower than the temperature of the pre-frozen
material. Allow the unit to operate at the set point for eight hours. The set
point may then be lowered in increments no greater than 10oC. Allow a
stabilizing period of eight hours for every ten degrees, until the desired set
point is achieved.
Failure to follow these procedures, or overloading the unit, may cause
excessive stress on the compressors and jeopardize user safety.
3
3. Unpacking
On delivery, unpack the unit and check for damage. Should there be any damage,
immediately contact the delivery service or relevant sales outlet.
Do not operate a unit that has been damaged during transport.
4. Installation
Do not deviate from the electric and temperature ratings printed on the data plate
located on the rear, lower right side of the unit.
Incorrect installation & operation of the equipment may result in potentially
hazardous conditions. To avoid hazards and minimize risk, follow all
instructions and operate the unit within the limits stated on the data plate.
4.1 Positioning
The unit must be placed in a dry well ventilated place away from direct sunlight and
sources of heat.
Install the unit on a vibration free, level floor, with a minimum of fifteen centimeters
of space on the sides, rear, and top. Allow sufficient clearance for the door to open at
least 90 degrees.
The ambient temperature range should be between +15°C to +32oC.
4.2 Leveling
The unit must be level: Both front to back and side to side.
The unit has adjustable leveling feet located adjacent to the front casters. Extend the
leveling feet by rotating them counterclockwise.
Remove the plastic protective sheets from the interior cabinet walls and shelves
before operating the unit.
4
4.3 Cleaning
Clean or disinfect the unit inside and outside before use. Do not use aggressive
cleaning agents, abrasive detergents, steel wool, abrasive sponges or chemical
solvents. When cleaning, make sure that no fluids of any kind run into the ventilator
housing.
Disinfectants are used in concentrations usual for the customer in one-or four-hour
values. For disinfecting small areas, a concentrated alcoholic agent is recommended.
4.4 Electrical Connections
Connect the unit to the correct power source. Incorrect voltage can result in
damage to the freezer.
For personal safety and trouble-free operation, the unit must be properly
grounded. Failure to ground the freezer may cause personal injury, or
damage to the unit. If the power supply outlet is not grounded, it is necessary
to install a ground from the ground screw located on the lower right rear side
of the unit.
Plug the supplied power line to the freezer and to a dedicated mains supply. Supply
voltage must be within +10% to -10% of the freezer’s rated voltage.
Never cut, or remove the grounding prong from the service cord plug. If the
prong is removed, the freezer will not be properly grounded.
5 Operation
5.1 Opening the Door
- Grasp the latch handle, and pull it firmly towards to you until the latch disengages
from the track.
- Keep pulling on the latch handle to open the main door.
5
5.2 Closing the Door
Note that the latch does not automatically self-engage when you close the door.
Ensure that the latch is in the open position.
- Push the door to the closed position and, in one continuous movement gently push
the handle away from you, making sure that the latch engages fully with the track.
Closing the door without ensuring that the latch is fully engaged with the
track could result in damage to the door.
5.3 Temperature Recorder (Optional)
If your unit has been fitted with a temperature recorder, please read the following.
-Pen arm calibration
Press and hold the change chart button (3) until the pen begins
to move off the chart. Once the pen has moved off the chart,
again press and hold the change chart button (3) until the pen
begins to move back onto the chart. Then pen should briefly
stop at the outer most temperature graduation of the chart
before continuing onto the chart to begin recording. If the pen
does not stop exactly at this location on the chart, it can be
adjusted or calibrated by using the left (1) or right (2) arrow
buttons.
-Chart range selection
After the recorder has been turned-on and is operating normally (recording
temperature), press and hold the change chart button (3) until the pen arm begins to
move off the chart. Once the pen has moved off the chart, press and hold the left (1)
or right (2) arrow button for approximately five seconds and then release the button.
The green LED light will flash one time if range 1 is selected, or will flash twice if
range 2 is selected, and so on.
6
Press the left arrow button (1) to increase the range number or press the right arrow
button (2) to decrease the range number that is selected for the recorder. When you
have finished selecting the range, press and hold the change chart button (3) until the
pen begins to move back onto the chart. The selected range will be saved into the
recorder’s permanent memory.
7
6. Operation
6.1 Prime Series Control Panel
P
C
A
F
H
J
L
N
D
Q
B
E
G
I
K
M
O
Figure 1. Prime Series Control Panel
A. I/O indicator
J. Heat exhaust indicator
B. I/O key
K. Clean filter indicator
C. Alarm indicator
L. Power failure indicator
D. Alarm mute
M. Fuse indicator
E. Alarm test
N. Voltage failure indicator
F. Temperature failure indicator
O. Low alarm battery indicator
G. Door open
P. LCO2/LN2 backup system
H. Compressor protection indicator
Q. Function keys
I. Ambient temperature indicator
Before using the freezer, familiarize yourself with the freezer controls.
8
6.1.1 Control Keys
6.1.1.1 On /Off
Press to start or to stop the unit. The indicator lights when the freezer
is in on.
Enter password in the following ssequence
(Up, Down,
Left, Right).
The freezer will start. The firmware version will be displayed.
6.1.1.2 Alarm Mute
Press to mute the alarm. The alarm indicator will light when mute is
active.
The alarm will sound again after each 5 minute period.
6.1.1.3 Alarm Test
Press to test the alarm. The alarm will sound when pressed.
6.1.1.4 Alarm Mode Switch
Press to sequentially scroll between cold alarm, warm alarm, and
control temperature.
6.1.1.5 Temperature Increment and Decrement
Press to increase or decrease the temperature.
9
6.1.1.6 Enter/ Escape
After entering the password, press the key to return to setting mode.
After setting, press to return to monitoring mode.
6.1.2 Indicators
6.1.2.1 Operation Indicator
Lights when the freezer is operating.
6.1.2.2 Alarm Indicator
Lights when an alarm is triggered.
6.1.2.3 Temperature Failure Indicator
Lights when the freezer temperature deviates from either upper or
lower set limits.
6.1.2.4 Door Open Indicator
Lights when the main door is opened, or is not properly closed.
6.1.2.5 Compressor Protection Indicator
Lights when the compressor has entered into a reduced operating
state.
10
6.1.2.6 Ambient Temperature Indicator
Lights when the ambient temperature has exceeded the upper limit of
the recommended operating range.
6.1.2.7 Heat Exhaust Indicator
Lights when the heat exhaust system is not functioning properly.
6.1.2.8 Filter Condition Indicator
Lights when the condenser filter is dirty.
6.1.2.9 Power Failure Indicator
Lights when there is a power failure.
6.1.2.10 Fuse Indicator
Lights when the surge protector on the main electric panel has been
damaged due to a power surge.
6.1.2.11 Voltage Failure Indicator
Lights when the incoming line voltage is above or below the voltage
regulator operating range.
6.1.2.12
Low Alarm Battery Indicator
Lights when the alarm battery charge is low.
11
The following indicators are active only when the freezer is equipped with an optional
backup system.
6.1.2.13 Backup System Supply Indicator
Lights when the backup system is operating.
6.1.2.14 Backup System Condition Indicator
Lights when the LCO2 or LN2 back-up cylinders are empty.
6.1.2.15 Backup System Battery Indicator
Lights when the backup system battery charge is low.
12
6.2 Merit Series Control Panel
A
C
D
F
B
E
Figure 2. Merit Series Control Panel
A. I/O indicator
D. Alarm mute
B. I/O key
E. Alarm test
C. Alarm indicator
F. Function keys
6.2.1 Control Keys
6.2.1.1 On /Off
. Press to start or to stop the unit. The indicator lights when the freezer
is in “On “.
Enter password in the following ssequence
(Up, Down,
Left, Right).
The freezer will start. The firmware version will be displayed.
6.2.1.2 Alarm Mute
Press to silence the alarm. The alarm indicator will light. If the failure
lasts more than five minutes, the alarm will sound again.
13
6.2.1.3 Alarm Test
Press to test the alarm. The alarm will sound when pressed.
6.2.1.4 Alarm Mode Switch
Sequentially press to change between cold alarm, warm alarm, and
control temperature.
6.2.1.5 Temperature Increment and Decrement
Press to increase or decrease the temperature value.
6.2.1.6 Enter/ Escape
After entering the password, press to return to setting mode.
After setting, press to return to monitoring mode.
6.2.2 Indicators
6.2.2.1 Operation Indicator
Lights when the freezer is operating.
6.2.2.2 Alarm Indicator
Lights when an alarm is triggered.
14
6.3 Start Up
Refer to Section 6.1 and to Figure 1 for the following procedures
6.3.1 Turning the Power On
1.
Connect the freezer to the power outlet. The control panel screen displays lights
up.
2.
Press , and enter the password (Sequentially Press:
). Then press
. The operation indicator lights up.
6.3.2 Setting the Cabinet Temperature
1.
Press
2.
Press
3.
Enter the password (Sequentially Press
4.
until CONTROL TEMP shows in the lower screen.
or
.
A password request appears on the screen.
: Up, Down, Left, Right),
then press
. The temperature can be increased or decreased by pressing
and holding
or
Press
.
to return to the monitoring mode.
6.3.3 Setting the Alarm
1.
2.
Press
or
until WARM ALARM or COLD ALARM is displayed on the
bottom of the screen.
Press
or
. You are prompted to enter the password.
3.
Enter the password (Sequentially Press
), then press
temperature can be increased or decreased by pressing and holding
. The
or
.
15
6.3.4 Alarm Mute
1.
2.
When the alarm sounds, press
to silence the alarm.
If the failure lasts more than five minutes, the alarm will sound again.
6.3.5 Alarm Test
If the warm alarm set point exceeds more than +10°C warmer than the
operating temperature set point, we do not suggest you test the alarm as
detailed below.
1.
Press and hold
. The temperature display shows the temperature rising.
When the temperature reaches the warm alarm set value, the alarm will sound.
Note: The temperature of the refrigerated area does not change. Only the sensor is
heated.
2.
Release
. The sensor and display return to the cabinet temperature within a
few minutes.
6.3.6 Remote Alarm Terminal
The terminal for the remote alarm is located on the rear lower right side of the unit.
The alarm is outputted from the terminal. Contact capacity is DC 24V, 5A or AC
115V / 230V, 5 / 3.5A. No voltage contact.
-Contact output
Used between COM and NO
Normal condition ”Open”
Abnormal condition “Close”
Used between COM and NC
Normal condition “Close”
Abnormal condition “Open”
16
-RS232/RS485 interface
The unit is quipped with either an RS232 or RS485 interface. For more information
about this please contact your distributor.
Note:
The alarm is activated under the following conditions:
1. When the power cord is disconnected from the outlet, or there is a power failure.
2. When the freezer temperature deviates above or below the alarm temperature
settings.
Refer to the Appendix (Page 21) for an explanation of the alarm codes.
7. Maintenance
To prevent electric shock and possibly injury, always disconnect the power
supply to the unit prior to any repair or maintenance.
Do not to inhale or consume medication or aerosols around the unit during
maintenance. This may harmful to your health.
Never touch the condenser when removing the condenser filter for cleaning.
Touching of the condenser may result in burns.
7.1 Rechargeable Battery
1.
2.
3.
4.
In the event of a power failure, the built-in battery monitors the electronics for a
maximum of 72 hours.
This battery is recharged automatically when the unit connected to the mains
power supply..
The battery should be replaced every 2 years as a precautionary measure. This
replacement should be carried out by a service technician. The unit must be
turned off and unplugged before the battery is removed.
The rechargeable battery must be disposed of in the appropriate manner. Do not
dispose of the battery with your normal garbage.
17
7.2 Condenser Maintenance
Clean the condenser at least every six months, but more frequently in dusty
environments.
To clean the condenser:
1.
2.
3.
4.
Pull open the grill situated on the bottom front right of the compressor housing.
Remove the filter and check the fans. If a fan is not operating, contact a service
engineer.
Vacuum clean the condenser.
Replace the filter and close the grill.
7.2.1 Cleaning the Condenser Filter
Clean the condenser filter every two to three months.
1.
2.
3.
4.
Pull open the grill situated on bottom front right of the compressor housing.
Remove the filter.
Shake the filter to loosen dust. Rinse the filter in clean water. Shake the excess
water from the filter, and replace the filter.
Close the grill.
7.3 Gasket Maintenance
Periodically check the door gaskets for punctures or tears. Leaks are visible as a
streak of frost which forms at the point of gasket failure.
7.4 Defrosting
The freezer does not have an auto-defrost function and should be defrosted
manually when necessary.
To defrost the freezer:
1.
2.
Empty the freezer.
Turn off the unit and allow the interior to warm to room temperature. This will
18
3.
be faster if the door is left open during the warm up process.
Allow all ice to melt and remove all the water from the bottom of the cabinet.
Dry the interior with a towel.
7.5 Cleaning
1.
The freezer should be cleaned and, if necessary, disinfected, before use and at
regular intervals afterwards.
2. Use only gentle cleaning agents. Never use aggressive cleaning agents, abrasive
detergents, steel wool, abrasive sponges or chemical solvents. When cleaning,
make sure that no fluids of any kind run into the ventilator housing.
3. Should there be an odor in the freezer, wash the interior with a solution of baking
soda and warm water.
19
8. Troubleshooting
CAUTION!
Repairs should only be performed by trained personnel.
If the unit malfunctions, check the following before calling for service.
The chamber does not cool:
1.
2.
3.
4.
Check the power supply and circuit breaker.
The voltage is too low. (Should this be the case, call an electrician.)
Check that the power switch is turned ON.
The freezer has been loaded with warm (room temperature) inventory.
Allow time to cool down.
Poor Cooling:
1.
2.
3.
4.
5.
6.
7.
8.
The ambient temperature is too high.
The inner doors are not completely closed. The outer door is not closed firmly.
(Frost or ice between the cabinet and door gasket could be preventing the door
from sealing properly).
The air intake grill is blocked.
The condenser filter is clogged.
The operating temperature set point is not been correctly inputted.
The freezer is in direct sunlight, or close to a heat source.
The rubber cap and insulation over the access port are not correctly in place.
Too many warm items are simultaneously placed in the freezer compartment.
Excessive Noise:
1. The freezer is not installed on a solid floor.
2. The freezer is not level.
3. Something is touching the frame.
4. The freezer is in the immediate post start-up phase.
The unit could sometimes be noisy when the chamber temperature is high. The noise
diminishes as the chamber cools. Before initial start up, familiarize yourself with the
freezer controls.
20
9. Appendices
ALARM ERROR CODES
When an alarm condition occurs, an audible signal sounds. The alarm error code will
flash in the display. The audible signal can be muted by pressing
. The following
alarm conditions can occur.
ALARM CODES: PRIME AND MERIT SERIES
Firmware version: 2.43~
CODE
BREAKDOWN DESCRIPTION
SERIES
Code1
Overheating: The alarm sounds when the freezer temperature
exceeds the maximum set temperature.
P&M
Code2
Low Temperature: The alarm sounds when the freezer
temperature falls below minimum set temperature.
P&M
Code3
The exterior door remains open for 5 min, or, is not closed
properly.
P&M
Code4
Power failure.
P&M
Code5
Low battery charge.
P&M
Code6
1 Static pressure switch.
P&M
Code7
2 Static pressure switch: Surpasses one minute.
P&M
Code8
Backup in operation.
P&M
Code9
LCO2 or LN2 bottle is empty.
P&M
Code10 Low backup battery power.
P&M
Code11 Faulty T1 temperature sensor.
P&M
Code12 Faulty T2 temperature sensor.
P&M
Code13 Dirty filter.
P&M
Code14 Ambient temperature has exceeded the upper limit.
P&M
21
POWER CONSUMPTION / HEAT GENERATION
50Hz/60Hz
Ambient
32。C
25。C
Ambient
32。C
25。C
Model
Heat Generated
Heat Generated
Power Consumption
Power Consumption
Power Consumption
W
W/Hr
W
W/Hr
KW/Month
30。Cà-86。C
@-86。C
30Cà-86。C
@-86。C
@-86。C
AV039
7250
608
3470
490
353
AV050
8700
730
4170
520
374
AV061
9152
826
4490
690
496
AV073
10023
910
4540
780
547
AV039
6524
550
3120
440
317
AV050
7920
660
3750
470
316
AV061
8242
689
4040
620
446
AV073
9060
745
4430
690
496
Power Consumption
Power Consumption
Power Consumption
Model
Heat Generated
Heat Generated
W
W/Hr
W
W/Hr
KW/Month
30。Cà-86。C
@-86。C
30Cà-86。C
@-86。C
@-86。C
AA039
4350
320
1105
220
158
AA050
5220
380
1470
235
169
AA061
5490
440
1658
310
223
AA073
6010
470
2200
350
252
AA039
3910
290
940
198
143
AA050
4750
340
1240
210
151
AA061
4950
360
1500
280
201
AA073
5440
390
1870
310
224
22
LCO2 BACK UP SYSTEM
The freezer must be switched off
before connecting the CO2 cylinder.
Connect the CO2 cylinder to the
freezer and open the valve on the
cylinder.
Turn on the back up battery switch,
located in the bottom right side of the
compressor housing panel.
Turn the freezer on by pressing the
I/O button on the controller.
Press the ENTER/ESC button on the
main controller for 10 seconds.
23
When the display shows Alarm
Record, press the ENTER/ESC
button again for 10 seconds.
The display shows Advanced Setting.
Enter the password by sequentially
pressing the
keys (Up,
Down, Left, Right) to access the
Advanced Setting menu.
Press
or
to access the Back
Up System menu.
Press
or
to set the back up
system to Enable.
24
Press
Alarm.
or
to access Back Up
Press
or
and set the back up
system alarm to Enable.
Press ENTER/ESC to complete and
save the settings.
The backup system will operate when the internal cabinet temperature runs at 5℃
lower than the set warm alarm temperature.
BACK UP SYSTEM ALARM CODES
CODE
REASON
SOLUTION
8
Back-up in operation.
9
Low or empty back up gas level.
Replace gas cylinder
10
Low back up battery power
Replace back up battery
Remember to check the gas levels in the cylinder.
25