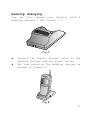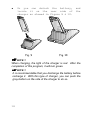
1
Acer GSM
G301
USER’S MANUAL
Copyright
Copyright © 1998 by Acer Peripherals,
Incorporated.
All rights reserved.
No
part of this publication may be reproduced,
transmitted,
transcribed,
stored
in
a
retrieval system or translated into any
language or computer language, in any form
or by any means, electronic, mechanical,
magnetic, optical, chemical, manual or
otherwise,
without
the
prior
written
permission
of
Acer
Peripherals,
Incorporated.
Disclaimer
Acer Peripherals, Incorporated makes no
representations
or
warranties,
either
expressed or implied, with respect to the
contents hereof and specifically disclaims
any warranties, merchantability or fitness
for any particular purpose.
Further, Acer
Peripherals,
Incorporated
reserves
the
right to revise this publication and to
make changes from time to time in the
contents hereof without obligation of Acer
Peripherals, Incorporated to notify any
person
of
such
revision
or
changes.
Table of Contents
Chapter 1
Safety Information
1
Chapter 2
Presentation
Have the first look
Accessories
More info about the keys
More info about the display
3
3
5
5
7
Chapter 3
Getting Started
SIM card insertion
Using batteries
Charging batteries
8
8
10
11
Chapter 4
Making Your First Call
Making a call
Answer a call
Adjust the earpiece volume
Chapter 5
Making Your Call Easy
One-Touch Dialing
Make an international call
Make an emergency call
Make a voice mail
Missed call
Abbreviated Call
Last 10 number redial
Incoming call waiting
In call option
Mute call
Notepad
14
14
15
15
16
16
16
16
16
17
17
17
18
18
18
18
i
End call
Swap call
Hold call
Unhold call
Join call
Private call
Messages
Chapter 6
ii
Knowing the Menu Better
Phone book
1-1 Add record
1-2 Find Record
1-3 Delete record
1-4 Memory selection
1-5 Last number
Message
2-1 New message
2-2 Write message
2-3 Saved message
2-4 Listen message
2-5 Cell message
2-6 Message settings
2-7 Delete all
Call services
3-1 Call diverting
3-2 Call barring
3-3 call waiting
3-4 Call information
Handset settings
4-1 Back light
4-2 Auto redial
4-3 Answer by
4-4 Keypad lock
4-5 Restore
4-6 Language
4-7 Time alert
18
19
19
19
19
19
19
20
21
21
21
22
22
22
23
23
23
23
24
24
24
25
26
26
27
27
28
29
29
29
29
29
29
30
30
Chapter 7
Index
Audio settings
5-1 Ring volume
5-2 Ring type
5-3 Keypad tone
Security settings
6-1 Set code status
6-2 Change password
6-3 Fixed dial
Network selection
7-1 Automatic selection
7-2 Manual selection
Tool box
8-1 Notepad
Care and Maintenance
31
31
31
31
32
32
32
33
34
34
34
35
35
36
37
iii
Chapter 1
SAFETY INFORMATION
On the Road…
• Follow regulations in force concerning
the use
of cellular phone in the place you are
driving.
• Use hands-free operation while driving a
vehicle.
• Park your car before conversing.
In the Air…
Using cellular phones in an aircraft may
cause interference to the radar system
which is illegal.
• Switch off your cellular phone before you
board on an aircraft.
Dangerous Areas…
Turn off your phone when you are near the
following places:
• Refueling station
• Fuel depots
• Chemical plants
• Blasting operation area
And These Electronic Devices…
Your cellular phone may cause interference
or malfunction of electronic equipment that
is not adequately shielded from radio
1
frequency energy.
Beware of interference which usage of your
phone may cause to the following devices:
• Medical devices, e.g. pacemakers, hearing
aids
• Electronic fuel injection systems
• Electronic anti-skid braking systems
• Electronic cruise control systems
• Other electronic systems
NOTE!!
Consult the dealer of your electronic devices for possible
influences.
WARNING!!
Failure to follow these instructions may
lead to suspension or denial of cellular
phone services to the offender or legal
action or both.
2
Chapter 2
PRESENTATION
Have the first look
Front View
Fig. 1
3
Side & Bottom View
Fig. 2
Rear View
Fig. 3
4
2-2 Accessories
With your purchase of this mobile phone,
apart
from
the
phone
itself,
various
accessories such as travel charger, desktop
charger, Li-ion batteries, Ni-MH batteries,
portable hand-free and hand-free car kit
are available, which you can find in the
authorized dealers.
2-3 More info about the keys
Two types of keys: function keys and
alphanumeric keys on the keypad help you
communicate with your personal phone. In
the following, they will be introduced to
you
with
their
names
and
respective
functions.
FUNCTION KEYS
Symbol
Name
Clear
Key
Functions
Short press to clear only one
letter.
Long press to clear all input
text.
Power Long press to turn power
On/Off on/off of your mobile.
Key
5
Select They scroll through menus,
ion
submenus
or
settings
and
Keys
allow you to choose the
function you want to use on
the menu.
A quick access to phone book.
In standby mode, press these
keys to link to phone book
directly.
Soft
It locates underneath the
keys
display screen and allows you
to choose the function of
send,
quit,
save,
menu,
select and confirm.
6
ALPHANUMERIC KEYS:
Numbers and letters can be keyed into the
screen by using these keys.
For example,
if you want to key in “JOHN”, please press
“5” once, “6” three times, “4” twice and
“6” twice. If typing a letter wrong, you
can use the selection keys to forward or
backward the cursor and clear key to erase
letters.
Moreover, if capital letter is
needed, press the key longer, the capital
will show on the screen.
Below is the
chart for the keys and their correspondent
characters of this mobile.
KEY
CHARACTERS
,.:1%!?;“‘<>()@&
ABC2ÅÄåäàÇæß
DEF3èéÉ£Æ$
GHI4ï
JKL5∆_ΦΓΛΩ
MNO6ÑñòÖö∅ö
PQRS7¥§
TUV8üÜù
W X Y Z 9 Π Ψ Σ Θ Ξ 1)
_0
7
+-*/=
#P
8
2-4 More info about the display
There are several icons often shown on the
LCD screen. The following is the essential
information about them.
ICON
NAME
Signal
Strength
Phone Book
Memory
Roaming
Short
Message
Ringer
Vibrator
MEANING
The more the bars
displayed, the better the
signal strength
1 refers to SIM card
memory.
2 refers to the phone’s
internal memory.
When your phone is used
in other network rather
then your home network,
this icon shows.
This symbol will be on
when a message is
received and will flash
when messages storage
memory is full.
Indicating audible ringer
is on.
Indicating vibrator
ringer is on.
9
Battery
status
Indicator
10
It shows four levels of
strength of the battery.
The more the bars, the
more the strength.
When charging, you can
see the strength of
battery on the screen and
the bars flash till the
battery is full.
Chapter 3
GETTING STARTED
3-1
SIM Card Insertion
What is SIM card?
You need a SIM (Subscriber Identification
Memory) card to access your mobile phone
and network.
Two types of SIM are on the
market. For this mobile, you need a small
size card.
This card contains all the
important information of your phone account
such as network accesses, PIN number, phone
books, messages, and services.
Please
handle it with special care.
If lose it,
please contact your dealer or service
provider as soon as possible.
Install your SIM card
Before installing your SIM card, please
switch off the phone and take off the
battery. As you can see on Figure 4, a SIM
card slot is on the lower left corner on
the back of your phone. Insert the card as
indicated as Figure 4.
Put the charged
battery back to the slot.
The SIM card
installation is done.
11
Install your SIM card
Fig. 4
12
3-2 Using Batteries
Fitting batteries
Fit the battery bottom into the battery slot
as showed in Figure 5.
Then push the top end of the battery into the
slot.
Figure 5
Removing batteries
Press the key on the top end of your
battery and pull the battery towards the
opposite side of the mobile.
The battery
13
will
14
slip
out
from
the
slot.
3-3 Charging Batteries
Your
mobile
phone
is
powered
by
a
rechargeable, environment-friendly battery.
When the power is low, a “BATTERY LOW”
message appears warning you to recharge it
as soon as possible.
Two typical approaches for you to recharge
the battery:
Travel charging
Using the cable provided to recharge your
battery. Plug one end of the cable to the
charging socket situated at the bottom of
the phone, and the other end to the adapter
as showed in Figure 6. On the screen, the
battery strength bars will flash on the LCD
screen till the battery is full.
15
Fig. 6
16
Desktop charging
You can also charge your battery with a
desktop charger ( See Figure 7 ).
Fig. 7
u
u
Connect the travel charger cable to the
desktop charger and the power outlet.
Put your phone on the desktop charger as
showed in Figure 8.
Fig. 8
17
u
Or you can detach the battery,
locate it on the rear side of
charger as showed in Figure 9 & 10.
Fig. 9
and
the
Fig. 10
NOTE!!
When charging, the light of the charger is red. After the
completion of this program, it will turn green.
NOTE!!
It is recommendable that you discharge the battery before
recharge it. With this type of charger, you can push the
gray bottom on the side of the charger to do so.
18
Chapter 4
MAKING YOUR FIRST CALL
MAKE A CALL
Step 1 Press
button to switch your phone
on. Then a greeting screen appears.
Step 2 Enter your PIN number and click OK.
NOTE!!
If this is your first time to enter the PIN, please
enter the PIN the network provider gave you
with the purchase of your SIM card. The
number you type will appear as starts sign on
the screen for security reasons. For details,
please refer to section 6 in Chapter 6.
NOTE!!
When entering wrong PIN over three times, your
phone will be locked up. It will not allow any
attempt. You shall contact your dealer to solve
this problem.
Step 3 After the PIN is accepted, your
phone
starts
searching
the
designated network automatically.
NOTE!!
However, when the network service is not
available, the following signs: “no service” will
pop up on the screen.
19
Step 4 After
connecting to the network
successfully, LCD screen will show
which network you connect to.
In
this “stand-by” mode, dial the
phone number including the area
code you desire.
Then, press the
soft key underneath “send” sign on
the display to send out your call.
Or if wishing to cancel/disconnect
the
call,
press
the
soft
key
underneath the “end” sign.
NOTE!!
If necessary, use the keys on the side of the
phone to adjust the volume.
ANSWER A CALL
When the phone rings or vibrates, press
“answer” softkey to accept and call and
then talk.
Three-mode options for you to answer your
calls: “Auto” mode, “Any key” mode and
“Send key” mode. Please refer to section 4
at Chapter 6 for details.
ADJUST THE EARPEICE VOLUME
Press the buttons on the side of the phone
to adjust the volume of the earpiece. Five
levels of volume are available for your
selection.
20
Chapter 5
MAKING YOUR CALL EASY
One-Touch Dialing
Two ways for you to do one-touch dialing
while on stand-by mode
u
You can use the first 10 record saved in
the phone book by press the location of
the desired number.
For instance, if
the location is 5, press 5 key to
initiate the call. The name and number
will appear on the screen when sending
out the call.
u
Or you long press “ send” key. The last
number you dial will be sent out
directly.
Make an International Call
u
u
u
Press “*“ key for about 1 seconds till
“+” shows up on the display.
Enter outgoing call’s national code,
area code and phone number.
Send out your key by pressing “send”
softkey.
NOTE!!
Please omit the first zero of receiver’s area code.
Make an Emergency Call
Enter
112(The
international
emergency
21
number) and press send key. The call will
be sent out.
NOTE!!
This 112 number can be used in any country despite if a
SIM card is available. As long as you are included in a
GSM network.
Make a Voice Mail Call
Long press 0 and you will link to your
voice mail center directly if you have
subscribed to your network provider and
saved the voice mail number in your phone.
For details, please refer to section 2-4 &
2-6 at Chapter 6.
Missed Call
If for any reason, incoming calls can not
be answered, a missed call message will
appear on the screen to remind you the
calls you missed.
Abbreviated Call
u
u
u
u
Key in a number ( 1 to 9) which locates
the desired phone number in the memory
Then press <send> key to enter them.
Press <send> key to send out the call
when the number shown is correct.
You can scroll numbers in the memory by
pressing selection keys till the desired
number shows up.
Last 10 number Redial
u
22
Press
“send”
key
to
access
the
last
u
u
number dialed.
Press selection keys to scroll through
the last 10 numbers dialed.
Press “send’ key to send the call if the
number shown is correct.
23
NOTE!!
You can long press the send key to send out the last
number dialed directly.
Incoming Call Waiting
This function is only available if you have
subscribed to your network provider.
An
incoming
call
number
and
call-waiting
message will appear on the screen when a
new incoming call arrives yet while you on
a call.
To initiate this function, enter
the Call Services menu.
u
Press 0 and send key to reject the
waiting call.
u
Press 1 and send key to end the active
call and connect the waiting call.
u
Press 2 and send key to hold on the
active call and connect to the waiting
call.
In Call Option
The in call option functions are prepared
for you to handle several situations while
you are making a call. Some of these
functions can be operated only under their
respective circumstances.
To access these
functions during a call, press the "option"
softkey while on a call.
1.Mute call
When no sound wants to be heard by your
interlocutor when you are on a call.
You
24
can choose the Mute function to do so.
2.Notepad
Here is an electronic memo for you to note
down important issues while on a call.
3.End call
Under a circumstance of multi-call, you can
end up one of them by selecting this
function.
4.Swap call
This function is available when you have
both active and held calls. Swap transfers
the active call to hold and vice versa, so
that you may converse with the other party.
5.Hold call
This function allows you to put a currently
active call on hold, so that you can
initiate a new call.
6.Unhold call
Once you end the new call while holding an
old call, the old call can be made active
again by selecting this function.
7.Join call
This function can let you make a conference
call where up to six persons can take part.
25
8.Private call
During a conference call, you can use this
function
to
talk
privately
with
one
participant.
9.Messages
You can read or write messages under this
function. Please refer to section 2 in
chapter 6 for details.
26
Chapter 6
KNOWING THE MENU BETTER
MENU TREE: A Quick Look
Phone Book
Message
Call Services
Handset Settings
Audio settings
Security Settings
6.1
Network Selection
Toll Box
Add record
Find record
Delete record
Memory selection
Last number
New message
Write message
Saved message
Listen message
Cell broadcast
Message settings
Delete All
Call divert
Call barring
Call waiting
Call information
Backlight
Auto redial
Answer by
Keypad lock
Restore
Language
Time alert
Ring volume
Ring type
Keypad type
Warning tone
Set code status
1.1
1.2
1.3
1.4
1.5
2.1
2.2
2.3
2.4
2.5
2.6
2.7
3.1
3.2
3.3
3.4
4.1
4.2
4.3
4.4
4.5
4.6
4.7
5.1
5.2
Change password
Fixed dial
Automatic selection
Manual selection
Notepad
8.1
5.3
5.4
6.2
6.3
7.1
7.2
27
1
PHONE BOOK
Phone book menu allows you to set up your
own phone book. You can add or delete the
records anytime you want. Further, you are
able to choose to save the records either
in SIM card memory or phone memory.
Moreover, you can search the last umber you
dial, the last number you receive, and the
last number you miss through this phone
book function.
The following is the structure and details
of this directory.
1-1
ADD RECORD
After selecting this ‘Add Record’
function, you see a screen asking
you to enter the name of the
receiver you desire to add to the
phone book.
u
Key in the name and click “OK”. Then
a screen appears asking you to enter
the phone number.
u
Enter the number and click “OK”. And
the phone will assign a location for
this receiver automatically.
u
Click “OK” to confirm the location.
A screen message “Record saved”
shows.
u
If more records need to be saved,
please repeat the steps above to
complete your recording.
u
1-2
28
FIND RECORD
1-2-1 By name
You can search the saved record by
entering the name of the receiver.
After
entering
the
name,
his/her
location, phone number and name will
appear simultaneously on the screen.
Then you can send the call out to
him/her by clicking “send” key.
1-2-2 By location
u
If you prefer to search the records
by location, when screen shows “Find
By Name”, you can use selection key
to put you to “Find By location”
mode.
u
After
selecting
this
mode,
the
screen asks you to key in the
location, a number code, of the
receiver.
u
After the number has been accepted,
the receiver’s phone number, name
and location will be demonstrated on
the screen.
1-3
DELETE RECORD
You can erase records which are no
longer needed here. There are two ways
to delete the records: By name or By
location. After you key in the name or
location of the record you wish to
delete, the information of the receiver
will demonstrate on the screen again.
Then click “OK”, this record will be
erased.
29
1-4
MEMORY SELECTION
You can choose which memory base you
desire to store your record.
This
mobile provides two options for you to
do so: SIM card memory and phone
memory.
When SIM card memory mode is
selected, it means that you can take
your information with you by carrying
the card solely. In another word, when
phone memory is chosen, all information
is saved in the phone system.
1-5
LAST NUMBER
All the data relates to the last number
can be traced at this category.
Four
service items are provided here: Last
number Dialed, Last number received,
Last number missed, Delete All (clear
all the data) .
2
2-1
30
MESSAGE
NEW MESSAGE
If a new text message delivered, a
short message icon appears on the
screen. Please enter this function to
read the new message.
u
After reading, you can choose to
reply, forward or erase the message.
u
If no new message at all, “No new
message” sign shows on the display.
2-2
WRITE MESSAGE
You can write short text messages by
using this fun.
u
Key in your message and click “OK”.
u
u
u
Enter the number you assign to
receive the message.
This message will be saved and a
sign “ Message saved.
Send?” sign
pops on the screen to seek your
confirmation.
Click “Yes” or “No” to send or
cancel the short message.
2-3
SAVED MESSAGE
You are able to read saved messages
after entering this function. Select
one saved message and press “option”
softkey to edit, delete, reply, and
send the message. Plus, if a phone
number data is included in the message,
the number can be saved or dialed by
using “Use number” function.
2-4 LISTEN MESSAGE
When entering this submenu, the phone
will call your voice mailbox at the
phone number stored in menu 2-6-3.
31
2-5
CELL BROADCAST
You can receive cell broadcast offered
by your network
provider, and choose preferred topics
and languages.
2-6
MESSAGE SETTINGS
2-6-1 Message center
This function stores the phone number
of the message center for sending your
text messages. You can obtain this
number from your service provider.
2-6-2 Valid period 12 hrs
You can set the time that your text
messages are stored at the message
center
while
the
message
center
attempts to deliver the message.
2-6-3 Voice mail box
Within this submenu, you can store the
phone number of your voice mailbox.
You can obtain this number from your
network provider.
2-6-4 Reply path
You can request the network to set the
route of replied message via your own
message center.
2-6-5 Delivering report
If you initiate this function,
32
your
network
report.
will
send
you
a
delivering
2-6-6 Alert beep
If receiving a short message, this
alert beep function will remind you of
this when it is initiated.
2-6-7 Message format
You can request the network to convert
your text message into the following
formats: Text, Paging, E-mail, Fax,
Voice, ERMES, Telex and 6rp4 Fax, 8
various forms of messages can be chosen
from the options.
2-7
DELETE ALL
Delete all the messages.
If you just
want to delete certain messages, please
refer to 2-1 & 2-3 in this chapter for
details.
33
3
3-1
CALL SERVICES
CALL DIVERT
Several diverting modes can be selected
here.
You can divert the calls under
different circumstances.
The following are the options.
NOTE!!
When this diverting function is no longer needed, you can
switch off this diverting function. Also, you can select
“status” to check if you are in a diverting mode.
3-1-1 Divert/ No condition
You can send your calls to another
designated phone number.
Key in the
number you wish to divert your calls.
3-1-2 Divert if busy
You send your calls to a designated
phone number when
your phone is busy.
3-1-3 Divert if no reply
When the incoming call is not replied,
your calls will be sent to another
phone you assign.
Key in the number
you desire to send.
3-1-4 Divert if unreachable
When the network is unavailable, your
34
calls
will
be
sent
to
another
designated number.
Set the number at
this branch.
3-1-5 Cancel All
You can cancel all the diverting
function here.
3-2
CALL BARRING
If wishing to bar outgoing or incoming
calls, you can use the barring function
to set up limitations.
3-2-1 Bar All out
Bar all outgoing calls.
3-2-2 Bar Int’l Out
Bar all outgoing international calls.
3-2-3 IntExtH Out
Bar outgoing international calls except
calls that connecting to home network.
3-2-4 Bar All In
Bar all incoming calls.
3-2-5 Bar Roaming in
Bar incoming calls when roaming.
3-2-6 Cancel All
Cancel all barring setting.
35
3-3 CALL WAITING
This function is only available when
you have subscribed to your network
provider. An incoming call number and
a call-waiting message will appear when
a new incoming call is directed to your
phone when you are on another call.
You
can
activate
or
cancel
this
function by checking the statue here.
3-4
CALL INFORMATION
3-4-1 Last call
3-4-1-1Call Duration:
It shows the duration of the last call
in hour, minute & second.
3-4-1-2Call cost:
It shows the cost of the last call.
3-4-2 All calls
3-4-2-1Call Duration
It show total duration of calls in
hour, minute & second since you reset
the timer.
3-4-2-2 Call Cost:
It shows the total fare of the calls
since the meter starts.
3-4-2-3 Clear Counters:
Reset the meter of call cost and call
duration.
3-4-3 Call rate
3-4-3-1Currency:
36
Enter a preferred currency base to
calculate the fare of your calls.
3-4-3-2Charge Unit:
Enter the unit price to count the fare.
3-4-4 Cost Limit(On/Off)
You can set limits to the total call
cost.
37
4
HANDSET SETTINGS
4-1
BACK LIGHT
5 different levels for you to adjust
the background lighting of the LCD
screen.
4-2
AUTO REDIAL
Two ways to redial a call.
u
The auto mode redials continuously
the number
u
The
prompt
mode
requires
your
confirmation before redialing the
phone number
u
You are able to cancel these auto
redial modes
4-3
ANSWER BY
Three options available for you
answer incoming calls.
u
The auto mode enables the phone
be automatically answered after
rings once.
u
The
calls
can
be
answered
clicking any key.
u
The
calls
can
be
answered
clicking “send” key.
4-4
38
KEYPAD LOCK
You can use keypad-lock
prevent unwilling key-in
to
to
it
by
by
function to
actions say
when you put your phone in a bag.
Also you can long press # to initiate
the keypad lock function.
4-5
4-6
RESTORE
Reset all the settings to the default
configuration.
LANGAUGE
Chinese
(Both
simplified
and
traditional versions), Czechoslovakia,
Danish,
Deutsche,
Dutch,
English,
French, Finish, Hungarian, Italian,
Polish, Portuguese, Norwegian, Spanish,
Swedish, and Russian, 17 languages
available
for
your
preference
to
choose.
4-7
TIME ALERT
Your phone will beep once a minute when
you make a call
after you initiate this function.
39
5
AUDIO SETTINGS
5-1
RING VOLUME
After entering the menu, use selection
keys to adjust the ring volume.
5level adjustment option.
5-2
RING TYPE
7 ring types, one vibrator and 9
melodies for you to choose in terms of
ring type of your mobile.
5-3
KEYPAD TONE
You can control the on/off of your
keypad tone by using this function.
40
6
6-1
SECURITY SETTINGS
SET CODE STATUS
Two sets of PIN can be set to protect
your phone.
PIN code is recorded in
SIM card memory. Phone code is carried
with the phone system.
6-1-1 PIN Code
Activate/Deactivate
the
PIN
code
function.
When
changing
the
Activate/Deactivate status, you have to
enter your PIN.
6-1-2 Phone Code
Activate/Deactivate the Phone Code.
When changing the Activate/Deactivate
status, you have to enter your phone
code.
6-2 CHANGE PASSWORD
6-2-1 PIN
You need to activate PIN function as
described in 6-1-1 before changing your
PIN.
u
In the beginning, you have to enter
the original PIN.
41
u
u
Then enter a new PIN.
Reconfirm the new PIN by entering
the new PIN again.
6-2-2 PIN 2
This second set of PIN is mainly used
to control limited services such as
call cost limitation and fixed dialing
numbers. You can change PIN 2 the same
way described in 6-2-1.
6-2-3 Phone Code
You can change your phone code the same
way described in 6-2-1.
6-2-4 Net Password
You can change net password the same
way described in 6-2-1.
.
6-3
FIXED DIAL
You can set limitation of the numbers
you call out.
NOTE!!
You need to have PIN2 to activate this function.
6-3-1 View
Under this branch, you can
Fixed Dial numbers you set.
42
see
what
6-3-2 Set status (on/Off)
Switch on/off about this
function.
Fixed
Dial
6-3-3 Modify
You can add or change records of your
fixed-dial numbers.
43
7
NETWORK SELECTION
When turning on your mobile phone, the
phone
automatically
selects
the
home
network for you.
You can also do network
selection by manual modes.
7-1
Automatic Selection
This mode automatically searches the
available services when the phone is
turned on.
7-2
Manual Selection
Manual
selection
shows
connectable
networks and allows you link to the one
you desire.
44
8
8-1
TOOL BOX
NOTEPAD
You can jot down important issues here.
45
Chapter 7
CARE & MAINTANANCE
Notice the following to ensure the proper
usage and the life of your cellular phone:
l
Keep
your
accessories
reach.
l
Keep your phone set dry.
l
Use your phone at a normal temperature.
Temperature higher than 55°C or lower
than -20°C (higher than 131°F or lower
than -4°F) may cause damage to your
handset.
l
Do not use or store your phone in dusty
or dirty areas of possible.
l
Do not disassemble the phone.
l
Do not use harsh detergents to clean the
phone.
cellular
phone
and
its
out of small children’s
NOTE!!
If your phone or its accessories are not working properly,
consult your cellular phone dealer for services.
46
Index
47
A
Abbreviate
d call
Answer
Anykey
answer
Auto
answer
Auto
redial
B
Barring
Busy
Battery
Battery
Low
Broadcast
C
Call
divert
Call hold
Call
waiting
Charging
Cost
D
Delivering
report
Desk
charger
Discharge
E
48
17
15, 29
29
29
29
27, 30
26
5, 7, 11
10
24
26
19
18, 27
7, 11
28,
24
12
13
16
F
Fixed dial
Format
H
Hold call
I
Internation
al call
IntExtH out
Int’l out
J
Join call
K
Keypad lock
Keypad tone
L
Language
Li-ion
Limited
services
Listen
message
M
Manual
selection
Memory
Message
Message
center
Mute
33
25
19
16, 27
27
27
19
29
31
30
5
14
24
34
7, 21, 32
7, 23
24
18
Emergency
call
49
N
Network
Ni-MH
No reply
Notepad
No
condition
No service
O
One touch
dialing
P
PIN
PIN2
Phone book
Phone code
Phone
memory
Portable
handfree
Private
call
50
14, 24
5
26
18, 35
26
14
16
14, 32, 33
32
7, 21
32, 33
22, 32
5
19
R
Redial
Ring type
Ring volume
Roaming
S
Signal
strength
SIM card
Softkey
Standby
mode
Swap call
T
Time alert
U
Unhold call
Unreachable
V
Voice mail
Valid
period
Vibrator
Volume
17, 29
31
31
7, 27
7
8
5
15
19
30
19
26
17, 24
24
7, 31
15, 31