1
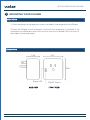
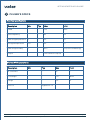
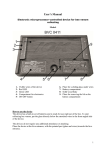
GETTING STARTED WITH PLUGEE
2
GETTING STARTED WITH PLUGEE
This document is the property of Webee L.L.C.. The data contained here, in whole or in part, may not be duplicated, used or
disclosed outside the recipient for any purpose. This restriction does not limit the recipient's right to use information contained
in the data if it is obtained from another source without restriction.
Webee Plugee
1
GETTING STARTED WITH PLUGEE
2INDEX
Section 1: Mounting your Plugee
Instructions........................................................................03
Dimensions........................................................................03
Section 2: Connecting to Smartee
Adding Plugee to Zigbee Network......................................04
Removing Plugee from Zigbee Network.............................04
Section 3: Specs
Electrical Specifications......................................................05
RF characteristics...............................................................05
Section 4: Security Instructions
Security Guidelines.............................................................06
Webee Plugee
Getting started
© 2014 Webee LLC, All rights reserved. The Webee logo, Boss and Bees are trademarks or registered trademarks of Webee LLC
Page 02
GETTING STARTED WITH PLUGEE
1
2 1 MOUNTING YOUR PLUGEE
Instructions
1- Attach the plug from the appliance to be controlled into the receptacle of the Plugee.
2-Attach the Plugee to wall receptacle. Verify that the receptacle is powered. If the
receptacle is powered by a wall switch, the wall switch must be kept ON at all times for
the module to operate properly.
Dimensions
2.41’’
1.56’’
2.62’’
Status LED
SIDE VIEW
Webee Plugee
ON/OFF Button
FRONT VIEW
Getting started
© 2014 Webee LLC, All rights reserved. The Webee logo, Boss and Bees are trademarks or registered trademarks of Webee LLC
Page 03
GETTING STARTED WITH PLUGEE
2 1 CONNECTING TO SMARTEE
Adding to Zigbee Network
To add the Plugee to the Smartee, click on the “Add Device” function of your App and
the Smartee will automatically connect your Plugee to the network. For more detailed
instructions check our Smartee User Manual.
If the Plugee does not automatically join the network, press and hold the Plugee button.
The Plugee will continuously blink as it attempts to join the hub.
Upon a successful joining of the Plugee to the ZigBee network of your Smartee, the
status LED will stop blinking.
If after following these steps the Plugee will not join the Smartee Zigbee network, do as
follows:
•Make sure the Plugee is powered up.
•Ensure the Plugee is within RF range of a routing device.
• Make sure the network on your Smartee is open for joining. Keep in mind that once you
clicked on Add Devices, the network will be open for 60 seconds.
•Check if the Plugee hasn’t join another network (the light will be static), see the next
step to learn how to remove it from a network in order to add it to a new one.
Once the Plugee is added to your Smartee, you will be able to start controlling it trough
your Webee App.
Removing from Zigbee Network
If it becomes necessary to remove the Plugee from a Zigbee network then you must
factory default the Plugee. To factory default the Plugee:
A.Remove the Plugee from the wall receptacle.
B.Press and hold the Plugee's button.
C.Reinstall the Pligee into the wall receptacle while holding the button.
D.After 2 seconds the status LED will turn ON.
E.Once the LED is ON let go of the button.
F.The Plugee will now be reset to factory defaults and begin scanning for a ZigBee to
join.
Webee Plugee
Getting started
© 2014 Webee LLC, All rights reserved. The Webee logo, Boss and Bees are trademarks or registered trademarks of Webee LLC
Page 04
GETTING STARTED WITH PLUGEE
3
2 1 PLUGEE’S SPECS
Electrical specifications
Description
Min
Typ
Max
Unit
Rated
-
-
120
VAC
Input frequency
-
-
60
Hz
Operating temperature
0º
-
40º
ºC
Storage temperature
-20º
-
50º
ºC
Operating Humidity
0
-
90%
RH (non-condensing)
Output
12A General Purpose
Wireless RF Characteristics
Description
Min
Typ
Max
Unit
RF Channels
-
-
16
-
TX Strength
-
-
+20
dBm
Range
-
-
50+
ft.
Protocol
Webee Plugee
Zigbee HA 1.2
Getting started
© 2014 Webee LLC, All rights reserved. The Webee logo, Boss and Bees are trademarks or registered trademarks of Webee LLC
Page 05
GETTING STARTED WITH PLUGEE
4
2 1 SAFETY INSTRUCTIONS
Safety Guidelines
-To be installed and/or used in accordance with appropriate electrical
codes and regulations.
-If you are unsure about any of these instructions, consult a
qualified electrician.
-Unplug unit when servicing connected appliances.
-Follow all guidelines carefully, if you have any questions contact us at
[email protected].
Warning: Each module outlet is rated to 12A only if the
connecting cord is rated at 90C or greater.
Warning: If a load greater than 12 amps is attached to the output,
the Plugee will be damage and will no longer function.
Warning: The total current of the device is 12A. Do not exceed
this value!
Warning: If a direct short is created on the output, the Plugee will
be damage and will no longer function.
FCC Information
This device complies with Part 15 of the FCC rules. Operation is subject to the following two
conditions:
(1) This device may not cause harmful interference and
(2) This device must accept any interference received, including interference that may cause
undesired operation.
This equipment has been tested and found to comply with the limits for a Class B digital device,
pursuant to Part 15 of the FCC Rules. These limits are designed to provide reasonable protection
against harmful interference.
This equipment generates, uses and can radiate radio frequency energy and, if not installed and
used in accordance with the instructions, may cause harmful inerference to radio communications.
However, there is no guarantee that interference will not occur in a particular installation. If this
equipment does cause harmful interference to radio or television reception, which can be determined
by turning the equipment off and on, the user is encouraged to try to correct the interference by one
or more of the following measures:
∙ Reorient or relocate the receiving antenna.
∙ Increase the separation between the equipment and the receiver.
∙ Connect the equipment into an outlet different from that to which the receiver is connected.
∙ Consult the dealer or an experienced radio/TV technician for help.
Contains FCC ID:
W7Z-ZICM357SP2
Webee Plugee
Getting started
© 2014 Webee LLC, All rights reserved. The Webee logo, Boss and Bees are trademarks or registered trademarks of Webee LLC
Page 06
GETTING STARTED WITH PLUGEE
2
V1.0 REV. January, 2015
© 2014 Webee LLC, All rights reserved. The Webee logo, Boss and Bees are trademarks or registered trademarks of Webee LLC
Webee Plugee
7